s uncrating s shortages 5 industrial - kent usalibrary.kentusa.com/manuals/mills/kent usa ktm-3vkf...
TRANSCRIPT

TABLE OF CONTENTS
Machine Specifications 3Milling Head Specifications 4Uncrating SShortages SCleaning 5Lifting Machine 6Placing on Solid Foundation 7Machine Levelling 7Handles 7Connecting Power Supply 7Alignment of Head 9LubricationAdjustment of Table Gib 10Adjustment of Saddle and Knee Gibs 10Clamping Table, Saddle and Knee 11Removing Table 12Removing Saddle 12Mounting Van-Drive Attachment to Ram Adapter 14Lubrication 14Operating Instructions 14Spindle Brake 16High-Low Range Switch 16Hi-Neutral-La Lever 16Power Feed Transmission Engagement Crank 17Quill Feed Selector 17Feed Reversing Knob 17Manual Feed 17Feed Control Lever 18Quill Feed Handle 18Quill Stop 18Micrometer Adjusting Nut 18Position of Ram 19Operating Instructions 19Removing Motor 20Changing Van-Drive Belt 22Changing Timing Belt 23General Speed Recommendations 24
2K Milling Head 25Basic Machine 26Leadscrew Assembly 2$3K Head Top Housing 30SK/3VK Head 323VK Head Tok Housing 363VK Head Back Gear 38Central Lubricating Oil-Feeding Equipment 40
Specitications subiect to change without prior notice
Propert
y of K
ent In
dustr
ial U
SA
Do Not
Reprod
uce

. LONGITUDINAL TRAVEL TABLE LENGTH
30 in. (762mm) 42 in. (1067mm)36 in. (914mm) 50 in. (1270 mm)
A B C D S F
MIN, 56(1422) 11-4/4(285) 0 0 4-1/4(108)
MAX. 82-3116” 78” 35-1/4” 18-1/2~’ 21” 28-1/4”(2088m1m) (l9SlmJm) (895m/m) (470m/m) (533m!m) (717m1m)
Figure 1. Basic Dimensions
Propert
y of K
ent In
dustr
ial U
SA
Do Not
Reprod
uce

BASIC MACHINE SPECIPICATIONS
Range
Table travel (X—a.xis)
Saddle travel (V—axis)Quill travelKnee travel (Z—axis manual)Ham travelThroat distance (mm.)
(max.)Table to spindle nose gageline (mm.)
Max. weight of workplace
Table
30 in, (762mm)(42” table)
16 in. (406mm)5 in. (127mm)
16 in. (406mm)24 in. (610mm)4—1/4 in. (171mm)28—1/4 in. (476mm)
2—1/2 in. (64mm)850 lbs. (386 kg.)
36 in. (914mm)
(50’’ table)
Overall sizes
T —Slots
T—Slot sizeHeight above floor (max.)
9 x 42 in.(229 x 1067mm)3 on 2-1/2 in.(64mm) centers5/8 in. (16mm)47—1/4 in. (1200mm)
lOx 50 in.(254 x 1270mm)
Space and weight
Floor areaHeightNet wei~tShipping weight
Power
7xlOft. (2.1x3,lm)82—3/16 in. (2088mm)2420 lbs. ~L100kg)2684 lbs. (1220kg)
Electrical supply—60 Hz., 3 phase 220/230/380/415/440/460/575V
Color
Standard Machine; GrayPropert
y of K
ent In
dustr
ial U
SA
Do Not
Reprod
uce

MIL
LIN
G-H
EA
DS
PE
CIF
ICA
TIO
NS
MO
DE
LH
EA
DH
EA
DH
EA
D
(STE
PS
PE
ED
)(T
WO
STEP
SS
PE
ED
)(V
AR
IAB
LES
PE
ED
)
Pow
er2
.OKP
or3.
OIIP
2.0
FlP
or3.
0H
P2.
0H
Por
j.OH
P
Moto
rRj’.
M.
1800
RP
M36
00R
PM
1800
RP
M
Spee
dR
ange
s—R
PM8
Step
s16
Step
sSt
eple
ssLO
W80
—32
516
0—66
060
—50
0H
IGH
660—
2720
1320
—54
4050
0—42
00
Quill
]ra
vel
5.0
in(1
27m
m)
5.0
in(1
27m
m)
5.0
in(3
27m
m)
Qui
llD
iam
eter
3.37
5in
(86
mm
)3.
375
in(8
6m
m)
3.37
5in
(86
mm
)
Spi
ndle
Tape
rR~
8R-
8R-
8
NS
T3O
NS
T3O
NS
T3O
..
I.8
IIin
(46
mm
)I.
8II
in(4
6m
m)
I.8
IIin
(46
mm
)S
pind
leD
iam
eter
2.67
7in
(68
mm
)2,
677
in(6
8mm
)2.
677
in(6
8m
m)
Spin
dle
Feed
Rate
.001
5/R
ev(.0
38m
m)
.001
5/R
ev(.0
38m
m)
.001
5/R
ev(.0
38m
m)
.003
/Rev
(.076
mm
).0
03/R
ev(.0
76m
m)
.003
/Rev
(.076
mm
).0
06/R
ev(.1
52m
m)
.OO
6eRe
v(.1
52m
m)
.006
/Rev
(.152
mm
)
Dril
ling
Cap
acity
-Man
ual
.75
in(1
9m
m)
dia.
.75
in(1
9m
m)
dia.
.75
in(2
2m
m)
dia.
Dril
ling
Cap
acity
&ow
er.3
7in
(9.4
mm
)di
a..3
7in
(9.4
mm
)di
a..3
7in
(9.4
mm
)di
a.
Bor
ing
Cap
acity
6.0
in(1
52.4
mm
)di
a.6.
0in
(152
.4m
m)
dia.
6.0
in(1
52.4
mm
)di
a.
Mill
ing
Cap
acity
1,5
in’/m
in1.
5in
3/m
in2.
0in
1/m
in(2
4cc/
mm
)(2
4cc/
mm
)(3
2cc/
mi,,
)
Spin
dle
toC
olum
n-M
inim
um4’
/4in
(108
mm
)4¼
in(1
08m
m)
4¼in
(108
mm
)Sp
indl
eto
Col
umn-
Max
imum
28¼
in(7
17m
m)
28¼
in(7
17m
m)
28¼
in(7
17m
m)
a
Propert
y of K
ent In
dustr
ial U
SA
Do Not
Reprod
uce

UNCRATING:
Carefully remove protective crating so machine and paris are not marred or damaged. Inthe event of damage in transit, IMMEDIATELY notify the distributor from whom themachine was purchased, as well as the transportation company making delivery,
SHORTAGES:
Check shipment carefully. against the itemized packing list. In case ofshortages, report them IMMEDIATELY to the distributor from whom themachine was purchased.
CLEANING:
Thoroughly clean protective coating from machine with suitable cleaningsolution.
WARNINGIT IS NOT RECOMMENDED THAT GASOLINE OR ANY OTHER HIGHLYINFLAMMABLE CLEANING AGENT BE USED.
Do not move the table, knee , saddle or ram until all ways have been wellcleaned and lubricated. Then, by hand, move table, saddle, and knee tolimit stop in one direction. Clean and lubricate exposed ways and thenmove each unit to the opposite IirnAt stop and similarly clean and lubricatethe exposed ways. Loosen bolts to unlock ram and move forward andbackward the full length to clean and lubricate.
POSITIONING HEAD UPRIGHT:
Loosen four locknuts (#162 page 35). out to detent and rotate head to verticalposition. Proceed with alignment of head as described on page9 . Tightennuts evenly, using normal pressure. Care should be taken to avoid excessivetightening since this will cause distortion in the quill. Tighten all nuts to25 ft. lbs. torque. then repeat to 50 ft. lbs.
—5—
Propert
y of K
ent In
dustr
ial U
SA
Do Not
Reprod
uce

LIFTING THE MACHINE
Note position of rem and table when lifting with sling.
MOVE TABLE AGAINSTCOLUMN
INSTALLED GROSSWEIGHT 01 MACHINEAPPROX. 2640 LBS.
PROPER LIFTING SLING
(4) BOLTS TIGHTEN TO47 PT. LBS. TORQUEBEFORE LIFTING
H
—6—
Propert
y of K
ent In
dustr
ial U
SA
Do Not
Reprod
uce

LIFTING AND PLACING ON SOLID FOUNDATION:
Machine should be lifted by placing a sling under the ram as illustrated on page 6.
The column and base are a one piece casting. When setting machine on aconcrete foundation, it is advisable to use a little grout (thin mortar) totake care of any unevenness in the concrete as well as to provide ,a solidfoundation at all points.
When setting machine on a floor that is uneven, shims should be used to correctthis condition. See Figure 2 for installation layout.
NOTEIT IS RECOMMENDED THAT THE MACHINE BE SECURED TO THEFLOOR TO PREVENT MOVEMENT OR TIPPING DUE TO OFF-CENTERLOADING.
Before securing machine to floor (i.e. tightening hold down bolts), makecertain all four corners are making contact with floor or shims, aftermachine is leveled. If this is not done, it is possible to twist the column andput a bind in the ways.
LEVELING MACHINE:Set machine by leveling the work table lengthwise add crosswise ~cith aprecision level.
HANDLES:When crating, the three ball crank handles are sometimes turned to face themachine. In these cases the handles should be reversed before operating.
CONNECTING POWER SUPPLY:To connect the power have a qualified electrician proceed as follows:
1. Check motor wiring to ensure it is compatible with power supply.
2. Connect machine wiring to power supply making sure connection complies to all localelectrical code.
3. Check for.correct spindle rotation. In the HIGH SPEED range,the spindle should rotate clockwise when viewed from the topof the machine.
NOTEDRUM SWITCH AND HI-NEUTRAL-LO LEVER MUST BE IN HI RANGE.
—7—
Propert
y of K
ent In
dustr
ial U
SA
Do Not
Reprod
uce

Ci, C z 1
< C C
y2’,
(12.
7)
23W
’(6o0)~
6”
(150
)
jA
-A(B
rack
eted
)num
bers
are
inm
i/I/m
eter
s
34%
”(8
80)
00
38~W
’(9
70)
r~
78”
(198
1)
tr~
-1
02
”(2
590)
S—
--—
-—
-_
__
__
__
__
Propert
y of K
ent In
dustr
ial U
SA
Do Not
Reprod
uce

ALIGNMENT OF HEAD:
In case of precision work where it is necessary to have head perfectlysquare with the table, use method described below. To set head square withtable, see Figures 3 & 4. This must be done with ram adapter t ~2,page 26)on Ram (fflO,page 26) ~by adjusting ram adapter through vertical adjustingworm shaft (4t8,page 26). Loosen four locknuts (#162,page 35).but leave~some drag on them for fine adjustment. To square head to table in thelongitudinal axis, mount indicator as shown in Figure 4.
NOTEWHEN INDICATING AS IN FIGURE 3, IT SHOULD BENOTED THAT THE TABLE IS FITTED TO BE SLIGHTLYHIGHER IN FRONT. USUALLY ABOUT .0005”.
LUBRICATION:Do not operate until properly lubricated:(A) Way surfaces and lead screws
MELCOTE 87X OR EQUIVALENT. ONE PUMP DAILt(B) Milling Heads (Spindle Bearings)
LGLT 2 OR EQUIVALENT, WEEKLY.(C) Motors are greased For life of bearings.
61i4fl
PM
PM ADAPTER
Lxi~trrs
Aligning faces
ZERO
Figure 3. Head Alignment Y Axis Figure 4. Head Alignment X Axis
—9—
Propert
y of K
ent In
dustr
ial U
SA
Do Not
Reprod
uce

lB ADJUSTIt~ SCREW
ADJUSTMENT OF TABLE GIB.The table is provided with a full lengthtapered gib (#46 page 26) in thesaddle, and an adjusting screw onthe left side. To take up gib,tighten gib adjusting screw (#44page 26) slightly and repeat until aslight drag is felt when moving thetable by hand.
ADJUSTMENT OF SADDLE GIB.A tapered gib (#48,page 26) is used foradjusting the saddle bearing on the knee.This forms a guide for the saddle. Totighten gib, remove chip wiper and use thesame method as described above. Replace chipwiper after gib has been adjusted.
ADJUSTMENT OF KNEE GJB.Remove cbip wiper and adjust screw‘until smooth movement is attained.Replace chip Wiper.
Figure 5. Saddle/Table Gib.(#46 page 26)
BACKIM3 FELT
P ER GUARD
SADEU 618 AflJ. SCREW
Figure 6. Saddle Knee Gib(#48 page 26)
CHIP WIPER GUARD ~P
GIB ADJ. SCREW
Figure 7. Knee-Column Gib(#61.page 26)
—10—
Propert
y of K
ent In
dustr
ial U
SA
Do Not
Reprod
uce

CLAMPING TABLE, SADDLE AND KNEE:When milling with longitudinal table feedonly, it is advisable to clamp the knee tothe column and the saddle to the knee toadd rigidity to these members and provide for heavier cuts with a minimum ofvibration. The saddle locking lever islocated on the left-hand side of sadale.
Excessive pressure can cause slight tablebind. Use moderate clamping pressure,as this will hold saddle sufficiently.
The table clamp levers are located on thefront of saddle and should always beclamped when longitudinal movement isnot required.
The two clamps on the left rear of the kneeshould only be used when the knee will notbe moved.
TA8LE CLMP LEVER
—Il —
Propert
y of K
ent In
dustr
ial U
SA
Do Not
Reprod
uce

REMOVING TABLE:Remove the following: ball crank, handles, dial holders and bearing brackets. Turn thelead screw all the way out and slide the table from the saddle. See Fig. 8.
REMOVING SADDLE:Follow the same procedures as removing table: however, it is necessary to remove theentire front bracket assembly. Next, remove the cross feed nut bracket which can onlybe done by removing the table. See Fig. S.
Propert
y of K
ent In
dustr
ial U
SA
Do Not
Reprod
uce

t~3
LEFT
BEAR
ING
BRAC
KET
(#25
LO
NG
ITU
DIN
AL
FEE
DSC
REW
LONG
FEED
NUT
RIG
HT
BEAR
ING
BRAC
KET
(#9
,P2
8)
BEAR
ING
BALL
CRAN
KHA
NDLE
(#3
,P2
8)
LONG
FEED
NUT
(#2
6,
P28
)BE
ARIN
GD
IAL
LOCK
(#9
,P2
8)
(#4
,P
28)
LONG
&CR
OSS
FEED
NUT
(#2O
,P28
)
CROS
SFE
EDNU
T
FIX
ED
(#2
1,
P28
)
CROS
SFE
EDBE
ARIN
GBR
ACKE
T(#
15
,P2
8)
CR
OSS
FEE
DS
CR
EW
BALL
BEAR
ING
(#9
,92
8)
Fig
ure
8.Lo
ngitu
dina
lan
dC
ross
Feed
Ass
embl
y
Propert
y of K
ent In
dustr
ial U
SA
Do Not
Reprod
uce

ASSEMBLY INSTRUCTIONSFOR MOUNTING 2VK, 3VK, 4V1C VARIDRIVE HEAD TO RAM ADAPTOR
Insert the four (4) tee bolts into the ram adaptor and position them tomatch the bolt holes in the head.
Slide the head onto the bofts, insert the spacers and washers and securewith the nuts.
Tighten all nuts to 25 ft. lbs. of torque, and then repeat to 50 ft. lbs.
CAUTIONIMPROPER TIGHTENING OF THESE COULD CAUSEA CHOPPY QUILL MOVEMENT
LUBRICATION:
The useful tile of the 3VK Head will be determined to a large extent by whether properlubrication methods are followed. Carefully follow the lube plate recommendations andavoid substitutions.
OPERATING INSTRUCTIONS:
SPEED CHANGE HANDWHEEL (16, Figure 9):DO NOT attempt to change spindle RPM unless the motor is running.Dial speeds will only be approximate. Belt wear will cause a slight variationin speeds from what is indicated on the dial.
When tightening or loosening the drawbar (#14,page 38),it is necessaryto lock the spindle. To do this, use the spindle brake (3) which is locatedon the left side of the belt housing. turning it either right or left until itbinds. Make sure the quill is raised all the way.
Drawbar (#14,page 38) has 7/l6~2O” right hand thread and should betightened with normal pressure using wrench furnished with machine.To loosen collet,baclc off drawbar and if collet does not open, given topof drawbar a slight tap. Spindle has non-sticking taper and collet shouldrelease readily.
—14—-
Propert
y of K
ent In
dustr
ial U
SA
Do Not
Reprod
uce

MOTOR
VARIABLE_____SPEED DIAL
SPINDLEBRAKE
MANUALFEED HANDWHEEL
~_SPEED CHANGEHAN DWHEEL
HI—NEUTRAL-LOLEVER
QUILL FEEDHANDLE
QUILL STOPKNOB
LEVER
Figure 9. Van-Speed Milling Head
MICROMETER ADJUSTINGNUT AND LOCKNUT
I ~11 ~WR\ r~
\~ a~zfl#W4
FEED CONTROL
.
‘~~~SPINDLE
INDICATOR MOUNTING ROD
—15—
Propert
y of K
ent In
dustr
ial U
SA
Do Not
Reprod
uce

SPINDLE BRAKE (3, Figure 9):Brake lever can be moved in either direction to stop spindle. When lockingspindle, lever should be moved right or left and then raised. There are noadjustments on brake so it must be replaced when worn out.
CAUTIONBE CERTAIN THAT THE SPINDLE BRAKE IS RELEASEDBEFORE STARTING THE MOTOR. THIS IS IMPORTANTAS THE MOTOR CAN BE DAMAGED IF SWITCH IS TURNEDON WITH BRAKE IN LOCKED POSITION.
FORWARD REVERSE SWITCH (#1, Fig. 9):This is the motor reversing switch. When the head is in direct drive (HighRange), the motor and spindle are turning the same direction. When the headis in “Back Gear”(Low Range), the spindle runs backwards unless the motordirection is reversed.
HI-NEUTRAL-LO LEVER (#15, Fig. 9):The lever is used to put the head into either direct drive or backgear.Rotate the spindle by hand to facilitate meshing of clutch or gears.
Neutral can be obtained at mid-way position, and is provided to permit free spindlerotation for indicating and set-up.
After an extended period of use, the neutral position may cause noise by allowing theclutch teeth to rub each other. This can be corrected by loosening set screw (#64, page36), and reversing the position of the detent plate (#65, page 36).
In high speed (flireet Drive), the spindle is driven by tapered clutch teeth.If the clutch is not meshed tightly, clutch rattle will be heard. This canbe corrected by moving the detent plate upward as the clutch wears. Thisis also the reason for possible loss of neutral, requiring the reversal ofthe detent plate.
CAUTIONDO NOT shift Hi-Lo Lever while motor is running.
—16--
Propert
y of K
ent In
dustr
ial U
SA
Do Not
Reprod
uce

POWER FEED ENGAGEMENT CRANK (#4, Fig.Y):Engages power feed worm gear. When lever is in right hand hole,power feed is engaged. To disengage, pull knob out and turn crank inclockwise or down direction and move to opposite position.
NOTEHANDLE MUST BE MOVED IN CLOCKWISE DIRECTIONTO ENGAGE OR DISENGAGE POWER FEED. IF HANDLEIS MOVED COUNTER- CLOCKWISE NO DAMAGE WILLBE DONE, BUT NOTHING WILL HAPPEN.
CAUTIONPOWER FEED GEAR MAY BE ENGAGED WHILE SPINDLEIS TURNING, HOWEVER, IT SHOULD BE ENGAGEDSLOWLY TO AVOID DAMAGE TO THE WORM GEAR.THE GEAR MAY BE DISENGAGED AT ANY TIME. DONOT USE POWER FEED AT SPEED ABOVE 3000 RPM.
IMPORTANT: It is recommended that the Power Feed worm gearbe disengaged whenever the power feed is notrequired. This will avoid unnecessary wear onpower feed worm gear.
QUILL FEED SELECTOR (#5, Fig. 9):This crank is used to select the feed rate to be used. It is shifted by pulling knob out andturning from one position to another. Feed rates are stamped on cover below each hole.Feed is more readily engaged with spindle running.
FEED REVERSE KNOB (#7, Fig. 9):Position of this knob depends upon direction of spindle rotation. If boringwith right hand cutting tools, pull feed handle towards operator untilclutch becomes engaged.
Neutral position is between forward and reverse position. It is recommendedthat the handle be left in neutral position when not in use.
MANUAL FEED HANDWHEEL (#6, Fig. 9):Feed reversing knob should be in neutral position and feed control lever(#8, Fig. 9) engaged. Clockwise rotation of handwheel moves quill down.Manual Feed Handw heel and quill feed handwheel may be disengaged bymoving them outward approximately 1/8”.
—17—
Propert
y of K
ent In
dustr
ial U
SA
Do Not
Reprod
uce

NOTEThe feed control lever must be engaged in orderto use manual feed controls. The Quill FeedHandle and Manual Feed Handwheel may be takenoff when not in use.
FEED CONTROL LEVER (#8. Fig. 9):Engages clutch on pinion shaft when moved left and will stayengaged until either quill stop comes in contact with micrometer adjustingnut forcing feed control lever to disengage automatically, or releasedmanually by moving lever to right.
NOTEThe Feed Control Lever is carefully set at plantto disengage automatically when quill stop goesagainst micrometer adjusting nut or against throwout pin at top. However, if this should go out ofadjustment, it may easily be brought back byregulating the socket set screw located at bottomof tripping rod (item no. 144 page 35).
CAUTIONWHEN ADJUSTING THE SOCKET SET SCREW,CHECK AUTOMATIC DISENGAGEMENT JN BOTHDIRECTIONS: THAT IS WITH QUILL-STOP NUT(#161,PAGE 35) AGAINST THE FEED TRIP LEVER(#145,PAGE 35) FOR DOWN POSITION, ANDAGAINST REVERSE TRIP BALL LEVER (#183,PAGE 35) FOR THE UP POSITION.
QUILL FEED HANDLE (#13. Fig. 9):May be removed by simply pulling handle off, It is recommended thathandle be disengaged when using power feed.
QUILL STOP KNOB (#14, Fig. 9):Itused to disengage power feed in either direction as well as acting as a depth stop whenworking to a given depth.
MICROMETER NUT (#11. Fig. 9):This nut is used for setting of depths. Each graduation on nut indicates.001” of depth, it reads directly to scale mounted along side of it. Depthsmay be obtained by setting micrometer nut in conjunction with quill stop.
QUILL LOCKThis is a friction lock to be used when quill is in stationary position suchas for milling. It is recommended this lock be used whenever quill movementis not desired.
—18—
Propert
y of K
ent In
dustr
ial U
SA
Do Not
Reprod
uce

RAM POSITIONRam can be moved by loosening two ram lock studs (#35 page 261 on turret (# 23page 26) and moving to desired position.
CAUTIONCARE SHOULD BE TAKEN TO LOCK RAMSECURELY AFTER SETTING.
NOTEIt is recommended that on heavy milling work,head should be kept as close to column aspossible, where maximum rigidity is obtained.
RECOMMENDATIONS:
Use 2, 3, or 4 flute end mills. Eighf flute end mills are usually, not assatisfactory for general milling. When using shell mills, face mills or anyother tooling, proper machining practice should be observed.
Power feed can be used for drills up to 3/8’ diameter in mdci tool steel. Overload clutchis preset to hold up to 200 lbs. down pressure on quill. Use manual feed for drills cver3/8’.
CAUTIONTHIS CLUTCH SHOULD NOT BE TAMPEREDWITH IN THE FIELD.
OPERATING INSTRUCTIONS
CAUTIONDO NOT TRY TO CHANGE SPINDLE SPEED ON VARIDRIVE HEAD UNTIL MOTOR IS RUNNING. THIS COULDCAUSE PARTS BREAKAGE.
Spindle Feeds are adjusted by turning speed change handwheel (#21 . page36) on the front of the belt housing. There are two ranges shown; 60 to500 and 500 to 4200.
60—500RPM is obtained through the back-gear drive and is referred to aslow range. To engage the back-gears, use the lever marked l-li-Neutral-Loon the right side of the head. Move this lever to the “LO” position and uselow range on the variable speed dial.
When shifting to “LO.” DO NOT FORCE THE LEVER if the back gears do notmesh. Hold the lever so that the gears are clear ofone another, rotate thespindle nose by hand until the gears line up, then put the unit in “LO”(back gear).
—19—
Propert
y of K
ent In
dustr
ial U
SA
Do Not
Reprod
uce

500-4200 RPM is direct drive and is the high range. The same procedure as previouslydescribed is used to select this range except the Hi-Neutral-Lo lever is set in the Hi position.
Wear on the van-drive belt will cause a slight change in the speeds to thatshown in windows (#23,page 36) on the dial. This can be dorrected asfollows. Crank the speed change handwheel (#16. Figure 9) snuglyagainst the high speed stop. (This will be near the 4200 reading on thedial.) Use a tachometer to determine the spindle speed, then turn thepivot stud (#16,page 38), after loosening the jam nut (Item ~7.page 38)until the spindle speed registers 4200 on th&tachomcter; tighten jamnut.
Now reposition the speed dial plate to match the tachometer reading. Thisis done by loosening the Sex nut (#l,page 36) until the spindle speedregisters 4200 on the tachometer; tighten jam nut.
I CAUTIONDO NOT SHIFT THE HI-NEUTRAL-tO LEVER WHENTHE FEED GEAR IS ENGAGED.
DO NOT LOOSEN the 3 hex nuts (#61,page 36) on the upper part of theQuill Housing (#192,page 34). These are set at the factory and are usedonly for alignment.
SWIVELING THE VARI-DRIVE may be accomplished by loosening the lower3 hex nuts (#47,page 36) attaching the Van—Drive unit to the quillhousing and then swiveling to any desired position. See arrangement ofT-Bolts (#45, page 36) in Gear Housing for this purpose.
WARNINGCARE MUST BE TAKEN TO SECURE THE NUTS(#47,page 36) WHEN THE ATTACHMENT IS INPOSITION. BEFORE THE MOTOR IS TURNED ON.
REMOVING THE MOTOR (See Fig. 10 ):Run the head to the lowest speed of either range and shut off the motor. This puts theVan-Drive belt iii the best position for disassembly.
1. DISCONNECT THE POWER and then remove the switch fromthe side of the belt housing.
—20--
Propert
y of K
ent In
dustr
ial U
SA
Do Not
Reprod
uce

2. Remove the cover (#54,page 38) (B. Figure 10) at the lowerend of the motor shaft. Use two cover screws (#55,page 38)(A) to fasten the spring (#44,page 38) (C) on the lower endof the motor shaft, to the lower motor van-drive pulley(#43,page 38). This will reduce the hazard of personalinjury that is always present when a heavy spring is undercompression. When the pulley, spring retainer (#45,page38) and spring are securely fastened as a single unit.crank the speed change handwheel (#16,Figure 9) to topspeed position.
3. Now remove the screws (#9,page 38) (0) that fasten themotor to the belt housing. The motor should be liftedslightly and pulled firmly away from the spindle andtoward the rear of the belt housing. This wifl pull thevan-drive belt (#27,page 38) deeply into the spindlepulley (#25.page 38) providing the slack needed to shipthe belt over the motor pulley (#43,page 38).
4. Now lift the motor high enough to rest me motor baseGENTLY on the adjusting screw (#16. page 38) CE) seendirectly in front of the motor flange. The belt can nowbe slipped over the lower pulley and the motor removedfrom the housing.
Figure 10. Removing the Motor (Side View)
—21 —
Propert
y of K
ent In
dustr
ial U
SA
Do Not
Reprod
uce

CHANGING VARI-DRIVE BELT (Figure 11)
Complete the previous procedures for removing the motor, then remove thethree screws (#1,page 38) (A. Fig. 11 ) and lift out the top bearing cap(#13,pages6) (B). Looking down inside of the housing, locate and remove two socket head cap screws (#17,page 38) and sleeves (#19,page 38)(C). Next, remove the six screws (#64,page 38) (D),then holding the belthousing (E) to the base (#63,page 38).
A
D
Figure 11. Removing the Van-Drive Belt
Remove the old belt (#27,page 38) and replace it with a new belt. Do notuse a substitute belt purchased from other than Bando Variable Belt 875vc.Vibration and heat could result from the use of the wrong belt.
C
tD
—22--
Propert
y of K
ent In
dustr
ial U
SA
Do Not
Reprod
uce

CHANGING TIMING BELT (Figure 12)
Complete the operation for removing the motor. Then put the Hi-NeutralLo lever (#15, Figure 9) in the Lo position, remove the drawbar(#14,page 38) (A, Figure 12) and lower the spindle.
Remove screws (#55,page 38) (B) hodling the upper and lower housings(#63,page 38) together, including the two lower screws (C) in speedchanger bracket just below the speed dial.
Figure 12. Removing Timing Belt
A slight blow under the speed changer bracket (#5,page 36) may beneeded to separate the upper housing CD) from its base.
As the housings are being separated, the I-lTD belt (E) (#36,page 36)still connects them, resisting the separating movement. The separationcan be assisted by gently pushing the belt off the large pulley (#86. page36) as the upper housing is being raised.
Remove the old belt and replace with a new belt.
A
T HNII~ I III 1111111111
D
E
--2 3—
Propert
y of K
ent In
dustr
ial U
SA
Do Not
Reprod
uce

GE N E RAL S PEED R EC OMME NOAT IONS
Feet Per Minute
Rough Ro~,gh and Light andMaterial to 6. Cut Cut F tnish Finish C et
Cast Iron. Soit-(Under 200 Brinnell) 70 80-90 120Cost Iron-Med.-(200-300 BrinnelI) 55 60-70 90Cost lron-Hord-(Over 200 BrinneIl) 40 50-60 70Steel (Chrome Nickel 40-45 Shore) 30 40 50Steel (Stainless) 60 80 90Steel (Low Corbon) 80 90 140Steel (High Carbon) 40 50 70Bronze (Medium) 90 120 50Bronze (Hard) 65 90 130Bross (Hard) IOU 150 200Copper 15Q 200 300Duroluminum 400 --- 600Aluminum 600 -- 1000
tABLEOF CUTTING SPEEDS AND FEEDS
Feet PerMinute 15 20 25 30 40 50 60 70 80 90 100
Dia meter,Inch., Revolutions Per Minute
1/16” 9-17 1222 1528 1833 2445 3056 3667 4278 4889 5500 61121/8’’ 458 611 764 917 1222 1528 1833 2139 2445 2750 30563/16’’ 306 407 509 611 815 7019 1222 7426 1630 1833 2037I 4’’ 229 306 382 458 61! 764 917 1070 1375 1375 15285 16’’ 183 244 306 367 489 611 733 856 978 1100 12223 8’’ 153 204 255 306 407 -509 611 713 815 917 10197/16” 131 175 218 262 349 437 524 611 698 786 8731/2’’ 115 153 191 229 306 382 458 535 611 688 7645/8’’ 91 122 153 183 244 306 367 428 489 550 6113/4” 76 102 127 153 20~i 255 306 357 407 458 5097/8’’ 65 87 109 131 175 218 262 306 349 393 4371” 57 76 95 115 153 19! 229 267 306 314 3821 1/8” 50 67 84 102 136 170 204 238 272 306 340I 1/4” 45 61 76 91 122 153 183 214 244 775 3061 3/8’ 41 55 69 83 III 139 167 194 222 250 2787 I’2” 38 50 63 76 102 127 153 178 204 229 255I 5/8” 35 47 58 70 94 118 14! 165 188 212 2351 3/4” 32 43 54 65 87 109 131 153 175 196 2151 7/8’’ 30 40 50 67 81 102 122 143 163 183 2047” 28 38 47 57 76 95 115 134 153 172 191
—24--
Propert
y of K
ent In
dustr
ial U
SA
Do Not
Reprod
uce

MANUAL FEW
FEED CONTROL LEVER
HIGH LOW SPEEDCLUTCH CONTROL
I POWER FEEDTRANSMISSIONENGAGEMENT CRANK
QUILL LOCK
MICROMETER AOJUSTtNG NUT
INDICATOR MOUNTING’ROD
Figure 13. Step Speed Milling Head
(DflVUvNG SWITCH is used to obtain clockwis, or counter clockwise rotation of spindle.
No4.: Due to back gear construction, when mactime is running in 1ow speed range, spindle rotation is opposite toon your reversing switch become’ reverse switch in tow speed range.
®WINDII IRAIC!
HARDENED AND GROUND SPINDLE
that 0f high speed rang.. Therefore forward
Lever con be moved in either direction to slop spindle: however, when locking spindle, lever should be moved to right or left and then raised.
CAUIIOM Be certoin that the spindle broke is released before starling the motor. This is important as the motor con be damaged if switch is left on with brokein locked position.
®HIGH LOW SPEED CLUTCH CON7RO Lis cirec fly in front at motor. When knob is in position. assho,vn on picture, ctutch is in high speed position. To putclutch into low speed posilion turn lever to the extreme right. It is necessary to table spindle while engaging high speed clutch This can be accomplish.
ad by either turning spindle nose by hand or 1,s~i turning dralsbar knob using wrench, providing drawbor in pulled’s p tightly.
CAIflIOM Do not shift clutch while motor is runin 9.
®BACK GEAR CONWOL is used in conjunction with the high low speed cistch control obose back gear control handle is slortped IN and OUT. Whenbock geor control hondle sin OUT position, which is the position tn,rthest Irom toce of machine, then HIGH LOW speed clutch control should be located as
illustrated in photogroph. With these controls in position as explained, head is set for operation in high speed range 660.2720 RPM). When back gearcontrol lever moved to IN posifion and HIGH 1,0W speed clutch control moved to extreme, ight then Its. head is ready t0, operation in the low speed range
(8O’325 RPM)
MOTOR
SPINDLE OEIAKEAND LOCK
8ELT SHIFTING AND ________
TENSION CONTRO~,
REVERSING SWITCH
QUILL FEED SELECTOR
QUILLFEED HANDLE
QUILL STOP
25—.
Propert
y of K
ent In
dustr
ial U
SA
Do Not
Reprod
uce

8—~~
t%)
0’
I/i
Co
CD
,-4
CD 0)
C., ~—
-0
Propert
y of K
ent In
dustr
ial U
SA
Do Not
Reprod
uce

BASIC MACHINE
ITEM NO. PARTS NO. DESCRIPTION ITEM NO. PARTS NO. DESCRIPTION
H5021 Vertical Adjusting Worm Shaft 58 3H4028-2 LeIf Hand Column Wiper2 5022 Worm Thrust Washer Holder (2 Req.)3 5020 Vertical Adjusting Worm 59 3H4028 Knee Wiper Felt4 5023 Roll. Pin 60 3H4028-l Knee Wiper Felt5 H5018 Ram 61 4038 Knee/Column Gib6 5027-1 Set Screw 62 1001-I Stop screw (2Req.)7 5027 Nut 63 3040 Chip Guards8 5019 Ram Adapter 64 H3039-l Chip Guards9 5033 Quill Housing ADJ. Gear 65 H3039 Chip Guards
10 5034 Roll Pin 66 3H400l KneeII 5035 Socket Head Cap Screw(2 Req.) 67 H 1003 Socket Head Cap Screw (4 Req.)12 5016 Ram Adapter Plate 68 H1002 Column Cover13 5031 Plate (2 Req.) 69 4025 Socket Head Cap Screw (3 Req.)14 5032 Round HP Drive Screw(28Req~) 70 4024-1 Grease Nipple15 5029 Spring Washer (3 Req.) 71 4024 Elevating Screw Nut16 H5028 Adapter Locking Bolt (3 Req.) 72 H4026 Pedestal17 5030 Turret Plate 73 4027 Socket Head Cap Screw (4Req.)18 5003 Spider 74 H 1004 Filter19 5043 Angle Plate 75 3BlOOS Knee Cover20 5028-1 Adapter Locking Bolt Washer 76 1006 Flat Head Socket Screw (4Req.)21 5026 Adapter Pivot Pin 77 4036 Socket Head Cap Screw (2 Req.)22 50 16-1 Plate (3 Req) 78 4034 Bevel Gear Cover23 H500l Turret 79 4020 Key24 H5002 Ram/Turret GTh 80 4021 Elevating Screw Assembly25 H5044 Ram Plate 81 4023 Jam Nut26 H5004 Locking Bolt (4 Req.) 82 4023-1 Spring Washer27 5005 Spring Washer (4 Req.) 83 40232 Washer28 5015 Ram Pinion Screw 84 4019 Bevel Gear29 H5007 Gib Screw (2Req.) 85 4022 Washer30 H5007-1 Gib Screw Nut (2 Req.) 86 4040 Sealed Ball Bearing 53051131 H5006 Ram Lock Plunger (2 Req.) 87 4039 Bearing Retainer Ring32 H5010 Ram Lock Stud (2 Req.) 88 4041 Socket Head Cap Screw (3Req.)33 5014 Plastic Ball 89 4042 Socket Head Cap Screw34 5013 Ram Pinion Handle 90 4042-1 Spring Washer35 5012 Ram Pinion 91 4017-1 Washer36 HlOOl Columm 92 4014 Bevel Pinion37 H4043 Knee Lock Plunger 93 4014-I Washer38 3031 Lock Bolt (5 Req,.) 94 2008 Grease Sealed Bearing 620411(2 Req.)39 3030 Lock Bolt Handle (5 Req.) 95 4015 Key40 H4044 Knee Lock Plunger 96 3H4Ol7 Elevating Shaft forl3%” Knee41 2031 Stop Piece T-Bolt (2 Req.) 97 4006 Bearing Cap42 2030 Table Stop Bracket (2 Req.) 98 2011 Bearing Retaining Ring43 2032 Hex Nut (2 Req.) 99 4009 Socket Head Cap Screw (3Req.)44 3028 GibAdjusting Screw (6 Req.) 100 4011 Dial Holder45 3H3001 Saddle 101 4010 Dial With 100 Graduations46 3026 Saddle/Table 0Th 102 4016 Dial Lock Nut47 H3032 Saddle Lock Plunger 103 4013 Gearshaft Clutch Insert48 3027 Saddle/Knee Gib 104 4012 Fix Gearshaft Clutch Nut49 H3029-l Table Lock Plunger 105 4002 Elevating Screw Assembly50 3035 Table Stop Bracket 106 4004 Washer51 3036 Socket Head Cap Screw(2 Req.) 107 4005 Socket Head Cap Screw52 2035 Plug (2 Req.) 108 4003 Handle53 2001-50 Table “50”54 3038 Oval Head Screw (12 Req.)55 3H3037-1 Saddle Knee Wiper Plate(2 Req.)56 3H3037 Felt Wipers (2 Req.)57 H3029 Table Lock Plunger
—27—
Propert
y of K
ent In
dustr
ial U
SA
Do Not
Reprod
uce

‘4
78
S
4
12
3
2
30
7
2
Propert
y of K
ent In
dustr
ial U
SA
Do Not
Reprod
uce
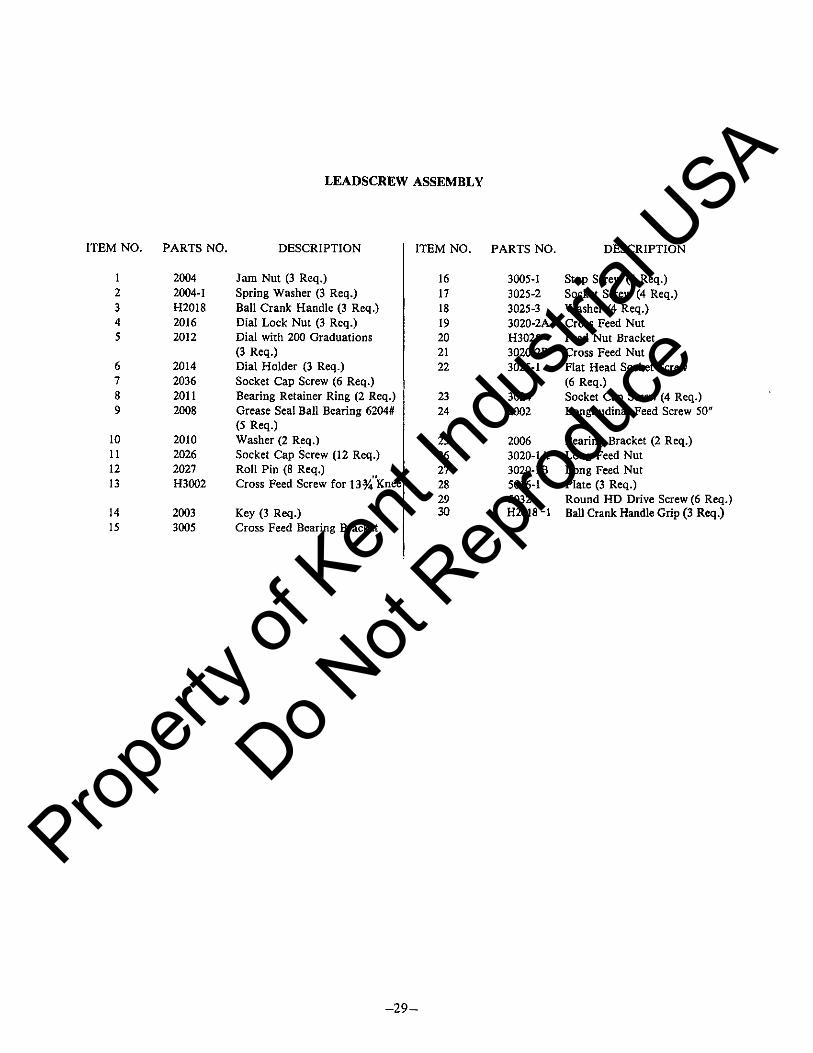
LEADSCREW ASSEMBLY
2345
6789
10111213
1415
2014203620112008
2010202620271-13002
16171819202122
2324
3005-1 Stop Screw (4 Req.)3025-2 Socket Screw (4 Req.)3025-3 Washer (4 Req.)3020-2A Cross Feed NutH3025 Feed Nut Bracket3020-2B Cross Feed Nut3025-1 Flat Head Socket Screw
(6 Req.)3024 Socket Cap Screw (4 Req.)2002 Longitudinal Feed Screw 50”
ITEM NO. PARTS NO.
20042004~lH20l820162012
ITEM NO. PARTS NO. DESCRIPTIONDESCRIPTION
Jam Nut (3 Req.)Spring Washer (3 Req.)Ball Crank Handle (3 Req.)Dial Lock Nut (3 Req.)Dial with 200 Graduations(3 Req.)Dial Holder (3 Req.)Socket Cap Screw (6 Req.)Bearing Retainer Ring (2 Req.)Grease Seal Ball Bearing 6204#(5 Req.)Washer (2 Req.)Socket Cap Screw (12 Req.)Roll Pin (8 Req.)Cross Feed Screw for 13% Knee
Key (3 Req.)Cross Feed Bearing Bracket
20033005
25 2006 Bearing Bracket (2 Req.)
! 26 3020-lA Long Feed Nut~ 27 3020-lB Long Feed Nut~ 28 5016-1 Plate (3 Req.)
29 5032 Round liD Drive Screw (6 Req.)30 Ff2018-I BallCrankHandleGrip(3Req.)
—29—
Propert
y of K
ent In
dustr
ial U
SA
Do Not
Reprod
uce

2
29—C) 30~ (~~-31(9~j
29 —C)35 —~
6
~ø—39
8
ii’
1
U
88
87
1—27
20 6049
t~748
78y79
81
77
/3~7482
84
775
—30—
Propert
y of K
ent In
dustr
ial U
SA
Do Not
Reprod
uce

3K HEAD TOP HOUSING
Drawbar for R 8 ColIelDrawbar WasherUpper Bearing LocknutBearing Sleeve LocknutBall BearingUpper Bearing Spacer (small)Upper Bearing Spacer (large)Ball BearingCompression Spring (4 Req.)Socket Set Screw (4 Req.)Spindle Pulley Bearing SleeveJam NutExternal Lock WasherBrake Ring Screw (3 Req.)Spring (2 Req.)Socket Set Screw (2 Req)Brake Lock StudBrake AssemblySpindle PulleySpindle Pulley HubSpring Washer‘V’ BeltTiming BeltTiming Belt Pulley FlangeTiming Belt PulleyTiming Belt Pulley FlangeFlat Head Screw (12 Req.)Hex Jam NutBlack Plastic Ball Handle (2Req.):Spindle Clutch LeverCam RingCam Ring Pin (2 Req.)Socket Set ScrewBrake Lock HandleBrake Lock PinSpeed NameplateDrive Screw (10 Req.)Hex Jam Nut (2 Req.)Motor Mounting Studs (2 Req.)Belt Housing
DESCRIPTION
Motor Locknut (2 Req.)Motor Locknut Handle (2 Req.)Black Plastic Ball (2 Req.)WasherSocket Cap ScrewMotor PulleyGear Housing CoverRound HD Screw (5 Req.)Wave Spring WasherOil CupBull Gear KeySplined gear HubSpindle Bull Gear AssemblyBearingCountershaftKeyCountershaft GearBearingDowel PinBack Gear Shifter ForkGear HousingRoll Pin (2 Req.)Socket Cap Screw (6 Req.)Feed Trip Name PlateBall BearingSnap RingLockwasherBearing LocknutHex Nut Hardened (3 Req.)Vertical Tee Bolt (3 Req.)Vertical Bolt Washer (3 Req.)Back Gear Shift CrankRoll PinShift CrankBlack Plastic Ball 1” Dia.Gearshift PlungerCompression SpringBelt Guard Assembly (2 Req.)Plate Pinch (2 Req.)Socket Cap Screw (2 Req.)Washer (2 Req)Nut (2 Req)
DESCRIPTIONITEM NO. PARTS NO.
60312 60323 60414 60425 60436 60447 60458 60439 6049
10 6047-2Il 604712 601913 602214 601815 602416 6047-117 602018 601419 604820 604021 6070-I22 603423 603524 607225 607126 607227 607328 607029 603830 603731 603632 603933 602334 601635 602136 601137 6011-139 600841 600242 6013
ITEM NO. PARTS NO.
43 600345 600646 600747 6001-148 6001-249 600950 607851 608052 6078-155 607956 6075-I57 607558 607459 605660 606861 606962 606763 605664 606665 606566 605068 605269 605770 601271 605372 605473 607774 607675 608376 608177 608278 606079 616781 616882 617183 616984 617085 602686 602787 6027-188 6027-289 6027-3
—3’—
Propert
y of K
ent In
dustr
ial U
SA
Do Not
Reprod
uce

N)
U,c
-j ≥~g
..,cd.~
(—
LS
Z_
,-‘—
-—
——
~_
__
_
~~
~“tiI\
/41(
i~Yi
rflEf
l~~
Wir’~
”~92
M’~
Q-
W~+
W!~
~Propert
y of K
ent In
dustr
ial U
SA
Do Not
Reprod
uce

3K/3V1( HEAD
ITEM NO. PARTS NO. DESCRIPTION ITEM NO. PARTS NO. DESCRIPTION
I 6141 RD. HD, Screw 46 6230 Key2 6140 Bevel Pinion Washer 47 6217 Roll Pin3 6139 Feed Bevel Pinion 48 6216 Reverse Clutch Rod4 6138 Feed Worm Gear Shaft Sleeve 49 6121-I Cap Screw5 6137 Worm Cradle Bushing 50 6162 Feed Gear Shift Fork6 6136 Worm Gear Spacer 51 6166 Cluster Gear Shift Crank7 6134 Feed Drive Worm Gear 52 6164 Set Screw8 6133 Feed Drive Worm Gear Shaft 53 6163 Feed Shift Rod9 6123 Set Screw 54 6256 Van-Speed Dial
10 6142 Key 55 6256-1 Drive Screw (2 Req.)11 6135 Key 56 6161 Cluster Gear Cover12 6126 Worm Gear Cradle Throw-out 57 6165 Cap Screw (4 Req.)13 6125 Shift Sleeve 58 6227-I Set Screw14 6132 Cap Screw (3 Req.) 59 6227-2 Set Screw15 6169 Gear Shift Plunger (2 Req.) 60 6186-1 Set Screw16 6128 RoIl Pin (2 Req.) 61 6186-2 Set Screw17 6170 Compression Spring (2 Req.) 62 6186 Quill Pinion Shaft Bushing18 6168 Shift Crank (2 Req.) 63 6190 Pinion Shaft Worm Gear Spacer19 6131 Black Plastic BaIl (3 Req.) 64 6187 Overload Clutch Worm Gear20 6122 Feed Engage Pin 65 6188 Overload Clutch Ring21 6121 Worm Gear Cradle 66 6195-i Key22 6147 Cluster Gear Key 67 ~l88-1 Snap Ring23 6150 Cap Screw 68 6195 Overload Clutch Sleeve24 6149-1 Spring Washer 69 6189 Round Head Screw (3 Req.)25 6149 Washer 70 6191 Compression Spring26 6148 Feed Reverse Bevel Gear 71 6192 compression Spring27 6143 Feed Driving Gear 72 6193 Overload Clutch Lever Spring28 6144 Feed Driving Gear Plunger29 6252 Needle Bearing BA66# 73 6199 Set Screw30 6145 Key 74 6199-1 Brass Plug31 6158 Snap Ring 75 6202 Clutch Ring Pin (2 Req.)32 6156 Bevel Gear Bearing 76 6204 Pin33 6159 Bevel Gear Thrust Spacer 77 6205 Clutch Arm Cover34 6151 Cluster Gear Shaft 78 6206 Cap Screw (2 Req.)35 6160 Cluster Gear Key 79 6224-1 Set Screw36 6157 Cluster Gear Shaft Upper 80 6224-2 SetScrew
Bearing 81 6156-1 Set Screw37 6153 Cluster Gears Assembly 82 6156-2 Set Screw38 6226 RoIl Pin 83 6194 Overload Clutch39 6227 Bushing 84 6197 Safety Clutch Spring40 6225 Worm 85 6198 Overload Clutch Locknut41 6224 Feed Worm Shaft Bushing 86 6200 Clutch Ring42 6223 FeedWorm Shaft Thrust Washer 87 6201 Overload Clutch Washer43 6220 Feed Reverse BevelGear(2 Req.) 88 61951 Snap Ring44 6222 Feed Reverse Clutch 89 6203 Overload Clutch Trip Lever45 6209 Feed Worm Shaft 90 6207 Socket Set Screw
91 6208 Chem Blacked Locknut
-33
Propert
y of K
ent In
dustr
ial U
SA
Do Not
Reprod
uce

LJ~
~‘
U,
‘C-
—~~
10
c-/
-~
a—
-~
‘ks/c
cD
$W
_~
*i~
_~
~*~
~
W’W
:~F~~
fl~
6
Propert
y of K
ent In
dustr
ial U
SA
Do Not
Reprod
uce

iTEM NO. PARTS NO. DESCRIPTION I ITEM NO. PARTS NO. DESCRIPTION
Cam Rod Sleeve AssyRoll PinDowel PinCompression SpringRoll PinTrip PlungerTrip Plunger BushingFeed Trip PlungerCotter Pin(2 Req.)Set ScrewKeyHandwheel ClutchSteel BallCompression SpringHandwheel Clutch Spring ScrewCotter PinFeed Trip BracketCap ScrewDowel PinCam RodTrip HandleSnap RingReverse KnobFeed Reverse Knob StudHandwheelFeed Trip LeverSocket Set ScrewLocknutTrip Lever PinBlack Plastic Ball HandlesPinion Shaft Hub HandleADS Worm ShaftSocket Set ScrewKeyWorm GearKeyCap ScrewQuill Pinion ShaftPinion Shaft Hub ScrewSteel BallCompression SpringSteel BallRack Feed Handle HubPinion Shaft Hub SleeveRD. Head Screw (2 ReqjSpring CoverClock Spring (Clock SpringAssy)
139 6114140 6109141 6110142 6251143 6251-1144 6244
• 145 6243146 6105147 6106148 6107149 6108
• 150 6115151 6104152 5036153 6116B154 6116-1155 6120
• 156 61!6A157 6117158 5037159 6119160 6117-I161 6117-2162 5038163 6253164 6084165 6086166 6090167 6091168 6092169 6094170 6085-1171 6085172 6088-1173 6088174 6093175 6096176 6095177 6097178 6098179 6258180 625918! 6101IS! 6157-I183 6157-2
92 623693 623794 6236-I95 624296 624197 624098 6118-I99 6118
100 6257101 6219102 6229103 6218104 6255105 6219-2106 6219-I107 6257108 6231109 6232(10 6231-1111 6239112 6234113 6215114 6213115 6214116 6210117 611!118 6113119 6113-1120 6112121 6173122 6174123 5040124 5042125 5041126 5039127 6184128 6172-1129 6172130 6183131 6176132 6175133 6177134 6178135 6182136 6120-I137 6180138 6181
Reverse Trip Ball Lever ScrewFeed Reverse Trip plungerReverse Trip Ball LeverSet BarCap ScrewDiem Blacked RD. HD. Screw (2 Req.)Micrometer ScaleQuill stop KnobScrewMicrometer NutQuill Micro-stop NutSnap RingQuill Stop Micro-screwT-Bolt Assy (4. Req.)Quill Lock SleeveCompression SpringLower Clamping Bolt Spacer (2 Req.)Quill Lock Sleeve TappedQuill Lock BoltSpring WasherLock HandleSpringSpring ScrewLocknut (4 Req.)Special Socket Set ScrewSpindleQuill SkirtLocknutLockwasherBearingSleeveSet ScrewQuillFelt Washer Screw (2 Req.)Felt WasherBearing (2 ReqjBearing Spacer-LargeBearing Spacer-SmallSpindle Dirt ShieldNose-PieceOil CapCopper PipeQuill HousingSet ScrewSet Screw
—35---
Propert
y of K
ent In
dustr
ial U
SA
Do Not
Reprod
uce

0~’
01
0,
0)
N)
?0 0
“3
a UT-I 6)
Propert
y of K
ent In
dustr
ial U
SA
Do Not
Reprod
uce

3V1( HEAD TOP HOUSING
DESCRIPTION
H~ Cap Nut
Van-Speed DialFull Dog Socket Set ScrewSpeed Changer HousingName PlateSocket Cap Screw (4 Req.)Chain JointRoll PinRoll PinSpeed Change StudSpeed Change ChainWasherTop Bearing CapRoll PinSpring WasherSpeed Change ShaftHandleCaution PlateSpeed Change HandwheelFlat Hd. Cap Screw (16 Req.)Plastic Face PlateSet ScrewSocket Cap Screw (4 Req.)Worm GearWasherPin (2 Req.)Speed Changer Spur GearSpeed Changer Chain DrumRoll PinBeltTiming Pulley Clutch SleeveSplined Gear HubSplindle Bull Gear AssemblyBall Bearing 6908# (2 Req.)Snap RingBull Gear Bearing SpacerVert, Tee Bolts (3 Req.)Steel Washer (3 Req.)Nut (3 Req.)Ball Bearing Gear Sleeve WasherFixed Clutch BracketGuide for Clutch Bracket (2 Req.)
DESCRIPTION
Flat HD Socket Cap Screw(2 Req.)Oil Cap (2 Req.)Compression Spring (3 Req.)Adjust Pin (3 Req.)Bearing LocknutBearing SleeveLock WasherWasherBull Gear Shift Pinion1-41-LOW Detent PlateHex Nut (3 Req.)Spring Washer (3 Req.)Studs (3Req.)Socket Set ScrewAdjustable PlateHI-LOW Detent PlungerSpringSocket Cap Screw (2 Req.)Black Plastic Ball HandleHI-LOW Shift CrankHI-LOW Pinion BlockSocket Set ScrewRoll PinSocket Cap Screw (2 Req.)Socket Cap Screw (6 Req.)Socket Set ScrewKeyBall Bearing 620311 (2 Req.)Bull Gear Pinion CounterShaftKeyKeyWave Spring WasherBull Gear PinionBull Gear Pinion Bearing CapSocket Cap Screw (3 Req.)Timing Belt PulleyJam NutWasherSpring WasherVentilator (2 Req.)Rubber Cover (2 Req.)
ITEM NO. PARTS NO. ITEM NO. PARTS NO.
52 70521—12456788-1BaSb
1010-I131516IS192021222324253030-132333535-136383940414243454647484951
H700 17001-170027004H7005H7006H700770087008-17008a700gbH70l07010-I701370157016H70 18H70I97020H7021H7022H70237024H70257030703 0-170327033H70357035-17036703870397040704170427043704570467047704870497051
5455
55-I5657
57-I57-259606162636465666768697071
71-172
72-17377.787980
80-I818283848586
- 8787-I87-288
88-I
705470557055-1705670577057-I705 7-270597060706170627063706470657066706770687069707070717071-I70727072-170737077707870797080
7080-I70817082708370847085708670877087-I7087-2H7088H7088-I
—37—
Propert
y of K
ent In
dustr
ial U
SA
Do Not
Reprod
uce

0
00
‘-I S
0,
0
-4
4D
iVCD
a
t0
a K,
0-a
~
Propert
y of K
ent In
dustr
ial U
SA
Do Not
Reprod
uce

3VK HEAD BACK GEAR
ITEM NO. PARTS NO. DESCRIPTION ITEM NO. PARTS NO. DESCRIPTION
1 8001 Socket Cap Screw(3 Req.)3 8003 Spring Washer4 8004 Ball Bearing 6007ff5 8005 Snap Ring7 8007 Hex Jam Nut8 8008 Motor 31fF (Complete unit)9 8009 Hex RD Screw (2 Req.)
10 H8010 Belt Housing13 8013 Speed Change Plate14 8014 Drawbar15 8015 CotterPin16 8016 Speed Change Plate Pivot Stud17 8017 Socket HDCap Screw (2Req.)18 8018 Washer19 8019 Pivot Sleeve (2Req.)20 8020 Draw Bar Washer21 8021 Spacer21-1 8021-I Snap Ring22 8022 Spindle Pulley Bearing Sliding
Housing22-1 8022-1 Snap Ring23 8023 Ball Bearing 6010ff (2 Req.)24 8024 Plastic Insert (2 Req.)25 8025 Adjustable-Driven Varidisc26 8026 Snap Ring27 8027 Belt28 8028 Stationary Driven Varidisc29 P18029 Brake Bearing Cap29-1 8029-1 Socket HD Cap Screw
(4 Req.)31 8031 Brake Spring (2 Req.)32 8032 Brake Shoe Assembly33 8033 Spindle Pulley Spacer34 8034 Spindle Pulley Hub36 8036 Brake Shoe Pivot Sleeve Screw38 8038 Drive Key39 8039 Key (2 Req.)39-I 8039-1 Flat RD Socket Cap Screw (2 Req.)39-2 8039-2 Flat HD Socket Cap Screw (2Req.)
40 8040 Stationary Motor Varidisc41 8041 Socket set Screw42 8042 Plastic Insert (2 Req.)43 8043 Adjustable Motor Varidisc Assembly44 8044 Spring for Varidisc Motor Shaft
~ 45 8045 Adjustable Varidisc Spring Collar.
~ 46 8046 Socket HO Cap Screw (2 Req.)~ 47 8047 Ret. Ring
~! 51 8051 Key53 H8053 Belt Rousing Base
~ 54 H8054 Motor Pulley Cover~ 55 8055 Socket Cap Screw‘ 58 8058 HI-LOW Range Nameplate• 59 8059 Drive Screw (6 Req.)~ 60 8060 Taper Pin (2 Req.)
61 8061 Quill Feed Nameplate63 R8063 Gear Housing64 8064 Socket Cap Screw (3 Req.)66 8066 Snap Ring67 8067 Brake Finger Pivot Stud (2 Req.)68 H8068 Brake Operating Finger
~ 68-I H8068-I Spacer• 69 3H8069 Bakelite Ball Handle
70 H8070 Brake Lock Handle70-1 H8070-I Socket Set Screw70-2 H8070-2 Socket Cap Screw70-3 H8070-3 Jam Nut71 P18071 Brake Lock Handle73 P18073 Sleeve for Brake Lock Shaft74 P18074 Brake Lock Shaft74-1 8074-1 Roll Pin75 8075 Rubber Bushing77 8077 Socket Set Screw (2 Req.)
—39—
Propert
y of K
ent In
dustr
ial U
SA
Do Not
Reprod
uce

CENTRAL LUBRICATING OIL-FEEDING EQUIPMENT
Hand OilerAluminum PipeRatio Distribution Controller- CPS4 (3 Req.)
4 9004 Socket Cap Screw (8 Req.)9005 “A” Type Distributor - A4
9006 Ratio Distribution Controller -
CPS3 (3 Req.)9007 Outside Steel Wire Soft Tube9008 “A” Ttpe Distributor - AS9009 Ratio Distribution Controller
CPS5 (2 Req.)
ITEM No. PARTS NO.
90012 90023 9003
DESCRIPTION
5
ITEM NO. PARTS NO.
6
DESCRIPTION
789
—40—
Propert
y of K
ent In
dustr
ial U
SA
Do Not
Reprod
uce

“4>C,CDC1J>1
1)
C”rn
~1/~
~\~
__
-~—
—/
—~
//
.1CS’
N—
—/~
S5fl
fl\/
//d
__~
~;r
~,L~
~/~
7~
\~
\tE.
\\\
‘\~
L≤~(~~
W\~\
\~))i-r;~
N-\
\~~
~&
2~(~©\~~~ZI~
t!°~4~
~/~C\I
~\
~\g
\\
~C
:/
~g
\N
~
~N~
~\‘\
‘\~D~
~6~
Propert
y of K
ent In
dustr
ial U
SA
Do Not
Reprod
uce

2VSF, 3VKFHEADTOP HOUSING OF INVERTER MOTOR TYPE
ITEM NO. PARTS No. DESCRIPTION ITEM NO. PARTS MO. DESCRIPTION
14 8001 Socket CAp Screw (3 Keg) 55 7087 Jam NUt (5/8”—UNfl15 7013 . Top Bearing Cap 56 7087—1 Spring Washer (5/8’)16 8004 Searing 57 7056 Timing Belt Pulley17 7056 Searing Locknut (2 Keg) 58 7084 Bull Gear Pinion Bearing18 7057—2 Lock Washer (2 Rag) 59 7052 Wave Spring Washer19 SBI4048A Spindle timing Belt Pulley 60 7079 Ball Bearing (2 Rag)20 H60488 Brake Wheel 61 7083 Bull Gearing Pinion21 531—60488-1 Socket Ho Cap screw (6 Keg) 62 7080 Gear Shaft22 8029 Brake Searing CAp 63 7085 Socket HO Cap Screw (3 Keg)23 8023 Ba31 Bearing 64 7077 socket Sot Screw24 H6048A—1 Washer 65 7078 Key25 8032 Brake Shoe Assembly 66 7078—1 Key26’ 8031 Brake Sating (2 Keg) 67 351—6001 3HP Invertor Motor27 8029—1 Socket HO Cap Screw (4 Keg) 68 5B1—6001—1 Key28 8036 Brake Shoe Pivot Sleeve 69 531—6009 Motor Timing Pulley30 5K6039 Key (8 X 7 X 60) 70 TA—4040 Pulley Washer31 8033 Spindle Pulley Spacer 71 531—6009—i Socket Cap Screw(6 Keg)32 H8068 Brake Operating Finger 72 581—6034 Timing Belt (880—8H—35)33 N8068—1 washer 73 H8063 Gear Mousing34 8067 Br~ke ?Inger Pivot Stud (2 Keg) 74 8064 socket Cap Screw(6 Keg)35 8066 Snap Ring (ES) 75 7063 socket Cap Screw (3 Keg)36 8053 Belt Housing Base 76 7062 Lock washer (3 Keg)37 H80541 Spindle Pulley Hub 77 7061 Hex Nut (3 Keg) -
38 7038 Timing Pulley Sleeve 78 8063—1 Grease Nipple (1/8”)41 7039 Spindle Gear Hub •7~, 7059 Bull Gear Shift Pinion42 7040 SpIndle BullS Gear Assembly ~0 7060 Hi—Low Detent Plate43 7081 Key 83 7068 Socket Cap Screw (2 Reg)44 7057 3earing Sleeve 84 7066 Hi—low DETENT Plunger45 7048 BalI Bearing Gear Sleeve Washer 85 7067 Spring46 7041 Ball Bearing (2 Keg) 86 7064 Set Screw47 7043 Ball Bearing Spacer 87 7071 Ri—Low Pinion Block48 7042 Snap Ring 88 7072 Roll Pin49 7057—1 washer 89 Z070 Hi—Low Shift crank50 7051 Ofide For Clutch Bracket (2 Keg) 90 7072 Socket Cap Screw(2 Keg)51 7052 Flat ~ Sccket Gao Screw (2 Keg) 91 3H7069 Brketlite Ball Handle52 7055—1 Adjust Pin (3 Req)U5x10) 92 1—6013 Belt Housing53 7055 Compression Spring (3 Keg) 93 1—6013—2 cover54 7036 Timing Belt 94 1—5013—3 Cap Screw (4 Rag)
Propert
y of K
ent In
dustr
ial U
SA
Do Not
Reprod
uce