s60 awd hub bearing + balljoint replacement
TRANSCRIPT

7/31/2019 S60 AWD Hub Bearing + Balljoint Replacement
http://slidepdf.com/reader/full/s60-awd-hub-bearing-balljoint-replacement 1/22
DISCLAIMER: For entertainment purposes only! Car maintenance should only be
performed by qualified Volvo mechanics! No liability accepted for any damage to the car
or yourself is accepted should you try to use this information for anything more than
interesting reading material. I am not a mechanic, so use your own judgement!
Things you might need:
PARTS
Hub Kit - Includes hub, driveshaft bolt, 4 mounting bolts - Volvo p/n 274298
Ball joint kit - Includes ball joint, 2 mounting bolts, driveshaft bolt - Volvo p/n 274548
Driveshaft screw - Volvo p/n 3076055 (don't buy, you get them in the kits!)
Anti-roll link nut, top - Volvo p/n 985909Caliper/limiter bolts - 985454 (2 needed)
TOOLS Sockets
• 10 mm socket
• 14 mm socket
• 15 mm socket
• 18 mm socket
• 19 mm socket
• 21 mm socket (13/16" seems close enough)
• T40 Torx
• T30 Torx
• 18 mm crowfoot wrench/adapter
Wrenches
• 8 mm wrench
• 18 mm wrench (ratcheting would be ideal)
• 21 mm wrench
Misc stuff
• M10 1.5mm pitch x 70mm bolts, the type that are partially smooth (see step 25)
• 2" diameter steel pipe nipple (see step 25)
Misc tools

7/31/2019 S60 AWD Hub Bearing + Balljoint Replacement
http://slidepdf.com/reader/full/s60-awd-hub-bearing-balljoint-replacement 2/22

7/31/2019 S60 AWD Hub Bearing + Balljoint Replacement
http://slidepdf.com/reader/full/s60-awd-hub-bearing-balljoint-replacement 3/22
Step 4
Loosen the roadwheel bolts as well (19 mm). I also fold in the mirrors, as I tend to knock them when
standing up! Your choice ;-)
Step 5
Jack up the car, put on jack stands.
Step 6
Take off the road wheels
Step 7
If you haven't already loosened the driveshaft screw in step 3, have someone press the brakes and
carefully loosen it now. Or you can insert a screwdriver into the brake disc to counterhold it while
loosening.
Step 8
Loosen the bolt on the anti-roll bar link, the top bolt on the shock. Counterhold with a T40, then use a
18mm wrench to loosen it.
Step 9
Carefully remove the ABS sensor by undoing the bolt (10mm). Don't pull up on the sensor wire to get

7/31/2019 S60 AWD Hub Bearing + Balljoint Replacement
http://slidepdf.com/reader/full/s60-awd-hub-bearing-balljoint-replacement 4/22
the sensor out! Also undo the wire holder, then carefully put the sensor somewhere it won't get hurt!
Step 10
Turn the wheel to expose the back of the caliper to make removing the bolts holding the caliper / limiter
in. Loosen the bolts, but before removing them have some rope or wire ready. You will have to hang the
caliper from the spring, and it's pretty heavy! Once you are set, remove the bolts and hang the caliper to
protect the rubber brake line.

7/31/2019 S60 AWD Hub Bearing + Balljoint Replacement
http://slidepdf.com/reader/full/s60-awd-hub-bearing-balljoint-replacement 5/22
You should use new bolts when putting the caliper back.

7/31/2019 S60 AWD Hub Bearing + Balljoint Replacement
http://slidepdf.com/reader/full/s60-awd-hub-bearing-balljoint-replacement 6/22
Step 11
If you turned the wheel to the side, return it to center.
You must measure the distance at the top bolt of the wheel spindle to the spring strut. When
reassembling you'll have to set this distance the same, as otherwise your wheel camber will be wrong!
Be sure to clean both measuring surfaces well before taking the measurement. I also took it three times
to make sure, re-zeroing the instrument inbetween measurements. The other side of my caliper was
above the bracket attacked to the sprint strut (can't see in photo). Mine was 87.0 mm for reference.

7/31/2019 S60 AWD Hub Bearing + Balljoint Replacement
http://slidepdf.com/reader/full/s60-awd-hub-bearing-balljoint-replacement 7/22
Step 12
If it's not obvious, mark the location of the disc relative to the hub. All that matters is which of the four
holes you put the retaining bolt through - it should be obvious from markings on the disc!
Step 13
Remove disc retaining bolt (10 mm).

7/31/2019 S60 AWD Hub Bearing + Balljoint Replacement
http://slidepdf.com/reader/full/s60-awd-hub-bearing-balljoint-replacement 8/22
Step 14
Remove the disc. If the disc is old it may be seized on, requiring the application of quite a bit of force! If
you were planning on replacing your disc now would be a great time to do so...
Step 15
Remove the driveshaft screw, DO NOT reuse. Your hub kit and each ball-join kit will come with a new
driveshaft screw, you have lots of spares. I would immediately place the old one away somewhere you
won't accidentally re-use it.
Step 16
Tap the driveshaft in 10-15mm with something soft (brass hammer, pin, etc).

7/31/2019 S60 AWD Hub Bearing + Balljoint Replacement
http://slidepdf.com/reader/full/s60-awd-hub-bearing-balljoint-replacement 9/22
Step 17
Loosen, but do not remove, the bolts attaching the spindle to the spring struct. The bolt head was
18mm, the nut was 21 mm. Note that 13/16" seemed to fit almost perfectly if you don't have a 21mm.
Step 18
Use two wrenches to undo tie rod end. Counterhold with an 8mm, then undo the nut with a 18mm
wrench (ratcheting would again make this go much faster). You should use a new nut on re-assembly.

7/31/2019 S60 AWD Hub Bearing + Balljoint Replacement
http://slidepdf.com/reader/full/s60-awd-hub-bearing-balljoint-replacement 10/22
Step 19
Pull bolts for spindle/suspension. You may have to fiddle around with the spindle or use a hammer to
lightly tap the bolts out. You should use new bolts/nuts on reassembly probably. Before you remove
them completely see next step for warnings!

7/31/2019 S60 AWD Hub Bearing + Balljoint Replacement
http://slidepdf.com/reader/full/s60-awd-hub-bearing-balljoint-replacement 11/22

7/31/2019 S60 AWD Hub Bearing + Balljoint Replacement
http://slidepdf.com/reader/full/s60-awd-hub-bearing-balljoint-replacement 12/22
Step 21
You will now undo the nut on the lower ball joint. Before doing that, I'd tie off the top of the spindle so
that it doesn't flop out and get damaged!
Use a counterhold, then undo the nut. My counterhold was a T30 Torx, the nut was 21 mm on the old
ball joint. The new ball joint was different sizes, so be sure to check yours! Also you may have to clean
the end out to see the counterhold, there was a lot of dirt in there.

7/31/2019 S60 AWD Hub Bearing + Balljoint Replacement
http://slidepdf.com/reader/full/s60-awd-hub-bearing-balljoint-replacement 13/22
Take the spindle, it should just lift off now! If you haven't already, take out the rubber driveshaft seal
and inspect it. Save it, since the new hub doesn't come with one.
Step 22 - HUB
You need to put it in a 'soft-jawed' vice. Lacking that, two pieces of wood worked well enough for me.

7/31/2019 S60 AWD Hub Bearing + Balljoint Replacement
http://slidepdf.com/reader/full/s60-awd-hub-bearing-balljoint-replacement 14/22
Clean the bolt threads sticking out that hold the hub on. It will make removal much easier!
Remove the bolts holding the hub on (18 mm), then tap the hub out. Clean the mounting surface for the
new hub, it should easily fit flush!

7/31/2019 S60 AWD Hub Bearing + Balljoint Replacement
http://slidepdf.com/reader/full/s60-awd-hub-bearing-balljoint-replacement 15/22
Step 23 - HUB
Insert the new hub, and insert NEW bolts (they came with the hub kit). Tighten criss-cross first to 20 Nm
(15lb-ft) then to 65 Nm (48 lb-ft).
Finally angle-tighten them a further 60 degrees, again criss-cross fashion. You can make a quick angle
gauge by printing off and cutting out a protractor (or stealing one from your kids). Aline 0 degrees with
horizontal for instance, tape it on the back of your ratchet, and tighten until 60 degrees is now
horizontal. You get the idea.

7/31/2019 S60 AWD Hub Bearing + Balljoint Replacement
http://slidepdf.com/reader/full/s60-awd-hub-bearing-balljoint-replacement 16/22
Step 24 - BALL JOINT
Use 14mm socket to remove bolts on ball joint.
Then remove ball joint - this is much much harder than it sounds! At least without the proper equipment
(slide hammer). I used a combination of a punch, a heavy bar, and some chain to slowly remove this.

7/31/2019 S60 AWD Hub Bearing + Balljoint Replacement
http://slidepdf.com/reader/full/s60-awd-hub-bearing-balljoint-replacement 17/22
Step 25 - BALL JOINT
You will need to make some guide bolts. Purchase some M10 1.5mm pitch bolts, ones with some area
without thread. Cut them down so the threaded area is only about 10mm. File the ends a bit to give
them a nice shape so they won't damage your threads! This become the guide bolts, to ensure the ball
joint goes on nice and centred.
Insert the ball joint in, and also your guide bolts:

7/31/2019 S60 AWD Hub Bearing + Balljoint Replacement
http://slidepdf.com/reader/full/s60-awd-hub-bearing-balljoint-replacement 18/22
Find a piece of pipe that fits over - I got a 2" x 2-1/2" steel pipe nipple part number UBLN-2025 that fit
perfectly over the protective cap. Hammer in the ball joint carefully, you can finish with a brass punch if
you want too. In retrospect the pipe should be longer, as the end of the joint stuck out!
Step 26 - BALL JOINT
Remove the guide bolts, and insert the new screws. Using 14mm socket tighten to 40 Nm / 30 lb-ft.
Step 27
Reinstall the ball joint in the control arm, ensuring the mating surfaces are clean! Using a crow-foot,
7/31/2019 S60 AWD Hub Bearing + Balljoint Replacement
http://slidepdf.com/reader/full/s60-awd-hub-bearing-balljoint-replacement 19/22
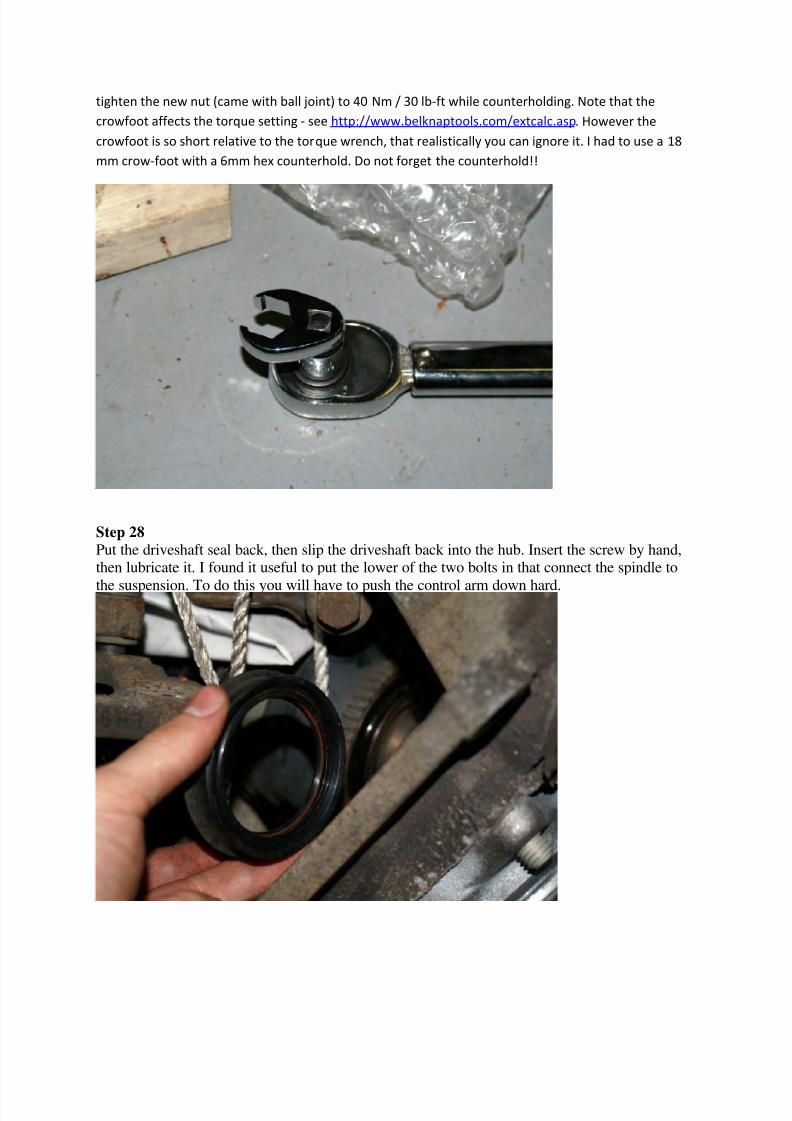
tighten the new nut (came with ball joint) to 40 Nm / 30 lb-ft while counterholding. Note that the
crowfoot affects the torque setting - see http://www.belknaptools.com/extcalc.asp. However the
crowfoot is so short relative to the torque wrench, that realistically you can ignore it. I had to use a 18
mm crow-foot with a 6mm hex counterhold. Do not forget the counterhold!!
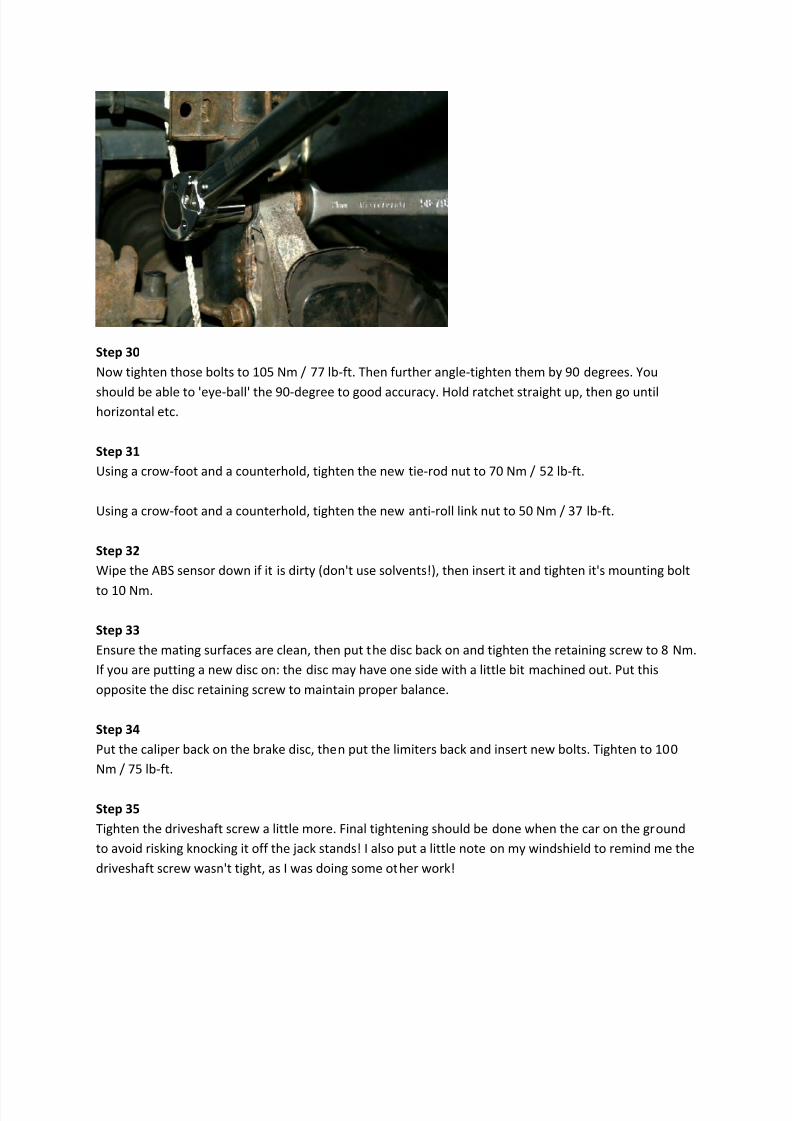
Step 28
Put the driveshaft seal back, then slip the driveshaft back into the hub. Insert the screw by hand,then lubricate it. I found it useful to put the lower of the two bolts in that connect the spindle to
the suspension. To do this you will have to push the control arm down hard.

7/31/2019 S60 AWD Hub Bearing + Balljoint Replacement
http://slidepdf.com/reader/full/s60-awd-hub-bearing-balljoint-replacement 20/22
Step 29
Insert both bolts & nuts, being sure they are inserted the correct way (from the front) on the
spindle/strut interface. You may have to play around with pushing the control arm / spindle down and
taping the bolts in to get them through. Tighten them enough that the spindle is not loose against the
strut. Then make sure you get the measurement you took in step 11.
7/31/2019 S60 AWD Hub Bearing + Balljoint Replacement
http://slidepdf.com/reader/full/s60-awd-hub-bearing-balljoint-replacement 21/22
Step 30
Now tighten those bolts to 105 Nm / 77 lb-ft. Then further angle-tighten them by 90 degrees. You
should be able to 'eye-ball' the 90-degree to good accuracy. Hold ratchet straight up, then go untilhorizontal etc.
Step 31
Using a crow-foot and a counterhold, tighten the new tie-rod nut to 70 Nm / 52 lb-ft.
Using a crow-foot and a counterhold, tighten the new anti-roll link nut to 50 Nm / 37 lb-ft.
Step 32
Wipe the ABS sensor down if it is dirty (don't use solvents!), then insert it and tighten it's mounting bolt
to 10 Nm.
Step 33
Ensure the mating surfaces are clean, then put the disc back on and tighten the retaining screw to 8 Nm.
If you are putting a new disc on: the disc may have one side with a little bit machined out. Put this
opposite the disc retaining screw to maintain proper balance.
Step 34
Put the caliper back on the brake disc, then put the limiters back and insert new bolts. Tighten to 100
Nm / 75 lb-ft.
Step 35
Tighten the driveshaft screw a little more. Final tightening should be done when the car on the ground
to avoid risking knocking it off the jack stands! I also put a little note on my windshield to remind me the
driveshaft screw wasn't tight, as I was doing some other work!

7/31/2019 S60 AWD Hub Bearing + Balljoint Replacement
http://slidepdf.com/reader/full/s60-awd-hub-bearing-balljoint-replacement 22/22
Step 36Put wheel back on, tighten wheel bolts.
Step 37
Lower car to ground
Step 38
Tighten driveshaft screw to 35 Nm / 36 lb-ft, then tighten a further 90 degrees.
Step 39
Tighten wheel bolts to 140 Nm / 103 lb-ft.