safety instructions owner's manual and installation ... · section in this manual for...
TRANSCRIPT

1
Safety Instructions ........................ 2-5
Operating InstructionsOven ............................................. 7-13Surface Burners .............................. 6
Care and CleaningBroiler Compartment .................... 17Broiler Pan and Grid ...................... 18Burners .............................................. 15Control Panel and Knobs ............... 6Grates .............................................. 14Lift-Up Cooktop .............................. 14Lift-Off Oven Door .......................... 18Oven Interior ................................... 19Painted Surfaces ............................ 19Removable Oven Bottom ............ 17Shelves ............................................. 16Thermostat Adjustment ................. 11
Installation Instructions ............ 20-28LP ...................................................... 28
Troubleshooting Tips ...................... 29
Warranty ........................................... 31
Write the model and serialnumbers here:
You can find them on a label underthe cooktop. See the Lift-Up Cooktopsection in this manual for instructionson how to lift the cooktop.
Owner's Manual andInstallation Instructions
RG200WRG244W
Model #
Serial #

2
IMPORTANT SAFETY INFORMATION.READ ALL INSTRUCTIONS BEFORE USING.
If the information in this manual is not followed exactly, a fire or explosion may result,causing property damage, personal injury or death.
IMPORTANT SAFETY NOTICE
All ranges can tip. BURNS or other SERIOUS INJURIES can result. INSTALL and CHECK the anti-tipbracket following the instructions supplied with the bracket. To reduce the risk of tipping therange, the range must be secured by a properly installed anti-tip bracket See installationinstructions shipped with the bracket for complete details before attempting to install.To check if the bracket is installed and engaged properly, look underneath the range to seethat the rear leveling leg is engaged in the bracket On some models, the storage drawer orkick panel can be removed for easy inspection. If visual inspection is not possible, slide therange forward, confirm the anti-tip bracket is securely attached to the floor or wall, and slidethe range back so the rear leveling leg is under the anti-tip bracket.If the range is pulled from the wall for any reason, always repeat this procedure to verify therange is properly secured by the anti-tip bracket.Never completely remove the leveling legs or the range will not be secured to the anti-tipdevice properly.If you did not receive an anti-tip bracket with your purchase, call 1-800-932-4267 toll-free toreceive one at no cost.
- Do not store or use gasoline or other flammable vapors and liquids in the vicinity of this or any other appliance.
- WHAT TO DO IF YOU SMELL GAS
Do not try to light any appliance.
Do not touch any electrical switch; do not use any phone in your building.
Immediately call your gas supplier from a neighbor's phone. Follow the gas supplier's instructions.
If you cannot reach your gas supplier, call the fire department.
- Installation and service must be performed by a qualified installer, service agency or the gas supplier.
WARNING
The California Safe Drinking Water and Toxic Enforcement Act requires the Governor of California to publish a list ofsubstances known to the state to cause cancer, birth defects or other reproductive harm, and requires businesses towarn customers of potential exposure to such substances.The fiberglass insulation in self-clean ovens gives off a very small amount of carbon monoxide during the cleaning cycle.Exposure can be minimized by venting with an open window or using a ventilation fan or hood.
WARNING
WARNING
SAVE THESE INSTRUCTIONS

3
Use this appliance for its intended purpose as describedin this owners manual.
Have your range installed and properly grounded by aqualified installer in accordance with the providedinstallation instructions. Any adjustment and serviceshould be performed only by qualified gas rangeinstallers or service technicians. Do not attempt to repairor replace any part of your range unless it is specificallyrecommended in this manual.
Your range is shipped from the factory set for use withnatural gas. It can be converted for use with LP gas. Ifrequired, these adjustments must be made by aqualified technician in accordance with the installationinstructions and local codes. The agency performing thiswork assumes responsibility for the conversion.
Have the installer show you the location of the rangegas shut-off valve and how to turn it off if necessary.
Plug your range into a 120-volt grounded outlet only. Donot remove the round grounding prong from the plug. Ifin doubt about the grounding of the home electricalsystem, it is your responsibility and obligation to have anungrounded outlet replaced with a properly grounded,three prong outlet in accordance with the NationalElectrical Code. Do not use an extension cord with thisappliance.
Before performing any service, unplug the range ordisconnect the power supply at the householddistribution panel by removing the fuse or switching offthe circuit breaker.
Be sure all packing materials are removed from therange before operating to prevent ignition of thesematerials.
Avoid scratching or impacting glass doors, cooktops orcontrol panels. Doing so may lead to glass breakage. Donot cook on a product with broken glass. Shock, fire orcuts may occur.
GENERAL SAFETY INSTRUCTIONSWARNING
WARNINGNEVER use this appliance as a space heater toheat or warm the room. Doing so may result incarbon monoxide poisoning and overheating ofthe oven.
SAVE THESE INSTRUCTIONS
Do not leave children alone or unattended in an areawhere an appliance is in use. They should never beallowed to climb, sit or stand on any part of theappliance.
Do not store items of interest to children above a rangeor on the backguard of a range-children climbing onthe range to reach items could be seriously injured.
Do not allow anyone to climb, stand or hang on theoven door, drawer or cooktop. They could damage therange or tip it over causing severe injury or death.
Never block the vents (air openings) of the range. Theyprovide the air inlets and outlets that are necessary forthe range to operate properly with correct combustion.Air openings are located at the rear of the cooktop, atthe top and bottom of the oven door, and at thebottom of the range under the warming drawer, loweroven drawer or kick panel.
Use only dry pot holders—moist or damp pot holders onhot surfaces may result in burns from steam. Do not letpot holders touch surface burners, burner grate, or ovenheating element Do not use a towel or other bulky clothin place of pot holders.
Be careful not to touch hot surfaces of the range.Potentially hot surfaces include burners, grates, cooktop,backguard, oven and door interior and crevices aroundthe oven door.
Do not heat unopened food containers. Pressure couldbuild up and the container could burst, causing aninjury.
To protect against foodborne illness, ensure thattemperatures of meat and poultry products meet orexceed the USDA minimum recommendedtemperatures for food safety. For more information see:www.isitdoneyet.gov or call the USDA meat and poultryhotline at 1-888-674-6854.

4
IMPORTANT SAFETY INFORMATION.READ ALL INSTRUCTIONS BEFORE USING.
WARNING KEEP FLAMMABLE MATERIALS AWAY FROM THE RANGEDo not store or use flammable materials in an oven ornear the cooktop, including paper, plastic, pot holders,linens, wall coverings, curtains, drapes and gasoline orother flammable vapors and liquids.Never wear loose-fitting or hanging garments while usingthe appliance. Avoid storing commonly used items incabinets above the range and be careful whenreaching over the range. Clothing in close proximity toburners or hot surfaces may ignite causing severe burns.
Do not let cooking grease or other flammable materialsaccumulate in or near the range. Grease in the oven oron the cooktop may ignite.Clean ventilating hoods frequently. Grease should notbe allowed to accumulate on the hood or filter.
WARNING
Do not use water on grease fires. Never pick up aflaming pan. Turn the controls off. Smother a flaming panon a surface burner by covering the pan completelywith a well-fitting lid, cookie sheet or flat troy. Ifnecessary, use a multipurpose dry chemical or foam-type fire extinguisher.If there is a fire in the oven during baking, turn the ovenoff and keep the door closed until the fire goes out. If
IN THE EVENT OF A FIRE, TAKE THE FOLLOWING STEPS TOPREVENT INJURY AND FIRE SPREADING:
necessary, use a multipurpose dry chemical or foamtype fire extinguisher.If there is a fire in the oven during self-clean, turn theoven off and wait for the fire to go out. Do not force thedoor open. Introduction of fresh air at self-cleantemperatures may lead to a burst of flame from theoven. Failure to follow this instruction may result in severeburns.
WARNINGNever leave the surface burners unattended at mediumor high heat settings. Foods, especially oily foods, mayignite resulting in fire that could spread to surroundingcabinets.Never leave oil unattended While frying. If allowed toheat beyond its smoking point, oil may ignite resulting infire that may spread to surrounding cabinets. Use adeep fat thermometer whenever possible to monitor oiltemperature.To avoid oil spillover and fire, use a minimum amount ofoil when shallow pan-frying and avoid cooking frozenfoods with excessive amounts of ice.Use proper pan size and avoid pans that are unstable oreasily tipped. Select cookware that is matched to thesize of the burner. Burner flames should be adjusted sothat they do not extend beyond the bottom of the panExcessive flame may be hazardous.Always use the LITE position when igniting the top burnersand make sure the burners have ignited.When using glass/ceramic cookware, make sure it issuitable for cooktop service; others may break becauseof sudden change in temperature.
COOKTOP SAFETY INSTRUCTIONS
To minimize the possibility of burns, ignition of flammablematerials and spillage, the handle of a container shouldbe turned toward the center of the range withoutextending over nearby burners.When preparing flaming foods under a hood, turn thefan on.Do not use a wok with a round metal support ring, thering may trap heat and block air to the burner resultingin a carbon monoxide hazard.Do not attempt to lift the cooktop if your range hassealed surface burners. Doing so may damage the gastubing to the surface burners resulting in a gas leak andrisk of fire.Do not use aluminum foil to cover the grates or line anypart of the cooktop. Doing so may result in carbonmonoxide poisoning, overheating of the cooktopsurfaces, or a potential fire hazard.
SAVE THESE INSTRUCTIONS
5
WARNING
WARNING
OVEN SAFETY INSTRUCTIONS
NEVER cover any slots, holes, orpassages in the oven bottom or cover an entire rack withmaterials such as aluminum foil. Doing so blocks airflowthrough the oven and may cause carbon monoxidepoisoning. Aluminum foil linings may also trap heat,causing a fire hazard.
Stand away from the range when opening the ovendoor. Hot air or steam which escapes can cause burnsto hands, face and/or eyes.Keep the oven free from grease buildup. Grease in theoven may ignite.Place oven racks in desired location while oven is cool. Ifrack must be moved while oven is hot, be careful toavoid touching hot surfaces.
Pull the oven rack to the stop-lock position when loadingand unloading food from the oven. This helps preventburns from touching hot surfaces of the door and ovenwalls.Do not leave items such as paper, cooking utensils orfood in the oven when not in use. Items stored in anoven can ignite.Do not leave items on the cooktop near the oven ventwhich is in the center of the backguard. Items mayoverheat resulting in a risk of fire or burns.When using cooking or roosting bags in the oven, followthe manufacturer’s directions.Never broil with door open. Open-door broiling is notpermitted due to overheating of control knobs.
SELF-CLEANING OVEN SAFETY INSTRUCTIONS (Some models)WARNING
Before operating the self-clean cycle, remove pans,shiny metal oven racks and other utensils from the oven.Only porcelain-coated oven racks may be left in theoven. Do not use self-clean to clean other parts, such asgrates.Before operating the self-clean cycle, wipe grease andfood soils from the oven. Excessive amount of greasemay ignite leading to smoke damage to your home.
If the self—cleaning mode malfunctions, turn the ovenoff and disconnect the power supply. Have it servicedby a qualified technician.Do not clean the door gasket. The door gasket isessential for a good seal. Care should be taken not torub, damage or move the gasket.Do not use oven cleaners. No commercial oven cleaneror oven liner protective coating of any kind should beused in or around any part of the oven.
The self-cleaning feature operates the oven at temperatures high enough to burn away food soils in the oven. Followthese instructions for safe operation.
The purpose of the warming drawer is to hold hotcooked foods at serving temperature. Bacteria will growvery rapidly in food that is between 40 and 140°F. Do notput cold food in warming drawer. Do not keep food inthe warming drawer for more than 2 hours. Failure tofollow these instructions may result in foodborne illness.Do not leave paper products, plastics, canned food orcombustible materials in the drawer. They may ignite.Do not touch the heating element or the interior surfaceof the drawer. These surfaces may be hot enough tocause burns.
WARMING DRAWER/LOWER OVEN DRAWER SAFETYINSTRUCTIONS (Some models)
WARNING
Use care when opening the drawer. Open the drawer acrack and let hot air or steam escape before removingor replacing food. Hot air or steam that escapes cancause burns to hands, face and/or eyes.Do not use aluminum foil to line the warming drawer. Foilis an excellent heat insulator and will trap heat beneathit. This will upset the performance of the drawer andpotentially cause a fire hazard.
SAVE THESE INSTRUCTIONS

6
Before Lighting a Gas Burner
Using the gas surface burners.Throughout this manual, features and appearance may vary from your model.
After Lighting a Gas BurnerMake sure all burners are in place.Make sure all grates on the range areproperly placed before using any burner.
Do not operate the burner for anextended period of time withoutcookware on the grate. The finish on thegrate may chip without cookware toabsorb the heat.Be sure the burners and grates are coolbefore you place your hand, a potholder, cleaning cloths or other materialson them.
How to Light a Gas Surface BurnerMake sure all the surface burners areplaced in their respective positions.Push the control knob in and turn it to theLITE position.You will hear a little clicking noise—thesound of the electric spark igniting theburner.Turn the knob to adjust the flame size. If theknob stays at LITE, it will continue to click.
Push the control knob in and turnit to the LITE position.
When one burner is turned to LITE, all theburners spark. Do not attempt todisassemble or clean around any burnerwhile another burner is on. An electricshock may result, which could cause youto knock over hot cookware.
How to Select Flame Size
Flames that are not covered by cookwaremay present a risk of burns or clothingignition. Never let flames extend beyondthe sides of the cookware.
Watch the flame, not the knob, as youadjust heat. When fast heating is desired,the flame size on a gas burner shouldmatch the cookware you are using.Flames larger than the bottom of thecookware will not result in faster heatingand may be hazardous.
WARNING
Aluminum: Medium-weight cookware isrecommended because it heats quicklyand evenly. Most foods brown evenly in analuminum skillet. Use saucepans with tightfitting lids when cooking with minimumamounts of water.Cast-Iron: If heated slowly, most skillets willgive satisfactory results.Enamelware: Under some conditions, theenamel of some cookware may melt.Follow cookware manufacturer’srecommendations for cooking methods.Glass: There are two types of glasscookware-those for oven use only and
Top-of-Range Cookwarethose for top-of-range cooking(saucepans, coffee and teapots). Glassconducts heat very slowly.Heatproof Glass Ceramic: Can be used foreither surface or oven cooking. It conductsheat very slowly and cools very slowly.Check cookware manufacturer’sdirections to be sure it can be used on gasranges.Stainless Steel: This metal alone has poorheating properties and is usually combinedwith copper, aluminum or other metals forimproved heat distribution. Combinationmetal skillets usually work satisfactorily ifthey are used with medium heat as themanufacturer recommends.
In Case of Power FailureIn case of a power failure, you can lightthe gas surface burners on your range witha match. Hold a lit match to the burner,then push in and turn the control knob tothe LITE position. Use extreme cautionwhen lighting burners this way.
Surface burners in use when an electricalpower failure occurs will continue tooperate normally.

7
Oven ControlYour oven is controlled by an OVEN TEMPknob. It can take up to 90 seconds beforethe flame comes on.After the oven reaches the selectedtemperature, the oven burner maintainsthe selected temperature.
Using the oven.Throughout this manual, features and appearance may vary from your model.
Power OutageThe oven or broiler cannot be lit during apower failure.If the oven is in use when a power failureoccurs, the oven burner shuts off. This isbecause the flow of gas is automaticallystopped and will not resume until power isrestored.
CAUTION When you are using a rack in thelowest position (A), you will need to usecaution when pulling the rack out. Werecommend that you pull the rack outseveral inches and then, using two potholders, pull the rack out by holding thesides of it. The rack is low and you can beburned if you put your hand in the middleof the rack and pull all the way out.
To avoid possible burns, place the shelves in the desired position before you turn the oven on.
Before you begin...The shelves have stop-locks, so that whenplaced correctly on the shelf supports (Athrough D), they will stop before comingcompletely out, and will not tilt.When placing and removing cookware,pull the shelf out to the bump on the shelfsupport.
CAUTION
To remove a shelf, pull it toward you, tilt thefront end up and pull it out.To replace, place the end of the shelf(stop-locks) on the support, tilt up the frontand push the shelf in.NOTE: The shelf is not designed to slide outat the special low shelf (A) position.
The oven has 4 shelf positions.

8
Upper Oven Vent
The type of margarine will affect baking performance!Most recipes for baking have been developed using high-fat products such as butter or margarine (80% fat). If youdecrease the fat, the recipe may not give the same results as with a higher-fat product.Recipe failure can result if cakes, pies, pastries, cookies or candies are made with low-fat spreads. The lower the fatcontent of a spread product, the more noticeable these differences become.Federal standards require products labeled "margarine" to contain at least 80% fat by weight. Low-fat spreads, on theother hand, contain less fat and more water. The high moisture content of these spreads affects the texture and flavorof baked goods. For best results with your old favorite recipes, use margarine, butter or stick spreads containing at least70% vegetable oil.
Oven Light
Plastic items on the cooktop maymelt if left too close to the vent.Vent appearance and locationvary.
Handles of pots and pans on the cooktopmay become hot if left too close to thevent.
Use the switch on the lower control panel toturn the light on or off.
Your oven is vented through ducts at therear of the range. Do not block these ductswhen cooking in the oven—it is importantthat the flow of hot air from the oven andfresh air to the oven burner beuninterrupted. Avoid touching the ventopenings or nearby surfaces during oven orbroiler operation—they may become hot.
Do not leave plastic or flammable itemson the cooktop—they may melt or igniteif left too close to the vent.Do not leave closed containers on thecooktop. The pressure in closedcontainers may increase, which maycause them to burst.Metal items will become very hot if theyare left on the cooktop, and could causeburns.
Using the oven.

9
Using the oven for baking.To avoid possible burns, place the shelves in the desired position before you turn the oven on.
How to Set the Oven For Baking1. Close the oven door. Then turn the OVEN
TEMP knob to the desired temperature.2. Check the food for doneness at the
minimum time on the recipe. Cook longerif necessary. Turn the OVEN TEMP knob toOFF and remove the food.
Oven ShelvesShelf Position
AB or CC or DB or CB or C
BB or CB or CB or C
Type of FoodAngel food cakeBiscuits, muffins or cupcakesCookiesBrowniesLayer cakesBundt or pound cakesPies or pie shellsFrozen pies (on cookie sheet)Casseroles
Place most foods in the middle ofthe oven.
Arrange the oven shelf or shelves in thedesired locations while the oven is cool. Thecorrect shelf position depends on the kind offood and the browning desired.As a general rule, place most foods in themiddle of the oven, on either the shelfposition B or C. See the chart for suggestedshelf positions.
PreheatingTo preheat, set the oven atthe correct temperature—selecting a highertemperature does not shortenthe preheat time.
Preheat the oven for 10 minutes if the recipecalls for it. Preheat means bringing the ovenup to the specified temperature beforeputting the food in the oven.
Preheating is necessary for good resultswhen baking cakes, cookies, pastry andbreads. For most casseroles and roasts,preheating is not necessary.
Baking Pans
Glass baking dishes also absorb heat.When baking in glass baking dishes, lowerthe temperature by 25°F and use therecommended cooking time in therecipe. This is not necessary when bakingpies or casseroles.
Use the proper baking pan. The type of finishon the pan determines the amount ofbrowning that will occur.
Dark, rough or dull pans absorb heatresulting in a browner, crisper crust. Usethis type for pies.Shiny, bright and smooth pans reflectheat, resulting in a lighter, more delicatebrowning. Cakes and cookies require thistype of pan.
Pan PlacementFor even cooking and proper browning,there must be enough room for aircirculation in the oven. Baking results will bebetter if baking pans are centered as muchas possible rather than being placed to thefront or to the back of the oven.
Pans should not touch each other or thewalls of the oven. Allow 1 to 1 1/2 inch spacebetween pans as well as from the back ofthe oven, the door and the sides.If you need to use two shelves, stagger thepans so one is not directly above the other.
10
Using the oven for baking.
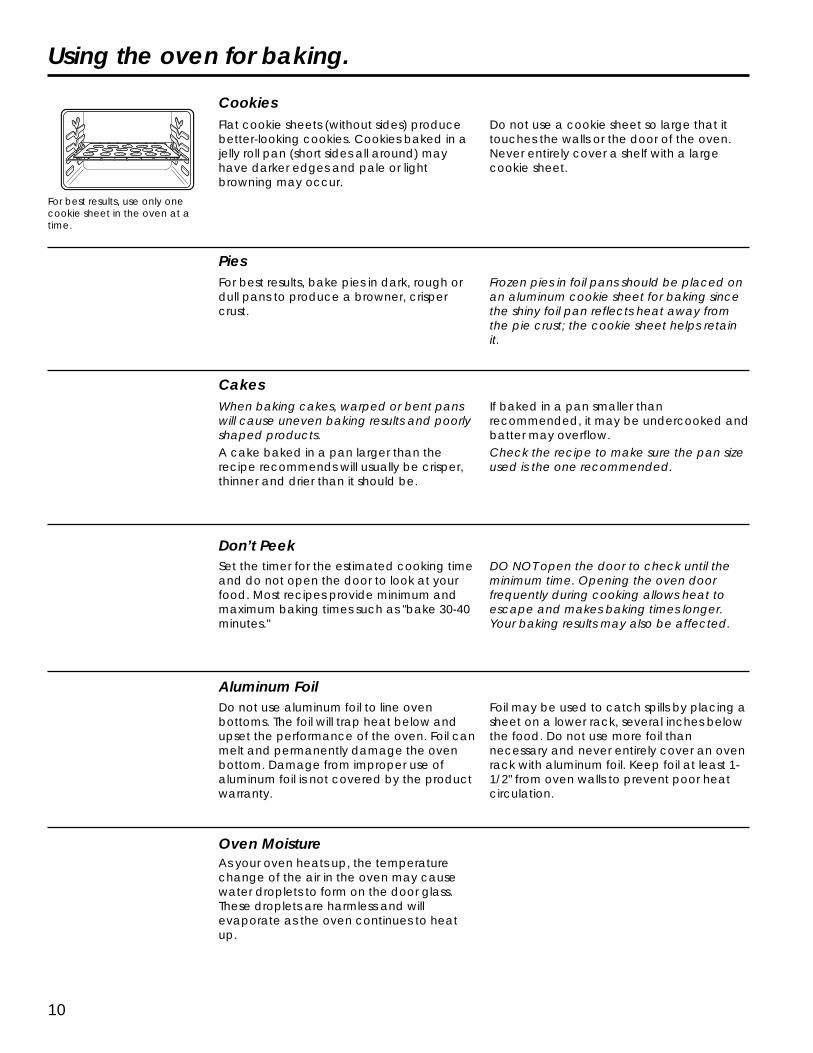
CookiesFlat cookie sheets (without sides) producebetter-looking cookies. Cookies baked in ajelly roll pan (short sides all around) mayhave darker edges and pale or lightbrowning may occur.
For best results, use only onecookie sheet in the oven at atime.
Do not use a cookie sheet so large that ittouches the walls or the door of the oven.Never entirely cover a shelf with a largecookie sheet.
PiesFor best results, bake pies in dark, rough ordull pans to produce a browner, crispercrust.
Frozen pies in foil pans should be placed onan aluminum cookie sheet for baking sincethe shiny foil pan reflects heat away fromthe pie crust; the cookie sheet helps retainit.
Cakes
Set the timer for the estimated cooking timeand do not open the door to look at yourfood. Most recipes provide minimum andmaximum baking times such as "bake 30-40minutes."
Don’t PeekDO NOT open the door to check until theminimum time. Opening the oven doorfrequently during cooking allows heat toescape and makes baking times longer.Your baking results may also be affected.
When baking cakes, warped or bent panswill cause uneven baking results and poorlyshaped products.A cake baked in a pan larger than therecipe recommends will usually be crisper,thinner and drier than it should be.
If baked in a pan smaller thanrecommended, it may be undercooked andbatter may overflow.Check the recipe to make sure the pan sizeused is the one recommended.
Aluminum Foil
Oven MoistureAs your oven heats up, the temperaturechange of the air in the oven may causewater droplets to form on the door glass.These droplets are harmless and willevaporate as the oven continues to heatup.
Do not use aluminum foil to line ovenbottoms. The foil will trap heat below andupset the performance of the oven. Foil canmelt and permanently damage the ovenbottom. Damage from improper use ofaluminum foil is not covered by the productwarranty.
Foil may be used to catch spills by placing asheet on a lower rack, several inches belowthe food. Do not use more foil thannecessary and never entirely cover an ovenrack with aluminum foil. Keep foil at least 1-1/2" from oven walls to prevent poor heatcirculation.

11
1. Place the shelf in the A or B position. Nopreheating is necessary.
2. Check the weight of the meat. Place it fatside up (or for poultry, breast-side-up) ona roasting rack in a shallow pan. Themelting fat will baste the meat. Select apan as close to the size of the meat aspossible. Line the pan with aluminum foilwhen using the pan for marinating,cooking with fruits, cooking heavily curedmeats or basting food during cooking.
Using the oven for roasting.Roasting is cooking by dry heat. Tender meat or poultry can be roasted uncovered in your oven. Roasting temperatures,which should be low and steady, keep spattering to a minimum.
Roasting is really a baking procedure used for meats. Roasting is easy just follow these directions:
How to Set the Oven For Roasting
Place the shelf in the A or Bposition.
3. Turn the OVEN TEMP knob to the desiredsetting.
4. After roasting is complete, turn the OVENTEMP knob to OFF and then remove thefood from the oven.
Adjust the oven thermostat—Easy to do yourself!
1. Pull the OVEN TEMP knob off the rangeand look at the back side.To make an adjustment, loosen(approximately one turn), but do notcompletely remove, the two screws onthe back of the knob.
2. With the back of the knob facing you,hold the outer edge of the knob with onehand and turn the front of the knob withthe other hand.To increase the oven temperature, movethe top screw toward the right. You’ll heara click for each notch you move theknob.To decrease the oven temperature, movethe top screw toward the left.
You may find that your new oven cooks differently than the one it replaced. Use your new oven for a few weeks tobecome more familiar with it. If you still think your new oven is too hot or too cold, you can adjust the thermostatyourself.Do not use thermometers, such as those found in grocery stores, to check the temperature setting of your oven. Thesethermometers may vary 20-40°F.NOTE: This adjustment will not affect the broiling temperatures. The adjustment will be retained in memory after a powerfailure.
To Adjust the Thermostat with this Type of Knob
������������
������ �
��������
� ��
��
Front of OVEN TEMP knob (knobappearance may vary)
Back of OVEN TEMP knob
Each click will change the oventemperature approximately 10°F. (Rangeis plus or minus 60°F from the arrow.) Wesuggest that you make the adjustmentone click from the original setting andcheck oven performance before makingany additional adjustments.
3. After the adjustment is made, retightenscrews so they are snug, but be carefulnot to overtighten.
4. Replace the knob, matching the flat areaof the knob to the shaft, and checkperformance.

12
Using the oven for broiling.
How to Set the Broiler CompartmentBroiling is cooking food by direct heat fromabove the food. Most fish and tender cutsof meat can be broiled. Follow thesedirections to keep spattering and smokingto a minimum.
Your range has a compartment below theoven for broiling.
Both the oven and broiler compartmentdoors must be closed during broiling.
Turn most foods once during cooking (theexception is thin fillets of fish; oil one side,place that side down on broiler grid andcook without turning until done). Timefoods for about one-half the total cookingtime, turn food, then continue to cook topreferred doneness.
1. You can change the distance of thefood from the heat source by positioningthe broiler pan and grid on one of threerack positions in the broilercompartment—A (bottom of broilercompartment), B (middle) and C (top).
2. Preheating the broiler or oven is notnecessary and can produce poorresults.
3. If meat has fat or gristle around theedge, cut vertical slashes through bothabout 2" apart. If desired, the fat may betrimmed, leaving a layer about 1/8"thick.
4. Arrange the food on the grid andposition the broiler pan on theappropriate rack in the oven or broilingcompartment. Placing food closer to theflame increases exterior browning of thefood, but also increases spattering andthe possibility of fats and meat juicesigniting.
5. Close the oven and broiler compartmentdoor.
6. Turn the OVEN CONTROL knob to BROIL.
7. When broiling is finished, turn the OVENCONTROL knob to OFF. Remove thebroiler pan from the broilercompartment and serve the foodimmediately. Leave the pan outside therange to cool.

13
Using the oven for broiling.
Aluminum FoilYou can use aluminum foil to line your broilerpan and broiler grid. However, you mustmold the foil tightly to the grid and cut slits init just like the grid.
Broiling Compartment Guide Suggestions
USDA recommends the following minimum safe internal temperatures:• Raw beef, pork, lamb, and veal steaks or chops: 145°F as measured with a food
thermometer before removing meat from the heat source. For safety and quality, allowmeat to rest for at least three minutes before carving or consuming.
• Raw ground beef, pork, lamb or veal: 160°F as measured with a food thermometer.• Poultry: 165°F as measured with a food thermometerFor more information see: www.isitdoneyet.gov or call the USDA meat and poultry hotline at1-888-674-6854.
Both the oven and broiler compartmentdoors must be closed during broiling.
Always use the broiler pan and grid thatcomes with your range. It is designed tominimize smoking and spattering bytrapping juices in the shielded lower partof the pan.For steaks and chops, slash fat evenlyaround the outside edges of the meat. Toslash, cut crosswise through the outer fatsurface just to the edge of the meat. Usetongs to turn the meat over to preventpiercing the meat and losing juices.
If desired, marinate meats or chickenbefore broiling. Or brush with barbecuesauce last 5-10 minutes only.When arranging the food on the pan, donot let fatty edges hang over the sidesbecause dripping fat could soil the oven.The broiler compartment does not needto be preheated. However, for very thinfoods, or to increase browning, preheat ifdesired.Frozen steaks can be broiled bypositioning the rack at the next lowestrack position and increasing the cookingtime given in this guide 1 1/2 times perside.

14
Care and cleaning of the range.Be sure electrical power is off and all surfaces are cool before cleaning any part of the range.
If your range is removed for cleaning, servicing or any reason, be sure the anti-tip device isreengaged properly when the range is replaced. Failure to take this precaution couldresult in tipping of the range and cause injury.To check if the bracket is installed and engaged properly, carefully tip the range forward.The bracket should stop the range within 4 inches. If it does not, the bracket must bereinstalled.If the range is pulled from the wall for any reason, always repeat this procedure to verifythe range is properly secured by the anti-tip bracket.If your range has no anti-tip bracket, call 1.800.932.4267 to receive one at no cost.
WARNING
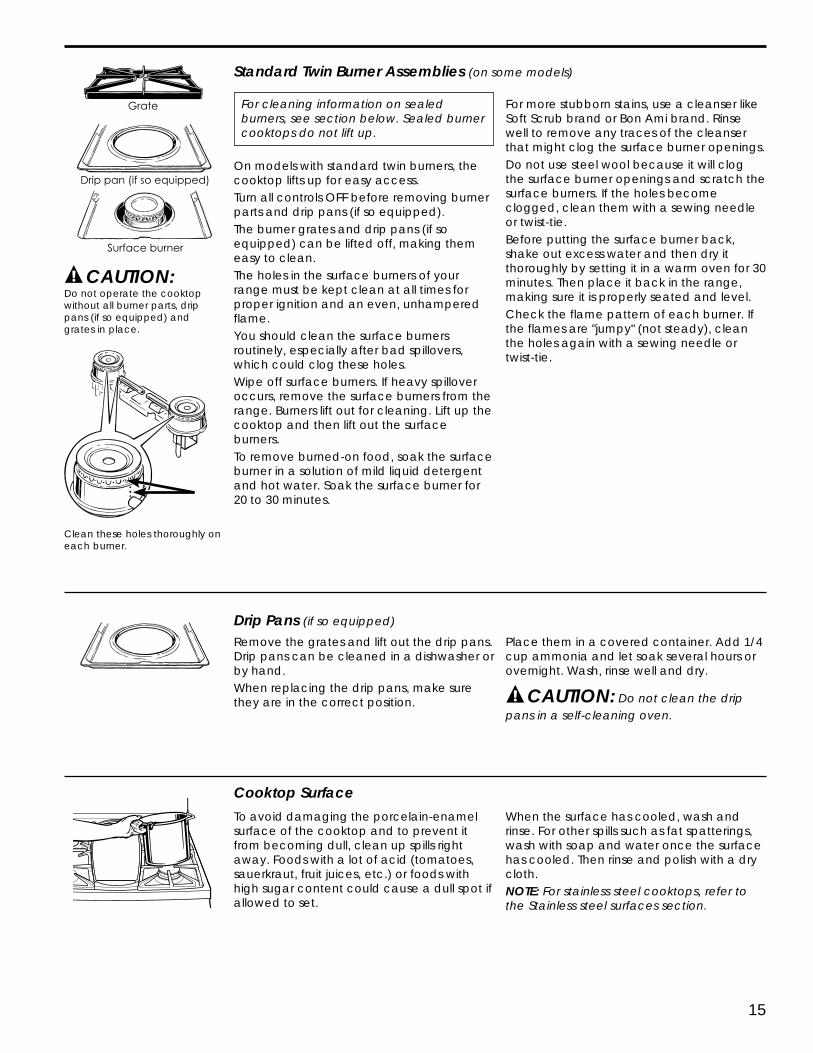
Lift-Up Cooktop (on models with standard twin burners)
Clean the area under the cooktop often.Built-up soil, especially grease, may catchon fire.To make cleaning easier, the cooktop maybe lifted up.NOTE: Do not lift the cooktop on sealedburner models. Lifting the cooktop can leadto damage and improper operation of therange.To raise the cooktop:1. Be sure the burners are turned off.2. Remove the grates.3. Grasp the two front burner wells and lift
up.
Clean under the cooktop with hot, soapywater and a clean cloth. If you removedyour surface burners while cleaning, makesure they are properly seated whenreplacing them.After cleaning, lower the cooktop (becareful not to pinch your fingers).Some models have dual support
rods that will hold the cooktopup while you clean underneathit.
Your range has two or three professional-style double grates. These grates are positionspecific. For maximum stability, these gratesshould only be used in their proper position;they cannot be interchanged left to right orfront to back. For convenience, theundersides of the left and right grates aremarked "LEFT FRONT" and "RIGHT FRONT."Make sure the front portion of both grates isin front. The middle grate has a bow in front.Make sure the bowed portion is toward thefront of the range. In addition, the middlegrate is supported by the left and rightgrates and must be installed LAST for stability.CleaningLift out when cool. Grates should be washedregularly and, of course, after spillovers.Wash them in hot, soapy water and rinsewith clean water. When replacing thegrates, be sure they are positioned securelyover the burners.
Burner GratesReplace the grates so that continuous arcsare formed with the center ribs of all threegrates.Do not operate a burner for an extendedperiod of time without cookware on thegrate. The finish on the grate may chipwithout cookware to absorb the heat.To get rid of burned-on food, place thegrates in a covered container. Add 1/4 cupammonia and let them soak several hours orovernight. Wash, rinse well and dry.Although they are durable, the grates willgradually lose their shine, regardless of thebest care you can give them. This is due totheir continual exposure to hightemperatures. You will notice this sooner withlighter color grates.NOTE: Do not clean the grates in a self-cleaning oven.
15
�����
������� ���������
��� ���������
Standard Twin Burner Assemblies (on some models)
On models with standard twin burners, thecooktop lifts up for easy access.Turn all controls OFF before removing burnerparts and drip pans (if so equipped).The burner grates and drip pans (if soequipped) can be lifted off, making themeasy to clean.The holes in the surface burners of yourrange must be kept clean at all times forproper ignition and an even, unhamperedflame.You should clean the surface burnersroutinely, especially after bad spillovers,which could clog these holes.Wipe off surface burners. If heavy spilloveroccurs, remove the surface burners from therange. Burners lift out for cleaning. Lift up thecooktop and then lift out the surfaceburners.To remove burned-on food, soak the surfaceburner in a solution of mild liquid detergentand hot water. Soak the surface burner for20 to 30 minutes.
For cleaning information on sealedburners, see section below. Sealed burnercooktops do not lift up.
For more stubborn stains, use a cleanser likeSoft Scrub brand or Bon Ami brand. Rinsewell to remove any traces of the cleanserthat might clog the surface burner openings.Do not use steel wool because it will clogthe surface burner openings and scratch thesurface burners. If the holes becomeclogged, clean them with a sewing needleor twist-tie.Before putting the surface burner back,shake out excess water and then dry itthoroughly by setting it in a warm oven for 30minutes. Then place it back in the range,making sure it is properly seated and level.Check the flame pattern of each burner. Ifthe flames are "jumpy" (not steady), cleanthe holes again with a sewing needle ortwist-tie.
CAUTION:
Clean these holes thoroughly oneach burner.
Do not operate the cooktopwithout all burner parts, drippans (if so equipped) andgrates in place.
Drip Pans (if so equipped)
Remove the grates and lift out the drip pans.Drip pans can be cleaned in a dishwasher orby hand.When replacing the drip pans, make surethey are in the correct position. CAUTION: Do not clean the drip
pans in a self-cleaning oven.
Place them in a covered container. Add 1/4cup ammonia and let soak several hours orovernight. Wash, rinse well and dry.
Cooktop SurfaceTo avoid damaging the porcelain-enamelsurface of the cooktop and to prevent itfrom becoming dull, clean up spills rightaway. Foods with a lot of acid (tomatoes,sauerkraut, fruit juices, etc.) or foods withhigh sugar content could cause a dull spot ifallowed to set.
When the surface has cooled, wash andrinse. For other spills such as fat spatterings,wash with soap and water once the surfacehas cooled. Then rinse and polish with a drycloth.NOTE: For stainless steel cooktops, refer tothe Stainless steel surfaces section.
16
Care and cleaning of the range.
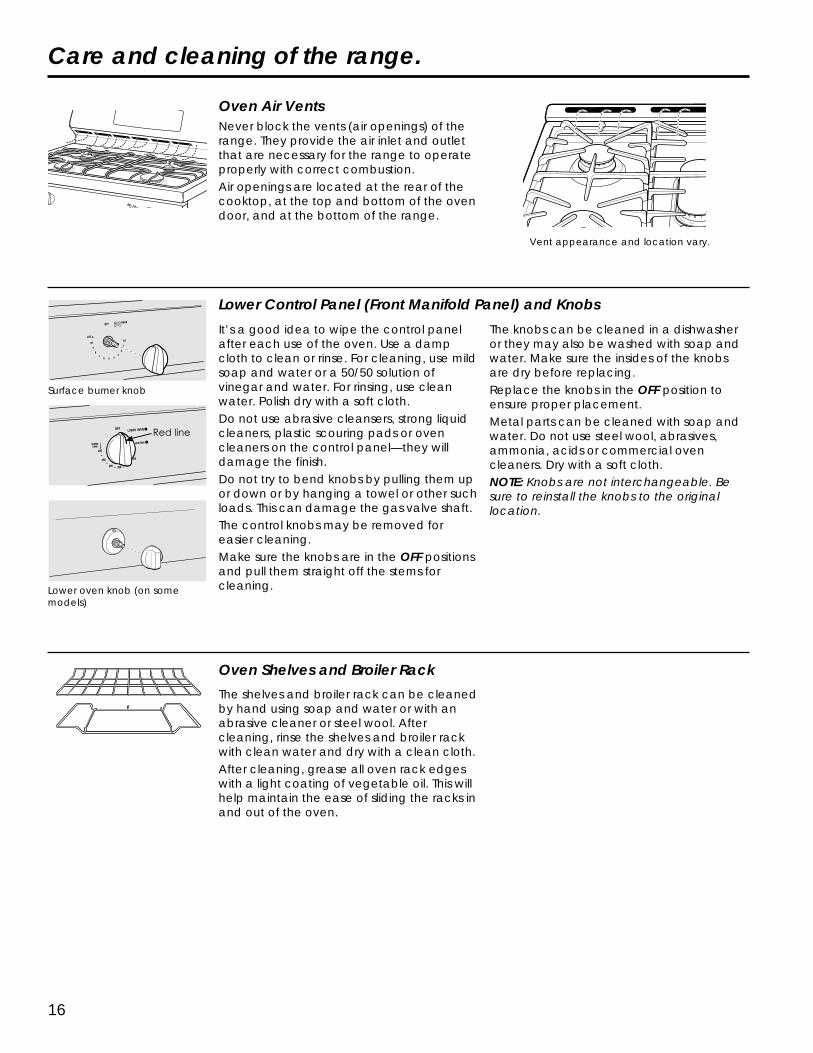
Oven Air Vents
Vent appearance and location vary.
Never block the vents (air openings) of therange. They provide the air inlet and outletthat are necessary for the range to operateproperly with correct combustion.Air openings are located at the rear of thecooktop, at the top and bottom of the ovendoor, and at the bottom of the range.
Lower Control Panel (Front Manifold Panel) and KnobsIt’s a good idea to wipe the control panelafter each use of the oven. Use a dampcloth to clean or rinse. For cleaning, use mildsoap and water or a 50/50 solution ofvinegar and water. For rinsing, use cleanwater. Polish dry with a soft cloth.Do not use abrasive cleansers, strong liquidcleaners, plastic scouring pads or ovencleaners on the control panel—they willdamage the finish.Do not try to bend knobs by pulling them upor down or by hanging a towel or other suchloads. This can damage the gas valve shaft.The control knobs may be removed foreasier cleaning.Make sure the knobs are in the OFF positionsand pull them straight off the stems forcleaning.Lower oven knob (on some
models)
Surface burner knob
The knobs can be cleaned in a dishwasheror they may also be washed with soap andwater. Make sure the insides of the knobsare dry before replacing.Replace the knobs in the OFF position toensure proper placement.Metal parts can be cleaned with soap andwater. Do not use steel wool, abrasives,ammonia, acids or commercial ovencleaners. Dry with a soft cloth.NOTE: Knobs are not interchangeable. Besure to reinstall the knobs to the originallocation.
�������
Oven Shelves and Broiler RackThe shelves and broiler rack can be cleanedby hand using soap and water or with anabrasive cleaner or steel wool. Aftercleaning, rinse the shelves and broiler rackwith clean water and dry with a clean cloth.After cleaning, grease all oven rack edgeswith a light coating of vegetable oil. This willhelp maintain the ease of sliding the racks inand out of the oven.

17
Removable Oven BottomTo replace:1. Grasp each side of the oven bottom and
guide its rear tabs into the slots in theback of the oven.
2. Lower the oven bottom and pull it forwarduntil it is secure under the front oven flooredge.
3. On models so equipped, replace theknurled screw in the front of the ovenbottom.
NOTE: If the oven bottom is replacedincorrectly, it may warp and causeundesirable baking results.
To remove:1. On models so equipped, remove the
knurled screw in the front of the ovenbottom.
2. Grasp each side of the oven bottom andpush it back.
3. Lift the front up and pull it out of the oven.
First remove the shelves from the oven. Theoven bottom lifts from the front.
��������������������������
Oven BottomThe oven bottom has a porcelain-enamelfinish. To make cleaning easier, protect theoven bottom from excessive spillovers byplacing a cookie sheet on the rack belowthe rack you are cooking on. This isparticularly important when baking a fruitpie or other foods with a high acid content.Hot fruit fillings or other foods that are highlyacidic (such as tomatoes, sauerkraut and
sauces with vinegar or lemon juice) maycause pitting and damage to the porcelain-enamel surface and should be wiped upimmediately.To clean up spillovers, use soap and water,an abrasive cleaner or soap-filled scouringpad. Rinse well to remove any soap beforeselfcleaning.
Broiler CompartmentTo replace the broiler pan:1. Slide the broiler pan onto the rack and
push both the broiler pan and the rack allthe way into the broiler compartment.
2. Close the broiler door.If a spillover occurs in the broilercompartment, allow the compartment tocool first. You can clean the compartmentwith soap and water, a mild abrasivecleanser, soap-filled scouring pads or anoven cleaner following package directions.
The broiler pan is held in place in the broilerrack.To remove the broiler pan:1. Gently pull forward on the drop down
broiler door.2. Pull the broiler rack with pan forward until
the rack stops. Grasp the broiler pan andremove it from the broiler rack.

18
Care and cleaning of the range.Broiler Pan and GridAfter broiling, remove the broiler pan fromthe oven. Remove the grid from the pan.Carefully pour out grease from the pan intoa proper container. Wash and rinse thebroiler pan and grid in hot water with asoap-filled or plastic scouring pad.
If food has burned on, sprinkle the grid withdetergent while hot and cover with wetpaper towels or a dishcloth. Soaking the panwill remove burned on foods.Do not store a soiled broiler pan and gridanywhere in the range.
The gasket is designed with agap at the bottom to allow forproper air circulation.Do not rub or clean the doorgasket—it has an extremely lowresistance to abrasion.If you notice the gasketbecoming worn, frayed ordamaged in any way or if it hasbecome displaced on the door,you should have it replaced.
��� �����
����
To clean the outside of the door:
TO CLEAN THE DOOR:
Do not allow excess water to run into anyholes or slots in the door.Wipe dishwashing detergent over anybaked-on spatters on the glass. Use asingle sided safety razor blade to clean itoff. Then wipe over the glass with a soapycloth to remove any residue and dry off.The area outside the gasket can becleaned with a soap-filled plastic scouringpad.
To clean the inside of the door:
Use soap and water to thoroughly cleanthe top, sides and front of the oven door.Rinse well. You may also use a glasscleaner to clean the glass on the outsideof the door.Spillage of marinades, fruit juices, tomatosauces and basting materials containingacids may cause discoloration and shouldbe wiped up immediately. When thesurface is cool, clean and rinse.Do not use oven cleaners, cleansingpowders or harsh abrasives on the outsideof the door.
Lift-Off Oven Door
To replace the door:1. Firmly grasp both sides of the door at the
top.2. Insert and seat the upper and lower hinge
arms into the oven slots.3. Push the hinge locks down from the hinge
hooks.4. Close the oven door and make sure it is
working properly. If it is not workingproperly, remove and replace it followingthe above steps.
DO NOT ATTEMPT TO CLOSE THE DOOR UNTILTHIS STEP IS COMPLETE. THE HINGE OR DOORCOULD BE DAMAGED.
To remove the door:1. Open the door to the full open position.2. Pull the hinge locks up over the hinge
hooks on both sides. You may need to usea flat-blade screwdriver to lift hinge locksup.
3. Grasp the door firmly on each side, liftslightly and pull it straight out and awayfrom the oven.
The oven door is removable, but it is heavy.You may need help removing and replacingthe door.
!��"�� ���� �����
"�� ����

19
Porcelain Oven InteriorWith proper care, the porcelain enamelfinish on the inside of the oven will stay new-looking for years.Let the range cool before cleaning.We recommend that you wear rubbergloves when cleaning the range.Soap and water will normally do the job.Heavy spattering or spillovers may requirecleaning with a mild abrasive cleaner.Soapy, wet metal pads may also be used.Do not allow food spills with a high sugar oracid content (such as tomatoes, sauerkraut,fruit juices or pie filling) to remain on thesurface. They may cause a dull spot evenafter cleaning.Household ammonia may make thecleaning job easier. Place 1/2 cup in ashallow glass or pottery container in a coldoven overnight. The ammonia fumes willhelp loosen the burned-on grease and food.
If necessary, you may use an oven cleaner.Follow package directions.
Cautions about using spray-on oven cleaners:Do not spray on the electrical controlsand switches because it could cause ashort circuit and result in sparking or fire.Do not allow a film from the cleaner tobuild up on the temperature sensor-itcould cause the oven to heat improperly.(The sensor is located at the top of theoven.) Carefully wipe the sensor cleanafter each oven cleaning, being carefulnot to move the sensor as a change in itsposition could affect how the ovenbakes.Do not spray any oven cleaner on theoutside of the oven door, handles or anyexterior surface of the oven, wood orpainted surfaces. The cleaner candamage these surfaces.
Painted SurfacesPainted surfaces include the sides, controlpanel and door. Clean these with soap andwater or a vinegar and water solution.
Do not use commercial oven cleaners,cleansing powders, steel wool or harshabrasives on any painted surface.
Shock or Burn Hazard: Before replacing oven light bulb, disconnect the electrical power to therange at the main fuse or circuit breaker panel. Failure to do so may result in electric shock or burn.WARNING
Oven Light Replacement (on some models)Be sure to let the light cover and bulb coolcompletely.To remove the cover:1. Twist lens counterclockwise about a
quarter turn to remove.Do not remove any screws to remove thecover.
2. Replace bulb with a 40-watt appliancebulb or two-prong halogen bulb, asappropriate.
To replace the cover:1. Line up tabs of lens in front of tabs on
housing and rotate clockwise to engage.
To remove:1. Hold a hand under the cover so it doesn’t
fall when released. With fingers of thesame hand, firmly push back the wirecover holder. Lift off the cover.
CAUTIONOven Light Replacement (on some models)
Before replacing your oven light bulb,disconnect the electrical power to therange at the main fuse or circuit breakerpanel. Be sure to let the light cover and bulbcool completely.
The oven light bulb is covered with aremovable glass cover that is held in placewith a bail-shaped wire. Remove the ovendoor, if desired, to reach cover easily.
Do not remove any screws to remove thecover.
2. Do not touch hot bulb with a wet cloth.Replace bulb with a 40-watt householdappliance bulb.
To replace cover:1. Place it into the groove of the light
receptacle. Pull the wire forward to thecenter of the cover until it snaps intoplace. When in place, the wire holds thecover firmly. Be certain the wire is in thedepression in the center of the cover.
2. Connect electrical power to the range.
#��������"�����
20
$"����������������
%���&����������������
$�������������
$�������"���'����� ��������
(��&�������)������������"
�����
�����*���������
InstallationInstructions
Range
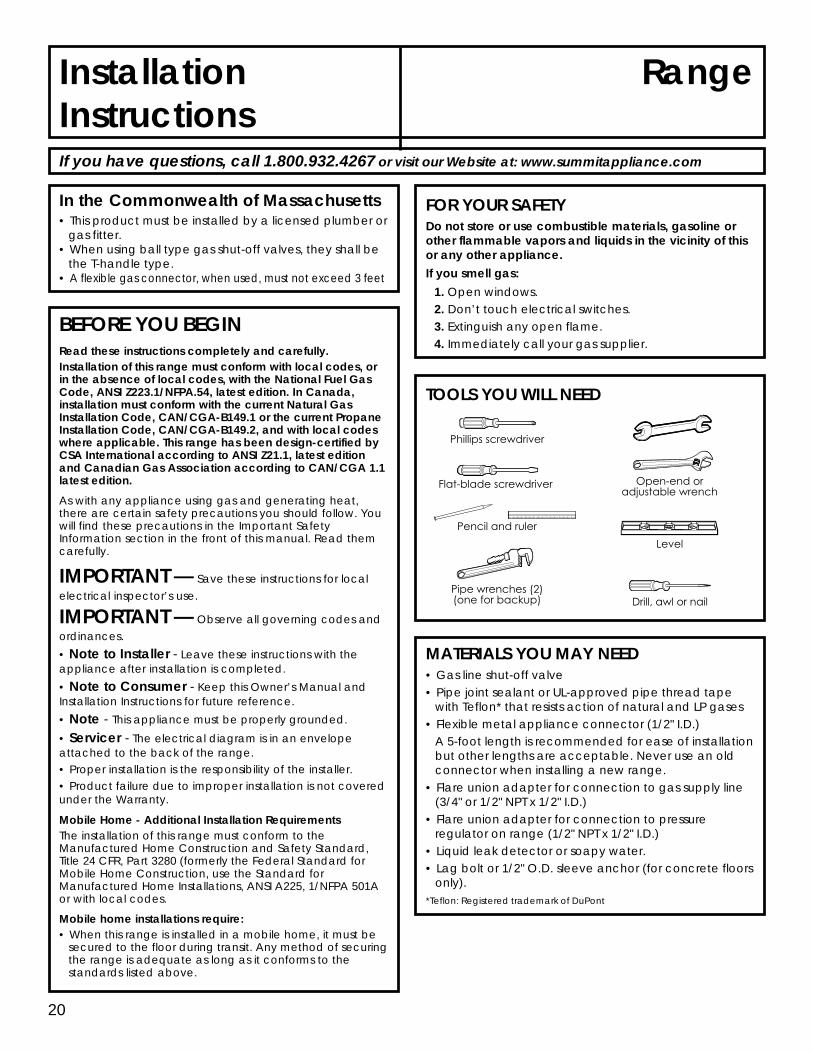
If you have questions, call 1.800.932.4267 or visit our Website at: www.summitappliance.com
• This product must be installed by a licensed plumber orgas fitter.
• When using ball type gas shut-off valves, they shall bethe T-handle type.
• A flexible gas connector, when used, must not exceed 3 feet
In the Commonwealth of Massachusetts FOR YOUR SAFETY
Mobile Home - Additional Installation RequirementsThe installation of this range must conform to theManufactured Home Construction and Safety Standard,Title 24 CFR, Part 3280 (formerly the Federal Standard forMobile Home Construction, use the Standard forManufactured Home Installations, ANSI A225, 1/NFPA 501Aor with local codes.
IMPORTANT — Save these instructions for localelectrical inspector’s use.
IMPORTANT — Observe all governing codes andordinances.• Note to Installer - Leave these instructions with theappliance after installation is completed.• Note to Consumer - Keep this Owner’s Manual andInstallation Instructions for future reference.• Note - This appliance must be properly grounded.• Servicer - The electrical diagram is in an envelopeattached to the back of the range.• Proper installation is the responsibility of the installer.• Product failure due to improper installation is not coveredunder the Warranty.
As with any appliance using gas and generating heat,there are certain safety precautions you should follow. Youwill find these precautions in the Important SafetyInformation section in the front of this manual. Read themcarefully.
BEFORE YOU BEGINRead these instructions completely and carefully.Installation of this range must conform with local codes, orin the absence of local codes, with the National Fuel GasCode, ANSI Z223.1/NFPA.54, latest edition. In Canada,installation must conform with the current Natural GasInstallation Code, CAN/CGA-B149.1 or the current PropaneInstallation Code, CAN/CGA-B149.2, and with local codeswhere applicable. This range has been design-certified byCSA International according to ANSI Z21.1, latest editionand Canadian Gas Association according to CAN/CGA 1.1latest edition.
Mobile home installations require:• When this range is installed in a mobile home, it must be
secured to the floor during transit. Any method of securingthe range is adequate as long as it conforms to thestandards listed above.
Do not store or use combustible materials, gasoline orother flammable vapors and liquids in the vicinity of thisor any other appliance.
1. Open windows.2. Don’t touch electrical switches.3. Extinguish any open flame.4. Immediately call your gas supplier.
If you smell gas:
TOOLS YOU WILL NEED
MATERIALS YOU MAY NEED
*Teflon: Registered trademark of DuPont
• Gas line shut-off valve• Pipe joint sealant or UL-approved pipe thread tape
with Teflon* that resists action of natural and LP gases• Flexible metal appliance connector (1/2" I.D.)
A 5-foot length is recommended for ease of installationbut other lengths are acceptable. Never use an oldconnector when installing a new range.
• Flare union adapter for connection to gas supply line(3/4" or 1/2" NPT x 1/2" I.D.)
• Flare union adapter for connection to pressureregulator on range (1/2" NPT x 1/2" I.D.)
• Liquid leak detector or soapy water.• Lag bolt or 1/2" O.D. sleeve anchor (for concrete floors
only).

21
Installation Instructions
WARNINGINSTALLATION SAFETYINSTRUCTIONSRead these instructions completely and carefully. Failureto follow these instructions can result in electrical shock,fire, serious injury, or death.
Improper installation, adjustment, alteration, serviceor maintenance can cause injury or propertydamage. Refer to this manual. For assistance oradditional information, consult a qualified installer,service agency, manufacturer (dealer) or the gassupplier.
Never reuse old flexible connectors. The use of oldflexible connectors can cause gas leaks and personalinjury. Always use NEW flexible connectors wheninstalling a gas appliance.
Leak testing of the appliance shall be conductedaccording to the manufacturer instructions.
Remove all packing material and literature from ovenbefore connecting gas and electrical supply torange.
Do not attempt to operate the oven of this rangeduring a power failure (Electric Ignition models only).
Have your range installed by a qualified installer.
Your range must be electrically grounded inaccordance with local codes or, in the absence oflocal codes, in accordance with the NationalElectrical Code (ANSI/NFPA 70, latest edition). InCanada, electrical grounding must be inaccordance with the current CSA C22.1 CanadianElectrical Code Part 1 and/or local codes. SeeElectrical Connections in this section.
Before installing your range on linoleum or any othersynthetic floor covering, make sure the floor coveringcan withstand 180°F without shrinking, warping ordiscoloring. Do not install the range over carpetingunless a sheet of 1/4" thick plywood or similar insulatoris placed between the range and carpeting.
Make sure the cabinets, floor, and wall coveringsaround the range can withstand heat generated bythe range up to 200°F.
Avoid placing cabinets above the range. To reducethe hazard caused by reaching over the open flamesof operating burners, install a ventilation hood overthe range that projects forward at least 5" beyondthe front of the cabinets.
The ventilating hood must be constructed of sheetmetal not less than 0.0122" thick. Install above thecooktop with a clearance of not less than 1/4"between the hood and the underside of thecombustible material or metal cabinet. The hoodmust be at least as wide as the appliance andcentered over the appliance. Clearance betweenthe cooking surface and the ventilation hood surfaceMUST NEVER BE LESS THAN 24".
EXCEPTION: Installation of a listed microwave oven orcooking appliance over the cooktop shall conform tothe installation instructions packed with that appliance.
If cabinets are placed above the range, allow aminimum clearance of 30" between the cookingsurface and the bottom of unprotected cabinets.
If a 30" clearance between cooking surface andoverhead combustible material or metal cabinetscannot be maintained, protect the underside of thecabinets above the cooktop with not less than 1/4"insulating millboard covered with sheet metal not lessthan 0.0122" thick. Clearance between the cookingsurface and protected cabinets MUST NEVER BE LESSTHAN 24".
The vertical distance from the plane of the cookingsurface to the bottom of adjacent overheadcabinets extending closer than 1" to the plane of therange sides must not be less than 18". (See theDimensions and Clearances illustration in this section.)

22
+,-.'/
0�����',/#���'+/#���
�
12/
3',/'+/
4',1.5/'+1.5/
6'/'/
�+-/+-/
�
0�����������������"������� ��� ������12/"�� "�
�0������
���
�
�0���������������������"������� ��� �
���
0�7�������" ���������������
����������
��
%������ �� �"���� ��������� ������ ����"��������8
� �
9��������������������������"���� �����
��
Installation Instructions
DIMENSIONS AND CLEARANCESProvide adequate clearances between the range and adjacent combustible surfaces. These dimensions must be metfor safe use of your range.The range may be placed with 0" clearance below cooktop and at the back wall.

23
Installation Instructions
LOCATIONDo not locate the range where it may be subject tostrong drafts. Any openings in the floor or wall behind therange should be sealed. Make sure the openingsaround the base of the range that supply fresh air forcombustion and ventilation are not obstructed bycarpeting or woodwork.
Your range, like many other household items, is heavyand can settle into soft floor coverings such ascushioned vinyl or carpeting. Use care when moving therange on this type of flooring. It is recommended thatthe following simple and inexpensive instructions befollowed to protect your floor.
The range should be installed on a sheet of plywood (orsimilar material). When the floor covering ends at thefront of the range, the area that the range will rest onshould be built up with plywood to the same level orhigher than the floor covering.
This will allow the range to be moved for cleaning orservicing. Also, make sure your floor covering willwithstand 180°F. (Seethe Installation Safety Instructionssection.)
Make sure the cabinets and wall coverings around yourrange can withstand the heat generated (up to 200°F)by the range. (See the Installation Safety Instructionssection.)
IMPORTANT!Remove all tape and packaging. Make sure the burnersare properly seated and level.
Take the accessory pack out of the oven and/ordrawer.
Check to be sure that no range parts have come looseduring shipping.
PROVIDE ADEQUATE GAS SUPPLYYour range is designed to operate at a pressure of 5" ofwater column on natural gas or, if designed for LP gas(propane or butane), 10" of water column.
Make sure you are supplying your range with the type ofgas for which it is designed.
This range is convertible for use on natural or propanegas. If you decide to use this range on LP gas,conversion must be made by a qualified LP installerbefore attempting to operate the range on that gas.
For proper operation, the pressure of natural gassupplied to the regulator must be between 6" and 13" ofwater column.
For LP gas, the pressure supplied must be between 11"and 13" of water column.
When checking for proper operation of the regulator,the inlet pressure must be at least 1" greater than theoperating (manifold) pressure as given above.
The pressure regulator located at the inlet of the rangemust remain in the supply line regardless of whethernatural or LP gas is being used.
A flexible metal appliance connector used to connectthe range to the gas supply line should have an I.D. of 1/2" and be 5 feet in length for ease of installation. InCanada, flexible connectors must be single wall metalconnectors no longer than 6 feet in length.
1

24
Installation Instructions
Shut off the main gas supply valve before disconnectingthe old range and leave it off until the new hook-up hasbeen completed. Don’t forget to relight the pilot on othergas appliances when you turn the gas back on.
Because hard piping restricts movement of the range,the use of a CSA International-certified flexible metalappliance connector is recommended unless localcodes require a hard-piped connection.
Never use an old connector when installing a newrange. If the hard piping method is used, you mustcarefully align the pipe; the range cannot be movedafter the connection is made.
To prevent gas leaks, put pipe joint compound on, orwrap pipe thread tape with Teflon* around, all male(external) pipe threads.
A. Install a manual gas line shut-off valve in the gas linein an easily accessed location outside of the range.Make sure everyone operating the range knowswhere and how to shut off the gas supply to therange.
B. Install male 1/2" flare union adapter to the 1/2" NPTinternal thread at inlet of regulator. Use a backupwrench on the regulator fitting to avoid damage.
When installing the range from the front, remove the90° elbow for easier installation.
CONNECT THE RANGE TO GAS2
C. Install male 1/2" or 3/4" flare union adapter to the NPTinternal thread of the manual shut-off valve, takingcare to back-up the shut-off valve to keep it fromturning.
D. Connect flexible metal appliance connector to theadapter on the range. Position range to permitconnection at the shut-off valve.
E. When all connections have been made, make sure allrange controls are in the off position and turn on themain gas supply valve. Use a liquid leak detector at alljoints and connections to check for leaks in thesystem.
Fire hazard: Do not use a flame to check forgas leaks.When using test pressures greater than 1/2 psig topressure test the gas supply system of the residence,disconnect the range and individual shut-off valve fromthe gas supply piping. When using test pressures of 1/2psig or less to test the gas supply system, simply isolatethe range from the gas supply system by closing theindividual shut-off valve.*Teflon: Registered trademark of DuPont
WARNING

25
6"��������������� �������� �����������8
1,/
1/
'/'/
-+/
5/
5/
5/
-'/
� �
-.+/
�
1,/0��8
�0���������������������������"������������"����
-5/0��8
-1/0�78
:/
12/
5/
��������3���
;���������6���������3���
�
�������� ����
�����
�����
�����������
��������������� ������
Installation Instructions
$��������� ������
3�����
��
�����
����
� �
��
�
-.'/��1.+/���$��
%��7����������+-.' �8��78�
3�����
����"��&� �����
������������ ������ ������ ������� ���� �� �������������� ���������
��������������� �!"��#$%�&�'()*��+
!�,���%�%��"��#$%�&�'()*��+
������������ ������� ������ ������ ���� �� ��������������� ���������
$��������� ������
4����������+-.'/
<,=;����
>������?���
���������
��
�����
����
� �
��
�
-.'/��1.+/���$��
����"��&� �����
>���
!����
4����������
<,=;����
RECOMMENDED GAS AND ELECTRIC SUPPLY LOCATIONNOTE: Recommended gas hookuplocations behind range. Gas fittingsand shut-off valve should NOTprotrude more than 2" from the wallto allow the range to fit against thewall.

26
;��������� ������7������ ������
Installation Instructions
Electrical Requirements
120-volt, 60 Hertz, properly grounded dedicated circuitprotected by a 15-amp or 20-amp circuit breaker ortime delay fuse.
Note: Use of automatic, wireless, or wired externalswitches that shut off power to the appliance are notrecommended for this product.
ELECTRICAL CONNECTIONS3
Grounding
WARNINGShock Hazard: This appliance must beproperly grounded. Failure to do so can resultin electric shock.
The power cord of this appliance is equipped with athree-prong (grounding) plug which mates with astandard three-prong grounding wall receptacle tominimize the possibility of electric shock hazard from thisappliance.The customer should have the wall receptacle andcircuit checked by a qualified electrician to make surethe receptacle is properly grounded.Where a standard two-prong wall receptacle isencountered, it is the personal responsibility andobligation of the customer to have it replaced with aproperly grounded three-prong wall receptacle.DO NOT, UNDER ANY CIRCUMSTANCES, CUT OR REMOVETHE THIRD (GROUND) PRONG FROM THE POWER CORD.DO NOT USE AN ADAPTER. DO NOT USE AN EXTENSIONCORD.A word about GFCI’s - GFCI’s are not required orrecommended for gas range receptacles.Ground Fault Circuit Interrupters (GFCI’s) are devicesthat sense leakage of current in a circuit andautomatically switch off power when a thresholdleakage level is detected. These devices must bemanually reset by the consumer. The National ElectricalCode requires the use of GFCI’s in kitchen receptaclesinstalled to serve countertop surfaces. Performance ofthe range will not be affected if operated on a GFCI-protected circuit but occasional nuisance tripping ofthe GFCI breaker is possible.
SEAL THE OPENINGS4Seal any openings in the wall behind the range and inthe floor under the range when hookups arecompleted.
IF THE RANGE HAS ELECTRIC IGNITION5There are separate ignition devices for the left and righthand surface burners. Both of these ignitors are ONwhen any knob is turned to the LITE setting. The ignitorswill spark as long as any of the top burner knobs are atthe LITE setting.In the event of an electrical power failure, the topburners can still be used. To light a burner, hold a litkitchen match adjacent to the top burner to be usedand turn valve knob to LITE. USE EXTREME CAUTION.
ADJUST THE OVEN BURNER AIRSHUTTER IF NECESSARY
6
For Natural Gas:The oven burner flame should be a clean, blue flamewith distinct inner cones approximately 1/2 inch long. Asoft, lazy flame with indistinct cones means too muchgas or not enough air. A noisy lifting flame means toomuch air.
4��� �����
>������ ��
@��������� ����
�8$8 ��
-.'/
-/
4���.�����������

27
Installation Instructions
ADJUST THE OVEN BURNER AIRSHUTTER IF NECESSARY (CONT.)
6
For LP Gas:The flame should have approximately 1-inch blue cones.After 30 seconds of burner operation, check for flameslifting off the burner parts. If lifting is observed, graduallyreduce the air shutter opening until flames are stabilized.Some yellow tipping may be normal for LP gas.
If Adjustment is Necessary:Loosen the lock screw located at the top of the airshutter, then rotate the air shutter to the correctsetting and retighten screw.
QUALITY OF FLAMES7
A
The oven burner air shutter adjustment is the sameon ranges with a gas pilot or electric ignition.
The air shutter should be set approximately 2/3open for natural gas, and approximately full openfor LP gas.
Oven burner flame can be checked as follows(without burner baffle in place):• To correct a yellow flame—Increase size of air
shutter opening.• To correct a lifting, but distinct, blue flame—
Decrease size of air shutter opening.
B
C
D
3���"����� ���������������
The combustion quality of burner flames needs to bedetermined visually.
If burner flames look like (A), call for service. Normalburner flames should look like (B) or (C), depending onthe type of gas you use.With LP gas, some yellow tipping on outer cones isnormal.
(C) Soft blue flames:Normal for natural gas.
(B) Yellow tips on outer cones:Normal for LP gas.
(A) Yellow flames:Call for service.
REPLACE OVEN PARTS8After all adjustments are made, replace the ovenbottom, shelves and oven door.

28
Installation Instructions
LEVELING THE RANGE9A. Install the oven shelves in the oven and position the
range where it will be installed with front access tofront leveling legs and rear access to rear levelinglegs. All legs must be leveled BEFORE the product isinstalled.
D. Use an open-end or adjustable wrench to adjust theleveling legs until the range is level.
B. Check for levelness by placing a spirit level or a cup,partially filled with water, on one of the oven shelves.If using a spirit level, take two readings-with the levelplaced diagonally first in one direction and then theother.
C. Remove the drawer (on some models). See the Careand cleaning of the range section. The front levelinglegs can be adjusted from the bottom and the rearlegs can be adjusted from the top (on some models)or the bottom.
�� �������
�������� �
��������������
�������� �
�������� � �����
��� �
��������������
WARNING
E. After leveling the unit, slide it into final position andverify levelness.
F. After the range is level, slide the range away from thewall so that the Anti-Tip device can be installed.
Never completely remove the leveling leg as therange will not be secured to the anti-tip deviceproperly.
INSTALLING THE ANTI-TIP DEVICE10
WARNINGANTI-TIP DEVICE
To reduce the risk of tipping the range, the range mustbe secured by a properly installed anti-tip bracket.Follow the instructions packaged with the bracket.To check if the bracket is installed and engagedproperly, look underneath the range to see that the rearleveling leg is engaged in the bracket. On some models,the storage drawer or kick panel can be removed foreasy inspection. If visual inspection is not possible, slidethe range forward, confirm the anti-tip bracket issecurely attached to the floor or wall, and slide therange back so the rear leveling leg is under the anti-tipbracket.If the range is pulled from the wall for any reason, alwaysrepeat this procedure to verify the range is properlysecured by the anti-tip bracket.If your range has no anti-tip bracket, call 1.800.932.4267to receive one at no cost.
• All ranges can tip.• BURNS or other SERIOUS INJURIES can
result.
• INSTALL and CHECK the anti-tip bracketfollowing the instructions supplied withthe bracket.
WHEN ALL HOOKUPS ARE COMPLETED11
CONVERT TO LP GAS (or convert back tonatural gas from LP)
Make sure all controls are left in the off position. Makesure the flow of combustion and ventilation air to therange is unobstructed.
This range leaves the factory set for use with natural gas.If you want to convert to LP gas, the conversion must beperformed by a qualified LP gas installer.The conversion instructions and LP orifices can be foundattached to the back of the range.Keep these instructions and the orifices in case you wantto convert back to natural gas.

29
Before you call for service...
Oven thermostat needs adjustment
Problem Possible Causes What To Do
Oven temperature too hotor too cold
See the Adjust the oven thermostat—Do it yourself!section.
��������"���������8$!��9(($;>8
Burner holes on the side or aroundthe top of the burner may beclogged.
Top burners do not light ordo not burn evenly
Plug on range is not completelyinserted in the electrical outlet
On models with electric ignition, make sure electricalplug is plugged into a live, properly grounded outlet.
Remove the burners and reinstall them properly.Burners may not be fitted correctlyonto mounting brackets.
Remove the burners and clean them with a safetypin or paper clip. Make sure you do not enlarge theholes.
A-Yellow flamesFurther adjustmentrequired
Burners have yellow oryellow-tipped flames
The combustion quality of burnerflames needs to be determinedvisually.
Use the illustrations below to determine if your burnerflames are normal. If burner flames look like A, furtheradjustment is required. Normal burner flames shouldlook like B or C, depending on the type of gas youuse. With LP gas, some yellow tipping on outer conesis normal.
C-Soft blue flamesNormal for naturalgas
B-Yellow tips onouter conesNormal for LP gas
See the Care and cleaning of the range section.
Burner flames very largeor yellow
LP gas is improperly connected. Check all steps in the Installation of the rangesection.
Oven will not work The thermostat capillary bulb mustbe clean and unobstructed.
Make sure the thermostat capillary bulb (located inthe upper portion of the oven) is in the correctposition, not touching oven sides and not coatedwith anything.
The oven vent is blocked. The oven vent, on the back of the range, must beunobstructed.
Oven control improperly set. See the Using the oven sections.
Incorrect cookware or cookwareof improper size being used.
See the Using the oven for baking or roasting section.
Oven bottom not securely seatedin position.
Improper air/gas ratio in the oven.Strong odor
An odor from the insulation around the oven liner isnormal for the first few times the oven is used.
This is temporary.
Adjust oven burner air shutter. See the Installation ofthe range section.
Surface burners light butoven does not
To check the oven gas shut-off valve on standardtwin burner models, raisecooktop and look for gasshut-off lever at theextreme left rear corner.(Standing pilot models donot have a gas shut-offvalve on the regulator.)
The oven gas shut-off valve mayhave accidentally been movedduring cleaning or moving.
Oven light will not work
Call for service.Switch operating light is broken.
Tighten or replace the bulb.Light bulb is loose or defective.

30
31
FELIX STORCH, INC
770 Garrison AvenueBronx, NY
TEL 718-893-3900FAX 718-842-3093
www.summitappliance.com
PARTS AND LABOR WARRANTY INFORMATIONSUMMIT Appliances are manufactured to provide outstanding value, and your satisfaction is our goal on every product.All SUMMIT major appliances carry a one year limited warranty on both parts and labor. All refrigerators and freezerscarry an additional four years on the compressor. Certain exclusions may apply.
GENERAL PARTS AND LABOR WARRANTYSummit warrants, to the original purchaser of every new unit, that the cabinet and all parts thereof be free from defectsin material or workmanship, under normal and proper use and maintenance service as specified by Summit and uponproper installation and start-up in accordance with the instruction packet supplied with each Summit unit. Summit’sobligation under this warranty is limited to a period of 12 months from the date of original purchase.
Any parts, covered under this warranty, that are determined by Summit to have been defective, within the above saidperiod, are limited to the repair or replacement, including labor charges, of defective parts or assemblies. The laborwarranty shall include pre-approved standard straight time labor charges only and reasonable travel time, asdetermined by Summit.
WARRANTY CLAIMSAll claims for labor or parts must be made directly through Summit. All claims should include: model number of the unit,the serial number of the cabinet, proof of purchase, date of installation, and all pertinent information supporting theexistence of the alleged defect. All claims should be filed within 30 days of completed repair or the warranty claimcould be refused.
THINGS NOT COVERED BY THIS WARRANTYSummit’s sole obligation under this warranty is limited to either repair or replacement of parts, subject to the additionallimitations below. This warranty neither assumes nor authorizes any person to assume obligations other than thoseexpressly covered by this warranty.
• NO CONSEQUENTIAL DAMAGES: Summit is not responsible for economic loss; profit loss; or special, direct,indirect, or consequential damages, including without limitation, losses or damages arising from food or productspoilage claims whether or not on account of refrigeration failure.
• WARRANTY IS NOT TRANSFERRABLE: This warranty is not assignable and applies only in favor of the originalpurchaser/user to whom delivered. Any such assignment or transfer shall void the warranties herein made andshall void all warranties, express or implied, including any warranty of merchantability or fitness for a particularpurpose.
• IMPROPER USE: Summit assumes no liability for parts or labor coverage for component failure or other damagesresulting from improper usage or installation or failure to clean and/or maintain product as set forth in thewarranty packet provided with the unit.
• ALTERATION, NEGLECT, ABUSE, MISUSE, ACCIDENT, DAMAGE DURING TRANSIT OR INSTALLATION, FIRE, FLOOD, ACTSOF GOD: Summit is not responsible for the repair or replacement of any parts that Summit determines havebeen subjected after the date of manufacture to alteration, neglect, abuse, misuse, accident, damage duringtransit or installation, fire, flood, or act of God.
• IMPROPER ELECTRICAL CONNECTIONS: Summit is not responsible for the repair or replacement of failed ordamaged components resulting from electrical power failure, the use of extension cords, low voltage, orvoltage drops to the unit.

32
• NO IMPLIED WARRANTY OF MERCHANTABILITY OR FITNESS FOR A PARTICULAR PURPOSE: There are no otherwarranties, expressed, implied or statutory, except the parts & labor warranty specifically described above. These warranties are exclusive and in lieu of all other warranties, including implied warranty and merchantabilityor fitness for a particular purpose. There are no other warranties which extend beyond the description on theface hereof.
• OUTSIDE UNITED STATES: This warranty does not apply to, and Summit is not responsible for, any warranty claimsmade on products sold or used outside the United States.
FELIX STORCH, INC
770 Garrison AvenueBronx, NY
TEL 718-893-3900FAX 718-842-3093
www.summitappliance.com
CALIFORNIA PROPOSITION 65WARNING! This product may contain chemicals known to the state of California to cause cancer or birth defects orother reproductive harm. For more information, visit: www.summitappliance.com/prop65
Chemicals known by the manufacturer to be present in this product in concentrations higher than threshold limits: NONE.
REQUESTING SERVICEIf you are in need of service, please either fill out a service request on our website, http://www.summitappliance.com/support, or call us at 800-932-4267 or 718-893-3900. Please be prepared to give us the following information: your name,address, phone, email, model, serial, date of purchase, place of purchase, and the problem you are having.