safety pressure washer service policy - dewalt servicenet
TRANSCRIPT

AS
SE
MB
LYT
RO
UB
LE
SH
OO
TIN
GS
AFE
TY
OP
ER
AT
ION
MA
INT
EN
AN
CE
GENERAL MANUAL FOR
Pres s ure Was her Service Pol icy
17188A 10/30/98
3491 Mission Oaks Blvd. / Camarillo, CA 93011
™
Pressure Washers
⇐
⇐
⇐
⇐
⇐
If repair or s ervice part purchase is required, our many Author ized Warranty Service Centers are conveniently located and equipped to handle al l in-warranty and out-of-warranty service.
To locate an Author ized Warranty Service Center near you, call
Al l pres sure washers car ry a manufacturer’s one year warranty from date of purchase for consumer use and a 90 day warranty for commercial use.
Retain sales receipt as proof of purchas e for warranty service.
Congratulations ! You have purchased from Amer ica’s leading manufacturer of
pres sure washers . T his pres sure was her, when proper ly us ed and maintained, wi l l provide trouble free service. Pleas e read and fol low these ins tructions for proper use and maintenance.
a high quality product
If you exper ience any problems and need as s is tance, please call us at our tol l free number 1-800-444-3353, Monday through Fr iday, 7:00 a.m. To 4:30 p.m. Pacific Standard T ime.
⇐
�������
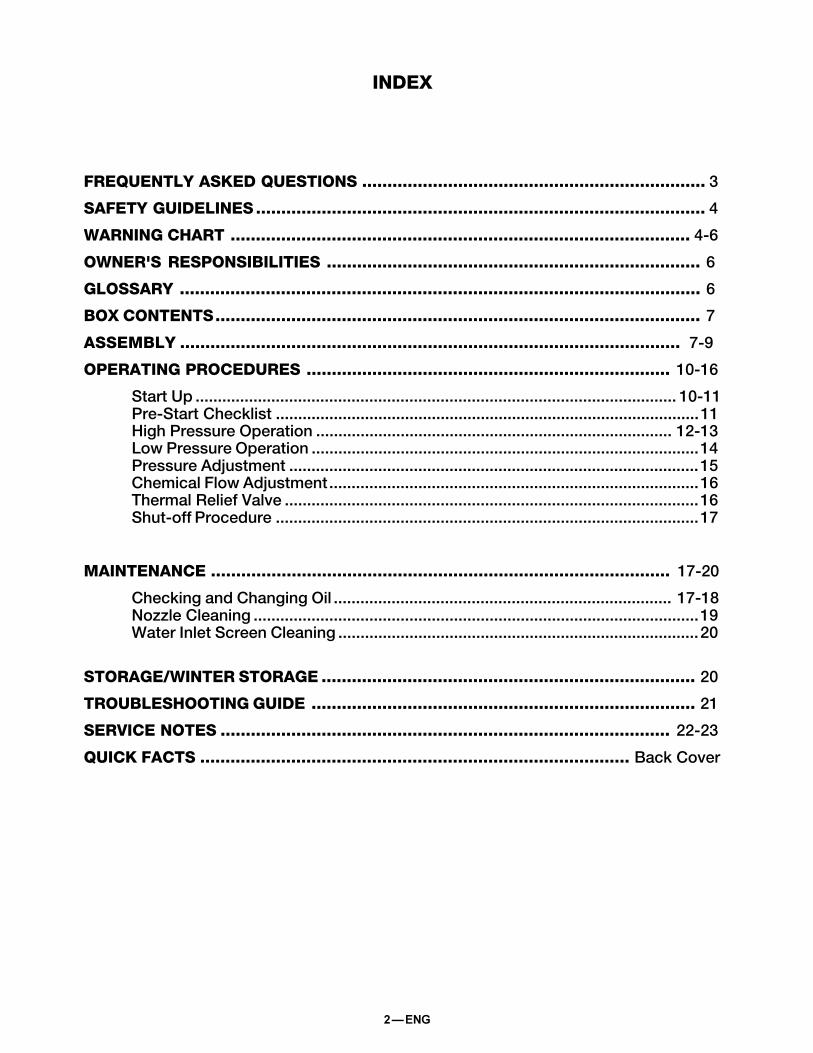
FREQUENTLY ASKED QUESTIONS .................................................................... 3
SAFETY GUIDELINES ......................................................................................... 4
WARNING CHART ........................................................................................... 4-6
OWNER'S RESPONSIBILITIES .......................................................................... 6
GLOSSARY ....................................................................................................... 6
BOX CONTENTS................................................................................................ 7
ASSEMBLY ................................................................................................... 7-9
OPERATING PROCEDURES ........................................................................ 10-16
Start Up ............................................................................................................ 10-11Pre-Start Checklist ...............................................................................................11High Pressure Operation ................................................................................ 12-13Low Pressure Operation .......................................................................................14Pressure Adjustment ............................................................................................15Chemical Flow Adjustment...................................................................................16Thermal Relief Valve .............................................................................................16Shut-off Procedure ...............................................................................................17
MAINTENANCE ........................................................................................... 17-20
Checking and Changing Oil ............................................................................ 17-18Nozzle Cleaning ....................................................................................................19Water Inlet Screen Cleaning .................................................................................20
STORAGE/WINTER STORAGE .......................................................................... 20
TROUBLESHOOTING GUIDE ............................................................................ 21
SERVICE NOTES ......................................................................................... 22-23
QUICK FACTS ..................................................................................... Back Cover
INDEX

�������
Frequently Asked Questions:
What kind of oil do I use?•Engine: Refer to Engine manual for oil recommendations.•Pump: Refer to page 17 and 18.
My Pressure Washer won’t start..(See Engine manual for starting instructions)•Has gasoline been added to the engine?•Is engine on/off switch in “on” position? (If applicable)•Has engine been primed or choked?•Adequate amount of oil in engine? (Some models are equipped with a "Low Oil ShutDown" switch)
How do I apply chemicals?•Wand/Lance must be in the low pressure setting. See page 14.•Chemical hose must be attached to pump and fully submerged in chemical/soap-Seepage 8 and 14.
•Chemical adjustment knob must be in open position. See page 16.
How do I adjust the pressure?•The pressure unloader is factory pre-set at the maximum pressure and should not beincreased. The pressure can be lowered by following the instructions on page 15. Donot attempt to increase the engine speed to achieve a higher pressure. Excessivepressure will damage the pump.
I don’t have enough pressure...•Do you have an adequate water supply(5 gallons per minute at 20 p.s.i.)?•All hoses free of kinks and leaks?•Is wand in high pressure setting? See page 12 & 13•Is spray nozzle blocked or partially obstructed? If so, clear and replace. See page 19.
What type of chemicals/soaps can I use?•Use only chemicals/soap designed for use in pressure washers.
Who can I call if I have questions or any problems?•Call us at 1-800-444-3353 Monday through Friday, 7:30 a.m. to 4:30 p.m., P.S.T.
How do I drain the oil?•Engine: Refer to the Engine manual for this information.•Pump: See page 17 and 18.
Where can I purchase parts and/or accessories?•Service parts can only be obtained through our many Authorized Warranty ServiceCenters. For a location nearest you, call us at 1-800-444-3353.
•Accessories can be purchased at an Authorized Warranty Service Center or at oneof the many local retailers.
�������
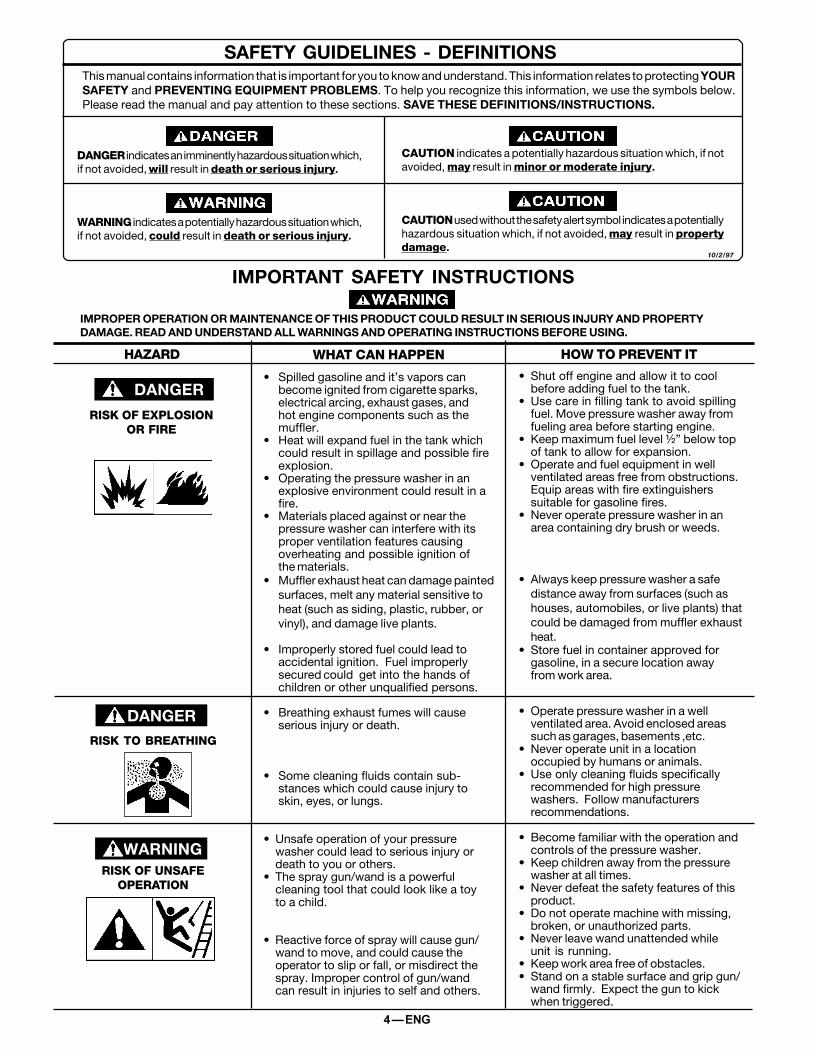
SAFETY GUIDELINES - DEFINITIONSThis manual contains information that is important for you to know and understand. This information relates to protecting YOURSAFETY and PREVENTING EQUIPMENT PROBLEMS. To help you recognize this information, we use the symbols below.Please read the manual and pay attention to these sections. SAVE THESE DEFINITIONS/INSTRUCTIONS.
DANGER indicates an imminently hazardous situation which,if not avoided, will result in death or serious injury.
WARNING indicates a potentially hazardous situation which,if not avoided, could result in death or serious injury.
10/2/97
CAUTION indicates a potentially hazardous situation which, if notavoided, may result in minor or moderate injury.
CAUTION used without the safety alert symbol indicates a potentiallyhazardous situation which, if not avoided, may result in propertydamage.
IMPROPER OPERATION OR MAINTENANCE OF THIS PRODUCT COULD RESULT IN SERIOUS INJURY AND PROPERTYDAMAGE. READ AND UNDERSTAND ALL WARNINGS AND OPERATING INSTRUCTIONS BEFORE USING.
HAZARD
• Spilled gasoline and it’s vapors canbecome ignited from cigarette sparks,electrical arcing, exhaust gases, andhot engine components such as themuffler.
• Heat will expand fuel in the tank whichcould result in spillage and possible fireexplosion.
• Operating the pressure washer in anexplosive environment could result in afire.
• Materials placed against or near thepressure washer can interfere with itsproper ventilation features causingoverheating and possible ignition ofthe materials.
• Muffler exhaust heat can damage paintedsurfaces, melt any material sensitive toheat (such as siding, plastic, rubber, orvinyl), and damage live plants.
• Improperly stored fuel could lead toaccidental ignition. Fuel improperlysecured could get into the hands ofchildren or other unqualified persons.
• Breathing exhaust fumes will causeserious injury or death.
• Some cleaning fluids contain sub-stances which could cause injury toskin, eyes, or lungs.
• Unsafe operation of your pressurewasher could lead to serious injury ordeath to you or others.
• The spray gun/wand is a powerfulcleaning tool that could look like a toyto a child.
• Reactive force of spray will cause gun/wand to move, and could cause theoperator to slip or fall, or misdirect thespray. Improper control of gun/wandcan result in injuries to self and others.
• Shut off engine and allow it to coolbefore adding fuel to the tank.
• Use care in filling tank to avoid spillingfuel. Move pressure washer away fromfueling area before starting engine.
• Keep maximum fuel level ½” below topof tank to allow for expansion.
• Operate and fuel equipment in wellventilated areas free from obstructions.Equip areas with fire extinguisherssuitable for gasoline fires.
• Never operate pressure washer in anarea containing dry brush or weeds.
• Always keep pressure washer a safedistance away from surfaces (such ashouses, automobiles, or live plants) thatcould be damaged from muffler exhaustheat.
• Store fuel in container approved forgasoline, in a secure location awayfrom work area.
• Operate pressure washer in a wellventilated area. Avoid enclosed areassuch as garages, basements ,etc.
• Never operate unit in a locationoccupied by humans or animals.
• Use only cleaning fluids specificallyrecommended for high pressurewashers. Follow manufacturersrecommendations.
• Become familiar with the operation andcontrols of the pressure washer.
• Keep children away from the pressurewasher at all times.
• Never defeat the safety features of thisproduct.
• Do not operate machine with missing,broken, or unauthorized parts.
• Never leave wand unattended whileunit is running.
• Keep work area free of obstacles.• Stand on a stable surface and grip gun/
wand firmly. Expect the gun to kickwhen triggered.
HOW TO PREVENT ITWHAT CAN HAPPEN
DANGER
DANGERRISK TO BREATHING
RISK OF EXPLOSIONOR FIRE
RISK OF UNSAFEOPERATION
IMPORTANT SAFETY INSTRUCTIONS
WARNING

������
SA
FE
TY
HAZARD
IMPORTANT SAFETY INSTRUCTIONS (cont’d)
• Spray directed at electrical outlets orswitches, or objects connected to anelectrical circuit, could result in a fatalelectrical shock.
• Your washer operates at fluid pressuresand velocities high enough to penetratehuman and animal flesh, which couldresult in amputation or other seriousinjury. Leaks caused by loose fittings orworn or damaged hoses can resultin injection injuries. DO NOT TREATFLUID INJECTION AS A SIMPLE CUT!See a physician immediately!
• Relieve system pressure before attempt-ing maintenance or disassembly ofequipment.
• Use of acids, toxic or corrosivechemicals, poisons, insecticides, or anykind of flammable solvent with thisproduct could result in serious injury ordeath.
• Contact with hot surfaces, such asengines exhaust components, couldresult in serious burn.
• ��������������������� ��������������� ����������������������������� ����� ������������������� �������������������� ������������������������������ ���� ��������� ���� ������ �
• Unplug any electrically operated productbefore attempting to clean it. Direct sprayaway from electric outlets and switches.
• Never place hands in front of nozzle.• Direct spray away from self and others.• Make sure hose and fittings are tightened
and in good condition. Never hold ontothe hose or fittings during operation.
• Do not allow hose to contact muffler.• Never attach or remove wand or hose
fittings while system is pressurized.
• Use only hose and high pressureaccessories rated for pressure higher thanyour pressure washer's p.s.i.
• To relieve system pressure, shut offengine, turn off water supply, and pull guntrigger until water stops flowing.
• Do not use acids, gasoline, kerosene, orany other flammable materials in thisproduct. Use only household detergents,cleaners and degreasers recommendedfor use in pressure washers.
• Wear protective clothing to protecteyes and skin from contact with sprayedmaterials.
• During operation, touch only the controlsurfaces of the pressure washer. Keepchildren away from the pressure washerat all times. They may not be able torecognize the hazards of this product.
• ������ ����� ���� � �������������������� ����������������������������������������� ������������ ��� �������� ��� ����� ����� ��� �� ����� ����� ����� ������������������������ ���������������������������������������������� ��������� ������� ��������������� !"#�����������������#��� �������� ���� ����������������������������� ���������������������� ������������������������ �� $������ ��� ���� � ���� ����������������������������������������� ��������
WHAT CAN HAPPEN HOW TO PREVENT IT
RISK OFELECTRICAL
SHOCK
RISK OF CHEMICAL BURN
RISK OF HOT SURFACES
RISK TO FLUID INJECTION
WARNING
WARNING
WARNING
WARNING
The powerful spray from your pressure washer is capable of causing damage to surfaces such as; wood, glass,automobile paint, auto striping and trim, and delicate objects such as flowers and shrubs. Before spraying, check theitem to be cleaned to assure yourself that it is strong enough to resist damage from the force of the spray. Avoid theuse of the concentrated spray stream except for very strong surfaces like concrete and steel.
Operating unit with water supply shut-off without flow of water will result in equipment damage. Operating the pressurewasher with water supply shut-off will void your warranty. You should never run this pressure washer for more than2 minutes without pulling the trigger to allow cool water to enter the pump and the heated (recirculated) water to exit.
RISK OF INJURY ANDPROPERTY DAMAGE WHEN
TRANSPORTING ORSTORING
DANGER
������
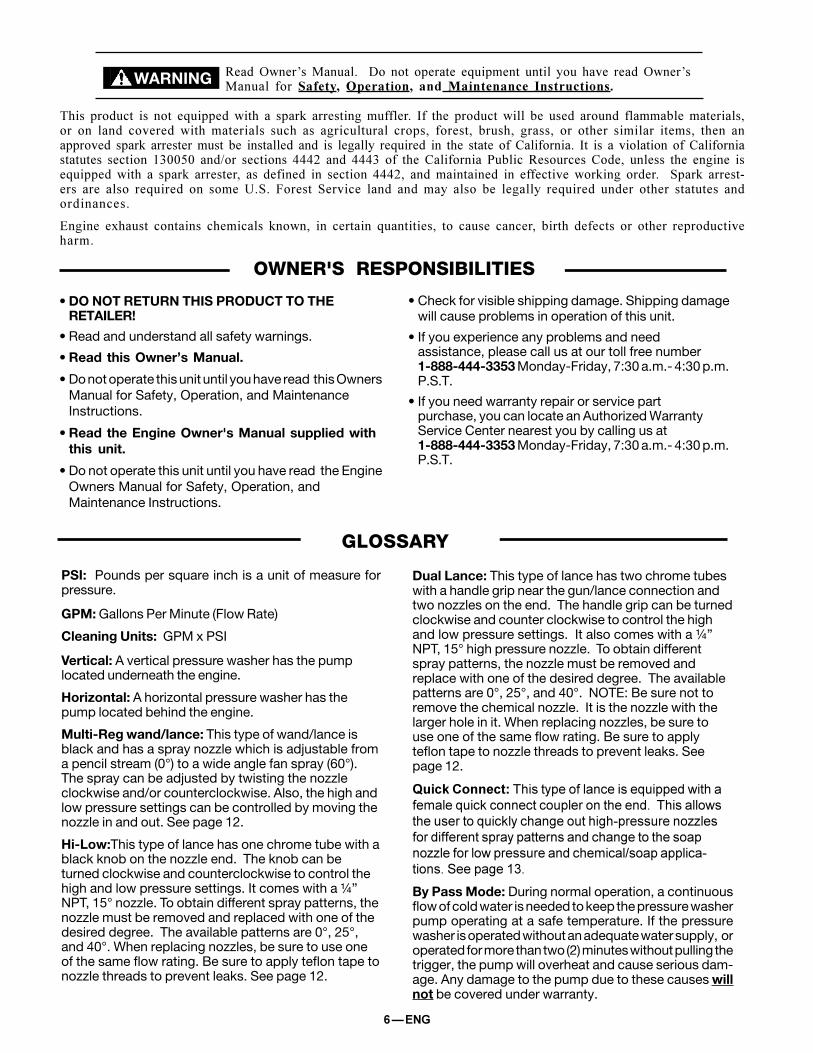
PSI: Pounds per square inch is a unit of measure forpressure.
GPM: Gallons Per Minute (Flow Rate)
Cleaning Units: GPM x PSI
Vertical: A vertical pressure washer has the pumplocated underneath the engine.
Horizontal: A horizontal pressure washer has thepump located behind the engine.
Multi-Reg wand/lance: This type of wand/lance isblack and has a spray nozzle which is adjustable froma pencil stream (0°) to a wide angle fan spray (60°).The spray can be adjusted by twisting the nozzleclockwise and/or counterclockwise. Also, the high andlow pressure settings can be controlled by moving thenozzle in and out. See page 12.
Hi-Low:This type of lance has one chrome tube with ablack knob on the nozzle end. The knob can beturned clockwise and counterclockwise to control thehigh and low pressure settings. It comes with a ¼”NPT, 15° nozzle. To obtain different spray patterns, thenozzle must be removed and replaced with one of thedesired degree. The available patterns are 0°, 25°,and 40°. When replacing nozzles, be sure to use oneof the same flow rating. Be sure to apply teflon tape tonozzle threads to prevent leaks. See page 12.
GLOSSARY
Dual Lance: This type of lance has two chrome tubeswith a handle grip near the gun/lance connection andtwo nozzles on the end. The handle grip can be turnedclockwise and counter clockwise to control the highand low pressure settings. It also comes with a ¼”NPT, 15° high pressure nozzle. To obtain differentspray patterns, the nozzle must be removed andreplace with one of the desired degree. The availablepatterns are 0°, 25°, and 40°. NOTE: Be sure not toremove the chemical nozzle. It is the nozzle with thelarger hole in it. When replacing nozzles, be sure touse one of the same flow rating. Be sure to applyteflon tape to nozzle threads to prevent leaks. Seepage 12.
������������������������ ������������������ �� ����������������������������������� ����������������������� ������������������������������������� ��� ������ ����� ��������� ������������������� �������� ��� �� ����� ���������� �����
By Pass Mode: During normal operation, a continuousflow of cold water is needed to keep the pressure washerpump operating at a safe temperature. If the pressurewasher is operated without an adequate water supply, oroperated for more than two (2) minutes without pulling thetrigger, the pump will overheat and cause serious dam-age. Any damage to the pump due to these causes willnot be covered under warranty.
WARNING
����� ������ ��� ��� ������������ �� ������ ������� ���������� ��� ���� ������ ����� ��� ��� ��� � ����������������������� � � �� � ������� ����� ���������� ���� ��� ����������� ������� �������� ������ ������� ��� ������ �������� ������� ��� � � �������� ������ ������������� ��� � ������� � � ��� �������� ������� � � ���� ������ ���������� ���� ��� ��� �� �������� � ���������� ���������� ������ � �� ! � � "��� ������ �� ###$� � � ###�� ��� ���� ������� ��� %����� &�������� ����� ����� ���� � �� �� �������������� �� ������ ���������� ��� ��� �� � � ������ � ###$�� � ���� ��� �� � � ��������������� �� ������ � '����� ������(���� ���� ����� ������� � � �����)�'�� *������ '������� �� � � ����� ����� ��� �������� ������� ��� ������ �������� � ��� � ����
+ �� �� �,����� �� ��� �� ���������� � �� �� � � ������ � �� �������� ��� ����� �� ����� ������ ������� ��� ������ ���������������
&���-� ��.��/� ���� � 0�� ��� �������� ������ �� ���� ��� ����� ����-� ��.�/� ��� ���� �������� ����� ��� ���� ������������ ��������� ���WARNING
• DO NOT RETURN THIS PRODUCT TO THERETAILER!
• Read and understand all safety warnings.
• Read this Owner’s Manual.
• Do not operate this unit until you have read this OwnersManual for Safety, Operation, and MaintenanceInstructions.
• Read the Engine Owner's Manual supplied withthis unit.
• Do not operate this unit until you have read the EngineOwners Manual for Safety, Operation, andMaintenance Instructions.
• Check for visible shipping damage. Shipping damagewill cause problems in operation of this unit.
• If you experience any problems and needassistance, please call us at our toll free number1-888-444-3353 Monday-Friday, 7:30 a.m.- 4:30 p.m.P.S.T.
• If you need warranty repair or service partpurchase, you can locate an Authorized WarrantyService Center nearest you by calling us at1-888-444-3353 Monday-Friday, 7:30 a.m.- 4:30 p.m.P.S.T.
OWNER'S RESPONSIBILITIES

�������
AS
SE
MB
LYBOX CONTENTS
������������������������������
�������� ���������� ���������� ���������� ���������� ��
���������������������������������������������������������������������������������������������������������������������������������������
�������������� ���������������� ���������������� ���������������� ���������������� ��
���������������
1. Connect handle to frame. Attach knobs (2) provided andtighten securely.
� ���������������� ���������������� ���������������� ���������������� ���������������
���������������������������������������������������������������������������
����������
����������
����������
�����������������������������������������������������������������������������������������������
ASSEMBLY
�������
ASSEMBLY
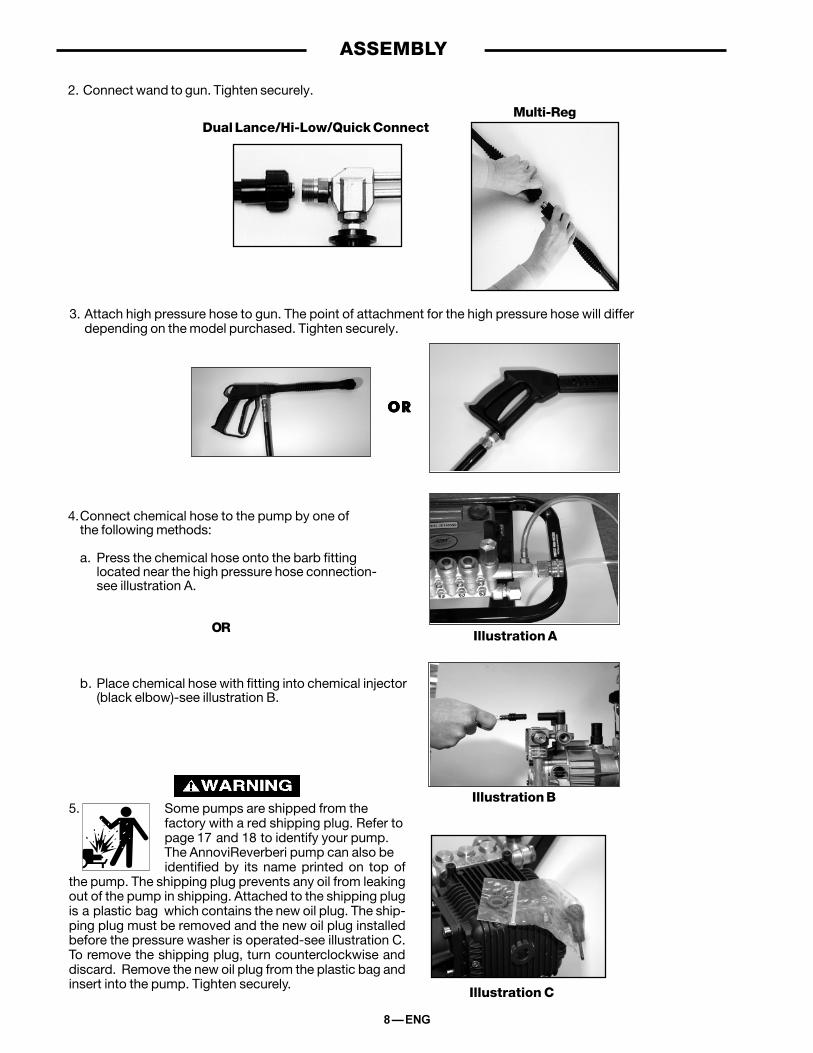
2. Connect wand to gun. Tighten securely.
Dual Lance/Hi-Low/Quick ConnectMulti-Reg
3. Attach high pressure hose to gun. The point of attachment for the high pressure hose will differdepending on the model purchased. Tighten securely.
Illustration A
Illustration B
4.Connect chemical hose to the pump by one ofthe following methods:
a. Press the chemical hose onto the barb fittinglocated near the high pressure hose connection-see illustration A.
OR
b. Place chemical hose with fitting into chemical injector(black elbow)-see illustration B.
����������
Illustration C
5. Some pumps are shipped from thefactory with a red shipping plug. Refer topage 17 and 18 to identify your pump.The AnnoviReverberi pump can also beidentified by its name printed on top of
the pump. The shipping plug prevents any oil from leakingout of the pump in shipping. Attached to the shipping plugis a plastic bag which contains the new oil plug. The ship-ping plug must be removed and the new oil plug installedbefore the pressure washer is operated-see illustration C.To remove the shipping plug, turn counterclockwise anddiscard. Remove the new oil plug from the plastic bag andinsert into the pump. Tighten securely.
������
ASSEMBLY
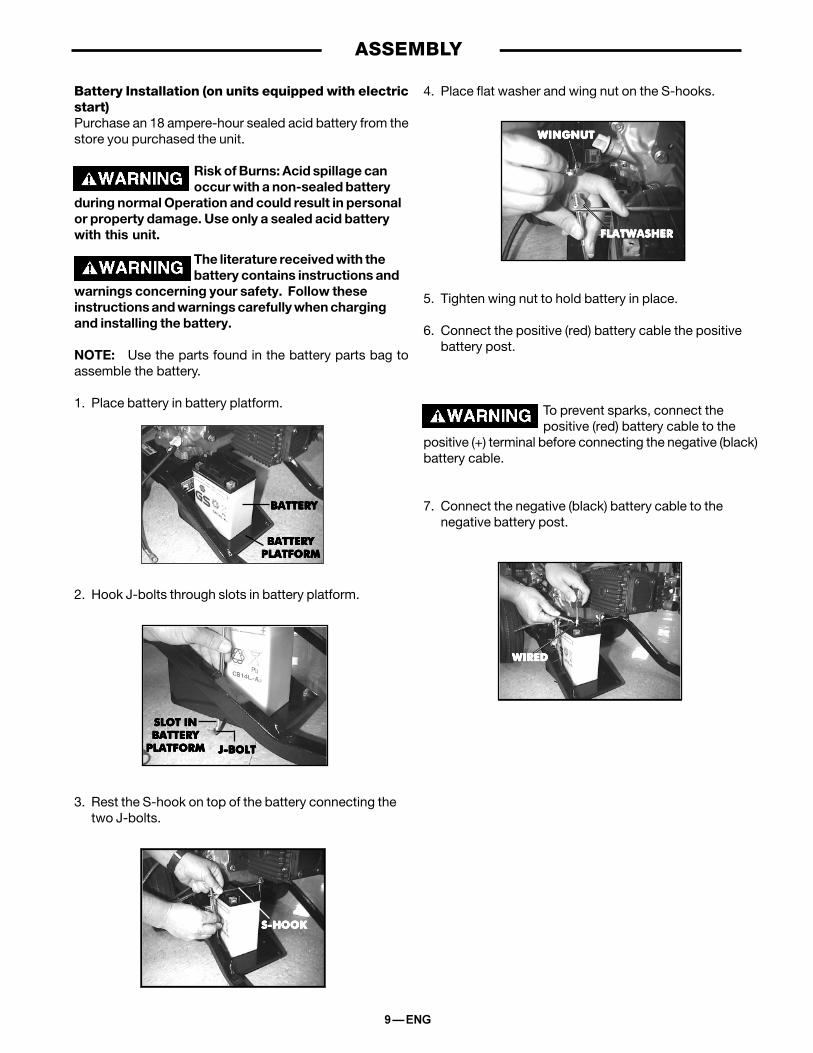
Battery Installation (on units equipped with electricstart)Purchase an 18 ampere-hour sealed acid battery from thestore you purchased the unit.
Risk of Burns: Acid spillage canoccur with a non-sealed battery
during normal Operation and could result in personalor property damage. Use only a sealed acid batterywith this unit.
The literature received with thebattery contains instructions and
warnings concerning your safety. Follow theseinstructions and warnings carefully when chargingand installing the battery.
NOTE: Use the parts found in the battery parts bag toassemble the battery.
1. Place battery in battery platform.
2. Hook J-bolts through slots in battery platform.
3. Rest the S-hook on top of the battery connecting thetwo J-bolts.
4. Place flat washer and wing nut on the S-hooks.
5. Tighten wing nut to hold battery in place.
6. Connect the positive (red) battery cable the positivebattery post.
To prevent sparks, connect thepositive (red) battery cable to the
positive (+) terminal before connecting the negative (black)battery cable.
7. Connect the negative (black) battery cable to thenegative battery post.
�������������������������
������������������������������
���������������������������������� ������ ������ ������ ������ ��
�� ������ ������ ������ ������ ����������������������������������
���� ������ ������ ������ ������ �� ��� ����� ����� ����� ����� ��
��� ���� ���� ���� ���� �
�����������������������������������
��������������������������������������������������
��������
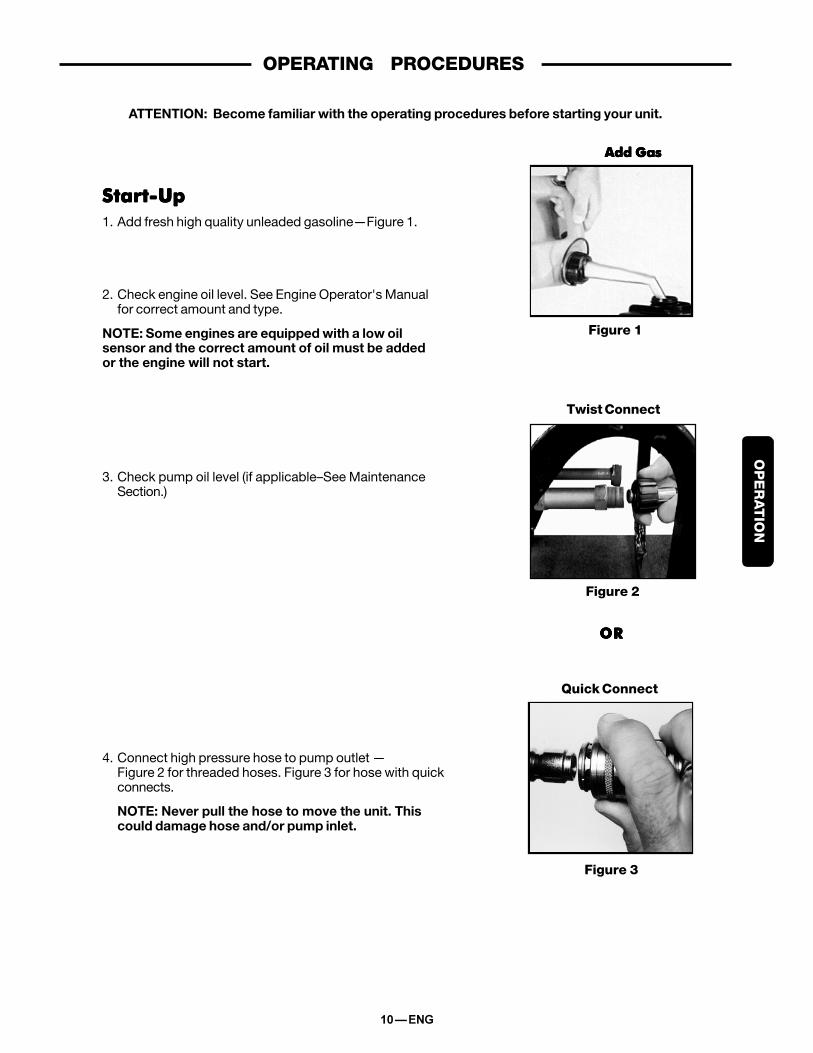
����������������������������������������1. Add fresh high quality unleaded gasoline—Figure 1.
2. Check engine oil level. See Engine Operator's Manualfor correct amount and type.
NOTE: Some engines are equipped with a low oilsensor and the correct amount of oil must be addedor the engine will not start.
3. Check pump oil level (if applicable–See MaintenanceSection.)
4. Connect high pressure hose to pump outlet —Figure 2 for threaded hoses. Figure 3 for hose with quickconnects.
NOTE: Never pull the hose to move the unit. Thiscould damage hose and/or pump inlet.
OPERATING PROCEDURES
Figure 1
Figure 2
Twist Connect
Figure 3
Quick Connect
����������
�����������������������������������
OP
ER
AT
ION
ATTENTION: Become familiar with the operating procedures before starting your unit.
��������
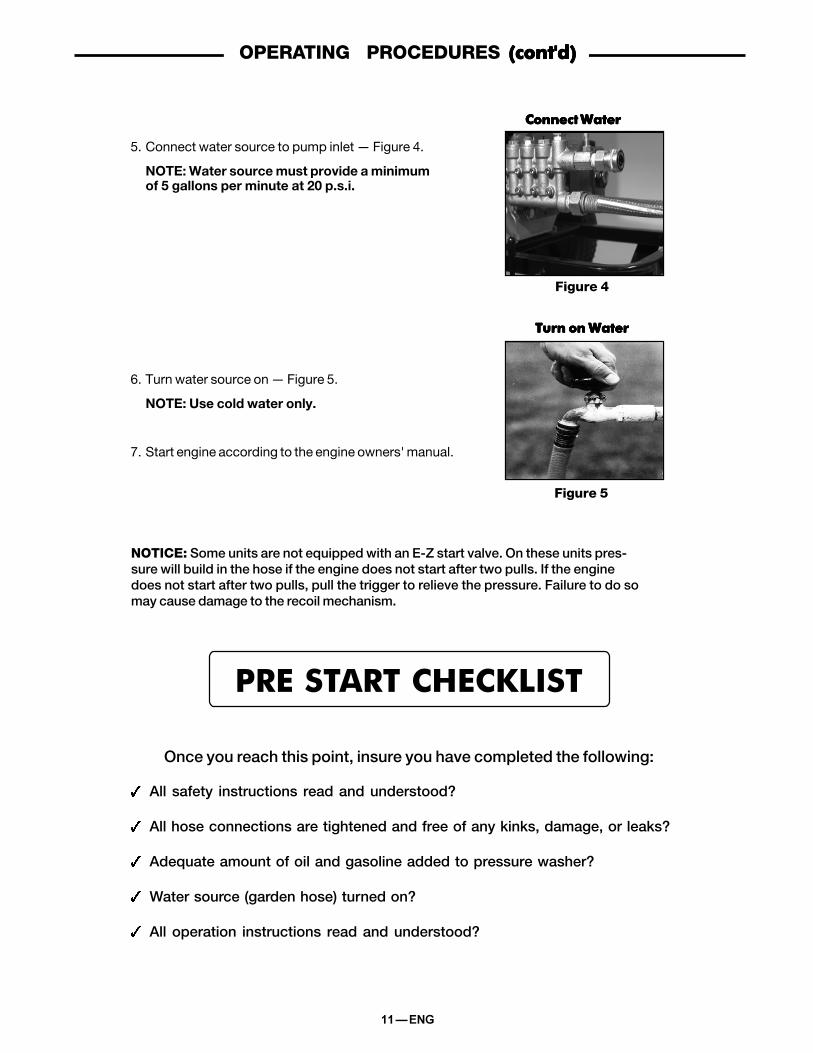
5. Connect water source to pump inlet — Figure 4.
NOTE: Water source must provide a minimumof 5 gallons per minute at 20 p.s.i.
6. Turn water source on — Figure 5.
NOTE: Use cold water only.
7. Start engine according to the engine owners' manual.
OPERATING PROCEDURES ���� �� ���� �� ���� �� ���� �� ���� ��
Figure 4
Figure 5
�����������������
Once you reach this point, insure you have completed the following:
3 All safety instructions read and understood?
3 All hose connections are tightened and free of any kinks, damage, or leaks?
3 Adequate amount of oil and gasoline added to pressure washer?
3 Water source (garden hose) turned on?
3 All operation instructions read and understood?
� ������������ ������������ ������������ ������������ �����������
���� ������� ���� ������� ���� ������� ���� ������� ���� �������
NOTICE: Some units are not equipped with an E-Z start valve. On these units pres-sure will build in the hose if the engine does not start after two pulls. If the enginedoes not start after two pulls, pull the trigger to relieve the pressure. Failure to do somay cause damage to the recoil mechanism.
��������
OPERATING PROCEDURES ���� �� ���� �� ���� �� ���� �� ���� ��
��������������������������������������������������������������������������������������������������������������NOTE: Do not let hoses come in contact with theHOT engine muffler during or immediately afteruse, as this will destroy the hose and replacementwill not be covered under warranty.
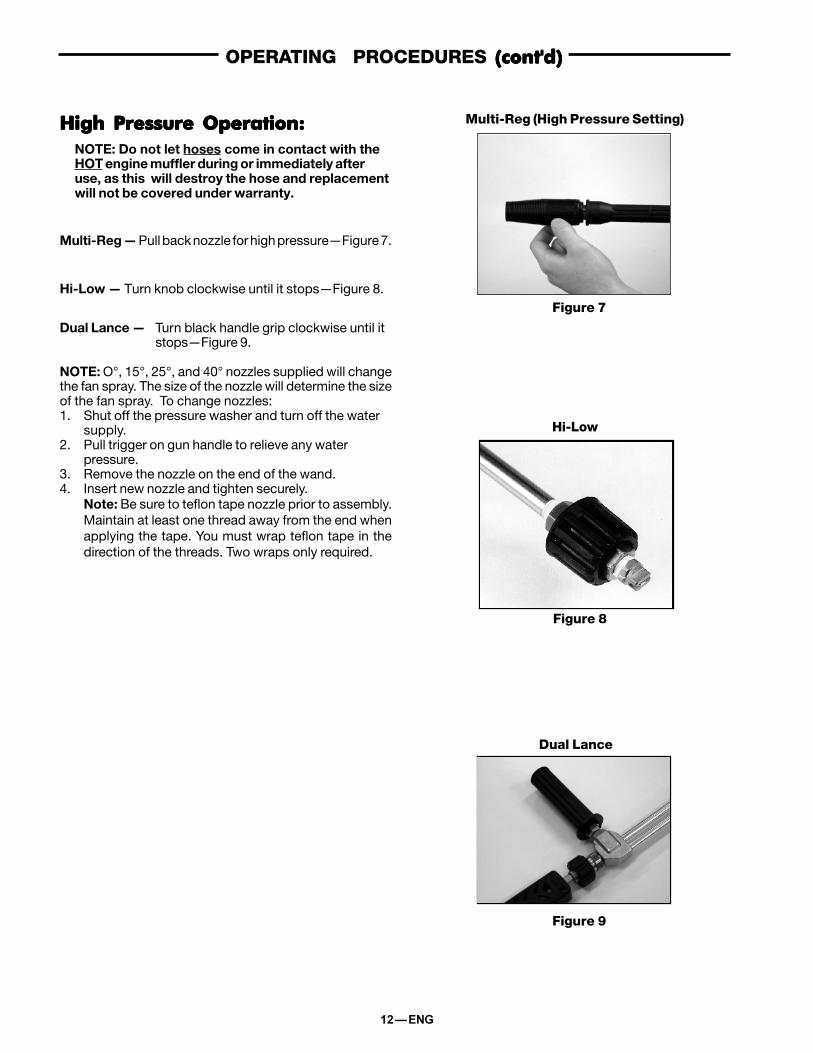
Multi-Reg — Pull back nozzle for high pressure—Figure 7.
Hi-Low — Turn knob clockwise until it stops—Figure 8.
Dual Lance — Turn black handle grip clockwise until itstops—Figure 9.
NOTE: O°, 15°, 25°, and 40° nozzles supplied will changethe fan spray. The size of the nozzle will determine the sizeof the fan spray. To change nozzles:1. Shut off the pressure washer and turn off the water
supply.2. Pull trigger on gun handle to relieve any water
pressure.3. Remove the nozzle on the end of the wand.4. Insert new nozzle and tighten securely.
Note: Be sure to teflon tape nozzle prior to assembly.Maintain at least one thread away from the end whenapplying the tape. You must wrap teflon tape in thedirection of the threads. Two wraps only required.
Figure 8
Hi-Low
Figure 9
Dual Lance
Multi-Reg (High Pressure Setting)
Figure 7

��������
OPERATING PROCEDURES ���� �� ���� �� ���� �� ���� �� ���� ��
Quick Connect – Use the 0�, 15�, 25�, and 40� nozzlesfor high pressure-Figure 10. The size of the nozzle willdetermine the size of the fan spray. To change nozzles:1. Shut off the pressure washer and turn off the water
supply.2. Pull trigger on gun handle to relieve any water
pressure.3. Pull quick connect coupler back and remove nozzle-
Figure 11.4. Pull quick connect coupler back and insert nozzle.5. Release quick connect and insure nozzle is secure.
To siphon chemicals/soaps, refer to low pressure operationbelow. Chemicals/soaps will not siphon in high pressuresetting.
����������� � �� ���!�����"������ ������������������������������� ������� ����� ����#����� ���������� ����� ���������������$������ ������������ ����������������� ����%���������� ����%��� �%����� ��� � ����� �������������������������#����������� ����� ��� ��������� ������������������������� ���� ��������������������������&�$�������������������� �������� ���%�� ������ � ��������������� ���%��������� �������������#����������� ����� ��� �������� ������������������������������$���������� ������������� �� ����%���� ����� � ����� ����������������������#�������������� ���� �����'#��
Figure 10
Quick Connect with Nozzles
Figure 11
Quick Connect Coupler
��������
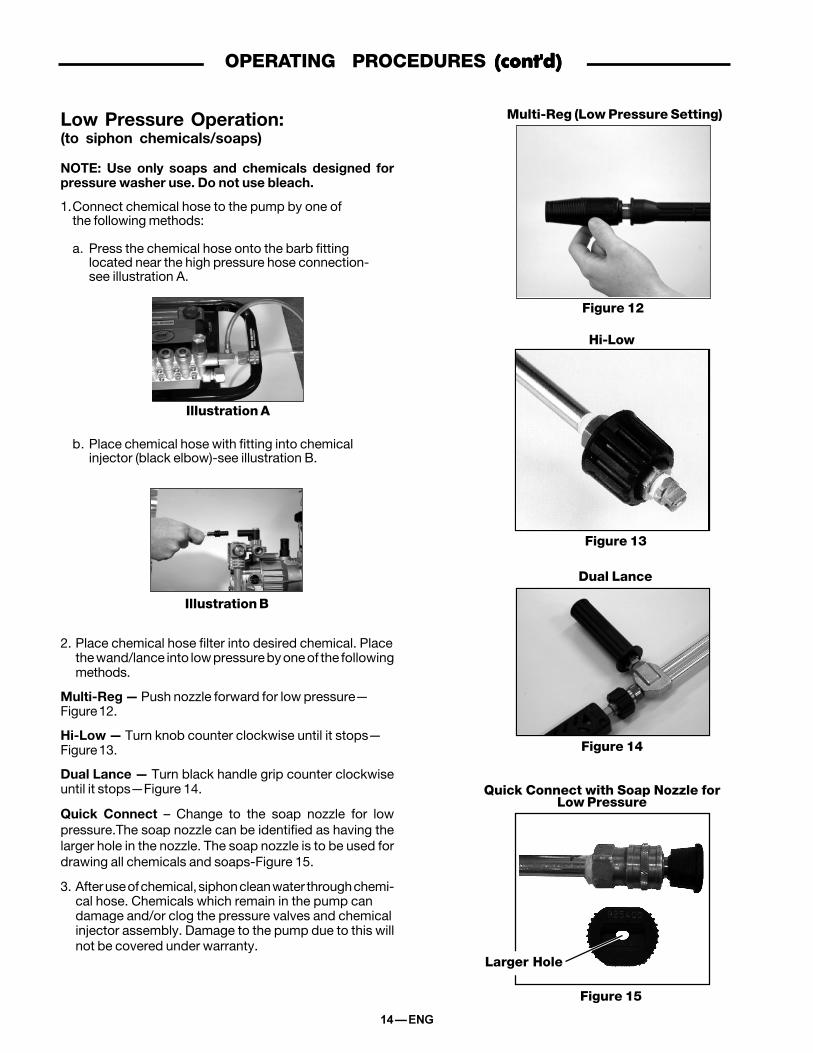
Low Pressure Operation:(to siphon chemicals/soaps)
NOTE: Use only soaps and chemicals designed forpressure washer use. Do not use bleach.
1.Connect chemical hose to the pump by one ofthe following methods:
a. Press the chemical hose onto the barb fittinglocated near the high pressure hose connection-see illustration A.
b. Place chemical hose with fitting into chemicalinjector (black elbow)-see illustration B.
2. Place chemical hose filter into desired chemical. Placethe wand/lance into low pressure by one of the followingmethods.
Multi-Reg — Push nozzle forward for low pressure—Figure 12.
Hi-Low — Turn knob counter clockwise until it stops—Figure 13.
Dual Lance — Turn black handle grip counter clockwiseuntil it stops—Figure 14.
Quick Connect – Change to the soap nozzle for lowpressure.The soap nozzle can be identified as having thelarger hole in the nozzle. The soap nozzle is to be used fordrawing all chemicals and soaps-Figure 15.
3. After use of chemical, siphon clean water through chemi-cal hose. Chemicals which remain in the pump candamage and/or clog the pressure valves and chemicalinjector assembly. Damage to the pump due to this willnot be covered under warranty.
Multi-Reg (Low Pressure Setting)
Figure 13
Hi-Low
Figure 14
Dual Lance
Figure 12
Figure 15
Quick Connect with Soap Nozzle forLow Pressure
Larger Hole
OPERATING PROCEDURES ���� �� ���� �� ���� �� ���� �� ���� ��
Illustration A
Illustration B
�������
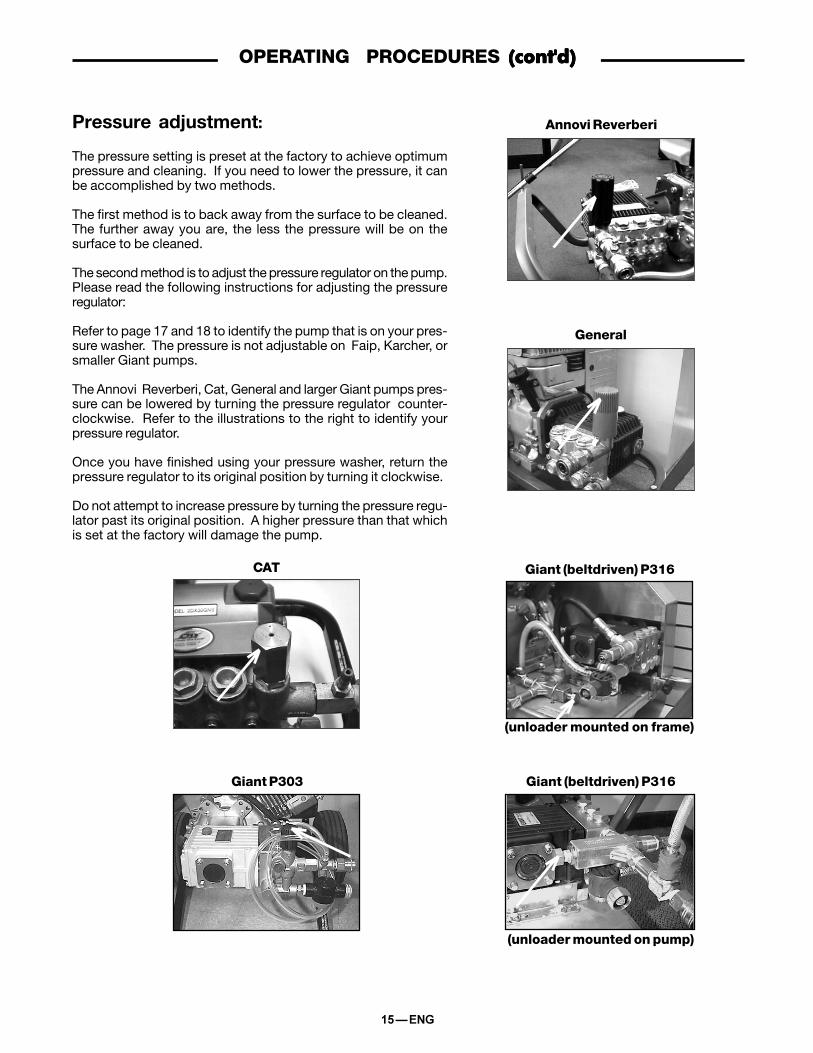
Pressure adjustment:
The pressure setting is preset at the factory to achieve optimumpressure and cleaning. If you need to lower the pressure, it canbe accomplished by two methods.
The first method is to back away from the surface to be cleaned.The further away you are, the less the pressure will be on thesurface to be cleaned.
The second method is to adjust the pressure regulator on the pump.Please read the following instructions for adjusting the pressureregulator:
Refer to page 17 and 18 to identify the pump that is on your pres-sure washer. The pressure is not adjustable on Faip, Karcher, orsmaller Giant pumps.
The Annovi Reverberi, Cat, General and larger Giant pumps pres-sure can be lowered by turning the pressure regulator counter-clockwise. Refer to the illustrations to the right to identify yourpressure regulator.
Once you have finished using your pressure washer, return thepressure regulator to its original position by turning it clockwise.
Do not attempt to increase pressure by turning the pressure regu-lator past its original position. A higher pressure than that whichis set at the factory will damage the pump.
CAT
Annovi Reverberi
OPERATING PROCEDURES ���� �� ���� �� ���� �� ���� �� ���� ��
General
Giant (beltdriven) P316
Giant P303 Giant (beltdriven) P316
(unloader mounted on frame)
(unloader mounted on pump)

�������
Chemical Flow Adjustment
Some pumps are equipped with an adjustable chemical injectoras shown here. Turn the chemical adjustment knob counterclock-wise to increase the amount of chemical used and clockwise todecrease the amount of chemical used. If the knob is turnedclockwise until it stops, the chemical injector will close and willnot draw any chemicals/soaps.
Thermal Relief Valve:During normal operation, the water from your cold water supplycirculates inside the pressure washer pump allowing the pumpto maintain a desired operating temperature. When you stopspraying water through your wand/lance and the engine is stillrunning, this is considered the by-pass mode.
When the unit is in the by-pass mode, the water circulation in-side the pump begins to heat up. If the unit is left in the by-passmode for more than two (2) minutes, the water temperature willrise to a dangerous level and damage the internal componentsof the pump.
In an effort to prevent damage, pumps are equipped with a ther-mal relief valve. This valve will open when the temperature risestoo high. This valve will then release a gush of water in an effortto lower the temperature inside the pump. Immediately after thisoccurs, the valve will close.
Do not allow your unit to operate in the by-pass mode, asoverheating of the pump will cause damage.
Shut Downn Procedure:1. If you have siphoned chemicals, siphon a bucket of clean
water through the chemical hose. NOTE: Failure to do sowill cause damage to the pump.
2. Turn engine off. See Engine Owner’s Manual. NOTE:NEVER turn the water off with the engine running.
3. Turn water source off.4. See Storage section in this manual for proper storage
procedures.
OPERATING PROCEDURES ���� �� ���� �� ���� �� ���� �� ���� ��
Chemical Adjustment
Thermal Relief Valve
or
or
���� !!������ ���� !!������ ���� !!������ ���� !!������ ���� !!������
��������
Karcher Faip (Vertical) Faip (Horizontal)
MAINTENANCE
WHEN DOING MAINTENANCE, YOU MAY BE EXPOSED TO HOT SURFACES, WATER PRESSURE, MOVING PARTS,OR FIRE RESULTING IN DEATH. BEFORE PERFORMING ANY MAINTENANCE OR REPAIR, DISCONNECT SPARKPLUG WIRE, LET ENGINE COOL AND RELEASE ALL WATER PRESSURE. THE ENGINE CONTAINS FLAMMABLEFUEL. DO NOT SMOKE OR WORK NEAR OPEN FLAMES WHILE PERFORMING MAINTENANCE.
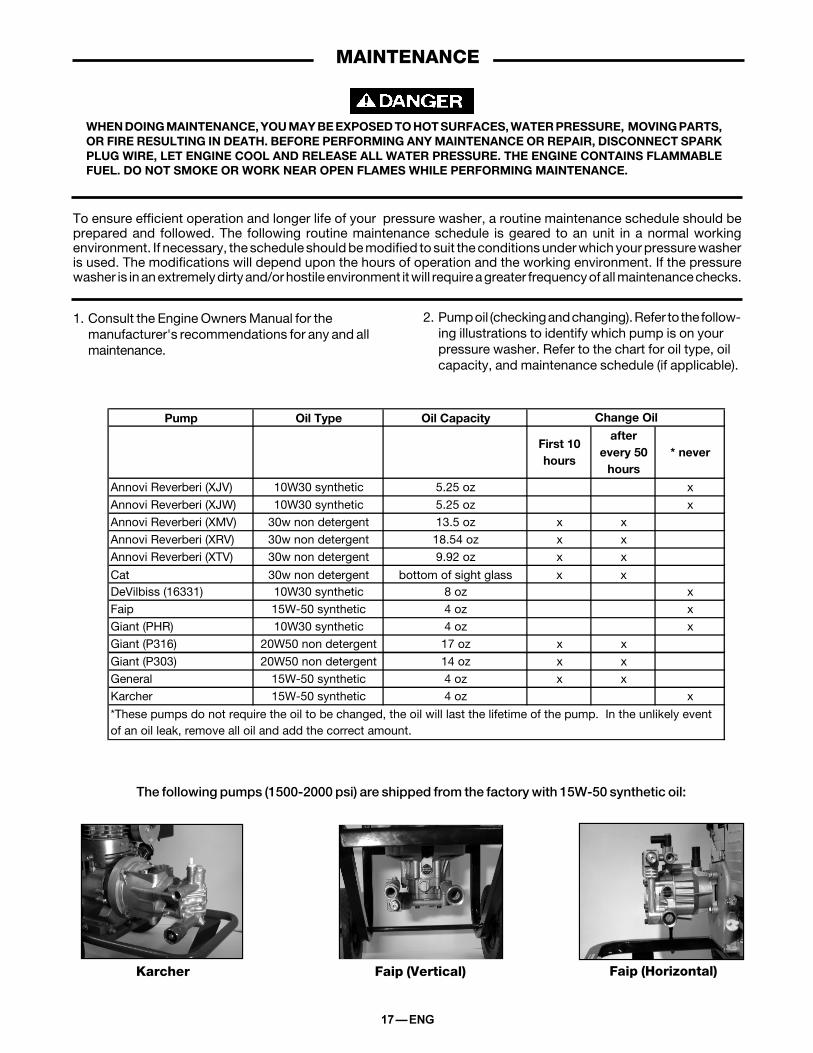
1. Consult the Engine Owners Manual for themanufacturer's recommendations for any and allmaintenance.
To ensure efficient operation and longer life of your pressure washer, a routine maintenance schedule should beprepared and followed. The following routine maintenance schedule is geared to an unit in a normal workingenvironment. If necessary, the schedule should be modified to suit the conditions under which your pressure washeris used. The modifications will depend upon the hours of operation and the working environment. If the pressurewasher is in an extremely dirty and/or hostile environment it will require a greater frequency of all maintenance checks.
The following pumps (1500-2000 psi) are shipped from the factory with 15W-50 synthetic oil:
2. Pump oil (checking and changing). Refer to the follow-ing illustrations to identify which pump is on yourpressure washer. Refer to the chart for oil type, oilcapacity, and maintenance schedule (if applicable).
Pump Oil Type Oil Capacity
Annovi Reverberi (XJV) 10W30 synthetic 5.25 oz x
Annovi Reverberi (XJW) 10W30 synthetic 5.25 oz xAnnovi Reverberi (XMV) 30w non detergent 13.5 oz x xAnnovi Reverberi (XRV) 30w non detergent 18.54 oz x xAnnovi Reverberi (XTV) 30w non detergent 9.92 oz x x
Cat 30w non detergent bottom of sight glass x xDeVilbiss (16331) 10W30 synthetic 8 oz xFaip 15W-50 synthetic 4 oz xGiant (PHR) 10W30 synthetic 4 oz xGiant (P316) 20W50 non detergent 17 oz x x
Giant (P303) 20W50 non detergent 14 oz x xGeneral 15W-50 synthetic 4 oz x x Karcher 15W-50 synthetic 4 oz x
Change Oil
*These pumps do not require the oil to be changed, the oil will last the lifetime of the pump. In the unlikely event of an oil leak, remove all oil and add the correct amount.
First 10 hours
after every 50
hours* never
��������
Cat Giant (PHR Series) General
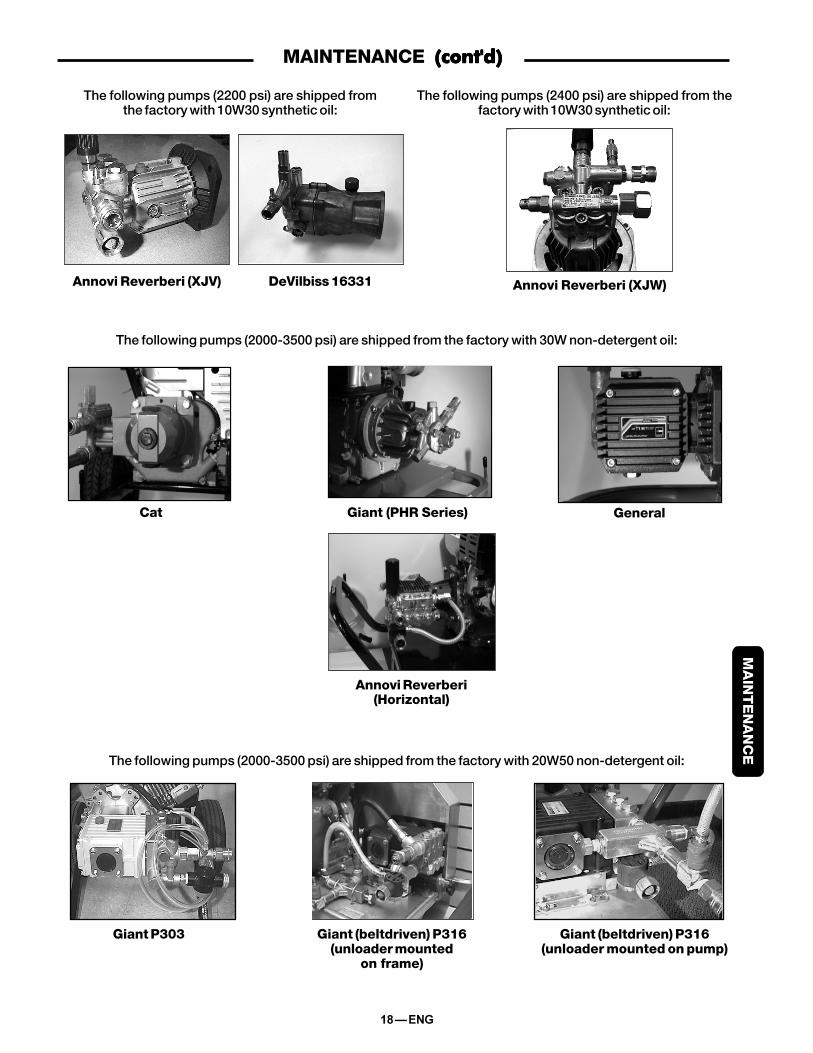
The following pumps (2400 psi) are shipped from thefactory with 10W30 synthetic oil:
The following pumps (2000-3500 psi) are shipped from the factory with 30W non-detergent oil:
Annovi Reverberi(Horizontal)
Annovi Reverberi (XJW)
Giant (beltdriven) P316(unloader mounted
on frame)
Giant P303
MAINTENANCE ���� �� ���� �� ���� �� ���� �� ���� ��
The following pumps (2200 psi) are shipped fromthe factory with 10W30 synthetic oil:
Annovi Reverberi (XJV)
Giant (beltdriven) P316(unloader mounted on pump)
MA
INT
EN
AN
CE
The following pumps (2000-3500 psi) are shipped from the factory with 20W50 non-detergent oil:
DeVilbiss 16331
� ������
MAINTENANCE (cont'd)
Nozzle cleaning:If the nozzle becomes clogged with foreign materials, such asdirt, excessive pressure may develop. If the nozzle becomespartially clogged or restricted, the pump pressure will pulsate.Clean the nozzle immediately using the nozzle kit supplied andthe following instructions:
Multi-Reg Wand/Lance:1. Shut off the pressure washer and turn off the water
supply.
2. Disconnect spark plug wire.
3. Pull trigger on gun handle to relieve any water pressure.
4. Disconnect the wand/lance from the gun.
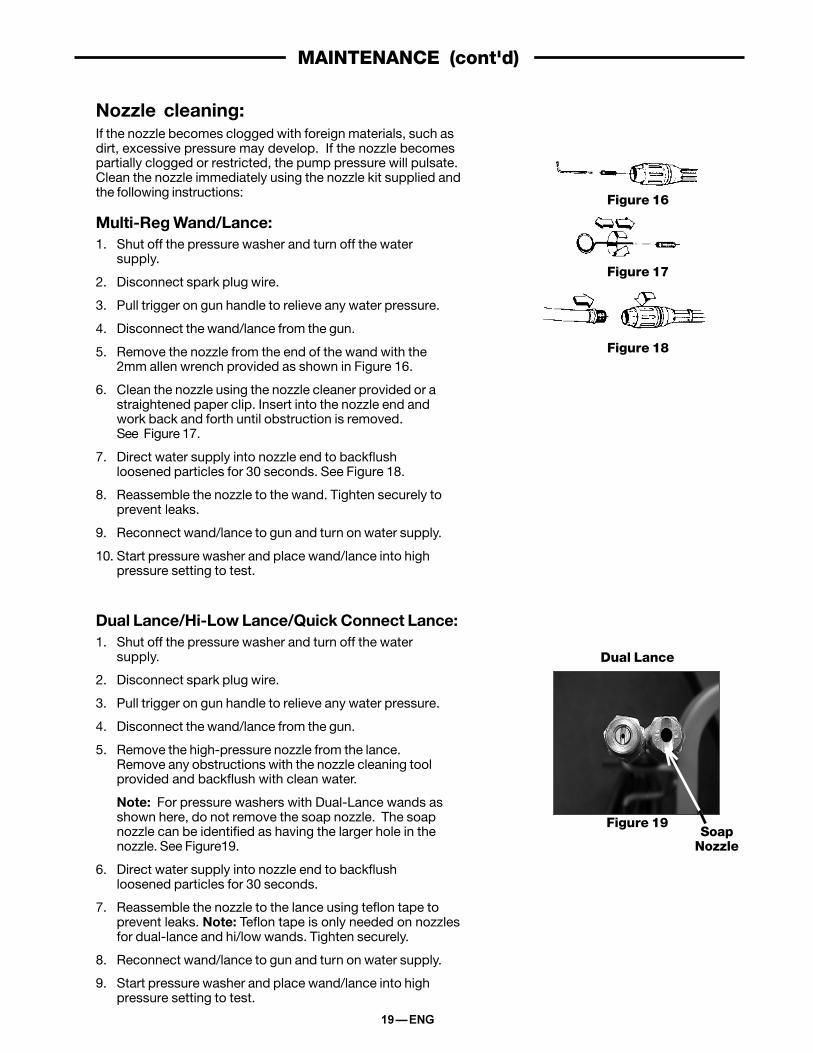
5. Remove the nozzle from the end of the wand with the2mm allen wrench provided as shown in Figure 16.
6. Clean the nozzle using the nozzle cleaner provided or astraightened paper clip. Insert into the nozzle end andwork back and forth until obstruction is removed.See Figure 17.
7. Direct water supply into nozzle end to backflushloosened particles for 30 seconds. See Figure 18.
8. Reassemble the nozzle to the wand. Tighten securely toprevent leaks.
9. Reconnect wand/lance to gun and turn on water supply.
10. Start pressure washer and place wand/lance into highpressure setting to test.
Dual Lance/Hi-Low Lance/Quick Connect Lance:1. Shut off the pressure washer and turn off the water
supply.
2. Disconnect spark plug wire.
3. Pull trigger on gun handle to relieve any water pressure.
4. Disconnect the wand/lance from the gun.
5. Remove the high-pressure nozzle from the lance.Remove any obstructions with the nozzle cleaning toolprovided and backflush with clean water.
Note: For pressure washers with Dual-Lance wands asshown here, do not remove the soap nozzle. The soapnozzle can be identified as having the larger hole in thenozzle. See Figure19.
6. Direct water supply into nozzle end to backflushloosened particles for 30 seconds.
7. Reassemble the nozzle to the lance using teflon tape toprevent leaks. Note: Teflon tape is only needed on nozzlesfor dual-lance and hi/low wands. Tighten securely.
8. Reconnect wand/lance to gun and turn on water supply.
9. Start pressure washer and place wand/lance into highpressure setting to test.
Figure 16
Figure 17
Figure 18
Figure 19
Dual Lance
SoapNozzle
��������
WINTER STORAGE:Items needed: Funnel, 12" piece of garden hose orequivalent and RV antifreeze (approximately 6 ozs.)
1. Follow the previous storage instructions.
2. To winterize the pressure washer, disconnect sparkplug wire from engine and remove high pressure hosefrom pump. Add RV antifreeze through garden hoseconnection as shown in the illustration below. Pullengine rope several times until antifreeze comes out ofhigh pressure hose connection.
3. Remove all water from high pressure hose, gun, andwand. To do so, disassemble high pressure hose fromgun. Drain all water from hose. Hold gun/wandassembly in a vertical position with the nozzle pointingdown, and pull gun trigger to remove any water.
STORAGE:Before you store the pressure washer, make sure you dothe following:
1. Remove gasoline from engine or add fuel stabilizer,such as "Sta-Bil" to the gasoline to preventgumming, and operate unit normally for five minutes.
2. If adding stabilizer, connect water supply and highpressure hose to pump.
3. Start pressure washer and insure water supply isturned on. Depress gun trigger to avoid running theunit in the "bypass mode."
4. Shut off unit and disconnect water supply.
5. Disconnect spark plug wire and remove spark plug.Pour one teaspoon of engine oil into the spark plughole. Place a rag over spark plug hole and pull ropeslowly several times to lubricate cylinder.
6. Protect the chemical hose, high pressure hose, gunand wand from damage (such as being stepped onor run over).
STORAGE & WINTER STORAGE
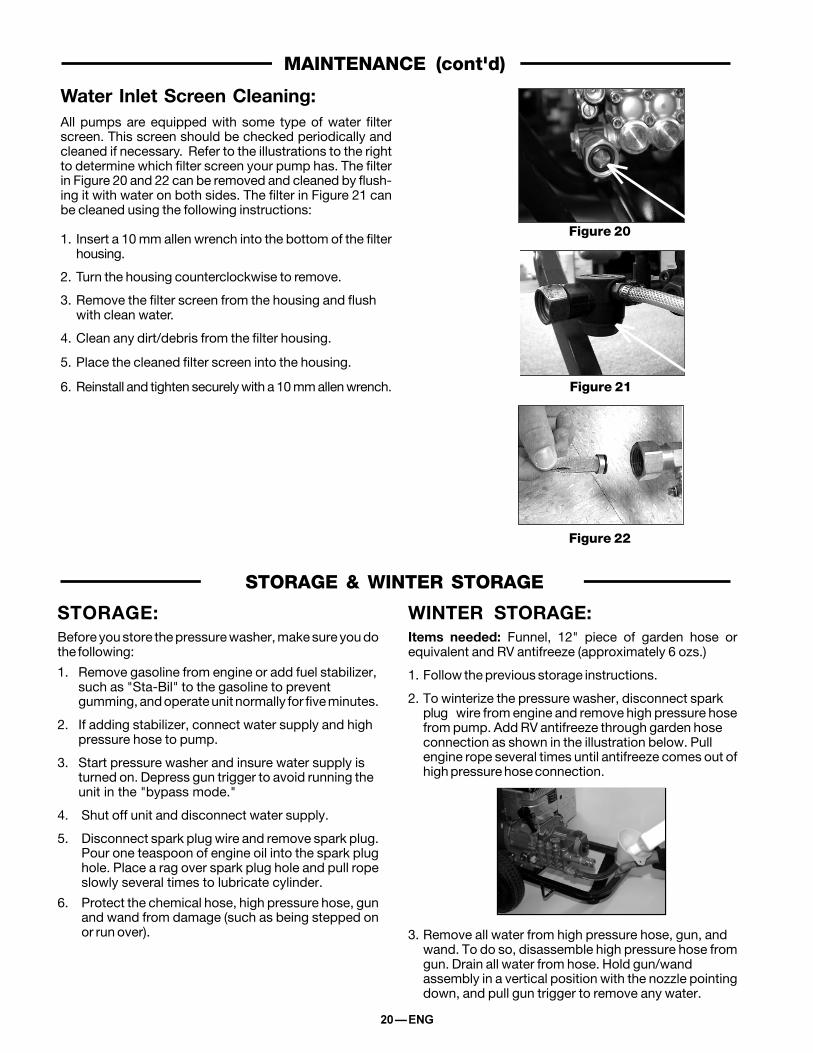
Water Inlet Screen Cleaning:All pumps are equipped with some type of water filterscreen. This screen should be checked periodically andcleaned if necessary. Refer to the illustrations to the rightto determine which filter screen your pump has. The filterin Figure 20 and 22 can be removed and cleaned by flush-ing it with water on both sides. The filter in Figure 21 canbe cleaned using the following instructions:
1. Insert a 10 mm allen wrench into the bottom of the filterhousing.
2. Turn the housing counterclockwise to remove.
3. Remove the filter screen from the housing and flushwith clean water.
4. Clean any dirt/debris from the filter housing.
5. Place the cleaned filter screen into the housing.
6. Reinstall and tighten securely with a 10 mm allen wrench.
Figure 20
Figure 21
MAINTENANCE (cont'd)
Figure 22
��������
TROUBLESHOOTING GUIDE
PROBLEM CAUSE CORRECTIONEngine will not start(see Engine Manual for fur-ther engine troubleshoot-ing)
No or low pressure (initialuse)
Will not draw chemicals
No or low pressure (afterperiod of normal use.)
Water leaking at gun/wandconnection
Water leaking at pump
Oil leaking at pump
1. No fuel.2. Low oil (if oil-alert equipped).3. Pressure buildup after initial use.4. Not primed or choked.5. Spark plug wire not attached.6. Engine ON/OFF switch in OFF
position (If equipped.)
1. Wand not in high pressure.
2. Low water supply.
3. Leak at high pressure hose.
4. Nozzle obstructed.
5. Water filter screen clogged.6. Defective E-Z start valve.
(If applicable)7. Air in hose.
1. Wand not in low pressure.2. Chemical filter clogged.3. Chemical screen not in chemical.
4. Chemical adjustment knob closed.
1. Worn seal or packing.2. Worn or obstructed valves.
1. Worn o-ring.2. Loose hose connection.
1. Loose connections.2. Piston packings worn.
1. Oil seals worn.2. Loose drain plug.3. Worn drain plug, o-ring
(if applicable).4. Worn fill plug o-ring.5. Pump overfilled.6. Incorrect oil used.
1. Add Fuel.2. Add required amount of oil.3. Squeeze gun trigger to relieve pressure.4. Push primer bulb 3 times or choke engine.5. Attach spark plug wire.6. Place engine ON/OFF switch in ON
position.
1. See page 12 and 13 for high pressureoperation.
2. Water supply must be at least 5 GPM @20 PSI (See page 3).
3. Repair leak. Apply teflon tape ifnecessary.
4. Clean nozzle with paper clip or nozzlecleaning tool, pour water into nozzle endto flush out obstruction.
5. Remove and clean filter.6. Check with Authorized Warranty Service
Center (AWSC.)7. Turn off the engine, then the water source.
Disconnect the water source from thepump inlet and turn the water source on toremove all air from the hose. When there isa steady stream of water present, turnwater source off. Reconnect water sourceto pump inlet and turn on water source.Squeeze trigger to remove remaining air.
1. See page 13 for low pressure operation.2. Clean filter.3. Insure end of chemical hose is fully
submerged into chemical.4. Turn knob fully counter-clockwise to open.
1. Have replaced by AWSC.2. Have replaced by AWSC.
1. Check and replace.2. Tighten.
1. Tighten.2. Have replaced by AWSC.
1. Have replaced by AWSC.2. Tighten.3. Check and replace.
4. Check and replace.5. Check for correct amount.6. Drain and fill with correct amount
and type of oil.
TR
OU
BLE
SH
OO
TIN
G
��������
SERVICE NOTES
��������
SERVICE NOTES
3491 Mission Oaks Blvd. / Camarillo, CA 93011
GENERAL MANUAL FOR™
Pressure Washers
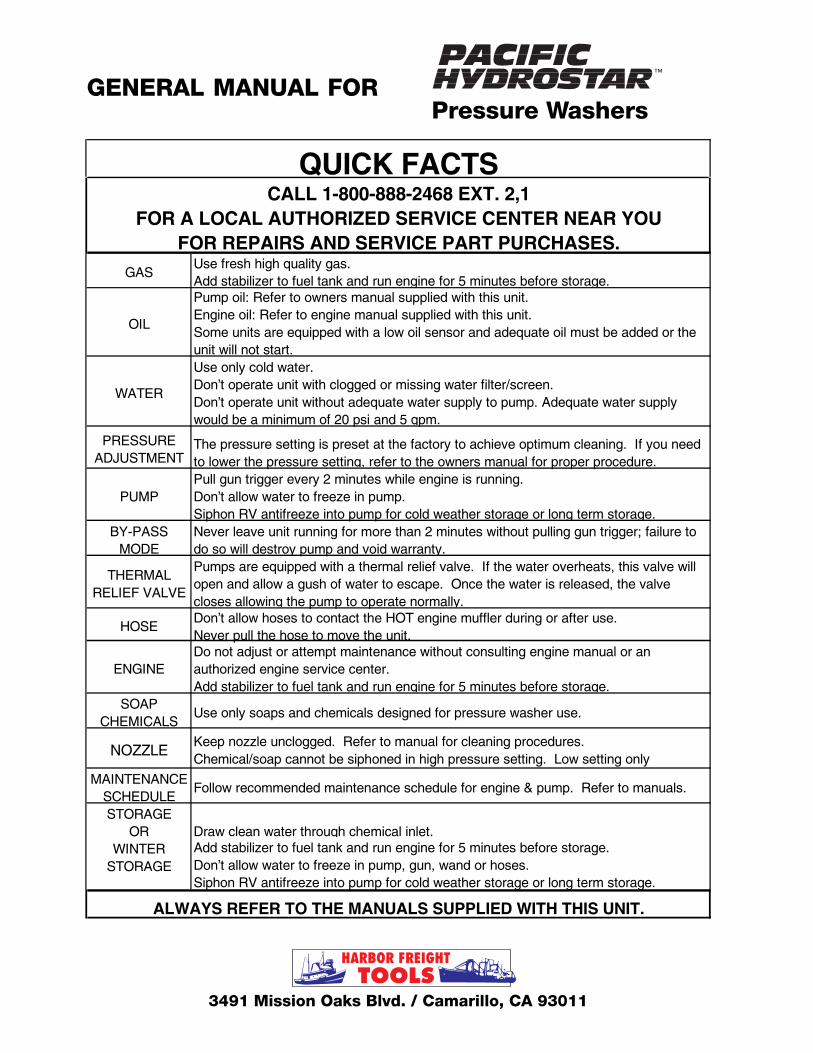
QUICK FACTSCALL 1-800-888-2468 EXT. 2,1
FOR A LOCAL AUTHORIZED SERVICE CENTER NEAR YOUFOR REPAIRS AND SERVICE PART PURCHASES.
GASUse fresh high quality gas.Add stabilizer to fuel tank and run engine for 5 minutes before storage.
OIL
Pump oil: Refer to owners manual supplied with this unit.Engine oil: Refer to engine manual supplied with this unit.Some units are equipped with a low oil sensor and adequate oil must be added or the unit will not start.
WATER
Use only cold water.Don’t operate unit with clogged or missing water filter/screen.Don’t operate unit without adequate water supply to pump. Adequate water supply would be a minimum of 20 psi and 5 gpm.
PRESSUREADJUSTMENT
The pressure setting is preset at the factory to achieve optimum cleaning. If you need to lower the pressure setting, refer to the owners manual for proper procedure.
PUMPPull gun trigger every 2 minutes while engine is running.Don’t allow water to freeze in pump.Siphon RV antifreeze into pump for cold weather storage or long term storage.
BY-PASS MODE
Never leave unit running for more than 2 minutes without pulling gun trigger; failure to do so will destroy pump and void warranty.
THERMALRELIEF VALVE
Pumps are equipped with a thermal relief valve. If the water overheats, this valve will open and allow a gush of water to escape. Once the water is released, the valve closes allowing the pump to operate normally.
HOSEDon’t allow hoses to contact the HOT engine muffler during or after use.Never pull the hose to move the unit.
ENGINEDo not adjust or attempt maintenance without consulting engine manual or an authorized engine service center.Add stabilizer to fuel tank and run engine for 5 minutes before storage.
SOAPCHEMICALS
Use only soaps and chemicals designed for pressure washer use.
NOZZLEKeep nozzle unclogged. Refer to manual for cleaning procedures.Chemical/soap cannot be siphoned in high pressure setting. Low setting only
MAINTENANCESCHEDULE
Follow recommended maintenance schedule for engine & pump. Refer to manuals.
STORAGEOR Draw clean water through chemical inlet.
WINTERSTORAGE
Add stabilizer to fuel tank and run engine for 5 minutes before storage.Don’t allow water to freeze in pump, gun, wand or hoses.Siphon RV antifreeze into pump for cold weather storage or long term storage.
ALWAYS REFER TO THE MANUALS SUPPLIED WITH THIS UNIT.