sec ax1100s en - abt electronics · service call check..... 36 specifi cations ... 1300 naperville...
TRANSCRIPT

Steam oven with microwave and grill functionOPERATION MANUAL WITH COOKBOOK
Read all instructions carefully before using the oven
AX-1100S/1100R
®
SHARP ELECTRONICS CORPORATIONSharp Plaza, Mahwah, NJ 07495-1163
TINSEB302WRRZ-D01 Printed in Thailand
®
SEC AX1100S_en.indd 1SEC AX1100S_en.indd 1 10.12.2 0:47:46 PM10.12.2 0:47:46 PM

C O N T E N T SFor Customer Assistance ................................................................................................ 1
Precautions to Avoid Possible Exposure to Excessive Microwave Energy ............... 1
Limited Warranty .............................................................................................................. 2
Product Information Card ................................................................................................ 2
Important Safety Instructions .......................................................................................... 3
Unpacking and Installation Instructions ........................................................................ 4
Grounding Instructions .................................................................................................... 5
Information You Need to Know .................................................................................. 6-11
Part Names ...................................................................................................................... 12
Control Panel .................................................................................................................. 13
Important Instructions .............................................................................................. 14-16
Before Operating ........................................................................................................... 17
Clean the Oven Before First Use ................................................................................... 17
Automatic Cooking .................................................................................................... 18-24
Manual Cooking ......................................................................................................... 25-28
Other Convenient Features ...................................................................................... 29-31
Cleaning and Care .......................................................................................................... 32
Troubleshooting Chart .............................................................................................. 33-35
Service Call Check ......................................................................................................... 36
Specifi cations ................................................................................................................. 36
Chart ................................................................................................................................ 37
Recipes ....................................................................................................................... 38-43
Touch Guide .................................................................................................................... 44
SEC AX1100S_en.indd 2SEC AX1100S_en.indd 2 10.12.2 0:47:48 PM10.12.2 0:47:48 PM

1
To aid in reporting this Steam Oven in case of loss or theft, please record below the model number and serial number located on the unit. We also suggest you record all the information listed and retain for future reference.
F O R C U S T O M E R A S S I S T A N C E
PRECAUTIONS TO AVOID POSSIBLEEXPOSURE TO EXCESSIVE
MICROWAVE ENERGY(a) Do not attempt to operate this oven with the door open since open-door operation can result
in harmful exposure to microwave energy. It is important not to defeat or tamper with the safety interlocks.
(b) Do not place any object between the oven front face and the door or allow soil or cleaner residue to accumulate on sealing surfaces.
(c) Do not operate the oven if it is damaged. It is particularly important that the oven door close properly and that there is no damage to the: (1) door (bent), (2) hinges and latches (broken or loosened), (3) door seals and sealing surfaces.
(d) The oven should not be adjusted or repaired by anyone except properly qualified service personnel.
Please provide the following information when you write or call: model number, serial number, date of purchase, your complete mailing address (including zip code), your daytime telephone number (including area code) and description of the problem.
TO PHONE:
DIAL 1-800- BE-SHARP ( 237-4277 ) for : SERVICE (for your nearest Sharp Authorized Servicer) PARTS (for your authorized parts distributor) ADDITIONAL CUSTOMER INFORMATION
DIAL 1-800-642-2122 for : REPLACEMENT ACCESSORIES
TO WRITE:
Sharp Electronics Corporation Customer Assistance Center 1300 Naperville Drive Romeoville, IL 60446-1091
TO ACCESS INTERNET: www.sharpusa.com
MODEL NUMBER _______________________ SERIAL NUMBER _____________DATE OF PURCHASE ______________________DEALER ___________________________ TELEPHONE ________________ SERVICER ___________________________ TELEPHONE ________________
SEC AX1100S_en.indd Sec1:1SEC AX1100S_en.indd Sec1:1 10.12.2 0:47:48 PM10.12.2 0:47:48 PM

2
The product information card, which is inside of the Steam Oven carton, should be completed within ten days of purchase and returned. We will keep it on fi le and help you access the information in case of loss, damage or theft. This will also enable us to contact you in the unlikely event that any adjustments or modifi cations are
ever required for your oven.
P R O D U C T I N F O R M A T I O N C A R D
LIMITED WARRANTYSHARP ELECTRONICS CORPORATION warrants to the fi rst consumer purchaser that this Sharp brand product (the Product), when shipped in its original container, will be free from defective workmanship and materials, and agrees that it will, at its option, either repair the defect or replace the defective Product or part thereof with a new or remanufactured equivalent at no charge to the purchaser for parts or labor for the period(s) set forth below.
This warranty does not apply to any appearance items of the Product nor to the additional excluded item(s) set forth below nor to any Product the exterior of which has been damaged or defaced, which has been subjected to improper voltage or other misuse, abnormal service or handling, or which has been altered or modifi ed in design or construction.
In order to enforce the rights under this limited warranty, the purchaser should follow the steps set forth below and provide proof of purchase to the servicer.
The limited warranty described herein is in addition to whatever implied warranties may be granted to purchasers by law. ALL IMPLIED WARRANTIES INCLUDING THE WARRANTIES OF MERCHANTABILITY AND FITNESS FOR USE ARE LIMITED TO THE PERIOD(S) FROM THE DATE OF PURCHASE SET FORTH BELOW. Some states do not allow limitations on how long an implied warranty lasts, so the above limitation may not apply to you.
Neither the sales personnel of the seller nor any other person is authorized to make any warranties other than those described herein, or to extend the duration of any warranties beyond the time period described herein on behalf of Sharp.
The warranties described herein shall be the sole and exclusive warranties granted by Sharp and shall be the sole and exclusive remedy available to the purchaser. Correction of defects, in the manner and for the period of time described herein, shall constitute complete fulfi llment of all liabilities and responsibilities of Sharp to the purchaser with respect to the Product, and shall constitute full satisfaction of all claims, whether based on contract, negligence, strict liability or otherwise. In no event shall Sharp be liable, or in any way responsible, for any damages or defects in the Product which were caused by repairs or attempted repairs performed by anyone other than an authorized servicer. Nor shall Sharp be liable or in any way responsible for any incidental or consequential economic or property damage. Some states do not allow the exclusion of incidental or consequential damages, so the above exclusion may not apply to you.
THIS WARRANTY GIVES YOU SPECIFIC LEGAL RIGHTS. YOU MAY ALSO HAVE OTHER RIGHTS WHICH VARY FROM STATE TO STATE.
AX-1100S or AX-1100R Home Use Steam Oven. Be sure to have this information available when you need service for your Product.
One (1) year parts and labor. The warranty period continues for an additional four (4) years, for a total of fi ve (5) years, with respect to the magnetron tube in the Product for parts only; labor and service are not provided free of charge for this additional period.
Non-functional accessories and light bulb.
From a Sharp Authorized Servicer located In the United States. To fi nd the location of the nearest Sharp Authorized Servicer, call Sharp toll free at 1-800-BE-SHARP (1-800-237-4277).
Ship prepaid or carry in your Product to a Sharp Authorized Servicer. Be sure to have Proof of Purchase available. If you ship the Product, be sure it is insured and packaged securely.
Your Product Model Number & Description:
Warranty Period for this Product:
Additional Item(s) Excluded from Warranty Coverage (if any):Where to Obtain Service:
What to do to Obtain Service:
TO OBTAIN SUPPLY, ACCESSORY OR PRODUCT INFORMATION, CALL 1-800-BE-SHARP OR VISIT www.sharpusa.com.Save the Proof of Purchase as it is needed should your oven ever require warranty service.
SEC AX1100S_en.indd Sec1:2SEC AX1100S_en.indd Sec1:2 10.12.2 0:47:48 PM10.12.2 0:47:48 PM

3
I M P O R T A N T S A F E T Y I N S T R U C T I O N S
1. Read all instructions before using the appliance.
2. Read and follow the specifi c
“PRECAUTIONS TO AVOID POSSIBLE EXPOSURE TO EXCESSIVE MICROWAVE ENERGY” on page 1.
3. This appliance must be grounded. Connect only to
properly grounded outlet. See “GROUNDING INSTRUCTIONS” on page 5.
4. Install or locate this appliance only in accordance with the provided installation instructions.
5. Some products such as whole eggs and sealed containers - for example, closed glass jars - are able to explode and should not be heated in this oven.
6. Use this appliance only for its intended use as described in this manual. Do not use corrosive chemicals or vapors in this appliance. This type of oven is specifi cally designed to heat, cook or dry food. It is not designed for industrial or laboratory use.
7. As with any appliance, close supervision is
necessary when used by children.
8. Do not operate this appliance if it has a damaged cord or plug, if it is not working properly or if it has been damaged or dropped.
9. This appliance should be serviced only by qualifi ed service personnel. Contact nearest Sharp Authorized Servicer for examination, repair or adjustment.
10. Do not cover or block any openings on the appliance.
11. Do not store or use this appliance outdoors. Do not use this product near water, - for example near a kitchen sink, in a wet basement, near a swimming pool or similar locations.
12. Do not immerse cord or plug in water.
13. Keep cord away from heated surfaces.
When using electrical appliances basic safety precautions should be followed, including the following:
WARNING - To reduce the risk of burns, electric shock, fi re, injury to persons or exposure to excessive microwave energy:
14. Do not let cord hang over edge of table or counter.
15. See door surface cleaning instructions on page 32.
16. To reduce the risk of fi re in the oven cavity:a. Do not overcook food. Carefully attend
appliance when paper, plastic or other combustible materials are placed inside the oven to facilitate cooking.
b. Remove wire twist-ties from paper or plastic bags before placing bag in oven.
c. If materials inside the oven ignite, keep oven door closed, turn oven off and disconnect the power cord or shut off power at the fuse or circuit breaker panel.
d. Do not use the cavity for storage purposes. Do not leave paper products, cooking utensils or food in the cavity when not in use.
17. Liquids, such as water, coffee or tea are able to be overheated beyond the boiling point without appearing to be boiling. Visible bubbling or boiling when the container is removed from the microwave oven is not always present. THIS COULD RESULT IN VERY HOT LIQUID SUDDENLY BOILING OVER WHEN A SPOON OR OTHER UTENSIL IS INSERTED INTO THE LIQUID. To reduce the risk of injury to persons:
a. Do not overheat the liquid. b. Stir the liquid both before and halfway
through heating it. c. Do not use straight-sided containers
with narrow necks. Use a wide-mouthed container.
d. After heating, allow the container to stand in the microwave oven at least for 20 seconds before removing the container.
e. Use extreme care when inserting a spoon or other utensil into the container.
18. If the oven light fails, consult a SHARP AUTHORIZED SERVICER.
19. Do not store anything directly on top of the appliance surface when the appliance is in operation.
SAVE THESE INSTRUCTIONS
SEC AX1100S_en.indd Sec1:3SEC AX1100S_en.indd Sec1:3 10.12.2 0:47:49 PM10.12.2 0:47:49 PM

4
U N P A C K I N G A N D I N S T A L L A T I O N I N S T R U C T I O N SUnpacking and Examining Your OvenRemove:1. all packing materials from inside the oven cavity.
Read enclosures and SAVE the Operation
Manual. 2. the feature sticker from the outside of the door, if
there is one.
Check the oven for any damage, such as misaligned or bent door, damaged door seals and sealing surfaces, broken or loose door hinges and latches and dents inside the cavity or on the door. If there is any damage, do not operate the oven and contact your dealer or SHARP AUTHORIZED SERVICER.
Choosing a Location for Your OvenYou will use your oven frequently so plan its location for ease of use. Do not place the oven on a mat, carpet or tablecloth or block the ventilation openings. The oven must be placed on a countertop which is a minimum of 36 inches (91.5 cm) from the fl oor. Allow at least 2 inches (5.1 cm) on the sides, and 4 inches (10.2 cm) above the top, and 2 inches (5.1 cm) at the rear of the oven for air circulation. Be sure to position oven so that the rear cannot be touched inadvertently.
Door seals and sealing surfaces
Latch
Door
hinges
Oven cavity
SEC AX1100S_en.indd Sec1:4SEC AX1100S_en.indd Sec1:4 10.12.2 0:47:49 PM10.12.2 0:47:49 PM

5
This appliance must be grounded. This oven is equipped with a cord having a grounding wire with a grounding plug. It must be plugged into a wall receptacle that is properly installed and grounded in accordance with the National Electrical Code and local codes and ordinances. In the event of an electrical short circuit, grounding reduces the risk of electric shock by providing an escape wire for the electric current.
WARNING - Improper use of the grounding plug can result in a risk of electric shock.
Electrical RequirementsThe electrical requirements are a 120 volt 60 Hz, AC only, 15 amp. or more protected electrical supply. It is recommended that a separate circuit serving only this oven be provided.
The oven is equipped with a 3-prong grounding plug. It must be plugged into a wall receptacle that is properly installed and grounded. Should you only have a 2-prong outlet, have a qualifi ed electrician install a correct wall receptacle.
A 3-prong adapter may be purchased and used temporarily if local codes allow. Follow package directions.
A short power-supply cord is provided to reduce risk of becoming entangled in or tripping over a longer cord.
Extension CordIf it is necessary to use an extension cord, use only a 3-wire extension cord that has a 3-blade grounding plug and a 3-slot receptacle that will accept the plug on the oven. The marked rating of the extension cord should be AC 115-120 volt, 15 amp. or more.
Be careful not to drape the cord over the countertop or table where it can be pulled on by children or tripped over accidentally.
NOTES:1. If you have any questions about the grounding or electrical
instructions, consult a qualifi ed electrician or service person.2. Neither Sharp nor the dealer can accept any liability for damage
to the oven or personal injury resulting from failure to observe the correct electrical connection procedures.
Radio or TV InterferenceShould there be any interference caused by the microwave part of the oven to your radio or TV, check that the oven is on a different electrical circuit, relocate the radio or TV as far away from the oven as feasible or check position and signal of receiving antenna.
G R O U N D I N G I N S T R U C T I O N S
3-Prong Plug
GroundedReceptacle Box
GroundingAdaptor
GroundedReceplacle Box
Grounding Pin
3-Prong Receptacle
Tab forGrounding Screw
Screw
Permanent and Correct Installation
Temporary Use
SEC AX1100S_en.indd Sec1:5SEC AX1100S_en.indd Sec1:5 10.12.2 0:47:49 PM10.12.2 0:47:49 PM

6
I N F O R M A T I O N Y O U N E E D T O K N O W
• Please make reading the Operation Manual your very fi rst step in working with your new oven. This important booklet explains exactly how the oven works and what you need to know to operate it successfully.
• Use the information in the charts and recipes to help adapt your own favorite recipes or convenience foods for preparation in the oven.
• The stated cooking times in the charts and recipes are guidelines and are based on standard conditions. Cooking results will vary according to the conditions of food, utensils and the oven. Please check the cooking result and if necessary, adjust cooking times accordingly.
• Prepare the food and use accessories as instructed.
• When placing food in the oven, turning, stirring or adding something to the food, please ensure the door does not remain open long so as to avoid loss of heat.
• Please refer to Food and Utensil Position Chart on page 25 before setting food in the oven.
• Always distribute the ingredients evenly inside a piece of ovenware or steam tray to achieve even cooking results.
• There is no need to fi ll the water tank for Microwave, Grill, Grill Mix High or Grill Mix Low cooking.
• If you would like to adapt your favorite recipes for the microwave, you should take note of the following: Shorten cooking times by a third to a half. Follow the example of the recipes in this cook book.
POINTS TO REMEMBER
SEC AX1100S_en.indd Sec1:6SEC AX1100S_en.indd Sec1:6 10.12.2 0:47:50 PM10.12.2 0:47:50 PM

7
I N F O R M A T I O N Y O U N E E D T O K N O W
The chart below will help you decide what utensils and coverings should be used in each mode.
Small flat pieces of aluminum foil placed smoothly on food can be used to shield areas from cooking or defrosting too quickly. Keep foil at least 1 inch (2.54 cm) from walls of oven.
Aluminium Foil
Metal, Foil Containers
China, Ceramics, Porcelain, Pottery, Stoneware
Heat-resistant Glass-waree.g. Pyrex®
Non-heat-resistant Glassware
Plastic/Polystyrene heat-resistant temp. over 140°C
Plastic, Thermoset
Plastic Wrap heat-resistant temp. over 140°C
Paper Towels,Paper Plates
Containers made of synthetic material
Parchment Paper
Wax Paper
Baking paper
Roasting Rack
Roasting Bags
Silver Dishes and Cooking Utensils or Containers that might rust inside the oven.
Rack
Steam trays
Glass tray
Utensils -Coverings
Steam
YES
Grill Microwave
YESYES
Use microwave-safe plastic containers for reheating and defrosting. Some microwave-safe plastics are not suitable f o r c o o k i n g f o o d s w i t h high sugar content. Follow manufacturer’s directions.
Care must be taken as some containers warp, melt or discolor at high temperatures.
Only use for warming or to absorb moisture. Care must be taken, as overheating may cause fi re. Do not use recycled paper towels which may contain metal fi lings.
Oven-proof porcelain, pottery, glazed earthenware and bone china are usually suitable. Do not use the container if it has a fl aw.
Care should be taken if using fi ne glassware as it can break or crack if heated suddenly.
Cooking Mode
Follow manufacturer ’s directions.
They could melt at high temperature.
Grill Mix
YES
NOYESYES NO
YESYESYES YES
In general, porcelain is suitable. Please be sure that your porcelain does not contain any metal or gold or silver plating. Check manufacturer’s recommendation for being microwave safe. Do not use the container if it has a fl aw.
YESYESYES YES
YESNOYES NO
YESNONO NO
YESNOYES NO
NONONO NO
YESNOYES NO
YESNONO NO
NONONO NO
NOYESNO YES
The metal rack supplied have been specially designed for Grill Mix and will not damage the oven.
NONOYES NO
YESYESYES YES
ABOUT UTENSILS AND COVERINGS
NONO
YESNOYES NO
YESNONO NO
NONOYES NO
NONONO NO
To prevent the glass tray from breaking:
• Before cleaning the glass tray with water, leave the glass tray to cool.
• Do not place anything hot on a cold glass tray.• Do not place anything cold on a hot glass tray
NO NO
SEC AX1100S_en.indd Sec1:7SEC AX1100S_en.indd Sec1:7 10.12.2 0:47:50 PM10.12.2 0:47:50 PM

8
DISH CHECK. If you wish to check if a dish is safe for microwaving, place the empty dish in the oven and microwave on 100% power for 30 seconds. If the dish becomes very hot, do NOT use it for microwaving.
ACCESSORIES There are many microwave or heat-resistant accessories available for purchase. Evaluate carefully before you purchase so that they meet your needs. A microwave-safe thermometer will assist you in determining correct doneness and assure you that foods have been cooked to safe temperatures when using microwave-only cooking. Sharp is not responsible for any damage to the oven when accessories are used.
For automatic cooking, use the recommended container in the cooking chart in this operation manual or the cookbook.
I N F O R M A T I O N Y O U N E E D T O K N O W
ABOUT STEAM COOKING
There are certain techniques for cooking with steam. It is essential that these techniques are followed for good results. Many of them are similar to those used in conventional cooking so may require little change. Note information in all of the charts in the cookbook for all cooking options that use Steam (Healthy Cooking*, Steam Cook High, Steam Cook Low).*Except for Auto Grill
• Always attend the oven when in use.• Use utensils/cookware suitable for the cooking mode as described on page 7.• Ventilate the room to allow the steam to dissipate.• After cooking and the oven has cooled, remove and empty the water tank, wipe oven cavity with a
soft cloth or sponge. Empty the drip tray.
Ensure food is arranged evenly. Food which has little or no space between will take longer to cook, please ensure food is positioned with enough space between items to allow the steam to circulate around it. For the container, a shallow dish is suitable. It is not recommended to use dense dishes, because of the thickness of such dishes, recommended cooking times will have to be extended.
Covering is not necessary in most cases. If a cover is required, aluminum foil is recommended to keep food from becoming wet from the condensed water in the oven cavity. Covered food will take longer to cook.
For accurate cooking times, keep the door closed.
Sometimes soups or casseroles reheated without covering look watery after cooking. Appearance will be better if stirred well.
Standing time is recommended after cooking to allow heat to disperse equally throughout the food. Do not allow to stand in the oven for a long time; food may be
overcooked or wet from the residual steam.
Container
Covering
Door
Stir
Stand
Cooking Techniques
FOR STEAM COOKING
Utensils should be checked to ensure that they are suitable for use in each cooking mode. When heating food in plastic containers, pay special attention to the melting temperature of the containers. Never heat the plastic containers at over their melting temperature. Keep an eye on the oven due to the possibility of melting and ignition.
SEC AX1100S_en.indd Sec1:8SEC AX1100S_en.indd Sec1:8 10.12.2 0:47:51 PM10.12.2 0:47:51 PM
9
I N F O R M A T I O N Y O U N E E D T O K N O W
• Check that food is thoroughly cooked/reheated before serving.• Cooking time will be affected by the shape, depth, quantity and temperature of food together with the size,
shape and material of the container.
Density
Quantity
Size
Shape
Temperature of Food
Seasoning andFlavoring
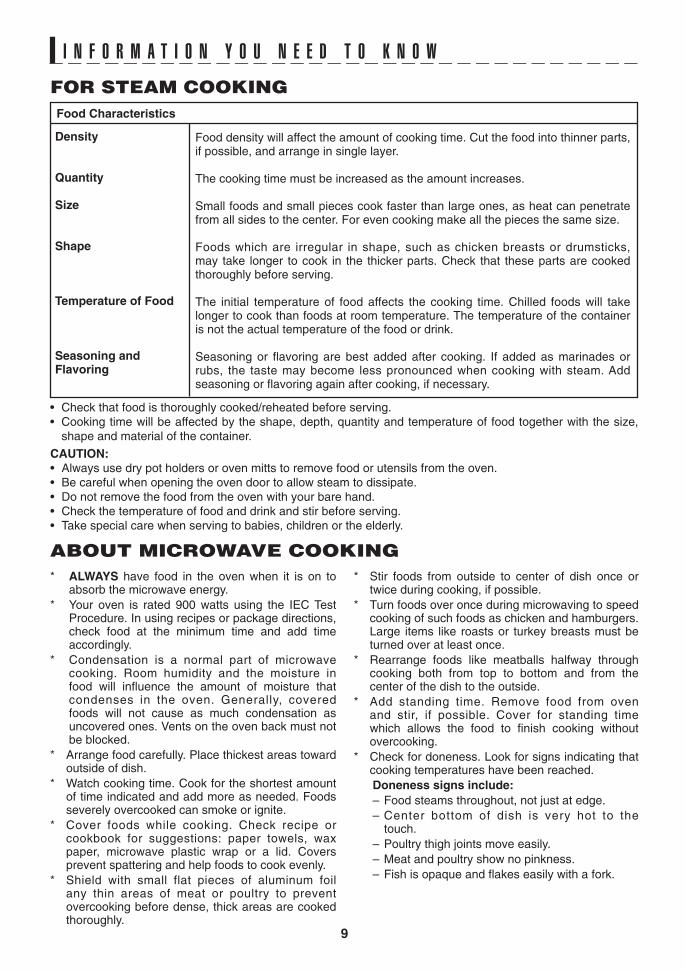
Food Characteristics
Food density will affect the amount of cooking time. Cut the food into thinner parts, if possible, and arrange in single layer.
The cooking time must be increased as the amount increases.
Small foods and small pieces cook faster than large ones, as heat can penetrate from all sides to the center. For even cooking make all the pieces the same size.
Foods which are irregular in shape, such as chicken breasts or drumsticks, may take longer to cook in the thicker parts. Check that these parts are cooked thoroughly before serving.
The initial temperature of food affects the cooking time. Chilled foods will take longer to cook than foods at room temperature. The temperature of the container is not the actual temperature of the food or drink.
Seasoning or fl avoring are best added after cooking. If added as marinades or rubs, the taste may become less pronounced when cooking with steam. Add seasoning or fl avoring again after cooking, if necessary.
CAUTION:• Always use dry pot holders or oven mitts to remove food or utensils from the oven. • Be careful when opening the oven door to allow steam to dissipate. • Do not remove the food from the oven with your bare hand. • Check the temperature of food and drink and stir before serving. • Take special care when serving to babies, children or the elderly.
FOR STEAM COOKING
* ALWAYS have food in the oven when it is on to absorb the microwave energy.
* Your oven is rated 900 watts using the IEC Test Procedure. In using recipes or package directions, check food at the minimum time and add time accordingly.
* Condensation is a normal part of microwave cooking. Room humidity and the moisture in food will infl uence the amount of moisture that condenses in the oven. Generally, covered foods will not cause as much condensation as uncovered ones. Vents on the oven back must not be blocked.
* Arrange food carefully. Place thickest areas toward outside of dish.
* Watch cooking time. Cook for the shortest amount of time indicated and add more as needed. Foods severely overcooked can smoke or ignite.
* Cover foods while cooking. Check recipe or cookbook for suggestions: paper towels, wax paper, microwave plastic wrap or a lid. Covers prevent spattering and help foods to cook evenly.
* Shield with small flat pieces of aluminum foil any thin areas of meat or poultry to prevent overcooking before dense, thick areas are cooked thoroughly.
ABOUT MICROWAVE COOKING
* Stir foods from outside to center of dish once or twice during cooking, if possible.
* Turn foods over once during microwaving to speed cooking of such foods as chicken and hamburgers. Large items like roasts or turkey breasts must be turned over at least once.
* Rearrange foods like meatballs halfway through cooking both from top to bottom and from the center of the dish to the outside.
* Add standing time. Remove food from oven and stir, if possible. Cover for standing time which allows the food to fi nish cooking without overcooking.
* Check for doneness. Look for signs indicating that cooking temperatures have been reached.
Doneness signs include:
– Food steams throughout, not just at edge.
– Center bottom of dish is very hot to the touch.
– Poultry thigh joints move easily.
– Meat and poultry show no pinkness.
– Fish is opaque and fl akes easily with a fork.
SEC AX1100S_en.indd Sec1:9SEC AX1100S_en.indd Sec1:9 10.12.2 0:47:51 PM10.12.2 0:47:51 PM

10
I N F O R M A T I O N Y O U N E E D T O K N O W
ABOUT CHILDREN
Children below the age of 7 should use the oven with a supervising person very near to them. Between the ages of 7 and 12, the supervising person should be in the same room.
The child must be able to reach the oven comfortably; if not, he/she should stand on a sturdy stool.
At no time should anyone be allowed to lean or swing on the oven door.
Children should be taught all safety precautions.
Don’t assume that because a child has mastered one cooking skill he/she can cook everything.
Children need to learn that the oven is not a toy. Young children should be supervised to ensure that they do not play with the oven.
DON’T
* Cook eggs in shells.* Reheat whole eggs.* Dry nuts or seeds in shells.
* Pop popcorn in regular brown bags or glass bowls.
* Exceed maximum time on popcorn package.
* Heat baby food in original jars.* Heat disposable bottles.* Heat bottles with nipples on.
* Heat or cook in closed glass jars or air tight containers.
* Can in the microwave as harmful bacteria may not be destroyed.
* Deep fat fry.* Dry wood, gourds, herbs or wet
papers.
DO
* Puncture egg yolks before cooking to prevent “explosion”.
* Pierce skins of potatoes, apples, squash, hot dogs and sausages so that steam escapes.
* Use specially bagged popcorn for the microwave oven.
* Listen while popping corn for the popping to slow to 1 or 2 seconds or use SENSOR POPCORN for “no-guess” popping.
* Transfer baby food to small dish and heat carefully, stirring often. Check temperature before serving.
* Put nipples on bottles after heating and shake thoroughly. “Wrist” test before feeding.
* Cut baked goods with fi lling after heating to release steam and avoid burns.
* Stir liquid briskly before and after heating to avoid “eruption”.
* Use deep bowl when cooking liquid or cereal to prevent boilovers.
Eggs, sausages, nuts, seeds, fruits & vegetables
Popcorn
Baby food
General
ABOUT FOOD WHEN USING THE MICROWAVE MODE
• Check foods to see that they are cooked to the United States Department of Agriculture's recommended temperatures.
ABOUT SAFETY
... for beef, lamb or veal cut into steaks, chops or roasts, fi sh
... for fresh pork, ground meat, f ish, seafood, egg dishes, frozen prepared food and beef, lamb or veal cut into steaks, chops or roasts
... for leftover, ready-to-reheat refrigerated, deli and carry out “ fresh” food, whole chicken or turkey, chicken or turkey breasts and ground poultry used in chicken or turkey burgers. NOTE: Do not cook whole, stuffed pou l t ry. Cook s tu f f ing separately to 165°F (74°C).
145°F(63°C)
T E M P F O O D
160°F(71°C)
165°F(74°C)
SEC AX1100S_en.indd Sec1:10SEC AX1100S_en.indd Sec1:10 10.12.2 0:47:51 PM10.12.2 0:47:51 PM

11
I N F O R M A T I O N Y O U N E E D T O K N O W
• To test for doneness, insert a meat thermometer in a thick or dense area away from fat or bone. NEVER leave the thermometer in the food during cooking, unless it is approved for microwave oven use.
• Accessible parts (e.g. oven door, oven cavity, dishes, accessories and especially the grill heating element) may become hot during use. Use dry pot holders or oven mitts when removing container, food and oven accessories from the oven and be careful not to touch the oven cavity to prevent burns.
• Use care when opening door. Avoid steam burns by directing steam away from the face and hands. Always stand back from the oven when opening it.
• Slowly lift the farthest edge of a dish’s covering and carefully open popcorn and oven cooking bags away from the face.
• Stay near the oven while it's in use and check cooking progress frequently so that there is no chance of overcooking food.
• NEVER use the cavity for storing cookbooks or other items.
• Select, store and handle food carefully to preserve its high quality and minimize the spread of foodborne bacteria.
• Use care when removing items from the oven so that the utensil, your clothes or accessories do not touch the door projection.
• Do not touch around the oven light. This part will become hot when the oven light is on.
• To avoid burns, always be careful of splashing grease from the baking tray when removing roasted or broiled meats from the oven.
• To avoid burns, always test food and container temperature and stir before serving. Pay special attention to the temperature of containers, foods and drinks. Do not drink beverage or soup without checking the container’s temperature.
• Do not touch the oven door, outer cabinet, rear cabinet, oven cavity, ventilation openings,
accessories, dishes and the escaping steam from the air vent openings during operation because
they will become hot.
• Do not operate the oven if water tank cracks and water leaks. Call 1-800-BE-SHARP to purchase a
replacement part.
• After use, condensed water may be inside oven cavity, especially on the oven fl oor. Dry any liquid residue with a sponge and wipe out to keep the oven clean.
• Do not place anything on the outer cabinet during operation.
• Do not move the oven during the operation. If the oven needs to be moved, always drain all water inside the oven using the DRAIN WATER function (See page 16). After draining, empty the drip tray.
• To prevent condensation, which could corrode the appliance, do not leave cooked food in the oven for an extended period.
• Clean the oven at regular intervals and remove any food deposits in the oven or on the door.
• Do not heat oil or fat for deep frying.
• ALWAYS use potholders to prevent burns when handling utensils that are in contact with hot food. Enough heat from the food can transfer through utensils to cause skin burns. In Steam, Grill and Grill Mix modes, cabinet, interior and door may be too hot to touch.
• Keep aluminum foil used for shielding at least 1 inch (2.54 cm) away from walls, ceiling and door for microwave cooking.
• Do not pour cold water on the oven fl oor after cooking as it might break.
• Do not pour cold water on the door as it might break.
• Do not touch hot surfaces.
• T h e u s e o f a c c e s s o r y a t t a c h m e n t s n o t recommended by the appliance manufacturer may cause injuries.
• The oven should not be left unattended during operation. Oven temperatures that are too high or cooking times that are too long may overheat foods resulting in a fi re.
• Do not insert fi ngers or objects in the steam outlets or air vent openings, as this may damage the oven and cause an electric shock or a hazard.
• If any objects drop inside the air vent openings,
turn off the oven immediately, unplug and consult a Sharp Authorized Servicer.
• Do not touch the plug with wet hands when inserting or removing from the outlet. Plug securely into the electric wall receptacle and remove by
gripping on the plug end. Never pull using just the cord.
SEC AX1100S_en.indd Sec1:11SEC AX1100S_en.indd Sec1:11 10.12.2 0:47:52 PM10.12.2 0:47:52 PM

12
P A R T N A M E S
NOTE:
Place the rack on glass tray as shown
in Figure 1.
WARNING:
T h e o v e n c a v i t y, d o o r, o u t e r
cabinet, accessories and dishes will become very hot, use thick dry pot holders when removing the food or accessories from the oven to prevent
burns.
1 Ventilation openings Be aware that hot steam or air comes out during steam or grill mix cooking, and keep children away from the oven.
2 Door open handle
3 LCD display
4 Control panel
5 Oven lamp
6 Upper position (position 3)
7 Lower position (position 2)
8 Water tank (See page 14.)
9 Door seals and sealing surfaces
10 Latch
11 Oven fl oor (position 1)
12 Door hinges
13 Steam outlets
14 Drip tray (See page 14.)
15 Oven cavity
16 See through door
17 Grill heating element (at the oven cavity ceiling)
18 Door lever
To open, grip the door lever from the bottom and pull it towards you.
ACCESSORIES
19 Rack
For Grill and Grill Mix.
Do not use for Steam and Microwave.
Always place on glass tray.
20 Glass tray
21 Steam tray x2
For Steam only. Always place above/on glass tray. Do not use for Microwave, Grill
and Grill Mix.
WARNING for stacking the steam tray and glass tray:After cooking, take out the steam tray fi rst. See figure 2. Be aware of excess water from the steam tray, we recommend you place it directly on a flat dish or tray to avoid spillages. Before taking out the glass tray, make sure that it is cool. Be aware that there may be water on the glass tray, so take care when removing it.
192120
Figure 1
Rack
Glass tray
Figure 2
Pot holder
Glass tray
Steam tray
6
8
9
10 1116
13 517
7
12
15 14
14
3
1
4
2
18
SEC AX1100S_en.indd Sec1:12SEC AX1100S_en.indd Sec1:12 10.12.2 0:47:52 PM10.12.2 0:47:52 PM

13
C O N T R O L P A N E LDISPLAY INFORMATION
The display shows useful information including cooking time and cooking mode.
AUTO: Automatic cooking is selected or in progress.
SENSOR: Sensor cooking is selected or in progress.
MANUAL: Manual cooking is selected or in progress.
CHECK: Some action is necessary (e.g. turn over, stir).
DEF: Steam Defrost or Micro Defrost is selected or in progress.
ON: The oven is in operation.
EXTEND: Cooking time can be extended.
HOT: The oven is very hot.
▲ (MORE): More time adjustment is selected for automatic cooking.
▼ (LESS): Less time adjustment is selected for automatic cooking.
DESCALE: Descaling is necessary.
WATER: Water is necessary. When this indicator is appeared on the
display, the oven is operating in the menu using water.
Tray position indicators:
The position of the tray(s) for automatic cooking and
manual steam cooking.
3: Upper position
2: Lower position
1: Oven Floor
1. Cooking mode & START indicators
The indicator will fl ash or light up during the operation. You can press a concerned key when the indicators are fl ashing.
When the indicators light up on the display, they mean that each cooking mode is selected or the oven is operating in each cooking mode.
1
Number next to the control panel illustration indicates pages
on which there are feature descriptions and usage information.
18
24
21
26 28
26
17
16,17,30
22
27
27 27
30
SEC AX1100S_en.indd Sec1:13SEC AX1100S_en.indd Sec1:13 10.12.2 0:47:53 PM10.12.2 0:47:53 PM

14
I M P O R T A N T I N S T R U C T I O N SREAD CAREFULLY BEFORE COOKING WITH STEAM
WATER TANKTo fi ll the water tank with fresh cold tap water is a must for cooking with steam. Be sure to follow the directions below.1. Pull the water tank toward you to remove. (Figure 1)2. Wash the water tank and lid for the fi rst time. 3. Open the lid and fi ll the water tank with fresh cold
tap water to the MAX mark each time you begin to cook. (Figure 2) Do not fi ll the water tank over the MAX mark.
4. Make sure the lid is closed fi rmly. (Figure 3)5. Install the water tank by pushing fi rmly. (Figure 4)6. After cooking, empty the water tank and wash the
water tank and the lid.
NOTES:1. Do not use any other liquids like distilled water, R.O
water, mineral water and etc.2. An insuffi cient amount of water in the water tank
may cause an undesired result.3. We recommend that you empty the water tank
every time after cooking. Do not leave the water tank fi lled with water in the oven over a day.
4. If “Err, WATER (fl ashing)” is shown in the display during Steam cooking, refer to Troubleshooting Chart on page 33. The message will not appear in Descale function.
5. Do not drop or damage the water tank. Heat may cause the water tank to change shape. Do not use a damaged water tank. Call 1-800-BE-SHARP to purchase a replacement part.
6. There may be a few water drops when removing the water tank. Wipe the oven dry with a soft cloth.
7. Do not block the air holes on the lid of the water tank. It will cause trouble during cooking.
DRIP TRAYBe sure to cook with drip tray in position and follow the directions below.
The drip tray is packed with the oven. Place the drip tray under the oven door as shown in Figure 5. This drip tray collects the condensation from the oven door.
To remove the drip tray: Pull the drip tray toward you with both hands.
* Make sure water is not dripping down before
removing the drip tray.
To replace the drip tray: Place the drip tray onto the right and left hooks under the oven and push fi rmly as shown in Figure 5. Insert the drip tray horizontally when
you attach it. Improper use may cause the damage to the hooks.
Empty the drip tray after each time you cook. Empty, rinse thoroughly, dry and replace. Failure to empty may cause the drip tray to overfl ow. Cooking repeatedly without emptying the drip tray may cause it to overfl ow.
WARNINGS:1. The oven will become very hot after cooking and draining water function.2. Do not open the oven with your face close to the oven. Steam from the oven may cause burns.3. Make sure that the oven has cooled before emptying the water tank and the drip tray and then wipe the oven
cavity.4. Do not touch the water directly as water in the drip tray may be hot.
Figure 2 Figure 4Figure 1
Figure 5
Drip trayHooks
Figure 3
SEC AX1100S_en.indd Sec1:14SEC AX1100S_en.indd Sec1:14 10.12.2 0:47:54 PM10.12.2 0:47:54 PM

15
I M P O R T A N T I N S T R U C T I O N S
Before cooking1. Make sure the water tank is fi lled with fresh cold tap water and is installed. (See page 14.)2. Make sure the empty drip tray is installed. (See page 14.)3. Place food in the oven. Make sure to place the glass tray in lower position (position 2) for cooking with steam
mode.
After Cooking1. After the oven has cooled, remove and empty the water tank, wipe oven cavity. Be aware that the grill
heating element and steam outlets may be still hot, so take care when wiping the ceiling and cavity back plate. (The grill heating element will turn on for a very short time before the end of the cooking.) Empty the drip tray.
2. Perform the Drain Water function at least once a day after using Healthy Cooking (except for Auto Grill), Steam Cook High and Steam Cook Low.
3. Check that water is not dripping down before removing the drip tray, as a small amount of water drains into the drip tray when the water tank is removed.
4. During and after cooking, condensed water may be on the door, oven walls and oven fl oor. Dry any liquid residue with a soft cloth. After the last use of the day, we recommend to operate the oven with Grill for 3 minutes without food and accessories for drying the water off around grill heating element.
WARNING: Do not open the oven with your face close to the oven. Steam from the oven may cause burns.NOTE: Keep the door closed. If opened during cooking, steam will escape and a longer cooking time will be required.
STEAM IN AUTOMATIC AND MANUAL COOKING
SEC AX1100S_en.indd Sec1:15SEC AX1100S_en.indd Sec1:15 10.12.2 0:47:54 PM10.12.2 0:47:54 PM

16
I M P O R T A N T I N S T R U C T I O N S
Perform the Drain Water function at least once a day after cooking with steam. It takes up to 7 minutes.
Drain Water function is very useful to prevent scale build up and the use of stale water. It causes evaporation of the internal steam system.
P R O C E D U R E
1
Press Minute Plus/START. “In F1” will fl ash on and off in the display during the Drain Water function.
2
Remove the water tank. Ensure that no food is in the oven. Press Info/Timer and number 1 to select “In F1”.
When the drain function has ended and the oven is cool, wipe oven cavity. Empty the drip tray.
3
NOTES:1. The water tank must be removed before starting
this procedure.2. If Drain Water Function is set, Energy Save Mode
will be cancelled temporary.
Whi te or gray gra ins, a lso cal led scale, may form in the water circuit inside the oven during steam generation, which could cause the oven to malfunction.
When “DESCALE (fl ashing)” is shown in the display, be sure to carry out Descale function immediately. It takes about 1 hour. (The descaling using citric acid or lemon juice is for about 30 minutes, and then rinsing with fresh water is for about 30 minutes.)
P R O C E D U R E
1
3
Do not place any food in the oven. Close the door fi rmly. Press Minute Plus/START to begin descaling. (about 30 min.)
4
When the oven has stopped and is cool, remove water tank, empty, rinse and refi ll with fresh cold tap water to the MAX mark. Replace the water tank. Empty the drip tray and replace it. Remove glass tray, empty, rinse and dry. Follow step 3 to replace glass tray. Close the door fi rmly. Press Minute Plus/START. Rinsing will start. (about 30 min.)
5
When rinsing has ended and the oven is cool, remove water tank and empty. Remove glass tray and empty. Wipe oven cavity to dry. Empty the drip tray.
6
Place the glass tray in lower position (position 2). Slide tray toward back wall of oven until it stops.
NOTE:If Descale Function is set, Energy Save Mode will be cancelled temporary.
Press Info/Timer and number 2 to select “In F2”.
2
Pure citric acid, available at some drugstores, or bottled 100% lemon juice with no pulp are used for descaling. Choose one and prepare the descaling solution.
To use pure citric acid, dissolve 1 tablespoon of pure citric acid crystals in 2 cups of water in a non-porous container. Stir well and pour into the water tank to the MAX mark.
To use 100% bottled lemon juice, check that there is absolutely no pulp in it. If there is pulp or you are not sure, strain through a fi ne strainer. Measure 1/3 cup of the strained lemon juice and add it to 2 cups of water. Stir well and pour into the water tank to the MAX mark.
Place the water tank in the oven correctly and push fi rmly into place.
DRAIN WATER FUNCTION
DESCALE FUNCTION
SEC AX1100S_en.indd Sec1:16SEC AX1100S_en.indd Sec1:16 10.12.2 0:47:55 PM10.12.2 0:47:55 PM

17
B E F O R E O P E R A T I N G C L E A N T H E O V E N B E F O R E F I R S T U S E• Before operating your oven, make sure you read
and understand this operation manual completely.• Before the oven can be used, follow these procedures:1. Place the drip tray correctly. See page 14.2. See below for getting started.3. Follow directions on the right side for clean the
oven before fi rst use.
Your oven has an Energy Save Mode. This feature saves electricity when the oven is not in use.
P R O C E D U R E
1
Open the door. The display will show “.0”.2
Plug the oven into a approved outlet.Nothing will appear on the display at this time.
Close the door.Now the oven is ready to use.
3
CAUTION:In Energy Save Mode the clock will not be displayed. In Energy Save Mode, if you do not operate the oven for 3 minutes or more (i.e. after closing the door, or pressing Stop/Clear, or at the end of cooking), you will not be able to operate the oven until you open and close the oven door.
NOTE:When you set Clock, Energy Save Mode will be cancelled.
1. Press Stop/Clear if you make a mistake during programming.
2. Stop the oven temporarily during cooking.3. Cancel a program during cooking, press twice.
You may detect smoke or a burning smell when using the grill for the fi rst time, this is normal and not a sign that the oven is out of order. To avoid this problem, when fi rst using the oven, operate the grill without food for 20 minutes.
PREPARATIONVentilate the room.
P R O C E D U R E
1 Ensure that no food is in the oven. Press Grill once.
Enter the time (20.00) and Minute Plus/START.
2
WARNING:The oven door, outer cabinet, oven cavity and especially the grill heating element will become hot.
TO SET THE CLOCK
* Suppose you want to enter the correct time of day. (A.M. or P.M.)
P R O C E D U R E
1
Enter the correct time of day by pressing the numbers in sequence.
2
Press Info/Timer and number 7 (In F7).
Press Minute Plus/START.3
GETTING STARTED
STOP/CLEAR
NOTES:1. This is a 12 hour clock. If you attempt to enter an
incorrect clock time, “Err” will appear in the display. Press the Stop/Clear and re-program the clock.
2. If the electrical power supply to the oven should be interrupted, the display will intermittently show blank after the power is reinstated. If this occurs during cooking, the program will be erased. The time of day will also be erased.
3. When you set Clock, Energy Save Mode will be canceled.
SEC AX1100S_en.indd Sec1:17SEC AX1100S_en.indd Sec1:17 10.12.2 0:47:56 PM10.12.2 0:47:56 PM

18
A U T O M A T I C C O O K I N GAutomatic Operation is cooked with steam, grill and microwave function. Refer to each function for the details.
Healthy cooking has 6 categories and 15 menus.
Category 1-5: Vegetable/Fish/Eggs/Steam Defrost/Combination Meal
Category 6: Auto Grill
For Category 1-5: Always cook food using steam tray and glass tray. Refer to the HEALTHY COOKING CHART for details on page 19. And see the important instructions on page 14-15.
* Suppose you want to cook 0.3 lb of fi sh fi llets.
Press number for desired weight. (Ex: press 3 for 0.3 lb.)
3
Place food in oven by following the directions in the cooking chart on page 19. Close the door. Press Minute Plus/START.
4
5 After cooking, EXTEND will appear. If you wish to extend cooking time, press the desired time and Minute Plus/START.
If not, press Stop/Clear.After the oven has cooled, remove and empty the water tank, wipe oven cavity. Empty the drip tray.
P R O C E D U R E
1 Make sure the water tank is fi lled to the MAX mark with fresh cold tap water and is installed. Press Fish once.
WARNING for stacking the steam tray and glass
tray:
After cooking, take out the steam tray fi rst. See
Figure 2 on page 12. Be aware of excess water from
the steam tray, we recommend you place it directly
on a fl at dish or tray to avoid spillages.
Before taking out the glass tray, make sure that it is
cool. Be aware that there may be water on the glass
tray, so take care when removing it.
NOTES:1. Enter the weight or amount of the food only. Do
not include the weight of the container.2. For foods weighing more or less than weights
given in the cooking charts, cook manually.3. The programmed cooking times are average
times. To extend cooking times preprogrammed in the automatic cooking, see EXTENDING COOKING TIME AT THE END OF STEAM COOKING on page 29. Before extending the cooking time, make sure the water tank is fi lled to the MAX mark with fresh cold tap water and is installed.
4. Any selection can be programmed with More or Less Time Adjustment. See page 29.
5. Keep the door closed. If opened during cooking, steam will escape and a longer cooking time will be required.
6. The amount of water in the water tank is suffi cient for one cooking operation. Water does not need to be added during cooking.
7. During and after cooking, condensed water may be on the door, oven walls and oven fl oor. Dry any liquid residue with a soft cloth. After the last use of the day, we recommend to operate the oven with Grill for 3 minutes without food for drying the water off around grill heating element.
8. After cooking, the oven will automatically cool and you will hear the sound of the cooling fan. The fan may continue to operate up to 10 minutes depending on the oven and parts temperature.
9. If you attempt to enter more or less than the allowed amount as indicated in chart, “Err” will appear in the display.
10. Weight can be entered only by the pound.
WARNINGS:1. The oven door, outer cabinet, oven cavity,
accessories, dishes and especially the grill heating element will become hot. Use thick pot holders when adding or removing foods to prevent burns.
2. Do not open the oven with your face close to the oven. Steam from the oven may cause burns.
NOTE for Steam Defrost:They are defrosted with Steam and Microwave. Do not use the glass tray, steam tray and metal rack.
HEALTHY COOKING
2 Select desired Fish setting.
(Ex: press number 2 to select Fish
fi llets.)
* When selecting the quantity: Press repeatedly the same number key that
you pressed at step 2, until the desired quantity appears.
When you cook Hard boiled eggs. You don't need to select quantity. Skip step 3.
*
SEC AX1100S_en.indd Sec1:18SEC AX1100S_en.indd Sec1:18 10.12.3 5:23:38 PM10.12.3 5:23:38 PM

19
A U T O M A T I C C O O K I N G
HEALTHY COOKING CHART
F O O D P R O C E D U R EA M O U N T F O O D P O S I T O N2
1 - 6 servings1 - 4 (1serving = 6spears)1 - 6 (cups)1 - 6 (cups)1 - 6 (cups)1 - 6 servings1 - 6 (cups)1 - 6 (cups)1 - 6 servings1 - 6 (cups)1 - 6 (ears)1 - 4 (halves)
1. Quick cooking Asparagus spears (medium) Broccoli fl orets Caulifl ower fl orets Zucchini (1/4-inch thick slices)2. Med. cooking Carrots (Sliced: 1/4-inch thick slices) Green beans (Cut into 2-inch pieces)3. Long cooking Carrots (Baby) Corn on the cob Acorn squash (Small, Cut into halves)
Spray the steam tray with nonstick cooking spray. Place fi sh in the steam tray on the glass tray.
Vegetables
Fish
Eggs
Place vegetables in the steam tray on the glass tray.
*Standard setting is for chicken fi llets. For fi sh fi llets, please select Less setting. See page 29.
1. Fish steaks (1/4-1/2 inch thick)2. Fish fi llets (3/4-1 inch thick)
1. Poached eggs
2. Hard boiled eggs
0.3 - 2 lb0.3 - 2 lb
1 - 4 eggs
1 - 6 eggs
Put each egg into a greased custard cup and place custard cup(s) on the rack in the steam tray on the glass tray.Place eggs in the steam tray on the glass tray.
2
2
2
Place fi sh on microwave-safe rack or dish. Place the dish on the oven fl oor directly. When the oven stops, turn over the fi sh. After defrosting, remove any water and icy glace and allow to stand 5-10 minutes until thoroughly defrost.
Steam defrost
1. Fish steaks (1/4-1/2 inch thick)2. Fish fi llets (3/4-1 inch thick)
0.3 - 1 lb0.3 - 1 lb
1
Combination meal
1. Quick veg + Fish/Chicken fi llets <1 portion of Vegetables> 6 Asparagus spears (medium) 1cup Broccoli fl orets 1cup Caulifl ower 1cup Zucchini (1/4-inch thick slices) <1 portion of Fish fi llets> 0.5lb Fish fi llet <1 portion of Chicken fi llets> 2 fi llets (around 0.2lb per 1fi llet)
1 - 4 portion Place vegetables in the steam tray.Place fi sh fi llets or chicken fi llets in the other steam try on the glass tray. Place the glass tray with fi sh fi llets or chicken fi llets on the steam tray into the oven. Start to cook.When the oven stops, place the steam tray with vegetables into the oven. Continue to cook.
Vegetable:3Fish/Chicken:2
2. Med veg + Fish/Chicken fi llets <1 portion of Vegetables>
1cup Carrots (Sliced: 1/4-inch thick slices) 1cup Green beans (cut into 2-inch pieces) <1 portion of Fish fi llets> 0.5lb Fish fi llet <1 portion of Chicken fi llets> 2 fi llets (around 0.2lb per 1fi llet)
1 - 4 portion Place vegetables in the steam tray.Place fi sh fi llets or chicken fi llets in the other steam tray on the glass tray.Place the trays into the oven. Start to cook.
Vegetable:3Fish/Chicken:2
3. Long veg + Fish/Chicken fi llets <1 portion of Vegetables>
1cup Carrots (Baby) 1ears Corn on the cob half Acorn squash (Small, Cut into halves) <1 portion of Fish fi llets> 0.5lb Fish fi llet <1 portion of Chicken fi llets> 2 fi llets (around 0.2lb per 1fi llet)
1 - 4 portion Place vegetables in the steam tray.Place fi sh fi llets or chicken fi llets in the other steam tray on the glass tray.Place the trays into the oven. Start to cook.
Vegetable:3Fish/Chicken:2
* You don't need to select quantity.
SEC AX1100S_en.indd Sec1:19SEC AX1100S_en.indd Sec1:19 10.12.2 0:47:58 PM10.12.2 0:47:58 PM

20
A U T O M A T I C C O O K I N GFor Category 6 (Auto Grill):Auto Grill has 3 menus.
* Suppose you want to cook 0.5 lb of chicken pieces.
1 Hamburgers2 Boneless poultry3 Chicken pieces
Refer to the AUTO GRILL CHART below for details.
NOTES:1. Enter the weight of the food only. Do not include
the weight of the container.2. For foods weighing more or less than weights
given in the cooking charts, cook manually.3. Always follow the instructions in the cooking chart.4. All selections can be programmed with More or
Less Time Adjustment. See page 29.5. After cooking, the oven will automatically cool
and you will hear the sound of the cooling fan. The fan may continue to operate up to 10 minutes depending on the oven and parts temperature.
WARNING:The oven door, outer cabinet , oven cav i ty, accessories, dishes and especially the grill heating element will become hot. Use thick pot holders when adding or removing foods to prevent burns.
Press number for desired weight. (Ex: press 5 for 0.5 lb.)
3
Place food in oven by following the directions in the cooking chart below. Close the door. Press Minute Plus/START.
4
P R O C E D U R E
1 Press Auto Grill once.
2 Select desired Auto Grill setting. (Ex: press number 3 to select Chicken pieces.)
The oven will stop and CHECKwill fl ash on and off.Open the door. Turn over thechicken pieces.Close the door. Press Minute Plus/START.
5
* When you cook Hamburgers. You don't need to select quantity. Skip step 3. Follow the directions in the AUTO GRILL CHART.
*
AUTO GRILL CHART
S E T T I N G F O O D P R O C E D U R EA M O U N T1 - 5(1/4 lb each)
0.5 - 2 lb
0.5 - 3 lb
1. Hamburgers
2. Boneless poultry
3. Chicken pieces
Form patties and place on rack. Place rack on the glass tray. Start to preheat. No food in the
oven. When preheat is over, place hamburgers in the oven. When oven stops, turn over.
Use this setting for boneless chicken or turkey cutlets. Fold under any very thin ends so no
overcooking occurs. Arrange pieces on rack. Place rack on the glass tray. When oven stops, turn over.
Arrange pieces on rack. Place rack on the glass
tray. When oven stops, turn over.
F O O D P O S I T O N3
2
2
* You don't need to select quantity.
SEC AX1100S_en.indd Sec1:20SEC AX1100S_en.indd Sec1:20 10.12.2 0:47:58 PM10.12.2 0:47:58 PM

21
A U T O M A T I C C O O K I N G
Sharp's Sensor is a semi-conductor device that detects the vapor (moisture and humidity) emitted from the food as it heats. The sensor adjusts the cooking times and power level for various foods and quantities.
Using Sensor Settings:1. Be sure the exterior of the cooking container
and the interior of the oven are dry. Wipe off any moisture with a dry cloth or paper towel.
2. The oven works with foods at normal storage temperature. For example, popcorn would be at room temperature.
3. Any Sensor Cook selection can be programmed with More or Less Time Adjustment. See page 29.
4. More or less food than the quantity listed in the chart should be cooked following the guidelines in any microwave cookbook.
5. During the first part of cooking with Sensor function, selected food number will appear on the display. Do not open the oven door or press Stop/Clear during this part of the cooking cycle. The measurement of vapor will be interrupted. If this occurs, an error message will appear. To continue cooking, press Stop/Clear and cook manually. When the sensor detects the vapor emitted from the food, the remainder of cooking time will appear.The door may be opened when remaining cooking time appears in the display. At this time, you may stir or season food, as desired.
6. If the sensor does not detect vapor properly, Err will be displayed, and the oven will turn off.
7. Check food for temperature or doneness after cooking. If food is not completely cooked, enter additional cooking time manually. Do not repeat cooking with Sensor function again as food may overcook.
Covering Foods:Some foods work best when covered. Use the cover recommended in the chart.1. Casserole lid.2. Plastic wrap: Use plastic wrap recommended for
microwave cooking. Cover dish loosely; allow approximately 1/2-inch to remain uncovered to allow steam to escape. Plastic wrap should not touch food.
3. Wax paper: Cover dish completely; fold excess wrap under dish to secure. If dish is wider than paper, overlap two pieces at least one inch to cover.
Be careful when removing any covering to allow steam to escape away from you.
* Suppose you want to pop a regular size popcorn with Standard time.
SENSOR POPCORN CHART
F O O D P R O C E D U R EA M O U N TPopcorn
1. Regular
2. Regular light
3. Mini
2.9 - 3.5 oz
Use only popcorn packaged for the microwave. Try several brands to decide which you like. Do not try to pop unpopped kernels.
1.1 - 1.55 oz
SENSOR COOK SENSOR POPCORN
P R O C E D U R E
1 Press Sensor Popcorn once. The oven starts automatically. “1” will appear in the display.
NOTE:To use Sensor Popcorn, press within 3 minutes after cooking, opening and closing the door or pressing the Stop/Clear.
Press Sensor Popcorn once. “1” will appear in the display.
Press Sensor Popcorn twice within 2 seconds. “2” will appear in the display.
Press Sensor Popcorn three times within 2 seconds. “3” will appear in the display.
1 package
2.9 - 3.0 oz
SEC AX1100S_en.indd Sec1:21SEC AX1100S_en.indd Sec1:21 10.12.2 0:47:59 PM10.12.2 0:47:59 PM

22
A U T O M A T I C C O O K I N G
MICRO REHEAT/COOK has 9 menus and allows you to heat many of your favorite foods.1 Sensor reheat*2 Frozen entrees*3 Fresh vegetables: quick cooking*4 Fresh vegetables: longer cooking*5 Frozen vegetables*6 Baked potatoes*7 Beverage8 Fresh roll, muffi n9 Frozen roll, muffi n* These menus are sensor cooking. Read carefully
the instructions for Sensor Cook on page 21 before the cooking.
MICRO REHEAT/COOK
P R O C E D U R E
1 Press Micro Reheat/Cook once.
2 Select desired Micro Reheat/Cook setting. (Ex: press number 8 to select fresh muffi n.)
Refer to MICRO REHEAT/COOK CHART for details on page 23.
* Suppose you want to reheat 6 fresh muffins with Standard time.
NOTES:1. Any selection can be programmed with More or
Less Time Adjustment. See page 29.2. More or less food than the quantity listed in the
chart should be cooked following the guidelines in any microwave cookbook.
3. The final result will vary according to the food condition (e.g. initial temperature, shape, quality). Check food temperature after heating. If additional time is needed, continue to heat manually.
4. For sensor cooking, it is not necessary to enter amount. Skip the step 3.
5. The condensed water may be drained into the drip tray during the cooking. Remove and empty the drip tray after cooking.
Repeat pressing same number 8 to increase quantity to 6 muffi ns. (Ex: press 6 more times for 6 muffi ns.)
3
Press Minute Plus/START.4
x 6
SEC AX1100S_en.indd Sec1:22SEC AX1100S_en.indd Sec1:22 10.12.2 0:48:00 PM10.12.2 0:48:00 PM

23
A U T O M A T I C C O O K I N G
MICRO REHEAT/COOK CHART
Place in dish or casserole slightly larger than amount to be reheated. Flatten, if possible. Cover with lid, plastic wrap or wax paper. Use covers such as plastic wrap or lids with larger quantities of more dense foods such as stews. After reheat-ing, stir well, if possible. Re-cover and allow to stand 2 to 3 minutes. Foods should be very hot. If not, continue to heat with variable power and time.
F O O D P R O C E D U R EA M O U N T1. Sensor reheat 4 - 36 oz
This setting is good for restoring cooled beverage to a better drinking temperature. Stir liquid briskly before and after heating to avoid “eruption”.
7. Beverage 0.5 - 2.0 cups
Use this setting to warm fresh rolls, muffi ns, biscuits, bagels, etc. Large items should be considered as 2 or 3 regular size. Arrange on plate; cover with paper towel.
8. Fresh roll, muffi n
1 - 8 pieces
Use this setting to warm frozen rolls, muffi ns, biscuits, bagels, etc. Large items should be considered as 2 or 3 regular size. Arrange on plate; cover with paper towel.
9. Frozen roll, muffi n
1 - 8 pieces
Pierce. Place on paper towel on the grass tray. Put the glass tray on the lower position. After cooking, remove from oven, wrap in aluminum foil and let stand 5 to 10 minutes. Use pot holders or oven mitts to prevent burns.
6. Baked potatoes 1 - 4 med.
3. Fresh vegetables: Quick cooking0.25 - 2.0 lb0.25 - 2.0 lb0.25 - 2.0 lb0.25 - 2.0 lb
1 med.0.25 - 1.0 lb0.25 - 2.0 lb2 - 4 med.
BroccoliBrussels sproutsCabbageCaulif. (fl owerets)Caulifl ower (whole)SpinachZucchiniBaked apples
4. Fresh vegetables: Longer cooking
0.25 - 1.5 lb2 - 4
0.25 - 1.5 lb
0.25 - 1.5 lb1 - 2
Carrots, slicedCorn on the cobGreen beansWinter squash: diced halves
Place in casserole. Add 1 - 4 tbsp. water. Cover with lid for tender vegetables. Use plastic wrap cover for tender-crisp vegetables. After cooking, stir, if possible. Let stand, covered, for 2 to 5 minutes.
Use this setting for frozen, convenience foods. It will give satisfactory results for most brands. You may wish to try several and choose your favorite. Remove package from outer wrapping and follow package directions for covering. After cooking, let stand, covered for 1 to 3 minutes.
2. Frozen entrees 6 - 17 oz
Add no water. Cover with lid or plastic wrap. After cooking, stir and let stand, covered, for 3 minutes.
5. Frozen vegetables 0.25 - 1.5 lb
Wash and place in casserole. Add no water if vegetables have just been washed. Cover with lid for tender vegetables. Use plastic wrap for tender-crisp vegetables. After cooking, stir, if possible. Let stand, covered, for 2 to 5 minutes.
SEC AX1100S_en.indd Sec1:23SEC AX1100S_en.indd Sec1:23 10.12.2 0:48:00 PM10.12.2 0:48:00 PM

24
A U T O M A T I C C O O K I N G
MICRO DEFROST
Micro Defrost has 4 menus. Do not use the glass tray, steam tray and metal rack. 1 Ground meat2 Chicken bone-in3 Chicken boneless4 Steaks, Chops
Refer to MICRO DEFROST CHART below for details.
* Suppose you want to defrost a 0.5 lb steak.
P R O C E D U R E
1 Press Micro Defrost once.
NOTES:1. Enter the weight of the food only. Do not include
the weight of the container.2. Any selection can be programmed with More or
Less Time Adjustment. See page 29.3. To defrost other foods or foods above or below
the weights allowed on Micro Defrost Chart, use time and 30% microwave power. See MANUAL DEFROST below.
4. After cooking, the oven will automatically cool and you will hear the sound of the cooling fan. The fan may continue to operate up to 10 minutes depending on the oven and parts temperature.
Press number for desired weight. (Ex: press 5 for 0.5 lb.)
3
Place food in oven by following the directions in the cooking chart below. Close the door. Press Minute Plus/START.
4
2 Select desired Micro Defrost setting. (Ex: press number 4 to select steaks.)
The oven will stop and CHECKwill fl ash on and off. Open the door. Turn over the steak and shield the defrosted portions.Close the door. Press Minute Plus/START.
5
MANUAL DEFROSTIf the food that you wish to defrost is not listed on the MICRO DEFROST CHART or is above or below the limits in the “Amount” column on the MICRO DEFROST CHART below, you need to defrost manually.
You can defrost any frozen food, either raw or previously cooked, by using Power Level 30%. Follow the exact 3-step procedure found under MICROWAVE on page 28.Estimate defrosting time and select 30% when you select the power level.
For either raw or previously cooked frozen food the rule of thumb is approximately 5 minutes per pound. For example, defrost 5 minutes for 1 pound of frozen spaghetti sauce. Always stop the oven periodically to remove or separate the portions that are defrosted. If food is not defrosted at the end of the estimated defrosting time, program the oven in 1 minute increments on Power Level 30% until totally defrosted.
When using plastic containers from the freezer, defrost only long enough to remove from the plastic in order to place in a microwave-safe dish.
MICRO DEFROST CHART
Remove any thawed pieces after each stage. Let stand, covered, for 5 to 10 minutes.
F O O D P R O C E D U R EA M O U N T1. Ground meat 0.5 - 2.0 lb
After each stage, rearrange and if there are warm or thawed portions, shield with small fl at pieces of aluminum foil. Remove any meat or fi sh that is nearly defrosted. Let stand, covered, for 10 to 20 minutes.
4. Steaks, Chops 0.5 - 3.0 lb
Arrange pieces with meatiest portions toward outside of glass dish or microwave-safe rack. After each stage, if there are warm or thawed portions, rearrange or remove. Let stand, covered, for 10 to 20 minutes.
2. Chicken bone-in
0.5 - 3.0 lb
After each stage, if there are warm or thawed portions, rearrange or remove. Let stand, covered, for 10 to 20 minutes.
3. Chicken
boneless
0.5 - 2.0 lb
SEC AX1100S_en.indd Sec1:24SEC AX1100S_en.indd Sec1:24 10.12.2 0:48:01 PM10.12.2 0:48:01 PM

25
M A N U A L C O O K I N GManual Cooking is an option in Steam Cook, Grill, Grill Mix and Microwave.Refer to the “Manual Cooking Chart” and “Food and Utensil Position Chart”. The charts give information on each setting.
High
Low
High
Low
212 °F
160 - 200 °F *
-
Grill: 50% power
Microwave: 50% power
Grill: 90% power
Microwave: 10% power
0 - 100% power
0 - 35 min.
0 - 60 min.
0 - 99 min. 99 sec.
0 - 99 min. 99 sec.
0 - 99 min. 99 sec.
0 - 99 min. 99 sec.
Steam Cook
Grill Mix
Microwave
Grill
Temp/power rangeCooking mode
YES
YES
NO
NO
NO
NO
Water tankTime range
* You can set the temperature from 160°F to 200°F in multiples of 5°F. (Initial setting: 190°F)
High
Low
High
Low
1 layer
2 layersSteam
Cook
Grill Mix
Microwave
Grill
2 layer cookingCooking mode
Steam tray
Steam tray
NO
NO
NO
NO
NO
3: Upper 2: Lower 1: Oven floor
Food and utensil position (Refer to Figure 1.)
YES
Food
Food
Food
Glass tray
Glass tray
Glass tray (No food)
Rack or dish
See NOTE 1.
Microwave safe container Food
Glass tray See NOTE 2.
Food
Microwave safe container
WARNING for stacking the steam tray and glass tray:After cooking, take out the steam tray fi rst. See Figure 2. Be aware of excess water from the steam tray, we recommend you place it directly on a fl at dish or tray to avoid spillages. Before taking out the glass tray, make sure that it is cool. Be aware that there may be water on the glass tray, so take care when removing it.
NOTES:1. Select desired position depending on the food size. Position 2 or position 3 is recommended for most
recipes. Place the food and glass tray on position 1 when roasting big portions to prevent touching the food to the oven ceiling. Smoke will occur during the cooking if the food touches the grill heating element.
2. For cooking cake, meatloaf and baked potato.3. Do not leave the steam tray and rack wet after use.
Figure 1Shelf runners
3
2
1
Figure 2
Pot holder
Glass tray
Steam tray
MANUAL COOKING CHART
FOOD AND UTENSIL POSITION CHART
SEC AX1100S_en.indd Sec1:25SEC AX1100S_en.indd Sec1:25 10.12.2 0:48:01 PM10.12.2 0:48:01 PM

26
M A N U A L C O O K I N G
STEAM COOK
Manual Steam Cook has 2 options, Steam Cook High and Steam Cook Low. Always cook food using steam tray and glass tray. See page 25 for the details. And see the important instructions on page 14-15.
Use Steam Cook High to steam foods such as chicken or vegetables. Use Steam Cook Low to steam fi sh or egg custard gently. With Steam Cook Low mode, cooking time is a little longer than Steam Cook High mode. Steam cooks food gently without destroying shape, color or aroma. The Steam Cook High can be programmed for up to 35 minutes (35.00). The Steam Cook Low can be programmed for up to 60 minutes (60.00). On Steam Cook Low, the temperature can be set between 160°F and 200°F by 5°F step. 2 layers cooking is available for Steam Cook High. 1 layer cooking only is available for Steam Cook Low.
P R O C E D U R E
1 Make sure the water tank is fi lled to the MAX mark with fresh cold tap water and is installed. Press Steam Cook Low until the desired temperature is displayed (175°F) .
Enter the desired cooking time.
2
Press Minute Plus/START.3
4 After cooking, EXTEND will appear. If you wish to extend cooking time, enter the desired time and press Minute Plus/START.
If not, press Stop/Clear.After the oven has cooled, remove and empty the water tank, wipe oven cavity. Empty the drip tray.
WARNINGS:1. The oven door, outer cabinet, oven cavity,
accessories, dishes and especially the grill heating element will become hot. Use thick pot holders when adding or removing foods to prevent burns.
2. Do not open the oven with your face close to the oven. Steam from the oven may cause burns.
NOTES:1. "Err" will be displayed at step 3 if the longer time
than the maximum time for each Steam cooking mode is entered. To clear, press Stop/Clear and re-program.
2. To extend steaming times, see EXTENDING COOKING TIME AT THE END OF STEAM COOKING on page 29. Before extending the cooking time, make sure the water tank is fi lled to the MAX mark with fresh cold tap water and is installed.
3. Keep the door closed. If opened during cooking, steam will escape and a longer cooking time will be required.
4. The amount of water in the water tank is suffi cient for one cooking operation. Water does not need to be added during cooking.
5. During and after cooking, condensed water may be on the door, oven walls and oven fl oor. Dry any liquid residue with a soft cloth. After the last use of the day, we recommend to operate the oven with Grill for 3 minutes without food for drying the water off around grill heating element.
6. After cooking, the oven will automatically cool and you will hear the sound of the cooling fan. The fan may continue to operate up to 10 minutes depending on the oven and parts temperature.
212 °F
160 - 200 °F
Temperature
Steam Cook High
Steam Cook Low
Cooking mode
STEAM COOK LOW* Suppose you want to cook for 20 minutes on Steam
Cook Low (175°F).
P R O C E D U R E
1 Make sure the water tank is fi lled to the MAX mark with fresh cold tap water and is installed. Press Steam Cook High until the desired tray position indicators are displayed (2 and 3).
Enter the desired cooking time.
2
Press Minute Plus/START.3
4 After cooking, EXTEND will appear. If you wish to extend cooking time, enter the desired time and press Minute Plus/START.
If not, press Stop/Clear.After the oven has cooled, remove and empty the water tank, wipe oven cavity. Empty the drip tray.
STEAM COOK HIGH* Suppose you want to cook for 20 minutes on Steam
Cook High with 2 layers.
x 2
x 4
SEC AX1100S_en.indd Sec1:26SEC AX1100S_en.indd Sec1:26 10.12.2 0:48:02 PM10.12.2 0:48:02 PM

27
M A N U A L C O O K I N G
GRILL GRILL MIX
The grill heating element at the top of the oven cavity has one power setting only. This mode does not use steam. This mode can be programmed for up to 99 minutes 99 seconds. 1 layer cooking only. Place the food onto the rack on glass tray and select desired position depending on the food size.
* Suppose you want to cook for 10 minutes on Grill with preheat.
WARNING:The oven door, outer cabinet , oven cavi ty, accessories, dishes and especially the grill heating element will become hot. Use thick pot holders when adding or removing foods to prevent burns.
NOTES:1. Keep the door closed. If opened during cooking,
heat will escape and a longer cooking time will be required.
2. After cooking, the oven will automatically cool and you will hear the sound of the cooling fan. The fan may continue to operate up to 10 minutes depending on the oven and parts temperature.
3. The condensed water may be drained into the drip tray during the cooking. Remove and empty the drip tray after cooking.
* Suppose you want to cook for 20 minutes on Grill Mix High.
P R O C E D U R E
Enter the desired cooking time.
2
Press Minute Plus/START.PRE-HEAt will appear in the display.
3
1 Press Grill twice.
* If the oven door is not opened, the oven wil l automatically hold at the preheat condition for 30 minutes. After this time has elapsed, an audible signal will sound, and “. 0” or the time of day will appear in the display.
To cook Grill without preheat
To cook without preheat, press Grill once in step 1. Enter cooking time and press Minute Plus/START.
WARNING:The oven door, outer cabinet , oven cavi ty, accessories, dishes and especially the grill heating element will become hot. Use thick pot holders when adding or removing foods to prevent burns.
NOTES:1. Keep the door closed. If opened during cooking,
heat will escape and a longer cooking time will be required.
2. After cooking, the oven will automatically cool and you will hear the sound of the cooling fan. The fan may continue to operate up to 10 minutes depending on the oven and parts temperature.
3. To program only preheat, press Minute Plus/START after step1. Preheating will start.
Grill Mix combines microwave power with grill. Grill Mix has 2 options; Grill Mix High and Grill Mix Low. This mode does not use steam. This mode can be programmed for up to 99 minutes 99 seconds. 1 layer cooking only.
Grill 50%Microwave 50%
Grill 90%Microwave 10%
Cooking mode
Grill Mix High
Grill Mix Low
Cooking method
P R O C E D U R E
Enter the desired cooking time.
2
Press Minute Plus/START.3
1 Press Grill Mix High once.
x 2
Your oven can be p rog rammed to comb ine preheating and grill cooking operation.
once
twice
Grill setting
Grill without preheat
Grill with preheat
Press Grill
To preheat and cook with Grill
When preheating is completed, a signal will sound 4 times and PRE-HEAt End will appear in the display. Open the door and place the food in the oven.
4
Press Minute Plus/START.5
SEC AX1100S_en.indd Sec1:27SEC AX1100S_en.indd Sec1:27 10.12.2 0:48:03 PM10.12.2 0:48:03 PM

28
M A N U A L C O O K I N G
Microwave is fast and convenient for cooking, reheating and defrosting. First enter the cooking time then select the power level. This mode does not use steam. This mode can be programmed for up to 99 minutes 99 seconds.There are 11 different power levels.
* Suppose you want to cook for 5 minutes on 100%.
P R O C E D U R E
Press Minute Plus/START.2
To change the microwave power level, press Micro until the desired power level is displayed.
* Suppose you want to defrost for 5 minutes on 30%.
NOTES:1. After cooking, the oven will automatically cool
and you will hear the sound of the cooling fan. The fan may continue to operate up to 10 minutes depending on the oven and parts temperature.
2. Do not use the steam tray and metal rack.3. The condensed water may be drained into the drip
tray during the cooking. Remove and empty the drip tray after cooking.
HINT:
For cooking cake, meatloaf and baked potato, place the container or food on the glass tray in lower position (position 2) .
This variable cooking control allows you to select the rate of microwave cooking.If a power level is not selected, then 100% is automatically used.1 layer cooking only.
100%
90%
80%
70%
60%
50%
40%
30%
20%
10%
0%
High
Medium High
Medium
Med Low / Defrost
Low
Power level Common words for power levels
P- HI
P- 90
P- 80
P- 70
P- 60
P- 50
P- 40
P- 30
P- 20
P- 10
P- 0
Display
MICROWAVE
1 Enter the desired cooking time.
P R O C E D U R E
1
Press Minute Plus/START.3
Change the power level by pressing Micro until the desired microwave power level is displayed (30P).
2
Enter the desired cooking time.
x 8
SEC AX1100S_en.indd Sec1:28SEC AX1100S_en.indd Sec1:28 10.12.2 0:48:05 PM10.12.2 0:48:05 PM

29
O T H E R C O N V E N I E N T F E A T U R E SMORE OR LESS TIME
ADJUSTMENT
To use with automatic cooking: You can adjust cooking results as you like.
Should you discover that you like any automatic settings slightly more done, press Micro once after entering weight and before pressing Minute Plus/START.
Should you discover that you like any automatic settings slightly less done, press Micro twice after entering weight and before pressing Minute Plus/START.
This function is for Healthy Cooking (except Steam Defrost and Auto Grill), Steam Cook High and Steam Cook Low only.Cooking results may vary depending on room temperature, initial food temperature and other factors. You can adjust cooking results by adding more cooking time at the end. When cooking is finished, the display will show “EXTEND”. It is only possible to add extra time during the 5 minutes when “EXTEND” is in the display. The time can be extended up to 9 minutes 99 seconds. Enter the desired time then press Minute Plus/START. The same cooking mode will be continued. Carefully check the cooking process.
NOTES:
1. Before extending Steam mode, make sure the water tank is fi lled to the MAX mark with fresh cold tap water and is installed. If “Err, WATER (fl ashing)” is displayed during cooking, fi ll the water tank to the MAX mark. Position and push fi rmly into place, then press Stop/Clear to clear the error message. To continue the cooking, cook manually. Check for doneness from time to time.
2. Extend mode is cancelled when Stop/Clear is
pressed.
3. The Extending Cooking Time function can be
repeated until the food is cooked as you desire.
4. While the display shows “EXTEND”, Energy Save Mode will be cancelled temporary.
This function allows you to cook using up to 3 manual cooking programs; combinations of Microwave, Grill and Grill Mix.
* Suppose you want to cook in Sequence Cooking for:
5 minutes on 70 % microwave power (Stage 1) 3 minutes on Grill without preheat (Stage 2) 3 minutes on Grill Mix High (Stage 3)
P R O C E D U R E
1
For 2nd stage, press Grill and enter the desired cooking time.
2
For 1st stage, press Micro until the desired microwave power level is displayed (70P), and enter the desired cooking time.
For 3rd stage, press Grill Mix High, and enter the desired cooking time.
3
Press Minute Plus/START.4
NOTE:
1. After cooking, the oven will automatically cool and you will hear the sound of the cooling fan. The fan may continue to operate up to 10 minutes depending on the oven and parts temperature.
2. You can only program Grill with preheat at the 1st stage.
WARNING:The oven door, outer cabinet , oven cavi ty, accessories, dishes and especially the grill heating element will become hot. Use thick pot holders when adding or removing foods to prevent burns.
x 4
EXTENDING COOKING TIME AT
THE END OF STEAM COOKING
MULTIPLE SEQUENCE
COOKING
SEC AX1100S_en.indd Sec1:29SEC AX1100S_en.indd Sec1:29 10.12.2 0:48:05 PM10.12.2 0:48:05 PM

30
O T H E R C O N V E N I E N T F E A T U R E S
• Suppose you want to set the kitchen timer for 5 minutes.
P R O C E D U R EEnter the desired time. 1
Press Info/Timer once.2
Use the Kitchen Timer as a minute timer or to monitor the standing time for cooked/defrosted food.
Auto minute allows you to operate the two following functions:
a) Direct startYou can directly start cooking on 100% microwave power for 1 minute by pressing Minute Plus/START.
NOTE:To avoid the misuse by children Minute Plus can be used only within 3 minutes after preceding operation, i.e., closing the door, pressing the Stop/Clear key or cooking completion.
b) Extend the manual cooking timeYou can extend the manual cooking time for multiples of 1 minute if Minute Plus/START is pressed while the oven is in operation.
NOTE:You can not use this function for Steam cooking.The cooking time can be extended up to 99 minutes.
Info key provides 8 features.
The number from “In F1” to “In F8” will be displayed when you select the feature.
These features can be selected by pressing Info/Timer and the desired function number and pressing Minute Plus/START.
DRAIN The remaining water inside the steam generator can be evaporated by using the DRAIN function. See page 16.
DESCALESee page 16.
WATER HARDNESSYour oven is set at the factory to water hardness setting 2 (hard). You can set the oven for the water hardness level.
You can use a test strip available at some drug stores, to check the water hardness level.
In some areas, it is possible to ask the water supply company for the water hardness.
When you use test strips, follow the instructions of them.
Hardness range
<120 ppm<120 mg/l<6.7 °dH120 - 250 ppm120 - 250 mg/l6.7 - 14.0 °dH>250 ppm>250 mg/l>14.0 °dH
Setting
Soft
Hard
Very hard
Hardness level
1
2
3
P R O C E D U R E
1
Press same number 3 until desired hardness level is displayed and press Minute Plus/START.The water hardness setting will be held in thememory even if the oven power is off.
2
Press Info/Timer and the number 3 to select Water Hardness. “In F3” will be displayed.
In F1: DrainIn F2: DescaleIn F3: Water hardnessIn F4: Demo
In F5: Child lockIn F6: Sound on/offIn F7: ClockIn F8: Energy save mode
KITCHEN TIMER INFO
MINUTE PLUS
NOTE:In Energy Save Mode, Open and close the door to activate Kitchen Timer before entering the desired time.
SEC AX1100S_en.indd Sec1:30SEC AX1100S_en.indd Sec1:30 10.12.2 0:48:06 PM10.12.2 0:48:06 PM
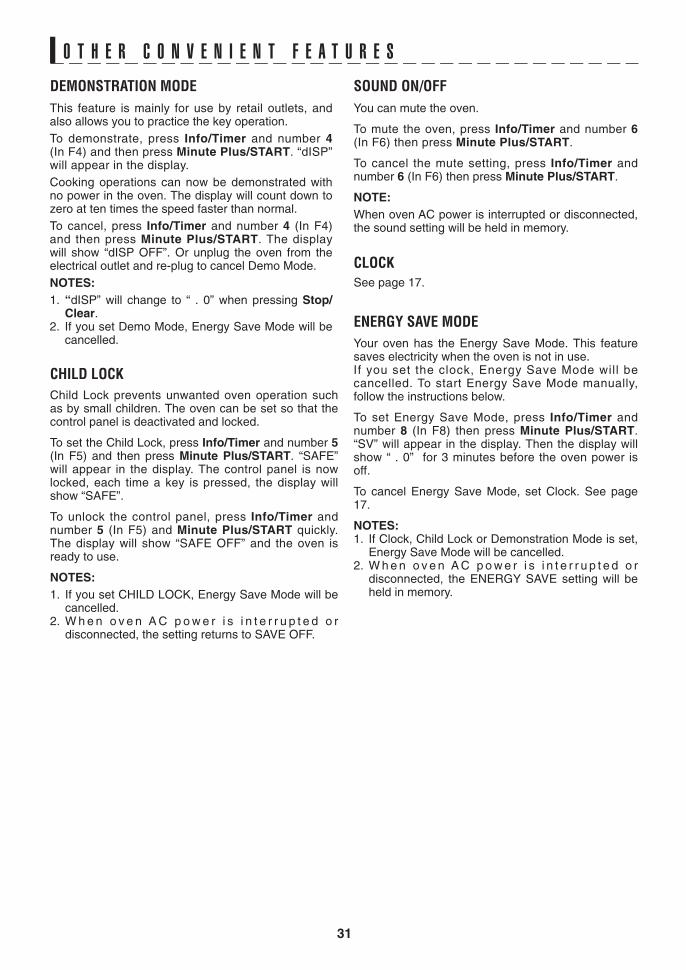
31
O T H E R C O N V E N I E N T F E A T U R E S
This feature is mainly for use by retail outlets, and also allows you to practice the key operation.
To demonstrate, press Info/Timer and number 4 (In F4) and then press Minute Plus/START. “dISP” will appear in the display.
Cooking operations can now be demonstrated with no power in the oven. The display will count down to zero at ten times the speed faster than normal.
To cancel, press Info/Timer and number 4 (In F4) and then press Minute Plus/START. The display will show “dISP OFF”. Or unplug the oven from the electrical outlet and re-plug to cancel Demo Mode.
NOTES:
1. “dISP” will change to “ . 0” when pressing Stop/Clear.
2. If you set Demo Mode, Energy Save Mode will be cancelled.
You can mute the oven.
To mute the oven, press Info/Timer and number 6 (In F6) then press Minute Plus/START.
To cancel the mute setting, press Info/Timer and number 6 (In F6) then press Minute Plus/START.
NOTE:
When oven AC power is interrupted or disconnected, the sound setting will be held in memory.
DEMONSTRATION MODE
CHILD LOCKChild Lock prevents unwanted oven operation such as by small children. The oven can be set so that the control panel is deactivated and locked.
To set the Child Lock, press Info/Timer and number 5 (In F5) and then press Minute Plus/START. “SAFE” will appear in the display. The control panel is now locked, each time a key is pressed, the display will show “SAFE”.
To unlock the control panel, press Info/Timer and number 5 (In F5) and Minute Plus/START quickly. The display will show “SAFE OFF” and the oven is ready to use.
NOTES:
1. If you set CHILD LOCK, Energy Save Mode will be cancelled.
2. W h e n o v e n A C p o w e r i s i n t e r r u p t e d o r disconnected, the setting returns to SAVE OFF.
SOUND ON/OFF
See page 17.
CLOCK
Your oven has the Energy Save Mode. This feature saves electricity when the oven is not in use.If you set the clock, Energy Save Mode will be cancelled. To start Energy Save Mode manually, follow the instructions below.
To set Energy Save Mode, press Info/Timer and number 8 (In F8) then press Minute Plus/START. “SV” will appear in the display. Then the display will show “ . 0” for 3 minutes before the oven power is off.
To cancel Energy Save Mode, set Clock. See page 17.
NOTES:1. If Clock, Child Lock or Demonstration Mode is set,
Energy Save Mode will be cancelled.2. W h e n o v e n A C p o w e r i s i n t e r r u p t e d o r
disconnected, the ENERGY SAVE setting will be held in memory.
ENERGY SAVE MODE
SEC AX1100S_en.indd Sec1:31SEC AX1100S_en.indd Sec1:31 10.12.2 0:48:07 PM10.12.2 0:48:07 PM

32
C L E A N I N G A N D C A R E
CAUTION: DO NOT USE COMMERCIAL OVEN CLEANERS, STEAM CLEANERS, ABRASIVE, HARSH CLEANERS, ANY THAT CONTAIN SODIUM HYDROXIDE OR SCOURING PADS ON ANY PART OF YOUR MICROWAVE OVEN.
Before cleaning, make sure the oven cavity, door, oven cabinet, accessories and especially the grill heating element are completely cool.
CLEAN THE OVEN AT REGULAR INTERVALS AND REMOVE ANY FOOD DEPOSITS - Keep the oven clean, or the oven could lead to a deterioration of the surface. This could adversely affect the life of the appliance and possibly result in a hazardous situation.
Oven exteriorThe outside of your oven can be cleaned easily with mild soap and water. Make sure the soap is wiped off with a moist cloth, and dry the exterior with a soft towel.
Oven controlsOpen the door before cleaning to de-activate the oven controls. Care should be taken when cleaning the oven control. Using a cloth dampened with water only, gently wipe the panel until it becomes clean. Avoid using excessive amounts of water. Do not use any sort of chemical or abrasive cleaner.
DoorTo remove all trace of dirt, regularly clean both sides of the door, the door seals and adjacent parts with a soft, damp cloth. Do not use harsh abrasive cleaners or sharp metal scrapers to clean the oven door glass since they can scratch the surface, which may result in shattering of the glass.
Door SealsAlways keep the door seals clean to prevent any damage. If water condenses inside the door seals, wipe dry with a soft cloth. Polish with another soft cloth. Do not use a chemical or abrasive cleaner on these surfaces. Care should be taken not to rub, damage, pull or move the seals. Before cooking, always check that door seals is lying smooth and fl at. If not, steam will leak from the door. Do not use the oven if it has a damaged door seals. Consult a Sharp Authorized Servicer.
Oven interior IMPORTANT INFORMATION:
• After every use: Wipe the oven walls with a soft cloth and warm water (or mild soapy water) while the oven is still warm. Using the oven without cleaning may lead spatters to get stuck.
• Do not use caustic cleaners (acidic/alkaline), spray type cleaners, abrasive or harsh cleaners or scouring pads as it may damage the surface of oven walls.
For removal of OIL AND FOOD SPLASHES on oven walls:1. Fill the water tank with fresh cold tap water to the
MAX mark.2. Operate the oven with Steam Cook High for 10
minutes without food. See page 26.3. After the steaming, wipe the dirt in the oven
interior with a dry soft cloth while the oven is still warm. Be aware that the grill heating element and steam outlets may be still hot, so take care when wiping the ceiling and cavity back plate. (The grill heating element will turn on for a very short time before at the end of the operation.) And then, we recommend to operate the oven with Grill for 3 minutes without food and accessories for drying
the water off around grill heating element.
Steam Tray / Glass Tray / RackWash steam tray, glass tray and rack after cooking with a mild soap or detergent solution, rinsing and polishing dry. Do not use harsh cleaners, sharp metal scrapers or stiff brushes to prevent damage to the easy clean surface. All the accessories can be washed in the dishwasher. Do not leave the steam tray and rack wet.
Water Tank and Water Tank LidAfter cooking, wash in a mild soap or detergent solution with a soft damp cloth or sponge, rinse and polish dry. Do not wash in the dishwasher. Do not use harsh cleaners, sharp metal scrapers or stiff brushes on the water tank and water tank lid.
Drip TrayEmpty drip tray after cooking, wash in a mild soap or detergent solution with a soft damp cloth or sponge, rinse, polish dry and replace below the oven front. Do not wash in the dishwasher.
Descaling within the Oven’s Steam PartsDuring steam production, scale may form in the steam generator. To remove scale, carry out descale function when “DESCALE” fl ashes on and off in the display. See page 16 for complete instructions.
Key Point for Cleaning - Immediately and frequently!The food splashes and oily meat juice, remaining on the oven interior walls will get stuck and hard to remove if it is not cleaned immediately and after each use. The usage of the steam function will assist in this cleaning process. They will be also perishable by the infl uence of steam.
SEC AX1100S_en.indd Sec1:32SEC AX1100S_en.indd Sec1:32 10.12.2 0:48:07 PM10.12.2 0:48:07 PM

33
Due to technical error, call service for your nearest Sharp Authorized Servicer.
1. The sensor does not detect vapor properly in microwave sensor mode.
2. Oven door is opened or Stop/Clear is pressed during sensing. For both 1 and 2, press Stop/Clear and cook manually.
1. The time you set is over the maximum time for Steam Cook High or Steam Cook Low. Press Stop/Clear and re-program.
2. The time of day you enter is incorrect. This is 12 hour clock. Press the Stop/Clear and re-program the clock.
The weight you enter is more or less than the allowed amount as indicated in chart. Press the Stop/Clear and re-program.
The oven is too hot to use for Steam Defrost, Micro Defrost or Steam Cook Low. Remove food from oven and allow to cool until the message clears. Remove water tank and fi ll with water to the MAX mark. Replace and push fi rmly into place, then press Stop/Clear to clear the error message. Make sure that the water tank is fi lled to the MAX mark with fresh cold tap water.To continue the cooking, cook manually. Check for doneness from time to time.NOTES: 1. Ensure you do not use any other liquids like distilled
water, R.O water, mineral water and etc.2. When this error message appears again and again
even if you fill the water tank with water, the internal steam system may be out of order. Call service for your nearest Sharp Authorized Servicer. You can use the oven for the cooking modes which do not use steam.
The water in the internal steam system is frozen.Operate the oven with Grill without food for 10 minutes. See page 27.
Follow step-by-step instructions for descaling. See page 16.
The oven cabinet and oven cavity are very hot. Pay extra attention not to burn yourself.
This message is not sign that the oven is malfunctioning.When the setting of Energy Save Mode is completed, “SV” will appear on the display. Then the display will show “ . 0” for 3 minutes before the oven power is off. See page 31.
If EE is displayed or you think the oven is not working properly, check the chart below before consulting a Sharp Authorized Servicer. This will help to prevent unnecessary service calls.
TECHNICAL ERROR MESSAGE / INFORMATION MESSAGE
TECHNICAL ERROR MESSAGE
SENSOR ERROR
INFORMATIONMESSAGE
EE
Err, SENSOR (fl ashing)
Err
Err, AUTO, DEF*, LBS (fl ashing)
Err, HOT (fl ashing)
Err, WATER (fl ashing)
COLd
DESCALE (fl ashing)
HOT (fl ashing)
SV
MESSAGE ON DISPLAY ACTION
WARNING:
Never adjust, repair or modify the oven by yourself. It is hazardous for anyone other than a qualifi ed service technician trained by SHARP to carry out any service or repair operation. This is important as it may involve the removal of covers that provide protection against electrical parts.
• Repairs and Modifi cations: Do not attempt to operate the oven if it is not working properly.• Outer cabinet: Never remove the outer cabinet to avoid the possibility of electric shock or burns.
T R O U B L E S H O O T I N G C H A R T
TROUBLESHOOTING CHART
* (DEF is on the display at Steam
Defrost and Micro Defrost mode)
SEC AX1100S_en.indd Sec1:33SEC AX1100S_en.indd Sec1:33 10.12.2 0:48:08 PM10.12.2 0:48:08 PM

34
T R O U B L E S H O O T I N G C H A R TThe following situations are normal and are not signs that the oven is malfunctioning.
* Open the door and close. * Check the power plug is properly connected to a
suitable wall outlet.* Check that fuse or circuit breaker is functioning
properly.* Disconnect the power cord, wait for a minute. Then
reconnect, open and close the door.
* Open the door and close. Is the oven light off? Press Minute Plus/START again.
* If the message “Err, HOT (fl ashing)” is displayed, wait until the message has disappeared.
The programmed cooking t ime and mode wil l be cancelled.Continue to cook with manual mode.
In the following cases, Energy Save Modewill be cancelled temporary:- When the door is opening.- Pause of the automatic cooking.- When the cooking fan is working after cooking.- Demonstration mode- Child lock- Extend mode- Drain mode- Descaling mode- Kitchen timer mode- When the display shows “Err, WATER (fl ashing)”.- When Clock is set.- When the oven hold preheated condition.
* Check the drip tray is installed correctly. Remove and replace the drip tray correctly.
See page 14.
* Did you empty the drip tray before the cooking? You must empty the drip tray and replace it before Steam Cooking will start. See page 14.
Control panel /power supply
Energy save mode
Water
The display is black / blank.
The display is fi ne but Minute Plus/START will not function when pressed.
Electr ical power supply is interrupted during cooking.
The display does not change to blank.
Leakage water from the bottom front of the oven.
QUESTION / SITUATION ANSWER
SEC AX1100S_en.indd Sec1:34SEC AX1100S_en.indd Sec1:34 10.12.2 0:48:08 PM10.12.2 0:48:08 PM

35
T R O U B L E S H O O T I N G C H A R TThe following situations are normal and are not signs that the oven is malfunctioning.
Steam has condensed inside the oven. Wipe dry with a soft cloth or a sponge after cooling.
The air ventilation openings are at the oven bottom (left side). It is normal for used steam to come from the air ventilation openings. Be aware that hot steam comes out during steam cooking, and keep children away from the oven.
This operation is normal.Steam has condensed on the oven fl oor. Wipe dry with a soft cloth or a sponge after cooling.
Check the door sealings to make sure it is lying smoothly and fl at.
When microwaving, you may hear the magnetron cycling on and off depending on the power level.
The cooling fan will operate until the oven is cool.The fan may continue to operate up to 10 minutes depending on the oven and parts temperatures.
High temperatures may cause expansion of the oven’s components. This is normal.
See page 17 for step-by-step instructions for cleaning the oven before the fi rst use.
* Did you fi ll the water tank with water to the MAX mark before cooking?
* Did you take the water tank off from the oven during the cooking? Do not remove the water tank during the cooking except for the case instructed in the cookbook or the operation manual.
* Did you use the glass tray? See the important instructions on page 14-15.
See “For removal of OIL AND FOOD SPLASHES on oven walls:” on page 32.It is important to clean the oven interior after every use.
Check Demonstration Mode on page 31 and cancel.
The air ventilation openings are at the oven bottom (left side). This is normal. Be aware that hot air comes out during Grill Mix cooking, and keep children away from the oven.
Steam
Noise / Sound
Smoke / Aroma
Cooking result
Food spatters
Others
Water is found inside the oven when the door is opened.
Steam comes out from the bottom of the oven.
Condensed water can be seen in the oven cavity.
Steam comes from the door during cooking.
N o i s e d u r i n g m i c r o w a v e cooking.
Noise after cooking.
Noise when cooking with high temperature.
When using the oven for the f i rst t ime, i t may smoke or smell.
The menu using the water does not have a good result.
It is diffi cult to remove foodspatters stuck on the oven walls.
Time appearing in the display is counting down very rapidly.
Hot air comes out from the bottom of the oven.
ANSWERQUESTION / SITUATION
SEC AX1100S_en.indd Sec1:35SEC AX1100S_en.indd Sec1:35 10.12.2 0:48:09 PM10.12.2 0:48:09 PM

36
S E R V I C E C A L L C H E C KPlease check the following before calling for service:
1. Place one cup of water in a glass measuring cup in the oven and close the door securely. Operate the oven for one minute on Microwave, HIGH 100% power.
A. Does the oven light come on? YES _______ NO _______B. Does the cooling fan work? YES _______ NO _______ You will hear the fan sound. C. Does the Microwave indicator appear in the display? YES _______ NO _______D. After 1 minute does the signal sound? YES _______ NO _______E. Is the water in the oven hot? YES _______ NO _______
2. Remove water from the oven and operate the oven for 5 minutes on Grill without preheat.A. Does the Grill indicator appear in the display? YES _______ NO _______B. After the oven stops, is inside of the oven hot? YES _______ NO _______
3. Fill the water tank with water and replace. Operate the oven for 3 minutes on Steam Cook High. A. After the oven stops, is the inside of the oven fi lled with steam? YES _______ NO _______
If “NO” is the answer to any of the above questions, please check electrical outlet, fuse and/or circuit breaker. If they are functioning properly, CONTACT YOUR NEAREST SHARP AUTHORIZED SERVICER. A microwave oven should never be serviced by a “do-it-yourself” repair person.
IMPORTANT: If the display shows nothing even if the power supply plug is properly connected, the Energy Save Mode may be in operation. Open and close the oven door to operate the oven. See page 17.
NOTES: 1. If time in the display is counting down very rapidly, check Demonstration Mode. (See page 31 for detail.)2. If the oven is set for more than 30 minutes at 80, 90 or 100 percent power level, after the fi rst 30 minutes the
power level will automatically adjust to 70 percent power to avoid overcooking.
AC Line Voltage: Single phase 120V, 60Hz, AC onlyAC Power Required: 1500 W 13A (Microwave) 1150 W 9.6A (Grill/Steam)Output Power: Microwave 900W* (IEC Test Procedure) Grill Heater 1100W Steam 900WFrequency: 2450 MHz
Outside Dimensions (WxHxD): 201/2” x 13” x 195/8” 520 mm x 330 mm x 500 mm
Cavity Dimensions (WxHxD)**: 131/2” x 8” x 15” 343 mm x 210 mm x 381 mm
Oven Capacity **: 1.0 cft / 27 LWeight: Approx. 44 lb / 20 kg
* The International Electrotechnical Commission’s standardized method for measuring output wattage. This test method is widely recognized.
** Internal capacity is calculated by measuring maximum width, depth and height. Actual capacity for holding
food is less.
S P E C I F I C A T I O N S
SEC AX1100S_en.indd Sec1:36SEC AX1100S_en.indd Sec1:36 10.12.2 0:48:09 PM10.12.2 0:48:09 PM

37
Beef Flank steak, 3/4 inch thick 1.0 - 1.5 lb Grill with preheat Med. 160°F 3
Steaks: Porterhouse, T-bone,
Rib eye or Sirloin, 1 inch thickGrill with preheat Med.Rare 145°F 3
Hamburgers*, 1/2 inch thick 0.25 lb. each Auto Grill, Hamburgers Preset 160°F 3
Pork Boneless loin chops, 3/4 inch thick 0.5 - 2.0 lb Grill Mix Low 14 - 17
12 - 14
12 - 14
16 - 19
10 - 12
7 - 9
15 - 20
10 - 12
10 - 12
20 - 25
15 - 18
10 - 12
160°F 3
Bone-in loin or rib chops, 3/4 inch thick Grill Mix Low 160°F 3
Ham slice, fully cooked, 3/4 inch thick Grill Heated through 3
Frankfurters Up to 1.0 lb Grill 160°F 3
Sausage Fresh patties or links 0.75 - 1.0 lb Grill Welldone 3
Smoked 0.75 - 1.0 lb Grill 140°F 3
Lamb Chops (rib or loin), 1 inch thick 3 - 4 oz. each Grill Mix Low 160°F 2
Poultry Boneless chicken breast halves*, 3/4 inch thick 0.5 - 2.0 lb Auto Grill, Boneless poultry Preset 160°F 2
Chicken pieces* 0.5 - 3.0 lb Auto Grill, Chicken pieces Preset 180°F 2
Fish Steaks, 1 inch thick 0.5 - 2.0 lb Grill Mix Low 2
Shellfish Scallops, sea Up to 1.0 lb Grill with preheat Opaque 2
Shrimp, jumbo Up to 1.0 lb Grill with preheat Opaque 2
C H A R T
F O O D D O N E N E S SA M O U N T F O O D P O S I T I O N
Grilling chart
T I M EO V E N S E T T I N G
Use rack and glass tray. Turn food over halfway through grilling.
* These menu are Healthy Cooking. See page 20 for the detail.
Dumplings Asian, cook 8 - 16 Steam Cook High 13 - 15 2
Eggs Poached* 1 - 4 Eggs, Poached eggs Preset 2
Fish Fillets*, 1/4 - 1/2 inch thick 0.3 - 2.0 lb Fish, Fish fillets Preset 2
Poultry Chicken breasts, boneless 0.3 - 2.0 lb Steam Cook High 20 - 30 2
Shellfish Clams and Mussels, in shell 0.5 - 2.0 lb Steam Cook High 12 - 16 2
Lobster tails, defrosted, 8 oz. each, in shell 1 - 4 tails Steam Cook High 12 - 17 2
Scallops 0.3 - 2.0 lb Steam Cook High 7 - 10 2
Shrimp, medium 0.3 - 2.0 lb Steam Cook High 10 - 16 2
Vegetables Asparagus spears*, medium 6 - 24 spears Vegetables, Quick cooking Preset 2
Fresh Broccoli florets* 1 - 6 cups Vegetables, Quick cooking Preset 2
Carrots* Baby 1 - 6 cups Vegetables, Long cooking Preset 2
Sliced, 1/4-inch thick slices 1 - 6 cups Vegetables, Med cooking Preset 2
Cauliflower florets* 1 - 6 cups Vegetables, Quick cooking Preset 2
Corn on the cob* 1 - 6 ears Vegetables, Long cooking Preset 2
Green beans*, cut into 2-inch pieces 1 - 6 cups Vegetables, Med cooking Preset 2
Greens Bok choy, chopped 1 - 6 cups Steam Cook High 5 - 8 2
Chinese broccoli, chopped 1 - 6 cups Steam Cook High 5 - 8 2
Chinese cabbage, chopped 1 - 6 cups Steam Cook High 5 - 8 2
Kale, torn 1 - 6 cups Steam Cook High 5 - 8 2
Spinach, torn 1 - 6 cups Steam Cook High 5 - 8 2
Potatoes, new Cut, 11/2-inch wedges 0.5 - 2.0 lb Steam Cook High 30 - 35 2
Whole, 11/2-inch diameter 0.5 - 2.0 lb Steam Cook High 30 - 35 2
Squash* Acorn squash, small, cut into halves 1 - 4 halves Vegetables, Long cooking Preset 2
Zucchini, 1/4-inch thick slices 1 - 6 cups Vegetables, Quick cooking Preset 2
F O O D A M O U N T F O O D P O S I T I O N
Steam chart
T I M EO V E N S E T T I N G
Use steam tray and glass tray.
* These menu are Healthy Cooking. See page 18,19 for the detail.
(min.)
(min.)
SEC AX1100S_en.indd Sec1:37SEC AX1100S_en.indd Sec1:37 10.12.2 0:48:09 PM10.12.2 0:48:09 PM
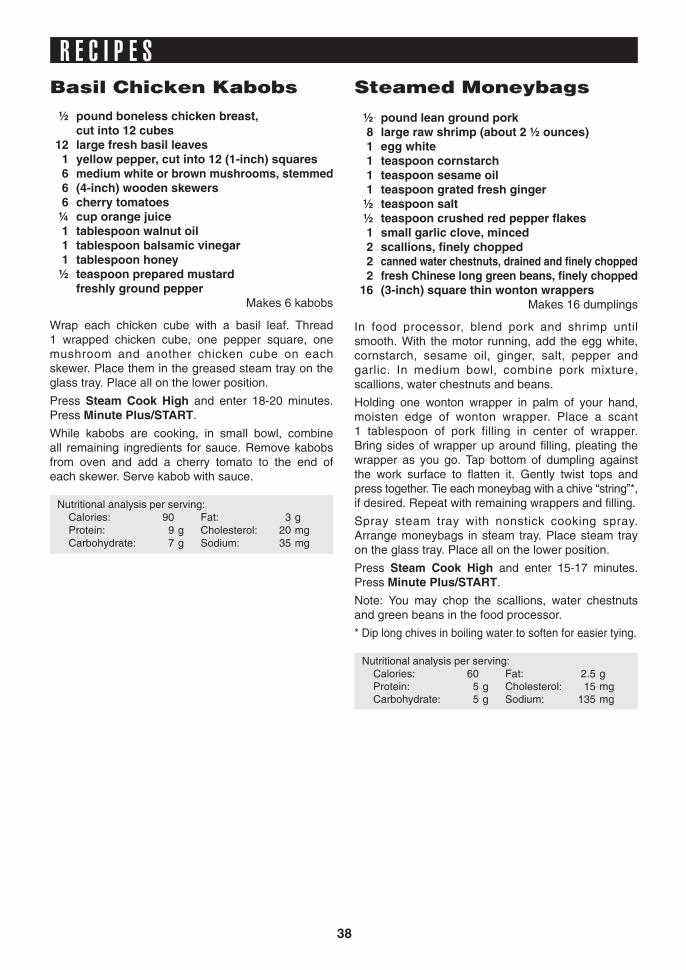
38
R E C I P E SBasil Chicken Kabobs
½ pound boneless chicken breast,
cut into 12 cubes
12 large fresh basil leaves
1 yellow pepper, cut into 12 (1-inch) squares
6 medium white or brown mushrooms, stemmed 6 (4-inch) wooden skewers
6 cherry tomatoes
¼ cup orange juice
1 tablespoon walnut oil
1 tablespoon balsamic vinegar
1 tablespoon honey
½ teaspoon prepared mustard
freshly ground pepperMakes 6 kabobs
Wrap each chicken cube with a basil leaf. Thread 1 wrapped chicken cube, one pepper square, one mushroom and another chicken cube on each skewer. Place them in the greased steam tray on the glass tray. Place all on the lower position.
Press Steam Cook High and enter 18-20 minutes. Press Minute Plus/START.
While kabobs are cooking, in small bowl, combine all remaining ingredients for sauce. Remove kabobs from oven and add a cherry tomato to the end of each skewer. Serve kabob with sauce.
Nutritional analysis per serving:
Calories: 90 Fat: 3 g
Protein: 9 g Cholesterol: 20 mg
Carbohydrate: 7 g Sodium: 35 mg
Steamed Moneybags
½ pound lean ground pork
8 large raw shrimp (about 2 ½ ounces)
1 egg white
1 teaspoon cornstarch
1 teaspoon sesame oil
1 teaspoon grated fresh ginger
½ teaspoon salt
½ teaspoon crushed red pepper fl akes 1 small garlic clove, minced 2 scallions, fi nely chopped 2 canned water chestnuts, drained and fi nely chopped 2 fresh Chinese long green beans, fi nely chopped 16 (3-inch) square thin wonton wrappers
Makes 16 dumplings
In food processor, blend pork and shrimp until smooth. With the motor running, add the egg white, cornstarch, sesame oil, ginger, salt, pepper and garlic. In medium bowl, combine pork mixture, scallions, water chestnuts and beans.
Holding one wonton wrapper in palm of your hand, moisten edge of wonton wrapper. Place a scant 1 tablespoon of pork filling in center of wrapper. Bring sides of wrapper up around fi lling, pleating the wrapper as you go. Tap bottom of dumpling against the work surface to fl atten it. Gently twist tops and press together. Tie each moneybag with a chive “string”*, if desired. Repeat with remaining wrappers and fi lling.
Spray steam tray with nonstick cooking spray. Arrange moneybags in steam tray. Place steam tray on the glass tray. Place all on the lower position.
Press Steam Cook High and enter 15-17 minutes. Press Minute Plus/START.
Note: You may chop the scallions, water chestnuts and green beans in the food processor.
* Dip long chives in boiling water to soften for easier tying.
Nutritional analysis per serving:
Calories: 60 Fat: 2.5 g
Protein: 5 g Cholesterol: 15 mg Carbohydrate: 5 g Sodium: 135 mg
SEC AX1100S_en.indd Sec1:38SEC AX1100S_en.indd Sec1:38 10.12.2 0:48:10 PM10.12.2 0:48:10 PM

39
R E C I P E S
Pork Dumplings
with Dipping Sauce
1/3 pound ground lean pork 1/3 cup fi nely chopped button mushrooms (about 1 ounce) 3 scallions, chopped ½ small carrot, peeled and fi nely chopped 1 celery rib, fi nely chopped 2 tablespoons soy sauce 1 teaspoon sesame oil 36 potsticker or Hong Kong dumpling wrappers* 2 tablespoons soy sauce 1 medium green chile pepper, chopped ½ teaspoon dark sesame oil 2 teaspoons brown sugar 1 tablespoon sherry
Makes 36 dumplings
In medium bowl, mix the first seven ingredients together well. Working with 2 or 3 wrappers at a time, place rounded teaspoon of mixture in center of each wrapper. Moisten edges with fi nger dipped in cold water, then press edges together fi rmly to form half moon. Continue until all pork mixture has been used.
Spray steam tray with nonstick cooking spray. Place 18 dumplings in the each steam tray leaving some space between. Place one steam tray on the glass tray. Place trays on the upper and lower position.
Press Steam Cook High and enter 16-18 minutes. Press Minute Plus/START.
Combine remaining fi ve ingredients for the dipping sauce.
* You may also use round wrappers called Gyoza wrappers or you can use square wonton wrappers and trim the corners to form a circle.
Nutritional analysis per serving:
Serving size: 2 dumplings
Calories: 60 Fat: 1.5 g
Protein: 3 g Cholesterol: 5 mg
Carbohydrate: 8 g Sodium: 380 mg
Chicken & Bacon Dumplings
6 Chinese dried mushrooms
¼ pound very lean bacon, coarsely chopped
¼ pound boneless chicken breast, coarsely chopped
1 tablespoon cornstarch
1 tablespoon oil
10 canned water chestnuts, drained and fi nely chopped 1 tablespoon dry sherry 1 teaspoon sugar 1 teaspoon sesame oil 1½ tablespoons dark soy sauce 1 teaspoon minced garlic 36 potsticker or Hong Kong dumpling wrappers* 36 single leaves of cilantro
Makes 36 dumplings
In small bowl, place mushrooms and 2 cups boiling water. Cover and set aside for 15 minutes. Drain and squeeze as dry as possible. Remove and discard the stems and any hard pieces. Finely chop the rest and put in bowl.
In small or large food processor, blend bacon, chicken and cornstarch into a paste.
In medium skillet over high heat, heat oil. Swirl to cover the bottom. Add the chicken mixture and stir-fry, breaking up any lumps, until opaque. Add the next six ingredients and mushrooms. Stir-fry until heated through, to mix the fl avors, about 2 to 3 minutes. Turn into medium bowl. Cover and chill.
Work with 2 or 3 wrappers at a time. Keep remainder covered. Put 1 teaspoon of the chicken mixture in the center of each wrapper. Put a cilantro leaf on top of the mixture. Dip your fi nger in water and run it around the edge of the wrapper. Bring the edges together fi rmly to form a half moon. Press between fi ngers to seal edges. Set fi nished dumplings aside, covered, until all the dumplings have been made.
Spray steam tray with nonstick cooking spray. Place 18 dumplings in the each steam tray leaving some space between. Place one steam tray on the glass tray. Place trays on the upper and lower position.
Press Steam Cook High and enter 16-18 minutes. Press Minute Plus/START.
Serve hot, with soy sauce seasoned with freshlyground pepper.
* You may also use round wrappers called Gyoza wrappers or you can use square wonton wrappers
and trim the corners to form a circle.
Nutritional analysis per serving: Calories: 30 Fat: 1 g
Protein: 1 g Cholesterol: 0 mg Carbohydrate: 4 g Sodium: 100 mg
SEC AX1100S_en.indd Sec1:39SEC AX1100S_en.indd Sec1:39 10.12.2 0:48:10 PM10.12.2 0:48:10 PM

40
R E C I P E S
Mussels with Herb
Butter Sauce
2 pounds fresh mussels ¼ cup butter, softened 1 clove garlic, minced 1 tablespoon chopped fresh parsley 1 tablespoon chopped fresh chives or basil ½ teaspoon grated lime or lemon zest freshly cracked black pepper to taste
Makes 6 servings
Scrub mussels under cold, running water with a nylon pad or stiff brush. Remove hair-like “beards”, if present. Discard mussels that are cracked or do not close when tapped.
Place mussels in the steam tray on the glass tray. Place all on the lower position. Press Steam Cook High and enter 14-16 minutes. Press Minute Plus/START.
While mussels are steaming, combine remaining ingredients and set aside. At end, spoon butter mixture onto each mussel. Serve immediately.
Nutritional analysis per serving:
Calories: 200 Fat: 11 g
Protein: 18 g Cholesterol: 60 mg
Carbohydrate: 6 g Sodium: 490 mg
Teriyaki Fish Fillets
½ cup water ¼ cup soy sauce ¼ cup dry sherry 2 tablespoons packed brown sugar ½ teaspoon ground ginger 1/8 teaspoon garlic powder 1 pound thin fi sh fi llets, fresh or defrosted
Makes 4 servings
In 8-inch square glass baking dish, combine all ingredients except fi sh. Stir until blended. Add fi sh, turning once to coat both sides. Cover with plastic wrap. Refrigerate 1 hour.
Spray the steam tray with nonstick cooking spray. Lift fi sh fi llets from marinade and drain well. Arrange on
the steam tray.
Place the steam tray on the glass tray. Place all on
the lower position in the oven. Press Steam Cook High and enter 16-18 minutes. Press Minute Plus/START.
Nutritional analysis per serving:
Calories: 130 Fat: 1 g Protein: 21 g Cholesterol: 55 mg Carbohydrate: 7 g Sodium: 1000 mg
Italian Stuffed Peppers
3 medium red, orange or yellow bell peppers 1 pound 93% lean ground beef 1 (8-ounce) can tomato sauce, divided ½ cup uncooked instant rice 1 egg, slightly beaten ½ teaspoon dried oregano leaves, crushed ½ teaspoon salt ¼ teaspoon pepper 1/8 teaspoon garlic power
Makes 6 servings
Cut peppers in half lengthwise. Remove seeds and membranes. Set aside.
In large bowl, mix ground beef, all but ¼ cup tomato sauce, rice, egg, oregano, salt, pepper and garlic powder. Spoon into pepper halves.
Spray steam tray with nonstick cooking spray and arrange pepper halves in it. Place steam tray on the glass tray. Place all on the lower position in the oven.
Press Steam Cook High and enter 35 minutes. Press Minute Plus/START.
When the oven stops, carefully open door and top each pepper half evenly with remaining ¼ cup tomato sauce. Fill the water tank. Press Steam Cook High and enter 5-8 minutes and press Minute Plus/START.
Nutritional analysis per serving:
Calories: 170 Fat: 6 g
Protein: 16 g Cholesterol: 75 mg
Carbohydrate: 13 g Sodium: 450 mg
Orange Carrots
4 large carrots (approximately 1 pound) peeled and cut in ¼-inch slices or 1 pound baby carrots 2 tablespoons butter or margarine 1 tablespoon grated orange peel 1 teaspoon sugar of equivalent artifi cial sweetener
Makes 6 servings
Place carrot slices in steam tray on the glass tray. Place all on the lower position. Press Steam Cook
High and enter 18-20 minutes. Press Minute Plus/START.
While carrots are steaming, in serving bowl, combine
remaining ingredients. Add steamed carrots to orange mixture. Toss to coat. Serve hot.
Nutritional analysis per serving:
Calories: 60 Fat: 4 g
Protein: 1 g Cholesterol: 10 mg
Carbohydrate: 7 g Sodium: 75 mg
SEC AX1100S_en.indd Sec1:40SEC AX1100S_en.indd Sec1:40 10.12.2 0:48:10 PM10.12.2 0:48:10 PM

41
R E C I P E S
Corn on the Cob with a
Twist
1 tablespoon light soy sauce 1 tablespoon olive oil ½ teaspoon sesame oil 1 clove garlic, minced 4 ears fresh corn, husks and silk removed
Makes 4 servings
In resealable plastic bag, combine f irst four ingredients. Add corn ears. Turn to coat corn. Seal. Refrigerate for several hours or overnight, turning corn ears occasionally.
Lift corn out of bag. Discard marinade. Wrap each ear in parchment paper, twisting the ends to seal. Place ears in the steam tray, trimming ends to fi t in the tray. Place the tray on the glass tray. Place all on the lower position. Press Steam Cook High and enter 30-33 minutes. Press Minute Plus/START.
Carefully remove parchment. Serve hot.
Nutritional analysis per serving:
Calories: 110 Fat: 5 g
Protein: 3 g Cholesterol: 0 mg
Carbohydrate: 18 g Sodium: 160 mg
Green Vegetable Medley
½ cup frozen green peas 4 baby zucchini or pattypan squash 12 fresh green beans 12 small asparagus spears 12 sugar snap peas 12 snow peas 2 tablespoons butter or margarine 4 green onions, sliced 1 inch fresh ginger, peeled and grated 2 tablespoons lemon juice 3 tablespoons soy sauce
Makes 4 servings
Place frozen peas in a small custard cup and put in the center of the steam tray. Rinse and trim ends of next 5 vegetables. Place in the steam tray. Place the steam tray on the glass tray. Place all on the lower position.
Press Steam Cook High and enter 12-14 minutes. Press Minute Plus/START.
After vegetables are done, remove from oven and wipe up any remaining moisture. In small microwave-safe bowl, combine remaining ingredients. Put in oven. Press Microwave and enter 1-2 minutes and 100% power. Press Minute Plus/START.
Nutritional analysis per serving:
Calories: 110 Fat: 6 g
Protein: 5 g Cholesterol: 15 mg
Carbohydrate: 9 g Sodium: 750 mg
Green Beans Almondine
1 pound fresh green beans
¼ cup slivered almonds
2 tablespoons butter or margarine
¼ teaspoon salt
¼ teaspoon ground nutmeg
¼ teaspoon pepperMakes 6 servings
Rinse beans. Break off ends. Break beans into 1 to 1½-inch pieces. Place beans in steam tray. Place steam tray on the glass tray. Place all on the lower position.
Press Steam Cook High and enter 18-20 minutes. Press Minute Plus/START.
When green beans are done, remove them from oven and wipe up any remaining moisture. In medium microwave-safe serving dish, mix almonds, butter, salt, nutmeg and pepper. Put them in oven. Press Microwave and enter 1 minute and 100% power. Press Minute Plus/START.
Add cooked beans to butter mixture and toss to coat. Serve hot.
Nutritional analysis per serving:
Calories: 80 Fat: 6 g
Protein: 2 g Cholesterol: 10 mg
Carbohydrate: 6 g Sodium: 130 mg
Savory Caulifl ower
1 medium whole caulifl ower (about 1½ pounds) ¼ cup shredded Cheddar cheese 2 tablespoons butter, melted ¼ cup fresh bread crumbs ¼ teaspoon black pepper 1 tablespoon chopped fresh parsley
Makes 6 servings
Rinse caulifl ower. Cut out core. Place caulifl ower in
steam tray on the glass tray. Put all on the lower level in the oven.
Press Steam Cook High and enter 32-35 minutes. Press Minute Plus/START.
While cauliflower is steaming, in medium bowl,
combine remaining ingredients. Place cooked caulifl ower on serving platter and quickly top with cheese mixture. Serve hot.
Nutritional analysis per serving:
Calories: 90 Fat: 6 g Protein: 4 g Cholesterol: 15 mg
Carbohydrate: 7 g Sodium: 105 mg
SEC AX1100S_en.indd Sec1:41SEC AX1100S_en.indd Sec1:41 10.12.2 0:48:11 PM10.12.2 0:48:11 PM

42
R E C I P E S
Ginger Pork Kabobs
1 egg, beaten ½ cup crushed chow mein noodles ¼ cup apple juice 2 tablespoons soy sauce 1 tablespoon grated gingerroot 1 pound ground pork 1 can (8 ounces) pineapple chunks (juice pack), drained 1 large red pepper, cut into ¾-inch chunks ½ cup apple juice 2 tablespoons cider vinegar 1 teaspoon cornstarch
Makes 4 servings
Mix egg, crushed noodles, ¼ cup apple juice, soy sauce and gingerroot. Crumble ground pork into mixture; blend thoroughly, shape into 1-inch balls. Set aside.
For glaze, mix ½ cup apple juice, vinegar and cornstarch in small bowl. Microwave at HIGH (100%) until thickened, 3-4 minutes, stirring every 30 seconds.
Thread pork balls alternately with pineapple and red pepper chunks on 4 wooden or metal skewers. Place them on rack in the glass tray.
Brush kabobs with glaze. Place all on the lower position in the oven. Press Grill Mix Low and enter 25-30 minutes. Press Minute Plus/START. Turn over halfway through grill time and brush with glaze. Brush with remaining glaze before serving.
Per Serving:
Calories: 256 Fat: 7 g
Protein: 29 g Cholesterol: 153 mg
Carbohydrate: 18 g Sodium: 652 mg
Honey Mustard Chicken
½ cup coarse ground mustard ¼ cup Dijon-style mustard ¼ cup honey 2 to 3 pounds boneless chicken breasts and thighs, skin removed
Makes 4 servings
Combine coarse mustard, Dijon mustard and honey. Set aside.
Place chicken in 10-inch oven-safe dish. Put dish in the glass tray. Place all on the lower position in the oven. Press Grill Mix High and enter 25-30 minutes. Press Minute Plus/START. Turn over halfway through grill time and pour off any liquid and brush with sauce to cover chicken pieces completely.Chicken next to bone should no longer be pink at end.
Per Serving:
Calories: 368 Fat: 8 g
Protein: 50 g Cholesterol: 133 mg
Carbohydrate: 19 g Sodium: 950 mg
Steak Kabobs
¼ cup sugar ¼ cup soy sauce ¼ cup white wine 1 tablespoon vegetable oil 1 teaspoon ground ginger ¼ teaspoon salt 2 pounds lean top beef round steak, cut into 1-inch cubes 2 large green peppers, cut into chunks 8 cherry tomatoes, cut into halves 1 can (8 ounces) pineapple chunks (juice pack), drained
Makes 4 servings
Mix sugar, soy sauce, wine, oil, ginger and salt in medium bowl. Stir in steak cubes; cover. Marinate at room temperature 1 hour or at least 4 hours in refrigerator.
Remove steak cubes from marinade; reserve marinade. Thread steak cubes alternately with remaining ingredients on 8 wooden or metal skewers. Place on rack in the glass tray. Place all on the lower position in the oven. Press Grill Mix Low and enter 15 minutes. Press Minute Plus/START. Turn and brush with marinade. Continue to cook for 15-20 minutes on Grill Mix Low or until desired doneness.
Per Serving:
Calories: 432 Fat: 17 g
Protein: 52 g Cholesterol: 153 mg
Carbohydrate: 15 g Sodium: 381 mg
Grilled Herbed Vegetables
2 pounds fresh vegetables of your choice (red onion, peppers, zucchini, portobello mushrooms, eggplant, etc.)
1/3 cup olive oil 2 tablespoons chopped fresh herbs or 2
teaspoons of dried herbs (thyme, rosemary, oregano, tarragon, etc.)
Makes 8 servings
Coat prepared vegetables with seasoned olive oil. Allow to stand for 30 minutes. Drain and pat dry. Place vegetables on the glass tray. Place the tray on the lower position in the oven. Press Grill and enter 25-30 minutes. Press Minute Plus/START. Turning frequently until vegetables are tender when pierced with a fork and browned. Serve hot or at room temperature.
Per Serving: Will depend on the varieties of vegetables used. Calories: 60 Fat: 6 g
Protein: 1 g Cholesterol: 0 mg Carbohydrate: 2 g Sodium: 0 mg
SEC AX1100S_en.indd Sec1:42SEC AX1100S_en.indd Sec1:42 10.12.2 0:48:11 PM10.12.2 0:48:11 PM

43
R E C I P E S
Grilled Salmon with
Basil Sauce
2 tablespoons olive oil 1 clove garlic, minced ¼ cup white wine 2 tablespoons lemon juice 1 cup fresh basil* ¼ cup grated Parmesan cheese ½ teaspoon Dijon-style mustard 4 salmon steaks (1¼ to 1½ pounds) or haddock, halibut, swordfi sh Cayenne pepper
Makes 4 servings
Combine oil, garlic, white wine and lemon juice in blender. Add basil, Parmesan cheese and mustard and blend until smooth.
Put one-fourth of basil sauce in bottom of 9-inch oven- safe dish. Arrange steaks on sauce and pour remaining sauce over tops of steaks. Sprinkle with cayenne.
Place dish on the glass tray. Place all on the lower position in the oven. Press Grill Mix Low and enter 20-25 minutes. Press Minute Plus/START. Fish fl akes easily when tested with a fork at end.* If not available, substitute ½ cup fresh parsley and 2 tablespoons dried basil.
Per Serving:
Calories: 357 Fat: 21 g
Protein: 35 g Cholesterol: 97 mg
Carbohydrate: 2 g Sodium: 209 mg
Crunchy Crab Boats
1 can (6 ounces) fancy white crabmeat, drained 1 package (3 ounces) cream cheese, softened ½ cup chopped almonds 2 tablespoons green onions, chopped 1 tablespoon dry white wine 1 teaspoon lemon juice 1 teaspoon prepared horseradish ¼ teaspoon garlic powder ¼ teaspoon salt Dash of white pepper Dash of cayenne pepper 2 hard rolls, cut in half ¼ cup shredded Swiss cheese
Makes 4 servings
Remove any bits of shell or cartilage from crab. Combine with next 10 ingredients. Mix well. Set aside. Toast rolls on GRILL for 3-5 minutes.
Spread one-fourth of crab filling on each roll half. Place Swiss cheese on top of each. Place them on rack in the glass tray. Place all on the lower position in the oven. Press Grill and enter 14-16 minutes. Press Minute Plus/START. Cook until cheese is melted and crab is hot. Sprinkle with paprika and serve.
Per Serving:
Calories: 292 Fat: 19 g.
Protein: 15 g Cholesterol: 57 mg
Carbohydrate: 15 g Sodium: 416 mg
Spicy Shrimp
¼ cup white wine ¼ cup water 3 tablespoons soy sauce 2 tablespoons sugar 1 tablespoon vegetable oil 2 teaspoons dried parsley fl akes 1/8 to ¼ teaspoon ground ginger Dash of hot pepper sauce 1 pound jumbo raw shrimp, shelled and deveined
Makes 4 servings
Mix all ingredients except shrimp in medium bowl. Stir in shrimp; cover. Marinate at room temperature 45 minutes or 3 hours in refrigerator.
Remove shrimp from marinade; reserve marinade. Place shrimp on the glass tray. Press Grill twice and enter 10-12 minutes. Press Minute Plus/START to start preheating. After preheated, Place the tray on the upper position in the oven. Brushing with marinade after half the time.
Microwave remaining marinade at HIGH (100%) 2-3 minutes. Serve over rice or as a dipping sauce when served as an appetizer, if desired.
Per Serving:
Calories: 109 Fat: 2 g
Protein: 18 g Cholesterol: 129 mg
Carbohydrate: 3 g Sodium: 319 mg
SEC AX1100S_en.indd Sec1:43SEC AX1100S_en.indd Sec1:43 10.12.2 0:48:12 PM10.12.2 0:48:12 PM
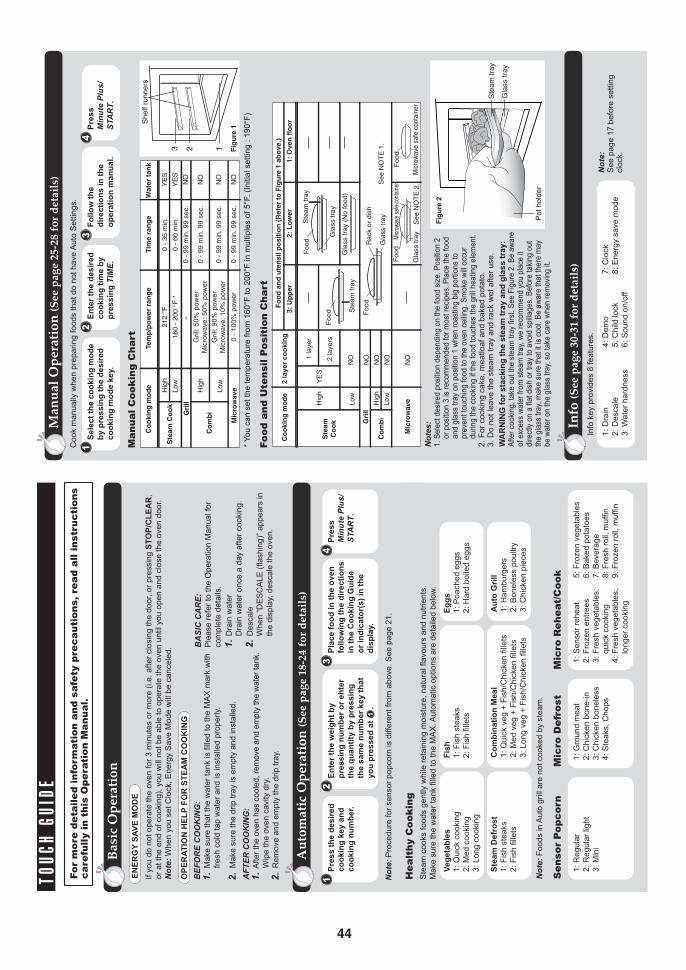
44
Fo
r m
ore
de
tail
ed
in
form
ati
on
an
d s
afe
ty p
rec
au
tio
ns,
rea
d a
ll i
nstr
uc
tio
ns
ca
refu
lly i
n t
his
Op
era
tio
n M
an
ua
l.
Basic
Ope
ratio
n
If y
ou
do
no
t o
pe
rate
th
e o
ve
n fo
r 3
min
ute
s o
r m
ore
(i.e
. a
fte
r clo
sin
g th
e d
oo
r, o
r p
ressin
g S
TO
P/C
LE
AR
,
or
at th
e e
nd
of co
okin
g),
yo
u w
ill n
ot b
e a
ble
to
op
era
te th
e o
ve
n u
ntil yo
u o
pe
n a
nd
clo
se
th
e o
ve
n d
oo
r.
Not
e: W
he
n y
ou
se
t C
lock, E
ne
rgy S
ave
Mo
de
will
be
ca
nce
led
.
BEF
OR
E C
OO
KIN
G:
M
ake s
ure
that th
e w
ate
r ta
nk is fill
ed to the M
AX
mark
with
fre
sh
co
ld ta
p w
ate
r a
nd
is in
sta
lled
pro
pe
rly.
M
ake
su
re th
e d
rip
tra
y is e
mp
ty a
nd
in
sta
lled
.
AFT
ER C
OO
KIN
G:
A
fter
the o
ven h
as c
oole
d, re
move a
nd e
mpty
the w
ate
r ta
nk.
W
ipe the o
ven c
avity d
ry.
R
em
ove a
nd e
mpty
the d
rip tra
y.
OP
ER
AT
ION
HE
LP
FO
R S
TE
AM
CO
OK
ING
1.
1.
2.
2.
1.
2.
BA
SIC
CA
RE:
Ple
ase
re
fer
to th
e O
pe
ratio
n M
an
ua
l fo
r
co
mp
lete
de
tails
.
D
rain
wa
ter
D
rain
wa
ter
on
ce
a d
ay a
fte
r co
okin
g.
D
esca
le
W
he
n “
DE
SC
AL
E (
fla
sh
ing
)” a
pp
ea
rs in
th
e d
isp
lay,
de
sca
le th
e o
ve
n.
Man
ual O
pera
tion
(See
pag
e 25-
28 fo
r det
ails)
Ma
nu
al
Co
ok
ing
Ch
art
Fo
od
an
d U
ten
sil P
osit
ion
Ch
art
Se
nso
r P
op
co
rn
He
alt
hy C
oo
kin
gS
tea
m c
oo
ks fo
od
s g
en
tly w
hile
re
tain
ing
mo
istu
re, n
atu
ral fla
vo
urs
an
d n
utr
ien
ts.
Ma
ke
su
re th
e w
ate
r ta
nk fill
ed
to
th
e M
AX
. A
uto
ma
tic o
ptio
ns a
re d
eta
iled
be
low
.
Auto
mat
ic O
pera
tion
(See
pag
e 18-
24 fo
r det
ails)
Co
ok m
an
ua
lly w
he
n p
rep
arin
g fo
od
s th
at d
o n
ot h
ave
Au
to S
ett
ing
s.
* Y
ou c
an s
et th
e tem
pera
ture
fro
m 1
60°F
to 2
00°F
in m
ultip
les o
f 5°F
. (I
nitia
l settin
g : 1
90°F
)
Not
es:
1. S
ele
ct d
esi
red
po
sitio
n d
ep
en
din
g o
n th
e fo
od
siz
e. P
osi
tion
2
o
r p
osi
tion
3 is
re
com
me
nd
ed
fo
r m
ost
re
cip
es.
Pla
ce th
e fo
od
a
nd
gla
ss tra
y o
n p
osi
tion
1 w
he
n r
oa
stin
g b
ig p
ort
ion
s to
p
reve
nt to
uch
ing
fo
od
to
th
e o
ven
ce
ilin
g. S
mo
ke w
ill o
ccu
r d
urin
g th
e c
oo
kin
g if
th
e fo
od
to
uch
es
the
grill
he
atin
g e
lem
en
t.2
. F
or
co
okin
g c
ake
, m
ea
tlo
af a
nd
ba
ke
d p
ota
to.
3. D
o n
ot le
ave
th
e s
tea
m tra
y a
nd
ra
ck w
et a
fte
r u
se
.
WA
RN
ING
fo
r s
tac
kin
g t
he
ste
am
tra
y a
nd
gla
ss
tra
y:
After
cooki
ng, ta
ke o
ut th
e s
team
tra
y fir
st. S
ee F
igure
2. B
e a
ware
of exc
ess
wate
r fr
om
ste
am
tra
y, w
e r
eco
mm
end y
ou p
lace
it
direct
ly o
n a
fla
t dis
h o
r tr
ay
to a
void
spill
ages.
Befo
re taki
ng o
ut
the g
lass
tra
y, m
ake
sure
that it
is c
ool.
Be a
ware
that th
ere
may
be w
ate
r on the g
lass
tra
y, s
o take
care
when r
em
ovi
ng it
.
1: R
eg
ula
r
2: R
eg
ula
r lig
ht
3: M
ini
1: G
rou
nd
me
at
2: C
hic
ke
n b
on
e-in
3: C
hic
ke
n b
on
ele
ss
4: S
teaks, C
hops
Ve
geta
ble
s
1: Q
uic
k c
oo
kin
g
2: M
ed
co
okin
g
3: L
on
g c
oo
kin
g
Fis
h
1: F
ish s
teaks
2: F
ish fill
ets
Eg
gs
1: P
oa
ch
ed
eg
gs
2: H
ard
bo
iled
eg
gs
Au
to G
rill
1: H
am
bu
rge
rs
2: B
on
ele
ss p
ou
ltry
3: C
hic
ke
n p
iece
s
Ste
am
De
fro
st
1: F
ish s
teaks
2: F
ish fill
ets
Co
mb
inati
on
Meal
1: Q
uic
k v
eg +
Fis
h/C
hic
ken fill
ets
2: M
ed
ve
g +
Fis
h/C
hic
ke
n fill
ets
3: L
on
g v
eg
+ F
ish
/Ch
icke
n fill
ets
1: S
en
so
r re
he
at
2: F
roze
n e
ntr
ee
s
3: F
resh v
egeta
ble
s:
quic
k c
ookin
g
4: F
resh v
egeta
ble
s:
lo
ng
er
co
okin
g
5: F
roze
n v
eg
eta
ble
s
6: B
ake
d p
ota
toe
s
7: B
eve
rag
e
8: F
resh r
oll,
muffin
9: F
roze
n r
oll,
mu
ffin
Mic
ro R
eh
eat/
Co
ok
Mic
ro D
efr
ost
1P
res
s t
he
de
sir
ed
co
okin
g k
ey a
nd
co
okin
g n
um
ber.
3P
lace f
oo
d in
th
e o
ven
follo
win
g t
he d
irecti
on
s
in t
he C
oo
kin
g G
uid
e
or
ind
icato
r(s)
in t
he
dis
pla
y.
4P
res
s
Min
ute
Plus
/ST
AR
T.
2E
nte
r th
e w
eig
ht
by
pre
ssin
g n
um
ber
or
eh
ter
the q
uan
tity
by p
ressin
g
the
sa
me
nu
mb
er
ke
y t
ha
t
yo
u p
ressed
at
.
13
Fo
llo
w t
he
dir
ecti
on
s in
th
e
op
era
tio
n m
an
ual.
4P
res
s
Min
ute
Plus
/ST
AR
T.
2S
ele
ct
the c
oo
kin
g m
od
e
by p
ressin
g t
he d
esir
ed
co
okin
g m
od
e k
ey.
En
ter
the d
esir
ed
co
okin
g t
ime b
y
pre
ssin
g T
IME.
EN
ER
GY
SA
VE
MO
DE
Hig
h
Low
Hig
h
Low
21
2 °
F
16
0 -
20
0 °
F *
-
Grill:
50
% p
ow
er
Mic
row
ave
: 5
0%
po
we
r
Grill:
90
% p
ow
er
Mic
row
ave
: 1
0%
po
we
r
0 -
10
0%
po
we
r
0 -
35
min
.
0 -
60
min
.
0 -
99
min
. 9
9 s
ec.
0 -
99
min
. 9
9 s
ec.
0 -
99
min
. 9
9 s
ec.
0 -
99
min
. 9
9 s
ec.
Ste
am
Co
ok
Co
mb
i
Mic
row
ave
Gri
ll
Te
mp
/po
we
r ra
ng
eC
oo
kin
g m
od
e
YE
S
YE
S
NO
NO
NO
NO
Wa
ter
tan
kT
ime
ra
ng
e
3 2
Sh
elf r
un
ne
rs
1 Fig
ure
1
Hig
h
Low
Hig
h
Low
1 layer
2 layers
Ste
am
Co
ok
Co
mb
i
Mic
row
ave
Gri
ll
2 layer
co
okin
gC
oo
kin
g m
od
e
Mic
row
ave
safe
con
tain
er
Ste
am
tra
y
Ste
am
tra
y
NO
NO
NO
NO
NO
3:
Up
per
2:
Lo
wer
1:
Oven
flo
or
Fo
od
an
d u
ten
sil p
osit
ion
(R
efe
r to
Fig
ure
1 a
bo
ve.)
YE
S
Food Food
Food
Food
Food
Gla
ss tra
y
Gla
ss tra
y
Gla
ss tra
y
Gla
ss tra
y (
No food)
Rack o
r dis
h
See N
OT
E 1
.
See N
OT
E 2
.
Fig
ure
2
Mic
row
ave
safe
co
nta
ine
r
Gla
ss t
ray
Ste
am
tra
y
Po
t h
old
er
Info
(See
pag
e 30-
31 fo
r det
ails)
1
Not
e: F
oo
ds in
Au
to g
rill
are
no
t co
oke
d b
y s
tea
m.
1: D
rain
2: D
esca
le
3: W
ate
r h
ard
ne
ss
4: D
em
o
5: C
hild
lo
ck
6: S
ou
nd
on
/off
7: C
lock
8: E
nerg
y s
ave m
ode
TOUC
H GU
IDE
Not
e: P
roce
du
re fo
r se
nso
r p
op
co
rn is d
iffe
ren
t fr
om
ab
ove
. S
ee
pa
ge
21
.
Info
key p
rovid
es 8
featu
res.
Not
e:S
ee
pa
ge
17
be
fore
se
ttin
g
clo
ck.
SEC AX1100S_en.indd Sec1:44SEC AX1100S_en.indd Sec1:44 10.12.2 0:48:12 PM10.12.2 0:48:12 PM

Horno de vapor con función de microondas y parrillaMANUAL DE OPERACIÓN CON LIBRO DE COCINA
Lea con detenimiento todas las instrucciones antes de utilizar el horno
AX-1100S/1100R
®
SHARP ELECTRONICS CORPORATIONSharp Plaza, Mahwah, NJ 07495-1163
TINSEB302WRRZ-D01 Impreso en Tailandia
®
SEC AX1100S_sp.indd 1SEC AX1100S_sp.indd 1 10.12.2 4:53:33 PM10.12.2 4:53:33 PM

C O N T E N I D OPara asistencia al consumidore ...................................................................................... 1
Precauciones para evitar posibles exposiciones al exceso de energía del microondas ..... 1
Garantía limitada .............................................................................................................. 2
Tarjeta de información del producto .............................................................................. 2
Instrucciones de seguridad importantes ....................................................................... 3
Instrucciones para desembalaje e instalación .............................................................. 4
Instrucciones para conexión a tierra .............................................................................. 5
Información que debe conocer .................................................................................. 6-11
Nombre de las partes ..................................................................................................... 12
Panel de control .............................................................................................................. 13
Instrucciones importantes ........................................................................................ 14-16
Antes de operar ............................................................................................................. 17
Limpie el horno antes del primer uso ........................................................................... 17
Cocción automática .................................................................................................. 18-24
Cocción manual ......................................................................................................... 25-28
Otras funciones convenientes ................................................................................. 29-31
Limpieza y cuidado ........................................................................................................ 32
Cuadro de Localización de fallas ............................................................................. 33-35
Revisión para solicitud de servicio .............................................................................. 36
Especifi caciones ............................................................................................................ 36
Tabla ................................................................................................................................ 37
Recetas ....................................................................................................................... 38-43
Guía de ayuda ................................................................................................................. 44
SEC AX1100S_sp.indd 2SEC AX1100S_sp.indd 2 10.12.2 4:53:35 PM10.12.2 4:53:35 PM

1
Para poder describir este Horno de vapor en caso de pérdida o robo, registre a continuación el número del modelo y el número de serie que se encuentra en la unidad. También le sugerimos que registre toda la información incluida y la conserve para posteriores consultas.
P A R A A S I S T E N C I A A L C O N S U M I D O R E
Proporcione la siguiente información al escribir o llamar: Número del modelo, número de serie, fecha de compra, su dirección de correo completa (incluyendo código postal), su número telefónico durante el día (incluyendo código del área) y la descripción del problema.
POR TELÉFONO:
LLAME AL 1-800- BE-SHARP (237-4277) para: SERVICIO (para ubicar al Personal de servicio autorizado Sharp más cercano) PARTES (para ubicar al Distribuidor de partes autorizado) INFORMACIÓN ADICIONAL PARA EL CLIENTE
LLAME AL 1-800-642-2122 para: ACCESORIOS DE REEMPLAZO
POR ESCRITO:
Sharp Electronics Corporation Customer Assistance Center 1300 Naperville Drive Romeoville, IL 60446-1091
POR INTERNET: www.sharpusa.com
NÚMERO DEL MODELO_____________________ NÚMERO DE SERIE ____________FECHA DE COMPRA ______________________DISTRIBUIDOR ________________________ TELÉFONO ________________ SERVICIO ___________________________ TELÉFONO ________________
PRECAUCIONES PARA EVITAR POSIBLES EXPOSICIONES AL EXCESO DE ENERGÍA
DEL MICROONDAS(a)
(b)
(c)
(d)
No trate de operar este horno con la puerta abierta ya que la operación puede provocar una exposición perjudicial a la energía del microondas. No altere o manipule indebidamente los interbloqueos de seguridad.
No coloque ningún objeto entre la parte frontal del horno y la puerta, ni deje que se acumulen residuos de limpiadores o suciedad en las superficies del cierre hermético.
No opere el microondas si está dañado. Es particularmente importante que la puerta del horno cierre apropiadamente y que no hayan daños en: (1) puerta (inclinación), (2) bisagras y pestillos (rotos o flojos), (3) sellos de la puerta y superficies de cierre hermético.
El horno sólo debe ser regulado o reparado por el personal de servicio calificado apropiado.
SEC AX1100S_sp.indd Sec1:1SEC AX1100S_sp.indd Sec1:1 10.12.2 4:53:35 PM10.12.2 4:53:35 PM

2
La tarjeta de información del producto, que está en la parte interior de la caja del Horno debe ser completada y devuelta dentro de los diez días a partir de la compra. Nosotros la conservaremos en el archivo y le ayudaremos a acceder a la información en caso de pérdida, daño o robo. Así también nos ayudará a comunicarnos con usted en el improbable caso de que alguna vez requiera algún ajuste o modifi cación para su horno.
T A R J E T A D E I N F O R M A C I Ó N D E L P R O D U C T O
GARANTÍA LIMITADASHARP ELECTRONICS CORPORATION garantiza al primer usuario o comprador que este producto Sharp (el "Producto") no tendrá ninguna falla de mano de obra ni materiales cuando haya sido despachado en su empaque original, y acepta, a su elección, reparar o reemplazar el Producto o el componente con uno nuevo o equivalente remanufacturado sin cargo de los componentes o de mano de obra al consumidor fi nal por el período que se indica a continuación.
Esta garantía no se aplica a cualquier componente del aspecto del Producto ni a ningún componente(s) excluido(s) que se indica a continuación ni a la parte externa del Producto que haya sido dañada o destruida, que haya sido sometida a un voltaje inapropiado u otro uso indebido, servicio o manipulación irregular o cuyo diseño o fabricación haya sido cambiado o modifi cado.
Con el fi n de hacer cumplir los derechos bajo esta garantía limitada, el comprador deberá seguir los pasos y proporcionar el comprobante de compra al personal de servicio de reparación.
La garantía limitada descrita en este documento es adicional a cualquier garantía implícita a la que puedan tener derecho los compradores de acuerdo a ley. TODAS LAS GARANTÍAS IMPLÍCITAS INCLUYENDO LAS GARANTÍAS DE COMERCIABILIDAD Y ADAPTACIÓN DE USO SE LIMITAN AL PERÍODO COMPRENDIDO A PARTIR DE LA FECHA DE COMPRA ESTABLECIDA A CONTINUACIÓN. Algunos estados no permiten limitaciones sobre la duración de una garantía implícita, de modo que la limitación antes mencionada puede no aplicarse a usted.
Ni el personal de ventas del vendedor ni cualquier otra persona está autorizado para hacer ninguna garantía a nombre de Sharp que no sean las incluidas en este documento, o extender la duración de cualquier garantía más allá del período de tiempo descrito en este documento.
Las garantías descritas en este documento serán las garantías únicas y exclusivas otorgadas por Sharp y serán las únicas y exclusivas soluciones disponibles para el comprador. La reparación de fallas, en la manera y período de tiempo descrito en este documento, deberá cumplir totalmente todas las obligaciones y responsabilidades de Sharp con el comprador respecto al Producto y deben constituir la satisfacción total de todos los reclamos, ya sea por el contrato, negligencia, obligación estricta u otros. En ningún caso Sharp tendrá la obligación, o responsabilidad, por cualquier daño o falla en el Producto causado por reparaciones o intento de reparaciones realizados por personas ajenas al personal de servicio de reparación autorizado. Sharp tampoco tendrá la obligación ni la responsabilidad por cualquier daño incidental o resultante, económico o daño a la propiedad. Algunos estados no aceptan la exclusión de daños accidentales o resultantes por lo que esta exclusión puede no aplicarse a su caso particular.
ESTA GARANTÍA LE OTORGA DERECHOS LEGALES ESPECÍFICOS. USTED TAMBIÉN CUENTA CON OTROS DERECHOS QUE VARÍAN SEGÚN CADA ESTADO.
AX-1100S o AX-1100R Horno de vapor para uso doméstico. Asegúrese de contar con esta información cuando requiera servicio para su producto.
Un (1) año para las partes y mano de obra. El período de garantía continúa por cuatro (4) años adicionales, para un total de cinco (5) años, respecto al tubo magnetrón sólo para partes; la mano de obra y el servicio no se brindan sin cargo para este período adicional.
Accesorios no funcionales y bombilla de luz.
En un Centro de servicio autorizado Sharp en los Estados Unidos. Para encontrar el Centro de servicio autorizado Sharp más cercano, llame a la línea gratuita de Sharp al 1-800-BE-SHARP (1-800-237-4277).
Envíe su producto con fl ete prepagado o llévelo a un Centro de servicio autorizado Sharp. Asegúrese de contar con el Comprobante de compra. Si va a enviar el producto, asegúrese de que cuente con seguro y que sea embalado de forma segura.
Número del modelo y descripción del producto:
Período de garantía para este producto:
Componentes adicionales excluidos de la cobertura de la garantía (si hubiere):
Dónde obtener el servicio:
Para obtener servicio:
PARA OBTENER SUMINISTROS, ACCESORIOS O INFORMACIÓN DEL PRODUCTO, LLAME A 1-800-BE-SHARP O VISITE www.sharpusa.com.Guarde el Comprobante de compra ya que será necesario en caso de que su horno requiera de servicio bajo garantía.
SEC AX1100S_sp.indd Sec1:2SEC AX1100S_sp.indd Sec1:2 10.12.2 4:53:35 PM10.12.2 4:53:35 PM

3
I N S T R U C C I O N E S D E S E G U R I D A D I M P O R T A N T E SAl usar artefactos eléctricos deben tomarse precauciones de seguridad básicas, incluyendo las siguientes:
ADVERTENCIA - Para reducir el riesgo de quemaduras, choque eléctrico, incendios, lesiones a personas o exposición al exceso de energía del microondas:
GUARDE ESTAS INSTRUCCIONES
1. Lea todas las instrucciones antes de usar el artefacto.
2. Lea y siga las especifi caciones
“PRECAUCIONES PARA EVITAR POSIBLES EXPOSICIONES AL EXCESO DE ENERGÍA DEL MICROONDAS” en la página 1.
3. Este artefacto debe ser conectado a tierra. Conéctela únicamente a un tomacorriente
puesto a t ie r ra adecuadamente . Vea “INSTRUCCIONES DE CONEXIÓN ELÉCTRICA A TIERRA” en la página 5.
4. Instale o coloque este artefacto sólo de acuerdo a las instrucciones de instalación proporcionadas.
5. Algunos productos como huevos enteros y recipientes sellados - por ejemplo, frascos de vidrio cerrados - pueden explotar y no deben ser calentados en este horno.
6. Use este artefacto sólo para el uso destinado como se describe en este manual. No use productos químicos corrosivos ni vapores en este artefacto. Este tipo de horno está diseñado específicamente para calentar, cocinar o deshidratar los alimentos. No está diseñado para uso industrial o de laboratorio.
7. Como cualquier artefacto, una supervisión adecuada es necesaria cuando lo usen los niños.
8. No haga funcionar este artefacto si el cable de energía o enchufe están dañados, si no funciona apropiadamente o si tiene daños o se ha caído.
9. Este ar tefacto debe recib i r serv ic io sólo del personal de servicio calificado. Comuníquese con el Personal de servicio autorizado de Sharp para una evaluación, reparación o ajuste.
10. No cubra ni bloquee ninguna ranura u orifi cio del artefacto.
11. No guarde ni use este artefacto en exteriores. No use este producto cerca del agua - por ejemplo, cerca del fregadero de la cocina, de una base mojada, de piscinas o lugares similares.
12. No sumerja el cable de energía o enchufe en el agua.
13. Mantenga el cable alejado de superfi cies calientes.
14. No deje que el cable cuelgue sobre el borde de la mesa o mostrador.
15. Vea las instrucciones para l impiar la superfi cie de la puerta en la página 32.
16. Para reducir el riesgo de incendio en la cavidad del horno:a. No cocine demasiado los alimentos. Esté
atento cuando se coloquen papeles, plástico o cualquier material combustible dentro del horno para facilitar la cocción.
b. Retire los sujetadores de las bolsas de papel o de plástico antes de colocarlas en el horno.
c. Si los materiales en el horno empiezan a arder, mantenga cerrada la puerta del horno, apáguelo y desconecte el cable de energía o desconecte la energía en la caja de fusibles o del panel del interruptor automático.
d. No use la cavidad para almacenar objetos. No deje productos de papel, utensilios de cocina o alimentos en la cavidad cuando no lo use.
17. Los líquidos, como agua, café o té pueden sobrecalentarse más allá del punto de ebullición sin que pueda notarse que están hirviendo. No siempre habrá burbujas o vapor de ebullición visibles al retirar el recipiente del horno microondas. ESTO PUEDE CAUSAR UN DERRAME IMPREVISTO DE LÍQUIDOS DEMASIADO CALIENTES AL INTRODUCIR UNA CUCHARA U OTRO UTENSILIO EN EL LÍQUIDO. Para reducir el riesgo de lesiones a personas:a. No sobrecaliente el líquido.b. Revuelva el líquido antes y a la mitad del
calentamiento.c. No use un recipiente de paredes rectas
y cuello angosto. Use un recipiente de boca ancha.
d. Después de calentar, deje el recipiente en el horno microondas por lo menos 20 segundos antes de retirarlo.
e. Use extremo cuidado cuando coloque una cuchara u otro utensilio en el recipiente.
18. Si la luz del horno no funciona, consulte al PERSONAL DE SERVICIO AUTORIZADO DE SHARP.
19. No almacene nada directamente encima de la superfi cie del artefacto cuando el artefacto se encuentre en operación.
SEC AX1100S_sp.indd Sec1:3SEC AX1100S_sp.indd Sec1:3 10.12.2 4:53:36 PM10.12.2 4:53:36 PM

4
I N S T R U C C I O N E S P A R A D E S E M B A L A J E E I N S T A L A C I Ó NDesembalaje y verifi cación de su hornoRetire:1. Todos los materiales de embalaje de la cavidad
del horno. Lea los anexos y GUARDE el Manual
de uso y cuidado.2. La etiqueta adhesiva en la parte exterior de la
puerta, si hubiera una.
Revise que el horno no tenga daños como puertas torcidas o mal alineadas, sellos de puerta y superfi cies del cierre hermético dañado, bisagras y pestillos rotos o flojos y abolladuras en la cavidad o en la puerta. Si encuentra algún daño, no haga funcionar el horno y comuníquese con su distribuidor o PERSONAL DE SERVICIO AUTORIZADO DE SHARP.
Elección de una ubicación para su hornoYa que usted usará el horno con frecuencia debe elegir su ubicación para un fácil uso. No coloque el horno sobre un tapete, alfombra o mantel ni bloquee las ranuras de ventilación. El horno debe colocarse sobre un mostrador con una altura mínima de 36 pulgadas (91,5 cm) desde el piso. Mantenga al menos 2 pulgadas (5,1 cm) a los lados, y 4 pulgadas (10,2 cm) sobre la parte superior del horno (excluyendo la ranura de ventilación), y 2 pulgadas (5,1 cm) en la parte trasera del horno para permitir la circulación del aire. Asegúrese de ubicar el horno para que no se pueda tocar la parte posterior inadvertidamente.
Sellos de la puerta y superfi cies de sellado
Pestillo
Bisagras
de la
puerta
Cavidad del horno
SEC AX1100S_sp.indd Sec1:4SEC AX1100S_sp.indd Sec1:4 10.12.2 4:53:36 PM10.12.2 4:53:36 PM

5
I N S T R U C C I O N E S P A R A C O N E X I Ó N A T I E R R AEste artefacto debe ser conectado a tierra. Este horno está equipado con un cable que tiene un alambre a tierra y un enchufe con conexión a tierra. Debe conectarlo en un tomacorriente de pared instalado y conectado a tierra apropiadamente de acuerdo con el Código eléctrico nacional y los códigos y reglamentos locales. En caso que se produzca un cortocircuito eléctrico, la conexión a tierra reduce el riesgo de choque eléctrico proporcionando un cable de escape para la corriente eléctrica.
ADVERTENCIA - El uso inapropiado del enchufe con toma a tierra puede causar una descarga eléctrica.
Requisitos eléctricosLos requisitos eléctricos son 120 voltios, 60 Hz, sólo CA, 15 amperios o más de suministro protegido de electricidad. Se recomienda un circuito por separado que sea sólo para este horno.
El horno está equipado con un enchufe con toma a tierra de tres clavijas. Éste se debe conectar en un tomacorriente de pared instalado y conectado a tierra apropiadamente. Si solo cuenta con un tomacorriente de dos clavijas, haga que un electricista califi cado instale un tomacorriente de pared correcto.
Se puede comprar y usar temporalmente un adaptador de 3 clavijas si los códigos locales lo permiten. Siga las instrucciones del empaque.
Se incluye un cable corto de suministro eléctrico para reducir el riesgo de enredarse o tropezarse con un cable más largo.
Cable de extensiónSi fuese necesario usar un cable de extensión, use sólo un cable de extensión de 3 alambres que tenga un enchufe con toma a tierra de 3 clavijas y un receptáculo de 3 muescas que se adapte al enchufe del horno. La capacidad indicada del cable de extensión debe de ser de 115-120 voltios CA, 15 amperios o más.
Debe tener cuidado de no colocar el cable sobre el mostrador o mesa de donde los niños podrían jalarlo o tropezarse con éste accidentalmente.
NOTAS:1. Si tiene alguna pregunta sobre las instrucciones eléctricas o
de conexión a tierra, consulte a un electricista califi cado o al encargado de brindar el servicio.
2. N i Sharp n i e l d is t r ibu idor pueden aceptar n inguna responsabilidad por los daños al horno o las lesiones personales causadas por no seguir los procedimientos de conexión eléctrica correctos.
Interferencia de radio o televisiónSi hay interferencia causada por el horno microondas en su radio o TV, revise que el horno tenga un circuito eléctrico distinto, aleje la
radio o TV del horno lo más que pueda o revise la posición y señal de la antena de recepción.
Enchufe de 3 clavijas
Caja del tomacorriente conectado a tierra
Adaptador de tierra
Caja del tomacorriente conectado a tierra
Clavija de tierra
Tomacorriente para 3 clavijas
Pestaña para el tornillo de conexión a tierra
Tornillo
Instalación permanente y correcta
Uso temporal
SEC AX1100S_sp.indd Sec1:5SEC AX1100S_sp.indd Sec1:5 10.12.2 4:53:36 PM10.12.2 4:53:36 PM

6
I N F O R M A C I Ó N Q U E D E B E C O N O C E R
• Haga de la lectura del Manual de operación el primer paso a la hora de trabajar con su nuevo horno. Este importante folleto explica exactamente cómo funciona el horno y qué necesitará saber para utilizarlo satisfactoriamente.
• Utilice la información contenida en las tablas y recetas para ayudarle a adaptar la preparación de sus recetas favoritas o de sus alimentos precocinados en el horno.
• Los tiempos de cocción establecidos en las tablas y recetas son simples guías y están basados en condiciones normales. Los resultados de la cocción variarán según las condiciones de los alimentos, utensilios y del horno. Compruebe el resultado de la cocción, y si fuese necesario, ajuste acordemente los tiempos de cocción.
• Prepare los alimentos y utilice los accesorios tal y como se le indica.
• Al colocar alimentos en el horno, girar, remover o añadir algo a los alimentos, asegúrese de que la puerta no permanezca abierta durante un largo período para evitar la pérdida de calor.
• Consulte la tabla de Colocación de alimentos y utensilios de la página 25 antes de introducir alimentos en el horno.
• Distribuya siempre los ingredientes de forma uniforme en el interior de una pieza de vajilla apta para hornos o bandeja de vapor para lograr resultados de cocción uniformes.
• No es necesario llenar el depósito de agua para la cocción en Microondas, Parrilla, Parrilla mixta alta o Parrilla mixta baja.
• Si desea adaptar sus recetas favoritas al microondas, deberá tener en cuenta lo siguiente: Reducir los tiempos de cocción en un tercio o a la mitad. Siga el ejemplo de las recetas incluidas en este libro de cocina.
PUNTOS A RECORDAR
SEC AX1100S_sp.indd Sec1:6SEC AX1100S_sp.indd Sec1:6 10.12.2 4:53:37 PM10.12.2 4:53:37 PM

7
I N F O R M A C I Ó N Q U E D E B E C O N O C E R
El cuadro siguiente le ayudará a decidir qué utensilios y envolturas debe usar en cada modo.
Pedazos planos pequeños de papel aluminio colocados ligeramente sobre los alimentos pueden ser útiles para proteger áreas que se estén descongelando o cocinando demasiado rápido. Mantenga el papel aluminio por lo menos a 1 pulgada (2.54 cm) de las paredes del horno.
Papel aluminio
Metal, recipientes de aluminio
Loza, alfarería, porcelana, cerámica, cerámica de gres
Utensilios de cristal resistentes al calor, como Pyrex®
Utensilios de cristal no resistentes al calor
Plástico/Poliestireno resistente a temperaturas superiores a los 140°C
Plastico, Thermoset
Envolturas de plástico resistentes a temperaturas superiores a los 140°C
Toallas de papel, platos de papel
Contenedores a base de material sintético
Papel manteca
Papel encerado
Papel para hornear
Rejilla para asar
Bolsas para asar
Platos y utensilios de cocina o recipientes plateados que pudieran corroerse dentro del horno.
Estante
Bandeja de vapor
Bandeja de cristal
Vapor
SÍ
Parrilla Microondas
SÍSÍ
Use recipientes plásticos seguros para microondas para recalentar y descongelar. Algunos plásticos seguros para microondas no son adecuados para la cocción de alimentos con alto contenido de grasa y azúcar. Siga las instrucciones del fabricante.
Debe tener cuidado ya que algunos recipientes se deforman, funden o decolorar a altas temper-aturas.
Utilice únicamente para el calentamiento o para absorber la humedad. Ponga especial atención, ya que un sobrecalentamiento podría causar un incendio. No use toallas de papel reciclado que pueden contener partículas metálicas.
En general, son adecuados los utensilios de porcelana, cerámica, arcilla vidriada y porcelana fi na aptos para
horno. No use el recipiente si tiene un desperfecto.
Debe tener cuidado al usar utensilios de cristal fi no que pueden romperse o rajarse si
se calientan repentinamente.
Siga las instrucciones del
fabricante.
Podrían derretirse a altas temperaturas.
Parrilla mixta
SÍ
NOSÍSÍ NO
SÍSÍSÍ SÍ
Por norma general, el uso de porcelana es compatible. Asegúrese de que su porcelana no contiene decoraciones metálicas, doradas ni plateadas. Consulte las recomendaciones del fabricante sobre su seguridad para uso en microondas. No use el recipiente si tiene un desperfecto.
SÍSÍSÍ SÍ
SÍNOSÍ NO
SÍNONO NO
SÍNOSÍ NO
NONONO NO
SÍNOSÍ NO
SÍNONO NO
NONONO NO
NOSÍNO SÍ
El estante de metal suministrado ha sido especialmente diseñado para la Parrilla mixta y no causará daños en el horno.
NONOSÍ NO
SÍSÍSÍ SÍ
SOBRE LOS UTENSILIOS Y ENVOLTURAS
NONO
SÍNOSÍ NO
SÍNONO NO
NONOSÍ NO
NONONO NO
Para evitar la ruptura de la bandeja de cristal:
• Antes de limpiar el bandeja de cristal con agua, deje que la bandeja de cristal se enfríe.
• No coloque ningún objeto caliente sobre una bandeja de cristal fría.• No coloque ningún objeto frío sobre una bandeja de cristal caliente.
NO NO
Utensilios - Envolturas
Modo de cocción
SEC AX1100S_sp.indd Sec1:7SEC AX1100S_sp.indd Sec1:7 10.12.2 4:53:37 PM10.12.2 4:53:37 PM

8
PROBAR EL PLATO. Si desea verifi car si un plato es seguro para uso en el microondas, coloque el plato vacío en el horno y hágalo funcionar durante 30 segundos al 100% de potencia. Si el plato se calienta demasiado, NO lo use para la cocción en microondas.
ACCESORIOS Hay muchos accesorios disponibles para microondas o resistentes al calor. Revise cuidadosamente antes de comprarlos para que satisfagan sus necesidades. Un termómetro resistente a las microondas le ayudará a determinar la cocción correcta y asegurará que sus alimentos se han cocido a temperaturas seguras al usar la cocción sólo con microondas. Sharp no es responsable de ningún daño al horno causado por el uso de los accesorios.
Para cocción automática use el recipiente recomendado en la tabla de cocción de este manual de operación o en el libro de cocina.
I N F O R M A C I Ó N Q U E D E B E C O N O C E R
ACERCA DE LA COCCIÓN AL VAPOR
Hay ciertas técnicas para la cocción con vapor. Es esencial seguir éstas técnicas para obtener buenos resultados. Muchas son similares a las utilizadas en la cocción convencional por lo que pueden necesitar un pequeño cambio. Observe la información de todas las tablas en el libro de cocina para todas las opciones de cocción que usan la Vapor (Cocción Sana*, Cocción con vapor alto y Cocción con vapor bajo).*Excepto para Parrilla automática
• Siempre esté atento al horno cuando esté en uso.• Use utensilios/vajilla adecuada para el modo de cocción como se describe en la página 7.• Ventile la habitación para permitir que el vapor se disipe.• Después de la cocción, cuando el horno se ha enfriado, retire y vacíe el depósito de agua, limpie la
cavidad del horno con un paño o esponja suave. Vacíe la bandeja de goteo.
Asegúrese de que los alimentos sean colocados de forma uniforme. Los alimentos que tengan poco o ningún espacio necesitarán más tiempo para la cocción, asegúrese de que los alimentos sean colocados de forma que exista sufi ciente espacio entre los artículos para permitir que el vapor circule entre ellos. En lo que respecta al contenedor, un plato poco profundo bastará. No se recomienda el uso de platos de gran grosor, ya que debido a la dimensión de los mismos, habría que extender los tiempos de cocción recomendados.
La envoltura no es necesaria en la mayoría de casos. Si se necesitase el uso de una cubierta, se recomienda el uso de papel de aluminio para evitar que los alimentos se humedezcan por al agua condensada dentro de la cavidad del horno. Los alimentos cubiertos necesitarán más tiempo para cocinarse.
Para tiempos de cocción exactos, mantenga la puerta cerrada.
A veces, las sopas o cacerolas recalentadas sin cubrir quedan aguadas después de la cocción. La apariencia mejorará si se mezcla bien.
Se recomienda un tiempo de espera después de la cocción para que el calor se disperse de forma pareja por todo el alimento. No deje reposar en el horno por mucho tiempo; los alimentos podrían quedar demasiado cocidos o húmedos a causa del vapor residual.
Contenedor
Envoltura
Puerta
Revolver
Dejar reposar
Técnicas de cocción
PARA COCCIÓN AL VAPOR
Deberá comprobar que los utensilios sean adecuados para su uso en cada modo de cocción. Al calentar alimentos en contenedores de plástico, ponga especial atención a la temperatura en la cual se derriten los contenedores. Nunca caliente los contenedores de plástico por encima de la temperatura en la cual se derriten. Vigile el horno ya que existe la posibilidad de ignición o de objetos derritiéndose.
SEC AX1100S_sp.indd Sec1:8SEC AX1100S_sp.indd Sec1:8 10.12.2 4:53:38 PM10.12.2 4:53:38 PM

9
I N F O R M A C I Ó N Q U E D E B E C O N O C E R
• Compruebe que el alimento esté bien cocido/recalentado antes de servir.• La forma, tamaño, cantidad y temperatura del alimento así como el tamaño, forma y material del recipiente
afectarán el tiempo de cocción.
Características de los alimentos
PRECAUCIÓN:• Siempre use agarraollas o guantes para horno para retirar los alimentos o utensilios del horno. • Tenga cuidado al abrir la puerta del horno para que el vapor se disipe. • No extraiga los alimentos del horno con las manos sin usar protección. • Compruebe la temperatura de los alimentos y bebidas y remueva antes de servir. • Ponga especial cuidado al servir alimentos a bebés, niños y ancianos.
PARA COCCIÓN AL VAPOR
* SIEMPRE coloque alimentos dentro del horno durante su operación para que absorban la energía del microondas.
* Su horno microondas tiene una potencia de 900 vatios según el Procedimiento de prueba de la norma IEC. Al usar las instrucciones de las recetas o empaques, revise los alimentos en el tiempo mínimo y agregue el tiempo necesario.
* La condensación es una parte normal de la cocción con microondas. La humedad ambiental y la humedad en la comida infl uirán en la cantidad de humedad que se condense en el horno. Generalmente, los alimentos cubiertos no producirán tanta condensación como los no cubiertos. No bloquee las ranuras de ventilación en la parte posterior.
* Distribuya los alimentos con cuidado. Coloque las áreas más gruesas hacia la parte exterior del plato.
* Verifi que el tiempo de cocción. Cocine durante el período de tiempo más corto indicado y aumente como sea necesario. Los alimentos que se cocinan demasiado pueden quemarse o encenderse.
* Cubra los alimentos durante su cocción. Consulte la receta o el l ibro de cocina para obtener sugerencias: Toallas de papel, papel encerado, película plástica para microondas o una tapa. Las cubiertas evitan derrames y permiten que los alimentos se cocinen de manera uniforme.
* Cubra las áreas delgadas de la carne o carne de ave con piezas pequeñas y planas de papel de aluminio
SOBRE LA COCCIÓN POR MICROONDAS
para evitar que se cocinen demasiado antes de que las áreas más gruesas se cocinen por completo.
* Revuelva los alimentos desde afuera hacia adentro del plato una o dos veces durante la cocción, si es posible.
* Voltee los alimentos una vez durante la cocción en microondas para acelerar la cocción de alimentos como pollo y hamburguesas. Los alimentos grandes como asados o pechugas de pavo deben voltearse al menos una vez.
* Reacomode los alimentos como albóndigas a la mitad de la cocción desde la parte superior a la inferior y desde el centro del plato hacia el exterior.
* Deje un tiempo de espera. Retire los alimentos del horno y muévalos, si es posible. Cubra durante el tiempo de espera, lo cual permite que los alimentos se terminen de cocinar sin recocerlos.
* Verifique la cocción. Verifique si hay señales que indiquen que se ha alcanzado la temperatura de cocción.
Las señales de cocción completa incluyen:
– Todo el alimento emana vapor, no sólo en los bordes.
– Temperatura muy caliente en la base central del plato al tacto.
– Las uniones de los muslos del ave se mueven con facilidad.
– La carne y la carne de ave no presentan un color rosáceo.
– El pescado está opaco y se desmenuza fácilmente con un tenedor.
Densidad
Cantidad
Tamaño
Forma
Temperatura del alimento
Condimentos y aderezos
La densidad de los alimentos afectará la duración del tiempo de cocción. Corte los alimentos en porciones más delgadas, de ser posible dispóngalos en una sola capa.
El tiempo de cocción debe aumentar en la misma proporción al aumento de la cantidad de alimentos.
Los alimentos pequeños y las porciones pequeñas se cocinan más rápido que los grandes ya que el calor puede penetrar desde todos los lados hacia el centro. Para una cocción pareja prepare todas las piezas del mismo tamaño.
Los alimentos que tienen formas irregulares, como las pechugas o palitos de pollo, pueden demorar más en cocer en las partes más gruesas. Verifi que que estas partes estén bien cocidas antes de servir.
La temperatura inicial de los alimentos afecta el tiempo de cocción. Los alimentos helados demorarán más en cocer que los alimentos a temperatura ambiente. La temperatura del recipiente no es la temperatura real del alimento o bebida.
Es mejor agregar los condimentos o aderezos después de la cocción. Si se agregan como marinadas o adobos, el sabor puede resultar menos pronunciado al cocinar al vapor. Agregue los condimentos o aderezos nuevamente después de la cocción, de ser necesario.
SEC AX1100S_sp.indd Sec1:9SEC AX1100S_sp.indd Sec1:9 10.12.2 4:53:38 PM10.12.2 4:53:38 PM

10
I N F O R M A C I Ó N Q U E D E B E C O N O C E R
SOBRE LOS NIÑOS
Los niños menores de 7 años deben usar el horno bajo la supervisión cercana de un adulto. En el caso de los niños entre 7 y 12 años, la persona que los supervisa debe estar en la misma habitación.
El niño debe alcanzar el horno de manera cómoda; en caso contrario, debe usar un banco fi rme.
No debe permitir que nadie se apoye o se cuelgue de la puerta del horno.
Los niños deben conocer todas las precauciones de seguridad.
No asuma que un niño/niña puede cocinar de todo sólo porque aprendió una técnica de cocción.
Los niños deben aprender que el horno no es un juguete. Los niños pequeños deben ser supervisados para asegurar que no jueguen con el horno.
NO
* Cocinar los huevos con cáscara.* Recaliente los huevos enteros.* Deshidrate nueces o semillas con
cáscara.
* Cocine palomitas de maíz en bolsas de papel común o en tazones de vidrio.
* Exceda el tiempo máximo que indica el paquete de las palomitas de maíz.
* Calentar los alimentos del bebé en sus frascos originales.
* Calentar botellas desechables.* Calentar las botellas con las
tetinas puestas.
* Calentar o cocine en frascos de vidrio cerrados o en recipientes herméticos.
* Preparar conservas o mermeladas en el microondas ya que las bacterias dañinas podrían no ser eliminadas.
* Freír en aceite.* Secar madera, calabazas, hierbas
o papeles húmedos.
SÍ
* Perfore las yemas del huevo antes de cocinarlo para evitar una “explosión”.
* Haga pequeños agujeros en la piel de las papas, manzanas, zapallos, hot dogs y salchichas para liberar el vapor.
* Use palomitas de maíz empacadas en una bolsa especial para horno microondas.
* Escuche mientras las palomitas revientan para saber si hay una demora de 1 o 2 segundos o use el SENSOR DE PALOMITAS DE MAÍZ para “no hacer conjeturas” por el sonido.
* Transfi era los alimentos del bebé a un plato pequeño y caliéntelos con cuidado, revolviendo con frecuencia. Verifi que en su muñeca la temperatura antes de servir.
* Coloque las tetinas en las botellas después de calentarlas y sacúdalas bien. Verifi que la temperatura usted mismo antes de alimentar al bebé.
* Corte los alimentos horneados con relleno después de calentarlos para liberar el vapor y prevenir las quemaduras.
* Revuelva bien los líquidos antes y después de calentar para evitar “erupciones”.
* Use un tazón profundo al cocinar líquido o cereal para evitar que rebosen.
Huevos, salchichas, frutos secos, semillas, frutas y vegetales
Palomitas de maíz
Alimentos para bebés
General
SOBRE LOS ALIMENTOS AL USAR EL MODO MICROONDAS
• Verifi que que la cocción de los alimentos se realice de acuerdo a las temperaturas recomendadas por el Departamento de Agricultura de los EE.UU.
SOBRE SEGURIDAD
... para carne, cordero o ternera corte en filetes, chuletas o asados, pescado
... para cerdo fresco, carne molida, pescado, mariscos, platos a base de huevos, alimentos preparados congelados y carne, cordero o ternera cortada en fi letes, chuletas o asado.
... p a r a s o b r a s , a l i m e n t o s refrigerados listos para recalentar, platos preparados y comida "lista" para llevar, pollo o pavo entero, pechugas de pollo o pavo y carne de ave molida usada en hamburguesas de pollo o pavo.
NOTA: No cocine carne de ave entera con relleno. Cocine el relleno por separado a 165°F (74°C).
145°F(63°C)
T E M P E R A T U R A A L I M E N T O
160°F(71°C)
165°F(74°C)
SEC AX1100S_sp.indd Sec1:10SEC AX1100S_sp.indd Sec1:10 10.12.2 4:53:38 PM10.12.2 4:53:38 PM

11
I N F O R M A C I Ó N Q U E D E B E C O N O C E R
• Para verifi car la cocción, introduzca un termómetro para carne en un área gruesa o densa lejos de la grasa y el hueso. NUNCA deje el termómetro en los alimentos durante la cocción, a menos que sea aprobado para uso en horno microondas.
• Las partes accesibles (ej. puerta del horno, cavidad del horno, platos, accesorios y especialmente el elemento calefactor de la parrilla) pueden calentarse durante el uso. Use agarraollas secos o guantes para horno al retirar los recipientes, alimentos y accesorios del horno de su interior y tenga cuidado de no tocar la cavidad del horno para prevenir quemaduras.
• Tenga cuidado al abrir la puerta. Evite las quemaduras causadas por el vapor dirigiéndolo lejos de su rostro y manos. Siempre apártese del horno al abrirlo.
• Levante lentamente el borde más alejado de la cubierta de un plato y abra con cuidado las bolsas de palomitas de maíz y las bolsas especiales para cocinar en horno apartándolas de su rostro.
• Permanezca cerca del horno mientras esté en uso y verifi que con frecuencia el progreso de la cocción para que los alimentos no se cocinen demasiado.
• NUNCA use la cavidad para guardar libros de cocina u otros artículos.
• Seleccione, almacene y manipule los alimentos con cuidado para conservar su alta calidad y minimizar la propagación de bacterias.
• Tenga cuidado al retirar los alimentos del horno para que los utensilios, su ropa o accesorios no toquen las partes salientes de la puerta.
• No toque las áreas alrededor de la luz del horno. Esta parte se calentará al encenderse la luz del horno.
• Para prevenir quemaduras, siempre tenga cuidado de no salpicar grasa de la bandeja para hornear al retirar del horno carnes asadas o asadas a la parrilla.
• Para evitar quemaduras, siempre pruebe la temperatura de los alimentos y recipientes y revuelva antes de servir. Preste especial atención a la temperatura de los recipientes, alimentos y bebidas. No tome bebidas o sopas sin comprobar la temperatura del recipiente.
• No toque la puerta del horno, la parte exterior del gabinete, la parte posterior del gabinete, la cavidad del horno, las ranuras de ventilación,
los accesorios, platos y el vapor que sale por las ranuras de ventilación durante el funcionamiento del horno porque se calentarán.
• No haga funcionar el horno si el depósito de agua se raja y se escapa el agua. Llame al 1-800-BE-SHARP para comprar una parte de reemplazo.
• Después de usar, el agua condensada puede estar dentro de la cavidad del horno, especialmente en el piso del horno. Seque cualquier residuo líquido con una esponja y pase un trapo para mantener limpio el horno.
• No coloque nada en la parte exterior del gabinete durante el funcionamiento.
• N o m u e v a e l h o r n o m i e n t r a s e s t á e n funcionamiento. Si tiene que mover el horno, siempre seque toda el agua dentro del horno usando la función DRAIN WATER (DRENAR EL AGUA) (Vea la página 16). Después de drenar, vacíe la bandeja de goteo.
• Para impedir la condensación, que podría corroer el artefacto, no deje alimentos cocidos en el horno por un período prolongado.
• Limpie el horno a intervalos regulares y retire cualquier acumulación de alimentos del interior del horno o de la parte superior.
• No caliente aceite ni manteca para freír.
• SIEMPRE use una agarradera para prevenir quemaduras al manipular utensilios que están en contacto con los alimentos calientes. El calor de los alimentos puede transferirse a través de los utensilios causando quemaduras en la piel. En los modos Al Vapor, Parrilla y Parrilla mixta, el gabinete, el interior y la puerta pueden estar demasiado calientes para tocarlos.
• Mantenga el papel aluminio usado para cubrir por lo menos a 1 pulgada (2,54 cm) de distancia de las paredes, techo y puerta al cocinar con microondas.
• No vierta agua fría en el superficie del horno después de la cocción ya que podría rajarse.
• No vierta agua fría en la puerta ya que podría rajarse.
• No toque las superfi cies calientes.
• El uso de accesorios auxiliares no recomendados por el fabricante del artefacto podría causar lesiones.
• El horno no debe quedar sin atención durante su funcionamiento. Las temperaturas que son demasiado altas o los t iempos de cocción demasiado prolongados pueden sobrecalentar los alimentos causando un incendio.
• No inserte los dedos u objetos en las salidas de vapor o ranuras de ventilación, ya que puede dañar el horno y causar un choque eléctrico o un peligro.
• Si cualquier objeto cae dentro de las ranuras de ventilación, apague inmediatamente el horno,
desconecte y consulte con el Personal del Servicio autorizado Sharp.
• No toque el enchufe con las manos húmedas al
insertarlo o retirarlo del tomacorriente. Conecte de manera segura dentro del tomacorriente eléctrico de pared y retire sujetando la parte final del enchufe. Nunca jale usando sólo el cable.
SEC AX1100S_sp.indd Sec1:11SEC AX1100S_sp.indd Sec1:11 10.12.2 4:53:39 PM10.12.2 4:53:39 PM

12
N O M B R E D E L A S P A R T E S
NOTA:
Coloque el estante en la bandeja de
cristal tal y como se muestra en la Figula 1.
ADVERTENCIA:
La cavidad del horno, la puerta, el gabinete exterior, los accesorios y
los platos podrían estar calientes, utilice agarraollas gruesos y secos al extraer los alimentos o accesorios del horno para evitar quemaduras.
1 Orifi cios de ventilación Tenga en cuenta que sale vapor o aire caliente durante la cocción con vapor o parrilla mixta, y mantenga a los niños alejados del horno.
2 Asa de aperture de la puerta
3 Pantalla LCD
4 Panel de mandos
5 Lámpara del horno
6 Posición superior (posición 3)
7 Posición inferior (posición 2)
8 Depósito de agua (Vea la página 14.)
9 Sellos de la puerta y superfi cies de sellado
10 Pestillo
11 Superfi cie del horno (position 1)
12 Bisagras de la puerta
13 Salidas de vapor
14 Bandeja de goteo (Vea la página 14.)
15 Cavidad del horno
16 Puerta transparente
17 Elemento calefactor de la parrilla (en la parte superior de la cavidad del horno)
18 Cierre de la puerta
Para abrir, sujete el cierre de la puerta por abajo y tire de él hacia usted.
ACCESORIOS
19 Estante
Para Parrilla y Parrilla mixta.
No utilizar al Vapor ni Microondas.
Colocar siempre sobre la bandeja de cristal.
20 Bandeja de cristal
21 Bandeja de vapor x2
Al Vapor únicamente. Colocar siempre sobre/en la bandeja
de cristal. No ut i l i zar para Microondas,
Parrilla y Parrilla mixta.
AVISO al colocar la bandeja de vapor y la bandeja de cristal:Tras la cocción, extraiga primero la bandeja de vapor. Consulte la Figula 2. Tenga cuidado con el exceso de agua en la bandeja de vapor, se recomienda que la coloque directamente sobre un plato plano o bandeja para evitar salpicaduras. Antes de extraer la bandeja de cristal, asegúrese de que esté fría. Tenga en cuenta que puede haber agua en la bandeja de cristal, por lo tanto ponga especial precaución al extraerla.
192120
Figura 1
Estante
Bandeja de cristal
Figura 2
Agarraollas
Bandeja de cristal
Bandeja de vapor
6
8
9
10 1116
13 517
7
12
15 14
14
3
1
4
2
18
SEC AX1100S_sp.indd Sec1:12SEC AX1100S_sp.indd Sec1:12 10.12.2 4:53:39 PM10.12.2 4:53:39 PM

13
P A N E L D E C O N T R O LINFORMACIÓN EN PANTALLA
La pantalla muestra información útil incluyendo tiempos y modos de cocción.
AUTOMÁTICA (AUTO): Se ha seleccionado cocción automática o
está en progreso.
SENSOR (SENSOR): Se ha seleccionado cocción por sensor o está
en progreso.
MANUAL (MANUAL): Se ha seleccionado cocción manual o está en progreso.
VERIFICAR (CHECK): Se necesita realizar una acción (ej. dar la vuelta, remover).
DESC. (DEF): Se ha seleccionado Descongelación con vapor o Descongelación con micro o están en progreso.
ENCENDIDO (ON): El horno está en funcionamiento.
EXTENDER (EXTEND): Se puede extender el tiempo de cocción.
CALIENTE (HOT): El horno está extremadamente caliente.
▲ (MÁS) (MORE): Se ha seleccionado más tiempo de ajuste para la cocción automática.
▼ (MENOS) (LESS): Se ha seleccionado menos tiempo de ajuste para la cocción automática.
DESINCRUSTAR (DESCALE): Se necesita desincrustar.
AGUA (WATER): Se necesita agua. Si este indicador aparece en la pantalla, el horno está funcionando en el
menú usando agua.
Indicadores de posición de la bandeja:
Posición de la(s) bandeja(s) para la cocción automática y cocción con vapor manual.
3: Posición superior
2: Posición inferior
1: Superfi cie del horno
1. Modo de cocción e Indicadores para COMENZAR
El indicador parpadeará o se iluminará durante el funcionamiento.
Podrá pulsar la tecla correspondiente cuando los indicadores parpadeen. Si los indicadores se iluminan en la pantalla, indican el modo de cocción seleccionado o el modo de cocción de funcionamiento del horno.
1
El número cerca de la ilustración del panel de control indica las páginas donde puede encontrar descripciones de las características e información de uso.
18 :COCCIÓN SANA
24 :Descongelación con micro 21 :Sensor de palomitas
26 :Cocción con vapor alto 28 :Micro
26 :Cocción con vapor bajo
17 :Parar/Borrar
16,17,30 :Info/Temporizador
22
27
27 27
30
:Recalentar/Cocinar por micro
Huevos
Pescado
Parrilla automática
:Parrilla mixta alta
:Parrilla:Parrilla mixta baja
:Minuto extra/COMENZAR
Comida mixta
Vegetales
Descongelación con vapor
SEC AX1100S_sp.indd Sec1:13SEC AX1100S_sp.indd Sec1:13 10.12.2 4:53:40 PM10.12.2 4:53:40 PM

14
I N S T R U C C I O N E S I M P O R T A N T E SLEA DETENIDAMENTE ANTES DE COCINAR CON VAPOR
DEPÓSITO DE AGUAAl cocinar con vapor es necesario rellenar el depósito de agua con agua corriente fría. Asegúrese de seguir las instrucciones siguientes.1. Jale el depósito de agua hacia usted para retirarlo.
(Figura 1)2. Lave el depósito de agua y la para el primer uso. 3. Cada vez que empiece a cocinar, abra la tapa
y llene el depósito de agua con agua del grifo fresca y fría hasta la marca MAX. (Figura 2) No llene el depósito de agua por encima de la marca MAX.
4. Asegúrese de que la tapa esté cerrada fi rmemente. (Figura 3)
5. Instale el depósito de agua presionando con fi rmeza. (Figura 4)
6. Después de la cocción, vacíe el depósito de agua y lave el depósito de agua y la tapa.
NOTAS:1. No ut i l ice n ingún ot ro l íqu ido como agua
destilada, ósmosis, agua mineral, etc.2. Una cantidad insufi ciente de agua en el depósito
de agua puede causar un resultado no deseado.3. Recomendamos que vacíe el depósito de agua
después de cada cocción. No deje el depósito de agua lleno con agua en el horno hasta el día siguiente.
4. Si “Err, WATER (parpadeando)” aparece en la pantalla durante la cocción con vapor, consulte el Cuadro de localización de fallos en la página 33. El mensaje no aparecerá en la función Desincrustar.
5. No deje caer ni dañe el depósito de agua. El calor puede causar que el depósito de agua cambie de forma. No use un depósito de agua dañado. Llame al 1-800-BE-SHARP para comprar una parte de reemplazo.
6. Pueden quedar unas cuantas gotas de agua al retirar el depósito de agua. Seque el horno con un paño suave.
7. No bloquee los orificios de ventilación en la tapa del depósito de agua. Causará problemas durante la cocción.
BANDEJA DE GOTEOAsegúrese de cocinar con la bandeja de goteo en posición y siga las instrucciones siguientes.
La bandeja de goteo están empacadas con el horno. Coloque la bandeja de goteo debajo de la puerta del horno como se muestra en la Figura 5. La bandeja de goteo reúne la condensación de la puerta del horno.
Para retirar la bandeja de goteo: Jale la bandeja de goteo hacia usted con ambas manos.
* Asegúrese que el agua no esté goteando antes de retirar la bandeja de goteo.
Para volver a colocar la bandeja de goteo: Coloque la bandeja de goteo sobre los ganchos de la derecha e izquierda debajo del horno y presione fi rmemente como se muestra en la Figura 5. Al colocar la bandeja de goteo, introdúzcala horizontalmente. El uso inadecuado podría producir daños en los ganchos.
Vacíe la bandeja de goteo después de cada cocción. Vacíe, enjuague bien, seque y reemplace. No vaciarla puede causar que la bandeja de goteo rebose. Cocinar repetidamente sin vaciar la bandeja de goteo puede causar que rebose.
ADVERTENCIAS:1. El horno estará muy caliente después de las funciones de cocción y de drenar el agua.2. No abra el horno con su cara cerca del mismo. El vapor del horno puede causar quemaduras.3. Asegúrese de que el horno se ha enfriado antes de vaciar el depósito de agua y la bandeja de goteo y
después seque la cavidad del horno.4. No toque el agua directamente ya que el agua en la bandeja de goteo puede estar caliente.
Figura 2 Figura 4Figura 1
Figura 5
Bandeja de goteo
Ganchos
Figura 3
SEC AX1100S_sp.indd Sec1:14SEC AX1100S_sp.indd Sec1:14 10.12.2 4:53:41 PM10.12.2 4:53:41 PM

15
I N S T R U C C I O N E S I M P O R T A N T E S
Antes de la cocción1. Verifi que que el depósito de agua esté lleno con agua fresca del grifo y que esté instalado. (Vea la página
14.)2. Asegúrese de que esté instalada la bandeja de goteo vacía. (Vea la página 14.)3. Coloque los alimentos en el horno. Asegúrese de colocar la bandeja de cristal en la posición inferior (posición
2) al cocinar en el modo vapor.
Luego de la cocción1. Después de que el horno se ha enfriado, retire y vacíe el depósito de agua y seque la cavidad del horno.
Tenga en cuenta que el elemento calefactor de la parrilla y las salidas de vapor podrían seguir calientes, de modo que tenga cuidado al limpiar el techo y la placa trasera de la cavidad. (El elemento calefactor de la parrilla se encenderá durante un corto período de tiempo antes del fi nal de la cocción.) Vacíe la bandeja de goteo.
2. Ejecute la función Drenar el agua por lo menos una vez al día después de usar el Cocción Sana (excepto para Parrilla automática), Cocción con vapor alto y Cocción con vapor bajo.
3. Revise que el agua no esté goteando antes de retirar la bandeja de goteo, ya que una pequeña cantidad de agua cae en la bandeja de goteo al retirar el depósito de agua.
4. Durante y tras la cocción, puede encontrarse agua condensada en la puerta, paredes y superfi cie del horno. Seque cualquier residuo líquido con un paño suave. Tras utilizarlo por última vez cada día, se recomienda poner el horno en funcionamiento usando la Parrilla durante 3 minutos sin alimentos ni accesorios para secar el agua que se encuentre alrededor del elemento calefactor de la parrilla.
ADVERTENCIA: No abra la puerta del horno con su cara cerca del mismo. El vapor del horno puede causar quemaduras.NOTA: Mantenga la puerta cerrada. Si la abre durante la cocción, el vapor saldrá expulsado y será necesario más tiempo de cocción.
VAPOR DURANTE LA COCCIÓN AUTOMÁTICA Y MANUAL
SEC AX1100S_sp.indd Sec1:15SEC AX1100S_sp.indd Sec1:15 10.12.2 4:53:42 PM10.12.2 4:53:42 PM

16
I N S T R U C C I O N E S I M P O R T A N T E S
Ejecute la función Drenar el agua por lo menos una vez al día después de la cocción con vapor de agua. Demora hasta 7 minutos.
La función Drenar el agua es muy útil para evitar la acumulación de sarro y el uso de agua dura. Causa la evaporación del sistema interno de vapor.
P R O C E D I M I E N T O
1
Pulse Minuto extra/COMENZAR. “In F1” parpadeará una y otra vez en la pantalla durante la función Drenar el agua.
2
Extraiga el depósito de agua.Asegúrese de que no haya alimentos en el horno.Pulse Info/Temporizador y el número 1 para seleccionar “In F1”.
Al fi nalizar la función de drenaje y una vez enfriado el horno, limpie la cavidad del mismo. Vacíe la bandeja de goteo.
3
NOTAS:1. Debe retirar el depósito de agua antes de iniciar
este procedimiento.2. Si la función Drenar el agua es habilitada, el modo
Ahorro de energía será cancelado temporalmente.
Se pueden formar granos blancos o grises, también llamados incrustaciones en el circuito interno de agua del horno durante la generación de vapor, lo que podría causar la falla del horno.
Cuando aparece en pantalla “DESCALE (parpadeando)”, asegúrese de ejecutar la función Descale de inmediato. Demora cerca de 1 hora. (Desincrustar utilizando ácido cítrico o zumo de limón lleva 30 minutos, y a continuación aclarar con agua fresca lleva 30 minutos.)
P R O C E D I M I E N T O
1
3
No coloque ningún alimento en el horno. Cierre la puerta fi rmemente. Pulse Minuto extra/COMENZAR para empezar a decapar. (unos 30 minutos)
4
Cuando el horno esté detenido y frío, retire el depósito de agua, vacíe, enjuague y vuelva a llenar con agua fría del grifo hasta la marca MAX. Vuelva a colocar el depósito de agua. Vacíe la bandeja de goteo y reemplazarlo. Retire la bandeja de cristal, vacíe, enjuague y seque.Siga con el paso 3 para volver a colocar la bandeja de cristal y la guía para decapar. Cierre la puerta fi rmemente. Pulse Minuto extra/COMENZAR. Empezará el enjuague. (unos 30 minutos)
5
Al terminar el enjuague y cuando el horno esté frío, retire el depósito de agua y vacíelo. Extraiga la bandeja de cristal y vacíela. Seque la cavidad del horno. Vacíe la bandeja de goteo.
6
Coloque la bandeja de cristal en la posición inferior (posición 2). Deslice la bandeja hacia la pared posterior del horno hasta que se detenga.
NOTA:Si la función Decapar el agua es habilitada, el modo Ahorro de energía será cancelado temporalmente.
Pulse Info/Temporizador y el número 2 para seleccionar “In F2”.
2
Para decapar use ácido cítrico puro, de venta en algunas farmacias o jugo de limón embotellado sin pulpa. Elija uno y prepare la solución para decapar.
Para usar ácido cítrico puro, disuelva 1 cucharada de cristales de ácido cítrico puro en 2 tazas de agua en un recipiente no poroso. Mezcle bien y vierta dentro del depósito de agua hasta la marca MAX.
Para usar jugo de limón puro embotellado, verifi que que no contiene nada de pulpa. Si tiene pulpa o usted no está seguro, cuele usando un colador fi no. Mida 1/3de taza del jugo de limón colado y agréguelo a 2 tazas de agua. Mezcle bien y vierta dentro del depósito de agua hasta la marca MAX.
Coloque el depósito de agua correctamente en el horno y presione con fi rmeza para asegurar.
FUNCIÓN DRENAR EL AGUA
FUNCIÓN DECAPAR
SEC AX1100S_sp.indd Sec1:16SEC AX1100S_sp.indd Sec1:16 10.12.2 4:53:42 PM10.12.2 4:53:42 PM

17
A N T E S D E O P E R A R L I M P I E E L H O R N O A N T E S D E L P R I M E R U S O• Antes de utilizar su horno, asegúrese de haber
leído y entendido todo el manual de operación.• Antes de usar el horno, siga estos procedimientos:1. Coloque la bandeja de goteo correctamente. Vea la página 14.2. Consulte a continuación para obtener información
sobre los primeros pasos.3. Siga las instrucciones al lado derecho para limpiar
el horno antes del primer uso.
Su horno posee un modo de Ahorro de energía. Esta función ahorra electricidad si el horno no está en uso.
P R O C E D I M I E N T O1
Abra la puerta. La pantalla mostrará “.0”.2
Conecte el horno a una aprobado salida. En este momento, no visualizará nada en la pantalla.
Cierre la puerta. El horno está listo para su uso.3PRECAUCIÓN:En el modo Ahorro de energía el reloj no será visualizado. En el modo Ahorro de energía, si no utiliza el horno durante 3 minutos o más (es decir, una vez cerrada la puerta, o tras presionar Parar/Borrar, o al fi nalizar la cocción), no será capaz de utilizar el horno hasta que haya abierto y cerrado la puerta del horno.
NOTA:Cuando ajuste el Reloj, el modo Ahorro de energía se cancelará.
1. Pulse Parar/Borrar si comete un error durante la programación.2. Detiene el horno temporalmente durante la cocción.3. Cancela un programa durante la cocción,
presionando dos veces.
Al utilizar la parrilla por primera vez, podría detectar humo o un cierto olor a quemado, esto es normal y no es síntoma de que el horno está averiado. Para evitar este problema, al utilizar el horno por primera vez, ponga en funcionamiento la parrilla sin introducir alimentos durante 20 minutos.
PREPARACIÓNVentile la habitación.
P R O C E D I M I E N T O
1 Asegúrese de que no haya alimentos en el horno. Pulse Parrilla una vez.
Introduzca el tiempo (20.00) y Minuto extra/COMENZAR.
2
ADVERTENCIA:La puerta del horno, el gabinete exterior, la cavidad del horno y especialmente el elemento calefactor de la parrilla estarán calientes.
PARA CONFIGURAR EL RELOJ* Suponga que quiere ingresar la hora correcta del
día. (A.M. o P.M.)
P R O C E D I M I E N T O
1
Introduzca la hora correcta del día pulsando los números en secuencia.
2
Pulse Info/Temporizador y el número 7 (In F7).
Pulse Minuto extra/COMENZAR.
3
PRIMEROS PASOS
PARAR/BORRAR
NOTAS:1. Éste es un reloj de 12 horas. Si intenta introducir una
hora incorrecta, “Err” aparecerá en la pantalla. Pulse Parar/Borrar y reprogramar el reloj.
2. Si el suministro de alimentación eléctrico del horno es interrumpido, la pantalla aparecerá en blanco de forma intermitente tras volver a establecer la alimentación. Si esto ocurre durante la cocción, el programa será eliminado. También se eliminará la hora del día.
3. Cuando ajuste el Reloj, el modo Ahorro de energía se cancelará.
SEC AX1100S_sp.indd Sec1:17SEC AX1100S_sp.indd Sec1:17 10.12.2 4:53:43 PM10.12.2 4:53:43 PM

18
C O C C I Ó N A U T O M Á T I C ALa operación automática está disponible con la Vapor, Parrilla y Microondas. Consulte cada función para más detalles.
La Cocción sana tiene 6 categorías y 15 menús.
Categoría 1-5: Vegeta les /Pescado/Huevos/Descongelación con vapor/Comida mixta
Categoría 6: Parrilla automática
Para la Categoría 1-5: Cocine alimentos utilizando siempre la bandeja de vapor y la bandeja de cristal. Consulte la TABLA DE COCCIÓN SANA para más detalles en la página 19. Y consulte las instrucciones importantes de las páginas 14-15.
* Supongamos que desea cocinar 0,136 kg (0,3 libras) de fi letes de pescado.
Pulse el número del peso deseado. (Ej. pulse 3 para 0,136 kg (0,3 libras))
3
Coloque los alimentos en el horno siguiendo las instrucciones de la tabla de cocción de la página 19. Cierre la puerta. Pulse Minuto extra/COMENZAR.
4
5 Después de la cocción aparecerá el mensaje EXTEND. Si desea extender el tiempo de cocción, pulse el tiempo deseado y Minuto extra/COMENZAR.
Si no, pulse Parar/Borrar.Después de que el horno se ha enfriado, retire y vacíe el depósito de agua y seque la cavidad del horno. Vacíe la bandeja de goteo.
P R O C E D I M I E N T O1 Asegúrese de que el depósito de
agua esté lleno de agua corriente fría hasta la marca MAX, así como de que se encuentre instalado. Pulse Pescado una vez.
AVISO al colocar la bandeja de vapor y la bandeja de cristal:Tras la cocción, extraiga primero la bandeja de vapor. Consulte la Figula 2 en la página 12. Tenga cuidado con el exceso de agua en la bandeja de vapor, se recomienda que la coloque directamente sobre un plato plano o bandeja para evitar salpicaduras. Antes de extraer la bandeja de cristal, asegúrese de que esté fría. Tenga en cuenta que puede haber agua en la bandeja de cristal, por lo tanto ponga especial precaución al extraerla.
NOTAS:1. Sólo ingrese el peso o cantidad del alimento. No
incluya el peso del recipiente.2. Para alimentos que pesen más o menos que los
pesos indicados en las tablas de cocción, cocine en el modo manual.
3. Los tiempos de cocción programados son tiempos promedios. Para aumentar los tiempos de cocción preprogramados en la cocción automática, consulte AUMENTAR EL TIEMPO DE COCCIÓN AL FINAL DE LA COCCIÓN AL VAPOR en la página 29. Antes de extender el tiempo de cocción, asegúrese de que el depósito de agua esté lleno de agua corriente fría hasta la marca MAX, así como de que se encuentre instalado.
4. Usted puede programar las selecciones con más o menos tiempo de ajuste. Vea la página 29.
5. Mantenga la puerta cerrada. Si lo abre durante la cocción, el vapor escapará y necesitará mayor tiempo de cocción.
6. La cantidad de agua en el depósito de agua es sufi ciente para una cocción. No tiene que agregar agua durante la cocción.
7. Durante y después de la cocción, puede haber agua condensada en la puerta, las paredes del horno y en el piso del mismo. Seque cualquier residuo líquido con un paño suave. Tras utilizarlo por última vez cada día, se recomienda poner el horno en funcionamiento en Parrilla durante 3 minutos sin alimentos para secar el agua que se encuentre alrededor del elemento calefactor de la parrilla.
8. Después de la cocción, el horno se enfr iará automáticamente y usted escuchará el sonido del venti lador de enfr iamiento. El venti lador puede continuar operando por hasta 10 minutos dependiendo del horno y la temperatura de las partes.
9. Si intenta introducir más o menos de la cantidad permitida indicada en la tabla, “Err” aparecerá en la pantalla.
10. Podrá introducir el peso únicamente en libras.
ADVERTENCIAS:1. La puerta del horno, el gabinete exterior, la cavidad
del horno, accesorios, platos y especialmente el elemento calefactor de la parrilla estarán calientes. Utilice agarraollas gruesos al añadir o extraer alimentos para evitar quemaduras.
2. No abra la puerta del horno con su cara cerca del mismo. El vapor del horno puede causar quemaduras.
NOTA para la Descongelación con vapor:Se descongelan con Vapor y Microondas. No utilice la bandeja de cristal, la bandeja de vapor ni el estante metálico.
COCCIÓN SANA
2 Seleccione el Pescado deseado.
(Ej. pulse el número 2 para seleccionar
fi letes de pescado.)
* Al seleccionar la cantidad: Pulse repetidamente la misma tecla numérica que pulsó
en el paso 2, hasta que aparezca la cantidad deseada. Cuando cocine los huevos duros. No es necesario
seleccionar la cantidad. Sáltese el paso 3.
*
SEC AX1100S_sp.indd Sec1:18SEC AX1100S_sp.indd Sec1:18 10.12.3 5:27:19 PM10.12.3 5:27:19 PM

19
C O C C I Ó N A U T O M Á T I C A
TABLA DE COCCIÓN SANA
A L I M E N T O P R O C E D I M I E N T OC A N T I D A D P O S I C I Ó N D E L O S A L I M E N T O S2
1 - 6 porciones1 - 4 (1 porción = 6 espárragos)1 - 6 (tazas)1 - 6 (tazas)1 - 6 (tazas)1 - 6 porciones1 - 6 (tazas)1 - 6 (tazas)1 - 6 porciones1 - 6 (tazas)1 - 6 (mazorcas)1 - 4 (mitades)
1. Cocción rápida Espárragos (medio) Brócoli Colifl or Calabacín (rodajas de ¼ pulgadas de grosor)2. Cocción media Zanahorias (Cortadas: rodajas de ¼ pulgadas de grosor) Judías verdes (Cortadas en trozos de 2 pulgadas)3. Cocción larga Zanahorias (pequeñas) Mazorca de maíz Calabaza de bellota (pequeña, cortada a la mitad)
Rocíe la bandeja de vapor con aceite de aerosol antiadherente. Coloque el pescado en la bandeja de vapor sobre la bandeja de cristal.
Vegetales
Pescado
Huevos
Coloque los vegetales en la bandeja de vapor sobre la bandeja de cristal.
* Ajuste estándar para los fi letes de pollo. Para los fi letes de pescado, seleccione el ajuste Menos. Consulte la página 29.
1. Carne de pescado (¼-½ pulgadas de grosor)2. Filetes de pescado (¾-1 pulgadas de grosor)
1. Huevos escalfados
2. Huevos duros
0,3 - 2 lb0,3 - 2 lb
1 - 4 huevos
1 - 6 huevos
Coloque cada uno de los huevos en una taza de fl an engrasada y coloque la(s) taza(s) en el estante de fl an en la bandeja de vapor sobre la bandeja de cristal. Coloque los huevos en la bandeja de vapor sobre la bandeja de cristal.
2
2
2
Coloque el pescado en un estante o plato aptos para el microondas. Coloque el plato directamente sobre la superfi cie del horno. Cuando el horno se detenga, dele la vuelta al pescado. Tras la descongelación, extraiga cualquier resto de agua o hielo glaseado y déjelo reposar durante 5-10 minutos hasta su completa descongelación.
Descongelación con vapor
1. Carne de pescado (¼-½ pulgadas de grosor)2. Filetes de pescado (¾-1 pulgadas de grosor)
0,3 - 1 lb0,3 - 1 lb
1
Comida mixta
1. Vegetales rápidos + fi letes de pescado/pollo <1 porción de vegetales> 6 Espárragos (medio) 1 taza de brócoli 1 taza de colifl or 1 taza de calabacín (rebanadas de ¼ pulgadas de grosor) <1 porción de fi letes de pescado> 0,5 libras de fi letes de pescado <1 porción de fi letes de pollo> 2 fi letes (alrededor de 0,2 libras por 1 fi lete)
1 - 4 porciones Coloque los vegetales en la bandeja de vapor. Coloque los fi letes de pescado o de pollo en otra bandeja para cocción con vapor sobre la bandeja de cristal. Coloque la bandeja de cristal con los fi letes de pescado o de pollo en la bandeja de vapor en el horno. Comience a cocinar. Cuando el horno se detenga, coloque la bandeja de vapor con los vegetales dentro del horno. Continúe cocinando.
Vegetales:3Pescado/Pollo:2
2. Vegetales medios + fi letes de pescado/pollo <1 porción de vegetales>
1 taza de zanahorias (Cortadas: rebanadas de ¼ pulgadas de grosor) 1 taza de judías verdes (cortadas en trozos de 2 pulgadas) <1 porción de fi letes de pescado> 0,5 libras de fi letes de pescado <1 porción de fi letes de pollo> 2 fi letes (alrededor de 0,2 libras por 1 fi lete)
1 - 4 porciones Coloque los vegetales en la bandeja de vapor. Coloque los fi letes de pescado o de pollo en otra bandeja para cocción con vapor sobre la bandeja de cristal.Coloque las bandejas en el horno. Comience a cocinar.
Vegetales:3Pescado/Pollo:2
3. Vegetales largos + fi letes de pescado/pollo <1 porción de vegetales>
1 taza de zanahorias (pequeñas) 1 porción de mazorca de maíz Media calabaza de bellota (pequeña, cortada a la mitad) <1 porción de fi letes de pescado> 0,5 libras de fi letes de pescado <1 porción de fi letes de pollo> 2 fi letes (alrededor de 0,2 libras por 1 fi lete)
1 - 4 porciones Coloque los vegetales en la bandeja de vapor. Coloque los fi letes de pescado o de pollo en otra bandeja para cocción con vapor sobre la bandeja de cristal.Coloque las bandejas en el horno. Comience a cocinar.
Vegetales:3Pescado/Pollo:2
* No es necesario seleccionar la cantidad.
SEC AX1100S_sp.indd Sec1:19SEC AX1100S_sp.indd Sec1:19 10.12.2 4:53:45 PM10.12.2 4:53:45 PM

20
C O C C I Ó N A U T O M Á T I C APara la categoría 6 (Parrilla automática):Parrilla automática tiene 3 menús.
* Supongamos que desea cocinar 0,227 kg (0,5 libras) de trozos de pollo.
1 Hamburguesas2 Aves de corral sin hueso3 Trozos de pollo
Para más detalles, consulte la siguiente TABLA DE PARRILLA AUTOMÁTICA.
NOTAS:1. Sólo ingrese el peso del alimento. No incluya el
peso del recipiente.2. Para alimentos que pesen más o menos que los
pesos indicados en las tablas de cocción, cocine en el modo manual.
3. Siempre siga las instrucciones en la tabla de cocción.
4. Se pueden programar todas las selecciones con más o menos tiempo de ajuste. Vea la página 29.
5. Después de la cocción, el horno se enfriará automáticamente y usted escuchará el sonido del ventilador de enfriamiento. El ventilador puede continuar operando por hasta 10 minutos dependiendo del horno y la temperatura de las partes.
ADVERTENCIA:La puerta del horno, el gabinete exterior, la cavidad del horno, accesorios, platos y especialmente el elemento calefactor de la parrilla estarán calientes. Utilice agarraollas gruesos al añadir o extraer alimentos para evitar quemaduras.
Pulse el número del peso deseado. (Ej. pulse 5 para 0,227 kg (0,5 libras))
3
Coloque los alimentos en el horno siguiendo las instrucciones de la tabla de cocción de abajo. Cierre la puerta. Pulse Minuto extra/COMENZAR.
4
P R O C E D I M I E N T O
1 Pulse Parrilla automática una vez.
2 Seleccione el ajuste de parrilla automática
deseado. (Ej. pulse el número 3 para
seleccionar trozos de pollo.)
El horno se detiene y CHECKse prende y se apaga.Abra la puerta. Dé la vuelta a los trozos de pollo. Cierre la puerta. Pulse Minuto extra/COMENZAR.
5
* Cuando cocine los Hamburguesas. No es necesario seleccionar la cantidad. Sáltese el paso 3. Siga las instrucciones en la TABLA DE PARRILLA AUTOMÁTICA.
*
TABLA DE PARRILLA AUTOMÁTICA
A L I M E N T O P R O C E D I M I E N T OC A N T I D A D1 - 5(¼ de libra cada uno)
0,5 - 2 lb
0,5 - 3 lb
1. Hamburguesas
2. Aves de corral sin hueso
3. Trozos de pollo
Moldee las hamburguesas y colóquelas en el estante. Coloque el estante sobre la bandeja de cristal. Comience a precalentar. No coloque alimentos en el horno. Una vez fi nalizado el precalentamiento, coloque las hamburguesas en el horno. Cuando el horno se detenga, dar la vuelta.
Utilice este ajuste para trozos de pollo o pavo sin hueso. Recubra los extremos que sean fi nos para evitar que se cocinen en exceso. Coloque las piezas en el estante. Coloque el estante sobre la bandeja de cristal. Cuando el horno se detenga, dar la vuelta.
Coloque las piezas en el estante. Coloque el estante sobre la bandeja de cristal. Cuando el horno se detenga, dar la vuelta.
P O S I C I Ó N D E L O S A L I M E N T O S3
2
2
* No es necesario seleccionar la cantidad.
SEC AX1100S_sp.indd Sec1:20SEC AX1100S_sp.indd Sec1:20 10.12.2 4:53:45 PM10.12.2 4:53:45 PM

21
C O C C I Ó N A U T O M Á T I C A
El Sensor de Sharp es un dispositivo semiconductor que detecta el vapor (humedad) emitido por los alimentos mientras se calientan. El sensor ajusta los tiempos de cocción y el nivel de potencia para varios alimentos y cantidades.
Uso de los ajustes del sensor:1. Asegúrese de que el exterior del recipiente
de cocción y el interior del horno estén secos. Remueva cualquier rastro de humedad con un paño seco o toalla de papel.
2. El horno funciona con alimentos a una temperatura de almacenamiento normal. Por ejemplo, las palomitas de maíz pueden estar a temperatura ambiente.
3. Cualquier selección de Sensor de cocción puede ser programada con mayor o menor ajuste de tiempo. Vea la página 29.
4. Si la cantidad de alimentos es mayor o menor a la que indica la tabla, debe ser cocinada siguiendo las pautas de cualquier libro de cocina para microondas.
5. Durante la primera parte de la función Sensor, el número del alimento seleccionado aparecerá en la pantalla. No abra la puerta del horno microondas ni pulse el botón Parar/Borrar durante esta parte del ciclo. La medición del vapor será interrumpida. Si esto sucede, en la pantalla aparecerá un mensaje de error. Para continuar cocinando, pulse Parar/Borrar y cocine de forma manual. Cuando el sensor detecte el vapor emitido por los alimentos, aparecerá en pantalla el tiempo de cocción restante. Puede abrir la puerta cuando aparezca en la pantalla el tiempo restante de cocción. En este momento, puede revolver o sazonar los alimentos, como desee.
6. Si el sensor no detecta el vapor apropiadamente, el mensaje Err aparecerá en la pantalla y el horno se apagará.
7. Revise la temperatura o la cocción de los alimentos después de cocinar manualmente. Si la cocción de los alimentos no está completa, ingrese manualmente un tiempo de cocción adicional. No repita la cocción con la función del sensor ya que los alimentos pueden cocinarse demasiado.
Envoltura de alimentos:La cocción de ciertos alimentos es mejor cuando están cubiertos. Use la envoltura recomendada en la tabla.1. Tapa de la cacerola.2. Película plást ica: Use la película plást ica
recomendada para cocción en microondas. Envuelva los platos de forma suelta; deje un espacio aproximado de 1/2 pulgada sin cubrir para permitir la salida de vapor. La película plástica no debe tocar los alimentos.
3. Papel encerado: Cubra el plato completamente; doble el exceso de la envoltura debajo del plato para asegurarlo. Si el plato es más ancho que el papel, sobreponga dos pedazos de papel por lo menos una pulgada para cubrir.
Tenga cuidado al retirar cualquier envoltura para permitir la salida de vapor lejos de usted.
* Suponga que quiere cocinar un empaque de tamaño regular de palomitas de maíz con tiempo normal.
TABLA DE SENSOR DE PALOMITAS
A L I M E N T O P R O C E D I M I E N T OC A N T I D A DPalomitas
1. Normal
2. Ligero
3. Pequeño
2,9 - 3,5 oz
Use palomitas de maíz envasadas especialmente para uso en microondas. Pruebe con varias marcas para elegir la que prefi era. No intente cocinar los granos que no reventaron completamente.
2,9 - 3,0 oz
SENSOR DE COCCIÓN SENSOR DE PALOMITAS
P R O C E D I M I E N T O
1 Pulse Sensor de palomitas una vez. El horno comenzará automáticamente. “1” aparecerá en la pantalla.
NOTA:Para utilizar Sensor de palomitas de maíz, pulse en un plazo de 3 minutos tras la cocción, abra y cierre la puerta o pulse Parar/Borrar.
P u l s e S e n s o r d e palomitas una vez. “1” aparecerá en la pantalla.
Pulse dos veces Sensor de palomitas en un plazo de 2 segundos. “2” aparecerá en la pantalla.
Pulse tres veces Sensor de palomitas en un plazo de 2 segundos. “3” aparecerá en la pantalla.
1 paquete
1,1 - 1,55 oz
SEC AX1100S_sp.indd Sec1:21SEC AX1100S_sp.indd Sec1:21 10.12.2 4:53:46 PM10.12.2 4:53:46 PM

22
C O C C I Ó N A U T O M Á T I C A
RECALENTAR/COCINAR POR MICRO tiene 9 menús y le permite calentar la mayoría de sus alimentos favoritos.1 Sensor de recalentamiento*2 Entrantes congelados*3 Vegetales frescos: cocción rápida*4 Vegetales frescos: cocción larga*5 Vegetales congelados*6 Patatas al horno*7 Bebidas8 Panecillo fresco, mollete9 Panecillo congelado, mollete* Estos menús son cocinados por sensor. Lea
cuidadosamente las instrucciones para la Cocción por sensor en la página 21 antes de cocinar.
RECALENTAR/COCINAR POR MICRO
P R O C E D I M I E N T O
1 Pulse Recalentar/Cocinar por micro una vez.
2 Seleccione el ajuste de Recalentar/
Cocinar por micro deseado.
(Ej. pulse el número 8 para seleccionar
molletes frescos.)
Consulte la TABLA RECALENTAR/COCINAR POR MICRO para más detalles en la página 23.
* Supongamos que desea recalentar 6 molletes frescos al tiempo Estándar.
NOTAS:1. Usted puede programar las selecciones con más o
menos tiempo de ajuste. Vea la página 29.2. Si la cantidad de alimentos es mayor o menor a la
que indica la tabla, debe ser cocinada siguiendo las pautas de cualquier libro de cocina para microondas.
3. El resultado fi nal variará según la condición del alimento (como temperatura inicial, forma, calidad). Revise la temperatura de los alimentos después del calentamiento. De ser necesario un tiempo adicional, continúe el calentamiento manualmente.
4. Para la cocción por sensor, no es necesario introducir la cantidad. Sáltese el paso 3.
5. El agua condensada puede gotear en la bandeja de goteo durante la cocción. Quite y vacíe la bandeja de goteo después de la cocción.
Pulse el mismo número 8 repetidamente para aumentar la cantidad a 6 molletes. (Ej.: pulse 6 veces más para 6 molletes.)
3
Pulse Minuto extra/COMENZAR.
4
x 6
SEC AX1100S_sp.indd Sec1:22SEC AX1100S_sp.indd Sec1:22 10.12.2 4:53:47 PM10.12.2 4:53:47 PM

23
C O C C I Ó N A U T O M Á T I C A
TABLA RECALENTAR/COCINAR POR MICRO
Coloque en un plato o cacerola ligeramente más grande que la cantidad que va a recalentar. Aplane, si es posible. Recubra con una tapa, película plástica o papel encerado. Use envolturas como películas plásticas o tapas para grandes cantidades de alimentos con mayor densidad como estofados. Después de recalentar, revuelva bien, si es posible. Recubra y deje que permanezca de 2 a 3 minutos. Los alimentos deben estar muy calientes. Si no es así, continúe el recalentamiento con una potencia y tiempo variables.
A L I M E N T O P R O C E D I M I E N T OC A N T I D A D1. Sensor de recalentamiento
4 - 36 oz
Este ajuste es adecuado para calentar una bebida fría a una mejor temperatura para beber. Revuelva bien los líquidos antes y después de calentar para evitar “erupciones”.
7. Bebidas 0,5 - 2,0 tazas
Use este botón para calentar rosquillas, panecillos, bizcochos, roscas congeladas, etc. Las porciones grandes deben considerarse como 2 ó 3 de tamaño normal. Colóquelos en un plato y cubra con toalla de papel.
8. Panecillo fresco, mollete
1 - 8 piezas
Use este botón para calentar rosquillas, panecillos, bizcochos, roscas congeladas, etc. Las porciones grandes deben considerarse como 2 ó 3 de tamaño normal. Colóquelos en un plato y cubra con toalla de papel.
9. Panecillo congelado, mollete
1 - 8 piezas
Haga pequeños agujeros. Coloque sobre papel toalla en el bandeja de cristal. Coloque la bandeja de cristal en la posición inferior. Después de la cocción, retire del microondas, envuelva en papel aluminio y deje reposar de 5 a 10 minutos. Use los mitones del horno para impedir las quemaduras.
6. Patatas al horno 1 - 4 medianas
3. Vegetales frescos: cocción rápida0,25 - 2,0 lb0,25 - 2,0 lb0,25 - 2,0 lb0,25 - 2,0 lb1 mediana
0,25 - 1,0 lb0,25 - 2,0 lb
2 - 4 medianas
BrócoliColes de BruselasRepolloColifl or (fl ores pequeñas)Colifl or (entera) EspinacaCalabacínManzanas al horno
4. Vegetales frescos: cocción larga
0,25 - 1,5 lb2 - 4
0,25 - 1,5 lb
0,25 - 1,5 lb1 - 2
Zanahorias en tajadasMaíz en mazorcaFrijol verdeCalabaza: picada en mitades
Coloque en una cacerola. Agregue de 1 a 4 cucharadas de agua. Recubra con la tapa para vegetales tiernos. Use película plástica para vegetales tiernos. Después de la cocción, revuelva si es posible. Deje que los alimentos reposen cubiertos de 2 a 5 minutos.
Use este ajuste para alimentos congelados precocidos. Obtendrá resultados satisfactorios para la mayoría de marcas. Si desea puede probar las diversas marcas y elegir la que prefi era. Retire la envoltura externa del paquete y siga las instrucciones del mismo para cubrirlo. Después de cocinar, deje reposar cubierto de 1 a 3 minutos.
2. Entrantes congelados
6 - 17 oz
No agregue agua. Cubra con una tapa o película plástica. Después de la cocción, revuelva y déjelos reposar cubiertos durante 3 minutos.
5. Vegetales congelados 0,25 - 1,5 lb
Lave y coloque en una cacerola. No agregue agua si acaba de lavar los vegetales. Recubra con la tapa para vegetales tiernos. Use película plástica para vegetales tiernos y crocantes. Después de la cocción, revuelva si es posible. Deje que los alimentos reposen cubiertos de 2 a 5 minutos.
SEC AX1100S_sp.indd Sec1:23SEC AX1100S_sp.indd Sec1:23 10.12.2 4:53:47 PM10.12.2 4:53:47 PM

24
C O C C I Ó N A U T O M Á T I C A
DESCONGELACIÓN CON MICRO
Descongelación con micro tiene 4 menús. No utilice la bandeja de cristal, la bandeja de vapor ni el estante metálico. 1 Carne molida2 Pollo con hueso3 Pollo deshuesado4 Filete, chuletas
Para más detalles, consulte la siguiente TABLA DE DESCONGELACIÓN CON MICRO.
* Supongamos que desea descongelar un filete de 0,227 kg (0,5 libras).
P R O C E D I M I E N T O
1 Pulse Descongelación con micro una vez.
NOTAS:1. Sólo ingrese el peso del alimento. No incluya el
peso del recipiente.2. Usted puede programar las selecciones con más o
menos tiempo de ajuste. Vea la página 29.3. Para descongelar otros alimentos o alimentos por
encima o debajo de los pesos permitidos en la TABLA DE DESCONGELACIÓN CON MICRO a continuación, use el botón time (tiempo) y la potencia al 30%. Vea DESCONGELAMIENTO MANUAL de abajo.
4. Después de la cocción, el horno se enfr iará automáticamente y usted escuchará el sonido del vent i lador de enfr iamiento. El vent i lador puede continuar operando por hasta 10 minutos dependiendo del horno y la temperatura de las partes.
Pulse el número del peso deseado. (Ej. pulse 5 para 0,227 kg (0,5 libras))
3
Coloque los alimentos en el horno siguiendo las instrucciones de la tabla de cocción de abajo. Cierre la puerta. Pulse Minuto extra/COMENZAR.
4
2 Seleccione el ajuste de Descongelación
con micro deseado. (Ej. pulse el
número 4 para seleccionar bistec.)
El horno se detiene y CHECKse prende y se apaga.Abra la puerta. Dele la vuelta al fi lete y proteja las partes descongeladas. Cierre la puerta. Pulse Minuto extra/COMENZAR.
5
DESCONGELAMIENTO MANUALSi los alimentos que desea descongelar no están incluidos en la TABLA DE DESCONGELACIÓN CON MICRO o se encuentran por encima o debajo de los límites en la columna “Cantidad” de la tabla de abajo, usted debe descongelar manualmente.
Usted puede descongelar cualquier al imento congelado, crudo o precocido usando el Nivel de potencia al 30%.Siga exactamente el procedimiento de 3 pasos que se encuentra en la sección Tiempo de cocción en MICROONDAS en la página 28.Calcule el tiempo de descongelamiento y seleccione 30% al elegir el nivel de potencia.
Para alimentos crudos o congelados precocidos la regla general indica aproximadamente 5 minutos por libra. Por ejemplo, descongele durante 5 minutos para una libra de salsa para espaguetis congelada. Siempre detenga el horno continuamente para retirar o separar las porciones que esté descongelando. Si al fi nal del tiempo de descongelamiento calculado los alimentos no se han descongelado, programe el horno en incrementos de 1 minuto a un nivel de potencia del 30% hasta que se descongelen totalmente.
Cuando use recipientes de plástico del congelador, descongele sólo lo suficiente para retirar el alimento del alimento y colocar el alimento en un plato para microondas.
TABLA DE DESCONGELACIÓN CON MICRO
Retire las piezas descongeladas después de cada etapa. Cubra y deje reposar de 5 a 10 minutos.
A L I M E N T O P R O C E D I M I E N T OC A N T I D A D1. Carne molida 0,5 - 2,0 lb
Después de cada etapa, reacomode y si hubiera alguna porción tibia o descongelada, protéjala con piezas pequeñas y planas de
papel aluminio. Retire las porciones de carne o pescado que estén casi descongeladas. Cubra y deje reposar de 10 a 20 minutos.
4. Filete, Chuletas 0,5 - 3,0 lb
Acomode las piezas con las partes más gruesas hacia la
parte externa del plato de vidrio o de la rejilla del microondas. Después de cada etapa, si hay porciones tibias o descongeladas, reacomode o retire. Cubra y deje reposar de 10 a 20 minutos.
2. Pollo con hueso 0,5 - 3,0 lb
Después de cada etapa, si hay porciones tibias o descongeladas, reacomode o retire. Cubra y deje reposar de 10 a 20 minutos.
3. Pollo deshuesado 0,5 - 2,0 lb
SEC AX1100S_sp.indd Sec1:24SEC AX1100S_sp.indd Sec1:24 10.12.2 4:53:48 PM10.12.2 4:53:48 PM

25
C O C C I Ó N M A N U A LCocción manual es una opción para la Cocción al vapor, Parrilla, Parrilla mixta y Microondas.Consulte la “Tabla de cocción manual” y la “Tabla de colocación de los alimentos y utensilios”. Las tablas proporcionan información sobre cada ajuste.
Alto
Baja
Alto
Baja
212 °F
160 - 200 °F *
-
Parrilla: Potencia 50%
Microondas: Potencia 50%
Parrilla: Potencia 90%
Microondas: Potencia 10%
Potencia 0 - 100%
0 - 35 min.
0 - 60 min.
0 - 99 min. 99 seg.
0 - 99 min. 99 seg.
0 - 99 min. 99 seg.
0 - 99 min. 99 seg.
Cocción al vapor
Parrilla mixta
Microondas
Parrilla
Rango de temperatura/potenciaModo de cocción
SI
SI
NO
NO
NO
NO
Depósito de agua
Rango de tiempo
* Podrá ajustar la temperatura de 160°F a 200°F en incrementos de 5°F. (Ajuste inicial: 190°F)
Alto
Baja
Alto
Baja
1 estrato
2 estratosCocción
al vapor
Parrilla
mixta
Microondas
Parrilla
2 estrato de
cocciónModo de cocción
Bandeja de vapor
Bandeja de vapor
NO
NO
NO
NO
NO
3: Superior 2: Inferior 1: Superficie del horno
Colocación de los alimentos y utensilios (Consulte la Imagen 1.)
SIAlimentos
Alimentos
Alimentos
Bandeja de cristal
Bandeja de cristal
Bandeja de cristal (Sin alimentos)
Estante o platos
Ver NOTA 1.
Contenedor apto para microondas
Alimentos
Bandeja de cristal Ver NOTA 2.
Alimentos
Contenedor apto para microondas
AVISO al colocar la bandeja de vapor y la bandeja de cristal:Tras la cocción, extraiga primero la bandeja de vapor. Consulte la Figula 2. Tenga cuidado con el exceso de agua en la bandeja de vapor, se recomienda que la coloque directamente sobre un plato plano o bandeja para evitar salpicaduras. Antes de extraer la bandeja de cristal, asegúrese de que esté fría. Tenga en cuenta que puede haber agua en la bandeja de cristal, por lo tanto ponga especial precaución al extraerla.
NOTAS:1. Seleccione la posición deseada dependiendo del tamaño de los alimentos. Se recomiendan las
posiciones 2 o 3 para la mayoría de las recetas. Coloque los alimentos y la bandeja de cristal en la posición 1 al asar grandes cantidades para evitar que los alimentos rocen con el techo del horno. Si los alimentos tocan el elemento calefactor de la parrilla durante la cocción podría aparecer humo.
2. Para cocinar un pastel, carne mechada y patatas al horno.3. No deje la bandeja de vapor ni el estante metálico mojados tras su uso.
Figura 1Correderas
3
2
1
Figura 2
Agarraollas
Bandeja de cristal
Bandeja de vapor
TABLA DE COCCIÓN MANUAL
TABLA DE COLOCACIÓN DE LOS ALIMENTOS Y UTENSILIOS
SEC AX1100S_sp.indd Sec1:25SEC AX1100S_sp.indd Sec1:25 10.12.2 4:53:49 PM10.12.2 4:53:49 PM

26
C O C C I Ó N M A N U A L
COCCIÓN AL VAPOR
La Cocción con vapor manual tiene 2 opciones, Cocción con vapor alto y Cocción con vapor bajo. Cocine alimentos utilizando siempre la bandeja de vapor y la bandeja de cristal. Consulte la página 25 para más detalles. Y consulte las instrucciones importantes en las páginas 14-15.
Utilice la Cocción con vapor alto para cocinar al vapor alimentos tales como pollo y vegetales. Utilice la Cocción con vapor bajo para cocinar al vapor pescados o fl an de huevo lentamente. Con el modo de Cocción con vapor bajo, el tiempo de cocción es menor que en el modo de Cocción al vapor alto. El vapor cocina los alimentos lentamente sin destruir su forma, color o aroma. La Cocción con vapor alto puede programarse para un máximo de 35 minutos (35.00). La Cocción con vapor bajo puede programarse para un máximo de 60 minutos (60.00). En la Cocción con vapor bajo, la temperatura podrá ser ajustada entre 160°F y 200°F en incrementos de 5°F. Se encuentran disponibles 2 estratos de cocción para la Cocción con vapor alto. Para la Cocción con vapor bajo, se encuentra disponible únicamente 1 estrato de cocción.
P R O C E D I M I E N T O1 Asegúrese de que el depósito de agua esté lleno de
agua corriente fría hasta la marca MAX, así como de que se encuentre instalado. Pulse Cocción con vapor bajo hasta que se visualice la temperatura deseada 79°C (175°F).
Introduzca el tiempo de cocción deseado.
2
Pulse Minuto extra/COMENZAR.
3
4 Después de la cocción aparecerá el mensaje EXTEND. Si desea extender el tiempo de cocción, pulse el tiempo deseado y Minuto extra/COMENZAR.
Si no, pulse Parar/Borrar. Después de que el horno se ha enfriado, retire y vacíe el depósito de agua y seque la cavidad del horno. Vacíe la bandeja de goteo.
ADVERTENCIAS:1. La puerta del horno, el gabinete exterior, la cavidad del horno,
accesorios, platos y especialmente el elemento calefactor de la parrilla estarán calientes. Utilice agarraollas gruesos al añadir o extraer alimentos para evitar quemaduras.
2. No abra la puerta del horno con su cara cerca del mismo. El vapor del horno puede causar quemaduras.
NOTAS:1. “Err” será visualizado en el paso 3 si se introduce
un período de tiempo superior al tiempo máximo para cada modo de Cocción con vapor. Para eliminar, pulse Parar/Borrar y vuelva a programar.
2. Para aumentar el t iempo de cocción, consulte AUMENTAR EL TIEMPO DE COCCIÓN AL FINAL DE LA COCCIÓN AL VAPOR en la página 29. Antes de extender el tiempo de cocción, asegúrese de que el depósito de agua esté lleno de agua corriente fría hasta la marca MAX, así como de que se encuentre instalado.
3. Mantenga la puerta cerrada. Si lo abre durante la cocción, el vapor escapará y necesitará mayor tiempo de cocción.
4. La cantidad de agua en el depósito de agua es sufi ciente para una cocción. No tiene que agregar agua durante la cocción.
5. Durante y después de la cocción, puede haber agua condensada en la puerta, las paredes del horno y en el piso del mismo. Seque cualquier residuo líquido con un paño suave. Tras utilizarlo por última vez cada día, se recomienda poner el horno en funcionamiento en Parrilla durante 3 minutos sin alimentos para secar el agua que se encuentre alrededor del elemento calefactor de la parrilla.
6. Después de la cocción, e l horno se enfr iará automáticamente y usted escuchará el sonido del ventilador de enfriamiento. El ventilador puede continuar operando por hasta 10 minutos dependiendo del horno y la temperatura de las partes.
212 °F
160 - 200 °F
Temperatura
Cocción con vapor alto
Cocción con vapor bajo
Modo de cocción
COCCIÓN CON VAPOR BAJO* Supongamos que desea cocinar durante 20 minutos
en Cocción con vapor bajo 79°C (175°F).
P R O C E D I M I E N T O
1 Asegúrese de que el depósito de agua esté lleno de agua corriente fría hasta la marca MAX, así como de que se encuentre instalado. Pulse Cocción con vapor alto hasta que se visualice los indicadores de posición de la bandeja deseados (2 y 3).
Introduzca el tiempo de cocción deseado.
2
Pulse Minuto extra/COMENZAR.
3
4 Después de la cocción aparecerá el mensaje EXTEND. Si desea extender el tiempo de cocción, pulse el tiempo deseado y Minuto extra/COMENZAR.
Si no, pulse Parar/Borrar.Después de que el horno se ha enfriado, retire y vacíe el depósito de agua y seque la cavidad del horno. Vacíe la bandeja de goteo.
COCCIÓN CON VAPOR ALTO* Supongamos que desea cocinar durante 20
minutos en Cocción con vapor alto con 2 estratos.
x 2
x 4
SEC AX1100S_sp.indd Sec1:26SEC AX1100S_sp.indd Sec1:26 10.12.2 4:53:49 PM10.12.2 4:53:49 PM
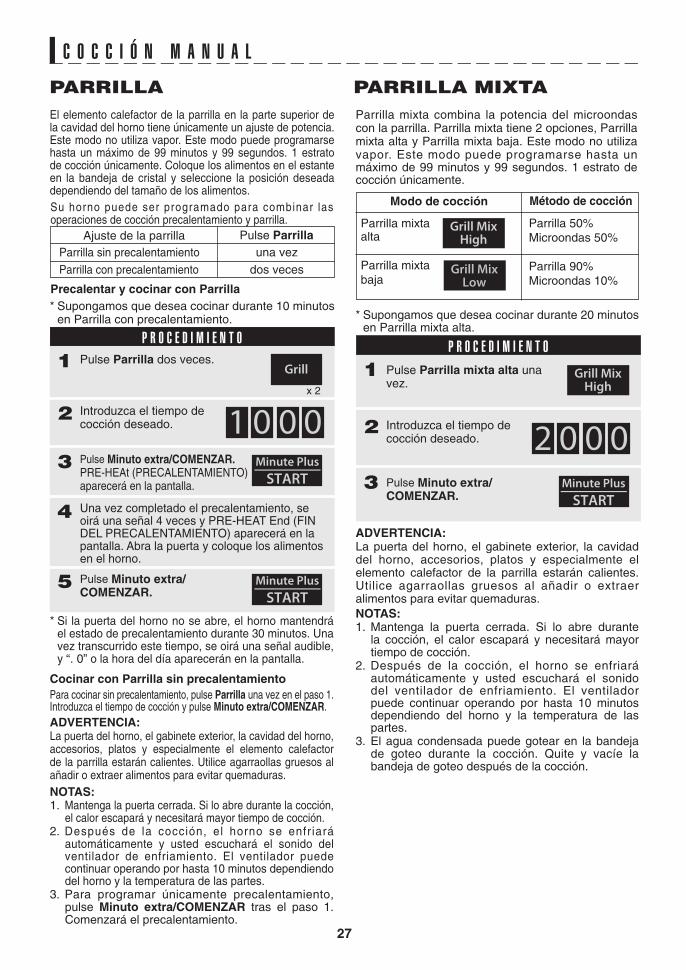
27
C O C C I Ó N M A N U A L
PARRILLA PARRILLA MIXTA
El elemento calefactor de la parrilla en la parte superior de la cavidad del horno tiene únicamente un ajuste de potencia. Este modo no utiliza vapor. Este modo puede programarse hasta un máximo de 99 minutos y 99 segundos. 1 estrato de cocción únicamente. Coloque los alimentos en el estante en la bandeja de cristal y seleccione la posición deseada dependiendo del tamaño de los alimentos.
* Supongamos que desea cocinar durante 10 minutos en Parrilla con precalentamiento.
ADVERTENCIA:La puerta del horno, el gabinete exterior, la cavidad del horno, accesorios, platos y especialmente el elemento calefactor de la parrilla estarán calientes. Utilice agarraollas gruesos al añadir o extraer alimentos para evitar quemaduras.
NOTAS:1. Mantenga la puerta cerrada. Si lo abre durante
la cocción, el calor escapará y necesitará mayor tiempo de cocción.
2. Después de la cocción, el horno se enfriará automáticamente y usted escuchará el sonido del ventilador de enfriamiento. El ventilador puede continuar operando por hasta 10 minutos dependiendo del horno y la temperatura de las partes.
3. El agua condensada puede gotear en la bandeja de goteo durante la cocción. Quite y vacíe la bandeja de goteo después de la cocción.
* Supongamos que desea cocinar durante 20 minutos en Parrilla mixta alta.
P R O C E D I M I E N T O
Introduzca el tiempo de cocción deseado.
2
Pulse Minuto extra/COMENZAR.PRE-HEAt (PRECALENTAMIENTO) aparecerá en la pantalla.
3
1 Pulse Parrilla dos veces.
* Si la puerta del horno no se abre, el horno mantendrá el estado de precalentamiento durante 30 minutos. Una vez transcurrido este tiempo, se oirá una señal audible, y “. 0” o la hora del día aparecerán en la pantalla.
Cocinar con Parrilla sin precalentamiento
Para cocinar sin precalentamiento, pulse Parrilla una vez en el paso 1. Introduzca el tiempo de cocción y pulse Minuto extra/COMENZAR.
ADVERTENCIA:La puerta del horno, el gabinete exterior, la cavidad del horno, accesorios, platos y especialmente el elemento calefactor de la parrilla estarán calientes. Utilice agarraollas gruesos al añadir o extraer alimentos para evitar quemaduras.
NOTAS:1. Mantenga la puerta cerrada. Si lo abre durante la cocción,
el calor escapará y necesitará mayor tiempo de cocción.2. Después de la cocción, el horno se enfr iará
automáticamente y usted escuchará el sonido del ventilador de enfriamiento. El ventilador puede continuar operando por hasta 10 minutos dependiendo del horno y la temperatura de las partes.
3. Para programar únicamente precalentamiento, pulse Minuto extra/COMENZAR tras el paso 1. Comenzará el precalentamiento.
Parrilla mixta combina la potencia del microondas con la parrilla. Parrilla mixta tiene 2 opciones, Parrilla mixta alta y Parrilla mixta baja. Este modo no utiliza vapor. Este modo puede programarse hasta un máximo de 99 minutos y 99 segundos. 1 estrato de cocción únicamente.
Parrilla 50%Microondas 50%
Parrilla 90%Microondas 10%
Modo de cocción
Parrilla mixta alta
Parrilla mixta baja
Método de cocción
P R O C E D I M I E N T O
Introduzca el tiempo de cocción deseado.
2
Pulse Minuto extra/COMENZAR.
3
1 Pulse Parrilla mixta alta una vez.
x 2
Su horno puede ser programado para combinar las operaciones de cocción precalentamiento y parrilla.
una vez
dos veces
Ajuste de la parrilla
Parrilla sin precalentamiento
Parrilla con precalentamiento
Pulse Parrilla
Precalentar y cocinar con Parrilla
Una vez completado el precalentamiento, se oirá una señal 4 veces y PRE-HEAT End (FIN DEL PRECALENTAMIENTO) aparecerá en la pantalla. Abra la puerta y coloque los alimentos en el horno.
4
Pulse Minuto extra/COMENZAR.
5
SEC AX1100S_sp.indd Sec1:27SEC AX1100S_sp.indd Sec1:27 10.12.2 4:53:51 PM10.12.2 4:53:51 PM

28
C O C C I Ó N M A N U A L
El microondas es rápido y útil para la cocción, recalentamiento y descongelación. Pr imero, in t roduzca e l t iempo de cocc ión, a continuación seleccione el nivel de potencia. Este modo no utiliza vapor. Este modo puede programarse hasta un máximo de 99 minutos y 99 segundos.Hay 11 niveles de potencia diferentes.
* Supongamos que desea cocinar durante 5 minutos al 100%.
P R O C E D I M I E N T O
Pulse Minuto extra/COMENZAR.
2
Para cambiar el nivel de potencia del microondas, pulse Micro hasta que aparezca en pantalla el nivel de potencia deseado.
* Supongamos que desea descongelar durante 5 minutos al 30%.
NOTAS:1. Después de la cocción, el horno se enfriará
automáticamente y usted escuchará el sonido del ventilador de enfriamiento. El ventilador puede continuar operando por hasta 10 minutos dependiendo del horno y la temperatura de las partes.
2. No utilice la bandeja de vapor ni el estante metálico.
3. El agua condensada puede gotear en la bandeja de goteo durante la cocción. Quite y vacíe la bandeja de goteo después de la cocción.
SUGERENCIA:
Para cocinar un pastel, carne mechada y patatas al horno, coloque el contenedor o alimentos en la bandeja de cristal en la posición inferior (posición 2).
Es te con t ro l de cocc ión var iab le le permi te seleccionar el rango para la cocción al microondas.Si no se selecciona un nivel de potencia, se utilizará 100% automáticamente.1 estrato de cocción únicamente.
100%
90%
80%
70%
60%
50%
40%
30%
20%
10%
0%
Alto
Medio-alto
Medio
Medio-bajo / Descongelar
Bajo
Nivel de potencia
Palabras más comunes para los niveles de potencia
P- HI
P- 90
P- 80
P- 70
P- 60
P- 50
P- 40
P- 30
P- 20
P- 10
P- 0
Pantalla
MICROONDAS
1 Introduzca el tiempo de cocción deseado.
P R O C E D I M I E N T O
1
Pulse Minuto extra/COMENZAR.
3
Cambie el nivel de potencia pulsando Micro hasta que aparezca en pantalla el nivel de potencia (30P).
2
Introduzca el tiempo de cocción deseado.
x 8
SEC AX1100S_sp.indd Sec1:28SEC AX1100S_sp.indd Sec1:28 10.12.2 4:53:52 PM10.12.2 4:53:52 PM

29
O T R A S F U N C I O N E S C O N V E N I E N T E SMAYOR O MENOR
AJUSTE DE TIEMPO
Para su uso en cocción automática: Puede ajustar los resultados de la cocción según su preferencia.
Si descubre que le gustan algunos de los ajustes automáticos un poquito más hechos, pulse una vez Micro tras introducir el peso y antes de pulsar Minuto extra/COMENZAR.
Si descubre que le gustan algunos de los ajustes automáticos un poquito menos hechos, pulse dos veces Micro después de introducir el peso y antes de pulsar Minuto extra/COMENZAR.
Esta función es para la Cocción sana (excepto la Descongelación con vapor y Parrilla automática), Cocción con vapor alto y Cocción con vapor bajo, exclusivamente.Los resu l tados de la cocc ión pueden var iar l igeramente dependiendo de la temperatura ambiente, la temperatura inicial de los alimentos y otros factores. Usted puede ajustar los resultados de la cocción aumentando más tiempo de cocción al final. Al terminar la cocción, la pantalla indicará “EXTEND”. Es posible agregar tiempo adicional durante los 5 minutos cuando “EXTEND” aparezca en la pantalla. El tiempo puede extenderse hasta 9 minutos y 99 segundos. Introduzca el tiempo deseado y a continuación pulse Minuto extra/COMENZAR. Continuará el mismo modo de cocción. Revise cuidadosamente el progreso de la cocción.
NOTAS:
1. Antes de extender el Modo vapor, asegúrese de que el depósito de agua esté lleno de agua corriente fría hasta la marca MAX, así como de que se encuentre instalado. Si se visualiza “Err, WATER (parpadeando)” durante la cocción, llene el depósito de agua hasta la marca MAX. Coloque y empuje fi rmemente en su lugar, a continuación pulse Parar/Borrar para eliminar el mensaje de error. Para continuar la cocción, cocine manualmente. Compruebe el punto de cocción de vez en cuando.
2. Se cancela el modo extendido al presionar Parar/Borrar.
3. La función Extender el tiempo de cocción puede repetirse hasta que los alimentos se hayan
cocinado a su gusto.
4. Mientras la pantalla muestre “EXTEND”, el modo de Ahorro de energía será cancelado temporalmente.
Esta función le permite cocinar utilizando hasta 3 programas de cocción manual; combinaciones de microondas, Parrilla y Parrilla mixta.
* Supongamos que desea cocinar en Cocción de secuencia durante:
5 minutos a una potencia de microondas del 70% (Fase 1) 3 minutos en Parrilla sin precalentamiento (Fase 2) 3 minutos en Parrilla mixta alta (Fase 3)
P R O C E D I M I E N T O
1
Para la 2ª fase, pulse Parrilla e introduzca el tiempo de cocción deseado.
2
Para la 1ª fase, pulse Micro hasta que el nivel de potencia del microondas deseado aparezca en la pantalla (70P), y a continuación introduzca el tiempo de cocción deseado.
Para la 3ª fase, pulse Parrilla mixta alta e introduzca el tiempo de cocción deseado.
3
Pulse Minuto extra/COMENZAR.
4
NOTA:
1. Después de la cocción, el horno se enfriará automáticamente y usted escuchará el sonido del ventilador de enfriamiento. El ventilador puede continuar operando por hasta 10 minutos dependiendo del horno y la temperatura de las partes.
2. Únicamente podrá programar la Parrilla con el precalentamiento en la fase 1.
ADVERTENCIA:La puerta del horno, el gabinete exterior, la cavidad del horno, accesorios, platos y especialmente el elemento calefactor de la parrilla estarán calientes. Utilice agarraollas gruesos al añadir o extraer alimentos para evitar quemaduras.
x 4AUMENTAR EL TIEMPO DE
COCCIÓN AL FINAL DE LA
COCCIÓN AL VAPOR
COCCIÓN EN
SECUENCIAS MÚLTIPLES
SEC AX1100S_sp.indd Sec1:29SEC AX1100S_sp.indd Sec1:29 10.12.2 4:53:53 PM10.12.2 4:53:53 PM

30
O T R A S F U N C I O N E S C O N V E N I E N T E S
• Supongamos que desea ajustar el temporizador de cocina a 5 minutos.
P R O C E D I M I E N T OIntroduzca el tiempo de deseado.
1
Pulse Info/Temporizador una vez.
2
Utilice el Temporizador de cocina como minutero o para monitorear el tiempo de reposo de los alimentos cocinados/descongelados.
Los minutos automáticos le permiten utilizar las dos siguientes funciones:
a) Inicio directoPodrá comenzar a cocinar directamente a una potencia de microondas del 100% durante 1 minuto pulsando Minuto extra/COMENZAR.
NOTA:Para evitar la manipulación por niños Minuto extra podrá utilizarse únicamente durante 3 minutos tras la operación anterior, es decir, cerrar la puerta, pulsar la tecla Parar/Borrar o fi nalización de la cocción.
b) Extender el tiempo de cocción manual
Podrá extender el tiempo de cocción manual en múltiplos de 1 minuto si se pulsa Minuto extra/COMENZAR mientras el horno esté en funcionamiento.
NOTA:No podrá utilizar esta función para la Cocción con vapor.El tiempo de cocción puede extenderse hasta 99 minutos.
Tecla Info proporciona 8 funciones.
El numero de “In F1” a “In F8” será visualizado al seleccionar las funciones.
Estas funciones pueden seleccionarse pulsando Info/Temporizador y el número de función deseado y presionando Minuto extra/COMENZAR.
DRENAJE El agua que permanece dentro del generador de vapor puede evaporarse utilizando la función DRENAJE. Consulte la página 16.
DESINCRUSTARConsulte la página 16.
DUREZA DEL AGUASu horno viene ajustado de fábrica con un nivel de dureza del agua de 2 (duro). Podrá ajustar el nivel de dureza del agua del horno.
Podrá utilizar una varilla de prueba disponible en algunas droguerías, para comprobar el nivel de dureza del agua.
En algunas zonas, es posible consultar con la compañía de suministro del agua la dureza del agua.
Al usar varillas de prueba, siga las instrucciones de las mismas.
Rango de dureza
<120 ppm<120 mg/l<6.7 °dH120 - 250 ppm120 - 250 mg/l
6.7 - 14.0 °dH>250 ppm>250 mg/l
>14.0 °dH
Ajuste
Blanda
Dura
Muy dura
Nivel de dureza
1
2
3
P R O C E D I M I E N T O
1
Pulse el mismo número 3 hasta que se visualice el nivel de dureza deseado y pulse Minuto extra/COMENZAR.El ajuste de la dureza del agua será retenido en la memoria incluso estando el horno apagado.
2
Pulse Info/Temporizador y el número 3 para seleccionar la dureza del agua. “In F3” será visualizado.
In F1: DrenajeIn F2: DesincrustarIn F3: Dureza del aguaIn F4: DemostraciónIn F5: Bloqueo infantilIn F6: Silencio activado/desactivadoIn F7: RelojIn F8: Modo de Ahorro de energía
TEMPORIZADOR DE COCINA INFO
MINUTO EXTRA
NOTA:En el modo de Ahorro de energía, abra y cierre la puerta para activar el Temporizador de cocina antes de introducir el tiempo deseado.
SEC AX1100S_sp.indd Sec1:30SEC AX1100S_sp.indd Sec1:30 10.12.2 4:53:55 PM10.12.2 4:53:55 PM

31
O T R A S F U N C I O N E S C O N V E N I E N T E S
Esta func ión es ut i l izada pr inc ipa lmente en comercios, y también le permite pract icar la operación de tecla.
Para demostrarlo, pulse Info/Temporizador y el número 4 (In F4) y a continuación pulse Minuto extra/COMENZAR. “dISP” aparecerá en la pantalla.
Las operac iones de cocc ión ahora pueden demostrarse sin que el horno reciba alimentación. La pantalla realizará la cuenta atrás a una velocidad 10 veces superior a la normal.
Para cancelar, pulse Info/Temporizador y el número 4 (In F4) y a continuación pulse Minuto extra/COMENZAR. “dISP OFF” aparecerá en la pantalla. O desenchufe el horno de la toma eléctrica y vuelva a enchufarlo para cancelar el Modo demostración.
NOTAS:
1. “dISP” cambiará a “ . 0” al pulsar Parar/Borrar.2. Si ajusta el Modo demonstración, el modo Ahorro
de energía se cancelará.
Usted puede anular el sonido del horno.
Para silenciar el horno, pulse Info/Temporizador y el número 6 (In F6) y a continuación pulse Minuto extra/COMENZAR.
Para cancelar el ajuste de modo silencioso, pulse Info/Temporizador y el número 6 ( In F6) y a continuación pulse Minuto extra/COMENZAR.
NOTA:
Cuando la toma de corriente CA del horno es interrumpida o desconectada, el ajuste de sonido será retenido en la memoria.
MODO DE DEMOSTRACIÓN
BLOQUEO INFANTILLa característica Child Lock evita la operación no deseada del horno de parte de niños pequeños. El horno puede ajustarse para que el panel de control se desactive o bloquee.
Para a jus tar e l B loqueo in fan t i l , pu lse In fo /Temporizador y el número 5 (In F5) y a continuación pulse Minuto extra/COMENZAR. “SAFE” aparecerá en la pantalla. El panel de mandos se bloqueará, cada vez que se pulse una tecla, la pantalla mostrará “SAFE”.
Para desbloquear el panel de mandos, pulse Info/Temporizador y el número 5 (In F5) y a continuación pulse rápidamente Minuto extra/COMENZAR. La pantalla mostrará “SAFE OFF” y el horno estará listo para el uso.
NOTAS:
1. Si ajusta el BLOQUEO INFANTIL, el modo ahorro de energía se cancelará.
2. Cuando la toma de corriente CA del horno es interrumpida o desconectada, el ajuste vuelve a SAFE OFF.
SILENCIO ACTIVADO/DESACTIVADO
Consulte la página 17.
RELOJ
Su horno posee el modo de Ahorro de energía. Esta función ahorra electricidad si el horno no está en uso. Si ajusta el reloj, el modo Ahorro de energía se cancelará. Para iniciar el modo Ahorro de energía manualmente, siga las siguientes instrucciones.
Para ajustar el modo de Ahorro de energía, pulse Info/Temporizador y el número 8 ( In F8) y a continuación pulse Minuto extra/COMENZAR. “SV” aparecerá en la pantalla. A continuación, la pantalla mostrará “ . 0” durante 3 minutos antes de apagar el horno.
Para cancelar el modo de Ahorro de energía, ajuste el Reloj. Consulte la página 17.
NOTAS:1. Si ajusta el Reloj, Bloqueo infantil, o el Modo
demostración, el modo Ahorro de energía se cancelará.
2. Cuando la toma de corriente CA del horno es interrumpida o desconectada, el AHORRO DE ENERGÍA configuración será retenido en la memoria.
MODO DE AHORRO DE ENERGÍA
SEC AX1100S_sp.indd Sec1:31SEC AX1100S_sp.indd Sec1:31 10.12.2 4:58:40 PM10.12.2 4:58:40 PM

32
L I M P I E Z A Y C U I D A D O
PRECAUCIÓN: NO UTILIZAR LIMPIADORES DE HORNO COMERCIALES, LIMPIADORES A L VA P O R , A B R A S I V O S , L I M P I A D O R E S EXTREMADAMENTE FUERTES QUE CONTENGAN HIDRÓXIDO DE SODIO NI ESTROPAJOS EN NINGUNA PARTE DE SU HORNO MICROONDAS.
Antes de limpiar, asegúrese de que la cavidad del horno, la puerta, el gabinete, los accesorios y especialmente el elemento calefactor de la parrilla estén totalmente fríos.
LIMPIE EL HORNO REGULARMENTE Y EXTRAIGA CUALQUIER RESTO DE ALIMENTOS - Mantenga el horno limpio, o podría deteriorar la superfi cie. Lo cual podría afectar negativamente la vida útil del aparato y probablemente producir una situación de riesgo.
Exterior del hornoEl exterior de su horno puede limpiarse con facilidad con jabón suave y agua. Asegúrese de eliminar todo resto de jabón con un paño húmedo, y de secar el exterior con un trapo suave.
Controles del hornoAntes de limpiar abra la puerta para desactivar los controles del horno. Tenga cuidado al limpiar el control del horno. Utilizando un paño humedecido únicamente en agua, limpie suavemente el panel hasta que esté limpio. Evite usar cantidades excesivas de agua. No utilice ningún tipo de limpiador químico o abrasivo.
PuertaPara ext raer todo resto de suc iedad, l impie regularmente ambos lados de la puerta, los sellos de la puerta, y las partes adyacentes con un paño suave y húmedo. No utilice fuertes limpiadores abrasivos, ni estropajos metálicos para limpiar la puerta de cristal del horno ya que podría rayar la superficie, lo que podría ocasionar la ruptura del cristal.
Sellos de la puertaMantenga siempre los sellos de la puerta limpios para evitar daños. Si se quedase agua condensada atrapada en los sellos de la puerta, límpiela con un paño suave. Púlalo con otro paño suave. No utilice limpiadores químicos o abrasivos en estas superficies. Tenga cuidado de no frotar, dañar, tirar o mover los sellos. Antes de cocinar, compruebe siempre que los sellos de la puerta estén en su lugar. De lo contrario, el vapor se fugaría por la puerta. No utilice el horno si tiene los sellos de la puerta dañados. Póngase en contacto con un técnico de servicio autorizado Sharp.
Interior del horno INFORMACIÓN IMPORTANTE:
• Después de cada uso: Limpie las paredes del horno con un paño suave y agua tibia (o con agua jabonosa suave) mientras el horno esté aún caliente. Utilizar el horno sin limpiarlo p o d r í a p r o v o c a r q u e l a s salpicaduras se endureciesen.
• No utilice productos de limpieza cáusticos (ácidos/alcalinos), limpiadores en aerosol, limpiadores abrasivos o fuertes o estropajos ya que podrían dañar la superfi cie de las paredes del horno.
Para la extracción de SALPICADURAS DE ALIMENTOS O ACEITES de las paredes del horno:1. Cada vez que empiece a cocinar, llene el depósito
de agua con agua del grifo fresca y fría hasta la marca MAX.
2. Ponga el horno funcionando en Cocción con vapor alto durante 10 minutos sin alimentos. Consulte la página 26.
3. Tras el vapor, limpie la suciedad en el interior del horno con un paño suave y seco mientras el horno aún esté caliente. Tenga en cuenta que el elemento calefactor de la parrilla y las salidas de vapor podrían seguir calientes, de modo que tenga cuidado al limpiar el techo y la placa trasera de la cavidad. (El elemento calefactor de la parrilla se encenderá durante un corto período de tiempo antes del fi nal de la cocción.) Y a continuación, se recomienda poner el horno funcionando en Parrilla durante 3 minutos sin alimentos ni accesorios para secar el agua que se
encuentre alrededor del elemento calefactor de la parrilla.
Bandeja de vapor / Bandeja de cristal / EstanteLave la bandeja de vapor, la bandeja de cristal y el estante tras la cocción utilizando jabón suave o solución detergente, aclarando y secando. No utilice limpiadores fuertes, estropajos de metal o cepillos duros para evitar daños en la superfi cie. Todos los accesorios pueden lavarse en el lavaplatos. No deje la bandeja de vapor ni el estante metálico mojados.
Depósito de agua y Tapa del depósito de aguaTras la cocción, lavar con jabón suave o solución detergente con un paño o esponja húmedo y suave, aclarar y secar. No lavar en el lavaplatos. No utilice limpiadores fuertes, estropajos de metal o cepillos duros en el depósito de agua ni en la tapa del depósito de agua.
Bandeja de goteoVacíe la bandeja de goteo después de cocinar, lave en una solución de jabón o detergente suave con un paño o esponja suave, enjuague, seque y vuelva a colocar debajo de la parte frontal del horno. No lave en la lavadora de platos.
Decapar las piezas del horno de vaporDurante la producción de vapor, se puede formar sarro en el generador de vapor. Para eliminar el sarro, ejecute la función decapar cuando “DESCALE”parpadea en la pantalla. Vea las instrucciones completas en la página 16.
Punto importante para la limpieza - ¡Inmediata y frecuentemente!La comida salpica, y los jugos aceitosos de la carne permanecen en el interior de las paredes del horno, se secarán y será muy difícil extraerlos si no se limpian inmediatamente y después de cada uso. El uso de la función al vapor le ayudará en el proceso de limpieza. También perecerán por la infl uencia del vapor.
SEC AX1100S_sp.indd Sec1:32SEC AX1100S_sp.indd Sec1:32 10.12.2 4:53:56 PM10.12.2 4:53:56 PM

33
Para fallas originadas por error técnico, llame al Personal de servicio autorizado Sharp más cercano.
1. El sensor no detecta apropiadamente el vapor en el modo del sensor de microondas.
2. La puerta está abierta o se ha pulsado Parar/Borrar durante la detección.
Tanto para 1 como para 2, pulse Parar/Borrar y cocine manualmente.
1. El tiempo introducido es superior al tiempo máximo para la Cocción con vapor alto o Cocción con vapor bajo. Pulse Parar/Borrar y vuelva a programar.
2. La hora del día introducida no es correcta. Éste es un reloj de 12 horas. Pulse Parar/Borrar y reprogramar el reloj.
El peso introducido es mayor o menor a la cantidad permitida indicada en la tabla. Pulse Parar/Borrar y reprogramar.
El horno está demasiado caliente para utilizar los menús de Descongelación con vapor, Descongelación con micro o Cocción con vapor bajo. Extraiga los alimentos del horno y deje que se enfríe hasta que desaparezca el mensaje. Extraiga el depósito de agua y llénelo con agua hasta la marca MAX. Sustituya y empuje fi rmemente en su lugar, a continuación pulse Parar/Borrar para eliminar el mensaje de error.Asegúrese de que el depósito de agua esté lleno de agua corriente fría hasta la marca MAX.Para continuar la cocción, cocine manualmente. Compruebe el punto de cocción de vez en cuando.NOTAS: 1. Asegúrese de no utilizar ningún otro líquido como agua
destilada, ósmosis, agua mineral, etc.2. Si este mensaje vuelve a aparecer una y otra vez incluso
tras llenar el depósito de agua con agua, el sistema de vapor interno podría estar averiado. Póngase en contacto con su técnico de servicio autorizado Sharp más cercano. Podrá utilizar el horno en los modos de cocción que no usen vapor.
El agua en el sistema interno de vapor está congelada. Ponga el horno funcionando en Parrilla durante 10 minutos sin alimentos. Consulte la página 27.
Siga las instrucciones para decapar paso a paso. Consulte la página 16.
La puerta del horno y la cavidad interior están muy calientes. Preste atención adicional para no quemarse.
Este mensaje no indica un funcionamiento erróneo del horno. Al completar los ajustes del modo Ahorro de energía, “SV” aparecerá en la pantalla. A continuación, la pantalla mostrará “ . 0” durante 3 minutos antes de apagar el horno. Consulte la página 31.
Si aparece EE o usted considera que el horno no está funcionando apropiadamente, revise la tabla a continuación antes de consultar al Personal de servicio autorizado Sharp. Así evitará hacer llamadas innecesarias.
MENSAJE DE ERROR TÉCNICO / MENSAJE INFORMATIVO
MENSAJE DE ERROR TÉCNICO
SENSOR DE ERROR
MENSAJE INFORMATIVO
EE
Err, SENSOR (parpadeando)
Err
Err, AUTO, DEF*, LBS (parpadeando)
Err, HOT (parpadeando)
Err, WATER (parpadeando)
COLd
DESCALE (parpadeando)
HOT (parpadeando)
SV
MENSAJE EN PANTALLA ACCIÓN
ADVERTENCIA:
Nunca ajustar, reparar ni modifi car el horno por su cuenta. Es peligroso que alguien que no sea un técnico de servicio cualifi cado por SHARP intente llevar a cabo las tareas de reparación o servicio. Esto es muy importante ya que podría incluir la extracción de las cubiertas que le protegen de las partes eléctricas.
• Reparaciones y Modifi caciones: No intente manejar el horno si no funciona adecuadamente.• Gabinete exterior: Nunca extraiga el gabinete exterior para evitar la posibilidad de descargas eléctricas o quemaduras.
C U A D R O D E L O C A L I Z A C I Ó N D E F A L L A S
CUADRO DE LOCALIZACIÓN DE FALLAS
* (DEF aparece en la pantalla en los modos de Descongelación con vapor y Descongelación con micro)
SEC AX1100S_sp.indd Sec1:33SEC AX1100S_sp.indd Sec1:33 10.12.2 4:53:56 PM10.12.2 4:53:56 PM

34
C U A D R O D E L O C A L I Z A C I Ó N D E F A L L A SLas siguientes situaciones son normales y no son señales de que el horno tenga fallas.
* Abra la puerta y cierre. * Ver i f i que que e l horno es té conec tado a un
tomacorriente de pared adecuado. * Revise que el fusible o interruptor automático
funcionen apropiadamente.* Desconecte el cable de alimentación, y espere un minuto.
A continuación, vuelva a conectar y cierre la puerta.
* Abra la puerta y cierre. ¿Está apagada la luz? Pulse Minuto extra/COMENZAR nuevamente.
* Si el mensaje “Err, HOT (parpadeando)” aparece en pantalla, espere hasta que el mensaje desaparezca.
S e c a n c e l a r á n e l t i e m p o y m o d o d e c o c c i ó n programados. Continúe cocinando en el modo manual.
En los siguientes casos, el modo de Ahorro de energía se cancelará temporalmente:- Al abrir la puerta.- Detener la cocción automática.- Si el ventilador de cocción sigue funcionado tras la cocción.- En el modo demonstración- Bloqueo infantil- Modo extender- Modo drenaje- Modo descalcifi cación- Modo temporizador de cocina- Si la pantalla muestra “Err, WATER (parpadeando)”- Al ajustar el Reloj.- Si el horno retiene la condición de precalentamiento.
* Compruebe que la bandeja de goteo esté colocada correctamente. Extraiga y vuelva a colocar la bandeja de goteo correctamente.
Consulte la página 14.
* Compruebe que la bandeja de goteo esté colocada correctamente. Extraiga y vuelva a colocar la bandeja de goteo correctamente. Consulte la página 14.
Panel de control /fuente dealimentación
Modo de Ahorro de energía
Agua
La pantalla está negra / vacía.
La pantal la está bien pero Minuto extra/COMENZAR no funcionará al ser pulsado.
Se interrumpió el suministro eléctrico durante la cocción.
La pantal la no se pone en blanco.
Fugas de agua desde la parte inferior frontal del horno.
PREGUNTA / SITUACIÓN RESPUESTA
SEC AX1100S_sp.indd Sec1:34SEC AX1100S_sp.indd Sec1:34 10.12.2 4:53:57 PM10.12.2 4:53:57 PM

35
C U A D R O D E L O C A L I Z A C I Ó N D E F A L L A SLas siguientes situaciones son normales y no son señales de que el horno tenga fallas.
Se ha condensado humo dentro del horno. Seque con un paño o esponja suave y seco tras el enfriamiento.
Los orifi cios de ventilación de aire están en la parte inferior del horno (lateral izquierdo). Es normal que el vapor utilizado salga a través de los orifi cios de ventilación de aire. Tenga en cuenta que saldrá vapor caliente durante la cocción con vapor, y mantenga a los niños alejados del horno.
Esto es normal.Hay vapor condensado en el piso del horno. Seque con un paño o esponja suave y seco tras el enfriamiento.
Compruebe los sellos de la puerta para asegurarse de que estén en la posición correcta.
Al escuchar el microondas, puede escuchar el ciclo de encendido y apagado del magnetrón dependiendo del nivel de potencia.
El ventilador de enfriamiento funcionará hasta que el horno se enfríe. El ventilador puede continuar operando hasta por 10 minutos dependiendo del horno y la temperatura de las partes.
Las altas temperaturas pueden causar la expansión de los componentes del horno. Esto es normal.
Vea las instrucciones paso a paso para la limpieza del horno antes del primer uso en la página 17.
* ¿Llenó el depósito del agua con agua hasta la marca MAX. antes de comenzar la cocción?
* ¿Sacó el depósito del agua del horno durante la cocción? No extraiga el depósito del agua durante la cocción excepto si así se lo indica el libro de cocina o el manual de operación.
* ¿Ut i l i zó l a bande ja de c r i s ta l? Consu l te l as instrucciones importantes en las páginas 14-15.
Consulte “Para la extracción de SALPICADURAS DE ALIMENTOS O ACEITES de las paredes del horno” en la página 32. Es importante limpiar el interior del horno tras cada uso.
Revise el modo Demostración en la página 31 y cancele.
Los orificios de ventilación de aire están en la parte inferior del horno (lateral izquierdo). Esto es normal. Tenga en cuenta que saldrá aire caliente durante la cocción Parrilla mixta, y mantenga a los niños alejados del horno.
Al vapor
Rudo / Sonido
Humo / Olor
Resultados de cocción
Salpicaduras de alimentos
Otros
Hay agua dentro del horno al abrir la puerta.
Fugas de vapor desde la parte inferior del horno.
Se puede ver condensación de agua en la cavidad del horno.
Sale vapor desde la puerta durante la cocción.
Hay ruidos durante la cocción con microondas.
Ruido durante la cocción.
Ru ido a l coc inar con a l ta temperatura.
Al usar el horno por primera vez, podría emitir humo u olor.
El menú que utiliza agua no da buenos resultados.
Es difícil deshacerse de las salp icaduras de a l imentos secas en las paredes del horno.
El tiempo que aparece en la pantalla está haciendo cuenta regresiva rápidamente.
Sale aire caliente desde la parte inferior del horno.
RESPUESTAPREGUNTA / SITUACIÓN
SEC AX1100S_sp.indd Sec1:35SEC AX1100S_sp.indd Sec1:35 10.12.2 4:53:57 PM10.12.2 4:53:57 PM

36
R E V I S I Ó N P A R A S O L I C I T U D D E S E R V I C I ORevise lo siguiente antes de llamar para solicitar servicio:
1. Coloque en el horno una taza de agua en una taza medidora de vidrio y cierre la puerta fi rmemente. Opere el horno por un minuto en microondas, 100% ALTO.
A. ¿Se enciende la luz del horno? SÍ _______ NO _______B. ¿Funciona el ventilador de enfriamiento? SÍ _______ NO _______ Oirá el sonido del ventilador. C. ¿Aparece el indicador de Microondas en la pantalla? SÍ _______ NO _______D. ¿Se oye la señal tras 1 minuto? SÍ _______ NO _______E. ¿El agua que está en el horno está caliente? SÍ _______ NO _______
2. Retire el agua del horno y hágalo funcionar por 5 minutos en Parrilla sin precalentamiento.A. ¿Aparece el indicador de Parrilla en la pantalla? SÍ _______ NO _______B. Después de apagar el horno microondas, ¿todavía está caliente su parte interna? SÍ _______ NO _______
3. Llene el depósito de agua con agua y vuelva a colocar. Ejecute el horno durante 3 minutos a Cocción con vapor alto. A. Después de apagar el horno microondas, ¿todavía está caliente su parte interna? SÍ _______ NO _______
Si respondió "NO" a cualquiera de las preguntas anteriores, por favor revise el tomacorriente eléctrico, la caja de fusibles y/o el interruptor del circuito. Si están funcionando correctamente, COMUNÍQUESE CON EL PERSONAL DE SERVICIO AUTORIZADO SHARP MÁS CERCANO. Un horno microondas nunca debe ser reparado por una persona "no califi cada".
IMPORTANTE: Si la pantalla no muestra nada incluso si el suministro de alimentación está conectado adecuadamente, el modo de Ahorro de energía podría estar activado. Abra y cierre la puerta del horno para poner en marcha el horno. Consulte la página 17.
NOTAS: 1. Si el tiempo visualizado desciende rápidamente, compruebe Modo demonstración. (Para más detalles,
consulte la página 31.)2. Si el horno se ha programado por más de 30 minutos a 80, 90 o 100% de potencia, después de los
primeros 30 minutos el nivel de potencia se ajustará automáticamente al 70%, para evitar la sobrecocción.
Voltaje en línea de CA: 120V monofásico, 60Hz, sólo CAEnergía de CA requerida: 1500 W 13A (Microondas) 1150 W 9,6A (Parrilla/Vapor)Potencia de salida: Microondas 900W* (Procedimiento de prueba según la norma IEC) Parrilla del calentador 1100W Vapor 900WFrecuencia: 2450 MHzDimensiones externas (Anch. x Alto x Prof.): 201/2” x 13” x 195/8” 520 mm x 330 mm x 500 mm
Dimensiones de la cavidad (Anch. x Alto x Prof.)**: 131/2” x 8” x 15” 343 mm x 210 mm x 381 mm
Capacidad del horno **: 1.0 pies cúbicos / 27 LPeso: Aprox. 44 lb / 20 kg
* Método estandarizado de la Comisión Electrotécnica Internacional para la medición de la potencia en vatios de salida. Este método de prueba es ampliamente reconocido.
** La capacidad interna se calcula midiendo el ancho, la profundidad y la altura máxima. La capacidad real
para los alimentos es menor.
E S P E C I F I C A C I O N E S
SEC AX1100S_sp.indd Sec1:36SEC AX1100S_sp.indd Sec1:36 10.12.2 4:53:57 PM10.12.2 4:53:57 PM

37
Ternera Arrachera, 3/4 pulgadas de grosor 1,0 - 1,5 lb Parrilla con precalentamiento Medio 160°F 3
Filetes: Mesón, Chuleta,
Entrecot o Solomillo, 1 pulgadas de grosorParrilla con precalentamiento Medio crudo 145°F 3
Hamburguesas*, 1/2 pulgadas de grosor 0,25 de libra cada uno Parrilla automática, Hamburguesas Preajuste 160°F 3
Cerdo Chuletas de lomo sin hueso, 3/4 pulgadas de grosor 0,5 - 2,0 lb Parrilla mixta baja 160°F 3
Lomo con hueso o costillas, 3/4 pulgadas de grosor Parrilla mixta baja 160°F 3
Lonchas de jamón, completamente cocinadas, 3/4 pulgada de grosor Parrilla Caliente 3
Salchichas Hasta 1,0 lb Parrilla 160°F 3
Salchichas Hamburguesas frescas o sartas 0,75 - 1,0 lb Parrilla Bien hecho 3
Ahumado 0,75 - 1,0 lb Parrilla 140°F 3
Cordero Chuletas (costillas o lomo), 1 pulgadas de grosor 3-4 de oz cada uno Parrilla mixta baja 160°F 2
Aves de
corral
Pechugas de pollo sin hueso a la mitad*, 3/4 pulgadas de grosor 0,5 - 2,0 lb Parrilla automática, Aves de corral sin hueso Preajuste 160°F 2
Trozos de pollo* 0,5 - 3,0 lb Parrilla automática, Trozos de pollo Preajuste 180°F 2
Pescado Filetes, 1 pulgadas de grosor 0,5 - 2,0 lb Parrilla mixta baja 2
Marisco Vieras, mar Hasta 1,0 lb Grill with preheat Opaco 2
Camarones, jumbo Hasta 1,0 lb Grill with preheat Opaco 2
14 - 17
12 - 14
12 - 14
16 - 19
10 - 12
7 - 9
15 - 20
10 - 12
10 - 12
20 - 25
15 - 18
10 - 12
T A B L A
A L I M E N T O P U N T O D E C O C C I Ó NC A N T I D A D P O S I C I Ó N D E L O S A L I M E N T O S
Tabla de Parrilla
T I E M P OH O R N O D E A J U S T E
Utilice el estante y la bandeja de cristal. Convertir los alimentos más de la mitad de la parrilla.
* Estos menús pertenecen a la Cocina sana. Para más detalles, consulte la página 20.
Dumplings Asiática, cocina 8 - 16 Cocción con vapor alto 13 - 15 2
Huevos Escalfados* 1 - 4 Huevos, Huevos escalfados Preajuste 2
Pescado Filetes*, 1/4 - 1/2 pulgadas de grosor 0,3 - 2,0 lb Pescado, Filetes de pescado Preajuste 2
Aves de corral Pechugas de pollo, sin hueso 0,3 - 2,0 lb Cocción con vapor alto 20 - 30 2
Marisco Almejas y mejillones, en concha 0,5 - 2,0 lb Cocción con vapor alto 12 - 16 2
Colas de langosta, descongeladas, 8 onzas cada una, en concha 1 - 4 colas Cocción con vapor alto 12 - 17 2
Vieras 0,3 - 2,0 lb Cocción con vapor alto 7 - 10 2
Camarón, medio 0,3 - 2,0 lb Cocción con vapor alto 10 - 16 2
Vegetales
frescos
Espárragos*, medio 6 - 24 espárragos Vegetales, Cocción rápida Preajuste 2
Brócoli* 1 - 6 tazas Vegetales, Cocción rápida Preajuste 2
Zanahorias * Pequeñas 1 - 6 tazas Vegetales, Cocción larga Preajuste 2
En rodajas, 1/4-pulgadas de grosor 1 - 6 tazas Vegetales, Cocción media Preajuste 2
Coliflor* 1 - 6 tazas Vegetales, Cocción rápida Preajuste 2
Mazorca de maíz* 1 - 6 mazorcas Vegetales, Cocción larga Preajuste 2
Judías verdes*, cortadas en trozos de 2 pulgadas 1 - 6 tazas Vegetales, Cocción media Preajuste 2
Vegetales Bok choy, troceado 1 - 6 tazas Cocción con vapor alto 5 - 8 2
Brócoli chino, troceado 1 - 6 tazas Cocción con vapor alto 5 - 8 2
Col china, troceada 1 - 6 tazas Cocción con vapor alto 5 - 8 2
Kale, desmigado 1 - 6 tazas Cocción con vapor alto 5 - 8 2
Espinacas, desmigadas 1 - 6 tazas Cocción con vapor alto 5 - 8 2
Patatas, nuevas Cortes, gajos de 11/2 pulgadas 0,5 - 2,0 lb Cocción con vapor alto 30 - 35 2
Enteras, diámetro de 11/2 pulgadas 0,5 - 2,0 lb Cocción con vapor alto 30 - 35 2
Calabaza* Calabaza de bellota, pequeña, cortada a la mitad 1 - 4 mitades Vegetales, Cocción larga Preajuste 2
Calabacín, rodajas de 1/4 pulgadas de espesor 1 - 6 tazas Vegetales, Cocción rápida Preajuste 2
A L I M E N T O C A N T I D A D P O S I C I Ó N D E L O S A L I M E N T O S
Tabla de vapor
T I E M P OH O R N O D E A J U S T E
Utilice la bandeja de vapor y la bandeja de cristal.
* Estos menús pertenecen a la Cocción sana. Para más detalles, consulte las páginas 18, 19.
(min.)
(min.)
SEC AX1100S_sp.indd Sec1:37SEC AX1100S_sp.indd Sec1:37 10.12.2 4:53:58 PM10.12.2 4:53:58 PM

38
R E C E T A SBrochetas de pollo y
albahaca
½ libra (0,22 kg) de pechugas de pollo sin hueso, troceadas en 12 trozos 12 hojas grandes de albahaca fresca 1 pimiento amarillo, troceado en 12 (1 pulgada/ 2,5 cm) trozos 6 champiñones de tamaño medio blancos o marrones, sin tallo
6 (4 pulgadas/ 10,2 cm) pinchos de madera 6 tomatitos ¼ de taza de zumo de naranja 1 cucharada sopera de aceite de nuez 1 cucharada sopera de vinagre balsámico 1 cucharada sopera de miel ½ cucharadita de café de mostaza pimienta recién molida
Para 6 brochetas
Envuelva cada trozo de pollo con una hoja de albahaca. Inserte 1 trozo de pollo envuelto en albahaca, un trozo de pimiento, un champiñón y otro trozo de pollo en cada pincho. Colóquelos en la bandeja de vapor previamente engrasada sobre la bandeja de cristal. Colóquelos en la posición inferior.
Pulse Cocción con vapor alto y entrar en 18-20
minutos. Pulse Minuto extra/COMENZAR.
Mientras se cocinan las brochetas, en un bol pequeño, mezcle el resto de los ingredientes para la salsa. Saque las brochetas del horno y añada un tomatito en el extremo de cada pincho. Sirva las brochetas con la salsa.
Valor nutricional de cada unidad:
Calorías: 90 Grasa: 3 g
Proteínas: 9 g Colesterol: 20 mg
Carbohidratos: 7 g Sodio: 35 mg
Paquetitos al vapor
½ libra (0,22 kg) de carne de cerdo molida magra
8 gambas crudas grandes (unas 2½ onzas / 70,8 gramos) 1 clara de huevo 1 cucharadita de café de harina de maíz 1 cucharadita de café de aceite de sésamo 1 cucharadita de café de jengibre rallado fresco ½ cucharadita de café de sal ½ cucharadita de café de pimiento rojo machacado
1 diente de ajo pequeño, picado 2 cebolletas, bien picadas 2 latas de castañas en agua, escurridas y bien troceadas 2 judías chinas frescas grandes, bien troceadas 16 (3 pulgadas / 7,6 cm) envolturas cuadradas de wonton fi nas
Para 16 paquetitos
En el procesador de alimentos, triture el cerdo y las gambas hasta que formen una pasta. Con el motor en funcionamiento, añada la clara de huevo, la harina de maíz, el aceite de sésamo, el jengibre, la sal, la pimienta y el ajo. En un bol de tamaño medio, combine la mezcla de cerdo, cebolletas, castañas en agua y los ejotes.
Mientras sujeta una envoltura de wonton en la palma de su mano, humedezca el borde de la envoltura del wonton. Coloque 1 cucharada sopera del relleno de cerdo en el centro de la envoltura. Rodee el relleno con los bordes de la envoltura, plisando la envoltura al mismo tiempo. Presione la parte inferior del paquetito contra la superficie de trabajo para aplanarlo. Suavemente, gire los extremos y presiónelos el uno contra el otro. Cierre cada paquetito con un “tallo” de cebollino*, opcional. Repita con el resto de envolturas y relleno.
Rocíe la bandeja de vapor con aceite de aerosol antiadherente. Coloque los paquetitos en la bandeja de vapor. Coloque la bandeja de vapor sobre la bandeja de cristal. Colóquelos en la posición inferior.
Pulse Cocción con vapor alto y entrar en 15-17
minutos. Pulse Minuto extra/COMENZAR.
Nota: Puede trocear las cebolletas, las castañas en agua y las judías verdes en el procesador de
alimentos.
* Sumerja los tallos del cebollino en agua hirviendo para ablandarlos y poder atarlos más fácilmente.
Valor nutricional de cada unidad: Calorías: 60 Grasa: 2.5 g
Proteínas: 5 g Colesterol: 15 mg Carbohidratos: 5 g Sodio: 135 mg
SEC AX1100S_sp.indd Sec1:38SEC AX1100S_sp.indd Sec1:38 10.12.2 4:53:58 PM10.12.2 4:53:58 PM

39
R E C E T A S
Dumplings de cerdo con
salsa
1/3 libra (0,13 kg) de carne de cerdo molida magra 1/3 taza de champiñones bien picados (alrededor de 1 onza / 28,4 gramos) 3 cebolletas, picadas ½ zanahoria pequeña, pelada y bien troceada 1 tallo de apio, bien troceado 2 cucharadas soperas de salsa de soja 1 cucharadita de café de aceite de sésamo 36 potsticker o envolturas para paquetitos Hong Kong* 2 cucharadas soperas de salsa de soja 1 pimiento verde picante mediano, troceado ½ cucharadita de café de aceite de sésamo oscuro 2 cucharaditas de café de azúcar moreno 1 cucharada sopera de jerez
Para 36 paquetitos
En un bol de tamaño mediano, mezcle bien los siete ingredientes. Mientras utiliza 2 ó 3 envolturas a la vez, coloque una cucharadita de café de la mezcla en el centro de cada envoltura. Humedezca los extremos con un dedo mojado en agua fría, a continuación presione los extremos fi rmemente hasta formar una media luna. Continúe hasta utilizar toda la mezcla de cerdo.
Rocíe la bandeja de vapor con aceite de aerosol antiadherente. Coloque 18 paquetitos en la bandeja de vapor dejando cierto espacio entre ellos. Coloque la bandeja de vapor sobre la bandeja de cristal. Coloque las bandejas en la posición superior e inferior.
Pulse Cocción con vapor alto y entrar en 16-18
minutos. Pulse Minuto extra/COMENZAR.
Mezcle el resto de los cinco ingredientes para preparar la salsa.
* Podrá util izar también envolturas redondas, llamadas envolturas Gyoza o podrá usar envolturas wonton cuadradas y recortar los extremos para formar un círculo.
Valor nutricional de cada unidad:Tamaño de la porción: 2 paquetitos
Calorías: 60 Grasa: 1.5 g
Proteínas: 3 g Colesterol: 5 mg
Carbohidratos: 8 g Sodio: 380 mg
Dumplings de pollo y bacon
6 champiñones chinos secos
¼ de libra (0,11 kg) de carne de bacon magra picada ¼ libra (0,11 kg) de pechugas de pollo sin hueso, picadas
1 cucharada sopera de harina de maíz
1 cucharada sopera de aceite
10 latas de castañas en agua, escurridas y bien troceadas 1 cucharada sopera de jerez seco
1 cucharadita de café de azúcar
1 cucharadita de café de aceite de sésamo
1½ cucharadas soperas de salsa de soja oscura
1 cucharadita de café de ajo picado
36 potsticker o envolturas para paquetitos Hong Kong* 36 hojas de cilantro
Para 36 paquetitos
En un bol pequeño, coloque los champiñones y 2 tazas de agua hirviendo. Cubra y deje reposar durante 15 minutos. Escurra y deje que seque lo más posible. Saque y tire los tallos y cualquier parte dura. Trocee el resto y añádalo al bol.
En un procesador de alimentos pequeño o grande, triture el bacon, el pollo y la harina de maíz hasta que formen una pasta.
En una sartén mediana a fuego alto, caliente el aceite. Remueva para cubrir el fondo. Añada la mezcla de pollo y sofría, deshaciendo cualquier grumo, hasta que esté opaca. Añada los siguientes seis ingredientes y los champiñones. Sofría hasta que esté caliente, para mezclar así los sabores, durante unos 2 a 3 minutos. Trasládela a un bol medio. Cubra y deje reposar.
Utilice 2 ó 3 envolturas a la vez. Mantenga el resto cubierto. Ponga 1 cucharadita de café de la mezcla de pollo en el centro de cada envoltura. Coloque una hoja de cilantro en la parte superior de la mezcla. Sumerja su dedo en agua y páselo alrededor de los bordes de la envoltura. Junte los bordes fi rmemente para formar una media luna. Presione con los dedos para sellar los bordes. Deje los dumplings listos a parte, cubiertos, hasta que haya fi nalizado todos los dumplings.
Rocíe la bandeja de vapor con aceite de aerosol antiadherente. Coloque 18 paquetitos en la bandeja de vapor dejando cierto espacio entre ellos. Coloque la bandeja de vapor sobre la bandeja de cristal. Coloque las bandejas en la posición superior e inferior.
Pulse Cocción con vapor alto y entrar en 16-18 minutos. Pulse Minuto extra/COMENZAR. Servir caliente, con salsa de soja sazonada con pimienta recién molida.
* Podrá util izar también envolturas redondas, llamadas envolturas Gyoza o podrá usar envolturas wonton cuadradas y recortar los extremos para formar un círculo.
Valor nutricional de cada unidad:
Calorías: 30 Grasa: 1 g Proteínas: 1 g Colesterol: 0 mg Carbohidratos: 4 g Sodio: 100 mg
SEC AX1100S_sp.indd Sec1:39SEC AX1100S_sp.indd Sec1:39 10.12.2 4:53:59 PM10.12.2 4:53:59 PM

40
R E C E T A S
Mejillones con salsa de
mantequilla y especias
2 libras (0,90 kg) de mejillones frescos ¼ taza de mantequilla, ablandada 1 diente de ajo, picado 1 cucharada sopera de perejil fresco picado 1 cucharada sopera de cebollinos o albahaca fresca
½ cucharadita de café de cáscara de limón o lima rallada pimienta negra recién molida para saborear
Sirve para 6
Frote los mejillones bajo agua fría con un estropajo de nilón o cepillo de cerdas duras. Extraiga las "barbas", si las hubiere. Deseche los mejillones que se hayan roto o que no se cierren al tocarse.
Coloque los mejillones en la bandeja de vapor en la bandeja de cristal. Colóquelos en la posición inferior. Pulse Cocción con vapor alto y entrar en 14-16 minutos. Pulse Minuto extra/COMENZAR.
Mientras deja los mejillones al vapor, mezcle el resto de los ingredientes y deje reposar. Por último, ponga un poco de la mezcla de la mantequilla en cada mejillón. Servir inmediatamente.
Valor nutricional de cada unidad:
Calorías: 200 Grasa: 11 g
Proteínas: 18 g Colesterol: 60 mg
Carbohidratos: 6 g Sodio: 490 mg
Filetes de pescado estilo
Teriyaki
½ taza de agua ¼ taza de salsa de soja ¼ taza de jerez seco 2 cucharadas soperas repletas de azúcar moreno ½ cucharadita de café de jengibre picado 1/8 cucharadita de café de ajo en polvo 1 libra (0,45 kg) de fi letes de pescados frescos o congelados
Sirve para 4
En una bandeja de cristal apta para hornos cuadrada de 8 pulgadas (20,3 cm), mezcle todos los ingredientes excepto el pescado. Remover hasta que se mezclen. Añadir el pescado, girando para cubrir ambos lados. Cubrir con una envoltura de plástico. Dejar en la nevera durante 1 hora.
Rocíe la bandeja de vapor con aceite de aerosol antiadherente. Saque los filetes de pescado y escúrralos bien. Colóquelos en la bandeja de vapor.
Coloque la bandeja de vapor sobre la bandeja de cristal. Colóquelos en la posición inferior. Pulse Cocción con vapor alto y entrar en 16-18 minutos. Pulse Minuto extra/COMENZAR.
Valor nutricional de cada unidad:
Calorías: 130 Grasa: 1 g
Proteínas: 21 g Colesterol: 55 mg
Carbohidratos: 7 g Sodio: 1000 mg
Pimientos rellenos
italianos
3 pimientos medios rojos, naranjas o amarillos 1 libra (0,45 kg) 93% de carne de ternera molida magra 1 (8 onzas / 227 gramos) lata de salsa de tomate, separada ½ taza de arroz instantáneo crudo 1 huevo, ligeramente batido ½ cucharadita de café de hojas de orégano secas, machacadas ½ cucharadita de café de sal ¼ cucharadita de café de pimienta 1/8 cucharadita de café de ajo en polvo
Sirve para 6
Corte los pimientos a lo largo en dos. Extraiga las semillas y membranas. Dejar aparte.
En un bol grande, mezcle la ternera picada, toda la salsa de tomate excepto ¼ de la taza, el arroz, orégano, sal, pimienta y el ajo en polvo. Colóquela en los pimientos partidos a la mitad.
Rocíe la bandeja de vapor con aceite de aerosol antiadherente y tramitar las mitades de pimienta en la bandeja. Coloque la bandeja de vapor sobre la bandeja de cristal. Colóquelos en la posición inferior.
Pulse Cocción con vapor alto y entrar en 35 minutos. Pulse Minuto extra/COMENZAR.
Una vez que el horno se detenga, tenga cuidado al abrir la puerta y vuelque el resto de la salsa de tomate sobre los pimientos. Rellene el depósito de agua. Pulse Cocción con vapor alto y entrar en 5-8 minutos y pulse Minuto extra/COMENZAR.
Valor nutricional de cada unidad:
Calorías: 170 Grasa: 6 g
Proteínas: 16 g Colesterol: 75 mg
Carbohidratos: 13 g Sodio: 450 mg
Zanahorias a la naranja
4 zanahorias grandes (aproximadamente 1 libra / 0,45 kg) peladas
y córtelas en rodajas de ¼ de pulgada (1,9 cm) ó 1 libra (0,45 kg) de zanahorias pequeñas
2 cucharadas soperas de mantequilla o margarina 1 cucharada sopera de cáscara de naranja rallada 1 cucharadita de café de azúcar o edulcorante artifi cial similar
Sirve para 6
Coloque las rodajas de zanahoria en la bandeja de vapor en la bandeja de cristal. Colóquelos en la posición inferior. Pulse Cocción con vapor alto y entrar en 18-20 minutos. Pulse Minuto extra/COMENZAR.
Mientras deja las zanahorias al vapor, mezcle el resto de los ingredientes en un bol. Añada las zanahorias hervidas a la mezcla de naranja. Revuelva hasta cubrir. Servir caliente.
Valor nutricional de cada unidad:
Calorías: 60 Grasa: 4 g
Proteínas: 1 g Colesterol: 10 mg
Carbohidratos: 7 g Sodio: 75 mg
SEC AX1100S_sp.indd Sec1:40SEC AX1100S_sp.indd Sec1:40 10.12.2 4:53:59 PM10.12.2 4:53:59 PM

41
R E C E T A S
Mazorca de maíz
1 cucharada sopera de salsa de soja 1 cucharada sopera de aceite de oliva ½ cucharadita de café de aceite de sésamo 1 diente de ajo, picado 4 mazorcas de maíz fresco, sin cáscara
Sirve para 4
Mezcle los cuatro primeros ingredientes en una bolsa de plástico con cierre. Añada las mazorcas de maíz. Gire para cubrir el maíz. Cierre. Déjelas en la nevera durante varias horas o toda la noche, dele la vuelta a las mazorcas de vez en cuando.
Saque las mazorcas de la bolsa. Deseche el adobo. Envuelva cada mazorca con una hoja de papel, tuerza los extremos para cerrar. Coloque las mazorcas en la bandeja de vapor, recorte los extremos para que encajen en la bandeja. Coloque la bandeja sobre la bandeja de cristal. Colóquelos en la posición inferior. Pulse Cocción con vapor alto y entrar en 30-33 minutos. Pulse Minuto extra/COMENZAR.
Extraiga con cuidado la envoltura. Servir caliente.
Valor nutricional de cada unidad:
Calorías: 110 Grasa: 5 g
Proteínas: 3 g Colesterol: 0 mg
Carbohidratos: 18 g Sodio: 160 mg
Mezcla de verduras verdes
½ taza de guisantes congelados 4 calabacines pequeños o calabaza 12 judías verdes frescas 12 espárragos pequeños 12 guisantes azucarado 12 arvejas 2 cucharadas soperas de mantequilla o margarina 4 cebollas verdes, en rodajas 1 pulgada (2,5 cm) de jengibre fresco, pelado y rallado 2 cucharadas soperas de zumo de limón 3 cucharadas soperas de salsa de soja
Sirve para 4
Coloque los guisantes congelados en una taza pequeña y colóquela en el centro de la bandeja de vapor. Lave y corte los bordes de las siguientes 5 verduras. Coloque en la bandeja de vapor. Coloque la bandeja de vapor sobre la bandeja de cristal. Colóquelos en la posición inferior.
Pulse Cocción con vapor alto y entrar en 12-14 minutos. Pulse Minuto extra/COMENZAR.
Una vez haya acabado con las verduras, sáquelas del horno y limpie cualquier resto de humedad. En un pequeño bol apto para microondas, mezcle el resto de los ingredientes. Introducir en el horno. Pulse Micro, entrar en 1-2 minutos y 100% de potencia. Pulse Minuto extra/COMENZAR.
Valor nutricional de cada unidad:
Calorías: 110 Grasa: 6 g
Proteínas: 5 g Colesterol: 15 mg
Carbohidratos: 9 g Sodio: 750 mg
Judías verdes almendradas
1 libra (0,45 kg) de judías verdes frescas
¼ taza de almendras troceadas
2 cucharadas soperas de mantequilla o margarina ¼ cucharadita de café de sal
¼ cucharadita de café nuez moscada triturada
¼ cucharadita de café de pimientaSirve para 6
Lave las judías. Rompa los extremos. Parta las judías en trozos de 1 a 1 ½ pulgadas (2,5 a 3,8 cm). Coloque las judías en la bandeja de vapor. Coloque la bandeja de vapor sobre la bandeja de cristal. Colóquelos en la posición inferior.
Pulse Cocción con vapor alto y entrar en 18-20 minutos. Pulse Minuto extra/COMENZAR.
Una vez que las judías estén listas, extráigalas del horno y seque cualquier resto de humedad. Mezcle en un plato apto para microondas las almendras, la mantequilla, la sal, la nuez moscada y la pimienta. Introducir en el horno. Pulse Micro, entrar en 1 minuto y 100% de potencia. Pulse Minuto extra/COMENZAR.
Añada las judías cocinadas a la mezcla de mantequilla y remueva para mezclar bien. Servir caliente.
Valor nutricional de cada unidad:
Calorías: 80 Grasa: 6 g
Proteínas: 2 g Colesterol: 10 mg
Carbohidratos: 6 g Sodio: 130 mg
Colifl or salada
1 colifl or entera de tamaño medio (alrededor de 1½ libra / 0,68 kg)
¼ taza de queso Cheddar rallado 2 cucharadas soperas de mantequilla, derretida
¼ taza de migas de pan ¼ cucharadita de café de pimienta negra 1 cucharada sopera de perejil fresco picado
Sirve para 6
Lave la colifl or. Saque el corazón. Coloque la colifl or en la bandeja de vapor en la bandeja de cristal. Colóquelos en la posición inferior.
Pulse Cocción con vapor alto y entrar en 32-35 minutos. Pulse Minuto extra/COMENZAR.
Mientras deja la colifl or al vapor, mezcle el resto de
los ingredientes en un bol de tamaño medio. Coloque la colifl or cocinada en un plato y rápidamente añada
la mezcla del queso. Servir caliente.
Valor nutricional de cada unidad: Calorías: 90 Grasa: 6 g
Proteínas: 4 g Colesterol: 15 mg Carbohidratos: 7 g Sodio: 105 mg
SEC AX1100S_sp.indd Sec1:41SEC AX1100S_sp.indd Sec1:41 10.12.2 4:54:00 PM10.12.2 4:54:00 PM

42
R E C E T A S
Brochetas de cerdo con
jengibre
1 huevo, batido ½ taza de fi deos chow mein partidos ¼ de taza de zumo de manzana 2 cucharadas soperas de salsa de soja 1 cucharada sopera de raíz de jengibre rallada 1 libra (0,45 kg) de carne de cerdo picada 1 lata (8 onzas / 227 gramos) de trozos de piña
(paquete con zumo), colada 1 pimiento rojo grande, cortado en trozos de ¾ pulgadas (1,9 cm) ½ de taza de zumo de manzana 2 cucharadas soperas de vinagre de sidra 1 cucharadita de café de harina de maíz
Sirve para 4
Mezcle el huevo, los fi deos partidos, ¼ taza de zumo de manzana, la salsa de soja y la raíz de jengibre. Espolvoree el cerdo picado en la composición, mezclar bien, hacer bolas de 1 pulgada (2,5 cm). Dejar a parte.
Para el glaseado, mezcle ½ taza de zumo de manzana, vinagre y la harina de maíz en un bol pequeño. Introdúzcala en el microondas a potencia ALTA (100%) hasta que engrose, 3-4 minutos, removiendo cada 30 segundos.
Coloque las bolas de cerdo con la piña y el pimiento rojo en 4 pinchos de madera o metálicos. Colóquelos sobre una estante en la bandeja de cristal.
Reboce las brochetas en el glaseado. Colóquelos en la posición inferior. Pulse Parrilla mixta baja y entrar en 25-30 minutos. Pulse Minuto extra/COMENZAR. Deles la vuelta a mitad del proceso y reboce con el glaseado. Vierta el resto del glaseado antes de servir.
Por porción:
Calorías: 256 Grasa: 7 g
Proteínas: 29 g Colesterol: 153 mg
Carbohidratos: 18 g Sodio: 652 mg
Pollo a la mostaza y miel
½ taza de mostaza molida de grano grueso ¼ taza de mostaza Dijon ¼ taza de miel 2 a 3 libras (0,90 a 1,36 kg) de pechugas y
muslos de pollo sin hueso, sin pielSirve para 4
Mezcle la mostaza de grano grueso, la mostaza Dijon y la miel. Dejar aparte.
Coloque el pollo en un recipiente apto para hornos de 10 pulgadas (25,4 cm). Coloque el plato en la bandeja de cristal. Colóquelos en la posición inferior en el horno. Pulse Parrilla mixta alta y entrar en 25-30 minutos. Pulse Minuto extra/COMENZAR. Deles la vuelta a mitad del proceso y elimine todo líquido y rocíe con la salsa hasta cubrir completamente los trozos de pollo.La carne de pollo cerca del hueso no deberá ser rosada.
Por porción:
Calorías: 368 Grasa: 8 g
Proteínas: 50 g Colesterol: 133 mg
Carbohidratos: 19 g Sodio: 950 mg
Brochetas de carne
¼ taza de azúcar ¼ taza de salsa de soja ¼ taza de vino blanco 1 cucharada sopera de aceite vegetal 1 cucharadita de café de jengibre picado ¼ cucharadita de café de sal 2 libras (0,90 kg) de fi letes de ternera magros,
cortados en cubos de 1 pulgada (2,5 cm) 2 pimientos verdes grandes, troceados 8 tomatitos, cortados a la mitad 1 lata (8 onzas / 227 gramos) de trozos de piña
(paquete con zumo), coladaSirve para 4
Mezcle el azúcar, la salsa de soja, el vino, el aceite, el jengibre y la sal en un bol de tamaño medio. Agregue los trozos de ternera; cubrir. Déjelos adobándose a temperatura ambiente durante 1 hora o al menos 4 horas en la nevera.
Saque los trozos de ternera del adobo; guarde el adobo. Inserte los trozos de ternera alternándolos con el resto de los ingredientes en 8 pichos de madera o metal. Colóquelos sobre una estante en la bandeja de cristal. Colóquelos en la posición inferior en el horno. Pulse Parrilla mixta baja y entrar en 15 minutos. Pulse Minuto extra/COMENZAR. Gírelos y rebócelos con el adobo. Déjelos cocinándose durante 15-20 minutos en la Parrilla mixta baja o hasta que se hayan hecho a su gusto.
Por porción:
Calorías: 432 Grasa: 17 g
Proteínas: 52 g Colesterol: 153 mg
Carbohidratos: 15 g Sodio: 381 mg
Verduras con especias a
la parrilla
2 libras (0,90 kg) de verduras frescas, a su gusto (cebol la ro ja , p imientos , ca labac ín , champiñones portobello, berenjena, etc.)
1/3 taza de aceite de oliva 2 cucharadas soperas de especias frescas
troceadas o 2 cucharaditas de café de especias secas (tomillo, orégano, romero, estragón, etc.)
Sirve para 8
Cubra las verduras ya preparadas con aceite de oliva sazonado. Deje reposar 30 minutos. Escurrir y secar. Coloque los vegetales en la bandeja de cristal. Coloque la bandeja en la posición inferior en el horno. Pulse Parrilla y entrar en 25-30 minutos. Pulse Minuto extra/COMENZAR. Gire las verduras frecuentemente hasta que estén tiernas al pincharlas con un tenedor, y estén doradas. Servir caliente o a temperatura ambiente.
Por porción: Dependerá del tipo de verduras que utilice. Calorías: 60 Grasa: 6 g Proteínas: 1 g Colesterol: 0 mg
Carbohidratos: 2 g Sodio: 0 mg
SEC AX1100S_sp.indd Sec1:42SEC AX1100S_sp.indd Sec1:42 10.12.2 4:54:00 PM10.12.2 4:54:00 PM

43
R E C E T A S
Salmón a la parrilla con
salsa de albahaca
2 cucharadas soperas de aceite de oliva 1 diente de ajo, picado ¼ taza de vino blanco 2 cucharadas soperas de zumo de limón 1 taza de albahaca fresca* ¼ taza de queso parmesano rallado ½ cucharadita de café de mostaza Dijon 4 fi letes de salmón (1,25 a 1,50 libras / 0,57 a 0, 68 kg)
o pescadilla, mero, pez espada Pimienta de cayena
Sirve para 4
Mezcle el aceite, el ajo, el vino blanco y el zumo de limón en una trituradora. Añada la albahaca, el queso parmesano y la mostaza a la pasta hasta que se mezclen.
Vierta un cuarto de la salsa de albahaca en un plato apto para hornos de 9 pulgadas (23 cm). Coloque los fi letes sobre la salsa y vierta el resto de la salsa por encima de los fi letes. Espolvoree la cayena.
Coloque el plato en la bandeja de cristal. Colóquelos en la posición inferior en el horno. Pulse Parrilla mixta baja y entrar en 20-25 minutos. Pulse Minuto extra/COMENZAR. El pescado se desmenuza con facilidad la pincharlo en el extremo con un tenedor.
* Si no está disponible, utilice ½ taza de perejil fresco y 2 cucharadas soperas de albahaca seca.
Por porción: Calorías: 357 Grasa: 21 g Proteínas: 35 g Colesterol: 97 mg Carbohidratos: 2 g Sodio: 209 mg
Barcos de cangrejo crujiente
1 lata (6 onzas / 170 gramos) de carne de cangrejo blanca, colada 1 paquete (3 onzas / 85 gramos) de queso cremoso, ablandado ½ taza de almendras troceadas 2 cucharadas soperas de cebollas verdes, troceadas 1 cucharada sopera de vino blanco seco 1 cucharadita de café de zumo de limón 1 cucharadita de café de rabanito picante ¼ cucharadita de café de ajo en polvo ¼ cucharadita de café de sal Una pizca de pimienta blanca Una pizca de pimienta de cayena 2 panecillos duros, cortados a la mitad ¼ taza de queso suizo
Sirve para 4
Extraiga cualquier resto de concha o cartílagos del cangrejo. Mezcle los siguientes 10 ingredientes. Mezcle bien. Dejar a parte. Tueste los panecillos en PARRILLA durante 3-5 minutos.
Unte un cuarto de la mezcla de cangrejo en cada mitad de panecillo. Ponga el queso suizo encima de cada panecillo. Colóquelos sobre una estante en la bandeja de cristal. Colóquelos en la posición inferior en el horno. Pulse Parrilla y entrar en 14-16 minutos. Pulse Minuto extra/COMENZAR. Cocine hasta que el queso se haya derretido y el cangrejo esté caliente. Espolvorear con pimentón dulce y servir.
Por porción:
Calorías: 292 Grasa: 19 g. Proteínas: 15 g Colesterol: 57 mg Carbohidratos: 15 g Sodio: 416 mg
Camarones picantes
¼ taza de vino blanco ¼ taza de agua 3 cucharadas soperas de salsa de soja 2 cucharadas soperas de azúcar 1 cucharada sopera de aceite vegetal 2 cucharaditas de café de perejil 1/8 a ¼ cucharadita de café de jengibre picado Una pizca de salsa picante 1 libra (0,45 kg) de camarones crudos gigantes,
sin cáscara y limpiosSirve para 4
Mezcle todos los ingredientes excepto los camarones en un bol de tamaño medio. Agregue los camarones; cubrir. Déjelos en adobo a temperatura ambiente durante 45 minutos o al menos 3 horas en la nevera.
Coloque los camarones sobre la bandeja de cristal. Pulse dos veces Parrilla e introduzca 10-12 minutos. Pulse Minuto extra/COMENZAR para comenzar el precalentamiento. Una vez precalentado, coloque la bandeja en la parte superior del horno. Humedecer con el adobo transcurrido la mitad del tiempo.
Ponga en el microondas el resto del adobo a ALTO (100%) durante 2-3 minutos. Servir sobre arroz o como salsa al servir como aperitivo, opcional.
Por porción:
Calorías: 109 Grasa: 2 g
Proteínas: 18 g Colesterol: 129 mg
Carbohidratos: 3 g Sodio: 319 mg
SEC AX1100S_sp.indd Sec1:43SEC AX1100S_sp.indd Sec1:43 10.12.2 4:54:01 PM10.12.2 4:54:01 PM

44
Pa
ra m
ás d
eta
lle
s s
ob
re l
a i
nfo
rma
ció
n y
pre
ca
uc
ion
es d
e s
eg
uri
da
d,
lea
co
mp
leta
me
nte
la
s i
nstr
uc
cio
ne
s d
e e
ste
Ma
nu
al
de
op
era
ció
n.
Ope
ració
n bá
sica
Si n
o u
tiliz
a e
l horn
o d
ura
nte
3 m
inuto
s o m
ás
(es
deci
r, u
na v
ez
cerr
ada la
puert
a, o tra
s pre
sionar
PA
RA
R/B
OR
RA
R,
o a
l fin
aliz
ar
la c
occ
ión),
no s
erá
capaz
de u
tiliz
ar
el h
orn
o h
ast
a q
ue h
aya
abie
rto y
cerr
ado la
puert
a d
el h
orn
o.
Not
a: C
ua
nd
o a
juste
el R
elo
j, e
l m
od
o A
ho
rro
de
en
erg
ía s
e c
an
ce
lará
.
AN
TES
DE
LA C
OC
CIÓ
N:
V
erifiq
ue
qu
e e
l de
pó
sito
de
ag
ua
est
é ll
en
o h
ast
a la
ma
rca
MA
X
c
on
de
ag
ua
fre
sca
de
l grifo
y q
ue
est
é in
sta
lad
o a
pro
pia
da
me
nte
.
V
erifiq
ue
qu
e la
ba
nd
eja
de
go
teo
esté
va
cía
e in
sta
lad
a.
LUEG
O D
E LA
CO
CC
IÓN
: D
espués d
e q
ue e
l horn
o s
e h
a e
nfr
iado, re
tire
y v
acíe
el
d
epósito d
e a
gua. S
eque la c
avid
ad d
el horn
o c
on u
n p
año.
R
etire
y v
acíe
la
ba
nd
eja
de
go
teo
. C
ON
SE
JO
S P
AR
A L
A C
OC
CIÓ
N A
L V
AP
OR
1.
1.
2.
2.
1.
2.
CU
IDA
DO
BÁ
SIC
O:
Co
nsu
lte
el M
an
ua
l d
e o
pe
ració
n p
ara
ob
ten
er
ma
yo
res d
eta
lles.
D
ren
ar
ag
ua
D
rene
el a
gua
una
vez
al d
ía lu
ego
de la
coc
ción
.
E
limin
ar
resid
uo
s
C
ua
nd
o e
n la
pa
nta
lla a
pa
rezca
el m
en
sa
je
“
DE
SC
AL
E (
pa
rpa
de
an
do
)”, e
limin
e lo
s
r
esid
uo
s d
el h
orn
o.
Ope
ració
n m
anua
l (Con
sulte
la p
ágin
a 25-
28 p
ara o
bten
er m
ás d
etal
les)
Ta
bla
de
co
cc
ión
ma
nu
al
Ta
bla
de
co
loc
ac
ión
de
lo
s a
lim
en
tos y
ute
nsilio
s
Se
nso
r d
e
pa
lom
ita
s
Co
cc
ión
Sa
na
La
co
cció
n a
l va
po
r co
cin
a lo
s a
lime
nto
s le
nta
me
nte
a la
ve
z q
ue
ma
ntie
ne
la fre
scu
ra, lo
s sa
bo
res
y n
utr
ien
tes
na
tura
les.
Ase
gú
rese
de
qu
e e
l de
pó
sito
de
ag
ua
est
é ll
en
o h
ast
a M
AX
. L
as
op
cio
ne
s a
uto
má
tica
s se
exp
lica
n a
co
ntin
ua
ció
n.
Ope
ració
n au
tom
ática
(Con
sulte
la p
ágin
a 18-
24 p
ara o
bten
er m
ás d
etal
les)
Co
cin
e m
an
ua
lme
nte
al p
rep
ara
r a
lime
nto
s q
ue
no
te
ng
an
Aju
ste
s A
uto
má
tico
s.
* P
od
rá a
justa
r la
te
mp
era
tura
de
16
0°F
a 2
00
°F e
n in
cre
me
nto
s d
e 5
°F. (A
juste
in
icia
l: 1
90
°F)
Not
as:
1.
Se
lecc
ion
e la
po
sici
ón
de
sea
da
de
pe
nd
ien
do
de
l ta
ma
ño
de
los
a
limen
tos.
Se
reco
mie
ndan
las
posi
cion
es 2
o 3
par
a la
may
oría
de
l
as
rece
tas.
Co
loq
ue
los
alim
en
tos
y la
ba
nd
eja
de
crist
al e
n la
pos
ició
n 1
al a
sar
gran
des
cant
idad
es p
ara
evita
r qu
e lo
s al
imen
tos
r
ocen
con
el t
echo
del
hor
no. S
i los
alim
ento
s to
can
el e
lem
ento
cal
efac
tor
de la
par
rilla
dur
ante
la c
occi
ón p
odrí
a ap
arec
er h
umo.
2.
Pa
ra c
ocin
ar
un
pa
ste
l, c
arn
e m
ech
ad
a y
pa
tata
s a
l h
orn
o.
3.
No
deje
la b
ande
ja d
e va
por
ni e
l est
ante
met
álic
o m
ojad
os tr
as s
u us
o.
AV
ISO
al c
olo
ca
r la
ba
nd
eja
de
va
po
r y
la
ba
nd
eja
de
cri
sta
l:Tr
as la
coc
ción
, ext
raig
a pr
imer
o la
ban
deja
de
vapo
r. C
onsu
lte la
Fig
ula
2.
Teng
a cu
idad
o co
n el
exc
eso
de a
gua
en la
ban
deja
de
vapo
r, se
re
com
iend
a qu
e la
col
oque
dire
ctam
ente
sob
re u
n pl
ato
plan
o o
band
eja
para
evi
tar
salp
icad
uras
. Ant
es d
e ex
trae
r la
ban
deja
de
cris
tal,
aseg
úres
e de
que
est
é fr
ía. T
enga
en
cuen
ta q
ue p
uede
hab
er a
gua
en la
ban
deja
de
cris
tal,
por
lo ta
nto
pong
a es
peci
al p
reca
ució
n al
ext
raer
la.
1: N
orm
al
2: L
ige
ro
3: P
eq
ue
ño
1: C
arn
e m
olid
a
2: P
ollo
co
n h
ue
so
3: P
ollo
de
sh
ue
sa
do
4: F
ilete
, chule
tas
Ve
geta
les
1: C
occió
n r
áp
ida
2: C
occió
n m
ed
ia
3: C
occió
n la
rga
Pescad
o
1: C
arn
e d
e p
esca
do
2: F
ilete
s d
e p
esca
do
Hu
evo
s
1: H
ue
vo
s e
sca
lfa
do
s
2: H
ue
vo
s d
uro
s
Parr
illa
au
tom
áti
ca
1: H
am
bu
rgu
esa
s
2:
Ave
s de
cor
ral s
in h
ueso
3: T
rozo
s d
e p
ollo
Desco
ng
ela
ció
n c
on
vap
or
1: C
arn
e d
e p
esca
do
2: F
ilete
s d
e p
esca
do
Co
mid
a m
ixta
1:
Ve
ge
tale
s rá
pid
os
+ file
tes
de
pe
sca
do
/po
llo
2:
Ve
ge
tale
s m
ed
ios +
file
tes d
e p
esca
do
/po
llo
3:
Ve
ge
tale
s la
rgo
s +
file
tes d
e p
esca
do
/po
llo
1:
Se
nso
r d
e r
eca
len
tam
ien
to
2: E
ntr
an
tes c
on
ge
lad
os
3: V
egeta
les fre
scos:
co
cció
n r
áp
ida
4: V
egeta
les fre
scos:
co
cció
n la
rga
5: V
eg
eta
les c
on
ge
lad
os
6: P
ata
tas a
l h
orn
o
7: B
eb
ida
s
8: P
an
ecill
o fre
sco
, m
olle
te
9:
Pa
ne
cillo
co
ng
ela
do
, m
olle
te
Re
ca
len
tar/
Co
cin
ar
po
r m
icro
De
sc
on
ge
lac
ión
c
on
mic
ro
1P
uls
e la t
ecla
y
el n
úm
ero
de
co
cció
n d
esead
o.
3C
olo
qu
e lo
s a
lim
en
tos e
n
el h
orn
o s
igu
ien
do
las
dir
eccio
nes d
e la G
uía
de
co
cció
n o
el (l
os)
ind
icad
or
(es
) e
n la
pa
nta
lla
.
4P
uls
e
Min
uto
extra
/CO
MEN
ZAR.
2In
tro
du
zca e
l p
eso
pu
lsan
do
so
bre
el n
úm
ero
o
intr
od
ucie
nd
o la c
an
tid
ad
pu
lsan
do
la m
ism
a t
ecla
nu
méri
ca q
ue p
uls
ó e
n .
13
Sig
a la
s in
str
uc
cio
ne
s
en
el m
an
ua
l d
e
op
era
ció
n.
4P
uls
e
Min
uto
extra
/CO
MEN
ZAR.
2S
ele
cc
ion
e e
l m
od
o d
e
co
cció
n p
uls
an
do
la t
ecla
de
mo
do
de
co
cc
ión
de
se
ad
a.
Intr
od
uzc
a e
l ti
em
po
de
co
cció
n d
esead
o p
uls
an
do
so
bre
Tem
poriz
ador
.
MO
DO
DE
AH
OR
RO
DE
EN
ER
GÍA
Alto
Baja
Alto
Baja
21
2 °
F
16
0 -
20
0 °
F *
-
Pa
rrill
a:
Po
ten
cia
50
%M
icro
on
da
s:
Po
ten
cia
50
%
Pa
rrill
a:
Po
ten
cia
90
%M
icro
on
da
s:
Po
ten
cia
10
%
Po
ten
cia
0 -
10
0%
0 -
35
min
.
0 -
60
min
.
0 -
99
min
. 9
9 s
eg
.
0 -
99
min
. 9
9 s
eg
.
0 -
99
min
. 9
9 s
eg
.
0 -
99
min
. 9
9 s
eg
.
Co
cció
n
al
vap
or
Parr
illa
mix
ta Mic
roo
nd
as
Parr
illa
Ran
go
de
tem
per
atu
ra/p
ote
nci
aM
od
o d
e c
occió
nm
od
e
SI
SI
NO
NO
NO
NO
De
pó
sit
od
e a
gu
aR
an
go
de
tie
mp
o
3 2
Co
rre
de
ras
1 Fig
ura
1
Alto
Baja
Alto
Baja
1 e
str
ato
2 e
str
ato
sC
occió
nal vap
or
Parr
illa
mix
ta
Mic
roo
nd
as
Parr
illa
2 e
str
ato
de
co
cció
nM
od
o d
e c
oc
ció
n
Con
tene
dor a
pto
para
mic
roon
das
Bandeja d
e v
apor
Bandeja
de v
apor
NO
NO
NO
NO
NO
3:
Su
peri
or
2:
Infe
rio
r1:
Su
perf
icie
del h
orn
o
Co
locació
n d
e lo
s a
lim
en
tos y
ute
nsilio
s (
Co
nsu
lte la Im
ag
en
1.)
SI
Alim
ento
s
Alim
ento
s
Alim
ento
sA
limento
s
Alim
ento
s
Bandeja
de c
rista
l
Bandeja
de c
rista
l
Ba
nd
eja
de
crist
al
Ban
deja
de
cris
tal (
Sin
alim
ento
s)
Esta
nte
o p
lato
s
Ver
NO
TA
1.
Ver
NO
TA
2.
Fig
ura
2
Con
tene
dor
apto
par
a m
icro
onda
s
Ba
nd
eja
d
e c
rista
l
Ba
nd
eja
d
e v
ap
or
Ag
arr
ao
llas
Info
(Con
sulte
la p
ágin
a 30-
31 p
ara o
bten
er m
ás d
etal
les)
1
Not
a: L
os a
lime
nto
s e
n la
pa
rrill
a a
uto
má
tica
no
se
co
cin
an
al va
po
r.
1: D
ren
aje
2: D
esin
cru
sta
r
3: D
ure
za
de
l a
gu
a
4: D
em
ostr
ació
n
5: B
loq
ue
o in
fan
til
6:
Sile
ncio
activa
do
/de
sa
ctiva
do
7: R
elo
j
8: M
od
o d
e A
ho
rro
de e
nerg
ía
GUÍA
DE
AYUD
A
Not
a: E
l p
roce
dim
ien
to p
ara
el se
nso
r d
e p
alo
mita
s e
s d
istin
to. C
on
su
lte
la
pá
gin
a 2
1.
Te
cla
Info
pro
porc
iona 8
funcio
nes.
Not
a:C
on
su
lte
la
pá
gin
a 1
7
an
tes d
e a
justa
r e
l re
loj.
SEC AX1100S_sp.indd Sec1:44SEC AX1100S_sp.indd Sec1:44 10.12.2 4:54:01 PM10.12.2 4:54:01 PM