sensiwatch platform 1.0 quick start guide
TRANSCRIPT

1
© 2021.Sensitech Inc. All Rights Reserved. A Carrier Company
Other product names and trademarks are owned by their respective companies.
Overview Window
Description
Program Menu – Select the Program you want to view.
Trip Status – Displays the number of Draft, Not
Started, In Transit, or Arrived trips.
Extended Stops By Trip – Graph of the number of
trips and extended stops.
Excursions – Displays the number of Total Alarms,
Active Alarms, Acknowledged alarms, Trips in
Compliance, and Total Trips.
Trips List – A list of Trips with excursions that need
alarms Acknowledged. To see alarms already
Acknowledged, select the Show Acknowledged check
box.
Welcome Menu – Click the Avatar icon to view the
Welcome menu.
My Profile – Click the change your Password,
Units of Measure types, or Localization (date/time
and number formats).
Help – Click to open Tutorial Links or access the
Quick Start Guide.
Release Notes – Click to view Release Notes.
Logout – Click to log out of SensiWatch Platform.

2
© 2021.Sensitech Inc. All Rights Reserved. A Carrier Company
Other product names and trademarks are owned by their respective companies.
Trips List Window
Navigation
Icon Description
Event
Severity
Red = Critical
Yellow = Warning
Green = Informational
Alarm Status
Alarm Unacknowledged
Alarm Acknowledged
Locate Me
On Bing maps, click to jump to your
location.
Zoom In
On Bing maps, click to zoom in on
the map.
Zoom Out
On Bing maps, click to zoom out on
the map.
Icon Description
Menu
On the Trips List window, in the left
pane, scroll all the way to the right,
and in the row of the trip that you
want, click the Menu icon to Edit a
Trip, Clone a Trip, or
Disable/Enable/Remove a Trip.

3
© 2021.Sensitech Inc. All Rights Reserved. A Carrier Company
Other product names and trademarks are owned by their respective companies.
Create a Trip with a Container 1. In the Program where you want to create a trip, on
the Trips window, click Create Trip.
2. From the Trip Template drop-down, select Supplier
to DC.
3. Define Origin or Create Origin Location.
4. Define the trip’s stops by creating or selecting all the
Stops that are required for the trip.
5. For each Stop, select the Type of Stop.
6. If required, enter the PO Number or Order Number,
Planned Arrival and Departure Times, Mode of
Transportation, and Products for the trip’s stop.
7. Select an Available Container.
8. Enter the Monitor ID.
9. Click Save as Draft or Create Trip.
Create a Trip with Only Monitors 1. In the Program where you want to create a trip, on
the Trips window, click Create Trip.
2. From the Trip Template drop-down, select DC to
Store.
3. Create or select an Origin.
4. Create or select all the Stops that are required for
the trip.
5. For each Stop, select the Type of Stop.
6. If required, enter the PO Number or Order Number,
Planned Arrival and Departure Times, Mode of
Transportation, and Products for the trip’s stop.
7. Add the required Monitors.
8. Click Save as Draft or Create Trip.
Edit a Trip 1. On the Trips window, use Search and Filters to find
the trip you want to edit.
2. From the Results list, on the row of the Trip that you
want to edit, scroll to the right, click the Menu icon,
and select Edit.
3. Make the required edits.
4. Click Save.
Note: You can also edit a Trip from the Trips Detail
window by clicking Actions>Edit.
Reorder Trip Stops When you create a Trip, you select at least one Stop. If
you have multiple stops, and you want to change the
order that the delivery makes the stops, then on the
Create New Trip or the Edit Trip window, in the Stops
section, drag-and-drop the Stop that you want to move
to its new order in the Stops list.
Make a Trip Public If you want users who have no login to the SensiWatch
Platform application to view a trip, then from the top of
the Create New Trip window, select Public. Otherwise,
the default is Private.
Icon Description
Public Trip
On the Trip Details or the Trip
Monitoring windows, identifies that
a trip is Public.
Reprocess Trips You can change data that are maintained outside of a
Trip that is used in a Trip, such as Locations, Product
Specifications, or Transit Container Specifications, and
then reprocess the trip. The Trip must be in either the In
Transit or Arrived state.
1. Once you edit the trip, reprocess the trip by selecting
Actions>Reprocess.
The Start Reprocessing This Trip window opens with
the Send notifications for updated trip events
check box selected. If you do not want to send
notifications for the modified trip, deselect the check
box.

4
© 2021.Sensitech Inc. All Rights Reserved. A Carrier Company
Other product names and trademarks are owned by their respective companies.
2. Click Yes to reprocess the trip, or click No.
Clone a Trip Select to create a copy of a trip, using its configuration
as the basis of a new trip.
1. On the Trips window, use Search and Filters to find
the trip you want to clone.
2. From the Results list, on the row of the Trip that you
want to copy, scroll to the right, click the Menu icon,
and select Clone.
3. Make the required edits.
4. Click Save as Draft or Create Trip.
Flag a Trip To highlight a Trip so that it can be watched, you can set
a flag for that trip. Then, you can Search or Sort for any
Trip with the Flag icon. You can flag (or unflag) a trip on
the following windows by selecting the Flag icon:
Create (or Edit) New Trip
Trip Monitoring
Trip Details
Disable/Enable/Remove a Trip You may want to disable or remove a trip if you want to
re-use the monitor assigned to the trip for another trip.
You can remove a trip that is in the Draft state, or you
can disable a trip that is in any state except Draft.
You can remove a Draft trip from the Trip Details window
by clicking Remove Trip. You can disable a trip that is
not a Draft, from either the Trip Details window by
clicking Disable Trip, or from the Trips list window by
scrolling to the right, clicking the Menu icon, and
selecting Disable Trip.
You can re-enable a trip that is disabled from either the
Trip Details window or the Trips list. Once you re-enable
the trip, that trip is in the Draft state.
View Reports 1. From the ribbon menu, click Reports.
2. From the Please select a Report to view drop-
down list, select the report that you want to view.
Only reports that you have permission to view
display in the list.
Filters/Search On the Trips List window, you can filter to search for the
specific trip that you want to view. The top row contains
three of the most-often-used filters: Trip Status, Alarm
Status, and Carrier. You can select a value from any of
these options, or you can click All Filters to view more
options. Click Clear (next to All Filters) to clear the filters
from the top ribbon.
To use All Filters, select any of the values under the
options by which you want to search. Some options have
scroll bars if there are more values to display. Use the
All Filters scroll bar to scroll to more options. You can
select to search by more than one option.
5
© 2021.Sensitech Inc. All Rights Reserved. A Carrier Company
Other product names and trademarks are owned by their respective companies.
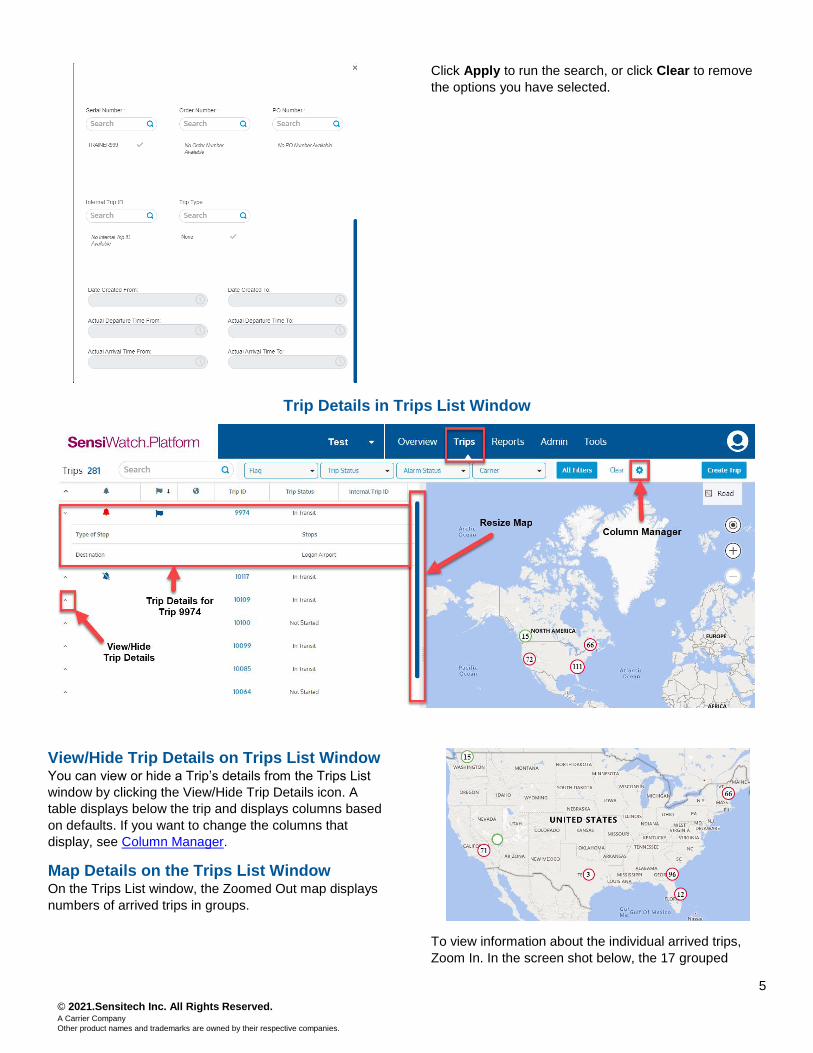
Click Apply to run the search, or click Clear to remove
the options you have selected.
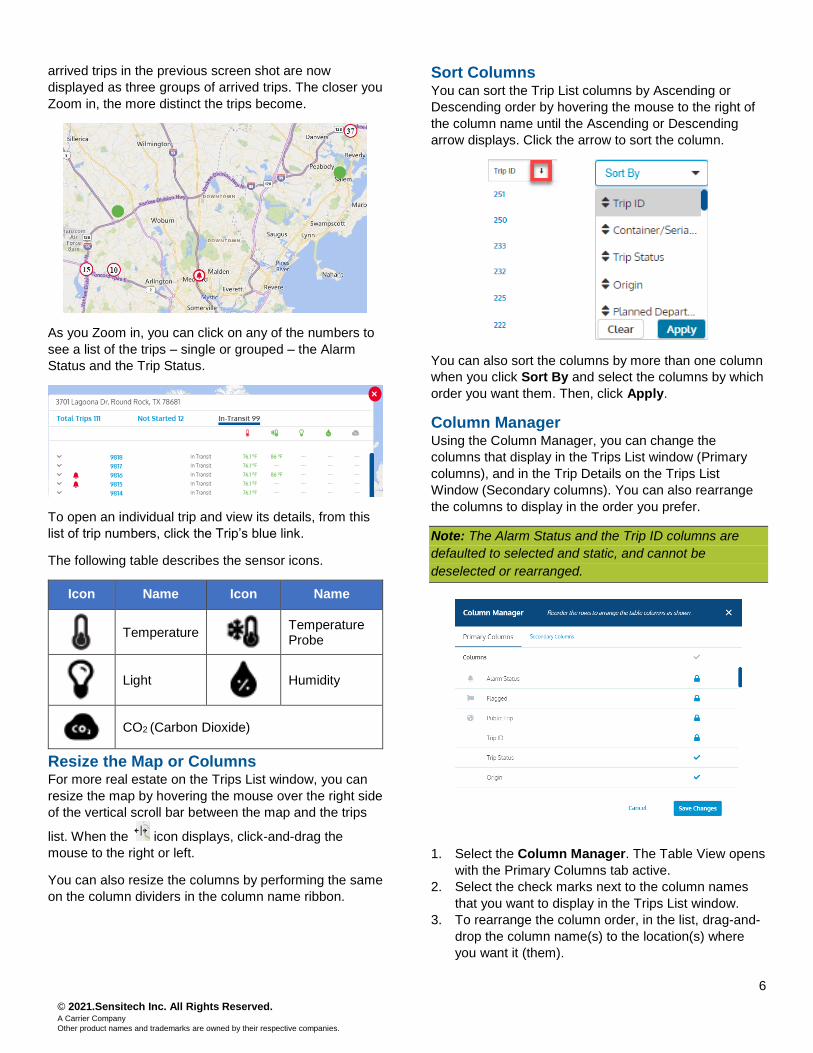
Trip Details in Trips List Window
View/Hide Trip Details on Trips List Window You can view or hide a Trip’s details from the Trips List
window by clicking the View/Hide Trip Details icon. A
table displays below the trip and displays columns based
on defaults. If you want to change the columns that
display, see Column Manager.
Map Details on the Trips List Window On the Trips List window, the Zoomed Out map displays
numbers of arrived trips in groups.
To view information about the individual arrived trips,
Zoom In. In the screen shot below, the 17 grouped
6
© 2021.Sensitech Inc. All Rights Reserved. A Carrier Company
Other product names and trademarks are owned by their respective companies.
arrived trips in the previous screen shot are now
displayed as three groups of arrived trips. The closer you
Zoom in, the more distinct the trips become.
As you Zoom in, you can click on any of the numbers to
see a list of the trips – single or grouped – the Alarm
Status and the Trip Status.
To open an individual trip and view its details, from this
list of trip numbers, click the Trip’s blue link.
The following table describes the sensor icons.
Icon Name Icon Name
Temperature
Temperature Probe
Light
Humidity
CO2 (Carbon Dioxide)
Resize the Map or Columns For more real estate on the Trips List window, you can
resize the map by hovering the mouse over the right side
of the vertical scroll bar between the map and the trips
list. When the icon displays, click-and-drag the
mouse to the right or left.
You can also resize the columns by performing the same
on the column dividers in the column name ribbon.
Sort Columns You can sort the Trip List columns by Ascending or
Descending order by hovering the mouse to the right of
the column name until the Ascending or Descending
arrow displays. Click the arrow to sort the column.
You can also sort the columns by more than one column
when you click Sort By and select the columns by which
order you want them. Then, click Apply.
Column Manager Using the Column Manager, you can change the
columns that display in the Trips List window (Primary
columns), and in the Trip Details on the Trips List
Window (Secondary columns). You can also rearrange
the columns to display in the order you prefer.
Note: The Alarm Status and the Trip ID columns are
defaulted to selected and static, and cannot be
deselected or rearranged.
1. Select the Column Manager. The Table View opens
with the Primary Columns tab active.
2. Select the check marks next to the column names
that you want to display in the Trips List window.
3. To rearrange the column order, in the list, drag-and-
drop the column name(s) to the location(s) where
you want it (them).
7
© 2021.Sensitech Inc. All Rights Reserved. A Carrier Company
Other product names and trademarks are owned by their respective companies.
4. If you want to display different columns on the Trips
List window when you click the View/Hide icon to
view a specific trip’s details within the table, then
from the Secondary Columns tab, perform the
same steps.
5. Click Save Changes. When you log out of
SensiWatch Platform and back in again, the column
changes that you made are retained.
View Trip Details To view Trip Details, from the Trips window, in the Trip
ID column, click the link of Trip you want to view. The
Trip Information displays in the left pane, and the Map,
Sensor Graph, and Excursions display in the right pane.
The following table describes the icons on the Trip
Information pane.
Icon Name Icon Name
Alarmed
Alarm
Alarm-Arrived
Alarm-Arrived Acknowledge
Acknowledge
Acknowledged Alarm
Origin
Active Stop
Current Location
Destination
Stop
No Alarm
Trip Information Tab Scroll to the bottom of the Trip Details window to view
the Trip Information tab. The tab includes the following
fields: Trip ID, Status, Internal Trip ID, Actual Arrival
Time, Trip Template, Trip Type, Driver Name, Driver
Cell, Trailer ID, Carrier, Managing Carrier, Parent
Supplier, Trip Note, Created, Created By, Updated, and
Updated By.
Origins and Stops Tab Click the Origins and Stops tab to view the following
information.
Container Tab Click the Container tab to view the following information.
View Map Data Points On the Trip Details map, hover the mouse over any data
point to view the information about that data point.

© 2021.Sensitech Inc. All Rights Reserved.
A Carrier Company.
Rev 50
Trip Details Window

© 2021.Sensitech Inc. All Rights Reserved.
A Carrier Company.
Rev 50
View Zones and Monitors If there is more than one zone or monitor for the trip, the
View All button displays. Click View All to see the list of
zone and monitor detail.
Acknowledge an Alarm On the Trip Details window, type your comments in the
text field and click Acknowledge.
Print Trip Details To print Trip details, from the Actions menu, select
Print. The option Print All Trip Information and Data is
the default.
Trip Details do not change when you filter or zoom, and
you cannot save the filters or zoomed data. However, if
you have used filters and/or zoomed map settings, you
can select the option Print with Graph Filters and Map
Zoom Settings to print them.
You can also type Notes to display in the Trip Note field
on the printed Trip Details.
Note: You can also print Trip Details by clicking the
Print icon to the left the Actions menu.
Edit an Alarm You can edit an alarm (enter Comments), then Save.
Note: The fields and options that display on each
window depend upon your Role. Therefore, you may or
may not see the fields and options on any given window.
View Multigraph Data Points Hover the mouse over any point on the Multigraph X-
axis to view the data. Note that the Segment Names
display both in the data points and on the timeline below
the Multigraph.
Clicking a Segment Name zooms the graph to display
only that segment data. Excursion icons display on the
segment timeline at the point that the excursion
occurred.
10
© 2021.Sensitech Inc. All Rights Reserved. A Carrier Company
Other product names and trademarks are owned by their respective companies.
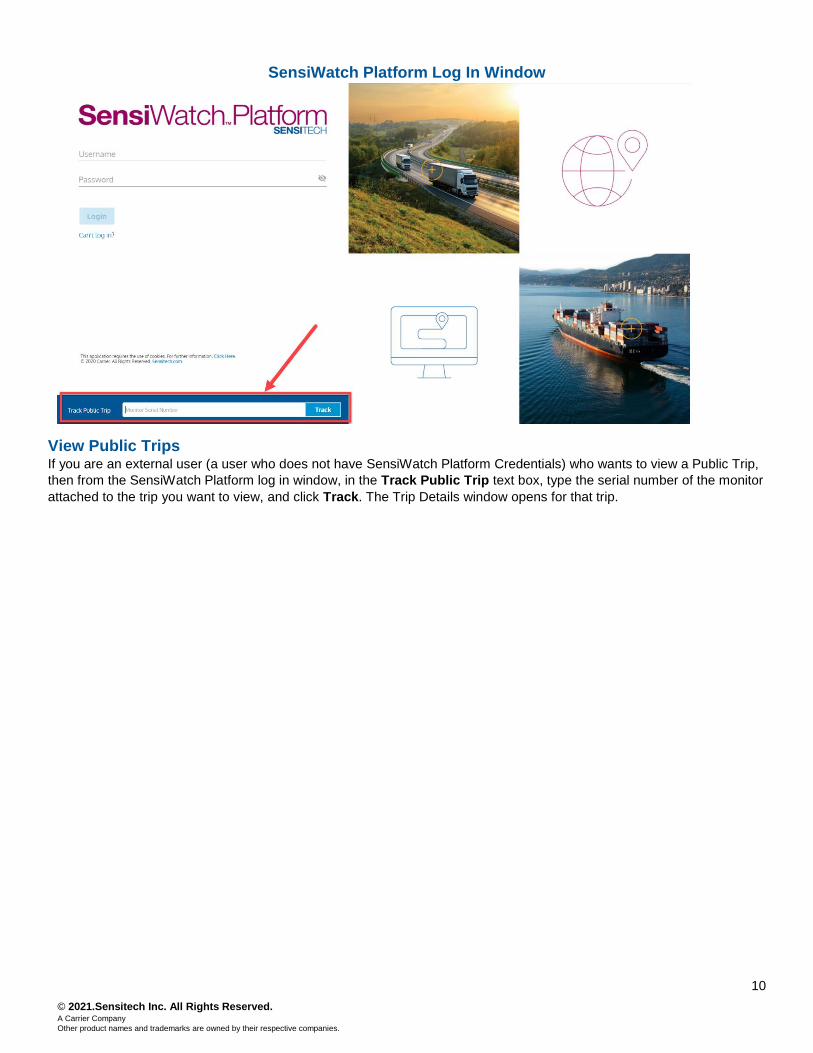
SensiWatch Platform Log In Window
View Public Trips If you are an external user (a user who does not have SensiWatch Platform Credentials) who wants to view a Public Trip,
then from the SensiWatch Platform log in window, in the Track Public Trip text box, type the serial number of the monitor
attached to the trip you want to view, and click Track. The Trip Details window opens for that trip.