servicenow resource request process user guide - bu.edu · 2 resource request process flow...
TRANSCRIPT

Pisaturo, Ralph
BOSTON UNIVERSITY
SERVICENOW RESOURCE REQUEST PROCESS USER GUIDE

1
Contents Resource Request Process Flow.................................................................................................................... 2
How to create a resource request, or plan - Role Project Manager ............................................................. 3
How to Change a Resource Plan After it has Been Requested –Role Project Manager ............................... 7
Making small changes ............................................................................................................................... 7
Increasing overall Resource Request ........................................................................................................ 7
Re-planning Resource Plan ....................................................................................................................... 7
Make a change prior to the request being allocated ............................................................................ 7
Make a change after the request has been allocated, and before the start date ................................ 7
Make a change after the request has been allocated, and after the start date ................................... 8
Soft Booking or Confirming a Resource Plan – Role Resource Manager ...................................................... 8
Hard Booking or Allocating a Resource Plan – Role Resource Manager .................................................... 10
Adjusting Allocations – Role Resource Manager ........................................................................................ 11
Adding an Additional Resource to the Plan ........................................................................................ 11
Adjusting Monthly or Weekly Allocations........................................................................................... 11
Adjusting Daily Allocations .................................................................................................................. 12
2
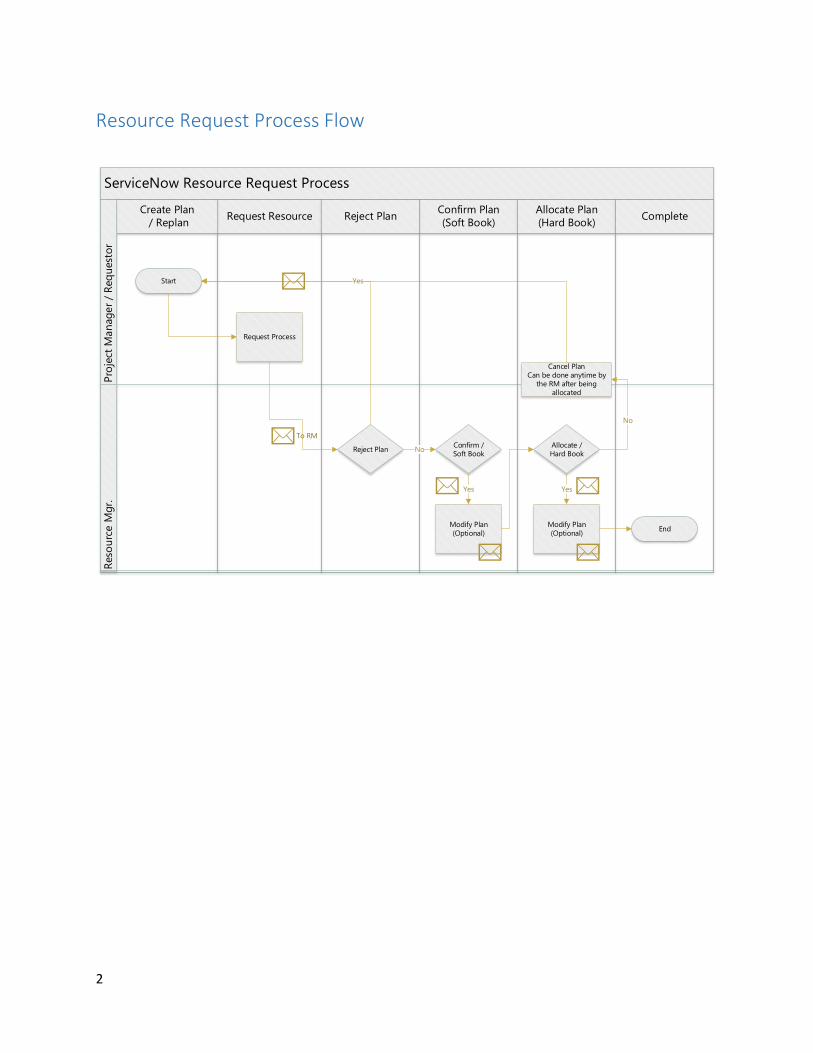
Resource Request Process Flow
ServiceNow Resource Request Process
Request ResourceConfirm Plan
(Soft Book)
Allocate Plan
(Hard Book)Reject Plan
Create Plan
/ ReplanComplete
Pro
ject
Man
ag
er
/ R
eq
uest
or
Reso
urc
e M
gr.
Start
Reject Plan
Request Process
End
Yes
Confirm /
Soft Book
Modify Plan
(Optional)
No
Yes
Allocate /
Hard Book
Modify Plan
(Optional)
Yes
Cancel Plan
Can be done anytime by
the RM after being
allocated
No
To RM

3
How to create a resource request, or plan - Role Project Manager
Requests should be per Role and per date period.
1. Go to the home form of the project for which you want to create the request.
2. Scroll down to the related lists at the bottom of the form and select the “Resource Plan” related
list.
3. Click “New” to create a new resource plan

4
4. Enter the “Resource Plan” information.
Note that you can request more than one resource in the same role for the same time period.
Select “Group Resource” as
the “Resource Type”
Enter the Resource Group
Select “Any Member”
Select the Role the
resource will fulfill on the
project
Select Hours or FTE,
whichever you prefer. The
system will calculate one to
the other for you.
If you selected hours, enter
the number of hours that
you will need the resource
for the date period. If you
selected FTE enter the
percent FTE needed.
1 = 100%, 0.5 – 50%, etc.
Enter the name of the
individual that should
receive notifications. The
default is you.
Enter any relevant notes
such as required skills, etc.

5
5. Save your “Resource Plan”
Upon saving your Resource Plan, monthly or weekly requested allocations will be calculated and
appear at the bottom on the Resource Plan. You should now review your allocation requests.
The default name will be
“Plan#, Project Name,
Role”. You can change it
but do so after you enter
the role and save or the
system will revert to the
default name.
Keep the default task as
this will ensure the
resource plan remains tied
to the project.
The start and end dates will
default to the start and end
dates of the project.
Change them as needed to
reflect when the resource
is required.
Selecting monthly will
allow you to adjust your
request/ plan on a monthly
basis. Select weekly if you
need to adjust your plan on
a weekly basis.
Select an “Even”
“Allocation Spread”. This
will evenly spread your
hours or FTE across all
months.

6
6. You can adjust your plan by clicking in either the Hour or FTE cell for the month that you want to
change and enter a new value. In the case below the resource is only needed for 10 hours in the
first month. The FTE will be calculated if you enter hours. Note that the system will not
rebalance your totals. If you edit the row detail of your request it will affect the overall request.
Caution – if you change the requested dates, FTE / Hours, or allocation type (weekly /
monthly) in the top form your allocation adjustments will revert back to an even spread.
7. After you are happy with your resource allocation requests click “Request”. An email will be sent
to the resource manager of the group indicating that there is a new Resource Plan to be
addressed.
7
How to Change a Resource Plan After it has Been Requested –Role
Project Manager
Making small changes If you want to make a “small” change to your resource plan, such as changing one or two moths
up or down simply add a note to the resource plan requesting that the Resource Manager adjust
the plan. This will send an email notification to the RM with the content of your note.
It’s always a good idea to follow up your note with a brief conversation with the Resource
Manager.
Increasing overall Resource Request If you need to increase your requested allocations across the board, or extend the date the
resource will be needed. It is best to leave the current resource plan as it is and create a new
plan requesting the incremental resource increase. See below for how to copy a resource plan.
Re-planning Resource Plan The resource manager can make changes to the plan and allocations on the project manager’s
behalf. If you prefer to, or need to re work the entire plan the approach will be different based
on the state of the plan, see below.
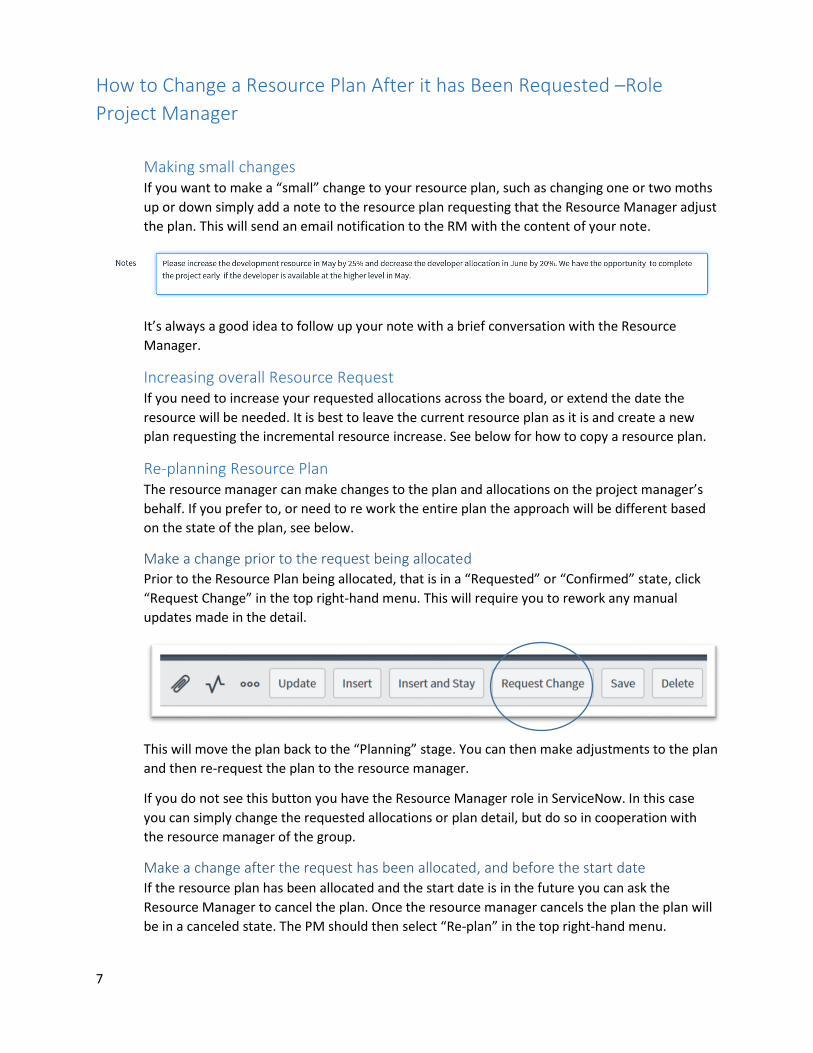
Make a change prior to the request being allocated Prior to the Resource Plan being allocated, that is in a “Requested” or “Confirmed” state, click
“Request Change” in the top right-hand menu. This will require you to rework any manual
updates made in the detail.
This will move the plan back to the “Planning” stage. You can then make adjustments to the plan
and then re-request the plan to the resource manager.
If you do not see this button you have the Resource Manager role in ServiceNow. In this case
you can simply change the requested allocations or plan detail, but do so in cooperation with
the resource manager of the group.
Make a change after the request has been allocated, and before the start date If the resource plan has been allocated and the start date is in the future you can ask the
Resource Manager to cancel the plan. Once the resource manager cancels the plan the plan will
be in a canceled state. The PM should then select “Re-plan” in the top right-hand menu.

8
This will move the plan back to the “Planning” stage. You can then make adjustments to the plan
and then resubmit the plan to the resource manager.
Make a change after the request has been allocated, and after the start date After the start date of the plan is in the past you will need to ask the Resource Manager to
cancel the plan. Once the resource manager cancels the plan the plan will be in a canceled state.
You can then make a copy of the plan by clicking the “Copy Resource Plan” under the related
links. Then go to the copied plan via the link that will appere at the top of the canceled resource
plan
Soft Booking or Confirming a Resource Plan – Role Resource Manager
1. To confirm or soft book a resource plan change the Members Preference to “Specific Members”
2. Select the resource or resources that will be fulfilling the request. If you select more than one
resource the hours / FTE will be spread evenly between the resources.

9
3. Click “Confirm”
4. Upon clicking “Confirm” the system will create a “Resource Allocation” for each “Resource
Request”, one per month if “Allocation Type” is set to monthly, one per week if “Allocation
Type” is set to weekly.
5. You can adjust your plan by clicking in either the Hour or FTE cell for the month that you want to
change and enter a new value. In the case below the resource is only available for 40 hours in
the second month due to a planned vacation.
a. Note the FTE will be calculated if you enter hours and hours will be calculated if you
enter FTE
b. Note that the system will not rebalance your totals. If you edit the row detail of your
request it will affect the overall request.
Caution – if you change the requested dates, FTE / Hours, or allocation type (weekly /
monthly) in the top form your allocation adjustments will revert back to an even spread.
Requested Allocations are
transferred to Resource
Allocations

10
If you do adjust the allocations it is recommended that you enter a note into the notes field to
inform the Project Manager of the changes. Upon clicking Save or Update a notification will be
sent to the Project Manager with the contents of your note.
Hard Booking or Allocating a Resource Plan – Role Resource Manager
1. Click “Allocate”
This will change your Resource Allocation to a “Hard” “Booking Type”

11
Adjusting Allocations – Role Resource Manager
Adding an Additional Resource to the Plan
The resource manager can add a resource to the plan. For example if you want to split the work
between resources you have that ability. Assuming that the plan has been confirmed and you determine
that you no longer have a single resource that can fulfill the request. To add a resource to the plan…
1. Click on the Member list icon and add a second developer.
This will reset the plan to the requested state. At this point you can simply confirm the plan again. This
will evenly split the requested allocations between the two resources.
Adjusting Monthly or Weekly Allocations Assuming you want to further adjust the resource plan you can do so by adjusting at the individual
allocation level, either monthly or weekly depending on what “Allocation Type” the Project Manger
selected. In this case say that you don’t want to split the work between two resources during the first
month of the project because the PM only requested .5 of a resource during the first month. To make
this change…

12
2. Click into the requested hours and add the number of hours to “Requested Hours” so that all
hours are allocated to the resource who will work on the project in month 1.
3. You can then subtract those hours from the second resource
Note that you cannot adjust an allocation once the allocation start date is in the past. However, if you
want to adjust the balance of a month once the month has begun you can drill down to the daily
allocation level and adjust the allocation for the future days in the month. To do this…
Adjusting Daily Allocations
1. Click on the Allocation number
2. You can then click on the any individual daily allocation and make a change

13
To change a series of allocations click on the cell you would like to change, hold down the control key
and then click on the same cell in the other allocations you would like to change. This will highlight all
the cells you want to change. Then release the control key, click into any of the cells you want to change.
Changing this one cell will update all highlighted cells.