sewing patterns - static-sympoz.s3.amazonaws.com · supplies ~ matching ˜read ~ sewing machine...
TRANSCRIPT

Supplies~ Matching �read~ Sewing Machine zipper foot~ 2 - 6 1/2” quilt blocks~ 1/3 yard background fabric ~ 1/3 yard Print Fabric~ 1/3 yard Fusible Fleece~ 1/3 yard light weight interfacing - I used Pellon SF101~ 12" coil Zipper
Cut~ From the Background fabric:2 - 1 1/4" x 10 1/2",4 - 2 1/2" x 6 1/2"
~Print Fabric2 - 4 1/2” x 10 1/2" Bottom of bag2 - 10 1/2" x 11 1/4" Lining 2 - 3" x 1" Zipper Tab1 - 10 1/2” x 10 1/2” Lining Pocket
~Fusible Fleece2 - 10 1/2" x 11 1/4"
~Light Weight Interfacing2 - 10 1/2" x 11 1/4"
�is roomy pouch is perfect to keep your sewing notions and smallsewing projects at hand. It is large enough to stow a 4” embroidery hoop for
hand embroidery projects. An inside pocket holds notions and scissors.
A 6 1/2” quilt block is the focal point. Use an orphan block or make a special sewing themed block for your pouch.You can �nd the “Stitching Fashion” block at �eSplendidSampler.com during 2016.
In 2017 you can �nd “Stitching Fashion” in the book “�e Splendid Sampler” by Martingale Press.
Charise CreatesSewing Patterns
Splendid Notions Pouch
Finished Size9 1/2” wide at top x 9 1/2” high
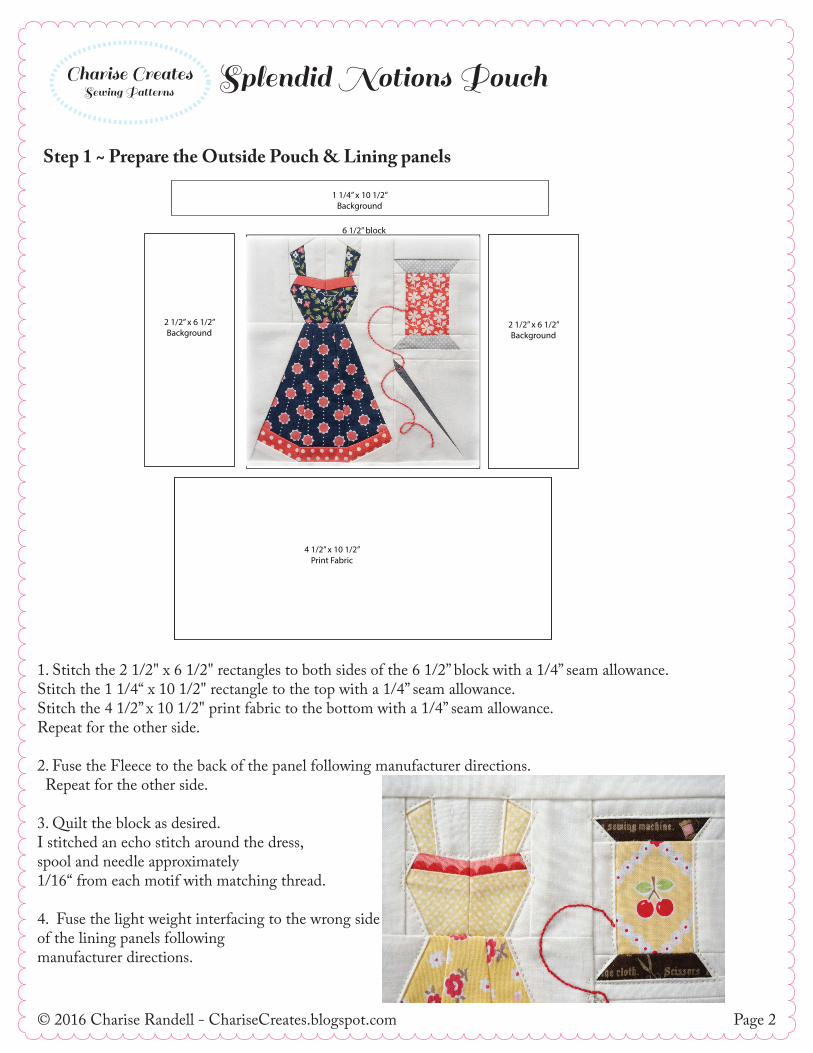
Step 1 ~ Prepare the Outside Pouch & Lining panels
1. Stitch the 2 1/2" x 6 1/2" rectangles to both sides of the 6 1/2” block with a 1/4” seam allowance.Stitch the 1 1/4“ x 10 1/2" rectangle to the top with a 1/4” seam allowance.Stitch the 4 1/2” x 10 1/2" print fabric to the bottom with a 1/4” seam allowance.Repeat for the other side.
2. Fuse the Fleece to the back of the panel following manufacturer directions. Repeat for the other side.
3. Quilt the block as desired. I stitched an echo stitch around the dress, spool and needle approximately1/16“ from each motif with matching thread.
4. Fuse the light weight interfacing to the wrong side of the lining panels followingmanufacturer directions.
1 1/4” x 10 1/2”Background
2 1/2” x 6 1/2”Background
2 1/2” x 6 1/2”Background
6 1/2” block
4 1/2” x 10 1/2”Print Fabric
Charise CreatesSewing Patterns
© 2016 Charise Randell - ChariseCreates.blogspot.com Page 2
Splendid Notions Pouch

© 2016 Charise Randell - ChariseCreates.blogspot.com Page 3
Step 2 ~ Create the lining pocket
5. Fold the 10 1/2” x 10 1/2” square right sides together, matching the raw edges.Stitch the long edge with a 1/4” seam allowance. Press seam open. Turn right side out. Press.
6. Place the pocket 2 1/2” from the top edge of a lining panel. Baste along the vertical sides 1/4” from the raw edge.Edgestitch the bottom.
Stitch a vertical line in the center of the pocket back tacking at ends.
Step 3 ~ Attach the Zipper
7. Measure the zipper and trim to 10 1/2” including the zipper tape.
8. Fold under the short ends ¼” towards the wrong side. Press. Press in half with the wrong sides together.
9. Butt the end of the zipper to the fold on the tab. Pin in place. Stitch the folded edge with an edgestitch.Repeat for the other side.
Fold
Raw Edge
Charise CreatesSewing Patterns
Baste Baste
2 1/2”
Splendid Notions Pouch

Cut~ From the Background fabric:2 - 1 1/4" x 10 1/2",4 - 2 1/2" x 6 1/2"
~Print Fabric2 - 4 1/2” x 10 1/2" Bottom of bag2 - 10 1/2" x 11 1/4" Lining 2 - 3" x 1" Zipper Tab1 - 10 1/2” x 10 1/2” Lining Pocket
~Fusible Fleece2 - 10 1/2" x 11 1/4"
~Light Weight Interfacing2 - 10 1/2" x 11 1/4"
© 2016 Charise Randell - ChariseCreates.blogspot.com Page 4
Charise CreatesSewing Patterns
Splendid Notions Pouch
10. Place zipper face down on the right side of the Pouch Panel at the top edge. Place the long edge of the zipper tape matching the top edge of the Pouch Panel and Pin in place.
11. Attach the zipper foot to your sewing machine. Stitch 1/4” away from the raw edge, starting and stopping 3/8” from the side edge, back tacking at ends.
3/8” 3/8”
13. Turn the lining over the zipper. �e wrong side of the Pouch Panel will be facing the wrong side of the Lining. Press both panels away from the zipper. Top stitch along the top edge, ¼” away from the top edge, stopping and starting 3/8” from side edge, back tacking at ends. Repeat for the other side.
12. Place the lining right sides with the right side of the Pouch Panel. �e zipper will be sandwiched in between the Pouch Panel and the Lining. Pin the lining in place along top edge.With the Pouch Panel, wrong side, facing you, stitch1/4” from the raw edge, follow the stitching that attaches the zipper to the Pouch Panel.
Lining Wrong side
Match rawedges
Pouch Panel
Step 3 ~ Attach the Zipper, Continued
3/8” 3/8”
© 2016 Charise Randell - ChariseCreates.blogspot.com
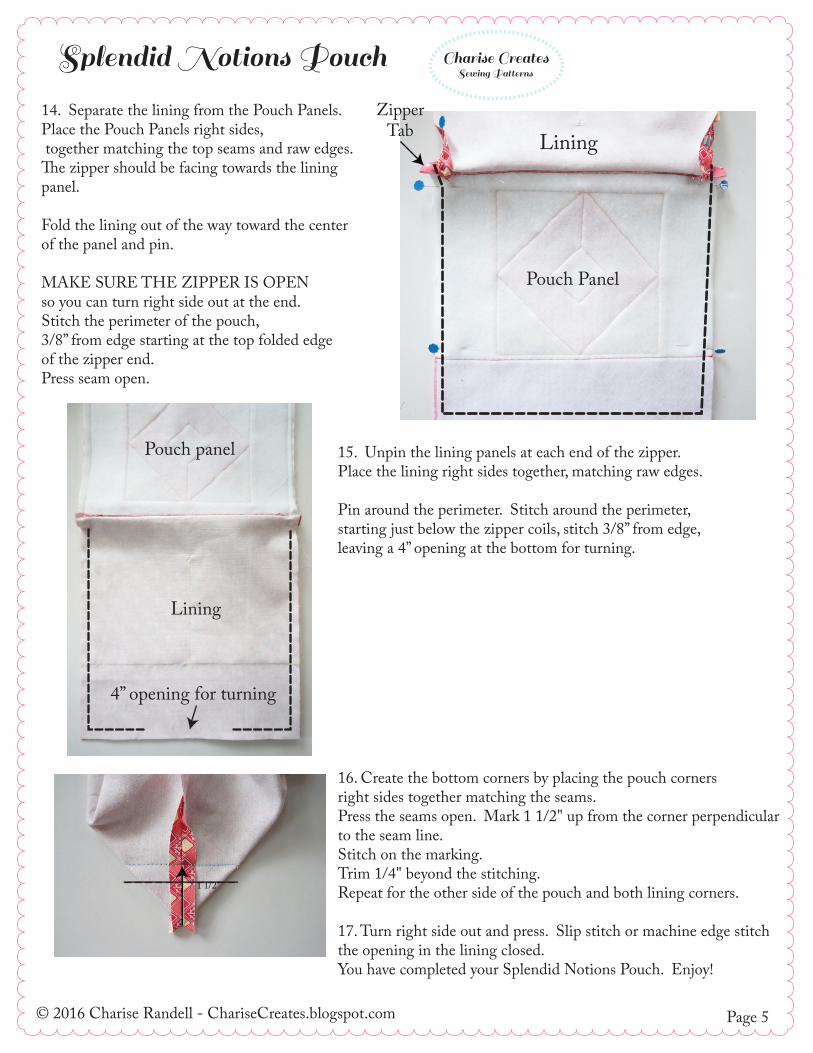
14. Separate the lining from the Pouch Panels. Place the Pouch Panels right sides, together matching the top seams and raw edges. �e zipper should be facing towards the liningpanel.
Fold the lining out of the way toward the center of the panel and pin. MAKE SURE THE ZIPPER IS OPEN so you can turn right side out at the end.Stitch the perimeter of the pouch, 3/8” from edge starting at the top folded edge of the zipper end. Press seam open.
15. Unpin the lining panels at each end of the zipper. Place the lining right sides together, matching raw edges.
Pin around the perimeter. Stitch around the perimeter, starting just below the zipper coils, stitch 3/8” from edge,leaving a 4” opening at the bottom for turning.
16. Create the bottom corners by placing the pouch corners right sides together matching the seams. Press the seams open. Mark 1 1/2" up from the corner perpendicularto the seam line. Stitch on the marking. Trim 1/4" beyond the stitching. Repeat for the other side of the pouch and both lining corners.
17. Turn right side out and press. Slip stitch or machine edge stitch the opening in the lining closed.You have completed your Splendid Notions Pouch. Enjoy!
Page 5
Charise CreatesSewing Patterns
Splendid Notions Pouch
LiningZipper
Tab
Pouch panel
Lining
1 1/2”
4” opening for turning
Pouch Panel