sharepoint 3.0 quick user guide
TRANSCRIPT
SharePoint 3.0 Quick User Guide
Contact Information: IT/Educational Technology
915-545-6421 Jose Lopez, Ext. 289, Section Manager
Hortencia Romero, Ext. 265, Senior Analyst Veronica Fernandez, Ext. 240, Senior Analyst
Rosie Sanchez, Ext. 235, Senior Analyst Abdiel Landeros, Ext 241, Prog/Analyst II

SHARE POINT 3.0 MANUAL
This document contains the basic instructions on how to access Share Point 3.0, and how to
view and upload documents. Note: The only people that can access SharePoint are the
Content Manager and Administrators that have permissions from the SharePoint Administrator.
There are two means to access SharePoint: You may use the following URL:
https://sharepoint.ttuhsc.edu/sites/TTUHSC/elpaso/dme/default.aspx or click on
http://www.ttuhsc.edu/elpaso/ and select El Paso Administration, Items of General
Interest, and Curriculum Development SharePoint Main site.
If you have access to SharePoint, you will be asked to enter your eRaider and Password.
Enter your eRaider
beginning with
TTUHSC\username and
password

The main SharePoint home page.
These are the four main
Courses
Various Links for Information Add Links
Other Links
for various
locations in
SharePoint

This menu will direct you to
all the working areas. The
first on the list is “View All
Site Content”.
This menu reflects all
locations within
SharePoint.

When you select the Department of Medical Education, you are able to view Courses,
Announcements, and Links. In this section, you are able to upload documents and navigate
throughout the site.
There are
numerous Links
under each
Course:

Documents: Library of folders related to the Course.
Shared Documents: Various documents related to the Course
Units: All Units related to the Course.
When you select Documents, Shared Documents, or Units, you are able to Insert New
Document, Upload Document, Actions for interface with other applications, and Settings
for your preference on viewing your screen.
To return to the home page of the Main Menu, select Home at the top of the left menu. To
return to the main Share Point site select Department of Medical Education at the top of the
window.

To Log-out, point to the top right corner Welcome Last Name, First Name select the down
arrow and view your selections.

STEPS TO CHECK IN AND CHECK OUT A SPREADSHEET IN SHAREPOINT
1. Select the
“Document
Content
Spreadsheet
“link
2. Select
“Shared
Documents”

The screen below shows the first clinical presentations with the dropdown menu. Click on the
scroll down menu and select Check out.
3. Select
the Unit
folder you
want to
check out
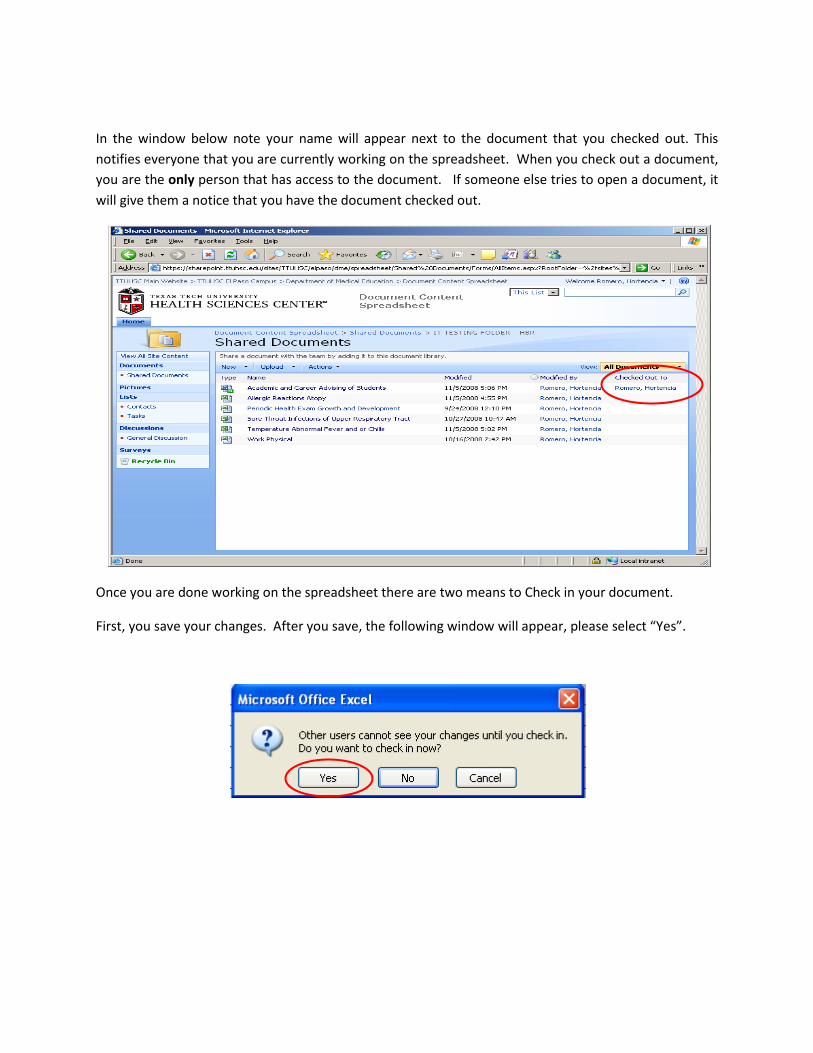
In the window below note your name will appear next to the document that you checked out. This
notifies everyone that you are currently working on the spreadsheet. When you check out a document,
you are the only person that has access to the document. If someone else tries to open a document, it
will give them a notice that you have the document checked out.
Once you are done working on the spreadsheet there are two means to Check in your document.
First, you save your changes. After you save, the following window will appear, please select “Yes”.
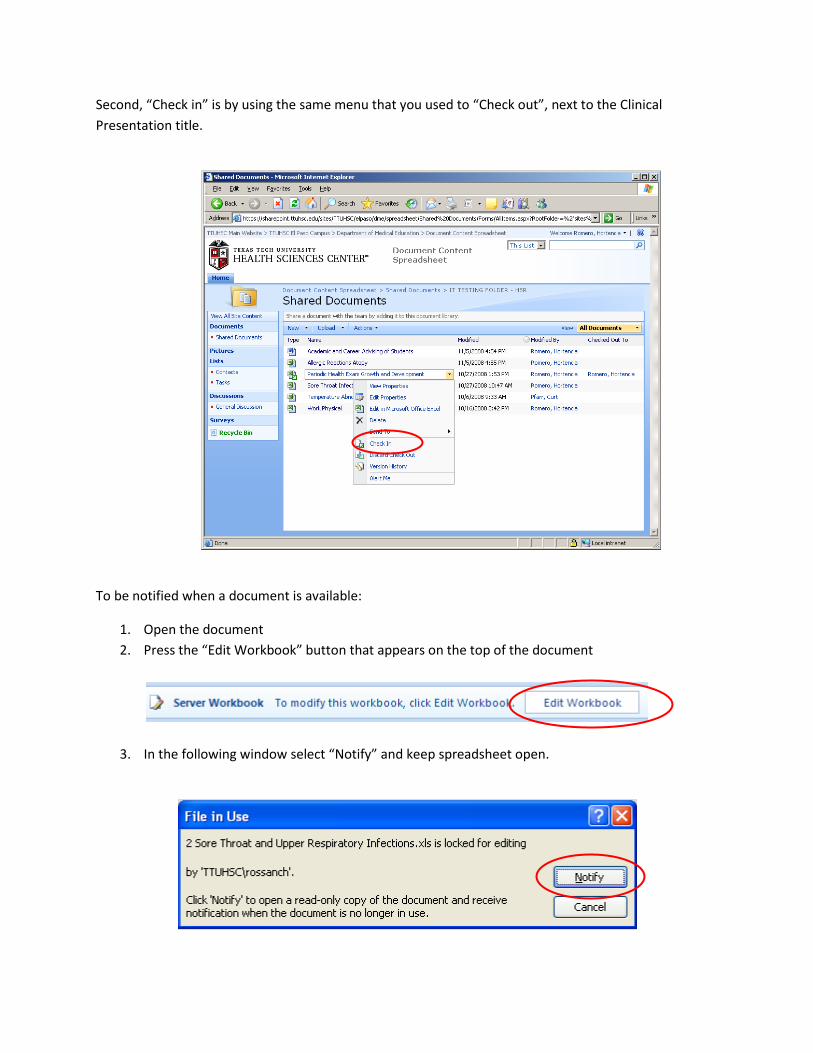
Second, “Check in” is by using the same menu that you used to “Check out”, next to the Clinical
Presentation title.
To be notified when a document is available:
1. Open the document
2. Press the “Edit Workbook” button that appears on the top of the document
3. In the following window select “Notify” and keep spreadsheet open.

Once the faculty that was working with the spreadsheet is done and the document is checked-in, you
are going to receive the following message. Please select cancel at this time and close the document to
prevent overwriting of the spreadsheet.