shiitake booklet sare
DESCRIPTION
Shiitake Booklet SARETRANSCRIPT

16
UVM Extension helps individuals and communities put
research-based knowledge to work.
Issued in furtherance of Cooperative Extension work,
Acts of May 8 and June 30, 1914, in cooperation with
the United States Department of Agriculture. University
of Vermont Extension, Burlington, Vermont.
University of Vermont Extension, and U.S. Department of
Agriculture, cooperating, offer education and employ-
ment to everyone without regard to race, color, national
origin, gender, religion, age, disability, political beliefs,
sexual orientation, and marital or familial status.
If you require accommodations to participate in this
program, please let Ben Waterman (802-656-9142 )
know by July 1, 2011 so we may assist you.
Cornell University provides equal program,
employment and education opportunities.
Shiitake Form: fleshy convex cap, slightly tough stalk,
Color: light to dark brown cap, creamy white gills, light brown stem
Best grown on: hardwoods like oak, maple, ironwood
Spawn form available: plug, grain, sawdust
Average size at harvest: 3-6 inch diameter cap, 2-4 inch stalk
Odor/flavor: robust, earthy
Does it grow wild in the United States: No
BACKGROUND:
The origins of Shiitake cultivation have been traced back thousands
of years to Japan. People often found these mushrooms growing on
downed 'shii' trees (this is where the mushroom got its name). People
would take the mushroom-clad logs, place them next to logs without
mushrooms and simply wait for the wind to disperse the spores.
Thankfully since then, alot of research in Japan and China has gone
into Shiitake-growing techniques, and we don't have to wait for the
wind anymore. In fact, Shiitake is the second most produced
mushroom in the world, following the common button mushroom.
Shiitake Mushroom Cultivation
2011 INTRODUCTORY GROWER’S
Cultivation of shiitake mushrooms is a fairly
simply process. This guise will help you plan
for an effective cultivation experience and give
you some insight before you have the logs out
and ready to grow mushrooms. Keep in mind
that this process is slightly different for each
grower an will benefit from personal
adjustments as your become a more
accomplished grower. Here is how we do it
and some advice we learned along the way.
ABOUT SHIITAKE (LENTINULA EDODES)
© Nicholas Laskovski—Dana Forest Farm

2
Choosing a Laying Yard
Before you begin, think about where you are going to keep all the logs once
they are inoculated with mushroom spawn. This will become the ‗laying
yard‘: the place where the logs are incubated and routine ―maintenance‖ is
performed. The logs usually remain in the laying yard for the rest of their
productive lifetime, which includes both fruiting and harvest.
Year-round shade (60-100%) and high humidity
Almost nothing is more important that laying (incubating) the logs
under year round shade in order to keep the logs from drying out
due to sun and wind. A laying yard beneath the canopy of a coniferous
forest is best. A deciduous canopy will suffice but it will be necessary to
protect the logs with 80% shade cloth or pine boughs during the winter.
Access and Relative Location
Ideally the laying yard should be assessable by a vehicle or tractor
and close to your home/farm. You should also consider its proximity to
electric (necessary to inoculate the logs) and water (necessary to irrigate
and soak the logs). You do not want to place a laying yard in any location
that necessities carrying the log over any great distance.
Proximity to Water and Water Source
A water source is necessary for forced fruiting (shocking) as well
as for maintaining a threshold moisture level in the logs. Take
into consideration how close and convenient each possible water source is.
Particularly think about moving materials through the laying yard and
common use patterns. If there is a dry spell and the logs must be wetted to
maintain moisture levels, logs may be submerged under water or
dampened under a sprinkler. It is critical that the moisture content of the
logs does not fall below a threshold level necessary for the survival of the
mycelium. Logs typically begin at about 40 -45 % moisture content and
should not drop below 25%. Ideally the water should come from a well or
stream (chlorinated public water will harm the mycelium), cool, and clean.
Other important aspects of the laying yard include slope,
microclimate, and accessibility. The slope and microclimate of the
laying yard will affect how you lay the logs. For example, if it is a site with
lots of exposure to wind, one may choose to lay logs closer together to
maintain log moisture.
IMPORTANT FACTOR TO CONSIDER
15
Materials Checklist: Outdoor Shiitake Cultivation
Access to water for force fruiting.
A cultivation area with modest shade and protection from wind.
Hardwood logs cut from healthy saplings or pole-size trees, or
from tops of larger trees.
Spawn and plunging tool: (Spawn and the following supplies
can be purchased from professional supplier.)
Cheese wax: For sealing spawn.
Daubers: For applying cheese wax.
Very high speed drill, available from professional suppliers. If
you only purchase one piece of equipment, it should be the
highest speed drill you can find.
Appropriate drill bits.
Who is doing what and when?
Tree selection and harvesting logs (Winter and Spring of Year 1)
Inoculation and stacking (Spring of Year 1)
Laying yard maintenance (Continuous)
Mushroom harvesting (Summer and Fall Year 2)
Marketing and Sales (Summer and Fall Year 2)
Delivery/ Distribution (Summer and Fall Year 2)

14
Supplies and Estimated Costs Details provided for information and planning purchases only
COMPANIES
Field & Forest Fungi Perfecti Mushroom
People
Mycosource
Sawdust
Spawn
$18 / 2 lb
$23 / 5.5 lb
$21 / 5.5 lb
(7-10 bags)
$15.75 / 5.5 l
(11-49 bags)
$19 / 5 lb
$17.10 / 5 lb
(10-19
bags)
$19 / kg
$17 / kg
(10-19
bags)
$12 / kg
(20+ bags)
$30 / 2.5 kg
$25 / 2.5 kg
(5+ bags)
Inoculator* $35 (palm style)
$33 (thumb
style)
$34.95 (palm
style)
$27 (palm
style)
$27 (thumb
style)
Drill bit -
7/16"
$9.50 -- $9.50 $15
Depth stop -
7/16"
$1.75 -- $2.50 --
Adaptor
(for angle
grinder)
$35 -- -- $40
Drill bit -
7/16"
w/ depth stop
(for angle
grinder)
$13 -- -- $20
Adapted
angle grinder
$125 -- -- --
Cheese Wax $8.50 / 2.5 lb
$15 / 5 lb
$137.50 / 55 lb
$4.95 / 1 lb
$34.95 / 10 lb
$3.20 / 1 lb --
Wax
Applicators
$1 / 4
$30 / 144
-- $0.30 --
ELECTRONIC BALANCE: (1000g max, 1g resolution): $40-$60
ELECTRIC DRILL $40-$60 for a low-end model
ANGLE GRINDER $60 for a low-end model
3
Worksheet for Mushrooms Yard Assessment
Describe the overall site(s). Consider factors like climate, landform,
existing vegetation/wildlife, infrastructure, patterns and current uses.
Rate the site or potential sites on the following (1 worst, 5 best)
Access / Relative Location 1 2 3 4 5
Shade 1 2 3 4 5
Slope 1 2 3 4 5
Water 1 2 3 4 5
Air / Wind 1 2 3 4 5
What are 3 –5 goals for your mushroom laying yard:
Assessments help us choose species and elements that are appropriate to
the environmental conditions and also help determine where to place them
on the landscape to maximize production and minimize the expenditure of
time, energy, and resources. For example, if I am looking to design a
mushroom laying yard, good criteria include:
Reliable access to water for soaking
60 – 100% shade (year-round) and high humidity
Good ventilation/air flow
Windbreaks (to keep logs from drying out)
Good access for people and equipment
Use of marginal landscapes less ideal for other uses (sloped)

4
What Tree Species to Use
OAK
Oak is often considered the species of choice for shiitake production in
North America. Research at the Center for Agroforestry has shown that red
and white oak performed about the same as substrates for shiitake.
Because oak is a valuable timber species, forest owners who include
timber production as part of their woodland management goals may be
reluctant to cut large amounts of young oak for shiitake cultivation.
However, tops left after logging are often of an appropriate size to be used
as bolts although timing might be less than optimal for mushroom
production.
OTHER EXCELLENT SPECIES
A number of other species have been shown to be as productive at oak.
These include: American beech (Fagus grandifolia), Sugar maple (Acer
saccharum), American hornbeam (Carpinus caroliniana) and
Hophornbeam (Ostrya virginiana).
OTHER POSSIBLE OPTIONS
Other species of interest include Ash, black
walnut, chestnut, alder, elm, black locust,
tupelo (black gum), sweet gum, and
eucalyptus. Although we don‘t know how
well these species will perform, we
encourage you to try them out if the trees
are available.
WHAT NOT TO USE
Don‘t use the wood from any evergreen
tree (pine, spruce, hemlock, etc.) We also
don‘t recommend using birch (Fagaceae) .
You may also consider buying pre-cut lengths (cost $1.00 - $2.00 /
bolt). Buyers should try to purchase logs in good condition with the
bark intact, and few places of rot or scarring. Be sure to ask when
logs were cut, what the storage conditions prior to delivery or pick-up
were . Remember that if the logs were stored in the sun, the moisture
content is likely to be too low.
BUYING BOLTS
13
Ideas to Help you Develop a Market
Talk with people in your area. Get your name and business out
there so people know what you sell and how they can reach you.
Offer free samples, recipes, or pamphlets to help customers real-
ize how tasty and fun mushrooms can be.
Talk with local chefs to see it they might be interested in your
product. It‘s nice if you have some information to leave them that
has your contact info clearly visible.
Ask if they would like you to bring in sample product. Perhaps
they would like some to trial before they buy.
If certain restaurants are willing to buy particularly large quanti-
ties, consider offering a bulk discount.
Grocery stores will most likely pay lower prices than selling at oth-
er venues, but can handle a lot of product on a regular basis.
Stores that put emphasis on buying locally or eating healthy foods
are good choices for your product. At the right venue, your buyers
will be pleased to have a great product like yours that makes the
store look good to consumers.
Make sure that the mushrooms you are selling are always top
quality.
Try to be consistent with delivery times and quantities. If you
have promised a certain amount of product, make sure you have
planned that into your rotation schedule.
© Steve and Julie Rockcastle, Green Heron Growers
12
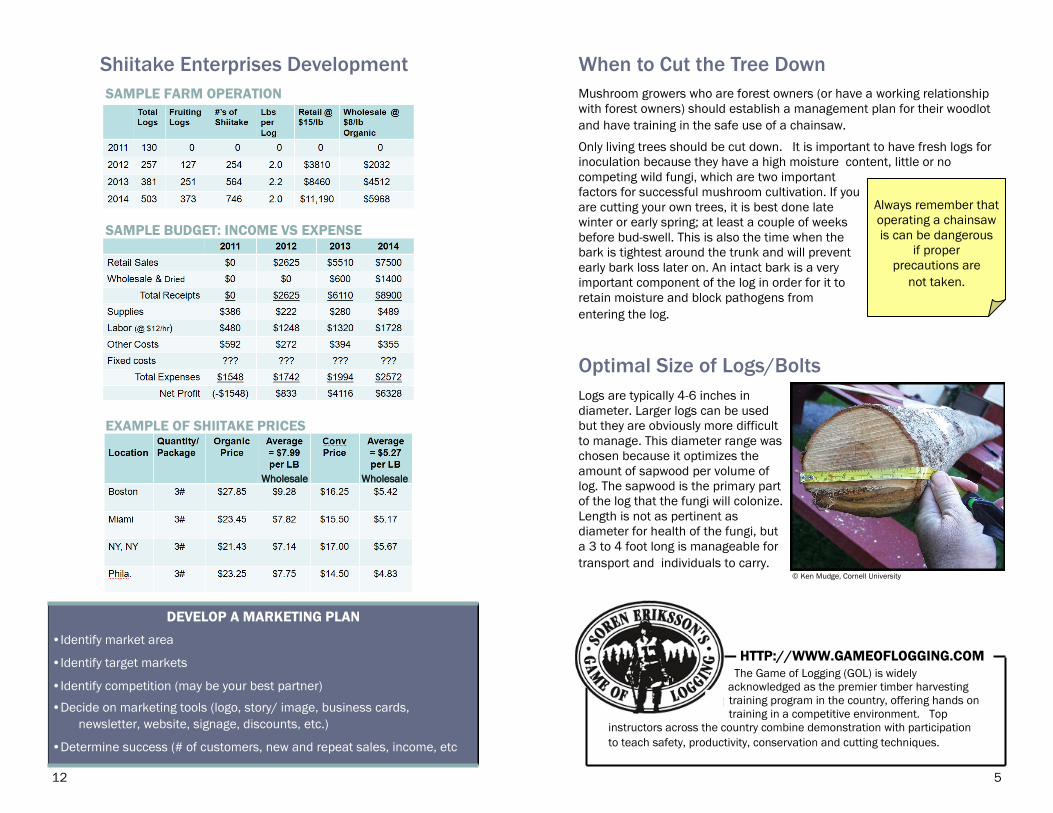
Shiitake Enterprises Development
SAMPLE BUDGET: INCOME VS EXPENSE
SAMPLE FARM OPERATION
EXAMPLE OF SHIITAKE PRICES
•Identify market area
•Identify target markets
•Identify competition (may be your best partner)
•Decide on marketing tools (logo, story/ image, business cards,
newsletter, website, signage, discounts, etc.)
•Determine success (# of customers, new and repeat sales, income, etc.)
DEVELOP A MARKETING PLAN
Wholesale Wholesale
5
When to Cut the Tree Down
Mushroom growers who are forest owners (or have a working relationship
with forest owners) should establish a management plan for their woodlot
and have training in the safe use of a chainsaw.
Only living trees should be cut down. It is important to have fresh logs for
inoculation because they have a high moisture content, little or no
competing wild fungi, which are two important
factors for successful mushroom cultivation. If you
are cutting your own trees, it is best done late
winter or early spring; at least a couple of weeks
before bud-swell. This is also the time when the
bark is tightest around the trunk and will prevent
early bark loss later on. An intact bark is a very
important component of the log in order for it to
retain moisture and block pathogens from
entering the log.
Optimal Size of Logs/Bolts
Logs are typically 4-6 inches in
diameter. Larger logs can be used
but they are obviously more difficult
to manage. This diameter range was
chosen because it optimizes the
amount of sapwood per volume of
log. The sapwood is the primary part
of the log that the fungi will colonize.
Length is not as pertinent as
diameter for health of the fungi, but
a 3 to 4 foot long is manageable for
transport and individuals to carry.
HTTP://WWW.GAMEOFLOGGING.COM
The Game of Logging (GOL) is widely
acknowledged as the premier timber harvesting
training program in the country, offering hands on
training in a competitive environment. Top
instructors across the country combine demonstration with participation
to teach safety, productivity, conservation and cutting techniques.
© Ken Mudge, Cornell University
Always remember that
operating a chainsaw
is can be dangerous
if proper
precautions are
not taken.

6
WHEN TO INOCULATE...
We recommend that the logs be stored between three to six weeks before
being inoculated. Regardless of how long you wait to inoculate, do not
store bolts in the sun. If a log is cut and left to sit for an extended period
of time before inoculation other species of fungi can invade the log or log
can dry out.
WHAT TYPE OF SPAWN TO USE
Bolts can be inoculated with sawdust spawn or of plug spawn. There are
advantages and disadvantages to each. Plug spawn is very simple to use—
the only tool needed is a hammer or mallet. The drawbacks are that plug
spawn is slightly more expensive per log than sawdust spawn, and the my-
celium may take a while to migrate out from the plug spawn.
Sawdust spawn is slightly cheaper than plug spawn, but it requires a spe-
cial tool, either purchased or home made, to insert the sawdust in the hole.
In addition to its lower cost, the mycelium contained in sawdust spawn
moves out into the log more quickly, giving somewhat faster production.
Other than that, the methods are the same between inoculating logs with
plug spawn and with sawdust spawn.
THE DOWEL INOCULATION METHOD
We recommend reviewing the video at
http://mushrooms.cals.cornell.edu/cultivation.htm
for step by step directions regarding drilling and inoculation.
Drill holes, 5/16‖ diameter, 1‘ deep, every 4 inches along the log. Ro-
tate log and repeat. To create a diamond pattern, shift the 2‖ down
along the guide for every other row. Typically 1 row of holes is drilled
for every inch of log diameter.
Place a plug (dowel) spawn in each drilled hole and hammer it into the
log. Each plug should lie just below flush with the log surface.
Inoculation of the Logs/Bolts
1 2 3
© Ken Mudge, Cornell University
11
WHEN AND HOW TO
HARVEST
It is not the size of the mush-
room that determines when it
is picked, but its growth pro-
gress. Gills should be visible
and the outer edge of the
mushroom should be slightly
curled under, but not tightly so.
If the edge has flattened out,
the mushroom is slightly over
ripe, but still edible. Shiitake
are usually ready 7 - 10 days
after shocking; colder tempera-
tures will slow growth and ideal
conditions will make it more
rapid. Using a knife is quick,
easy, and ensures a clean cut
on the stem. It also does not
rip or damage any bark.
HOW MUCH TO EXPECT
Mushroom production for a
typical log will peak the second
and third years. At this time it
is reasonable to expect 0.25-
0.5 lb per log or higher per
flush, with the goal of doing two
shockings per season.
STORING FRESH
MUSHROOMS
Never store fresh mushrooms
in a plastic bag. Use paper
bags and keep them refrigerat-
ed. Mushrooms will keep under
refrigeration for up to one
week.
© Nicholas Laskovski—Dana Forest Farm
© Steve and Julie Rockcastle, Green Heron Growers
© Steve and Julie Rockcastle, Green Heron Growers

10
In a natural production model, growers do not do anything to the mush-
room logs to make them fruit. Logs are left to fruit naturally, flushing either
when there is heavy rainfall or when a temperature change encourages
fruiting. In a forced production model, growers control when logs fruit. Logs
may sometimes also fruit naturally, (in fact, heavy rain can knock produc-
tion schedule way out of whack) but the majority of harvests are induced
according to a preplanned log rotation schedule. Because yields can be
predicted and kept relatively constant in this model, it has greater retail
potential.
SHOCKING
Shocking, or forcing, is the process used to force mycelium into fruiting
body (mushroom) production. Soaking logs in cold water for an extended
period of time is most typical means to induce fruiting. Place the logs in
the coldest water you have available. Because temperature adjustment is
not practical, we recommend a fast moving stream or tank kept out of sun.
Leave the logs submerged in the water for 12 hours. The remove the logs
from the water and stack them in an A frame conducive to the upcoming
harvest. In 3 – 5 days, the log will begin pinning, or sending up the begin-
nings of mushrooms. These will grow and develop into full-sized shiitake
mushrooms.
HOW OFTEN TO SHOCK
After fruiting, logs need to be rested for 6 - 8 weeks before being forced
again. The more often the logs are shocked, the shorter their lifetime is
likely to be. We recommend only shocking once during first production
year, then twice during year second and third.
Logs should be stacked in the laying yard so they are easily identified in
order to establish a schedule for shocking and harvesting. This plan should
take into account the number of times each log will be forced a season,
when logs will be forced, how logs will move through the laying yard, when
mushrooms are needed, when the plan predicts mushrooms will be
available, and when logs will be retired at the end of their lifetime.
Fruiting Shiitakes
7
THE SAWDUST INOCULATION
METHOD
The first step in inoculation is drilling
holes into the bolt. For sawdust-based
inoculation, use a 7/16" drill bit size and
drill to a depth of 1.25". We recommend
a drill bit with a built in drill stop; it is
better than the adjustable drill stop you
purchase in a common hardware store.
More holes are not detrimental and in fact
are likely to speed up colonization of the
log.
After the holes are drilled, it is time to
place the spawn in the holes, bringing the
shiitake mycelium in contact with its new
food source (substrate), the log. Stab the
inoculation tool into the spawn and pound
it once or twice to inject the spawn taking
care that the tool is full place the tool over
the hole and depress the plunger at the
top to compact the spawn into the hole;
the hole should be full so that the spawn
is level with or just below the surface of
the log. Repeat this process for all holes.
DRILL OR ANGLE
GRINDER?
Outfitting an angle
grinder with a drill bit
is another method of
drilling holes into the
log. (This required an
adaptor for the angle
grinder.) While
equipping an angle
grinder with a drill bit
is expensive, it is
possible to move very
quickly with this tool,
reducing the time
spent per log. They
are especially useful
for larger operations.
© Nicholas Laskovski—Dana Forest Farm

8
Waxing the holes helps seal in moisture so that the spawn does not dry out.
By sealing off the holes, the chance of contamination by competing fungi
species is reduced. During this step each hole is completely sealed using
food grade wax. Electric skillets work particularly well to
melt the wax however, you have to put a pot on the
electric skillet to hold the wax. A skillet alone is too
shallow and dangerous. They are sturdy, portable, and the
temperature control is easy. You can also heat the wax
in a pot over a portable propane or white gas stove. Wax
should be heated to 350-400 degrees (wisps of smoke).
You can apply the wax in a number of different ways. Foam paint brushes
($0.50 - $0.80 / brush) are very effective and many people already own a
foam paint brush. One inch brushes work best. These can be reused many
times (until the brush comes off of the
wooden handle). Cotton daubers
($30.00 / 144 pc = $0.21 / 1pc)) are
cheaper than foam paint brushes, these
small cotton balls on the end of a wire
handle are available from select
mushroom product suppliers. They can
be reused and are very effective.
To apply the wax, use the chosen
applicator to transfer the hot wax onto
each hole in the log. Care should be
taken to seal the hole. One dip of the
applicator should complete a few holes.
Waxing the Logs
Some growers choose to wax the ends of each mushroom log either by
dipping the log directly into the pot of melted wax or by painting each
end with a paint brush soaked in wax. Other growers choose to skip
this step. The importance of this step may vary based on climate,
which largely governs how crucial it is to strictly manage moisture
levels. Waxing the ends will keep moisture in and prevents competitive
fungi from gaining a foothold. However wax also is one of the main
production costs and the waxing process adds considerable time to the
inoculation process. A cost-benefit analysis of additional wax cost
and shiitake yield has not yet been conducted.
WAXING THE ENDS
© Ken Mudge, Cornell University
NEVER LEAVE
MELTING WAX
UNATTENDED.
WAX IS HIGHLY
FLAMMABLE.
9
CRIB STACK (RICK STACK)
Crib stacks are simple and quick to make.
First four to five logs are laid down on a flat
surface, then four to five logs are placed on
top of them in the opposite direction; the
pattern is continued for about five levels.
Crib stacks are a very space efficient way to
keep logs as they make use of vertical space,
compactly storing large numbers of logs. This
stacking method is excellent for the spawn
run period.
HIGH A-FRAME
A high A-frame consists of logs leaning upright
on one or two sides against a supporting
beam, such as a cut sapling lashed
horizontally onto two trees or a taut wire.
This stacking method works well for the
fruiting and harvest stages. Logs are well
aerated, mushrooms are easily visible, and
picking is easy as there is maximum access
to each log. Because the log is vertical, slug
damage to mushrooms may be less than
when logs are fruiting closer to the ground.
Because logs stacked in A-frames take up a
lot of space in a laying yard, they are usually
not left on the A-frame for any other part of
the process; this is especially true for a forced
production model.
JAPANESE HILLSIDE METHOD
This stacking method is more complex to set
up, and only recommended for steep
hillsides. This technique creates a very
stable, aerated stack in which mushrooms
are highly visible and easy to pick. The
majority of logs are raised off the ground,
potentially reducing slug damage. For more
information on this stacking method see ―Our Cultivation Guides‖ featured
on the Northern Mushroom Growers Website at http://
mushrooms.cals.cornell.edu/
Stacking Logs
© Steve Sierigk, Hawk Meadow Farm
© Steve and Julie Rockcastle,
Green Heron Growers
© Ken Mudge, Cornell University