shuttle - endorphin.es – be so kind and read the manual. ... • the endorphin.es shuttle is a...
TRANSCRIPT

Launch plan 1
Shuttle

First things first
RTFM – be so kind and read the manual. It will provide you with the information you need to fully indulge in the module you just purchased – for which we like to thank you.
Enjoy your sound experiences, dear sonic traveller.
Beginning from the product's purchase date a 1-year warranty is guaranteed for each product in case of any manufactur-ing errors or other functional deficiencies during runtime.
The warranty dœs not apply in case of:
• damage caused by misuse
• mechanical damage arising from careless treatment (dropping, vigorous shaking, mishandling, etc.)
• damage caused by liquids or powders penetrating the device
• heat damage caused by overexposure to sunlight or heating
• electric damage caused by improper connecting
Visit us:
http://endorphin.es
http://youtube.com/user/TheEndorphines
http://facebook.com/TheEndorphines
Drop us a line:
FURTH BARCELONA, S.L.
VAT ID:ES B66836487
© 2013-2017 – Endorphin.es – Interstellar Enterprises

© 2013-2017 – Endorphin.es – Interstellar Enterprises page 1 of 10
SHUTTLE OPERATED BY ENDORPHIN.ES INTERSTELLAR ENTERPRISES
LIFE IS A TRIP
• The Endorphin.es SHUTTLE is a unique performance instrument containing 5 Eurorack modules in one single 84hp faceplate
• Shuttle Control (SC)—16 channel USB->MIDI->CV interface with almost infinite possibilities interpreting MIDI events into analogue control voltages—including CV/Gate, random or noise generators, MIDI or tap-clocks, utility LFOs and envelopes
• Furthrrrrr Generator (FG)—dual triangle-core VCO with a waveshaper
• Grand Terminal (GT)—dual voltage controlled gate with 8 resonant filter modes (ladder, diode, lpg, state variable, comb)
• dual envelope generators (voltage controlled) with looping/AD/ASR with arbitrary voltage to control slope shapes: from EXP to LIN to LOG without stretching the length of a certain slope (GT)
• Cabin Pressure audio FX processor with 8 selected effects (GT)
• Cockpit (CP)—4 stereo channel mixer with sidechain ducking
• Gateway (GW)—dual 1+1 utility mixer and auto-tuners to scale, offset and invert voltages

© 2013-2017 – Endorphin.es – Interstellar Enterprises page 2 of 10
WELCOME TO THE NEW ENDORPHIN.ES – SHUTTLE!
CONTENT OF THIS QUICK START GUIDE
Intro .............................................................................................. 2
Natural signal flow ..................................................................... 4
What’s in the box? ...................................................................... 4
Quick start connection: Power up ........................................... 4
Audio sources ............................................................................. 4
Patching a mixer ........................................................................ 5
Listening to the final output .................................................... 5
Sequencing ................................................................................. 5
Playing a melody ........................................................................ 6
Shaping the timbre .................................................................... 7
Performance Autotuning ........................................................... 7
Cabin Pressure & Mixer Connections ..................................... 8
Patch Examples ................................................................. 9 & 10
INTRO
Endorphin.es, that’s us. We draw our own schematics, trace and prototype PCBs, write our own code, do our own panel de-signs, encapsulate VCO core chips, squeegee own print-screens and make the package design, shoot video tutorials, perform as artists and support the Modular Movement all over Europe.
And we are glad to finally present you, the SHUTTLE: the Endorphin.es performance modular synthesizer. It is the result of 5 years of intense development—module after module was put together neatly to finally create an instrument in a class of it’s own—a set of well selected devices for musicians to imagine music and bring it to life in the most pleasant way.
There are no rules which and how many modules a modular system should contain. We offer a range of modules, that match and altogether cover almost every aspect of musical performance—including sound generators, modifiers, effects, voltage generators, MIDI processing and mixing.
With the SHUTTLE you obtain 5 Endorphin.es modules in a 84hp Frap.tools PLUS case with handmade Endorphin.es signature silkscreen printing, a PSU, a set of cables and a carrying bag. The whole SHUTTLE is around 43-44 cm long—the approximate size allowed in almost every airliner to ensure safe traveling with your instrument. Portable power adapters ensure the use of instrument in any part of the world—no matter of the voltages coming from the power receptacle. The SHUTTLE panel is secured in the case with Befaco Knurlies for ultra-fast access of the backside of the modules for trimming the parameters of some modules, for setting jumpers (stereo/mono channels) on the Cockpit or installing the rich-in-timbres Strong-Zero VCO core.
‘Modular’ means flexibility in the first place—that’s one of the main reasons musicians like it. The SHUTTLE system may be used as an independent modular instrument, as well as it may be mounted into another case of your choice, or even to be disassembled into a separate single modules (drop us a line, if you wish to know how: [email protected]).

© 2013-2017 – Endorphin.es – Interstellar Enterprises page 3 of 10
The SHUTTLE system consists of the following Endorphin.es modules starting from left to right:
• Cockpit (mixer)
• Grand Terminal (filters, envelopes, effects)
• Gateway (utilities and auto-tuners)
• Furthrrrr Generator (sound source)
• Shuttle Control (MIDI to CV converter, CV source, power distributor)
or when looking from right to left (for us the natural signal/cv flow):
• Shuttle Control (MIDI to CV converter, CV source, power distributor)
• Furthrrrr Generator (sound source)
• Gateway (utilities and auto-tuners)
• Grand Terminal (filters, envelopes, effects)
• Cockpit (mixer)
The idea of that manual is not explaining every knob, button or jack (as this is already done in every single module's man-ual), but to inspire you to explore the SHUTTLE, to find out how the modules interact within the whole instrument, how to create own patches and perform music.
While explaining the signal flow of the patch examples, we will continuously refer to different functions of a certain module (every part/block on the instrument's panel). We strongly recommend you to follow the link and read the manuals of all mod-ules one by one.
Find all recent manuals here: http://endorphin.es/endorphin.es--manuals.html
We create complex modules, however after learning their functionality, you will see the clear and straightforward approach. That’s why operating them in a full system requires some practice and general synthesis knowledge. We also recommend watching all video tutorials on our YouTube channel:
https://www.youtube.com/channel/UCNtNiep4J3q_JYB5RgImoBg
Learning to perform with the SHUTTLE requires some perseverance as first. Many knobs have intuitive icons definitions, in-stead of written labels for instant understanding of a function. Live music performance is always a situation that requires a fair amount of concentration—not in terms of coming to a show with an already prepared patch and having all of the knobs set in their sweetspot positions, but more in terms of turning spontaneous mistakes into musical transitions. Live performance can be compared with driving a car through a busy city—not a relaxing impression when you do it the first time. Following road signs helps you to get to your destination in the same way as when you follow the icons on the SHUTTLE to shape your timbre the way you want.
We do not have pre-patched wiring for instant setups on purpose. That pushes musicians to think out-of-the-box and be cre-ative. Finally, after you realize the possibilities, in fact there are virtually no limits for your personal sound design at all. With the SHUTTLE you can easily create a Moog Minimoog alike classical mono-synth, a duo-/para-phonic or dual-voice mono-pho-nic setup, or even hook it up to all of your other modular gear to create a polyphonic setup with up to 8 voices, or recreate a Bu-chla Music Easel with a twist by using the build-in random source of uncertainty inspired CV generators of the Shuttle Control.

© 2013-2017 – Endorphin.es – Interstellar Enterprises page 4 of 10
NATURAL SIGNAL FLOW
The control panel of the SHUTTLE consists of blocks grouped in their functionality. Blocks consist of parts of modules and give you an overview of tools you usually find in music synthesizers:
Starting from right to left, audio and control voltage signals create timbres and everything is put out on the left part—that type of flow for us seems pretty natural as we consider the SHUTTLE as a closed ecosystem.
WHAT’S IN THE BOX?
With every SHUTTLE system we include a universal PSU adapter, 13 mono TS patch cables of different length (to create patch-es), as well as 1 stereo TRS cable (to patch the Grand Terminal into the Cockpit), 1 stereo TRRS cable (to connect the Cockpit to an iOS device and use it as a FX-processor), a TRS Y-cable to two single TS jacks adapter (used to connect the final output to a PA, monitor speakers or a mixer) and a USB type B cable to connect the Shuttle Control to a PC/Mac or an iPad.
QUICK START CONNECTION: POWER UP
The initial launch of the SHUTTLE starts with connecting the power adapter into a power outlet from one side and plugging the DC connector into the dc 12-20V input located at the far upper right corner of the SHUTTLE's Shuttle Control module:
Flicking the launch switch will power up the SHUTTLE (you might see LEDs will light up or blink at least on the Cockpit, the Grand Terminal and the Furthrrrr Generator) and Shuttle Control will load preset ‘1’.
AUDIO SOURCES
Connect the output of any wave form of the Furthrrrr Genera-tor's Modulator and/or Carrier to the Gates A and/or B of the Grand Terminal and turn the red X knobs (filter cut-off) clock-wise moderately.

© 2013-2017 – Endorphin.es – Interstellar Enterprises page 5 of 10
PATCHING A MIXER
Set the blue volume knob of the Grand Terminal to a moder-ate amount. Then connect the stereo line out of the Grand Terminal with a stereo cable (TRS) into any of stereo chan-nel inputs of the Cockpit mixer, check that the channel of that mixer is not muted (on/green, muted/red) and set the volume of that channel to a moderate level:
LISTENING TO THE FINAL OUTPUT
Adjust the blue volume knob on the Cockpit to a minimal level first. Connect your PA, monitor speakers or headphones directly or use the supplied Y-cable.
Increase the volume to a level when you start to hear waveforms from the Furthrrrr Generator. Try to increase the level coming from the Grand Terminal and maybe level on the Cockpit to obtain the desired volume.
Of course the final stereo ouptut of the Grand Terminal can as well be routed into a mixer, a PA or drive your headphones—or can be routed into an audio interface directly. For convenient connection to a mixer or speakersphones, we include a special Y-cable adapter to split the stereo signal (TRS) into two separate (left and right) mono channels (TS):
SEQUENCING
Control voltages generated by the Shuttle Control are translated from certain MIDI messages. These CVs may be patched into every CV IN jacks of the modules located to the left (there’s a total of 34 CV/Gate inputs in the SHUTTLE). CVs may be literally anything—starting from LFOs, pitch CVs, gates, triggers, noise sources or random CV.
There is no sequencer built by Endorphin.es. Instead we advice to use:
• External MIDI sequencers like Squarp Pyramid, Korg SQ-1 or Arturia Beatstep by connecting them to the Shuttle Control via USB
• Your favourite DAW for PC/MAC—e.g. Ableton Live, Cubase etc.
• iOS based sequencers or DAWs like Liine Lemur, Modstep etc.
• Or external CV sequencers like the Doepfer Dark Time or Winter Modular Eloquencer by patching the CV directly into the SHUTTLE without using the Shuttle Control as interpreter for MIDI data

© 2013-2017 – Endorphin.es – Interstellar Enterprises page 6 of 10
It is possible to connect two ‘devices’ simultaneously: one ‘host’ (PC/MAC, iPad, OTG enabled tablet) to the ‘to device’ con-nector and one ‘device’ (class compliant USB-MIDI device) to one of the ‘to host’ sockets. The other empty ‘to host’ socket may be used as power source only – e.g. for USB LED lamp. It is not an option to connect a second device to the second ‘to host’ socket, as the Shuttle Control only accepts one at the time.
PLAYING A MELODY
For playing a melody, one need to connect CV and gate signals from the Shuttle Control to further modules. Continuing the patch made before, and using default power-up preset ‘1’ from Shuttle Control, we connect CV1 output (assigned to pitch CV) to the ‘key in’ of the Car-rier oscillator and CV9 output (assigned to gate) to the ‘check-in’ input of Airplane B, the right hand envelope generator of the Grand Terminal:
Right after that, a last connection is required: the output of the envelope is ap-plied to the gate's filter ‘cv in’ so the filter will open when the envelope launches.
To do that, connect the uni-polar output from ‘exits ->’ into the ‘cv in’ above the X knob of Gate B.
After we insert patch cables into the X/Y CV inputs, the appropriate red/blue knobs become attenuators for the incoming voltage. So far, we adjust the red X knob to obtain a proper modulation and also adjust blue ‘take off’ and ‘landing’ knobs of the Grand Terminal'senvelope generator: set it to instant attack and medium de-cay.
Now you can play any notes/sequences from any MIDI controller or DAW connect-ed to the Shuttle Control on any MIDI channel and obtain a sound at the output of a Cockpit mixer.

© 2013-2017 – Endorphin.es – Interstellar Enterprises page 7 of 10
SHAPING THE TIMBRE—DYNAMIC FM MODULATION
We continue the same patch and add more modulations.
Furthrrrr Generator has a powerful modulation bus, so far the Modulator oscillator can modulate the Carrier in 4 different ways and the amount of modulation (modulation index) can be voltage controlled.
Let’s enable ‘frequency’ by toggling the switch—that means the frequency of the Modulator will modulate the Carrier's frequency (linear or exponential – depending on the jumper on the backside of the FG—it’s set to linear by default).
Afterwards connect bi-polar Airplane B output to the ‘mood index’ ‘cv in’ jack. Adjust the red and blue attenuator/attenuverter knobs manually (shown in the illustration) so with every note launched with envelope B there will be a dynamic FM modulation. In that moment we can consider the setup as a two operator FM-synthesizer.
Grand Terminal's Airplane A/B envelopes usually pair well with the dual gates (one envelope per gate).
TIPP: Running out of envelopes? Create additional simple note/velocity/CC controlled envelopes with the Shuttle Control.
PERFORMANCE AUTOTUNING
Before every performance it may be important to tune the oscillators so the sequence will play in a proper musical scale. That’s what the Gateway is used for. Basically, it’s a dual 1+1 mixer with offset and a ‘tuned voltage generator’ based on analyzing the oscillator's frequency. The principle of our autotuners is pretty simple: you have to connect the original pitch CV (CV1 in our example) coming from the Shuttle Control (or another pitch CV source) to the ‘key in’ (Gateway) and the ‘drop out’ (Gateway) to the ‘key in’ (Furthrrrr Generator). Now the only thing the autotuner needs to work properly, is a reference waveform. So you connect another unused waveform of the the oscillator that has to be tuned to the ‘tune in’ jack (Gateway).
After you applied the reference waveform into ‘tune in’ (shown in the illustration to the left—reference wave is the pulse out-put of the Carrier) you will see Ab and A# LEDs will alter according to the change in pitch the same way as the LEDs located below the frequency knobs of the Furthrrrr Generator.
What did we do? CV1 (pitch CV output) of the Shuttle Control is now sending the pitch CV to the ‘key in’ of the upper or low-
er autotuner of the Gateway. The Gateway now can listen to the reference waveform of the Carrier, and then alter the incom-ing pitch CV to match it to a proper tuning. This properly tuned CV is put out at the ‘drop out’ jack of the Gateway. This is a result of mixing the ‘key in’ voltage, with the manual offset of the red A/B offset knob, ‘cv in’ delined by the blue attenuverter knob and the stepped tuning CV (positive or negative) that is applied to the pitch CV when pressing the red button above/below the ‘tune in’ jack shortly. So far, having that routing set up, you can use the red knob as oscillator’s coarse tune (about 6 octaves) and blue knob as a fine tune.
Before pressing the red ‘tune’ button, the only thing you have to do is to send a pure single ‘A’ note as pitch CV (without ap-plying frequency modulation) from your sequencer or MIDI keyboard, so the Gateway can listen to what is interpreted as ‘A’ by the oscillator. After short pressing the red ‘tune’ button, the oscillator will be tuned to the next closest A-note and you will see both Ab and A# LEDs will light up. After that you may start your sequence/performance and you can be sure your oscillator is in proper tune to all the rest of your instruments.
Hint: When you press that button again for over a second, the stepped CV generated by the autotuner will be removed from the ‘drop out’ output and your oscillator is again ‘untuned’.

© 2013-2017 – Endorphin.es – Interstellar Enterprises page 8 of 10
The middle part of the Gateway contains switches and out-put jacks for certain deeper functions of the Grand Termi-nal that is loctaed left to it. With ‘end of stage(s)’ (Grand Terminal) or ‘A/B ends’ (Gateway) one can obtain end of attack or end of decay trigger outputs—either both from one jack or from separate jacks.
This may also be useful for multiplying or dividing a clock or using offset triggers to launch other events.
A set of switches defines the CV destination for the envelopes of the Grand Terminal (see illustration to the left).
And finally, the two ‘VCF mode’ switches define the behavior of the Gates (Grand Terminal). Either they work as pure filters (Voltage Con-trolled Filter) when the switch is in the upper position, or as filter/amplifier (Voltage Controlled Filter and Amplifier at the same time) with the switch in lower position (see illustration below).
CABIN PRESSURE & MIXER CONNECTIONS
The output of the filter section is connected to the Cabin Pressure— the powerful and flexible stereo effect pro-cessor on board of the Grand Terminal. Every effect algo-rithm was picked and coded to suit a wide range of musi-cal styles—from creating light ambiences to huge infinite halls and drones. The parameters of the effect may either be CV controlled, or synchronized to a clock with proper divisions:
The output of the effect processor is mixed to the dry signal in the Grand Terminal by applying ‘cabin pressure’ with the red knob or CV—and then the stereo output of the Grand Terminal is patched into the Cockpit. This is the stage where other audio instrument's (synthesizers, drum-ma-chines etc.) outputs are mixed (see illustration).

© 2013-2017 – Endorphin.es – Interstellar Enterprises page 9 of 10
PATCH EXAMPLES
The colours of the cables used in the patch examples below are for reference purposes only. They might but must not correspond to the cables included with the shuttle or your own patch-cords colors.
EXAMPLE NO.1
(Eastcoast) “Trumansburg” is a dual-voice patch from the default preset ‘C’ stored in your Shuttle Control. In that patch CV outputs 1-8 in Shuttle Control are assigned to MIDI Channel 1, and CV ouptuts 9-16 are assigned to MIDI Channel 2. Thus, Mod-ulator, Airplane A, Gate A are controlled by MIDI channel 1 and Airplane B, Carrier, Gate B are controlled by MIDI channel 2. Gray cables are pitch CV outputs that go to the autotuners to ensure the oscillators of the Furthrrrr Generator are in tune. Green cables are wired to trigger the envelopes. Pink cables connect CV to the envelopes to modulate the Gates.
Violet cables are connecting the Modulator and the Carrier to the filters, as well as their reference waveforms into the ‘tune in’ of the autotuners of the Gateway.
Blue/red is a stereo cable from Grand Terminal's stereo output (headphone icon) into the Cockpit.
The yellow cable is a MIDI clock output with PPQN divided by 24, so the clock represents a 4-2-the-floor bass-drum beat. We route that signal into the sidechain input of the Cockpit and choose the 3rd mode for its ducking processor (three blue LED blinks at the startup of the system).
The black Y-cable serves for connecting speakerphones or may be routed to a mixer or your audio interface. The cyan cable is a USB type B cable for connecting PC/MAC/iPad.
© 2013-2017 – Endorphin.es – Interstellar Enterprises page 10 of 10
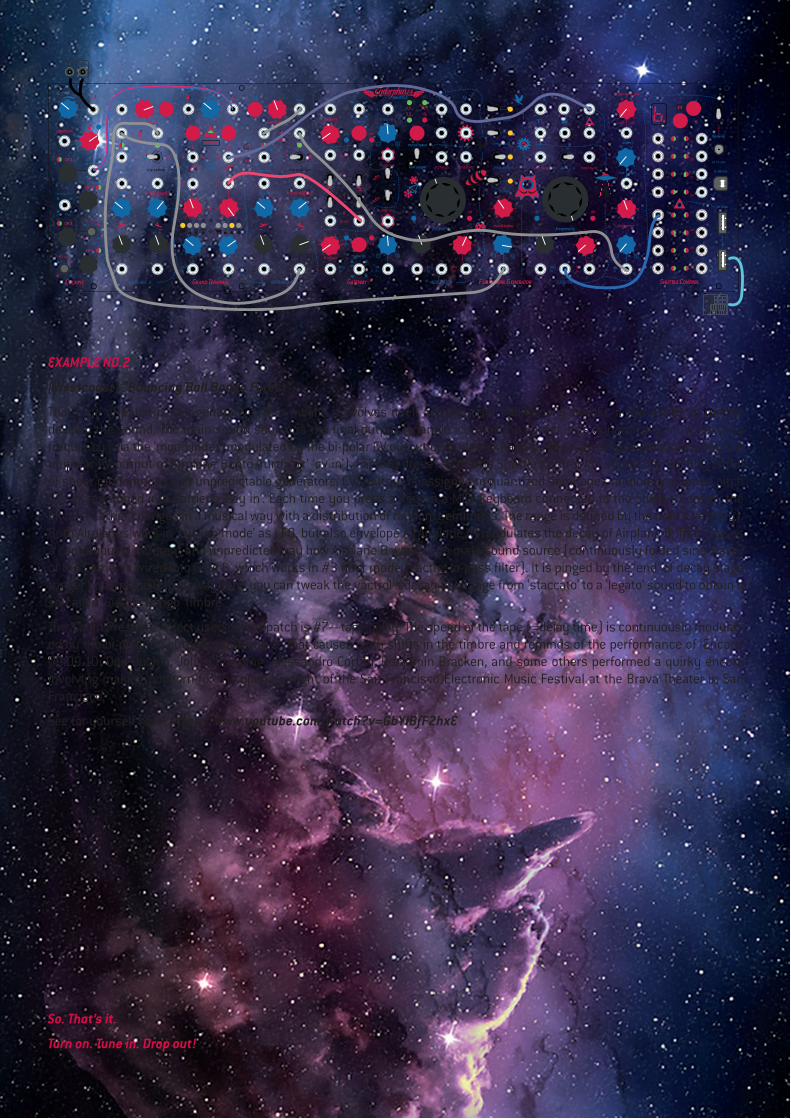
EXAMPLE NO.2
(Westcoast) “Bouncing Ball Bongo Forest”:
That type of patch is self-generative. That means it evolves itself and the user additionally tweaks a few knobs to further develop the sound. The main sound source is the final output (triangle icon) of the Carrier. It is dynamically modulated by frequency (via the ‘mood index’ modulated by the bi-polar CV output of Airplane A) and by the waveshaper (modulated by the unipolar CV output of Airplane B into ‘furthrrrr’ ‘cv in’). Factory preset ‘b’ on the Shuttle Control (‘b’ stands for Buchla) is full of sheer randomness and unpredictable generators. CV5 output is assigned to quantized semitones randomly stepped pitch CV—it is patched into Carrier's ‘key in’. Each time you press a key on a MIDI keyboard connected to the Shuttle Control, the pitch of Carrier changes in a musical way with a distribution of random semitones. The range is defined by the note's velocity). Both Airplanes work in ‘cycling mode’ as LFO, but also envelope A (Airplane A) modulates the decay of Airplane B. That causes a continuously different and unpredicted way how Airplane B works. The main sound source (continuously folded sine wave) of the Carrier is wired into Gate B, which works in #3 filter mode (vactrol lo-pass filter). It is pinged by the ‘end’ of decay stage trigger by Airplane B (Gateway) and you can tweak the vactrol's decay to change from ‘staccato’ to a ‘legato’ sound to obtain a so-called ‘Buchla Bongo’ timbre.
The ‘Cabin Pressure’ effect used in that patch is #7—tape delay. The speed of the tape (=delay time) is continuously modulat-ed by the bi-polar CV output of Airplane B. That causes pitch shifts in the timbre and reminds of the performance of ‘Encore’ 09.09.10: Don Buchla, John Chowning, Alessandro Cortini, Benjamin Bracken, and some others performed a quirky encore involving making popcorn for the opening night of the San Francisco Electronic Music Festival at the Brava Theater in San Francisco.
See for yourself here: https://www.youtube.com/watch?v=GbYlBfF2hxE
So. That’s it.
Turn on. Tune in. Drop out!