simon's win32 cheat sheet - microsoft.com · simon's win32 cheat sheet . this sheet...
TRANSCRIPT
Simon's Win32 Cheat Sheet This sheet summarises all the things I do to make my Windows machine more useful to me. I've summarised it here partly for my own benefit (I have to repeat the process on each new machine) and partly in the hope that it may be be of use to others.
Warning: some of these suggestions date back at least a decade, so they may be out of date.
Please tell me, [email protected], if you find mistakes (please tell me how to fix them), or if there are things you find useful that aren't mentioned here.
Translations:
• Into Bosnian by Vlada Catalic. • Into Macedonian by Vlada Catalic.
Contents
General setup and user interface ..................................................................................................... 4
Your environment variables ........................................................................................................ 4
Make Caps-lock behave like Ctrl ................................................................................................ 4
Make your Contacts take precendence over the global address list ......................................... 5
Install better fonts ......................................................................................................................... 5
Stop booting with NumLock on ................................................................................................... 6
Make the cmd shell have decent copy/paste ............................................................................... 6
Move a window whose title bar is off the screen ........................................................................ 6
Renew certificates ......................................................................................................................... 7
Switch off the pesky MDM process ............................................................................................. 7
Work around the pesky foo.ps[1] problem .......................................................................... 7
Access your Windows machine remotely .................................................................................... 7
Make filename completion work in the cmd shell ...................................................................... 8
Info about your profile ................................................................................................................. 8
Change what's started at boot time ............................................................................................. 9
Monitor power-saving and Exceed .............................................................................................. 9
Make the printer staple by default ............................................................................................ 10
Printing the first page (only) of a letter on printed letterhead ................................................ 10
Find out what a funny filename extension means .................................................................... 11
Make Adobe Acrobat start faster .............................................................................................. 11
Show full menus in Outlook ....................................................................................................... 11
Recover a gigabyte of disk space ............................................................................................... 11
Keyboard shortcuts ..................................................................................................................... 12
Useful freeware ................................................................................................................................ 13
Powertoys ..................................................................................................................................... 13
SysInternals ................................................................................................................................. 13
Launchy ....................................................................................................................................... 13
PDF tools ...................................................................................................................................... 13
Perform useful tasks ....................................................................................................................... 15
Wake up your laptop's network connections ........................................................................... 15
Folder navigation ........................................................................................................................ 16
Run the Inbox Repair Tool (Outlook users) ............................................................................. 17
Capture a screenshot .................................................................................................................. 17
Click in a URL without opening it ............................................................................................. 17
Defragment your disk from the command line ........................................................................ 18
Restart the desktop after Explorer crash.................................................................................. 18
Notes about .reg files ................................................................................................................... 18
Print ASCII files .......................................................................................................................... 19
Show folder sizes ......................................................................................................................... 19
Reading Macintosh floppy discs ................................................................................................ 19
Papers and presentations ............................................................................................................... 20
A PDF reader that doesn't lock the file ..................................................................................... 20
Export Postscript from a Word, Excel, or Powerpoint document .......................................... 20
Include LaTeX equations in Powerpoint slides ........................................................................ 21
Draw a picture and include it in a LaTeX document .............................................................. 21
Include typeset material from Postscript into a Powerpoint slide .......................................... 23
Include mathematical symbols in Word documents ................................................................ 24
Install and configure useful packages ........................................................................................... 25
Skype ............................................................................................................................................ 25
Emacs ........................................................................................................................................... 25
LaTex ........................................................................................................................................... 26
Installing a Telnet client ............................................................................................................. 27
SSH and making keys ................................................................................................................. 28
Cygwin ......................................................................................................................................... 28
Services for Unix ......................................................................................................................... 30
CVS............................................................................................................................................... 30
Installing GHC ............................................................................................................................ 30
Be a GHC developer ................................................................................................................... 30
Links to other people's cheat sheets: Philoman has a huge collection.
Acknowledgements. Many thanks to Sigbjorn Finne and Luca Cardelli, from whom much of the enclosed advice comes.
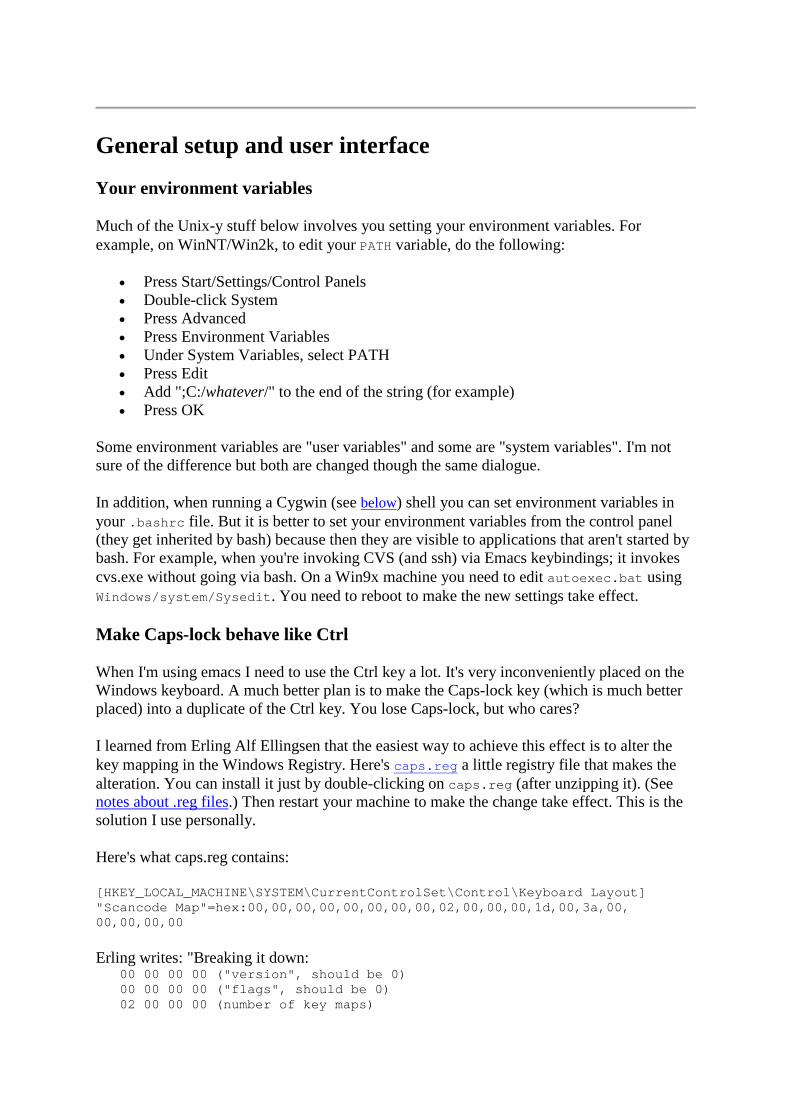
General setup and user interface
Your environment variables
Much of the Unix-y stuff below involves you setting your environment variables. For example, on WinNT/Win2k, to edit your PATH variable, do the following:
• Press Start/Settings/Control Panels • Double-click System • Press Advanced • Press Environment Variables • Under System Variables, select PATH • Press Edit • Add ";C:/whatever/" to the end of the string (for example) • Press OK
Some environment variables are "user variables" and some are "system variables". I'm not sure of the difference but both are changed though the same dialogue.
In addition, when running a Cygwin (see below) shell you can set environment variables in your .bashrc file. But it is better to set your environment variables from the control panel (they get inherited by bash) because then they are visible to applications that aren't started by bash. For example, when you're invoking CVS (and ssh) via Emacs keybindings; it invokes cvs.exe without going via bash. On a Win9x machine you need to edit autoexec.bat using Windows/system/Sysedit. You need to reboot to make the new settings take effect.
Make Caps-lock behave like Ctrl
When I'm using emacs I need to use the Ctrl key a lot. It's very inconveniently placed on the Windows keyboard. A much better plan is to make the Caps-lock key (which is much better placed) into a duplicate of the Ctrl key. You lose Caps-lock, but who cares?
I learned from Erling Alf Ellingsen that the easiest way to achieve this effect is to alter the key mapping in the Windows Registry. Here's caps.reg a little registry file that makes the alteration. You can install it just by double-clicking on caps.reg (after unzipping it). (See notes about .reg files.) Then restart your machine to make the change take effect. This is the solution I use personally.
Here's what caps.reg contains:
[HKEY_LOCAL_MACHINE\SYSTEM\CurrentControlSet\Control\Keyboard Layout] "Scancode Map"=hex:00,00,00,00,00,00,00,00,02,00,00,00,1d,00,3a,00, 00,00,00,00 Erling writes: "Breaking it down: 00 00 00 00 ("version", should be 0) 00 00 00 00 ("flags", should be 0) 02 00 00 00 (number of key maps)
1d 00 3a 00 (map scan code 1D to scan code 3A) 00 00 00 00 (blank key map) If my memory serves me, 0x1D is the left ctrl key, and 0x3A is Caps Lock."
Here is other info I've been told about keyboard codes:
• There is an official Microsoft article explaining how to remap keyboard scan codes. They even provide an example of how to properly swap Caps Lock and Ctrl!
• Here is a Microsoft document containing a table of all the keyboard scan codes. Useful for further keyboard re-programming. Use the values in the "scan 1 make" column.
• Additionally, if you use PuTTY with a US keyboard layout, you will find that the Right Alt key doesn't work. (Apparently PuTTY is a UK program, and UK keyboards have something called "AltGr" instead of a Right Alt key; see this page) You can fix this by making Right Alt send the same scan code as Left Alt:
• Here is a utility that allegedly turns CapsLock into Ctrl: http://www.sysinternals.com/ntw2k/source/ctrl2cap.shtml. I used it for some years. NOTE: the distributed version of Ctrl2Cap (2.0) works fine with Windows XP. About a year ago I had a lot of trouble with version 2.0 on my then-Windows-2000 machine. I fiddled about for ages, and contacted the author. Nothing worked. Fortunately, I had a previous version still around, and that does work. Well, it did for me. Here it is. Use only if desperate.
• Luca recommends the Happy Hacking keyboard. No caps-lock at all.
(Thanks to Erling Alf Ellingsen, Tom Weeks, and Luca.)
Make your Contacts take precendence over the global address list
[This one is relevant for Outlook only, and even then I think it's specific to Outlook XP.]
When you type someone's name in the "To" field of a message, Outlook tries to figure out who you mean. It can look in more than one address book, and its essential that it looks in your own Contacts first, else it'll auto-complete to some random person in the global address list (which in my company is pretty big). It won't even flag a "not-sure"; it just auto-completes to the wrong person.
It's easy to make it look in your Contacts list first, once you know how, but it's devilish hard to find out how. Here's what to do.
• Select "Tools/Address Book...". • In the new window, select "Tools/Options...". • In the lower pane select "Contacts", and use the up-arrow button beside the pane to
move "Contacts" up to the top.
Install better fonts
Luca Cardelli's home page has a couple of nice fonts available under "Mac/PC resources". In particular, his LICS font has a menagerie of useful mathematical symbols that aren't available in any standard font.
To install a new font, just drag it into C:/WINNT/Fonts. You don't even need to reboot.
Stop booting with NumLock on
It has happened to me, both at home and at work, that my computer would boot up with NumLock on. (This makes it puzzling when you try to type the password to log on...). This setting somehow gets embedded in the guts of the boot process, for unknown reasons.
To fix it, add the line (found in the Microsoft Knowledge Base):
NUMLOCK=OFF at the end of your C:\config.sys. Num lock will still turn on at the beginning of booting, but will turn off again before the end of booting. (This works for Win98; I don't know if it works for Win2k.)
Make the cmd shell have decent copy/paste
The default setup for copy and paste in the cmd shell is a huge pain. (You have to right-click, select Mark, and then select the bit you want to copy.) You can fix this:
• Right click in the title bar of the cmd window. • Select Properties. • Check QuickEdit, and click OK. • You're then asked whether you want the change to apply just to this instance, or to all
instances; choose the latter.
Now you can left-click and drag to select; right-click to put the selection on the clipboard and exit select mode; and right-click again to paste.
There are various other things you can change in the Properties pane for a cmd window, such as the background colour and window size. Thanks to Reenen Kroukamp for telling me about this.
Move a window whose title bar is off the screen
When a window's title bar goes off the screen (which happens occasionally, though I can never remember why) you appear to be stuck, becuase the usual window-movement operations all involve clicking on the title bar. Here's what to do:
• Right-click window's icon in your Task Bar, and select "Move" • Now you can move the window with the arrow keys.
As an alternative to the first step:
• Make sure the window has the focus (click in it, or use Alt-Tab). • Press Alt-Space. This brings up the window's title-bar menu. • Release the Alt-Space, and press 'M' (for "move").

Renew certificates
(This may be Microsoft specific.)
• Run... certmgr.msc • Pick Personal, and right-click the certificate that's about to expire; pick "All tasks..."
and "Renew certificate with existing key". • Follow instructions from there
Switch off the pesky MDM process
On my laptop, a background process MDM.exe used to appear, which seemed to cause hundreds of page faults a second even when I was doing absolutely nothing. Since I use my machine a lot for compiling, I reckoned I could do without it.
MDM is the Machine Debug Manager, and it is installed with Internet Explorer. Like me, you probably don't need it. Here is how to tun it off/disable it. Go to the Control Panels and click Internet Options. Click on the Advanced tab and check the box 'diable script debugging'. This should stop it appearing.
Work around the pesky foo.ps[1] problem
Using Internet Explorer, I often follow a link to someone's paper, with a filename like foo.ps.gz. In response to the popup box, I click on "Open this file from its current location"; zip files can't hurt you (I belive). IE downloads the zip file, and WinZip starts up automatically, which is all very wonderful. But alas, the file it displays is called foo.ps[1], rather than foo.ps, so I can't double-click on it in the WinZip window. I have no idea where the pesky "[1]" comes from.
The slow solution is to extract the file, rename it, and then double-click on it. Less slow is to right-click on it in the WinZip window, select "View...", and then select gsview as your viewer.
But the best (albeit hackish) solution is to tell Windows that ".ps[1]" is a suffix meaning "here's a Postscript file; run gsview". It's easily done. In an file browser window select "Tools/Folder Options" and click the "File Types" tab. Click "New". In the new dialogue window type "ps[1]" as the new file extension. In the same window, click "Advanced", and select "Postscript" from the huge list you are offered.
Now do the same for "ps[2]", "ps[3]". (I've never needed more.)
Access your Windows machine remotely
Windows now comes with Remote Desktop built-in, which lets you display your windows desktop on another (Windows) machine: look in "Start/All Program/Accessories/Communications/Remote Desktop Connection". However, you can only connect to a remote machine if the remote machine is willing to accept such connections. To make it willing:
• In the "System" Control Panel (also accessible via Right-click/Properties on "My Computer"), choose the Remote tab, and check "Allow users to connect remotely to this computer".
• In the "Network connections" Control Panel (also accessible via Right-click/Properties on "My network places"), select Right-click/Properteies on the local-area connection. Pick the Advanced tab, and click the "Settings.." button for Windows Firewall. Pick the Exceptions tab, and ensure that the "Remote Desktop" checkbox is checked.
(Some time ago, a couple of people told me that VNC is a wonderful thing: http://www.uk.research.att.com/vnc/. It lets you display your windows desktop on a Unix machine or Mac, and vice versa. However I'm also told that it has a "general utter lack of security", so that running it may expose you to all sorts of bad things. Don't blame me!)
Make filename completion work in the cmd shell
When you are typing commands to the standard cmd shell, filename completion doesn't work by default. Here's how to switch it on (thanks to Alex Buckley for this).
• Run regedit.exe (Start/Run..; then type regedit). • Search for "completionchar" (it's under
HKEY_CURRENT_USER\Software\Microsoft\Command Processor; ignore the one that's under HKEY_USERS).
• Change its value from 0 to 9 (ASCII code for Tab). You can do this by right-click/Modify on "completionchar".
Instead of this rigmarole, you can just double-click complete.reg (you'll need to unzip first), which makes the above change to the registry. See notes about .reg files. The next command processor (cmd.exe) you run will perform tabbed filename completion. Tab completes the first filename with the given prefix; subsequent tabs cycle through the filenames with that prefix.
This doesn't work in Win95/8 because they only have the old command.com available as a command processor.
Info about your profile
Your "profile" is stored in WINNT/Profiles/<your-user-name>. If you have a roaming profile, like I do, some of this stuff gets copied to the main server when you log out, and sucked down when you log in, so it's desirable that it's not too big. In particular:
• The Desktop folder is copied. If you have big files (not shortcuts) on your desktop, they'll get copied up and down.
• The Favorites folder is copied.
On the other hand:
• The Local Settings folder is not copied. This is a good thing, because it's big: o Application data: machine specific application data.
o History: Internet Explorer history. o Temp: temporary files. o Temporary Internet Files: Internet Explorer offline cache.
Having a roaming profile on a laptop is a Bad Idea in my view. First, there's a danger that you'll get stuck on a dialup line dragging down a big profile. (Mind you, since you have to log in before you can dial up, this is unlikely to happen. But it can be awkward if you are connected when you log in, but then you disconnect later.) More important, with a roaming profile you share settings of your environment variables, such as $HOME. So then emacs (for example) will look for a .emacsrc file that isn't available when you are disconnected from the network.
You can change whether you have a roaming or local profile thus: My Computer/Properties/Advanced/User Profiles Settings/Change Type/Local.
Changing this setting affects only the computer you change it on. A single account can have a roaming profile on one computer and a local profile on another.
Change what's started at boot time
Windows has many marvellous ways of changing what programs are run at startup time; e.g. what programs end up in your "system tray". I could never work out how to get rid of them, until Sigbjorn told me:
• You can selectively turn items on/off via the msconfig utility under Win98. Do Start->Run, type "msconfig" and then look under the Startup tab of the UI that pops up.
msconfig works on Windows XP too, but I've not used it in anger.
Monitor power-saving and Exceed
For a long time I was frustrated because I could not persuade my desktop PC to switch off the monitor as it is supposed to. (Doing so saves a lot of power overnight, and all screens come with "Energy Star" stuff designed just for this purpose. It also extends the life of the cathode ray tube by turning off its electron-emitting heater filament.)
The problem turned out to be Exceed (at least in V7.0). Exceed is an X server that lets you display X windows on your machine. In its default configuration, Exceed prevents the screen switching off. To fix this:
• Get the Exceed configuration window up. Either use Start/Programs/Hummingbird/Exceed/Xconfig, or right-click the Exceed icon in the task bar and select Tools/Configuration...
• Double-click "power management". • Uncheck the box that says "Prevent display from being shut down". You can ignore
the promising looking boxes about "Refuse sleep" and "User interaction"; they didn't seem to affect anything.
Make the printer staple by default
I am fortunate enough to use a printer with a stapler, but it took me ages to discover how to make it staple by default. The same trick works for various other printer settings. What is particularly exiciting is that you have to make the same change in two places in the printer properties. If you only do it in one, it works for a few weeks, and then stops working. Don't ask me why, but it does.
Here's how to change the default behaviour:
• Open "Start/Printers and Faxes" • Right-click the printer and select "Properties". • Click the "General" tab • Click the "Printing preferences..." button • Click the "Layout" tab • Click the "Advanced..." button • Expand "Document options/Printer features" • Click on the underlined "Staple off" item and change it to "Staple on". • Click OK twice, so you are back to the main Properties window for the printer. • Click the "Advanced" tab. • Click th "Printing defaults..." button. • Click the "Layout" tab, the "Advanced..." button, and change the settings just as you
did before. • Take a moment to wonder why you had to do it all twice. Conclude that you have no
idea.
In general, any settings you make here should be the default for all future printing on that printer.
You can also do this on a case-by-case basis. When you are about to print your document:
• Select "File/Print.." • Click "Properties" in the Printer panel at the top • Click the "Paper/Quality" tab • Click "Advanced..." • Now you are back to the dialogue described above....
The properties change only for this one document, but they do seem to persist across successive printing of the same document from the same application.
Printing the first page (only) of a letter on printed letterhead
Your printer may have multiple paper trays, one loaded with headed paper. When printing a letter, you only want the first page to come from this tray. Here's how to achieve this glorious outcome.
Select "File/ Print..", choose your printer etc, then click the "Properties" button (top RH corner). Click "Advanced...". Find the bit that says "First page different", and open it up (click the "+" sign). Change the setting to "Enabled" and pick the media type. The latter step
selects which paper try the printer will use, but unhelpfully in my set-up the "media type" settings are things like "pre-printed" and "labels" rather than "Tray 1" , "Tray 2", etc. Quite how it knows which tray has pre-printed sheets is beyond me. I use trial and error to find the mapping.
Find out what a funny filename extension means
I occasionally come across a file with an extension (suffix) I don't recognise. There are quite a few web sites with a comprehensive list of what file extensions mean, but I didn't find them easy to find. Here are the ones I know about.
• FileInfo.com • Whatis.Com - Every File Format in the World • Wotsit's Format • Joz's Extensions Base • FILExt: the file extension source • Dot What!? • Wikipedia • File-extensions.org
Make Adobe Acrobat start faster
[Note: I gather that this process does not work for version AcroRead 7.0. And in any case version 7.0 seems to start up much faster for me, so the fiddling isn't necessary.] Adobe Acrobat is the standard reader for PDF, but it starts up really slowly because it loads a bazillion plug-ins. You can trim the plug-ins, and hence greatly speed up start up as follows:
• Go the directory Program Files\Adobe\Acrobat 6.0\Reader. • Make a new directory skipped_plug_ins. (Doesn't matter what you call it.) • Move all the files in directory plug_ins into your new directory, except:
o EWH32.api o IA32.api o Search.api
(These three are needed by Internet Explorer, though the last is only needed for search.)
Thanks to Ulfar Erlingsson for this tip.
Show full menus in Outlook
Outlook (2003 and later) shows you only the most recently used menu items; it shows the others after a short delay. If you don't like this, use Tools/Customize and check "Always show full menus".
Recover a gigabyte of disk space
If you are like me your hard disk is pretty full. A simple change in settings can save you almost 10% of your hard drive.
By default, Windows XP reserves 12% of the hard drive for something called restore points. These can be used to restore the system to a previous situation if you mess up the system with some install or other changes. This 12% can get used pretty fast when you install a lot of software. And 12% of your disk is a lot: 28GB drive * 12% = 3.36GB.
You can reserve less space, and so free up a lot. The downside is that you will not be able to restore the system to 10 restore points ago. I for one never used this options anyhow, so restoring just a few points back is plenty for me.
• Right-click "My computer" and select "Properties". • Choose the "system restore" tab. • Change the settings to 3-4% and click ok.
Don't forget to check the available space before and after you do it.
Keyboard shortcuts
Windows has lots of useful keyboard shortcuts, which save all that mousing around. Here's the list that Microsoft publishes.
I didn't know until recently that there's a bunch of useful key-combinations that come with the Windows-logo key; follow the above link and look under "Microsoft Natural Keyboard keys".
Useful freeware
Powertoys
Microsoft Powertoys is a bunch of small but useful tools. Ones I've used or had recommended include:
• TweakUI: a control panel that lets you alter aspects of the Windows user interface. The ones I like are:
o File-name completion in the cmd shell. o Stopping popup windows stealing focus, so that your input goes to the new
window.
You can also arrange that moving the mouse over a window changes focus, more like X-windows.
• CmdHere: adds an item to the context menu that pops up when you right-click in a folder window, which opens a cmd window with the current directory being that folder.
• DeskMan: a four-window virtual desktop manager
SysInternals
SysInternals is a collection of utilities (provided now by Microsoft) that do many good things. The one I have used is:
• Process Explorer: a bit like the Task Manager window, but it displays the tree of processes. If you kick off make and it spawns lots of other thing, it's handy to be able to kill the root process easily.
Launchy
Launchy lets you launch appliactions with a few keystrokes, no mouse. (Similar functionality is built into Vista's Start menu.)
PDF tools
I've found a few useful programs for maniulating PDFs, at least if you don't have the Professional edition of AcroRead.
• Foxit. If someone (eg the Inland Revenue) gives you a PDF form to complete, you may want to save it half-completed, and resume later. AcroRead doesn't let you do that, which is very annoying. Foxit does; it's a free PDF reader. In general, I found this a useful resource for PDF forms.
• PDFsam, short for "PDF split and merge", is a GUI-based tool that lets you combine several PDFs into one, or select pages out of an existing PDF.

• pdftk is a comammnd-line tool that let you split, merge, rotate, compress etc PDF documents. I have not tried it, but it looks plausible.
Perform useful tasks
Wake up your laptop's network connections
I often disconnect my laptop, which runs Windows 2000, from the network to move it around. When I do this I only suspend it; I don't log off or power down. The trouble is that often when I reconnect, the little green light on the connector comes on, but the network connection doesn't work at all. By trial and error, I've found a series of actions that usually fixes the problem. I used to reboot the machine, which was time-consuming, and often didn't help. But these steps seem to do the trick; don't ask me why. Try them in this order: they are arranged in order of increasing brutality and time-consuming-ness.
• Step 1: jiggle your DHCP connections. DHCP is the magic by which your laptop gets an IP address from the LAN it is connected to. After a while, especially if you have disconnected, you may need to force your machine to re-negotiate its IP address with the DHCP server. This is essential (and reasonable) if you are plugging into a different network than the one you unplugged from, especially if you did the unpluggery while the machine was suspended (so it didn't notice). Even if you are reconnecting with the same network that you left, your DHCP "lease" might have expired, in which case renegotiation is required.
Here's how to do it:
o Open a cmd shell. o Type "ipconfig /release" o Type "ipconfig /renew"
You can see how many network interfaces you have running with "ipconfig /all" , and you can tell it to release or renew a specific interface by putting it's name at the end, like "ipconfig /renew ethernet".
Sometimes you don't need the "release" step, but it can't hurt.
• Step 2: make sure your proxy settings are right. If you are inside a corporate network, the external Internet is probably accessible only through a proxy server. There seem to be two sorts of proxy servers: HTTP proxy stuff and Winsock proxy stuff. Internet Explorer definitely uses the former. SSH definitely uses the latter. You identify your proxy server for these two in entirely different ways, and the two servers don't need to be the same.
So you have to do this:
o HTTP proxy: in "Start/Settings/Control Panel/Internet Options", click "Connections", then "LAN settings", then check "Use a proxy server" and fill in its name. You can get to the same dialogue from an Explorer window: "Tools/Internet Options/Connections/Lan Settings".
o Winsock proxy: in "Start/Settings/Control Panel/WSP Client", check "Enable WinSock Proxy Client". You have to fill in the name of a server too. Click "Update now".
If you are outside a corporate network, your proxy server is probably inaccessible, so you need to un-check both of these settings. (Fortunately, doing so doesn't lose the name of the proxy server, so re-enabling is easy.)
• Step 3: wiggle the Winsock proxy client. (Do this only if you are using a proxy.) Sometimes the Winsock proxy stuff seems to get hung up. To wake up you Winsock proxy, do this:
o Open "Start/Settings/Control Panel/WSP client". Click "Update now".
With a bit of luck it'll say "Refresh operation completed successfully". Click "OK". It offers to restart Windows. Don't; I have not found it to be necessary.
Just because you get "Refresh operation completed successfully" doesn't mean that the proxy server is offering Winsock proxy service. The only way I know to find out whether it really is doing so is to run "ssh -v machine-name" from a cmd shell, where machine-name is the name of some machine outside your firewall. If ssh gets stuck and hangs, the Winsock proxy isn't working. If it gets through to the end and either logs you in, or says "Aborted by user", you're ok.
If you aren't ok, you have to try a different proxy server; type its name into the WSP client box and try "Update now" again.
• Step 4: re-enable the network card. Open "Start/Settings/Control Panel/Network and Dialup Connections". Right-click "Local Area Connection", and select "Disable". Wait till the control panel window shows it disabled. Now right-click and select "Enable". If the control panel window doesn't show it disabled, try Step 4.
I'm really not sure what this step does, if anything.
• Step 5: reconfigure the device (if all else fails). In the "Network and Dialup Connections" window (from Step 4), right-click on "Local Area Connection" and select Properties. In the window that pops up, at the top is a "Connect using..." panel, with a button called "Configure". Press it.
A device window appears. If it says "device working properly" then Step 5 isn't going to help. But I often find it says something else (like "disabled"). If so, press the "Reconfigure" button (I think). Then press "Next" and with a bit of luck the device will get reset.
After this I invariably find that Step 3 is required.
That's it! Usually works for me. Thanks to Richard Black and Julian Melville.
Folder navigation
Open a folder in a new window, without replacing the current window, even though you have set View/FolderOptions/Settings/OpenEachFolderInSameWindow: just hold down the control key while you double-click. If you are using Active Desktop (i.e. single click), you need to Left-Mouse-Press on the folder, then press the control key, then release the mouse button, then release the control key.
Run the Inbox Repair Tool (Outlook users)
If something bad happens to your Personal Folders, Outlook may put up a box saying "Exit all mail-enabled applications and run the Inbox Repair Tool". I couldn't find the "Inbox Repair Tool"!
It turns out that it's a program called Scanpst.exe, which I found using the "Find files and folders" search engine. (It was deeply buried in Program Files/Common Files/System/....)
The name "Inbox Repair Tool" seems to be a misnomer: it'll repair your personal.pst file too.
Capture a screenshot
Capturing a screenshot is especially useful when reporting a bug where the alert box, or whatever, doesn't support cut and paste.
• Press Alt-PrtScrn. This puts a screenshot of the currently-active window on the clipboard. (Plain PrtScrn will take a shot of the entire screen.)
Once you have the picture on the clipboard you can paste it into an email, or Word, or Powerpoint, and many other applications. In many such applications you can resize the pasted image by dragging the resizing tabs on the sides and corners; the ones in the corners will usually preserve the aspect ratio.
If you just want to save the picture as a file, one simple way is this:
• Open Start/Programs/Accessories/Paint • Paste. (Press 'yes' to the message about a large clipboard.) • Save As.. Choose PNG (portable network graphics) or GIF (albeit only 256 colour)
format; they more compact than BMP (the default) or JPEG (photo-oriented).
A good screen-shot utility is Capture. It captures screenshots into .bmp files, as well as to the clipboard. Thanks to Ron Kaminsky for the pointer.
Click in a URL without opening it
When using an editor like Word or Outlook, have you ever tried to put the insertion point into the middle of an underlined-in-blue URL, so that you can edit it? If you just click in the URL, Word or Outlook will try to follow the (probably bogus) URL, which is hardly what you wanted.
Fortunately, someone at Microsoft thought of that: just hold down Ctrl while you click. Took me ages to discover this.
Defragment your disk from the command line
You can defragment your disk from a cmd shell simply by typing defrag c: Defragmenting can significantly improve the speed of some things (e.g. running a compiler).
Someone told me that if you carry on working while the defrag process is running, it continually restarts from scratch, so didn't make any progress. But this didn't happen for me. It just clunks away happily in the background.
Here's how to do this as a scheduled task so it happens overnight. Create a batch-file, e.g. defragall.bat and put in into a directory in your path. The batch-file looks like this:
@echo off defrag c: defrag d: defrag ... Now, go to "Start/Programs/Accessories/System Tools/Scheduled Tasks". Add scheduled task and point it to the batch file. Set up the time etc to whatever you want. (Thanks to Mark Oude Alink for this.)
Restart the desktop after Explorer crash
It occasionally happens that I click on a link in Explorer, and the Explorer window locks up entirely. The hour-glass appears, and the window will do nothing, ever again. (Pressing Stop etc has no effect. The wavy flag does not wave.) It's as if it has gone into an infinite loop.
The only way out is to kill Explorer from the Task Manager. Alas, that kills my desktop too, so the Start button and taskbar disappear. One way to solve this is to log out and back in again, but you don't need to do that: here's how to restart your dekstop.
Do a Ctrl+Alt+Delete, go into Task Manager, then ensure that the 'Applications' tab is selected and then press 'New task'. Type 'explorer' and yey presto, your desktop reappears.
Notes about .reg files
Double-clicking a ".reg" file makes a change to the registry (it asks for confirmation first). That's an alarming thing to do. Here are a couple of things that make it less worrying:
• You can read the contents of the .reg file by right-clicking it and select "Edit". (This opens Notepad. For some reason, emacs only sees gibberish.)
• If you are scared about fiddling with the registry (I am) you can always back up just the little branch you are changing, creating your own .reg file containing the old piece. Select "Start/Run...", type "regedit". Navigate your way down the registry keys to the one you are planning to change; in this case, it's
• [HKEY_LOCAL_MACHINE\SYSTEM\CurrentControlSet\Control\Keyboard Layout]
Now right-click it, and select "Export". The dialogue box lets you say where to save it; check that "Selected branch" is chosen in the "Export range" panel. That'll create you a little .reg file; double-clicking it will re-install it if the patch went wrong.
Print ASCII files
I often want to print program listings. The prfile utility is rather like the Unix a2ps; it formats Ascii listings for printing, adding titles, frames, and putting 2 or more pages on one sheet. http://hem.passagen.se/ptlerup/prfile.html
Show folder sizes
I sometimes want to know how much space a folder takes. Right-click/Properties does the job for a single folder but the free TreeSize utility displays a nice tree with all the folder sizes filled in. http://www.jam-software.com/index.html
Reading Macintosh floppy discs
You can read a 1.44Mb Macintosh floppy disc directly on your PC, if you have the right software. (The 800kb kind need different hardware.)
• The best site I found to look for software on the net for this was http://www.zdnet.com/. The search string "read +floppy +mac" found me four programs; none were free, but all had demo versions.
• The one I tried was TransMac. It installed and worked first time. Slightly wierd UI, and the demo version doesn't copy folders recursively, but it did the job for me. The full version is less than $100.
Papers and presentations
A PDF reader that doesn't lock the file
When writing a paper I'm in an edit-runLatex-view cycle. But Adobe Acrobat locks the file it is reading, so to run Latex you have to close the viewer, run Latex, and then re-open the PDF. Painful! The Sumatra PDF viewer doesn't lock the file. Instead it automatically updates the view if the PDF file changes. Much nicer! (Ghostview does this toofor Postscript files.)
Export Postscript from a Word, Excel, or Powerpoint document
I often want to export Postscript from from a Word, Excel, or Powerpoint document. For example: submit a Word documemt to a conference, or include a chart made by Excel in a paper, or include Powerpoint pictures in a LaTeX file. I know two ways to do this, neither of them obvious.
Use "Print as file"
Using "Print as file" is most direct, but it takes multiple actions on each occasion.
• Select File/Print.... • In the print dialogue box, check 'print as file'. • In the same dialogue box, click Properties, then the Paper/Quality tab, then
Advanced.... Then, in the hierarchical tree, click on Document Options/Postscript Options/Postscript Output Option. A little drop-down menu box appears: select the Encapsulated Postscript (EPS) option. If you don't do this, you get lots of extra non-postscript goop in your Postscript file.
• Click OK enough to get you back to the Print.. dialogue box. • Click OK. You get a file browser window. In the bottom-most selector pick "All Files
(*.*)" (if you don't do this, Powerpoint will add a suffix to whatever file name you pick). In the next-to-bottom box type the name of the Postscript file (e.g. foo.ps). Click Save.
If you select File/Print... again, to repeat the process after editing the file, you don't need to repeat the "print as file", or "select EPS" steps; they are remembered.
The stuff above only prints one slide (the first). If you want to print all of the slides of a Powerpoint presentation, with each slide on a new page, Mike Barnett found that you can proceed as follows:
• Change the second option "TrueType Download Option" from "Auto" to "Bitmap"
Trying to view the resulting PostScript using Ghostview ends up in errors that Ghostview complains about. But if you take the PostScript and convert it to PDF, then Acrobat has no problem displaying all of the pages. It doesn't appear to make any difference for this if I change the "PostScript Output Option" to "EPS" or not. [Mike adds: this recipe may not work with Office 2003. I finally got it to work using "Optimize for Portability" as the PostScript
Output Option and "Automatic" as the TrueType Font Download Option. The PostScript is still wacky: in GhostView you see only the first page, but the PDF contains all of the pages, *except* for the last slide. So I had to add a dummy last slide to the presentation...]
Install a pseudo-printer
The second method takes two minutes to set up, but is then less work to use. It works by installing a pseudo-printer, but you don't need any hardware to do this!
• Open "Start/Printers and Faxes". • Double-click "Add Printer" to wake up the add-printer wizard. • Select "Local printer" and un-check the "Automatically detect plug-and-play" box;
click Next. • In the "Select a port" box, select "Use the following port" and choose "FILE: (Print to
file)" menu item. This is the crucial and entirely non-obvious step. • In the "Install printer software" box, you pick some printer for which you have the
sofware. Chances are, it'll already be on your hard disk if you choose a popular brand. I chose "Apple Laserwriter NTX v51.8", but I don't have an algorithm for how to choose. Pretty much any one should work.
• The rest of the wizard boxes are self explanatory. You get to type a name for the printer: you can use "Print Postscript to file" or something like that.
Once you have done this, you simply choose your new printer in the "File/Print.." dialogue, whenever you want to print Postscript. When you click OK in the "Print.." box, you'll be asked for a file name. I didn't get a proper file-select dialogue box here, so it wasn't clear to me which directory the file would end up in, so I had to type a full path name. I don't know whether this infelicity is driver-specific.
Excel charts
If you want to dump a single Excel chart as Postscript:
• Right-click the chart and select "Chart Window". • Now you can right click the chart window's title bar, and select Print.
Include LaTeX equations in Powerpoint slides
Writing mathematics in Powerpoint slides is a pain. But no longer!
Written by George Necula, TexPoint is a Powerpoint add-in that enables the easy use of LaTeX symbols and formulas in Powerpoint presentations. The package allows you to write LaTeX source for symbols or one-line formulas in your slides and then translates that source into the appropriate sequence of symbols. For more complicated formulas, you can also embed arbitrary LaTeX source in the Powerpoint presentation. The source is processed and displayed automatically every time it is edited.
I havn't used it yet, but it looks terrific, and people who have used it say it's great.
Draw a picture and include it in a LaTeX document
I use LaTeX for writing papers, and I often want to include diagrams. Here are a couple of ways to use excellent Win32 drawing tools to do so. (It took me ages to discover this stuff.)
Powerpoint is widely available, and is an excellent drawing editor. I particularly like the fact that connectors stay connected when you move boxes around, and that box labels stay with the box. Generally, the user interface is jolly good. The trick is to get it to dump a picture you can include in LaTeX:
• Draw your picture(s) on a slide. You can draw several diagrams on a single slide, and later extract them selectively. I draw them actual size (Powerpoint has a ruler that works) and use zoom to make them big enough to draw easily. I have never tried using more than one slide.
• Save the diagram as a normal Powerpoint file, say foo.ppt. • Save the diagram to a Postscript file (see above). • View the EPS file with Ghostview (or some other previewer). Note the coords of the
Bottom LH and Top RH corners. Ghostview helpfully displays these in the status bar. (Do not make the mistake of grabbing the top LH and bottom RH coords!)
• In your LaTeX file, add • \usepackage{epsfig}
at the beginning. Then, where you want your figure, put:
\begin{figure} \begin{center} \epsfig{file=foo.eps, bbllx=35pt, bblly=582pt, bburx=214pt, bbury=775pt, clip=} \end{center} \caption{Your caption} \label{your-label} \end{figure}
(Of this, the only important part is the \epsfig line.) Fill in the coordinates you got from the previous step in the bbllx etc fields. (bbllx = bounding box lower left x-coord.) The clip= part is important: it says to ignore stuff outside the specified bounding box.
• If you have multiple drawings on a single slide, just use a separate \epsfig line for each, with the same file name but different coordinates.
• If you have only one drawing on the slide, you can avoid the coordinate-fiddling stuff above (thanks to Laci Lavosz):
o Once you have the EPS file created by Powerpoint, open it with Ghostview, and then convert it to EPS (even though it is already EPS). You do this by selecting "PS to EPS" on Ghostview's File menu.
o In the dialog box that opens, choose "Automatically calculate Bounding Box", and save it as foo.eps. You can also specify the bounding box by hand.
o Now you include it in a LaTeX file using the following incantation: o \usepackage{graphicx}
in the header, and this where you want to include it:
\begin{figure} \includegraphics*{foo.eps}
\end{figure}
(It seems that you need the "*", since it tends to print white stuff around the figure otherwise; the clipping is somehow not perfect.)
That's it! It's quite a pain, but it works. Furthermore, if you edit the drawing, you can just "print" the file again. Powerpoint will remember the EPS setting, so it's quite quick. If you don't change the bounding box, you don't need to change the LaTeX file at all.
When I asked around about this I got the following alternative suggestions, which I have not tried.
• Visio got star billing. It seems to have an even better UI than Powerpoint, and can export Encapsulated Postscript (use Save As, and select EPS from the offered file types in the dialogue box which asks you what file to save it in).
• I used to use xfig on Unix. It can export Postscript, PDF, mixed LaTeX/PS, and many other formats, including bitmaps. markup.
• A couple of people recommended "http://bourbon.usc.edu:8001/tgif/">Tgif on Unix. • Adobe Illustrator knows about exporting Postscript. • CorelDraw likewise.
Include typeset material from Postscript into a Powerpoint slide
I'm preparing a Powerpoint presentation for a paper that I have typeset in LaTeX. Powerpoint is excellent for text and diagrams, but I wanted to include many equations and type-inference rules that I had carefully typeset in my LaTeX paper. Here's how to do it with amazingly little effort.
• Display your typeset paper with some renderer (e.g. GhostView) that lets you change the magnification.
Zoom in to make the equation (or whatever) be about the same proportion of your total screen size as the proportion of your final slide you want it to cover.
• Capture a screenshot of the active window onto the clipboard. • Switch to Powerpoint, and do "Paste". The bitmap gets stuck into your current slide.
When you do a full-screen display, it should display exactly as it did the moment you clipped it.
• Crop the picture if necessary. You can do this in Powerpoint, by displaying the "Picture" toolbar. You can also scale the bitmap by dragging its corners, but that may make the displayed image look less well rendered. Or you can edit the picture separately using Paint.
Someone else responded thus: I do pictures in a similar easy way - if I want to save a screen I want to put in a slide or word document, I press "Alt-PrtScn" on the keyboard (current focus window image goes into clipboard), then go to Office Photo Editor, File, New, control-V (paste) and then use the Select Tool to snip out graphics that I want.
Andreas Øye writes: "One tool I've found useful for getting Postscript graphics into Word/Powerpoint is pstoedit. Part open source and part shareware (EMF export)."

Include mathematical symbols in Word documents
[Contributed by Tuomas Aura.] It can be frustrating to use Word's Insert Symbol function to insert a mathematical symbol, because the symbol you want can be hard to find.
Instead, you can type a 4-digit hexadecimal character code, and then type Alt-X. For example, a square subset-or-equal symbol (\sqsubseteq in Latex) is = 2291 + Alt-X.
These two Word documents give the character codes:
• The longer one (4 pages) includes accented and Cyrillic characters. • The shorter one (2 pages) does not.
Install and configure useful packages
Skype
People complain that my microphone volume is too low. I open "Control Panels/Sounds and Audio Devices/Voice tab", select "Volume" and drag the volume control up. Now they can hear me. But then it slowly slides back down of its own accord! Skype is doing this. To stop this happening, start Skype, and do "Tools/Options/Audio settings tab", and on the "Microphone" un-check "Let Skype adjust my audio settings".
Emacs
There is a general FAQ for Emacs on Windows at http://www.gnu.org/software/emacs/windows/faq.html.
Install ispell for Emacs
ispell is an interactive spell checker for Emacs. I got a working copy from ftp://ftp.franken.de/pub/win32/develop/gnuwin32/cygwin/porters/Humblet_Pierre_A/V1.1. Look for ispell...README and ispell...tar.gz.
The instructions in the README are fine. I found it easy to install by untar-ing (telling WinZip to use path-names!) into c:/cygwin, and making sure that c:/cygwin/usr/local/bin was on my PATH.
Tags tables for emacs
[This one is not Win32-specific at all.] Tags tables are great. Here are two things I've found indispensable:
• You can do global search-and-replace across all the source files in your programming project, using tags-query-replace. It's interactive; it works on regular-expression patterns (like query-replace-regexp); the response "!" tells emacs to do all the changes in the current file, and then move on to the next file.
• I often find I need to refresh the tags table because the source files have changes. But I was constantly frustrated: I'd update the TAGS file, but no matter how often I said visit-tags-table thereafter, emacs always used the old TAGS table. Sigh.
Finally I found a function that doesn't appear to be documented in any of the obvious places: tags-reset-tags-tables. It does the obvious thing.
But there is one more gotcha: if you are editing the TAGS file in emacs itself, you must kill the buffer (not just save it) before visiting the tags file anew, else it seems to just stick with the old bogus one, even after you do tags-reset-tags-tables.
Printing from Emacs
Among other things, it tells you how to set up emacs so you can print from Emacs. I reproduce the simplest version here, due to Andrew Innes:
Printing (very) plain text. In 20.4, you should start by clearing out ALL printing-related settings from your .emacs, especially packages like print-nt that were written for older releases. If you have a printer physically attached to your computer, then I believe the default settings will very likely work just as they are (assuming you have already configured Windows to support the printer, and can successfully print a test page). So first try loading a small text file, and then selecting Tools -> Print -> Print Buffer from the menubar.
If you don't have a printer physically attached, or it is not attached to the standard parallel printer port (LPT1), then set `printer-name' accordingly:
(setq printer-name "LPT2:") ; non-standard port (setq printer-name "//some-server/its-printer") ; network printer Again try Tools -> Print -> Print Buffer from the menubar, to see if it works. For network printers, remember the rule: Emacs will only be able to print to "//some-server/its-printer" if "its-printer" is listed as a shared printer in the output of "net view some-server".
LaTex
I'm going to assume that you already have the miktex version of LaTex (http://www.miktex.org) installed, in "c:/texmf".
Configure LaTex
Here is how to configure Latex. In particular, you need to explain where to find your style files, bibliographies etc, and (unlike Unix) you don't do that through environment variables.
• Load c:/texmf/miktex/config/miktex.ini into your editor. (In an earlier version it was miktex.environment.)
• Edit the paths in this file. They are all well documented in comments. A suffix of "/" means "look in this directory". A suffix of "//" means look in this directory and its subdirectories recursively.
• If configure.exe exists in the config directory, run it. In later versions, this step seems to be unnecessary; indeed, configure.exe does not exist.
Runing dvips
I usually use dvips to convert the DVI files that Latex spits out into Postscript. It takes a couple of slightly-obscure flags that you may need:
• -P cmz makes dvips produce "Type 1 fonts", which display much better (or generate smaller files) when converted to PDF. Always use this if you are generating PDF. Without the -P flag you get "bit-mapped fonts"; these display marginally better with xdvi and gsview.
• -t letter or -t a4. This flag governs the placement of the typeset document on the printed page. Latex has already fixed the size of the printed area; the -t flag just controls where on the page the printed area is placed.
Getting PDF
To generate PDF from a Latex source, I've had conflicting advice about pdflatex:
• One person says: don't use pdflatex if you can avoid it. Use ordinary latex, then dvips then ps2pdf. pdflatex is finicky and accepts fewer inputs. If you have a tool that creates EPS (or EPSI), you're out of luck.
• Another says (about converting EPS): epstopdf which comes with Ghostscript, and is also packaged with MikTex. It has always worked fine for me.
That's all I know!
Make hyperlinks work
If you add \usepackage[ps2pdf,colorlinks=true]{hyperref} to your document, you should get working hyperlinks. The ps2pdf bit makes the links work in PDF, after conversion (using ps2pdf) from Postscript to PDF. Otherwise you get "dvips: Oh no, link not found in target hashtable".
View DVI files
It's possible to look at the DVI files directly. What took me ages to discover is that the DVI file viewer that comes with miktex is called yap.
Here's how to make yap your default DVI viewer, so that double-clicking a DVI file will open it. In a file browser window pick "Tools/Folder Options...". Click on the "File Types" tab; check that DVI is not in the list of known extensions; click "New"; type "dvi" into the extension box; then click OK. Now select the DVI item in the scrolling list of file types, and click "Change". I get a window saying "Windows doesn't know how to open DVI files". Click "Select the program from a list"; in the new dialogue box, click Browse.. and navigate to "C:/texmf/miktex/bin/yap.exe". Now OK your way out.
Installing a Telnet client
TeraTerm is a good telnet client to run on your machine. You can find it at http://hp.vector.co.jp/authors/VA002416/teraterm.html In particular, it supports a SSH plugin, TTSSH. The latter is available on the same page as above. When you run TeraTerm, from the Setup window do the following:
• Setup/Terminal. Click "Term size = Window size". This lets you resize your window (otherwise you can't).
• Setup/Window. Change the size of the scroll buffer if you want. • Setup/keyboard. In 'Transmit DEL by' click 'Backspace' and 'Delete' (unless you only
want one or the other. Click 'Meta key' too. • Setup/Save settings. Just click ok.
Alternatively, Jurgen Bohn wrote to me to recommend PuTTY, a free implementation of Telnet and SSH for Win32 platforms, along with an xterm terminal emulator
http://www.chiark.greenend.org.uk/~sgtatham/putty/ He said "This free tool is very easy to use and requires no installation etc." I havn't tried it myself.
SSH and making keys
SSH comes with Cygwin and with MSYS. Once you have it, people will say "send me your public key". You can generate a public-key/private-key pair, using the command ssh-keygen -d (ssh-keygen comes with ssh.) Running this command creates the private and public keys in $HOME/.ssh/id_dsa and $HOME/.ssh/id_dsa.pub respectively, assuming you accept the standard defaults.
ssh-keygen will ask for a passphrase. The passphrase is a password that protects your private key. In response to the 'Enter passphrase' question, you can either:
• [Recommended.] Enter a passphrase, which you will quote each time you use CVS. ssh-agent makes this entirely un-tiresome.
• [Deprecated.] Just hit return (i.e. use an empty passphrase); then you won't need to quote the passphrase when using CVS. The downside is that anyone who can see into your .ssh directory, and thereby get your private key, can mess up the repository. So you must keep the .ssh directory with draconian no-access permissions.
To protect your .ssh from access by anyone else, right-click your .ssh directory, and select Properties. If you are not on the access control list, add yourself, and give yourself full permissions (the second panel). Remove everyone else from the access control list. Don't leave them there but deny them access, because 'they' may be a list that includes you! ssh-keygen -d generates a so-called "Version 2" key pair. Version 2 is more secure. However if you want a Version 1 key pair, use
ssh-keygen Doing so creates the private and public RSA keys in $HOME/.ssh/identity and $HOME/.ssh/identity.pub respectively.
Cygwin
Cygwin is a suite of Unix lookalike tools that dresses up the Win32 environment into something more UNIX-like. Notably, it provides gcc, as and ld. Cygwin also provides CVS.
Important grungy information about Cygwin:
• Cygwin doesn't deal well with filenames that include spaces. "Program Files" and "Local files" are common gotchas.
• Cygwin implements a symbolic link as a text file with some magical text in it. So other other that don't use Cygwin's I/O libraries won't recognise such files as symlinks. In particular, programs compiled by GHC are meant to be runnable without having Cygwin, so they don't use the Cygwin library, so they don't recognise symlinks.
Here's how to install Cygwin.
• Install Cygwin 1.1.x from • http://sources.redhat.com/cygwin/
(Just click on the "Install Cygwin now" icon.) If you have a pre-1.1 version, you should deinstall this first. Say "DOS" to the radio box labelled "Default Text File Type". Say "Use IE5 settings" to the radio box mentioning it.
• Issue the following command: • mount -f c: /
(replacing the drive letter and path of the Cygwin installation as appropriate). This makes your default drive properly visible to Unix programs.
• Add C:/cygwin/bin to your PATH. • In the bin directory of the cygwin tree, copy bash.exe as sh.exe. (If sh.exe already
exists, it's been installed by the ash package; you can either deinstall that first, or just overwrite it, unless you know otherwise.) This is needed because some UNIX utils have got /bin/sh hardwired in.
• Set your SHELL user environment variable to c:/bin/sh. When you invoke a shell in Emacs, this $(SHELL) is what you get.
• Set your HOME user environment variable to point to your home directory. This is where, for example, bash will look for your .bashrc file.
• Set your MAKE_MODE user environment variable to UNIX. If you don't do this you get very wierd messages when you type 'make', such as:
• /c: /c: No such file or directory Here are some usage hints:
• If you add • alias start='cmd /c start'
to your $HOME/.bashrc, it lets you start up Windows applications associated with a particular file extension directly from the bash prompt, e.g.,
sofbox$ start someDoc.html
starts up IE displaying someDoc.html.
• As long as you have POSIXLY_CORRECT unset (default), you can do: • cd 'C:\Program Files\...'
without individually escaping the spaces. This is useful when you want to paste windows paths as arguments to cygwin commands.
• Right clicking in the cygwin window will paste the contents of the clipboard buffer just like in X.
• When you do want to use windows explorer, you can type 'explorer .' and it will open explorer in the same directory as cygwin.
• Use cygpath.exe to translate between Win32 paths (with forward or backward slashes) and cygwin paths.
Services for Unix
Microsoft now produce a package called Services for Unix (SFU). Like Cygwin, it provides a Unix environment on top of the Windows platform, but the integration between SFU and Windows is much deeper and more intimate.
I have never used SFU, but I've seen a demo and it looks pretty good. It's free too, I believe, from version 3.5 onwards.
http://www.microsoft.com/windows/sfu/ I am told that it does not work on the Home edition of Windows XP.
CVS
There is a very nice graphical front-end to CVS for Win32 platforms, with a UI that people will be familiar with, at
http://www.wincvs.org/ We have tried, and failed, to make it work with all the ssh stuff. If you succeed, let us know.
Brian Zhou recommends TortoiseCVS, another graphical front-end for CVS on Win32, which makes a CVS repository look like a Windows Explorer folder.
http://cvsgui.sourceforge.net/TortoiseCVS/download.shtml I havn't tried it myself.
Installing GHC
Use the InstallShield download from http://haskell.org/ghc. By default, this installs GHC in c:/ghc/ghc-x.yy/*.
You'll need to add c:/ghc/ghc-x.yy/bin to your PATH; that makes GHC easy to invoke. And that is all.
Be a GHC developer
To build GHC from source, follow the instructions in the Notes for building under Windows section of the GHC building guide. If you check out the source using CVS, follow the instruction in the Using the CVS repository section of the same guide.