simple woodworking: bookcase - wordpress.com€¦ · want more chief's shop plans? visit...
TRANSCRIPT

Want more Chief's Shop plans? Visitchiefsshop.com and look through thePlans section.Be sure to "Like" Chief's Shopon facebook by heading over tofacebook.com/ChiefsShop.
More Plans
lumberSolid Wood Version1 - 1 /2 x 6 x 22 - 1 x 3 x 81 - 1 x 10 x 83 - 1 x 12 x 81 - 1 /4 x 4 x 4sheet of plywood
Plywood Version1 - 1 /2 x 6 x 21 - 1 /4 x 4 x 4sheet of plywood
1 - 3/4 x 4 x 8sheet of plywood
(availability will vary)hardware/supplies1 1 /2" screws (optional)1 1 /2", 3/4" brads1 1 /4" pocket hole screwsshelf pinspocket hole plugswood glue, wood filler,paint/stain, furniture glides
toolstable sawmiter sawjigsaw or bandsawsanderpneumatic nailer/hammerdrill/driverKreg Pocket Hole JigKreg Shelf Pin Jigclampssquarelong flexible metal ruleror long scrap strip
WhatYou'll Need
SSiimmppllee WWooooddwwoorrkkiinngg::bbooookkccaassee
© Chris Hill/Chief's Shop 2012 Page 1chiefs‐shop.com
NOTELayout
take care!
About These PlansOn this first page you will see above the project complete. On the last page you'll find thefinished outer dimensions. Be sure to read ALL of the project steps before you start.
To the right is a list of the Lumber, Hardware/Supplies, and Tools you will need to completethis project. A measuring tape and pencil are not included because that should be prettystandard and self explanatory.
Below What You'll Need is the Parts list. This also is included on the Cutting Diagram page,which is the next to last page of this plan document. Also on the Cutting Diagram page is anestimate of the cost of the lumber. This estimate doesn't include any other supplies and doesnot factor in sales tax.
Throughout these plans you'll find the icons below:
This indicates a diagram detailing the dimensions of a project partand/or the placement for pocket holes, screws, nails, etc.
Notes are the instructions for aparticular step/section of the project.
This indicates when to payclose attention to the diagrams,take precautions for safety, etc.
PartsBottom Shelf (1) - 3/4 x 11 1 /4 x 36Main Shelf (1) - 3/4 x 11 1 /4 x 36Divider (1) - 3/4 x 11 1 /4 x 18 3/4Sides (2) - 3/4 x 11 1 /4 x 36Front Rail (1) - 3/4 x 2 1 /2 x 36Back Rail (1) - 3/4 x 2 1 /2 x 36Bottom Rails (2) - 3/4 x 1 3/4 x 36End Stiles (4) - 3/4 x 4 1 /4 x 36End Rails (2) - 3/4 x 1 3/4 x 7 3/4End Shelves (6) - 3/4 x 4 x 7 3/4Magazine Rack (2) - 1 /2 x 5 1 /2 x 7 3/4Back (1) - 1 /4 x 36 x 37 1 /2Top (1) - 3/4 x 11 1 /4 x 46Shelves (3) - 3/4 x 11 1 /4 x 17 1 /2**adjust as needed
All parts are listed in actual dimensions. Refer tothe Cutting Diagram on the last page of this planas a guide for determining the specific boardfrom which to cut the parts.

© Chris Hill/Chief's Shop 2012 Page 2chiefs‐shop.com
Layout
NOTE Use the layouts as guides for measuring, marking, cutting and drilling pocket holes in thePanels. Create four.Be sure to set your pocket hole j ig and drill bit for 3/4-inch stock.
SSiimmppllee WWooooddwwoorrkkiinngg::bbooookkccaassee
Main Shelf
Bottom Shelf

Page 3chiefs‐shop.com © Chris Hill/Chief's Shop 2012
SSiimmppllee WWooooddwwoorrkkiinngg::bbooookkccaassee
Layout
NOTE Use the layouts as guides for measuring, marking, cutting, drilling pocket holes, anddrilling shelf pin holes in the Divider. Make sure you follow the layout closely for bothsides of the part.Be sure to set your pocket hole j ig and drill bit for 3/4-inch stock.
Divider (right side)
Divider (left side)

NOTEPosition the Divider as shown (centered on the Main Shelf and Bottom), and attach usingglue and 1 1 /4-inch pocket hole screws. Make sure the faces of the parts are positioned asshown below, as this is crucial for a following steps.
Page 4chiefs‐shop.com © Chris Hill/Chief's Shop 2012
SSiimmppllee WWooooddwwoorrkkiinngg::bbooookkccaassee
1 1 /4" pockethole screws
1 1 /4" pockethole screws
Divider
Bottom
Main Shelf

© Chris Hill/Chief's Shop 2012chiefs‐shop.com Page 5
SSiimmppllee WWooooddwwoorrkkiinngg::bbooookkccaassee
Layout
NOTE Use the layouts as guides for measuring, marking, cutting and drilling shelf pin holes in theSides. Label these parts as left and right to avoid confusion in the following steps.
Left Side
Right Side

NOTEPosition the parts as shown at right and attachusing glue and 1 1 /4-inch pocket hole screws.Do not tighten the screws attaching theassembly to the Right Side fully yet, allowsome play in the joints. You may need to turnthe assembly on a side or edge to make it easierto attach the parts. Be sure to clamp in placewhile attaching.
Page 6chiefs‐shop.com © Chris Hill/Chief's Shop 2012
SSiimmppllee WWooooddwwoorrkkiinngg::bbooookkccaassee
Layout
NOTE Use the layouts as guides for measuring, marking, cutting and drilling pocket holes in theFront Rail, Back Rail, and Bottom Rails. Only cut the arc on the Front Rail and not theBack Rail. Be sure to set your pocket hole j ig and drill bit for 3/4-inch stock.
Front Rail/Back Rail
Bottom Rail
Bottom Rail
Bottom Rail
Back Rail
Front Rail
Left Side
Right Side
1 1 /4" pockethole screws
Page 7chiefs‐shop.com © Chris Hill/Chief's Shop 2012
SSiimmppllee WWooooddwwoorrkkiinngg::bbooookkccaassee
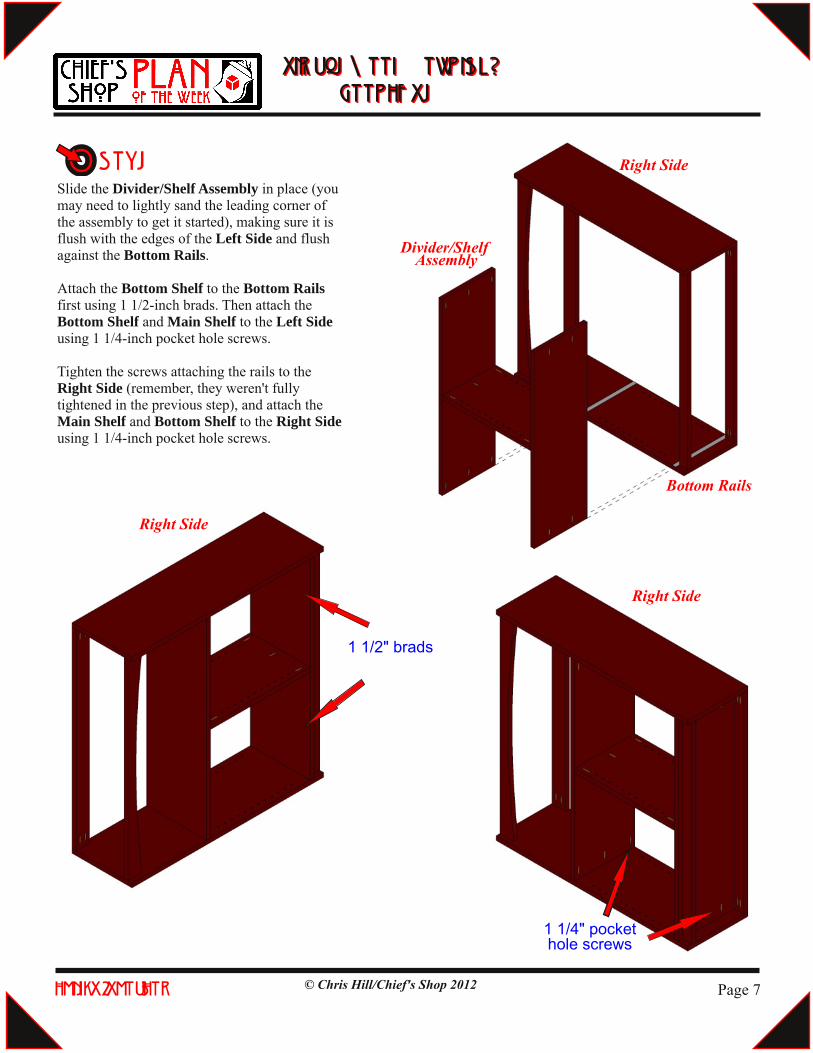
NOTESlide the Divider/Shelf Assembly in place (youmay need to lightly sand the leading corner ofthe assembly to get it started), making sure it isflush with the edges of the Left Side and flushagainst the Bottom Rails.Attach the Bottom Shelf to the Bottom Railsfirst using 1 1 /2-inch brads. Then attach theBottom Shelf and Main Shelf to the Left Sideusing 1 1 /4-inch pocket hole screws.
Tighten the screws attaching the rails to theRight Side (remember, they weren't fullytightened in the previous step), and attach theMain Shelf and Bottom Shelf to the Right Sideusing 1 1 /4-inch pocket hole screws.
Right Side
Divider/ShelfAssembly
Right Side
Right Side
Bottom Rails
1 1 /4" pockethole screws
1 1 /2" brads

Page 8chiefs‐shop.com © Chris Hill/Chief's Shop 2012
SSiimmppllee WWooooddwwoorrkkiinngg::bbooookkccaassee
Layout
NOTE Use the layouts as guides for measuring, marking, cutting and drilling pocket holes in theEnd Stiles. Create two of each of the above.Be sure to set your pocket hole j ig and drill bitfor 3/4-inch stock.
If you prefer, you can use the grid layout below to mark the blank.
End Stiles

Page 9chiefs‐shop.com © Chris Hill/Chief's Shop 2012
SSiimmppllee WWooooddwwoorrkkiinngg::bbooookkccaassee
NOTEPosition the End Rail as shown at right,clamp in place, and attach to the EndStiles using glue and 1 1 /2-inch screws(countersunk) or 1 1 /2-inch brads. Drivethe fasteners through the Stiles and intothe Rail.
End Rail
NOTEPosition the End Assembly as shown at left,clamp in place, and attach to the Right Sideusing glue and 1 1 /4-inch pocket hole screws.

Page 10chiefs‐shop.com © Chris Hill/Chief's Shop 2012
SSiimmppllee WWooooddwwoorrkkiinngg::bbooookkccaassee
Layout
NOTE Use the layout as a guide for measuring, marking, cutting and drilling pocket holes in theEnd Shelves. Be sure to set your pocket hole j ig and drill bit for 3/4-inch stock.
End Shelf
NOTEPosition the End Shelves as shown at left.Attach the bottom shelf to the End Rail andEnd Stiles using glue and 1 1 /4-inch brads. Usea square to keep the shelf properly aligned.
Position the remaining two shelves as shown.
End Shelves
bottom shelf

Page 11chiefs‐shop.com © Chris Hill/Chief's Shop 2012
SSiimmppllee WWooooddwwoorrkkiinngg::bbooookkccaassee
NOTEPosition the remaining two shelves as shown,and attach them to the Right Side using glueand 1 1 /4-inch pocket hole screws. Use a squareto ensure proper alignment. Drive 1 1 /4-inchbrads through the End Stiles and into theshelves. Again, use a square to ensure properalignment.
(bottom view)

Page 12chiefs‐shop.com © Chris Hill/Chief's Shop 2012
SSiimmppllee WWooooddwwoorrkkiinngg::bbooookkccaassee
NOTESand a slight roundover on one edge of theMagazine Rack. Position one corner of theunsanded edge as shown at right and tilt it to thedesired angle, so that it's roughly 1 /8- to 1 /4-inch from the edge of the End Stiles. Attachusing 1 1 /2-inch brads. Be careful to mark yournail line properly to avoid blowing out the bradon the Magazine Rack.
MagazineRack
MagazineRack

Page 13chiefs‐shop.com © Chris Hill/Chief's Shop 2012
SSiimmppllee WWooooddwwoorrkkiinngg::bbooookkccaassee
NOTERepeat the steps from Pages 8-12 to attach the EndShelf Assembly to the Left Side. Now is a goodtime to fill any pocket holes, screw holes, or bradholes, apply edge banding on plywood (if desired),and apply a finish to all but the back edges of thesides, shelves, and Divider, the back faces of theBack Rail and back Bottom Rail, and the top edgesof the entire assembly.
NOTEPosition the Back as shown, clamp in place,and mark the position of the assembly(reaching through the front and marking on theface of the Back). Apply a finish to the edges,ends, and faces of the Back, making sure to notapply a finish to the marked areas.
Attach the Back to the assembly using glue and3/4-inch brads. Touch up the finish on the Backas needed now.

Page 14chiefs‐shop.com © Chris Hill/Chief's Shop 2012
SSiimmppllee WWooooddwwoorrkkiinngg::bbooookkccaassee
Layout
NOTE Use the layout as a guide for measuring, marking, and cutting Top.
NOTEPosition the Top centered on the assembly and markthe outline of the assembly on the underside of theTop. Apply edge banding to the Top (if usingplywood), and apply a finish to the entire part,except for the areas marked.
Apply glue to the top edges of the assembly,reposition the Top, and attach using 1 1 /2-inch brads.Fill in any holes and touch up the finish as needed.

Page 15chiefs‐shop.com © Chris Hill/Chief's Shop 2012
SSiimmppllee WWooooddwwoorrkkiinngg::bbooookkccaassee
NOTEPosition the shelf pins in place (make sure the finish has dried properly) and cut the Shelves to fit. Remove the Shelves,apply edge banding to the front edge (if using plywood), and apply a finish. Be sure to allow the Shelves to dryproperly before reinserting them. Attach furniture glides or felt pads to the bottom of the assembly if placing theBookcase on wood flooring.

Page 16chiefs‐shop.com © Chris Hill/Chief's Shop 2012
SSiimmppllee WWooooddwwoorrkkiinngg::bbooookkccaassee
Follow ALL SAFETYGUIDELINES AND RECOMMENDATIONS provided by the manufacturers ofyour tools, and any chemicals such as glue and finishes you use in this project. YOUare responsiblefor your safety, so use common sense when working in the shop!
take care!
cutting DIAGRAM1 /2 x 6 x 2
1 x 3 x 8
1 x 1 0 x 8
1 x 1 2 x 8
1 /4-inch x 4- x 4-footsheet of plywood
Estimated Lumber CostSolid Lumber
White Pine: $81
Clear Pine: $160
PartsBottom Shelf (1) - 3/4 x 11 1 /4 x 36Main Shelf (1) - 3/4 x 11 1 /4 x 36Divider (1) - 3/4 x 11 1 /4 x 18 3/4Sides (2) - 3/4 x 11 1 /4 x 36Front Rail (1) - 3/4 x 2 1 /2 x 36Back Rail (1) - 3/4 x 2 1 /2 x 36Bottom Rails (2) - 3/4 x 1 3/4 x 36End Stiles (4) - 3/4 x 4 1 /4 x 36End Rails (2) - 3/4 x 1 3/4 x 7 3/4End Shelves (6) - 3/4 x 4 x 7 3/4Magazine Rack (2) - 1 /2 x 5 1 /2 x 7 3/4Back (1) - 1 /4 x 36 x 37 1 /2Top (1) - 3/4 x 11 1 /4 x 46Shelves (3) - 3/4 x 11 1 /4 x 17 1 /2**adjust as needed
All parts are listed in actual dimensions. Refer tothe Cutting Diagram on the last page of this planas a guide for determining the specific boardfrom which to cut the parts.

Page 17chiefs‐shop.com © Chris Hill/Chief's Shop 2012
SSiimmppllee WWooooddwwoorrkkiinngg::bbooookkccaassee
Follow ALL SAFETYGUIDELINES AND RECOMMENDATIONS provided by the manufacturers ofyour tools, and any chemicals such as glue and finishes you use in this project. YOUare responsiblefor your safety, so use common sense when working in the shop!
take care!
cutting DIAGRAM
1 /2 x 6 x 2
1 /4-inch x 4- x 4-footsheet of plywood
3/4-inch x 4- x 8-footsheet of plywood
Estimated Lumber CostPlywood
Pine Plywood: $50
Birch Plywood: $66
For this version you willwant to add an edge bandingto the 3/4-inch plywood, oruse a wood filler.
PartsBottom Shelf (1) - 3/4 x 11 1 /4 x 36Main Shelf (1) - 3/4 x 11 1 /4 x 36Divider (1) - 3/4 x 11 1 /4 x 18 3/4Sides (2) - 3/4 x 11 1 /4 x 36Front Rail (1) - 3/4 x 2 1 /2 x 36Back Rail (1) - 3/4 x 2 1 /2 x 36Bottom Rails (2) - 3/4 x 1 3/4 x 36End Stiles (4) - 3/4 x 4 1 /4 x 36End Rails (2) - 3/4 x 1 3/4 x 7 3/4End Shelves (6) - 3/4 x 4 x 7 3/4Magazine Rack (2) - 1 /2 x 5 1 /2 x 7 3/4Back (1) - 1 /4 x 36 x 37 1 /2Top (1) - 3/4 x 11 1 /4 x 46Shelves (3) - 3/4 x 11 1 /4 x 17 1 /2**adjust as needed
All parts are listed in actual dimensions. Refer tothe Cutting Diagram on the last page of this planas a guide for determining the specific boardfrom which to cut the parts.

Page 18chiefs‐shop.com © Chris Hill/Chief's Shop 2012
SSiimmppllee WWooooddwwoorrkkiinngg::bbooookkccaassee