simview - microsoftlaerdalcdn.blob.core.windows.net/downloads/f2440/simview... · 6.6 controlling...
TRANSCRIPT

Version 2.1
SimView The Administrator’s Direction for Use

Contents
1 Introduction ..................................................................................................................................................................... 3
Before you start installing ................................................................................................................................... 3 1.1
Quick installation overview ................................................................................................................................ 3 1.2
2 Cautions and warnings .................................................................................................................................................. 4
Warranty ................................................................................................................................................................. 4 2.1
3 Important Note .............................................................................................................................................................. 4
SimView Security and Privacy concerns .......................................................................................................... 4 3.1
Whose responsibility is it to secure the SimView Server? ......................................................................... 4 3.2
Anti-virus and Firewalls ....................................................................................................................................... 4 3.3
Privacy ...................................................................................................................................................................... 4 3.4
Unauthorized access to SimView content ...................................................................................................... 5 3.5
Axis IP Cameras .................................................................................................................................................... 5 3.6
File security and backup of data ........................................................................................................................ 5 3.7
4 Setup ................................................................................................................................................................................. 6
Computer name .................................................................................................................................................... 6 4.1
Microphone installation ....................................................................................................................................... 6 4.2
External Audio Equipment .................................................................................................................................. 6 4.3
USB Web-cam install............................................................................................................................................ 6 4.4
SimView extension installation and configuration ......................................................................................... 7 4.5
Simulator setups for use with SimView. .......................................................................................................... 8 4.6
5 SimView .......................................................................................................................................................................... 10
Software installation ........................................................................................................................................... 10 5.1
Configuration ....................................................................................................................................................... 10 5.2
6 Using SimView Server ................................................................................................................................................. 21
The login screen .................................................................................................................................................. 21 6.1
The Home screen: .............................................................................................................................................. 21 6.2
The View & setup window ............................................................................................................................... 22 6.3
Video windows .................................................................................................................................................... 23 6.4
Recording a scenario .......................................................................................................................................... 25 6.5
Controlling SimView from the Instructor Application ............................................................................... 25 6.6
Operating the IP cameras ................................................................................................................................. 26 6.7
Debriefing ............................................................................................................................................................. 27 6.8
Sharing simulations ............................................................................................................................................. 29 6.9
Simulation sessions ............................................................................................................................................. 31 6.10
7 Maintenance ................................................................................................................................................................... 33
Backup strategy ................................................................................................................................................... 33 7.1
What to back-up? ................................................................................................................................................ 33 7.2
Hard disk “clean-up” of unsaved simulations ............................................................................................... 33 7.3
System notification .............................................................................................................................................. 34 7.4
8 Troubleshooting ........................................................................................................................................................... 35
9 Index ................................................................................................................................................................................ 38

3
1 Introduction The directions for use include comprehensive step-by-step instructions and illustrations for using SimView.
All supplied user manuals and labeling from original manufactures should be followed.
The SimView direction for use does not supersede those from the original manufacturer.
Check www.laerdal.com for newest version of this DFU.
Before you start installing 1.11. Have all actions from the “Presales Questionnaire and site survey” been solved successfully?
2. Is the Network infrastructure ready with the camera(s) connected?
3. Unpack the boxes and check that everything is delivered and undamaged, so that you have all the
needed parts ready before start.
4. Read the documentation before you start.
Figure 1
Quick installation overview 1.2The following is a quick overview of the steps needed to setup the SimView system.
They are only relevant if you are not having a Laerdal Representative to assist you with the installation.
1. If you ordered the cameras together with the SimView, the first thing to do is to install the cameras
in the planned places and connect them to the Ethernet, if you already have the cameras in place
then go to step 2.
2. Install the PC and connect it to the Ethernet.
3. Connect keyboard and mouse to the PC.
4. Connect Web-cam if needed to a USB port on the PC.
5. Connect the microphone to the PC.

4
2 Cautions and warnings
• By using this product, Laerdal® Medical does not condone the use of this system for violating any
government, state or local laws or personal rights.
• This product contains software that may be installed to other computer systems that may allow
remote visual and audio monitoring. Allowing access to private networks and the recording of
unannounced conversations may be a violation of personal rights. It is recommended that individuals
in the areas of recording equipment be made aware of the installed equipment and to the fact that
there conversations and activities could be viewed and recorded without notice.
• It is not advised to use this system as a means of physical security for the protection of public or
private property.
• Laerdal® Medical will not be responsible for loss or stolen property due to the use nor failure of
operation of this equipment.
• Read understand, and follow all equipment instructions, safety warning and guidelines before
operating the Laerdal® SimView and all associated equipment.
• Do not use cables or connectors with bent pins or visible damage.
Warranty 2.1Please refer to the enclosed printed Laerdal® Global Warranty or www.laerdal.com for terms and
conditions.
3 Important Note
SimView Security and Privacy concerns 3.1This document is meant to address concerns regarding SimView privacy and security. These matters are of
course very dear to Laerdal.
Whose responsibility is it to secure the SimView Server? 3.2The SimView server system is by default not configured with any firewall or antivirus software.
It is the customer's responsibility to install such software and to include the PC in the normal Domain
policies on the network. Furthermore it is also the customer's responsibility to keep the PC's updated with
the latest security patches.
This is due to the fact that once the PC is installed at the customer site; Laerdal has no control over the PC
and therefore cannot be responsible for maintaining security.
Anti-virus and Firewalls 3.3The PC is not supplied with an anti-virus program. Windows firewall is not activated by default. It is the
customer’s responsibility to protect the simulation system components from unauthorized access.
Privacy 3.4Content stored on the SimView server cannot be accessed without proper login credentials. Two types of
login exist to get access to the stored simulations. One type grants access to change the configuration,
delete files and edit logs and the other type only grants access to view the simulations and live video feed
without being able to change anything.
You can create as many users as needed on the system.

5
It is important to understand that there is no filtering done on the logins, which means that all content
stored on the server can be viewed by everyone with a valid login.
If the built in user access functionality does not suffice, then further restrictions can be imposed on the PC
by adding Domain policies controlled by the local IT administrators on the network, however this is the
responsibility of the customer to set up as desired.
Note! Some regions have laws or regulations stating that rooms under video/audio surveillance must be
properly marked with a sign or similar. Please make sure you are complying with your local regulations.
Unauthorized access to SimView content 3.5The SimView server software is, as mentioned in the Privacy section above, designed to prevent access to
the content if a user does not have a login; however it cannot be guaranteed that unauthorized access to
content is not possible. SimView Server should consequently never be exposed directly to the Internet.
Securing the PC with the proper Domain policies and restrictions is therefore needed and should be planned
with customer's IT administrator if the PC is to be connected to the local network.
Proper polices for exporting and securely storing files should therefore be implemented and carried out if
deemed necessary.
It is also possible to isolate the SimView server and connected peripherals such as cameras and Instructor
Application PCs on a separate network in order to minimize risks.
If your site wishes to restrict access to SimView Server and access to make simulations there are some key
points to adhere to:
Users accessing the SimView server must use their own Windows/Domain account, as the browser
will remember passwords to SimView.
All instructors using the system to record from an Instructor PC should have their own SimView
user account and Windows account and not share a single account on this PC.
These points may not be interesting to your site if access to the SimView Server is physically limited and you
value ease of use higher than strict security.
Axis IP Cameras 3.6The cameras supported by SimView can be accessed over the network and should be secured with
passwords to prevent unauthorized access to the live streaming video. Laerdal has no control over this
software and rely on the vendor and user to securely protect access.
File security and backup of data 3.7The customer is responsible for file security and backup routines for all simulation session data. All use and
storage of simulation session data should be in accordance with local rules, regulations or laws, and is the
sole responsibility of the customer. See more on backup in sections 5.2.2 on page 11 and 7.3 on page 33.
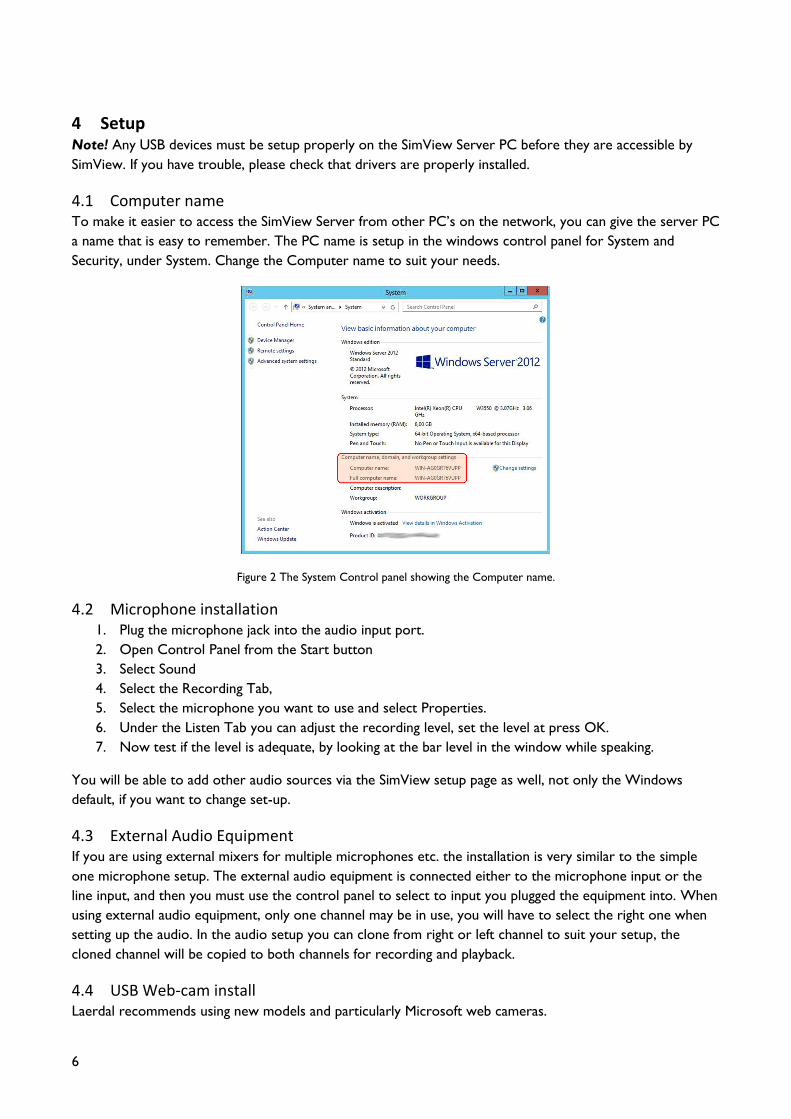
6
4 Setup Note! Any USB devices must be setup properly on the SimView Server PC before they are accessible by
SimView. If you have trouble, please check that drivers are properly installed.
Computer name 4.1To make it easier to access the SimView Server from other PC’s on the network, you can give the server PC
a name that is easy to remember. The PC name is setup in the windows control panel for System and
Security, under System. Change the Computer name to suit your needs.
Figure 2 The System Control panel showing the Computer name.
Microphone installation 4.21. Plug the microphone jack into the audio input port.
2. Open Control Panel from the Start button
3. Select Sound
4. Select the Recording Tab,
5. Select the microphone you want to use and select Properties.
6. Under the Listen Tab you can adjust the recording level, set the level at press OK.
7. Now test if the level is adequate, by looking at the bar level in the window while speaking.
You will be able to add other audio sources via the SimView setup page as well, not only the Windows
default, if you want to change set-up.
External Audio Equipment 4.3If you are using external mixers for multiple microphones etc. the installation is very similar to the simple
one microphone setup. The external audio equipment is connected either to the microphone input or the
line input, and then you must use the control panel to select to input you plugged the equipment into. When
using external audio equipment, only one channel may be in use, you will have to select the right one when
setting up the audio. In the audio setup you can clone from right or left channel to suit your setup, the
cloned channel will be copied to both channels for recording and playback.
USB Web-cam install 4.4Laerdal recommends using new models and particularly Microsoft web cameras.

7
1. Plug it into a free USB port.
2. Install the supplied software and configure it according to the supplied user guide.
This may not be needed for all type of USB cameras!
3. If the web-cam includes a microphone, you will have the possibility to use it instead of any other
installed microphone.
SimView extension installation and configuration 4.5If you are using SimView with Instructor Applications, like SimMan, SimMan3G etc. you must install the
SimView Extension Configuration tool on the PC running the Instructor Application and
configure it according to your needs and the guideline described in this guide.
This is also the process you need to perform if you have updated from AVS. The video settings in the
Instructor Applications have to be changed in order to use SimView instead of AVS Video Server. If you
should want to use AVS again, just change the video setting back to the old values and remove legacy
support in SimView Extension, see Figure 3.
The IP address for the SimView Server may have to include /SimView, if that is the address you must write in
a browsers navigation field to connect to the SimView Server, i.e. 192.168.1.125/SimView and not just
192.168.1.125.
You can also use the name you have entered as the Computer name in the Control panel instead of the IP
address, see chapter 4.1.
Use the “Test connection” button to make sure you have the correct server address, then press “Save and
close”.
Note! SimView Extension must be installed after all other Laerdal software like the simulators SimMan3G,
SimMan etc. and the Laerdal Debrief Viewer.
Figure 3 The SimView Extension setup windows

8
Simulator setups for use with SimView. 4.6The setup for the different types of simulators is shown in the next two chapters.
4.6.1 Setting up SimMan3G and SimMan Essential SimMan3G and SimMan Essential use the same setup.
The next two pictures show how to setup the service.
Figure 4 SimMan3G Extension Service, select the Profile Editor
Figure 5 The Profile editor setup for the SimMan3G
Enable “Use video server (AVS)
Insert the IP address, (“localhost” or “127.0.0.1” is not allowed) for the PC running the Instructor
Application.
Enable monitor recording
Set the quality to High, screen size on patient monitor not to exceed Full HD (1920x1080 pixels)
Use the “Save as..” to save the profile and the press “Close”
You must the start a new session in order to use the new profile.

9
Tip! When SimMan3G starts you can make sure that the profile you saved is the one that is used for the
session:
Figure 6 The SimMan3G start screen showing the profile used
4.6.2 Non SimMan3G setup The setup for SimMan, SimMom, SimJunior Advanced, SimNewB Advanced for SimPad, ALS Advanced for
SimPad, SimJunior for SimPad and SimBaby is different as seen on the next illustration
Figure 7 The SimMan setup
Tip! If you experience connection problems between the Instructor Application and SimView, after the
setup, make sure that the Laerdal SimView Extension Service is started, and configured properly. You can
check by using the “Component Services” tool, go to the Start menu and write services in the search field;
select the “Component Service”. Under the “Services (Local)” you should see “Laerdal SimView Extension
Service”, if the status is not running, then press the “Start” button in the top left side of the services listing.
You can also use the SimView Extension to check the connection and the service as both will be checked
when the “Test connection” is used.

10
5 SimView
Software installation 5.1The SimView server PC will be supplied with the software pre-installed.
The first time you want to access SimView, you can do so by following these steps:
A default administrator user is already created with the following login information:
User: admin
Password: Laerdal1
Important! You should change the password for this user once you are ready to use the system!
On the desktop you will see the SimView application icon.
To start the SimView double click the SimView icon on the desktop:
Configuration 5.2In order to use SimView it will have to be configured with the addition of extra users and different external
component like microphones, cameras, Patient Monitors etc. this is done in the “View & Setup” window.
5.2.1 Users In order to use SimView Server, users have to be added.
Note! If no SMTP server address is setup it will not be possible to reset a lost password for any account
including the administrator account in SimView. Se the chapter “Server settings - General” for more info on
how to setup the SMTP address.
To add more users you must login as administrator, using the username and password you have chosen in
the previous steps.
1. Click the VIEW &SETUP button (1).
2. Click the Server settings (2) triangle to open the dialog.
3. Click the User administration (3) this will open an input window where all details about the user can
be entered.
4. Fill out all the fields (4)
5. Click the User type radio button (5) to give the user a role.
6. Click the Create button (6)
7. Close the input window by clicking the VIEW &SETUP button (1)
8. Figure 8

11
9. Figure 9
Figure 10 The user creation window
The difference between the Administrator and the User is in what they can do with the system. The
administrator can record, change the configuration of the system regarding number of cameras etc. and edit
the event log in the simulations, by adding comments; the normal users can only watch simulations.
5.2.2 Server settings - General Under server setting the address of a SMTP mail server can be added in order to get a mail with a password
reset, in the event that someone has forgotten the password it (see Figure 9 Error! Reference source
not found.). If the address is not present only Laerdal support will be able to help. Add the address in the
filed SMTP server, and press “Save changes”
In the server setting pane you can also add a server name and the directory for saving the simulations, if
nothing is entered for the “Working directory” the default C:\Avsfiles will be used.
5.2.3 Server settings - Storage Since SimView Server handles video files in high quality, the system will run out of space eventually and it is
important to actively decide on whether older simulations should be backed up or simply deleted.
A backup strategy must therefore be made on how to store old simulations and prevent data loss in the
event of a hard disk failure.
The data storage strategy can be set in the server settings frame. See Figure 9Error! Reference source
not found..
Simulations can be exported to external disk storage by using the export function. When exported they are
also ready for use with the SimViewer application.
The need for space depends on how the video quality is setup. The use of full HD video takes up much more
space than normal VGA video, but the quality of the video may be sufficient, for many purposes.

12
The server settings only offer the possibility to delete by date. If this is not what you want you will have to
manually export or delete files. To do this, go to the home screen:
Figure 11 The Home screen and options for simulations
Select the simulation to watch or delete by clicking on the link below the picture.
When you have selected the simulation by clicking on the picture you have 3 options if you click the triangle
in the bottom right corner:
Export the simulation for stand-a-lone use with SimViewer or for backup purposes.
Delete the simulation if it is not relevant anymore and for freeing up space on the hard drive.
You can make a private link for sharing the simulation with others without exporting it.
You can then send this link to the person you want to share it with. The person will only be able to
see this simulation and nothing else, and will not be able to user other features of SimView
The person that gets the link must have access to the PC with SimView, but does not need a
SimView account to see the simulation. The access via this link will be restricted to only this one
simulation.
Note! Only delete simulation files using the SimView “Home” screen or by using the facility under Server
settings: “View recovered simulations”.
5.2.4 Video file sizes The hard disk storage needed for video files depends on the resolution and frame rate.
AXIS camera file sizes
1280x720 25fps 30MB/min
1280x720 20fps 25MB/min
1280x720 15fps 20MB/min
800x450 25fps 15MB/min
800x450 20fps 12MB/min
800x450 15fps 10MB/min
480x270 25fps 6,5MB/min
480x270 20fps 6MB/mim
480x270 15fps 5MB/min
USB camera file sizes:
1280x720 10fps 15MB/min 640x480 30fps 15MB/min 320x240 30fps 5MB/min
Analog camera file size: 15MB/min, there is no size options, but it looks like 640x480.
The sizes are approximate as the motion activity in the picture will change the actual file size; the more
motion the bigger file size
5.2.5 Unsaved simulations If you by mistake forget to save the simulations during debrief, you can find the simulation in the “Server
setting” under “View recovered simulations”.

13
When clicking this link you will see a window with the simulations that for any reason not are saved
correctly, you will be able to view them and decide if they have to be deleted, or you can delete straight
away without viewing first.
Note! If during recording the server is switched off by an accidental power cut, videos shorter than 4
minutes may not be retrieved, and in videos longer than four minutes the timeline and event logs end time
shown may be shorter than the actual video recording. You may not be able to seek in the video that is
beyond this maximum time, using the either the timeline or the event log, but you can see the whole
recorded sequence.
5.2.6 IP Camera To add cameras to the simulation setup, start SimView and login as Administrator.
Note! SimView only supports AXIS IP cameras.
1. From the Home screen click the “VIEW & SETUP” (1)
2. Click the “Add equipment” (2)
3. Click the in the “Devices” (3) box.
4. Select the camera type you want IP or USB to use by clicking on it in the list window (4 and 5).
5. Wait while the list of IP cameras is updated (see Figure 15).
6. Click in the “Found devices” (6) to get the drop-down list and select the desired camera (7).
7. Fill in the “Login” (8) administrator name and “Password” (9)
8. Click the “Add equipment” (10).
9. You can now select the resolution on the video quality by clicking the “Resolution” (11) drop-down
list and selecting the resolution you want.
10. You can also change the number of picture per second (fps) by clicking the “Fps” (12)drop-down
list
11. Press “Save changes” (13) if this was the last camera to add, otherwise add a new camera by
clicking the “Add equipment” button (2) again and continue until you have added all the needed
cameras.
12. You can deactivate the camera by un-checking the “Active” (14) check box, and click “Save
changes”.
13. If you want to remove the camera from the setup click on the “Remove” button (15).
Figure 12 Add equipment starting point

14
Figure 13 Drop-down list of possible type of equipment
Figure 14 IP Camera selected
Figure 15 IP camera search on going please wait
Figure 16 IP camera search finished and drop-down list ready
Figure 17 IP camera selection with camera IP addresses shown

15
Figure 18 Video resolution selection
Figure 19 Frames per second selection
5.2.7 USB Cameras Adding USB cameras is similar to adding IP cameras.
Figure 20 Add equipment starting point
Figure 21

16
Figure 22
Figure 23
Figure 24
5.2.8 Audio To add a microphone to the simulation setup, start SimView and login as Administrator.
To add the Windows default microphone or audio input that has been set-up under the recording tab in the
“Windows Sound Control Pane”:
1. From the Home screen click the “VIEW & SETUP” (1)
2. Click the Add equipment link (2).
3. Select the Microphone by selecting it from the drop down menu (3 and 4)
4. Select the microphone you want to use from the drop down list (5 and 6).
5. Click the Add equipment (7) button to update and exit.
6. Choose the stereo mode to suit your setup, if you are using the line or microphone input (8).

17
Figure 25
Figure 26
Figure 27
Figure 28
Figure 29
5.2.9 Patient Monitor To add the Instructor Applications Patient Monitor, start SimView and login as Administrator.
1. From the Home screen click the “VIEW & SETUP” (1)
2. Click the “Add equipment” (2) button.
3. Click the in the “Devices” (3).
4. Select the Patient Monitor by clicking in the list window (4 and 5).
5. Insert the correct IP number in the “IP address” (6) field, the other fields are pre-filled and should
not be changed.
6. Click the “Add equipment” (7).
7. If you want to change the IP address later enter the new address in the field (8)
8. Press “Save changes” (9).

18
9. Later changes in IP address can be done by changing the address in the address field (8) and save
changes.
Figure 30
Figure 31
Figure 32
Figure 33

19
Figure 34
“Tip” Remember that the Patient Monitor is regarded as one of the maximum 4 cameras that can be used
during recording. In order to enable Patient Monitor recording you must setup the SimView Extension
service and enable it in the Instructor Application, see chapter 4.5 and 4.6 on page 7.
5.2.10 Analog camera Adding an analog camera follows the same line as the USB camera, but requires that the PC is equipped with
a Laerdal video grabber card. If you have more than one camera select the with the drop down list (6).
Figure 35
Figure 36
Figure 37

20
Figure 38

21
6 Using SimView Server With SimView you can record simulation sessions and annotate the video included in the event log file. You
can view the video either as a student or as an administrator.
Note! Only the administrator can make annotations in the event log file to aid the student.
The login screen 6.1When SimView Server is started the first thing to do is log in, this is done on the login screen.
Figure 39
Enter your username and password and click Log in.
You will then see the home screen, from where you can choose your next step.
If you do not have a login, you should contact your SimView administrator.
The Home screen: 6.2
Figure 40 The Home screen
Select the simulation to watch by clicking on the link below the picture.

22
If you are the administrator, you can edit the simulation by adding comments. These can help make the
student aware of errors or things done correctly.
Note! The students, or regular users, cannot edit the simulations.
Tip! The picture shown together with the simulations is a snapshot from the first camera added during initial
configuration; i.e. the leftmost enabled camera tab in the “Equipment configuration”.
Besides being able to view the simulation, you also have 3 options if you click the triangle in the bottom right
corner:
Delete the simulation if it is not relevant anymore and for freeing up space on the hard drive.
Add the simulation to favorites.
Export the simulation.
Share the simulation.
For more information on the last two topics see chapter 6.9 Sharing simulations.
The View & setup window 6.3The options available on the View & Setup screen depend on the user’s role: administrator or user.
The View & Setup window also gives administrator the possibility to change the configuration of SimView,
more information on setup in “SimView, The Administrators Direction for Use”.
The View & Setup window shows the images captured from the active camera, you will see images from all
active cameras if you have more than one active camera.
Figure 41 The two type of View & Setup screens
If you are an admin user you will have the possibilities shown to the left otherwise the window at the right is
for the normal user.

23
Video windows 6.4
Figure 42 The View window with one active camera
Figure 43 Picture in picture
Figure 44 Three window layout
Figure 45 Three active cameras and a patient monitor
window setup
When you have more than one camera active you can change the layout of the video windows and choose
which camera to be show in the main video window by using the buttons in bottom control strip of the
video window.
Figure 46 The window layout control

24
Figure 47 Alternative four window setup
The window top bar gives control over PTZ position, 4:3 or 16:9 format control and expansion of video
window. The bar shows up when the mouse cursor is placed inside the window.
Figure 48 Controls on the small video window
Figure 49 Controls on the expanded window
The swap window button will swap the window in the Main Video Window; with the contents of the Small
Video Window the Expand Window button will expand the window to fill the entire video frame, to only
showing this one video stream.
Note! The functions on the control bar depend on the user type that is logged in, only when logged in as the
SimView administrator the PTZ controls and the Operator Mode are available.
Tip! The web browser must have its pop-up blocker disabled in order to use the “Operator Mode” for the
AXIS cameras.
Note! The layout is optimized for widescreen displays in 16:9 format, things may look different and less
optimized when seen on a 4:3 format screen.

25
Recording a scenario 6.5The scenario recording is started and stopped from one of the Instructor Application like SimMan or
SimMan3G etc. The cameras connected to the server will provide video footage to cover the scenario
together with the input from the Patient Monitor and the Instructor Application.
The maximum recording length in SimView is 4 hours, but the Instructor Applications may have other
restrictions on the maximum recording length, the shortest will apply.
Note! The Patient Monitor is counted as a camera, and is included in the maximum of 4 cameras that can be
used for recording.
Controlling SimView from the Instructor Application 6.6When using the SimView Server together with the Instructor Applications like SimMan3G, there are a few
things to observe in order for everything to work as expected. Apart from the setup described in the
administrator manual, there are thing to observe when starting and stopping the recording sessions.
Always start sessions from the file menu “Start new session…” then press the “Start session” (see green
marking). When stopping the recording session use the “End session”.
In the pop-up window you have 3 choices “Quit”, “Start new session” or “Debrief”, never use the “Save
session” as it does not work with SimView Server. To save a simulation session go to Debrief and save it on
the SimView page that show up in your web browser.
Figure 50
Tip! Only use the options marked with green boxes.
Figure 51

26
Operating the IP cameras 6.7The PTZ (Pan Tilt and Zoom) cameras can be operated from the View & Setup page during watching and
recording. Moving the cursor into the picture frame will add the control buttons as well as the top banner
with presets and Operator Mode.
Note! The PTZ control in SimView only supports IP cameras and does not support analog cameras.
Note! The built in controls in SimView are mainly to be used for adjusting the position of the cameras, not
for real time control during a session.
You can set new fixed position by clicking the star button once you have positioned the camera where you
want it, you will be asked to enter a name for the position. You can have up to 5 different positions; they will
be shown at the top banner in the video window when you have the cursor placed inside the window. The
Operator button is for opening the AXIS control in a new browser window.
Note! You will only have the control buttons if you are logged in as the administrator.
Figure 52 Camera control buttons for PTZ cameras.
6.7.1 Operator Mode The Operator Mode is used for real time control of the PTZ. Use this option if you need to control video in
real time during a session.

27
Debriefing 6.8When you stop the simulation in the Instructor Application you must go to debrief to save the recorded
session. When the debrief is opened you must log in to the SimView server in the browser window that
opens on your Instructor PC. You will only have to this once for each day or as long as you are logged in to
the Instructor PC. The window you will see after the login is the debrief window:
Figure 53 The debrief window
Note! Only users with admin rights can save sessions.
In order to be able to see the recorded session later it is important to save the simulation using the “Save”
button. You can add the name of the instructor and the students name(s) to the “Simulation Information”
tab before saving.
In the debrief window you can see the simulation, if you are administrator you can also annotate the
simulation. A student user you can just watch the recorded session.
If you do any additions or changes to the simulation after the first save you must save again.
Tip! If you forget to save a session or experience a problem causing the simulation to not be saved, you can
retrieve this session from the Server Settings section under “View recovered simulations” in the View and
Setup screen.

28
6.8.1 Printing the event log If you would like to have the “Event log” on paper you can use the “Print” option, use the arrow to get the
“save as” and the “print” option
If you not are administrator on SimView the “Save” button is exchanged with a “Print” button as you are not
allowed to edit and save simulations.
Figure 54
The print option give the possibility to make a PDF file of the “Event log”.
Figure 55 The options when doing a “Print”.
Figure 56 Saving the print file.
Figure 57 The print file, showing the “Event log”.

29
Sharing simulations 6.9There is more than one way to share the simulation recordings with the participants.
If the participant has an account on the SimView Server, then the person can just log-in on the SimView
server from any PC on the network, using an internet browser i.e. Internet Explorer or similar.
If the participant does not have an account on the SimView Server, then you have two ways of sharing the
simulation, either export the file to a thump drive or send a link to the simulation.
You can make a private link for sharing the simulation with others without exporting it.
You can then send this link to the person you want to share it with. The person will only be able to
see this simulation and nothing else, and will not be able to use other features of SimView
The person who gets the link must have access to the SimView server via the local network, but
does not need a SimView account to see the simulation. The access via this link will be restricted to
only this one simulation.
Export:
o You can save the full session containing all the data for stand-a-lone use with SimViewer or
for backup purposes.
o You can also select to just export a video file with audio which can be played in a Media
Player.
Delete the simulation if it is not relevant anymore and for freeing up space on the hard drive.
Figure 58 Export or share a private link to a simulation
Figure 59 Export options
The “Simulation Activity File” is an *.ssx file for use with the SimViewer application it includes the whole
scenario with vital signs, event log and video from all cameras and the patient monitor used during the
session. It looks as seen on the SimView Server.
The video file is a *.mov file for use with a media player application. (Microsoft Media Player or QuickTime),
it is the video file from the selected camera or patient monitor including audio if a microphone has been
enabled; there is no vital signs or event log.

30
Figure 60 Transferring a SimView recording to another person by using the export function.
6.9.1 Exporting a simulation When exporting the simulation you have two options, the whole simulation or just one of the video files.
When exporting the whole simulation it will in SimViewer look exactly as in SimView with all video and
event log etc.
Choosing to export a video file will only show the video from the chosen camera.
When exporting you have the option to save the file on a USB memory stick (thumb drive) for use on other
PCs, even stand-alone PCs with no network connection, but you can also save the file on a network
attached hard drive for use on the local network. The PC needs to have SimViewer installed in order to
show the recordings.
6.9.2 Sharing simulation links Sharing simulation by private links can be done by e-mail.
To use the e-mail option you will have either have a Live Mail account or have a mail client with a valid e-
mail account installed on the SimView Server, or the PC from where you are doing the export.
Figure 61 Sharing a link to a simulation.

31
Simulation sessions 6.10
6.10.1 The timeline The timeline in the bottom of the Viewer Window can be used to search forward and backward in the
session. The timeline size can be controlled by clicking the double arrow that shows up in the right top
corner of the frame when the cursor is inside the timeline. Clicking inside the timeline will move the video
forward or backward, depending on clicking in front or behind the actual play time.
Holding the cursor over the vital signs will activate a pop-up with the values of the vital signs at that time.
Figure 62 The different timeline views
6.10.2 Basic and Detailed Views The simulation log can be showed with two different levels of detail in the Event Log.
As seen on Figure 63 there are a lot more information in the detailed view, so if you want to just get an
overview of the session; use the basic view.
Figure 63 The difference between Basic View and Detailed View
You can change between the views by using the pull-down menu in the Event Log view and then select
“Basic View, “Detailed View” or “Original View”
Note! You cannot edit the event log in the “Original View” .

32
6.10.3 Adding comments to the Event Log If you let the cursor hover over the event list a plus sign occurs, and clicking it gives the opportunity to add
comments.
In the window that pops up you may now choose which type of comment you want to insert, all the
possibilities are show on the picture here:
Figure 64 The different comment windows.
Figure 65Adding a drug or an event.
When you have added the comment for the student, you can export the session for use with the SimViewer,
and at the same time free the local hard disk space for new simulations by deleting the file. You can now
only see the simulation with SimViewer as it will not be visible in the SimView home screen.
The exported files can be put anywhere incl. on a USB thumb drive.

33
7 Maintenance
Backup strategy 7.1Video files take up large amount of hard disk storage, so a strategy for how to save the simulations for later
use is needed.
The main use of SimView is to record the session and do the annotations for the students, but not to keep
all the simulation on the server.
The simulations that need to be saved for later and frequent use must be exported with the export function
to a remote storage server or a portable hard disk.
From the remote storage server all the simulations can be viewed with the SimViewer application from any
PC connected to the storage server or using the portable hard disk.
You can export simulations in a format ready for the SimViewer application for viewing anywhere including
offline as the files can be saved on USB memory sticks or portable hard disks.
You can also delete files not needed after being backed up somewhere else.
What to back-up? 7.2Create a system image backup regularly as this will store all settings and programs for easy repair if the hard
disk stops working
In order to repair or move the SimView simulations it is important to make regular backups of the following
folders:
AvsFiles and any extra working directories used for storing video
App_Data folder in the SimView installation folder, including the file avs.sdf.
The AvsFiles folder is either specified in the Server setting in View & Setup or placed at the default location:
C:\AvsFiles.
The App_Data folder with the file avs.sdf is located in:
<System Drive>:\Program Files (x86)\Laerdal\SimView Server\App_Data.
See also the sub-chapters “Server settings - General” and “Server settings - Storage” in the “SimView”
chapter.
Hard disk “clean-up” of unsaved simulations 7.3If you have unsaved simulations you can delete or save them by clicking the “View unsaved simulations”
under the “Server settings” tab. An unsaved simulation occurs whenever you don’t press the save button
during the debrief session that is opened after session is ended. This saving of the files is to make sure you
don’t lose any simulations by mistake. When you press the “Show” button at the filename in the Recovered
Simulations window you will get the option to save the simulation. You can also just delete the simulation if
you don’t need it.
Note! Any unsaved simulation is automatically deleted after 12 hours.

34
An automatic clean-up is run every 12 hours, but you can run the clean-up manually at any time, just click at
the “Run automatic clean up now”
Figure 66
The automatic clean-up for saved simulation is enabled on the server settings by entering the number of days
that simulation have to be older than in order to be deleted (1), and then click in the check to enable the
feature box and save changes (2), you will get at warning to alert you about the automatic deletion of files.
(See Figure 66)
Note! Sessions marked as favorites will not be deleted
System notification 7.4
Figure 67
If you get this message you will have to click it and under server setting you will see what caused the
warning.
Note! Only the admin user is able to see the information in the Server settings
Figure 68
Solve the issue indicated in the System notification area. This can be system driver upgrade or as shown here
a hard disk clean-up.

35
8 Troubleshooting Q: My events and timeline don’t match / Timeline starts in wrong position
A: Make sure that all your Instructor PCs, Manikins and SimView Server time and date settings are in synch
and in same Time Zone.
Q: I get an error when starting recording a session, that the server in busy, unavailable or network problem,
but the server is not in use and I can connect to it with my browser?
A: make sure you have the latest version of the SimView Extension, and it is set correctly regarding IP
addresses, it will check both the connection and that the service is up running. I severe cases you may have
to reboot the Instructor Application PC.
Q: I cannot record on the SimView server even as the SimView Extension tests OK?
A: Check if the Laerdal SimView Extension Service is started; use the “Component Service” to check.
Figure 69
You can find the “Component Service” by typing it into the Start menus search field.
Q: Something went wrong during recording and now I cannot see my simulations?
A: The simulation may not have been save in the debrief session after the recording was stopped. In the
“Server setting” tab you can use the “Unsaved simulations” button to see simulations that have not been
save by mistake. You can view the simulation and then save it or if you want delete it.
Q: I can see my simulations on the SimView Server PC, but the video is frozen on my Instructor PC?
A: If the number of video cameras incl. the patient monitor is more than 2 some older laptops cannot play
the video. To solve the problem either reduce the number of cameras or upgrade the Instructor laptop PC
to the recommended hardware. See the user manual for SimViewer.
Q: Windows was upgraded by the windows auto-upgrade, now my USB cameras don’t work?
A: The USB camera driver has been upgraded and you must remove the camera in SimView and the setup
the USB camera in SimView again.
Q: A USB device will not start. It used to work.
A: Please remove it from the device list and add it again. If it still doesn’t work, try to move it to a different
port.
Q: My USB camera is having issues working properly even after trying to move it to a new port and
reconfiguring it.
A: Make sure the newest drivers are installed.

36
Q: Why is the Instructor app referring to AVS system instead of SimVIew
A: This was the name of the Laerdal AVS software for which the Instructor Applications were originally
created.
Q: I can’t start a recording in the SimView browser, even though I have stopped and went to debrief in the
Instructor application.
A: In SimView browser click reload or pressF5, then you can start a recording from the SimView browser.
Q: The video feed is pixelated or bad. It usually looks ok.
A: The IP cameras will need to be rebooted once in a while after heavy use or many concurrent users. You
can do this by unplugging them from the network cable or by logging on to Operator mode and going to
reset camera.
Q: Why is there a 2 second delay in the video and sound when viewing through SimView?
A: The system aggregates the different audio and video sources and then relays them to any client logged on
to SimView Server. This makes it easy to view the all the feeds remotely, with as little effort as possible for
the end user, but unfortunately the aggregation and relay add a delay.
Q: How much space does my video recording take up on the hard disk?
A: Have a look in chapter 5.2.4 on page 12. There is information here that provides sample file sizes based
on the resolution level and length of the recording.
Q: How do I reset the AXIS camera to its factory defaults?
A: To reset the camera to the original factory default settings, use the control button and the restart button
on the side of the camera as described on the next pages.
AXIS P5534:
Using the control and restart buttons will reset all the parameters, including the IP address, to the factory
default settings:
1. Remove the top cover.
2. Press and hold the control button and the restart button at the same time.
3. Release the restart button but continue to hold down the control button.
4. Continue to hold down the control button until the status indicator color changes to amber (this may
take up to 15 seconds).
5. Release the control button.
6. When the status indicator changes to green (which may take up to 1 minute), the process is complete and
the camera has been reset. The unit now has the default IP address 192.168.0.90
7. Put the top cover back in its original position.
It is also possible to reset parameters to the original factory default settings via the web interface. For more
information, please see the online help or the User’s Manual available from the AXIS Network Video
Product CD supplied with this product.

37
AXIS M3204:
This will reset all parameters, including the IP address, to the Factory Default settings:
1. Disconnect power from the camera.
2. Press and hold the Control button and reconnect power.
3. Keep the Control button pressed until the Power indicator flashes amber (this may take up to 15
seconds).
4. Release the Control button. When the Power indicator displays green (which can take up to 1 minute)
the process is complete and the camera has been reset.
It is also possible to reset parameters to the original factory default settings via the web interface.
For more information, please see the online help or the user’s manual.
Q: I can see a lot of simulations on the “Home” screen, but I cannot view them?
A: The simulation file may have been moved or deleted without the use of SimView. If the files are moved
back, they should play again, if they have been deleted, delete the entries on the “Home” screen, they have
been lost.
Q: I sometimes get a “connection timed “out or garbled video for my PTZ cameras.
A: This can happen if the room has too little light. Please make sure that there is light enough or change the
PTZ camera settings according to the Axis manual. To restore the connection press F5.
Q: The image is very choppy and / or out of synch and / or latency is very high
A: This happens if the network cannot handle the traffic properly, i.e. low bandwidth or unstable connection.
Make sure you are using a wired 100 Mbit network or faster
Cables are in good working order
Network is not congested
38
Alternatively you can lower the resolution of the cameras to lower bandwidth usage
If the video is played back on a low performance PC it may be the reason for the problems.
Q: I often have “Time out no data received” when I arrive in the morning?
A: Some cameras may give this problem when the images don’t change, as in darkness, try to add an overlay
with the data and time, this is done in the ASIX camera setup, using the operator mode.
Q: Not all of the USB camera settings work?
A: Try a lower frame rate, update the driver. Disabling the manufactures driver, and rely on the Microsoft
embedded driver may solve the issue completely.
Q: SimView is not remembering my passwords.
A: Remembering passwords is a feature in the browser you are using (such as Internet Explorer or Firefox).
If passwords are not being remembered it is most likely because of a user actively selecting not to save the
password for this site. To reset this setting, you can try to clear the browser’s cache settings or enquire with
your IT whether policies are in place to stop you from remembering passwords. It may also be because you
have used another address for the SimView Server, i.e. shifting between name and IP address.
9 Index A list of acronyms used in the document and also links to where to find things.
PoE Power over Ethernet
WiFi Wireless internet
WLAN Wireless Local Area Network
IP-Camera Internet Protocol Camera
Ethernet Network type
Switch Network switch
Firewall System to block unwanted access
LAN Local Area Network
HTTP Hyper Text Transfer Protocol
RTP
RTSP
DNS Domain Name Server
H.264
MJPEG Motion JPEG
JPEG Joint Photographic Experts Group
VBR Variable Bit Rate
CBR Constant Bit Rate
GOV Group Of Video