skill codes for each drill -...
TRANSCRIPT

1
Skill Codes for Each Drill
Here’s an explanation of the codes associated with each drill. Most of the drills build a variety of skills,
so we used codes to signify the skills that each drill will develop. Use the table of contents below and
this key to find the drills that fit your needs.
A=Agility
AP=Aggressive Play
BH=Ball Handling /
Dribbling
CM=Communication
D=Defense
F=Footwork
O=Offense
P=Passing
R=Rebounding
S=Shooting
TW=Teamwork
C=Conditioning

2
Key to Diagrams

Shooting 3
Shooting Drills
Shooting 4
Ram Shooting
Purpose:
(P, S, CM) This drill will help develop proper passing and shooting techniques. This drill also
emphasizes communication between teammates.
Instructions:
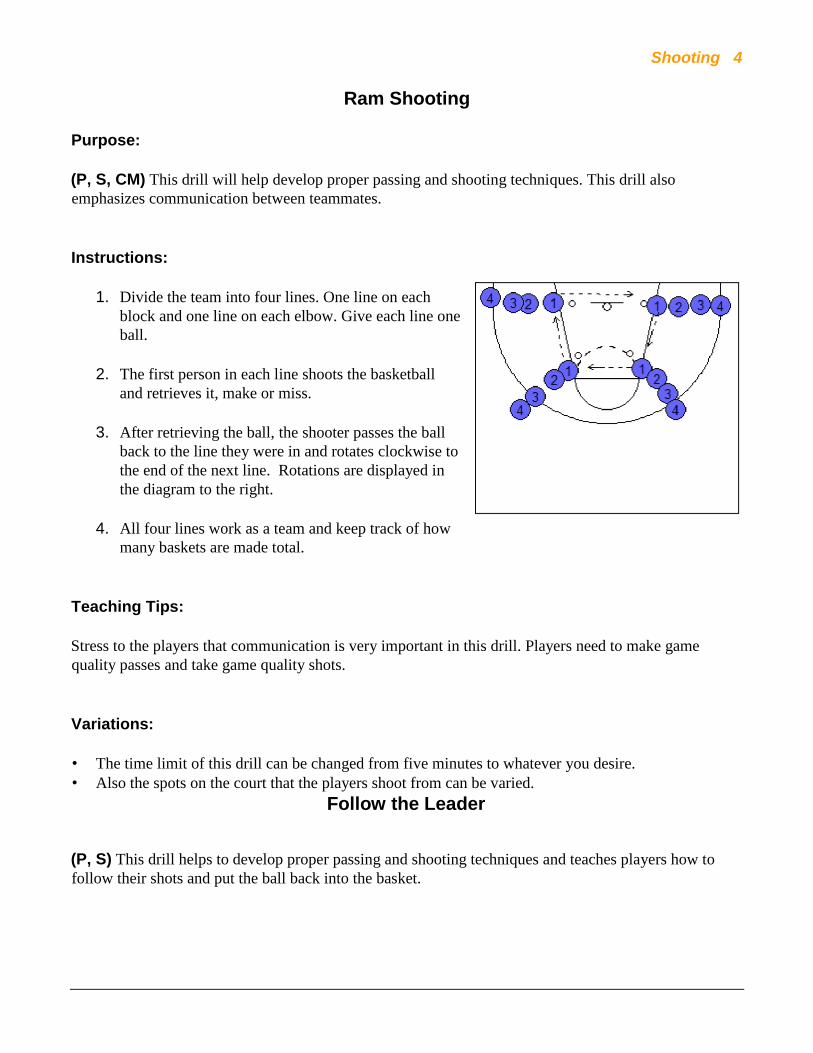
1. Divide the team into four lines. One line on each
block and one line on each elbow. Give each line one
ball.
2. The first person in each line shoots the basketball
and retrieves it, make or miss.
3. After retrieving the ball, the shooter passes the ball
back to the line they were in and rotates clockwise to
the end of the next line. Rotations are displayed in
the diagram to the right.
4. All four lines work as a team and keep track of how
many baskets are made total.
Teaching Tips:
Stress to the players that communication is very important in this drill. Players need to make game
quality passes and take game quality shots.
Variations:
• The time limit of this drill can be changed from five minutes to whatever you desire.
• Also the spots on the court that the players shoot from can be varied.
Follow the Leader
(P, S) This drill helps to develop proper passing and shooting techniques and teaches players how to
follow their shots and put the ball back into the basket.

Shooting 5
Instructions:
1. Begin the drill with two groups of five, standing in line at the
baseline. Each group has one ball.
2. The first person in line shoots a baseline jump shot.
3. The shooter follows the shot and if it goes in, passes it to the next
person in line.
4. If the shot misses, the shooter must try to catch the rebound
before it hits the floor. If they can, they put the ball back in the
basket.
5. After everyone in line attempts a shot at the first spot, the line
then moves to another spot and begins again.
6. A jump shot is worth two points and a put back is worth one.
Each team must keep a running tally. The team with the most
points at the end of the drill wins.
Shooting 6
Teaching Tips:
Stress the importance of watching where the ball bounces off the rim, as well as proper passing and
shooting techniques.
Variations:
• Vary the difficulty of this drill by changing the spots from which players must shoot.

Shooting 7
Teaching Tips:
Long Lay Up
(BH, S, P) This drill helps develop ball handling, shooting and passing
skills. The emphasis is on fast break lay ups and overhand baseball
passes.
Instructions:
1. Split the team into two lines. One on the right side at half court and
one on the left side. Give each line one ball.
2. The person at the front of the line will sprint down the right side of
the court, dribbling the basketball and attempt a fast break lay up.
3. After attempting the lay up, the shooter grabs their own rebound,
takes two dribbles in the other direction and throws a baseball pass to
the next person standing in the opposite line.
4. This person catches the ball, sprints down the right side dribbling,
and attempts a lay up. They then pass the ball to the next person in
the opposite line, and so on.
5. Both lines are to work as a team and count how many lay ups are made.

Shooting 8
Teaching Tips:
Stress that players keep their heads up when dribbling and use proper footwork when attempting the lay
up. Also stress correctly passing the ball to a teammate by leading the pass out in front of them.
Distance of the pass should be adjusted according to age level.
Variations:
• Give players a strict time limit in which to make a certain number of lay-ups as a team. As the team
progresses, the time should decrease as the number of lay ups required increases.

Shooting 9
Teaching Tips:
Pressure Lay Ups
(S, BH) This drill helps to teach players how to make lay ups in high
pressure situations
Instructions:
1. Divide the group into four lines that stand at half court. Two on
the right side and two on the left side.
2. The inside lines on the right and left sides of the court have one
ball each. The first person in the inside line passes the ball to the
first person in the outside line, who then dribbles the ball down
the right side and attempts a lay up.
3. After releasing the ball, the passer must sprint to catch the person
trying to attempt the lay-up and apply pressure on the player.
4. After the lay up is attempted, the two players now run to the two
lines on the other side of the court and switch sides (see diagram).
Players need to be reminded to push the ball out in front of their
bodies when they speed dribble. They also need to be reminded to keep their heads up and shield the
defender from the ball when attempting the lay up.
Shooting 10
Teaching Tips:
Variations:
• Keep track of the number of lay ups made in 5 minutes. Make a goal for the students.
• Turn the drill into a one on one transition defense drill by giving the defense a little head start to the
basket.
Shooting 11
Teaching Tips:
B-Ball Drag Race
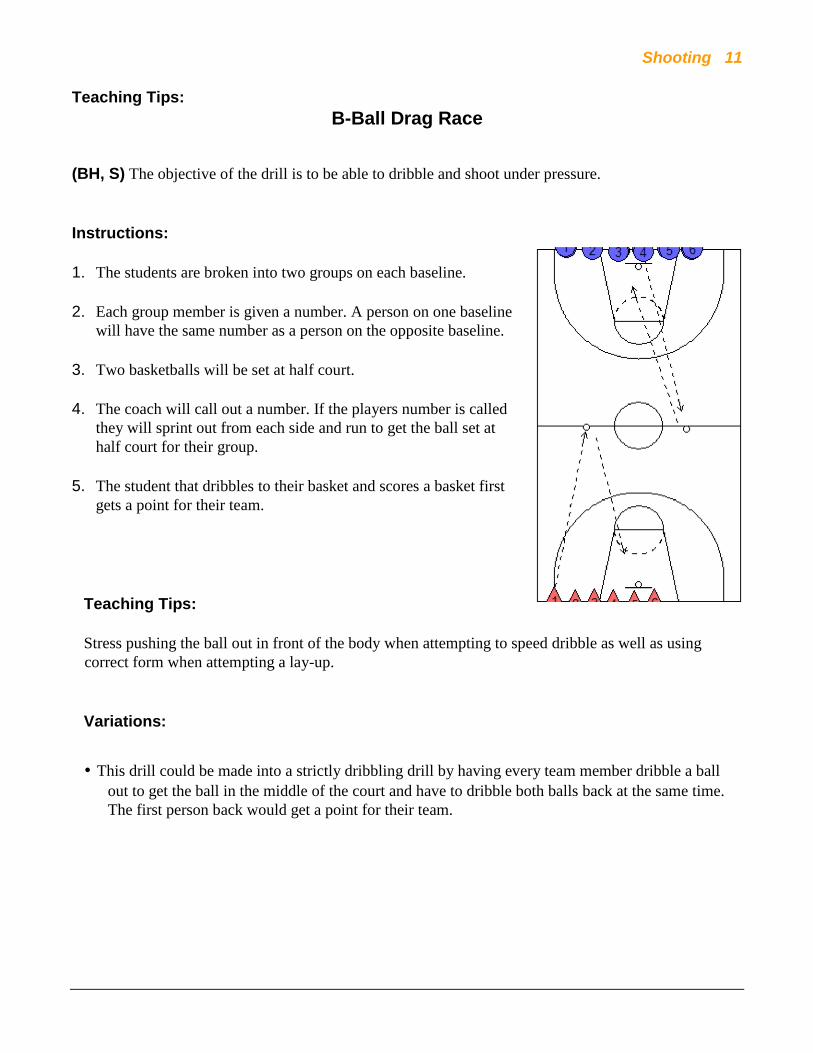
(BH, S) The objective of the drill is to be able to dribble and shoot under pressure.
Instructions:
1. The students are broken into two groups on each baseline.
2. Each group member is given a number. A person on one baseline
will have the same number as a person on the opposite baseline.
3. Two basketballs will be set at half court.
4. The coach will call out a number. If the players number is called
they will sprint out from each side and run to get the ball set at
half court for their group.
5. The student that dribbles to their basket and scores a basket first
gets a point for their team.
Teaching Tips:
Stress pushing the ball out in front of the body when attempting to speed dribble as well as using
correct form when attempting a lay-up.
Variations:
• This drill could be made into a strictly dribbling drill by having every team member dribble a ball
out to get the ball in the middle of the court and have to dribble both balls back at the same time.
The first person back would get a point for their team.

Shooting 12
Three Team Shooting
Purpose:
(C, S) This drill helps players with their conditioning and their ability to shoot the basketball both off
the pass and when they are tired.
Instructions:
1. Break your team up into three groups of four players each. One
group is on each baseline and one group is in the middle of the
court as shown to the right.
2. The four players at half court are to spread out along the midline.
3. The groups of four players standing on each baseline are each
given a basketball. On the whistle, the players in the middle run
toward the baseline and call for a ball to be passed to them by a
player on the baseline.
4. The player then catches the ball, shoots on the near basket and
retrieves their own rebound.
5. The person who passed the ball then runs to the other end of the
court and receives a pass from the other baseline, and the rotation
continues.
Teaching Tips:
Players need to be reminded to work hard in this drill for conditioning purposes. They also need to give
a target for the ball to be passed and use proper footwork and shooting techniques. Be sure to remind
passers to be precise.
Variations:
• The type of shot taken can be varied in this drill (three pointer, mid-range, lay up, etc.).
• Give the students a time limit and goal for the number of shots to make. This can be varied
depending on the ability of the team or the time that you have available.

Shooting 13
Shoot Till You Make It
(TW, S, C, BH, R) The purpose of this drill is to encourage and develop teamwork, shooting,
conditioning, dribbling and rebounding.
Instructions:
1. Separate players into two or three teams with the skill and ability
levels equally divided.
2. Each team is to line up on the same end line of the court. The first
player in line for each team has a ball.
3. On the whistle, the first players from each team are to begin
dribbling towards the other end of the court as fast as they can.
4. When they get to the other end, they are to take a shot at the
elbow area of the court and retrieve their own rebounds. If they
missed the first shot, he keeps shooting close to the hoop until he
makes the shot.
5. When a player makes the shot, he then retrieves his rebound and
dribbles as fast as he can back to his teammates, handing the ball
off to the next player in line, who then executes the same routine.
6. The team that finishes in the fastest time is the winner.
Teaching Tips:
Encourage players to cheer on their teammates as they execute their turn in the drill. Remind players to
focus on correct fundamentals and techniques, as they are more likely to dribble and shoot triumphantly
with proper execution.
The younger the players are, the closer the shot should be.
Variations:

Shooting 14
• Move the shooting position and run the drill several times.
• Require players to dribble with a certain hand.
• Have them perform a dribble move (crossover, behind-the-back, and so on) at half-court.
• Do not allow lay ups, require them to make the shot from the selected spot.
Half Moon
Purpose:
(S, R, P, TW) This is a fun drill that does it all -- it teaches players how to catch and shoot, follow their
shot, slide out to a shooter, and make good passes.

Shooting 15
Instructions:
1. Divide your squad into two teams. Scatter your players inside
the three point line on each end of the court. (Youth – 10 to 15
feet away from hoop)
2. Give the ball to one player in the corner (on each end of the
court).
3. On the whistle, the player on each side of the court that has the
ball will take a shot. They will follow their shot and pass it to
the next player.
4. The first shooter slides out and put token pressure on the new
shooter.
5. This process will continue until one team reaches a set number
of baskets and is declared the winner.

Shooting 16
Teaching Tips:
It is very important to make sure your players are always using good shooting form and technique.
Continually watch them and immediately fix any problems! Feet should be square to the basket, knees
bent on the catch, follow through, and so on.
Make sure your players jump straight up and land exactly from the point they jumped. It makes the
player’s shot difficult to block. If you find the players lunging forward or not landing where they first
jumped, tell them they can not cross the 3-point line until the ball hits the rim.
After the first game, have the players switch sides of the court.
Variation:
• Make it a best of 3 or 5 series to add extra intensity to the drill. Make it more competitive by
rewarding the winner.

Shooting 17
Knockout
Purpose:
(S, R, P) Your players will love this drill! This is a great drill to break up the monotony of practice
while also helping your players deal with pressure situations, namely, free throws late in the game.
Hitting free throws down the stretch can be the difference between a win and a loss.
Instructions:
1. Line your players up at the free throw line in single file.
Give the first two players in the line a basketball.
2. On your whistle, the first player in line will shoot a free
throw. If they make it, they will retrieve the ball and
pass it to the next person in line without a basketball. If
they miss, they must retrieve the ball and make a lay-up.
3. The next player in line is allowed to shoot a free throw
as soon as the previous player’s ball hits the rim or goes
through the net. If the previous player misses, the next
player is attempting to make a free throw (or rebound
shot) before that player makes their rebound shot.
Avoid rushing too much to prevent ruining your
shooting mechanics.
4. If the scenario in step 3 occurs, the previous player has
to sit out for the rest of the drill.
5. This process continues until only one player remains.
Teaching Tips:
This drill is a great way to keep your players from getting bored. Use this drill as a break from some of
the more necessary, tedious parts of practice.
Shooting 18
If you notice some of your players starting to cheat, (shooting in front of the free throw line, knocking
another player’s ball away) make them sit out until the next game.
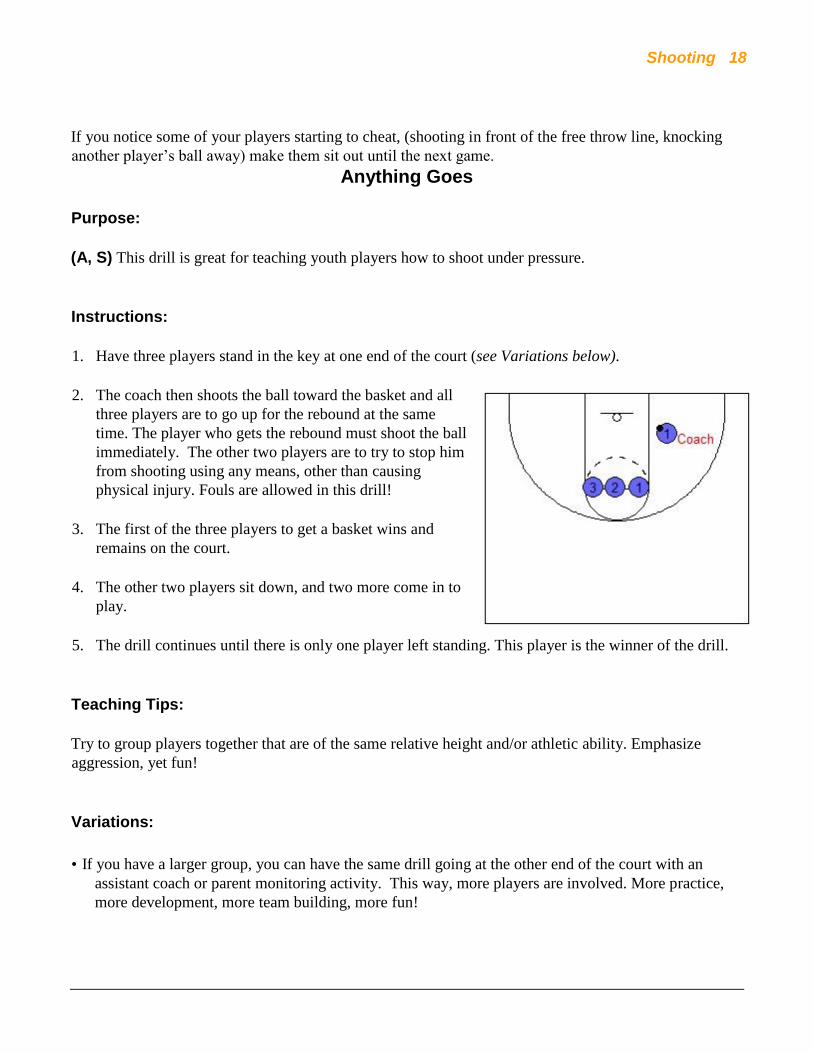
Anything Goes
Purpose:
(A, S) This drill is great for teaching youth players how to shoot under pressure.
Instructions:
1. Have three players stand in the key at one end of the court (see Variations below).
2. The coach then shoots the ball toward the basket and all
three players are to go up for the rebound at the same
time. The player who gets the rebound must shoot the ball
immediately. The other two players are to try to stop him
from shooting using any means, other than causing
physical injury. Fouls are allowed in this drill!
3. The first of the three players to get a basket wins and
remains on the court.
4. The other two players sit down, and two more come in to
play.
5. The drill continues until there is only one player left standing. This player is the winner of the drill.
Teaching Tips:
Try to group players together that are of the same relative height and/or athletic ability. Emphasize
aggression, yet fun!
Variations:
• If you have a larger group, you can have the same drill going at the other end of the court with an
assistant coach or parent monitoring activity. This way, more players are involved. More practice,
more development, more team building, more fun!

Shooting 19
5 Spot Shooting
Purpose:
(S, R, P, TW) This is a fun shooting drill that forces players to follow their shot and rebound the
basketball.
Instructions:
1. Pick 5 spots on the floor. Split your team into two
groups and line them up at the first spot, giving each
group 3 balls.
2. On the whistle, the first player in line shoots the ball. As
soon as the ball hits the rim, the next player in line
shoots. The shooter hustles after the ball and passes to
the next person in line without a basketball.
3. After the team makes a certain number of baskets, they
are to move to the next spot.
4. The first team to make the designated amount of baskets
from each spot is the winner.
Teaching Tips:
Lower the number of baskets made and the distance from the hoop based on age group. For example:
- Make 3 from 5 feet away for 8 year olds.
- Make 5 from 15 feet away for 13 year olds.

Shooting 20
Variations:
• To make this drill more difficult, only count swishes.
• For advanced players, have the team make a certain number of baskets in a row before they move
onto the next spot.
Make ‘em and Step Back
Purpose:
(S, R, P, TW) This is another fun shooting game that focuses on shooting with proper form, rebounding
your shot and passing.
Instructions:
1. Split your team in half. You only need one basket for
this game, but put each group at different baskets if
possible. Each line needs three basketballs.
2. Each basket has 4 spots. The first spot is about 3 feet
way from the basket. The second spot is 6 feet away.
The third spot is 9 feet away, and the fourth spot is 12
feet away.
3. On the whistle, the first person in line shoots the
basketball, rebounds their own shot and passes it to the
next person in line without a basketball.
4. As soon as the first person’s shot hits the rim or goes
through the hoop, the next person in line starts.
5. As soon as the team makes 4 shots, they move to the
second spot.
Make 3 from the 2nd spot Make 2 from the 3rd
spot Make 1 from the 4th spot.
6. The first team to make the designated amount from each
spot wins.
Shooting 21
Teaching Tips:
Make sure everybody is using proper shooting form.
Variations:
• Have the teams make 5 baskets from each spot.
• Only count swishes.
• Have the teams shoot from more than 1 shooting angle on the floor. For example: side of the hoop,
front of the hoop, angled to the hoop.
• Use 5 or 6 spots for older players.

Shooting 22
Line Shooting
Purpose:
(S) This is a great shooting drill that focuses on proper shooting form. A lot of players get caught up
with how many they make or miss. If they make a shot with bad form, they think that’s how they are
supposed to shoot. If they miss with good form, they don’t think they should shoot that way. If you
take them away from the hoop, they do not concentrate on the misses or makes. We also provide a twist
to make it competitive.
Instructions:
1. Each player needs a partner. Each pair is to find a line
on the basketball court (Half court lines, out of bounds
lines, free throw lanes).
Each group needs a ball.
2. The player is to square to the line, try to shoot the ball
to their partner and have it hit the line. If the ball hits
the line, it counts as a make. If the ball misses the line,
it counts as a miss.
3. At first, just have the players shoot back and forth while
concentrating on good form.
4. After a minute or two, have each pair count to see who can make the most out of 10.
Teaching Tips:
Make sure that players are using good shooting form. If the player is right-handed, the player’s right
foot can be on the shooting line or slightly to the right of it and vice-versa if the player is left-handed.
Variations:
• Change the number of shots from 10 to 15, 20, or another pre-determined number, depending on
skill level.
• See who can make the most consecutive “shots”.

Shooting 23
Competitive Full Court Lay Ups
Purpose:
(S, D, P, R) This is a fun drill that helps players improve their ball-handling, dribbling speed, and lay
up accuracy.
Instructions:
• Start with one player at the opposite end of the court from the
rest of the team as shown in the diagram to the right. If you are
shooting right-handed lay ups, the players start on the right side.
The player on the opposite end, along with the first player in
line will each need a ball.
• On the whistle, both players are to dribble down the court for a
lay up.

Shooting 24
• The player that started on the opposite end will rebound his shot
and outlet the pass to the next person in line.
The player who started in the front of the line shoots a lay up,
gets his own rebound, and dribbles to the opposite end of the
court to do another lay up.
• This pattern continues throughout the drill.
• Pick a number of lay ups that the group must make in a specific
amount of time. For example, have them try to make 20 lay ups
in 2 minutes. Adjust these numbers according to the age of
your players.
Teaching Tips:
Have the players try to use a minimal amount of dribbles. Remind
them to push the ball out in front of them when dribbling, which helps them develop speed with the
dribble.
Variations:
o If you have two full length courts, split your team up into two groups and have them
compete. The first team to 25 lay ups wins. o Switch sides and do left-handed lay ups.

Shooting
25