slab teacups: clay handbuilding - jennifer...
TRANSCRIPT

Slab Teacups: Clay Handbuilding Grade Level: 912 Anticipated Time Period: Approximately 13 class periods Prior Knowledge:
● Students will be familiar with clay as an art medium as well as some clay tools. ● Students have knowledge of basic glazing techniques and of slipping and scoring. ● Students will have knowledge of the elements and principles of design.
Unit Goal:
● Students will become familiar with basic handbuilding methods. ● Students will gain an understanding of how to create forms using the slab method. ● Students will gain insight into the history and origins of clay handbuilding.
Objectives:
● The learner will identify and discuss the visual characteristics and qualities of handbuilt pottery as well as vessels created by the Mayans.
○ (CT Standard 5b: Describe and analyze visual characteristics of works of art using visual art terminology).
○ (CT Standard 4b: Analyze common characteristics of visual arts evident across time and among cultural/ethnic groups in order to formulate analyses, evaluations and interpretations of meaning).
● The learner will create a teacup using the slab handbuilding method, incorporating texture
and pattern. ○ (CT Standard 1b: Students conceive and create original works of art that
demonstrate a connection between personal expression and the intentional use of art materials, techniques, and processes).
○ (CT Standard 2b: Apply comprehension and skill in incorporating the elements of art and principles of design to generate multiple solutions to and effectively solve a variety of visual art problems).
. Materials and Resources:
● Clay ● Slip ● Various tools ● Glazes ● Brushes ● Rulers ● Rolling pins ● Use of projector to view the presentation
Vocabulary: ● Handbuilding=This term refers to the one of several techniques of building pots using
the only the hands and simple tools rather than the potters wheel. The term used for creating pottery using the potter's wheel is "throwing"
● 3D=An object that has or appears to have height, width and depth. ● Texture=An element that refers to the surface quality (rough, smooth, etc.) of an object
or artwork. Texture can be actual or implied. Drawings and paintings describe implied textures. Actual textures are those you can actually feel (tactile).
● Pattern=A principle of design referring to the combinations of lines colors, and shapes repeated in a series.
● Unity=A principle of design which occurs when all of the elements of a piece combine to make a balanced, harmonious, complete whole.
Day 1: Goal Assemble clay body (teacup) Teacher Preparation:
● Have clay and materials available for demonstration. ● Gather visuals and create handbuilding presentation.
Motivation/Initiation:
● The lesson will begin with a presentation which will consist of an outline of the project, an overview of basic handbuilding techniques as well as an art history component. At the end of the presentation, a sample will be displayed to ensure understanding.
● We will then discuss the materials and vocabulary terms used in this project to assess knowledge and understanding. Project criteria will also be addressed.
● Each day a goal will be given for students to concentrate on so that the lesson is broken up into smaller segments, allowing students to focus on one step at a time.
Process/Procedure:
1. Class will begin with an introduction of the goals for the day. Students will create and complete the body of their teacup.
2. Next, slab construction of the teacup will be demonstrated to ensure full comprehension. Texture and pattern will also be demonstrated.
3. Students will be asked to gather their materials and begin working on the project. 4. Students will spend the class quietly working and will raise their hands if they need help
or have any questions. 5. Teacher will circulate around the room to observe and make sure students stay on track.
6. Students will clean up during the last 5 minutes of class. The materials will be collected and put away. Students will then put their projects on the drying rack to dry completely

prior to a bisque firing. If decoration is still in process, students will place their work into a plastic bag and spray with water to keep moist.
7. Students will be dismissed by table according to clean up and correctly following directions.
Closure: 1. Before leaving the classroom, students will be asked for feedback/comments/questions. How many students finished step one and are ready to glaze next time, etc. Day 2: Goal Complete texture/patterns and begin glazing. Students will continue to work on patterns/texture or if completed, begin glazing their bisqueware. Day 3: Goal Complete glazing. Glaze fire. Students will continue to glaze if they have not completed their cups. Students will then complete an assessment rubric as well as participate in a class critique.
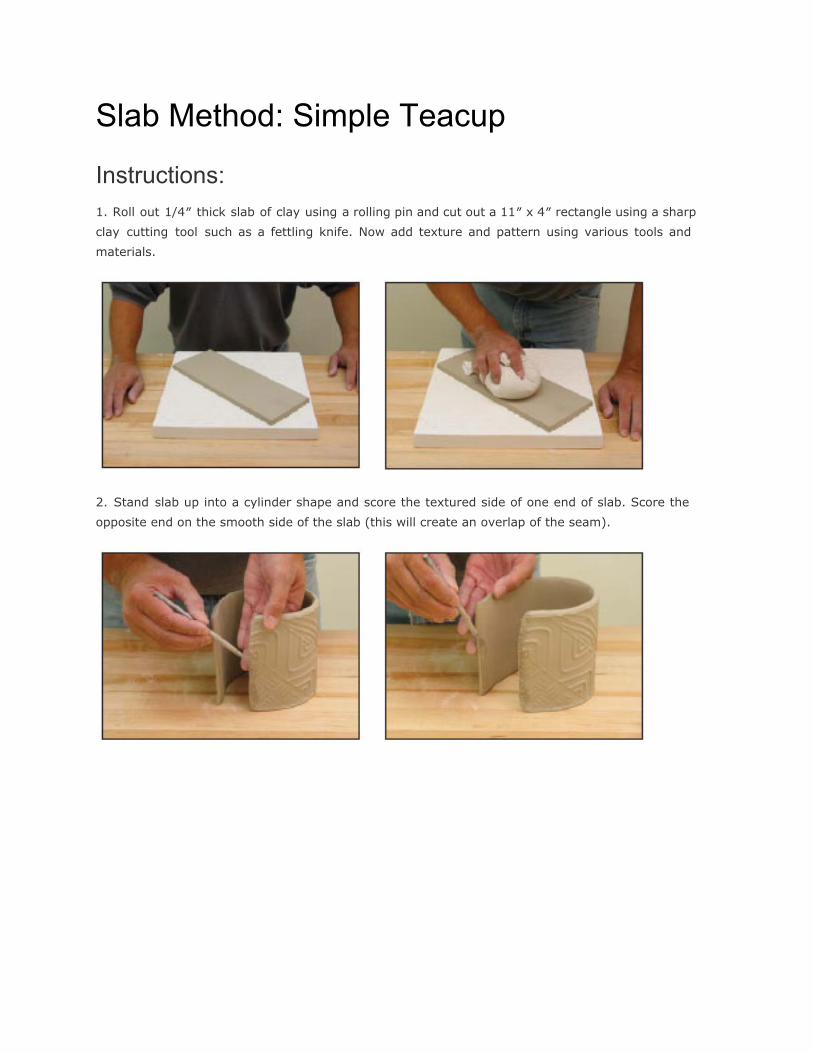
Slab Method: Simple Teacup
Instructions: 1. Roll out 1/4″ thick slab of clay using a rolling pin and cut out a 11″ x 4″ rectangle using a sharp
clay cutting tool such as a fettling knife. Now add texture and pattern using various tools and
materials.
2. Stand slab up into a cylinder shape and score the textured side of one end of slab. Score the
opposite end on the smooth side of the slab (this will create an overlap of the seam).
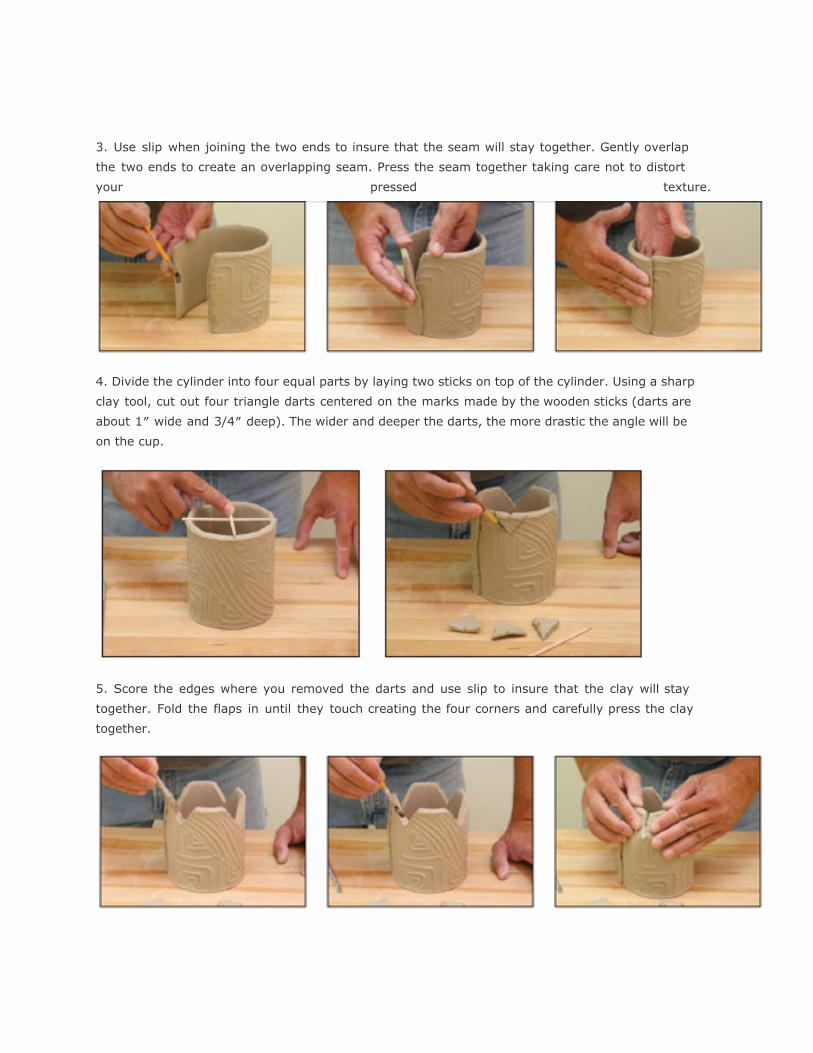
3. Use slip when joining the two ends to insure that the seam will stay together. Gently overlap
the two ends to create an overlapping seam. Press the seam together taking care not to distort
your pressed texture.
4. Divide the cylinder into four equal parts by laying two sticks on top of the cylinder. Using a sharp
clay tool, cut out four triangle darts centered on the marks made by the wooden sticks (darts are
about 1″ wide and 3/4″ deep). The wider and deeper the darts, the more drastic the angle will be
on the cup.
5. Score the edges where you removed the darts and use slip to insure that the clay will stay
together. Fold the flaps in until they touch creating the four corners and carefully press the clay
together.

6. Roll out another clay slab to 1/4″ thickness. Turn the tea-bowl over, place on top of the slab,
and trace around the bottom edge into the clay slab. Cut out the clay piece from the slab using
sharp clay cutting tool.
7. Score and use slip to attach the bottom slab to the tea bowl. Use a roller to roll the slab onto
the tea bowl.
8. For the foot on the tea bowl, cut out a 3/4″ wide strip of clay. Cut length to match up with the
shape and diameter of the slab bottom (approximately 4″). If this seems too large, cut to desired
length. Score and use slip to attach the ends together.

9. Place foot onto tea bowl to insure a proper fit. Score and slip the foot and press into place.
10. Stand tea bowl upright and define the final shape of the rim (the rim could be round or
square). Use a damp sponge to soften the top edge of the lip.
11. Bisque fire tea bowl to proper cone temperature depending on clay body used. Apply glaze to
tea bowl and fire to appropriate temperature.


Assessment Rubric Assignment: Slab Teacup Student Name:__________________Class: ___________ Circle the number that best represents how well you feel that you completed the criteria for the assignment.
Excellent
Good
Average
Needs Work
Rate Yourself
My Rating
Criterion #1: Correct use of materials/techniques: (40 pts.) Greenware Stage:
● Correct use of slab method/teacup construction. Correct size and shape.
10 98 7 6 or less
● Patterns/textures are purposeful and help to create interest and unity.
10 98 7 6 or less
● All clay additions have been slipped and scored properly.
10 98 7 6 or less
Bisque Stage:
● Glaze application is neat (23coats) and helps to enhance/unify your piece.
10
98
7
6 or less
Criterion #2: Craftsmanship (20 pts.) Neat, clean and complete? Skillful use of the art tools and media overall? Did you put forth an effort and take pride in your work?
20
1916
15
14 or less
Total: 60 points Your Total:
My Total: