slotted conduit, pull box & pull rope - welcome to...
TRANSCRIPT
1 / 10
Slotted Conduit, Pull Box & Pull Rope
InstallatIon InstructIons
THERMAL MANAGEMENT SOLUTIONS EN-TraceTekSlottedConduit-IM-H58175 01/13
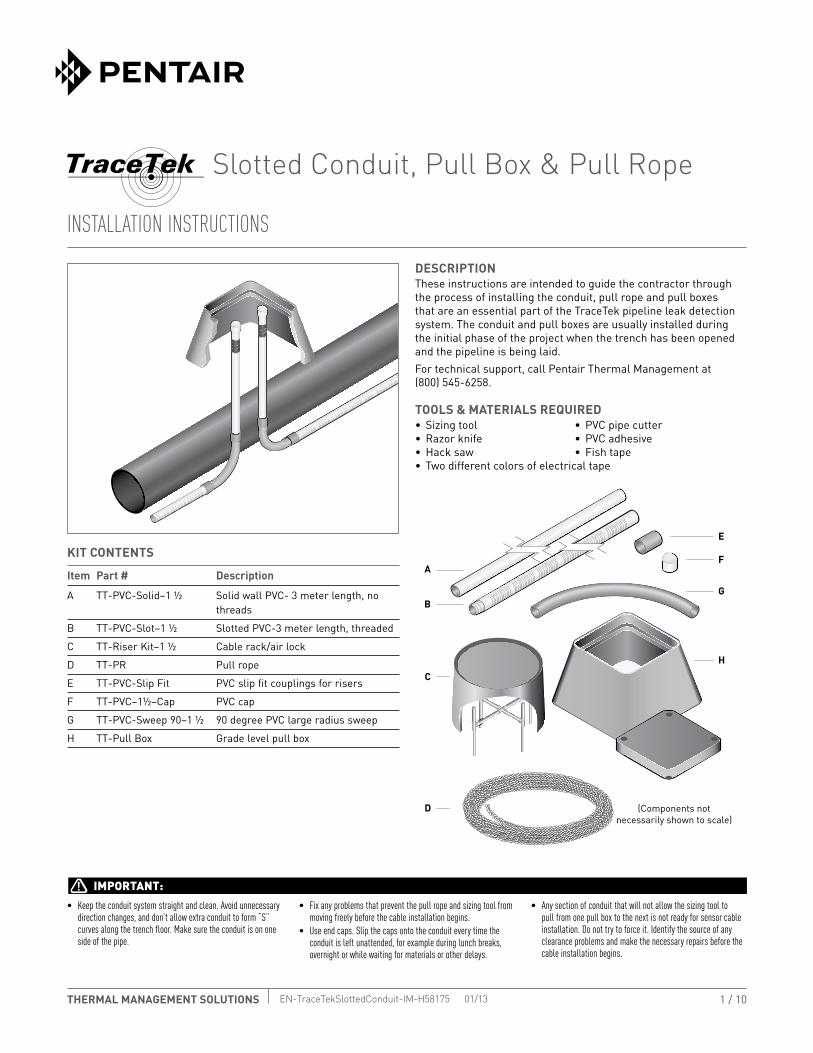
DEScRIpTIONThese instructions are intended to guide the contractor through the process of installing the conduit, pull rope and pull boxes that are an essential part of the TraceTek pipeline leak detection system. The conduit and pull boxes are usually installed during the initial phase of the project when the trench has been opened and the pipeline is being laid.For technical support, call Pentair Thermal Management at (800) 545-6258.
TOOLS & MATERIALS REqUIRED• Sizingtool • PVCpipecutter• Razorknife • PVCadhesive•Hacksaw • Fishtape• Twodifferentcolorsofelectricaltape
• Keeptheconduitsystemstraightandclean.Avoidunnecessarydirectionchanges,anddon’tallowextraconduittoform“S”curvesalongthetrenchfloor.Makesuretheconduitisononesideofthepipe.
• Fixanyproblemsthatpreventthepullropeandsizingtoolfrommovingfreelybeforethecableinstallationbegins.• Useendcaps.Slipthecapsontotheconduiteverytimetheconduitisleftunattended,forexampleduringlunchbreaks,overnightorwhilewaitingformaterialsorotherdelays.
• Anysectionofconduitthatwillnotallowthesizingtooltopullfromonepullboxtothenextisnotreadyforsensorcableinstallation.Donottrytoforceit.Identifythesourceofanyclearanceproblemsandmakethenecessaryrepairsbeforethecableinstallationbegins.
IMPORTANT:
KIT cONTENTS
Item part # Description
A TT-PVC-Solid–1½ SolidwallPVC-3meterlength,nothreads
B TT-PVC-Slot–1½ SlottedPVC-3meterlength,threaded
C TT-RiserKit–1½ Cablerack/airlock
D TT-PR Pullrope
E TT-PVC-SlipFit PVCslipfitcouplingsforrisers
F TT-PVC–1½–Cap PVCcap
G TT-PVC-Sweep90–1½ 90degreePVClargeradiussweep
H TT-PullBox Gradelevelpullbox
G
F
E
H
(Components notnecessarily shown to scale)
A
B
C
D
THERMAL MANAGEMENT SOLUTIONS EN-TraceTekSlottedConduit-IM-H58175 01/13 2 / 10
Assembly Techniques
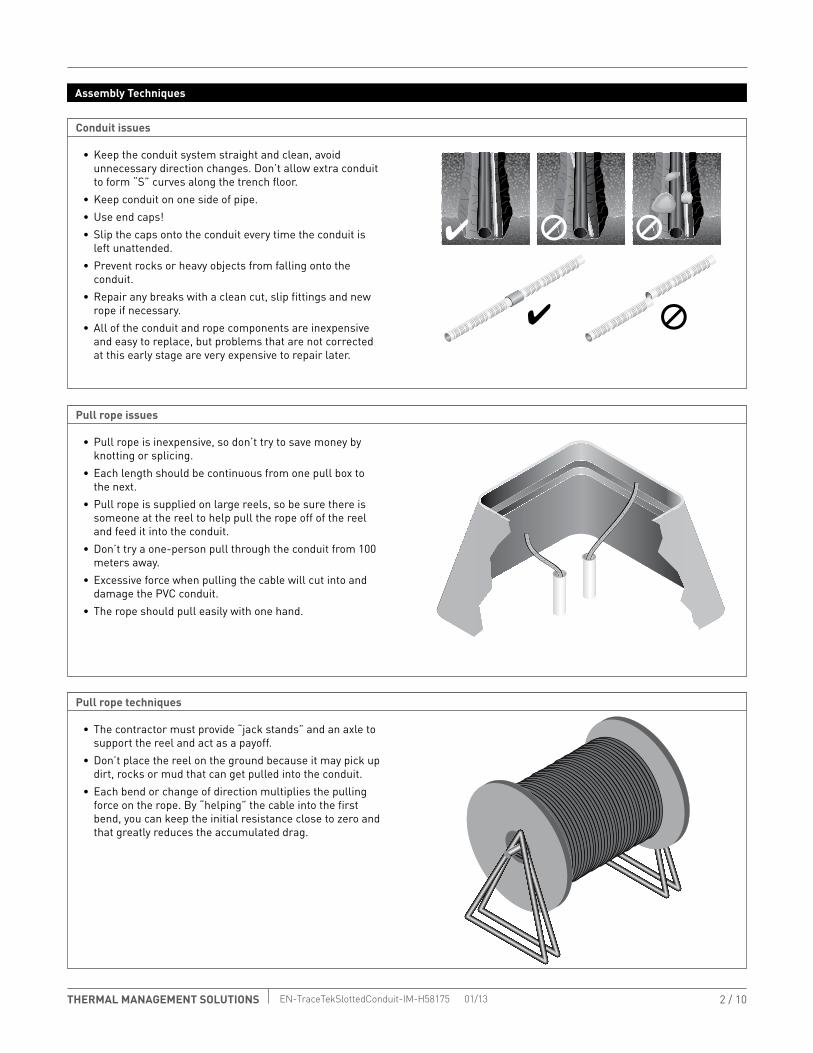
conduit issues
pull rope issues
pull rope techniques
• Keeptheconduitsystemstraightandclean,avoidunnecessary direction changes. Don’t allow extra conduit toform“S”curvesalongthetrenchfloor.
• Keepconduitononesideofpipe.• Useendcaps!• Slipthecapsontotheconduiteverytimetheconduitis
left unattended.• Preventrocksorheavyobjectsfromfallingontothe
conduit.• Repairanybreakswithacleancut,slipfittingsandnew
rope if necessary.• Alloftheconduitandropecomponentsareinexpensive
and easy to replace, but problems that are not corrected atthisearlystageareveryexpensivetorepairlater.
• Pullropeisinexpensive,sodon’ttrytosavemoneybyknotting or splicing.
• Eachlengthshouldbecontinuousfromonepullboxtothe next.
• Pullropeissuppliedonlargereels,sobesurethereissomeone at the reel to help pull the rope off of the reel and feed it into the conduit.
• Don’ttryaone-personpullthroughtheconduitfrom100meters away.
• ExcessiveforcewhenpullingthecablewillcutintoanddamagethePVCconduit.
• Theropeshouldpulleasilywithonehand.
• Thecontractormustprovide“jackstands”andanaxletosupport the reel and act as a payoff.
• Don’tplacethereelonthegroundbecauseitmaypickupdirt, rocks or mud that can get pulled into the conduit.
• Eachbendorchangeofdirectionmultipliesthepullingforceontherope.By“helping”thecableintothefirstbend,youcankeeptheinitialresistanceclosetozeroandthat greatly reduces the accumulated drag.
3/10THERMAL MANAGEMENT SOLUTIONS EN-TraceTekSlottedConduit-IM-H58175 01/13
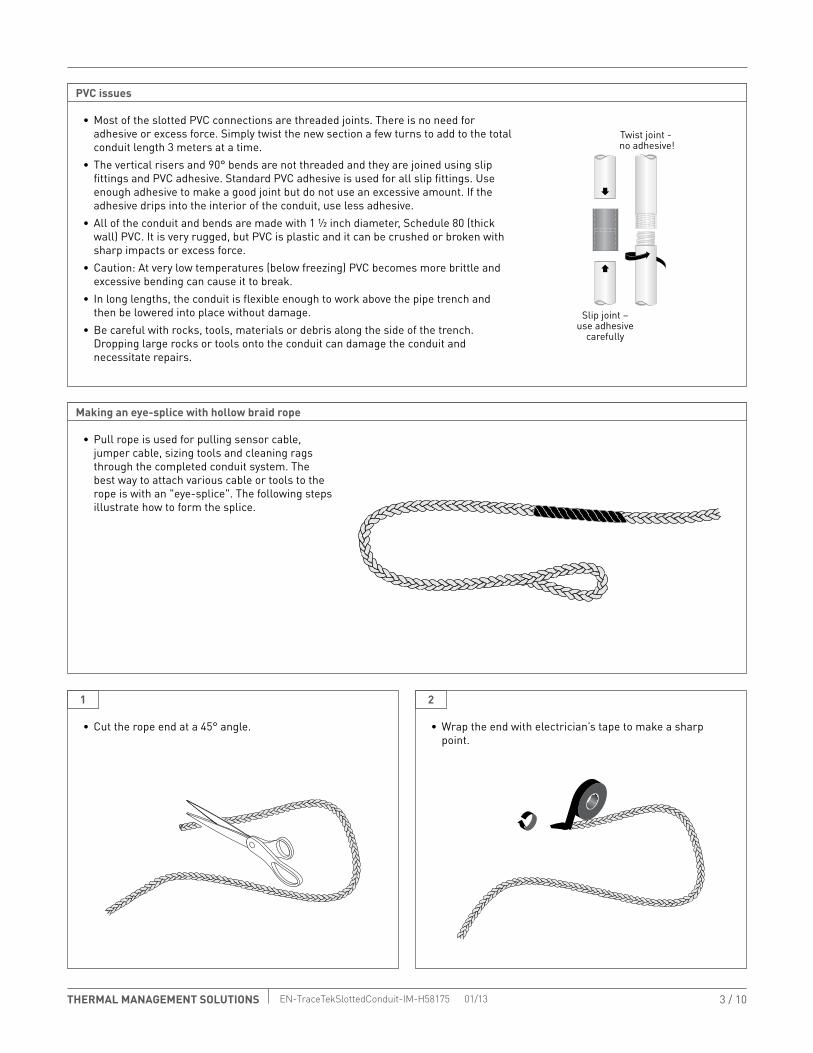
1 2
• Cuttheropeendata45°angle. •Wraptheendwithelectrician’stapetomakeasharppoint.
Slip joint –use adhesive
carefully
Twist joint - no adhesive!
pVc issues
Making an eye-splice with hollow braid rope
•MostoftheslottedPVCconnectionsarethreadedjoints.Thereisnoneedforadhesiveorexcessforce.Simplytwistthenewsectionafewturnstoaddtothetotalconduitlength3metersatatime.
• Theverticalrisersand90°bendsarenotthreadedandtheyarejoinedusingslipfittingsandPVCadhesive.StandardPVCadhesiveisusedforallslipfittings.Useenoughadhesivetomakeagoodjointbutdonotuseanexcessiveamount.Iftheadhesivedripsintotheinterioroftheconduit,uselessadhesive.
• Alloftheconduitandbendsaremadewith1½inchdiameter,Schedule80(thickwall)PVC.Itisveryrugged,butPVCisplasticanditcanbecrushedorbrokenwithsharp impacts or excess force.
• Caution:Atverylowtemperatures(belowfreezing)PVCbecomesmorebrittleandexcessivebendingcancauseittobreak.
• Inlonglengths,theconduitisflexibleenoughtoworkabovethepipetrenchandthen be lowered into place without damage.
• Becarefulwithrocks,tools,materialsordebrisalongthesideofthetrench.Dropping large rocks or tools onto the conduit can damage the conduit and necessitate repairs.
• Pullropeisusedforpullingsensorcable,jumpercable,sizingtoolsandcleaningragsthrough the completed conduit system. The bestwaytoattachvariouscableortoolstotherope is with an "eye-splice". The following steps illustrate how to form the splice.
THERMAL MANAGEMENT SOLUTIONS EN-TraceTekSlottedConduit-IM-H58175 01/13 4 / 10
3
5
4
6
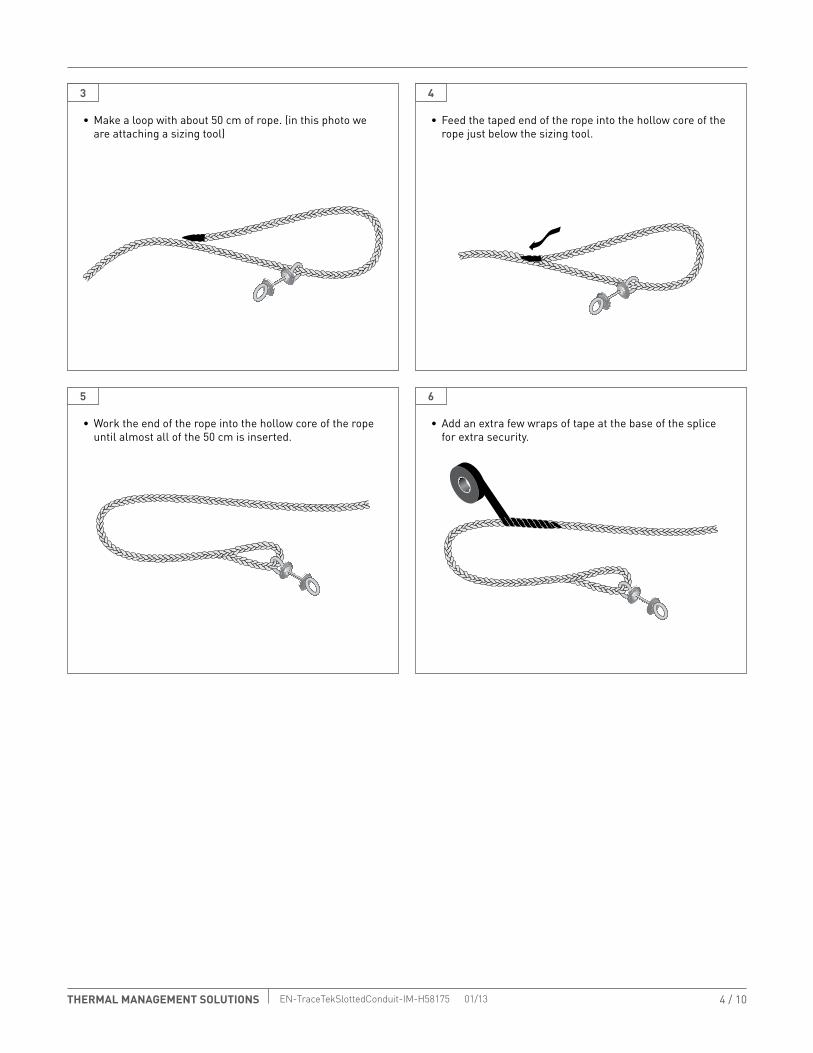
•Makealoopwithabout50cmofrope.(inthisphotoweareattachingasizingtool)
•Worktheendoftheropeintothehollowcoreoftheropeuntil almost all of the 50 cm is inserted.
• Feedthetapedendoftheropeintothehollowcoreoftheropejustbelowthesizingtool.
• Addanextrafewwrapsoftapeatthebaseofthesplicefor extra security.

5 / 10THERMAL MANAGEMENT SOLUTIONS EN-TraceTekSlottedConduit-IM-H58175 01/13
1
3
2
4
• Atthefirstpullboxlocation, position the reel of pull rope to one side of the trench.
• Formaneye-spliceinthe leading end of the pull rope.
•Useastiffpieceofwireora“fishtape”tothreadthepullropeintooneoftheverticalriserassembliesfromthetopdownandthroughthe90°bend.
• Useastiffwireor"fishtape"topulltheropethrough the first section of slotted conduit.
•Useaminimumamountofadhesivetogluethe slotted conduit into the slip fitting.
• Tojointhefirst3meterlengthofslottedPVCconduitusethePVCcutterorahack-sawtocutoffthefemalethreadend portion (about 5 cm).
• Assemblethehorizontalportionoftheconduitsystem,threadingadditionalropethrougheachincremental3msectionofslottedconduit.Donotuseanyglueoradhesiveon the threaded couplings. Twist them together by hand.
pVc & pull Rope Installation Instructions
conduit and pull rope installation sequence
• Prepareseveralverticalriserswith90°bendsandslipfitconnectors,usesufficientbutnottoomuchPVCadhesiveand set them aside to dry.
• Itisagoodpracticetopre-fabricateseveraloftheseverticalassembliesandsetthemasideuntiltheyareneeded.
• Everypullboxlocationwillrequiretworiserassembliesexcept for the first and last ones in the system.

THERMAL MANAGEMENT SOLUTIONS EN-TraceTekSlottedConduit-IM-H58175 01/13 6 / 10
2 m
250 m maximum
Blue tape(northbound)
Red tape(southbound)
5
7
9
6
8
10
• Threadthepullropethroughtheriserassembly, then use a minimum amount of adhesivetogluetheverticalriserassemblyto the end of the slotted conduit. Be careful withthePVCadhesivesotheropeisnotglued by accident.
• IftheropechecksoutOK,thencutthe rope, bundle the extra 2 meters of rope at each end and push into the end of each riser, then install end caps without any glue.
• Iftheconduitisnotalreadyloweredonto the trench floor, now is a good time to do it.
• Afteramaximumof250mofslottedconduitisinstalled,use a hacksaw or conduit cutter to trim the last length of slotted conduit to adjust to the next pull box location.
• Theentireprocessofconduitassemblycanbestartedandcontinuedwhileworkingatgradelevelononesideofthe trench.
• Afterthesteelpipelinehasbeenpositionedonthebottomofthetrench,itistimetolowerthePVCconduitontothesame bedding sand.
• Thelongrunofconduitwillbeflexibleenoughtograduallymovetheconduitontothetrenchfloorwithoutdropping or breaking.
•Makeatesttomakesurethatthepullropemovesfreelywithoutbindingorexcessforce.Ifthereisanydoubtinvestigateandfixtheproblemnow.
• Preparingforbackfilling,and separating risers by using colored tape to mark“Northbound”and“Southbound”conduits.
• Blueisnorthboundandred is southbound. After the conduit is buried it willnotbeobviouswhichdirection either pull rope will run, so consistent identification on the end of the riser is necessary.
7 / 10THERMAL MANAGEMENT SOLUTIONS EN-TraceTekSlottedConduit-IM-H58175 01/13
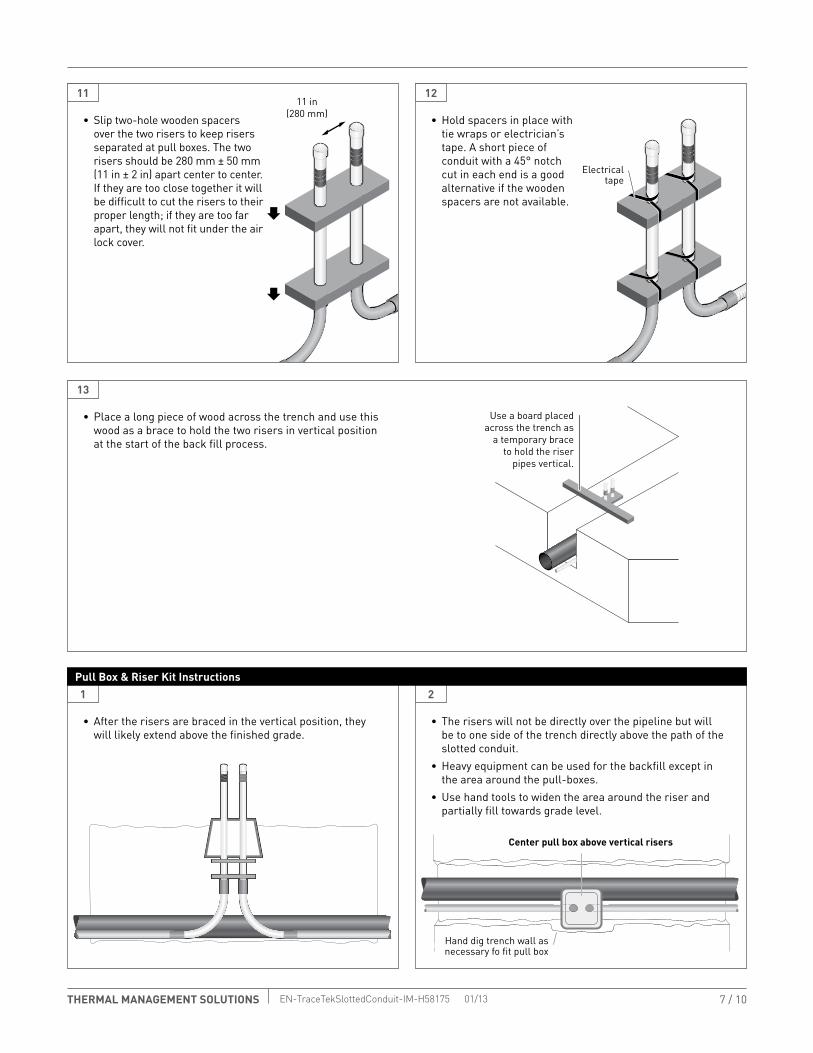
11 in(280 mm)
Use a board placedacross the trench as
a temporary braceto hold the riser
pipes vertical.
Electricaltape
Center pull boxabove vertical risers
Center pull box above vertical risers
Hand dig trench wall asnecessary fo fit pull boxHand dig trench wall as
necessary fo fit pull box
11
1
13
12
2
• Placealongpieceofwoodacrossthetrenchandusethiswoodasabracetoholdthetworisersinverticalpositionat the start of the back fill process.
•Holdspacersinplacewithtie wraps or electrician’s tape. A short piece of conduitwitha45°notchcut in each end is a good alternativeifthewoodenspacersarenotavailable.
• Theriserswillnotbedirectlyoverthepipelinebutwillbetoonesideofthetrenchdirectlyabovethepathoftheslotted conduit.
•Heavyequipmentcanbeusedforthebackfillexceptinthe area around the pull-boxes.
•Usehandtoolstowidentheareaaroundtheriserandpartiallyfilltowardsgradelevel.
• Sliptwo-holewoodenspacersoverthetworiserstokeeprisersseparated at pull boxes. The two risers should be 280 mm ± 50 mm (11 in ± 2 in) apart center to center. Iftheyaretooclosetogetheritwillbe difficult to cut the risers to their proper length; if they are too far apart, they will not fit under the air lockcover.
• Aftertherisersarebracedintheverticalposition,theywilllikelyextendabovethefinishedgrade.
pull Box & Riser Kit Instructions
THERMAL MANAGEMENT SOLUTIONS EN-TraceTekSlottedConduit-IM-H58175 01/13 8 / 10
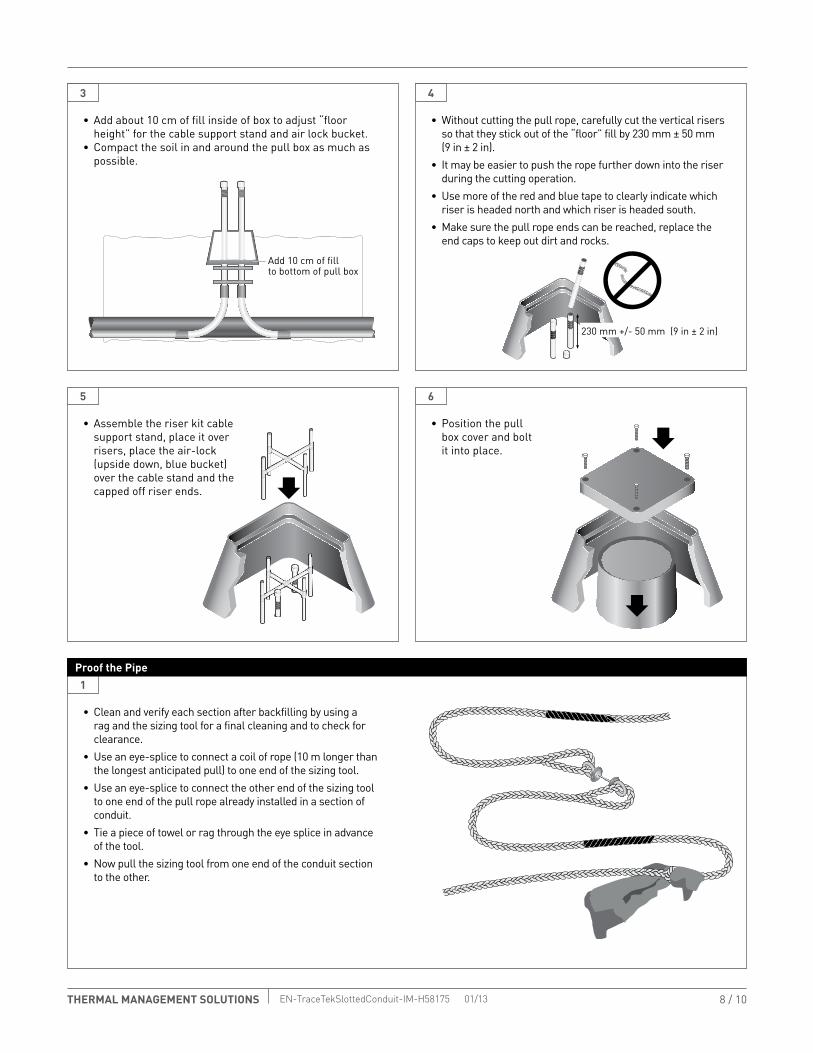
Add 10 cm of fill to bottom of pull box
3
5
230 mm +/- 50 mm (9 in ± 2 in)
4
6
• Addabout10cmoffillinsideofboxtoadjust“floorheight”forthecablesupportstandandairlockbucket.
• Compactthesoilinandaroundthepullboxasmuchaspossible.
• Assembletheriserkitcablesupportstand,placeitoverrisers, place the air-lock (upside down, blue bucket) overthecablestandandthecapped off riser ends.
•Withoutcuttingthepullrope,carefullycuttheverticalriserssothattheystickoutofthe“floor”fillby230mm±50mm (9in±2in).
• Itmaybeeasiertopushtheropefurtherdownintotheriserduring the cutting operation.
• Usemoreoftheredandbluetapetoclearlyindicatewhichriser is headed north and which riser is headed south.
• Makesurethepullropeendscanbereached,replacetheend caps to keep out dirt and rocks.
• Positionthepullboxcoverandboltit into place.
1
• Cleanandverifyeachsectionafterbackfillingbyusingaragandthesizingtoolforafinalcleaningandtocheckforclearance.
• Useaneye-splicetoconnectacoilofrope(10mlongerthanthelongestanticipatedpull)tooneendofthesizingtool.
• Useaneye-splicetoconnecttheotherendofthesizingtoolto one end of the pull rope already installed in a section of conduit.
• Tieapieceoftowelorragthroughtheeyespliceinadvanceof the tool.
• Nowpullthesizingtoolfromoneendoftheconduitsectionto the other.
proof the pipe

9/10THERMAL MANAGEMENT SOLUTIONS EN-TraceTekSlottedConduit-IM-H58175 01/13
2
3
• Asyoupull,coilthepullropebyhandtokeepitoutofthedirt.• Afterpullingthetoolthroughtheentirelengthofconduit,replacetheragwithcleanmaterialifnecessary,movetheragtootherendofthepullingtoolandreversetoprocesstopull the original pull rope back into the conduit.
• Theideaistomakesurethattheconduitisfreefromanyaccumulated dirt or mud and to make sure that there are no crushed or broken sections of conduit.
Inspector check List1. Verifythatthesizingtoopullsfreelythrougheachsectionof
conduit.2. Verifythatthepullropeisfreeofknotsandsplicesandthat
there is 2 m of extra rope at both ends of each section.3. Verifytrimmedheightofrisertubesabovebackfillis230
mm±50mm(9in±2in).4. Verifyspacingofrisertubesis280mm±50mm(11in±2
in) mm center to center.5. Verifyconduitsaremarkedwithdifferentcolortapeto
indicate directions.6. Verifyendcapsareusedtocovertheextrapullropeand
riser when the inspection is completed.
10 / 10THERMAL MANAGEMENT SOLUTIONS EN-TraceTekSlottedConduit-IM-H58175 01/13
WWW.THERMAL.PENTAIR.COM
©2007-2013Pentair.
NORTH AMERICA Tel: +1.800.545.6258Fax: +1.800.527.5703Tel: +1.650.216.1526Fax: [email protected]
EuROPE, MIddLE EAsT, AfRICATel: +32.16.213.511Fax: [email protected]
AsIA PACIfICTel: +86.21.2412.1688Fax: [email protected]
LATIN AMERICATel: +55.11.2588.1400Fax: [email protected]
PentairandTraceTekareownedbyPentairoritsglobalaffiliates.Allothertrademarksarethepropertyoftheirrespectiveowners.Pentairreservestheright to change specifications without prior notice.