snc qrg v1 - philips screen – lighting and consumer lifestyle ... defining which columns and the...
TRANSCRIPT

SNC Quick Reference Guide v1.0
Ref: SNC-QRG-1.0 Date: 2014-07-07 Page: 2
Table of Contents Table of Contents ......................................................................................................................... 2
General navigation ....................................................................................................................... 3
Queries ......................................................................................................................................... 8
Personalize your screen .............................................................................................................. 11
Alerts ........................................................................................................................................... 14
Notifications ............................................................................................................................... 17
Assign Partner Product Data ....................................................................................................... 19
Confirming Purchase Orders as requested ................................................................................. 20
Confirming Purchase Orders with Changes ................................................................................ 21
Setting Time Bucket Profiles ....................................................................................................... 23
Create Planned Receipts ............................................................................................................. 26
Change Planned Receipts ........................................................................................................... 29
Scheduling Agreement Releases................................................................................................. 30
Create Advance Shipping Notices (ASNs) ................................................................................... 32
Publish Advance Shipping Notices (ASNs) .................................................................................. 34
Assigning Serial Numbers ........................................................................................................... 36

Ref: SNC-QRG-1.0 Date: 2014-07-07 Page: 3
General navigation Main screen – Lighting and Consumer Lifestyle
A. Your name should be here. This is your personal login, therefore, your own
name should appear here. B. Top menu entry specific to “Supply Network Collaboration” tasks. C. SNC 2nd level menu
1. Home: Default page, generic information to SNC community 2. SNC Supplier: MAIN working area, here you can find the main SNC
functions 3. Logistic reports 4. Performance reports
D. 3rd level navigation 1. Info: Default page 2. Help: Here you can find the online help pages
E. Generic SNC communication to you as part of the user community.

Ref: SNC-QRG-1.0 Date: 2014-07-07 Page: 4
Main Screen - Healthcare
A. Top-level menu. SNC-related activities are located under Supply Network Collaboration.
B. The applications available to you in the portal. SNC is available under SNC Supplier.
C. The bulletin with Philips related news items D. Notifications appear here. Be sure to pay attention to these when you login, as
they may contain important information E. Your name should appear here. This is where you log out too.

Ref: SNC-QRG-1.0 Date: 2014-07-07 Page: 5
SNC Screens
A. SNC screen name B. SNC internal navigation. When navigating in various SNC functions, use this
area to revert back (return to previous page). DO NOT use the browser Back button!
Clicking the icons to the lower right of the arrow buttons allows you to select the screen you want to go back to from your browser history.
C. SNC specific 3rd level navigation. Use this to navigate the SNC functions. The
menus in SNC are visible at the top of the screen. If you click on them, the options will show in the dropdown menu. For example, the Due List can be found under Delivery Receipts and Requirements Due List:
D. Main working area. Here the selections, actions, lists, etc., are processed

Ref: SNC-QRG-1.0 Date: 2014-07-07 Page: 6
E. Set current screen as initial screen. Enables the user to define a screen of preference as the default start screen when logging on to SNC. Simply enter the screen you would like to default to, example, Due list for purchasing document. Press the button and you will get the message Next time you log on, the application will start with this screen.
Message History
In several cases the system issues messages, these can be found just below the SNC screen name. In some cases the system issues multiple messages, but only displays the last few. Use the “Display Message Log” button to see the log of all messages.

Ref: SNC-QRG-1.0 Date: 2014-07-07 Page: 7
Copy and pasting cells (with hyperlinks) Purchase Order (PO) Numbers on the PO Work list are hyperlinks; they link to a page containing information about the PO. This is for convenient navigation from the work list to the PO details. In some cases however a user just needs the actual number, to copy and paste in a different application. In those cases copy the contents of the cell containing an hyperlink as follows. Left click on the cell that you need to copy. Click on the cell, but not on the actual hyperlink (blue underlined text).
Select the contents of the cell by clicking just in front of the required string and drag your mouse over the string not releasing the right mouse button
Finally, press Ctrl + C on your keyboard to copy the selected value. Paste the contents in the required application by pressing Ctrl + V.

Ref: SNC-QRG-1.0 Date: 2014-07-07 Page: 8
Queries Retrieving information in SNC has changed from using selection screens to using Queries. A big advantage of Queries is that you can easily save and re-use them. In SNC, Queries are particularly useful in the Due List for purchasing documents and SMI Overview. Defining and saving a useful query when you use SNC for the first time can save a lot of time in the future. In addition, a well-defined query limits the amount of results generated by SNC, increasing system performance. Setting up a Query Within the Due List/SMI Overview, click on Define New Query:
Click Next:

Ref: SNC-QRG-1.0 Date: 2014-07-07 Page: 9
Enter Query Criteria. Fields with a red asterisk are mandatory fields (here: Customer Location). For example, you could make a selection based upon Product Number Range.
NOTE: Always remove the default 100 in Maximum Number of Hits and leave it empty! Not doing this might cause query results to be incomplete. Click Next

Ref: SNC-QRG-1.0 Date: 2014-07-07 Page: 10
Enter a Name for the Query, and click Finish.
Your query is now active:

Ref: SNC-QRG-1.0 Date: 2014-07-07 Page: 11
Personalize your screen Each screen can be personalized per user; defining which columns and the order in which the columns are displayed. In the bottom right hand corner of each screen, you will find a Settings button.
Click on Settings:
1. To change which columns are displayed, use the Column Selection tab. Highlight the column description and use the Add or Remove buttons to include/exclude columns. Columns on the left are not included, whilst columns on the right are included in the display.
2. You may change the sequence of columns by highlighting the Displayed Column and using the Change Sequence buttons, any column can be moved up or down the list. All other columns will be realigned automatically.
3. Any column may be sorted alphabetically or numerically, ascending or descending. On the ‘Sort’ tab, highlight the column(s) to be sorted and use the

Ref: SNC-QRG-1.0 Date: 2014-07-07 Page: 12
Add / Remove buttons. Columns appearing on the right will be sorted.
4. By changing the number of Columns Fixed to the Left you can fix a number of
panes, making the information visible even if you scroll to the right. This is useful for e.g. keeping track of which product the information belongs too.
5. Finally the number of displayed rows or columns can be controlled by the
Display tab. For example, if you want to display more rows, increase the Displayed Rows to greater than the default 8.

Ref: SNC-QRG-1.0 Date: 2014-07-07 Page: 13
After adjustment, click the OK button for the changes to take effect. These changes are only temporary. Execution of a new list would overwrite these changes. However, you have the possibility of saving your changes as a variant or layout so you can use these adjustments again. Click the Save as… button, enter a description and click the OK button.
Optionally, you can tick the Initial View box to set a view as you default view. This is useful when you use the specified layout frequently. Now you can select that saved layout using the drop-down View box

Ref: SNC-QRG-1.0 Date: 2014-07-07 Page: 14
Alerts Open the Alert monitor by clicking the menu path Exceptions Alert Monitor.
1. Specify the data to have in the selection. On the above screen, scroll down to
Alert Type and click the icon. A pop-up box as shown below will appear.
Select 0023 (New Scheduling Agreement Releases) and press OK.

Ref: SNC-QRG-1.0 Date: 2014-07-07 Page: 15
2. Save your selection. Click the icon and choose Save as.
Choose a descriptive name.

Ref: SNC-QRG-1.0 Date: 2014-07-07 Page: 16
The report may be created per user or per partner. By saving as Partner-Specific, the variant will be available for all users of the business partner (Supplier). Press OK to finish. After this, the selection is available in the dropdown selection.

Ref: SNC-QRG-1.0 Date: 2014-07-07 Page: 17
Notifications 1. Activate (use) a pre-defined Alert
2. Click on Set Notification

Ref: SNC-QRG-1.0 Date: 2014-07-07 Page: 18
3. Fill the notification details
User in system: Your User ID Minimum Priority: 3) Information Unacknowledged Alerts only should be selected Immediate Notification should be selected Click Save.
Ref: SNC-QRG-1.0 Date: 2014-07-07 Page: 19
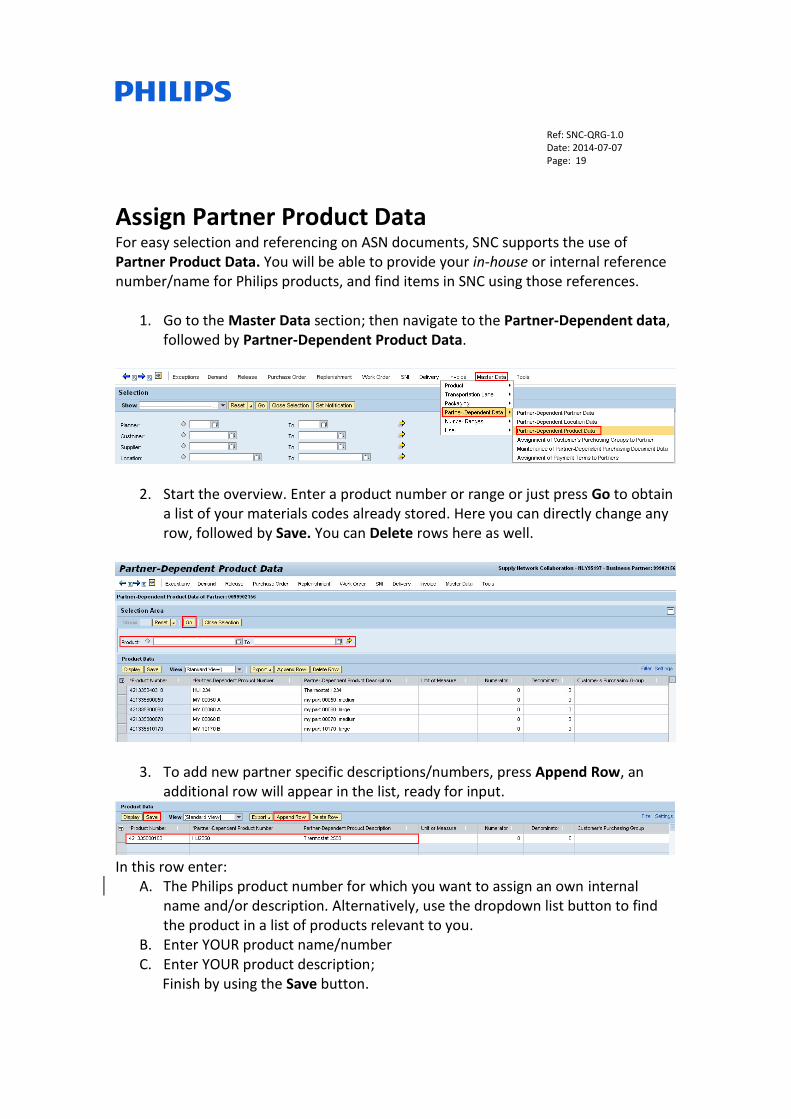
Assign Partner Product Data For easy selection and referencing on ASN documents, SNC supports the use of Partner Product Data. You will be able to provide your in-house or internal reference number/name for Philips products, and find items in SNC using those references.
1. Go to the Master Data section; then navigate to the Partner-Dependent data, followed by Partner-Dependent Product Data.
2. Start the overview. Enter a product number or range or just press Go to obtain a list of your materials codes already stored. Here you can directly change any row, followed by Save. You can Delete rows here as well.
3. To add new partner specific descriptions/numbers, press Append Row, an additional row will appear in the list, ready for input.
In this row enter:
A. The Philips product number for which you want to assign an own internal name and/or description. Alternatively, use the dropdown list button to find the product in a list of products relevant to you.
B. Enter YOUR product name/number C. Enter YOUR product description;
Finish by using the Save button.

Ref: SNC-QRG-1.0 Date: 2014-07-07 Page: 20
Confirming Purchase Orders as requested From the alert monitor screen, select Purchase Orders, double-click, then select Purchase Order Worklist from the menu. Note: you may have set your system such that you will get the Purchase Order Worklist as the default screen
Select: Process Due Confirmations .This worklist contains all POs to be confirmed. Once an item is confirmed it moves to the worklist Change Confirmations Press Go.
Select the requested Purchase Order for confirmation. (Note; your view may look differently, based on you own settings/selection) Tick the check box Conf. Rqstd. and enter SO no. (only required for the first line, it will copy to all other lines). Press Save and Publish.

Ref: SNC-QRG-1.0 Date: 2014-07-07 Page: 21
Confirming Purchase Orders with Changes Confirm and Publish all POs which you can acknowledge as requested via the Cnf. Rqst. box first! This will prevent regular POs being delayed by Exceptions. From the Purchase Order Worklist (your selection), look for the Purchase Order you want to change, select the R:C (Requested/Confirmed) field in the PO line.
Now select Confirm in the Purchase Order item; a second line appears where the scheduled quantity can be confirmed.
The scheduled quantity can be entered in the second line in the column Qty. Another schedule line can be added (by clicking Confirm again) for the remaining quantity of the Purchase Order. You should always Split a PO in multiple lines when changing the quantity, to make sure the total acknowledged quantity matches the requested quantity.

Ref: SNC-QRG-1.0 Date: 2014-07-07 Page: 22
When you have finished confirming the Purchase Order, press Save or Publish in the order header. You can update the Delivery Date at the same time, but keep in mind to adjust the Shipping Date accordingly.

Ref: SNC-QRG-1.0 Date: 2014-07-07 Page: 23
Setting Time Bucket Profiles The time bucket profile relates to the time buckets shown in the SMI Overview and the SMI Details screen. Although it is possible to differentiate in time bucket profile between materials, it is advisable to have only one profile, because:
1. Only one profile can be assigned generic to all materials, deviating profiles need to be assigned material by material;
2. The SMI overview will only show the time buckets, not what they mean. This will be very confusing if materials in the overview can have different profiles. This can, of course, be resolved by creating a selection variant for the SMI overview per profile.
To set the Time Bucket Profile, follow the menu path Replenishment SMI Monitor Time Buckets Profile.
Enter the fields Customer Location and Product to select the location and product for which you want to update the profile. In case you want to make a generic change to the profile, just select any location-product combination that is subject to SMI. Next click the button Go.

Ref: SNC-QRG-1.0 Date: 2014-07-07 Page: 24
The system will now show the profile assigned to the material. Click Edit to change the profile.
Field Function Display Horizon In this field you define the total duration for the planning
horizon. Set the period type and the number of periods. The system identifies periods according to the calendar. The current period is seen as 1 period, regardless of how much of the time period has already passed. Example: you select two years, the current date is June 20, 2014 The system will then show you the remainder of 2014 (year 1) and the whole year 2015 (year 2). It will not show (part of) 2016.
No. of Days This field has no use. Do not enter. No. of Weeks Here you enter the number of weeks for which you want
to see the time buckets as days. First period of the planning horizon is week 1; for that week only the remaining days will be shown. This setting relates to the short-term horizon.
No. of Months Here you enter the number of months for which you want to see the time buckets as weeks. The system will only show the time bucket in weeks for the period that comes after the period specified in the No. of Weeks setting. However, the No. of Months setting defines month 1 as its starting point. This means the entire

Ref: SNC-QRG-1.0 Date: 2014-07-07 Page: 25
period can be shown in days instead of months, when the period specified in the No. of Weeks setting exceeds the time specified in the No. of Months setting. This setting relates to the medium-term horizon. The time bucket is only available in case the period type for the horizon is a month or year.
No. of Years Here you enter the number of years for which you want to see the time buckets as months. The system will only show the time bucket in months, after the weeks and months defined in the previous fields. The first period of the planning horizon is regarded as year 1. This setting relates to the long-term horizon. The time bucket is only available in case the period type for the horizon is a year.
Offset With the field offset you can specify that the planning horizon starts in the future or in the past and not with the current period. Enter a positive or negative number of days by which you want to shift the start of the planning horizon. In case you use the offset, the system will start counting weeks, months and years, based on the first day of the planning horizon.
Example:
Current date is June 20 2014 (Friday), there is no offset defined. Horizon is two years, so the system will show the periods from June 20 2014 until December 31 2015. Number of weeks is 4, so the system will show the week of June 20, and the next three weeks as days. Click Save to save the Time Bucket settings. As explained above, it is recommended to save one profile for all location products.
Ref: SNC-QRG-1.0 Date: 2014-07-07 Page: 26
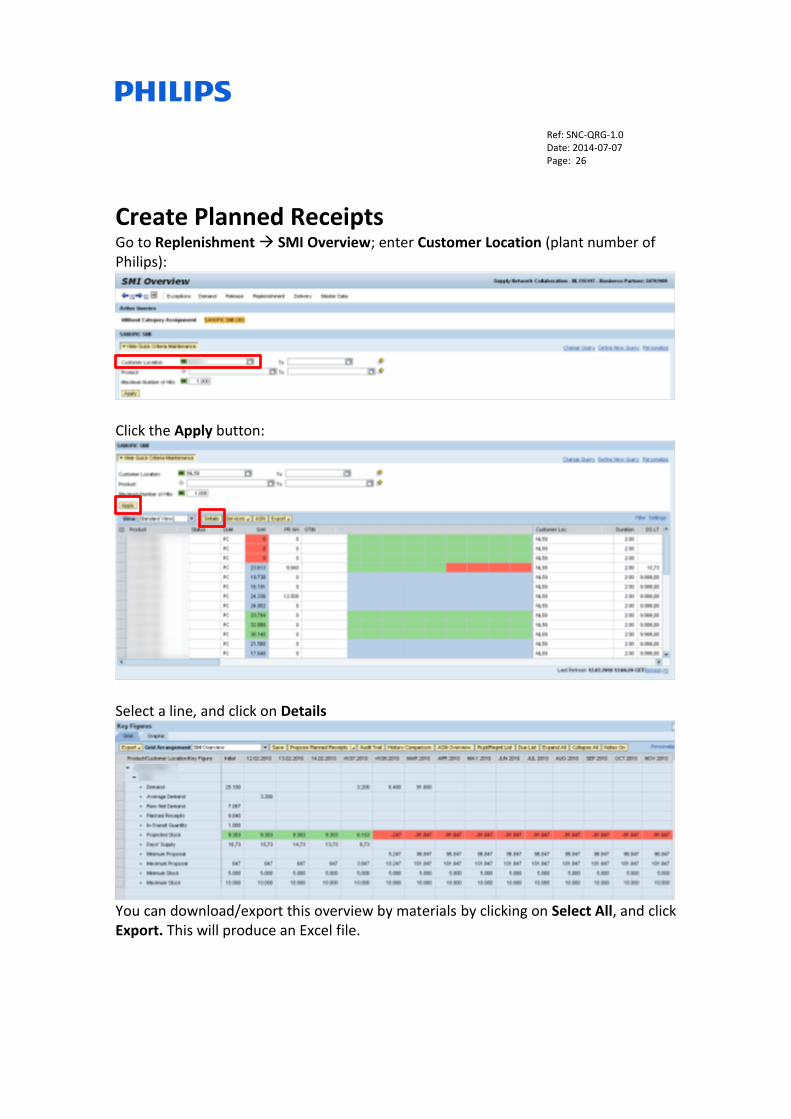
Create Planned Receipts Go to Replenishment SMI Overview; enter Customer Location (plant number of Philips):
Click the Apply button:
Select a line, and click on Details
You can download/export this overview by materials by clicking on Select All, and click Export. This will produce an Excel file.

Ref: SNC-QRG-1.0 Date: 2014-07-07 Page: 27
Note: The Grid Arrangement provides a color code status of the material. Row Description Planned Receipts This row indicates the quantity of material the supplier
plans to provide to Philips on that day. Projected Stock Calculated taking the stock on hand at Philips, plus any
Planned Receipts, plus Material In Transit. Min. and Max. Proposal Based on the inventory level on this day, and the number
of days of demand, a proposal for the planned order is suggested for the minimum and maximum proposal
Days of supply Based on the supply and the demand, this will show how many days of supply are on hand.
Min. and max. Stock The quantities reflect the minimum and maximum stock levels for this part on this day.
In the Grid Arrangement, change from SMI Overview to SMI Ship-From Location:
A window Planned Receipts will open Enter the quantity you plan to deliver to Philips on the correct day.
There are two ways to create Planned Receipts:
a) Manually enter the Planned Receipt quantity in the appropriate bucket and press Enter to see the result.
b) Or click on the Propose Planned Receipt, and SNC will propose a planned quantity within the horizon.

Ref: SNC-QRG-1.0 Date: 2014-07-07 Page: 28
When the Planned receipts have satisfied the Min/Max stock level, clearly visible by the color codes, you can click on the Save button. You cannot create an Advanced Shipping Notice without a Planned Receipt in place.
Ref: SNC-QRG-1.0 Date: 2014-07-07 Page: 29
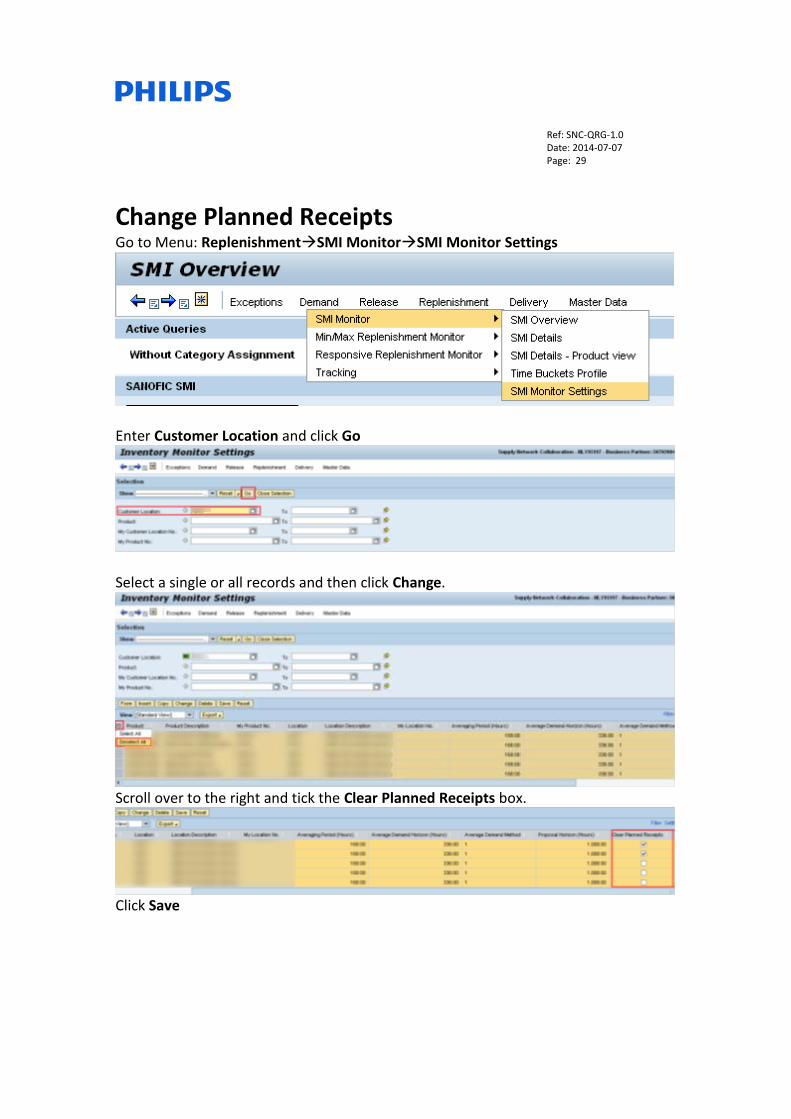
Change Planned Receipts Go to Menu: ReplenishmentSMI MonitorSMI Monitor Settings
Enter Customer Location and click Go
Select a single or all records and then click Change.
Scroll over to the right and tick the Clear Planned Receipts box.
Click Save

Ref: SNC-QRG-1.0 Date: 2014-07-07 Page: 30
Scheduling Agreement Releases If your Philips customer makes use of Scheduling Agreement Releases to communicate demand to you, it is necessary to acknowledge these releases before you make an Advanced Shipping Notice (ASN) and ship the items. To acknowledge Scheduling Agreement Releases click Release Release Overview.
Select your Customer Location from the selection grid and click Go.
Below the Selection grid you will now see a list of All items supplied by your company to Philips. Note that you do not see demands here. To check demands, select an item and click Details.

Ref: SNC-QRG-1.0 Date: 2014-07-07 Page: 31
Comparison of releases can be made by clicking on the Compare Releases button.
By default, SNC will compare the current release with the previous release. This can be changed by selecting alternative releases from the top grid.
Back in the main list with Scheduling Agreement Releases you can now acknowledge a release by clicking the appropriate line and selecting Acknowledge (Acknowledge multiple lines at once by holding the Ctrl button on your keyboard and selecting the lines to be acknowledged)

Ref: SNC-QRG-1.0 Date: 2014-07-07 Page: 32
Create Advance Shipping Notices (ASNs) Follow the Menu path DeliveryDue List for Purchasing Documents in the case of Purchase Order Collaboration. In the case of SMI/SMOI follow DeliveryDue List for Planned Receipts (SMI).
From the Due list overview, select the rows ready for delivery
Use the Shift and Control keys to make multiple selections. Press the Create ASN button. In the resulting ASN-creation screen, complement the default suggested information
A. Enter an ASN No. This number should reference registration in your internal
systems. B. Check and, if necessary, correct the suggested defaults for each of the
products selected. NOTE: you should always change the quantity to the quantity to be delivered in case of a blanket order, since the default quantity will show the entire annual demand.
You now have two options:
a) Save/Draft – which allows you to make quantity changes later b) Publish ASN

Ref: SNC-QRG-1.0 Date: 2014-07-07 Page: 33
Saving ASNs in Draft status enables you as a supplier to: · Prepare the shipment · Pick the products for the shipment from your warehouse/stock location · Make final adjustments to the exact quantities · Finalize the documents
After saving the ASN as a Draft it can be printed: Push the Print button. A pop-up with the ASN PDF document will open clearly stating the document to be in draft status:
With this document you could execute internal processes (like picking of goods) Note: the internal product number is also visible on this document. ASNs saved as a Draft still need to be Published!

Ref: SNC-QRG-1.0 Date: 2014-07-07 Page: 34
Publish Advance Shipping Notices (ASNs) Once the internal processes are completed, and the goods are ready for delivery the document needs to be finalized. Go to the ASN overview (Menu path: DeliveryAdvanced Shipping NotificationASN Overview)
Using the ASN number on the draft document select the ASN to finalize; Enter the ASN number and press Go
After this a list with the ASN appears:
You can now:

Ref: SNC-QRG-1.0 Date: 2014-07-07 Page: 35
1. Change and Publish (e.g. if for one of the collected products the standard quantity in a packing unit is different than on the ASN, or in the case there is shortage) 2. Publish without any changes NOTE: Always Print a PO after publishing it and attach the printed Delivery Note to your shipment.

Ref: SNC-QRG-1.0 Date: 2014-07-07 Page: 36
Assigning Serial Numbers Some products require serial numbers. In case the system expects serial numbers to be entered for a material, it will issue an error message when you try publishing an ASN and the serial numbers were not added. To add serial numbers, in the ASN overview select the line for which you want to add serial numbers and click on Show Details.
The details are divided over two tabs, click on the tab Serial Number
Add a line in the tab Serial Number for each serial number to enter. Number of lines to be added should be equal to the ASN Quantity. In this case 3.

Ref: SNC-QRG-1.0 Date: 2014-07-07 Page: 37
Next add the serial numbers in the column Serial Number.
The ASN can now be published.