soak off gel instructions 7 8 - star nail off gel instructions.pdf · 8. cure in a 9 watt uv lamp...
TRANSCRIPT
Stir if necessary as the pigments may settle during shipping.
POLISH LOOK:1. Prepare all of the nails by pushing back and removing the cuticles. This step is very important. The most common cause of lifting is cuticle left on the nail.
2. Using a 240 grit file or block, gently remove the natural shine from all of the nails. This removes surface oils and contaminants on the nail plate.
3. Wash away dust with anti-bacterial soap and water.
4. Apply dehydrator to all of the nails to remove the moisture from washing.
5. If you are adding length, apply tips or forms. For this demo we are doing a natural nail overlay.
6. Apply primer to the nail plates. Use caution with primer so that you do not flood the nail plate and cuticle.
7. Apply a thin coat of clear gel to act as your base coat. Be sure and cover the entire nail from side wall to side wall, free-edge to free-edge.
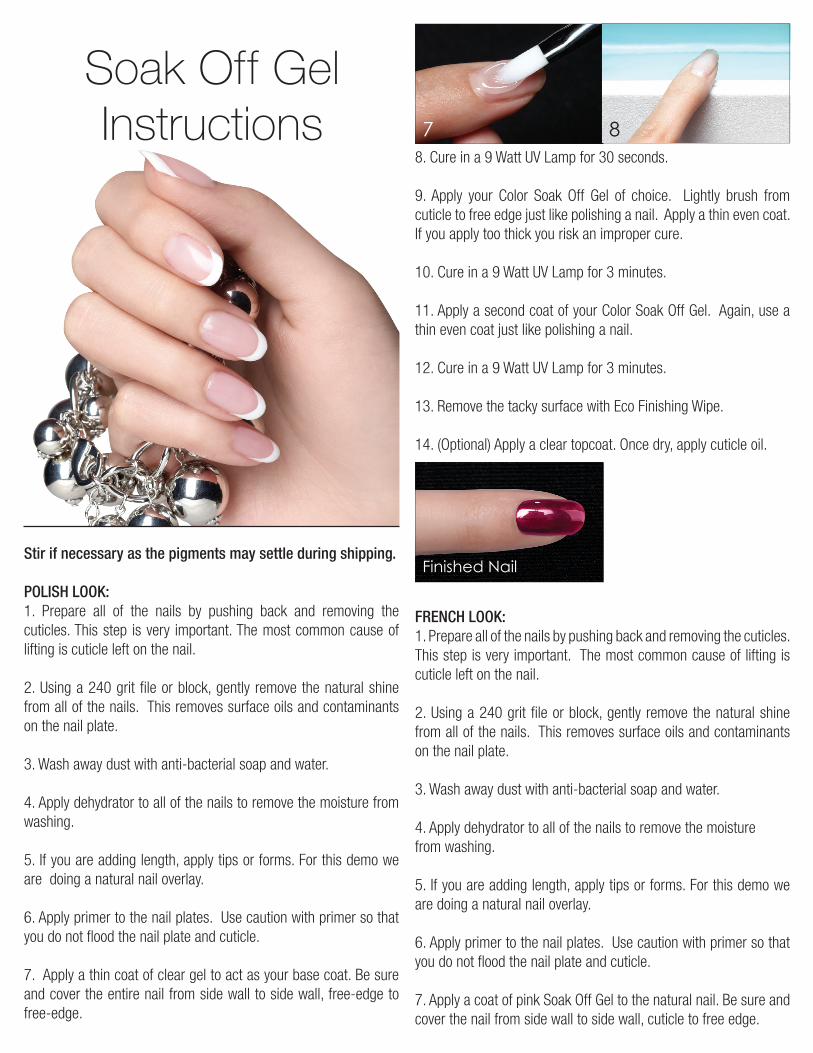
8. Cure in a 9 Watt UV Lamp for 30 seconds.
9. Apply your Color Soak Off Gel of choice. Lightly brush from cuticle to free edge just like polishing a nail. Apply a thin even coat. If you apply too thick you risk an improper cure.
10. Cure in a 9 Watt UV Lamp for 3 minutes.
11. Apply a second coat of your Color Soak Off Gel. Again, use a thin even coat just like polishing a nail.
12. Cure in a 9 Watt UV Lamp for 3 minutes.
13. Remove the tacky surface with Eco Finishing Wipe.
14. (Optional) Apply a clear topcoat. Once dry, apply cuticle oil.
FRENCH LOOK:1. Prepare all of the nails by pushing back and removing the cuticles. This step is very important. The most common cause of lifting is cuticle left on the nail.
2. Using a 240 grit file or block, gently remove the natural shine from all of the nails. This removes surface oils and contaminants on the nail plate.
3. Wash away dust with anti-bacterial soap and water.
4. Apply dehydrator to all of the nails to remove the moisture from washing.
5. If you are adding length, apply tips or forms. For this demo we are doing a natural nail overlay.
6. Apply primer to the nail plates. Use caution with primer so that you do not flood the nail plate and cuticle.
7. Apply a coat of pink Soak Off Gel to the natural nail. Be sure and cover the nail from side wall to side wall, cuticle to free edge.
Soak Off GelInstructions
Finished Nail
7 8

8. Cure in a 9 Watt UV Lamp for 30 seconds.
9. Using the white Soak Off Gel, apply the french smile line. If you make any mistakes, you can use a clean gel brush dipped in Finishing Wipe to perfect the smile line and remove any gel from the skin.
10. Cure in a 9 Watt UV Lamp for 3 minutes.
11. Apply a coat of clear Soak Off Gel over the entire nail. This will cap and protect your french without tinting your white. Never use pink gel to cap your french or you will turn your white smile pink.
12. Cure in a 9 Watt UV Lamp for 3 minutes.
REMOVAL:CAUTION: Never use any form of heating (or electrical) unit to warm the So Quick Soak Off UV Gel Solution. You risk serious injury to your client. The following instructions provide two techniques for removing the Soak Off Gel.
Technique 1What you will need: A towel, glass or ceramic dish, wood stick and So Quick Soak Off UV Gel Solution.
1. Pour enough So Quick Soak Off UV Gel Solution into your glass or ceramic dish to cover your clients nails.
2. Put both of your clients fingertips into the solution.
3. Use a towel to cover the dish (and over their hands). This will help keep the body heat in and will be enough warmth to aid in speeding up the Soak Off process.
4. Depending on the thickness of your application, Soak Off time can take anywhere from 5 - 10 minutes.
5. After 5 - 10 minutes remove the towel. You should see a crackle effect all over the surface of your client’s nails. This indicates that it is releasing from the bed. Unlike traditional acrylics, Soak Off Gel does not dissolve. It releases from the nail.
6. Now take your wood stick and gently scrape the nail. This should take little to no pressure at all.
7. Once you’ve removed all of the Soak Off Gel, have your client wash their hands with soap and water.
Technique 2What you will need: 10 small squares of tin foil, cotton balls or strips, towel, wood stick and So Quick Soak Off UV Gel Solution.
1. Pour enough So Quick Soak Off UV Gel Solution into a glass or ceramic dish to saturate pieces of cotton.
2. Saturate a cotton ball and place it on your client’s nail.
3. Take a square of tin foil and wrap the tip of the nail and up the finger.
4. Repeat steps 2 and 3 for each finger.
5. Once all the fingers are covered in foil, wrap your client’s hands together in a towel to trap the body heat. This will help to speed up the Soak Off process.
6. Depending on the thickness of your application, Soak Off time can take anywhere from 5 - 10 minutes.
7. After 5 -10 minutes remove the towel. Unwrap the first finger you wrapped. You should see a crackle effect all over the surface of your client’s nails. This indicates that it is releasing from the bed. Unlike traditional acrylics, Soak Off Gel does not dissolve. It releases from the nail.
8. Take your wood stick and gently scrape the nail. This should take little to no pressure at all.
9. Repeat steps 7 and 8 on each nail one at a time.
10. Once you’ve removed all of the Soak Off Gel, have your client wash their hands with soap and water.
9 10
11 12
Finished Nail
7 8