sop pro fxp 95 uprad it (rulatd) - davco tec · 2019-05-03 · f3223 rv a 3 may 3, 2019 sop pro fxp...
TRANSCRIPT

1. Make sure the Shop Pro FXP is disconnected from the 120VAC power source.
2. Remove the vent cap and drain the filtration unit completely then close drain valve - leave the cap off until instructed to replace it.
3. Replace the drain hose in the clip.
4. Loosen the five ¼" headed bolts slightly until the motor cover slides to the left and remove the cover.
5. Remove the two ½" headed pump bracket bolts/washers and discard.
6. Slide the pump and bracket to the right as shown.
F3223 REV A
May 3, 20191
SHOP PRO FXP 95 UPGRADE KIT (REGULATED)
DAVCO Technology, LLC www.davco.com800-328-26111600 Woodland Drive, Saline, MI 48176-1629
F3223 REV A
May 3, 20192
SHOP PRO FXP 95 UPGRADE KIT (REGULATED)
DAVCO Technology, LLC www.davco.com800-328-26111600 Woodland Drive, Saline, MI 48176-1629
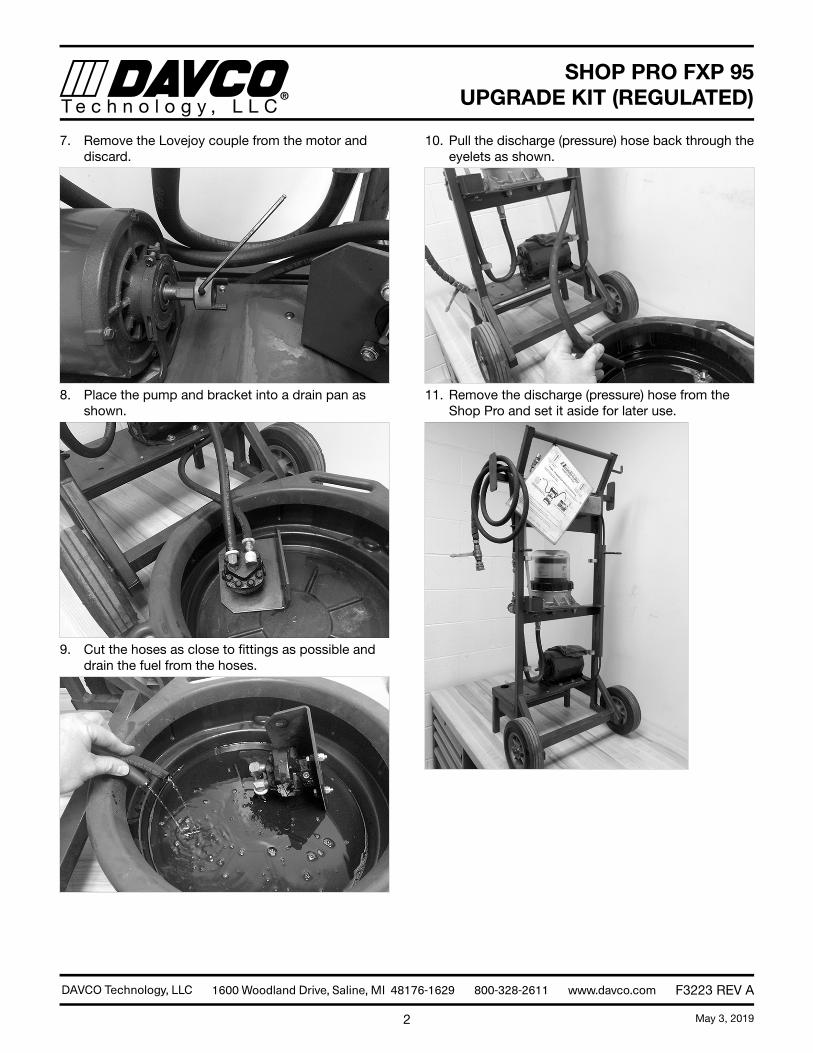
7. Remove the Lovejoy couple from the motor and discard.
8. Place the pump and bracket into a drain pan as shown.
9. Cut the hoses as close to fittings as possible and drain the fuel from the hoses.
10. Pull the discharge (pressure) hose back through the eyelets as shown.
11. Remove the discharge (pressure) hose from the Shop Pro and set it aside for later use.
F3223 REV A
May 3, 20193
SHOP PRO FXP 95 UPGRADE KIT (REGULATED)
DAVCO Technology, LLC www.davco.com800-328-26111600 Woodland Drive, Saline, MI 48176-1629
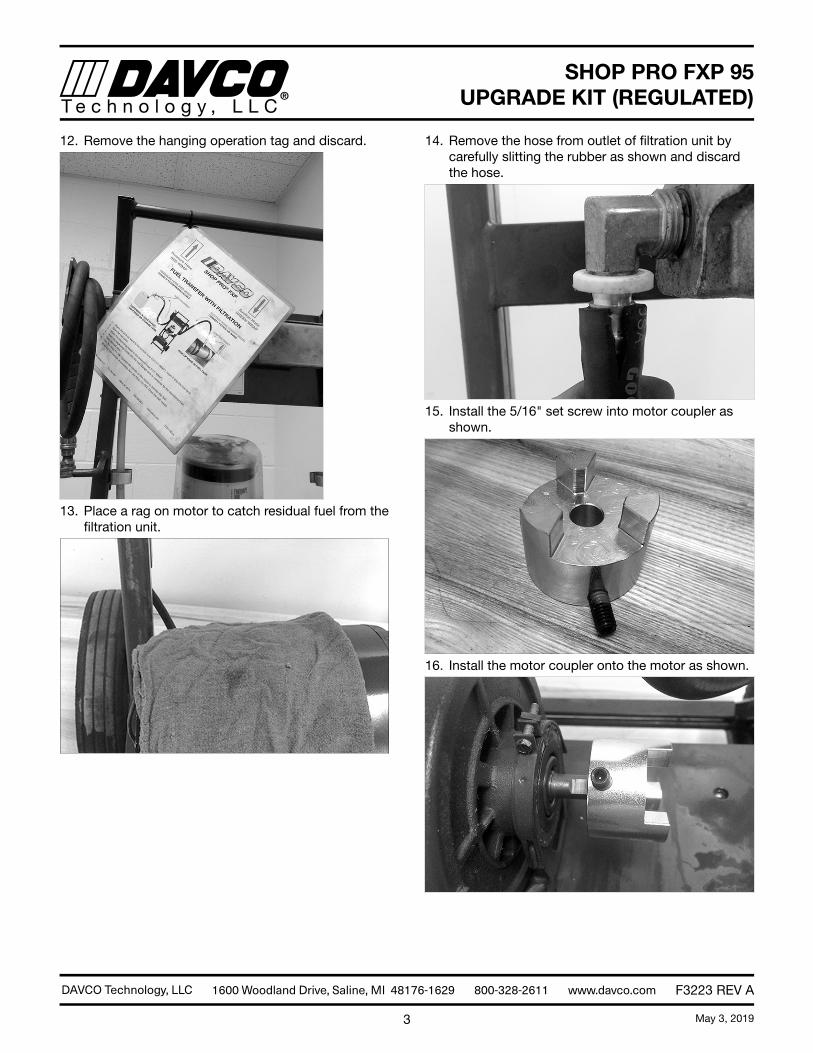
12. Remove the hanging operation tag and discard.
13. Place a rag on motor to catch residual fuel from the filtration unit.
14. Remove the hose from outlet of filtration unit by carefully slitting the rubber as shown and discard the hose.
15. Install the 5/16" set screw into motor coupler as shown.
16. Install the motor coupler onto the motor as shown.
F3223 REV A
May 3, 20194
SHOP PRO FXP 95 UPGRADE KIT (REGULATED)
DAVCO Technology, LLC www.davco.com800-328-26111600 Woodland Drive, Saline, MI 48176-1629
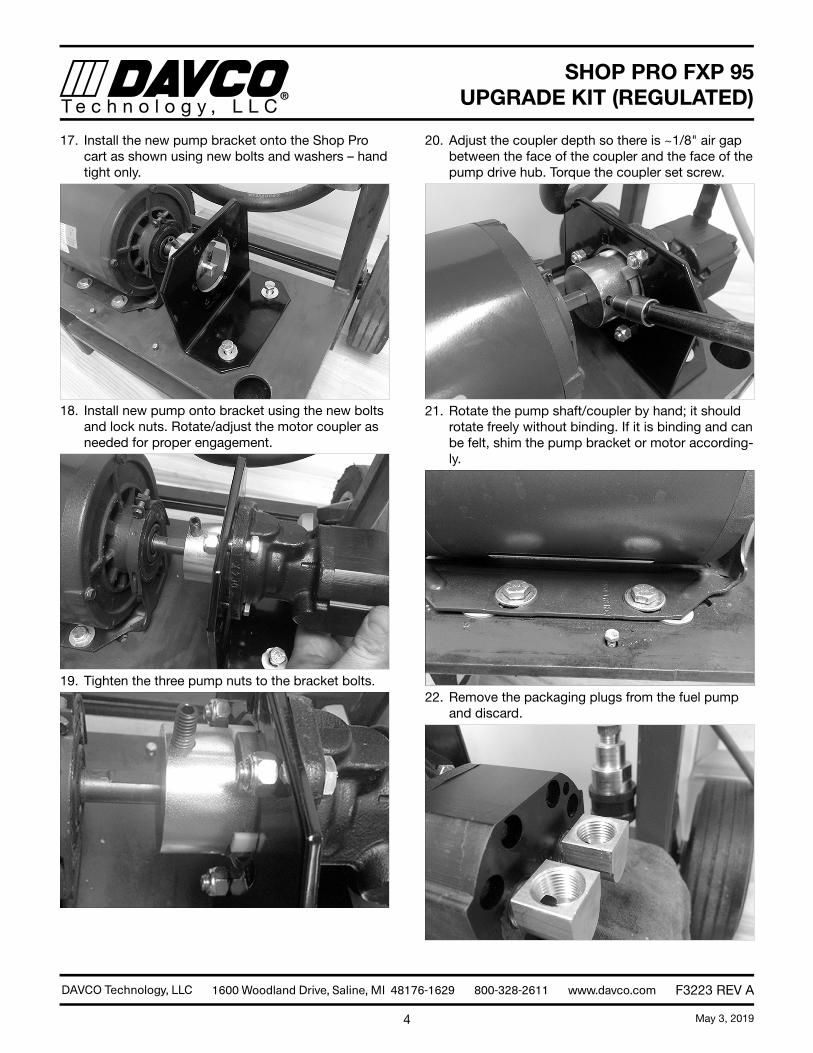
17. Install the new pump bracket onto the Shop Pro cart as shown using new bolts and washers – hand tight only.
18. Install new pump onto bracket using the new bolts and lock nuts. Rotate/adjust the motor coupler as needed for proper engagement.
19. Tighten the three pump nuts to the bracket bolts.
20. Adjust the coupler depth so there is ~1/8" air gap between the face of the coupler and the face of the pump drive hub. Torque the coupler set screw.
21. Rotate the pump shaft/coupler by hand; it should rotate freely without binding. If it is binding and can be felt, shim the pump bracket or motor according-ly.
22. Remove the packaging plugs from the fuel pump and discard.
F3223 REV A
May 3, 20195
SHOP PRO FXP 95 UPGRADE KIT (REGULATED)
DAVCO Technology, LLC www.davco.com800-328-26111600 Woodland Drive, Saline, MI 48176-1629
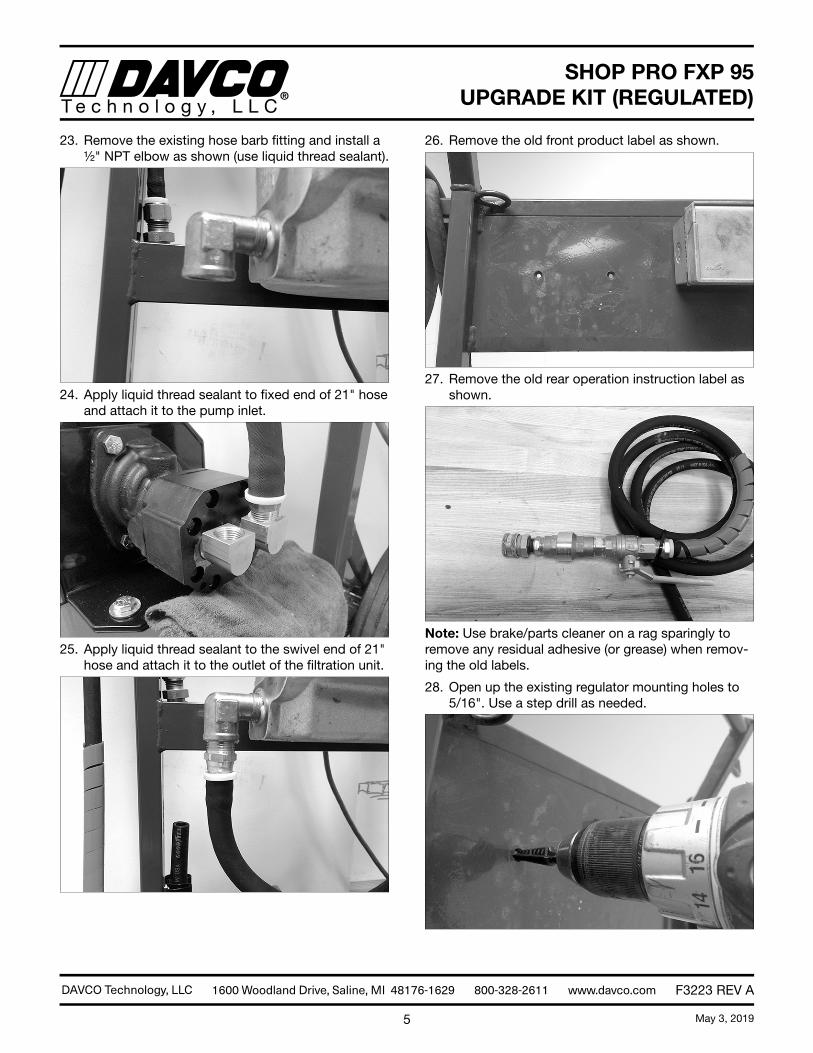
23. Remove the existing hose barb fitting and install a ½" NPT elbow as shown (use liquid thread sealant).
24. Apply liquid thread sealant to fixed end of 21" hose and attach it to the pump inlet.
25. Apply liquid thread sealant to the swivel end of 21" hose and attach it to the outlet of the filtration unit.
26. Remove the old front product label as shown.
27. Remove the old rear operation instruction label as shown.
Note: Use brake/parts cleaner on a rag sparingly to remove any residual adhesive (or grease) when remov-ing the old labels.
28. Open up the existing regulator mounting holes to 5/16". Use a step drill as needed.

F3223 REV A
May 3, 20196
SHOP PRO FXP 95 UPGRADE KIT (REGULATED)
DAVCO Technology, LLC www.davco.com800-328-26111600 Woodland Drive, Saline, MI 48176-1629
29. Countersink the regulator mounting holes as need-ed.
30. Install the inner most regulator bolt/regulator/lock washer and nut (hand tight) as shown.
31. Rotate the regulator into place and install the bolt/lock washer and nut. Tighten both bolts as shown.
32. Wrap the discharge (pressure) hose around the cart as shown.
33. Install the new front product label and replace it as shown.
34. Install the new rear operation instruction label and replace it as shown.
F3223 REV A
May 3, 20197
SHOP PRO FXP 95 UPGRADE KIT (REGULATED)
DAVCO Technology, LLC www.davco.com800-328-26111600 Woodland Drive, Saline, MI 48176-1629
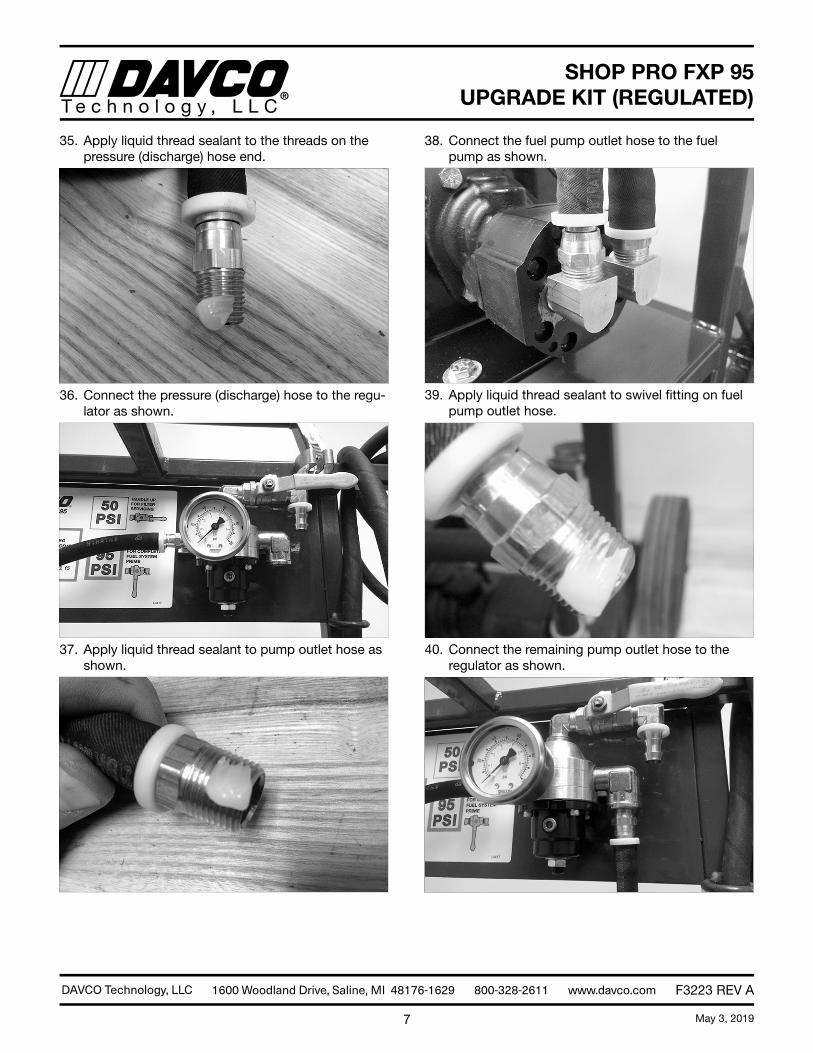
35. Apply liquid thread sealant to the threads on the pressure (discharge) hose end.
36. Connect the pressure (discharge) hose to the regu-lator as shown.
37. Apply liquid thread sealant to pump outlet hose as
shown.
38. Connect the fuel pump outlet hose to the fuel pump as shown.
39. Apply liquid thread sealant to swivel fitting on fuel pump outlet hose.
40. Connect the remaining pump outlet hose to the regulator as shown.

F3223 REV A
May 3, 20198
SHOP PRO FXP 95 UPGRADE KIT (REGULATED)
DAVCO Technology, LLC www.davco.com800-328-26111600 Woodland Drive, Saline, MI 48176-1629
41. Drain the suction hose into a drain pan as shown.
42. Disconnect the old suction hose from the sight glass.
43. Cut the old suction hose near the hose end and remove and the discard hose.
44. Apply liquid thread sealant to pipe threads on the sight glass tee.
45. Install the sight glass tee as shown.
46. Lubricate one end of the 8" suction hose and in-stall it on the regulator outlet as shown.
F3223 REV A
May 3, 20199
SHOP PRO FXP 95 UPGRADE KIT (REGULATED)
DAVCO Technology, LLC www.davco.com800-328-26111600 Woodland Drive, Saline, MI 48176-1629
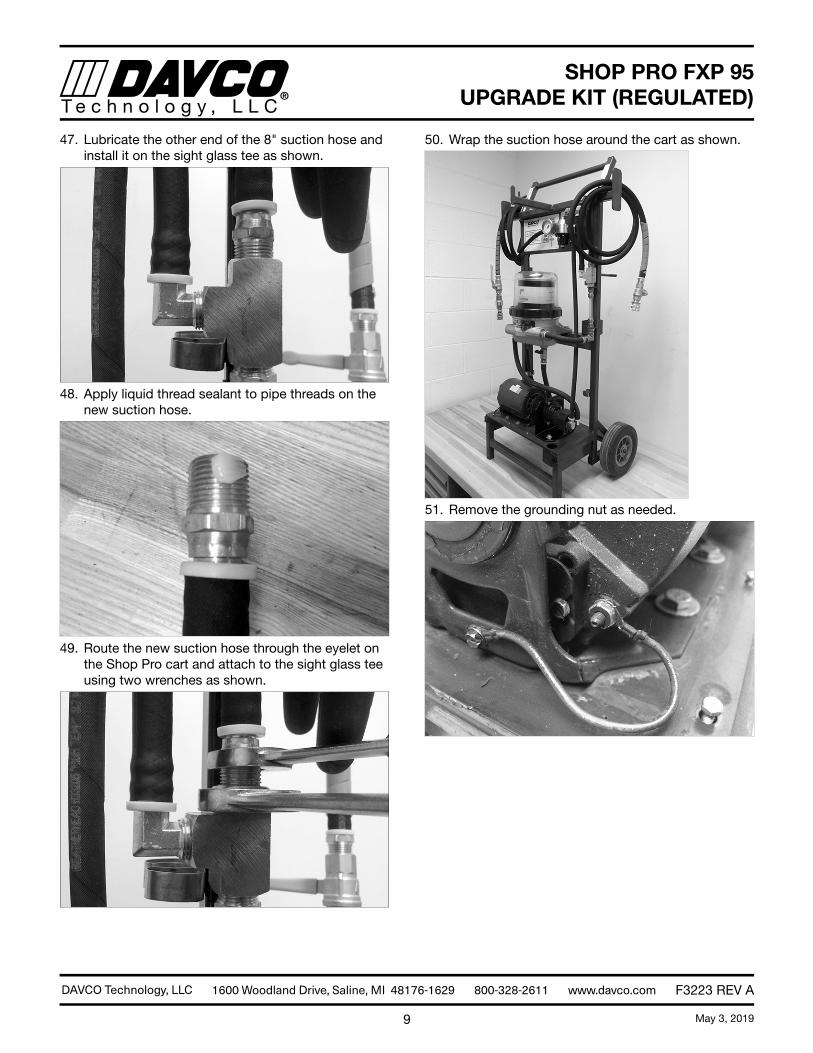
47. Lubricate the other end of the 8" suction hose and install it on the sight glass tee as shown.
48. Apply liquid thread sealant to pipe threads on the new suction hose.
49. Route the new suction hose through the eyelet on the Shop Pro cart and attach to the sight glass tee using two wrenches as shown.
50. Wrap the suction hose around the cart as shown.
51. Remove the grounding nut as needed.

F3223 REV A
May 3, 201910
SHOP PRO FXP 95 UPGRADE KIT (REGULATED)
DAVCO Technology, LLC www.davco.com800-328-26111600 Woodland Drive, Saline, MI 48176-1629
52. Loosen the motor clamp bolts slightly until the motor pivots in the cradle freely.
53. Rotate the motor upward exposing the electrical connection access plate.
54. Loosen the access plate screws slightly and re-move the plate from motor.
55. Pull the power cord back to expose the electrical connections on the circuit board.
56. Using needle nose pliers swap L1 and L2 (red and black wires) to reverse the motor rotation.
57. Bundle the power cord back into the electrical cavity and replace access panel.
RED WIRE
BLACK WIRE

F3223 REV A
May 3, 201911
SHOP PRO FXP 95 UPGRADE KIT (REGULATED)
DAVCO Technology, LLC www.davco.com800-328-26111600 Woodland Drive, Saline, MI 48176-1629
58. Rotate the motor on pivot so the electrical cord is down towards the motor mounting plate and tight-en the motor clamp bolts.
59. Align pump/motor and the confirm pump rotation - attach the tubes to the suction and the dispensing hoses and place them in a bucket of fuel. Open both valves as shown.
60. Connect an extension cord to power box on the back of the cart.
61. Align the motor/pump – carefully turn the power switch on and note the sound and appearance of the motor/pump coupler. The sound should be smooth and coupler should spin concentric.
62. Tighten the two pump bracket bolts up to finalize the alignment then shut off the power switch.
F3223 REV A
May 3, 201912
SHOP PRO FXP 95 UPGRADE KIT (REGULATED)
DAVCO Technology, LLC www.davco.com800-328-26111600 Woodland Drive, Saline, MI 48176-1629
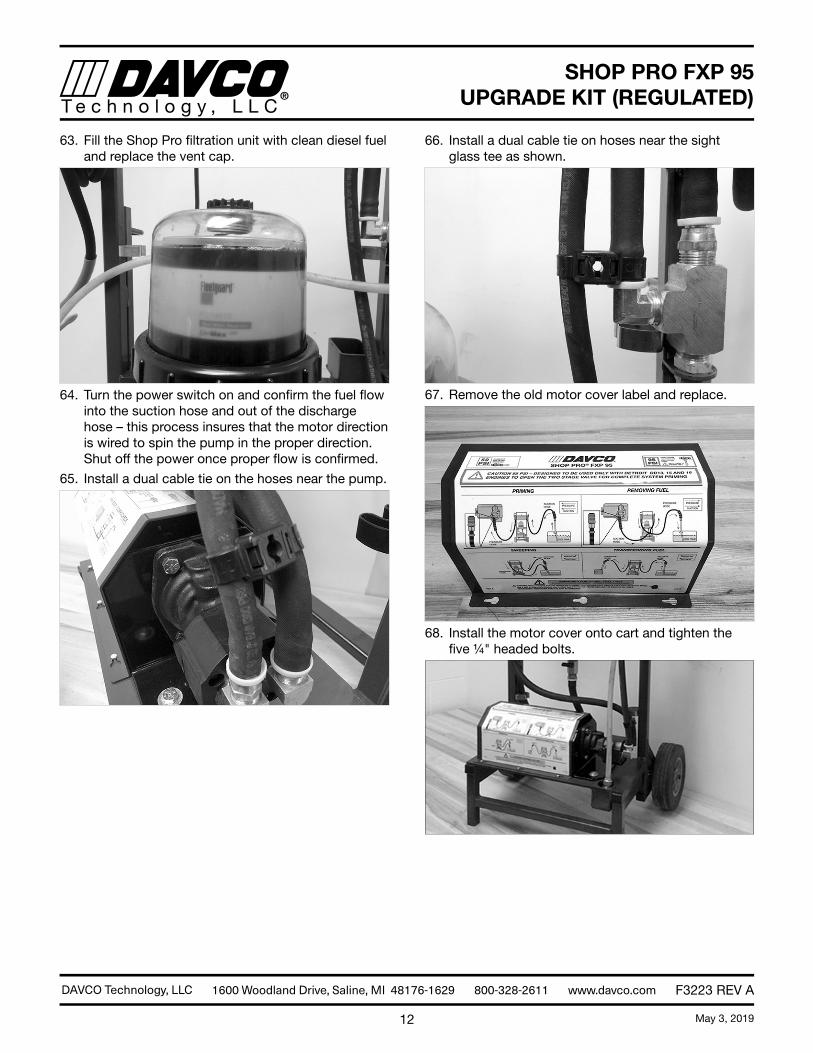
63. Fill the Shop Pro filtration unit with clean diesel fuel and replace the vent cap.
64. Turn the power switch on and confirm the fuel flow into the suction hose and out of the discharge hose – this process insures that the motor direction is wired to spin the pump in the proper direction. Shut off the power once proper flow is confirmed.
65. Install a dual cable tie on the hoses near the pump.
66. Install a dual cable tie on hoses near the sight glass tee as shown.
67. Remove the old motor cover label and replace.
68. Install the motor cover onto cart and tighten the five ¼" headed bolts.
F3223 REV A
May 3, 201913
SHOP PRO FXP 95 UPGRADE KIT (REGULATED)
DAVCO Technology, LLC www.davco.com800-328-26111600 Woodland Drive, Saline, MI 48176-1629
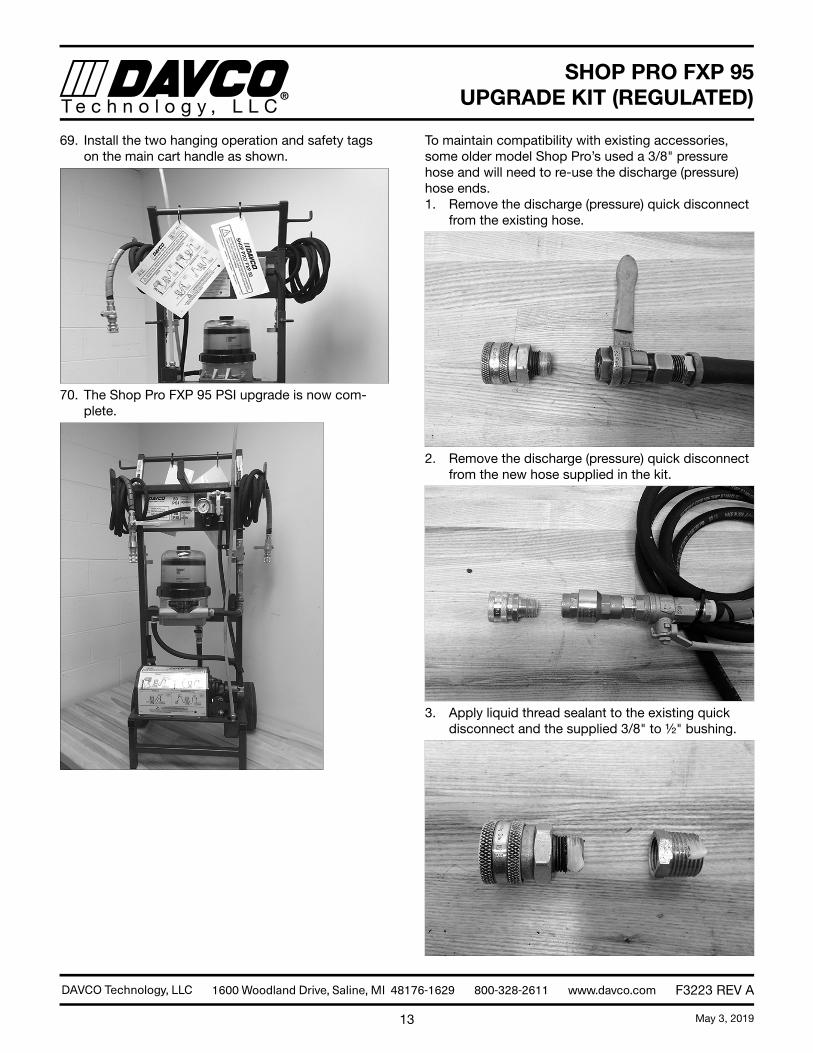
69. Install the two hanging operation and safety tags on the main cart handle as shown.
70. The Shop Pro FXP 95 PSI upgrade is now com-plete.
To maintain compatibility with existing accessories, some older model Shop Pro’s used a 3/8" pressure hose and will need to re-use the discharge (pressure) hose ends.1. Remove the discharge (pressure) quick disconnect
from the existing hose.
2. Remove the discharge (pressure) quick disconnect from the new hose supplied in the kit.
3. Apply liquid thread sealant to the existing quick disconnect and the supplied 3/8" to ½" bushing.
F3223 REV A
May 3, 201914
SHOP PRO FXP 95 UPGRADE KIT (REGULATED)
DAVCO Technology, LLC www.davco.com800-328-26111600 Woodland Drive, Saline, MI 48176-1629
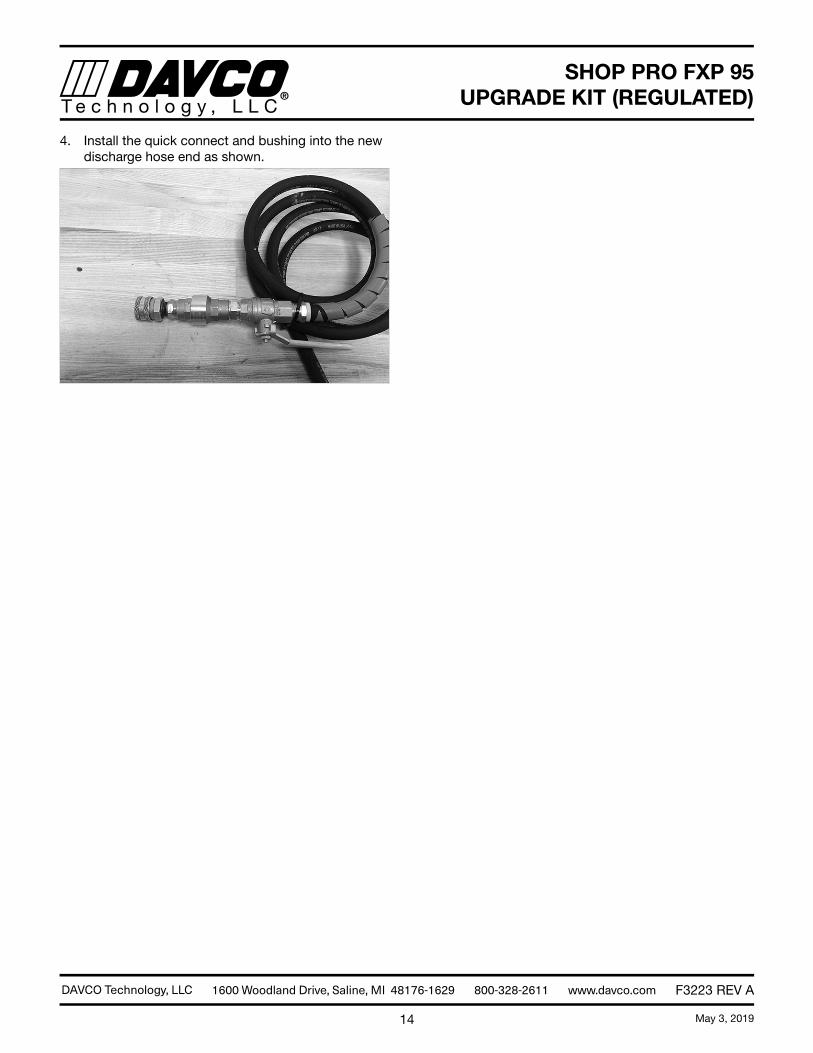
4. Install the quick connect and bushing into the new discharge hose end as shown.