southern belles just kisses - robertkaufman.com · just kisses designed by darlene zimmerman...
TRANSCRIPT

Just KissesDesigned by Darlene Zimmermanwww.feedsacklady.com
Featuring
SOUTHERN BELLES
For questions about this pattern, please email [email protected].
Finished quilt measures: 62” x 62”

page 2
Fabric and Supplies Needed
Color Fabric Name/SKU Yardage
ADZ-18448-200 VINTAGE
ADZ-18453-5 YELLOW
ADZ-18450-5 YELLOW
ADZ-18449-36 ALOE
ADZ-18451-36 ALOE
ADZ-18452-36 ALOE
ADZ-18448-63 SKY
ADZ-18453-63 SKY
ADZ-18452-80 EVENING
ADZ-18447-200 VINTAGE
ADZ-18453-5 YELLOW
ADZ-18453-63 SKY
ADZ-18452-80 EVENING
TEN-711-42SOUTHERN BELLES
*includes Fabric E-U
ADZ-18451-122 CAMELLIA
ADZ-18449-122 CAMELLIA
ADZ-18450-122 CAMELLIA
ADZ-18453-122 CAMELLIA
Color Fabric Name/SKU Yardage
Fabric amounts based on yardage that is 42” wide.
A
B
C
D
E
F
G
H
I
J
K
L
M
N
O
P
Q
2/3 yard
1 yard
1 yard
1/4 yard
one Ten Pack
*included in Ten Square
pack
*included in Ten Square
pack
*included in Ten Square
pack
*included in Ten Square
pack
*included in Ten Square
pack
*included in Ten Square
pack
*included in Ten Square
pack
*included in Ten Square
pack
*included in Ten Square
pack
*included in Ten Square
pack
*included in Ten Square
pack
*included in Ten Square
pack
*included in Ten Square
pack

page 3
- Read through all of the instructions before beginning.- All of the seam allowances are 1/4” unless otherwise noted.- Press seam allowances open unless otherwise noted. - Width of fabric (WOF) is equal to at least 42” wide.- Right sides together has been abbreviated to RST.- Remember to measure twice and cut once!
From the Ten Square that matches Fabric K, cut:four 1” x 10” strips. Subcut: thirty-two 1” squares for the cornerstones
From seventeen of the Ten Squares, cut:one 4-7/8” x 10 strip. Subcut: two 4-7/8” squares. Cut once diagonally. two 2-1/2” x 10” strips. Subcut: eight 2-1/2” squares for blocks and cornerstones
From eight of the Ten Squares, cut:four 1” x 9-1/2” strips for the frames of the embroidered blocks
Notes Before You Begin
Cutting Instructions
Copyright 2019, Robert KaufmanFor individual use only - Not for resale
You will also need:4 yards for backing
Embroidery flossEmbroidery hoop
Embroidery needles
Fabric and Supplies Needed
Color Fabric Name/SKU Yardage
ADZ-18452-23 LAVENDER
ADZ-18449-63 SKY
ADZ-18450-73 LAKE
ADZ-18451-23 LAVENDER
Color Fabric Name/SKU Yardage
Fabric amounts based on yardage that is 42” wide.
R
S
T
U*included in Ten Square
pack
*included in Ten Square
pack
*included in Ten Square
pack
*included in Ten Square
pack
5/8 yardADZ-18452-80 EVENING
**Also used for Fabric D
Binding**
page 4
From a variety of remaining Ten Squares cut:2-1/2” x 10” strips. Subcut a total of: nine additional 2-1/2” squares for blocks and cornerstones
Set Fabric A aside for the Embroidering the Blocks section. From Fabric B, cut:eight 2-1/2” x WOF strips. Subcut: sixty-eight 2-1/2” x 4-1/2” sashesfive 2-7/8” x WOF strips. Subcut: sixty-eight 2-7/8” squares. Cut once diagonally.
From Fabric C, cut:fourteen 2-1/2” x WOF strips. Subcut: one hundred twenty 2-1/2” x 4-1/2” sashes
From Fabric D, cut:three 2-1/2” x WOF strips. Subcut: thirty-six 2-1/2” squares for the cornerstones
From the Binding Fabric, cut:seven 2-1/2” x WOF strips
Step 1 Embroider the Fabric A blocks with 1-2 strands of floss, matching the colors of the printed blocks. Use an outline stitch, a lazy daisy stitch and French knots.
Step 2 Cut the blocks apart exactly down the middle between the blocks. After embroidery, hand wash the blocks in warm water, rinsing well. Lay flat to dry.
Step 3 Iron the blocks face down on a fluffy towel. Trim the blocks to 9-1/2” square. Set aside.
Embroider the Blocks
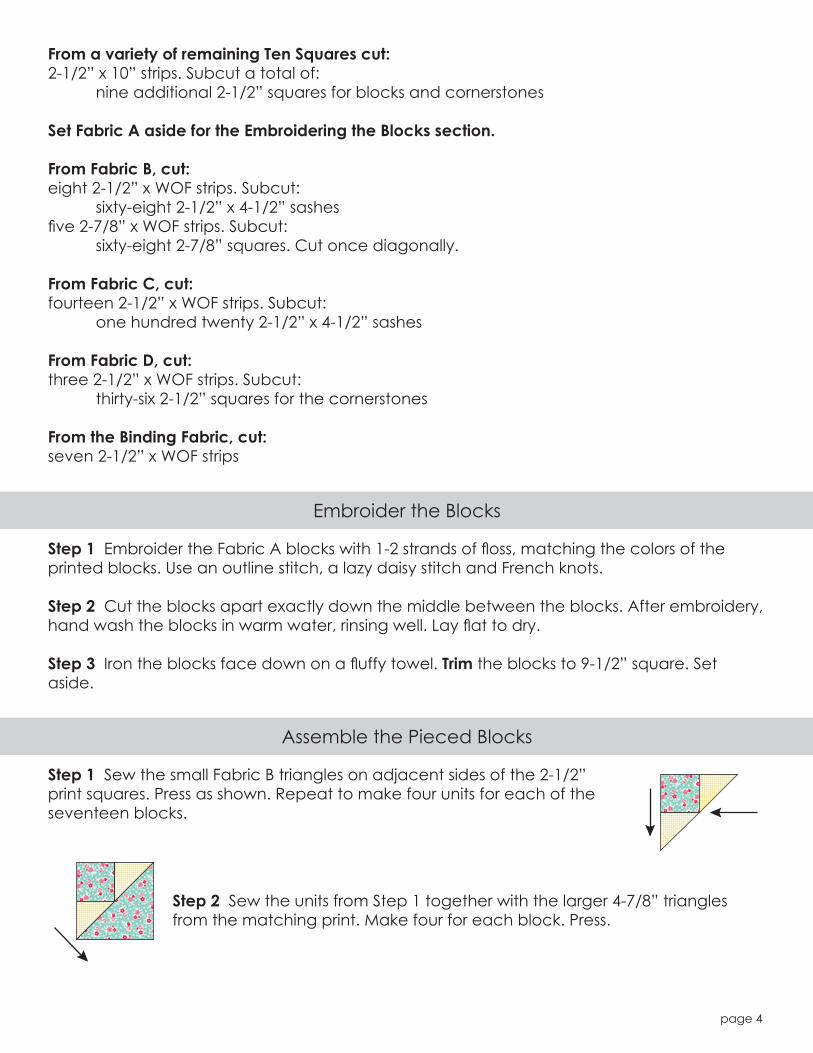
Step 1 Sew the small Fabric B triangles on adjacent sides of the 2-1/2” print squares. Press as shown. Repeat to make four units for each of the seventeen blocks.
Assemble the Pieced Blocks
Step 2 Sew the units from Step 1 together with the larger 4-7/8” triangles from the matching print. Make four for each block. Press.

page 5
Step 1 Sew a print 2-1/2” square between two 2-1/2” x 4-1/2” Fabric C sashes. Press toward the sashing strips. Make sixty units.
Assembling the Quilt
Step 3 Sew four units from Step 2 together with the 2-1/2” x 4-1/2” Fabric B sashing strips, with a matching print cornerstone in the center. Press as shown. At this point the block should measure 10-1/2” square. Repeat to make seventeen blocks.
Step 4 Using four 1” x 9-1/2” sashing strips and four 1” cornerstones, add a frame around each of the embroidered squares. Press toward the strips. At this point the blocks should measure 10-1/2” square. Repeat to make eight blocks.
Step 2 Sew Step 1 units between the two embroidered blocks and three pieced blocks for the first row. Add sashing strips on both ends of that row. Press toward the sashing strips.
Step 3 Using the Quilt Assembly Diagram as a guideline, assemble the remaining rows with sashing strips.
Step 4 Make horizontal sashing strips using the 2-1/2” Fabric D squares as the cornerstones between each Step 1 unit. Make six sashing rows, pressing the seams toward the sashing strips.
Step 5 Sew the block rows and the horizontal sashing rows together, matching and pinning seams.

page 6
This pattern may be used for personal purposes only and may not be reproduced in any form without the express permission from Robert Kaufman Fabrics. This pattern is not for resale. All patterns, unless otherwise attributed, are © Robert Kaufman Co., Inc. 2005-2019. All rights reserved.
Your quilt top is complete! Baste, quilt, bind and enjoy!