space details administrators guide administration confluence...
TRANSCRIPT
Document generated by Confluence on Jan 01, 2008 18:35 Page 1
Space DetailsKey: CONF27X
Name: Confluence 2.7 Temp Archive
Description: Complete documentation for latest version of Confluence wiki
Creator (Creation Date): [email protected] (Dec 17, 2003)
Last Modifier (Mod. Date): smaddox (Dec 19, 2007)
Available Pages• Administrators Guide
• Administration• Cache Statistics
• Changing time of Daily Backup
• Confluence Data Directory Configuration
• Confluence home directory contents
• Content Index Administration
• Finding Unused Spaces
• Important Directories and Files
• Manually Backing Up The Site• Configuring Daily Backups
• User Submitted Backup & Restore Scripts
• Migrate Or Clone Confluence Between Servers
• Moving Confluence Between Servers
• Rebuilding the Ancestor Table
• Restoring a Site
• Restoring a Space• Changing the version of a space backup
• Restoring Data from other Backups
• Restoring Data from the Administration Console
• Retrieve file attachments from a backup
• Troubleshooting failed XML site backups
• Viewing and Editing License Details
• Viewing System Information
• Where Is My ConfluenceHome Directory?
• Cluster Administration page• Cluster Troubleshooting
• Configuring Confluence• Optional Settings
• Attachment Storage Configuration
• Enabling CamelCase Linking
• Enabling Remote APIs
• Enabling Rich Text Editing Option
• Enabling Threaded Comments
• Enabling Trackback

Document generated by Confluence on Jan 01, 2008 18:35 Page 2
• Making Rich Text Editing default
• WebDAV Configuration
• Other Settings• Configuring Attachment Size
• Configuring Character Encoding
• Configuring HTTP Timeout Settings
• Configuring Indexing Language
• Configuring Jira Issues Icon mappings
• Configuring Number Formats
• Configuring Shortcut Links
• Configuring Time and Date Formats
• Number of Ancestors to Show in Breadcrumbs
• Thumbnail Settings
• Site Configuration• Configuring the Server Base URL
• Configuring the Site Homepage
• Customising Default Space Content
• Editing the Global Logo
• Editing the Site Title
• Editing the Site Welcome Message
• View Space Goes to Browse Space
• Configuring Encoding• Troubleshooting Character Encodings
• "€" Euro character
• MySQL 3.x Character Encoding Problems
• Configuring Mail• Configuring a Server for Outgoing Mail
• Enabling the 'Mail Page' plugin
• The Mail Queue
• Confluence and JIRA• Add Confluence EAR-WAR to JIRA Standalone
• Integrating JIRA and Confluence
• Override properties in JIRA to Confluence Bridge
• Setting Up Trusted Communication between JIRA and Confluence
• Confluence Security• Confluence Community Security Advisory 2006-01-19
• Confluence Security Advisory 2005-02-09
• Confluence Security Advisory 2005-12-05
• Confluence Security Advisory 2006-01-20
• Confluence Security Advisory 2006-01-23
• Confluence Security Advisory 2006-06-14
• Confluence Security Advisory 2007-07-26
• Confluence Security Advisory 2007-08-08

Document generated by Confluence on Jan 01, 2008 18:35 Page 3
• Confluence Security Advisory 2007-11-19
• Confluence Security Advisory 2007-11-27
• Confluence Security Advisory 2007-12-14
• Java Policy Security with Confluence
• NoFollow Support
• Design and Layout• Custom Decorator Templates
• Customising Look and Feel Overview• Customising Colour Schemes
• Customising Layouts• Upgrading Custom Layouts
• Global Templates
• Working With Decorator Macros
• Themes Configuration• Applying a Theme To A Site
• Creating a Theme• Adding a theme icon
• Customising the Left Navigation Theme
• Deploying the theme as a plugin
• Including Cascading Stylesheets in Themes
• Modifying Look and Feel (for themes)• Configuring the theme plugin
• Themes Overview
• Importing Data• Snip Snap Import
• Macros• Configuring the userlister Macro
• Editing and Removing macros
• Enable The Flowchart Macro
• Enabling HTML macros• Enabling the html-include Macro
• Troubleshooting the Gallery Macro
• Performance Tuning• Configuring a Large Confluence Installation
• Confluence Performance Enhancement• Creating Memory Leaks with Spring
• Filtering Regular Expression Application
• How Adaptavist Runs Confluence
• Memory usage and requirements• java.util.zip.ZipFile.open causes OutOfMemoryError for large zip files
• Requesting Performance Support
• Troubleshooting Slow Performance Using Page Request Profiling
• Profiling using the YourKit Plugin
• Recognised System Properties
Document generated by Confluence on Jan 01, 2008 18:35 Page 4
• Scheduled Jobs
• Search• Setup Confluence To Index External Sites
• Setup External Search Tool To Index Confluence
• Security• Adding SSL for Secure Logins and Page Security
• Anonymous Access to Remote API
• Enabling or Disabling Public Signup
• Hiding External Links From Search Engines
• Hiding the People Directory
• Managing External Referrers• Excluding external referrers
• Hiding external referrers
• User Email Visibility
• Spam Prevention (Captcha)
• Troubleshooting slow search performance and "Too many open files" problem
• User Management• Confluence User Management
• Adding a Group
• Adding a New User
• Adding or Removing a User from a Group
• Changing Usernames
• Editing User Details
• Global Groups Overview
• Global Permissions Overview
• Migrating to new User Management
• Removing a Group
• Removing a User
• Setting up Anonymous Access
• Viewing members of a group
• How to Improve User Search Performance
• Integrating with Crowd
• JIRA User Management• Delegate user management to use JIRA logins
• Revert from JIRA to internal user management
• JIRA User Management FAQ
• LDAP User Management• Activating External User Management
• Add LDAP Integration• Automatically Adding LDAP users to the confluence-users Group
• Customising atlassian-user.xml
• Add LDAP Integration For User Authentication Only
• atlassian-user.xml reference

Document generated by Confluence on Jan 01, 2008 18:35 Page 5
• Changes in osuser.xml from 1.0.3a to 1.1.x
• Configuring multiple LDAP repositories
• Confluence Caching OSUser Provider
• Importing LDAP Users
• LDAP FAQ• Connect to LDAP via SSL
• Troubleshooting the "Not Permitted" Screen under LDAP Integration• Cannot login with Confluence admin account
• Migrating users from Confluence to JIRA
• Requesting External User Management Support• Paddle
• Understanding User Management in Confluence
• User Management Frequently Asked Questions
• Working with Confluence Logs• log4j Logging Levels

Document generated by Confluence on Jan 01, 2008 18:35 Page 6
Administrators Guide
This page last changed on Dec 17, 2007 by smaddox.
Confluence 2 Administrator's Guide
Configuring ConfluenceData and BackupsSystem AdministrationImporting DataMail ConfigurationSecurityUser ManagementDesign and LayoutIntegrating Confluence and JIRAPlugins and MacrosPerformance TuningCharacter EncodingSupport
Additional Resources
Visit the Configuration Guide for documentationon configuring databases and application servers.The Confluence User Guide has information onhow to use Confluence as a collaborative tool.Go to Documentation Home for links to moreresources.
Search
Download
You can download the Confluence Admin Guide inPDF, HTML or XML formats.
Site Administrator?
The Confluence Administrators Guide providesinformation to site administrators on how tomanage their Confluence instances.
If you still have a question that hasn't beenanswered, write and tell us about it.
If you are using Confluence Hosted, please referto the Confluence Hosted Administrator's Guide.
Configuring Confluence
Site ConfigurationConfiguring the Site HomepageEditing the Site TitleEditing the Site WelcomeMessageView Space Goes to BrowseSpaceEditing the Global LogoConfiguring the Server Base URLConfiguring HTTP TimeoutSettingsRecognised System PropertiesCustomising Default SpaceContent
Optional SettingsEnabling Remote APIs
User Management
Confluence User ManagementGlobal Groups OverviewGlobal Permissions OverviewSetting up Anonymous AccessAdding a New UserEditing User DetailsRemoving a UserEnabling or Disabling PublicSignupAdding or Removing a User froma GroupAdding a GroupRemoving a GroupViewing members of a groupRestoring Passwords To RecoverAdmin User Rights
External User Management

Document generated by Confluence on Jan 01, 2008 18:35 Page 7
Enabling Rich Text EditingOptionMaking Rich Text Editing defaultEnabling CamelCase LinkingEnabling TrackbackEnabling Threaded CommentsAttachment StorageConfigurationConfiguring Attachment Size
Display SettingsConfiguring Indexing LanguageNumber of Ancestors to Show inBreadcrumbsConfiguring Character EncodingConfiguring Time and DateFormatsConfiguring Number FormatsThumbnail SettingsConfiguring Shortcut Links
Data and Backups
Backups ConfigurationConfiguring Daily BackupsChanging time of Daily BackupManually Backing Up The Site
Restoring DataRestoring a SiteRestoring a SpaceRestoring Data During SetupRestoring Data from theAdministration ConsoleRetrieve file attachments from abackup
Scheduled JobsScheduled Jobs
System Administration
System ConfigurationInformationViewing System InformationViewing and Editing LicenseDetailsCache StatisticsCluster Administration page
System AdministrationContent Index AdministrationUpgrading ConfluenceMoving Confluence BetweenServersMigrate to a Different DatabaseMigrate Or Clone ConfluenceBetween ServersImportant Directories and FilesRebuilding the Ancestor TableFinding Unused Spaces
Understanding UserManagement in ConfluenceActivating External UserManagementLDAP Integration OverviewConfluence Caching OSUserProviderRequesting External UserManagement SupportTroubleshooting the "NotPermitted" Screen under LDAPIntegration
Crowd User ManagementIntegrating Confluence withCrowd
JIRA User ManagementDelegating User Management inConfluence to JIRAOverride properties in JIRA toConfluence Bridge
Design and Layout
Configuring LayoutsCustomising Look and FeelOverviewCustomising Colour SchemesCustomising LayoutsWorking With Decorator MacrosGlobal Templates
Configuring ThemesThemes OverviewCreating a ThemeApplying a Theme To A SiteIncluding Cascading Stylesheetsin Themes
Integrating Confluence andJIRA
Integrating JIRA and ConfluenceConfiguring Jira Issues IconmappingsAdding Confluence EAR-WAR toJIRA StandaloneSetting Up TrustedCommunication between JIRAand Confluence
Plugin Management
Confluence Plugin GuideInstalling and ConfiguringPlugins manuallyInstalling and ConfiguringPlugins using the PluginRepository Client

Document generated by Confluence on Jan 01, 2008 18:35 Page 8
Importing Data
Universal Wiki ConverterBuild jspwiki-exporter fromsourceSnip Snap ImportImporting Pages from Disk
Mail Configuration
Configuring a Server forOutgoing MailThe Mail QueueEnabling the 'Mail Page' plugin
Security
Overview and AdvisoriesSecurity Overview andAdvisories
Security Options
Spam Prevention (Captcha)Managing External ReferrersHiding external referrersHiding External Links FromSearch EnginesExcluding external referrersUser Email VisibilityAnonymous Access to RemoteAPIAdding SSL for Secure Loginsand Page SecurityJava Policy Security withConfluence
Setting Up TrustedCommunication between JIRAand ConfluenceEnabling the 'Mail Page' plugin
MacrosConfiguring User MacrosEditing and Removing UserMacrosEnabling HTML macrosEnabling the html-include MacroEnabling the Flowchart MacroTroubleshooting the GalleryMacroConfiguring the userlister MacroWorking With Decorator MacrosWriting Macros
Performance Tuning
Memory usage andrequirementsConfiguring a Large ConfluenceInstallationPerformance tuningWorking with Confluence LogsPage Request ProfilingProfiling using the YourKit Plugin
Character Encoding
Configuring EncodingTroubleshooting CharacterEncodings
Support
How to Get Support

Document generated by Confluence on Jan 01, 2008 18:35 Page 9
Administration
This page last changed on Feb 02, 2006 by vidya.
• Cache Statistics• Changing time of Daily Backup• Confluence Data Directory Configuration• Confluence home directory contents• Content Index Administration• Finding Unused Spaces• Important Directories and Files• Manually Backing Up The Site
° Configuring Daily Backups- User Submitted Backup & Restore Scripts
• Migrate Or Clone Confluence Between Servers• Moving Confluence Between Servers• Rebuilding the Ancestor Table• Restoring a Site• Restoring a Space
° Changing the version of a space backup• Restoring Data from other Backups• Restoring Data from the Administration Console• Retrieve file attachments from a backup• Troubleshooting failed XML site backups• Viewing and Editing License Details• Viewing System Information• Where Is My ConfluenceHome Directory?
Document generated by Confluence on Jan 01, 2008 18:35 Page 10
Cache Statistics
This page last changed on Oct 05, 2007 by smaddox.
Confluence provides statistics about its internal caches that allow you to track the size and hit ratioof each cache and tune it for better performance (if necessary). See Performance Tuning for moreinformation.
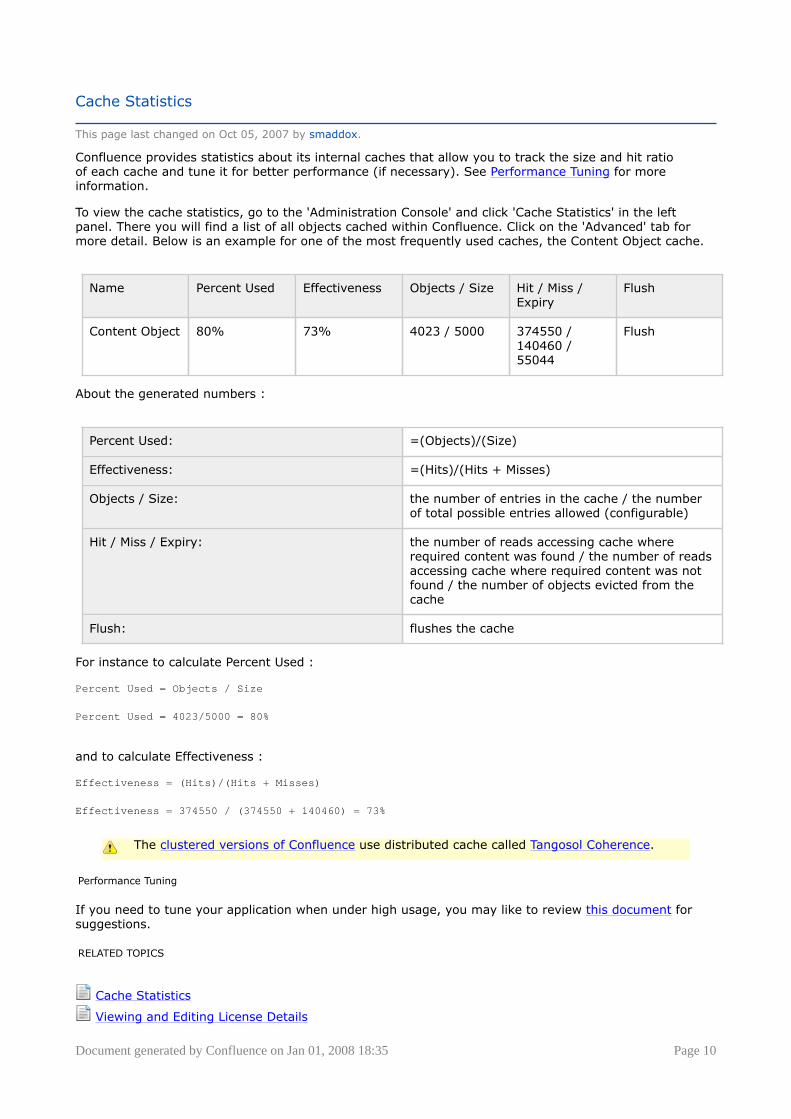
To view the cache statistics, go to the 'Administration Console' and click 'Cache Statistics' in the leftpanel. There you will find a list of all objects cached within Confluence. Click on the 'Advanced' tab formore detail. Below is an example for one of the most frequently used caches, the Content Object cache.
Name Percent Used Effectiveness Objects / Size Hit / Miss /Expiry
Flush
Content Object 80% 73% 4023 / 5000 374550 /140460 /55044
Flush
About the generated numbers :
Percent Used: =(Objects)/(Size)
Effectiveness: =(Hits)/(Hits + Misses)
Objects / Size: the number of entries in the cache / the numberof total possible entries allowed (configurable)
Hit / Miss / Expiry: the number of reads accessing cache whererequired content was found / the number of readsaccessing cache where required content was notfound / the number of objects evicted from thecache
Flush: flushes the cache
For instance to calculate Percent Used :
Percent Used = Objects / Size
Percent Used = 4023/5000 = 80%
and to calculate Effectiveness :
Effectiveness = (Hits)/(Hits + Misses)
Effectiveness = 374550 / (374550 + 140460) = 73%
The clustered versions of Confluence use distributed cache called Tangosol Coherence.
Performance Tuning
If you need to tune your application when under high usage, you may like to review this document forsuggestions.
RELATED TOPICS
Cache Statistics
Viewing and Editing License Details

Document generated by Confluence on Jan 01, 2008 18:35 Page 11
Viewing System Information

Document generated by Confluence on Jan 01, 2008 18:35 Page 12
Changing time of Daily Backup
This page last changed on Nov 02, 2007 by jlargman.
By default, Confluence runs its daily backup at 2.00 AM. You can configure Confluence to perform thebackup at a time that is best suited to you or your organisational needs.
Time is derived from the Confluence server
The time zone is taken from the server on which Confluence is running. To check the timeaccording to the server, go to the 'Administration Console', click 'System Information' in theleft-hand panel and look at the 'System Time'.
Confluence uses Quartz for scheduling periodic jobs. To change the time of your daily backup, you willneed to edit the Quartz configuration.
To change the time of your daily backup
1. Open the Quartz configuration file schedulingSubsystemContext.xml located under confluence/WEB-INF/lib/confluence-2.6.0.jar
2. Find the following section of the file:
<bean id="backupTrigger" class="org.springframework.scheduling.quartz.CronTriggerBean"><property name="jobDetail"><ref bean="backupJob"/></property><property name="cronExpression"><value>0 0 2 * * ?</value></property></bean>
3. The string '0 0 2 * * ?' sets up a Cron Trigger for the job to run at the zeroth second of thezeroth minute of the 2nd hour, every day of every month, every day of the week.
4. Re-jar the file, either with a zip utility (change the title of .zip back to .jar) or a java command.5. You can set a new time by editing this string. Note that the date and time format in this
configuration file is in this order:Second minute hour day
6. Restart Confluence.
For example, to set the new time to twenty past ten PM, change the string to '0 20 22 * * ?'.If you wanted to back up only once a week, for example, at midnight on Sundays, you would change thestring to '0 0 0 ? * SUN'.For complete details on the formatting of the cron string, please see http://www.opensymphony.com/quartz/api/org/quartz/CronTrigger.html.
RELATED TOPICS
Alternative Backup Strategy for Large Confluence Sites
Backup FAQ
Changing time of Daily Backup
Configuring Daily Backups
Manually Backing Up The Site

Document generated by Confluence on Jan 01, 2008 18:35 Page 13
Confluence Data Directory Configuration
This page last changed on May 22, 2006 by [email protected].
Here is a link listing important Confluence files.
The home directory defines the location of the directory where Confluence will store it's data, includingattachments, indexes and backups. Administrators can set this location by defining a value for the file<MY-INSTALL>/confluence/WEB-INF/classes/confluence-init.properties. To find what your homedirectory is currently set to, open this file and check the confluence.home property. It is unset on newinstallations.
Windows Configuration
On Windows, the path
C:\confluence\data
will be written as:
confluence.home=C:/confluence/data
Note that all backslashes (\) are written as forward slashes (/).
UNIX/Linux/Mac Configuration
On any UNIX-based system, the property is defined using the normal directory syntax:
confluence.home=/var/confluence/
Symbolic links
If your confluence.home directory contains a symbolic link, you must define the absolute path.
Please note that there can be no symbolic links within the confluence.home directory.If disk space is an issue, place the entire confluence.home directory on a disk partitionwhere there is enough space.
The absolute path of generated files (such as exports) is compared with the absolute pathof the confluence.home directory when constructing URLs. When a sub-directory has adifferent path, the URL will be incorrect, and you may receive "Page not found" errors.These measures are in place to prevent "directory traversal" attacks.
Fixing the Confluence Configuration
The Confluence configuration file: confluence-cfg.xml inside the home directory may contain referencesto the original location of your Confluence home. You will need to edit this file to update these referencesto also point to the new location. The two properties in this file that need to change are:
• daily.backup.dir if you have not configured your backups to be placed elsewhere already• hibernate.connection.url if you are using the embedded HSQL database.

Document generated by Confluence on Jan 01, 2008 18:35 Page 14
Confluence home directory contents
This page last changed on Sep 21, 2007 by [email protected].
The Confluence home directory contains data that work in concert with the Confluence database toprovide the wiki experience. This document outlines the purpose of the various files and directories in theConfluence home directory.
Files and directories
confluence.cfg.xml
This file is the most critical file in the Confluence home directory. It contains all of the informationnecessary for Confluence to start up such as:
• Product license• Context path• Database details such as location and connection pool settings• Paths to important directories
attachments
This directory contains every version of each attachment stored in Confluence. This directory is not usedwhen Confluence is configured to store attachments in the database. Attachments are always stored inthe database in clustered instances of Confluence.
Paths within this directory have the following structure:
/attachments/PAGE_ID/ATTACHMENT_ID/VERSION
An alternative directory may be specified for attachment storage by setting the attachments.dirproperty in confluence.cfg.xml
backups
Confluence will place its daily backup archives in this directory, as well as any manually generatedbackups. Backup files in this directory take the following form:
daily-backup-YYYY_MM_DD.zip
An alternative directory may be specified for backups by setting the daily.backup.dir property inconfluence.cfg.xml.
bundled-plugins
This directory exists for Confluence 2.3 and above
Recent versions of Confluence ship with a set of bundled plugins. These are plugins written by theAtlassian and the Confluence community that we think provide useful and broadly applicable functionalityin Confluence. The {{bundled-plugins)) directory is where Confluence will unpack its bundled pluginswhen it starts up. This directory is refreshed on every restart, so removing a plugin from this directorywill not uninstall the plugin; it will simply be replaced the next time Confluence starts up.
database
This is where Confluence stores its database when configured to run with the HSQL embedded databaseand as such contains all Confluence runtime data. Instances configured to run using an external databasesuch as MySQL will not use this directory.

Document generated by Confluence on Jan 01, 2008 18:35 Page 15
index
This is where Confluence stores its indexes for rapid retrieval of often used data. The Confluence index isused heavily by the application for content searching and recently updated lists and as such is critical fora running Confluence instance. It is important to note however that should the data in this directory belost or corrupted, it can be restored by running a full reindex from within Confluence. This can take a longtime depending on how much data is stored Confluence's database.
An alternative directory may be specified for the index by setting the lucene.index.dir property inconfluence.cfg.xml. As this is the most heavily accessed directory in the Confluence home directoryyou might want to consider hosting it on the fastest disk available. It would also be useful if the diskholding the Confluence index was not heavily used by any other application to reduce access contention.
plugin-cache
This directory exists for Confluence 2.3 and above
As of Confluence 2.3, all Confluence plugins are now stored in the Confluence database. To allow forquicker access to classes contained within the plugin JARs, Confluence will cache these plugins in theplugin-cache directory. This directory is updated as plugins are installed and uninstalled from thesystem and is completely repopulated from the database every time Confluence is restarted. As such,removing plugins from this directory does not uninstall them.
resources
The resources directory stores any space logos used in your Confluence instance. For each space with aspace logo, there is a directory within resources named after the space's key. That directory contains thespace's logo.
temp
The temp directory is used for various runtime functions such as exporting, importing, file upload andindexing. As the name suggests, and file in this directory is of temporary importance and is only usedduring runtime. This directory can be safely emptied when Confluence is offline.
An alternative directory may be specified for temporary data by setting the webwork.multipart.saveDirproperty in confluence.cfg.xml.
thumbnails
When Confluence generates a thumbnail of an image (for example when the gallery macro is used), theresulting thumbnail is stored in this directory for quicker retrieval on subsequent accesses. This directoryis essentially a thumbnail cache, and deleting files from this directory simply means the thumbnail willhave to be regenerated on the next access.
Confluence 2.2 and older
The following files and directories were used by versions of Confluence older than 2.3
config
The config directory is used to store data used by Confluence's bandana data persistence framework.This system is used by Confluence to store the global instance settings and is used by various plugins fortheir own configuration and data persistence needs. Confluence versions 2.3 and later store these data inthe Confluence database and do not use this directory.
The most important file in this directory is the confluence-global.bandana.xml file. This file is used tostore all of the settings from the Administration console in Confluence.

Document generated by Confluence on Jan 01, 2008 18:35 Page 16
plugins
The plugins directory is where Confluence stores all installed plugin JARs. It is possible to install andremove plugins by placing and deleting plugin JARs from this directory.
default-formatting.properties
This properties file contains various formatting information such as the formats for decimal numbers anddates used in the Confluence user interface. These configuration data where relocated to the Confluencedatabase from Confluence 2.3 and onwards.

Document generated by Confluence on Jan 01, 2008 18:35 Page 17
Content Index Administration
This page last changed on Jun 24, 2007 by smaddox.
The Content Index powers Confluence's search functionality and is also used for a number of relatedfunctions such as building email threads in the mail archive. While the index is maintained automatically,you may need to rebuild it manually under these circumstances:
• If you find that your searching and mail threading are malfunctioning.• After an upgrade (if a reindex is required after an upgrade, it will be noted in upgrade section of the
release notes).
To manually rebuild the content index,
1. Go to the 'Administration Console' and click on 'Content Indexing' under the heading 'Administration'in the left panel.
For reasons of efficiency, content is not immediately added to the index. New and modifiedConfluence content is first placed in a queue, and the queue is processed once every minute.
2. Click 'Rebuild Index'.
Slow reindexing?
Indexing can take a long time to complete, depending on the number of pages, number,type and size of attachments and the amount of memory allocated to Confluence.
It may help to increase the heap memory allocation of Confluence by following theseinstructions.
If you are running an older version of Confluence and find that the index rebuild is notprogressing, you may need to shut down Confluence, and restart it with the following Javasystem property set: bucket.indexing.threads.fixed=1. This will cause the re-indexingto happen in a single thread and be much more stable (but slower).
RELATED TOPICS
Configuring Indexing Language
Content Index Administration
Rebuild index from scratch
Working with Macros
[!Administration Guide Attachments
directory^adminhome.gif!]
Document generated by Confluence on Jan 01, 2008 18:35 Page 18
Finding Unused Spaces
This page last changed on Nov 21, 2007 by smaddox.
Sometimes, you want to know what is not being used. It's great to know what's getting most attention,but what about stagnant pages, or even entire spaces that are no longer active?
While viewing space activity and the Global Statistics plugin can provide hints, they still don't alwaysprovide enough detail. The simple way is to go directly to the database. We recommend DbVisualizer, andhave basic instructions for connecting it to HSQLDB.The following query identifies the last date on which content was modified in each space within a singleConfluence instance:
SELECT spaces.spacename, MAX(content.lastmoddate)FROM content, spacesWHERE content.spaceid = spaces.spaceidGROUP BY spaces.spacename;
It returns a list of spacenames, and the last date and time at which any content was added or changed.Alternatively, this one simply identifies spaces whose content hasn't changed since a specified date:
SELECT spaces.spacenameFROM content, spacesWHERE content.spaceid = spaces.spaceidGROUP BY spaces.spacenameHAVING MAX(content.lastmoddate) < '2006-10-10';
The result is a simple list of space names.It's also possible to present the information in a wiki page, using the SQL plugin, which can be installedvia the Plugin Repository. You'll also need to define a database resource in conf/server.xml andconfluence/WEB-INF/web.xml, as described here. Having done so, you can use wiki markup code likethe following, replacing confluenceDS with the name of your own local datasource:
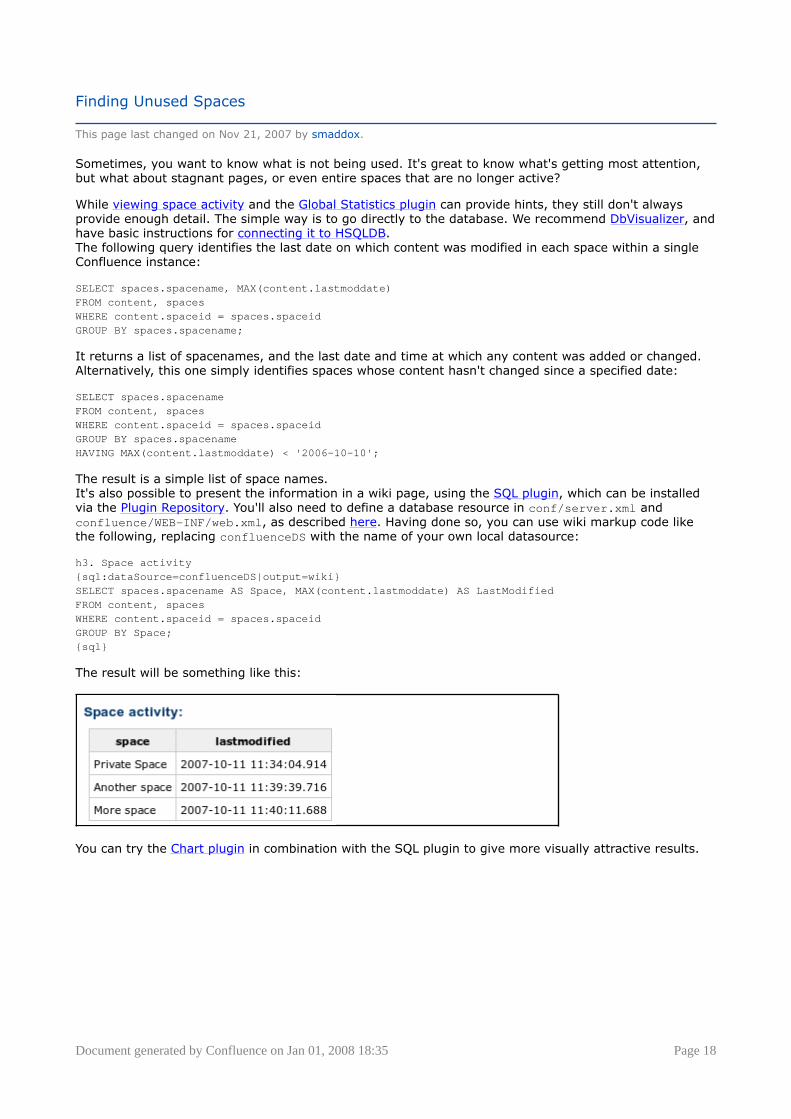
h3. Space activity{sql:dataSource=confluenceDS|output=wiki}SELECT spaces.spacename AS Space, MAX(content.lastmoddate) AS LastModifiedFROM content, spacesWHERE content.spaceid = spaces.spaceidGROUP BY Space;{sql}
The result will be something like this:
You can try the Chart plugin in combination with the SQL plugin to give more visually attractive results.

Document generated by Confluence on Jan 01, 2008 18:35 Page 19
Important Directories and Files
This page last changed on Dec 17, 2007 by smaddox.
The Install Directory
This is the directory into which the downloaded Confluence application has been unpacked. Confluencedoes not modify or store any data in this directory.
Important Files and Directories
• confluence/WEB-INF/classes/confluence-init.properties : This file tells Confluence whereto find the Confluence Home Directory. This file is modified by the administrator when installingConfluence.
• confluence/WEB-INF/classes/osuser.xml : This file is modified when connecting Confluence to anexternal user management system such as an LDAP server or JIRA instance in Confluence 2.0 andearlier.
• confluence/WEB-INF/lib/ : This directory is used when deploying plugins, especially those pluginsthat cannot automatically be loaded through the Administration Console.
• confluence/WEB-INF/classes/log4j.properties : Confluence's logging configuration file. SeeWorking with Confluence Logs.
• confluence/WEB-INF/classes/ehcache.xml : This is where you can configure the size ofConfluence's internal caches
• confluence/WEB-INF/classes/styles/site-css.vm : Confluence's main stylesheet, modify at yourown risk
• conf/server.xml : SSL configuration.
The Temp Directory
The temp directory is configured in the Java runtime and some Confluence components write temporaryfiles or lockfiles into this directory.
Typically, this directory is /tmp on Unix systems, or C:\Temp on Windows.
To change the location of this directory, you should start the Java Virtual Machine in which confluence isrunning with the argument:
-Djava.io.tmpdir=/path/to/your/own/temp/directory.
The Confluence Home Directory
This is the directory in which Confluence stores its configuration information, search indexes, customdecorators and page attachments. Also, if you're using the embedded HSQL database, the database isalso stored in this directory. Administrators can expect the Confluence Home Directory to grow quite largein a busy site.
The location of this directory is configured by the system administrator during installation (seeconfluence-init.properties above).
Important Files and Directories
• confluence.cfg.xml : Confluence's core configuration file; includes the configuration for connectingto its database.
• default-formatting.properties : Some auxiliary configuration data concerning default numberand date formats.
• attachments/ : All file attachments in the Confluence site are stored under this directory. This is theonly place Confluence keeps attachment files.
• backups/ : If Confluence is configured to produce daily backups, these are kept in this directory.Administrators should occasionally delete old or unwanted backups from this directory to prevent itfrom growing too large.
• config/ : Miscellaneous global and per-space configuration files are kept in this directory.• database/ : If Confluence is being run from the embedded HSQL database, the database files will
be kept in this directory.

Document generated by Confluence on Jan 01, 2008 18:35 Page 20
• index/ : The full-text search index is kept in this directory. Removing or modifying files in thisdirectory may cause search to no longer function. Rebuilding the search index from Confluence'sglobal administration screen will completely regenerate the contents of this directory.
• plugins/ : Dynamically uploaded plugins are stored in this directory. Administrators can install newplugins by copying them into this directory and triggering a scan from the plugin management page.
• temp/ : Confluence stores temporary files in this directory, especially during backups and exports. Adaily job within Confluence deletes files that are no longer needed.
• thumbnails/ : Stores temporary files for image thumbnails. The contents of this directory can besafely deleted, as Confluence will regenerate thumbnails as required.
• velocity/ : Storage for customised page layouts, globally and per-space.
Database
All other data - page contents, links, archived mail and so on is kept in the database. If you haveconfigured Confluence to use the embedded HSQL database, the database will store its files underdatabase/ in the Confluence Home Directory. Otherwise, the database management system you areconnecting to is responsible for where and how your remaining data is being stored.
TipAll of Confluence's persistent data is stored either in the Confluence Home Directory, or thedatabase. If you have backup copies of both of these, taken at the same time, you will beable to restore Confluence from them (see Restoring Data from other Backups).
RELATED TOPICS
[!Administration GuideAttachments directory^dochome.gif!]

Document generated by Confluence on Jan 01, 2008 18:35 Page 21
Manually Backing Up The Site
This page last changed on Dec 17, 2007 by smaddox.
Confluence is configured to make a daily backup of your data and store it as a zipped XML file in the'backups' folder under the Confluence Home Directory. A System Administrator can also manually back upthe data from the Administration Console.
You need to have System Administrator permissions in order to perform this function.
Consider an alternative backup strategy if your Confluence site is large or you areencountering problems with your automated backup.
To manually back up your site,
1. Go to the 'Administration Console' and click 'Backup & Restore' in the 'Administration' section of theleft-hand panel.
2. Select 'Archive to backups folder' to store a copy of the backup in the same folder as Confluence'sdaily backups. (If you do not archive the backup it will be made available for you to download, andthen deleted from the server after 24 hours).
3. Select 'Backup attachments' to include attachments in your backup.4. Click 'Backup'.
Please note that this process will take a few minutes.5. Once the backup is completed, you will be prompted to download the zipped backup file.
If you are running Confluence behind Apache and are facing timeout errors, please considercreating the export directly from Tomcat, instead of going through Apache. This will speedup the process and prevent timeouts.
RELATED TOPICS
Alternative Backup Strategy for Large Confluence Sites
Backup FAQ
Changing time of Daily Backup
Configuring Daily Backups
Manually Backing Up The Site

Document generated by Confluence on Jan 01, 2008 18:35 Page 22
Configuring Daily Backups
This page last changed on Dec 17, 2007 by smaddox.
Confluence backs up your data on a daily basis into a zipped XML file. By default, the backup isperformed at 2.00 a.m. and the backup files are stored in the backups folder under the Confluence HomeDirectory.
Time is derived from the Confluence server
The time zone is taken from the server on which Confluence is running. To check the timeaccording to the server, go to the 'Administration Console', click 'System Information' in theleft-hand panel and look at the 'System Time'. You can change the time of the daily backup.
Consider an alternative backup strategy if your Confluence site is large or you areencountering problems with your automated backup.
The default naming convention for the backup files is 'daily-backup-yyyy_MM_dd'. Confluence can writebackups to both local and mapped network drives.From the Administration Console, you can:
• Enable or disable backups.• Include or exclude attachments in backups.• Configure a different path to store backup files.• Change the naming format used for the files.
You need to have System Administrator permissions in order to perform this function.
To configure your daily backups,
1. Go to the Administration Console and click 'Daily Backup Admin' in the 'Configuration' section.2. Click the 'Edit' button on the 'Daily Backup Administration' screen.3. Now you can do the following:
• To disable backups — Select 'Disable'.• To specify an alternate path to store backup files — Select 'Custom' and then enter the path.
The directory must be on either a local drive or a mounted network drive.• To exclude attachments from backups — Select 'Off' beside 'Backup Attachments'. By default,
this is 'On'.• To use a different naming prefix format — Enter the new format in the 'Backup File Prefix' input
field.• To use a different date format — Enter the date format in the 'Backup File Date Pattern' input
field using the syntax described in this document from Sun.4. 'Save' your changes.
Below is an example of daily backup being disabled.
RELATED TOPICS
Alternative Backup Strategy for Large Confluence Sites

Document generated by Confluence on Jan 01, 2008 18:35 Page 23
Backup FAQ
Changing time of Daily Backup
Configuring Daily Backups
Manually Backing Up The Site

Document generated by Confluence on Jan 01, 2008 18:35 Page 24
User Submitted Backup & Restore Scripts
This page last changed on Aug 08, 2007 by smaddox.
These scripts are user-submitted and should be used with caution as they are not covered by Atlassiantechnical support. If you have questions on how to use or modify these scripts, please post them to theConfluence user forum. Feel free to submit new scripts or post updates by logging in and adding them tothe page as a comment.
Delete Old Backups - Wscript Script On Windows
This script examines backup filename and deletes them if necessary, it may need to be edited.
'If you want 3 day old files to be deleted then insert 3 next to Date - "your number here"'This script will search out and delete files with this string in them ".2005-12-04-" This ofcourse depends on the number you enter.'You can always do a wscript.echo strYesterday or strFileName to see what the script thinks you aresearching for.
dtmYesterday = Date - 3
strYear = Year(dtmYesterday)
strMonth = Month(dtmYesterday)If Len(strMonth) = 1 ThenstrMonth = "0" & strMonthEnd If
strDay = Day(dtmYesterday)If Len(strDay) = 1 ThenstrDay = "0" & strDayEnd If
strYesterday = strYear & "-" & strMonth & "-" & strDay
strFileName = "C:\test*." & strYesterday &"-*"
Set objFSO = CreateObject("Scripting.FileSystemObject")objFSO.DeleteFile(strFileName)
Delete Old Backups - Basic Bash Script For Linux
Old XML backups can be deleted automatically by inserting a nightly or weekly automation script or cronsimilar to the following:
ls -t <path to your backup dir>/* | tail -n +6 | xargs -i rm {}
Or, using the older form of the tail command if your system does not support the standard form:
ls -t <path to your backup dir>/* | tail +6 | xargs -i rm {}
Delete Old Backups - Advanced Bash Script For Linux
Old XML backups can be deleted automatically by inserting a nightly or weekly automation script or cronsimilar to the following. Set the BACKUP_DIR and DAYS_TO_RETAIN variables to appropriate values foryour site. Between runs, more files than DAYS_TO_RETAIN builds up.
#!/bin/sh
# Script to remove the older Confluence backup files.# Currently we retain at least the last two weeks worth# of backup files in order to restore if needed.
BACKUP_DIR="/data/web/confluence/backups"DAYS_TO_RETAIN=14

Document generated by Confluence on Jan 01, 2008 18:35 Page 25
find $BACKUP_DIR -maxdepth 1 -type f -ctime +$DAYS_TO_RETAIN -delete
Manual Database & Home Backup - Bash Script For Linux
This backs up a mySQL database and the Confluence home directory.
#!/bin/bashCNFL=/var/confluenceCNFL_BACKUP=/backup/cnflBackup/`date +%Y%m%d-%H%M%S`
rm -rf $CNFL/temp/*mkdir $CNFL_BACKUPmysqldump -uroot -p<password> confluence|gzip > $CNFL_BACKUP/confluence.mysql.data.gztar -cjvf $CNFL_BACKUP/data.bzip $CNFL > $CNFL_BACKUP/homedir.status
Related Topics
• Site Backup and Restore• Backup FAQ

Document generated by Confluence on Jan 01, 2008 18:35 Page 26
Migrate Or Clone Confluence Between Servers
This page last changed on Sep 03, 2007 by [email protected].
To copy a Confluence instance from one server to another, for example to transfer the current productionsnapshot to a test server as permitted in the licence agreement:
On the original server:
1. Stop Confluence2. Copy your Confluence install directory3. Copy your Confluence home directory4. Use your database administration tool to access your external database and create a Confluence
database export5. Start Confluence
On the target server:
1. If you are not using Standalone Confluence, setup the same version of the application server use onthe original
2. Setup the database to be an exact clone of the originala. Setup the same database version and driverb. Setup the database user to have the same permissions as the originalc. Import the Confluence database export
3. Place the Confluence install directory but do not start Confluence yet4. Place the Confluence home directory5. If the home directory is in a different location, go to the Confluence install directory and edit ..
\confluence\WEB-INF\classes\confluence-init.properties. The home directory is set underconfluence.home
6. To modify any database connection information, go to the Confluence home directory and editconfluence.cfg.xml. The connection URL is set under hibernate.connection.url
7. Start Confluence
The target instance will be a clone of the original instance.
Related Tasks
Add LDAP Integration
Adding SSL for Secure Logins and Page Security
Customising Look and Feel Overview
Database Configuration
Installing the Confluence EAR-WAR edition
Troubleshooting Problems & Requesting Technical Support
Upgrading Confluence

Document generated by Confluence on Jan 01, 2008 18:35 Page 27
Moving Confluence Between Servers
This page last changed on Oct 17, 2006 by [email protected].
Adminstrators may need to move a Confluence instance from one server to another for upgrades ordowntime.
Avoid upgrades while transferring
If you are planning to switch databases, application servers or Confluence versions,perform the transfer and test that it is successful separately to any other changes.
Transferring Confluence Standalone To Another Server Using TheSame Operating System
If you are using Confluence Standalone and the operating systems on both servers are the same,then the home and install folders can be copied straight into an identical external database and usermanagement setup.
1. On the original server, create zips of the Confleunce install and home directories. Copy the zips tothe new server.
2. On the new server, unzip the install and home directories. Windows users should avoid unzippingwith the Windows built-in extractor, instead use Winzip or the free 7Zip. If you are changing thelocation of the home directory, open the Confluence install\confluence\WEB-INF\classes directoryand edit confluence-init.properties by changing the line starting with 'confluence.home='.
3. This next step is dependent on your database:• For users of the internal database, the content is stored inside the home directory. You should
consider switching to an external database after the transfer is successful.• For databases stored on another server, change the user account or datasource permissions
so that the new server has the same network access permissions as the original. Thenconfirm from the new server that the hostname can be resolved and is listening for databaseconnections on the expected port.
• For external databases stored locally:A. On the original server, create a manual database backup.B. Copy the database backup to the new server.C. On the new server, install or upgrade the database version to match the original server.D. Import the database backup.E. Add a database user account with the same username and password as the original.F. Provide the user with the full access to the imported mdatabase.G. Use a database administration tool to confirm that the user can login from the localhost.
4. If you are using internal user management, skip this step. For users who have JIRA or LDAPintegration, provide the new server with network or local access to the same hosts as the original.
5. If you configured Confluence as a Windows service, repeat those instructions.
All Other Transfers
Create a backup and import into the new server.
1. Create a backup from Confluence by going to 'Administration' -> 'Backup & Restore', checking the'Backup Attachments' and selecting 'Backup'.
2. Identify the current version of Confluence your are using, displayed at the bottom of eachConfluence page.
3. Download the same version as you are currently using to the new server, which may be the currentConfluence release, or an older version.
4. Using the same version, follow the Upgrading Confluence guide.

Document generated by Confluence on Jan 01, 2008 18:35 Page 28
Rebuilding the Ancestor Table
This page last changed on Jun 17, 2007 by [email protected].
In Confluence, the ancestor table controls the breadcrumb navigation at the top of each Confluence page.Occassionally, the ancestor table will become out of sync. When this happens, you can rebuild the table torestore everything to normal.
Simply access this URL:
http://yoursite/admin/permissions/rebuild_ancestor_table.action
RELATED TOPICS

Document generated by Confluence on Jan 01, 2008 18:35 Page 29
Restoring a Site
This page last changed on Dec 17, 2007 by smaddox.
CAUTION: Restoring a backup of an entire confluence site (consisting of multiple spaces)will:
• Wipe out all Confluence content in the database. Ensure that your database is backedup.
• Log you out after the restore process. Make sure you know your login detailscontained in the data being restored.
Confluence supports backward compatibility for site backups. (But not for space backups). You canonly successfully restore backups of a site from an older version of Confluence to a newer version ofConfluence. For example, if you create a site backup in Confluence 2.4.3, it cannot be restored into aConfluence 2.2.2 instance. It can however, be restored into 2.4.5 or 2.5.x, because 2.4.5 and 2.5.x arenewer versions of Confluence.
There are two ways to restore a site from a backup file:
1. Restore a site from the Confluence Setup Wizard: This restores the data into a new instance ofConfluence.
2. Restore a site from the Administration Console: This restores data into the current instance ofConfluence.
If your daily backup zips cannot be restored for whatever reason, but you have backups ofboth your database and your Confluence home directory, then it is still possible to restorefrom these backups.
Selective space restore not possible
You cannot select a single space to restore from the entire site backup when the backupcontains more than one space.
RELATED TOPICS
Confluence 2.7 Temp Archive
Manually Backing Up The Site
Restoring a Site
Restoring a Space
Restoring Data from the Administration Console

Document generated by Confluence on Jan 01, 2008 18:35 Page 30
Restoring a Space
This page last changed on Dec 17, 2007 by smaddox.
Confluence will only allow you to restore a space if a space by that name does not already exist on thesite. If you already have a space with the identical name, you will need to delete or rename the existingspace before restoring the new one.
Cannot restore to a different major Confluence release
Confluence only supports forward compatibility and backward compatibility for individualspace import and export when executed within the same major version of Confluenceinstances.This means that a space export created in a newer major version of Confluence cannotbe imported into an older major version of Confluence. For example, if you create a spaceexport in Confluence 2.4.5, it cannot be imported into a Confluence 2.2.2 instance. Itcan be however imported into 2.4.6. (because 2.2.2 and 2.4.5 are two different 'major'versions). Similarly, a space export created in 2.2.2 can not be imported into 2.4.5.However, it can be restored in 2.2.10. (Since 2.2.2 and 2.2.10 belong to the same majorversion release )If such an operation is carried out, an error message similar to the one below will bedisplayed and the import action will be stopped.
You need to have System Administrator permissions in order to perform this function.
To restore a space,
Go to the 'Administration Console' and click 'Backup and Restore' in the 'Administration' section of theleft-hand panel.
You can restore data in one of two ways:
1. Upload a zipped backup to Confluence:• Browse for the backup file.• Uncheck 'Build Index' if you want to create the index at a later stage.• Click 'Upload and Restore'.
2. Restore a backup from the file system:• Select the backup file from the form field displayed. If you do not see your backup file,
make you sure that it has been copied into the /opt/java/src/confluence/deployments/conf.atlassian.com/home/restore directory.
• Uncheck 'Build Index' if you want to create the index at a later stage.• Click 'Restore'.
Restoring Spaces between Major Releases
As described in the warning above, you cannot restore a space directly between two major versions. i.e.an individual space backup from 2.2.x cannot be imported into a 2.3.x.Whilst there is presently no functionality in Confluence that allows you to do so, there is however amanual workaround to this problem.
Always back up your data before attempting this procedure.
Please follow the procedure below:
1. Create a manual site backup2. Configure a separate installation of the Confluence version you want the space export for i.e. the
version into which you want to export the space.3. Use one of the two restoration methods listed here to import the site backup.4. After restoring the site backup, create the XML backup for the space you want.

Document generated by Confluence on Jan 01, 2008 18:35 Page 31
5. Import this backup into your main Confluence instance and you now have that space.
Alternative
Another way is to change the version of a space backup.
RELATED TOPICS
Confluence 2.7 Temp Archive
Manually Backing Up The Site
Restoring a Site
Restoring a Space
Restoring Data from the Administration Console

Document generated by Confluence on Jan 01, 2008 18:35 Page 32
Changing the version of a space backup
This page last changed on Jul 11, 2007 by mryall.
Confluence prevents the import of space backups which aren't from the same major version. The reasonfor this is that any schema change between the export and imported version of Confluence will cause theimport to fail, leaving you with an incomplete import. Even worse, the failure can be database-dependent,so it may work fine on one particular database but your backup will fail to import later.
Do not import a modified space backup on a production server. Import the modified spacebackup on a test server, then export from the test server to create a pristine space backupfor the new version.
To change the version of a space backup, do the following:
• extract the space backup ZIP file• edit exportDescriptor.properties in a text editor• change the buildNumber to the buildNumber of the Confluence version you wish to import into• zip up the modified contents of the backup into a ZIP file again.
This will allow you to import a backup into a test instance of Confluence. After checking the importedspace for errors, export it cleanly from the test server and import the fresh backup into your productionserver.
If your import fails on the test server due to Hibernate errors, this indicates a schema incompatibility andcannot be worked around. You will need to restore your entire site on an old version of Confluence, andexport the space from there. See the last section of Restoring a Space for details.

Document generated by Confluence on Jan 01, 2008 18:35 Page 33
Restoring Data from other Backups
This page last changed on Sep 12, 2007 by [email protected].
Typically, Confluence data is restored from the Administration Console or from the Confluence SetupWizard.
If you are experiencing problems restoring from an zipped XML backup file, it is still possible to restoreprovided you have:
1. a backup of your home directory2. a backup of your database (if you're using an external database)
Instructions for this method of restoring differ depending on whether you are using the embeddeddatabase or an external database (like Oracle, MS SQL Server, MySQL or Postgres).
Embedded DatabaseIf you are running against the embedded database, the database is located inside the database folder ofyour Confluence Home Directory. Hence, all you need to do is:
1. retrieve the most recent backup of your home directory2. unpack the Confluence distribution and point the confluence-init.properties file to this directory
External DatabaseIf you're using an external database, you need to:
1. prepare backups of your home directory and database (preferably backups that are dated thesame). That is, make sure the home directory is accessible on the filesystem and the databaseavailable to be connected to.
2. if this database happens to have a different name, or is on a different server, you need to modifythe jdbc url in the confluence.cfg.xml file inside the Confluence Home Directory. The value of thisproperty is specified as hibernate.connection.url.
3. unpack the Confluence distribution and point the confluence-init.properties file to the homedirectory.
RELATED TOPICS
Migrate to a Different Database

Document generated by Confluence on Jan 01, 2008 18:35 Page 34
Restoring Data from the Administration Console
This page last changed on Dec 17, 2007 by smaddox.
Use this option if you want to restore data into your current instance of Confluence. If you want to restoredata into a new instance, follow the instructions here.
You need to have System Administrator permissions in order to perform this function.
CAUTION: Restoring a backup of an entire confluence site (consisting of multiple spaces)will:
• Wipe out all Confluence content in the database. Ensure that your database is backedup.
• Log you out after the restore process. Make sure you know your login detailscontained in the data being restored.
To restore data from backup,
Go to the 'Administration Console' and click 'Backup and Restore' in the 'Administration' section of theleft-hand panel.
You can restore data in one of two ways:
1. Upload a zipped backup to Confluence:• Browse for the backup file.• Uncheck 'Build Index' if you want to create the index at a later stage.• Click 'Upload and Restore'.
2. Restore a backup from the file system:• Select the backup file from the form field displayed. If you do not see your backup file,
make sure that it has been copied into the /opt/java/src/confluence/deployments/conf.atlassian.com/home/restore directory.
• Uncheck 'Build Index' if you want to create the index at a later stage.• Click 'Restore'.
RELATED TOPICS
Confluence 2.7 Temp Archive
Manually Backing Up The Site
Restoring a Site
Restoring a Space
Restoring Data from the Administration Console

Document generated by Confluence on Jan 01, 2008 18:35 Page 35
Retrieve file attachments from a backup
This page last changed on Jan 02, 2007 by [email protected].
File attachments on pages can be retrieved from a backup without needing to import the the backup intoConfluence. This is useful for recovering attachments that have been deleted by users.
Both daily and manual backups allow this, as long as the 'Include attachments' property was set. Userswanting to restore pages, spaces or sites should check out the Administrators Guide instead.
Before following the instructions for recovering attachments, please review how backups store file andpage information.
How Backups Store File and Page Information
The backup zip file contains entities.xml, an XML file containing the Confluence content, and a directoryfor storing attachments.
Backup Zip File Structure
Page attachments are stored under the attachments directory by page and attachment id. Here is anexample listing:
Listing for test-2006033012_00_00.zip\attachments\98\10001\attachments\98\10002\attachments\99\10001entities.xml
Inside the attachment directory, each numbered directory inside is one page, and the numbered fileinside is one attachment. The directory number is the page id, and the file number is the attachment id.For example, the file \attachments\98\10001 is an attachment with page id 98 and attachment id 10001.You can read entities.xml to link those numbers to the original filename. Entities.xml also links each pageid to the page title.
Entities.xml Attachment Object
Inside the entities.xml is an Attachment object written in XML. In this example, the page id is 98, theattachment id is 10001 and the filename is myimportantfile.doc. The rest of the XML can be ignored:
<object class="Attachment" package="com.atlassian.confluence.pages"><id name="id">98</id><property name="fileName"><![CDATA[myimportantfile.doc]]></property>...<property name="content" class="Page" package="com.atlassian.confluence.pages"><idname="id">10001</id></property>...</object>
Entities.xml Page Object
This XML describes a page. In this example, the page id is 98 and the title is Editing Your Files. The restof the XML can be ignored:
<object class="Page" package="com.atlassian.confluence.pages"><id name="id">98</id><property name="title"><![CDATA[Editing Your Files]]></property>...</object>

Document generated by Confluence on Jan 01, 2008 18:35 Page 36
Instructions for Recovering Attachments
Each file must be individually renamed and re-uploaded back into Confluence by following the instructionsbelow. Choose one of the three methods:
Choice A - Recover Attachments By Filename
Best if you know each filename you need to restore, especially if you want just a few files:
1. Unzip the backup directory and open entities.xml.2. Search entities.xml for the filename and find the attachment object with that filename. Locate its
page and attachment id.3. Using the page and attachment id from entities.xml, go to the attachments directory and open that
directory with that page id. Locate the file with the attachment id.4. Rename the file to the original filename and test it.5. Repeat for each file.6. To import each file back into Confluence, upload to the original page by attaching the file from within
Confluence.
Choice B - Restore Files By Page
Best if you only want to restore attachments for certain pages:
1. Unzip the backup directory and open entities.xml.2. Search entities.xml for the page title and find the page object with that title. Locate its page id.3. Go to the attachments directory and open that directory with that page id. Each of the files in the
directory is an attachment that must be renamed.4. Search entities.xml for attachment objects with that page id. Every attachment object for the page
will have an attachment id and filename.5. Rename the file with that attachment id to the original filename and test it.6. Repeat for each page.7. To import each file back into Confluence, upload to the original page by attaching the file from within
Confluence.
Choice C - Restore All Files
Best if you have a small backup but want to restore many or all the attachments inside:
1. Unzip the backup directory and open entities.xml.2. Go to the attachments directory and open any directory. The directory name is a page id. Each of
the files in the directory is an attachment that must be renamed.3. Search entities.xml for attachment objects with that page id. When one is found, locate the
attachment id and filename.4. Rename the file with that attachment id to the original filename and test it.5. Find the next attachment id and rename it. Repeat for each file in the directory.6. Once all files in the current directory are renamed to their original filenames, search entities.xml for
the page id, eg directory name. Find the page object with that page id and locate its page title.7. Rename the directory to the page title and move on to the next directory. Repeat for each un-
renamed directory in the attachments directory.8. To import each file back into Confluence, upload to the original page by attaching the file from within
Confluence.
To obtain detailed information about lost attachments, location, name and type of theattachments, you may use the findattachments script

Document generated by Confluence on Jan 01, 2008 18:35 Page 37
Troubleshooting failed XML site backups
This page last changed on Dec 13, 2007 by ganand.
Seeing an error when creating or importing a backup?
Problem Solution
Exception while creating backup Follow instructions below
Exception while importing backup Follow Troubleshooting XML backups that fail onrestore instead
Resolve Errors With Creating An XML Backup
The errors may be caused by a slightly corrupt database. If you're seeing errors such as 'Couldn'tbackup database data' in your logs, this guide will help you correct the error on your own. We stronglyrecommend that you backup your database and your Confluence home directory beforehand, so that youcan restore your site from those if required. If you are unfamiliar with SQL, we suggest you contact yourdatabase administrator for assistance.
To Identify And Correct The Problem
To work out where the data corruption or problems are, increase the status information reported duringbackup, then edit the invalid database entry:
1. Stop Confluence.2. If you have an external database, use a database administration tool to create a manual database
backup.3. Backup your Confluence home directory. You will be able to restore your whole site using this and
the database backup.4. Open the my_confluence_install/confluence/WEB-INF/classes/log4j.properties and add this
to the bottom and save:
log4j.logger.com.atlassian.confluence.importexport.impl.XMLDatabinder=DEBUG, confluenceloglog4j.additivity.com.atlassian.confluence.importexport.impl.XMLDatabinder=false
5. Find your Confluence output logs. On standalone, this is the /logs directory under your Confluenceinstall. Move or delete all existing Confluence logs to makes it easier to find the relevant loggingoutput.
6. Restart Confluence and login.7. Begin a backup so that the error reoccurs.8. You must now check your log files to find out what object could not be converted into XML format.
Open my_confluence_install/logs/catalina.out. Scroll to the bottom of the file.9. Do a search for 'ObjectNotFoundException'. You should see an error similar to this:
01 2005-08-24 00:00:33,743 DEBUG [DOCPRIV2:confluence.importexport.impl.XMLDatabinder] Writingobject: com.atlassian.confluence.core.ContentPermission with ID: 5 to XML.02 2005-08-24 00:00:33,743 DEBUG [DOCPRIV2:confluence.importexport.impl.XMLDatabinder] Writingproperty: type03 2005-08-24 00:00:33,743 DEBUG [DOCPRIV2:confluence.importexport.impl.XMLDatabinder] Writingproperty: group04 2005-08-24 00:00:33,743 DEBUG [DOCPRIV2:confluence.importexport.impl.XMLDatabinder] Writingproperty: expiry05 2005-08-24 00:00:33,743 DEBUG [DOCPRIV2:confluence.importexport.impl.XMLDatabinder] Writingproperty: content06 [DOCPRIV2:ERROR] LazyInitializer - Exception initializing proxy<net.sf.hibernate.ObjectNotFoundException: No row with the given identifier exists: 2535,07 of class:com.atlassian.confluence.core.ContentEntityObject>net.sf.hibernate.ObjectNotFoundException:08 No row with the given identifier exists: 2535, of class:com.atlassian.confluence.core.ContentEntityObject09 atnet.sf.hibernate.ObjectNotFoundException.throwIfNull(ObjectNotFoundException.java:24)

Document generated by Confluence on Jan 01, 2008 18:35 Page 38
10 at net.sf.hibernate.impl.SessionImpl.immediateLoad(SessionImpl.java:1946)11 at net.sf.hibernate.proxy.LazyInitializer.initialize(LazyInitializer.java:53)12 atnet.sf.hibernate.proxy.LazyInitializer.initializeWrapExceptions(LazyInitializer.java:60)13 at net.sf.hibernate.proxy.LazyInitializer.getImplementation(LazyInitializer.java:164)14 atnet.sf.hibernate.proxy.CGLIBLazyInitializer.intercept(CGLIBLazyInitializer.java:108)15 at com.atlassian.confluence.core.ContentEntityObject$$EnhancerByCGLIB$$cc2f5557.hashCode(<generated>)16 at java.util.HashMap.hash(HashMap.java:261)17 at java.util.HashMap.containsKey(HashMap.java:339)18 atcom.atlassian.confluence.importexport.impl.XMLDatabinder.toGenericXML(XMLDatabinder.java:155)
10. Open a DBA tool such as DbVisualizer and connect to your database instance. Scan the table namesin the schema. You will have to modify a row in one of these tables.
11. To work out which table, open catalina.out, check the first line of the exception. This says therewas an error writing the ContentPermission object with id 5 into XML. This translates as the rowwith primary key 5 in the CONTENTLOCK table needs fixing. To work out what table an object mapsto in the database, here's a rough guide:
• Pages, blogposts, comments --> CONTENT table• attachments --> ATTACHMENTS table
12. Now you must find the primary key of the incorrect row in this table. In this case, you can check thefirst line and see that the row has a primary key of 5.
13. Each property is written to a column, so the last property that was being written has the incorrectvalue. The row being written to when the exception was thrown was CONTENT (line 5) with a valueof 2535 (line 6). Now you know the column and value. This value 2535 is the id of an entry that nolonger exists.
14. Using a database administrative tool, login ot the Confluence database. Locate the row in therelevant table and correct the entry. Check other rows in the table for the default column value,which may be null, 0 or blank. Overwrite the invalid row value with the default.
15. Restart Confluence.16. Attempt the backup again. If the backup fails and you are stuck, please lodge a support request
with your latest logs.
Troubleshooting "Duplicate Key" related problems
If you are encountering an error message such as:
could not insert:[bucket.user.propertyset.BucketPropertySetItem#bucket.user.propertyset.BucketPropertySetItem@a70067d3];SQL []; Violation of PRIMARY KEY constraint 'PK_OS_PROPERTYENTRY314D4EA8'. Cannot insert duplicatekey in object 'OS_PROPERTYENTRY'.; nested exception is java.sql.SQLException: Violation ofPRIMARY KEY constraint 'PKOS_PROPERTYENTRY_314D4EA8'. Cannot insert duplicate key in object'OS_PROPERTYENTRY'.
this indicates that the Primary Key constraint 'PK_OS_PROPERTYENTRY_314D4EA8' has duplicate entriesin table 'OS_PROPERTYENTRY'.You can locate the constraint key referring to 'PK_OS_PROPERTYENTRY_314D4EA8' in your table'OS_PROPERTYENTRY' and locate any duplicate values in it and remove them, to ensure the "PRIMARYKEY" remains unique. An example query to list duplicate entries in the 'OS_PROPERTYENTRY' table is:
SELECT ENTITY_NAME,ENTITY_ID,ENTITY_KEY,COUNT(*) FROM OS_PROPERTYENTRY GROUP BYENTITY_NAME,ENTITY_ID,ENTITY_KEY HAVING COUNT(*)>1
To Help Prevent This Issue From Reoccuring
1. If you are using the embedded database, be aware that it is bundled for evaluation purposes anddoes not offer full transactional integrity in the event of sudden power loss, which is why an externaldatabase is recommended for production use. You should migrate to an external database.
2. If you are using an older version of Confluence than the latest, you should consider upgrading atthis point.

Document generated by Confluence on Jan 01, 2008 18:35 Page 39
RELATED TOPICS

Document generated by Confluence on Jan 01, 2008 18:35 Page 40
Viewing and Editing License Details
This page last changed on Dec 17, 2007 by smaddox.
The 'License Details' page tells you:
• How many users your Confluence instance is licensed to support, and how many are currentlyregistered.Note: The number of registered users only includes users who have 'can use Confluence' permission.Deactivated users are not included.Click the 'Refresh' button to make sure you see the latest count.
• What type of license you have (e.g. Commercial, Academic, Community).• How much time remains in your one-year support and upgrades period (for full licenses) or 30-day
trial (for trial licenses).• Your server ID, which:
° is generated when you install Confluence for the first time° exists for the life of the Confluence instance° survives an upgrade° is held in the database° is not bound to a specific licence° is the same for all servers in a cluster.
From Confluence release 2.5.5, the 'License Details' page shows Server ID instead of License ID.
To view the details of your Confluence license,
1. Log into Confluence as a user with Confluence Administrator or System Administrator permissions.2. Go to the 'Administration Console' and click 'License Details' under the heading 'Administration in
the left-hand panel.
To look up your license details on the Atlassian website, please log in to my.atlassian.com
To update your Confluence license,
1. Log into Confluence as a user with Confluence Administrator or System Administrator permissions.2. Go to the 'Administration Console' and click 'License Details' under the heading 'Administration in
the left-hand panel.3. Enter your new license details into the 'License' field and click the 'Save' button.
If you are running a Confluence Cluster, you will need to:• update each server's Confluence license separately.• ensure that the new license has enough nodes to cover all servers that are currently running
in your cluster. (To check the number of active servers in your cluster, see the ClusterAdministration page.)
Screenshot : License Details

Document generated by Confluence on Jan 01, 2008 18:35 Page 41
RELATED TOPICS
Apache and Tomcat load balancing
Cache Statistics
Cluster Administration page
Cluster safety mechanism
Cluster Troubleshooting

Document generated by Confluence on Jan 01, 2008 18:35 Page 42
Viewing System Information
This page last changed on Dec 17, 2007 by jnolen.
The System Information screen provides information about Confluence's configuration, and theenvironment in which Confluence has been deployed. Your system configuration information is helpful tous when diagnosing errors you may face using Confluence. If you file a support request or bug report, themore detail you can provide about your installation and environment the faster we will be able to help.
To view your system information, go to the 'Administration Console' and click 'System Configuration' inthe 'Administration' section.
The handy Memory Graph helps you keep track of Confluence's memory usage.
RELATED TOPICS
• Cache Statistics• Viewing and Editing License Details• Viewing and Managing Installed Plugins

Document generated by Confluence on Jan 01, 2008 18:35 Page 43
Where Is My ConfluenceHome Directory?
This page last changed on Mar 04, 2004 by vidya.
Often in the documentation, you'll see a reference to the "ConfluenceHome" directory. This is thedirectory in which Confluence stores its configuration information, search indexes, custom decorators andpage attachments. Also, if you're using the embedded HSQL database, the database is also stored in thisdirectory.
When Confluence first starts up, it reads a file called confluence-init.properties, which is locatedinside the confluence/WEB-INF/classes directory under where you unpacked the distribution. This filecontains a single line telling Confluence where the ConfluenceHome directory is. If you ever forget whereyou put your home directory, check confluence-init.properties.

Document generated by Confluence on Jan 01, 2008 18:35 Page 44
Cluster Administration page
This page last changed on Dec 17, 2007 by smaddox.
Overview
Any instance of Confluence which uses a clustered license has a Cluster Configuration page whichincludes information about the active cluster.
1. Click 'Administration', available at the top-right of every Confluence page.2. Click 'Cluster Configuration' in the left-hand menu, in the section called 'Clustering'.
Availability
To access this functionality, you must:
• be a System Administrator (i.e. have global System Administrator permissions), and• be using Confluence 2.3 or later, and• be using a clustered Confluence license.
Screenshot
Cluster Administration Page
This page shows your cluster configuration, and allows you to start a new Confluence cluster using datafrom this instance.
Cluster Status indicates whether your cluster is currently running.
Licensed nodes is the maximum number of instances of Confluence your license allows in a cluster.
Active nodes lists the instances of Confluence currently participating in the cluster.
Starting a new cluster will perform the following changes:

Document generated by Confluence on Jan 01, 2008 18:35 Page 45
• enable a clustered cache• migrate attachments from file system to the database• publish database connection information so other nodes can join the cluster.
All access to Confluence will be locked while this takes place, and you will be forced to restartConfluence afterwards.
Cluster name is a short name for identifying your cluster. Other Confluence instances can join the clusterusing this name.
To join an existing cluster, start a clean copy of Confluence on this node and select 'Join Cluster'during the setup wizard.
Related documents
Confluence Cluster InstallationCluster Troubleshooting

Document generated by Confluence on Jan 01, 2008 18:35 Page 46
Cluster Troubleshooting
This page last changed on Nov 13, 2007 by [email protected].
Symptoms
Below is a list of potential problems with a Confluence cluster, and their likely solutions. The solutions arelisted below.
Problem Likely solutions
Cluster panic errors at startup Add multicast route, Check firewall
Error in log: The interface is not suitablefor multicast communication
Change multicast interface, Add multicast route
Multicast being sent, but not received (detectablewith tcpdump)
Check firewall, Check intermediate routers,Increase multicast TTL
Any issue not covered here Contact support
Which multicast address?
The multicast address and port used by Confluence can be found on the Cluster Administration page, orin confluence.cfg.xml in the Confluence home directory.
Debugging tools
Listed below are some debugging tools that help determine what the status of the multicast traffic is:
Tool Information provided
netstat -gn Lists multicast groups. Does not work on Mac OSX.
netstat -rn Lists system routing table.
tcpdump -i interface Captures network traffic on the given interface.Most useful on an interface that only receivescluster traffic.
Add multicast route
Multicast networking requirements vary across operating systems. Some operating systems require littleconfiguration, while some require the multicast address to be explicitly added to a network interfacebefore Confluence can use it.
Usually, adding a route for all multicast traffic to use the correct interface will fix multicast traffic. Theexample below is for a Ubuntu Linux system:
route add -net 224.0.0.0 netmask 240.0.0.0 dev eth0
To support multiple applications using multicast on different interfaces, you may need to specify a routespecific to the Confluence multicast address.
Check firewall
Ensure your firewall allows UDP traffic on the multicast address and port used by Confluence.

Document generated by Confluence on Jan 01, 2008 18:35 Page 47
Change multicast interface
Confluence might have selected the incorrect interface for multicast traffic, which means it cannotconnect to other nodes in the cluster. To override the interface used for multicast traffic after initial setup,edit confluence.cfg.xml in the Confluence home directory and add a property (or change the existingone) to select your desired network interface. For example to tell Confluence to use eth1:
<property name="confluence.cluster.interface">eth1</property>
Increase multicast TTL
The multicast time-to-live (TTL) specifies how many hops a multicast packet should be allowed to travelbefore it is discarded by a router. It should be set to the number of routers in between your clusterednodes: 0 if both are on the same machine, 1 if on two different machines linked by a switch or cable, 2 ifon two different machines with one intermediate router, and so on.
Create a file in the Confluence home directory called tangosol-coherence-override.xml. Add thefollowing to it, setting the TTL value appropriately (1 is the default):
<?xml version='1.0'?><coherence><cluster-config><multicast-listener><time-to-live system-property='tangosol.coherence.ttl'>1</time-to-live></multicast-listener></cluster-config></coherence>
Alternatively, simply start Confluence with the system property: -Dtangosol.coherence.ttl=1. Again, 1is the default value, and you should change it to something appropriate to your network topology.
Check intermediate routers
Advanced switches and routers have the ability to understand multicast traffic, and route it appropriately.Unfortunately sometimes this functionality doesn't work correctly with the multicast managementinformation (IGMP) published by the operating system running Confluence.
If multicast traffic is problematic, try disabling advanced multicast features on switches and routers inbetween the clustered nodes. These features can prevent multicast traffic being transmitted by certainoperating systems.
For best results, use the simplest network topology possible for the cluster traffic between the nodes. Fortwo nodes, that means a single network cable. For larger numbers, try using a single high-quality switch.
Advanced Tangosol configuration
If the solution to your problem involves changes to the Tangosol configuration, these changes should notbe made to the Confluence configuration in confluence/WEB-INF/classes/. Instead, to ensure yourconfiguration survives upgrades, make your changes via:
• Tangosol system properties• creating a tangosol-coherence-override.xml file in the Confluence home directory.
Examples of making these changes are shown in the increasing the TTL section.
Didn't find a solution? Contact Atlassian support
We have dedicated staff on hand to support your installation of Confluence. Please follow the instructionsfor raising a support request and mention that you're having trouble setting up your Confluence cluster.

Document generated by Confluence on Jan 01, 2008 18:35 Page 48
Configuring Confluence
This page last changed on Feb 02, 2006 by vidya.
• Optional Settings° Attachment Storage Configuration° Enabling CamelCase Linking° Enabling Remote APIs° Enabling Rich Text Editing Option° Enabling Threaded Comments° Enabling Trackback° Making Rich Text Editing default° WebDAV Configuration
• Other Settings° Configuring Attachment Size° Configuring Character Encoding° Configuring HTTP Timeout Settings° Configuring Indexing Language° Configuring Jira Issues Icon mappings° Configuring Number Formats° Configuring Shortcut Links° Configuring Time and Date Formats° Number of Ancestors to Show in Breadcrumbs° Thumbnail Settings
• Site Configuration° Configuring the Server Base URL° Configuring the Site Homepage° Customising Default Space Content° Editing the Global Logo° Editing the Site Title° Editing the Site Welcome Message° View Space Goes to Browse Space
Document generated by Confluence on Jan 01, 2008 18:35 Page 49
Optional Settings
This page last changed on Jan 31, 2006 by vidya.
• Attachment Storage Configuration• Enabling CamelCase Linking• Enabling Remote APIs• Enabling Rich Text Editing Option• Enabling Threaded Comments• Enabling Trackback• Making Rich Text Editing default• WebDAV Configuration

Document generated by Confluence on Jan 01, 2008 18:35 Page 50
Attachment Storage Configuration
This page last changed on Dec 17, 2007 by smaddox.
Confluence allows you to store attachments in one of three places:
• Filesystem - locally in the Confluence home directory• Database - in Confluence's configured database• WebDAV - remotely on a WebDAV server (*deprecated*)
A System Administrator can configure Confluence's attachment storage via the 'Attachment Storage'option on the 'Administration Console'.
You need to have System Administrator permissions in order to perform this function.
Attachment Storage Options
Local File System
By default, Confluence stores attachments in the attachments directory within the configured Confluencehome folder.
Database
Confluence gives administrators the option to store attachments in the database that Confluence isconfigured to use.
Here are some reasons why, as an administrator, you may want to choose this storage system:
• Ease of backup.• Avoiding issues with certain characters in attachment file names.
While storing attachments in the database can offer some advantages, please beaware that the amount of space used by the database will increase because of thegreater storage requirements.
WebDAV
Confluence also allows administrators to set an external WebDAV repository as the location forattachment storage.
WebDAV attachment manager deprecated
The option to store Confluence attachments on a WebDAV server has never worked in auseful fashion, and has not been maintained for many versions.
• The WebDAV attachment manager will be deprecated from Confluence 2.7, and will beremoved from a later version of Confluence.
• If you store attachments on external WebDAV servers, we recommend that youmigrate to file-system or database-backed attachment storage as soon as possible.Refer to CONF-9313 and CONF-2887.
• This DOES NOT affect the operation of the WebDAV plugin.
Migration between Attachment Storage Systems
You can 'migrate' your attachments from one storage system to another. All existing attachments will bemoved over to the new attachment storage system.

Document generated by Confluence on Jan 01, 2008 18:35 Page 51
When the migration occurs, all other users will be locked out of the Confluence instance.This is to prevent modification of attachments while the migration occurs. Access will berestored as soon as the migration is complete.
To perform a migration, follow the steps below:
1. View the 'Administration Console'.2. Click 'Attachment Storage' in the left-hand panel. The current configuration will be displayed.
Attachment storage configuration3. Click the 'Edit' button to modify the configuration.4. Select the storage system you desire.
Edit attachment storage5. Click the 'Save' button to save the changes.6. A screen will appear, asking you to confirm your changes. Clicking 'Migrate' will take you to a screen
that displays the progress of the migration.
Migration warning
Troubleshooting
To enable debug logging for WebDAV attachment storage, add the following to the bottom of WEB-INF/classes/log4j.properties and restart Confluence:
log4j.logger.com.atlassian.confluence.pages.persistence.dao=DEBUG,confluenceloglog4j.additivity.com.atlassian.confluence.pages.persistence.dao=false
log4j.logger.org.apache.webdav=DEBUG,confluenceloglog4j.additivity.org.apache.webdav=false
RELATED TOPICS
Important Directories and Files

Document generated by Confluence on Jan 01, 2008 18:35 Page 52

Document generated by Confluence on Jan 01, 2008 18:35 Page 53
Enabling CamelCase Linking
This page last changed on Dec 17, 2007 by smaddox.
CamelCase linking is a form of markup used in many wikis where words are capitalised and compoundedtogether without spaces, 'LikeThis', in order to create links automatically.
By default, CamelCasing is not enabled in Confluence. To use CamelCasing, a Confluence administratorwill need to enable this option from the 'Administration Console'.
To enable CamelCasing,
1. From the 'Administration Console' click 'General Configuration' in the left-hand panel.2. Click 'Edit' on the 'General Configuration' screen.3. Select 'On' beside 'CamelCase Links'.4. Click 'Save'.
RELATED TOPICS
Attachment Storage Configuration
Enabling CamelCase Linking
Enabling Remote APIs
Enabling Rich Text Editing Option
Enabling Threaded Comments
[!Administration Guide Attachments
directory^adminhome.gif!]

Document generated by Confluence on Jan 01, 2008 18:35 Page 54
Enabling Remote APIs
This page last changed on Dec 16, 2007 by smaddox.
Confluence provides XML-RPC and SOAP remote APIs. You need to enable the APIs from theAdministration Console before you can access Confluence remotely.
You need to have System Administrator permissions in order to perform this function.
To enable the remote API,
1. Go to the 'Administration Console' and click 'General Configuration' in the left-hand panel.2. Click 'Edit' next to 'Site Configuration'.3. Select 'On' next to 'Remote API (XML-RPC & SOAP)'.4. 'Save' your changes.
RELATED TOPICS
Remote API Specification
RPC Plugins
Confluencer.NET
Document generated by Confluence on Jan 01, 2008 18:35 Page 55
Enabling Rich Text Editing Option
This page last changed on Dec 17, 2007 by smaddox.
With Confluence 2.0 and later versions, users have the option of using the Rich Text editor to createpages. By default, this is set to 'On'. If desired, a Confluence administrator can disable 'Rich Text Editing'from the Administration Console.
To disable Rich Text editing,
1. Go to the Administration Console and click General Configuration' in the left-hand panel.2. In the 'General Configuration' screen, click 'Edit'.3. Select 'Off' beside 'Rich Text Editing'.4. Click 'Save'.
RELATED TOPICS
Enabling Rich Text Editing Option
Making Rich Text Editing default
Rich Text Editor Overview

Document generated by Confluence on Jan 01, 2008 18:35 Page 56
Enabling Threaded Comments
This page last changed on Jun 24, 2007 by smaddox.
Comments on pages or news items are displayed in one of two views:
• Threaded: Shows the comments in a hierarchy of responses. Each subsequent reply to a comment isindented to indicate the relationships between the comments.
• Flat: Displays all the comments in one single list and does not indicate the relationships betweencomments.
By default, comments are displayed in Flat mode.
To enable or disable the 'threaded view',
1. Go to the 'Administration Console', click on 'General Configuration' in the left panel.2. In the 'Options and Settings' screen, click 'Edit'.3. Select "On'beside 'Threaded Comments'.4. Click 'Save'.
RELATED TOPICS
Commenting on a Page
Viewing Comments

Document generated by Confluence on Jan 01, 2008 18:35 Page 57
Enabling Trackback
This page last changed on Jun 24, 2007 by smaddox.
When Trackback is enabled, any time you link to an external webpage that supports TrackbackAutodiscovery, Confluence will send a trackback ping to that page to inform it that it has been linked to.
Confluence pages also support Trackback Autodiscovery and when Trackback is enabled, can receivetrackback pings sent by other sites.
To enable trackback,
1. Go to the 'Administration Console', click on 'General Configuration' in the left panel.2. In the 'Feature Settings' screen, click 'Edit'.3. Select "On' beside 'Trackback' and click 'Save'.
RELATED TOPICS
Attachment Storage Configuration
Enabling CamelCase Linking

Document generated by Confluence on Jan 01, 2008 18:35 Page 58
Making Rich Text Editing default
This page last changed on Dec 17, 2007 by smaddox.
A Confluence administrator can configure whether the default mode of editing on the site is 'Rich Text' or'Wiki Markup'.
Users will still be able to configure their individual preferences from the 'Edit' tab of a page.
To make Rich Text Editing the default,
1. From the 'Administration Console' click 'General Configuration' in the left-hand panel.2. Click 'Edit' on the 'General Configuration' screen.3. Select 'On' beside 'Users see Rich Text Editor by default'.
(Select 'Off' to set 'Wiki Markup' editing as the default.)4. Click 'Save'.
RELATED TOPICS
Enabling Rich Text Editing Option
Making Rich Text Editing default
Rich Text Editor Overview
[!Administration Guide Attachments
directory^adminhome.gif!]

Document generated by Confluence on Jan 01, 2008 18:35 Page 59
WebDAV Configuration
This page last changed on Dec 17, 2007 by jnolen.
WebDAV allows users to access Confluence content via a WebDAV client, such as 'My Network Places'in Microsoft Windows. Provided that the user has permission, they will be able to read and write tospaces, pages and attachments in Confluence. They will be asked to log in, and the standard Confluencepermissions apply.
On the 'WebDav Configuration' page, you can:
• allow/disallow specific actions on pages and attachments via WebDAV. The configurable actions are:create/move, edit and delete.
• enable/disable access to specific virtual files/folders.
• The 'WebDav Configuration' page will only be available if the WebDAV plugin has beenenabled (see Installing and Configuring Plugins using the Plugin Repository Client).
• The settings on the 'WebDav Configuration' page do not apply to external attachmentstorage configuration.
To configure WebDAV options for pages and attachments ,
1. Go to the 'Administration Console'.2. Click 'WebDav Configuration' under 'Configuration' in the left panel. The 'WebDAV Configuration'
page is displayed.3. Check or uncheck the options in the 'Permissions' section as required.4. Check or uncheck the options in the 'Virtual Files and Folders' section as required.5. Click the 'Save' button.
Screenshot: WebDAV configuration
RELATED TOPICS
Attachment Storage Configuration (Confluence 2.7 Temp Archive)
Important Directories and Files (Confluence 2.7 Temp Archive)
WebDAV Configuration (Confluence 2.7 Temp Archive)
WebDAV Plugin (Confluence Extension)

Document generated by Confluence on Jan 01, 2008 18:35 Page 60

Document generated by Confluence on Jan 01, 2008 18:35 Page 61
Other Settings
This page last changed on Jan 31, 2006 by vidya.
• Configuring Attachment Size• Configuring Character Encoding• Configuring HTTP Timeout Settings• Configuring Indexing Language• Configuring Jira Issues Icon mappings• Configuring Number Formats• Configuring Shortcut Links• Configuring Time and Date Formats• Number of Ancestors to Show in Breadcrumbs• Thumbnail Settings
Document generated by Confluence on Jan 01, 2008 18:35 Page 62
Configuring Attachment Size
This page last changed on Dec 17, 2007 by smaddox.
Confluence gives you the option of limiting the maximum size of a single file attachment. Confluenceadministrators should keep in mind that the amount of disk space used by Confluence is directlyproportional to the number and size of attachments put into the system.
To configure the maximum size allowed for an attachment,
1. Go to the 'Administration Console' and click 'General Configuration' in the left-hand panel.2. Click 'Edit' on the 'General Configuration' screen.3. Enter the maximum size next to 'Attachment Maximum Size'. The default is 10 mb.4. 'Save' your changes.
RELATED TOPICS
Configuring Attachment Size
Configuring Character Encoding
Configuring HTTP Timeout Settings
Configuring Indexing Language
Configuring Number Formats

Document generated by Confluence on Jan 01, 2008 18:35 Page 63
Configuring Character Encoding
This page last changed on Jun 24, 2007 by smaddox.
Confluence uses UTF-8 character encoding to deliver its pages.
While it is possible to change the character encoding, unless you are certain of what you are doing, werecommend that you leave this as it is.
To change the character encoding,
1. Go to the 'Administration Console' and click on 'General Configuration' in the left panel.2. Click 'Edit' at the bottom of the 'Options and Settings' screen.3. Beside 'Encoding', enter the new character encoding of your choice.4. 'Save' your changes.
RELATED LINKS
Joel Spolsky: The Absolute Minimum Every Software Developer Absolutely, Positively Must Know AboutUnicode and Character Sets (No Excuses!)
RELATED TOPICS
Configuring Attachment Size
Configuring Character Encoding
Configuring HTTP Timeout Settings
Configuring Indexing Language
Configuring Number Formats

Document generated by Confluence on Jan 01, 2008 18:35 Page 64
Configuring HTTP Timeout Settings
This page last changed on Aug 07, 2006 by [email protected].
This feature is available in 2.2.8 and later versions of Confluence
When macros such as the RSS macro, the Calendar macro or the Repository Client Plugin make HTTPrequests to servers which are down, a long timeout value is used. You can set this timeout value througha system parameter to avoid this.
If you are using Tomcat, you can add this to the catalina.bat/sh file:
JAVA_OPTS=-Dhttp.timeout=timeInSecondsHere

Document generated by Confluence on Jan 01, 2008 18:35 Page 65
Configuring Indexing Language
This page last changed on Jun 24, 2007 by smaddox.
Changing the Indexing Language setting may improve the accuracy of Confluence search results if themajority of the content of your site is in some language other than English. Since Confluence v. 2.2.5,the content indexing support is provided in German, Russian, Chinese, CJK, French, Brazilian, Czech andGreek besides English (default).
To configure a different indexing language,
1. Go to the 'Administration Console' and click on 'General Configuration' in the left panel.2. Click 'Edit' on the right hands side of the 'Formatting and International Settings' section.3. There is a drop-down list of 'Indexing Language' currently supported in Confluence.4. 'Save' your changes.
RELATED TOPICS
Configuring Indexing Language
Content Index Administration
Rebuild index from scratch
Working with Macros

Document generated by Confluence on Jan 01, 2008 18:35 Page 66
Configuring Jira Issues Icon mappings
This page last changed on Jun 24, 2007 by smaddox.
If you are using the {jiraissues} macro to retrieve information from a JIRA server, you will have to tellConfluence where to find the icons for any custom statuses or issue types you have configured in JIRA.
Confluence is configured by default with all JIRA's standard issue type and status icons. Youwill only need to change these settings if you have customised additional statuses or issuetypes for JIRA or have changed JIRA's default icons.
To configure custom icons,
1. Go to the 'Administration Console' and click on 'Jira Issue Icon Mappings' in the left panel.2. For each icon you wish to configure, enter the name of the issue type or status into the Jira entity
field, and the filename of its icon into the filename field.
Ensure that the icon with that filename is located in the /images/icons directory of the JIRAserver.
3. You may edit existing icon mappings by clicking on the remove link by an existing mapping, then re-adding it with a new icon filename.
RELATED TOPICS
Configuring Attachment Size
Configuring Character Encoding
Configuring HTTP Timeout Settings
Configuring Indexing Language
Configuring Number Formats

Document generated by Confluence on Jan 01, 2008 18:35 Page 67
Configuring Number Formats
This page last changed on Jun 24, 2007 by smaddox.
To change the number formats,
1. Go to the 'Administration Console' and click on 'General Configuration' in the left panel.2. Click 'Edit' at the bottom of the 'Options and Settings' screen.
• There are two number format settings:° Long Number Format° Decimal Number Format
3. Change the formats using the guidelines in this document.4. 'Save' your changes.
RELATED TOPICS
Configuring Attachment Size
Configuring Character Encoding
Configuring HTTP Timeout Settings
Configuring Indexing Language
Configuring Number Formats
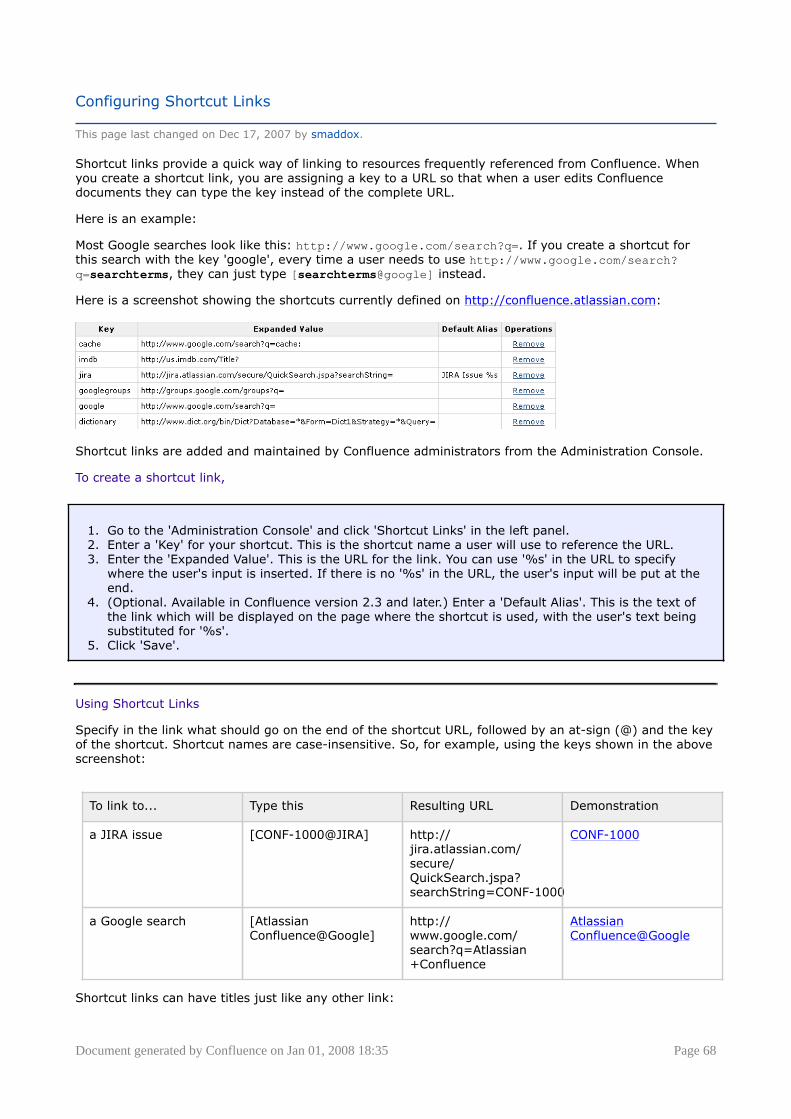
Document generated by Confluence on Jan 01, 2008 18:35 Page 68
Configuring Shortcut Links
This page last changed on Dec 17, 2007 by smaddox.
Shortcut links provide a quick way of linking to resources frequently referenced from Confluence. Whenyou create a shortcut link, you are assigning a key to a URL so that when a user edits Confluencedocuments they can type the key instead of the complete URL.
Here is an example:
Most Google searches look like this: http://www.google.com/search?q=. If you create a shortcut forthis search with the key 'google', every time a user needs to use http://www.google.com/search?q=searchterms, they can just type [searchterms@google] instead.
Here is a screenshot showing the shortcuts currently defined on http://confluence.atlassian.com:
Shortcut links are added and maintained by Confluence administrators from the Administration Console.
To create a shortcut link,
1. Go to the 'Administration Console' and click 'Shortcut Links' in the left panel.2. Enter a 'Key' for your shortcut. This is the shortcut name a user will use to reference the URL.3. Enter the 'Expanded Value'. This is the URL for the link. You can use '%s' in the URL to specify
where the user's input is inserted. If there is no '%s' in the URL, the user's input will be put at theend.
4. (Optional. Available in Confluence version 2.3 and later.) Enter a 'Default Alias'. This is the text ofthe link which will be displayed on the page where the shortcut is used, with the user's text beingsubstituted for '%s'.
5. Click 'Save'.
Using Shortcut Links
Specify in the link what should go on the end of the shortcut URL, followed by an at-sign (@) and the keyof the shortcut. Shortcut names are case-insensitive. So, for example, using the keys shown in the abovescreenshot:
To link to... Type this Resulting URL Demonstration
a JIRA issue [CONF-1000@JIRA] http://jira.atlassian.com/secure/QuickSearch.jspa?searchString=CONF-1000
CONF-1000
a Google search [AtlassianConfluence@Google]
http://www.google.com/search?q=Atlassian+Confluence
AtlassianConfluence@Google
Shortcut links can have titles just like any other link:

Document generated by Confluence on Jan 01, 2008 18:35 Page 69
To link to... Type this Resulting URL Demonstration
Internet MovieDatabase
[Fight Club|tt0137523@IMDB]
http://us.imdb.com/Title?tt0137523
Fight Club
Google Cache [Cached Homepage|www.atlassian.com@cache]
http://www.google.com/search?q=cache:www.atlassian.com
Cached Homepage
Deleting Shortcut Links
Once you have created a shortcut link, it is listed under 'Shortcut Links' in the 'Administration Console'.Click 'Remove' to delete the shortcut.
RELATED TOPICS

Document generated by Confluence on Jan 01, 2008 18:35 Page 70
Configuring Time and Date Formats
This page last changed on Jun 24, 2007 by smaddox.
Confluence allows you to localise the formats used to display dates and times within the web interface.The settings use the syntax of Java's SimpleDateFormat class (described below).
To change the time and date formats,
1. Go to the 'Administration Console' and click on 'General Configuration' in the left panel.2. Click 'Edit' at the bottom of the 'Options and Settings' screen.
• There are three time and date format settings:° Time Format : displaying only the time of day (for example, when each news item is
posted)° Date Time Format : displaying both the date and the time of day (for example, in
historical versions of pages)° Date Format : displaying only the date (for example, the creation and most recent
modification dates of pages)3. Change the formats using the guidelines in this document.4. 'Save' your changes.
RELATED LINKS
• Java 1.4.2 SimpleDateFormat API
RELATED TOPICS
Configuring Attachment Size
Configuring Character Encoding
Configuring HTTP Timeout Settings
Configuring Indexing Language
Configuring Number Formats

Document generated by Confluence on Jan 01, 2008 18:35 Page 71
Number of Ancestors to Show in Breadcrumbs
This page last changed on Jun 24, 2007 by smaddox.
Whenever there are three or more page links to be displayed in the breadcrumbs, Confluence will use anellipsis like this '...' and display only the topmost and lowermost page links. Clicking on the ellipsis willdisplay the page links in between.
Note that the Dashboard and space homepage links are always displayed at the start of thebreadcrumbs, and are not counted as ancestors for the purpose of this setting.
Screenshot: Breadcrumbs
You can configure how many immediate ancestors you want displayed in the breadcrumbs when you goto the page.
To configure the number of ancestors to show in the breadcrumbs,
1. Go to the 'Administration Console' and click on 'General Configuration' in the left panel.2. Click 'Edit' at the bottom of the 'Options and Settings' screen.3. Beside 'Number of Ancestors to show in Breadcrumbs', enter a number. For example, if you enter 2,
two immediate ancestors for the page will be displayed following the dots.4. 'Save' your changes.
Configuring Attachment Size
Configuring Character Encoding
Configuring HTTP Timeout Settings
Configuring Indexing Language
Configuring Number Formats

Document generated by Confluence on Jan 01, 2008 18:35 Page 72
Thumbnail Settings
This page last changed on Jun 24, 2007 by smaddox.
The thumbnail settings allow you to define the height and width of images when they are displayed asthumbnails.
To configure thumbnail settings,
1. Go to the 'Administration Console' and click on 'General Configuration' in the left panel.2. Click 'Edit' at the bottom of the 'Options and Settings' screen.3. Under the heading 'Thumbnail Settings', enter a value in pixels for:
• Maximum Height: 200 pixels by default.• Maximum Width: 200 pixels by default.
4. 'Save' your changes.
RELATED TOPICS
Gallery Macro
Thumbnail Macro
Uploading a Profile Picture

Document generated by Confluence on Jan 01, 2008 18:35 Page 73
Site Configuration
This page last changed on Jan 31, 2006 by vidya.
• Configuring the Server Base URL• Configuring the Site Homepage• Customising Default Space Content• Editing the Global Logo• Editing the Site Title• Editing the Site Welcome Message• View Space Goes to Browse Space

Document generated by Confluence on Jan 01, 2008 18:35 Page 74
Configuring the Server Base URL
This page last changed on Dec 16, 2007 by smaddox.
The Server Base URL is the URL via which users access Confluence. The base URL must be set to thesame URL by which browsers will be viewing your Confluence site.
Confluence will autodetect the base URL during setup, but you may need to set it manually if your site'sURL changes, or if you set up Confluence from a different URL to the one that will be used to access itpublicly.
You need to have System Administrator permissions in order to perform this function.
To configure the Server Base URL,
1. Go to the 'Administration Console' and click 'General Configuration' in the left-hand panel.2. Click the 'Edit' button next to 'Site Configuration'.3. Enter the new URL in the 'Server Base URL' text box.4. 'Save' your changes.
.
If you configure a different base URL, or if visitors use some other URL to accessConfluence, it is possible that you may encounter errors while viewing some pages.
Example
If Confluence is installed to run in a non-root context path, the server base URLshould include the context path. For example, if Confluence is running at http://www.foobar.com/confluence, the server base URL will be http://www.foobar.com/confluence.
RELATED TOPICS
Configuring the Server Base URL
Configuring the Site Homepage
Customising Default Space Content
Editing the Global Logo
Editing the Site Title
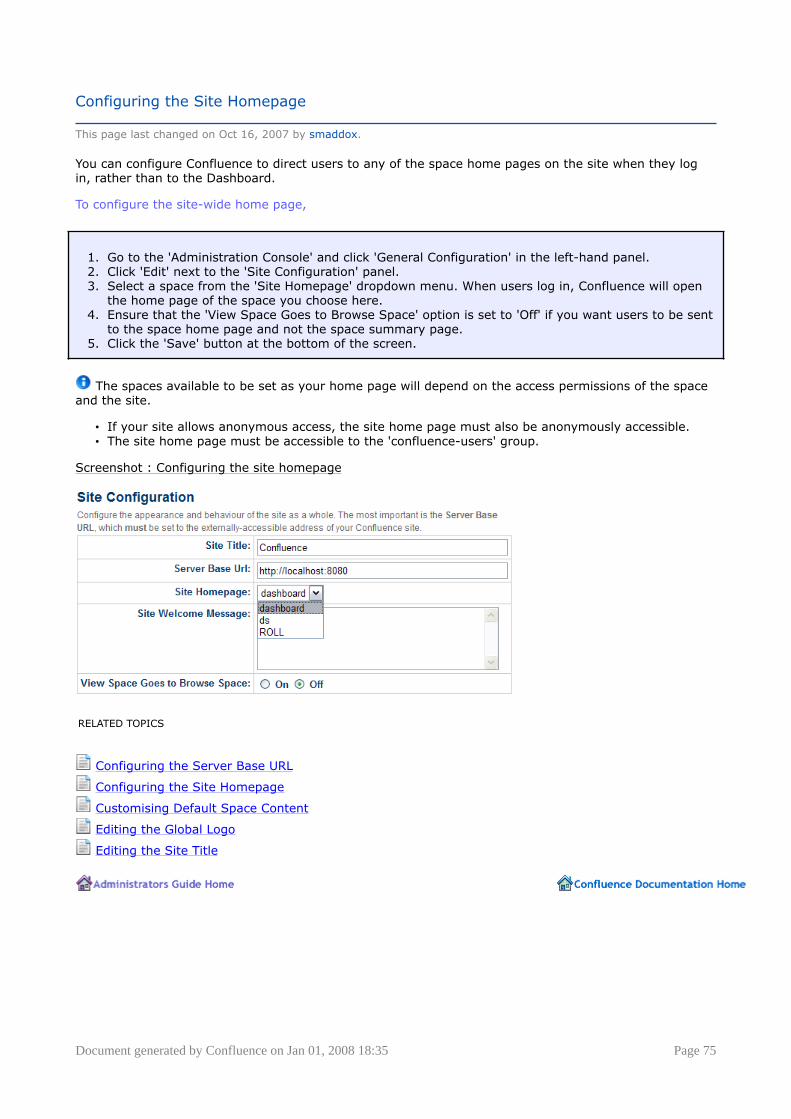
Document generated by Confluence on Jan 01, 2008 18:35 Page 75
Configuring the Site Homepage
This page last changed on Oct 16, 2007 by smaddox.
You can configure Confluence to direct users to any of the space home pages on the site when they login, rather than to the Dashboard.
To configure the site-wide home page,
1. Go to the 'Administration Console' and click 'General Configuration' in the left-hand panel.2. Click 'Edit' next to the 'Site Configuration' panel.3. Select a space from the 'Site Homepage' dropdown menu. When users log in, Confluence will open
the home page of the space you choose here.4. Ensure that the 'View Space Goes to Browse Space' option is set to 'Off' if you want users to be sent
to the space home page and not the space summary page.5. Click the 'Save' button at the bottom of the screen.
The spaces available to be set as your home page will depend on the access permissions of the spaceand the site.
• If your site allows anonymous access, the site home page must also be anonymously accessible.• The site home page must be accessible to the 'confluence-users' group.
Screenshot : Configuring the site homepage
RELATED TOPICS
Configuring the Server Base URL
Configuring the Site Homepage
Customising Default Space Content
Editing the Global Logo
Editing the Site Title

Document generated by Confluence on Jan 01, 2008 18:35 Page 76
Customising Default Space Content
This page last changed on Dec 16, 2007 by smaddox.
Confluence Administrators can define default content for a space home page. This content will appear onthe home page whenever someone adds a new space. You can define different content for global spacesand for personal spaces.
Notes:
• The default content will appear only for new spaces created after you have defined the content.Content in existing home pages will not be changed.
• Confluence will replace the text '{0}' with the space name.
To define default content for home pages in global spaces,
1. Go to the 'Administration Console' and click 'Default Space Content' under 'Configuration' in the leftpanel.
2. The 'Space Home Pages' tab will open on the 'Default Space Content' page. Enter the content whichyou want to appear on the home page for new global spaces.
3. Click the 'Save' button.
To define default content for home pages in personal spaces,
1. Go to the 'Administration Console' and click 'Default Space Content' under 'Configuration' in the leftpanel.
2. The 'Space Home Pages' tab will open on the 'Default Space Content' page. Click the 'Personal SpaceHome Pages' tab.
3. Enter the content which you want to appear on the home page for new personal spaces.4. Click the 'Save' button.
To undo your most recent changes,
1. Go to the 'Administration Console' and click 'Default Space Content' under 'Configuration' in the leftpanel.
2. Select either the 'Space Home Pages' tab or the 'Personal Space Home Pages' tab, as required.3. Click the 'Revert' button.
Screenshot : Defining default space content

Document generated by Confluence on Jan 01, 2008 18:35 Page 77
RELATED TOPICS
Configuring the Server Base URL
Configuring the Site Homepage
Customising Default Space Content
Editing the Global Logo
Editing the Site Title

Document generated by Confluence on Jan 01, 2008 18:35 Page 78
Editing the Global Logo
This page last changed on Jun 24, 2007 by smaddox.
By default, the global logo appears beside the page title on all pages in the site. You can disable the logoor replace it with one of your own.
To edit the global logo,
1. From the 'Administration Console' click on 'Global logo' under the heading 'Look and Feel' in the leftpanel.
2. In the screen displayed, select 'Off' to disable logo.3. To upload a new logo, click 'Browse' to select a new image and click 'Upload Logo'.
RELATED TOPICS
Configuring the Server Base URL
Configuring the Site Homepage
Customising Default Space Content
Editing the Global Logo
Editing the Site Title

Document generated by Confluence on Jan 01, 2008 18:35 Page 79
Editing the Site Title
This page last changed on Jun 24, 2007 by smaddox.
The site title appears in your browser's title bar. By default, it is set to 'Confluence'.
To change the title of your Confluence instance,
1. Go to the 'Administration Console' and click on 'General Configuration' in the left panel.2. Click 'Edit' at the bottom of the 'Options and Settings' screen.3. Enter a new title for your site in the input field beside 'Site Title' and 'Save'.
RELATED TOPICS
Configuring the Server Base URL
Configuring the Site Homepage
Customising Default Space Content
Editing the Global Logo
Editing the Site Title

Document generated by Confluence on Jan 01, 2008 18:35 Page 80
Editing the Site Welcome Message
This page last changed on Oct 21, 2007 by [email protected].
The site welcome message appears on the Dashboard. It can be used to provide users with anintroduction to the site, or as a "message of the day".
To edit the site welcome message,
1. Go to the 'Administration Console' and click on 'General Configuration' in the left panel.2. Click 'Edit' at the bottom of the 'Options and Settings' screen..3. In the text-entry box beside 'Site Welcome Message' enter your text using regular Confluence
markup.4. 'Save' your changes.
RELATED TOPICS
Configuring the Server Base URL
Configuring the Site Homepage
Customising Default Space Content
Editing the Global Logo
Editing the Site Title

Document generated by Confluence on Jan 01, 2008 18:35 Page 81
View Space Goes to Browse Space
This page last changed on Jun 24, 2007 by smaddox.
By default, when you click on a space link, you are taken to the space's homepage. If you wish, youcan configure Confluence to redirect all space links on the site to the 'Browse Space' view of the spaceinstead.
To direct the space link to the 'browse space' view,
1. Go to the 'Administration Console' click on 'General Configuration' in the left panel.2. Click 'Edit' at the bottom of the 'Options and Settings' screen. .3. Select 'ON' beside 'View Space goes to Browse Space' and click 'Save'.
RELATED TOPICS
Configuring the Server Base URL
Configuring the Site Homepage
Customising Default Space Content
Editing the Global Logo
Editing the Site Title
Document generated by Confluence on Jan 01, 2008 18:35 Page 82
Configuring Encoding
This page last changed on Apr 09, 2007 by mjensen.
Confluence allows the configuration of which character encoding is used to deliver pages.
While different character encodings are supported, we strongly recommend that UTF-8 isused. Confluence is heavily tested on UTF-8, and users are likely to have less problemswith this encoding than others.
Mac UsersMac Users please note that MacRoman encoding is compatible with UTF-8. You do not needto change your encoding settings if you are already using MacRoman.
To avoid problems with character encoding, make sure the encoding used across the differentcomponents of your system are the same:
• Configuring Database Character Encoding• Application Server URL encoding• Confluence Character Encoding
If you are having problems with the character encoding in Confluence, please see the TroubleshootingCharacter Encodings page.

Document generated by Confluence on Jan 01, 2008 18:35 Page 83
Troubleshooting Character Encodings
This page last changed on Jul 18, 2007 by [email protected] users may have problems with certain characters in a Confluence instance. Symptoms may include:
• Non-ASCII characters appearing as question marks (?)• Page links with non-ASCII characters not working• Single characters being displayed as two characters• Garbled text appearing
In most cases, it is due to a mis-configuration in one of the components that Confluence uses.
Follow these steps to diagnose the problem:
1. Run the encoding test
Confluence includes an encoding test that can reveal problems with your configuration.
To perform the test, view the /admin/encodingtest.action page on your Confluence instance. You willbe required to copy and paste a line of text and submit a form. The test will take the text and pass itthrough Confluence, the application server and the database, and return the results.
Example:
http://confluence.atlassian.com/admin/encodingtest.action
If the text displayed in the encoding test is different to what was entered, then there areproblems with your character encoding settings.
A successful test looks like the following:
MySQL 3.x

Document generated by Confluence on Jan 01, 2008 18:35 Page 84
MySQL 3.x is known to have some problems with the upper- and lower-casing of somecharacters, and may fail the last two tests. For more information, see MySQL 3.x CharacterEncoding Problems.
2. Ensure the same encoding is used across all components
As mentioned in the Configuring Encoding document, the same character encoding should be used acrossthe database, application server and web application (Confluence).
• To change the character encoding used in Confluence, see Configuring Character Encoding.• To change the character encoding used in the application server, please ensure you set the
Application Server URL encoding and view your application server's documentation on any othersettings required to enable your encoding.
• To change the character encoding used in the database, see Configuring Database CharacterEncoding.
3. Requesting support
If there are still problems with character encoding after following the above steps, create a supportrequest, and our support staff will aid in solving your problem.
Entering in the following details will help us to identify your problem:
• Attach screenshots of the problem• Attach the results of the encoding test (above)• Select which application server (and version) you are using• Select which database (and version) you are using• Copy the contents of the System Information page into the 'Description' field

Document generated by Confluence on Jan 01, 2008 18:35 Page 85
"€" Euro character
This page last changed on Sep 17, 2006 by cmiller.
The € (euro) symbol is a three byte character, with byte values in file (UTF-8) of 0xE2, 0x82, 0xAC.
Sometimes, if the character encoding is not set consistently among all participating entities of thesystem, Confluence, server and the database, one may experience strange behaviour.
...I write a page with a Euro sign in it (€). All is well, the Euro sign shows up in the wiki markuptext-box, and the preview, and the display of the saved page.One day later, the Euro sign has changed into a question mark upside down!...What is going on? Why does the Euro sign mysteriously change? How do I prevent it?
Interestingly enough the character encoding test passes with no problems, demonstrating thatConfluence and the connected Database both recognise the € symbol.
There are two potential reasons for this behaviour:
Database and Confluence is using utf-8 encoding. The connection is not.
When data transferred to it via the connection which does not use utf-8 encoding gets encodedincorrectly. Hence, updating the connection encoding may resolve this problem from now on, yet itprobably would not affect already existing data.
Database is not using utf-8. Confluence and your connection are.
If your Database encoding is not set to UTF-8, yet is using some other encoding such as latin1, it couldbe one of the potential reasons why you lose the "€" characters at some stage. It could be occurringdue to caching. When Confluence saves data to the database, it may also keep a local cached copy.If the database encoding is set incorrectly, the Euro character may not be correctly recorded in thedatabase, but Confluence will continue to use its cached copy of that data (which is encoded correctly).The encoding error will only be noticed when the cache expires, and the incorrectly encoded data isfetched from the database.
For instance the latin1 encoding would store and display all 2-byte UTF8 characters correctly except forthe euro character which is replaced by '?' before being stored. As Confluence's encoding was set toUTF-8, the 2-byte UTF-8 characters were stored in latin1 database assuming that they were two latin1different characters, instead of one utf8 character. Nevertheless, this is not the case for 3-byte utf8characters, such as the Euro symbol.
Please ensure that you set the character encoding to UTF-8 for all the entities of your system as advisedin this guide.

Document generated by Confluence on Jan 01, 2008 18:35 Page 86
MySQL 3.x Character Encoding Problems
This page last changed on Mar 21, 2006 by [email protected].
MySQL 3.x is known to have some problems upper- and lower-casing certain (non-ASCII) characters.
Diagnosing the problem
1. Follow the instructions for Troubleshooting Character Encodings.2. If the upper- and lower-cased strings displayed on the Encoding Test are different, then your
database is probably affected.
An example (faulty) output of the Encoding Test is shown below:
Solution
Upgrade to a newer version of MySQL. (4.1 is confirmed to work.)

Document generated by Confluence on Jan 01, 2008 18:35 Page 87
Configuring Mail
This page last changed on Feb 02, 2006 by vidya.
• Configuring a Server for Outgoing Mail• Enabling the 'Mail Page' plugin• The Mail Queue

Document generated by Confluence on Jan 01, 2008 18:35 Page 88
Configuring a Server for Outgoing Mail
This page last changed on Dec 17, 2007 by smaddox.
Configuring your Confluence server to send outgoing mail allows your Confluence users to:
• receive Daily Reports• send a page via email
You need to have System Administrator permissions in order to perform this function.
To configure Confluence Standalone to send outgoing mail,
1. Go to the 'Administration Console' and click 'Mail Servers' under 'Configuration' in the left panel. Thiswill list all currently configured SMTP servers.
2. Click 'Add New SMTP Server' (or edit an existing server).• Name: By default, this is set to 'SMTP Server'.• From: Enter the email address that will be displayed in the 'from' field for email messages
originating from this server.• Subject Prefix: Enter a subject prefix, if required.
3. Configuring the Host Address, Username and Password:• Manually enter your 'Host Address', 'Username' and 'Password' details in the form fields
displayed (recommended).OR
• Specify the 'JNDI' location of a mail session configured in your application server in the formfield displayed.
Troubleshooting
If you experience problems with these configurations, please check that your <Confluence-Install>/confluence/WEB-INF/lib contains only one copy of the following JAR files:
1. javamail-x.x.x.jar2. activation-x.x.x.jar3. mail-x.x.x.jar
Ideally, these should be:
• javamail-1.3.2.jar• activation-1.0.2.jar• mail-1.3.2.jar (or later)
You will then need to move these into the proper directory:
Standalone Version: Please move the above three jar files from the confluence/WEB-INF/lib directoryto the common/lib directory and restart Confluence.
RELATED TOPICS
Configuring a Server for Outgoing Mail
Enabling the 'Mail Page' plugin
The Mail Queue

Document generated by Confluence on Jan 01, 2008 18:35 Page 89
Enabling the 'Mail Page' plugin
This page last changed on Dec 17, 2007 by smaddox.
The 'Mail Page' plugin allows anyone with the 'View' space permission to email a Confluence page.
Confluence versions 2.4 and later come with the 'Mail Page' plugin preinstalled.
The 'Mail Page' plugin is disabled by default. This is because, when someone emails a Confluence page,they can select from a list of all Confluence users and groups (note, however, that email addressesare not visible), or even mail the page to arbitrary addresses. If you have enabled anonymous accessor self-signup, visitors could potentially use this feature to send spam or nuisance email through yourConfluence server.
This plugin only works when the mail server is configured.
You need to have System Administrator permissions in order to perform this function.
To enable the 'Mail Page' plugin,
1. Go to the 'Administration Console' and click 'Plugins' under 'Configuration' in the left-hand panel.2. This will list all plugins that are currently installed in your Confluence system. Click 'Mail Page
Plugin'.3. This will display the 'Mail Page Plugin' details. To enable the 'Mail Page' plugin, click 'Enable plugin'.4. Ensure that both of the following are enabled:
• 'Mail Page Link' — displays the 'E-mail' link next to the 'Copy' link on the 'Page Info' screen(see 'E-mailing a page')
• 'mailpageactions' — enables the e-mail operation.
RELATED TOPICS
Configuring a Server for Outgoing Mail
Enabling the 'Mail Page' plugin
The Mail Queue

Document generated by Confluence on Jan 01, 2008 18:35 Page 90
The Mail Queue
This page last changed on Dec 17, 2007 by smaddox.
Email messages waiting to be sent out are queued in a mail queue and periodically flushed fromConfluence once a minute. A Confluence administrator can also manually flush emails from the mailqueue.
If there is an error sending messages, the failed emails are sent to an error queue from which you caneither try to resend them or delete them.
To view the mail queue,
1. Go to the 'Administration Console' and click 'Mail Queue' in the left-hand panel. This will display theemails currently in the queue.
2. Click 'Flush Mail Queue' to send all emails immediately.3. Click 'Error Queue' to view failed email messages. You can try to 'Resend' the messages, which will
flush the mails back to the 'Mail Queue' or 'Delete' them from here.
RELATED TOPICS
Configuring a Server for Outgoing Mail
Enabling the 'Mail Page' plugin
The Mail Queue
RELATED TOPICS

Document generated by Confluence on Jan 01, 2008 18:35 Page 91
Confluence and JIRA
This page last changed on Dec 04, 2007 by smaddox.
• Add Confluence EAR-WAR to JIRA Standalone• Integrating JIRA and Confluence• Override properties in JIRA to Confluence Bridge• Setting Up Trusted Communication between JIRA and Confluence
RELATED TOPICS
• Configuring Jira Issues Icon mappings• JIRA Issues Macro• JIRA Portlet Macro

Document generated by Confluence on Jan 01, 2008 18:35 Page 92
Add Confluence EAR-WAR to JIRA Standalone
This page last changed on Mar 16, 2007 by [email protected].
This document will assist you in adding Confluence to your existing JIRA Standalone.
Step 0 - Consider alternatives
This guide is for experts only. If you run into any difficulties with this process, Atlassian technicalsupport may provide limited assistance outside of helping users switch to running Confluence Standaloneseparately.
Before embarking on this process, consider whether you could not rather run JIRA and Confluence inseparate Tomcat instances running behind an Apache frontend server (see guides for Confluence andJIRA). There are some benefits to keeping them separate:
• Each app can be restarted without affecting the other.• If one webapp hangs for any reason (eg. running out of memory), it doesn't affect the other.• Any problems can be debugged more easily. Logs are separate and product-specific, rather than
everything going to catalina.out. Thread and heap dumps are smaller and more relevant.• It reduces the likelihood of jar conflicts (eg. jars that must be installed in common/lib), particularly
if you later want to install a third webapp not from Atlassian.
Offsetting this is the extra complexity of having to run Apache.
If you wish to proceed, please follow these instructions:
Step 1 - Download and extract WAR
1. Download the Confluence WAR file2. Extract the downloaded zip file. It should extract to a folder called confluence-<version>. Inside this
folder you'll find a folder called "confluence". Make a note of the absolute path to this directory (asyou will need to use it later). Note: Do not copy the confluence folder to the webapps folder insidetomcat - this may cause Confluence to be deployed more than once.
Step 2 - Configure confluence-init.properties
1. Open confluence/WEB-INF/classes/confluence-init.properties in a text editor2. Set the confluence.home property to a directory of your choosing. This is the directory that will
contain all of Confluence's configuration, backup and attachment files.
Step 3 - Edit tomcat context descriptors
If you are deploying to JIRA version 3.3 or higher:
1. Create a file called confluence.xml in your JIRA standalone's conf/Catalina/localhost directory (ifyou have set up a different hostname for your JIRA tomcat instance, please specify that instead oflocalhost)
2. Open confluence.xml and add these lines:
<Context path="/confluence" docBase="c:/applications/confluence-2.1.3/confluence"debug="0" reloadable="true"> <Logger className="org.apache.catalina.logger.FileLogger"prefix="atlassian-confluence." suffix=".log" timestamp="true"/> </Context>
3. For docBase specify the value you noted down earlier. This is the full path to the confluencefolder in your confluence-<version> installation folder, not the confluence home folder. It shouldlook like: c:/<path to confluence installation>/confluence-<version>/confluence.
Otherwise (for older versions of JIRA):
1. Open conf/server.xml in a text editor2. Find the block that begins: <Context path="" docBase="../atlassian-jira" debug="0"
reloadable="true"> and ends with </Context> block.3. After the </Context>, append the following:

Document generated by Confluence on Jan 01, 2008 18:35 Page 93
<Context path="/confluence" docBase="c:/applications/confluence-2.1.3/confluence"debug="0" reloadable="true"> <Logger className="org.apache.catalina.logger.FileLogger"prefix="atlassian-confluence." suffix=".log" timestamp="true"/> </Context>
4. For docBase specify the value you noted down earlier. This is the full path to the confluencefolder in your confluence-<version> installation folder, not the confluence home folder. It shouldlook like: c:/<path to confluence installation>/confluence-<version>/confluence.
5. Remove the commons-logging-1.0.4.jar file from the confluence\WEB-INF\lib directory
Do not delete the existing Jira <Context> block. Insert the code above after the Jira <Context> block.
Step 4 - Modify your setenv.sh/bat (ONLY IF YOU ARE RUNNING A SUN MICROSYSTEMSJVM)
1. Open JIRA's bin/setenv.sh/bat (.sh on unix, .bat on windows) in a text editor.2. Find the line that says: "... JAVA_OPTS=... " and add -XX:MaxPermSize=128m to its end.
The Java Virtual Machine sets aside a portion of memory as the "permanent space", for objects that itnever expects to have to garbage-collect. Because JIRA and Confluence are both quite large applications,it is possible that this permanent space will be filled up. Increasing the application heap size will not help,because the permanent generation size is a separate setting.
This flag is only supported on JVM's created by Sun Microsystems. If you include this flagwhile running another vendors JVM (such as JRocket, or IBM's JVM) they will not start.
Step 5 - Restart the Server
1. Shut down, and then restart the standalone server2. Confluence should now be accessible on the same server as your existing JIRA standalone, under
the confluence directory.For example, if your JIRA is running at http://jira.example.org:8080/, Confluence will be running onhttp://jira.example.org:8080/confluencereuse
When setting up the Confluence database do not reuse the JIRA database. Create a new database forConfluence.
Troubleshooting
When I try to send a test mail from Confluence, I get javax.mail.NoSuchProviderException: smtp
In some circumstances, Confluence will be unable to send email after being deployed in the sameapplication-server as JIRA. If, when you try to send a test mail from the administration tool, you get theerror: "javax.mail.NoSuchProviderException: smtp", please follow these instructions to fix it.
I have installed JIRA and Confluence in some other application server than Tomcat
These instructions only apply to the standalone Tomcat version of JIRA. Other application servers havenot been tested in this configuration, and users have specifically reported difficulties deploying the twoapplications together in Orion Server and JBoss. We hope to resolve these issues soon.
Confluence is slow, and dumps enormous amounts of information to its logfiles
If you are seeing a large amount of DEBUG logging output, then ensure that you have removed thecommons-logging-1.0.4.jar file from the confluence\WEB-INF\lib directory
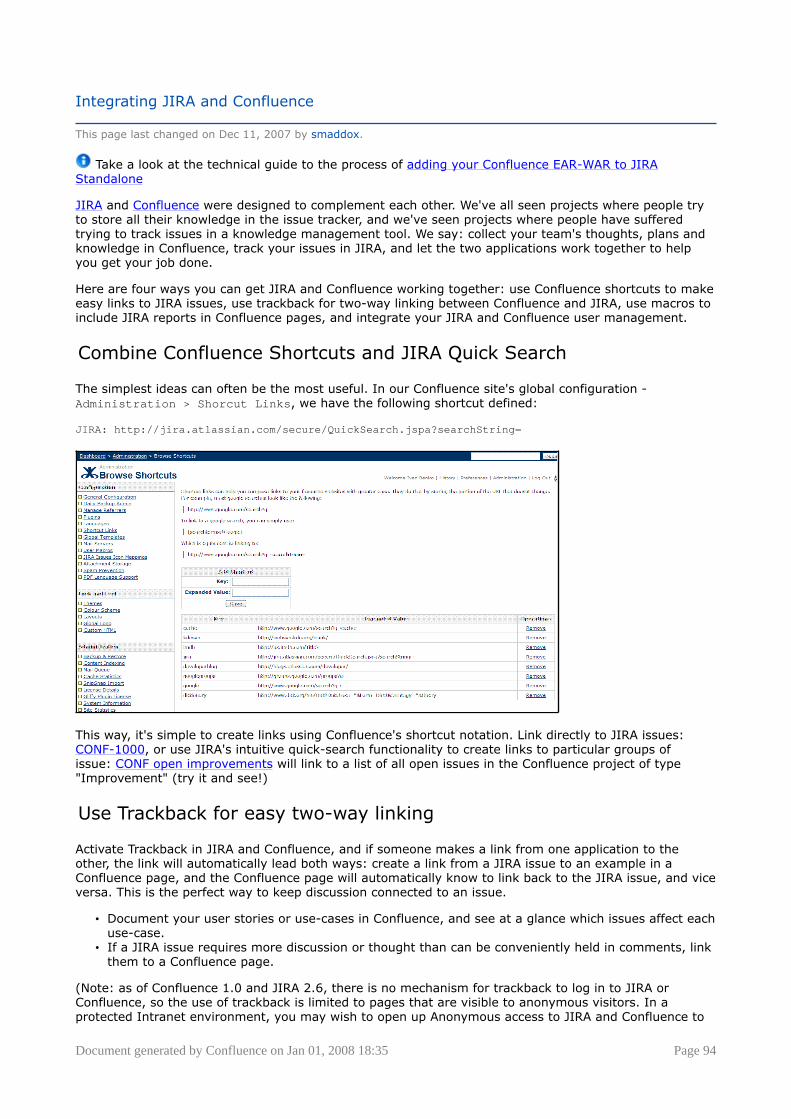
Document generated by Confluence on Jan 01, 2008 18:35 Page 94
Integrating JIRA and Confluence
This page last changed on Dec 11, 2007 by smaddox.
Take a look at the technical guide to the process of adding your Confluence EAR-WAR to JIRAStandalone
JIRA and Confluence were designed to complement each other. We've all seen projects where people tryto store all their knowledge in the issue tracker, and we've seen projects where people have sufferedtrying to track issues in a knowledge management tool. We say: collect your team's thoughts, plans andknowledge in Confluence, track your issues in JIRA, and let the two applications work together to helpyou get your job done.
Here are four ways you can get JIRA and Confluence working together: use Confluence shortcuts to makeeasy links to JIRA issues, use trackback for two-way linking between Confluence and JIRA, use macros toinclude JIRA reports in Confluence pages, and integrate your JIRA and Confluence user management.
Combine Confluence Shortcuts and JIRA Quick Search
The simplest ideas can often be the most useful. In our Confluence site's global configuration -Administration > Shorcut Links, we have the following shortcut defined:
JIRA: http://jira.atlassian.com/secure/QuickSearch.jspa?searchString=
This way, it's simple to create links using Confluence's shortcut notation. Link directly to JIRA issues:CONF-1000, or use JIRA's intuitive quick-search functionality to create links to particular groups ofissue: CONF open improvements will link to a list of all open issues in the Confluence project of type"Improvement" (try it and see!)
Use Trackback for easy two-way linking
Activate Trackback in JIRA and Confluence, and if someone makes a link from one application to theother, the link will automatically lead both ways: create a link from a JIRA issue to an example in aConfluence page, and the Confluence page will automatically know to link back to the JIRA issue, and viceversa. This is the perfect way to keep discussion connected to an issue.
• Document your user stories or use-cases in Confluence, and see at a glance which issues affect eachuse-case.
• If a JIRA issue requires more discussion or thought than can be conveniently held in comments, linkthem to a Confluence page.
(Note: as of Confluence 1.0 and JIRA 2.6, there is no mechanism for trackback to log in to JIRA orConfluence, so the use of trackback is limited to pages that are visible to anonymous visitors. In aprotected Intranet environment, you may wish to open up Anonymous access to JIRA and Confluence to

Document generated by Confluence on Jan 01, 2008 18:35 Page 95
allow trackback to take place. Future revisions of the applications will give you the opportunity to allowConfluence to "log in" to JIRA and vice versa, avoiding this limitation)
Use the {jiraissues} and {jiraportlet} macros to embed JIRA reportsand portlets into your Confluence site
Any JIRA search-result can be embedded in a Confluence page using the {jiraissues} macro with yourchoice of included fields and field ordering, and any JIRA dashboard portlet can be embedded in aConfluence page using the {jiraportlet} macro.
This way you can incorporate information from JIRA into the normal flow of your knowledgemanagement. Combined with other macros like {junitreport}, {rss} and {html-include} and the FatCowsuite, you can create dashboards in Confluence consolidating information from across your project, withConfluence and JIRA at the centre.
For Confluence 2.7.0 and later, an administrator can configure JIRA (3.12.0 or later) and Confluence tocommunicate in a trusted way, so that Confluence can request information from JIRA on behalf of thecurrently logged-in user. JIRA will not ask the user to log in again or to supply a password.
Trusted communication is used when embedding information from one application (e.g. a list of JIRAissues) into another application (e.g. a Confluence page).
Read more about trusted communication.
Link to Confluence pages from JIRA issues
While it is possible to simply paste links to Confluence pages into text fields of an issue (e.g.descriptions), the JIRA Linker Plugin provides a custom field that helps you find the correct page.
Integrate JIRA and Confluence user-management
To save you having to enter users into both JIRA and Confluence, you may benefit from using AtlassianCrowd as the user-repository for both applications.
Alternatively you can configure Confluence to use JIRA's user database (this requires that you are usingJIRA with an external database; it will not work if you are using JIRA with an embedded HSQL database).
And much more coming...
When you buy a license for JIRA or Confluence, you are automatically entitled to a year of updates. Welisten to our customers needs, and having our products complement and work well with each other isvery important to us. So if there is any way you think Confluence and JIRA could be made to work better,suggest it in our discussion space, and it may very well end up in a future version.
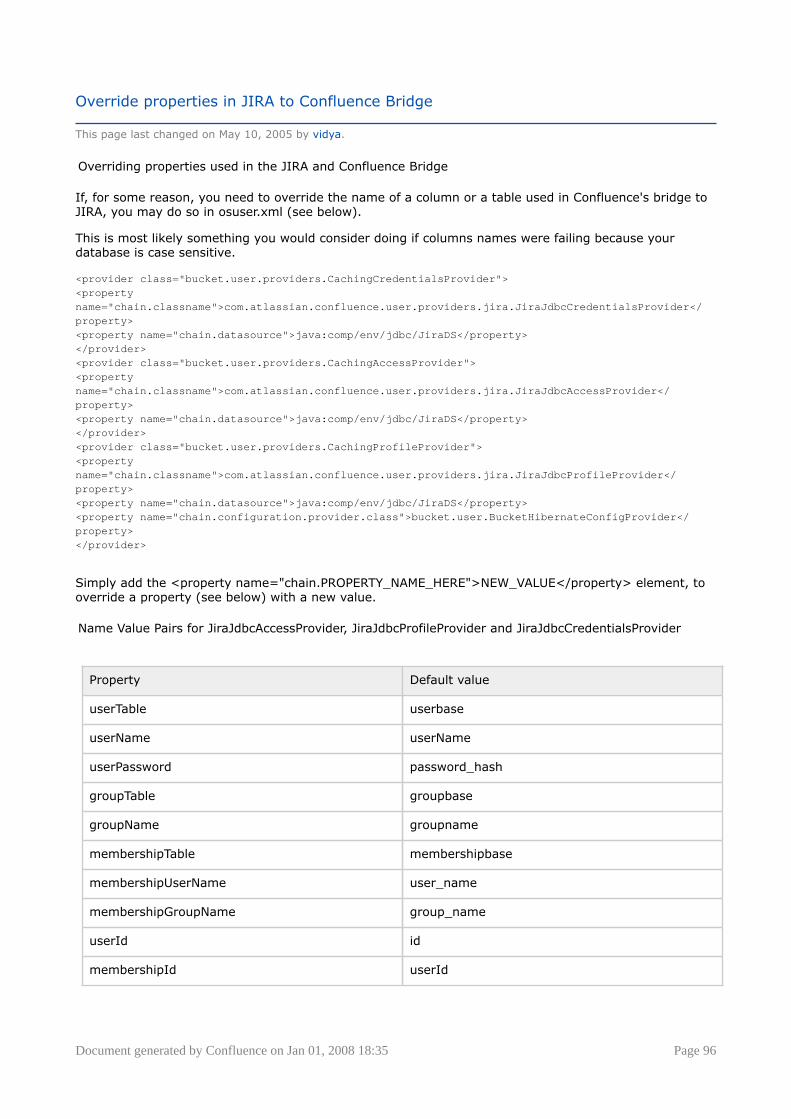
Document generated by Confluence on Jan 01, 2008 18:35 Page 96
Override properties in JIRA to Confluence Bridge
This page last changed on May 10, 2005 by vidya.
Overriding properties used in the JIRA and Confluence Bridge
If, for some reason, you need to override the name of a column or a table used in Confluence's bridge toJIRA, you may do so in osuser.xml (see below).
This is most likely something you would consider doing if columns names were failing because yourdatabase is case sensitive.
<provider class="bucket.user.providers.CachingCredentialsProvider"><propertyname="chain.classname">com.atlassian.confluence.user.providers.jira.JiraJdbcCredentialsProvider</property><property name="chain.datasource">java:comp/env/jdbc/JiraDS</property></provider><provider class="bucket.user.providers.CachingAccessProvider"><propertyname="chain.classname">com.atlassian.confluence.user.providers.jira.JiraJdbcAccessProvider</property><property name="chain.datasource">java:comp/env/jdbc/JiraDS</property></provider><provider class="bucket.user.providers.CachingProfileProvider"><propertyname="chain.classname">com.atlassian.confluence.user.providers.jira.JiraJdbcProfileProvider</property><property name="chain.datasource">java:comp/env/jdbc/JiraDS</property><property name="chain.configuration.provider.class">bucket.user.BucketHibernateConfigProvider</property></provider>
Simply add the <property name="chain.PROPERTY_NAME_HERE">NEW_VALUE</property> element, tooverride a property (see below) with a new value.
Name Value Pairs for JiraJdbcAccessProvider, JiraJdbcProfileProvider and JiraJdbcCredentialsProvider
Property Default value
userTable userbase
userName userName
userPassword password_hash
groupTable groupbase
groupName groupname
membershipTable membershipbase
membershipUserName user_name
membershipGroupName group_name
userId id
membershipId userId

Document generated by Confluence on Jan 01, 2008 18:35 Page 97
Setting Up Trusted Communication between JIRA and Confluence
This page last changed on Dec 11, 2007 by smaddox.
An administrator can configure JIRA and Confluence to communicate in a trusted way, so that Confluencecan request information from JIRA on behalf of the currently logged-in user. JIRA will not ask the user tolog in again or to supply a password.
When JIRA is configured to trust Confluence in this way, we call Confluence the 'trusted application' andJIRA the 'trusting application'.
Trusted communication is used when embedding information from one application (e.g. a list of JIRAissues) into another application (e.g. a Confluence page). Currently only JIRA can be configured to trustConfluence, and only the following two macros have been enhanced to use trusted communication:
• JIRA Issues macro• JIRA Portlet macro
Further implementations will follow, especially as we roll out the tight integration required betweenAtlassian products for JIRA Studio.
Potential security risk
Do not configure a trusted application unless you trust all code in that application to behaveitself at all times. Trusted communication uses public/private key cryptography to establishthe identity of the trusted server, so you must also be sure that the trusted application willmaintain the security of its private key. Read the details of the security risks below.
On this page:
• Prerequisites• Why do we need Trusted Communication?• Overview• Configuring JIRA to Trust Confluence• Configuring the Macro Plugin in Confluence• Adding the Macro to a Confluence Page• Viewing the Confluence Page• Security Risks• Troubleshooting• Technical Overview of the Trusted Applications Authentication (TAA) Protocol
Prerequisites
• JIRA 3.12.0 or later.• Confluence 2.7.0 or later.• In order to authenticate successfully against JIRA, the Confluence user must also be registered as a
JIRA user with the same username.
Common user base recommended
It is highly recommended that your JIRA and Confluence instances share a commonuser base, rather than two separate user bases with duplicated usernames. You willreceive an error if Confluence passes JIRA a username which JIRA cannot recognise. Also,with separate user bases you run the risk that the same username may be used by twodifferent people. The trusted application does not supply the user's password, so thetrusting application will assume the username belongs to the user registered in the trustingapplication's own user base.
Tip: Try Atlassian Crowd for a tidy user management solution.

Document generated by Confluence on Jan 01, 2008 18:35 Page 98
Why do we need Trusted Communication?
The JIRA Issues and the JIRA Portlet macros allow you to embed a list of JIRA issues into a Confluencepage. Prior to Confluence 2.7, if you wanted to display JIRA issues that had restricted viewing, then youneeded to store the JIRA user's credentials (username and password) in the macro code directly on theConfluence page. This was not very secure.
The reasons we require the user credentials are:
• Your JIRA instance might not be public, and you might not want to allow anonymous access to yourissues.
• You might have security restrictions on some of your issues. So you don't want to allow someone toleak data from your JIRA project by using the JIRA Issues Macro on a Confluence page.
Overview
Here is a summary of the integration points in a trusted communications relationship. Each of thefollowing points is described in more detail in the sections below.
• A JIRA System Administrator configures JIRA to trust Confluence.• A Confluence System Administrator configures the macro plugin to use (or not use) trusted
communication.• A Confluence user adds one of the macros to a Confluence page.• A Confluence user or anonymous user views the Confluence page.
Configuring JIRA to Trust Confluence
Trust only has to be established once between the two applications. Once trust has been established, it isentirely transparent to the Confluence users.
Using the JIRA Administration Console, the JIRA System Administrator defines Confluence as a trustedapplication by specifying the Confluence instance's URL and other information. Refer to the JIRAdocumentation for details.
Configuring the Macro Plugin in Confluence
By default, Confluence ships with trusted communication enabled for the following macros:
• JIRA Issues macro• JIRA Portlet macro
A Confluence System Administrator can decide on the level of trusted communication used by themacros. The different levels are:
• Ignore trusted communications altogether. Trusted communication is turned off at the global level.• Perform trusted communications whenever the macro is used on a Confluence page, but do not
show certain warning messages.• Perform trusted communications whenever the macro is used on a Confluence page, and show all
warning messages. This is the default configuration.
To change the default trusted communication level for the JIRA Macros plugin,
1. Go to the 'Administration Console' in Confluence and click 'Plugins' in the left-hand panel.2. The 'Plugin Manager' screen appears, showing a list of installed plugins. Scroll down and click the
'JIRA Macros' link.3. The 'JIRA Macros' panel appears in the top middle of the screen, as shown below. Click 'Enable' or
'Disable' next to the following options:
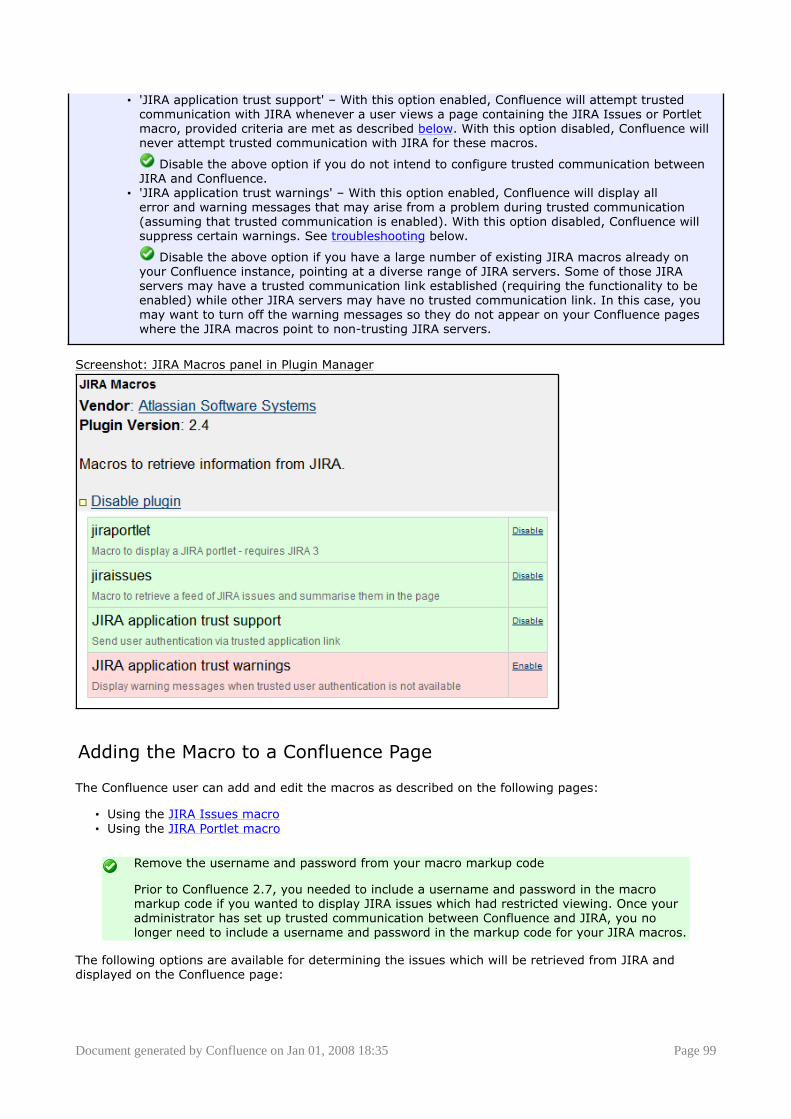
Document generated by Confluence on Jan 01, 2008 18:35 Page 99
• 'JIRA application trust support' – With this option enabled, Confluence will attempt trustedcommunication with JIRA whenever a user views a page containing the JIRA Issues or Portletmacro, provided criteria are met as described below. With this option disabled, Confluence willnever attempt trusted communication with JIRA for these macros.
Disable the above option if you do not intend to configure trusted communication betweenJIRA and Confluence.
• 'JIRA application trust warnings' – With this option enabled, Confluence will display allerror and warning messages that may arise from a problem during trusted communication(assuming that trusted communication is enabled). With this option disabled, Confluence willsuppress certain warnings. See troubleshooting below.
Disable the above option if you have a large number of existing JIRA macros already onyour Confluence instance, pointing at a diverse range of JIRA servers. Some of those JIRAservers may have a trusted communication link established (requiring the functionality to beenabled) while other JIRA servers may have no trusted communication link. In this case, youmay want to turn off the warning messages so they do not appear on your Confluence pageswhere the JIRA macros point to non-trusting JIRA servers.
Screenshot: JIRA Macros panel in Plugin Manager
Adding the Macro to a Confluence Page
The Confluence user can add and edit the macros as described on the following pages:
• Using the JIRA Issues macro• Using the JIRA Portlet macro
Remove the username and password from your macro markup code
Prior to Confluence 2.7, you needed to include a username and password in the macromarkup code if you wanted to display JIRA issues which had restricted viewing. Once youradministrator has set up trusted communication between Confluence and JIRA, you nolonger need to include a username and password in the markup code for your JIRA macros.
The following options are available for determining the issues which will be retrieved from JIRA anddisplayed on the Confluence page:
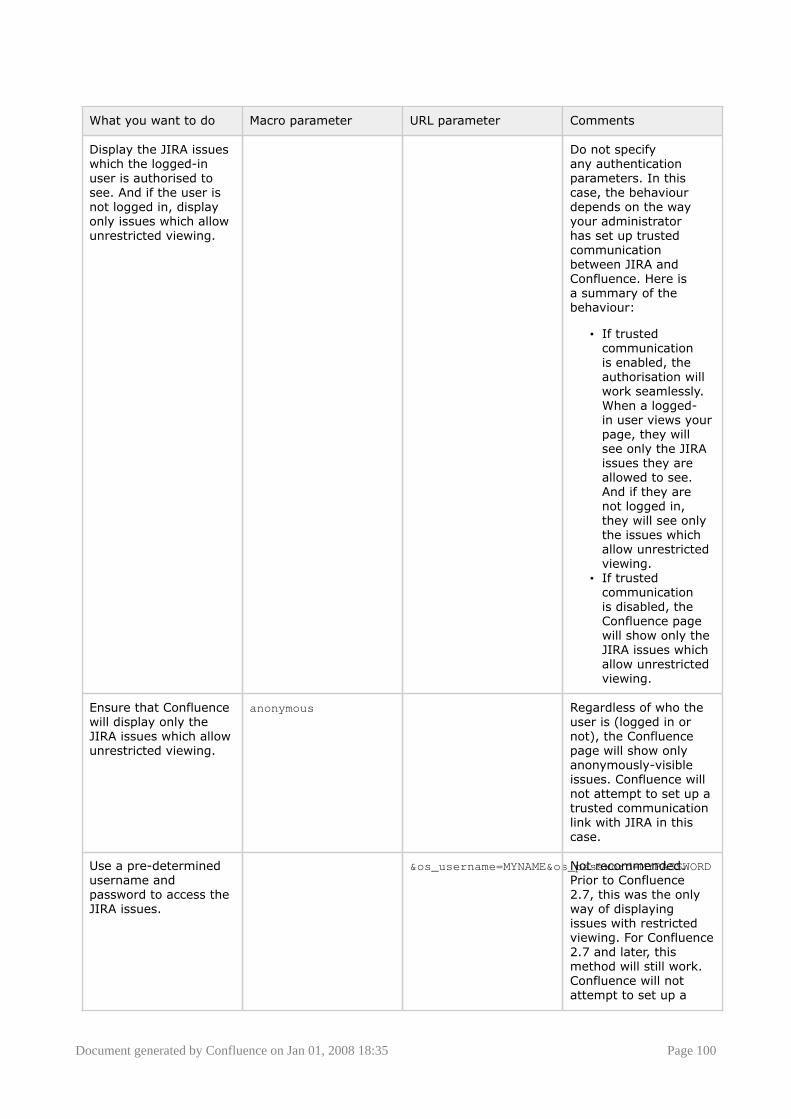
Document generated by Confluence on Jan 01, 2008 18:35 Page 100
What you want to do Macro parameter URL parameter Comments
Display the JIRA issueswhich the logged-inuser is authorised tosee. And if the user isnot logged in, displayonly issues which allowunrestricted viewing.
Do not specifyany authenticationparameters. In thiscase, the behaviourdepends on the wayyour administratorhas set up trustedcommunicationbetween JIRA andConfluence. Here isa summary of thebehaviour:
• If trustedcommunicationis enabled, theauthorisation willwork seamlessly.When a logged-in user views yourpage, they willsee only the JIRAissues they areallowed to see.And if they arenot logged in,they will see onlythe issues whichallow unrestrictedviewing.
• If trustedcommunicationis disabled, theConfluence pagewill show only theJIRA issues whichallow unrestrictedviewing.
Ensure that Confluencewill display only theJIRA issues which allowunrestricted viewing.
anonymous Regardless of who theuser is (logged in ornot), the Confluencepage will show onlyanonymously-visibleissues. Confluence willnot attempt to set up atrusted communicationlink with JIRA in thiscase.
Use a pre-determinedusername andpassword to access theJIRA issues.
&os_username=MYNAME&os_password=MYPASSWORDNot recommended.Prior to Confluence2.7, this was the onlyway of displayingissues with restrictedviewing. For Confluence2.7 and later, thismethod will still work.Confluence will notattempt to set up a
Document generated by Confluence on Jan 01, 2008 18:35 Page 101
trusted communicationlink with JIRA in thiscase.
Refer to the section below for details of what happens when a user views a Confluence page containing aJIRA macro.
Viewing the Confluence Page
When a user views a Confluence page which contains a JIRA Issues or JIRA Portlet macro, this is whathappens:
• If the macro markup contains an explicit username and password in the URL parameter, Confluencewill not request trusted communication with JIRA. Confluence will retrieve the JIRA issues which thespecified username is authorised to see. This behaviour is the same as Confluence versions prior to2.7.
• If the macro markup contains the anonymous parameter, Confluence will retrieve only theJIRA issues which allow unrestricted viewing. Confluence will not attempt to set up a trustedcommunication link with JIRA in this case.
• If the user is anonymous (not logged in), Confluence will retrieve only the JIRA issues which allowunrestricted viewing. Confluence will not attempt to set up a trusted communication link with JIRA inthis case.
• If trusted communication is disabled via the Plugin Manager in Confluence, then Confluence will notrequest trusted communication with JIRA. So if there is no explicit username and password in themarkup code, Confluence will retrieve only the JIRA issues which allow unrestricted viewing. Thisbehaviour is the same as Confluence versions prior to 2.7.
• If trusted communication is enabled via the Plugin Manager in Confluence:° If the user is logged in, then Confluence attempts trusted communication with JIRA.
Confluence sends the username to JIRA. JIRA returns a set of issues which that usernameis authorised to access, based on the JIRA user base and the JIRA groups and permissions.Confluence displays those issues on the page.
° If JIRA or Confluence encounters a problem during the trusted communication process,an error message may appear on the Confluence page above the macro output – seetroubleshooting below.
Security Risks
Please take the following considerations into account when setting up trusted communication:
• When you configure JIRA to trust an application, you are allowing the application to access JIRAin the name of a particular user. The trusted application passes JIRA the user's login name, but noother authentication information. JIRA does not request the user's password. By doing this, you arebypassing JIRA's authentication mechanism.
• Do not configure a trusted application unless you trust all code in that application to behave itself atall times.
• Trusted communication uses public/private key cryptography to establish the identity of the trustedserver. The trusted application needs to maintain the security of its private key. Confluence stores itsprivate key in the database. So you must be sure that the Confluence database is secure, and alsoany full backups of the database.
• Be aware of the risks associated with using separate user bases, as explained above. We stronglyrecommend a common user base between the trusted and trusting applications.
• When configuring an application to trust another application, you should use a trusted network orSSL to protect the sensitive information passed between the applications during the configurationprocedure. This will help to prevent man-in-the-middle attacks.
Troubleshooting
Below are the warning messages which may appear on your Confluence page, above the output of theJIRA Issues or JIRA Portlet macro.

Document generated by Confluence on Jan 01, 2008 18:35 Page 102
Warning Message Cause Solution Warning Message Canbe Turned Off?
The JIRA server doesnot recognise youruser name. Issueshave been retrievedanonymously.
The logged-inConfluence user is notregistered in the JIRAuser base.
Add the username toyour JIRA user base. Itis highly recommendedthat your JIRA andConfluence instancesshare a common userbase.
No
The JIRA serverdoes not trustthis Confluenceinstance for userauthentication.Issues havebeen retrievedanonymously.You can set themacro to alwaysuse an anonymousrequest by settingthe 'anonymous'parameter to 'true'.
Your JIRA instance hasnot been configured totrust your Confluenceinstance.
One of the followingsolutions:
• Configure JIRA totrust Confluence.
• Disable trustedcommunicationsfor the JIRAmacros inConfluence.
• Use theanonymousparameter in allyour JIRA Issuesand JIRA Portletmacros.
Yes
The JIRA server doesnot support trustrequests. Issueshave been retrievedanonymously.You can set themacro to alwaysuse an anonymousrequest by settingthe 'anonymous'parameter to 'true'.
Your JIRA instanceis not able to handletrusted communications(i.e. the JIRA version isearlier than 3.12.0).
One of the followingsolutions:
• Download thelatest version ofJIRA and thenconfigure JIRA totrust Confluence.
• Disable trustedcommunicationsfor the JIRAmacros inConfluence.
• Use theanonymousparameter in allyour JIRA Issuesand JIRA Portletmacros.
Yes
Technical Overview of the Trusted Applications Authentication (TAA)Protocol
Read this section if you want a bit more information on the technical side of things.
Atlassian has developed its own protocol to set up trust between JIRA and Confluence. Below is atechnical overview of the process.
Configuring JIRA to trust Confluence:
1. When the JIRA System Administrator provides the base URL of the Confluence instance, JIRArequests a trusted application authentication certificate from Confluence. The certificate contains
Document generated by Confluence on Jan 01, 2008 18:35 Page 103
Confluence's trusted application ID and public key (generated specifically for use with the TAAprotocol).
2. JIRA validates the certificate and asks the System Administrator for a few extra details about thetrust relationship, such as a name for the Confluence instance, timeout, allowed IP addresses andallowed request URLs.
3. JIRA stores all this information in the database.
Making a trusted request from Confluence to JIRA:
1. Confluence sends a web request to JIRA, appending additional headers to the request, including:• Timestamp (nonce) of the request + user name of the currently logged-in Confluence user,
encrypted with a symmetric key (generated on the fly).• The symmetric key, encrypted with Confluence's private key.• Confluence's application ID (as displayed when trusted communication was established).
2. JIRA attempts to decode the encrypted headers, using the stored information about the relationship.It conducts the following checks to validate the request:
• The trusted application ID refers to a valid trusted application.• The given username exists in the JIRA user base.• The agreed timeout has not expired.• The request originated from a trusted IP address.• The resource being requested matches those specified in the URL match list.
3. If any of these checks fails, a response is sent to Confluence indicating the reason for failure.Otherwise, JIRA will authenticate the specified user for the duration of the single request, andrespond with the resources (i.e. the JIRA issues).
RELATED TOPICS
JIRA Issues MacroJIRA Portlet Macro

Document generated by Confluence on Jan 01, 2008 18:35 Page 104
Confluence Security
This page last changed on Dec 17, 2007 by smaddox.
Application Security Overview
As a public-facing web application, Confluence's application-level security is obviously important. Thisdocument answers a number of questions that commonly arise when customers ask us about the securityof our product.
This document is for system administrators looking to evaluate the security of theConfluence web application. It does not address Confluence's internal security – user/group management and content permissions – except as it relates to the overall applicationsecurity.
Password Storage
When Confluence's internal user management is used, passwords are hashed through SHA1 beforebeing stored in the database. There is no mechanism within Confluence to retrieve a user's password –when password recovery is performed, a new random password is generated and mailed to the user'sregistered address.
When external user management is enabled, password storage is delegated to the external system.
Buffer Overflows
Confluence is a 100% pure Java application with no native components. As such it is highly resistant tobuffer overflow vulnerabilities – possible buffer overruns are limited to those that are bugs in the JavaRuntime Environment itself.
SQL Injection
Confluence interacts with the database through the Hibernate Object-Relational mapper. Databasequeries are generated using standard APIs for parameter replacement rather than string concatenation.As such, Confluence is highly resistant to SQL injection attacks.
Script Injection
Confluence is a self-contained Java application and does not launch external processes. As such, it ishighly resistant to script injection attacks.
Cross-site Scripting
As a content-management system that allows user-generated content to be posted on the web,precautions have been taken within the application to prevent cross-site scripting attacks:
• The wiki markup language in Confluence does not support dangerous HTML markup• Macros allowing the insertion of raw HTML are disabled by default• HTML uploaded as a file attachment is served with a content-type requesting the file be downloaded,
rather than being displayed inline• Only system administrators can make HTML-level customisations of the application
When cross-site scripting vulnerabilities are found in the Confluence web application, we endeavour to fixthem as quickly as possible.
Transport Layer Security
Confluence does not directly support SSL/TLS. Administrators who are concerned about transport-layersecurity should set up SSL/TLS at the level of the Java web application server, or the HTTP proxy in frontof the Confluence application.
For more information on configuring Confluence for SSL, see: Adding SSL for Secure Logins and PageSecurity

Document generated by Confluence on Jan 01, 2008 18:35 Page 105
Session Management
Confluence delegates session management to the Java application server in which it is deployed. We arenot aware of any viable session-hijacking attacks against the Tomcat application server shipped withConfluence Standalone. If you are deploying Confluence in some other application server, you shouldensure that it is not vulnerable to session hijacking.
Plugin Security
Administrators install third party plugins at their own risk. Plugins run in the same virtual machine as theConfluence server, and have access to the Java runtime environment, and the Confluence server API.
Administrators should always be aware of the source of the plugins they are installing, and whether theytrust those plugins.
Administrator Trust Model
Confluence is written under the assumption that anyone given System Administrator privileges is trusted.System administrators are able, either directly or by installing plugins, to perform any operation that theConfluence application is capable of.
As with any application, you should not run Confluence as the root/Administrator user. If you wantConfluence to listen on a privileged network port, you should set up port forwarding or proxying ratherthan run Confluence with additional privileges. The extra-careful may consider running Confluence insidea chroot jail.
Vulnerabilities, Advisories and Patches.
If you find a security bug in Confluence
Open an issue on http://jira.atlassian.com in the Confluence project.
• Set the priority of the bug to "Blocker"• Provide as much information on reproducing the bug as possible• Set the security level of the bug to "Developer and Reporters only"
All communication about the vulnerability should be performed through JIRA, so we can keep track of theissue and get a patch out as soon as possible.
Confluence Security Advisories
When a security issue in Confluence is discovered and resolved, we will inform customers through thefollowing mechanisms:
• A security advisory will be posted on this page• A copy of the advisory will be sent to the confluence-users and confluence-announce mailing-
lists (subscribe here). These lists are mirrored on our forums• If the person who reported the issue wants to publish an advisory through some other agency (for
example, CERT), we'll assist in the production of that advisory, and link to it from our own.
Our Patch Policy
When a security issue is discovered, we will endeavour to:
• issue a new, fixed Confluence version as soon as possible• issue a patch to the current stable version of Confluence• issue patches for older versions of Confluence if feasible
Patches will generally be attached to the relevant JIRA issue.

Document generated by Confluence on Jan 01, 2008 18:35 Page 106
Past Security Advisories
• Confluence Community Security Advisory 2006-01-19• Confluence Security Advisory 2005-02-09• Confluence Security Advisory 2005-12-05• Confluence Security Advisory 2006-01-20• Confluence Security Advisory 2006-01-23• Confluence Security Advisory 2006-06-14• Confluence Security Advisory 2007-07-26• Confluence Security Advisory 2007-08-08• Confluence Security Advisory 2007-11-19• Confluence Security Advisory 2007-11-27• Confluence Security Advisory 2007-12-14• Java Policy Security with Confluence — If you would like to secure the confluence webapp to make
sure plugins (or other code executed) cannot access unwanted system resources, the following willrestrict file system access.
• NoFollow Support
Related Server Security Pages
Adding SSL for Secure Logins and Page Security
Java Policy Security with Confluence
Click to see pages relatedto user and group permissions.
Assigning Space Permissions
Confluence Permissions Architecture
Confluence Security
Confluence Security Advisory 2006-01-23
Hiding the People Directory
How do I tell if a user has permission to...?
HTML Macro
Revoking Space Permissions
Security Overview
Space Permissions Overview

Document generated by Confluence on Jan 01, 2008 18:35 Page 107
Confluence Community Security Advisory 2006-01-19
This page last changed on Jan 20, 2006 by [email protected].
This security advisory is not endorsed by Atlassian - this is a public service advisory froma member of the confluence community. Please remember to backup any modified files,and use these instructions at your own risk. While this information is based on Confluencev2.1.2, it may have uses with older affected versions of Confluence.
The official security advisory is located at Confluence Security Advisory 2006-01-20
Problem
There is a possibility of XSS exploitation of the Full Name user profile field when displayed.
Solution
The problem was unescaped outputting of the fullname - wrapping the output in$generalUtil.htmlEncode() resolve it. The vast majority of the problem can be resolved by changing /confluence/template/includes/macros.vm in the distribution on the following lines:
• 180• 186• 200• 340• 893
I have attached the modified macros.vm file here which you can copy into your distribution.
Scope
There are other places which are still affected which Atlassian have been made aware of, a completeresolution should be provided by Atlassian in their own offical advisory.
I hope this helps some of you!
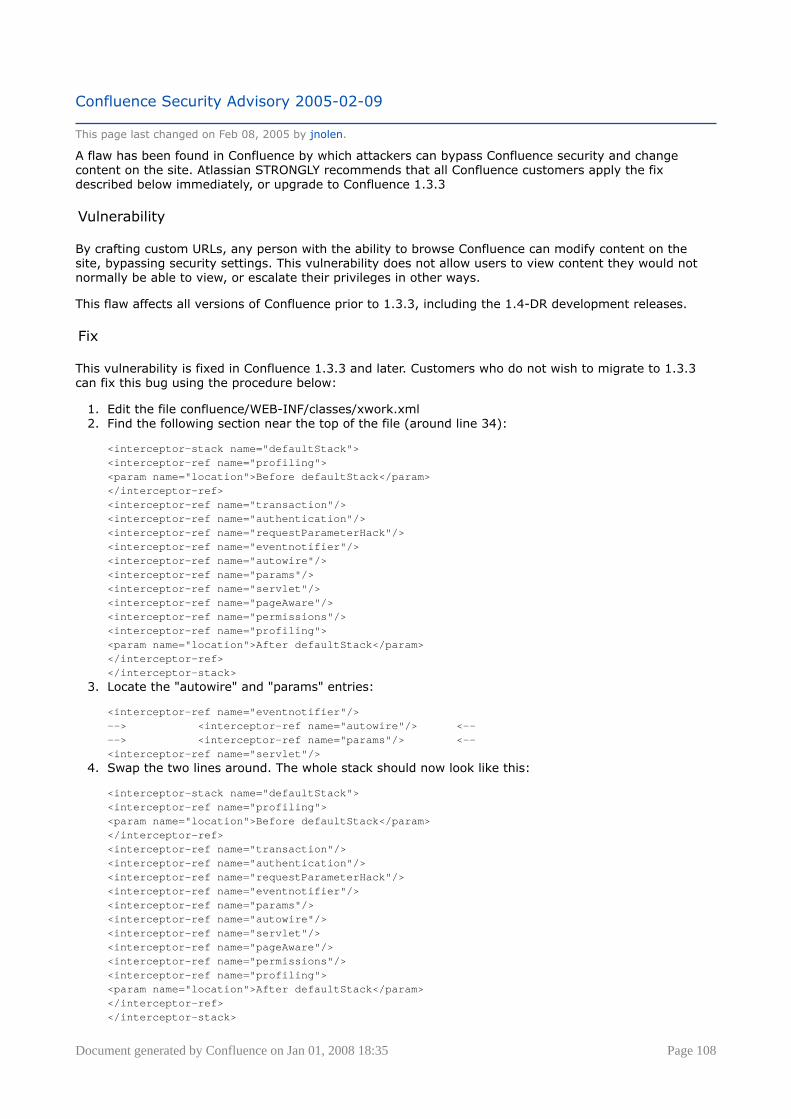
Document generated by Confluence on Jan 01, 2008 18:35 Page 108
Confluence Security Advisory 2005-02-09
This page last changed on Feb 08, 2005 by jnolen.
A flaw has been found in Confluence by which attackers can bypass Confluence security and changecontent on the site. Atlassian STRONGLY recommends that all Confluence customers apply the fixdescribed below immediately, or upgrade to Confluence 1.3.3
Vulnerability
By crafting custom URLs, any person with the ability to browse Confluence can modify content on thesite, bypassing security settings. This vulnerability does not allow users to view content they would notnormally be able to view, or escalate their privileges in other ways.
This flaw affects all versions of Confluence prior to 1.3.3, including the 1.4-DR development releases.
Fix
This vulnerability is fixed in Confluence 1.3.3 and later. Customers who do not wish to migrate to 1.3.3can fix this bug using the procedure below:
1. Edit the file confluence/WEB-INF/classes/xwork.xml2. Find the following section near the top of the file (around line 34):
<interceptor-stack name="defaultStack"><interceptor-ref name="profiling"><param name="location">Before defaultStack</param></interceptor-ref><interceptor-ref name="transaction"/><interceptor-ref name="authentication"/><interceptor-ref name="requestParameterHack"/><interceptor-ref name="eventnotifier"/><interceptor-ref name="autowire"/><interceptor-ref name="params"/><interceptor-ref name="servlet"/><interceptor-ref name="pageAware"/><interceptor-ref name="permissions"/><interceptor-ref name="profiling"><param name="location">After defaultStack</param></interceptor-ref></interceptor-stack>
3. Locate the "autowire" and "params" entries:
<interceptor-ref name="eventnotifier"/>--> <interceptor-ref name="autowire"/> <----> <interceptor-ref name="params"/> <--<interceptor-ref name="servlet"/>
4. Swap the two lines around. The whole stack should now look like this:
<interceptor-stack name="defaultStack"><interceptor-ref name="profiling"><param name="location">Before defaultStack</param></interceptor-ref><interceptor-ref name="transaction"/><interceptor-ref name="authentication"/><interceptor-ref name="requestParameterHack"/><interceptor-ref name="eventnotifier"/><interceptor-ref name="params"/><interceptor-ref name="autowire"/><interceptor-ref name="servlet"/><interceptor-ref name="pageAware"/><interceptor-ref name="permissions"/><interceptor-ref name="profiling"><param name="location">After defaultStack</param></interceptor-ref></interceptor-stack>

Document generated by Confluence on Jan 01, 2008 18:35 Page 109
5. Restart Confluence.

Document generated by Confluence on Jan 01, 2008 18:35 Page 110
Confluence Security Advisory 2005-12-05
This page last changed on Dec 04, 2005 by cmiller.
A flaw has been found in Confluence by which attackers to inject malicious HTML code into Confluence.Atlassian STRONGLY recommends that all Confluence customers apply the fix described belowimmediately, or upgrade to Confluence 2.0.2
Vulnerability
By entering HTML code into the Confluence search input fields, attackers can cause arbitrary scriptingcode to be executed by the user's browser in the security context of the Confluence instance.
This flaw affects all versions of Confluence between 1.4-DR releases and 2.0.1.
(Atlassian was not informed of the problem before it was published by third-party security researchers.You can read the third-party security advisory here: http://secunia.com/advisories/17833/. Thevulnerability was originally reported here.)
Fix
This vulnerability is fixed in Confluence 2.0.2 and later. Customers who do not wish to migrate to 2.0.2can fix this bug using the procedure below:
1. Edit the confluence/decorators/components/searchresults.vmd2. Replace the following reference (around line 48):
$action.getText("search.result", [$start, $end, $total, $queryString])
with
$action.getText("search.result", [$start, $end, $total,$generalUtil.escapeXml($queryString)]).
3. Edit the confluence/search/searchsite-results.vm.4. Replace the following reference (around line 11):
Searched for <b>$action.searchQuery.queryString</b>
with
Searched for <b>$generalUtil.escapeXml($action.searchQuery.queryString)</b>
5. Restart Confluence.
Alternatively, you can download the patched source files from CONF-4825. If you are patching a 2.0.xinstallation, then use the files with the .2.0 suffix. If you are patching a 1.4.x installation, then use thefiles with the .1.4 suffix.
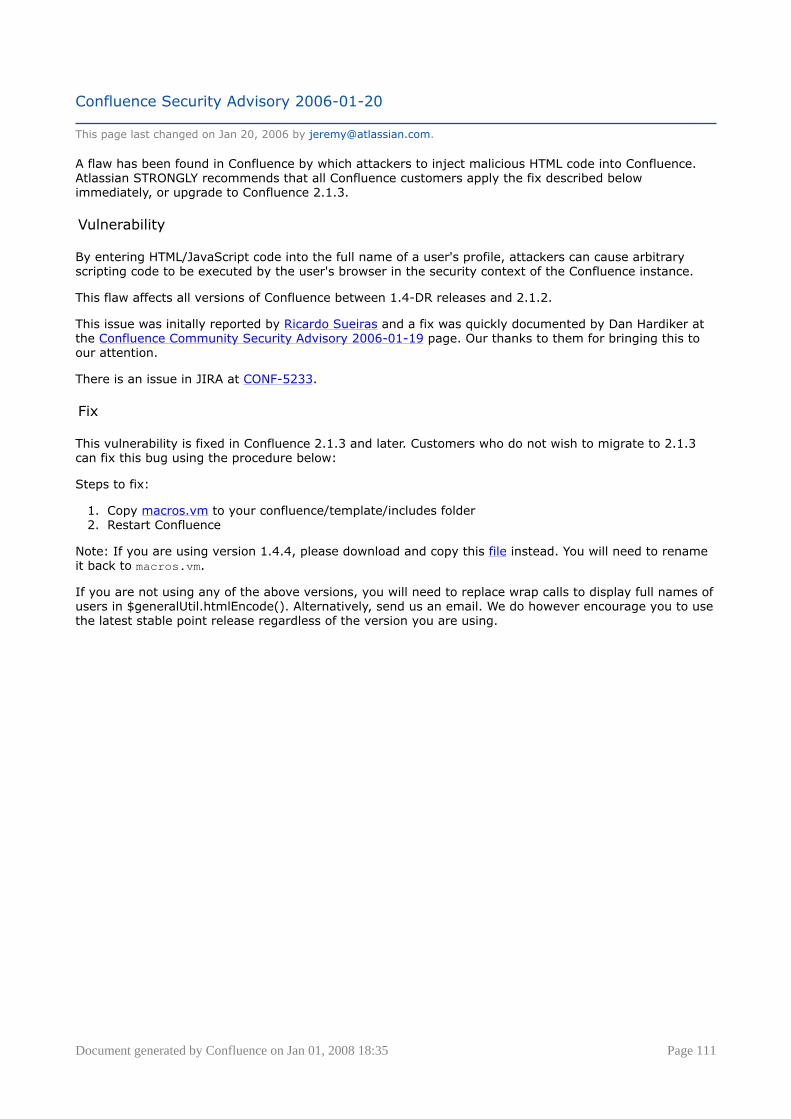
Document generated by Confluence on Jan 01, 2008 18:35 Page 111
Confluence Security Advisory 2006-01-20
This page last changed on Jan 20, 2006 by [email protected].
A flaw has been found in Confluence by which attackers to inject malicious HTML code into Confluence.Atlassian STRONGLY recommends that all Confluence customers apply the fix described belowimmediately, or upgrade to Confluence 2.1.3.
Vulnerability
By entering HTML/JavaScript code into the full name of a user's profile, attackers can cause arbitraryscripting code to be executed by the user's browser in the security context of the Confluence instance.
This flaw affects all versions of Confluence between 1.4-DR releases and 2.1.2.
This issue was initally reported by Ricardo Sueiras and a fix was quickly documented by Dan Hardiker atthe Confluence Community Security Advisory 2006-01-19 page. Our thanks to them for bringing this toour attention.
There is an issue in JIRA at CONF-5233.
Fix
This vulnerability is fixed in Confluence 2.1.3 and later. Customers who do not wish to migrate to 2.1.3can fix this bug using the procedure below:
Steps to fix:
1. Copy macros.vm to your confluence/template/includes folder2. Restart Confluence
Note: If you are using version 1.4.4, please download and copy this file instead. You will need to renameit back to macros.vm.
If you are not using any of the above versions, you will need to replace wrap calls to display full names ofusers in $generalUtil.htmlEncode(). Alternatively, send us an email. We do however encourage you to usethe latest stable point release regardless of the version you are using.

Document generated by Confluence on Jan 01, 2008 18:35 Page 112
Confluence Security Advisory 2006-01-23
This page last changed on Jan 20, 2006 by [email protected].
A flaw has been found in Confluence by which the unrestricted content of a space can be revealed insearch results.
Vulnerability
By entering in a space key and blank query string into the Search macro, pages from the specified spacewill be displayed, without filtering on page and space permissions. This can allow unpermitted users toview the excerpts of pages they don't have access to.
This flaw is confirmed to affect all releases from 1.4 to 2.1.2.
More information is available at CONF-5189.
Fix
This vulnerability is fixed in Confluence 2.1.3 and later. We strongly suggest that customers upgrade tothis release to fix the vulnerability.
Customers who are using 1.4.x and do not wish to upgrade can download a patched class fromCONF-5198.

Document generated by Confluence on Jan 01, 2008 18:35 Page 113
Confluence Security Advisory 2006-06-14
This page last changed on Jun 14, 2006 by cmiller.
Vulnerability
By crafting a custom HTTP request, an attacker can delete or modify global permissions settings on aConfluence site.
This flaw affects all Confluence versions between 1.4 and 2.2.2. 2.2.3 and later are not vulnerable.
Fix
This issue has been fixed in Confluence 2.2.3. Patches are also available for all versions of Confluencebetwen 1.4 and 2.2.2. For more information, please see this issue report.
Atlassian STRONGLY recommends that all customers either upgrade to Confluence 2.2.3, or apply thepatch.

Document generated by Confluence on Jan 01, 2008 18:35 Page 114
Confluence Security Advisory 2007-07-26
This page last changed on Jul 25, 2007 by smaddox.
In this advisory:
• Users with view permission in a space can copy and save a page• Space name and key are not validated nor escaped
Users with view permission in a space can copy and save a page
Vulnerability
A user who has only view permissions in a space can copy a page and then save it in the space. In thisway, users can create a page in a space where they have only view permission.
This flaw affects only Confluence version 2.5.4.
Fix
This issue has been fixed in Confluence 2.5.5. A patch is also available for Confluence 2.5.4. For moreinformation, including instructions on applying the patch, please see this issue report.
If you are using Confluence 2.5.4, Atlassian strongly recommends that you upgrade to Confluence 2.5.5or apply the patch.
Space name and key are not validated nor escaped
Vulnerability
The input for space name and key is not validated properly - any characters are allowed. This makes aConfluence instance vulnerable to an XSS attack.
Fix
This issue has been fixed in Confluence 2.5.5. For more information, please see this issue report.
Atlassian recommends that you upgrade to Confluence 2.5.5.

Document generated by Confluence on Jan 01, 2008 18:35 Page 115
Confluence Security Advisory 2007-08-08
This page last changed on Aug 07, 2007 by smaddox.
In this advisory:
• Input in the RSS Feed Builder is not validated• Input when editing Space Permissions is not validated• Number of labels that can be added to a page is not restricted• Input when editing navigation themes is not validated• Viewing of space content alphabetically is not validated• Input when editing Space Name is not validated• Input when viewing attachments by file-type is not validated
Input in the RSS Feed Builder is not validated
Vulnerability
The input for the RSS Feed Builder is not required to be escaped. This can make a Confluence instancevulnerable to an XSS attack.
Fix
This issue has been fixed in Confluence 2.5.6. For more information, please see CONF-8993.
Atlassian recommends that you upgrade to Confluence 2.5.6.
Input when editing Space Permissions is not validated
Vulnerability
The 'Grant permission to' field on the 'Edit Space Permissions' screen is not validated. This can make aConfluence instance vulnerable to an XSS or DoS attack.
Fix
This issue has been fixed in Confluence 2.5.6. For more information, please see CONF-8980 andCONF-8979.
Atlassian recommends that you upgrade to Confluence 2.5.6.
Number of labels that can be added to a page is not restricted
Vulnerability
There is no restriction on the number of labels that can be added to a page at a time. This can make aConfluence instance vulnerable to a DoS attack.
Fix
This issue has been fixed in Confluence 2.5.6. For more information, please see CONF-8978.
Atlassian recommends that you upgrade to Confluence 2.5.6.

Document generated by Confluence on Jan 01, 2008 18:35 Page 116
Input when editing navigation themes is not validated
Vulnerability
The 'Navigation Page' specified in the 'Left Navigation Theme' configuration is not validated. This canmake a Confluence instance vulnerable to a XSS attack.
Fix
This issue has been fixed in Confluence 2.5.6. For more information, please see CONF-8956.
Atlassian recommends that you upgrade to Confluence 2.5.6.
Viewing of space content alphabetically is not validated
Vulnerability
When viewing space content by alphabetic character, the input is not validated as being alphabetic. Thiscan make a Confluence instance vulnerable to an XSS attack.
Fix
This issue has been fixed in Confluence 2.5.6. For more information, please see CONF-8952.
Atlassian recommends that you upgrade to Confluence 2.5.6.
Input when editing Space Name is not validated
Vulnerability
The 'Name' field on the 'Edit Space Details' screen is not validated. This can make a Confluence instancevulnerable to an XSS attack.
Fix
This issue has been fixed in Confluence 2.5.6. For more information, please see CONF-8951.
Atlassian recommends that you upgrade to Confluence 2.5.6.
Input when viewing attachments by file-type is not validated
Vulnerability
The 'Filter By Extension' field on the 'List Space Attachments' screen is not validated. This can make aConfluence instance vulnerable to an XSS attack.
Fix
This issue has been fixed in Confluence 2.5.6. For more information, please see CONF-8950.
Atlassian recommends that you upgrade to Confluence 2.5.6.

Document generated by Confluence on Jan 01, 2008 18:35 Page 117
Confluence Security Advisory 2007-11-19
This page last changed on Nov 18, 2007 by smaddox.
In this advisory:
• DWR debug mode enabled• XSS vulnerability in exception error page• XSS vulnerability in the URL destination for the print icon• XSS vulnerability in wiki markup for images
Atlassian recommends that you upgrade to Confluence 2.6.1 to fix the vulnerabilities described below.
DWR debug mode enabled
Vulnerability
Debug mode was enabled by default on Direct Web Remoting (DWR). This made it easy for a potentialattacker to find information about available AJAX request handlers in Confluence.
Fix
This issue has been fixed in Confluence 2.6.1. If you do not wish to upgrade at this time, you can fixthe problem by editing your <confluence install>/confluence/WEB-INF/web.xml file. For moreinformation, please see CONF-9718.
XSS vulnerability in exception error page
Vulnerability
The attributes and parameters were not escaped on the Confluence exception error page. This is apotential vulnerability to a cross-site scripting attack.
Fix
This issue has been fixed in Confluence 2.6.1. For more information, please see CONF-9704 andCONF-9560.
XSS vulnerability in the URL destination for the print icon
Vulnerability
The print icon on the HTTP 404 error page uses the path of the requested URL, which potentially containsmalicious JavaScript. The 404 page did not correctly escape it. This is a potential vulnerability to a cross-site scripting attack.
Fix
This issue has been fixed in Confluence 2.6.1. A patch is supplied for customers with Confluence version2.6 who do not wish to upgrade at this time. For more information, please see CONF-9456.
XSS vulnerability in wiki markup for images
Vulnerability
When using image URLs in wiki markup, quotes were not correctly escaped. This is a potentialvulnerability to a cross-site scripting attack.

Document generated by Confluence on Jan 01, 2008 18:35 Page 118
Fix
This issue has been fixed in Confluence 2.6.1. For customers with Confluence 2.6 who do not with toupgrade at this time, the new atlassian-renderer JAR should resolve this issue. For more information,please see CONF-9209.

Document generated by Confluence on Jan 01, 2008 18:35 Page 119
Confluence Security Advisory 2007-11-27
This page last changed on Nov 27, 2007 by smaddox.
In this advisory:
• XSS Type 2 Vulnerabilities in Macros and Wiki Markup• ° Severity
° Risk Assessment° Risk Mitigation° Vulnerability° Fix
XSS Type 2 Vulnerabilities in Macros and Wiki Markup
Severity
Atlassian rates this vulnerability as HIGH, according to the scale published by the SANS Institute. Thescale allows us to rank a vulnerability as critical, high, moderate or low, as described in the SANSvulnerability analysis.
Risk Assessment
We have identified and fixed some security flaws which may affect Confluence instances in a publicenvironment. These flaws are XSS (cross-site scripting) vulnerabilities in some of Confluence's macrosand Wiki Markup, which potentially allow a malicious user (hacker) to insert their own HTML tags or scriptinto a Confluence page.
• The hacker might take advantage of this flaw to steal other users' session cookies or othercredentials, by sending the credentials back to the hacker's own web server.
• The hacker's text and script might be displayed to other people viewing the Confluence page. This ispotentially damaging to your company's reputation.
Atlassian recommends that you upgrade to Confluence 2.6.2 to fix the vulnerabilities described below.
You can read more about XSS attacks at cgisecurity, CERT and other places on the web.
Risk Mitigation
If you judge it necessary, you can disable public access (e.g. anonymous access and public signon) toyour wiki until you have applied the necessary patch or upgrade. For even tighter control, you couldrestrict access to trusted groups only.
Vulnerability
The following macros are affected:
• {color}• {panel}• {section}• {column}• {code}
The Wiki Markup for inserting images (e.g. !myImage.png!) is also vulnerable to XSS exploitation.
Fix
The fix is to escape all user input, so that no user input is interpreted as HTML or CSS. In some cases wealso perform stricter validation on the range of values a user can supply in an attribute.
These issues have been fixed in Confluence 2.6.2. For more information, please see CONF-9350.
Document generated by Confluence on Jan 01, 2008 18:35 Page 120
Our thanks to Igor Minar, who reported this issue to Atlassian. We fully support the reporting ofvulnerabilities and we appreciate his working with us towards identifying and solving the problem.
Please let us know what you think of the format of this security advisory and the information we haveprovided.

Document generated by Confluence on Jan 01, 2008 18:35 Page 121
Confluence Security Advisory 2007-12-14
This page last changed on Dec 13, 2007 by smaddox.
In this advisory:
• XSS Vulnerability in Configure RSS Feed Action• ° Severity
° Risk Assessment° Risk Mitigation° Vulnerability° Fix
XSS Vulnerability in Configure RSS Feed Action
Severity
Atlassian rates this vulnerability as HIGH, according to the scale published by the SANS Institute. Thescale allows us to rank a vulnerability as critical, high, moderate or low, as described in the SANSvulnerability analysis.
Risk Assessment
We have identified and fixed a security flaw which may affect Confluence instances in a publicenvironment. This flaw is an XSS (cross-site scripting) vulnerability in a Confluence action, whichpotentially allows a malicious user (hacker) to embed their own JavaScript into a Confluence page.
• The hacker might take advantage of this flaw to steal other users' session cookies or othercredentials, by sending the credentials back to the hacker's own web server.
• The hacker's text and script might be displayed to other people viewing the Confluence page. This ispotentially damaging to your company's reputation.
To fix the vulnerabilities described below, Atlassian recommends that you take one of the following steps:
• Upgrade to Confluence 2.7, or• Download and install the patch for Confluence 2.5.8 or Confluence 2.6.2 from our JIRA site – see
issue CONF-10164.
You can read more about XSS attacks at cgisecurity, CERT and other places on the web.
Risk Mitigation
If you judge it necessary, you can disable public access (e.g. anonymous access and public signon) toyour wiki until you have applied the necessary patch or upgrade. For even tighter control, you couldrestrict access to trusted groups only.
Vulnerability
A hacker can inject their own JavaScript into the following Confluence action:
http://www.anyhost.com/confluence/dashboard/configurerssfeed.action
The above Confluence action is used to build an RSS feed based on your Confluence pages and newsitems. The action is invoked when a selects 'Feed Builder' from your Confluence Dashboard. It can also beinvoked by simply entering the URL into the browser address bar.
Fix
These issues have been fixed in Confluence 2.7, which you can download from the download centre.
A patch is available for Confluence 2.5.8 and Confluence 2.6.2. For more information, please seeCONF-10164.

Document generated by Confluence on Jan 01, 2008 18:35 Page 122
Our thanks to jeff peichel, who reported this issue to Atlassian. We fully support the reporting ofvulnerabilities and we appreciate his working with us towards identifying and solving the problem.
Please let us know what you think of the format of this security advisory and the information we haveprovided.

Document generated by Confluence on Jan 01, 2008 18:35 Page 123
Java Policy Security with Confluence
This page last changed on Jan 14, 2007 by [email protected].
If you would like to secure the confluence webapp to make sure plugins (or other code executed) cannotaccess unwanted system resources, the following will restrict file system access.
Create the following .java.policy file and place it somewhere:
.java.policy
grant {permission java.util.PropertyPermission "*", "read,write";permission java.net.SocketPermission "*:-", "connect,accept,listen";permission java.io.FilePermission "/tangosol-coherence-override.xml","read";permission java.io.FilePermission "/tangosol-coherence-override-prod.xml","read";permission java.io.FilePermission "/path/to/confluenceWebapp/-","read,write";permission java.io.FilePermission "/path/to/confluence.home","read,write,delete";permission java.io.FilePermission "/path/to/confluence.home/-","read,write,delete";permission java.io.FilePermission "/path/to/resin/lib/-","read";permission java.io.FilePermission "/tmp", "read";permission java.io.FilePermission "/tmp/*", "read,write,delete";permission java.io.FilePermission "quartz.properties", "read";permission java.util.logging.LoggingPermission "control";permission java.awt.AWTPermission "*";permission java.lang.reflect.ReflectPermission "suppressAccessChecks";permission java.io.SerializablePermission "*";permission java.lang.RuntimePermission "*";permission java.net.NetPermission "*";permission ognl.OgnlInvokePermission "*";};
Make sure the following are java options are defined:
-Djava.security.manager -Djava.security.policy=/path/to/.java.policy
Of course you might be able to get away with less - please edit with any improvements you have!

Document generated by Confluence on Jan 01, 2008 18:35 Page 124
NoFollow Support
This page last changed on May 23, 2005 by vidya.
NoFollow support is a new feature in the release of Confluence 1.4.
Nofollow Support
As part of the effort to combat the spamming of wikis and blogs (Confluence being both), Google cameup with some markup which instructs search-engines not to follow links. By removing the main benefit ofwiki-spamming it's hoped that the practice will stop being cost-effective and eventually die out.
By default, all URLs inserted in a page (or in comments) will be given the nofollow tag. Inter-page links(i.e. Documentation Home) or shortcut links (i.e. CONF-2622@JIRA) will not be tagged.
The site administrator can turn the feature off in General Configuration.

Document generated by Confluence on Jan 01, 2008 18:35 Page 125
Design and Layout
This page last changed on Jan 31, 2006 by vidya.
• Custom Decorator Templates• Customising Look and Feel Overview
° Customising Colour Schemes° Customising Layouts
- Upgrading Custom Layouts° Global Templates° Working With Decorator Macros
• Themes Configuration° Applying a Theme To A Site° Creating a Theme
- Adding a theme icon° Customising the Left Navigation Theme° Deploying the theme as a plugin° Including Cascading Stylesheets in Themes° Modifying Look and Feel (for themes)
- Configuring the theme plugin° Themes Overview

Document generated by Confluence on Jan 01, 2008 18:35 Page 126
Custom Decorator Templates
This page last changed on Jul 08, 2007 by smaddox.
About Decorators
Confluence is built on top of the Open Source SiteMesh library, a web-page layout system that providesa consistent look and feel across a site. SiteMesh works through "decorators" that define a page's layoutand structure, and into which the specific content of the page is placed. If you are interested, you canread more on the SiteMesh website.
What this means for Confluence is that you can customise the look and feel of almost all of yourConfluence site through editing three decorators:
• The "Main" decorator defines the look and feel of most pages on the site• The "Popup" decorator defines the look and feel of the popup windows such as the "Insert Link" and
"History" pages.• The "Printable" decorator defines the look and feel of the printable versions of pages (available
through the Cannot resolve external resource into attachment. icon on each page)
You can view and edit these decorators from within Confluence: they are available from the "Layouts"option on the site's Administration menu. Changes to the decorators will affect all spaces hosted on thatConfluence installation.
The decorator that is used to draw Confluence's administrative pages can not be edited from withinConfluence. This means that if you make some editing mistake that renders the rest of the siteunuseable, the administrative pages should still be available for you to fix the template.
Browsing the Default Decorators
At any time, you can browse the default decorators that come packaged with Confluence by followingthe "View Default" links on the "Site Layouts" page. The template browser also allows you to view the"#parsed" templates that are included within the template when it is compiled. While you can't edit theseincluded templates, you will probably have to copy some or all of them into your custom template as youdo your customisation.
Editing Custom Decorators: Add a Logo
To edit Confluence decorators, you should have a good knowledge of HTML, and some understanding ofthe Velocity templating language.
The first thing you will see when you choose to create a custom "Main" decorator is... there's not much toedit. By default, most of the content of this decorator is included from other files:
<html><head><title>$title - Confluence</title>
#standardHeader()</head><body onload="placeFocus()">
<div id="Content"><table border="0" cellpadding="0" cellspacing="0" width="100%"><tr><td width="60%" rowspan=2 class="logocell">#pagetitle("spacenametitle")</td>
<td width="40%" align="right" valign="top">#globalnavbar("table")</td></tr>#if ($setup.isSetupComplete())<tr><td align=right valign="bottom">#usernavbar()#printableicon()#helpicon()

Document generated by Confluence on Jan 01, 2008 18:35 Page 127
</td></tr>#end</table>
#breadcrumbsAndSearch()
<table border="0" cellpadding="5" cellspacing="0" width="100%"><tr><td><table border="0" cellpadding="0" cellspacing="0" width="100%"><tr>
<td valign="top" class="pagebody">## The "toolbar-style" page operations## #if ($page.getProperty("page.operations"))## <table align="right" class="toolbar"><tr><td>## $page.getProperty("page.operations")## </td></tr></table>## #end
#if ($page.getProperty("page.surtitle"))$page.getProperty("page.surtitle")#end
#if (!$page.getProperty("page.no-page-header"))<div class="pageheader"><span class="pagetitle">$title</span></div>#end
$body</td>
#parse ("/decorators/includes/complete_footer.vmd")
We can add our logo, changing the "logocell" table cell:
<td width="60%" rowspan=2 class="logocell"><img align="right"src=http://www.atlassian.com/images/atlassian_logo.gifwidth="203" height="60">#pagetitle("spacenametitle")</td>
When you insert this into the right section of the template and hit save, visitors to the site will see thelogo at the top of each page. Note, the administrative pages will be unaffected: you will have to go to thedashboard or to a space to see the changes you have made.
Macros
Some parts of the page are drawn using Velocity macros, including the navigation bar. The macros youshould know about when editing decorators are described in Decorator Macros
If Something Goes Terribly Wrong
From the "Site Layouts" page in Confluence's administrative menu, you can delete your customtemplates. When you do this, the default template will be restored, fixing anything that may have beenbroken.
Alternatively, the custom templates are stored inside the confluence.home directory you defined inconfluence-init.properties when installing Confluence. If you have somehow managed to renderConfluence completely unuseable through editing your templates, simply delete the confluence.home/velocity directory, and restart Confluence. The default templates will be restored.
WARNING: Only delete the velocity directory! Changing anything else inside your confluence.home isdangerous, and you could lose important data!

Document generated by Confluence on Jan 01, 2008 18:35 Page 128
For Advanced Users
The velocity directory is at the front of Confluence's velocity template search path. As such, you canoverride any of Confluence's velocity templates by placing an identically named file in the right place.
While we don't recommend you do this unless you know exactly what you're doing, it does give youcomplete control over the look of every aspect of Confluence. It also means that you can edit yourtemplates in a text-editor if you wish, rather than through the web interface.
There are, however, two important caveats:
1. Velocity is configured to cache templates in memory. When you edit a page from within Confluence,it knows to reload that page from disk. If you are editing the pages on disk, you will either have toturn off velocity's caching temporarily in WEB-INF/classes/velocity.properties, or restart theserver to make your changes visible.
2. Because we only officially support the modification of the three global decorator files, other changesmay interact unpredictably with future versions of Confluence. When upgrading, you should alwaystest your custom modifications thoroughly before deploying them on a live site.

Document generated by Confluence on Jan 01, 2008 18:35 Page 129
Customising Look and Feel Overview
This page last changed on Dec 17, 2007 by smaddox.
You can customise the 'look and feel' of Confluence at both the global and space levels.
Any changes you make to the look and feel of the site at the global level will be applied as the defaultlook and feel for all the spaces in the site. An individual space can be configured to have its own look andfeel through the space administration screens.
Here's how you can customise the look and feel of your site:
• Colour Scheme : Change the colour scheme of the user interface.• Layouts : Edit how the controls are laid out in the site. This does not change the actual page layouts
but the way the surrounding controls appear in the page.• Themes : Use themes for advanced layout customisation.
RELATED TOPICS
Customising Colour Schemes
Customising Layouts
Customising Look and Feel Overview
Global Templates
Upgrading Custom Layouts

Document generated by Confluence on Jan 01, 2008 18:35 Page 130
Customising Colour Schemes
This page last changed on Dec 17, 2007 by smaddox.
A Confluence administrator can configure a new colour scheme for the site dynamically from theAdministration Console.
The default colour scheme for the site will also become the default for all spaces within it. However, itis possible for space administrators to configure a different colour scheme for spaces from the spaceadministration screens.
To change the site's colour scheme,
1. Go to the 'Administration Console' and click 'Colour Scheme' in the left-hand panel.This will bring up a new screen. See screenshot below.
2. Click 'EDIT'. Enter standard HTML/CSS2 colour codes, or use the colour-picker
to choose a newcolour from the palette provided. Any changes you make will immediately be reflected across theConfluence installation.
The colour scheme applies to the following UI elements:
• Top Bar - the bar across the top of the page that contains the breadcrumbs – i.e. the path fromDashboard to current screen which runs across the top of the Confluence page.
• Breadcrumbs Text - the text of the breadcrumbs.• Space Name Text - the text of the current space name located above the page title.• Heading Text - all heading tags throughout the space.• Links - all links throughout the space.• Borders and Dividers - table borders and dividing lines.• Menu Bar Background - background of top navigational buttons• Menu Bar Text - text that appears on the menu bar• Menu Bar Background Highlight - background colour of menu bar when highlighted.• Menu Bar Text Highlight - menu bar text when highlighted
Screenshot : Editing a site's colour scheme

Document generated by Confluence on Jan 01, 2008 18:35 Page 131
Handy HintIf you mess things up, just click the 'Reset' button and then try again.
RELATED TOPICS
Customising Colour Schemes
Customising Layouts
Customising Look and Feel Overview
Global Templates
Upgrading Custom Layouts

Document generated by Confluence on Jan 01, 2008 18:35 Page 132
Customising Layouts
This page last changed on Dec 17, 2007 by smaddox.
You can customise the layout of your Confluence instance by editing the 'decorators' that define the lookand feel of the site.
Confluence is built on top of the open source SiteMesh library, a web-page layout system. Read moreon the SiteMesh website. To edit the layout of Confluence, you will need to modify these decorator files.A decorator file is a .vmd file and is written in a very simple programming language called Velocity.Learn more about Velocity. Once you become familiar with Velocity, you can edit the decorator files topersonalise the appearance of Confluence.
You need to have System Administrator permissions in order to perform this function.
• You can customise the layouts for a particular space or for the whole site. This pagetells you how to customise layouts for the site as a whole. To customise the layouts fora space, use the 'Layout' menu on the 'Space Admin' page.
• When you upgrade Confluence, you must reapply your custom layouts to the newlyinstalled default layouts.
The decorator files are grouped into:
• Site layouts : These are used to define the controls that surround each page in the site. Forexample, the header and the footer.
• Content layouts : These control the appearance of content such as pages and news items: theydon't change the way the pages themselves are displayed, but allow you to alter the way thesurrounding comments or attachments are displayed.
• Export Layouts: These control the appearance of spaces and pages when they are exported toHTML. If you are using Confluence to generate a static website, for example, you will need to modifythese layouts.
To edit a site decorator file,
1. Go to the 'Administration Console' and click 'Layouts' under 'Look and Feel' in the left-handnavigation panel. The decorators are grouped under Site, Content and Group layouts.
• Click 'View Default' to view the vmd file.• Click 'Create Custom' to edit the default vmd file. This will open up the vmd file in edit mode.
2. Make changes and click 'Update'.
If something goes wrong : Click 'Reset Default' to revert to the original layouts.
Alternatively, the custom templates are stored inside the confluence.home directory you defined inconfluence-init.properties when installing Confluence. If you have somehow managed to renderConfluence completely unuseable through editing your templates, simply delete the confluence.home/velocity directory, and restart Confluence. The default templates will be restored.
CAUTION: Only delete the velocity directory! Changing anything else inside your confluence.home isdangerous, and you could lose important data!
Using Velocity Macros
When editing Custom Decorator Templates, there are a number of macros available to define complex orvariable parts of the page such as menus and breadcrumbs. You may insert these macros anywhere inyour templates. More information on Working With Decorator Macros.
For Advanced Users

Document generated by Confluence on Jan 01, 2008 18:35 Page 133
The velocity directory is at the front of Confluence's velocity template search path. As such, you canoverride any of Confluence's velocity templates by placing an identically named file in the right place.While we don't recommend you do this unless you know exactly what you're doing, it does give youcomplete control over the look of every aspect of Confluence. It also means that you can edit yourtemplates in a text-editor if you wish, rather than through the web interface.
WARNING
1. Velocity is configured to cache templates in memory. When you edit a page fromwithin Confluence, it knows to reload that page from disk. If you are editing the pageson disk, you will either have to turn off velocity's caching temporarily in WEB-INF/classes/velocity.properties, or restart the server to make your changes visible.
2. Because we only officially support the modification of the three global decoratorfiles, other changes may interact unpredictably with future versions of Confluence.When upgrading, you should always test your custom modifications thoroughly beforedeploying them on a live site.
RELATED TOPICS
Customising Colour Schemes
Customising Layouts
Customising Look and Feel Overview
Global Templates
Upgrading Custom Layouts

Document generated by Confluence on Jan 01, 2008 18:35 Page 134
Upgrading Custom Layouts
This page last changed on Nov 05, 2007 by smaddox.As Confluence evolves, so do the default layouts that drive the rendering of every page. As newfunctionality is added or current functionally is changed, the default layouts are modified to support thesechanges.
If you are using custom layouts based on defaults from a previous Confluence version, yourun the risk of breaking functionality, or worse, missing out on great new features!
Take care on each new release of Confluence to reapply your changes to the new default templates.
To reapply your custom layouts, you need to:
1. Obtain the source of your custom layout from your current version of Confluence.2. Reapply your customisations to the new default layouts.
Step 1. Obtaining your Custom Layouts
Before Confluence 2.3, custom layouts are stored in the velocity directory within your Confluence homedirectory tree. You can open these files in any text editor.
With Confluence 2.3 and later, custom layouts are stored in the DECORATOR table within your Confluencedatabase. You can SELECT for the source of the layout using SQL like this:
mysql> select SPACEKEY,DECORATORNAME,BODY from DECORATOR;+----------+---------------------+------+| SPACEKEY | DECORATORNAME | BODY |+----------+---------------------+------+| NULL | decorators/main.vmd | ... |+----------+---------------------+------+1 row in set (0.03 sec)
This example was tested on MySQL, but should be relevant for all SQL databases.
Step 2. Reapplying your Customisations
You will need to manually apply the changes you made to the new default layouts provided by the newversion of Confluence.
Use the documentation on customising layouts to create a new custom layout and use the sourceobtained in step 1 to manually reintegrate them.
Turning off caching
Velocity is configured to cache templates in memory. When you edit a page from within Confluence, itknows to reload that page from disk. If you are editing the pages on disk, you will either have to turn offvelocity's caching temporarily in WEB-INF/classes/velocity.properties, or restart the server to makeyour changes visible.
For Confluence 2.6, the velocity.properties file is available in the confluence-2.6.0.jar file. The jarfile is located in the WEB-INF/lib directory. If you wish to make modification to the files in the jar, werecommend the following steps:
1. Stop Confluence.2. Make a backup copy of the jar file.3. Un-jar the file4. Locate and edit the appropriate file that you wish to modify.5. Re-jar the confluence-2.6.0.jar file.6. Relocate the jar file to the appropriate directory.7. Restart Confluence.
Test your modifications carefully

Document generated by Confluence on Jan 01, 2008 18:35 Page 135
Because we only officially support the modification of the three global decorator files, otherchanges may interact unpredictably with future versions of Confluence. When upgrading,you should always test your custom modifications thoroughly before deploying them on alive site.

Document generated by Confluence on Jan 01, 2008 18:35 Page 136
Global Templates
This page last changed on Dec 17, 2007 by smaddox.
A template is a pre-defined page that can be used as a prototype when creating new pages. Templatesare useful for giving pages a common style or format.
Global Templates are defined by Confluence administrators and are available in every space across thesite.
Templates are written in regular Confluence markup, using special markup to define form fields that needto be filled in.
To add a global template,
1. Go to the Administration Console and click 'Global templates' in the left navigation panel.2. Click 'Add new global template'.3. Enter a name for your template in the 'Name' text field and an optional description in the
'Description' text field.4. Using regular Confluence markup and form field markup (if you are using forms), enter content in
the text-entry box as you would in any other Confluence page.5. Click 'edit' next to 'Labels' if you want to use labels to categorise information. Add your labels. These
labels will be included in all pages created using this template.6. Preview and click 'Save'.
Screenshot: A template as used to create a page
RELATED TOPICS
Creating a Page using a Template
Form Field Markup for Templates

Document generated by Confluence on Jan 01, 2008 18:35 Page 137
Working With Decorator Macros
This page last changed on Jun 24, 2007 by smaddox.
Decorator Macros are Velocity macros which are used to draw complex or variable parts of the page suchas menus and breadcrumbs when editing Custom decorators. Decorator macros can be inserted anywherein your templates.
The macro is called by inserting a string of the form: #macroName("argument1" "argument2""argument3").There are no commas between the arguments. Unless otherwise noted, these macros takeno arguments.
NOTE: These macros will only work reliably when customising main.vmd. They may not work in otherVelocity decorators. Decorator macros will not work inside normal confluence pages.
Macro Usage
#breadcrumbs() Draws the "You are here" breadcrumbs list, likethe one found above the page name in the defaulttemplate.
#includePage(pageTitle) Includes a confluence page with the specified title.If you have 2 or more pages with the same titleacross multiple spaces, this macro will includethe page belonging to the space you are currentlyviewing.
#searchbox() Inserts a search box into the page, like the oneto the far right of the breadcrumbs in the defaulttemplate.
#globalnavbar(type) Draws the global navigation bar, as found in thetop right-hand corner of the default template. Thenavigation bar can be displayed in two modes:
#globalnavbar("table") Displays the navigation bar in its defaultmode: drawn as a table of links with colouredbackgrounds and mouse-over effects.
#globalnavbar("text") Displays the navigation bar as series of text linksseparated by | characters.
#usernavbar() Draws the user-specific navigation-bar. This barcontains the links to the user's profile and history,or to the login and signup pages if the user is notlogged in.
#helpicon() Draws the Cannot resolve external resource intoattachment. help icon, and link to the Confluencehelp page.
#printableicon() On pages where a printable version is available,draws the Cannot resolve external resource intoattachment. printable page icon, linking to theprintable version of the page. Otherwise, drawsnothing
#pagetitle(class) When you are viewing a page in a Confluencespace, draws the name of the space that page isin. Otherwise, writes the word "CONFLUENCE".The"class" argument is the CSS class that the titleshould be drawn in. Unless you have customisedyour Confluence installation's CSS file, you should

Document generated by Confluence on Jan 01, 2008 18:35 Page 138
call this with "spacenametitle" as the class:#pagetitle("spacenametitle")
#poweredby() Writes out the "Powered by Confluence" andConfluence version-number boilerplate found atthe bottom of the default template.
#bottomshadow() Draws the fading shadow-effect found at thebottom of the content area in the defaulttemplate.
#dashboardlink() Inserts a link to the dashboard page.
RELATED TOPICS
Editing and Removing macros
Enabling HTML macros
Enabling the html-include Macro
User Macros
Writing Macros
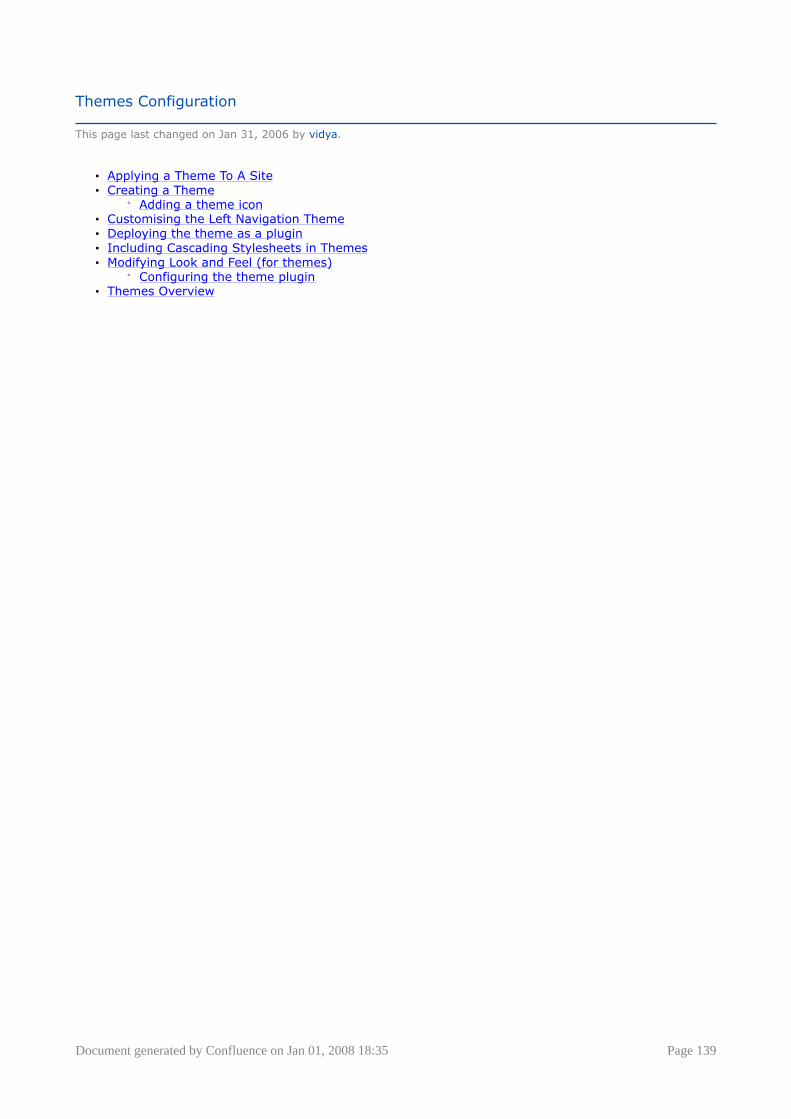
Document generated by Confluence on Jan 01, 2008 18:35 Page 139
Themes Configuration
This page last changed on Jan 31, 2006 by vidya.
• Applying a Theme To A Site• Creating a Theme
° Adding a theme icon• Customising the Left Navigation Theme• Deploying the theme as a plugin• Including Cascading Stylesheets in Themes• Modifying Look and Feel (for themes)
° Configuring the theme plugin• Themes Overview

Document generated by Confluence on Jan 01, 2008 18:35 Page 140
Applying a Theme To A Site
This page last changed on Dec 18, 2007 by smaddox.
Themes can can be applied across the site or to individual spaces.
Themes can be installed as plugins. Once a theme has been installed, a Confluence administrator canapply it via the Administration Console. Once installed, themes become available to be applied across asite or to individual spaces. Any theme applied at the global level will become the default theme for allspaces in the site.
Confluence 2.6 introduced a fresh, clean look for the Default theme. If you prefer theoriginal Confluence look and feel, select the Confluence Classic Theme.
To apply a theme across the site,
1. Ensure that the theme plugin you wish to apply has been installed.2. Go to the 'Administration Console' and click 'Themes' under 'Look and Feel' in the left navigation
panel.3. If there are any themes installed, they will be listed here.4. Select a theme and click 'Confirm'.
Screenshot : Applying a theme
RELATED TOPICS
Adding a theme icon
Applying a Theme To A Site
Applying A Theme To A Space
Document generated by Confluence on Jan 01, 2008 18:35 Page 141
Creating a Theme
Including Cascading Stylesheets in Themes

Document generated by Confluence on Jan 01, 2008 18:35 Page 142
Creating a Theme
This page last changed on Jun 24, 2007 by smaddox.
There are three steps involved involved in creating a theme:
• Modifying the look and feel of Confluence: Work with the different components that define the lookand feel of Confluence and modify them to suit your theme:
° Layout° Colour Scheme (optional)° Stylesheet (optional)
• Configuring the atlassian-plugin.xml file: Edit the central configuration file for the theme plugin toreference the new files defining your theme.
• Adding a theme icon: Add a preview icon for your theme.• Deploying the theme as a plugin : Bundle the files into a jar file and deploy the theme as a plugin
into Confluence.
Unsure what a theme is?
RELATED TOPICS
Adding a theme icon
Applying a Theme To A Site
Applying A Theme To A Space
Creating a Theme
Including Cascading Stylesheets in Themes

Document generated by Confluence on Jan 01, 2008 18:35 Page 143
Adding a theme icon
This page last changed on Jun 24, 2007 by smaddox.
A theme icon can be packed with a theme to give the user a little preview on how the theme will changethe layout of Confluence. If you do not specify a custom icon for your theme, a default icon will be shownin the preview.
Defining the theme icon in the atlassian-plugin.xml
To include an icon in the theme, you will need to reference it as a Downloadable Plugin Resource fromwithin the theme module.
Here is an example where an icon called my-theme-icon.gif is being used in the Dinosaur Theme:
<theme key="dinosaurs" name="Dinosaur Theme" class="com.atlassian.confluence.themes.BasicTheme"><description>A nice theme for the kids</description><colour-scheme key="com.example.themes.dinosaur:earth-colours"/><layout key="com.example.themes.dinosaur:main"/><layout key="com.example.themes.dinosaur:mail-template"/><resource name="themeicon.gif" type="download" location="com/example/themes/dinosaur/my-theme-icon.gif"><property key="content-type" value="image/gif"/></resource></theme>
The resource parameter takes three arguments:
• Name: The name of the icon ( has to be themeicon.gif).• Type: The type of resource-in this instance, 'download'.• Location: The location of the file represented in the jar archive you will use to bundle your theme.
The icon will automaticly appear on the themes screen in the space and global administration and will bedisplayed next to the text and description of the theme.
Creating your own theme icon
In order to keep the look and feel of the icons consistent, we recommend to base the icon style on iconsshipped with the Confluence themes. A good starting point when creating new icons is to use the defaulttheme icon or the left navigation theme icon:
RELATED TOPICS
Adding a theme icon (Confluence 2.7 Temp Archive)

Document generated by Confluence on Jan 01, 2008 18:35 Page 144
Applying a Theme To A Site (Confluence 2.7 Temp Archive)
Applying A Theme To A Space (Confluence 2.7 Temp Archive)
Creating a Theme (Confluence 2.7 Temp Archive)
Including Cascading Stylesheets in Themes (Confluence 2.7 Temp Archive)

Document generated by Confluence on Jan 01, 2008 18:35 Page 145
Customising the Left Navigation Theme
This page last changed on Jun 13, 2007 by [email protected].
Introduction
Confluence comes bundled with the Left Navigation theme. This theme has a navigation menu on the left-hand side of the screen, which can be customised to contain additional links, sections and even macros.
Creating a custom navigation page
Custom left navigation
By default, the left-navigation theme just displays the space icon (or profile icon for a personal space),and three menus: page operations, browse space, and add content.
To add your own content to the top, create a page in your space called 'Navigation'. Put content therethat you want to appear on the left navigation menu.
A couple of tips:
• items in a bulleted list show up as normal menu items• use 'h1' to add a section heading for your menu items.
Examples
As an example, create a page called 'Navigation' with the following content:
h1. Search engines

Document generated by Confluence on Jan 01, 2008 18:35 Page 146
* [Google|http://www.google.com]* [Yahoo|http://www.yahoo.com]* [MSN|http://search.msn.com]
This will give a left navigation menu like the image on the side of this page.
You can see another example of customised left-navigation theme on the Codegeist space with itsassociated Navigation page.
See Also
To insert an expandable/collapsible left navigation menu, see the PageTree Plugin. Note that this looksbetter on the 'Default' theme rather than on the 'Left Navigation Theme'.

Document generated by Confluence on Jan 01, 2008 18:35 Page 147
Deploying the theme as a plugin
This page last changed on Jun 24, 2007 by smaddox.
In order to deploy your custom Confluence theme, you will have to have Ant installed. To learn how toinstall and use Ant, please follow the instructions on the projects website.
To deploy the theme, execute the following command from within the theme directory in your Confluenceinstallation:
ant build -Dtheme=<specifynameoftheme>
For example to build a theme with the name dinosaur, you will have to type:
ant build -Dtheme=dinosaur
You will find the build jar of the dinosaur theme in you Confluence install directory under .../themes/dinosaur/dist_ directory.
Installing the theme
To install the theme you can simply drop the previously created .jar file into the .../confluence/WEB-INF/lib directory in your Confluence installation as described under Installing and Configuring Plugins.
As a second option, you can also call the following ant command instead of the one found above to installthe theme and copy the jar automatically in the appropriate directory.
ant install -Dtheme=<specifynameoftheme>
Read more about plugins
To change the time and date formats,
1. Go to the 'Administration Console' and click on 'General Configuration' in the left panel.2. Click 'Edit' at the bottom of the 'Options and Settings' screen.
• There are three time and date format settings:° Time Format : determines the time format for when each news item is posted° Date Time Format : determines date and time format for historical versions of pages.° Date Format : determines date and time format for all new and modified content.
3. Change the formats using the guidelines in this document.4. 'Save' your changes.
RELATED TOPICS
Adding a theme icon (Confluence 2.7 Temp Archive)
Applying a Theme To A Site (Confluence 2.7 Temp Archive)
Applying A Theme To A Space (Confluence 2.7 Temp Archive)
Creating a Theme (Confluence 2.7 Temp Archive)
Including Cascading Stylesheets in Themes (Confluence 2.7 Temp Archive)

Document generated by Confluence on Jan 01, 2008 18:35 Page 148
Including Cascading Stylesheets in Themes
This page last changed on Nov 19, 2007 by smaddox.
Confluence allows you to integrate your own stylesheets within the theme plugin so you can havegreater control over the appearance of your site. Confluence's main stylesheet is a useful reference whenoverriding styles and can be found in the Confluence install directory under ...confluence/WEB-INF/classes/styles/site-css.vm.
CSS for Confluence 2.6
Please refer to the information about changes in Confluence 2.6.
Step One: Defining the stylesheet in the atlassian-plugin.xml
To make a stylesheet available to a decorator, you will need to reference it as a resource from within thecentral configuration file - atlassian-plugin.xml.
Here is an example where a stylesheet is being used to define the 'leftnavigation' theme:
<layout key="main" name="Main Decorator" class="com.atlassian.confluence.themes.VelocityDecorator"overrides="/decorators/main.vmd"><resource type="velocity" name="decorator"location="templates/leftnavigation/main.vmd"/><resource type="stylesheet" name="leftnav.css"location="templates/leftnavigation/leftnav-css.vm"></resource></layout>
The resource parameter takes three arguments:
• Type: The type of resource-in this instance, 'stylesheet'.• Name: The name of the stylesheet.• Location: The location of the file represented in the jar archive you will use to bundle your theme.
Step Two: Using the stylesheet in the decorator
To reference the stylesheet in the decorator, you will need to use the #pluginStylesheet velocity macro.
For example, here's how you reference the leftnav.css file defined in the layout entry above:
#pluginStylesheet("com.atlassian.confluence.themes.leftnavigation:main" "leftnav.css")
The macro takes two arguments:
• completePluginKey: The complete plugin key which is constructed from the pluginkey and the layoutkey like this: {pluginKey}:{layoutKey}In the above example, com.atlassian.confluence.themes.leftnavigation is the key of theplugin, and main is the key of the layout.
• stylesheetName: the name of the stylesheet
If you place your stylesheet after the #standardHeader macro in the decorator, the contents of yourcustom stylesheet will override those in Confluence's default stylesheet.
If your stylesheet needs to reference the colour scheme, you need to use the space stylesheet macroinstead:
#pluginSpaceStylesheet("com.atlassian.confluence.themes.leftnavigation:main" "leftnav.css"$spaceKey)
You can then use colour scheme references in your stylesheet, similar to Confluence's stylesheets, andthey will be replaced with the appropriate global or space-specific colour scheme:
.navItemOver {color: $action.navSelectedTextColor;}

Document generated by Confluence on Jan 01, 2008 18:35 Page 149
RELATED TOPICS
Adding a theme icon (Confluence 2.7 Temp Archive)
Applying a Theme To A Site (Confluence 2.7 Temp Archive)
Applying A Theme To A Space (Confluence 2.7 Temp Archive)
Creating a Theme (Confluence 2.7 Temp Archive)
Including Cascading Stylesheets in Themes (Confluence 2.7 Temp Archive)

Document generated by Confluence on Jan 01, 2008 18:35 Page 150
Modifying Look and Feel (for themes)
This page last changed on Jun 24, 2007 by smaddox.
Here's how you can define a new look and feel for Confluence in your theme:
1. Layout : Edit Confluence's layout by modifying the decorator files that are used to define it.• Working with Decorators• Velocity Template Overview• Configuring the atlassian.plugin.xml file to reference the decorators
2. Colour schemes : Configure a new colour scheme for your theme. Optional• Configuring a new colour scheme• Configuring the atlassian.plugin.xml file to include the new colour scheme
3. Stylesheet : Include a stylesheet to define your theme. Optional
Note that for every component you edit, you will need to configure the atlassian-plugin.xmlwhich is the central configuration file for the plugin to override the default files with the new files you'vecreated.
Layout: Working with decorators
What are decorators?Confluence is built on top of the Open Source SiteMesh library, a web-page layout system. To edit thelayout of Confluence, you will need to modify these decorator files. A decorator file is a vmd file and iswritten in a very simple programming language called Velocity. Learn more about Velocity.
Confluence comes bundled with a set of decorator or VMD files that you can customize. Broadly these arecategorised into Site, Content and Export decorators. These are further grouped into categories calledcontexts and under each context has various modes (ways of viewing the context).
To make editing easier, layout for similar screens (example: view and edit page screens) is configuredthrough the same VMD file. So, if you want to customize how the Confluence View Page Screen or EditPage Screen looks, you can make both of these changes inside one decorator file: page.vmd.
Decorator Context Mode Comment
page.vmd page 'view', 'edit', 'edit-preview', 'view-information', and 'view-attachments'
blogpost.vmd blogpost (news) 'view', 'edit', 'edit-preview', and 'remove'
We prefer to use 'news'as an end-user term;all templates andclasses use 'blogpost'to indicate RSS relatedcontent
mail.vmd mail 'view', 'view-thread'and 'remove'
space.vmd space-pages, space-mails, space-blogposts,space-templates,space-operations,space-administration
CONTEXT: "space-pages". MODES: "list-alphabetically", "list-recently-updated", "list-content-tree", "create-page".CONTEXT: "space-mail". MODES: "view-mail-archive".
space.vmd handles awide range of options,this context is accessedby clicking on 'browsespace' in the defaulttheme of Confluence(tabbed theme)

Document generated by Confluence on Jan 01, 2008 18:35 Page 151
CONTEXT: "space-blogposts". MODES:"view-blogposts","create-blogpost".CONTEXT: "space-templates". MODES:"view-templates".CONTEXT: "space-operations". MODES:"view-space-operations".CONTEXT: "space-administration".MODES: "view-space-administration", "list-permission-pages".
global.vmd global 'dashboard', 'view-profile', 'edit-profile','change-password-profile', 'edit-notifications-profile'
main.vmd n/a (header and footerformatting)
main.vmd is used tocontrol the header andfooter of each page,not the page specificpresentation logic
For example, if you wanted to remove the 'Attachments' tab on the view page screen, you would makethis layout change in the page.vmd file - where the 'view' mode is handled (as shown below).
#*Display page based on mode: currently 'view', 'edit', 'preview-edit', 'info' and 'attachments.See the individual page templates (viewpage.vm, editpage.vm, etc.) for the setting of the modeparameter.*### VIEW#if ($mode == "view")
<make layout modifications here>
#elseif ...
Step One: Copying the decorators
The easiest way to begin configuring a new layout is by copying the default decorator files and editingthem to suit your theme.
1. Go to the 'Administration Console' and click on Layouts in the left panel. This will display options toview and edit the default decorators.
2. Copy the files that you intend to modify and place them in a directory structure that makes sense toyou. See example below.
Step Two: Creating a directory structure for the decorators:
You should place your decorators in a directory hierarchy which makes sense to you. We recommendthat you place the atlassian-plugin.xml file at the top level of the directory structure, and then place thedecorators in directories which make a meaningful division of what they do.
Here is an example:
atlassian-plugin.xmlcom/atlassian/confluence/themes/mytheme/

Document generated by Confluence on Jan 01, 2008 18:35 Page 152
com/atlassian/confluence/themes/mytheme/global.vmdcom/atlassian/confluence/themes/mytheme/space.vmdcom/atlassian/confluence/themes/mytheme/mail.vmdcom/atlassian/confluence/themes/mytheme/blogpost.vmdcom/atlassian/confluence/themes/mytheme/main.vmdcom/atlassian/confluence/themes/mytheme/page.vmd
Step Three: Editing the decorators
To edit the decorators, you will require knowledge of a very simple programming language called Velocity.Learn more about Velocity.
Decorator Macros
When editing the decorators, you will need to use Decorator Macros to draw complex or variable parts ofthe page such as menus and breadcrumbs. See Working With Decorator Macros
Theme Helper Object
When editing decorator files you will also come across a variable called $helper - this is the theme helperobject.
The following table summarises what this object can do:
Behaviour Explanation
$helper.domainName displays the base URL of your Confluence instanceon your page. This is useful for constructing linksto your own Confluence pages.
$helper.spaceKey returns the current space key or null if in a globalcontext.
$helper.spaceName returns the name of the current space
$helper.renderConfluenceMacro("{create-space-button}")
renders a call to a Confluence Macro for thevelocity context
$helper.getText("key.key1") looks up a key in a properties file matching
key.key1=A piece of text
and returns the matching value ("A piece of text")
$helper.action returns the XWork action which processed therequest for the current page.
If you are on a page or space screen you also have access to the actual page and space object by using$helper.page and $helper.space respectively.
If you want to deliver more into what other methods are available in this object, please see our API's forThemeHelper.
Step Four: Configuring the central configuration file to reference the new decorators
How to do this is explained in Configuring the theme plugin

Document generated by Confluence on Jan 01, 2008 18:35 Page 153
Working with colour schemes for themes
Configuring the colour scheme
The easiest way to configure a colour scheme is to do it dynamically from the Administration Console (asyou would normally when you want to change the site's colour scheme online), and then express it asan xml file. This method makes it possible for you to experiment with different colours and test them outbefore including the colour scheme in your theme.
1. Go to the 'Administration Console' and click on 'Colour scheme' in the left panel.2. Use the colour picker to define the colours for the following UI elements:
• Top Bar - the bar across the top of the page that contains the breadcrumbs.• Space Name Text - the text of the current space name located above the page title.• Heading Text - all heading tags throughout the space.• Links - all links throughout the space.• Borders and Dividers - table borders and dividing lines.• Menu Bar Background - background of top navigational buttons• Menu Bar Text - text that appears on the menu bar• Menu Bar Background Highlight - background colour of menu bar when highlighted.• Menu Bar Text Highlight - menu bar text when highlighted
More information on customising colour schemes
Expressing the colour scheme as XML
Once, you have decided on the colours for the different UI elements, you will need to configure theatlassian.plugin.xml to include the new colour scheme. How to do this is explained in detail in Configuringthe theme plugin.
RELATED TOPICS
Adding a theme icon
Applying a Theme To A Site
Applying A Theme To A Space
Creating a Theme
Including Cascading Stylesheets in Themes

Document generated by Confluence on Jan 01, 2008 18:35 Page 154
Configuring the theme plugin
This page last changed on Jun 24, 2007 by smaddox.
Each plugin is described in its own atlassian-plugin.xml file, which specifies attributes of the plugin,including a description of each module it contains. Once you have modified the different components todefine a new look and feel for your theme, you will need to configure this file so Confluence knows whereto look when overriding the default files.
The easiest way to begin is by copying the atlassian-plugin.xml from one of the default themes bundledwith confluence and modifying it for your theme.
The structure of an atlassian-plugin.xml file is fairly self-explanatory. In the code segment below you willfind a full example of an atlassian-plugin.xml:
<atlassian-plugin key="com.atlassian.confluence.themes.tabless" name="Plain Theme"><plugin-info><description>This theme demonstrates a plain look and feel for Confluence. It is useful as abuilding block for your own themes.</description><version>1.0</version><vendor name="Atlassian Software Systems Pty Ltd" url="http://www.atlassian.com/"/></plugin-info>
<theme key="tabless" name="Tabless Theme" class="com.atlassian.confluence.themes.BasicTheme"><description>plain Confluence theme.</description><layout key="com.atlassian.confluence.themes.tabless:main"/><layout key="com.atlassian.confluence.themes.tabless:global"/><layout key="com.atlassian.confluence.themes.tabless:space"/><layout key="com.atlassian.confluence.themes.tabless:page"/><layout key="com.atlassian.confluence.themes.tabless:blogpost"/><layout key="com.atlassian.confluence.themes.tabless:mail"/><colour-scheme key="com.atlassian.confluence.themes.tabless:earth-colours"/></theme>
<layout key="main" name="Main Decorator" class="com.atlassian.confluence.themes.VelocityDecorator"overrides="/decorators/main.vmd"><resource type="velocity" name="decorator"location="com/atlassian/confluence/themes/tabless/main.vmd"/></layout>
<layout key="global" name="Global Decorator"class="com.atlassian.confluence.themes.VelocityDecorator"overrides="/decorators/global.vmd"><resource type="velocity" name="decorator"location="com/atlassian/confluence/themes/tabless/global.vmd"/></layout>
<layout key="space" name="Space Decorator"class="com.atlassian.confluence.themes.VelocityDecorator"overrides="/decorators/space.vmd"><resource type="velocity" name="decorator"location="com/atlassian/confluence/themes/tabless/space.vmd"/></layout>
<layout key="page" name="Page Decorator" class="com.atlassian.confluence.themes.VelocityDecorator"overrides="/decorators/page.vmd"><resource type="velocity" name="decorator"location="com/atlassian/confluence/themes/tabless/page.vmd"/></layout>
<layout key="blogpost" name="Blogpost Decorator"class="com.atlassian.confluence.themes.VelocityDecorator"overrides="/decorators/blogpost.vmd"><resource type="velocity" name="decorator"location="com/atlassian/confluence/themes/tabless/blogpost.vmd"/></layout>

Document generated by Confluence on Jan 01, 2008 18:35 Page 155
<layout key="mail" name="Mail Decorator" class="com.atlassian.confluence.themes.VelocityDecorator"overrides="/decorators/mail.vmd"><resource type="velocity" name="decorator"location="com/atlassian/confluence/themes/tabless/mail.vmd"/></layout>
<colour-scheme key="earth-colours" name="Brown and Red Earth Colours"class="com.atlassian.confluence.themes.BaseColourScheme"><colour key="topbar" value="#440000"/><colour key="spacename" value="#999999"/><colour key="headingtext" value="#663300"/><colour key="link" value="#663300"/><colour key="border" value="#440000"/><colour key="navbg" value="#663300"/><colour key="navtext" value="#ffffff"/><colour key="navselectedbg" value="#440000"/><colour key="navselectedtext" value="#ffffff"/></colour-scheme>
</atlassian-plugin>
Modifying the {{atlassian-plugin.xml}}file
We will configure this file section by section
Plugin information
<atlassian-plugin key="com.atlassian.confluence.themes.tabless" name="Plain Theme"><plugin-info><description>This theme demonstrates a plain look and feel for Confluence. It is useful as abuilding block for your own themes.</description><version>1.0</version><vendor name="Atlassian Software Systems Pty Ltd" url="http://www.atlassian.com/"/></plugin-info>
plugin key : Specify a key that uniquely identifies the plugin, eg. com.example.themes.dinosaur
name : Give the plugin a name.
description : Provide a short description of the plugin.
vendor : Replace the text with your information.
Theme information
<theme key="dinosaurs" name="Dinosaur Theme"class="com.atlassian.confluence.themes.BasicTheme"><description>A nice theme for the kids</description><colour-scheme key="com.example.themes.dinosaur:earth-colours"/><layout key="com.example.themes.dinosaur:main"/><layout key="com.example.themes.dinosaur:mail-template"/></theme>
theme key : Specify a key that uniquely identifies the theme.
class : The class of a theme must implement com.atlassian.confluence.themes.Theme. Thecom.atlassian.confluence.themes.BasicTheme class provided with Confluence gathers together all theresources listed within the module definition into a theme.
name : Give the theme a name. Make sure that you replace all instances of the theme name with thisname.
description : Provide a short description of your theme
Document generated by Confluence on Jan 01, 2008 18:35 Page 156
colour-scheme key : A theme can contain an optional colour-scheme element that defines which colour-scheme module this theme will use. If you are using a new colour scheme, enter its key.
layout key : A theme can contain any number of layout elements that define which layouts should beapplied in this theme. Refer to these modules by their module complete key as shown above.
Referencing the decorators
You will need to add a layout entity as shown below for each of the decorators you are using. See workingwith decorators
<layout key="page" name="Page Decorator" class="com.atlassian.confluence.themes.VelocityDecorator"overrides="/decorators/page.vmd"><resource type="velocity" name="decorator"location="com/atlassian/confluence/themes/tabless/page.vmd"/></layout>
class : The class which each decorator, or layout, is mapped to must implementcom.atlassian.confluence.themes.VelocityDecorator.
overrides : The layout entry must provide an overrides attribute which defines which decorator withinConfluence is being overrridden by the theme.
Location : Specify the location of the new decorator file, so Confluence know where to look whenoverriding the default decorator.
It is possible for a theme to use modules that aren't in the same plugin as the theme. Just keep inmind that your theme will be messed up if the plugin that the theme depends on is removed.
Including the colour scheme
Colour schemes can be pre-configured for your theme dynamically from the Administration Console. Seeconfiguring colour schemes
To transport them within a theme however, they need to be expressed in the atlassian-plugin.xml fileas shown above.
<colour-scheme key="earth-colours" name="Brown and Red Earth Colours"class="com.atlassian.confluence.themes.BaseColourScheme"><colour key="topbar" value="#440000"/><colour key="spacename" value="#999999"/><colour key="headingtext" value="#663300"/><colour key="link" value="#663300"/><colour key="border" value="#440000"/><colour key="navbg" value="#663300"/><colour key="navtext" value="#ffffff"/><colour key="navselectedbg" value="#440000"/><colour key="navselectedtext" value="#ffffff"/></colour-scheme>
colour-scheme key : Specify a key that uniquely identifies the colour scheme.
name : Give a name to the colour scheme.
class : The class of the colour scheme must implementcom.atlassian.confluence.themes.ColourScheme. Thecom.atlassian.confluence.themes.BaseColourScheme class provided with Confluence sets the coloursbased on the module's configuration.
colour key: For each UI element, you will need to add its name and value.
see configuring colour scheme

Document generated by Confluence on Jan 01, 2008 18:35 Page 157
RELATED TOPICS
Adding a theme icon
Applying a Theme To A Site
Applying A Theme To A Space
Creating a Theme
Including Cascading Stylesheets in Themes

Document generated by Confluence on Jan 01, 2008 18:35 Page 158
Themes Overview
This page last changed on Dec 17, 2007 by smaddox.
Themes are pre-defined styles that can be applied to alter the appearance of your site.
Use themes when you want to add new functionalities or to change the appearance of Confluence. Forexample, you will need to use themes to apply a left-navigation scheme instead of the default top-navigation scheme.
Themes are installed as plugins and added via the Administration Console. Once installed, themes can beapplied across the site or to individual spaces.
What do you want to do?
Apply a themeCreate a new themeInclude cascading stylesheets in a theme
RELATED TOPICS
Adding a theme icon
Applying a Theme To A Site
Applying A Theme To A Space
Creating a Theme
Including Cascading Stylesheets in Themes

Document generated by Confluence on Jan 01, 2008 18:35 Page 159
Importing Data
This page last changed on Nov 14, 2007 by smaddox.
• Snip Snap Import
• Universal Wiki Converter• Build jspwiki-exporter from source• Importing Pages from Disk

Document generated by Confluence on Jan 01, 2008 18:35 Page 160
Snip Snap Import
This page last changed on Dec 17, 2007 by smaddox.
The snipsnap importer allows you to import a Snip Snap XML backup file into a space in Confluence.
What is Snip Snap?
Snip Snap is a wiki used as a knowledge and content management tool. For moreinformation, take a look at the Snip Snap home page and the Wikipedia page about SnipSnap.
Some limitations:
• Currently, attachments are not imported, and Confluence does not recognise duplicate users.• You cannot import content into multiple spaces.
You need to have System Administrator permissions in order to perform this function.
To import a Snip Snap backup file into Confluence,
1. First, use Snip Snap to export a backup to an XML file.2. In Confluence, go to the Administration Console and click 'SnipSnap Import' in the left-hand panel.3. Enter the location of the Snip Snap backup file in the input field displayed. You can also 'browse' and
locate the file.4. Select a space to import the content into and click 'Save'.
RELATED TOPICS
Importing Data

Document generated by Confluence on Jan 01, 2008 18:35 Page 161
Macros
This page last changed on Dec 12, 2007 by smaddox.
Macros allow you to perform programmatic functions within a page, and can be used for generating morecomplex content structures.
Generally speaking, a macro is simply a command wrapped inside curly braces {...}. To learn how towrite your own macro, or use macros written by other people, read the Confluence Plugin Guide.
• Configuring the userlister Macro• Editing and Removing macros• Enable The Flowchart Macro• Enabling HTML macros
° Enabling the html-include Macro• Troubleshooting the Gallery Macro
• Setting Up Trusted Communication between JIRA and Confluence

Document generated by Confluence on Jan 01, 2008 18:35 Page 162
Configuring the userlister Macro
This page last changed on Dec 18, 2007 by smaddox.
The userlister macro has an optional 'online' parameter. If the 'User Listener' plugin is configured to allowthis feature, then the page author can specify 'online=true' to show a list of all online users.
List of online users can be misleading
When the parameter 'online=true' is used, Confluence uses a context listener to generatethe list of online users. A context listener is a J2EE term for something that listens forevents in the application server. We listen for session open and close events, so a user is'online' if they have a session on the application server. Some application servers don'tcorrectly despatch close events for sessions – in these cases, the list of online users may bemisleading.
You need to have System Administrator permissions in order to perform this function.
To enable the 'online' filter in the userlister macro,
1. Go to the 'Administration Console' and click 'Plugins' in the left-hand panel. This will list thecurrently installed plugins.
2. Scroll down and click the 'User Listener' link. The User Listener plugin panel will appear at the top ofthe screen.
3. Enable the 'User Log In Listener' module by clicking the 'Enable' link on its right.4. Restart Confluence.
Screenshot: Enabling the User Log In Listener
RELATED TOPICS
Userlister MacroMacros

Document generated by Confluence on Jan 01, 2008 18:35 Page 163
Editing and Removing macros
This page last changed on Dec 18, 2007 by smaddox.
You need to have System Administrator permissions in order to perform this function.
To edit or remove a user macro,
1. Go to the 'Administration Console' and click 'User Macros' in the left-hand panel. This will list thecurrently configured user macros with options to 'Edit' or 'Remove' each macro.
• Click 'Edit'. This will display the edit screen for the macro. Make changes in the 'template' inputfield and click 'Save'.
Templates are in HTML, not wiki markup.• Click 'Remove' to delete the macro.
RELATED TOPICS
Editing and Removing macros
Enabling HTML macros
Enabling the html-include Macro
User Macros
Writing Macros
Document generated by Confluence on Jan 01, 2008 18:35 Page 164
Enable The Flowchart Macro
This page last changed on Dec 18, 2007 by smaddox.
Installation
This plugin must be installed by a System Administrator.
1. Install GraphViz2. Install Apache Ant3. If running on Windows, restart your computer4. Instructions to insert the GraphViz installation directory path into PATH variable depend on your
operating system.Windows Users1. Open the directory GraphViz is installed under and confirm the path. An example path is C:\Program Files\ATT\Graphviz\bin2. Go to Start > Control Panel > System3. Select the 'Advanced' tab, then 'Environment Variables'4. Under 'System Variables', select the 'Path' variable5. Select 'Edit' and view the 'Variable value' text6. Confirm that path to the bin directory of GraphViz is appended to this string in the MS-DOS 8.3standard and separated by a semicolon. An example might be ;C:\PROGRA~1\ATT\Graphviz\binLinux, OS X or Unix Users1. Open the directory GraphViz is installed under and confirm the path2. Login as the user who runs Confluence or starts the Confluence service3. Append the path to the bin directory of GraphViz to the 'Path' variable
5. Build the GraphViz plugin from source.2. Stop Confluence3. Open a command window in your Confluence install directory and go to the plugins directory4. From the plugins directory, compile the GraphViz by running ant -Dlibrary=graphviz install5. Start Confluence
Usage
See the Flowchart Macro in the User Guide.
Troubleshooting
Error Message
flowchart: No useable executable name defined in graphviz.propertiesgraphviz: No useable executable name defined in graphviz.propertiesspacegraph: No useable executable name defined in graphviz.properties
Solution
1. Check that the system 'Path' variable includes a path to dot.exe, the executable file contained inthe Graphviz bin directory.
2. Restart Confluence server
Document generated by Confluence on Jan 01, 2008 18:35 Page 165
Enabling HTML macros
This page last changed on Dec 18, 2007 by smaddox.
The {html} macro allows you to use HTML code within a Confluence page.
The {html-include} macro allows you to include the contents of an HTML file in a Confluence page.
CAUTION: Including unknown HTML inside a webpage is dangerous. Because HTML can contain activescripting components, it would be possible for a malicious attacker to present a user of your site withscript that their web browser would believe came from you. Such code could be used, for example, tosteal a user's authentication cookie and give the attacker their Confluence login password.By default, the HTML macros are disabled. You should only turn on these macros if you trust all yourusers not to attempt to exploit them.
You need to have System Administrator permissions in order to perform this function.
To enable the HTML macros,
1. Go to the 'Administration Console' and click 'Plugins' in the left-hand panel. This will display theinstalled plugins active for this Confluence installation.
2. Click' 'HTML macros', then click 'Enable Plugin'
RELATED TOPICS
Editing and Removing macros
Enabling HTML macros
Enabling the html-include Macro
User Macros
Writing Macros

Document generated by Confluence on Jan 01, 2008 18:35 Page 166
Enabling the html-include Macro
This page last changed on Dec 18, 2007 by smaddox.
The {html-include} macro allows you to include the contents of an HTML file in a Confluence page.
CAUTION: Including unknown HTML inside a webpage is dangerous. Because HTML can contain activescripting components, it would be possible for a malicious attacker to present a user of your site withscript that their web browser would believe came from you. Such code could be used, for example, tosteal a user's authentication cookie and give the attacker their Confluence login password.
Enabling the HTML Macros
By default, the HTML macros are disabled. You should only turn on these macros if you trust all yourusers not to attempt to exploit them.
You need to have System Administrator permissions in order to perform this function.To enable the HTML macros,
1. Go to the 'Administration Console' and click 'Plugins' in the left-hand panel. This will display theinstalled plugins active for this Confluence installation.
2. Click' 'HTML macros', then click 'Enable Plugin'
Usage Example
To embed an external page:
{html-include:url=http://www.example.com}
RELATED TOPICS
Editing and Removing macros
Enabling HTML macros
Enabling the html-include Macro
User Macros
Writing Macros

Document generated by Confluence on Jan 01, 2008 18:35 Page 167
Troubleshooting the Gallery Macro
This page last changed on May 29, 2007 by [email protected].
Gallery Macro
Usage: {gallery:columns=3\|title=Example Title}{gallery}
Description: Forms a thumbnail gallery of all images attachedto a page
Example: {gallery:columns=3\|title=Example Title}{gallery}
Input: optional: columns=<int n>|title=<title string>
Output: a thumbnail gallery with the number of columnsspecified (default 4) and a heading for the titleparameter
Bundled with Confluence?: yes
Troubleshooting
If you encounter the following error message: System does not support thumbnails: no JDK imagesupport then ensure that you have following system property available for your JVM:
JAVA_OPTS=-Djava.awt.headless=true
Also see CONF-1737
Please note that gallery-ext.jar is available at CONF-6620

Document generated by Confluence on Jan 01, 2008 18:35 Page 168
Performance Tuning
This page last changed on Dec 17, 2007 by smaddox.
Like any server application, Confluence may require some tuning as it is put under heavier use. We doour best to make sure Confluence performs well under a wide variety of circumstances, but there's nosingle configuration that is best for everyone's environment and usage patterns.
If you are having problems with the performance of Confluence and need our help resolving them, youshould read this document: Requesting Performance Support
Access logs
You can find out which pages are slow and which users are accessing them by enabling Confluence'sbuilt-in access logging.
Built-in Profiler
You can identify the cause of page delays using Confluence's built-in profiler according to TroubleshootingSlow Performance Using Page Request Profiling.
Choice of Database
The embedded database that is provided with Confluence is meant only to be used for evaluation, orfor low-volume Confluence sites. Once your site grows, you will almost certainly need to switch to anexternal relational database management system. Beyond this, we do not recommend any particularRDBMS over another. We recommend using what you are familiar with, because your ability to maintainthe database will probably make far more difference to what you get out of it than the choice of databaseitself.
Antivirus Software
Antivirus Software can greatly decrease the performance of Confluence. Antivirus Software that interceptsall access to the hard disk is particularly detrimental, and may even cause errors with Confluence. Ifpossible configure your software to ignore the Confluence home directory, or at least its index directory.
Database Indexes
If Confluence is running slowly, the most likely cause is that there is some kind of bottleneck in thedatabase.
If you have the luxury of access to a DBA, it would be worthwhile having them tune the databasespecifically to the demands that your particular Confluence installation is placing on it. If you do nothave a DBA, you may want to consult the database indexing advice that we have been gathering fromcustomer reports and our own experience running and developing Confluence. The instructions on thatpage are for Oracle, but most of the indexes can be applied to (and will help with) any database.
(These database indexes are now created automatically when Confluence is installed, but existinginstallations upgrading to a more recent version may still need to add them manually)
Cache Tuning
To reduce the load on the database, and speed up many operations, Confluence keeps its own cacheof data. Tuning the size of this cache may speed up Confluence (if the caches are too small), or reducememory (if the caches are too big). Future versions of Confluence will allow you to tune the size of thiscache from within the web application.
In Confluence 2.3 to 2.5, the cache is configured in confluence/WEB-INF/classes/confluence-coherence-cache-config.xml (or confluence/WEB-INF/classes/confluence-coherence-cache-

Document generated by Confluence on Jan 01, 2008 18:35 Page 169
config-clustered.xml for clustered versions). In Confluence 2.6, these files can be found inconfluence/WEB-INF/lib/confluence-2.6.0.jar.
There is also a Cache Statistics page provided with Confluence. This page shows the size of each cacheand its hit ratio.
Important Caches
• com.atlassian.confluence.core.ContentEntityObject should be set to at least 20-30% of thenumber of content entity objects (pages, comments, emails, news items) in your system. To find the
number of content entity objects, use the query select count from CONTENT.• com.atlassian.confluence.core.ContentEntityObject.bodyContents should be set to at
least 20% of the number of content entity objects (pages, comments, emails, news items) in
your system. To find the number of content entity objects, use the query select count fromCONTENT.
• com.atlassian.confluence.security.PermissionCheckDispatcher.isPermitted() should be setto at least the number of concurrent users you expect to access Confluence at the same time
• com.atlassian.confluence.user.DefaultUserAccessor.deactivatedUsers must be set to atleast the number of users with USE_CONFLUENCE permission (don't worry, it only takes up a few
bytes per user). To find an upper bound for this, use the query select count from OS_USER, or
if you have configured atlassian-user.xml to use the Hibernate repository, select count fromusers.
• com.atlassian.confluence.security.SpacePermission should be set to the number of spacepermissions in your deployment (a good rule of thumb is 20 times the number of spaces). You can
find the number of space permissions using the query select count from SPACEPERMISSIONS.
The following are more specific performance problems that can be resolved from tuning the cache.
"Edit Page" screen takes a long time to load
If you're installation of Confluence is suffering from this problem, it may be due to a insufficientSpacePermissions cache size. To address this problem, first determine the number of space permissionobjects in your Confluence instance. You can do this by running this query against your database:
> select count(*) from SPACEPERMISSIONS
Now locate the cache entry for SpacePermissions in your ehcache.xml file. It looks like this:
<cache name="com.atlassian.confluence.security.SpacePermission" maxElementsInMemory="10000"eternal="false" timeToIdleSeconds="3600" timeToLiveSeconds="0" overflowToDisk="false" />
The equivalent for confluence-coherence-cache-config.xml would be:
<local-scheme><scheme-name>cache:com.atlassian.confluence.security.CachingSpacePermissionManager.permissions</scheme-name><scheme-ref>default</scheme-ref><high-units>10000</high-units><expiry-delay>0s</expiry-delay></local-scheme>
Adjust the maxElementsInMemory or high-units property to the number of space permissions youhave (in the example above, I've used 10000). Also, just as important, you need to adjust thetimeToLiveSeconds or expiry-delay property to 0.
Note: 10K of space permissions consumes approximately 8MB of memory. Please ensure there is enoughmemory allocated to your instance to cater for this.
How to set specific cache settings
1. Find the cache name from the cache name mappings:• For Confluence 2.6.x and earlier, the cache name mappings are in file confluence/WEB-INF/classes/com/atlassian/confluence/admin/actions/cache-name-mappings.properties.

Document generated by Confluence on Jan 01, 2008 18:35 Page 170
• For Confluence 2.7.0 and later, you will find the cache name mappings in the filecom/atlassian/confluence/core/ConfluenceActionSupport.propertieswhich is packed into the confluence-2.7.jar file.
2. Find the appropriate <cache-mapping> tag in confluence-coherence-cache-config.xml orconfluence-coherence-cache-config-clustered.xml. If the tag doesn't exist, you can create itwithin the <caching-scheme-mapping> tag.
3. The <scheme-name> will correspond to a <local-scheme> tag below. It refers to a schemereference. Either change the high-units tag in the scheme reference, or add a high-units tag tooverride the scheme reference. For example, the following tag would change the Content Bodiescache from the default 1000 units to 2000 units:
<local-scheme><scheme-name>cache:com.atlassian.confluence.core.ContentEntityObject.bodyContents</scheme-name><high-units>2000</high-units><scheme-ref>default</scheme-ref><expiry-delay>0s</expiry-delay></local-scheme>
You can find more information about configuring the Coherence cache in the Coherence cachedocumentation.
Adjust Application Server Memory Settings
See Managing Application Server Memory Settings.
Use A Web Server
For high-load environments, performance can be improved by using a web server such as Apache in frontof the application server. There is a configuration guide to Running Confluence behind Apache.
When configuring your new web server, make sure you configure sufficient threads/processes to handlethe load. This applies to both the web server and the application server connector, which are typicallyconfigured separately. If possible, you should enable connection pooling in your web server connectionsto the application server.
RELATED TOPICS
Working with Confluence Logs

Document generated by Confluence on Jan 01, 2008 18:35 Page 171
Configuring a Large Confluence Installation
This page last changed on Jan 24, 2007 by [email protected] any application to several thousand users requires care and planning, expecially if those usersare going to be relying on the application to get their work done.
General Advice
Staged Rollout
Do not try to deploy Confluence immediately to your whole organisation. Instead, roll it out departmentby department, or project by project.
How Confluence will scale given a particular software and hardware configuration depends very much onhow Confluence is likely to be used in your organisation. Launching Confluence to everybody at once mayseem like a neat idea, but it also means that any problems you might experience scaling the system up toyour entire organisation will hit you all at once, annoy everyone and possibly hurt adoption.
Rolling Confluence out gradually will give you the chance to tune it as you go, resulting in a much morepainless experience. There will also be organisational advantages: you can identify those teams orprojects who are most likely to be successful 'early adopters', and those teams can experiment with howbest a wiki might suit your organisation, and pass on their 'best wiki practices' as usage of Confluenceexpands.
Configuring your Application Server, Web Server and Database
Because Confluence can be deployed in so many server combinations, we do not currently have guideson the best tuning parameters for each individual server. We will be happy to provide support, however.If you have any tuning parameters that you find particularly useful for Confluence instances, feel free toshare them with other Confluence users in the Confluence Community space.
Things to Keep an Eye On
Memory Usage
The Java virtual machine is configured with a "maximum heap size" that limits the amount of memory itwill consume. If Confluence fills up this maximum heap size it will run out of memory, and start behavingunpredictably. You can keep track of Confluence's memory usage from the System Information screen ofthe administration console:
This example shows that, at the time of writing, confluence.atlassian.com is using 173MB of an allocated313MB of heap. (The JVM was configured with a maximum heap size of 450MB, but this information is notavailable in the graph. The 313MB figure shows that the full 450MB of heap has not yet been needed)
Database Connection Pool
Confluence will need a database connection for each simultaneous user connection to the server. It isalso a good idea to have 5-10 connections spare for Confluence internal processes such as backups, re-indexing or daily notification jobs.
Running out of pooled connections will cause the server to slow down as more users are waiting for aconnection to be freed before starting their own request, and will eventually cause visible system errorsas Confluence times out waiting for a database connection.

Document generated by Confluence on Jan 01, 2008 18:35 Page 172
If you are using Confluence's internal connection pool, you can increase the number of availableconnections by modifying the hibernate.c3p0.max_size property in {confluence_home}/confluence-cfg.xml, and restarting Confluence. Make sure you have also configured your database to be able tosupport that many simultaneous connections.
Cache Sizes
The Performance Tuning page includes some useful rules of thumb for configuring the sizes ofConfluence's internal caches.

Document generated by Confluence on Jan 01, 2008 18:35 Page 173
Confluence Performance Enhancement
This page last changed on Oct 24, 2005 by jnolen.
One of our current tasks is improving Confluence's performance, in time and space. This page lists someof the things we've done to speed up Confluence, and to reduce its memory footprint.
• Creating Memory Leaks with Spring• Filtering Regular Expression Application

Document generated by Confluence on Jan 01, 2008 18:35 Page 174
Creating Memory Leaks with Spring
This page last changed on Oct 24, 2005 by jnolen.
I've spent the last few days looking at Confluence's memory footprint.
The biggest win so far (besides turning off all the caches ) has been in Spring. Confluence usesdependency injection everywhere, both for its services and to initialise short lived objects like xworkactions. It seems that Spring doesn't directly cater for the latter use, and is very easy to misuse if youaren't careful.
Spring keeps track of dependencies between the beans it manages, so if you inject bean A into bean B,Spring will record the fact. Spring will call B.setA(A) of course, to perform the injection. Then it adds thename of B to the list of beans which depend on A, so that during shutdown it can remove B before A.
Confluence autowires beans using the DefaultListableBeanFactory.autowireBeanProperties()method. This assumes that the bean is a singleton, and registers it. It also doesn't check whether thebean it is registering is already a dependent of the bean being injected. So the linked list of dependenciesgrows with every page view. Five hundred views go it up to almost 10MB!
Spring does allow non-singleton beans, and it understands that they shouldn't be registered asdependents, but DefaultListableBeanFactory doesn't provide a way of autowiring a non-singleton bean.
I created a new factory to do the job:
private static class BucketListableBeanFactory extends DefaultListableBeanFactory{public BucketListableBeanFactory(ApplicationContext context){super(context);}
public void autowireNonSingletonBeanProperties(Object existingBean, int autowireMode, booleandependencyCheck)throws BeansException{if (autowireMode != AUTOWIRE_BY_NAME && autowireMode != AUTOWIRE_BY_TYPE){throw new IllegalArgumentException("Just constants AUTOWIRE_BY_NAME and AUTOWIRE_BY_TYPE allowed");}RootBeanDefinition bd = new RootBeanDefinition(existingBean.getClass(), autowireMode,dependencyCheck);bd.setSingleton(false);populateBean(existingBean.getClass().getName(), bd, new BeanWrapperImpl(existingBean));}}
That's just a copy of autowireBeanProperties(), with the addition of a call to setSingleton().
Confluence's calisthenics and orthodontia is under way. Soon we'll be running light without overbyte!

Document generated by Confluence on Jan 01, 2008 18:35 Page 175
Filtering Regular Expression Application
This page last changed on Oct 24, 2005 by jnolen.
Confluence uses (mostly) regular expressions to convert wiki style markup into html. These are simple towrite, fairly simple to compose (that is, you can add another regular expression which gets applied on topof the ones you already have), and most importantly, are forgiving.
It wouldn't be too hard to write a grammar expressing the markup language, but when a user entersmarkup which the system doesn't understand, you need to fail softly – not throwing away any input, andnot presenting the user with an error message. The mechanics of the markup process must be invisible tothe user.
Regular expressions can be expensive to apply – for instance, when viewing a 100line page in Confluence 1.4, 17% of the CPU time used during the request is used injava.util.regex.Matcher.replaceAll().
A typical regular expression is
"(^|\\s)---(\\s|$)"
which finds
---
and replaces it with an emdash,
—
which renders as — .
It's simple to see when this regular expression certainly doesn't apply to some wiki text – when that textdoesn't include
---
You can do an analagous test for each of our many regular expressions, just look for a constant part ofthe regex. Of course, the existence of the constant part is a necessary, not a sufficient condition to knowthat the regex will match, but it works well enough to be worthwhile.
A simple
wikiText.indexOf(constantPart) > 0
check before each application of a regular expression reduces that 17% to 9%, on a page of 100 lineswhich has bold and italic markup on every other line.
It's interesting that replaceAll() doesn't try that itself. Presumably its optimised for the case when thestring you give it does match the expression, which is probably the most common situation.
A very simple but worthwhile saving. The only situation we need to worry about is if many of the lines inour pages have many types of markup on them, because then we not only pay for the replaceAll(), butalso pay for the indexOf.

Document generated by Confluence on Jan 01, 2008 18:35 Page 176
How Adaptavist Runs Confluence
This page last changed on Sep 19, 2006 by [email protected].
Key information about performance tuning and how Adapatavist runs many instances of Confluence. Thiswas posted to the mailing list but not captured in the forums so I wanted to copy it here:
Confluence Performance Recommendations from Adaptavist
Hi,> 1) Opterons – for better or worse, we're solely an Intel shop at this point (i.e. I'll get some resistancegoing down the AMD path). It seems like the latest Woodcrest Xeons have caught up with the Opteronsperformance-wise (although AMD was smacking around Intel for a while before that). Have you theWoodcrest Xeons at all? (I'm guessing at this point you're probably just interested in pursuing an Opteronpath but figured I'd ask.)We found the Opterons are perfect for running multithreaded apps - especially when running lots ofConfluence / JIRA installs on a server in their own Resin containers. In addition, the Opterons use aless electrical power than their Intel counterparts which reduces our energy bills - for that reason we'venot tried the Woodcrest chip yet. The chassis used for Opteron chips is also more established than theWoodcrest counterpart and is thus cheaper at the moment and has more options. Any dual-core will likelygive better results, but you'll obviously need your OS and other software on the server to be set-up totake advantage of them.> 2) Resin vs. Tomcat – would you mind guessing at performance numbers from what you've seen? In aton of Googling, it seems like people are saying that Tomcat was slow back with 4.x but got much fasterwith 5.x and even more with 5.5.x. See the comments in the first link.
Resin, properly configured, is still faster In addition, it uses a lot less RAM (important when you have50 web apps in their own containers). We spent a lot of time super-fine-tuning Resin (about 4 months ifmemory serves - huge thanks to Caucho and the chaps at BeJUG) to run Confluence very nicely indeed.I can't vouch for it's speed with regards to other apps. We've found Resin to be highly stable (whencorrectly configured) and it deals very well with that elusive Confluence memory leak (something younotice on a site like JavaPolis[1] with over 17,600 registered users). It's garbage collection, again whenproperly tuned, was better than Tomcat and we found many tasks easier to automate with Resin ascompared to Tomcat.
Admittedly, a lot of the reasons that we chose Resin for are geared to an environment where we'rerunning up to 50 Confluences on a single server, each in their own web app. That's quite a differentscenario to what you are doing where you maybe have one or two Confluences on a server. Although,having said that, we use the same set-up for our dedicated hosting (we're hosting some real BIGConfluence installs as you'll know if you followed the discussion about the import routine we've beenworking on) and it works great in that environment too.
We use the commercial version of Resin[2] - it's much better than the OS version as it has fewer bugs,runs more smoothly and has some real nice features (read: absolutely critically essential for the sanity ofour staff thus reducing our monthly bills for padded cells and therapy) for the type of environment we useit in. We also really liked Caucho's licensing of resin[3]: $500 per physical server with 2 cores (additionalcores @ $500/core which is very reasonable) regardless of the number of Resin containers on that server.
It should be noted that some of the stats you provided links to were done on Windows running Cygwin
- hardly an ideal server environment The second link (with all the graphs that people like meunderstand) was far more representative. We run on SuSE Linux 10 EMT64 (or something like that -whatever the latest version of their 64-bit OS is) so there's no Windows bloat getting in the way of theweb apps, etc.> 3) Memory. I think I'll go for DDR667 and see if I can bump Confluence up to 2 GB. Is there ever apoint where you can allocate too much RAM? (i.e. java and/or Confluence just don't handle tracking thatmany cached objects well)I think we're up to 16GB in most of our servers now. Confluence does enjoy more RAM (althoughcontainers such as Resin bring the overall RAM consumption down a fair bit - very noticeable on serverswith 50 containers/apps). More RAM means more space to cache and longer gaps between forced GC.RAM allocation is also vital when it comes to the nightly backup (or "the dreadded backup hour" as werefer to it) - you can imagine the CPU and RAM spikes caused by 50 large Confluence installations alldeciding to backup at the same time (roll on Confluence 2.3!)...
Should you have too much memory, you can always run a Quake server on there :o)

Document generated by Confluence on Jan 01, 2008 18:35 Page 177
FYI: We also separate our database out on to a separate server.
Best Regards,
Guy
[1] http://www.javapolis.com - at last year's conference the Belgian's were somewhat annoyed at theterm "SOA" which is an obscenity over there. They were also less than happy about the spoons in sexualpositions plastered all over Antwerp (and several thousand Javapolians wearing the conference t-shirts).So this year Stephan and the crew have decided to push the boundaries to hitherto unimaginable levels -anyone who's seen the promo video will know exactly what I mean (and no, not the white painted blokenext to the urinal - the video goes waaaay beyond that - how they got James Gosling to... well, you'llhave to wait and see)[2] http://www.caucho.com/resin-3.0/features/overview.xtp[3] http://www.caucho.com/sales/sales.xtp
Dan will probably be along in the morning to correct any mistakes I've made -

Document generated by Confluence on Jan 01, 2008 18:35 Page 178
Memory usage and requirements
This page last changed on Oct 04, 2007 by [email protected].
Managing Confluence's performance and memory usage really depends on what resources are available- Confluence will run faster if you give it lots of memory for its caches, but it should still be able to runquite well in low-memory environments, with the right tuning. Below are some tips on getting the mostout of your Confluence site:
Increasing the amount of memory available to Confluence
See Increasing JIRA memory for details on how to increase the memory available to web applicationservers typically used to run Confluence.
Embedded Database
The embedded HSQL database that comes with Confluence essentially holds all your data in memorywhile the Confluence server is running. If you are running out of memory, you should consider migratingConfluence to some external RDBMS.
Caching
By default, Confluence keeps large in-memory caches of data to improve its responsiveness and the userexperience. The trade off is an increase in memory requirements to support the cache. The default size ofthese caches will be reduced significantly in Confluence 1.5 (although this means that administrators oflarger Confluence sites may need to configure the size of their caches to improve performance).
To customise confluences cache to meet your needs, see cache tuning.To increase the amount of memory available to confluence, see allocating more memory to tomcat.
Mail error queue
Confluence keeps a copy of all emails that it failed to send within an internal error queue. In the event ofintermittent failures such as network connectivity issues, the emails in this queue can be manually resentwhen the problem is fixed. Under certain circumstances, the mail queue can fill up with large objects.Since Confluence 1.4.1 the queue is regularly flushed, but if you get a lot of mail errors, you might get aspike in memory usage.
Attachments
The indexing of large attachments requires that the attachment be loaded into memory. In the caseof large attachments, this can cause a temporary strain on the systems resources, and may result inindexing failing because the attachment could not be fully loaded into memory.
System backup / resort
The Confluence backup and resort process scales linearly with the size of data. This can have a significantimpact on large Confluence instances where the amount of data exceeds the amount of availablememory. If you are experiencing OutOfMemoryErrors during either a backup or restore, you with eitherneed to move to per space backups or increase the memory allocated to Confluence. This is addressed inthe upcoming Confluence 2.0.
If you are attempting to restore a backup and encountering the OutOfMemoryError, how much memorywill you need to make it work? A good rule of thumb is to have a look at the size of the entities.xml file inyour backup. This file contains all of the data Confluence will be loading, so at least that much is required.Add another 64-128Mb to ensure that Confluence has enough memory to load and function and thatshould be enough.
This problem has been resolved in Confluence post 1.4.x. To increase the amount of memory available toconfluecne, see allocating more memory to tomcat.

Document generated by Confluence on Jan 01, 2008 18:35 Page 179
Known issues that we do not have control over.
There are also some memory issues we don't have any control over. For example,
• There's a memory leak in the Oracle 10g JDBC drivers. Not much we can do about that.• one customer found a rather nasty memory leak that appeared to originate inside Tomcat 5, but
only using the IBM JDK on PowerPC.
If you're having problems that appear to be a memory leak, file an issue on http://support.atlassian.com.Our memory profiler of choice is YourKit, so if you can get a memory dump from that tool showing a leak
Confluence is taking long periods of time to respond to some actions
A common cause of random pauses in Confluence is the jvm running garbage collection. To determine ifthis is what is happening, enable verbose garbage collection and look at how long java is taking to freeup memory. If the random pauses match when java is running its garbage collection, garbage collection isthe cause of the pause.
Verbose garbage collection will generate log statements that indicate when java is collecting garbage,how long it takes, and how much memory has been freed.
To enable gc logging, start Confluence with the option -XX:+PrintGCDetails -XX:+PrintGCTimeStamps-verbose:gc -Xloggc:gc.log. Replace gc.log with an absolute path to a gc.log file.
For example, with a Windows service, run:
tomcat5 //US//Confluence ++JvmOptions="-XX:+PrintGCDetails -XX:+PrintGCTimeStamps -verbose:gc -Xloggc:c:\confluence\logs\gc.log"
or in bin/setenv.sh, set:
export CATALINA_OPTS="$CATALINA_OPTS -XX:+PrintGCDetails -XX:+PrintGCTimeStamps -verbose:gc -Xloggc:${CATALINA_BASE}/logs/gc.log"
If you modify bin/setenv.sh, you will need to restart Confluence for the changes to take effect.
What can you do to minimise the time taken to handle the garbage collection? See http://java.sun.com/docs/hotspot/gc1.4.2/ for details on tuning the jvm to minimize the impact that garbage collection has onthe running application.

Document generated by Confluence on Jan 01, 2008 18:35 Page 180
java.util.zip.ZipFile.open causes OutOfMemoryError for large zip files
This page last changed on Nov 29, 2006 by [email protected].
Problem
For large backup zip files (bigger than 1GB) OutOfMemoryErrors can occur during restore, even thoughthe maximum heap size is way above this value.
The error will look something like this:
Cause:javax.servlet.ServletException: Servlet execution threw an exceptionatorg.apache.catalina.core.ApplicationFilterChain.internalDoFilter(ApplicationFilterChain.java:275)caused by: java.lang.OutOfMemoryErrorat java.util.zip.ZipFile.open(Native Method)
However, when looking at the system information you will find that there is still a lot of memory availableon the heap.
Memory Information:Total Memory: 2480 MBFree Memory: 2385 MBUsed Memory: 95 MB
Solution
The problem seems to be a bug in Java. The method java.util.zip.ZipFile.open does not actually use theallocated memory of the heap, it maps the entire zip file into virtual memory outside the heap. If you runinto this problem, you should try to reduce your heap size to about 600MB and try the restore again. Thisseems to accord with the experience of other developers:
if you set a small value for max heap size, it workscorrectly, but if you specify too large a value, thenOutOfMemoryErrors occur.There is no obvious relationship between the max heap size,the size of the zip file, and the computer's availablememory. With a max heap size less than about 600 MB, errorsnever occur. Large than that, and they occur. A 1.2 GB zipfile always opens correctly, but a 1.4 GB one never does (ifthe max heap size is larger than 600 MB). I have testedthis on computers with both 256 MB of RAM and 2 GB of RAM,and the behavior is nearly identical.
Related topics
Allocating more memory

Document generated by Confluence on Jan 01, 2008 18:35 Page 181
Requesting Performance Support
This page last changed on Nov 01, 2007 by jeff.If you are having performance issues with Confluence, and the advice on Performance Tuning has nothelped, you can always ask us for help. Performance issues can be hard to diagnose, however, and weoften spend a lot of time going back and forth looking for more information about what may be causingConfluence to be slow for you. The best way to get a speedy resolution to your issue is to provide thisinformation up front.
Please gather all of the information listed below and include it in your support request, even if you thinkyou have a good idea what's causing the problem. That way we don't have to ask for it later.
System Information
Confluence Server
• Take a screenshot of Confluence's Administration # System Information (or save the page asHTML)
• Take a screenshot of Confluence's Administration # Cache Statistics (or save the page asHTML)
• Find out the exact hardware Confluence is running on° How many CPUs? What make and model? What MHz?° How much memory is installed on the machine?° How much memory is assigned to Confluence's JVM? (i.e. what are the -Xmx and -Xms
settings for the JVM?)° What other applications are being hosted on the same box?
Confluence Content
• How many users are registered in Confluence?• How many spaces are there in your Confluence server?• Approximately how many pages? (Connect to your database and perform 'select count(*) fromcontent where prevver is null and contenttype = 'PAGE'')
The Database
• What is the exact version number of Confluence's database server?• What is the exact version number of the JDBC drivers being used to access it? (For some databases,
the full filename of the driver JAR file will suffice)• Is the database being hosted on the same server as Confluence?• If it is on a different server, what is the network latency between Confluence and the database?• What are the database connection details? How big is the connection pool? If you are using the
standard configuration this information will be in your confluence_cfg.xml file. Collect this file. If youare using a Data source this information will be stored in your application server's configuration file,collect this data.
User Management
• Are you using external user management or authentication? (i.e. JIRA or LDAP user delegation, orsingle sign-on)
• If you are using external JIRA user management, what is the latency between Confluence and JIRA'sdatabase server?
• If you are using LDAP user management:° What version of which LDAP server are you using?° What is the latency between Confluence and the LDAP server?
Diagnostics
Observed Problems
• Which pages are slow to load?

Document generated by Confluence on Jan 01, 2008 18:35 Page 182
° If it is a specific wiki page, attach the wiki source-code for that page• Are they always slow to load, or is the slowness intermittent?
Access logs
• Enable user access logging, including redirecting the logs to a separate file° You can run this file through a log file analyser such as AWStats, or manually look through for
pages which are slow to load.
Profiling and Logs
• Enable Confluence's built-in profiling for long enough to demonstrate the performance problem usingTroubleshooting Slow Performance Using Page Request Profiling.
° If a single page is reliably slow, you should make several requests to that page° If the performance problem is intermittent, or is just a general slowness, leave profiling
enabled for thirty minutes to an hour to get a good sample of profiling times• Find Confluence's standard output logs (which will include the profiling data above). Take a zip of
the entire logs directory.• Take a thread dump during times of poor performance
CPU Load
• If you are experiencing high CPU load, please install the YourKit profile and attach two profilerdumps taken during a CPU spike. If the CPU spikes are long enough, please take the profiles 30-60seconds apart.
Next Step
Open a ticket on https://support.atlassian.com and attach all the data you have collected. This shouldgive us the information we need to track down the source of your performance problems and suggest asolution. Please follow the progress of your enquiry on the support ticket you have created.
If your site is non-responsive, please use our Live Support during business hours once you have createdthe ticket to escalate your problem.

Document generated by Confluence on Jan 01, 2008 18:35 Page 183
Troubleshooting Slow Performance Using Page Request Profiling
This page last changed on Dec 18, 2007 by smaddox.
This page tells you how to enable page-request profiling. With profiling turned on, you will see a record ofthe time it takes (in milliseconds) to complete each action made on any Confluence page. If Confluence isresponding slowly, an internal timing trace of the slow page request can help to identify the cause of thedelay.
You will need access to the Confluence server to view a profile.
In this page:
• Enabling Page-Request Profiling• Profiling an Activity• Example of a Profile
Enabling Page-Request Profiling
There are two ways to turn on profiling for your Confluence instance:
• Append ?profile=on to the URL of any Confluence page.• Use the 'Logging and Profiling' option in the 'Administration Console'.
Both methods are described below.
Using a Page's URL to Enable/Disable Profiling
1. Go to any page in your Confluence instance.2. Turn profiling on or off as follows:
• To turn profiling on: In your browser address bar, change the URL by appending ?profile=onto the end of the URL for static pages, or &profile=on if the URL is dynamic and already hasparameters.For example, if your Dashboard link is:
http://localhost:8080/dashboard.action
then you must manually add ?profile=on to the end of the URL:
http://localhost:8080/dashboard.action?profile=on
• To turn profiling off: In your browser address bar, change the URL by appending ?profile=offto the end of the URL for static pages, or &profile=off if the URL is dynamic and already hasparameters.For example, if your Dashboard link is:
http://localhost:8080/dashboard.action
then you must manually add ?profile=off to the end of the URL:
http://localhost:8080/dashboard.action?profile=off
3. Press Enter.
Using the Administration Console to Enable/Disable Profiling
From Confluence 2.7, you can use the 'Logging and Profiling' option to enable or disable profiling.
You need to have System Administrator permissions in order to perform this function.
To enable page profiling,
1. Go to the 'Administration Console' and click 'Logging and Profiling' in the 'Administration' section ofthe left-hand panel.
2. The 'Logging and Profiling' screen appears. Click the 'Enable Profiling' button.
Document generated by Confluence on Jan 01, 2008 18:35 Page 184
If profiling is already enabled, the button will be labelled 'Disable Profiling' instead.
To disable page profiling,
1. Go to the 'Administration Console' and click 'Logging and Profiling' in the 'Administration' section ofthe left-hand panel.
2. The 'Logging and Profiling' screen appears. Click the 'Disable Profiling' button.
If profiling is already disabled, the button will be labelled 'Enable Profiling' instead.
Screenshot: Changing Log Levels and Profiling

Document generated by Confluence on Jan 01, 2008 18:35 Page 185
Profiling an Activity
1. Locate Confluence's standard screen output, or stdout, on the Confluence server.
If you are running Confluence as a Windows service, the log entries will be written to the /logs/stdout.log file under the Confluence install directory, while users running Confluence usingstartup.bat under Windows have stdout written to the command prompt window.
2. Enable profiling, using either of the methods described above.Profiles for every page hit, for all users, will now be logged to your application server's default logsuntil Confluence is restarted. Note that each time a user visits a link, a single profile is printed.
3. Confirm that profiles are being printed to stdout.

Document generated by Confluence on Jan 01, 2008 18:35 Page 186
4. Perform the activity that is resulting in unusually slow response time.5. Copy the profile for that action. When deciding which profiles to copy, look for the links that took
a long time to respond. If a single page is slow, only that profile is necessary. If Confluence isgenerally or intermittently slow, copy all profiles logged during the slowdown until a reasonablesample has been collected.
6. If you were instructed to profile your instance by Atlassian technical support, attach all relevantprofiles to your support ticket.
7. Turn profiling off again, using either of the methods described above.8. Confirm that profiles are no longer being printed to stdout.
Example of a Profile
Below are the first few lines of a normal profile for accessing a page called Confluence Overview.
[344ms] - /display/ds/Confluence+Overview[313ms] - SiteMesh: parsePage: http://localhost:8080/display/ds/Confluence+Overview[313ms] - XW Interceptor: Before defaultStack: /pages/viewpage.action (ViewPageAction.execute())[0ms] - SpaceAwareInterceptor.intercept()[16ms] - PageAwareInterceptor.intercept()[0ms] - AOP: PageManager.getPage()[16ms] - AOP: PermissionManager.hasPermission()[0ms] - AOP: SpacePermissionManager.hasPermission()[16ms] - AOP: SpacePermissionManager.hasPermission()[0ms] - AOP: SpacePermissionManager.hasPermission()[0ms] - AOP: SpacePermissionManager.hasPermission()[281ms] - XW Interceptor: After defaultStack: /pages/viewpage.action (ViewPageAction.execute())[281ms] - XW Interceptor: After validatingStack: /pages/viewpage.action (ViewPageAction.execute())...
RELATED TOPICS
Requesting Performance SupportWorking with Confluence Logs

Document generated by Confluence on Jan 01, 2008 18:35 Page 187
Profiling using the YourKit Plugin
This page last changed on Dec 12, 2007 by mryall.
Introduction
There is a plugin for Confluence 2.2 and later which allows easy profiling using the YourKit profiler. Nolicense is required to generate a memory or CPU snapshot, but you will need at least an evaluationlicense to analyse the results.
JIRA also has a plugin to profile JIRA's CPU and memory usage with YourKit.
Configuring YourKit in your JVM
Download YourKit 6.0 or higher for your platform, and install it by following the installation instructions.
The following instructions apply to Confluence Standalone and Tomcat installations with Sun JDK1.5. They should be easily applicable to other application servers and JVMs, however. The YourKitdocumentation covers this in more detail.
Windows configuration
On Windows, add to your PATH environment variable the bin/win32/ directory underneath the YourKitinstallation directory. For example, you might add "C:\Program Files\YourKit Java Profiler 6.0.12\bin\win32" to your PATH, via Control Panel, System, Advanced, Environment Variables.
To configure Confluence's JVM to use the YourKit agent, you need to add a parameter to JAVA_OPTS inthe bin/setenv.bat file in your Confluence application directory. This file controls the startup parametersfor Tomcat, so you'll need to restart it after making the changes.
Add the 'agentlib' parameter to the end like this:
set JAVA_OPTS=%JAVA_OPTS% -Xms128m -Xmx256m -agentlib:yjpagent
Linux/Mac OS X configuration
On Unix-based systems, include the installation directory in the library path environment variable, asshown below:
• For the Mac: export DYLD_LIBRARY_PATH=$DYLD_LIBRARY_PATH:/path/to/yourKitAgent• For other Unix-based systems: export LD_LIBRARY_PATH=$LD_LIBRARY_PATH:/path/to/yourKitAgent
In general, to configure a Sun 1.5 JDK, you add the agentlib parameter:
java -agentlib:yjpagent ...
You can add this to Tomcat's bin/setenv.sh like this:
JAVA_OPTS="-Xms128m -Xmx256m $JAVA_OPTS -Djava.awt.headless=true -agentlib:yjpagent "
Performance impact
Running YourKit can have detrimental effects on performance.
To minimize performance problems use the following modifications to the agentlib parameter:
-agentlib:yjpagent=disablecounts,disablealloc,disablej2ee
See also "Profiling overhead: how to reduce or avoid" in the YourKit documentation.
Installing the YourKit plugin
Download the plugin and upload it into Confluence through the Administration, Plugins page.

Document generated by Confluence on Jan 01, 2008 18:35 Page 188
A new menu option will appear under the 'Administration' heading. Click it and you should see the optionsto take a memory or CPU snapshot.
YourKit Profiling menu item
This profiler dump will be saved to a local temp directory, and the path shown once it is complete. For theCPU snapshot, this will take at least 30 seconds. For the memory snapshot, 10-15 seconds.
You can take either a memory or CPU snapshot
Why would I do this?
Analysing a profiler dump enables Atlassian Support (or you, if you are interested) to see exactly what ishappening in your application: what classes are using the memory, what is using CPU and so on. This canhelp us debug tricky performance problems which would otherwise be impossible to analyse remotely.
Take a CPU snapshot if:
• Confluence is sometimes unresponsive• Pages take a long time to load• Confluence's CPU usage is peaking.
Take a memory snapshot if:
• Confluence's memory usage is higher than you expect• You are getting OutOfMemoryError's in your logs.
Plugin source code
The source code for this Confluence plugin is available from Subversion and browseable in Fisheye. TheJAR produced by 'mvn package' includes a copy of the YJP redistributable bundled in META-INF/lib/.
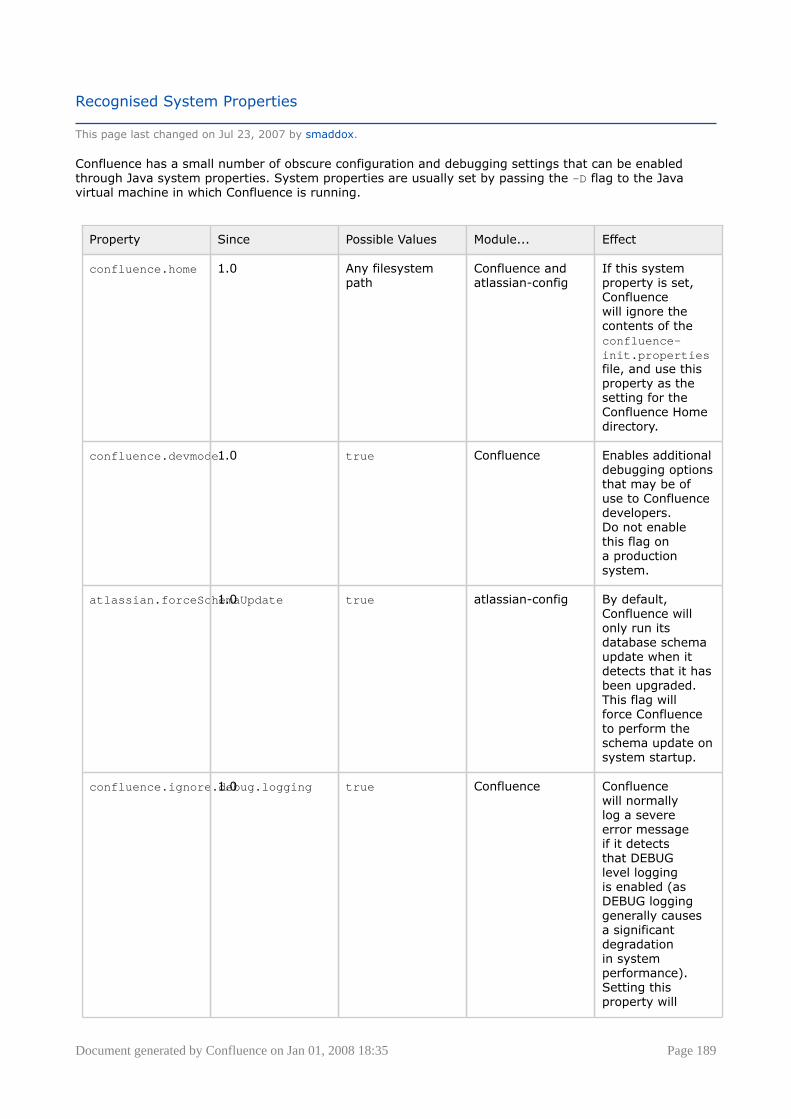
Document generated by Confluence on Jan 01, 2008 18:35 Page 189
Recognised System Properties
This page last changed on Jul 23, 2007 by smaddox.
Confluence has a small number of obscure configuration and debugging settings that can be enabledthrough Java system properties. System properties are usually set by passing the -D flag to the Javavirtual machine in which Confluence is running.
Property Since Possible Values Module... Effect
confluence.home 1.0 Any filesystempath
Confluence andatlassian-config
If this systemproperty is set,Confluencewill ignore thecontents of theconfluence-init.propertiesfile, and use thisproperty as thesetting for theConfluence Homedirectory.
confluence.devmode1.0 true Confluence Enables additionaldebugging optionsthat may be ofuse to Confluencedevelopers.Do not enablethis flag ona productionsystem.
atlassian.forceSchemaUpdate1.0 true atlassian-config By default,Confluence willonly run itsdatabase schemaupdate when itdetects that it hasbeen upgraded.This flag willforce Confluenceto perform theschema update onsystem startup.
confluence.ignore.debug.logging1.0 true Confluence Confluencewill normallylog a severeerror messageif it detectsthat DEBUGlevel loggingis enabled (asDEBUG logginggenerally causesa significantdegradationin systemperformance).Setting thisproperty will

Document generated by Confluence on Jan 01, 2008 18:35 Page 190
suppress the errormessage.
confluence.i18n.reloadbundles1.0 true Confluence Setting thisproperty willcause Confluenceto reload its i18nresource bundlesevery time aninternationalisedstring is lookedup. This canbe usefulwhen testingtranslations,but will makeConfluence runinsanely slowly.
atlassian.disable.caches2.4 true atlassian-plugins,atlassian-cache-servlet
Setting thisproperty willdisable conditionalget and expires:headers onsome webresources. Thiswill significantlyslow down theuser experience,but is useful indevlopment if youare frequentlychanging staticresources anddon't want tocontinually flushyour browsercache.

Document generated by Confluence on Jan 01, 2008 18:35 Page 191
Scheduled Jobs
This page last changed on Oct 04, 2007 by smaddox.
This page provides a quick overview of the jobs that are scheduled to run regularly in your Confluenceinstance.
Job Name Description
backupJob performs a site backup
mailQueueFlushJob sends notifications that have been queued up
referralQueueFlushJob referrals to Confluence pages are queued up. Thisjob writes this referrals to the database
taskQueueFlushJob flushes the task queue
cleanTempDirectoryJob this cleans up temp files created in Confluencehome temp directory (created by exports etc.)
dailyReportJob sends out an email summary of all changes inConfluence to all subscribers
clearOldMailErrorsJob notifications that fail to send due to errors areadded tot he mail error queue. This job resets thisclear periodically.
indexQueueFlushJob each content update to Confluence needs to beupdated in index so search results are accurate.This job flushes changes to the index.
indexOptimizerJob index optimization is performed to compactthe index and maintain searching performance.This task is expensive and does not need to beperformed too regularly. If you see Confluenceperformance deteriorate around 3pm, you can tryscheduling this job for 3am only and check thatsearch performance remains reasonable.
indexQueueCleanJob this job is responsible for periodically triggering anIndex Queue clean to ensure that size of the indexqueue does NOT grow indefinately.
mailPollJob polls POP accounts on all spaces that have themconfigured.
clusterSafetyJob ensures that only one cluster is ever writing tothe database at one time. For non-clusteredinstances, this job is still useful for alertingcustomers that have accidentally deployedtwo instances of Confluence against the samedatabase.

Document generated by Confluence on Jan 01, 2008 18:35 Page 192
Search
This page last changed on Jun 22, 2007 by smaddox.
Setup Confluence To Index External Sites
Setup External Search Tool To Index Confluence
Document generated by Confluence on Jan 01, 2008 18:35 Page 193
Setup Confluence To Index External Sites
This page last changed on May 07, 2007 by [email protected].
Confluence Indexing External Sites
Confluence cannot easily index external sites due to technical reasons, but there are two alternatives:
1. Embed External Pages Into Confluence2. Replace Confluence Search
Technical Reasons
Confluence indexes pages using a customised Lucene search engine that returns matching pages, mailand blog posts for which the searcher has view permission. It would require significant source codemodifications to enable Confluence to process search results from external pages, as the indexing processhas been customised to utilise internal Confluence metadata. Note that users can still index content fromnew attachment filetypes.
Embed External Pages Into Confluence
If you only have a small number of external sites to index, you may prefer to enable the HTML-includeMacro and use it embed the external content inside normal Confluence pages.
Replace Confluence Search
Use your own programmer resources to replace Confluence's internal search with a crawler that indexesboth Confluence and external sites. This advanced option is easier than modifying the internal searchengine. It requires removing Confluence internal search from all pages and replacing the internal resultspage with your own crawler front-end.
1. Setup a replacement federated search engine to index the Confluence site, as well as your othersites, and provide the results that way. You would need to host a web crawler, such as these open-source crawlers. Note that you can perform a search in Confluence via the remote API
2. Replace references to the internal search by modifying the site layout so that it links to your searchfront-end
3. Host another site containing the search front-end. You may wish to insert it into a suitable contextpath in your application server so that it appears to be from a path under Confluence. Tomcat setsConfluence's paths from the Confluence install\confluence\WEBINF\web.xml file.

Document generated by Confluence on Jan 01, 2008 18:35 Page 194
Setup External Search Tool To Index Confluence
This page last changed on Jul 06, 2007 by [email protected].
Any web crawler can be configured to index Confluence content. If a login is required to view content thatwill be indexed, you should create a Confluence user specifically for the search crawler to use. Grant thisuser view rights to all content you wish to index, but deny that user all delete and administration rights.This ensures that an aggressive crawler will not be able to perform actions that could modify the site.

Document generated by Confluence on Jan 01, 2008 18:35 Page 195
Security
This page last changed on Jan 31, 2006 by vidya.
• Adding SSL for Secure Logins and Page Security• Anonymous Access to Remote API• Enabling or Disabling Public Signup• Hiding External Links From Search Engines• Hiding the People Directory• Managing External Referrers
° Excluding external referrers° Hiding external referrers
• User Email Visibility
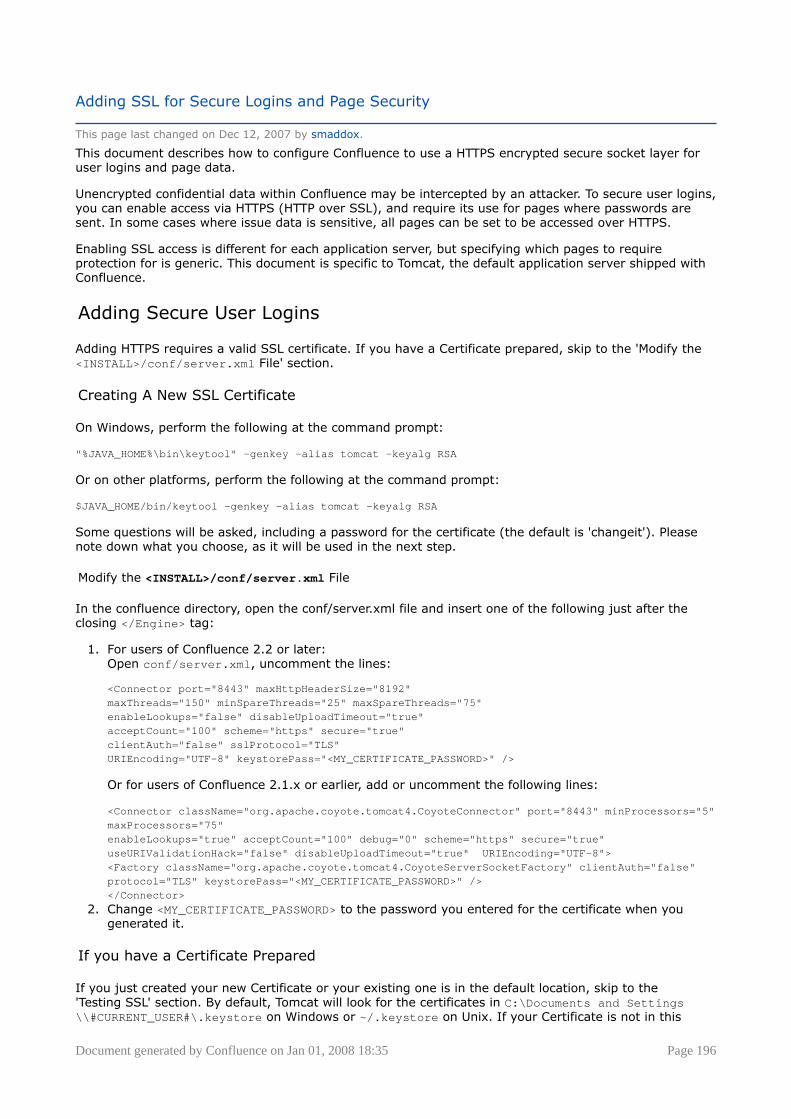
Document generated by Confluence on Jan 01, 2008 18:35 Page 196
Adding SSL for Secure Logins and Page Security
This page last changed on Dec 12, 2007 by smaddox.
This document describes how to configure Confluence to use a HTTPS encrypted secure socket layer foruser logins and page data.
Unencrypted confidential data within Confluence may be intercepted by an attacker. To secure user logins,you can enable access via HTTPS (HTTP over SSL), and require its use for pages where passwords aresent. In some cases where issue data is sensitive, all pages can be set to be accessed over HTTPS.
Enabling SSL access is different for each application server, but specifying which pages to requireprotection for is generic. This document is specific to Tomcat, the default application server shipped withConfluence.
Adding Secure User Logins
Adding HTTPS requires a valid SSL certificate. If you have a Certificate prepared, skip to the 'Modify the<INSTALL>/conf/server.xml File' section.
Creating A New SSL Certificate
On Windows, perform the following at the command prompt:
"%JAVA_HOME%\bin\keytool" -genkey -alias tomcat -keyalg RSA
Or on other platforms, perform the following at the command prompt:
$JAVA_HOME/bin/keytool -genkey -alias tomcat -keyalg RSA
Some questions will be asked, including a password for the certificate (the default is 'changeit'). Pleasenote down what you choose, as it will be used in the next step.
Modify the <INSTALL>/conf/server.xml File
In the confluence directory, open the conf/server.xml file and insert one of the following just after theclosing </Engine> tag:
1. For users of Confluence 2.2 or later:Open conf/server.xml, uncomment the lines:
<Connector port="8443" maxHttpHeaderSize="8192"maxThreads="150" minSpareThreads="25" maxSpareThreads="75"enableLookups="false" disableUploadTimeout="true"acceptCount="100" scheme="https" secure="true"clientAuth="false" sslProtocol="TLS"URIEncoding="UTF-8" keystorePass="<MY_CERTIFICATE_PASSWORD>" />
Or for users of Confluence 2.1.x or earlier, add or uncomment the following lines:
<Connector className="org.apache.coyote.tomcat4.CoyoteConnector" port="8443" minProcessors="5"maxProcessors="75"enableLookups="true" acceptCount="100" debug="0" scheme="https" secure="true"useURIValidationHack="false" disableUploadTimeout="true" URIEncoding="UTF-8"><Factory className="org.apache.coyote.tomcat4.CoyoteServerSocketFactory" clientAuth="false"protocol="TLS" keystorePass="<MY_CERTIFICATE_PASSWORD>" /></Connector>
2. Change <MY_CERTIFICATE_PASSWORD> to the password you entered for the certificate when yougenerated it.
If you have a Certificate Prepared
If you just created your new Certificate or your existing one is in the default location, skip to the'Testing SSL' section. By default, Tomcat will look for the certificates in C:\Documents and Settings\\#CURRENT_USER#\.keystore on Windows or ~/.keystore on Unix. If your Certificate is not in this

Document generated by Confluence on Jan 01, 2008 18:35 Page 197
location, you will need to update your <INSTALL>/conf/server.xml file as outlined below, so thatTomcat can find it. Advanced users who require an official CA-issued key pair for their Certificate can findinstructions in the Tomcat documentation.
1. For users of Confluence 2.2 or later:Open conf/server.xml, add the keystoreFile="<MY_CERTIFICATE_LOCATION>" parameter to theConnector tag as shown below:
<Connector port="8443" maxHttpHeaderSize="8192"maxThreads="150" minSpareThreads="25" maxSpareThreads="75"enableLookups="false" disableUploadTimeout="true"acceptCount="100" scheme="https" secure="true"clientAuth="false" sslProtocol="TLS"URIEncoding="UTF-8" keystorePass="<MY_CERTIFICATE_PASSWORD>"keystoreFile="<MY_CERTIFICATE_LOCATION>" />
Or for users of Confluence 2.1.x or earlier, change the <Factory> tag to following:
<Factory className="org.apache.coyote.tomcat4.CoyoteServerSocketFactory"clientAuth="false" protocol="TLS" keystoreFile="<MY_CERTIFICATE_LOCATION>"keystorePass="<MY_CERTIFICATE_PASSWORD>" />
2. Change <MY_CERTIFICATE_LOCATION> to the path of the Certificate.
Testing SSL
Restart Tomcat and access your instance on https://<MY_BASE_URL>:8443/.
For more detailed information on setting up SSL with Tomcat (including additional configuration options),have a look at Tomcat 4 SSL Howto or Tomcat 5.5 SSL Howto.
Although HTTPS is now activated and available, the old HTTP URLs (http://localhost:8080) are stillavailable. In most situations one wants these URLs to continue working, but for some to redirect to theirHTTPS equivalent.
If you have changed the port that the SSL connector is running on from the preconfiguredvalue of 8443, you must update the redirectPort attribute of the standard HTTPconnector to reflect the new SSL port. Tomcat needs this information to know which port toredirect to when an incoming request needs to be secure.
To configure which URLs you want secured, edit the confluence/WEB-INF/web.xml file and add thefollowing declaraiont to the end, before the </web-app> tag:
<security-constraint><web-resource-collection><web-resource-name>Login and Restricted Space URLs</web-resource-name><url-pattern>/login.action</url-pattern></web-resource-collection><user-data-constraint><transport-guarantee>CONFIDENTIAL</transport-guarantee></user-data-constraint></security-constraint>
Note that the example above specifies a url-pattern for the login URL /login.action. This meansthat whenever a user tries to access the unprotected version of the login page, they will be redirectedautomatically to the secured version of it.
If you want to protect individual spaces, there isn't a complete way of doing this at the moment. You canadd a pattern like this:
<security-constraint><web-resource-collection><web-resource-name>Login and Restricted Space URLs</web-resource-name><url-pattern>/login.action</url-pattern><url-pattern>/display/SALARIES/*</url-pattern></web-resource-collection><user-data-constraint>

Document generated by Confluence on Jan 01, 2008 18:35 Page 198
<transport-guarantee>CONFIDENTIAL</transport-guarantee></user-data-constraint></security-constraint>
This will redirect all URLs for page views in the SALARIES space. This does not however, protect pagesthat are accessed via a URL like /pages/viewpage.action?pageId=123. Confluence generates thesetypes of URLs for pages that have non-ASCII characters in the title. Hence this is not a complete solution.
If you want to protect all pages and spaces, use:
<security-constraint><web-resource-collection><web-resource-name>Restricted URLs</web-resource-name><url-pattern>*.action</url-pattern></web-resource-collection><user-data-constraint><transport-guarantee>CONFIDENTIAL</transport-guarantee></user-data-constraint></security-constraint>
Once this change is made, restart Confluence and access http://localhost:8080. You should be redirectedto https://localhost:8443/login.action.
There does not seem to be an easy way to make subsequent pages revert to HTTP afterlogging in via HTTPS - see JRA-7250
Note for users of Confluence versions prior to 2.2
You are required to configure a Realm, even though the security-constraint above does not access it. Addthis realm tag inside the Engine tag:
<Engine ...<Realm className="org.apache.catalina.realm.MemoryRealm" />...</Engine>
You can protect other paths as necessary, but be aware that if attachments are protected,they will not be downloadable from Internet Explorer (see this issue).

Document generated by Confluence on Jan 01, 2008 18:35 Page 199
Anonymous Access to Remote API
This page last changed on Jun 24, 2007 by smaddox.
Sites may wish to disable anonymous access to the remote API to make it harder for malicious usersto write 'bots' that perform bulk changes to the site. If you wish to enable the Remote APIs but do notwant anonymous users to access Confluence remotely, you can disable anonymous access from theAdministration Console.
To disable anonymous access to Remote APIs,
1. Go to the 'Administration Console' and click on 'General Configuration' in the left panel.2. Click 'Edit' at the bottom of the 'Options and Settings' screen.3. Select 'Off' beside 'Anonymous Access to API'.4. 'Save' your changes.
RELATED TOPICS
Adding SSL for Secure Logins and Page Security
Anonymous Access to Remote API
Enabling or Disabling Public Signup
Excluding external referrers
Hiding External Links From Search Engines
Document generated by Confluence on Jan 01, 2008 18:35 Page 200
Enabling or Disabling Public Signup
This page last changed on Dec 17, 2007 by smaddox.
Enabling 'Public Signup' allows users to sign themselves up to the site.
If you want to restrict your site to a particular set of users, you may want to disable 'Public Signup'. Inthis instance, administrators can add new users from the Administration Console.
To enable or disable public signup,
1. From the 'Administration Console' click 'General Configuration' in the left-hand panel.2. This will display the 'General Configuration' screen. Click 'Edit'.3. Beside 'Public Signup', select 'On' to enable Public Signup. Select 'Off' to disable it.4. Click 'Save'.
RELATED TOPICS
Adding a Group
Adding a New User
Adding or Removing a User from a Group
Adding SSL for Secure Logins and Page Security
Anonymous Access to Remote API

Document generated by Confluence on Jan 01, 2008 18:35 Page 201
Hiding External Links From Search Engines
This page last changed on Dec 17, 2007 by smaddox.
Hiding external links from search engines helps to discourage spammers from posting links on your site.If you turn this option on, any URLs inserted in pages and comments will be given the 'nofollow' attribute,which prevents search engines from following them.
Shortcut links and links to other pages within Confluence are not affected.
To hide external links from search engines,
1. Go to the 'Administration Console' and click 'General Configuration' in the left panel.2. This will display the 'General Configuration' screen. Click 'Edit'.3. Select 'On' beside 'Hide External Links From Search Engines'.4. 'Save' your changes.
RELATED TOPICS
Adding SSL for Secure Logins and Page Security
Anonymous Access to Remote API
Enabling or Disabling Public Signup
Excluding external referrers
Hiding External Links From Search Engines
Document generated by Confluence on Jan 01, 2008 18:35 Page 202
Hiding the People Directory
This page last changed on Jun 17, 2007 by [email protected].
The People Directory provides a list of all users in your Confluence system.
If you need to disable the People Directory set the following system properties on your application servercommand line:
• To disable the People Directory for anonymous users,
-Dconfluence.disable.peopledirectory.anonymous=true
• To disable the People Directory entirely,
-Dconfluence.disable.peopledirectory.all=true
These two properties are available in Confluence 2.5.2 and later.
Note that the 'People Directory' link will still appear on the dashboard, so you will needto modify the following file to remove the link: /decorators/global.vmd (In ConfluenceStandalone, this is located in the confluence directory)

Document generated by Confluence on Jan 01, 2008 18:35 Page 203
Managing External Referrers
This page last changed on Jun 24, 2007 by smaddox.
An external referrer is any site that links to your Confluence instance.
By default, external referrers for a page are listed under 'Incoming Links' under the 'Info' tab of the page.
Here's how you can manage your external referrers:1. Hide all external referrers : By default, Confluence lists all external referrers under the 'Info' tab of apage. If you turn this option on, external referrers will not be listed here.2. Specify which external referrers to exclude : You can decide which referrers you want to exclude frombeing displayed on your site.
RELATED TOPICS
Adding SSL for Secure Logins and Page Security (Confluence 2.7 Temp Archive)
Anonymous Access to Remote API (Confluence 2.7 Temp Archive)
Enabling or Disabling Public Signup (Confluence 2.7 Temp Archive)
Excluding external referrers (Confluence 2.7 Temp Archive)
Hiding External Links From Search Engines (Confluence 2.7 Temp Archive)

Document generated by Confluence on Jan 01, 2008 18:35 Page 204
Excluding external referrers
This page last changed on Dec 17, 2007 by smaddox.
Excluding external referrers prevents them from being displayed anywhere on your site.
There are two instances where you may want to do this:
1. If you are running a Confluence installation that is open to public:
In a site that is open to public, one unfortunate problem is that malicious sites can spam the display ofa page's incoming links statistics. This is usually done to get the site's URL to appear in the sidebar. Byadding these sites to the 'excluded referrers' list, you can prevent them from being listed on your site.
2. If Confluence is installed on a server with multiple domain names or IP addresses:
Confluence will consider any URL originating from the domain name where Confluence is installed as aninternal link. However, if Confluence is installed on a server with multiple domain names or IP addresses,you will need to add the other domain name prefixes to this list to let Confluence know that any linksfrom these domains should not be considered external links.
You need to be a Confluence administrator and know the URL of the site to add it to the excludedreferrers list.
To add a URL to the excluded referrers list,
1. Go to the Administration Console and click 'Manage Referrers' in the left-hand panel.2. Add the URL to the 'Excluded External Referrer Prefixes' section. You must include 'http://' at the
front of the URL.
You can add more than one URL by putting each URL on a new line.
Once saved, all incoming links from URLs that match the blocked list will no longer be recorded.Referrer URLs are blocked if they start with any of the URLs in the exclusion list. So http://evilspamsite.blogspot.com will also match http://evilspamsite.blogspot.com/nastypage.html
RELATED TOPICS
Adding SSL for Secure Logins and Page Security
Anonymous Access to Remote API
Enabling or Disabling Public Signup
Excluding external referrers
Hiding External Links From Search Engines

Document generated by Confluence on Jan 01, 2008 18:35 Page 205
Hiding external referrers
This page last changed on Sep 17, 2007 by [email protected].
By default, Confluence lists all external referrers under the 'Info' tab of a page. You can configureConfluence to hide referrers from this view.
To hide external referrers,
1. Go to the 'Administration Console' and click on 'Manage Referrers' in the left panel.2. Click 'Off' beside 'External Referrers'
RELATED TOPICS
Adding SSL for Secure Logins and Page Security
Anonymous Access to Remote API
Enabling or Disabling Public Signup
Excluding external referrers
Hiding External Links From Search Engines

Document generated by Confluence on Jan 01, 2008 18:35 Page 206
User Email Visibility
This page last changed on Dec 18, 2007 by smaddox.
Confluence provides three options for email address privacy which can be configured by a Confluenceadministrator from the Administration Console:
• Public: email addresses are displayed publicly.• Masked: email addresses are still displayed publicly, but masked in such a way to make it harder for
spam-bots to harvest them.• Only visible to site administrators: only Confluence administrators can see the email addresses.
Note that, if you select this option, email addresses will not be available in the 'User Search' popup(e.g. when setting Page Restrictions).
To configure user email visibility,
1. From the 'Administration Console' click 'General Configuration' in the left-hand panel.2. This will display the 'General Configuration' screen. Click 'Edit'.3. Select one of the options next to 'User email visibility': 'public', 'masked', or 'only visible to site
administrators'.4. 'Save' your changes.
Screenshot : email visibility
RELATED TOPICS
Adding SSL for Secure Logins and Page Security
Anonymous Access to Remote API
Enabling or Disabling Public Signup
Excluding external referrers
Hiding External Links From Search Engines

Document generated by Confluence on Jan 01, 2008 18:35 Page 207
Spam Prevention (Captcha)
This page last changed on Dec 17, 2007 by smaddox.
Captcha Configuration
If your Confluence site is open to the public you may find that automated spam is being added, in theform of comments or new pages.
You can configure Confluence to deter automated spam by asking users to prove that they are humanbefore they are allowed to:
• Sign up for an account• Add a comment• Create a page• Edit a page
Captcha is the technical term for a test that can distinguish a human being from an automated agentsuch as a web spider or robot. When Captcha is enabled, users are required to read some text from animage (see the example on the right) and type the text into the form.
When Captcha is on, users will need to recognise a distorted picture of a word, and must type the wordinto a text field. This is easy for humans to do, but very difficult for computers.
You can choose which users don't have to complete Captchas. You can exempt signed-in users (they willhave completed a Captcha when they signed up), or members of particular groups.
By default Captchas will not be shown to registered users. Only anonymous users will have to performthe Captcha test when creating comments or editing pages.
If you don't trust all registered users, you can choose to disable Captchas for only a certain group/groupsof users.
You can also customise the Captcha image (see Advanced Configuration below).
You need to be a Confluence administrator to enable Captcha.
To enable Captcha for Confluence,
1. Click the 'Administration' link in the top right corner of any Confluence screen.2. Choose Spam Configuration' from the 'Configuration' menu on the left.3. Turn on Captcha by clicking the 'ON' link.4. If you want to disable Captcha for certain groups:
• Select 'No one' if you want everyone to see Captchas.• Select 'Signed in users' if you want only anonymous users to see Captchas.• If you want everyone to see Captchas except members of specific groups, select the 'Members
of the following groups' and enter the group names in the text box.You can click the magnifying-glass icon to search for groups. Search for all or part of a groupname and click the 'Select Groups' button to add a single or multiple groups to the list.
• To remove a group from the list, delete the group name.5. Click the 'Save' button.

Document generated by Confluence on Jan 01, 2008 18:35 Page 208
Advanced Configuration
You can also control which type of image is presented to your users. This requires editing theapplicationContext.xml file which you can find in the confluence/WEB-INF/classes directory underyour Confluence installation.
The section of this file which configures Captchas looks like this:
<!-- Image capture service --><!-- this is a very easy captcha generator. If you want difficult captures, uncomment theDefaultGimpyEngine below,or use an engine class from http://jcaptcha.sourceforge.net --><bean id="captchaEngine" class="com.atlassian.confluence.security.ConfluenceCaptchaEngine"autowire="byName"/><!--bean id="captchaEngine" class="com.octo.captcha.engine.image.gimpy.DefaultGimpyEngine"autowire="byName"--><bean id="captchaManager" class="com.atlassian.confluence.security.DefaultCaptchaManager"autowire="byName"/>
You can replace the 'captchaEngine' class with any text-based engine from jcaptcha.

Document generated by Confluence on Jan 01, 2008 18:35 Page 209
Troubleshooting slow search performance and "Too many open files" problem
This page last changed on Mar 16, 2007 by [email protected].
The purpose of this document is to provide a workaround for customers using Confluence version 2.2.xand who are experiencing slow search performance and/or Too many open files error in their logs.
This problem has been properly addressed as of Confluence 2.3. If upgrading is an option for you, werecommend upgrading to the latest stable version.
The workaround
The workaround for this problem involves two steps.
1. Reducing the frequency of index optimisation
Index optimisation is performed over your entire search index periodically to maintain good searchperformance. However, this process will lock down the index for the entire duration that it occurs.Searching will not be possible during this time. For small Confluence instances with small indexes,optimisation time is negligible. However, for larger instances, where optimisation is potentially expensiveto perform, it could cause a noticeable inconvenience for users.
In Confluence 2.2.x, index optimisation is scheduled to occur every time the index queue is flushed(every minute). Optimisation does not need to performed this regularly. To fix this:
1. Extract DefaultConfluenceLuceneIndexManager.zip to your confluence/WEB-INF/classes/com/atlassian/confluence/search/lucene directory. This patch will allow you to specify a JVMparameter to adjust the frequency of optimization. For example if you want it to occur on every 20thflush of the index queue start Confluence with this JVM parameter:
-Dconfluence.optimize.index.modulo=20
Setting it back to 1 will revert back to normal behaviour (optimize on every flush).2. Restart Confluence
2. Apply a patched bonnie jar
To address the Too many open files issue, you need to download the patched bonnie jar attached tothis issue: http://jira.atlassian.com/browse/CONF-7401. Copy the jar to your {[confluence/WEB-INF/lib}} directory and remove the old one. Now restart and rebuild the index.
If are still experiencing problems after this, please file a support request at http://support.atlassian.comand we'll investigate the issue further.
Document generated by Confluence on Jan 01, 2008 18:35 Page 210
User Management
This page last changed on Jan 31, 2006 by vidya.
• Confluence User Management° Adding a Group° Adding a New User° Adding or Removing a User from a Group° Changing Usernames° Editing User Details° Global Groups Overview° Global Permissions Overview° Migrating to new User Management° Removing a Group° Removing a User° Setting up Anonymous Access° Viewing members of a group
• How to Improve User Search Performance — If your Confluence instance contains thousands ofuser accounts and you are experiencing performance issues when searching for users, the followingmigration guide is for you.
• Integrating with Crowd• JIRA User Management
° Delegate user management to use JIRA logins- Revert from JIRA to internal user management
° JIRA User Management FAQ• LDAP User Management
° Activating External User Management° Add LDAP Integration
- Automatically Adding LDAP users to the confluence-users Group- Customising atlassian-user.xml
° Add LDAP Integration For User Authentication Only° atlassian-user.xml reference° Changes in osuser.xml from 1.0.3a to 1.1.x° Configuring multiple LDAP repositories° Confluence Caching OSUser Provider° Importing LDAP Users° LDAP FAQ
- Connect to LDAP via SSL° Troubleshooting the "Not Permitted" Screen under LDAP Integration
- Cannot login with Confluence admin account• Migrating users from Confluence to JIRA — There is currently no way to delegate user management
from JIRA to Confluence. So, if you are in a situation where your users are defined in Confluenceand would like to take advantage of Confluence's ability to use JIRA user management, you willneed to transfer all of your existing Confluence users into JIRA. You can do this manually, or if youhave a large number of users, you can use the attached XML-RPC script.
• Requesting External User Management Support° Paddle
• Understanding User Management in Confluence• User Management Frequently Asked Questions

Document generated by Confluence on Jan 01, 2008 18:35 Page 211
Confluence User Management
This page last changed on Jan 31, 2006 by vidya.
• Adding a Group• Adding a New User• Adding or Removing a User from a Group• Changing Usernames• Editing User Details• Global Groups Overview• Global Permissions Overview• Migrating to new User Management• Removing a Group• Removing a User• Setting up Anonymous Access• Viewing members of a group

Document generated by Confluence on Jan 01, 2008 18:35 Page 212
Adding a Group
This page last changed on Jun 24, 2007 by smaddox.
To add a new group,
1. Go to the 'Administration Console' and click on 'Manage Groups' in the left panel.2. Enter a name for your group in the 'Add Group' input field and click 'Save'.
You are now ready to start adding users to the group.
RELATED TOPICS
Adding or Removing a User from a Group
Global Groups Overview
Removing a Group
Viewing members of a group
[!Administration Guide Attachments
directory^adminhome.gif!]
Document generated by Confluence on Jan 01, 2008 18:35 Page 213
Adding a New User
This page last changed on Dec 17, 2007 by smaddox.
There are two ways a new user can be added to Confluence:
Public Signup: Enabling public signup from the Administration Console allows users to sign themselves upto the site.By Confluence Administrators : If you want to restrict your site to a select group of users, you maywant to disable 'Public Signup'. In this instance, administrators with Confluence Administrator or SystemAdministrator permissions can add new users from the Administration Console.
To add a new user to Confluence from the Administration Console,
1. Go to the 'Administration Console' and click 'Manage Users' in the left-hand panel.2. Click the link 'Add new user' at the top of the page.3. In the form displayed, enter the user's details: username, password, name and email address.4. Click 'Create' to add the user.
RELATED TOPICS
Adding a Group
Adding a New User
Adding or Removing a User from a Group
Changing Usernames
Editing User Details

Document generated by Confluence on Jan 01, 2008 18:35 Page 214
Adding or Removing a User from a Group
This page last changed on Jun 24, 2007 by smaddox.
To add or remove a user from a group,
1. Go to the 'Administration Console' and click on 'Manage Users' in the left panel.All members of the Confluence-Users group are listed in alphabetical order (first name). To find auser, you can either browse through the pages; or do a search on the user's mail id or the group towhich they belong.
2. Click on the user link. This will display the user's current details and links to edit them.3. Click 'Edit Groups'. This will display two lists of groups:
• 'Not a member of groups': All groups to which the user doesn't belong. To add the user to agroup, select a group and click 'Join'. Hold Ctrl and click to select more than one group.
• 'Member of groups': All groups to which the user belongs. Select a group and click 'Leave' toremove the user from the group.
You cannot use the Edit Groups option to add or remove users from external groups, asConfluence access to LDAP and JIRA groups is read only.
RELATED TOPICS
Adding a Group
Adding a New User
Adding or Removing a User from a Group
Changing Usernames
Editing User Details

Document generated by Confluence on Jan 01, 2008 18:35 Page 215
Changing Usernames
This page last changed on Jun 24, 2007 by smaddox.
A username is the name used to login to Confluence, eg. jsmith. There is no support for changing ausername via Confluence yet, but you can to vote towards a feature request to allow usernames to bechanged from the web interface.
Instructions For Changing Usernames
Usernames can only be changed through direct update to the Confluence database.
1. If you have a database administrator, request that they approve the database-related stepsdescribed below
2. If you are using JIRA user management, Revert from JIRA To Internal User Management3. Backup Confluence4. Creating a usermigration table:
create table usermigration(oldusername varchar,newusername varchar)
5. Usernames that will be changed must be placed in the usermigration table with their current andplanned usernames:
insert into usermigration (oldusername, newusername)values ('oldusername', 'newusername');
6. If your DB administration tool does not support multiple SQL queries, these must be enteredindividually.
update attachmentsset creator = newusername from usermigration uwhere creator = u.oldusername;
update attachmentsset lastmodifier = newusername from usermigration uwhere lastmodifier = u.oldusername;
update contentset lastmodifier = newusername from usermigration uwhere lastmodifier = u.oldusername;
update contentset creator = newusername from usermigration uwhere creator = u.oldusername;
update contentset username = newusername from usermigration uwhere username = u.oldusername;
update extrnlnksset creator = newusername from usermigration uwhere creator = u.oldusername;
update extrnlnksset lastmodifier = newusername from usermigration uwhere lastmodifier = u.oldusername;
update linksset lastmodifier = newusername from usermigration uwhere lastmodifier = u.oldusername;
update linksset creator = newusername from usermigration uwhere creator = u.oldusername;

Document generated by Confluence on Jan 01, 2008 18:35 Page 216
update notificationsset lastmodifier = newusername from usermigration uwhere lastmodifier = u.oldusername;
update notificationsset creator = newusername from usermigration uwhere creator = u.oldusername;
update pagetemplatesset lastmodifier = newusername from usermigration uwhere lastmodifier = u.oldusername;
update pagetemplatesset creator = newusername from usermigration uwhere creator = u.oldusername;
update spacesset creator = newusername from usermigration uwhere creator = u.oldusername;
update spacesset lastmodifier = newusername from usermigration uwhere lastmodifier = u.oldusername;
update spacepermissionsset permusername = newusername from usermigration uwhere permusername = u.oldusername;
update spacepermissionsset creator = newusername from usermigration uwhere creator = u.oldusername;
update spacepermissionsset lastmodifier = newusername from usermigration uwhere lastmodifier = u.oldusername;
update contentlockset creator = newusername from usermigration uwhere creator = u.oldusername;
update contentlockset lastmodifier = newusername from usermigration uwhere lastmodifier = u.oldusername;
update os_userset username = newusername from usermigration uwhere username = u.oldusername;
update trackbacklinksset creator = newusername from usermigration uwhere creator = u.oldusername;
update trackbacklinksset lastmodifier = newusername from usermigration uwhere lastmodifier = u.oldusername;
7. If using Confluence 2.1 or newer, run the following command:
update userset name = newusername from usermigration uwhere name = u.oldusername;
8. Reassign personal spaces associated with the old username to the new username. The tilda (~) isrequired as it is prepended to the space key of all personal spaces.
update spacesset spacekey = '~newusername'

Document generated by Confluence on Jan 01, 2008 18:35 Page 217
where spacekey = '~oldusername';
9. Each username is associated with a full name. For example, username 'jsmith' may have a full nameof 'John M Smith'. If this fullname needs to be changed, modify the fullname in the user or os_usertable.
All old usernames in Confluence should now be replaced with the new usernames from theusermigration table.
RELATED TOPICS
Adding a Group
Adding a New User
Adding or Removing a User from a Group
Changing Usernames
Editing User Details

Document generated by Confluence on Jan 01, 2008 18:35 Page 218
Editing User Details
This page last changed on Jun 24, 2007 by smaddox.
To update a user's details,
1. Go to the 'Administration Console' and click on the link 'Manage Users' in the left panel.2. Locate the user by doing a search on the user's mail id or the groups to which they belong.3. Click on the user link. This will display the user's current details and links to edit them.
• View Profile : View the user's profile.• Edit Groups : Add or remove this user from a group.• Edit Details : Edit the user's name and email address. Changing a user's username is not
supported through the application, see Changing Usernames for other solutions.• Set Password : Edit the user's password details.• Deactivate : It is not possible to 'remove' a user if the user is responsible for content on the
site because Confluence will need the user information to maintain history of pages. In thisinstance, you can deactivate the user so that they can no longer log in to Confluence.
• Remove : You can remove a user permanently if the user has not added or edited any contenton the site.
Deactivating users
This functionality was removed in Confluence 2.1.x. See Removing a User for moreinformation.
Screenshot : User Details
RELATED TOPICS
Adding a New User
Adding or Removing a User from a Group
Editing User Details
Global Permissions Overview
Removing a User

Document generated by Confluence on Jan 01, 2008 18:35 Page 219
Global Groups Overview
This page last changed on Dec 18, 2007 by smaddox.
There are two special default groups in Confluence:
1. confluence-administrators: This is a group of 'super-users' who can access the 'AdministrationConsole' and perform site-wide administration. Members of this group can also see all spaces in theConfluence instance.
Any user who is a member of this group has site-wide administration powers, regardless of anyother setting. The settings on the Global Permissions screen do not affect the powers allowed tomembers of this group.
There is an outstanding request to remove the 'confluence-administrators' group froma future version of Confluence (see CONF-4616).
2. confluence-users: This is the default group for all new users. Permissions you assign to this groupwill be assigned to all newly signed-up users of Confluence.
Other user groups : A Confluence administrator can also group users together into user groups for moreconvenient administration. Once created, groups become available at the space and page levels to allowfor flexible access control. A user in one of these groups will automatically be granted all permissionsgranted to the group.
Anonymous users : Confluence treats all users who do not log in when they access Confluence as being'anonymous'. You can grant anonymous 'Use Confluence' permission via the Global Permissions screen.This will allow non-registered users to access pages and spaces in Confluence. A space administrator canthen further control anonymous access per space via the space permissions.
RELATED TOPICS
Adding a Group
Adding a New User
Adding or Removing a User from a Group
Changing Usernames
Editing User Details
Enabling or Disabling Public Signup
Global Groups Overview
Global Permissions Overview
Removing a Group
Removing a User

Document generated by Confluence on Jan 01, 2008 18:35 Page 220
Global Permissions Overview
This page last changed on Dec 18, 2007 by smaddox.
Permissions determine the actions which a user is allowed to perform within Confluence. Globalpermissions are one of the levels of permission provided by Confluence.
To grant global permissions, go to the 'Global Permissions' section of the Administration Console. In orderto assign these permissions, you must already have the global 'Confluence Administrator' or 'SystemAdministrator' permission (described below). You can then assign global permissions to groups, individualusers and anonymous users. Further permissions are granted from the space administration screens.
On this page:
• Overview of the Global Permissions• Comparing the System Administrator with the Confluence Administrator Permission• Comparing the Administrator Permissions with the confluence-administrators Group• Updating Global Permissions
Overview of the Global Permissions
Global permissions control access across the whole Confluence site. Here is a list:
Global Permission Description
Can Use This is the most basic permission that allows usersto access the site.
Users with this permission count towards thenumber of users allowed by your license. See theinformation on removing/deactivating users.
Attach Files to User Profile This allows the user to upload files to be stored intheir user profile.
Attaching files to a user profile was afeature made obsolete by personal spaces.This permission is therefore not relevant sinceConfluence 2.2.
Personal Space This permission allows the user to create apersonal space.
Create Space(s) This permission allows users to create new spaceswithin your Confluence site. When a space iscreated, the creator automatically has the 'Admin'permission for that space and can perform space-wide administrative functions.
Confluence Administrator This permission allows users to access theAdministration Console that controls site-wide administrative functions. Users with thispermission can perform most, but not all, ofthe Confluence administrative functions. Seethe comparison of 'System Administrator' and'Confluence Administrator' below.
System Administrator This permission allows users to access theAdministration Console that controls site-wide administrative functions. Users with thispermission can perform all the Confluenceadministrative functions, including the oneswhich the 'Confluence Administrator' permissiondoes not allow. Users with this permission are

Document generated by Confluence on Jan 01, 2008 18:35 Page 221
listed on the 'Site Administrators' page thatis linked from 'Contact Administrators' in thefooter throughout the Confluence site. Seethe comparison of 'System Administrator' and'Confluence Administrator' below. Refer also to thenote about the 'confluence-administrators' groupbelow.
The first system administrator is defined during installation
During the installation of Confluence, the Installation Wizard asks for the username of theSystem Administrator. This user will have the 'System Administrator' permission and will bea member of the 'confluence-administrators' group.
Comparing the System Administrator with the ConfluenceAdministrator Permission
New with Confluence 2.7 and later comes the ability to have two levels of administrator in Confluence:
• System Administrator – Users with this permission can perform all the Confluence administrativefunctions, including the ones which the 'Confluence Administrator' permission does not allow.
• Confluence Administrator – Users with this permission can perform most, but not all, of theConfluence administrative functions.
Tip: The two-tier administration is useful when you want to delegate some administrator privilegesto project managers or team leaders. You can give 'Confluence Administrator' permission to users whoshould be able to perform most administrative functions, but should not be able to perform functions thatcan compromise the security of the Confluence system.
The following functions are excluded from the 'Confluence Administrator' permission:
Administration Screen Excluded Function
General Configuration The following functionality is disallowed:
• Server Base URL• Remote API plugin• External user management• Public Signup
Daily Backup Admin This function is disallowed entirely.
Plugins This function is disallowed entirely.
Plugin Repository This function is disallowed entirely.
Mail Servers This function is disallowed entirely.
User Macros This function is disallowed entirely.
Attachment Storage This function is disallowed entirely.
Layouts This function is disallowed entirely.
Custom HTML This function is disallowed entirely.
Backup & Restore This function is disallowed entirely.
SnipSnap Import This function is disallowed entirely.

Document generated by Confluence on Jan 01, 2008 18:35 Page 222
Logging and Profiling This function is disallowed entirely.
Cluster Configuration This function is disallowed entirely.
Comparing the Administrator Permissions with the confluence-administrators Group
The 'confluence-administrators' group defines a set of 'super-users' who can access the AdministrationConsole and perform site-wide administration. Members of this group can also see all spaces in theConfluence instance. The settings on the 'Global Permissions' screen do not affect the powers allowed tomembers of this group.
Granting the 'System Administrator' or 'Confluence Administrator' permission to a user will notautomatically grant the user access to all spaces in the site. These permissions will only give access tothe Administration Console.
Be aware, however, that users with 'System Administrator' can add themselves to the 'confluence-administrators' group and become a super-user.
Confluence Administrator permission and confluence-administrators group are not related
Going by the names, you would think the 'confluence-administrators' group and the'Confluence Administrator' permission are related – but they are not. To resolve confusion,we want to make explicit that granting a user or group 'Confluence Administrator'permission is not the same as granting them membership to the 'confluence-administrators'group. Granting the 'Confluence Administrator' permission enables access to only a subsetof the administrative functions. Granting membership to the 'confluence-administrators'group, on the other hand, gives complete access.
There is an outstanding request to remove the 'confluence-administrators' group from a future versionof Confluence (see CONF-4616).
Read more about global groups.
Updating Global Permissions
To edit the global permissions for a group or user,
1. Go to the Administration Console and click 'Global Permissions' in the 'Security' section of the left-hand panel.
2. The 'View Global Permissions' screen appears. Click the 'Edit Permissions' button.3. The 'Edit Global Permissions' screen appears, as shown below. Add or edit group and user
permissions as follows:• To add permissions for a group:
° First add the group to Confluence, if you have not already done so.° Now on the 'Edit Global Permissions' screen, enter the group name in the text box
labelled 'Grant browse permission to' in the 'Groups' section. You can click the magnifyingglass to search for the group name.
° Click the 'Add' button.° The group will appear in the list and you can now edit its permissions.
• To add permissions for a specific user:° First add the user to Confluence, if you have not already done so.° Consider adding the user to a group and then assigning the permissions to the group, as
described above, instead of assigning permissions to the specific user.° To assign permissions to a specific user on the 'Edit Global Permissions' screen, enter the
username in the text box labelled 'Grant browse permission to' in the 'Individual Users'section. You can click the magnifying glass to search for the username.
° Click the 'Add' button.

Document generated by Confluence on Jan 01, 2008 18:35 Page 223
° The username will appear in the list and you can now edit its permissions.• To edit the permissions for a user or group:
° Click the checkbox under the relevant permission and next to the relevant user/group.A tick in the box indicates that the permission is granted. Click again to uncheck thepermission.
• To allow anonymous access to your Confluence site, check 'can use' in the 'Anonymous Access'section. See more information.
• Click the 'Save All' button to save your changes.
Screenshot: Editing global permissions
RELATED TOPICS
Adding a Group
Adding a New User
Adding or Removing a User from a Group
Changing Usernames
Editing User Details
Enabling or Disabling Public Signup
Global Groups Overview
Global Permissions Overview
Removing a Group
Removing a User
Security Overview
Setting up Anonymous Access
Viewing members of a group
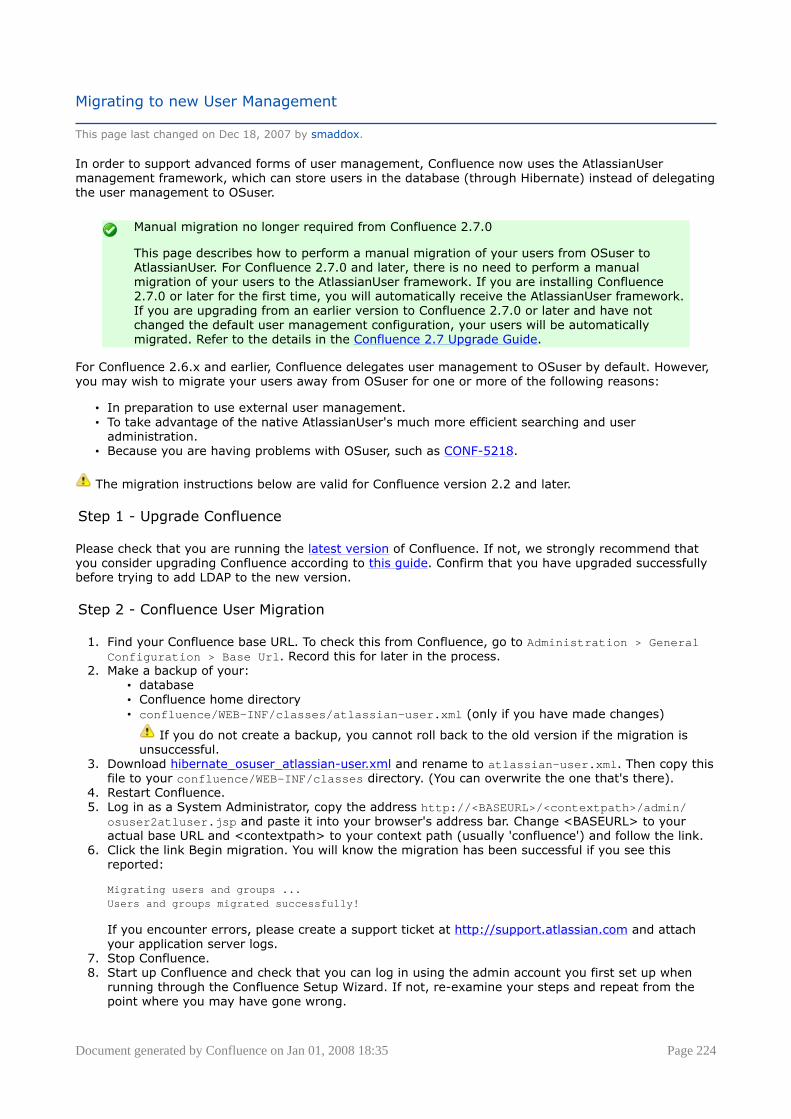
Document generated by Confluence on Jan 01, 2008 18:35 Page 224
Migrating to new User Management
This page last changed on Dec 18, 2007 by smaddox.
In order to support advanced forms of user management, Confluence now uses the AtlassianUsermanagement framework, which can store users in the database (through Hibernate) instead of delegatingthe user management to OSuser.
Manual migration no longer required from Confluence 2.7.0
This page describes how to perform a manual migration of your users from OSuser toAtlassianUser. For Confluence 2.7.0 and later, there is no need to perform a manualmigration of your users to the AtlassianUser framework. If you are installing Confluence2.7.0 or later for the first time, you will automatically receive the AtlassianUser framework.If you are upgrading from an earlier version to Confluence 2.7.0 or later and have notchanged the default user management configuration, your users will be automaticallymigrated. Refer to the details in the Confluence 2.7 Upgrade Guide.
For Confluence 2.6.x and earlier, Confluence delegates user management to OSuser by default. However,you may wish to migrate your users away from OSuser for one or more of the following reasons:
• In preparation to use external user management.• To take advantage of the native AtlassianUser's much more efficient searching and user
administration.• Because you are having problems with OSuser, such as CONF-5218.
The migration instructions below are valid for Confluence version 2.2 and later.
Step 1 - Upgrade Confluence
Please check that you are running the latest version of Confluence. If not, we strongly recommend thatyou consider upgrading Confluence according to this guide. Confirm that you have upgraded successfullybefore trying to add LDAP to the new version.
Step 2 - Confluence User Migration
1. Find your Confluence base URL. To check this from Confluence, go to Administration > GeneralConfiguration > Base Url. Record this for later in the process.
2. Make a backup of your:• database• Confluence home directory• confluence/WEB-INF/classes/atlassian-user.xml (only if you have made changes)
If you do not create a backup, you cannot roll back to the old version if the migration isunsuccessful.
3. Download hibernate_osuser_atlassian-user.xml and rename to atlassian-user.xml. Then copy thisfile to your confluence/WEB-INF/classes directory. (You can overwrite the one that's there).
4. Restart Confluence.5. Log in as a System Administrator, copy the address http://<BASEURL>/<contextpath>/admin/
osuser2atluser.jsp and paste it into your browser's address bar. Change <BASEURL> to youractual base URL and <contextpath> to your context path (usually 'confluence') and follow the link.
6. Click the link Begin migration. You will know the migration has been successful if you see thisreported:
Migrating users and groups ...Users and groups migrated successfully!
If you encounter errors, please create a support ticket at http://support.atlassian.com and attachyour application server logs.
7. Stop Confluence.8. Start up Confluence and check that you can log in using the admin account you first set up when
running through the Confluence Setup Wizard. If not, re-examine your steps and repeat from thepoint where you may have gone wrong.

Document generated by Confluence on Jan 01, 2008 18:35 Page 225
9. Download hibernate_cache_atlassian-user.xml, rename it to atlassian-user.xml then copy to your<INSTALL>/confluence/WEB-INF/classes directory. It should overwrite the previous atlassian-user.xml.
10. Restart Confluence. Check that your users can still log in.
RELATED TOPICS
Understanding User Management in ConfluenceConfluence 2.7 Upgrade Guide

Document generated by Confluence on Jan 01, 2008 18:35 Page 226
Removing a Group
This page last changed on Jun 24, 2007 by smaddox.
To remove a group,
1. Go to the 'Administration Console' and click on 'Manage Groups' in the left panel. A list of all existinggroups is displayed along with links to remove them.
2. Click 'Remove' beside the group you want to remove. You will need to confirm your action before thegroup is deleted.
RELATED TOPICS
Configuring Attachment Size
Configuring Character Encoding
Configuring HTTP Timeout Settings
Configuring Indexing Language
Configuring Number Formats

Document generated by Confluence on Jan 01, 2008 18:35 Page 227
Removing a User
This page last changed on Nov 13, 2007 by jfleming.
It is not possible to remove a user if the user is responsible for content on the site, becauseConfluence will need the user information to maintain a history of pages. If you wish to prevent sucha user from accessing Confluence, you can deactivate a user so that they can no longer log in toConfluence.
You can remove a user if the user has not added or edited any content on the site.
To deactivate or remove a user,
1. Go to the 'Administration Console' and click 'Manage Users' in the left panel.2. Find the user by searching on the username, full name or email address. You can also click 'Show all
users' to browse the list of all users.3. Click the username. This will display the user's current details and links to edit them.4. Click 'Remove' if the user is not responsible for any content on the site.5. If the user is responsible for content on the site, you will need to deactivate the user (also known as
disabling the user):• Remove the user from all groups that have the global 'Can Use' permission. Click 'Edit Groups'
to remove the person from the group(s).• If the specific user has the global 'Can Use' permission, you will also need to remove this
permission.
Number of users and your license
The License Details page tells you how many users your Confluence instance is licensed tosupport, and how many are currently registered The number of registered users includesonly users who have the 'Can Use' global permission. Deactivated users, as describedabove, are not included.
Deactivating users in Confluence 2.0.x and earlier
Earlier Confluence releases provide a 'Deactivate' link. If you click this link, the user willbe prevented from logging in to the Confluence site. This function was removed fromConfluence 2.1.x and later for performance reasons.
Screenshot: Adding and removing users to/from groups
RELATED TOPICS
Adding a Group
Adding a New User
Adding or Removing a User from a Group

Document generated by Confluence on Jan 01, 2008 18:35 Page 228
Changing Usernames
Editing User Details

Document generated by Confluence on Jan 01, 2008 18:35 Page 229
Setting up Anonymous Access
This page last changed on Jun 24, 2007 by smaddox.
You can enable public access to your site by granting the 'Use Confluence' permission to 'Anonymous'users from the Administration Console.
This user category has been created for convenient administration of users who have not logged into thesite. Permissions assigned to this group apply to all anonymous users of the site.
To enable public access to your site,
1. Go to the 'Administration Console' and click 'Global Permissions' in the left panel.2. Click 'Edit Permissions'.3. Under 'Anonymous Access' check 'Can Use' Confluence.
Once you grant this permission, further permissions can be granted from the space administrationscreens to control the viewing and editing privileges of anonymous users. See Space PermissionsOverview.
To turn off "Anonymous Access", uncheck the "Can Use" option.
RELATED TOPICS
Adding a New User
Adding or Removing a User from a Group
Editing User Details
Global Permissions Overview
Removing a User

Document generated by Confluence on Jan 01, 2008 18:35 Page 230
Viewing members of a group
This page last changed on Jun 24, 2007 by smaddox.
To view the members of a group,
1. Go to the 'Administration Console' and click on 'Manage Groups' in the left panel. This will list allthe existing groups on the site along with the number of users in each group (displayed withinparenthesis).
2. Click on the number within the paranthesis to display all the users in the group.
RELATED TOPICS
Adding or Removing a User from a Group
Global Groups Overview
Removing a Group
Viewing members of a group

Document generated by Confluence on Jan 01, 2008 18:35 Page 231
How to Improve User Search Performance
This page last changed on Dec 11, 2007 by smaddox.
If your Confluence instance contains thousands of user accounts and you are experiencing performanceissues when searching for users, the following migration guide is for you.
Background
In Confluence 2.1, we introduced a new system for user management inside Confluence (atlassian-user)that was more powerful than the previous system (OSUser). However, to avoid potential upgrade issues,we continued to use OSUser when storing users in the local Confluence database.
The native atlassian-user storage format provides much more efficient searching, and greatly improvesthe performance of user administration and Confluence's 'user picker' pop-up. We plan on migrating allConfluence instances to the new format around version 2.6 or 2.7, but until then Confluence instanceswith large numbers of users can still take advantage of these performance improvements by performingthe migration manually.
Migration procedure
Do not use this procedure if you have LDAP user management enabled.
This guide assumes that you are using Confluence's local users and groups. If you havealready configured Confluence for LDAP user/group management and are experiencing usermanagement slowness, please follow the guide for Requesting External User ManagementSupport.
Manual migration no longer required from Confluence 2.7.0
This page describes how to perform a manual migration of your users from OSuser toAtlassianUser. For Confluence 2.7.0 and later, there is no need to perform a manualmigration of your users to the AtlassianUser framework. If you are installing Confluence2.7.0 or later for the first time, you will automatically receive the AtlassianUser framework.If you are upgrading from an earlier version to Confluence 2.7.0 or later and have notchanged the default user management configuration, your users will be automaticallymigrated. Refer to the details in the Confluence 2.7 Upgrade Guide.
For details of the procedure, refer to Migrating to new User Management.

Document generated by Confluence on Jan 01, 2008 18:35 Page 232
Integrating with Crowd
This page last changed on Nov 26, 2007 by smaddox.
Atlassian's Crowd identity management system can be integrated with Confluence. Please see IntegratingCrowd with Confluence.

Document generated by Confluence on Jan 01, 2008 18:35 Page 233
JIRA User Management
This page last changed on Jan 31, 2006 by vidya.
• Delegate user management to use JIRA logins° Revert from JIRA to internal user management
• JIRA User Management FAQ

Document generated by Confluence on Jan 01, 2008 18:35 Page 234
Delegate user management to use JIRA logins
This page last changed on Dec 16, 2007 by smaddox.
If you already have a significant user base set up inside JIRA, it makes sense to connect Confluence toJIRA so that user management is centralised and not duplicated. This document outlines how to delegateConfluence's user authentication and group management to JIRA so that you can use your JIRA users tolog in to Confluence.
Read Before Proceeding
1. The examples used in this document are based on Tomcat Application Server and the MySQLdatabase. The same concepts (but not the verbatim examples) can be applied to other applicationservers or databases.
2. Always install Confluence with a new database. Do not attempt to use the existing JIRA database,with either JDBC or data source. Do not add any spaces or content once Confluence installation iscomplete. Users in Confluence will no longer be valid once you switch over to using your JIRA users.
3. If JIRA is using LDAP for authentication, you should not use JIRA for Confluence user management.Use Add LDAP Integration instead.
4. If you have existing users or groups in Confluence, these users will not be available once you switchto using JIRA's user management. Any existing content will no longer be associated with valid users.
5. If you run into a problem, check the Troubleshooting section.
Technical Overview
In the configuration described below, Confluence will use JIRA's database for its user and groupinformation. The Confluence application will have two database connections:
1. A connection to the primary database, set up during Confluence installation. This database stores allthe normal Confluence data: spaces, pages, comments, etc.
2. A read-only data source connection to JIRA's database, set up after Confluence is installed.Confluence reads information about users and groups from this database.
The reason this works is because both JIRA and Confluence use the same user management library,OSUser. The OSUser database schema is the same in JIRA and Confluence, so Confluence can easily readfrom JIRA's tables to get the user and group information.
Step One: Installing Confluence
Skip this step if you have installed Confluence already and completed the setup wizard.
1. If you are running JIRA standalone please follow these instructions for installing Confluence.
2. If you have JIRA deployed under your own tomcat server, please follow these instructions.
3. Ensure that Confluence is running and has been set up, that is, you have completed the setup wizardand verified that you can create pages.
4. Shut down Confluence.
Step Two: Setting up a Datasource to JIRA's Database
In order to delegate all user authentication attempts and group membership queries to JIRA, Confluenceneeds to be aware of JIRA's database, and hence the user tables in JIRA's database.
In Tomcat this is achieved by specifying JIRA's database as a resource. You will need to declare it insidethe <context> descriptor you set up in Step One.
If there is an existing block of <Resource> in the <context> descriptor, please do notreplace it. Rather, just add the following <Resource> block inside the <context> descriptor.
If you are running Confluence WAR/EAR version separate to JIRA, or under JIRA standalone3.3 and later, your Confluence context will be in the confluence.xml file.

Document generated by Confluence on Jan 01, 2008 18:35 Page 235
If you are running Confluence standalone separate to JIRA, or Confluence WAR/EAR versionunder an older version of JIRA, your Confluence context will be in the server.xml file. Youshould never have a Confluence context in both.
If you are running Confluence standalone (or Confluence inside a JIRA standalone) and aren't sure whichversion of Tomcat you are using, check your log files. You'll see *INFO: Starting Servlet Engine: ApacheTomcat/5.5.nn* if you are using Tomcat 5.5.
The DataSource configuration below is using MySQL as an example. You will need to modifythese settings according to the database that you are using.
• Tomcat 4.x and Tomcat 5.0.x: Sample context descriptor
<Context path="/confluence" docBase="C:/programs/confluence" swallowOutput="true"><Resource name="jdbc/JiraDS" auth="Container" type="javax.sql.DataSource"/><ResourceParams name="jdbc/JiraDS"><parameter><name>username</name><value>your_db_username</value></parameter><parameter><name>password</name><value>your_db_password</value></parameter><parameter><name>driverClassName</name><value>com.mysql.jdbc.Driver</value></parameter><parameter><name>url</name><value>jdbc:mysql://your.domain.com/jira_database_name?autoReconnect=true</value></parameter><parameter><name>factory</name><value>org.apache.commons.dbcp.BasicDataSourceFactory</value></parameter></ResourceParams></Context>
• Tomcat 5.5.x: This version of Tomcat has a new syntax for specifying resources (note that you don'tadd a new context to server.xml, just add the Resource to your existing Context):
<Context path="/confluence" docBase="C:/programs/confluence" swallowOutput="true"><Resource name="jdbc/JiraDS" auth="Container" type="javax.sql.DataSource"username="your_db_username"password="your_db_password"driverClassName="com.mysql.jdbc.Driver"url="jdbc:mysql://your.domain.com/jira_database_name?autoReconnect=true"/></Context>
Step Three: Installing the JDBC Driver
Ensure that your JDBC driver is on the classpath of your application server. In this example, a jar for themysql driver should be in the /common/lib folder.
1. Download the mysql driver from here.2. Copy the jar file into the /common/lib folder
Step Four: Modifying osuser.xml
Please perform this step after you have completed the Confluence setup wizard.
1. Find the osuser.xml file in the /confluence/WEB-INF/classes folder and open in a text editor.Comment out the following block of code:

Document generated by Confluence on Jan 01, 2008 18:35 Page 236
<provider class="bucket.user.providers.CachingCredentialsProvider"><propertyname="chain.classname">com.opensymphony.user.provider.hibernate.HibernateCredentialsProvider</property><propertyname="chain.configuration.provider.class">bucket.user.BucketHibernateConfigProvider</property></provider><provider class="bucket.user.providers.CachingAccessProvider"><propertyname="chain.classname">com.opensymphony.user.provider.hibernate.HibernateAccessProvider</property><property name="chain.configuration.provider.class">bucketuser.BucketHibernateConfigProvider</property></provider><provider class="bucket.user.providers.CachingProfileProvider"><propertyname="chain.classname">com.opensymphony.user.provider.hibernate.HibernateProfileProvider</property><propertyname="chain.configuration.provider.class">bucket.user.BucketHibernateConfigProvider</property></provider>
2. Uncomment this block:
<provider class="bucket.user.providers.CachingCredentialsProvider"><propertyname="chain.classname">com.atlassian.confluence.user.providers.jira.JiraJdbcCredentialsProvider</property><property name="chain.datasource">java:comp/env/jdbc/JiraDS</property></provider><provider class="bucket.user.providers.CachingAccessProvider"><propertyname="chain.classname">com.atlassian.confluence.user.providers.jira.JiraJdbcAccessProvider</property><property name="chain.datasource">java:comp/env/jdbc/JiraDS</property></provider><provider class="bucket.user.providers.CachingProfileProvider"><propertyname="chain.classname">com.atlassian.confluence.user.providers.jira.JiraJdbcProfileProvider</property><property name="chain.datasource">java:comp/env/jdbc/JiraDS</property><propertyname="chain.configuration.provider.class">bucket.user.BucketHibernateConfigProvider</property></provider>
Your osuser.xml should now look like this:
<opensymphony-user><!--Authenticators can take properties just like providers.
This smart authenticator should work for 'most' cases - it dynamically looks upthe most appropriate authenticator for the current server.--><authenticator class="com.opensymphony.user.authenticator.SmartAuthenticator"/>
<!-- JIRA User management (with caching) --><!-- Note: Do not add any line breaks or spaces when specifying the chain.classname, otherwisea ClassNotFoundException will be thrown -->
<provider class="bucket.user.providers.CachingCredentialsProvider"><propertyname="chain.classname">com.atlassian.confluence.user.providers.jira.JiraJdbcCredentialsProvider</property><property name="chain.datasource">java:comp/env/jdbc/JiraDS</property></provider>

Document generated by Confluence on Jan 01, 2008 18:35 Page 237
<provider class="bucket.user.providers.CachingAccessProvider"><propertyname="chain.classname">com.atlassian.confluence.user.providers.jira.JiraJdbcAccessProvider</property><property name="chain.datasource">java:comp/env/jdbc/JiraDS</property></provider><provider class="bucket.user.providers.CachingProfileProvider"><propertyname="chain.classname">com.atlassian.confluence.user.providers.jira.JiraJdbcProfileProvider</property><property name="chain.datasource">java:comp/env/jdbc/JiraDS</property><propertyname="chain.configuration.provider.class">bucket.user.BucketHibernateConfigProvider</property></provider>
<!--<provider class="bucket.user.providers.CachingCredentialsProvider"><propertyname="chain.classname">com.opensymphony.user.provider.hibernate.HibernateCredentialsProvider</property><propertyname="chain.configuration.provider.class">bucket.user.BucketHibernateConfigProvider</property></provider><provider class="bucket.user.providers.CachingAccessProvider"><propertyname="chain.classname">com.opensymphony.user.provider.hibernate.HibernateAccessProvider</property><propertyname="chain.configuration.provider.class">bucket.user.BucketHibernateConfigProvider</property></provider><provider class="bucket.user.providers.CachingProfileProvider"><propertyname="chain.classname">com.opensymphony.user.provider.hibernate.HibernateProfileProvider</property><propertyname="chain.configuration.provider.class">bucket.user.BucketHibernateConfigProvider</property></provider>-->
<!--<provider class="com.opensymphony.user.provider.memory.MemoryCredentialsProvider" /><provider class="com.opensymphony.user.provider.memory.MemoryAccessProvider" /><provider class="com.opensymphony.user.provider.memory.MemoryProfileProvider" />--></opensymphony-user>
Please make sure your file looks like this.
In this example, JiraDS is the name of the JIRA datasource you are sharing with Confluence. If you havechanged the name in step 2 of this documentation, you will need change all occurences of the value heretoo.
You can also download the already configured file here.
Step Five: Customising osuser.xml
In some cases you may need to customise the behaviour of the JiraJdbc classes. You can do this bysetting properties within the osuser.xml file.
This process is documented here.
Step Six: Modifying atlassian-user.xml
This step is only applicable for Confluence 2.7 and later .
Please comment-out/remove the following line from your <Confleunce-Install>/confluence/web-inf/classes/atlassian-user.xml file:

Document generated by Confluence on Jan 01, 2008 18:35 Page 238
<hibernate name="Hibernate Repository" key="hibernateRepository" description="HibernateRepository" cache="true"/>
and add this line instead:
<osuser name="OSUser Repository" key="osuserRepository"/>
Step Seven: Creating Confluence Groups in JIRA
1. Add confluence-users and confluence-administrators groups in JIRA2. Add yourself to both these groups.
• To give your existing JIRA users access to Confluence, you have two options.• Manually edit the groups of these users inside JIRA and give them membership to one or both
of these confluence groups OR• Start up Confluence. Log in using your JIRA account, and go to Administration and then Global
Permissions. Now assign the 'can use' permission to your desired JIRA groups.
In order to use Confluence, users must be a member of the confluence-users group (orhave Confluence 'can use' permission).
Step Eight: Activating External User Management
Since user management is now conducted in JIRA and outside of Confluence, you will need to switchexternal user management on.
NOTE: Activating external user management will remove user and group management optionsfrom Confluence. Your users will also no longer be able to edit their full name or email address insideConfluence. (If they want to, they would have to do so in JIRA).
To switch external user management on:
1. Log into Confluence using your JIRA account.2. Go to the Administration Console and click General Configuration in the left-hand panel3. Click 'Edit' at the bottom of the 'Options and Settings' screen.4. Select 'ON' beside 'External User Management'.
For answers relating to JIRA User Management, click on any query below.
Troubleshooting
Confluence login pageloads with 'NullPointerException' system error
If the page loads with 'System error' with cause 'java.lang.NullPointerException atcom.atlassian.user.impl.osuser.OSUUserManager.getOpensymphonyUser(OSUUserManager.java:85)' andoutput logs shows 'user.provider.jdbc.BaseJDBCProvider] init Could not look up DataSource using JNDIlocation' error, either the Resource for the DataSource is not being loaded by the application server, or itis being loaded but the resource names do not match. Check the names first, so if '/confluence/WEB-INF/classes/osuser.xml' specifies a datasource named 'java:comp/env/jdbc/JiraDS', the datasource specifiedin server.xml or confluence.xml must be 'jdbc/JiraDS'.
Confluence login pageloads with 'HTTP Status 404' and output log shows 'java.lang.ClassNotFoundException' for driver, eg'com.mysql.jdbc.Driver'

Document generated by Confluence on Jan 01, 2008 18:35 Page 239
Missing the database driver library. On standalone or Apache Tomcat, download the database jar to thecommon\lib directory.
Confluence login pageloads but login fails with 'Username and password are incorrect' and output log shows 'Access denied foruser'
Caused by an incorrect database URL or login in the datasource.
Confluence login pageloads but login fails with 'Username and password are incorrect' and output log shows 'Cannot createJDBC driver'
If your log outputs an error with "FATAL [user.provider.jdbc.JDBCCredentialsProvider] Could not list users.org.apache.commons.dbcp.SQLNestedException: Cannot create JDBC driver of class '' for connect URL'null'", you are using the incorrect Tomcat format for specifying the Datasource resource. You shouldcheck your Tomcat version and use the alternative format.
I cannot get my JIRAintegration to work, where can I get technical support?
See Requesting External User Management Support for information on logging a support request.
RELATED TOPICS
Delegate user management to use JIRA logins
Migrating users from Confluence to JIRA
Revert from JIRA to internal user management

Document generated by Confluence on Jan 01, 2008 18:35 Page 240
Revert from JIRA to internal user management
This page last changed on Oct 25, 2006 by [email protected].
Administrators can revert a Confluence instance that uses JIRA for user management back to internaluser management. With few users, it is easier to manually recreate the JIRA users and groups inConfluence. For more users, migrate JIRA users and groups into the Confluence database instead.
Option A - Manually Recreate Users In Confluence
This option is too time consuming for hundreds or thousands of users. After completing the reversion,links to users who created or updated Confluence content may go to error screens.
To manually recreate the users, you must first have an instance of Confluence with internal usermanagement and your data.
• If you have made limited customisations to Confluence and migrating would be desirable - follow theupgrade guide and import your data to a new installation.
• Alternatively, if you have made extensive customisations or do not wish to migrate - go todelegating user management to JIRA and remove your JIRA user management by undoing theinstructions in revese order. These steps are specific to your instance so cannot be covered here.
Then manually create JIRA's groups and users in Confluence. If you have assigned permissions inConfluence to a group which exists in JIRA, you must create a group in Confluence with the same name.If a user who exists in JIRA has created content or has had permissions assigned to them, you must alsocreate that user in Confluence.
Option B - Transfer JIRA Users & Groups To Confluence
This option manually migrates JIRA users into the Confluence database, but requires knowledge of SQL.
Users not using mySQL
Users of non-mySQL databases must be experienced enough to modify the SQL to work intheir database as examples are provided for mySQL only. If you adapt the SQL to anotherdatabase, please consider posting the SQL you used to the comments.
Users of Confluence 2.0 or older
Pre-Confluence 2.0 users may need to modify the instructions to your older schema, orupgrade Confluence. For example, on Confluence 2.1.5 and older, SQL references to theproperty table must be updated to be called OS_PROPERTYENTRY in all upper-case.
Stage One - Create Backups
Creating backups is the only way to restore your data if something goes wrong.
1. From Confluence, create a full XML backup including attachments.2. Stop Confluence.3. Take a backup copy of the Confluence home and install directories.4. Repeat the above steps for JIRA.5. From your mySQL admin tool, create a database backup for the JIRA and Confluence databases.
Stage Two - Replace Confluence User Management
Replace the Confluence user and group permissions with JIRA by transferring table content. The SQLprovided is specific to mySQL and must be modifed for other databases. For each SQL statement, do afind and replace on the JIRA and Confluence table names to your table names. In the examples, they arecalled confluence224 and jira364.
1. Login to a DBA tool that can execute SQL on your DB.2. Erase user and group content from the Confluence DB:

Document generated by Confluence on Jan 01, 2008 18:35 Page 241
delete from confluence224.os_propertyentry where entity_name='OSUser_user';delete from confluence224.os_user_group;delete from confluence224.os_group;delete from confluence224.os_user;
3. Copy JIRA's groupbase table into Confluence's os_group table:
insert into confluence224.os_group (id, groupname)select *from jira364.groupbase;
4. Copy JIRA's userbase table into Confluence's os_user table:
insert into confluence224.os_user (id, username, passwd)select *from jira364.userbase;
5. Copy JIRA's membershipbase table into Confluence's os_user_group table.
insert into confluence224.os_user_group (group_id, user_id)select distinct groupbase.id as "group_id", userbase.id as "user_id"from jira364.groupbase, jira364.membershipbase, jira364.userbasewhere membershipbase.user_name = userbase.username and membershipbase.group_name =groupbase.groupname;
6. Merge relevant content from JIRA's propertyentry and propertystring tables into Confluence'sos_propertyentry table. Some versions of SQL use "0" instead of "false" for boolean values.
insert into confluence224.os_propertyentry (entity_name, entity_id, entity_key, key_type,boolean_val, double_val, string_val, text_val, long_val, int_val, date_val)select 'OSUser_user', propertyentry.entity_id, propertyentry.property_key, 5, false, 0,propertystring.propertyvalue, '', 0, 0, nullfrom jira364.propertyentry, jira364.propertystringwhere propertyentry.entity_name='OSUser' and propertyentry.id=propertystring.id;
Stage Three - Revert To Local Management
• If you have made limited customisations to Confluence and migrating would be desirable - Installa new instance of Confluence using the upgrade guide and use Method 1 to import your updateddatabase.
• Alternatively, if you have made extensive customisations or do not wish to migrate - go toDelegating User Management to JIRA and remove your JIRA user management by undoing theinstructions in revese order. These steps are specific to your instance so cannot be covered here.
Done! Note that the original administrator may not display their groups correctly, however their groupsare still present.

Document generated by Confluence on Jan 01, 2008 18:35 Page 242
JIRA User Management FAQ
This page last changed on Jan 14, 2007 by [email protected].
For answers relating to JIRA User Management, click on any query below.
Troubleshooting
Confluence login pageloads with 'NullPointerException' system error
If the page loads with 'System error' with cause 'java.lang.NullPointerException atcom.atlassian.user.impl.osuser.OSUUserManager.getOpensymphonyUser(OSUUserManager.java:85)' andoutput logs shows 'user.provider.jdbc.BaseJDBCProvider] init Could not look up DataSource using JNDIlocation' error, either the Resource for the DataSource is not being loaded by the application server, or itis being loaded but the resource names do not match. Check the names first, so if '/confluence/WEB-INF/classes/osuser.xml' specifies a datasource named 'java:comp/env/jdbc/JiraDS', the datasource specifiedin server.xml or confluence.xml must be 'jdbc/JiraDS'.
Confluence login pageloads with 'HTTP Status 404' and output log shows 'java.lang.ClassNotFoundException' for driver, eg'com.mysql.jdbc.Driver'
Missing the database driver library. On standalone or Apache Tomcat, download the database jar to thecommon\lib directory.
Confluence login pageloads but login fails with 'Username and password are incorrect' and output log shows 'Access denied foruser'
Caused by an incorrect database URL or login in the datasource.
Confluence login pageloads but login fails with 'Username and password are incorrect' and output log shows 'Cannot createJDBC driver'
If your log outputs an error with "FATAL [user.provider.jdbc.JDBCCredentialsProvider] Could not list users.org.apache.commons.dbcp.SQLNestedException: Cannot create JDBC driver of class '' for connect URL'null'", you are using the incorrect Tomcat format for specifying the Datasource resource. You shouldcheck your Tomcat version and use the alternative format.
I cannot get my JIRAintegration to work, where can I get technical support?
See Requesting External User Management Support for information on logging a support request.

Document generated by Confluence on Jan 01, 2008 18:35 Page 243
LDAP User Management
This page last changed on May 17, 2007 by ganand.
Grouping page for external user management documentation (including LDAP, ActiveDirectory, etc). Whatresource do you need?
• Overview of external user management• Help with troubleshooting external user management• Guide to adding LDAP integration with group management• LDAP FAQ
Check the listing of children pages below for other useful resources.
Document generated by Confluence on Jan 01, 2008 18:35 Page 244
Activating External User Management
This page last changed on Dec 17, 2007 by smaddox.
If your user management is being handled outside of Confluence by JIRA you will need to turn on theexternal management option in Confluence, from the Administration Console.
Running Confluence with Crowd:
• If you would like to handle your user management outside of Confluence via Crowd, you will need toturn on the external management option.
• For Confluence 2.5.6 and later: External user management when running with Crowd is optional.You can leave external user management off and still run Confluence under Crowd. But externaluser management is recommended, because it allows you to use Crowd's powerful cross-directoryadministration features instead of Confluence's more limited Confluence-centric user management.
If your user management is being done with LDAP, you must not turn on external user management,although users and groups which exist in your LDAP repository cannot be modified.
Activating an external user management sytem will remove all user and group management options fromConfluence. The assignment of permissions to groups and users is still carried out within Confluence, butthe creation of groups and users is not.
This will also prevent users from signing up to the site, as well as editing their name, email and passwordparticulars from within Confluence.
You need to have System Administrator permissions in order to perform this function.
To activate an external user management system,
1. Go to the 'Administration Console' and click 'General Configuration' in the left-hand panel.2. In the 'General Configuration' screen, click 'Edit'.3. Select 'On' beside 'External User Management'.4. Click 'Save'.
RELATED TOPICS
Activating External User Management
Add LDAP Integration For User Authentication Only
Changes in osuser.xml from 1.0.3a to 1.1.x
Confluence Caching OSUser Provider
Importing LDAP Users

Document generated by Confluence on Jan 01, 2008 18:35 Page 245
Add LDAP Integration
This page last changed on Dec 17, 2007 by smaddox.
Try Atlassian Crowd for powerful LDAP integration
Atlassian's Crowd is a web-based single sign-on (SSO) tool that simplifies applicationprovisioning and identity management. Crowd supports features that Confluence-only LDAPintegration cannot support, such as multiple user directories.
Confluence can delegate user authentication to LDAP and use LDAP group memberships to set the user'sConfluence access permissions. This also allows Active Directory (AD) integration. This guide is for bothusers enabling LDAP, and those upgrading their LDAP scheme to support group management. It applies toLDAP over HTTP and SSL/HTTPS.
Once the LDAP is enabled and LDAP users are using Confluence, you cannot revert to local usermanagement without those users being disabled. However, you can create new local users while usingLDAP integration.
Who is this guide for?
To decide if this is the correct document for you, please answer these 2 questions:
1. Are you using Atlassian-User LDAP on Confluence 2.1.x? If so, follow the 2.1.x LDAP UpgradeInstructions instead.
2. Are you using a version of Confluence older than 2.1? If you are using 2.0.x, follow OSUser LDAPintegration instead. If it is older than 2.0, you must upgrade Confluence.
Step 1 - Upgrade Confluence
Please check that you are running the latest version of Confluence. If not, we strongly recommend thatyou consider upgrading Confluence according to this guide. Confirm that you have upgraded successfullybefore trying to add LDAP to the new version.
Step 2 - Contact your LDAP/AD Administrator
Integration can only be setup by an administrator confident with running user queries against theirLDAP directory. You should request assistance from your LDAP or Active Directory administrator for thefollowing steps.
Step 3 - Check your LDAP server
Confirm this information about your LDAP server.
1. Check your server LDAP version. Supported versions are v2 and v3. Supported LDAP servers includeOpenLDAP, Microsoft Active Directory, Novell eDirectory, and any server that uses Java JNDI-LDAPmapping.
2. Your LDAP or Active Directory server must support static groups. This means that the user DNs mustbe stored against a membership attribute inside an LDAP groups. An example of a static group isshown below:
Dn: CN=Sales and Marketing,CN=Users,DC=ad,DC=atlassian,DC=comobjectClass: top; group;cn: Sales and Marketing;distinguishedName: CN=Sales and Marketing,CN=Users,DC=ad,DC=atlassian,DC=com;name: Sales and Marketing;...member: CN=John Smith,CN=Users,DC=ad,DC=atlassian,DC=commember: CN=Sally Smith,CN=Users,DC=ad,DC=atlassian,DC=com...
The membership attribute in this case is member, but this is not required. Note that the full DNsof John and Sally Smith are listed. If the values against member are not full DNs, but are justusernames, then you need to add the flag

Document generated by Confluence on Jan 01, 2008 18:35 Page 246
<useUnqualifiedUsernameForMembershipComparison>true</useUnqualifiedUsernameForMembershipComparison>
to your LDAP configuration. Open Directory on OS X uses this configuration.3. You must not have LDAP groups called 'confluence-users' or 'confluence-administrators'.4. You must have at least one existing Confluence administrator with System Administrator
permissions, whose username does not exist in the LDAP server (see Step 4).
Step 4 - Check the System Administrator account
This step assumes that you have at least one Confluence user account which has System Administratorpermissions for your Confluence site. For this account, please check that there isn't an account on yourLDAP system that has the exact same username.
If there is an LDAP account with the exact same username, and you do not have another local Confluenceaccount that has System Administrator permissions rights, then you should perform one of the following:
• create another account, that doesn't exist on LDAP, to act as the administratorOR:
• rename your local Confluence administrator account to use another username that doesn't exist inLDAPOR:
• rename your LDAP account
This will ensure that you will have an account that has sufficient rights to administer your site after youmigrate your users.
Step 5 - Configure your LDAP repository
1. Follow Customising atlassian-user.xml2. Start up Confluence and check that you can log in using the System Administrator account you first
set up when running through the Confluence Setup Wizard. If not, re-examine your steps and repeatwhere necessary.
3. If you can't successfully log in with this account, please check that the username of this accountdoes not already exist in your LDAP server. If usernames are the same, Confluence recognises LDAPaccounts over local Confluence accounts.
Step 6 - Grant access to LDAP users and groups
To grant Confluence login access to your LDAP groups and users:
1. From Confluence, go to Administration > Global Permissions2. Click to Edit Permissions for Groups3. In the textbox to Grant Browse Permission, enter the name of an LDAP group that should have
Confluence access. Click Add.4. Tick the Can Use box for the LDAP group. If the group is not found, it was not present in your LDAP
server.5. For other LDAP groups that need access to Confluence, add them using the same method.6. If you are integrating LDAP with Confluence for authentication only, no LDAP groups will appear in
Confluence. All the individual LDAP users will have to be manually added to an internal Confluencegroup with Can Use permissions enabled before they can have access to Confluence.
7. Set up your Confluence page and space permissions for these LDAP groups and users.
Tip: To set up all LDAP users as members of particular Confluence internal groups, you can try theLDAP Dynamic Groups Plugin.
Installation complete!
Related Pages
• Confluence LDAP Documentation Index

Document generated by Confluence on Jan 01, 2008 18:35 Page 247
Troubleshooting
Check your Confluence version
This documentation applies to Confluence 2.7. There are a couple key bugs that have been resolved inConfluence 2.6 or 2.6.1, but that pertain to 2.5.6 and 2.5.7.
1. http://jira.atlassian.com/browse/CONF-9434 relates to hibernate cache=true;The xml file supplied here has the hibernate cache set to "true".
2. http://jira.atlassian.com/browse/CONF-9195 relates to the migration step.Version 2.6.1 corrects this problem.
More information
• LDAP FAQ• If LDAP users or groups are not displayed in Confluence, download the Paddle diagnostic tool• List of known, unresolved LDAP bugs• Comments on this page.
Support
Failing all else, lodge a support request. Be sure to attach your atlassian-user.xml, Paddle logs and a zipof your Confluence logs.

Document generated by Confluence on Jan 01, 2008 18:35 Page 248
Automatically Adding LDAP users to the confluence-users Group
This page last changed on Nov 07, 2007 by ganand.
This Authenticator adds users to confluence-users as they log in. To use it, change the line:
<authenticator class="com.atlassian.confluence.user.ConfluenceAuthenticator"/>
in seraph-config.xml to:
<authenticator class="com.atlassian.confluence.user.ConfluenceGroupJoiningAuthenticator"/>
If you are using Confluence 2.2 you need to download the ConfluenceGroupJoiningAuthenticator.class fileand put it in WEB-INF/classes/com/atlassian/confluence/user.
Confluence 2.3 and later include this class as standard.
From Confluence 2.6, the directory structure WEB-INF/classes/com/atlassian/confluence/user nolonger exists. The files and classes that used to exist here, now reside within the confluence-2.6.0.jarin WEB-INF/lib directory.

Document generated by Confluence on Jan 01, 2008 18:35 Page 249
Customising atlassian-user.xml
This page last changed on Jul 25, 2007 by [email protected].
The LDAP server connection is specified by manually editing the file atlassian-user.xml. Confluence 2.3onwards supports multiple LDAP servers by repeating the instructions below for each server so that thereare multiple repositories defined.
Stage 1 - Configure Connection Details
1. Edit the file .../confluence/WEB-INF/classes/atlassian-user.xml and configure the connectionfor either AD or LDAP.
• Connections in Active Directory• Connections in other LDAP servers
2. If your Active Directory Server allows anonymous searches, then you do not need to specifya securityPrincipal and securtyCredential at all. For an example of how you would configureConfluence to allow anonymous authentication, see Enable Anonymous Authentication in LDAP orActive Directory
3. To connect to LDAP over SSL, see Connect to LDAP via SSL4. Check your configuration against the example connection details shown below.
<ldap key="ldapRepository" name="LDAP [email protected]" cache="true"><host>hecate.atlassian.com</host><port>389</port><securityPrincipal>cn=admin,dc=atlassian,dc=private</securityPrincipal><securityCredential>secret</securityCredential><securityProtocol>plain</securityProtocol><securityAuthentication>simple</securityAuthentication><baseContext>dc=atlassian,dc=private</baseContext>
....
Stage 2 - Map LDAP Data Tree
1. Configuring the mappings in atlassian-user.xml for either AD or LDAP.• Mapping Active Directory• Mapping other LDAP servers
2. Check your configuration against the example connection details shown below.
...
<baseUserNamespace>dc=staff,dc=perftest,dc=atlassian,dc=private</baseUserNamespace><baseGroupNamespace>dc=groups,dc=perftest,dc=atlassian,dc=private</baseGroupNamespace><usernameAttribute>cn</usernameAttribute><userSearchFilter>(objectClass=inetorgperson)</userSearchFilter><firstnameAttribute>givenname</firstnameAttribute><surnameAttribute>sn</surnameAttribute><emailAttribute>mail</emailAttribute><groupnameAttribute>cn</groupnameAttribute><groupSearchFilter>(objectClass=groupOfNames)</groupSearchFilter><membershipAttribute>member</membershipAttribute></ldap>
Stage 3 - Directory Search Depth Settings
These are the default settings:
...<userSearchAllDepths>false</userSearchAllDepths><groupSearchAllDepths>false</groupSearchAllDepths>
The above settings configure the search depth on users and groups. If you set either attribute to:
• false - Confluence will search only for users/groups directly defined in <baseUserNamespace> and<baseGroupNamespace>.

Document generated by Confluence on Jan 01, 2008 18:35 Page 250
• true - Confluence will search for users/groups defined in the above namespaces and also innamespaces nested within them. For example, if your users are distributed across multiplenamespaces, you should set this option to true.
Setting the value to true may have a high cost in performance for large directories, becauseConfluence will search the whole tree and not just the immediate namespace.
Stage 4 - Optional LDAP Settings
The following settings do not appear in the default atlassian-user.xml file:
<poolingOn>true</poolingOn><maxSize>0</maxSize><initSize>10</initSize><prefSize>10</prefSize><debugLevel>none</debugLevel><securityProtocol>plain ssl</securityProtocol><authentication>simple</authentication><timeout>0</timeout><initialContextFactory>com.sun.jndi.ldap.LdapCtxFactory</initialContextFactory><batchSize>100</batchSize><timeToLive>0</timeToLive>
However, if you want to override the default values listed above, you can add the value onto the end likeso:
...<groupnameAttribute>cn</groupnameAttribute><groupSearchFilter>(objectClass=groupOfNames)</groupSearchFilter><membershipAttribute>member</membershipAttribute><initSize>20</initSize></ldap>
It is important that the connection pool timeout value be set to 0, as this will force Atlassian User (via theJNDI layer) to clean up lingering connections that have lived past one request. More information aboutLDAP pools here.
Stage 5 - Configure LDAP for User Authentication only
Description
There are two kinds of Confluence/LDAP integration available:
UserAuthentication
Internal Users Internal Groups LDAP Users LDAP Groups
LDAP WithoutGroups
LDAP With Groups
This section covers LDAP without groups, where if a username exists in both Confluence and LDAP, theyuse their LDAP password to login. You still maintain users from Confluence and use internal Confluencegroups for group permissions.
Alternatively, you may use LDAP with Groups to have users and groups automatically updated from LDAP,and use LDAP groups for group permissions.
Applies For
• Enabling LDAP for the first time• Upgrading existing LDAP without enabling group management

Document generated by Confluence on Jan 01, 2008 18:35 Page 251
Important Points
• Only the password lookup is done against LDAP and only if the Confluence username coincideswith the LDAP username. Users and user profiles are still managed in Confluence. See technicalexplanation below.
• Each LDAP user in Confluence must be added to an internal Confluence group having Can Usepermissions in order for those LDAP users to access Confluence.If a password is created for an LDAPuser in Confluence,it will be ignored as the LDAP password will override it.
• User management in Confluence 2.0 and earlier is handled by OSUser. OSUser is configured throughthe osuser.xml file located in confluence/WEB-INF/classes.
Instructions
If you do not wish Confluence to retrieve any of your LDAP groups and display them inside Confluencethen you can do this by specifying a dummy value for the groupSearchFilter filter in your atlassian-user.xml file. That is update your atlassian-user.xml file with the following:
<groupSearchFilter>(objectClass=dummyValue)</groupSearchFilter>
An example atlassian-user.xml file:
<baseUserNamespace>cn=users,dc=ad,dc=atlassian,dc=com</baseUserNamespace><baseGroupNamespace>ou=groups,dc=ad,dc=atlassian,dc=com</baseGroupNamespace><usernameAttribute>sAMAccountName</usernameAttribute><userSearchFilter>(objectClass=user)</userSearchFilter><firstnameAttribute>givenname</firstnameAttribute><surnameAttribute>sn</surnameAttribute><emailAttribute>mail</emailAttribute><groupnameAttribute>cn</groupnameAttribute><groupSearchFilter>(objectClass=dummyValue)</groupSearchFilter><membershipAttribute>member</membershipAttribute><userSearchAllDepths>false</userSearchAllDepths><groupSearchAllDepths>false</groupSearchAllDepths>
Please note: You will still have to provide a valid LDAP DN for baseGroupNamespace. You could use thebase DN for example.
Configuring multiple LDAP repositories
For some LDAP servers, it might be necessary to configure Confluence to connect to multiple LDAPservers. This functionality is available in Confluence 2.3 and above, and has a separate guide: Configuringmultiple LDAP repositories.
Related pages
Add LDAP IntegrationConfiguring multiple LDAP repositories
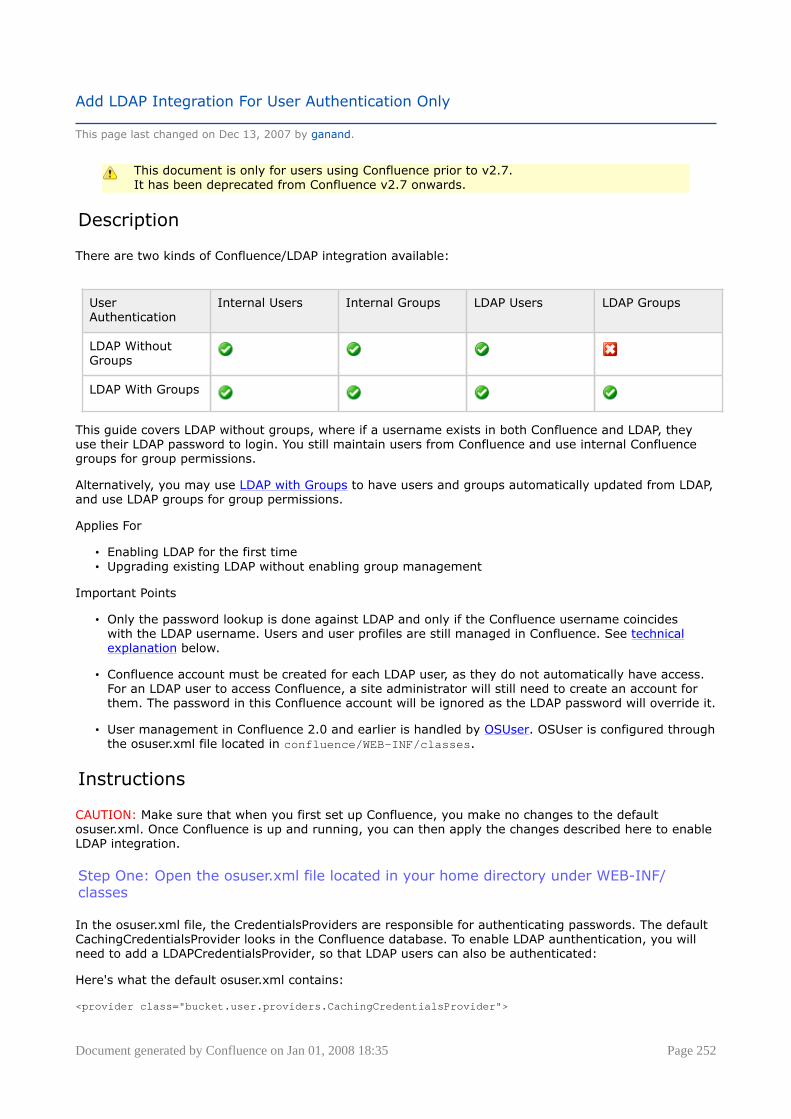
Document generated by Confluence on Jan 01, 2008 18:35 Page 252
Add LDAP Integration For User Authentication Only
This page last changed on Dec 13, 2007 by ganand.
This document is only for users using Confluence prior to v2.7.It has been deprecated from Confluence v2.7 onwards.
Description
There are two kinds of Confluence/LDAP integration available:
UserAuthentication
Internal Users Internal Groups LDAP Users LDAP Groups
LDAP WithoutGroups
LDAP With Groups
This guide covers LDAP without groups, where if a username exists in both Confluence and LDAP, theyuse their LDAP password to login. You still maintain users from Confluence and use internal Confluencegroups for group permissions.
Alternatively, you may use LDAP with Groups to have users and groups automatically updated from LDAP,and use LDAP groups for group permissions.
Applies For
• Enabling LDAP for the first time• Upgrading existing LDAP without enabling group management
Important Points
• Only the password lookup is done against LDAP and only if the Confluence username coincideswith the LDAP username. Users and user profiles are still managed in Confluence. See technicalexplanation below.
• Confluence account must be created for each LDAP user, as they do not automatically have access.For an LDAP user to access Confluence, a site administrator will still need to create an account forthem. The password in this Confluence account will be ignored as the LDAP password will override it.
• User management in Confluence 2.0 and earlier is handled by OSUser. OSUser is configured throughthe osuser.xml file located in confluence/WEB-INF/classes.
Instructions
CAUTION: Make sure that when you first set up Confluence, you make no changes to the defaultosuser.xml. Once Confluence is up and running, you can then apply the changes described here to enableLDAP integration.
Step One: Open the osuser.xml file located in your home directory under WEB-INF/classes
In the osuser.xml file, the CredentialsProviders are responsible for authenticating passwords. The defaultCachingCredentialsProvider looks in the Confluence database. To enable LDAP aunthentication, you willneed to add a LDAPCredentialsProvider, so that LDAP users can also be authenticated:
Here's what the default osuser.xml contains:
<provider class="bucket.user.providers.CachingCredentialsProvider">

Document generated by Confluence on Jan 01, 2008 18:35 Page 253
<propertyname="chain.classname">com.opensymphony.user.provider.hibernate.HibernateCredentialsProvider</property><property name="chain.configuration.provider.class">bucket.user.BucketHibernateConfigProvider</property></provider><provider class="bucket.user.providers.CachingAccessProvider"><property name="chain.classname">com.opensymphony.user.provider.hibernate.HibernateAccessProvider</property><property name="chain.configuration.provider.class">bucket.user.BucketHibernateConfigProvider</property></provider><provider class="bucket.user.providers.CachingProfileProvider"><propertyname="chain.classname">com.opensymphony.user.provider.hibernate.HibernateProfileProvider</property><property name="chain.configuration.provider.class">bucket.user.BucketHibernateConfigProvider</property></provider>
Step Two: Edit the osuser.xml file as shown below:
For Confluence version 2.1 and later:
<provider class="com.atlassian.confluence.user.ConfluenceLDAPCredentialsProvider"><property name="java.naming.factory.initial">com.sun.jndi.ldap.LdapCtxFactory</property><property name="java.naming.provider.url">ldap://localhost:389</property><property name="searchBase">dc=atlassian,dc=com</property><property name="uidSearchName">cn</property><!--<property name="java.naming.security.principal">cn=Manager,dc=atlassian,dc=com</property><property name="java.naming.security.credentials">secret</property><property name="exclusive-access">true</property>--></provider>
<provider class="bucket.user.providers.CachingCredentialsProvider"><propertyname="chain.classname">com.opensymphony.user.provider.hibernate.HibernateCredentialsProvider</property><property name="chain.configuration.provider.class">bucket.user.BucketHibernateConfigProvider</property></provider><provider class="bucket.user.providers.CachingAccessProvider"><property name="chain.classname">com.opensymphony.user.provider.hibernate.HibernateAccessProvider</property><property name="chain.configuration.provider.class">bucket.user.BucketHibernateConfigProvider</property></provider><provider class="bucket.user.providers.CachingProfileProvider"><propertyname="chain.classname">com.opensymphony.user.provider.hibernate.HibernateProfileProvider</property><property name="chain.configuration.provider.class">bucket.user.BucketHibernateConfigProvider</property></provider>
For older verisons of Confluence
<provider class="com.opensymphony.user.provider.ldap.LDAPCredentialsProvider"><property name="java.naming.factory.initial">com.sun.jndi.ldap.LdapCtxFactory</property><property name="java.naming.provider.url">ldap://localhost:389</property><property name="searchBase">dc=atlassian,dc=com</property><property name="uidSearchName">cn</property><!--<property name="java.naming.security.principal">cn=Manager,dc=atlassian,dc=com</property><property name="java.naming.security.credentials">secret</property>

Document generated by Confluence on Jan 01, 2008 18:35 Page 254
<property name="exclusive-access">true</property>--></provider>
<provider class="bucket.user.providers.CachingCredentialsProvider"><propertyname="chain.classname">com.opensymphony.user.provider.hibernate.HibernateCredentialsProvider</property><property name="chain.configuration.provider.class">bucket.user.BucketHibernateConfigProvider</property></provider><provider class="bucket.user.providers.CachingAccessProvider"><property name="chain.classname">com.opensymphony.user.provider.hibernate.HibernateAccessProvider</property><property name="chain.configuration.provider.class">bucket.user.BucketHibernateConfigProvider</property></provider><provider class="bucket.user.providers.CachingProfileProvider"><propertyname="chain.classname">com.opensymphony.user.provider.hibernate.HibernateProfileProvider</property><property name="chain.configuration.provider.class">bucket.user.BucketHibernateConfigProvider</property></provider>
• Update the following properties to suit your LDAP server:° url (currently set to ldap://localhost:389)° searchBase (currently set to dc=atlassian,dc=com)° uidSearchName (currently set to cn)
• If your LDAP server is not configured to allow anonymous lookups, you need to:° remove comment tags° enter the username; including searchBase (currently set to cn=Manager,dc=atlassian,dc=com)° enter password (currently set to secret)
The Credentials (password) checking is a separate operation from user-profile lookups. The profile canbe loaded from the Confluence database, but the password is looked up from LDAP. Furthermore, multiplecredentials providers can be specified (here, LDAP and OSUser), and if one fails, the other will be used.This allows non-LDAP users to log in with their Confluence password.
RELATED TOPICS
Activating External User Management
Add LDAP Integration For User Authentication Only
Changes in osuser.xml from 1.0.3a to 1.1.x
Confluence Caching OSUser Provider
Importing LDAP Users

Document generated by Confluence on Jan 01, 2008 18:35 Page 255
atlassian-user.xml reference
This page last changed on Sep 17, 2006 by [email protected].
This page describes the function of each of the tags in an atlassian-user.xml file.
Child tags of the <ldap> tag:
host The host name of the machine running the LDAPserver. This must resolve from the machinerunning Confluence.
port The port number that the LDAP server is runningon. This should usually be 389.
securityPrincipal The distinguished name of a user who is allowedto browse the entire LDAP repository. This isomitted if the repository has anonymous accessenabled.
securityCredential That user's password. This is omitted if therepository has anonymous access enabled.
securityProtocol Must be 'plain'. This is omitted if the repositoryhas anonymous access enabled.
securityAuthentication Must be 'simple', or 'none' if the repository hasanonymous access enabled.
baseContext This should be set to a context at the 'top' of yourLDAP tree.
baseUserNamespace This should be set to a context which contains allyour user entities.
userSearchFilter A filter which matches only user entities.
baseGroupNamespace This should be set to a context which contains allyour group entities
groupSearchFilter A filter which matches only group entities
usernameAttribute The name of the attribute on a user entity whichcontains the Confluence user name of the user.
firstnameAttribute The name of the attribute on a user entity whichcontains the first name of the user.
surnameAttribute The name of the attribute on a user entity whichcontains the surname of the user.
emailAttribute The name of the attribute on a user entity whichcontains the email address of the user.
groupnameAttribute The name of the attribute on a group entity whichcontains the Confluence group name of the group.
membershipAttribute The name of an attribute on a group entity whichcontains the distinguished name of a member ofa group. This should occur multiple times on agroup to indicate multiple members of the group.
userSearchAllDepths

Document generated by Confluence on Jan 01, 2008 18:35 Page 256
Set to 'true' to search the baseUserNamespacelevel and all nodes underneath for users. Defaultsto 'false'.
groupSearchAllDepths Set to 'true' to search the baseGroupNamespacelevel and all nodes underneath for groups.Defaults to 'false'.
useUnqualifiedUsernameForMembershipComparison Set to 'true' to use the value of theusernameAttribute for membership comparisonsinstead of the distinguished name. Defaults to'false'.

Document generated by Confluence on Jan 01, 2008 18:35 Page 257
Changes in osuser.xml from 1.0.3a to 1.1.x
This page last changed on Sep 14, 2006 by [email protected].
If you have setup Confluence to:
• delegate user management to JIRA (as per our documentation here) or• use LDAP/Active directcory authentication (as per our documentation here)
Then you will need to make the following changes to your osuser.xml file:
1. replace
com.atlassian.confluence.user.providers.Caching
with
bucket.user.providers.Caching
Doing this will effectively convert the following:
com.atlassian.confluence.user.providers.CachingCredentialsProvidercom.atlassian.confluence.user.providers.CachingAccessProvidercom.atlassian.confluence.user.providers.CachingProfileProvider
to
bucket.user.providers.CachingCredentialsProviderbucket.user.providers.CachingAccessProviderbucket.user.providers.CachingProfileProvider
2. and replace
com.atlassian.confluence.user.ConfluenceHibernateConfigProvider
with
bucket.user.BucketHibernateConfigProvider
Alternatively
You can just reconfigure the new osuser.xml with your changes.

Document generated by Confluence on Jan 01, 2008 18:35 Page 258
Configuring multiple LDAP repositories
This page last changed on May 17, 2007 by ganand.
Availability
Confluence 2.3 and above support multiple LDAP servers configured in atlassian-user.xml. Instructionsare below.
Confluence releases prior to 2.3 do not support multiple LDAP repositories.
Prerequisites
Before reading this, ensure you understand the configuration details outlined in Customising atlassian-user.xml. This describes how to configure a single LDAP repository in Confluence, and is prerequisiteknowledge for following the instructions below.
For brevity, all examples on this page are partial examples. A complete atlassian-user.xml LDAPconfiguration can be found in Customising atlassian-user.xml.
Configuration
To configure multiple LDAP repositories in Confluence, put multiple <ldap>...</ldap> entries intoconfluence/WEB-INF/classes/atlassian-user.xml.
The order of the entries in the file will be the order that the repositories are searched for users. Thatis, if a user tries to log in with the username jsmith, the first repository in atlassian-user.xml willbe searched for the user with the username jsmith. If no user is found in that repository, the secondrepository specified in atlassian-user.xml will be searched.
Here is a partial configuration that connects Confluence to two different LDAP servers. They aregiven the identifiers ldap1 and ldap2, and connect to the servers ldap-sf.example.org and ldap-nyc.example.org respectively.
<atlassian-user><repositories><ldap key="ldap1" name="San Francisco Example Repository" cache="true"><host>ldap-sf.example.org</host><port>389</port>
<!-- ... remainder of server configuration ... -->
</ldap>
<ldap key="ldap2" name="New York City Example Repository" cache="true"><host>ldap-nyc.example.org</host><port>389</port>
<!-- ... remainder of server configuration ... -->
</ldap>
<hibernate key="hibernate" name="Hibernate Repository" description="Hibernate Repository" /></repositories></atlassian-user>
Points to note:
• each server must have a unique key attribute• each server must include the full LDAP configuration, including baseUserNamespace,baseGroupNamespace and so on
• Confluence's internal repository, the <hibernate> repository, must be specified last• you can include more than two LDAP repositories, but please read the Side effects section below.

Document generated by Confluence on Jan 01, 2008 18:35 Page 259
Side effects
The main side effect of configuring multiple LDAP servers is degrading performance. There are manyactivities in Confluence where user or group information is retrieved:
• logging in• user/group searches• permission checks when viewing or editing a page.
Confluence tries to cache as much information as possible from the LDAP queries, but almost certainlyadding multiple LDAP servers will degrade the performance of the application. This is especially true if anyof the LDAP servers are geographically distant from Confluence, where any LDAP query has a significantlatency (> 50 ms roundtrip).
Two connections to the same server
It also possible, but not usually recommended, for Confluence to connect twice to the same server. Whenconnecting twice to the same server, you must not have overlapping group or user namespaces in theLDAP tree.
Here is an partial configuration, retrieving two separate LDAP user branches, but only one LDAP groupbranch. To configure only a single group branch, the group filter in the second LDAP repository searchesfor a non-existent value so it will not return any results. (This is generally fast as long as your LDAPserver has an index on objectClass for the given tree section.)
<atlassian-user><repositories><ldap key="ldap1" name="Example Repository, SF user tree" cache="true"><host>ldap.example.org</host><port>389</port><!-- ... remainder of connection configuration ... -->
<!-- user search filter --><baseUserNamespace>cn=San Francisco,dc=ldap,dc=example,dc=org</baseUserNamespace><userSearchFilter>(objectClass=user)</userSearchFilter>
<!-- ... remainder of user configuration ... -->
<!-- group search filter --><baseGroupNamespace>cn=Groups,dc=ldap,dc=example,dc=org</baseGroupNamespace><groupSearchFilter>(objectClass=group)</groupSearchFilter>
<!-- ... remainder of server configuration ... --></ldap><ldap key="ldap2" name="Example Repository, NYC user tree" cache="true"><host>ldap.example.org</host><port>389</port><!-- ... remainder of connection configuration ... -->
<!-- user search filter --><baseUserNamespace>cn=New York City,dc=ldap,dc=example,dc=org</baseUserNamespace><userSearchFilter>(objectClass=user)</userSearchFilter>
<!-- ... remainder of user configuration ... -->
<!-- group search filter --><baseGroupNamespace>cn=Groups,dc=ldap,dc=example,dc=org</baseGroupNamespace><groupSearchFilter>(objectClass=nothing)</groupSearchFilter>
<!-- ... remainder of server configuration ... --></ldap><hibernate key="hibernate" name="Hibernate Repository" description="Hibernate Repository" /></repositories></atlassian-user>

Document generated by Confluence on Jan 01, 2008 18:35 Page 260
Points to note:
• each repository will have its own connection pool, so Confluence will use twice as many connectionsto the LDAP server
• performance will typically be degraded, as discussed in Side effects above• each server must have a unique key attribute• each server must include the full LDAP configuration, including baseUserNamespace,baseGroupNamespace and so on
• Confluence's internal repository, the <hibernate> repository, must be specified last.
Related pages
Customising atlassian-user.xmlAdd LDAP Integration

Document generated by Confluence on Jan 01, 2008 18:35 Page 261
Confluence Caching OSUser Provider
This page last changed on Apr 06, 2004 by mryall.
During some operations such as rendering pages, Confluence makes a large number of queries to theuser management subsystem (OSUser). To cater for this, the OSUser providers built in to Confluence inv1.0 performed a certain amount of in-memory caching of user identities. Unfortunately, this means thatif you configure Confluence to use some other provider (such as LDAP or JIRA), this caching is no longerperformed, and the application slows significantly as a result.
This document is aimed at Confluence users who have, or wish to have Confluence use an external usermanagement through customising their osuser.xml file. If you are just using Confluence's built-in user-management, you do not need to read this document.
Note
While the caching providers should work with any OSUser provider, we have only tested them againstConfluence's built-in user-management, and the JIRA provider that ships with Confluence.
Provider Configuration
Confluence 1.0.1 introduces the following OSUser providers:com.atlassian.confluence.user.providers.CachingCredentialsProvider,com.atlassian.confluence.user.providers.CachingAccessProvider,com.atlassian.confluence.user.providers.CachingProfileProvider. They are written as cachingwrappers around another provider that does all the real work. So, for example, this is the defaultCredentialsProvider configuration that ships with Confluence:
<provider class="com.atlassian.confluence.user.providers.CachingCredentialsProvider"><property name="chain.classname">com.opensymphony.user.provider.hibernate.HibernateCredentialsProvider</property><property name="chain.configuration.provider.class">com.atlassian.confluence.user.ConfluenceHibernateConfigProvider</property></provider>
To configure the caching provider, you need to supply:
1. The class-name of the provider that will ultimately be providing the credentials, as the propertychain.classname
2. Any properties that need to be passed to that next provider. If the next provider requires a propertyconfiguration.provider.class, then you can pass that property to the provider by prependingchain. to the property name: chain.configuration.provider.class
The configuration for the Access and Profile providers is identical.

Document generated by Confluence on Jan 01, 2008 18:35 Page 262
Importing LDAP Users
This page last changed on Jun 24, 2007 by smaddox.
Deprecation NoticeA new improved LDAP integration was introduced in Confluence 2.1. This documentdescribes the old style LDAP integration and has been deprecated. If you are new toConfluence and have not set up LDAP integration before, we recommend using the newLDAP integration.
To import users from your LDAP server into Confluence,
1. Download the LDAP user importer.2. Open ldap2confluence.sh (Unix) or ldap2confluence.bat (Windows)3. Set the Base URL to the URL of your Confluence system (e.g. http://my.server/confluence).4. Set the 'ADMINUSER' and 'ADMINPASSWORD' variables to the username and password of your
Confluence Admin user.5. Setup the connection.properties file as described here.6. Setup the mappings.properties file as described here.7. Run ldap2confluence to import your users.
RELATED TOPICS
Activating External User Management
Add LDAP Integration For User Authentication Only
Changes in osuser.xml from 1.0.3a to 1.1.x
Confluence Caching OSUser Provider
Importing LDAP Users

Document generated by Confluence on Jan 01, 2008 18:35 Page 263
LDAP FAQ
This page last changed on Dec 13, 2007 by ganand.
For answers relating to LDAP User Management, click on any query below.
Troubleshooting
I just added LDAPintegration, why can't I login using my original account?
If there is an LDAP user with the same username as your administrator account, you must now use theirpassword to login. LDAP logins override internal logins.
Why do my LDAP userssees 'Not Permitted' screens when they login?
To login, the user must be a member of one or more groups that have been granted 'Can Use' permissionfrom the Administration -> Global Permissions -> Group Permissions.
Confluence failsto start with error 'Error creating bean with name 'userManager' defined in class path resource[atlassianUserContext.xml]'?
Your atlassian.xml file may contain filters with characters that must be escaped from XML. Check here fordetails.
Editing a user under Administration -> Manage Users throws an error'org.apache.velocity.exception.MethodInvocationException'
If you see an error:"org.apache.velocity.exception.MethodInvocationException: Invocation of method 'isUserDeactivated'in class com.atlassian.confluence.user.actions.ViewUserAction threw exception classjava.lang.NullPointerException : null"You should open \confluence\WEB-INF\classes\atlassian-user.xml and check that your HibernateRepository is not wrapped in a comment tag (<!-- and -->). The line to uncomment is:<hibernate name="Hibernate Repository" key="hibernateRepository" description="HibernateRepository" />
After setting up LDAP, Icannot see LDAP users or groups from the Confluence user or group browser
Are your users or groups located in subtrees beneath the directory returned by the searchfilter? If so, you may need to add <usersearchalldepths>TRUE</usersearchalldepths> or<groupsearchalldepths>TRUE</groupsearchalldepths> to your altassian-user.xml See Map LDAPUsers and Groups for details.
I cannot see an LDAP/ADgroup in Confluence

Document generated by Confluence on Jan 01, 2008 18:35 Page 264
Is the group in a subtree? If so, you will need to edit atlassian-user.xml and add agroupSearchAllDepths=true parameter to the LDAP repository to set Confluence to search subtrees ofthe base group namespace. See Map LDAP Users and Groups for details.
I cannot get my LDAP towork, where can I get technical support?
See Requesting External User Management Support for information on logging a support request.
General Questions
How can I enable LDAP?
See Add LDAP Integration.
Are all users in LDAPvisible in Confluence administration? Can they can be assigned groups/permissions?
All LDAP users with 'Can Use' permission can be viewed from the user browser, even if they havenever logged in. When an LDAP user logs in for the first time, a Confluence user account is createdautomatically to store their information. You have read-only access to LDAP groups, and can add/removeConfluence internal groups to any user.
How are LDAP/AD userscounted toward my license limit?
Your user count is determined by the number of internal users plus the number of LDAP users who canpotentially login. LDAP users that are a member of an LDAP group with 'Can Use' permission granted inConfluence can all potentially login, which means that all members of groups with this permission grantedwill be counted towards your license. To manage your license usage, only grant login permission to ADgroups where all members need accounts. You may like to setup a special confluence LDAP group if nocombination of your existing groups is suitable.
When a user is deletedfrom LDAP, how does Confluence handle this? Is the user's assignment to one or more groups still visible?
Users are not deleted from Confluence, but their logins are disabled within one hour as they expire in thecache. Only non-LDAP groups are retained. Refer to the overview for more detail.
How can I assign anLDAP user a Confluence account?
LDAP groups or users granted 'Can Use' permission under 'Global Permissions' can login to Confluence.
Can we use LDAP andConfluence groups simultaneously, as a 'mixed mode', where some groups are kept in Confluence andothers in LDAP?

Document generated by Confluence on Jan 01, 2008 18:35 Page 265
Yes.
If a user is in Confluencewith one password, and an LDAP user with the same username is added, which password gets used?
The LDAP login has priority over the Confluence login. If LDAP 'Can Use' permission is removed or theuser is deleted, the Confluence login will still work.
I enabled LDAP and someusers are now returned twice under the user browser
When LDAP is enabled, it is normal for the user browser to return two copies of users who have bothLDAP and internal users accounts. If you are interested in a fix for this, please vote towards 'Userbrowser shows duplicate accounts when a user exists both locally and in LDAP'.
The original internaluser had a lowercase username, but the LDAP user has the same username in Uppercase, does it matterwhich one I use?
As mentioned above, LDAP login has priority over the confluence login; however only the password istaken into account here. You can log in with either the lowercase or UPPERCASE username.
Active Directory Questions
Can it make distinctionsbetween security and distribution groups, or group types?
No, Confluence has no group types. However, you can configure Confluence to only recognise someof these groups over others. For example, you can configure Confluence to only recognise distributiongroups. this is done by adjusting the groupSearchFilter in your atlassian-user.xml file.
Can group membershipsbe retrieved from multi-domain forests?
Yes, you can do this by configuring multiple repositories: one for each domain. More instructions on howto do this can be found here: http://confluence.atlassian.com/x/AgDUAg
Can Confluence supportmultiple Active Directory repositories?
Yes.
Can it handle nesting?
No, each child group must be individually specified instead. You may wish to vote towards support fornested groups at CONF-6755.

Document generated by Confluence on Jan 01, 2008 18:35 Page 266
Domino LDAP Questions
Groups are found underAdministration->Security->Manage Groups with the correct user membership. But individual users arealways shown as not belonging to any groups?
Domino servers allow user groups to be set as 'mail-only', 'access control' and 'multi-purpose'. If thegroups are set to 'mail-only', when Confluence queries the Domino LDAP server about a given user,Domino will return null. Groups that are created as 'multi-purpose' seem to work fine.
Other Questions
For troubleshooting, please create a problem report. General enquiries should be posted to a supportticket

Document generated by Confluence on Jan 01, 2008 18:35 Page 267
Connect to LDAP via SSL
This page last changed on Oct 17, 2007 by jfleming.
Atlassian User LDAP supports connecting to an LDAP server over SSL/HTTPS.
1. Import your LDAP server's public certificate into the Confluence JVM keystore. This is the certificatethat the LDAP server will use to set up the SSL encryption, and you can use any alias of yourchoosing in place of "ldapCert".
keytool -import -alias ldapCert -file <LdapServerCertificate.crt> -keystore %JRE_HOME%/lib/security/cacerts
2. Edit the file in your Confluence install directory, confluence\WEB-INF\classes\atlassian-user.xml:Change the value of securityProtocol from "plain" to "ssl": <securityProtocol>ssl</securityProtocol>Switch the LDAP connection to the SSL port, if it's different from the default LDAP port. If you'reusing the most common LDAPS port, set <port>636</port>
3. Add the root certificate to your default Java keystore with the following command. This is thecertificate that was used to authorise the LDAP server's certificate; it will be either the one thatwas used for signing it, or will come from further up in the trust chain, possibly the root certificate.This is often a self-signed certificate, when both ends of the SSL connection are within the samenetwork. Again, the exact alias is not important.
keytool -import -alias serverCert -file <RootCertificate.crt> -keystore %JRE_HOME%/lib/security/cacerts
The keytool will ask you for a password. The default password is "changeit" without the quotes.4. Verify that the certificate has been added successfully by entering the following command:
keytool -list -keystore %JRE_HOME%/lib/security/cacerts
5. Ensure that you've updated JAVA_OPTS to specify the path to the keystore, as specified inConnecting to SSL services, before restarting tomcat/Confluence.
There's no need to specify an alias for Confluence to use; on connecting to the LDAP server, it will searchthrough the keystore to find a certificate to match the key being presented by the server.

Document generated by Confluence on Jan 01, 2008 18:35 Page 268
Troubleshooting the "Not Permitted" Screen under LDAP Integration
This page last changed on Jun 14, 2006 by mryall.
If you have set up Confluence with AtlassianUser integration and attempted a login with an LDAP/ADaccount and got a page titled "Not Permitted" here are the steps to troubleshoot this:
• Have you assiged USE permission to the relevant LDAP groups from the Administration > GlobalPermissons page?
Before an LDAP user can login and use Confluence, the LDAP group they belong to must be given USEpermission directly. (Please note: nested groups is not supported in Confluence as yet, so you cannotspecify the parent group. If you want this feature, please vote for it here.)
• Does an account exist on your LDAP/AD server that has the same name as your local adminaccount? (for example, is there an acccount on LDAP called 'admin'?)
If so, then you will not be able to login with your local admin account once you enable LDAP integration.To rectify this, you need to either rename your LDAP admin account or rollback your LDAP integration andcreate another Confluence admin account.
• You have assigned USE permission to the relevant LDAP groups, but LDAP users in those groups stillget "Not Permitted"?
Here, you need to check if Confluence is actually aware that your LDAP users belong to those LDAPgroups. To work this out, here is what we need from you:
1. login as the local admin account you created when you first set up Confluence.2. enable profiling by appending ?profile=on to the end of a Confluence URL (say the URL of the
dashboard, if you happen to be on that page) and hit enter to refresh the page. This setting will nowbe enabled and cause additional information to be written to your log files to help us diagnose theproblem.
3. Now browse to the Administration > Manage Users screen and do a search for any LDAP user.4. Now click on the user to view their details (including the groups they belong to).5. Now submit a support ticket at http://support.atlassian.com and attach:
• a screenshot of the user details page• your server logs files
If you are feeling brave, you can attempt to decipher the logs yourself. Here's how:
1. your logs should display something similar to this:
[0ms] -com.atlassian.user.impl.ldap.adaptor.LDAPStaticGroupAdaptor_search((&(objectClass=groupOfNames)(member=cn=confadmin,ou=users,ou=people,ou=functest,dc=atlassian,dc=com)))[0ms] - com.atlassian.user.impl.ldap.repository.DefaultLDAPRepository_getLDAPContext[0ms] -com.atlassian.user.impl.ldap.adaptor.LDAPStaticGroupAdaptor_search_JNDI_RAW_((&(objectClass=groupOfNames)(&(objectClass=groupOfNames)(member=cn=confadmin,ou=users,ou=people,ou=functest,dc=atlassian,dc=com))))
This means that Confluence is using this LDAP search filter (&(objectClass=groupOfNames)(member=cn=confadmin,ou=users,ou=people,ou=functest,dc=atlassian,dc=com)) to find thegroups that the user 'confadmin' belongs to. Obviously, the objectClass and member attributes maydiffer in your install, but the filter should be similar.
2. connect to your LDAP/AD server with JXplorer or an LDAP tool of your choice, and issue the abovefilter and check that you get the results you expect. This should help you to identify if and why thefilter is incorrect and what it should be. Please add what you find in this step to the support ticket ifyou are unable to resolve it from here.

Document generated by Confluence on Jan 01, 2008 18:35 Page 269
Cannot login with Confluence admin account
This page last changed on Aug 20, 2006 by [email protected].
By 'admin account', we are referring to the account that was setup during the Confluence setup wizard.
If you have just integrated Confluence with LDAP or Active Directory, but find yourself not being able tologin with this account but instead get a 'not permitted' screen: here's the explanation and fix:
Explanation
This is caused by there being an account on LDAP with the same username as your admin account.(so for example, your Confluence admin account is 'admin' and there's a user on LDAP that also hasusername 'admin').
Fix
1. Shutdown Confluence2. Open confluence/WEB-INF/classes/atlassian-user.xml in a text editor and comment out the LDAP
statements for now. For example:
<atlassian-user><repositories>
<osuser key="osuserRepository" name="OSUser Repository"/>
<!--<ldap key="ldapRepository" name="LDAP [email protected]" cache="true"><host>hecate.atlassian.com</host><port>389</port><securityPrincipal>cn=admin,dc=atlassian,dc=private</securityPrincipal><securityCredential>secret</securityCredential><securityProtocol>plain</securityProtocol><securityAuthentication>simple</securityAuthentication><baseContext>dc=atlassian,dc=private</baseContext>
<baseUserNamespace>dc=staff,dc=perftest,dc=atlassian,dc=private</baseUserNamespace><baseGroupNamespace>dc=groups,dc=perftest,dc=atlassian,dc=private</baseGroupNamespace><usernameAttribute>cn</usernameAttribute><userSearchFilter>(objectClass=inetorgperson)</userSearchFilter><firstnameAttribute>givenname</firstnameAttribute><surnameAttribute>sn</surnameAttribute><emailAttribute>mail</emailAttribute><groupnameAttribute>cn</groupnameAttribute><groupSearchFilter>(objectClass=groupOfNames)</groupSearchFilter><membershipAttribute>member</membershipAttribute></ldap>-->
<hibernate name="Hibernate Repository" key="hibernateRepository" description="HibernateRepository" />
</repositories></atlassian-user>
Notice the <!-- and --> symbols added before and after the <ldap> tags.3. Start up Confluence. You should now be able to login with your admin account4. Create another admin account that has a different name to the one that exists in LDAP or Active
Directory.5. Undo the changes you made to atlassian-user.xml and restart Confluence.
Alternative Fix
Alternatively, you can either rename or remove the admin account present on LDAP or Active Directory.But if this is not an option, stick to the fix above.

Document generated by Confluence on Jan 01, 2008 18:35 Page 270
Migrating users from Confluence to JIRA
This page last changed on Sep 06, 2006 by mryall.
There is currently no way to delegate user management from JIRA to Confluence. So, if you are in asituation where your users are defined in Confluence and would like to take advantage of Confluence'sability to use JIRA user management, you will need to transfer all of your existing Confluence users intoJIRA. You can do this manually, or if you have a large number of users, you can use the attached XML-RPC script.
You should backup your JIRA installation before running this script. This is an experimentalscript that has not gone through the same extensive testing as the Confluence and JIRAproducts.
Getting the migration tool
• Download the attached rpc-tools-0.9.zip.• Extract the ZIP file to a temporary directory on your computer.
Patching Confluence 2.0.x
A patched RPC plugin is included in the ZIP file to allow remote retrieval of a full list of users fromConfluence 2.0.x. To install it:
• In your Confluence webapp, move confluence/WEB-INF/lib/confluencerpc.jar to a backuplocation
• Copy plugins-confluencerpc.jar from the patch/ directory in the extracted ZIP file toconfluence/WEB-INF/lib.
No patch is required for Confluence 2.1 and later.
Running the migration tool
• Back up your JIRA database.• If you do not have an 'admin' username with password 'admin' in both JIRA and Confluence, create
it now.• Ensure JIRA and Confluence have remote API access enabled. In both applications, it is configured
in the General Configuration screen in Administration.• Edit connection.properties in the extracted ZIP file to the set the XML-RPC URLs for JIRA and
Confluence. The XML-RPC URLs in the default file correspond to the following application base URLs:° JIRA - http://localhost:8080° Confluence - http://localhost:8080/confluence
• Run java -jar tools.jar in the extracted ZIP file directory.
A successful run will generate output like the following:
$ java -jar tools.jar- Transferring group: confluence-administrators- Transferring group: confluence-users- Transferring user: testuser1- Transferring user: testuser2
Things to note:
• This script requires that both the Confluence and JIRA remote APIs are available and accessible toa username 'admin', password 'admin'. You can temporarily add this user to both system to run thescript, then remove it afterwards.
• A random password will be assigned to each user that is transferred because it is not possible toaccess password information via the XML-RPC API. Therefore they will have retrieve a new passwordvia the password reminder.
• Jira does not allow users to sign up if they do not have a valid email address. Therefore we willassign them an email address of type [email protected] to any Confluence users that do not

Document generated by Confluence on Jan 01, 2008 18:35 Page 271
have a email address. This will allow you to find the users and help them to create a password orchange the email address.
Trouble running the script?
• Ensure you have created a user 'admin' with password 'admin' in both Confluence and JIRA.• Ensure both applications have remote API access enabled (see above).• Ensure you have patched the Confluence RPC plugin if running Confluence 2.0.x.
If you're still having trouble, please raise a support request, and include a copy of the error you'regetting.

Document generated by Confluence on Jan 01, 2008 18:35 Page 272
Requesting External User Management Support
This page last changed on Dec 12, 2007 by smaddox.
If you are having external user management issues with Confluence, and the advice on Add LDAPIntegration has not helped, you can always ask us for help. External user management issues can behard to diagnose, however, and we often spend a lot of time understanding the particular configurationyou have. The best way to get a speedy resolution to your issue is to provide this information up front.
Please gather all of the information listed below and include it in your support request (http://support.atlassian.com), even if you think you have a good idea what's causing the problem. That way wedon't have to ask for it later.
Confluence server
• Take a screenshot of Confluence's Administration # System Information (or save the page asHTML)
• Take a screenshot of Confluence's Administration # Global Permissions, if you are havingproblems with logging in
• Take a screenshot of the Space permissions page, if you are having problems with space or pagepermissions.
Confluence configuration files
• Attach a copy of atlassian-user.xml, found in confluence/WEB-INF/classes• Attach a copy of osuser.xml, found in confluence/WEB-INF/classes.• If you have implemented a custom authenticator or in any way modified seraph-config.xml orseraph-paths.xml, please provide the modified files as well.
If you are running Confluence 2.1 you will have to attach the following file instead of atlassian-user.xml
• Attach a copy of atlassianUserContext.xml, found in confluence/WEB-INF/classes
User management system
• What is the name and version of your LDAP server?• Does your LDAP server use dynamic or static groups?
Using Active Directory for LDAP?
Please include LDAP Studio Entry Editor snaphots with the information specified on this page
Diagnostics
• Enable profiling (as described here)• Enable detailed user management logging by editing confluence/WEB-INF/classes/log4j.properties:
Change this section:
#### Atlassian User####log4j.logger.com.atlassian.user=DEBUG, confluencelog#log4j.additivity.com.atlassian.user=false#log4j.logger.com.atlassian.confluence.user=DEBUG,console#log4j.additivity.com.atlassian.confluence.user=false#log4j.logger.bucket.user=DEBUG,console#log4j.additivity.bucket.user=false
To this:
#### Atlassian User###

Document generated by Confluence on Jan 01, 2008 18:35 Page 273
log4j.logger.com.atlassian.user=DEBUG, confluenceloglog4j.additivity.com.atlassian.user=falselog4j.logger.com.atlassian.confluence.user=DEBUG,confluenceloglog4j.additivity.com.atlassian.confluence.user=falselog4j.logger.bucket.user=DEBUG,confluenceloglog4j.additivity.bucket.user=falselog4j.logger.com.atlassian.seraph=DEBUG, confluenceloglog4j.additivity.com.atlassian.seraph=falselog4j.logger.com.opensymphony.user=DEBUG, confluenceloglog4j.additivity.com.opensymphony.user=false
• After enabling both the above, please attempt a Confluence LDAP account login and attach a copy ofthe log files that are produced when the problem occurs. To do this, locate your install directory orexploded WAR directory, then zip the full /logs subdirectory into a single file for us to examine. Anexample location might be confluence-2.2.2-std/logs.
If you are using LDAP, download Paddle and run it. Attach the logs created to thesupport ticket.
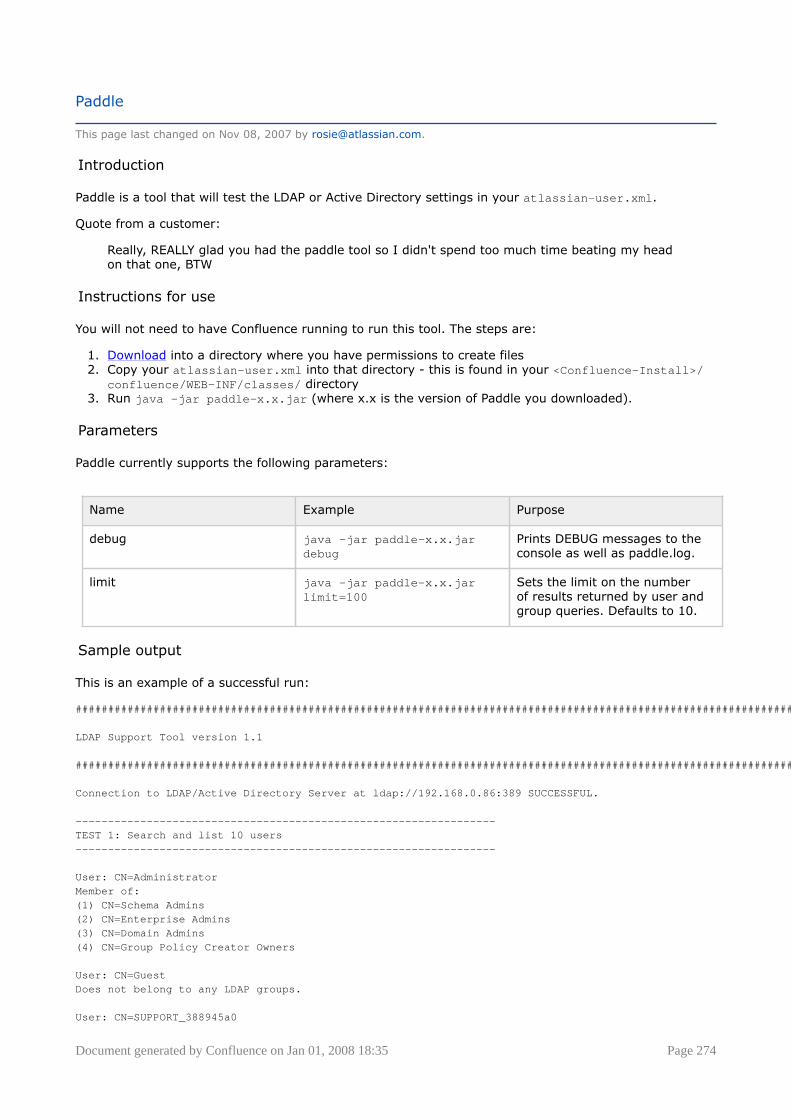
Document generated by Confluence on Jan 01, 2008 18:35 Page 274
Paddle
This page last changed on Nov 08, 2007 by [email protected].
Introduction
Paddle is a tool that will test the LDAP or Active Directory settings in your atlassian-user.xml.
Quote from a customer:
Really, REALLY glad you had the paddle tool so I didn't spend too much time beating my headon that one, BTW
Instructions for use
You will not need to have Confluence running to run this tool. The steps are:
1. Download into a directory where you have permissions to create files2. Copy your atlassian-user.xml into that directory - this is found in your <Confluence-Install>/
confluence/WEB-INF/classes/ directory3. Run java -jar paddle-x.x.jar (where x.x is the version of Paddle you downloaded).
Parameters
Paddle currently supports the following parameters:
Name Example Purpose
debug java -jar paddle-x.x.jardebug
Prints DEBUG messages to theconsole as well as paddle.log.
limit java -jar paddle-x.x.jarlimit=100
Sets the limit on the numberof results returned by user andgroup queries. Defaults to 10.
Sample output
This is an example of a successful run:
###########################################################################################################################
LDAP Support Tool version 1.1
###########################################################################################################################
Connection to LDAP/Active Directory Server at ldap://192.168.0.86:389 SUCCESSFUL.
-----------------------------------------------------------------TEST 1: Search and list 10 users-----------------------------------------------------------------
User: CN=AdministratorMember of:(1) CN=Schema Admins(2) CN=Enterprise Admins(3) CN=Domain Admins(4) CN=Group Policy Creator Owners
User: CN=GuestDoes not belong to any LDAP groups.
User: CN=SUPPORT_388945a0

Document generated by Confluence on Jan 01, 2008 18:35 Page 275
Member of:(1) CN=HelpServicesGroup
User: CN=IUSR_MALTSHOVELDoes not belong to any LDAP groups.
User: CN=IWAM_MALTSHOVELMember of:(1) CN=IIS_WPG
User: CN=ASPNETDoes not belong to any LDAP groups.
User: CN=krbtgtDoes not belong to any LDAP groups.
User: CN=John\, SmithMember of:(1) CN=Domain Users(2) CN=Sales and Marketing
User: CN=Matt RyallMember of:(1) CN=Enterprise Admins(2) CN=Domain Admins
User: CN=Justin KokeMember of:(1) CN=Domain Controllers(2) CN=Enterprise Admins
Found more than 10 results.
-----------------------------------------------------------------TEST 2: Search and list 10 groups-----------------------------------------------------------------
Group: CN=HelpServicesGroupMembers:(1) CN=SUPPORT_388945a0,CN=Users,DC=ad,DC=atlassian,DC=com
Group: CN=TelnetClientsNo members in this group.
Group: CN=IIS_WPGMembers:(1) CN=S-1-5-20,CN=ForeignSecurityPrincipals,DC=ad,DC=atlassian,DC=com(2) CN=S-1-5-6,CN=ForeignSecurityPrincipals,DC=ad,DC=atlassian,DC=com(3) CN=S-1-5-18,CN=ForeignSecurityPrincipals,DC=ad,DC=atlassian,DC=com(4) CN=IWAM_MALTSHOVEL,CN=Users,DC=ad,DC=atlassian,DC=com
Group: CN=SQLServer2005SQLBrowserUser$MALTSHOVELMembers:(1) CN=S-1-5-18,CN=ForeignSecurityPrincipals,DC=ad,DC=atlassian,DC=com
Group: CN=SQLServer2005MSSQLServerADHelperUser$MALTSHOVELMembers:(1) CN=S-1-5-20,CN=ForeignSecurityPrincipals,DC=ad,DC=atlassian,DC=com
Group: CN=SQLServer2005SQLAgentUser$MALTSHOVEL$MSSQLSERVERMembers:(1) CN=S-1-5-18,CN=ForeignSecurityPrincipals,DC=ad,DC=atlassian,DC=com
Group: CN=SQLServer2005MSSQLUser$MALTSHOVEL$MSSQLSERVERMembers:(1) CN=S-1-5-18,CN=ForeignSecurityPrincipals,DC=ad,DC=atlassian,DC=com

Document generated by Confluence on Jan 01, 2008 18:35 Page 276
Group: CN=SQLServer2005MSFTEUser$MALTSHOVEL$MSSQLSERVERMembers:(1) CN=S-1-5-18,CN=ForeignSecurityPrincipals,DC=ad,DC=atlassian,DC=com
Group: CN=SQLServer2005MSOLAPUser$MALTSHOVEL$MSSQLSERVERMembers:(1) CN=S-1-5-18,CN=ForeignSecurityPrincipals,DC=ad,DC=atlassian,DC=com
Group: CN=SQLServer2005NotificationServicesUser$MALTSHOVELNo members in this group.
Found more than 10 results.

Document generated by Confluence on Jan 01, 2008 18:35 Page 277
Understanding User Management in Confluence
This page last changed on Dec 11, 2007 by smaddox.
Looking for help with your user management configuration? See Requesting External UserManagement Support.
Try Atlassian Crowd for powerful user administration
Atlassian's Crowd is a web-based single sign-on (SSO) tool that simplifies applicationprovisioning and identity management, including LDAP integration. For more information,please see the Crowd documentation on Integrating Crowd with Confluence.
On this page:
• Components of User Management• Authentication• ° Seraph
° XML-RPC and SOAP Authentication° Password Authentication and User Management
• Confluence User Management Frameworks• ° AtlassianUser
° OSUser• Related pages
Components of User Management
1. Authentication - determining what user identity is making a request to Confluence.2. User management - storing and retrieving core information about users.3. Group membership - storing and retrieving groups, and group membership.4. Profile information - providing metadata associated with users.
It's important to understand that these are separate components of the user management system. Theterm LDAP integration is not really meaningful, because you could use LDAP repository for any or all ofthe above tasks.
For example, in OSUser authentication can be performed against different repository to that used forgroup membership queries. In AtlassianUser, authentication and group membership can be retrieved fromLDAP, but profile information is still stored in the Confluence database.
Authentication
Seraph
Almost all authentication in Confluence (and JIRA) is performed through Seraph, Atlasian's open sourceweb authentication framework. The goal of seraph is to provide a simple, extensible authenticationsystem that we can use on any application server.
Seraph is implemented as a servlet filter. Its sole job is, given a web request, to associate thatrequest with a particular user (or no user if the request is anonymous). It supports several methodsof authentication, including HTTP Basic Authentication, form-based authentication, and looking upcredentials already stored in the user's session.
Seraph performs no user management itself. It merely checks the credentials of the incoming request,and delegates any user-management functions (looking up a user, checking a user's password is correct)to Confluence's user-management subsystem.
If you were looking to integrate Confluence with a Single Sign-On (SSO) infrastructure, you would do soby writing a custom Seraph authenticator (and in fact, many customers have done so).
XML-RPC and SOAP Authentication
Authentication for requests performed by the remote API do not go through Seraph, so they can'ttake advantage of Seraph authenticators. XML-RPC and SOAP authentication requests are checked

Document generated by Confluence on Jan 01, 2008 18:35 Page 278
directly against the user-management framework, and tokens are assigned directly by the remote APIsubsystem.
Password Authentication and User Management
By default, password authentication is delegated from Seraph to the user management system. This isnot necessary, however. Single Sign-On systems may have no password authentication at all, and get allthe necessary credentials from the SSO provider.
Confluence User Management Frameworks
The rest of this document covers the user management frameworks used by Confluence: AtlassianUserand OSUser.
AtlassianUser
AtlassianUser is a new user and group management framework developed by Atlassian, and is the coreframework used in Confluence since version 2.1. AtlassianUser was developed with the following goals inmind:
• Support LDAP as a fully functional repository for authentication, group management and profileinformation (profile information not yet implemented).
• Compatibility with both JIRA and Confluence (JIRA support not yet implemented).• Be simple to configure.
AtlassianUser provides user, group and profile management services to Confluence. It does so bydelegating tasks to configurable repositories. Multiple repositories can be configured, so for exampleConfluence can draw user information from both the database and an LDAP server.
Default Configuration
Configuration of AtlassianUser is done through the <<confluence-install>>\confluence\WEB-INF\classes\atlassian-user.xml file. See the atlassian-user.xml reference page. (In Confluence 2.1,configuration of AtlassianUser is done through the atlassianUserContext.xml file. )
For Confluence 2.7.0 and later:
• All user management is performed by AtlassianUser's native providers.• OSUser delegation is still supported for customers who rely on the OSUser/JIRA bridge or the old-
style OSUser LDAP support.• Refer to the Confluence 2.7 Upgrade Guide for details of the automatic migration which may
occur during the upgrade process, for customers who are using the standard user managementframework.
For Confluence 2.6.x and earlier:
• Confluence's AtlassianUser configuration delegates all user, group, profile and passwordauthentication to OSUser.
Database (Hibernate) Support in AtlassianUser
AtlassianUser can store user, group and profile data directly in Confluence's database. This is the defaultbehaviour for Confluence 2.7.0 and later.
LDAP Support in AtlassianUser
AtlassianUser currently supports password authentication, user management and group managementwith an LDAP server. Follow the instructions on configuring AtlassianUser LDAP integration.
At this point, only read-only access to LDAP is planned. Java's JNDI-LDAP interface does not supportupdating an LDAP repository, and the administration tools that come with LDAP servers such as MicrosoftActive Directory are generally comprehensive and already available in enterprise IT departments.

Document generated by Confluence on Jan 01, 2008 18:35 Page 279
JIRA Integration via AtlassianUser
AtlassianUser will not support delegating Confluence user management to JIRA. Instead, our goal isto implement AtlassianUser as the JIRA user management framework as well. Once this is done, bothConfluence and JIRA can use the same LDAP server for their authentication and group management.
OSUser
OpenSymphony User was Confluence's core user management framework until it was replaced byAtlassianUser in version 2.1. OSUser is still supported through AtlassianUser's OSUser repositories.OSUser is also built around the model of pluggable providers, but its LDAP support is limited.
OSUser Database (Hibernate) Providers
In its default configuration, Confluence's OSUser providers store a list of users and groups together withprofile information in tables in the Confluence database:
• os_user (authentication)• os_group (group membership)• os_user_group (group membership)• os_propertyentry (profile information)
The hashed password in the os_user table is used to authenticate the user unless LDAP support isenabled. The os_user_group table is queried for group membership information.
OSUser configuration is controlled through the <<confluence-install>>\confluence\WEB-INF\classes\osuser.xml file.
LDAP Support in OSUser
OSUser only supports authentication against an LDAP server. That is, you can check user passwordsagainst LDAP, but all other user information must be shadowed in the Confluence database. Follow theinstructions on configuring OSUser LDAP authentication.
If you need support for LDAP user information or group membership as well, you should useAtlassianUser instead (see above).
Delegating User Management to JIRA via OSUser
Confluence can use OSUser to retrieve information for authentication, group membership and profileinformation from JIRA.
If you look at the discussion of OSUser's implementation above, you can see how this can works prettyeasily. A data source to JIRA database is configured in Confluence which lets Confluence read directlyfrom JIRA's os_* tables. For example, when a user is created in JIRA, the username and password goesin the os_user table in the JIRA database. Confluence looks at the same table in the JIRA database toauthenticate the user.
Access to the JIRA database is read-only. For this reason, Confluence maintains a subset of the user'sprofile information locally in the Confluence database (things like last login time and user preferencesthat Confluence needs to be able to modify) .
Follow the instructions on configuring OSUser delegation to JIRA.
Related pages
HTTP authentication with SeraphSingle Sign-on Integration with JIRA and ConfluenceAdd LDAP IntegrationAdding LDAP Integration To Confluence 2.0.xDelegate user management to use JIRA loginsMigrating to new User ManagementConfluence 2.7 Upgrade Guideatlassian-user.xml reference

Document generated by Confluence on Jan 01, 2008 18:35 Page 280
User Management Frequently Asked Questions
This page last changed on Jan 17, 2007 by [email protected].
This page has been split into the LDAP FAQ and JIRA User Management FAQ.

Document generated by Confluence on Jan 01, 2008 18:35 Page 281
Working with Confluence Logs
This page last changed on Dec 18, 2007 by smaddox.
Confluence uses Apache's log4j logging service. This allows a developer or administrator to control thelogging behavior and the log output file by editing a configuration file, without touching the applicationbinary. There are six known log4j logging levels.
On this page:
• Finding the Log Configuration File• Finding the Confluence Log Files• Changing the Destination of the Log Files• Changing the Logging Levels• Using Some Specific Confluence Logging Options
Finding the Log Configuration File
Confluence's logging behaviour is defined in the following properties file:<CONFLUENCE-INSTALL>/confluence/WEB-INF/classes/log4j.properties
This file is a standard log4j configuration file, as described in the Apache log4j documentation.
Finding the Confluence Log Files
This section describes Confluence's default logging behaviour, assuming that you have not changed thedestination of the logs.
For Confluence 2.6.x and earlier, the default behaviour is:
• For Confluence Standalone, log entries are written to <confluence_install>/logs. The main logfile is called atlassian-confluence.log.
• For Confluence EAR/WAR, log entries are written to the application server logs, i.e. the default logfiles of the application container.
For Confluence 2.7.x and later, both Standalone and EAR/WAR editions follow the same defaultbehaviour:
• When you start Confluence, log entries will be sent to the application server logs until Confluencehas completed its initial bootstrap. Any log entries written to the console will be repeated into the<confluence-home> log described below.
• Once the initial startup sequence is complete, all logging will be to <confluence-home>/logs/atlassian-confluence.log. For example: c:/confluence/data/logs/atlassian-confluence.log.
Note that the default location is now the Confluence home directory instead of the applicationserver's log file.
Changing the Destination of the Log Files
Terminology: In log4j, an output destination is called an 'appender'.
To change the destination of the log files, you need to stop Confluence and then change the settings inthe 'Logging Location and Appender' section of the log4j.properties file. The location of this file isdescribed above.
In the standard properties file supplied with Confluence 2.7 and later, you will find entries for twoappenders:
• com.atlassian.confluence.logging.ConfluenceHomeLogAppender – This is a custom appenderwhich controls the default logging destination described above. This appender allows the followingsettings:
Document generated by Confluence on Jan 01, 2008 18:35 Page 282
° MaxFileSize° MaxBackupIndex
• org.apache.log4j.RollingFileAppender – If you want to log to a different location, uncommentthe RollingFileAppender line and change the destination file in the line below it. Comment out theprevious lines referring to the ConfluenceHomeLogAppender.
Confluence ships with the full suite of appenders offered by log4j. Read more about appenders in thelog4j documentation.
Changing the Logging Levels
We recommend that you configure Confluence's logging to your own requirements. You can change thelog settings in two ways:
• Edit the properties file – Your changes will take effect next time you start Confluence, and for allsubsequent sessions.
• Set the logging levels at runtime – Your changes will be in effect only until you next restartConfluence.
Both methods are described below.
Terminology: In log4j, a 'logger' is a named entity. Logger names are case-sensitive and they follow ahierarchical naming standard. For example, the logger named com.foo is a parent of the logger namedcom.foo.Bar.
Editing the Properties File
To configure the logging levels and other settings on a permanent basis, you need to stop Confluence andthen change the settings in the log4j.properties file, described above.
The properties file contains a number of entries for different loggers that can be uncommented if you areinterested in logging from particular components. Read more in the Apache log4j documentation.
Below are some guidelines on specific configuration options you may find useful.
Changing the Logging Levels at Runtime
From Confluence 2.7, you can change some of Confluence's logging behaviour via the AdministrationConsole while Confluence is running. Any changes made in this way will apply only to the currently-running Confluence lifetime. The changes are not written to the log4j.properties file and are thereforediscarded when you next stop Confluence.
Not all logging behaviour can be changed via the Administration Console. For logging configuration notmentioned below, you will need to stop Confluence and then edit the logging properties file instead.
The 'Logging and Profiling' screen shows a list of all currently defined loggers. On this screen you can:
• Turn page profiling on or off.• Turn detailed SQL logging on or off.• Add a new logger for a class/package name.• Remove a logger for a class/package name.• Set the logging level (INFO, WARN, FATAL, ERROR or DEBUG) for each class or package name.• Reset all logging levels to a predefined profile.
To change the log levels at runtime,
1. Go to the 'Administration Console' and click 'Logging and Profiling' in the 'Administration' section ofthe left-hand panel.
You need to have System Administrator permissions in order to perform this function.
Document generated by Confluence on Jan 01, 2008 18:35 Page 283
2. The 'Logging and Profiling' screen appears, as shown below. Use the following guidelines to changethe logging behaviour while Confluence is running:
• 'Performance Profiling' — See Page Request Profiling.• 'SQL Logging' — Click the 'Enable SQL Logging' button to log the details of SQL requests made
to the database.
If you need to enable logging of SQL parameter values, you will need to change the settingin the properties file. This option is not available via the Administration Console.
• 'Log4j Logging' — Click one of the profile buttons to reset all your loggers to the predefinedprofiles:
° The 'Production' profile is a fairly standard profile, recommended for normal productionconditions.
° The 'Diagnostic' profile gives more information, useful for troubleshooting and debugging.It results in slower performance and fills the log files more quickly.
• 'Add New Entry' — Type a class or package name into the text box and click the 'Add Entry'button. The new logger will appear in the list of 'Existing Levels' in the lower part of the screen.
• 'Existing Levels' - These are the loggers currently in action for your Confluence instance.° You can change the logging level by selecting a value from the 'New Level' dropdown list.
Read the Apache documentation for a definition of each level.° Click the 'Remove' link to stop logging for the selected class/package name.
3. Click the 'Save' button to save any changes you have made in the 'Existing Levels' section.
Screenshot: Changing Log Levels and Profiling

Document generated by Confluence on Jan 01, 2008 18:35 Page 284
Using Some Specific Confluence Logging Options
This section contains some pointers to specific log configurations you may need.
Log the Details of SQL Requests made to the Database
You may want to increase Confluence's logging so that it records individual SQL requests sent to thedatabase. This is useful for troubleshooting specific problems.

Document generated by Confluence on Jan 01, 2008 18:35 Page 285
You can enable detailed SQL logging in two ways:
• At runtime – see instructions above.• Via the logging properties file – see the detailed instructions.
Log the Details of Users Viewing/Accessing each Confluence Page
You can configure the log to show which users are accessing which pages in Confluence. This can only bedone via the logging properties file – see the detailed instructions.
RELATED TOPICS
• Important Directories and Files• Enabling detailed SQL logging• Enabling user access logging• Logging A Thread Dump• Enabling Page Request Profiling

Document generated by Confluence on Jan 01, 2008 18:35 Page 286
log4j Logging Levels
This page last changed on Dec 10, 2007 by smaddox.
Logging Levels
• DEBUG - designates fine-grained informational events that are most useful to debug an application(what is going on)
• INFO - announcements about the normal operation of the system - scheduled jobs running, servicesstarting and stopping, user-triggered processes and actions
• WARN - any condition that, while not an error in itself, may indicate that the system is running sub-optimally
• ERROR - a condition that indicates something has gone wrong with the system
• FATAL - a condition that indicates something has gone wrong so badly that the system can notrecover
• TRACE - n/a within confluence
There are two ways to modify the logging levels, as described in Working with ConfluenceLogs.
• Modifying the runtime log levels via the Administration Console.• Manually modifying the <Confluence-Install>\confluence\WEB-INF\classes\log4j.properties file.
Default Log Level
The standard Confluence log level WARN is a way for Confluence to communicate with the serveradministrator. Logging at WARN level and higher should be reserved for situations that require some kindof attention from the server administrator, and for which corrective action is possible.
Reference : log4j manual