stampin' up - stamp with laurie
TRANSCRIPT
Stamp with Laurie | Stampin’ Up! © 2020 | www.stampwithlaurie.com
Stampin’ Blends
Alcohol Based Blending Markers By Laurie Alexander
Create an artist-quality colour-blending experience with Stampin’ Blends. These high quality, dual-tip markers in Stampin’ Up! exclusive colours will open a whole new world of colourful creativity. Experiment by blending light and dark shades of the same colour or by blending colours with similar hues. Each individual marker includes both a bullet tip and a brush end. Combo packs include a dark shade and a light shade.
There are 37 colours, plus Bronze, Ivory and Color Lifter that are available. 5 New colours have been added including Cinnamon Cider, Just Jade, Magenta Madness, Misty Moonlight and Melon Mambo.
Blends in Action
• Each colour is packaged in a group of two markers consisting of light/dark.
• The barrels are square-ish. So, they won't roll off your table.
• Store horizontally to maintain the life of each marker.
• Caps nest (stick the lid on the other end of your marker so you don’t lose it!)
• Open markers away from your project to minimize ink splatter.
• Replace the lid quickly after colouring to prevent your marker from drying out. You should hear a “click” when you replace the lid, so you know it’s on all the way.
• There is a 'bullet type tip' on one end and a brush tip on the other. The brush
tip is good for saturating the paper and getting into tight corners. The bullet type is good for smaller areas where you want more control. There are little icons showing the different types of tips on the marker barrel with the thicker line near the marker caps indicates the brush tip/larger tip.
• There is an Ivory Stampin' Blends Marker and Bronze Stampin' Blends Marker for skin tones. With them, you can create a wide range of skin tones by using them independently, layering them together, or with other colours. Try adding petal pink or crumb cake.
• The Stampin' Blends Color Lifter pulls colour from images you coloured with
Stampin' Blends markers to add highlights and dimension. It is also a "magic eraser" for mistakes. The colour lifter has no colour in it and it is used to erase, highlight, blend and add texture.
• Use to colour rhinestones, pearls, buttons, wood accents and even on window sheets
• Stampin' Up! recommends using Memento Tuxedo Black inkpad on Whisper
White card stock. Memento is designed to work well with alcohol markers. This ink will not turn muddy when blending with Blends! It is also recommended that you stamp and then let the ink dry for a few seconds before colouring.

Stamp with Laurie | Stampin’ Up! © 2020 | www.stampwithlaurie.com
Light Source
When using Blends, you need to keep in mind your light source. When colouring, try not to over blend the tones. This washes out your contrast. Things to keep in mind:
1) Highlights are the lightest area on an object. This is where the light hits first and it is where the light is the strongest.
2) Midtones are the middle colours, the areas they are neither highlights nor shadows. This would be the main colour of the object you are colouring.
3) Shadow would be the darkest area of the object, or where the light does not reach as strongly. Shadows are a stronger shade of whatever the midtone colour of the image would be.
How to Use Blends
There are various ways to add ink to your paper. There is no right way to do it. It is just preference. Some people prefer adding ink from light to dark creating a saturation of ink for easy blending. Others prefer to add ink from dark to light creating a lighter
coloured image since you use less ink. The two most common ways to add ink are circling and flicking. Each technique produces a particular appearance and knowing how to use them will add depth and variation to your projects.
Highlights
Midtones Shadows
Stamp with Laurie | Stampin’ Up! © 2020 | www.stampwithlaurie.com
Blending Techniques
One of the most exciting things about Blends, as the name suggests, is their blending capabilities.
1) Apply a smooth layer in small circles of the lightest colour to your image. If you have a large area to cover, work in sections to keep the ink moist. This wet ink will help with the blending.
2) Add the dark colour where the shadows will be using a flicking motion to help with the blending process and reduce the amount of ink needed for a smooth blend.
3) Use the light colour to blend along the area where the dark and the light colours meet
4) You may need to go over it a few times to get it blended how you like.
Smooth Colouring Technique
Blends have the ability to lay down smooth, even colour without streaks. 1) Colour in small circles keeping the leading edge wet and allow the ink to
blend to create a seamless look 2) Make sure you saturate the entire area so that you eliminate any light or
mottled areas 3) Check the back of your paper to make sure that the ink is saturating evenly
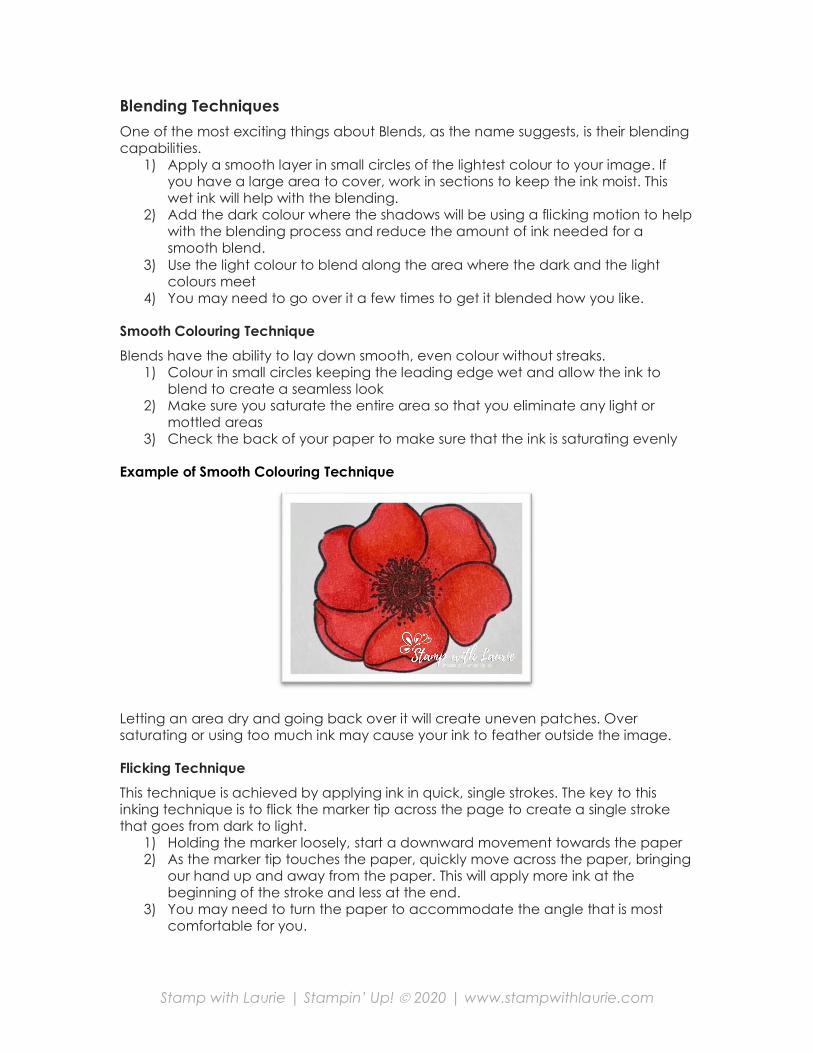
Example of Smooth Colouring Technique
Letting an area dry and going back over it will create uneven patches. Over saturating or using too much ink may cause your ink to feather outside the image.
Flicking Technique
This technique is achieved by applying ink in quick, single strokes. The key to this inking technique is to flick the marker tip across the page to create a single stroke that goes from dark to light.
1) Holding the marker loosely, start a downward movement towards the paper 2) As the marker tip touches the paper, quickly move across the paper, bringing
our hand up and away from the paper. This will apply more ink at the beginning of the stroke and less at the end.
3) You may need to turn the paper to accommodate the angle that is most comfortable for you.

Stamp with Laurie | Stampin’ Up! © 2020 | www.stampwithlaurie.com
Flicks can be left unblended to create texture such as for hair or feathers (see image below). Or, they can be blended out to create smooth shading.
Example of Flicking Technique:
No-Lines Flicking Technique: For this technique, you stamp the image in a light colour like Sahara Sand and then colour it.
Stampin’ Blends Color Lifter
The Color Lifter can be used for a number of techniques. The most important one is

Stamp with Laurie | Stampin’ Up! © 2020 | www.stampwithlaurie.com
pushing any unwanted ink back into the image. This marker contains no pigment and is purely an alcohol solution. Because of this, the Color Lifter will move all other colours away from it.
Fixing Mistakes
Think of the Color Lifter as your magic eraser. While it doesn’t actually erase ink, it can push it back into a coloured image. If you colour outside the lines, use it to push the ink back towards the image. Don’t go all the way up to the line of the image with the Lifter, or you could push the ink from the Lifter too far into the image creating a halo effect or it may bleed back into the area you are trying to erase. If the mistake remains or the colour bleeds, let it dry and try it again. This does take some practice. You can also use the bullet tip to help scrub the ink away and have more control.
Adding Texture
Touch the tip of the Lifter to the surface of a coloured image. Hold for a few seconds and lift. The Lifter will lighten the area. If you use the Lifter on a wet coloured image, the area will have a fuzzy, indistinct edge. If you use it on a dry coloured image, the edges will be crisper and more distinct (see sides of jug below).
This is also a good technique to use for sand. You can also use the dotting effect with the Blends used in the image. In this image, I used the Dark Soft Suede, as well as the
Lifter.

Stamp with Laurie | Stampin’ Up! © 2020 | www.stampwithlaurie.com
To create texture, swirl the lifter in one place over the colour and the alcohol will pool a little. This gives a cool watercolour effect and adds texture and background to your image. This technique is good for water, sky, etc. (see bird image below).
Highlight/Lightening Colour
Use it to highlight by removing colour you’ve blended (like on a balloon, jar, apple; see center of jug above). If an area on your image gets too dark, you can lighten it a bit with the Lifter. Use a flicking motion with the marker to avoid creating a dark ridge of the colour that was pushed. Use it to soften up or blend any harsh lines. Use it sparingly when softening lines or you will create a lighter stripe
Advance Colouring
Adding a third colour to your mix gives extra dimension to your colouring. For this sunflower, I used Mango Melody Light and Dark, but added Calypso Coral Light to
the shadows to give them more dimension. Whereas for the Whiskey, I used Cinnamon Cider Light and Darn and added Mango Melody Dark. For the glass, I used Balmy Blue and my Color Lifter to soften the edges.

Stamp with Laurie | Stampin’ Up! © 2020 | www.stampwithlaurie.com
Tip to Tip Blending Technique
To combine two different colored blends on an image, try the Tip to Tip blending technique. This gives you a smooth transition of colors and doesn’t end up looking all blotchy where the colors meet. I’ve chosen Calypso Coral and Old Olive Stampin' Blends for my first leaf.
1. Stamp the image with Memento Ink. 2. Apply the Light Calypso Coral and Light Old Olive Stampin' Blends to the
image. Meet somewhere in the middle with the colors – it doesn’t have to be neat.
3. With the Dark Calypso Coral and Dark Old Olive Stampin' Blends, add a layer of color around the edge of the image.
4. Brush the tip of the Light Calypso Coral Stampin' Blends over the tip of the Light Old Olive Stampin' Blends to pick up some color. The Calypso Coral Stampin' Blends marker then acts as your brush to apply a mix of both colors to the center of the leaf. I kept working these blends together until I was happy with the transition where the colors meet.
To demonstrate that this Tip to Tip technique can work with other colors, I’ve created leaves using Old Olive with Soft Suede and Daffodil Delight with Cherry Cobbler. Don’t worry about your markers being contaminated—all you need to do is run them over some scrap paper a few times and the nibs will clean themselves.

Stamp with Laurie | Stampin’ Up! © 2020 | www.stampwithlaurie.com
Colouring Other Things
Besides colouring ribbon, rhinestones, pearls and wooden elements, you can also use you Blends to colour other things like these Christmas ornaments. However, when working with wood, the ink will bleed. So, you need a light hand and not colour right up to the edges of the image.
A number of demonstrators in this group have also coloured on ceramic with the blends. You will need to heat them in an oven to set the ink.
Resources
Basics of Alcohol Marker Blending by Stampin' Up!: https://www.youtube.com/watch?time_continue=445&v=HxaPQvomPhA
Stampin' Blends: Color Lifter and Skin Tones by Stampin' Up!: https://www.youtube.com/watch?time_continue=31&v=3Js27azqwdM
Blends Colour Chart by Di Barnes: To keep track of which colours you have purchased and to see the actual colours for colour comparisons. Print on Whisper White card stock and colour with your Blends. https://dianebarnes.blogspot.com/2020/06/new-stampin-blends-markers-and-colour-chart.html

Stamp with Laurie | Stampin’ Up! © 2020 | www.stampwithlaurie.com
Cards Using Blends

Stamp with Laurie | Stampin’ Up! © 2020 | www.stampwithlaurie.com