stc launch guide - newnet · 1 about stc newnet’s secure transaction cloud (stc) solution offers...
TRANSCRIPT

STC Launch Guide
STC Version : 8.1.0
Date : 23rd August’ 2018

TRADEMARK
This document contains proprietary information that is protected by copyright; it is intended for your internal use only. It is not to
be disclosed to third parties. All rights reserved. No part of this document may be photocopied or reproduced in any way without
the prior written permission of NewNet Communication Technologies, LLC (NewNet.) The information contained in this
document is subject to change without notice. NewNet makes no warranty of any kind with regard to this material. NewNet shall
not be liable for errors contained herein or for incidental or consequential damages in connection with the use of this material.
COPYRIGHT INFORMATION
In no event shall the authors or distributors be liable to any party for direct, indirect, special, incidental, or consequential damages
arising out of the use of this software, its documentation, or any derivatives thereof, even if the authors have been advised of the
possibility of such damage. The authors and distributors specifically disclaim any warranties, including, but not limited to, the implied
warranties of merchantability, fitness for a particular purpose, and non-infringement. This software is provided on an “as is” basis,
and the authors and distributors have no obligation to provide maintenance, support, updates, enhancements or modifications.
GOVERNMENT USE
If you are acquiring this software on behalf of the U.S. government, the Government shall have only "Restricted Rights" in the
software and related documentation as defined in the Federal Acquisition Regulations (FARs) in Clause 52.227.19 (c) (2). If you are
acquiring the software on behalf of the Department of Defence, the software shall be classified as "Commercial Computer
Software" and the Government shall have only "Restricted Rights" as defined in Clause 252.227-7013 (c) (1) of DFARs.
Notwithstanding the foregoing, the authors grant the U.S. Government and others acting in its behalf permission to use and
distribute the software in accordance with the terms specified in this license.
PERFORMANCE SPECIFICATIONS
NewNet Communication Technologies, LLC, reserves all the rights to change the equipment performance specifications stated
herein at any time without notice. For OEM components, NewNet relies on the specifications supplied by the OEM vendors.
SUCCESSOR IN INTEREST
NewNet Communication Technologies is the successor in interest to:
• EBS, Inc.
• NewNet
• Centigram Communications Corporation
• ADC ESD, Inc.
• ADC Enhanced Services Division
• SS8
Any rights or title to the marks or copyrights of these entities, unless otherwise disclosed, are the property of NewNet.
ALL RIGHTS RESERVED
Copyright 2008- 2020 by:
NewNet Communication Technologies, LLC
720 East Butterfield Road. Suite 250
Lombard, IL 60148
+1 224-795-5200
www.newnet.com

P a g e | 3
NewNet Communications Proprietary and Confidential Information
This document contains confidential information, which is proprietary to NewNet. No part of its contents may be used, copied, disclosed or conveyed to any party in any manner whatsoever without prior written permission from NewNet.
STC Launch Guide
Contents: 1 About STC .......................................................................................................................................................... 4 2 Prerequisites ........................................................................................................................................................ 5
2.1 Accessing Instance ..................................................................................................................................... 5 2.2 Pre-Launch ................................................................................................................................................. 5
2.2.1 Admin user key-pair generation .............................................................................................................. 5 2.2.2 Application user key-pair generation ....................................................................................................... 6
2.3 Post-Launch ............................................................................................................................................... 7 2.3.1 Details to be obtained from NewNet Support Team or NewNet Partner teams ......................................... 7 2.3.2 Logging in to the Instance....................................................................................................................... 7
3 Secure Transaction Cloud Stack Creation ............................................................................................................. 8 3.1 STC Creation.............................................................................................................................................10
3.1.1 Select Template .....................................................................................................................................10 3.1.2 Specify Details ......................................................................................................................................11 3.1.3 Options .................................................................................................................................................12 3.1.4 Review ..................................................................................................................................................13
3.2 STC Cloud Properties ................................................................................................................................15 3.3 Security Group ..........................................................................................................................................16
4 Launching the AWS Instance ..............................................................................................................................18 5 Configuration .....................................................................................................................................................19
5.1 Application Configuration .........................................................................................................................19 5.2 Installing and configuring CEM Client .......................................................................................................19
5.2.1 Pre-Requisite .........................................................................................................................................19 5.2.2 Installing CEM Client ............................................................................................................................19
6 Generation and installation of feature key............................................................................................................24 6.1 To install the feature key ............................................................................................................................24 6.2 To display the feature key installed ............................................................................................................24
7 Redundancy configuration ..................................................................................................................................25 7.1 AG application configuration .....................................................................................................................25 7.2 TransKrypt application configuration .........................................................................................................25
8 Software Update .................................................................................................................................................26

P a g e | 4
NewNet Communications Proprietary and Confidential Information
This document contains confidential information, which is proprietary to NewNet. No part of its contents may be used, copied, disclosed or conveyed to any party in any manner whatsoever without prior written permission from NewNet.
1 About STC
NewNet’s Secure Transaction Cloud (STC) solution offers a virtualized payment application with high performance and high security. The STC application facilitates multiple Virtual Networks Functions (VNF) for TLS, IPsec, SSH, and HTTPS for PCI compliant security; ISO8583, TPDU, VISA, XML as Transaction Protocols; Tokenization and P2PE for end to end security of transactions and key payment functions of EMV Crypto and PIN Handling along with Load Balancing and high availability. STC offers high security virtualized payment transport solution with virtualized Hardware Security Module (HSM) for the SDN, NFV ready cloud infrastructure in the public, private or hybrid cloud environments. The Launch Guide document in structured in the following manner.
1. The Prerequisite section states the procedures required for successful access of the AWS instance. This section contains a Pre-Launch which is requirement to launch the instance and Post-Launch which is required after launching the instance for accessing and configuration of the instance.
2. The Secure Transaction Cloud Stack Creation section states the creation of the AWS Instance. 3. Launching AWS Instance section briefs about how to launch the Instance. 4. Configuration Section briefs the configurations required for the AWS Instance. 5. Redundancy Configuration briefs about the configuration to be made on the redundant
instance. 6. Software Update section mentions if there are newer versions of the software if available.

P a g e | 5
NewNet Communications Proprietary and Confidential Information
This document contains confidential information, which is proprietary to NewNet. No part of its contents may be used, copied, disclosed or conveyed to any party in any manner whatsoever without prior written permission from NewNet.
2 Prerequisites
2.1 Accessing Instance
Refer the links below for accessing the AWS Instance and usage/conversion of the keys required for using Putty. http://docs.aws.amazon.com/AWSEC2/latest/UserGuide/AccessingInstancesLinux.html http://docs.aws.amazon.com/AWSEC2/latest/UserGuide/putty.html
2.2 Pre-Launch
2.2.1 Admin user key-pair generation
STC instance is preconfigured with stgadm user for admin operations. AWS doesn’t allow
password, so we use RSA public/RSA private key pair instead of password. Key pair for stgadm has
to be generated for launching the AWS Instance. This user key pair has to be generated for
launching the AWS Instance.
• Sign in to the EC2 Management Console, via https://aws.amazon.com/console/ using your
credentials.
• After logging into the AWS account, in the left navigation pane, Under Network and
Security, choose Key Pair.
Click Services➔EC2➔Key Pairs (Under Network & Security)
1. Click “Create Key Pair”. In the Create Key Pair dialog box, provide a key pair name and Click
“create”.

P a g e | 6
NewNet Communications Proprietary and Confidential Information
This document contains confidential information, which is proprietary to NewNet. No part of its contents may be used, copied, disclosed or conveyed to any party in any manner whatsoever without prior written permission from NewNet.
Figure 1 : Create Key Pair
2. The key pair file, for example “keypair1.pem”, is auto downloaded by the browser to local
machine.
2.2.2 Application user key-pair generation
STC instance is preconfigured with tc3000 user for updating the STC instance’s configurations via
CLI or CEM. The user key pair to be generated is required for launching the CLI to access the
application. This user does not have privileges to administer the Linux system.
The tc3000 cli key launch parameter accepts the public key only in the openssh format.
For more information, refer to the link
http://docs.aws.amazon.com/AWSEC2/latest/UserGuide/ec2-key-pairs.html
The user’s keypair can be generated in windows or Linux setup. The command to generate the key
pair is as mentioned below.
Linux Platform:
# ssh-keygen -t rsa -b 2048 -f <name.pem> -N '' -C "tc3000"
This command generates below key pair.
name.pem private key
name.pem.pub public key
o Use private key (name.pem) in CEM and/or for CLI login via ssh.

P a g e | 7
NewNet Communications Proprietary and Confidential Information
This document contains confidential information, which is proprietary to NewNet. No part of its contents may be used, copied, disclosed or conveyed to any party in any manner whatsoever without prior written permission from NewNet.
o Use generated public key (name.pem.pub), during the instance creation in the CLIKey
param.
Windows Platform:
Use Putty-Gen to generate the key pair. The Puttygen generates the key and prompts an option to
save the keys. The generated private keys when saved, can be chosen to be stored in .ppk format.
Please refer the link on PuttyGen Usage
https://www.ssh.com/ssh/putty/windows/puttygen
2.3 Post-Launch
This section of the document is required post the launch of the AWS Instance. On successful completion of the sections – STC Creation, Launching AMI and Configuration, obtain the details mentioned below.
2.3.1 Details to be obtained from NewNet Support Team or NewNet Partner teams
Post the launch of the STC Instance, obtain the feature key file.
The Feature key file information is as mentioned in section 5. Generation and installation of feature
key.
The support team can be contacted at [email protected]
2.3.2 Logging in to the Instance
Refer to the links below to access the STC instance as stgadm or tc3000 user.
http://docs.aws.amazon.com/AWSEC2/latest/UserGuide/AccessingInstancesLinux.html http://docs.aws.amazon.com/AWSEC2/latest/UserGuide/putty.html There are 2 modes of login to the instance.
1. stgadm user for access to the linux shell prompt for system administration. Use the keys generated in Step 2.2.1
2. tc3000 user for CLI access to the application only. Use the keys generated in Step 2.2.2

P a g e | 8
NewNet Communications Proprietary and Confidential Information
This document contains confidential information, which is proprietary to NewNet. No part of its contents may be used, copied, disclosed or conveyed to any party in any manner whatsoever without prior written permission from NewNet.
3 Secure Transaction Cloud Stack Creation
The user should have access to Secure Transaction Cloud (BYOL) from the marketplace.
Figure 2 : STC Market Place page
• Choose the “Continue to Subscribe” Option.
• This navigates to the “Subscribe to this software” page
Figure 3: Subscribe to this software

P a g e | 9
NewNet Communications Proprietary and Confidential Information
This document contains confidential information, which is proprietary to NewNet. No part of its contents may be used, copied, disclosed or conveyed to any party in any manner whatsoever without prior written permission from NewNet.
• Choose on “Continue to Configuration” option. This navigates to “Configure this software” tab.
Figure 4: Configure this software
Configure the relevant options for
• Choose Fulfillment Option: “STC Resources Topology”
• Choose the version of STC, Software Version: <Relevant version>
• Choose the region of STC, Region:<>
• Choose the “Continue to Launch” option This navigates to the “Launch this software” page.
Figure 5: Launch this software

P a g e | 1 0
NewNet Communications Proprietary and Confidential Information
This document contains confidential information, which is proprietary to NewNet. No part of its contents may be used, copied, disclosed or conveyed to any party in any manner whatsoever without prior written permission from NewNet.
• In this page, against the “Choose Action” , select “Launch CloudFormation” from the drop down and click “Launch” option.
• This navigates to the “Create Stack” page.
• The “Create Stack” page is STC Creation as mentioned below in section 3.1
3.1 STC Creation
The steps mentioned below guides through creation of an STC Stack.
• The “Create Stack” wizard guides through four step processes which are required to be completed to create an Instance.
a. Select Template b. Specify Details c. Options d. Review
3.1.1 Select Template
• On selecting the “Launch with CloudFormation Console” option it navigates to the “Select
Template” page on the “Create Stack” section
• The required Amazon S3 template URL is available by default in the “Specify an Amazon S3
template URL”
Figure 6 Select Template

P a g e | 1 1
NewNet Communications Proprietary and Confidential Information
This document contains confidential information, which is proprietary to NewNet. No part of its contents may be used, copied, disclosed or conveyed to any party in any manner whatsoever without prior written permission from NewNet.
Choose NEXT which navigates to the “Specify Details” page.
3.1.2 Specify Details
Specify Details has the following sections. The values for the parameters must be entered as obtained per the pre-requisite section.
• Specify a Stack name which identifies your stack in AWS. The name must start with an
alphabetical character and can contain alphanumeric characters and dashes. Stack name can contain a maximum of 128 characters.
• STC VPC CIDR: Available default VPC CIDR(default to 10.1.0.0/16)
• Allowed Remote Access CIDR: CIDR block parameter must be in the form x.x.x.x/x. ( For example, 0.0.0.0/0)
• AdminKey: stgadm user public key <choose the previously created key pair> Refer Section 2.2.1
• CLIKey: tc3000 user public key < Public key generated for tc3000 user>. Refer Section 2.2.2
• Primary FQDN: <Name for the Primary Instance> [This name specified will be used for the CEM as mentioned under CEM Configuration. This is used in generation of keystore certificate with this name for primary instance and will be used for CEM client login.] The name should begin with an alphabet and the name can contain alphanumeric characters and dot (.). The range for the name is between 4 to 40 characters.
• Secondary FQDN: <Name for the Secondary Instance> [This name specified will be used for the CEM as mentioned under CEM Configuration. This is used in generation of keystore certificate with this name for secondary instance and will be used for CEM client login.]. The name should begin with an alphabet and the name can contain alphanumeric characters and dot (.). The range for the name is between 4 to 40 characters.
• Store Password: <User defined> [The keystore is initialized with this password]. The password should be 8 to 20 characters long, and should contain at least one uppercase letter, one lower case letter and one number. The password should not contain special characters.
• CU Password: <User defined > [This initializes the crypto-user with this password]The password should be 8 to 20 characters long, and should contain at least one uppercase letter, one lowercase letter and one number. The password should not contain special characters.
• CO Password: <User Defined> [This initializes the crypto-user with this password]. The password should be 8 to 20 characters long, at least one uppercase letter, one lowercase letter, one number and should not contain special characters.

P a g e | 1 2
NewNet Communications Proprietary and Confidential Information
This document contains confidential information, which is proprietary to NewNet. No part of its contents may be used, copied, disclosed or conveyed to any party in any manner whatsoever without prior written permission from NewNet.
Figure 7: Specify Details
3.1.3 Options
The settings in this page are optional.
Figure 8: Options

P a g e | 1 3
NewNet Communications Proprietary and Confidential Information
This document contains confidential information, which is proprietary to NewNet. No part of its contents may be used, copied, disclosed or conveyed to any party in any manner whatsoever without prior written permission from NewNet.
Click NEXT, which navigates to the REVIEW page.
3.1.4 Review
• Review the entered details, accept the “I acknowledge that AWS CloudFormation mught creare IAM resources” checkbox and Click on CREATE
•
Figure 9: Review
• On clicking on the CREATE tab, the CloudFormation Management Console screen appears.
• Click refresh button on top right corner to view the stack.
• The stack status will be “CREATE IN_PROGRESS”. This process of the stack creation takes several minutes( Estimated time 20 mins). On a successful create; the stack status will change to “CREATE_COMPLETE” and this entry will be visible in the first row.

P a g e | 1 4
NewNet Communications Proprietary and Confidential Information
This document contains confidential information, which is proprietary to NewNet. No part of its contents may be used, copied, disclosed or conveyed to any party in any manner whatsoever without prior written permission from NewNet.
Figure 10 : Stack Create Completion
Note:
• If the stack detects an internal failure during creation, the cloud formation template terminates the stack.
• If the stack creation is successful, the console displays a success message.
• If stack fails to create in 30 mins, it will be rolled back.
The Output tab displays the information of both the “Primary” and the “Secondary” Instance.
Figure 11 : Instance Output

P a g e | 1 5
NewNet Communications Proprietary and Confidential Information
This document contains confidential information, which is proprietary to NewNet. No part of its contents may be used, copied, disclosed or conveyed to any party in any manner whatsoever without prior written permission from NewNet.
3.2 STC Cloud Properties
• Select the newly created Stack. This will display the Stack related information in the same page.
• Select the “RESOURCES” tab, and click on the Physical ID entry against “STCInst”(Highlighted)
Figure 12: Stack Information
• This will navigate to the EC2 Instance tab as shown in figure (11). This tab displays the STC Cloud properties which help manage the instance.
Figure 13: STC Instance

P a g e | 1 6
NewNet Communications Proprietary and Confidential Information
This document contains confidential information, which is proprietary to NewNet. No part of its contents may be used, copied, disclosed or conveyed to any party in any manner whatsoever without prior written permission from NewNet.
3.3 Security Group
Click on the Security Group entry in the Instance page.
• Under the Security group, add relevant inbound rules.
By default, outbound allows all traffic, but there are few inbound rules available.
• The Primary and Secondary AWS Instance share the same Security Group .
• Modify the Security Group of Primary/Secondary to accommodate additional incoming Ports (say newly added IP-Forwarding-table).
For Instance: If the user configures a new IP-Forwarding entry with IP say 10.200.2.1 and port 3121. This new port should be added to the “Inbound Rules”.
Click on the Edit(highlighted). This leads to the screen mentioned in figure (12)
Click on “Add rule” and mention additional ports for AWS to allow them.
For Instance as per our example, add port 3121

P a g e | 1 7
NewNet Communications Proprietary and Confidential Information
This document contains confidential information, which is proprietary to NewNet. No part of its contents may be used, copied, disclosed or conveyed to any party in any manner whatsoever without prior written permission from NewNet.
3
Figure 14:Security Group
Click on the “Edit” tab and add inbound rules as per requirement and click “Save”. This completes the process of launching the instance with all required instance configurations.

P a g e | 1 8
NewNet Communications Proprietary and Confidential Information
This document contains confidential information, which is proprietary to NewNet. No part of its contents may be used, copied, disclosed or conveyed to any party in any manner whatsoever without prior written permission from NewNet.
4 Launching the AWS Instance
1. Follow the procedure as mentioned in section 2.3.2 for logging into the instance as a CLI(tc3000) user.
2. Start the applications via the CLI CLI# start application name=ag
The start of ag application would take some time. Once this is complete, execute the start for the transkrypt application.
CLI# start application name=transkrypt
3. View the application summary. Ensure the Usage-status is active and the operational status
is enabled. The below screenshot is just an example. The version column might vary based on the version being used. CLI# show application summary
[ application summary ]
name version package cpu memory usage-s operational administr
=============== ========= =========== === ======== ======= =========== =========
ag 09.02.006 stg_app 0 3162560 active enabled unlocked
system 12.00.006 system 0 131836 active enabled unlocked
transkrypt 04.00.006 transkrypt 0 220144 active enabled unlocked

P a g e | 1 9
NewNet Communications Proprietary and Confidential Information
This document contains confidential information, which is proprietary to NewNet. No part of its contents may be used, copied, disclosed or conveyed to any party in any manner whatsoever without prior written permission from NewNet.
5 Configuration
Few basic configurations are listed
Application Configuration
Installing and configuring CEM Client
Install the Feature Key and Grant License
5.1 Application Configuration
The Instance when launched is already preconfigured with basic configurations and the services are open on port 4040.
5.2 Installing and configuring CEM Client
5.2.1 Pre-Requisite
• Windows
• Installing Java 1.8 The Windows machine where the CEM client will be installed should have Java
Version 1.8 Installed. Set the Java Home and JRE Home in the Environment Variables. (Refer this link on how to set the environment variables https://docs.oracle.com/javase/tutorial/essential/environment/paths.html)
Figure 15 : Environment Variables
5.2.2 Installing CEM Client
CEM users need to import server’s public certificates into “awskeystore” client key store to authenticate with the CEM server.
5.2.2.1 Importing cem server certificates (awskeystore)
1. CEM server public certificates gets generated in the instances under the /opt folder with specified fqdn-name i.e /opt/<fqdn-name>.cer. [As mentioned in section 2.1.2 Specify Details]
2. Copy the public certificates from both instances to a cem client machine using SCP client
For instance assuming given default fqdn names are primary.cer, secondary.cer. These files need to be copied from ec2 instances into cem client machine.
Use the command below to generate awskeystore key and import certificates in the windows machine where the CEM client will be installed.

P a g e | 2 0
NewNet Communications Proprietary and Confidential Information
This document contains confidential information, which is proprietary to NewNet. No part of its contents may be used, copied, disclosed or conveyed to any party in any manner whatsoever without prior written permission from NewNet.
C:\keytool -import -alias primary -file primary.cer -keystore
awskeystore.key
C:\keytool -import -alias secondary -file secondary.cer -keystore
awskeystore.key
5.2.2.2 Client Installation
The CEM client installation can be done on a Windows machine.
1. CEM Client software is available with in AMI at /opt/CEMClient. Copy the client software
into windows machine and follow the steps for setup.
2. Install the CEM jar file with Client-Only option. The user installing the CEM client should
have administrative privileges.
3. Copy the generated awskeystore.key file in client windows machine.
4. Modify the client.properties file present in the client install path to incorporate the
awskeystore.key path
clientTruststorePath=<awskeystore file path>
Eg: clientTruststorePath=C:\\STC\\CEM\\Licence\\awskeystore.key
5. Edit the hosts file in the local machine (The path where the hosts file is present :
C:\Windows\System32\drivers\etc) to incorporate the Primary and Secondary FQDN
names, created in the section 3.1.2 Specify Details for CEM client to access the Primary and
secondary Instances. Ensure having administrator access while editing the file.
Figure 16 : hosts file
P a g e | 2 1
NewNet Communications Proprietary and Confidential Information
This document contains confidential information, which is proprietary to NewNet. No part of its contents may be used, copied, disclosed or conveyed to any party in any manner whatsoever without prior written permission from NewNet.
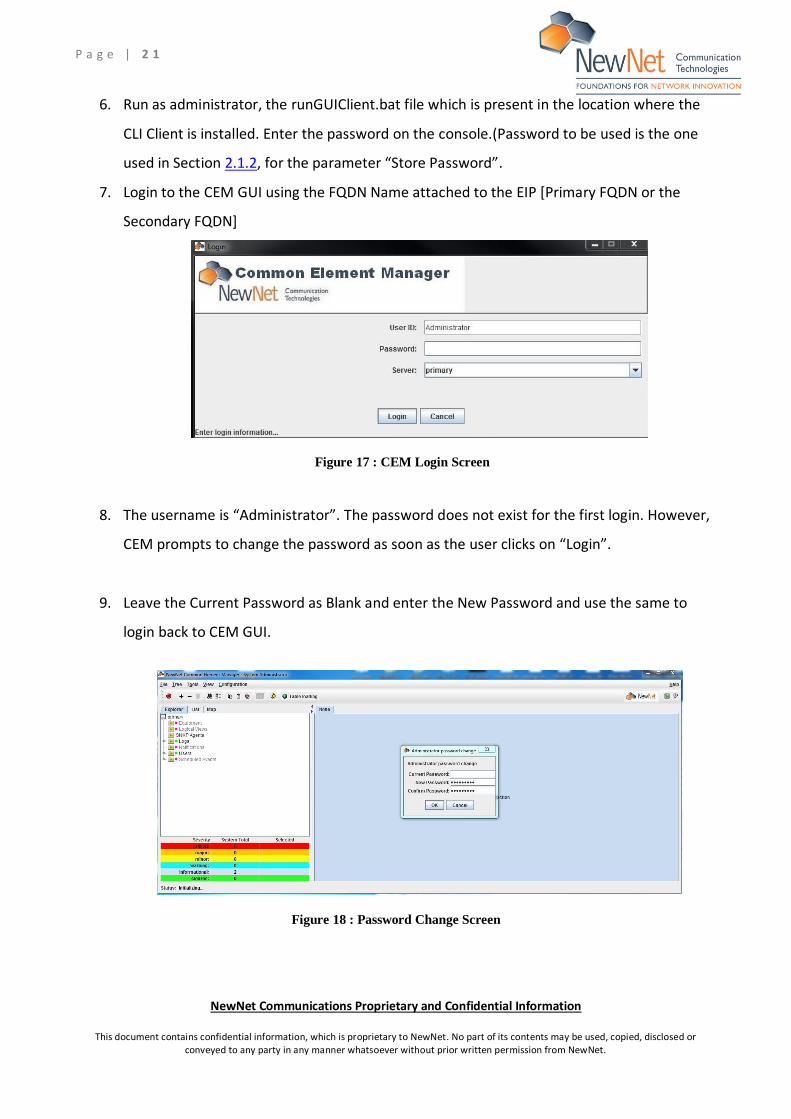
6. Run as administrator, the runGUIClient.bat file which is present in the location where the
CLI Client is installed. Enter the password on the console.(Password to be used is the one
used in Section 2.1.2, for the parameter “Store Password”.
7. Login to the CEM GUI using the FQDN Name attached to the EIP [Primary FQDN or the
Secondary FQDN]
Figure 17 : CEM Login Screen
8. The username is “Administrator”. The password does not exist for the first login. However,
CEM prompts to change the password as soon as the user clicks on “Login”.
9. Leave the Current Password as Blank and enter the New Password and use the same to
login back to CEM GUI.
Figure 18 : Password Change Screen

P a g e | 2 2
NewNet Communications Proprietary and Confidential Information
This document contains confidential information, which is proprietary to NewNet. No part of its contents may be used, copied, disclosed or conveyed to any party in any manner whatsoever without prior written permission from NewNet.
10. On logging in to the CEM GUI, create a new equipment folder.
Figure 19 ; Equipment Folder
11. In the screenshot below, the new equipment holder is named AWS.
Figure 20 : Equipment Folder Created
12. Discover the instances via the private-IP.( the private IPs is available in the Outputs tab as
described in Figure 11)
Figure 21 : Discover Instance

P a g e | 2 3
NewNet Communications Proprietary and Confidential Information
This document contains confidential information, which is proprietary to NewNet. No part of its contents may be used, copied, disclosed or conveyed to any party in any manner whatsoever without prior written permission from NewNet.
Enter the following values for the options
Hostname IP Address : Private IP
Read Community: newnetpub
Write Community: newnetpriv
Figure 22: Discover Instance parameters

P a g e | 2 4
NewNet Communications Proprietary and Confidential Information
This document contains confidential information, which is proprietary to NewNet. No part of its contents may be used, copied, disclosed or conveyed to any party in any manner whatsoever without prior written permission from NewNet.
6 Generation and installation of feature key
• Obtain for the feature key xml file from the support team. Provide the system name of the
instance.
• Login as CLI(tc3000) user. Follow procedure mentioned in section 2.3.2
• The system name can be obtained via the following command.
CLI# show system serial-number
serial-number : i-02dcae66600bdf1b4
• The system serial-number has to be obtained from both the instances.
• On obtaining the feature key xml file, place the same in the /tmp/ftp location.
• Install the feature key as mentioned below.
Below are the commands for feature key installation
6.1 To install the feature key
CLI# install feature file=fkey.xml
CLI# grant feature feature-id=<43> application=<ag> quantity= <100>
6.2 To display the feature key installed
CLI# show feature

P a g e | 2 5
NewNet Communications Proprietary and Confidential Information
This document contains confidential information, which is proprietary to NewNet. No part of its contents may be used, copied, disclosed or conveyed to any party in any manner whatsoever without prior written permission from NewNet.
7 Redundancy configuration
7.1 AG application configuration
Whenever AG (Access Guard) application configuration changes, and the save operation performed on one instance the same changes are to be configured on other instance and saved.
7.2 TransKrypt application configuration
Keys that have been added/deleted/modified in TransKrypt application on one instance have to be carried to other by copying /etc/cavium/hsm.db file from modified instance to other redundant instance. A reboot is needed on the other instance after copying hsm.db from modified instance.

P a g e | 2 6
NewNet Communications Proprietary and Confidential Information
This document contains confidential information, which is proprietary to NewNet. No part of its contents may be used, copied, disclosed or conveyed to any party in any manner whatsoever without prior written permission from NewNet.
8 Software Update
NA