step by step dhcp server installation & configuration on ... · objective: main functionality...
TRANSCRIPT

Step by Step DHCP Server
Installation & configuration on
Microsoft Windows Server 2016
Hussain Shakir
LinkedIn: https://www.linkedin.com/in/mrhussain
Twitter: https://twitter.com/hshakir_ms
Blog: http://mstechguru.blogspot.ae/

Table of Contents
OBJECTIVE: .................................................................................................................................. 3
INSTALLATION PROCEDURE: ............................................................................................... 3
INSTALL USING POWERSHELL ............................................................................................. 3
ROLE & FEATURE BASED INSTALLATION ........................................................................ 5
DHCP ROLE INSTALLATION:................................................................................................. 5
DHCP CONFIGURATION: ...................................................................................................... 10
CREATION & CONFIGURATION OF SCOPE: .................................................................... 12
RESERVING IP ADDRESS FROM LEASED ADDRESSES: ................................................. 24
SCOPE OPTIONS: ...................................................................................................................... 25
FILTERS: ...................................................................................................................................... 28
DHCP CLASSES: ........................................................................................................................ 31
USER CLASSES: ......................................................................................................................... 31
POLICES: ..................................................................................................................................... 32
Maintenance of DHCP: ............................................................................................................. 37
DHCP Backup: ............................................................................................................................ 38
DHCP Restore: ............................................................................................................................ 39

Objective:
Main Functionality of DHCP server is to provide clients auto IP Address, Subnet mask, DNS Address and Gateway Address whenever clients request in the network in auto configure mode. This document provides information on How to install & Configure DHCP Server.
Installation Procedure:
There are two methods of installation DHCP Server feature in the server manager.
1. Install using PowerShell 2. Role & Feature based Installation
Install using PowerShell
DHCP role can be install using the PowerShell. It is a command line interface for running
command to perform the installation with minimal resources, the same installation which
can be done in GUI based environment can be done in PowerShell.
Follow the below instructions.
Click on the windows button, then Windows PowerShell folder then windows
PowerShell as shown in diagram.

The other way to open the PowerShell is click on window button then Server Manager
and from the Server Manager window click on the tools and select the Windows
PowerShell.
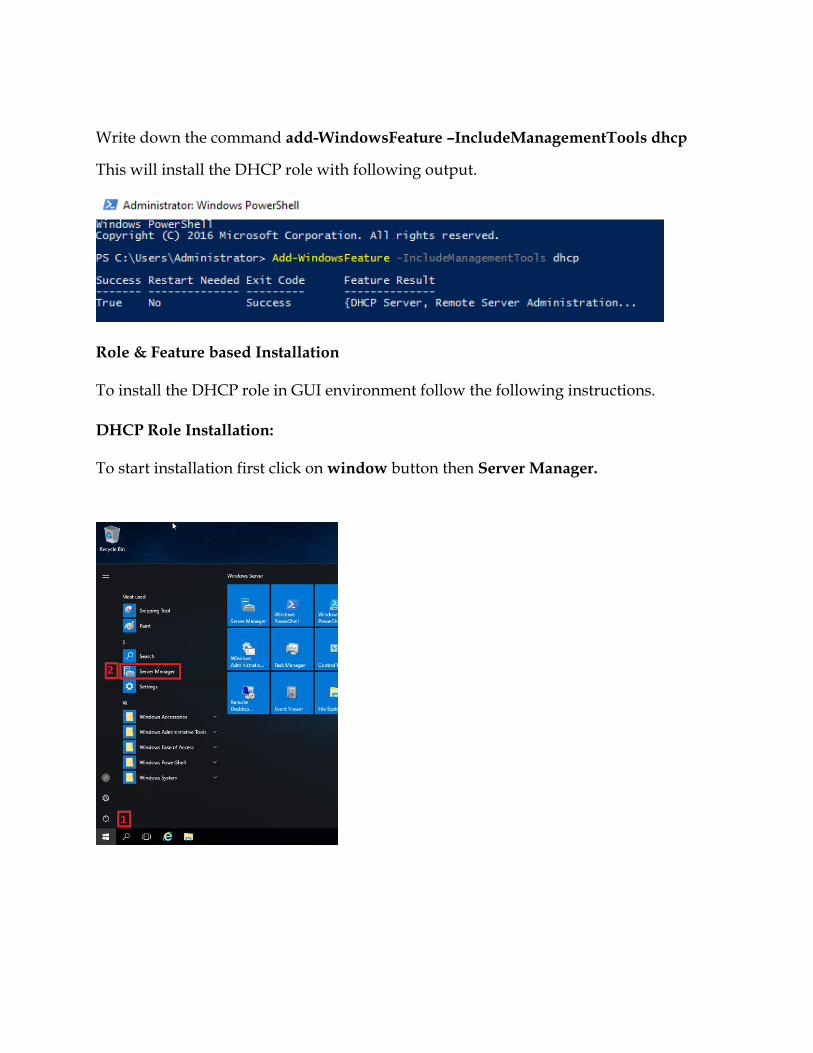
Write down the command add-WindowsFeature –IncludeManagementTools dhcp
This will install the DHCP role with following output.
Role & Feature based Installation
To install the DHCP role in GUI environment follow the following instructions.
DHCP Role Installation:
To start installation first click on window button then Server Manager.

In the Server Manager window click the Dashboard then click on Add roles and features.
In the Add roles and feature Wizard click on Next.
Note: Please read out the information on the screen that is relevant to the installation of
roles and windows sever requirements.
First Select the installation type as Role-base or feature-based installation as shown in
following diagram then click on Next.

Select the server from the server pool on which you are going to install the role as shown
in following window then click Next.

In next screen you can select multiple roles here we will Click on DHCP Server then a
new window appears which show that required tools to be added click on Add Feature.
Click Next to go to next step.

Click Next.
First click on the check box Restart the destination server automatically if required, then
click Yes and in the last click Install to start installation process.

When the feature installation succeeded message shown under the progress bar Then
click on Close to exit from the wizard.
DHCP Configuration:
After installation of the DHCP role the next section is configuration, how and what IP
addresses range to use, which gateway router and DNS server may be used and for how
much time it should be used.

Now to open DHCP Console go to Window Button on the task bar then click Server
Manager.
In the server manager window Click on Tools then DHCP to open the DHCP
configuration console.

Creation & Configuration of Scope:
DHCP scope has a valid range of IP addresses pool to be given to clients by leasing, the
mac address reservation, exclusion and other scope option can be done. Further
information is shared as follows with step wise actions.
In the DHCP console right click on IPV4 then click on New Scope…to create new scope
The new scope wizard helps you set up scope for distributing IP addresses to network
computers in the network. To continue further Click Next.
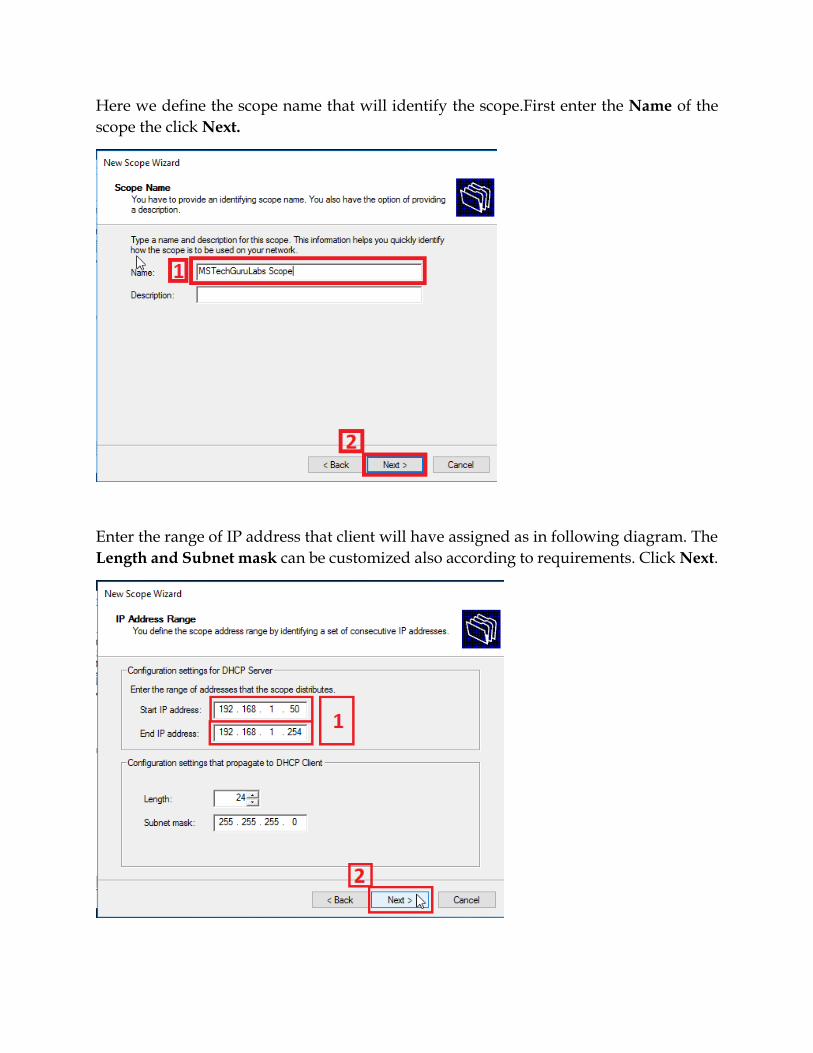
Here we define the scope name that will identify the scope.First enter the Name of the
scope the click Next.
Enter the range of IP address that client will have assigned as in following diagram. The
Length and Subnet mask can be customized also according to requirements. Click Next.

If there is any IP address that come in the range of IP address given in DHCP server can
be excluded by adding the range of IP addresses. Click Next.
The lease duration specifies how long a client can use an IP address from this scope.
Default is 8 days time for leasing one IP address, this time is customizable.
Set the lease duration time then click Next.

If you have some other options like DNS servers WiNS you can add it here by choosing
Yes radio button. Then click Next.
Here we can specify the routers, default gateways to be distributed by this scope.
Enter the IP address of the Router or Gate way by typing the IP address in text box, then
click add button.

Now the IP address is added now click Next to continue to next step.
Enter the DNS server IP addresses according to setup that we want our client to use. Then
click Next.

If there is no DNS server in the network the WINS server can be used, which convert the
NetBIOS computer name to IP address.
Enter the WINS server IP addresses according to your setup. Then click Next.

After almost creation of the scope at this step the scope need to be activated that clients
can obtain address leases only if a scope is activated.
Chose Yes, I want to activate this scope now then click Next to go to last step.
The completeing the new scope wizard show you have successfully completed the new
wizard scopeOn successful configuration of scop click Finish.
The Scope is created and activated as well as shown in the following diagram.

DORA (Discover, Offer, Request Acknowledgment): The process of obtaining automatic IP
address on DHCP client.
1. DHCPDiscover: whenever the computer turned on connected to LAN send a
broad cast message and look for the DHCP server.
2. DHCPOffer: when the DHCP server receive the Discover message , the DHCP
server send a broad cast message to the client that I have an offer(TCP/IP
configuration) for you.
3. DHCPRequest: when the client receive the offer broadcast then it sends a request
that I am ready to accept the offer (TCP/IP configuration).
4. DHCPACK: the request is entertained by DHCP server and sends an
acknowledgement broadcast that you got it (TCP/IP configuration) but it will be
with lease duration. The default lease duration is 8 days, when 50% of the time is
consumed the DHCP client request DHCP server unicast the to renew the lease
duration.

DHCP Scope Properties:
Address Pool:
The address pool contain the range of IP addresses that is kept for automatic assigning to
clients like in wireless connectivity normally we provide IP range to clients.
In the DHCP console window click on the Address Pool show the address pool.
Address Leases:
Address lease are those IP addresses which are given to DHCP clients by DHCP Server.
In DHCP console window by click on the Address leases which will show the IP
addresses that are leased to clients.

DHCP Exclusion of IP addresses:
It is an option in DHCP if someone want to exclude IP addresses or range from pre
allocated range in the address pool.
For exclusion follow the diagrams.
Right Click on Address pool, click on new Exclusion Range
Add starting and end IP address then click Add.
The range of IP address: 192.168.1.55 – 100 will be excluded from the Address Pool range:
192.168.1.50-254.

Click on close to end exclusion
The exclusion range will display under the address pool.
Reservations:
If some clients on the network has a requirement that whenever it comes on the network
it should have one specific time always.
To create reservation right click on Reservation the click on New Reservation… a new
reservation window will open now.

For new reservation provide information for a reserved client.
Enter the Reservation name, IP address, MAC address and description then click add.
After adding the information of new reservation, the created record will show in the
reservations column.

Reserving IP address from leased addresses:
If DHCP clients have already got IP addresses from DHCP server and same IP need to be
reserved for it then follow the instruction below.
In the DHCP console click on Address Leases under the
scope[192.168.1.0]MSTechguruLab, then right click on the record showing the Client IP
Address Name and Lease Expiration. Select Add to Reservation.
After clicking Add to Reservation a message window shows that lease is converted
successfully to reservation, then click OK to close it.

After the successful conversion to reservation and creation of new reservations the
reserved IP addresses will show as follows.
Scope Options:
Scope options undoer the scope is used to provide the default gateway , DNS, Time server
adresses etc information to DHCP clients in the same scope. The scope option uder the
scope will apply to the scope only. Where Server Options is applies to all scopes under
the DHCP.
To configure the scope option in the DHCP consle right click on Scope Options then click
Configure Options.. to display scope options window.

Following diagram shows the scope option like 003 Router, 004 Time server and 005
Name server where on clicking each the information can be entered in the Data Enter
area.

After addition of entries following window show the added scope options for Router and
DNS Servers.

Filters:
In DHCP server filters are used to forcefully allow or deny the specific clients by adding
their MAC addresses in the allow or deny filters. By default, allow, deny filters are
disabled. To use filters one have to enable it.
Follow the diagram to enable/disable the filters.
To create new filter click Filters then right click Deny , click on New Filter to force fully
deny one specific network device add the mac address of the client that will not receive
the DHCP services.

When New Filter window appear enter the MAC address and description details as
shown according to ones need.
The other way is to go to Address leases then right click on client record Add to Filter
then select deny filter as shown in following diagrams.

The other way is to go to Address leases then right click on client record Add to Filter
then select allow filter as shown in following diagrams.
After addition the filter record will show as follows.

DHCP Classes:
The classes are created first then it is used in the policy, first here are types of classes.
Default class, this class is created automatically when the DHCP installation is
performed and all DHCP clients are by default configured as Default Class.
Vendor class, this class is created manually and use segregation of vendor type
like there are Dell and HP computers in the network and one wants to give dell
DNS and Router information different then HP or we can take the operating
system as base like windows 8 and windows 10 should have different gateways
and DNS configurations.
User Class, created manually it provide different IP address configurations to
DHCP client end.
User classes:
In a scenario one created the user class by name of executive and they need to use internet
from different server so they will be provided with different Router IP address.
To create user class right click on the IPv4 under the mstechguru, click Define User Class,
an DHCP User classes window appear click Add the New Class window appears enter
the required details as shown then click OK

DHCP User classes window will show the added user class then click on Close to exit
Polices:
Now to use the user class apply the DHCP policy to provide different router to executive
class.

Right click on Policy under scope, then click on New Policy to create policy.
To create DHCP policy enter the policy name then click next to go to next step which will
allow the distribution of configurable IP addresses to clients.
After entering name add the condition for the policy by clicking Add which will show
add/edit condition window.

Provide information according to requirements likewise as below; User Class, Equals
Executives then click OK.
The condition is added now click Next to next step.

In following we will use our old DHCP Setting so select No as shown below. Then click
Next for next step.

Add the new router information by clicking the 003 Router checkbox likewise as follows
then click Next for next step.
In the DHCP configuration policy wizard on last step shows the summary of policy with
conditions and settings, click Finish to close the window.

After the completion of Policy wizard the applied or new policy will show up in the
policies under the scope.
Maintenance of DHCP:
Following diagram shows the important task of DHCP server for maintenance like
backup, restore and all tasks (start, stop, pause, resume and restart).

DHCP Backup:
Following diagram shows the important task of DHCP server for maintenance like
backup the DHCP Server configuration done on it.
To backup right click on the Server name eg. mstechguru under the DHCP, then click
Backup to take backup.
For saving the backup select the destination location directory, then click OK

Following shows the generated backup file of DHCP Server.
DHCP Restore:
To restore right click on the Server name eg. mstechguru under the DHCP, then click
Restore to take restore to backward positon or fine working position.

For restoring the backup select the destination location directory, then click OK to close
the dialog.
The services of DHCP will restart to do restoration process click Yes

Services are restarting
The restoration process completed successfully now click OK to close the window.
Hope this will help you 😊