still with bubble plates - destileria bonanza
TRANSCRIPT

Still with bubble plates
by rednose » Tue Mar 09, 2010 7:27 pm
I'm tired of the SS scrubbers in my bok and was thinking to re-built it with this design which I found in an Italian site talking about distilling grappa while HD was down. Did someone try this concept? Could be one or three smaller caps and the distance between each plate much wider. I know the built of OD and others that where working with plates but didn't find anything about bubble caps in small stills. I don't need 94%, I'm very fine with 85% and I'm almost sure it can be archived with plates. Attachments
by rednose » Tue Mar 09, 2010 8:27 pm
It will be a little fuzzy to built a 2” column. Problem is that I can't get any 3" copper tube here. I cut my finger today treating to get the bloody scrubbers out for cleaning after a run with plastic smelling booze, there is coming the idea from. I use the bok only for small works now but love here.
by rednose » Wed Mar 10, 2010 9:35 am
I would weld everything with TIG, next week I should have access to that, so the temp in elaboration isn't a biggy. I'm sure that it can be built in one only day if 4 plates are used. It'll be a relative short column and could be cleaned with vinegar and limes juice, we produce limes so I have a huge amount. Anyhow I'm not sure if the effect in a 2" column is worth the efforts but if I get 3" material I will try it.

As I have few access to copper I'm thinking to built a 6 " head of SS something like the Holstein heads for flavour.
I'm not sure yet, still thinking loud but I might go for a shotgun deplagmator on 6". Sorry for the crappy draft but I couldn't get customed to autocad never.
by Rednose » Fri Mar 12, 2010 6:11 pm
I will use removable copper caps (top screwed), that should be enough copper in the vapour path.
New head built
by rednose » Mon Mar 15, 2010 8:55 am
I want the dephlagmator or condenser to fill the plates with liquid as soon as possible to stabilize the head. The idea came to me from a design of a Mansfield still in the book "Distillation Principles and Processes" from Sydney Young (1922).

I will go for three plates, they should give the same affect as 3 thumpers, for whiskey. In case that I want neutral spirit I can add 3 or 4 plates later as my head and dephlagmator is screwed together. The photo of the bubble caps is borrowed from Decoys collection. I'm fighting with myself on the question: copper or SS?
aroma head
by rednose » Wed Mar 17, 2010 2:19 pm
Today I took the decision to make the new head in SS but the bubble caps will be in copper to filter the sulphates. I will make the head in two parts, one has 3 plates and another 4 plates, in total 7. To make neutral I'll use 7 and for whisky only 3 plates. The dephlagmator will have a water flow valve to regulate the temperature. Diameter will be 6", my Apollo worm will serve as the product condenser but maybe one day I'll try a SS shotgun condenser.

by rednose » Wed Mar 17, 2010 2:57 pm
The unions will be screwed (6 x 1/4" screws each) with a Teflon seal between the 1/4 rings, Kiwi. The interesting part for me will be the sight glasses, there are two ways: an expensive but easy or unexpensive and more time to do 'em. Not sure yet neither how to manage the part of LED illumination, but comes time - comes idea. Estimated material cost is 1000 USD.
by rednose » Sat Mar 27, 2010 6:49 am
I managed this week to cut almost all parts of the new stills, it's missing to solder 'em but the TIG welder didn't arrive yet, hope I have it till Wednesday. Yes, you was reading right, I said "stills" I'm building two sections of still heads, one of 3 and one of 4 plates each with an own detachable dephlagmator. In case that I want higher ABV with fewer flavors as vodka, I mount both heads on the same boiler. When I want whisky with flavour I use the heads separate and can run two stills with 300 ltr boilers at the same time. It has been a lot of work, especially machine work but for something these kind of stills (like Holstein) cost some ten thousands.
by rednose » Wed Apr 07, 2010 4:40 pm
Little update on the built. We made the worm condensers today and welded the boilers. Hopefully and at the end the TIG welder should arrive tomorrow (wow), we need it to solder the bubble plates and columns. I also had a problem to get the right glasses for the sight glasses; they should be ready next week. Also missing yet the security valves for pressure and vacuum, but hope to get 'em soon. Don't forget that I'm living in a third world country and it's not like shopping in USA.
pics updates
by rednose » Fri Apr 09, 2010 2:30 pm

Ok, Ok, I didn't want to take pics in crude work but here we go. First a pic of the both stills, on the right you see one worm condenser. The buddy in the middle is one of my helpers. Attachments
new stills
new stills
by rednose » Fri Apr 09, 2010 2:36 pm
Here the same body while making a condenser, 7 windings of 3/4 SS tube.
worm condenser
Next photo a view through the dephlagmator (all unclean=> DIRTY) Ends with 1" thread to connect to the condenser
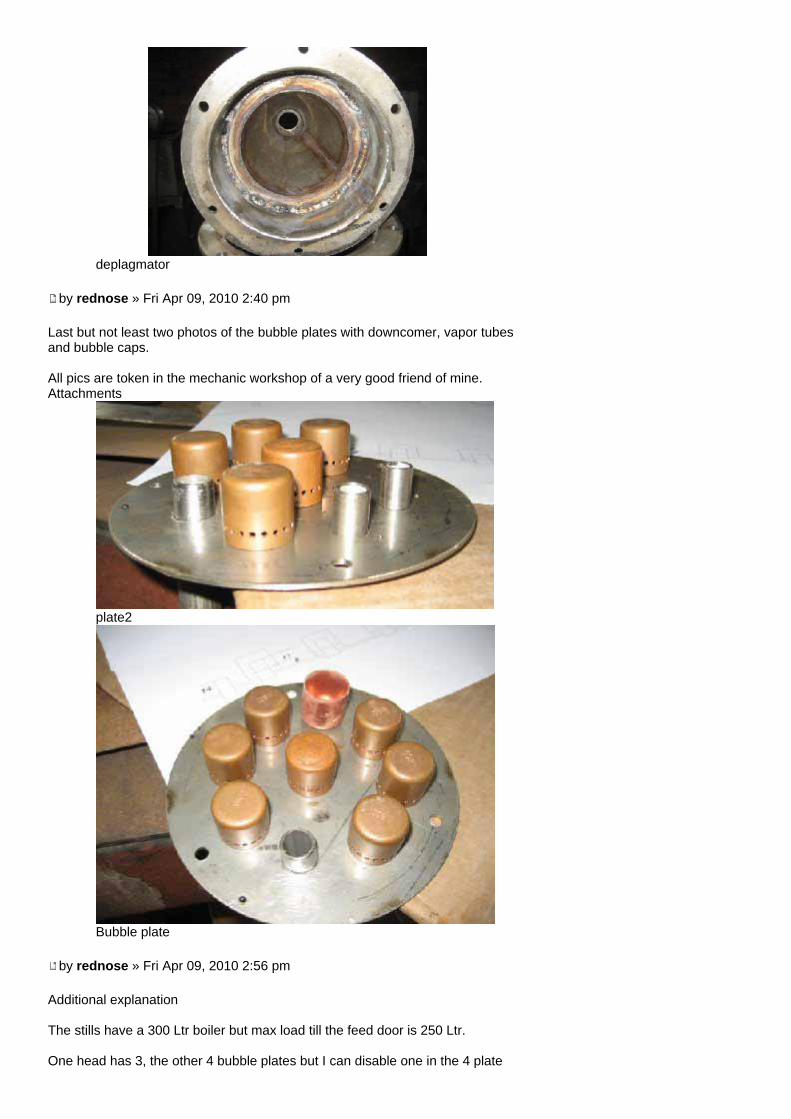
deplagmator
by rednose » Fri Apr 09, 2010 2:40 pm
Last but not least two photos of the bubble plates with downcomer, vapor tubes and bubble caps. All pics are token in the mechanic workshop of a very good friend of mine. Attachments
plate2
Bubble plate
by rednose » Fri Apr 09, 2010 2:56 pm
Additional explanation The stills have a 300 Ltr boiler but max load till the feed door is 250 Ltr. One head has 3, the other 4 bubble plates but I can disable one in the 4 plate

head to have them almost equal running. I can mount both head together and produce higher ABV but they will run mostly in whiskey mode.
by rednose » Thu Apr 15, 2010 3:15 pm
The new home for the boilers is almost done, can heat with propane or wood.
by Rednose » Fri Apr 16, 2010 7:15 am
That's the work of Maestro Marcelo, I pay him 15$ a day. He isn't good in math but getting a brickwork together he knows pretty well. He made parts of my hotel before.
by Rednose » Fri Apr 16, 2010 7:23 am
Propane cost 1.60 USD for 15 Kg here, I will run mostly on propane. I also can get crap wood from a neighbour who makes furniture and doors etc. but it'll be more work to burn and control the heat and you're right, in that case a staff will clean it up. My consulting service, if you wanna call it so (I'm mec. Ing.), is a neighbour favour but it looks like one of 'em wanna go a little more further and bottle his booze by himself, that will be a paid contract to get everything together.
by rednose » Sat Apr 17, 2010 8:24 pm
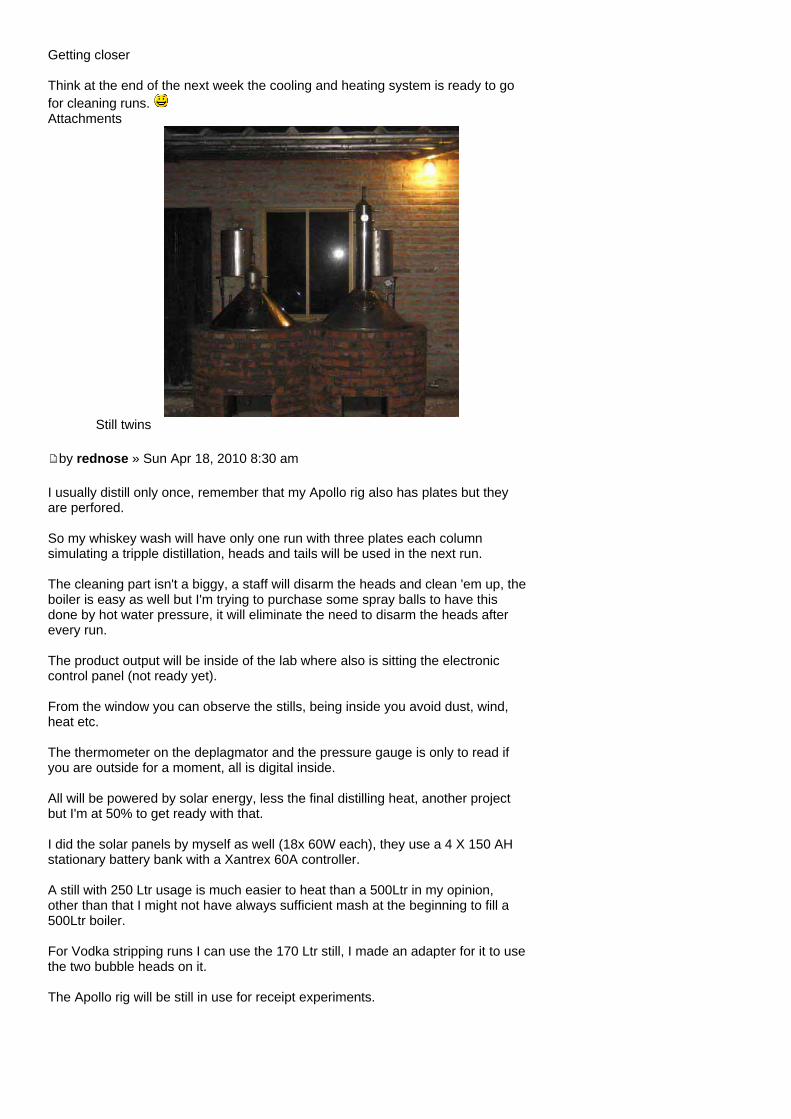
Getting closer Think at the end of the next week the cooling and heating system is ready to go for cleaning runs. Attachments
Still twins
by rednose » Sun Apr 18, 2010 8:30 am
I usually distill only once, remember that my Apollo rig also has plates but they are perfored. So my whiskey wash will have only one run with three plates each column simulating a tripple distillation, heads and tails will be used in the next run. The cleaning part isn't a biggy, a staff will disarm the heads and clean 'em up, the boiler is easy as well but I'm trying to purchase some spray balls to have this done by hot water pressure, it will eliminate the need to disarm the heads after every run. The product output will be inside of the lab where also is sitting the electronic control panel (not ready yet). From the window you can observe the stills, being inside you avoid dust, wind, heat etc. The thermometer on the deplagmator and the pressure gauge is only to read if you are outside for a moment, all is digital inside. All will be powered by solar energy, less the final distilling heat, another project but I'm at 50% to get ready with that. I did the solar panels by myself as well (18x 60W each), they use a 4 X 150 AH stationary battery bank with a Xantrex 60A controller. A still with 250 Ltr usage is much easier to heat than a 500Ltr in my opinion, other than that I might not have always sufficient mash at the beginning to fill a 500Ltr boiler. For Vodka stripping runs I can use the 170 Ltr still, I made an adapter for it to use the two bubble heads on it. The Apollo rig will be still in use for receipt experiments.

Apollo rig
by Rednose » Sun Apr 18, 2010 8:38 am
I hope it will be a long time biz but EC folks love what's new than after a while they go back to what they have done or consumed before. It'll be hard work to be constantly popular but I'll do my best. I know that this is a home distiller thread but my example can be useful for someone who decides to go official in the future. My total expenses without the solar system are around 5.000 USD actually. A Holstein or Carl still which is of course much better than mine can get easily to 50k + and I have two of 'em. So with other words where you don't have hard fireman and municipal controls you can DIY a semi pro still.
by Rednose » Thu Apr 22, 2010 5:28 pm
Tomorrow I will solder the bubble caps to the plates, the downcomers end in a cap as well (not shown here) but reverse like a cup. If someone wants any changes talk now or shut up forever, lol. Attachments

bubble tower
by rednose » Thu Apr 22, 2010 5:38 pm
This is an important point of the new rigs, this are overpressure valves calibrated at 150 PSI. I will bring 'em down to 60 PSI and use one as overpressure and the other in reverse as shown for vacuum security. If I would built another rig I would weld 'em below the liquid level, I find it better that it throws out unflammable liquid than flammable vapour if overpressure is present. I might correct that inside the boiler with an extension. The overpressure valve will be extended far away from the heat by SS tubes Attachments

by Rednose » Thu Apr 22, 2010 7:32 pm
Well, I have the gauge and will observe in the first runs what pressure it usually has, than I can fine tune the valves but have to start with something and 150 PSI was far too much in my opinion. The tower isn't high and it should be around 10 PSI in normal function, no more.
by rednose » Thu Apr 29, 2010 2:26 pm
I changed the resorts of the valves to smaller ones and they are very sensible now. There will not be more than 10 PSI in my boilers as the columns aren't very high. The vacuum release valve is a very good idea, thanks for that. Anyhow I will keep the valves and add the manual ball valve. The boiler is made out of 2mm 304 SS. The bottom sits on a 8mm heat plate (just a round black iron plate) to prevent burning mash. The top is a 1/4 SS ring, inside 6" and outside 8" (same thang the man hole). It has eight 8mm screws to fit the column sealed with 2mm Teflon seal. Attachments
by Rednose » Wed May 12, 2010 3:11 pm
Today I made my first run with one of the new stills, it was planned for tomorrow but the wash cleared up pretty fast. Wash was 180 Ltr UJSSM and 6 gal of heads and tails from the last 2 runs of “Apollo” (only 60% of total boiler vol). I had to stop the run at the very beginning as I had a small leak in the head gasket. Than I took 500ml fore shots and 3 gal heads at 85% ABV. At 80% I collected hearts and run ‘em till 70%, a total of 4 gal in 1.5 hours.

It was a nice ¼ “stream. For tails I powered the still up and stopped the reflux (dephlagmator) and got another 4.5 gal until 25% ABV. During refluxing, the cuts have been clear and easy to differ. Now is missing to test the 4 plate still and install the dashboard (control panel), the probes already arrived, missing the instruments. At the end I have to polish the complete thang. Maybe I’ll upload some pics after cleaning all. I can’t tell ya all how happy I’m with the results, this was really hard work. Joe
by rednose » Wed May 12, 2010 3:49 pm
Both together will make a good vodka still but need a lot of power to bring vapor till the worm condenser. The most important part of the head is the dephlagmator, the white thing is the temp meter but the bloody flash made it invisible. Upper left connection is water in which I can regulate or stop completely with a ball valve and a bypass. Lower connection is a cleaning tube to rinse the still after work without the need to disarm it. Right side is cooling water out. As soon as I stop the cooling flow on the dephlagmator the ABV falls 15 to 20 % ABV as the plates will dry out.
deplaghmator
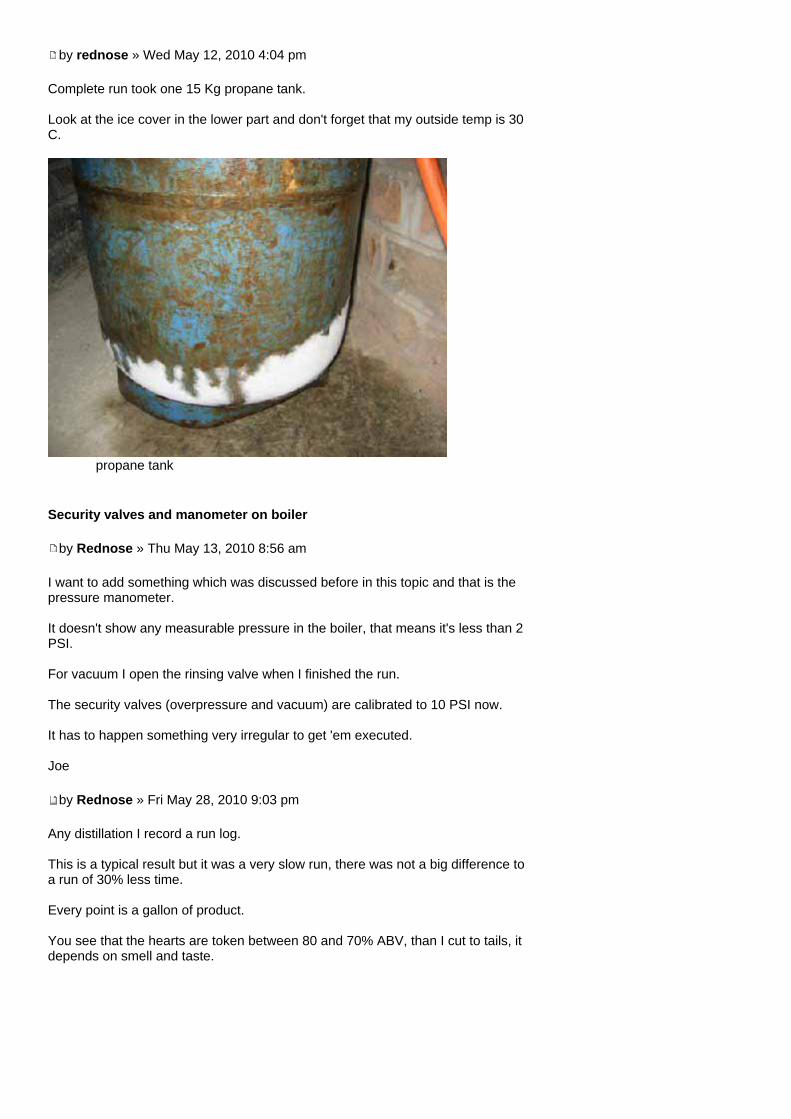
by rednose » Wed May 12, 2010 4:04 pm
Complete run took one 15 Kg propane tank. Look at the ice cover in the lower part and don't forget that my outside temp is 30 C.
propane tank
Security valves and manometer on boiler
by Rednose » Thu May 13, 2010 8:56 am
I want to add something which was discussed before in this topic and that is the pressure manometer. It doesn't show any measurable pressure in the boiler, that means it's less than 2 PSI. For vacuum I open the rinsing valve when I finished the run. The security valves (overpressure and vacuum) are calibrated to 10 PSI now. It has to happen something very irregular to get 'em executed. Joe
by Rednose » Fri May 28, 2010 9:03 pm
Any distillation I record a run log. This is a typical result but it was a very slow run, there was not a big difference to a run of 30% less time. Every point is a gallon of product. You see that the hearts are token between 80 and 70% ABV, than I cut to tails, it depends on smell and taste.

run log
Joe
by rednose » Sat May 29, 2010 6:07 am
Maybe today I'll finish the SS water cooled parrots for the new twins. Here a draw
Water cooled parrot
by rednose » Sat May 29, 2010 6:35 am

Each still has his own control panel for head temp, cooling temp and an additional USB connection to log the temps during a run on excel. Missing the 24V power sources, is on the way. The cases are from HP Laser printers, have some blown of 'em.
Digital control panel
by rednose » Sat May 29, 2010 12:34 pm
Parrots are done. Missing water in-out connections, didn't have them in stock. The stills are outside but the product comes tubed inside the air conditioned lab to classify. Attachments

Watercooled parrot
by rednose » Tue Aug 24, 2010 6:47 am
I've got a PM from Kentucky, he ask me how and why bubble plates work and what would be a good design for a 4 incher. Let's come at first to the theory behind this, for that I copy a part (slightly modded) from the parent site about Thumpers: The still’s boiler begins giving off ethanol vapors (say at 40% purity at 96 ° C off a 5% wash)... these get passed into the thumper and try to bubble up through the liquid there. But because the liquid is cold too, the vapor will all condense if given the chance (e.g. small bubbles & water deep enough). A bit later on, the thumper liquid is starting to heat up and increasing in ethanol content.... soon the thumper is at say 84 ° C, and the ethanol content is around 40% - gees - that sounds like a second pot still doesn't it? So the ethanol starts coming out of solution, though this time it will be at around 75-80% - hence the second distillation occurring - all for free, no additional cost or heating involved. Of course all this depends on how effective the thumper is at knocking down the incoming vapor - e.g. bubble size, depth of immersion, % alcohol in the vapor & thumper liquid etc, but you get the basic idea. So far the parent site comments on thumpers. You can, if you have enough heat source work with up to 2 thumpers but no more without direct heating the thumpers themselves, other is that the alc content on the 3rd thumper will go closed to a no-no level above 50% ABV which could make us a bomb if separately heated. The advantage of a thumper chain is that you can fill them with wash liquid to maintain flavors.

We use the bubble plates as inline thumpers in a bubble plate still, as more plates you have - as higher the ABV and as more flavor from the original wash material will get lost. The downcomers make sure that the plates/column don't over fill We need to know what we are shooting for, in a whiskey still I don't go higher as two plates after having some experience with it. A light rum can work with as much as 4 or 5 plates. There are many designs out there, starting with the cap design, we have squares, rectangles, rounds, bell likes, valve likes, multiples, uniques and many more. The next post will take some time, I have to think about what would be best (in my opinion) for a 4 incher, that's what Kentucky wants to build. Attachments
thumper.gif (2.1 KiB) Viewed 86 times
by rednose » Tue Aug 24, 2010 8:07 am
Ok, here is what I would make, I would use 5 perforated (2mm holes) 3/4" bubble caps on a 4 inch plate. This disk has 4 " and you can see more than less the distribution of the caps which would be soft soldered on top of the plate. The reversed cup is to receive the liquid from the upper plates downcomer. If you like that design I can post a horizontal draw with measures for the vapor

tubes and downcomers (1/2" tubes). I would leave 4" space between each plate, the plate material should be copper as it will be easier to work for you (mine are SS). One add: using this design, I would highly recommend to have an over pressure valve (about 15 PSI) installed on your boiler, the small holes can get tapped with solid material if you cook on grain - over filled. If you don't want to install the valve you have to make very sure that your wash (beer) is very well siphoned and clear. Joe
by Rednose » Tue Aug 24, 2010 8:26 am
Here a side view of my 6 inch plates during built Attachments
How stuff don't work
by Rednose » Tue Aug 24, 2010 8:53 am
Small quiz: What's wrong in this draw from HowStuffWorks.com? It has two basic mistakes.

moonshine-diagram.gif (21.88 KiB) Viewed 81 times
Kentucky shinner wrote:the arm from the cap should be below the liquid in the thumper and the cold water should exit from the top of the worm keg That's it, congrats. Oki, let me work on the horizontal draw this afternoon. I might post it tomorrow as I have some appointments and my seminary of artisan education. I will hopefully graduate as distilling master this weekend. This thang took me 1/2 year of efforts.
by rednose » Tue Aug 24, 2010 9:43 am
The caps will be soft soldered, the downcomers, vapour tubes and outside ring needs to be brazed, If you solder all soft you will have a solder salad.
by rednose » Tue Aug 24, 2010 9:56 am
Kentucky shinner wrote:how would it be if I used acetylene torch and used hard silver solder? That's it for everything else but the caps. We solder them soft to get 'em off easily if ever needed.
by rednose » Tue Aug 24, 2010 10:09 am
Ok, ready. This version has the liquid level 2mm raised (in relation to mine) as you will have more turbulences in a 4 incher than a 6 incher as the caps have less space between 'em. All measurements are in mm. You can cut the caps 6 mm deep with a saw or small high speed disk for the

vapor release if that is easier for you. Joe
I use copper caps. it's the only copper part in all my still. Yup I already made them in 6 inch (the twins in my avatar) and use them daily, this special design was made for Kentucky as he wants to built a 4 incher. I'm with a similar plan (4" vodka still) but using only one cap per plate. This isn't proved till now, that's why I recommend the multiple cap design. I have too many stuff to do with the permits actually to start a new built right now. Putting weight will raise the column high and Kentucky has only 25" which is enough if you fix the caps. In this country it's very difficult to count with time, yesterday they told us we will graduate as artisanes on this saturday, today they say it will be end of September, I'm a little pissed as I wanna be in the x-mas market with our products and time will be short. Next month is the most important exhibition of Ecuadorian products, EXPO 2010 and I wanted to participate but with the today’s news it's impossible.
by rednose » Sat Sep 04, 2010 7:14 am
There are frequently ongoing topics about good or bad seals in HD. I already mentioned in the sight glass topic that I use this teflon band for all my pressure fittings. It's a soft Teflon string which, in case that you can't get it, can be made by yourself, it's priced around 40 USD.

Get 5 or more (depends on the thickness you want for the seal) Teflon rolls and knot them together at the beginning. Than use a piece of cable to fix the knot to a hand drill. The rolls have to be set on a piece of wood and a nail in the centre. Than start the drill and you will have a multiple Teflon band when the rolls finished. Joe
Chesterton 2.4mm X 15.3 m teflon seal
tdms3500_EN.pdf Valvelon data sheet (140.92 KiB) Downloaded 9 times
by rednose » Mon Sep 20, 2010 8:21 am
I discarded the idea to build a new vodka still in 4” but I can use some material for the shotgun condenser I will need. I will go for a 9 plated bubble column in 8 inch. The column and bubble plates will be copper, the shotgun dephlagmator and condenser in SS. The boiler will be made in 3mm SS The boiler will be 1000 Ltr max charge and flat shaped to have enough vapor pushed up. The heat source will be diesel; I already purchased a Beckett burner 3 gal/min 100 PSI, which should do the job. I expect 6 to 8 gal/h with this setup on a ABV above 90% in hearts. I have enough heat to feed another (double) column if I’m not fine with the first results. Maybe I can add a vacuum pump in the future to save some energy but I’m not 100% clear jet how these vacuum stills work on cuts and that is very important to have a high quality product.

The hot cooling water will pass after the dephlagmator to a worm in SS bucket filled with material for the next batch to preheat it, that could vaporize the first nasties a bit as well. The still will be computerized, I mean it will have bells and rings when a certain temp is reached in the still head or in the cooling water for security and cut warnings during the run as the to be distilled product will always be the same. The still will be used to rectify crude sugar cane liquor at 40% ABV. I have to see how to finance this project as many other circumstances play a roll like enough cooling water (might have to drill a well) and stocking the likker to age it for some weeks. I know that this still isn’t home use anymore, neither the twins are, but it might inspire someone to scale it down to the actual home built standard, the 4 inchers. Sourcing all needed parts will take some time
1000 Ltr SS boiler
by rednose » Mon Sep 20, 2010 9:58 am
Here you go Kentucky, it's 127 Ltr, I used the complete lenght of a SS sheet => 2.44 / pi = 77cm The blue part is the max charge.

127 Ltr boiler
by rednose » Mon Sep 20, 2010 10:42 am
Yeah, all numbers in Cm. Would make a nice addition to your pool area with a brick insulation. When you don't use it you can tarn it as a solar powered water fountain or just put a pot with flowers on top.
by rednose » Tue Sep 21, 2010 9:14 am
I’m officially licensed now, hurray. There is a small paperwork still pendent, the analysis of my first official liquors, whisky and a Pernod like anis drink. This is made in the health ministry and gives green light to sell it nationwide, will take a month or so more. Joe
So, after installing the sight glasses I was able to run my still today and guess what? What I said from the beginning in the flute section that it is impossible that a bubble plate don't bubble is now clear. I could have bet my ass on it. That means as I also said from the beginning that the perforated plates don't are calculated well, the holes have to be smaller and more of them.

Bubbling first plate
by Samohon » Sun Oct 03, 2010 1:32 pm
How many bubble caps have yo got on the plate Joe..? Does the 30% surface area of plate for bubble caps still hold as they do for the perforated plates? Nice to see it working...
by Rednose » Sun Oct 03, 2010 2:27 pm
No Sam, I don't use that formula of 30% surface. I have 7 3/8 inch tubes that pass the vapor through the bubble caps in a 6 inch column. I'm sure that Spooky will make some modifies based on this fact.
night movi
by rednose » Sun Oct 03, 2010 6:42 pm
It's night time now and I'm running another batch, I tried to make a small vid to show how strong the bubbles are working. I converted it to a wmv file to be able to post it as a zip, just download and unzip. Just an hour ago the upper sight glass started to leak a bit and I tried to tighen it, it cracked. Anyhow it doesn't leak anymore and I can finish the run. Tomorrow maestro Pepe have to make me a new glass, cost 0.50$ each. The sound in the vid is coming from the 300 glass maples I use as boiler chips.