storiesworth telling · 2010-04-13 · storiesworth telling:a guide to creating student-led...
TRANSCRIPT
Stories Worth TellingA Guide to Creating Student-LedDocumentaries
Mary Palmer, English TeacherPerry Lee, Social Studies Teacher
Century High SchoolBismarck, North Dakota
Contents
Page 4 Sharing Our Start5 The First Attempt 6 Gaining Support and Meeting Standards 7 An Opportunity for Community-Service Learning 7 The Impact on Students and the Community9 What We’ve Learned
Page 10 Getting Started and Setting Expectations 11 Finding a Story Worth Telling 11 Motivating Students 13 Clarifying Expectations and Assessing Student Work
Page 14 Managing the Project14 Dividing the Roles15 Managing the Classroom Environment17 Determining Your Equipment Needs
Page 20 Managing the Production Process 20 Filming Techniques21 Conducting Background Research
Page 23 Interviewing Skills23 Preparing for the Interview23 Conducting the Interview24 Interview Guidelines25 Logging the Interview
Page 26 The Writing Process 26 Writing the Script 28 Completing the Storyboard
Page 30 The Editing Process 30 Becoming Proficient with iMovie 30 Editing Steps and Tips 32 Putting It All Together 33 Sharing Your Documentaries
Stories Worth Telling: A Guide to Creating Student-Led Documentaries
Stories Worth Telling: A Guide to Creating Student-Led Documentaries
Page 34 Celebrating and Reaping the Benefits
Page 36 Appendix A: Sample Assessment Tool
Page 37 Appendix B: Application for Documentary
Page 39 Appendix C: Sample Interview Transcript
Page 41 Appendix D: Sample Documentary Introduction
Page 42 Appendix E: Sample Storyboard
Page 44 Appendix F: Storyboard Template
© 2007, 2009 Apple Inc. All rights reserved.
Apple, the Apple logo, FireWire, GarageBand, iDVD, iLife, iMovie, iPhoto, iPod, iTunes, Mac, Macintosh, Power Mac, QuickTime, and SuperDrive aretrademarks of Apple Inc., registered in the U.S. and other countries. iWeb is a trademark of Apple Inc. Other company and product namesmentioned herein may be trademarks of their respective companies.
Contents 3

Stories Worth Telling: A Guide to Creating Student-Led Documentaries
Sharing Our StartWhat started out as a family conversation during Thanksgivingdinner in 1996 turned out to stimulate a whirlwind of excitingand meaningful projects within our classroom and community.
My dad, who is now 83 years old, doesn’t like to talk much about the past (he claimshe can’t remember). But this particular Thanksgiving was different. On his owninitiative, he started describing life during The Great Depression—how he couldrecall the taste of every orange he had; how he treasured every bite of chocolate;how they used to collect bones, batteries, and cow chips; how he is thankful for theabundance of “good things” he can now share with his children and grandchildren.To me, those “good things” include the wisdom he has gained and the wealth ofexperiences hidden behind his stories—stories that I wished I had on tape forposterity.
Not long after this storytelling debut, I noticed an ad in our local paper calling forteachers who wanted to explore the world of connecting technology withcurriculum. With images of The Great Depression still on my mind, I knew I wantedour students to have the same experience I had had on Thanksgiving. Afterproposing the idea of student-led documentaries to my teaching partner, Perry, whocasually said, “Sure, why not try?,” we wrote the grant proposal and received enoughmoney for our start: two Apple Power Mac 6500 computers equipped with AvidCinema and one camera (for 80 students).
We were on our way to transforming the way we taught, the way students learn,and the way our community viewed teenagers and education.
That first year we went into this project without a compass: We knew our finaldestination, but didn’t really know the steps to follow to complete a classdocumentary. My partner, a social studies teacher, had no background in technologyor journalism, but he understood the worth of a story. I had an academicbackground in English and communications and some experience in photographyand desktop publishing, having advised the student paper and yearbook for anumber of years. Completing a full-length documentary with 80 students, however,was going to be a different beast. But we fostered a vision of the far-reaching powerof this kind of project.
4
Stories Worth Telling: A Guide to Creating Student-Led Documentaries
The First AttemptSince no one in our district knew anything about video editing, we needed toexperiment with a project of our own before we opened it up for the students.Doing this was the way we both learned the editing software. We were driven by apurpose: to learn the basics and to complete an authentic task. After relying on thetutorial and manual as we worked on our projects at home, we felt we could moveon to the next step: introducing the idea to our students. The school year wasalready half over.
That first project was a blur as we learned something new and tackled unfamiliarissues every day. But we studied. And we worked. And this is the process wefollowed:
Step 1: We wanted to pick a topic that involved our curriculum and that would bemeaningful to students and the community. The Great Depression. That decisionwas easy after recognizing that the majority of the people who have lived throughthis era were quickly fading away; plus, a variety of interesting topics could becovered.
Step 2: We identified resources in our community. One of the first places we askedfor help was our state historical society, which sent its head archivist to talk aboutThe Great Depression era and the process of recording oral history. He providedinsight into interviewing techniques as well as questions to ask regarding that timeperiod.
Step 3: We all (the teachers and students) started to ask around—who hasgrandparents, neighbors, or friends who lived through The Great Depression or whoelse has expertise in that area? We were trying to find those who would be willingto be interviewed.
Step 4: The class developed a list of topics to be covered and questions to beasked.
Step 5: We made those community connections and set up and conductedinterviews, after discussing camera techniques and etiquette with the class.
Step 6: This is where we got stuck. We had the interviews in hand, but now what?We also needed to keep moving in the rest of our curriculum. Luckily, we hadstudents in each class who were just as curious and as eager as we were to see thisthing through. And students came back from their interviews excited to tell theirsubjects’ stories.
So, as a class, we discussed the “Now what?”. We established an outline, filled in thatoutline with sound bites students selected, and “hired” a set of student screenwritersto write the scripts and producers to oversee the computer editing process.
Step 7: We really didn’t know what we had or how good the documentary wasuntil the night we held the premiere viewing for the community.
When we look back on that first year, we are amazed that we dared tackle thestudent-led documentary again. But what we saw happen the night of the premiereand what we heard from the students and community members after the projectwas completed spurred us on to do another, and another, and anotherdocumentary.
Sharing Our Start 5

Stories Worth Telling: A Guide to Creating Student-Led Documentaries
Since that time, we’ve completed ten full-length documentaries with our students,including: The Great Depression, World War II, A Review of the Century, Vietnam, TheKorean War, a compilation of Stories of the American Experience, North DakotaHeritage, and Vietnam Revisited.
Over this period, we’ve learned, grown, and changed.
Also, over this period, the technology has changed and we are now committed tothe Apple iLife suite of digital authoring tools. These tools have improved theprocess and our efficiency due to their friendly format, which makes editing easierand allows for unlimited creativity with the ability to readily combine various mediatypes. The technology involved with iLife is simple enough for the teacher and thestudent to focus on what’s important—the story.
Gaining Support and Meeting StandardsSometimes, gaining the support of the administration for such projects is difficult,especially when catch phrases and movements of the day (No Child Left Behind,proficiency, state standards, benchmarks, assessments) seem to cloud theeducational process. But we’ve found that student-led documentaries matchmultiple standards of various disciplines. In social studies, for example, this projectaligns with at least three of our state standards for grades 9-12: Students understandthe nature and scope of history; Students use social studies resources for a variety ofpurposes; Students understand the role of the citizen in society. And depending onthe topic of the documentary, other standards could also be met. Our state Englishstandards ask that students engage in the research, reading, writing, speaking, andlistening process; standards also touch on understanding media and principles oflanguage—all six standards are met through our documentary making.
Most disciplines involve the research process and honing communication skills, bothobvious skills acquired when completing a documentary. While completingdocumentary work, students access both primary and secondary sources. Thisresearch is meaningful for students and the community and enhances existingcurriculum.
In Educational Leadership, Elliot W. Eisner, a Stanford University education and artprofessor, wrote about how to move curriculum beyond “hoop-jumping” and into aprocess that is “genuinely meaningful to students, challenging them with problemsand ideas that they find both interesting and intellectually demanding.” Accordingto Eisner, curriculum should cultivate five major qualities: judgment, critical thinking,meaningful literacy, collaboration, and service—each of which can be addressedthrough a student-led documentary (Educational Leadership, “Preparing for Todayand Tomorrow,” December 2003/January 2004, pages 6-10).
Throughout 12 years of working with student-led documentaries, the positive resultshave been apparent, as shown by the personal testimonies that demonstrate howthese projects can change viewpoints and lives for administrators, teachers,students, and community members.
Sharing Our Start 6
Stories Worth Telling: A Guide to Creating Student-Led Documentaries
An Opportunity for Community-Service LearningAs part of the learning process, we also discovered community-service learning, aneducational process and philosophy that recognizes that if students are to learn atfull potential, they need to see a connection between curriculum and life, and,moreover, that they need to feel needed. These are fairly simple concepts but onesthat needed to materialize in our classroom.
Community service learning has been defined in many ways, with most expertsagreeing that this type of learning focuses on three major components:
• Creating a service experience for students that directly relates to academic subjectmatter
• Providing a beneficial service for the community, one that makes students see therelevance of what they are learning
• Securing opportunities to reflect on what students are doing, feeling, and learning
While no single process or reform will eradicate attitudes of apathy or isolation, wefelt our students needed a chance to be needed, and that service learning is oneway to bridge the gap between young people and adults, between the classroomand the world, and to provide a sense of worth for all people involved.
The more I studied service learning, the more my mind started turning—in whatway could our students be of service to the larger community while learning what isalready established in their curriculum? Student-led documentaries became ouranswer.
The Impact on Students and the CommunityA different type of learning takes place with student-led documentaries—learningthat is more difficult to measure, but that increases empathy and interest andcreates stronger students. How can one measure pride, a sense of connection, anincreased understanding, a feeling of self worth, changed lives?
“I can attest firsthand to the power of student-led documentaries, having witnessed atleast six of the Century High School public viewings and presentations. Every timestudents introduce the teams’ projects, they provide testimonials about the impact ofthe process on their lives. They always comment on the difference between reading atext and reliving history with its original participants. The power of this format couldeasily be included in music, physical education, science, or virtually any other topic.There is a depth these students reach that far exceeds traditional classroom learning.”
—Rita Kelly, Principal at Century High School, Bismarck, ND
Our students, many of whom refer to this project in college essays as the highlight of their academic experience, express the benefits of the student-leddocumentaries best:
“I was fortunate enough to be a part of a project which profoundly affected manypeople, and made me think about my world outside the everyday environment oflockers and textbooks … in the process learning more about myself than I everthought possible inside the confines of a classroom.”
—Dave Shireley, 2002 graduate
Sharing Our Start 7

Stories Worth Telling: A Guide to Creating Student-Led Documentaries
“I talked about how they had changed my life, how they had taught me, and howthey had made history come alive for my classmates and me…. Our words touchedthese men; their own stories told through the eyes of generation X touched them…. Iknew I would never be the same.”
—Katie Durick, 2002 graduate
This project, often involving family members who had never talked about life-shaping events, such as war, has changed the way we teach and the way ourstudents learn because the work is authentic, demanding communication skills (oraland written), understanding of history, working as a team, and meeting deadlines toproduce a product that extends beyond these school walls. Jerry Feist, from ourlocal Veterans’ Center, has requested over 100 copies of our Vietnam documentary,using them as a therapeutic tool for his clients. Students have presented their workat Vietnam rallies, reunions, and retired businessmen and teachers’ breakfastmeetings; our local cable access television station has also aired our productions.
As far as evaluation of effectiveness, the community as well as the students havespoken to that:
“As a participant in the Vietnam documentary,… I have found my contribution—though small—helped create a historical tapestry that allows our community tobetter understand the Vietnam experience as seen through the eyes of the men andwomen directly affected by that particular war. This unique opportunity provides theviewer with a hands-on, often heart-wrenching, view of the personal conflict thatinvariably evolves from the tragedy of war. I firmly believe this sort of documentationshould be cultivated and shared with our youth, community, and state to betterunderstand the past in order to learn from the mistakes so they will not be repeatedin the future.”
—Tom Willard, State Coordinator North Dakota Veterans’ History Project
“I’m so pleased that my son had the opportunity to participate in a project so uniqueas the veterans’ documentary produced by students in Century High School’sAmerican Pageant class….The veterans’ documentary enabled students to blend avariety of skills—planning, organizing, interviewing, writing, editing, and videoproduction as well as the experiences of working individually and coordinating with agroup to produce the best possible end product. Not only did the students learn, butleft ‘footprints’ on the minds of many by presenting the documentary at variouscommunity forums….”
—Connie McBride, parent
“…Through their student-led documentary project, the class gave the student theopportunity to interact directly with the individual, get to know them, and gain theirtrust and respect. The work was fulfilling for both participants…. The video alsoprovides a permanent record of the information, as well as the people and theinteraction between them. I have also received comments from students who reallyenjoyed editing, producing the videotapes, and doing the technical work themselves.This demonstrated to me that it was a team effort and involved multiple levels ofexpertise and participation to produce the finished product….”
—Merl Paaverud, parent, former school board member,and director of State Historical Society
Sharing Our Start 8
Stories Worth Telling: A Guide to Creating Student-Led Documentaries
“Century High School (CHS) students of Perry Lee and Mary Palmer have beensubmitting programs to Community Access Television (CATV) for the past fouryears….There are primarily two types of comments we’ve received from the publicregarding the CHS documentaries. One is of an appreciation of the teamwork anddedication of the students in their tremendous efforts in making the programs. Theother comments involve an admiration and respect for the subjects, primarily warveterans, who are interviewed in the documentaries. CATV has a mission to bringquality, local programming to the people of Bismarck, North Dakota and the CHSdocumentaries help us to accomplish this mission. In addition, they provide a valuablemeans of connection between students and their elders by honoring their livesthrough a public video presentation.”
—Mary Van Sickle, manager of CATV
What We’ve LearnedFollowing are some of the lessons we’ve learned along the way:
• Learning is about telling stories, regardless of the discipline. All subjects havematerial for powerful stories, whether it is telling the story of a summer scienceprogram for at-risk students, a local river and its water qualities, interesting laws,teenage drinking, local artists, or an engineering firm in the community.
• We learned not to be afraid of learning along with students and communitymembers or of asking for help as we brainstormed together.
• As teachers, we found we needed to work and manage time in a way that variedfrom the traditional.
• If we had to do it again, we would start small. Before tackling a full-lengthdocumentary, like we did the first year, we would warm up with smaller projects soall students would have time to catch on to the process.
• We found that video projects appeal to all levels of students—from the high-levelstudent to the struggling student who has not tasted much success in his or hereducational career.
• Regardless of the discipline, these documentaries teach our students the vital skillsof organization and communication.
• To make student-led documentaries work, we as teachers have to hold on to astrong vision for what this project can do for students, the community, andourselves.
• While we can never truly keep up with technological advancements, we mustembrace the constant changing of technology, but do so slowly and surely.
• We found that if a teacher believes in the worth of this project, that teacher needsto sell it to administration, colleagues, and the community, and try to make thisexperiential process contagious.
• We’ve learned never to underestimate the talent of students and the response ofcommunity members. Each year, we’ve been pleasantly surprised by something.
Sharing Our Start 9

Stories Worth Telling: A Guide to Creating Student-Led Documentaries
Getting Started and SettingExpectationsYou’re ready to begin to develop student-led documentarieswith your class—what do you do first? This section discussesthe process of getting started, including selecting a story,motivating students, defining and sharing expectations, andother beginning steps.
It’s a good idea to work up to a full-length documentary instead of starting withone. First, experiment with a number of enjoyable, smaller projects to provide a basefor students and for you as a teacher. After doing this, moving on to bigger projectswill be less daunting.
Students can work individually or in small groups on almost any subject. Forexample, students working on a science experiment could film the different stagesof the experiment, import those video clips into iMovie (the Apple iLife videoediting application), edit the clips, and arrange them to tell the story of theexperiment. They could add narration and match it up with the clips to explain theexperiment. They could add music and text where appropriate, and then presenttheir project to the class. This might be only a two- to three-minute movie, but itwould involve most of the basic elements of completing a major documentary.
To introduce filmmaking to our students, in October each year, we have the classcomplete a video poetry project in which students analyze the Romantic poets ofAmerican literature, pick a poem, and interpret it through video and sound. This getsthem excited to work with the technology, while at the same time helping themlearn to analyze poetry.
These first, smaller exercises are designed to familiarize students with theequipment, the software, and to stimulate creative thinking and group cooperation.Think about what existing lesson would be complemented by such a project.Now that the use of iLife in the classroom is so widespread, hundreds of examples and ideas exist. You can visit the Apple Learning Interchange athttp://edcommunity.apple.com/ali to view a wealth of educator-created lessonplans.
After you have completed the smaller projects, you’re ready to pick a story for themajor documentary project.
10
Stories Worth Telling: A Guide to Creating Student-Led Documentaries
Finding a Story Worth TellingIn the process of finding what student-led documentary will work for a specificdiscipline, you should examine the curriculum for areas that can be connected tothe world outside of school walls: What unit can be taught in a way that willenhance learning if documentary work is adopted and that might also be of serviceto the community?
Once you have some possibilities, student input becomes important—they need tobe part of this process if they are to take ownership of the project. They might alsohave ideas that are newer and fresher than our own. The class brainstormingprocess should open up many possibilities.
Once you and the students have examined the curriculum, more than likely, a storyworth telling will emerge.
Examples of story topics:• Managing and operating recycling centers
• Influencing lawmakers to adopt laws that protect the environment
• Providing free preschool experiences for children while studying childdevelopment
• Advising city government on where a bicycle trail can be laid without disturbingthe ecology
• Mapping and surveying for a team of archaeologists or a local game and fishdepartment
• Teaching recreational skills to people with physical or mental disabilities
• Providing services to the elderly while studying various issues concerninggeriatrics
• Cleaning up rivers and streams
This list touches on just a few possibilities for stories—the possibilities are limitedonly by our imagination and interest.
Motivating StudentsFollowing are some tips for engaging students as you begin to implement astudent-led documentary project.
Teacher RoleOne of the beautiful, but scary, transformations that occurs while completing astudent-led documentary is that the traditional role of teacher as lecturer andkeeper of knowledge changes; it has to change if this is going to work. As part ofmotivating students to do a job well done, teachers become coaches.
Much like a coach of a sport, the students are first taught the fundamentals—howto use the equipment and how to go about the step-by-step process of creating adocumentary. It then comes down to looking over their shoulders and helping themwhen they need help. Demonstrating how the process is done is critical so thestudents have a base, but the real learning comes from doing.
Getting Started and Setting Expectations 11
Stories Worth Telling: A Guide to Creating Student-Led Documentaries
Selling Students on the IdeaOnce a teacher believes in the power of student-led documentaries and has acouple of examples to show the class, motivating students becomes easier. To geteveryone off to a good start means “selling” the project to the students. Show themhow much you believe in the project and its subject. You must have a clear visionand pass that vision on to the students. The students must believe this is reallygoing to work and be something special. Students cannot view this as just anotherassignment. They need to see how it can initiate change, elevate social issues, informothers about an important topic, or create connections in the community.Ultimately, the students need to know that their final product will be shared with awide audience and that copies will be made for sharing, for keepsakes, for posterity,or for an agent of others’ education or as an agent of change.
Aiming HighAnother motivating tool includes expectation. We firmly believe students rise to thelevel of expectation challenging them. With your students, study and modelprofessionals—anything from Channel One, the History Channel, Discovery Channel,PBS, news programs, or local broadcasts. Study how they transition into a topic, howthey set up quotes, how they set up cameras and lights. Call members of the localmedia and see if someone is willing to come in and talk to your students about howto conduct an interview. Not only can someone from the media help students ininterviewing techniques, they can also provide pointers on lighting, camera angles,audio, editing, and selecting sound bites.
Promote the Service and NeedSchool administrators and the public love the idea of students making a connectionwith their community. Student-led documentaries provide a great way for studentsto get involved outside of their peer group. Countless stories exist out there, andthey deserve to be told. This is a chance for the average person to keep these storiesalive for posterity and beyond. This is a great way to incorporate service learning.Students learn from the project and from the people they interview. Theinterviewees learn from the students, and the generation gap is chipped away.
Technology Sells ItselfWith the current push for the use of technology in the classroom, this process isperfect for hands-on technology incorporation. The bottom line is, you are usingtechnology to create a documentary, not just doing an activity to use technology.Students will buy into a project much faster and with more vigor when it includesthe use of technology. Technology is a big part of their generation, and theygravitate to it—it engages them so they spend more time on task and strive toprovide high-quality work. The biggest bonus is that they have fun with it.
Getting Started and Setting Expectations 12
Stories Worth Telling: A Guide to Creating Student-Led Documentaries
Clarifying Expectations and Assessing Student WorkPart of laying the foundation for this endeavor involves clarifying expectations,which also involves assessment. After studying professional work, students shouldknow that quality work is the only work that will be accepted. But, they need tounderstand what constitutes quality.
This assignment, which is more than an assignment, is so important to us that wemake it worth a large portion of a semester grade, approximately equivalent to fourunit tests.
You can divide the assessment into five different categories:
• The raw interview or the A-roll (100 points)This considers quality of image, lighting, and sound, as well as the questions askedand the quality of useable sound bites.
• The filler or supplemental shots or the B-roll (50 points) This includes supplemental shots such as the interviewee showing a scrapbook ofphotos, letters, other memorabilia, photos that can be used over sound bites,scanned images, and so on.
• The log or transcription of video shot (50 points) This category can be modified, depending on the project being completed. A logor transcription is a timed, verbatim script of everything that was asked and saidduring the interview. This log speeds up the process of outlining and searching forsound bites. The students can also be required to complete a transcript of theinterview that can be used for other purposes. For example, a transcript could beused by other students or community members who want to do further researchon a topic.
• The written script/story and storyboard (100 points) Before students write the script, they learn about organizing the material, findingthe essential elements of the story, transitioning into the next topic, as well asother writing skills. The storyboard then asks the students to match audio withvideo—what is being said to what is being seen.
• The overall effect of the completed story (100 points) Sometimes, when you’re working on 30 seconds of the story at a time, seeing thewhole picture and feeling the overall effect is difficult. So this category views thecompleted story: Did it achieve a single effect? Did it make the audience feel andunderstand the intended message? Did all of the elements—the music, text,sound bites, language used in the script—flow together in a story that seemedeffortless?
See Appendix A, “Sample Assessment Tool,” for an assessment document that youcan hand out to your class.
Getting Started and Setting Expectations 13
Stories Worth Telling: A Guide to Creating Student-Led Documentaries
Managing the ProjectThis section suggests methods of sharing the work among thestudents as well as other classroom management techniques.It also provides information on the necessary hardware andsoftware.
Dividing the RolesWe’ve found that dividing the students into groups to do the project works wellusing two different forms: the Three-Role process and the All-Hats process. For mostof our earlier projects, we used the Three-Role process. For more recent projects,we’ve moved to the All-Hats process so that each student has the full experience ofcreating a documentary.
Three-Role ProcessThis process divides the students into assigned roles that they keep throughout theproject. These roles include:
Reporters: After all students have covered the topic of the project in class, thereporters do the grassroots work. They go out and do the interviews (usually ingroups of three). This group listens to their taped interview and logs it. Then theygather research information on the topic using various resources from the library tothe Internet. This is also the group that finds photos, documents, and Internet videoclips and images (B-roll), as well as music from the time period that can be used inthe documentary, and logs each resource.
Screenwriters: This is a small group of strong writers. They take the tapes and thelogs from the reporters, watch the videos looking for sound bites, and study the logsfor guidance. This group writes the script and completes the storyboard for thedocumentary.
Producers: This group does the computer editing work. The producers put togetherthe final product that will be the documentary. They get the script and storyboardfrom the screenwriters and match up the video clips and other images with thenarration, music, and other audio. They do all the other work with the editingsoftware to make a professional-looking documentary.
All-Hats ProcessThe other way we’ve established groups involves splitting students into groups ofthree to five students and requiring all groups to complete all of the aspects of thedocumentary process. This means each group member wears all hats. They create
14

Stories Worth Telling: A Guide to Creating Student-Led Documentaries
their own short story on one person or topic. Typically a three- to five-minute mini-documentary results. Each finished mini-documentary, or vignette, is then exportedand blended together onto a video master copy to function as one documentary.This style of project work has not produced quite the level of professionalism aswith the Three-Role process, but we’ve found that it’s better for the studentsbecause they get the full experience.
Regardless of the method you choose, it’s a good idea to have each student fill outan application that indicates their desired role, preferred partners, as well as theirstrengths and weaknesses. This has been extremely helpful and practical.
See Appendix B, “Application for Documentary,” for an application form that you canhand out to students.
Managing the Classroom EnvironmentSometimes, when doing student-led documentaries, outsiders or observers mightthink that this project sounds or looks a bit chaotic. But there are methods that youcan use to contain the madness! One of the most important things in classroommanagement is to clarify expectations, establish clear deadlines, and make studentsaccountable for progress every day.
Team TeachingIn the early 1990s, teams of teachers at our school started to form because of thefocus on interdisciplinary teaching; two-hour block classes developed. We werefortunate enough to be part of this movement, combining English 11 and AmericanHistory, and since that time our instruction has never been the same. Not only didthis combination make sense because of the strong correlation of subject matter,this block class also allowed us to pursue major projects, such as student-leddocumentaries. As teachers, we’re in the classroom at the same time for two hourswith forty students, and we freely exchange and interject ideas and informationregarding the topic being taught.
Classroom Management Using the Three-Role ProcessIf a teacher decides to split the class into three groups, the largest being reporters,and the two smaller groups being screenwriters and producers, classroommanagement is usually not an issue because much of the work is done outside ofthe classroom. The work of the reporters, mainly interviewing, transcribing orlogging, and researching background information is primarily done on their owntime. Once the reporters’ work is done, we remove the screenwriters from theclassroom so they can work on the script and the storyboard. Every school is set updifferently, but we have an advantage in that we have an empty study room just afew feet from our classroom. When no empty room is available, our students havealso worked in the hallway just outside our room. These students are also expectedto treat this as homework, especially as deadlines approach. This freedom demandsresponsibility from these two smaller groups.
Managing the Project 15

Stories Worth Telling: A Guide to Creating Student-Led Documentaries
After the screenwriters complete the script and storyboard, the screenwriters handtheir product to the small group of three to four producers who also work in thestudy room during class time and their own time. This often involves after-schooltime for us as well. They, too, are given deadlines and daily expectations, helpingthem stay on task.
The length of time these two groups spend outside of the classroom generallyequates to one unit that we have covered, three to four weeks at the most. Duringthis time, we exempt students from the particular unit we’re covering, knowing theyare learning about the documentary topic and about writing, organization,communication, and group skills on a deeper level than they would be otherwise.
Classroom Management Using the All-Hats ProcessAllowing more students to learn on a deeper level is also part of the reason wechanged our organizational strategy in the past couple of years. But splitting theclass into more, but smaller groups that are responsible for all steps is a bit morechallenging to manage; plus, the quality of the product varies more. But ultimately,more students feel their contribution was integral to the whole process. They workharder and feel proud of their segment. We’ve also found that this methodconsumes more class time and might call for a sacrifice of an existing unit—asacrifice we believe is worth making.
With additional but smaller groups of three to four students, you’ll need to spendmore time on the writing instruction. We usually spend two to three hours talkingabout journalistic writing and studying professional examples, and then we spendmore class time in our computer or library lab working on individual stories andscripts.
Once their stories are finalized (some members can begin this process duringrevisions), students begin adding video and photos, and recording narration, andadding sound-bites, and music.
Most of the time, because we have two sessions of forty students for two hours, wehave ten groups of four students working on individual segments at one time—thetwo classes sharing the same ten computers (so we have two groups’ projects oneach computer).
Managing ten groups of students at this stage can be somewhat of a juggling act,but if they have been shown the basics of iLife and have worked on a smallerproject earlier in the year, they are fired up and ready to get to work. We can’temphasize enough how important it is to establish deadlines and dailyexpectations. Students also need to learn how to be independent, patient, and to beexplorers in their own search for answers when teachers cannot answer allquestions as soon as they would like.
Setting up the classroom to accommodate multiple groups can be a challenge, buteach teacher will find something that works within the blueprint of his or herschool. We usually put three to four groups in a study room, three to four groups inour classroom, and the remaining groups in the hallway. Since we team teach, we’reable to float around to these areas, making sure no one is left unattended for toolong. Individual classroom teachers will have fewer groups but will still need tosupervise five to six groups of filmmakers.
Managing the Project 16

Stories Worth Telling: A Guide to Creating Student-Led Documentaries
An ideal situation, an ideal classroom, would have a mobile lab of eight to twelvenotebook computers. This would ease the hassle of equipment setup. Having morecomputers that are not shared with other teachers or departments would also makesaving work easier.
Saving Student ProjectsOur students save their work on their individual computers, so we haven’t had topurchase external storage drives. If you have fewer computers, an external FireWireor USB drive works well to save student work in progress. If students work on theirprojects in a lab, they could save their projects on a school server.
To publish your students’ projects, you can put their final documentaries on yourschool website, post them on a webpage created with iWeb (part of the iLife suite),copy them onto a CD, or, if your computer has a DVD-writable drive (also called aSuperDrive), your students use iDVD (also part of the iLife suite) to create their ownDVDs, complete with buttons and menus. And, because DVDs hold so muchinformation, you can put all of your students’ documentaries on one DVD disc.
Determining Your Equipment NeedsTo get the equipment you need to create classroom documentaries, you don’t haveto start big, and you can seek financial help from a wide variety of sources. We’vehad help from grants, but now, with most schools filling up with computers, accesshas become much easier. Following is the equipment you’ll need to start creatingdocumentaries with your students:
ComputersTo create classroom documentaries, two computers would be the minimum for aclass, but we recommend four. We’ve built up to six computers in our class and weusually borrow four more so that we have ten available for students for editing theirdocumentaries.
We know that many teachers struggle with their district’s philosophy or theirtechnology department’s views about Mac vs. PC. We feel very fortunate that ourdistrict allows teachers and departments to choose their own direction based onpersonal preference as well as which format best meets the needs of theircurriculum. In our case, there’s no question that a Mac is the best choice.
SoftwareWith Mac computers, the iLife suite comes with the computer, or you can purchasethe latest version of iLife separately. One of the beneficial things that has happenedthroughout the last decade is that the applications have become increasingly easierto use and help easier to find.
Managing the Project 17
Stories Worth Telling: A Guide to Creating Student-Led Documentaries
Because of our years of experience with student-led documentaries, we receive a lotof requests for help from students, teachers, and community members who want tocreate documentaries of their own, asking what applications we recommend thatthey use. We’ve looked at other computer editing systems and tell them that noneof these systems compare to iLife, which includes iMovie, the Apple video editingtool. For ease of use, quality, and reliability you can’t beat iMovie. There’s nothing toset up or install. You just plug in the camera and go to it.
For us, a big factor is getting large numbers of students working on editing quickly,and iMovie makes this easy for us. Because students catch on to iMovie so readilyand because it’s so reliable, it quickly builds student self esteem. In the end, all ofour students learn to make a high-quality finished product with iMovie. Also, thequality of the digital video and audio are excellent.
CamerasThe next item you will need is a digital video camcorder. There are a wide range ofdigital video devices and formats, including tape-based cameras and the latesttapeless camcorders that record to flash memory, hard drives, or other forms ofmedia. The new iPod nano with a built-in video camera is an example of aninexpensive flash-based recording device that captures high-quality video for use inyour projects, and it’s small enough to carry in your pocket.
Many of today’s cameras let you choose whether to shoot in standard definition orhigh definition format. Both iMovie ’09 and Final Cut Pro work with most Mini-DV orHDV tape-based camcorders that require a FireWire or USB 2.0 cable to transfer data.Not all Mac computers include a FireWire port. Check your system configuration toensure your camera will work before purchasing a camcorder.
If you are shooting with a tapeless camcorder, you should check the Apple websiteto see if the product you are using has been tested and will work with your system.
MicrophonesRegardless of the digital video camera you use, using wireless microphones forconducting interviews is essential. When purchasing a camera, make sure it has amicrophone jack. We have ten pairs of wireless microphones that we’veaccumulated over the years. They’re fairly inexpensive and well worth the cost. Thewireless microphones have given our audio that professional TV station quality thatwe’d never again do without. If you don’t use microphones, you must get veryclose—uncomfortably close—to the person being interviewed. The most commonproblem we’ve had has been with audio because people don’t like to get this close.We tell our students to watch TV reporters. Even with microphones, they get right intheir subject’s face. We’ve had some great interviews that our students have donethat were unusable in the documentary because of poor sound quality. A few ofthose times were heartbreaking, so now we never send a student out on aninterview without microphones.
A USB desktop microphone will give your students higher-quality audio whenrecording their narration. You just plug the microphone into your Mac, and yourstudents record their voice with the desktop microphone right into iMovie. Speakersare also useful so that students can clearly hear their movie’s audio, and makeadjustments.
Managing the Project 18

Stories Worth Telling: A Guide to Creating Student-Led Documentaries
Other EquipmentTripods are a necessity to ensure that students get clear and steady footage. Fluidhead tripods are the best for a smooth, fluid movement, but any tripod is betterthan no tripod. Headphones are a good idea for the cameraperson to use to make iteasier to check the quality of the audio while filming the interviews.
You also might want to have some digital still cameras available to the students sothey can capture still images, such as photos of the interviewee, objects such asmedals or trophies, or historical locations. With iMovie, you can add motion to yourphotos and pan and zoom in on specific parts of the photo, just like you see in PBSdocumentaries.
A flatbed scanner is a good addition so the students can easily include images frombooks or items such as photographs or letters in their movies. They just scan theimage, add it to iPhoto (the Apple iLife application for organizing, editing, andsharing digital photos), adjust the color and brightness and crop out the parts theydon’t want, and then add it to iMovie.
Carrying bags are a good idea for protecting the camera and transporting otherequipment, such as tripods and microphones.
The following is a basic checklist of equipment needs:
___ Mac computers with the included iLife applications (Two would be theminimum for a class, but four are recommended.)
___ Digital video cameras (You can start with one or two and have students checkthem out. Some students may have cameras at home they can use.)
___ Digital still camera (to capture still images)
___ Wireless microphones (It’s best to have the same number as cameras.)
___ Tripods (one for each camera)
___ A scanner
___ One or two USB desktop microphones for narration
___ A carrying bag (one per camera)
___ Extra DV tapes
Optional:
___ Speakers (one set per computer)
___ An external storage device (such as a FireWire or USB drive)
___ Headphones (for ensuring good quality audio while filming)
___ Blank CD or DVD discs (if you’re planning to publish the documentaries on a CDor DVD)
Managing the Project 19

Stories Worth Telling: A Guide to Creating Student-Led Documentaries
Managing the Production ProcessPart of the production process is helping the students learnhow to research the topic and gather resources and how tobest use the equipment to film their interviews.
When you first introduce the video cameras to the class, point out that they need toremember two basic rules: First, treat the equipment as if you paid for it. Treat it withrespect, and be gentle. Don’t force anything together or apart. Second, if you don’tknow, ask.
Filming TechniquesA third and fourth rule could be added to those presented above: Practice, practice,practice, and be prepared for anything. Before filming an interview, students need topractice with the video cameras. Two main basics to practice involve placement andlighting.
Often interviews are conducted at homes. We encourage students to look for aninterview spot that is comfortable for the person being interviewed. A real problemwith this can be what is behind the subject being interviewed. Students need tovisually troubleshoot and notice distractions that might show up behind theirsubject. Often the background is too busy or there are things that appear to begrowing out of the subject’s head. Students must be aware that these problemsbecome much more evident on film than when they’re filming. Students might haveto move the subject or something from behind the subject. People are usuallyagreeable about this as long as the students explain what they’re trying to do. Wesuggest that our students tell their subjects that their teachers are real picky.Blaming us makes it easier for the students to feel more at ease in moving theirsubject around. It’s also nice if students can move their subject away from the wallto create a sense of space. This helps bring out the subject’s face, creating a bit of athree-dimensional effect.
Rule of ThirdsMany of the techniques we teach are the same techniques any photographer wouldpractice, such as the rule of thirds. The cameraperson should try to make sure thatthe person being interviewed isn’t right in the middle of the screen. Again, havestudents watch interviews on TV and notice that the subject is always slightly off tothe right or left. Whatever the side is, the subject should be looking into the othertwo-thirds of the shot to make it appear that he or she is looking into space or at a
20
Stories Worth Telling: A Guide to Creating Student-Led Documentaries
person, and not at a wall. The student conducting the interview should positionhimself or herself slightly to the side so that the subject is not looking directly intothe camera. Using the rule of thirds should be subtle. If the subject moves around alot, it’s okay if he or she becomes centered.
A good shot can start with one to two inches of space above the subject’s head,with the lower portion cut off at the waist. This gives the cameraperson a chance topull slowly into the subject’s face during the interview. The general problem wehave found is students not pulling in tight enough. As the cameraperson zooms in,they should zoom in tighter on the top of the interviewee’s head, rather than his orher chin. An effective technique is to zoom in even tighter on the face to bring outthe eyes during an emotional part of the interview.
LightingBecause we do not have professional studio equipment, such as special lighting,using existing lighting requires the student to make conscientious choices. Theyshould move the tripod around and take the time to look at the subject through thecamera and check for good lighting. Good light, but not direct light, should come infrom a slight side angle, so that one third of the subject’s face is in a subtle shadow.To get some variety, it’s a good idea to film a few interviews outside. The bestsituation would be on a clear day in the morning or in the evening when thesunlight is warm and not too direct. Cloudy days also work because the direct sunhas been naturally filtered. When interviewing, students need to be sure to avoidbacklighting, which results from placing subjects in front of windows. We always tellthe students that the key to a good-looking interview is to focus on the eyes—thereshould be points of light visible in the subject’s eyes. If backlighting can’t beavoided, more light should be placed in front of the interviewee’s face to avoidshadows and dark, emotionless images.
Capturing the best footage requires practice, with a lot of trial and error, as well asremembering a few basic techniques, as described above.
Conducting Background ResearchStudents benefit from documentary work in a number of ways: Not only do theyexperience active learning, but it’s active learning complemented by research andnote taking. Before they conduct interviews, the students must have gatheredsufficient background information about the topic. The point is, of course, that thestudents must demonstrate a basic knowledge of the topic in order to ask goodquestions and gain the trust and respect of the person being interviewed. Once theinterviews are complete and the story writing stage begins, the students can gatheradditional statistics and research to help bring their subject’s sound bites togetherand enrich the telling of the story.
During the research stage, students need to find what we call filler shots,supplemental material, or B-roll, which includes photos, letters, memorabilia, filmfootage, and so on to complement the topic. Students can use a digital still camerato take photographs of the person they interviewed, historical sites, or of objectssuch as medals, trophies, and so on. They can use the same camera or a flat-bedscanner to capture images of items such as letters, pictures in books, print
Managing the Production Process 21

Stories Worth Telling: A Guide to Creating Student-Led Documentaries
photographs, and so on. If you don’t have a still camera, students can tape or holdan item up against a wall, and with good lighting (no glare), they can film it with thevideo camera on the tripod. In the past, we would pan or tilt the camera to get themovement you see in professional documentaries. Now you can add movement tostill images with iMovie, using what is called the “Ken Burns Effect.” This is a greattool, allowing students to do all the panning and zooming on the computer insteadof manually.
As for locating film footage, a lot of film out there is now public domain—such asgovernment and military footage. We also get help locating footage from ourCommunity Access TV station, as well as our local TV and news stations. Your statecongressperson’s office and other community organizations are also good resources.Much of the footage you find will need to be converted to the digital format. If it’sin VHS format, you just insert the tape in your VCR and connect your digital videocamera to the video out jacks. Switch the video camera to the VCR setting andrecord what you need. Now it’s ready to import into iMovie. The fastest growingimage library is the Internet, where you can find images and video that can beimported into iMovie. Make sure that the images you find are high resolution orthey will look grainy in your movie.
You can use iPhoto (also part of the iLife software suite) to organize and edit yourstill images. You can organize your images into albums so it’s easy to find the onesyou want to use in your movie. You can also use iPhoto to edit your images to makethem lighter or darker, adjust the color, eliminate red-eye, crop them to select onlythe part you want to keep, and more. The images in your iPhoto library are instantlyavailable in iMovie.
Your students will also want to locate appropriate music to include in their movie.They can find royalty-free music on the Internet or import music directly from musicCDs. They can also create their own music with GarageBand, another great tool fromApple that’s part of the iLife suite. Students can use the included loops to createtheir music, use the additional loops included with the GarageBand Jam Packcollections, or they can record their own music. They can also include other types ofaudio files in their movies, such as clips of relevant speeches that may be availableon the Internet.
Once the students have the music they want to use, they can then use iTunes toorganize their music files. (iTunes comes installed with every new Mac or can bedownloaded for free from the Apple website.) Similar to iPhoto, you can use iTunesto create a special playlist of music just for your movie. Your iTunes music library isalso instantly available in iMovie.
While completing these projects, many people will ask about copyright concerns.We refer to our local experts in that field, as well as to other resources, such as thoseavailable from Tech & Learning at www.techlearning.com/section/Copyright. We’vepurchased royalty-free music CDs and public domain image CDs and DVDs so wecover ourselves in this area.
Managing the Production Process 22
Stories Worth Telling: A Guide to Creating Student-Led Documentaries
Interviewing Skills One of our favorite topics to talk about with the studentsinvolves the elements of a good interview because it is the interview that shapes the story, and it is the interview that builds trust, rapport, and the relationship. Maturecommunication skills make an interview work.
Preparing for the InterviewThis communication starts from the moment students pick up the phone, knock onthe door, or write the letter to contact their subject. Even though this step mightseem basic to us as adults, students need to be reminded and even role-play howthey are going to set up the interview. You might even want to give them a samplescript: “Hello, Mr. Miller? My name is Mike Gillum, a student from Generic HighSchool, and we’re working on a documentary that focuses on the effects of ournearby nuclear plant. I received your name from my mother who said you’ve beenan advocate for more restrictions concerning emissions. I was wondering if we couldconduct an interview with you to record your views.”
Students should cover the who, what, and why in their introduction. They should beconfident in what they’re asking. The when, where, and how can be answered afterthe interview is granted. When establishing the when, where, and how, studentsshould consider shooting on location or at the subject’s home, making sure thearrangements are convenient for the subject. This initial contact establishescredibility and that indelible first impression.
Conducting the InterviewWhen the student and the subject meet, the students are expected to actprofessionally. Students need to know what that expectation entails. At this point,you might want to call in a professional journalist or give students information youhave from experience. At their face-to-face meeting, students should be instructedto reintroduce themselves and their mission. They should shake hands and providean idea of what to expect, even information regarding the setup of the interview.While the equipment is being set up and checked, the interviewer can provideexpectations or make small talk to make the subject feel more at ease. Beingprofessional does not mean being stuffy. Once equipment is ready to go, getting thebasic facts behind the story is important: the full name, title of person beinginterviewed, and the person’s involvement in the topic. This establishes the facts andthe foundation of the story.
23

Stories Worth Telling: A Guide to Creating Student-Led Documentaries
A sound story is a mix of facts and reactions to those facts. To get good, emotionalreactions, the interviewer has to show concern, passion, and knowledge about thesubject. The interviewer also needs to show their subject that they are interested inhim or her as a person. Some of this interaction is difficult to instruct or predict, butsince you’re not at the interviews, you need to trust these teenagers to be interestedand educated listeners. We’ve had examples of students interviewing veterans andthe veteran is getting emotional as he tells the story of losing a buddy to a bullet,and the next question the students asked (with no pause in between) was, “So, howwas the food?” So we need to remind students of what listening is all about. Remindstudents that listening is about silence.
As discussed in “Managing the Production Process,” students should also learn thebackground information they need before going out to interview. This backgroundinformation stimulates questions they should ask, recognizing that they will need toveer from those questions as situations arise and as follow-up questions are needed.Having the class brainstorm questions together is also beneficial. The best questionsto ask include open-ended questions rather than “yes” and “no” questions; questionsthat will elicit the essential Who? What? When? Where? Why? How? These questionsshould trigger emotion and produce powerful sound bites. Students need to createa list of interview questions and bring it with them to their interview.
When concluding the interview, students need to remember the power of a thankyou and a handshake. Students should also inform their subject as to the “whatnext” question their interviewee might have, telling them what will happen withtheir interview and when they should expect to see themselves on film. We have ourstudents send a thank you note and also an invitation to our open house showingof the documentary. This touch brings everything together.
You can use the following guidelines to review the interview protocol with students.
Interview Guidelines• Set up the interview.
• Act and look professional, but be personable.
• Be prepared—do background research.
• Define and state the purpose of the interview.
• Ask the easy questions first.
• Be a good listener and be sensitive.
• Throughout the interview, take mental notes regarding nonverbal communication,which can reveal much about an interviewee’s feelings or attitudes.
• Don’t talk too much.
• Probe behind answers and ask follow-up questions.
• Ask for details—ask concrete questions.
• Save the tough questions for last.
• Ask about photos, public relations material, letters, awards to use as backgroundmaterial for B-roll, and then film or photograph these items and let the subject tellyou about this material.
• Conclude the interview.
Interviewing Skills 24
Stories Worth Telling: A Guide to Creating Student-Led Documentaries
Once the students have left the interview, they should have a strong feeling as towhat they want to do with this story—what sound bites they want to use, whatdirection to take the story, and what message they want to present based on theinterview. Often, the day after the interview, students will want to discuss with theclass how their interview went, sharing everything from disasters to success stories.This reflection is essential. Other students can learn from mistakes made and bemotivated by great stories captured.
Logging the InterviewOne of the less exciting but crucial steps regarding the documentary processinvolves logging or transcribing the interview. This step involves listening to thefilmed interview and writing down the responses and the times.
Though time consuming, this step is important for at least two reasons: 1) It helpsspeed up the writing and editing process when students don’t have to guess andspend time looking for those five sound bites they want to use in their story or thedocumentary. 2) If these interviews will be stored for posterity, the transcriptionswould be beneficial for people doing research in the future.
We tell students that transcribing the interview will take at least one hour for everyten minutes of interview. While some information can be summarized orcategorized, it’s best to have a verbatim transcript. We ask them to make two printedcopies of the transcript: one clean copy for cataloging and one for writing on thatthey can use for highlighting and brainstorming their story ideas.
See Appendix C, “Sample Interview Transcript,” that you can share with your studentsas an example of what their transcription could look like.
Interviewing Skills 25
Stories Worth Telling: A Guide to Creating Student-Led Documentaries
The Writing ProcessOnce the interviews and transcriptions are done, we askstudents to develop the script for the documentary.
Writing the ScriptYou can use the following “Steps in the Writing Process” to discuss how to proceedwith the class. After the script is completed, it’s used in a storyboard that combinesthe spoken and written words of the film with the specific clips, images, music, otheraudio, and other elements that will be used.
Steps in the Writing Process1 As you begin to develop the script, decide on the major theme on which you want
to focus. What is each interview subject’s story? What do you want the audience tothink after viewing each subject’s story? After viewing your whole documentary oryour portion of the class documentary?
2 Write a lead, or an introduction, for the whole documentary or your portion of theclass documentary. A lead is a journalism term for the opening statement made in astory. It is meant to capture attention as well as capture the direction and mood ofthe story. The lead for the whole documentary should portray its purpose ormission.
3 What sound bites will you use to complement your lead/angle? Go through yourtranscription log and select potential sound bites by making notations on the log.Try to use at least one to two quotes from all interviewees. When you’re done, makea list of the sound bites, with the exact quote and time so importing quotes intoiMovie is more efficient. (For example: “Coming home: Jones—33:12-34:33 ‘Iremember going to a bar for a drink as soon as I got off the plane. The first questionthe waitress asked me was how many babies I killed.’ ”)
As you review the interviews, keep notes on what reactions you’re lacking and thosethat you feel will be necessary to get from another source, such as anotherinterview.
4 Look at the background information you accumulated during your research anddetermine any additional research that needs to be done. Divide the researchamong yourselves or solicit help.
5 Construct an outline for the script. Develop a clear outline. Where do you want tostart? What flows together logically and chronologically? Where and how do youwant to end? Consider a motif to tie it all together. Consider a title for your segment.
26

Stories Worth Telling: A Guide to Creating Student-Led Documentaries
6 Write a rough draft for your documentary, complete with transitions, quotes, and aconclusion. Write the script in a journalistic style—one that is conversational,capturing a cadence. This script should be complete with facts, reaction, andemotion. A typical setup for documentaries and news stories is news, news, reactionto that news, news, reaction, news, reaction, news, news, reaction, and so on.
7 Edit and reedit your script.
8 Hand in your rough draft.
Determining the ThemeExplain to students that in the writing process, one of the most essential aspects isdeciding on an angle, which is a theme or a message for the audience. Progressingwithout that direction is difficult and dangerous. If smaller groups are working onindividual stories, they need to decide on the angle within their group. If a smallgroup of screenwriters is responsible for writing the whole script, brainstorming as aclass would work so everyone’s input is heard. Like every other stage through whichstudents progress, it’s a good idea to study the examples of the professionals, suchas Tom Brokaw’s segment on The Greatest Generation.
Writing the IntroductionYou can use the following suggestions as you discuss the process for writing anintroduction (or lead) with students. If you’re creating a class documentary made upof different groups’ vignettes, each group writes an introduction for their portion.The introduction to the whole documentary can be written by a separate group ofstudents, with input from the whole class.
• Within your introduction, focus on the goal of the documentary or your individualvignette—what emotion do you want to convey, what mood do you want to set,what lesson or purpose do you want your audience to grasp?
• The introduction should avoid overuse of adjective and adverbs, but instead bepacked with power words: specific, concrete nouns and vivid action verbs. Forexample, what words or phrases come to mind when thinking about Vietnamveterans and the Vietnam War? Protest, misunderstanding, political conflict,unanswered questions, jungle patrol missions, VC warfare, Agent Orange, burningvillages, protest music, unresolved issues.
• The introduction to the whole class documentary should include a mix of still andvideo shots that complement the narration, as well as any sound bites that packenough power to belong here. This segment should be no longer than 3-4minutes, but no shorter than 45 seconds.
You might want to have your students study introductions used in television orother video stories. They should note how the introduction leads into sound bites,how the subjects are set up, and how the story works its way toward the title.
For an example of an introduction from one of our student-led documentaries, seeAppendix D, “Sample Documentary Introduction.”
The Writing Process 27
Stories Worth Telling: A Guide to Creating Student-Led Documentaries
Setting Up Sound BitesEach time an interview is used in the documentary, students need to make sure ithas a proper setup. Setting up a person’s interview requires students to know theseinterviewees and their stories well. Here are some examples of such setups from ourstudent-led documentaries:
“Paul Bussel has written about what war was like, about his own combatexperience.”
“As a W.W.II fighter pilot ace and recipient of the Congressional Medal of Honor, JoeFoss represents the American hero (leads into sound bite of Foss). In the squadronFoss led, half of the boys were right off the farm—they knew how to hunt and nevergive up.” (This is followed by Foss’s stories of boys who never gave up.)
Remember that the script should provide the facts and set up the sound bites,which provide the emotions and the stories.
Additional Script-Writing TipsYou can provide these additional suggestions to students as they develop theirscripts:
• Don’t forget about silence—don’t feel as if you have to fill every second withtalking. Sometimes images and music say more than words. Sometimes, silencecan act as a transition.
• Break up sound bites with B-roll film or filler/supplemental shots.
• Focus on flow during the body of the documentary or your story, making sure allideas transition together.
• You can place two interviews back-to-back, but make sure they don’t repeat;instead, they should complement each other.
• A major challenge involves melding facts together with the emotion of the era ortopic. For example:“GIs teach us again what we already know: how combat, killing,and seeing others killed is a brutal way to spend your youth, and that experiencecan haunt them years later.”
Completing the StoryboardWhen students have finished revising their scripts, they’re ready to develop astoryboard for their documentary or their portion of the class documentary.
During the writing process, a mix of sound and sights should be coming together asthe story develops. This matching of sound and sights comes together in thestoryboard. Here is also where students need to become serious about weedingthrough what might be hours of information and narrowing those hours intominutes. Now is the time to choose precisely what elements they want to use: Fullinterviews (voice and visuals)? Voice interview? Photos? Existing footage? There’s atrick to weaving these aspects together, and that trick involves conciseness andsome sacrifice and editing, editing, editing, rewriting, rewriting, and rewriting.
The Writing Process 28

Stories Worth Telling: A Guide to Creating Student-Led Documentaries
Storyboards are divided into columns for the video and the audio, with a thirdcolumn sometimes used for miscellaneous notes and reminders. The audio portionincludes the script. As students complete the storyboard, they should keep track ofshots still needed to complete the documentary.
For an example of a storyboard that you can share with your students, see Appendix E, “Sample Storyboard.” Also, see Appendix F, “Storyboard Template,” thatstudents can use to create their storyboards.
The storyboard greatly aids in the next step, which involves combining the wordsand images on the computer for the final product.
The Writing Process 29
Stories Worth Telling: A Guide to Creating Student-Led Documentaries
The Editing Process In the editing process, our students use iMovie to import theirvideo clips and to add narration, music, titles, transitions, andother elements.
Becoming Proficient with iMovieAlthough iMovie is easy to learn, one way to get up to speed quickly is by using the iMovie tutorial available at www.apple.com/ilife/tutorials. Another helpfulresource is The Macintosh iLife in the Classroom book from Peachpit Press. If you wanteven more help, Apple also offers a leader-led two-day workshop for educators onDocumentary Filmmaking. This workshop is led by experienced professionals and isdelivered at your school site for up to 16 educators.
If you had your students complete a smaller video project earlier in the year, they’llbe well prepared to start editing their documentary. If not, you can connect a Macto a projector and show your students the basic iMovie techniques. You can do thisin less than an hour. After that, students are ready to venture out on their own. Fromthere, you can help groups individually as they need help. Most of the learning isreally learning on the go.
Editing Steps and TipsFollowing is the process we use for students to edit their final movie.
Creating a New iMovie ProjectThe starting point for using iMovie is to open the application and create a newproject. iMovie includes a variety of themes that each offer a unified design for amovie, with titles and transitions that fit with that theme. You can choose a themewhen you first create the project or apply a theme later.
Importing Video The next step is to import the video clips you want to use. With the new projectstarted, and the digital video camera connected to the Mac with the appropriatecable, you can run your camera using the buttons in iMovie to select the portions ofthe video you want to import. The video you import is automatically organized bydate into events in the Event Library.
30

Stories Worth Telling: A Guide to Creating Student-Led Documentaries
Adding Video Clips and Other Images to Your ProjectWith the video clips imported, the next step is to drag the video clips you want touse from the Event Library to the iMovie project area and add photos and otherimages from the Photos browser. You can rearrange the order of clips and images,stabilize shaky video, and use the Precision Editor’s tools to cut clips and make otheredits to your movie.
Recording Narration For the narration portion of the script, the narrator can read right into themicrophone built into your Mac, and record their voice directly into iMovie using theiMovie Record feature. For higher-quality audio, you can connect a USB desktopmicrophone to your Mac to record the narration. Once you record your narration, itcomes in on a separate audio track in iMovie, so you can move it around to matchwith clips as needed. We also cut or split a lot of our narration audio tracks, as wellas a lot of our interview sound bites so we have more flexibility in placing them inour movie.
Once you have recorded narration, you may need to adjust the timing of clips or stillimages to match the audio. One way to extend the time that photos are displayed isby using the Ken Burns effect, which adds a motion effect to still images.
Adding Music Another aspect of sound that needs to be considered is music. Music can play a keyrole in setting the mood and enhancing your project. If you’ve previously addedyour music to iTunes, you can add it to your movie right from iMovie. You can moveit around, change the volume, or shorten or lengthen it to match your clips.
Adjusting Volume The volume of the audio for your clips can be adjusted, or even turned offcompletely. For example, you can lower the volume of the background music so thatit doesn’t interfere with someone speaking in your movie, or increase the volume ofthe person you interviewed so that they can be heard more clearly. You can alsoincrease the volume of music in certain parts of the video for a dramatic effect.
You can extract audio from a clip, and then “cut away” to use that audio over aphoto or action scene.
Adding TitlesYou can add text throughout your movie, such as a title page, credits, citations, oreven to add emphasis to powerful quotes. You have many options for how your textis displayed. You can have text presented over a black or colored background or youcan put it on top of a clip, or you can add animation to your text.
The Editing Process 31

Stories Worth Telling: A Guide to Creating Student-Led Documentaries
Using MapsAn easy and effective way to show locations being discussed in a documentary iswith the animated maps that are included with iMovie. You enter the start and endlocations—perhaps to show people’s migration path—choose from flat and 3D mapstyles, and iMovie adds an animated map to your movie.
Using EffectsiMovie comes with exciting effects that can be applied to your project. Sepia tone isone effect our students have used frequently for a vintage look. Picture-in-pictureand green screen effects, both available with the Advanced Tools in iMovie, can beparticularly valuable in documentaries. With a picture-in-picture effect, you insertvideo that plays in a small window on top of another clip shown in the full screen;for example, an interview subject could be shown in the small picture with a clip ofthe event being discussed in the larger window. With a green-screen effect, yourecord video in front of a green backdrop, and then electronically “cut out” thesubject and place that clip into another video clip. Students might want to do thisto create a “you are there” effect, with a person talking in the location beingdiscussed. We use effects sparingly. Make sure that effects are used appropriatelyand don’t distract from the story.
Using TransitionsTransitions from one clip to another give your project a smooth and professionallook. We mostly use the cross dissolve or overlap transitions. You can also adjust thespeed of the transition. Cross dissolves steal a little of the clip from both sides andmake your clip shorter. Overlap takes a little from the end of the clip, but does notaffect the length of the clip. You should get the clips in and arrange them the wayyou want before applying transitions. Transitions should be one of the final steps ofthe project. Students need to be careful with effects and transitions so they aren’tdistracting.
If You Make a MistakeAt any point in the project, if you have done something you did not intend to do,you can always undo your last action. You cannot use this Undo feature once you’vesaved your work.
If you make changes to a clip and decide you want to start over, you can restore aclip back to how it was originally imported into iMovie.
Putting It All TogetherIf you’re creating a class documentary, each student group will now have acompleted portion of the whole documentary. The next step is to combine theseiMovie projects into one movie. You can do this by opening each group’s movieproject on one computer (more than one iMovie file can be open at a time) andthen copying and pasting individual clips, sections, or a whole movie from onewindow to another to create one iMovie project.
The Editing Process 32

Stories Worth Telling: A Guide to Creating Student-Led Documentaries
Sharing Your DocumentariesOnce the whole movie is complete, you have several options for publishing it.
You can copy your movie onto a CD or use the iDVD feature built into iMovie toeasily create a professional-looking DVD of your movie, complete with chapters,coordinated menu, background music, and buttons. You can also send the movie toiTunes directly from iMovie and then copy it onto an iPod for sharing.
Another option is to export your movie as a QuickTime movie and include it oneither your school website or on a new webpage, such as a webpage created withiWeb, another iLife application. This is another easy way to share your students’documentaries with a wide audience.
The Editing Process33

Stories Worth Telling: A Guide to Creating Student-Led Documentaries
Celebrating and Reaping theBenefitsOver the past six years, we’ve learned that “almost finished” is adangerous, infamous phrase. But once students are truly done,when their documentaries are transferred to a master tape orburned on a CD or DVD, it’s time to celebrate and reap thebenefits of all the hard work.
One of our major celebrations involves a joint effort with the community—our openhouse, our premiere showing. Up until this point, even our students have not viewedthe documentary in its entirety. Sometimes, we decorate our commons area for theoccasion; sometimes, we serve cookies and coffee and have a guest book forcommunity members to sign. This is a time when students greet their intervieweesand their family and friends and other community members at the door; they shakehands, sometimes hug. Here, the breaking down of generational barriers is evident.Here, the pride of a job well done and the anticipation of the show surfaces.
After sending out invitations, pumping all the press possibilities—from radio tonewspaper to all television stations—we’re ready to show our efforts to an authenticaudience. What happens during this time of sharing is always surprising.
Our first documentary focused on The Great Depression (we worked on that until5:30 p.m. the day of the showing), and the turnout was “nice”—close family andfriends of students and those being interviewed. We received good press and theword spread. Our second year, we advanced to World War II. This was truly acelebration. We premiered our documentary to a full house, an audience filled withWorld War II veterans in their colors. One of our students volunteered to play theNational Anthem on her trumpet, and when her nerves got the best of her, it didn’tmatter—the crowd sang so loudly, with patriotic spirit, we hardly noticed. At thisshowing, we noticed several generations showing up, grandparents bringing theirchildren and grandchildren to hear the story of the Greatest Generation. Here, wesaw our students sitting by their veterans, proud to be part of a larger project.
Our Vietnam showing: what a contrast—not a celebration but a time of healing, anda time of tackling tough questions surrounding this war. Ten minutes before theshowing, we worried about the turnout. Two minutes before, brigades ofmotorcycles were heard in the parking lot, and veterans and their companions filledthe auditorium to see what we had done with their often-misunderstood story. Wewere nervous. The response was one of heartfelt and, sometimes, inexpressiblegratitude for the seriousness with which these teenagers illustrated this era andanswered those looming questions regarding Vietnam. Always surprising.
34

Stories Worth Telling: A Guide to Creating Student-Led Documentaries
Since our first student-led documentary, the students’ work has continually aired onour local community access television station. On Veterans’ Day of 2003, they ran allthree of our war documentaries. Since our first student-led documentary, we’ve hadnumerous and various requests to make copies for families and veterans’ andhistorical organizations, to show segments at reunions, service organizationmeetings, workshops, and more. These documentary projects do not end when thegrade is given; these projects create living history and stories that will endure forgenerations.
Every year, when this process is over, we make a non-binding vow to take next yearoff (the process of completing student-led documentaries can be consuming andtiring). But every year, shortly after we recover, or maybe before we recover, wediscuss the possibilities for next year.
The student-led documentary has grown to become quite a paradox for us: It’s thebest part of what we do; it’s the worst part. It’s the most rewarding; it’s the mostpunishing. It’s the most exciting; it’s the most frustrating. But once we weigh thegood and the bad, we quickly realize that the bad, the difficult, and the frustratingaspects (and working through those times) are part of the euphoria of completing aproject that has captured a story, has increased interest and learning for all involved,has fostered an understanding beyond facts, has made history come to life, hasmade someone cry, has changed a life.
These changes in learning, interest, and life are not metaphorical or exaggerated.We’ve seen it happen. And that’s why we keep going back for more. And that’s whywe encourage more educators to investigate the possibilities of the power of thestory within their content area. For remember, as for the telling of stories, there shallbe no end.
Celebrating and Reaping the Benefits 35
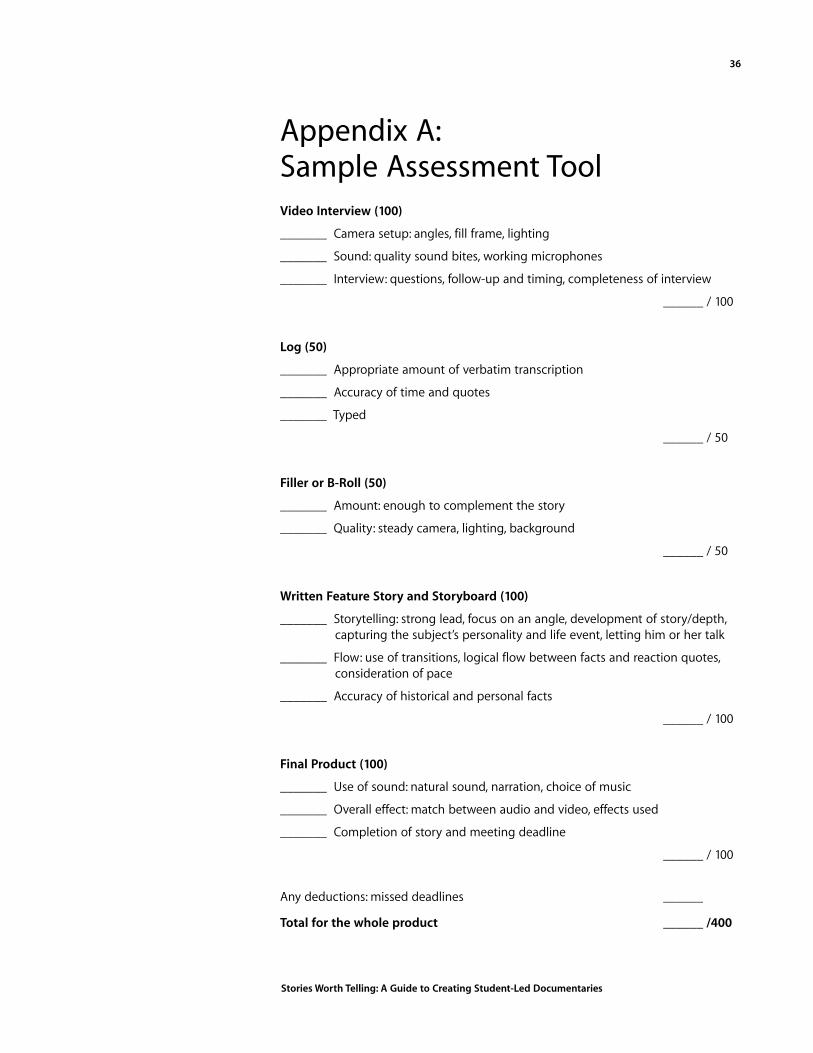
Stories Worth Telling: A Guide to Creating Student-Led Documentaries
Appendix A:Sample Assessment ToolVideo Interview (100)
_______ Camera setup: angles, fill frame, lighting
_______ Sound: quality sound bites, working microphones
_______ Interview: questions, follow-up and timing, completeness of interview
______ / 100
Log (50)
_______ Appropriate amount of verbatim transcription
_______ Accuracy of time and quotes
_______ Typed
______ / 50
Filler or B-Roll (50)
_______ Amount: enough to complement the story
_______ Quality: steady camera, lighting, background
______ / 50
Written Feature Story and Storyboard (100)
_______ Storytelling: strong lead, focus on an angle, development of story/depth,capturing the subject’s personality and life event, letting him or her talk
_______ Flow: use of transitions, logical flow between facts and reaction quotes,consideration of pace
_______ Accuracy of historical and personal facts
______ / 100
Final Product (100)
_______ Use of sound: natural sound, narration, choice of music
_______ Overall effect: match between audio and video, effects used
_______ Completion of story and meeting deadline
______ / 100
Any deductions: missed deadlines ______
Total for the whole product ______ /400
36

Stories Worth Telling: A Guide to Creating Student-Led Documentaries
Appendix B:Application for Documentary
1 What area of the process are you most interested in?A. Interviewing
B. Writing the story
C. Editing the film on computer
D. Research
E. Editing the whole documentary
F. Other ____________________________________________________________
2 Do you know someone you could interview on the documentary’s topic?
_____ Yes ______ No
If you do, who is this person? ___________________________________________
3 What strengths do you have that would contribute to a job well done?
____________________________________________________________________
____________________________________________________________________
____________________________________________________________________
____________________________________________________________________
____________________________________________________________________
4 What weaknesses do you have that might hinder your progress in this group project?
____________________________________________________________________
____________________________________________________________________
____________________________________________________________________
____________________________________________________________________
____________________________________________________________________
5 This project, and your contribution, will be completed in groups of 4-5 people. Withwhom would you most like to work? ____________________________________________________________________ ____________________________________________________________________ __________________________________
** With whom would you least like to work? (Optional)__________________________________ ____________________________________________________________________ __________________________________
37
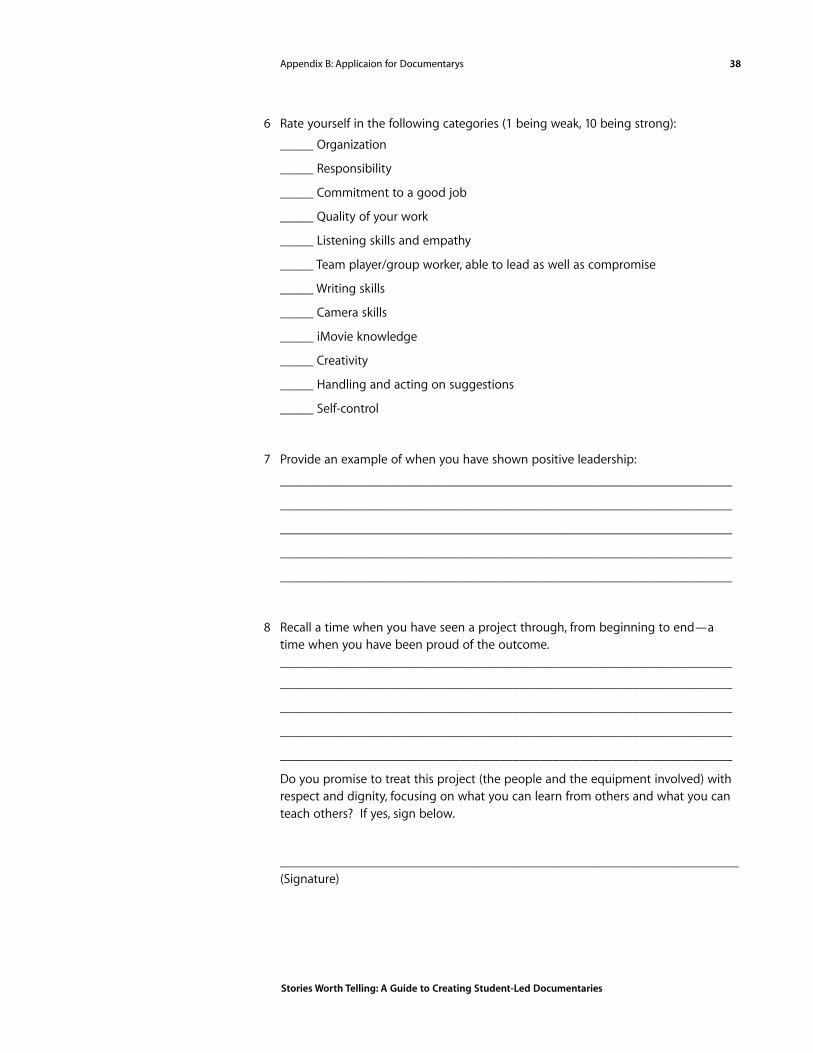
Stories Worth Telling: A Guide to Creating Student-Led Documentaries
6 Rate yourself in the following categories (1 being weak, 10 being strong):
_____ Organization
_____ Responsibility
_____ Commitment to a good job
_____ Quality of your work
_____ Listening skills and empathy
_____ Team player/group worker, able to lead as well as compromise
_____ Writing skills
_____ Camera skills
_____ iMovie knowledge
_____ Creativity
_____ Handling and acting on suggestions
_____ Self-control
7 Provide an example of when you have shown positive leadership:
____________________________________________________________________
____________________________________________________________________
____________________________________________________________________
____________________________________________________________________
____________________________________________________________________
8 Recall a time when you have seen a project through, from beginning to end—atime when you have been proud of the outcome.____________________________________________________________________
____________________________________________________________________
____________________________________________________________________
____________________________________________________________________
____________________________________________________________________
Do you promise to treat this project (the people and the equipment involved) withrespect and dignity, focusing on what you can learn from others and what you canteach others? If yes, sign below.
_____________________________________________________________________(Signature)
Appendix B: Applicaion for Documentarys 38
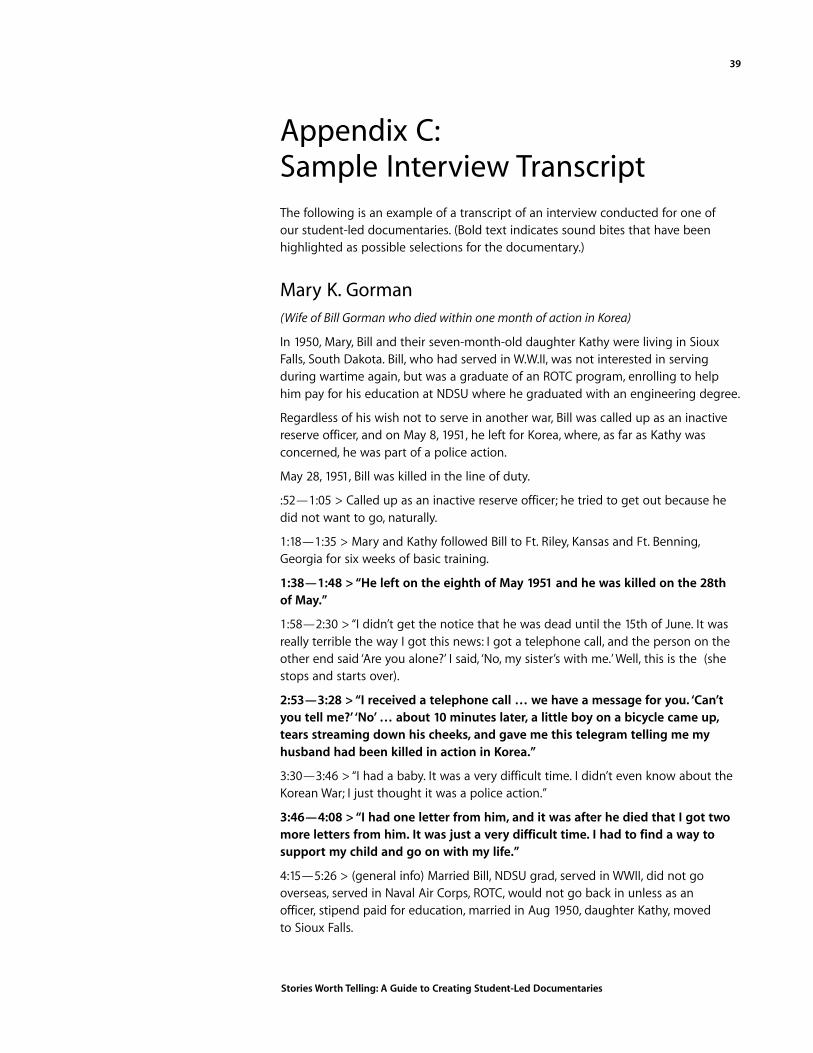
Stories Worth Telling: A Guide to Creating Student-Led Documentaries
Appendix C:Sample Interview TranscriptThe following is an example of a transcript of an interview conducted for one of our student-led documentaries. (Bold text indicates sound bites that have beenhighlighted as possible selections for the documentary.)
Mary K. Gorman(Wife of Bill Gorman who died within one month of action in Korea)
In 1950, Mary, Bill and their seven-month-old daughter Kathy were living in SiouxFalls, South Dakota. Bill, who had served in W.W.II, was not interested in servingduring wartime again, but was a graduate of an ROTC program, enrolling to helphim pay for his education at NDSU where he graduated with an engineering degree.
Regardless of his wish not to serve in another war, Bill was called up as an inactivereserve officer, and on May 8, 1951, he left for Korea, where, as far as Kathy wasconcerned, he was part of a police action.
May 28, 1951, Bill was killed in the line of duty.
:52—1:05 > Called up as an inactive reserve officer; he tried to get out because hedid not want to go, naturally.
1:18—1:35 > Mary and Kathy followed Bill to Ft. Riley, Kansas and Ft. Benning,Georgia for six weeks of basic training.
1:38—1:48 > “He left on the eighth of May 1951 and he was killed on the 28thof May.”
1:58—2:30 > “I didn’t get the notice that he was dead until the 15th of June. It wasreally terrible the way I got this news: I got a telephone call, and the person on theother end said ‘Are you alone?’ I said, ‘No, my sister’s with me.’ Well, this is the (shestops and starts over).
2:53—3:28 > “I received a telephone call … we have a message for you. ‘Can’tyou tell me?’ ‘No’ … about 10 minutes later, a little boy on a bicycle came up,tears streaming down his cheeks, and gave me this telegram telling me myhusband had been killed in action in Korea.”
3:30—3:46 > “I had a baby. It was a very difficult time. I didn’t even know about theKorean War; I just thought it was a police action.”
3:46—4:08 > “I had one letter from him, and it was after he died that I got twomore letters from him. It was just a very difficult time. I had to find a way tosupport my child and go on with my life.”
4:15—5:26 > (general info) Married Bill, NDSU grad, served in WWII, did not gooverseas, served in Naval Air Corps, ROTC, would not go back in unless as an officer, stipend paid for education, married in Aug 1950, daughter Kathy, moved to Sioux Falls.
39
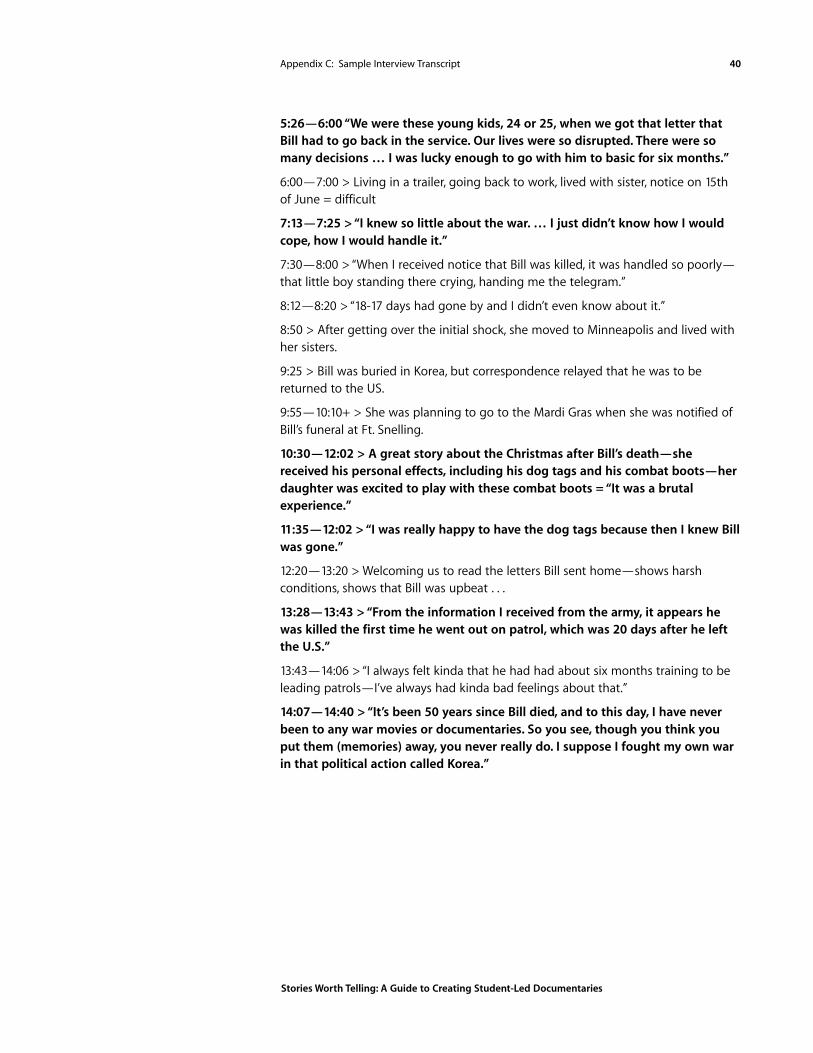
Stories Worth Telling: A Guide to Creating Student-Led Documentaries
5:26—6:00 “We were these young kids, 24 or 25, when we got that letter thatBill had to go back in the service. Our lives were so disrupted. There were somany decisions … I was lucky enough to go with him to basic for six months.”
6:00—7:00 > Living in a trailer, going back to work, lived with sister, notice on 15thof June = difficult
7:13—7:25 > “I knew so little about the war. … I just didn’t know how I wouldcope, how I would handle it.”
7:30—8:00 > “When I received notice that Bill was killed, it was handled so poorly—that little boy standing there crying, handing me the telegram.”
8:12—8:20 > “18-17 days had gone by and I didn’t even know about it.”
8:50 > After getting over the initial shock, she moved to Minneapolis and lived withher sisters.
9:25 > Bill was buried in Korea, but correspondence relayed that he was to bereturned to the US.
9:55—10:10+ > She was planning to go to the Mardi Gras when she was notified ofBill’s funeral at Ft. Snelling.
10:30—12:02 > A great story about the Christmas after Bill’s death—shereceived his personal effects, including his dog tags and his combat boots—herdaughter was excited to play with these combat boots = “It was a brutalexperience.”
11:35—12:02 > “I was really happy to have the dog tags because then I knew Billwas gone.”
12:20—13:20 > Welcoming us to read the letters Bill sent home—shows harshconditions, shows that Bill was upbeat . . .
13:28—13:43 > “From the information I received from the army, it appears hewas killed the first time he went out on patrol, which was 20 days after he leftthe U.S.”
13:43—14:06 > “I always felt kinda that he had had about six months training to beleading patrols—I’ve always had kinda bad feelings about that.”
14:07—14:40 > “It’s been 50 years since Bill died, and to this day, I have neverbeen to any war movies or documentaries. So you see, though you think youput them (memories) away, you never really do. I suppose I fought my own warin that political action called Korea.”
Appendix C: Sample Interview Transcript 40

Stories Worth Telling: A Guide to Creating Student-Led Documentaries
Appendix D: SampleDocumentary IntroductionThe following is an introduction from one of our student-led documentaries onVietnam that you can share with your students to help them with writing their ownintroductions.
Our Search for Answers“Ask not what your country can do for you; ask what you can do for your country.”
But can a country ask too much? Too much of its citizens? Too much of its youngmen?
In the early part of the 1960s, just one generation (20 years) after men returned fromfighting against world dictatorships in Europe and the Pacific, just 10 years after menreturned from fighting communism in Korea, young soldiers were called to dutyagain—this time in Vietnam.
This conflict lasted over 10 years, involved 2.6 million American troops and tookclose to 60,000 U.S. lives, mostly in their teens and early twenties—but this conflictis about more than numbers. The Vietnam war conjures up images of jungle patrolmissions, VC warfare, Agent Orange, burning villages, protest music, fatalistic faces ofthe Vietnamese, but just as importantly, the Vietnam war conjures up unansweredquestions:
• What was our goal, our mission?
• Why were we not allowed to win?
• How much of the war had to do with big business and money?
• Why weren’t soldiers welcomed back as heroes?
• Did we ask too much? Was the expense too great?
Part of the lingering pain for Vietnam veterans involves these unresolved issues.
Hopefully, one question that can be answered is what can we learn from Vietnam?
The young men and women who fought in this often misunderstood battle are nowin their 50s, entrenched in the demands of society, career, and family; most of themhave moved beyond the horrors of the past. But we have asked them to recall thosedays of combat and conflict, of frustration and fear. We have asked them to sharetheir stories, to relive their pain in Our Search For Answers.
41
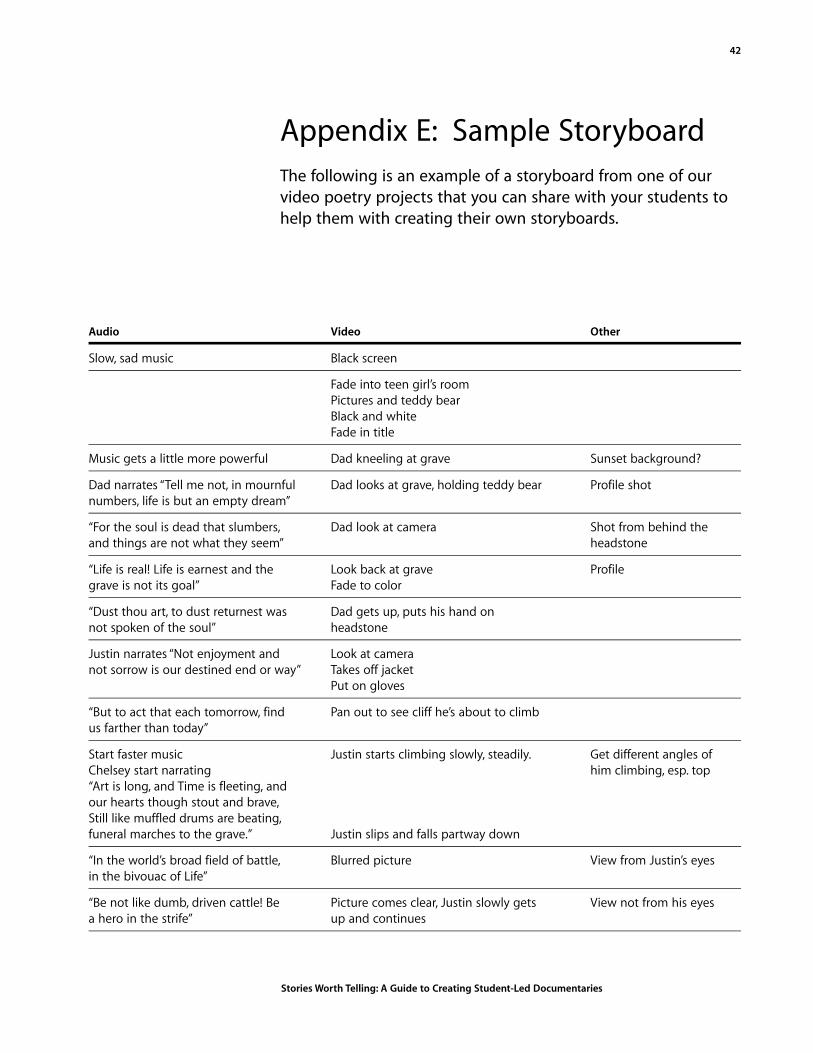
Stories Worth Telling: A Guide to Creating Student-Led Documentaries
Appendix E: Sample StoryboardThe following is an example of a storyboard from one of ourvideo poetry projects that you can share with your students tohelp them with creating their own storyboards.
Audio Video Other
Slow, sad music Black screen
Fade into teen girl’s roomPictures and teddy bearBlack and whiteFade in title
Music gets a little more powerful Dad kneeling at grave Sunset background?
Dad narrates “Tell me not, in mournful Dad looks at grave, holding teddy bear Profile shotnumbers, life is but an empty dream”
“For the soul is dead that slumbers, Dad look at camera Shot from behind theand things are not what they seem” headstone
“Life is real! Life is earnest and the Look back at grave Profilegrave is not its goal” Fade to color
“Dust thou art, to dust returnest was Dad gets up, puts his hand on not spoken of the soul” headstone
Justin narrates “Not enjoyment and Look at cameranot sorrow is our destined end or way” Takes off jacket
Put on gloves
“But to act that each tomorrow, find Pan out to see cliff he’s about to climbus farther than today”
Start faster music Justin starts climbing slowly, steadily. Get different angles of Chelsey start narrating him climbing, esp. top“Art is long, and Time is fleeting, and our hearts though stout and brave,Still like muffled drums are beating,funeral marches to the grave.” Justin slips and falls partway down
“In the world’s broad field of battle, Blurred picture View from Justin’s eyesin the bivouac of Life”
“Be not like dumb, driven cattle! Be Picture comes clear, Justin slowly gets View not from his eyesa hero in the strife” up and continues
42

Stories Worth Telling: A Guide to Creating Student-Led Documentaries
Audio Video Other
Go to softer music Dad going through his daughter’s thingsNarrate very slowly“Trust no future however pleasant! Let the dead past bury its dead”
“Act – act in the living present! Justin frantically climbingHeart within and God overhead!” Pan out to see sun in background.
Justin reaches the top
“Lives of great men all remind us, Justin leaning, hands on knees, panting View from abovewe can make our lives sublime”
Pause narration, music very loud Justin stands up talland passionate
“And departing leave behind us See the footprints Justin madefootprints of the sands of time”
“Footprints that perhaps another, Dad walking down railroad tracks near Faraway shotsailing over life’s solemn main” the cliff
“Seeing, shall take heart again.” Dad looks at footprints, and steps ontoLet music play awhile Justin’s path, following his prints.
“Let us, then, be up and doing, with Dad starts climbinga heart for any fate” Falls in the same place Justin fell
“Still achieving, still pursuing, learn Dad gets to the top and a hand reaches We never see whose hand to labor and to wait” down to help him up it is.
Passionate music Black screenSee the words “Life that shall send a challenge to its end, and when it comes,say, ‘Welcome, Friend.’”–Henry Wadsworth Longfellow
Appendix E: Sample Storyboard43

Stories Worth Telling: A Guide to Creating Student-Led Documentaries
Appendix F: Storyboard TemplateTitle of Project_________________________________________________________
Audio Video Notes
44

Stories Worth Telling: A Guide to Creating Student-Led Documentaries
Audio Video Notes
Appendix F: Storyboard Template45