sttaanndd arrdd pooppeerrattiinngg prroocceedduurree … · sttaanndd arrdd pooppeerrattiinngg...
TRANSCRIPT

TTeecchhnniiccaall pprroocceedduurree :: SSOOPP--TT--VVVV..1100..22
VViirraall vveeccttoorr sseerrvviiccee
SSttaannddaarrdd OOppeerraattiinngg PPrroocceedduurree
((SSOOPP))
TTiittrraattiioonn ooff rrLLVV oorr rrRRVV vviirraall
ssuuppeerrnnaattaannttss bbyy qqPPCCRR
Date : 27/04/2011
Index : 0
Page 1 of 10
Written by, Function, visa :
Bruno MATEO Viral vector technician
Radia ZERGAOUI Engineer in charge of Quality insurance
Verified by, Function, visa :
Hélène VERGNAULT Viral vector Manager
Authorized by, Function, visa :
Pascale BOUILLÉ
President and Scientific Director
DDAATTEE RREEVVIIEEWWIINNGG MMOODDIIFFIICCAATTIIOONN PPUURRPPOOSSEE MMOODDIIFFIIEEDD CCHHAAPPTTEERRSS
CCOOPPIIEESS FFOORR UUSSEERRSS TTrraaiinneeeess FFoorr IInnffoorrmmaattiioonn
BBrriiccaarrdd MMaarriioonn vviissaa MMaattééoo BBrruunnoo vviissaa vviissaa
LLeerrooyy JJuulliieenn vviissaa VVeerrggnnaauulltt HHééllèènnee vviissaa vviissaa
TTaabbllee ooff ccoonntteenntt
TTiittrraattiioonn ooff rrLLVV oorr rrRRVV vviirraall ssuuppeerrnnaattaannttss bbyy qqPPCCRR
SSOOPP--TT--VVVV..1100 1 - Purpose 2 – Application domain 3 – References 4 - Definitions 5 - Responsibilities 6 - Process 7 - Appendix
Operating modes OM1: Seeding of HCT 116 cells OM2: transduction of cells with viral vectors OM3: Washing and lysis of transduced HCT116 cells OM4: Extraction of genomic DNA OM5: qPCR OM6: Analysis of results
Appendix AI : FDS ATCC cells HCT116

SSOOPP--TT--VVVV..1100..22
CONFIDENTIAL Page 2 of 26
1 – Purpose
Describe the methods to be implemented during the titration of a lot of vectors rLV or rRV
by qPCR.
2 – Application domains
This procedure applies in the context of the titration of a lot of vectors rLV or rRV by qPCR. The steps are: - D-1: seeding of HCT116 cells - D0: transduction of cells with 6 serial dilutions of each supernatant vectors - D 3: cell lysis and extraction of genomic DNA - D3: qPCR
3 –References
//
4 – Definitions
rrLLVV: lentiviral vector ; rrRRVV : retroviral vector, MoMLV Moloney murine leukemia virus qqPPCCRR : quantitative polymerase chain reaction
5 – Responsabilities
Manipulations are performed by operators according to specifications defined during laboratory meeting.
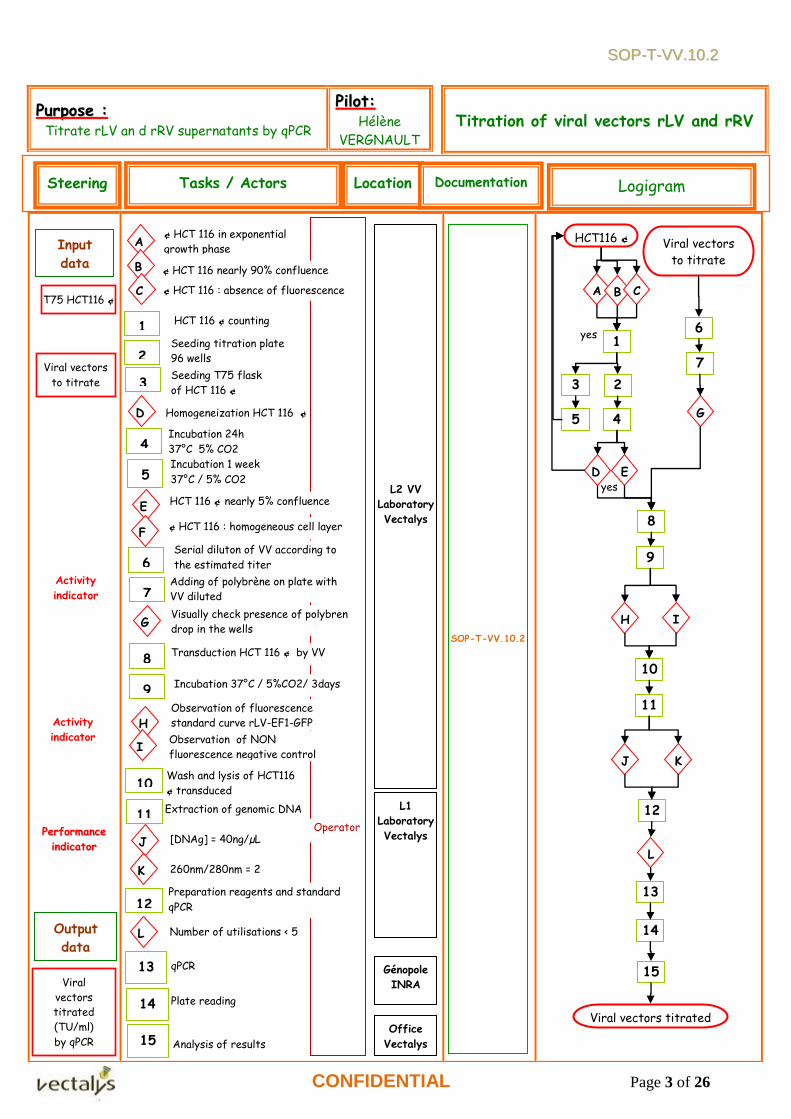
6 – Process a) Logigram
At each step of the process of "titration of rLV or rRV viral supernatants by qPCR”, there are checkpoints for controlling and managing the process from the beginning to the end. In the flowchart below are figured all the steps and checkpoints in the process of titration of rLV or rRV viral supernatants by qPCR.
SSOOPP--TT--VVVV..1100..22
CONFIDENTIAL Page 3 of 26
Operateur
PPuurrppoossee :: Titrate rLV an d rRV supernatants by qPCR
PPiilloott:: Hélène
VERGNAULT
Titration of viral vectors rLV and rRV
Viral vectors
to titrate
HCT116 ¢
1 yes
Viral vectors titrated
A B C
2 3
4 5
8
E yes
D
9
H I
6
7
G
10
11
J K
12
L
13
14
15
Location Tasks / Actors Logigram Documentation Steering
Input
data
Output
data
Viral
vectors
titrated
(TU/ml)
by qPCR
Activity
indicator
Viral vectors
to titrate
T75 HCT116 ¢
HCT 116 ¢ counting
L2 VV
Laboratory
Vectalys
A
L1
Laboratory
Vectalys
SOP-T-VV.10.2
¢ HCT 116 in exponential
growth phase
¢ HCT 116 nearly 90% confluence
¢ HCT 116 : absence of fluorescence
1 Seeding titration plate
96 wells
Incubation 24h
37°C 5% CO2
Homogeneization HCT 116 ¢
Seeding T75 flask
of HCT 116 ¢
Incubation 1 week
37°C / 5% CO2
HCT 116 ¢ nearly 5% confluence
¢ HCT 116 : homogeneous cell layer
2
3
4
5
6
7
8
9
10
12
13
11
Serial diluton of VV according to
the estimated titer
Adding of polybrène on plate with
VV diluted
Visually check presence of polybren
drop in the wells
Activity
indicator
Transduction HCT 116 ¢ by VV
Incubation 37°C / 5%CO2/ 3days
Observation of fluorescence
standard curve rLV-EF1-GFP
Observation of NON
fluorescence negative control
Wash and lysis of HCT116
¢ transduced
Extraction of genomic DNA
B
C
D
E
F
G
H
I
J
K
[DNAg] = 40ng/µL
260nm/280nm = 2
PPeerrffoorrmmaannccee
iinnddiiccaattoorr
Preparation reagents and standard
qPCR
L Number of utilisations < 5
qPCR
Analysis of results
14 Plate reading
15
Génopole
INRA
Office
Vectalys
Operator

SSOOPP--TT--VVVV..1100..22
CONFIDENTIAL Page 4 of 26
b) Process
Operating Mode n°1:
Seeding of HCT116 cells
11-- OObbjjeeccttiivvee aanndd ppuurrppoossee
To describe the HCT116 cell seeding, the first stage of the protocol for the titration of rLV or rRV viral vectors by qPCR. HCT116 cells are seeded on Thursday, the day before transduction, in 96-well plate at a cell density of 12,500 cells per well. Cells are trypsinized once a week, the day of seeding the 96 well plates. At this stage, the critical point lies into the homogeneity of cell suspensions.
22-- RReeaaggeennttss,, ccuullttuurree mmeeddiiaa aanndd ssoolluuttiioonnss
Identification Supplier References Complete culture media: 4,5g/l Glc DMEM – 10% FBS - 2mM Ultra Glutamine – 1% Penicillin/Streptomycin
Vectalys SOP-T-VV.2
Trypsin EDTA PAA L11-004
Blank DMEM PAA T1033.3001
33-- EEqquuiippmmeennttss
Identification Supplier References
96-well flat-bottomed and sterile plate Corning 3596
75cm² T-flask Corning 430641
Cell counting slide Fast Read 102 Dutscher 020304
100mL Sterile container Dutscher
Multichannel micropipette Eppendorf
Vacuum pump
epifluorescence microscope
Standard BSL2+ lab equipments and materials.

SSOOPP--TT--VVVV..1100..22
CONFIDENTIAL Page 5 of 26
44-- EExxppeerriimmeennttaall pprroottooccooll
Handling of HCT116 cells under BSC II: biological safety cabinet type II BSL-2+ precautions
day D-1 a) Trypsinization
1– Preheat blank and complete DMEM culture medium in a water bath at 37 °C.
2 – Preheat the trypsin in a water bath at 37 °C.
3 – Insert two empty centrifuge tubes of 50ml and 15ml into the biological safety cabinet II.
4 – Prepare the number of 96-well plates needed:
1 sample = 5 dilutions + 1 negative control (non-transduced cells)
Cells must be in exponential growth phase.
5 – Check by microscopic observation that the cell culture is at nearly 90% confluence.
6 – Check by microscopic observation the absence of fluorescence.
Under BSC II
7 -Remove the culture medium by aspiration.
8 - Wash the cell layer by adding 10ml of blank DMEM by 75cm² T-flask
Pay attention to add DMEM on the opposite side to the cells. 9 - Remove the rinsing solution with a aspirating pipette
10 - Rinse a second time with 10 ml of blank DMEM.
11 - Add 3 ml trypsin-EDTA per 75 T-flask and place the flask in the incubator at 37°C until cell detachment (between 2 and 5 minutes).
12 - Dissociate cellular aggregates by pipetting up and down with a 5ml pipette.
13 - Add 9 ml of complete culture medium.
Thoroughly mix the cell suspension by pipetting up and down with a 5ml pipette.
14 - Transfer the cells in a 50ml centrifuge tube which is identified as "stock suspension".
b) Counting
To be more precise, counting is done on an intermediate volume of the cell suspension after homogenization.
1 - Thoroughly mix the stock suspension by pipetting up and down with a 10 ml pipette.
2 - Take 2 ml of the stock suspension and place them in the empty 15ml centrifuge tube.
3 - Similarly, thoroughly mix the 2ml of cell suspension by pipetting up and down with a P1000 micropipette.
4 - Collect 20μl with a P100 micropipette and place them in a counting slide.

SSOOPP--TT--VVVV..1100..22
CONFIDENTIAL Page 6 of 26
5 - Count the number N of cells in 16 squares using a Fast Read 102 disposable counting slide and then calculate the cell concentration as follows:
Cell concentration = c = N x 10000 = number of cells/ mL
c) Preparation of cell suspension
1 – Calculate the dilution required to make the cell suspension. Keep in mind that for each sample to be assayed you must inoculate 6 wells with 12500 HCT116 cells and 250µL of complete medium per well.
Inoculate a few additional wells as margin
Number of wells = n = number of samples + margin Volume of cell suspension (µL) = n x 6 x 12500 / c x 1000
Total volume (µL) = n x 6 x 250
2 – To prepare the cell suspension, homogenize the required volume of “stock suspension” by pipetting up and down with a P1000 micropipette, then collect the required volume in a 100mL sterile container.
3 – Add complete medium to total volume
4 – Thoroughly mix the cell suspension.
d) Inoculation of the titration plate
1 – Dispense 250µl of the cell suspension by well of the 96-wells plate with a multichannel pipette, in 6 successive wells for each sample.
Between each pipetting, thoroughly homogenize the cell suspension by pipetting up and down with multichannel pipette
2 – After seeding, thoroughly mix the cells into the wells by shaking the plate with lateral movements.
3 – Incubate the plate at 37°C.
e) Seeding of the HCT116 cell culture flask.
1– Inoculate a 75 T-flask with 150 000 cells and 10mL complete medium.
2 – incubate the flask at 37°C and 5% CO2.
55-- DDooccuummeennttaattiioonn
Describe all the experiments in the laboratory notebook.

SSOOPP--TT--VVVV..1100..22
CONFIDENTIAL Page 7 of 26
Operating Mode n°2:
Transduction of HCT116 cells with viral vectors
11-- OObbjjeeccttiivvee aanndd pprriinncciippllee To describe the method of transduction of cells by serial dilutions of supernatants of rRV or rLV vectors.
22-- RReeaaggeennttss,, ccuullttuurree mmeeddiiaa aanndd ssoolluuttiioonnss
Identification Supplier References
96 wells plate seeded with HCT116 cells / SOP-T-VV.10.2 MO1
rLV or rRV viral vectors Vectalys SOP-T-VV.3.2
800µg/ml polybren (100X) Hexadimethrine bromide > 94%
SIGMA H9268-10G
Complete culture medium : 4,5g/l Glc DMEM– 10% FBS - 2mM Ultra Glutamin – 1% Penicillin/Streptomycin
Vectalys SOP-T-VV.2
33-- EEqquuiippmmeennttss
Identification Supplier References
Sterile 96 Deepwell plate Tref Dutscher 034053
Vacuum pump
Multichannel pipette
Stainless steel container
Standard BSL2+ lab equipments and materials.

SSOOPP--TT--VVVV..1100..22
CONFIDENTIAL Page 8 of 26
44-- EExxppeerriimmeennttaall pprroottooccooll
Handling of HCT116 cells under biological safety cabinet II BSL-2+ precautions
Day D0
Before preparing the viral vector supernatants, check the state of the cells with a microscope: approximately 5% confluence and homogeneity of cells in each well of the plate!
a) Dilution of concentrated samples
The dilution depends on the estimated titer, the viral vector supernatants should be diluted by a certain factor in complete medium
A crude viral vector supernatant with a titer about 1E6 TU/ml must be ½ diluted*. For concentrated samples, dilute the vectors to reach a 1E6 TU/ml concentration and then perform a ½ dilution in series. *In fact, the production of viral vectors is performed without fetal calf serum. If the cells are transduced by undiluted vector supernatant, they may suffer from a deficiency of serum and thus be lysed!! To avoid this problem, it is important to complement the supernatant with fetal calf serum by diluting it in complete medium.
For higher precision, the minimum volume must be 5μl.
For dilutions greater than 20, it is imperative to go through an intermediate dilution.
b) Preparation of the serial dilutions of the viral vectors
For each sample, there must be: 5 wells with ½ serial dilutions + 1 well with non-transduced cells (negative control)
Each well is transduced in complete medium + Polybrene (8µg/ml final concentration). Samples are prior diluted in complete medium For the crude samples, the first well is half diluted in complete medium. For each type of viral vector, rLV or rRV, an internal standard is added, i.e. a viral supernatant rLV-EF1-GFP or rRV-GFP with known titer and which is titrated in parallel by FACS or by fluorimeter (Versafluor, Biorad).
Samples Dilutions (in complete medium) Type of analysis
Viral vector supernatant to be tested Serial dilutions qPCR
Positive control rLV-EF1-GFP ou rRV-GFP qPCR FACS Fluorimeter (Versafluor)
Negative control HCT 116 non-transduced cells qPCR
Table 2: controls and titration
1 – Prepare the pattern plate and identify the samples.
2 – Prepare the dilutions of the viral vectors in a sterile 96 deepwell plate under the biological safety cabinet II.
3 – Dispense 5μl of 100X Polybrene with a P10 micropipette in the first well for each sample to be titrated.

SSOOPP--TT--VVVV..1100..22
CONFIDENTIAL Page 9 of 26
Visually check the presence of the Polybrene drop in those wells!
4– Determine the number of wells to be diluted.
N = (number of samples to be titrated + margin) x 5
5 – Dispense in a small sterile container Nx2,5µL of 100X Polybrene and Nx250µL of complete medium.
6 – Thoroughly mix by pipetting up and down.
7 – With a multichannel pipette, dispense 250μl of this mix in the other 5 wells of the deepwell plate for each sample to be titrated (2/3/4/5/6 columns and / or 8 / 9/10/11/12) cf. Table 3.
8 – Dispense 500μl of viral supernatant (SN) in the first well of the deepwell plate (columns 1 and / or 7) and then perform the ½ serial dilutions of the mix obtained from the previous well.
9 – For each dilution, thoroughly mix by pipetting up and down with the multichannel pipette. Adequate volumes are reported in Table 3 below.
0
Tableau 3 : Dilutions des surnageant de vecteurs viraux
Table 4 : pattern plate : 10 rLV samples + 4 rRV samples
c) Transduction of the HCT116 cells by the viral vectors
1 – Remove the 96 well titration plate seeded the previous day with HCT116 cells from the incubator and place it under the biological safety cabinet.
2 – Discard the culture medium by turning the plate over a stainless steel container containing a disinfectant (Désogerme virex).
3 – Take 250μl of viral supernatants from the deepwell plate, using a multichannel micropipette, and place them on the seeded HCT116 cells in 96-well plate.
n° wells 1 / 7 2 / 8 3 / 9 4 / 10 5 / 11 6 /12
Volume of 100X Polybrene (µl) 5 2.5 2.5 2.5 2.5 2.5
Volume of complete medium (µl) 0 250 250 250 250 250
Volume of diluted supernatant(µl) 500 0 0 0 0 0
Dilutions
NT Dilutions
NT 1/2 1/2 1/2 1/2 1/2 1/2 1/2 1/2
1 SN
2 3 4 5 6 7 SN
8 9 10 11 12
13 SN
14 15 16 17 18 19 SN
20 21 22 23 24
25 SN
26 27 28 29 30 31 SN
32 33 34 35 36
37 SN
38 39 40 41 42 43 SN
44 45 46 47 48
49 SN
50 51 52 53 54 55 SN
56 57 58 59 60
61 SN
62 63 64 65 66 67 SN
68 69 70 71 72
73 SN
74 75 76 77 78 79 SN
80 81 82 83 84
85 SN
86 87 88 89 90 91 SN
92 93 94 95 96
rLV internal standard with known titer and titrated by FACS in parallel
rLV to be titrated
rRV internal standard with known titer and titrated by FACS in parallel
rRV to be titrated
NT=Non transduced cells
SN Diluted viral supernatant

SSOOPP--TT--VVVV..1100..22
CONFIDENTIAL Page 10 of 26
Be careful not to dislodge cells Start with the well the less concentrated
(From well 6 to well 1 and from well 12 to well 7) to use the same micropipette tip
for the 6 dilutions of the same viral vector supernatant Clearly identify wells
4 – Incubate the 96-well plate at 37°C and 5% CO2 for 3 days.
55-- DDooccuummeennttaattiioonn
Describe all the experiments in the laboratory notebook.

SSOOPP--TT--VVVV..1100..22
CONFIDENTIAL Page 11 of 26
Operating Mode n°3:
Washing and lysis of HCT116 cells
11-- OObbjjeeccttiivvee aanndd ppuurrppoossee
To describe the method of washing and lysis of HCT116 cells previously transduced by rLV or rRV viral vectors, for the extraction of their genomic DNA.
22-- RReeaaggeennttss,, ccuullttuurree mmeeddiiaa aanndd ssoolluuttiioonnss
Identification Supplier References
Transduced HCT116 cells Vectalys SOP-T-VV.10.2 MO1MO2
PBS 10X PAA H15-011
Kit Promega Wizard SV 96 Genomic Promega A2371
33-- EEqquuiippmmeennttss
Identification Supplier References
Vacuum pump
Multichannel pipette Eppendorf
Stainless steel container
2 sterile containers
Standard BSL2+ lab equipments and materials.

SSOOPP--TT--VVVV..1100..22
CONFIDENTIAL Page 12 of 26
44-- EExxppeerriimmeennttaall pprroottooccooll
Handling of HCT116 cells under biological safety cabinet
BSL-2+ precautions
Day D+3 a) Preparation of lysis mix
1 – In a sterile container, prepare the Lysis mix knowing that for 1 well, we need:
150µl of lysis buffer + 1µl of RNAse
2 – So, for N wells:
Volume of mix = (N+ margin) 150µl lysis buffer + (N + margin) 1µl RNAse
b) Washing of transduced HCT 116 cells
1 – After 3 days of incubation at 37 ° C and 5% CO2, remove the 96-well plate with HCT116 cells transduced with viral supernatants.
2 – Observe the plate under a fluorescence microscope, to check the expression of the GFP for the internal standard.
3 – Also check the non-fluorescence for the negative control (non-transduced wells)
Observe fluorescence for all samples to ensure consistency with the transgene
Under BSC II
4– Prepare in adapted flasks the necessary amounts of 1X PBS, for N wells taking some margin:
PBS 1X = (N+margin) x 3x200µL in a sterile container
5 – Remove the cell supernatant by aspirating with the multichannel pipette and discard the medium in a stainless steel container containing a disinfectant (Désogerme virex).
6 – Each well is three times with 200µl PBS1X per well.
c) HCT116 cells lysis
1– Dispense 150μl per well of lysis mix (from the sterile container), using the multichannel pipette, and incubate the plate at 37°C and 5% CO2 for 10 minutes.
2 – After 10 minutes, remove the plate from the incubator and cover it with a plastic film.
To avoid cross-well contamination during transport
plate is covered with plastic film
3– Place the plate in a tray containing ice to transport it from the production lab to molecular biology lab.
55-- DDooccuummeennttaattiioonn Describe all the experiments in the laboratory notebook.

SSOOPP--TT--VVVV..1100..22
CONFIDENTIAL Page 13 of 26
Operating Mode n°4:
Extraction of genomic ADN
11-- OObbjjeeccttiivvee aanndd ppuurrppoossee
To describe the method for extracting genomic DNA for titration of rLV or rRV viral supernatants by qPCR, using “Promega Wizard SV 96 Genomic” kit. This step is performed in the molecular biology lab. Genomic DNA is extracted by chromatography on silica columns. After capture of DNA, impurities (proteins and salts) are removed by several washings with ethanol (around 70%- the more ethanol is diluted, the more washing is efficient). The DNA is then eluted in water.
22-- RReeaaggeennttss,, ccuullttuurree mmeeddiiaa aanndd ssoolluuttiioonnss
Identification Supplier References
“Promega Wizard SV 96 Genomic” kit Promega A2371
Wizard SV 96 binding plate Promega A2271
Wizard SV wash solution Promega A1318
Absolute Ethanol (99,9% purity)
96 well plate with lysates (stored in ice)
33-- EEqquuiippmmeennttss
Identification Supplier References
Vacuum pump
Multichannel pipette
Sterile container
Spectrophotometer
Centrifuge
Standard BSL1 lab equipments and materials.
The operator should wear gloves and work in optimum conditions of cleanliness throughout the operation.
Solutions must be guaranteed without contamination
44-- EExxppeerriimmeennttaall pprroottooccooll

SSOOPP--TT--VVVV..1100..22
CONFIDENTIAL Page 14 of 26
Experiment in molecular biology lab Day D+3
a) Preparation
1 – Prepare the "wash solution" by diluting absolute ethanol in order to reduce it to 95% v / v. Add 630ml of the 95% ethanol in commercial concentrated wash solution.
2 – Preheat the necessary volume of elution buffer (nuclease-free water) in a water bath at 65 ° C before starting the extraction of DNA. Provide 100μl per well.
3– Prepare the vacuum apparatus as described by the supplier.
Check that the system aspirate well
b) Genomic DNA extraction
1– Place a Binding plate (silica columns) on the vacuum apparatus and transfer the cell lysates from the 96-well plate into the Binding plate with a multichannel pipette.
2 – Apply vacuum and cover the Binding plate with a plastic film until the whole cell lysates are passed through the columns.
NB: Do not use the pump over 50kPa as pressure.
3– Add 1 ml wash solution per well and then apply vacuum until everything is passed through.
4 – Repeat 2 times.
5 – At the end of the third washing, continue to apply vacuum for 2 minutes to dry the membrane and to remove all traces of ethanol that could inhibit the PCR reaction.
6 – After 2 minutes, turn the pump off, wipe the two sides of the Binding plate with a clean paper towel.
7– For the elution, connect the vacuum line to the manifold collar; place the binding plate on manifold bed. Add the manifold collar. Place the Binding plate on the collar.
8 – Transfer the preheated nuclease free water in a sterile container. With a multichannel pipette, dispense 100µl nuclease free water per well of the binding plate.
9– Allow DNA to rehydrate for 2 minutes then place a plastic film on the binding plate.
10 – Apply vacuum aspiration for 2 minutes.
11– Centrifuge the deep well plate containing eluted DNAs (pulse at 200-300g)
12– Determine the DNA concentration in some wells by spectrophotometry at 260nm to verify the quality and the quantity of the extracted DNA.
The concentration should be around 40ng/μl and 260nm/280nm ratio around 2
55-- DDooccuummeennttaattiioonn
Describe all the experiments in the laboratory notebook.
SSOOPP--TT--VVVV..1100..22
CONFIDENTIAL Page 15 of 26
Operating Mode n°5:
qPCR Quantitative polymerase chain reaction
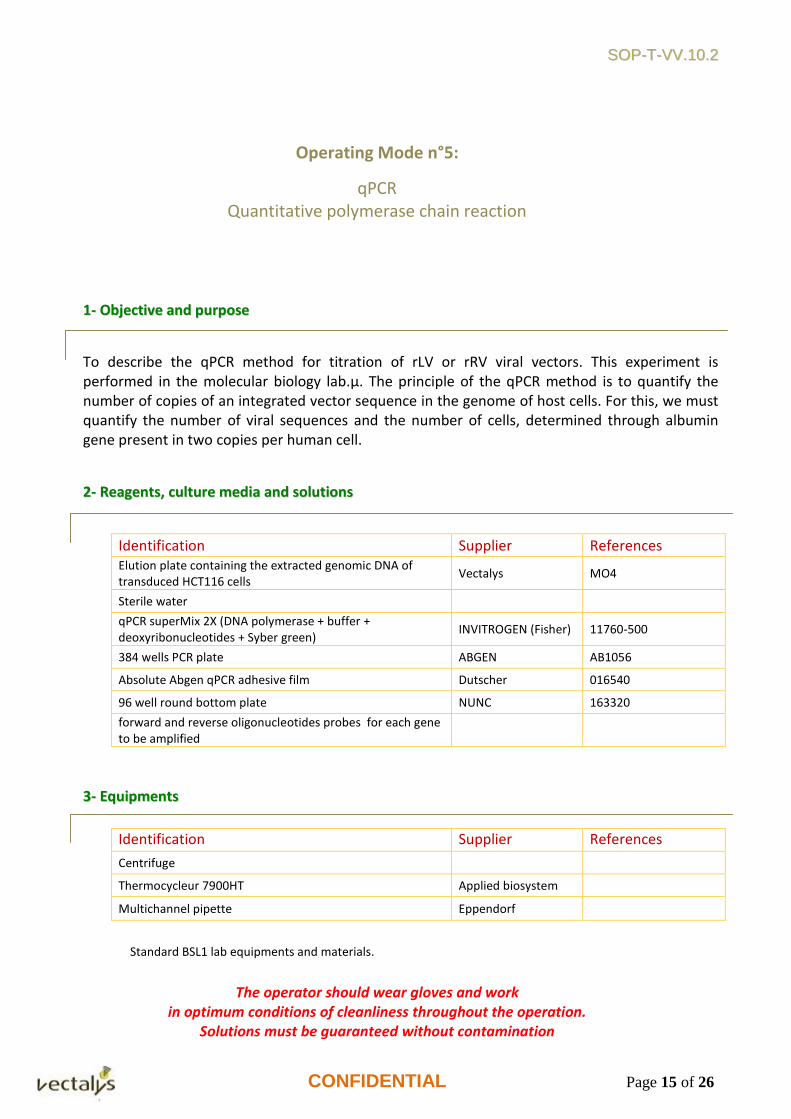
11-- OObbjjeeccttiivvee aanndd ppuurrppoossee
To describe the qPCR method for titration of rLV or rRV viral vectors. This experiment is performed in the molecular biology lab.µ. The principle of the qPCR method is to quantify the number of copies of an integrated vector sequence in the genome of host cells. For this, we must quantify the number of viral sequences and the number of cells, determined through albumin gene present in two copies per human cell.
22-- RReeaaggeennttss,, ccuullttuurree mmeeddiiaa aanndd ssoolluuttiioonnss
Identification Supplier References Elution plate containing the extracted genomic DNA of transduced HCT116 cells
Vectalys MO4
Sterile water
qPCR superMix 2X (DNA polymerase + buffer + deoxyribonucleotides + Syber green)
INVITROGEN (Fisher) 11760-500
384 wells PCR plate ABGEN AB1056
Absolute Abgen qPCR adhesive film Dutscher 016540
96 well round bottom plate NUNC 163320
forward and reverse oligonucleotides probes for each gene to be amplified
33-- EEqquuiippmmeennttss
Identification Supplier References
Centrifuge
Thermocycleur 7900HT Applied biosystem
Multichannel pipette Eppendorf
Standard BSL1 lab equipments and materials.
The operator should wear gloves and work in optimum conditions of cleanliness throughout the operation.
Solutions must be guaranteed without contamination
SSOOPP--TT--VVVV..1100..22
CONFIDENTIAL Page 16 of 26
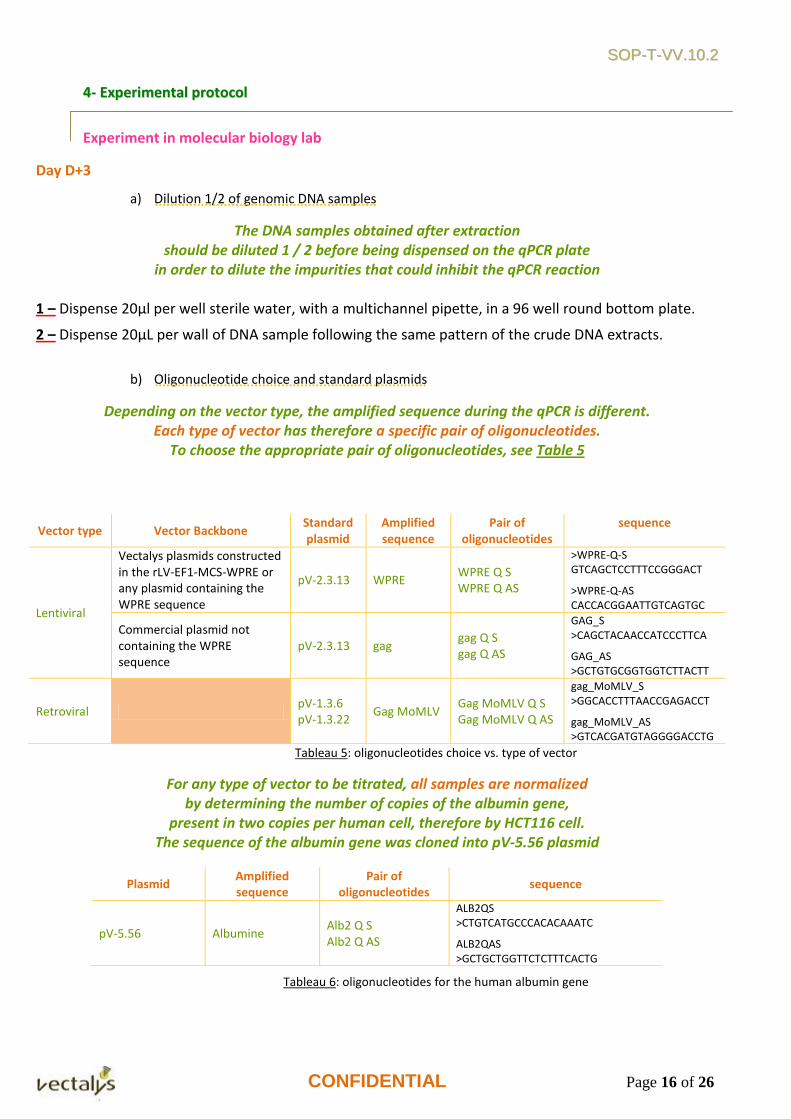
44-- EExxppeerriimmeennttaall pprroottooccooll
Experiment in molecular biology lab Day D+3
a) Dilution 1/2 of genomic DNA samples
The DNA samples obtained after extraction should be diluted 1 / 2 before being dispensed on the qPCR plate
in order to dilute the impurities that could inhibit the qPCR reaction
1 – Dispense 20µl per well sterile water, with a multichannel pipette, in a 96 well round bottom plate.
2 – Dispense 20µL per wall of DNA sample following the same pattern of the crude DNA extracts.
b) Oligonucleotide choice and standard plasmids
Depending on the vector type, the amplified sequence during the qPCR is different. Each type of vector has therefore a specific pair of oligonucleotides.
To choose the appropriate pair of oligonucleotides, see Table 5
Tableau 5: oligonucleotides choice vs. type of vector
For any type of vector to be titrated, all samples are normalized by determining the number of copies of the albumin gene,
present in two copies per human cell, therefore by HCT116 cell. The sequence of the albumin gene was cloned into pV-5.56 plasmid
Tableau 6: oligonucleotides for the human albumin gene
Vector type Vector Backbone Standard plasmid
Amplified sequence
Pair of oligonucleotides
sequence
Lentiviral
Vectalys plasmids constructed in the rLV-EF1-MCS-WPRE or any plasmid containing the WPRE sequence
pV-2.3.13 WPRE WPRE Q S WPRE Q AS
>WPRE-Q-S GTCAGCTCCTTTCCGGGACT
>WPRE-Q-AS CACCACGGAATTGTCAGTGC
Commercial plasmid not containing the WPRE sequence
pV-2.3.13 gag gag Q S gag Q AS
GAG_S >CAGCTACAACCATCCCTTCA
GAG_AS >GCTGTGCGGTGGTCTTACTT
Retroviral pV-1.3.6 pV-1.3.22
Gag MoMLV Gag MoMLV Q S Gag MoMLV Q AS
gag_MoMLV_S >GGCACCTTTAACCGAGACCT
gag_MoMLV_AS >GTCACGATGTAGGGGACCTG
Plasmid Amplified sequence
Pair of oligonucleotides
sequence
pV-5.56 Albumine Alb2 Q S Alb2 Q AS
ALB2QS >CTGTCATGCCCACACAAATC
ALB2QAS >GCTGCTGGTTCTCTTTCACTG

SSOOPP--TT--VVVV..1100..22
CONFIDENTIAL Page 17 of 26
c) Preparation of standard curves
For each sample type, two standard curves must be achieved: - A range of vector sequence to determine the number of copies of integrated vectors - A range of albumin gene to determine the number of cells
The standard curves are prepared from the corresponding standard plasmids (vector and albumin) which are at a concentration of 1μg/μl.
The standard curves are prepared each time. Never thaw standards twice, to avoid plasmids degradation
Moreover, the pipetted volumes for dilutions should be high enough to ensure accuracy. The final volume is 80μl for each point.
Preparation of the first point of the standard curve = 1E10 copies The qPCR is performed on 5μl of sample per well, the standard curves must then be prepared so that 5μl of 1 well corresponds to 1E10 copies of the sequence to be amplified. This means that the plasmid should be at a concentration of 0,2E10 copies /µL.
1– Dilute each plasmid with sterile water so that it is at a concentration of 100ng/μl= plasmid stock 2– Calculate the copy number per 100ng of plasmid
To determine the concentration of plasmid in copy number of plasmid / µL, use the following formula or refer to Table 7.
N plasm = copies number of plasmid Cplasm = plasmid Concentration (ng/µl = 100ng/µl) Npb = number of plasmid base pairs MMpb = molecular weight of one base pair = 660g/mol = 660E9 ng/mol MM plasm = plasmid molecular weight = Npb x MMpb N =Avogadro Number= 6,02E23 mol
-1
This calculation is determined in two steps: - Calculation of moles number in 100ng of plasmid: Moles number in 100ng of plamid = 1.10-7 (in g)/ [Plamid size (in bp) x 660 g/mol (molecular weight corresponding to one base pair)]. - Calculation of copy number in 100ng of plasmid: Copy number for 100ng of plasmid = Avogadro number (6,02.1023mol-1) x Moles number in 100ng of plasmid, that means:
Copy number for 100ng of plasmid = 6,02x1023 x [1.10-7 / (Plasmid size in bp x 660)]
Plasmid N pb N plasm for 100ng
plasmid
pV-2.3.13 7119 1,28.1010
copies
pV-1.3.6 5987 1,52.1010
copies
pV-5.56 4138 2,2.1010
copies
Table 7 : plasmide copies number

SSOOPP--TT--VVVV..1100..22
CONFIDENTIAL Page 18 of 26
3– Calculate the volume of plasmid stock solution to collect as described in the following formula:
Volume of plasmid stock solution (µl) = (2x10⁹ copies per µl x 80 µl) / (Copy number of plasmid) 4– From the plasmid stock tube, prepare in an Eppendorf tube, 80μl of standard plasmid (vector or albumin) at the appropriate concentration that is:
0,2E10 copies / µl so that 1E10 copies are dispensed in 5µl/well of the qPCR plate
Preparation of the other points of the standard curve: 1– In Eppendorf tubes, perform 1/10 serial dilutions in sterile water to a final volume of 80μl, following the process below for each dilution D:
I. Vortex the tube of D dilution at max speed II. Centrifuge this tube
III. Gently vortex the tube IV. Homogenize by pipetting up and down V. Dispense 8µL of the D dilution in 72µL sterile water = D-1 dilution
2– Perform similarly 12 points of the standard curve: from 1E10 copies/well to 1E0 copies/well + 0 (sterile water)
d) Preparation of reactional mix for N samples
The qPCR MIX should be performed under specific hood in the molecular biology lab with dedicated micropipettes
Calculation of the reactional volume:
Number of wells using reactional mix = (number of sample to be assayed* x 6 wells) + 12 wells of the standard curve = (Nx6)+12 * the number of samples to be assayed includes internal standards.
1– On ice, prepare a reaction mix for each pair of oligonucleotides (vector and albumin), in sufficient quantity. To do this, multiply by [(N x6) +12] the amounts indicated in the table below.
Table 8: Volumes for qPCR reaction
e) Preparation of the qPCR 384 well plate
Organize the qPCR 384 well plate so as to have on the same side qPCR reactions with «albumin" primers
and other reactions with "vector" primers
1– Dispense 10µl reactional mix in the [(N x6) +12] wells, in the adequate part (Albumin or vector)
samples 5 µl/well (genomic DNA diluted 1/2)
Forward Oligo 10 µM 0,3 µl
Reverse Oligo 10 µM 0,3 µl
qPCR Super Mix 2X 7,5 µl
Sterile water 1,9 µl
Total volume of reactional mix / well 10 µl
total reaction Volume/ well 15 µl

SSOOPP--TT--VVVV..1100..22
CONFIDENTIAL Page 19 of 26
2– Dispense 5μl of N samples of diluted genomic DNA in 2 copies (N on Albumin mix and N on vector mix)
3– Dispense 5μl of each point of the standard curve in 12 wells of the corresponding mix (vector or Albumin).
Table 9: qPCR plate pattern
4– Cover the plate with a specific "ABgene Absolute qPCR" adhesive film that allows light to pass.
5– Centrifuge the plate for a few seconds, then cover with aluminum foil
6– Keep the plate at 4 ° C until use.
It is important to consider that the qPCR method used in this procedure was developed for vector
titration purposes, in which the diluted samples are analyzed in simplicate. In fact, when a titration is
performed on a new vectors batch, we don’t know the exact vectors titer. Therefore, we perform serial
dilution for samples instead of performing a triplicate analysis on undiluted vectors. As we don’t know
if the new vector titer will fall into the linearity range, this serial dilution method allow us to clearly
identify the linearity range for each new samples. Thus enabling an accurate titration.
Diluted samples Diluted samples
1 2 3 4 5 6 1 2 3 4 5 6
S 1
S N
Vector standard
curve 1.10
10 1.10
9 1.10
8 1.10
7 1.10
6 1.10
5 1.10
4 1.10
3 1.10
2 1.10
1 1.10
0 0
Albumin standard
curve 1.10
10 1.10
9 1.10
8 1.10
7 1.10
6 1.10
5 1.10
4 1.10
3 1.10
2 1.10
1 1.10
0 0
Albumin Mix
Vector Mix

SSOOPP--TT--VVVV..1100..22
CONFIDENTIAL Page 20 of 26
f) qPCR
The qPCR reaction is performed using the ABI7900HT robot
The qPCR cycle de qPCR is as follows - 2 min at 50°C - 10 min at 95°C - 15 sec at 95°C + 1 min at 60°C= 40 cycles - 15 sec at 95°C - 15 sec at 60°C - 15 sec at 95°C
55-- DDooccuummeennttaattiioonn
Describe all the experiments in the laboratory notebook.

SSOOPP--TT--VVVV..1100..22
CONFIDENTIAL Page 21 of 26
Operating Mode n°6:
Results analysis
11-- OObbjjeeccttiivvee aanndd uurrppoossee
Describe the results analysis method for the titration of rLV or rRV viral supernatants by qPCR.
22-- RReeaaggeennttss,, ccuullttuurree mmeeddiiaa aanndd ssoolluuttiioonnss
none 33-- EEqquuiippmmeennttss
Identification Supplier References
SDS 2.2 software SDS 2.2
qPCR analysis file
44-- EExxppeerriimmeennttaall pprroottooccooll
a) Data analysis
copy qPCR data in the qPCR analysis file, Standard curves:
1– Copy the Ct values (cycle threshold) for each standard curve.
2– Verify that the Ct value of the 0 point for the standard curve is high (out of range), which certifies the non-contamination of the water.
3– For each standard curve, draw the number of copies vs Ct, the y-axis being logarithmic
4– Determine the linearity zone and the equation of the standard curve with a regression coefficient higher than 0.99.

SSOOPP--TT--VVVV..1100..22
CONFIDENTIAL Page 22 of 26
Albumine
y = 1E+11e-0,698x
R2 = 0,9927
1,E+00
1,E+01
1,E+02
1,E+03
1,E+04
1,E+05
1,E+06
1,E+07
1,E+08
1,E+09
4 9 14 19 24 29 34
Ct
nb
co
pie
s
WPRE
y = 4E+11e-0,7907x
R2 = 0,9907
1,E+00
1,E+01
1,E+02
1,E+03
1,E+04
1,E+05
1,E+06
1,E+07
1,E+08
1,E+09
9 14 19 24 29Ct moy
nb
co
pie
s
This equation must be of the form: Copies number = A.exp (-B.Ct)
Samples
1–Copy Ct values for the different samples for albumin and vector sequences.
2– Determine the copy numbers of albumin and vector for each sample dilution thanks to the equations.
3– Deduce the cell number by dividing the number of copies of albumin by 2
4– For each dilution, then calculate the number of copies of vector per cell by dividing the number of copies of vector by the cell number.
5– Draw the number of copies vs. the dilution and determine the linearity zone.
6– For all points in the linearity zone, calculate the titer in TU / ml following formula:
Titer TU/ml = Copy number /cellule x (Number* of transduced cells /ml) / dilution factor
= copy number / cell x 100 000 / dilution factor (100 000 cells/ml for the transduction) The titer of the sample (TU / ml) is the average of these titers in the linear part.
WPRE
Ct Copy nb
10,38 1,E+10
1,E+09
1,E+08
13,95 1,E+07
Lin
eari
ty 15,65 1,E+06
18,96 1,E+05
22,72 1,E+04
25,35 1,E+03
27,57 1,E+02
28,14 1,E+01
28,09 1,E+00
28,15 0,E+00
WPRE Equation:
y=(4E11)*exp(-0,7907*x)
ALBUMINE
Ct Copy nb
Undetermined 1,E+10
12,65 1,E+09
13,04 1,E+08
14,07 1,E+07
Lin
eari
ty 16,82 1,E+06
19,89 1,E+05
23,73 1,E+04
27,77 1,E+03
29,66 1,E+02
30,29 1,E+01
30,85 1,E+00
30,59 0,E+00
Albumin Equation :
y=(1E11)*exp(-0,698*x)

SSOOPP--TT--VVVV..1100..22
CONFIDENTIAL Page 23 of 26
rV2.1A1.95
R2 = 0,9946
0
2
4
6
8
10
0,00 0,25 0,50 0,75 1,00
dilution
Nb
re c
op
ies
/ce
llu
le
Example : Titration of lot number rV2.1A1.95 rLV-EF1-GFP-WPRE with WPRE and Albumin oligonucleotides
Note : There may be a difference between the titer obtained by qPCR and the titer obtained by FACS. To limit this bias, for the reference sample, determine the multiplication factor between the titer obtained by qPCR and the known titer determined by FACS and standardize the samples thanks to this multiplicative factor.
55-- DDooccuummeennttaattiioonn
Describe all the experiments in the laboratory notebook.
WPRE - Equation : y=(4E11)*exp(-0,7907*x)
sample Ct Copy nb
rV2.1A1.95 1 19,76 6,53E+04
rV2.1A1.95 2 21,92 1,18E+04
rV2.1A1.95 3 26,53 3,10E+02
rV2.1A1.95 4 23,62 3,10E+03
rV2.1A1.95 5 24,86 1,16E+03
rV2.1A1.95 6 26,97 2,18E+02
Albumin - Equation y=(1E11)*exp(-0,698*x)
sample Ct Copy nb Cell nb
rV2.1A1.95 1 22,55 1,45E+04 7265,46
rV2.1A1.95 2 23,82 6,01E+03 3005,18
rV2.1A1.95 3 28,05 3,12E+02 156,17
rV2.1A1.95 4 22,31 1,72E+04 8581,22
rV2.1A1.95 5 23,77 6,21E+03 3106,46
rV2.1A1.95 6 24,98 2,67E+03 1336,34
sample dilution Copy nb/Cell TU/mL
rV2.1A1.95 1 1,00 8,99 8,99E+05
rV2.1A1.95 2 0,50 3,93 7,86E+05
rV2.1A1.95 3 0,25 1,98 7,94E+05
rV2.1A1.95 4 0,13 0,36 2,89E+05
rV2.1A1.95 5 0,06 0,37 5,97E+05
rV2.1A1.95 6 0,00
Mean TITER = 6,73E+05 TU/mL

SSOOPP--TT--VVVV..1100..22
CONFIDENTIAL Page 24 of 26
Annexe n°1:
Fiche de données et sécurité des cellules HCT116

SSOOPP--TT--VVVV..1100..22
CONFIDENTIAL Page 25 of 26

SSOOPP--TT--VVVV..1100..22
CONFIDENTIAL Page 26 of 26