student administration peoplesoft version 9 · student administration peoplesoft version 9.0 ......
TRANSCRIPT

Student Administration
PeopleSoft Version 9.0
CLASS SCHEDULING V E R S I O N 2.2
TRIM RE F E R E N C E : D2010 /165489
U P D A T E D OC T O B E R 2014

2 Class Scheduling (v 2.2) The University of Adelaide
Student System - Class Scheduling
Copyright © 2010 by The University of Adelaide and PeopleSoft All rights reserved. Published 2002.
Restricted Rights
No part of this document may be reproduced or transmitted in any form or by any means, electronic or mechanical, including photocopying and recording, for any purpose without the express written permission of The University of Adelaide. This document is subject to change without notice, and PeopleSoft and The University of Adelaide do not warrant that the material contained in this document is error-free. If you find any problems with this document, please report them to Information Technology Services in writing.
PeopleSoft, the PeopleSoft logo, PeopleTools, PS/nVision, PeopleCode, and PeopleBooks are registered trademarks, and Red Pepper, PeopleTalk, and “We work in your world.” are trademarks of PeopleSoft, Inc. All
other company and product names may be trademarks of their respective owners. Copyright © 2002
PeopleSoft, Inc. All rights reserved.
Document Approval
This document has been approved by:
Name Title Signature Date
Fred Rochler University Timetable
Coordinator
04/11/2014
Document Review
This document is due for review by June 2016.

The University of Adelaide Class Scheduling (v 2.2) 3
Contents INTRODUCTION ................................................................................................................................................ 5
BUSINESS PROCESSES ....................................................................................................................................... 6
EXERCISES ........................................................................................................................................................ 6
Exercise 1 – Understand Academic Term/Session Structure ............................................................................ 7
Term codes ................................................................................................................................................. 7
Session codes .............................................................................................................................................. 7
Academic Calendar ..................................................................................................................................... 8
Class Section ............................................................................................................................................... 9
Exercise 2 – Identify a non-timetabled course and class ................................................................................ 10
View a non-timetabled class in the Class Schedule .................................................................................. 11
Exercise 3 – Identify a timetabled course and class ........................................................................................ 15
Exercise 4 – View the Schedule of Classes pages in PeopleSoft ..................................................................... 17
View a timetabled class in the Class Schedule ......................................................................................... 17
View a Class Type in the Class Schedule ................................................................................................... 20
View the Academic Organisation and Academic Group in the Class Schedule ........................................ 21
Interpret Meeting Pattern information in the Class Schedule ................................................................. 22
View Enrolment Controls in the Class Schedule ....................................................................................... 23
Exercise 5 – Set up enrolment controls .......................................................................................................... 25
Change the session for a non-timetabled course ..................................................................................... 25
Change an enrolment component for a timetabled course ..................................................................... 27
Change the enrolment capacity ............................................................................................................... 30
Set up Auto Enrol to automatically enrol students in a component ........................................................ 32
Exercise 6 – Hold a class back from enrolment ............................................................................................... 34
Exercise 7 – Release a class for enrolment ..................................................................................................... 36
Exercise 8 – Create an Enrolment Requirement Group for restriction by program ....................................... 38
Check if the required ERG exists ............................................................................................................... 38
Create an ERG ........................................................................................................................................... 39
Exercise 9 – Attach an Enrolment Requirement Group to a course ............................................................... 43
Exercise 10 – Attach an Enrolment Requirement Group to a class ................................................................ 45
Exercise 11 – Add class notes .......................................................................................................................... 47
Exercise 12 – View Class Associations ............................................................................................................. 50
View Class Association number from the Schedule of Classes page ........................................................ 50
View Class Associations from the Class Associations page ....................................................................... 51
Exercise 13 – Set up classes with different Class Associations ....................................................................... 56
Delete non-enrolment components ......................................................................................................... 56
Group lectures with certain tutorials for timetabled classes ................................................................... 59
Exercise 14 – Assign topics to a class .............................................................................................................. 61
Exercise 15 – Schedule a new course (non-timetabled) ................................................................................. 64

4 Class Scheduling (v 2.2) The University of Adelaide
Exercise 16 – Add a class to a non-timetabled course .................................................................................... 69
Exercise 17 – Prevent further enrolments in a class ....................................................................................... 72
Exercise 18 – Search and view Enrolment Control details .............................................................................. 76

The University of Adelaide Class Scheduling (v 2.2) 5
Introduction
Welcome to Class Scheduling. This module contains the tools needed to learn the concepts and procedures involved in scheduling classes at The University of Adelaide. Objectives At the end of this module you will be able to:
1. Understand Academic Term / Session structure. 2. Understand timetabled and non-timetabled classes. 3. View the Schedule of Classes, including timetabled and non-timetabled classes, class
associations and enrolment controls. 4. Change class associations, enrolment components and enrolment capacity. 5. Hold back and releases classes for enrolment. 6. Set up auto-enrol. 7. Create an enrolment requirement group and apply it to a course and a class. 8. Add class notes. 9. Assign topics. 10. Schedule a new course. 11. Add an additional class. 12. Cancel a class.
Prerequisites Completion of the following module:
1. Introduction to PeopleSoft Student Administration

6 Class Scheduling (v 2.2) The University of Adelaide
Business Processes
The University of Adelaide has a variety of specific regulations and guidelines regarding responsibility, processes, limitations and authority for the use of this system. For more information, go to https://www.adelaide.edu.au/sss/doco/.
Exercises
These exercises will be used during the training session for you to practice the skills needed to meet the objectives listed previously and also as future reference material when required in your work.
BEFORE WE BEGIN
Any change being made at the class level must be done before enrolments commence. Whenever class components are to be changed or cancelled you must ensure that no students are enrolled in the course. If they are, YOU MUST:
Contact the students to ask them to withdraw from the course
Once students have withdrawn, make the changes to the class or classes as required and delete the class if necessary (see Exercise 17 – Cancel a class)
Set up the class or classes correctly so students can enrol. Failure to follow this procedure creates problems not only for students, but also for academic areas that have to deal with these issues. If you encounter problems, please contact [email protected] in the first instance to better investigate and solve the problem.
The University of Adelaide Class Scheduling (v 2.2) 7
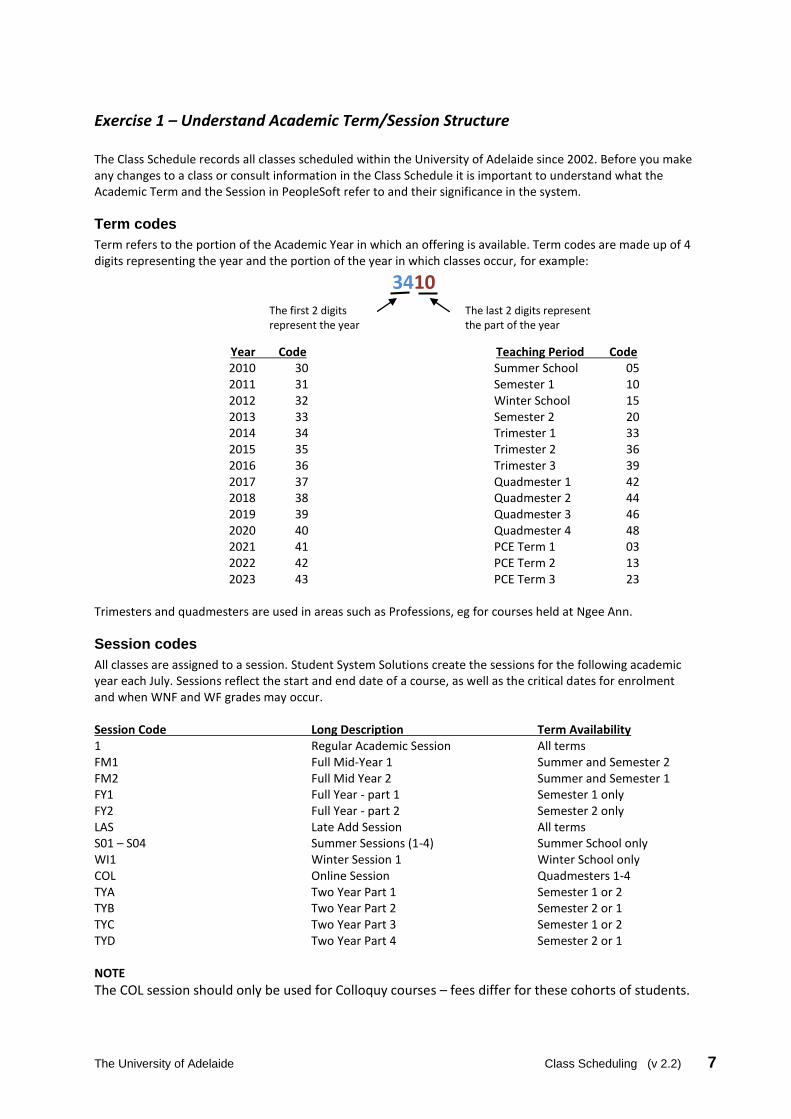
Exercise 1 – Understand Academic Term/Session Structure The Class Schedule records all classes scheduled within the University of Adelaide since 2002. Before you make any changes to a class or consult information in the Class Schedule it is important to understand what the Academic Term and the Session in PeopleSoft refer to and their significance in the system.
Term codes
Term refers to the portion of the Academic Year in which an offering is available. Term codes are made up of 4 digits representing the year and the portion of the year in which classes occur, for example:
3410
Year Code 2010 30 2011 31 2012 32 2013 33 2014 34 2015 35 2016 36 2017 37 2018 38 2019 39 2020 40 2021 41 2022 42 2023 43
Teaching Period Code Summer School 05 Semester 1 10 Winter School 15 Semester 2 20 Trimester 1 33 Trimester 2 36 Trimester 3 39 Quadmester 1 42 Quadmester 2 44 Quadmester 3 46 Quadmester 4 48 PCE Term 1 03 PCE Term 2 13 PCE Term 3 23
Trimesters and quadmesters are used in areas such as Professions, eg for courses held at Ngee Ann.
Session codes
All classes are assigned to a session. Student System Solutions create the sessions for the following academic year each July. Sessions reflect the start and end date of a course, as well as the critical dates for enrolment and when WNF and WF grades may occur. Session Code Long Description Term Availability 1 Regular Academic Session All terms FM1 Full Mid-Year 1 Summer and Semester 2 FM2 Full Mid Year 2 Summer and Semester 1 FY1 Full Year - part 1 Semester 1 only FY2 Full Year - part 2 Semester 2 only LAS Late Add Session All terms S01 – S04 Summer Sessions (1-4) Summer School only WI1 Winter Session 1 Winter School only COL Online Session Quadmesters 1-4 TYA Two Year Part 1 Semester 1 or 2 TYB Two Year Part 2 Semester 2 or 1 TYC Two Year Part 3 Semester 1 or 2 TYD Two Year Part 4 Semester 2 or 1 NOTE
The COL session should only be used for Colloquy courses – fees differ for these cohorts of students.
The first 2 digits represent the year
The last 2 digits represent the part of the year

8 Class Scheduling (v 2.2) The University of Adelaide
Academic Calendar
Student System Solutions posts details of critical dates at http://www.adelaide.edu.au/sss/doco/. Click the Terms & Sessions link. A spreadsheet similar to this one will open in Excel:
Some of the critical dates are defined as follows: Census Date The last day to drop a course without incurring any fees. When a course is dropped before
this date it will not show in Access Adelaide or on academic transcripts. Census dates for Regular Academic Sessions in Semesters 1 and 2 are 31 March and 31 August.
Last Day to WNF Indicates the last day to withdraw from a course with a grade of Withdraw No Fail. A WNF grade will be recorded when a student drops a course between the Census Date and this date.
Last Day to WF Indicates the last day to withdraw from a course with a grade of Withdraw Fail. A WF grade will be recorded when a student drops a course between the “Last Day to WNF” and this date.

The University of Adelaide Class Scheduling (v 2.2) 9
Class Section
Section refers to the unique identifier of a class within a combination of term, course ID, course offering and session. Sections are described using letters and numbers, where 2 letters describe the component (for timetabled classes) or campus (non-timetabled classes), and 2 numbers describe the number of occurences of that component or campus (ie streams). If it is necessary to change section codes, this should be done in the Course Catalogue. This will flow through to Syllabus Plus and the Schedule of Classes.
Non-timetabled classes Timetabled classes Section Code Campus Section Component Description
01BR BR BRAD AU01 AUR Aural 01EX EX EXT BD01 BND Band 01FL FL FLIND CB01 CBL Case based learning 01HO HO HOSP CE01 CEX Class Exercise 01NA NA NGA CH01 CHO Choir 01NT NT NTRCE CL01 CLN Clinical 01NW NW NWC CM01 CMG Class Meeting 01OL OL ONLINE CO01 COM Computer Exercise 01RG RG REGPK CP01 CPF Classical Performance Forum 01RW RW ROSE DS01 DST Dissertation 01TB TB THBRT FL01 FLD Fieldwork 01SA SA UNISA IN01 IND Independent Study 01WA WA UWA JP01 JPF Jazz Performance Forum 01WT WT WAITE LA01 LAB Laboratory LE01 LEC Lecture PA01 PAP Paper PB01 PBL PBL Session PF01 PFM Performance PJ01 PJT Project PL01 PLA Placement PM01 PEF Performance Forum PR01 PRA Practical RE01 RES Resource Session RH01 RHY Rhythm Class RP01 RPT Repertoire RS01 RSL Rehearsal SE01 SEM Seminar SG01 SGD Small Group Discovery ST01 STU Studio SU01 SUP Supervision TE01 TEC Technique/Repertoire TH01 THE Thesis TP01 TPR Teaching Practice TT01 TTN Tuition TU01 TUT Tutorial UN01 UNS Unspecified WR01 WRK Workshop Z GEN MyUni
Timetabled classes have a room and time allocated in Syllabus Plus. Non-timetabled classes allow students to enrol, but no room is required (eg for Honours and off-campus courses). NOTE OL session should only be used for Colloquy courses – fees differ for these cohorts of students. Exercise completed.
10 Class Scheduling (v 2.2) The University of Adelaide
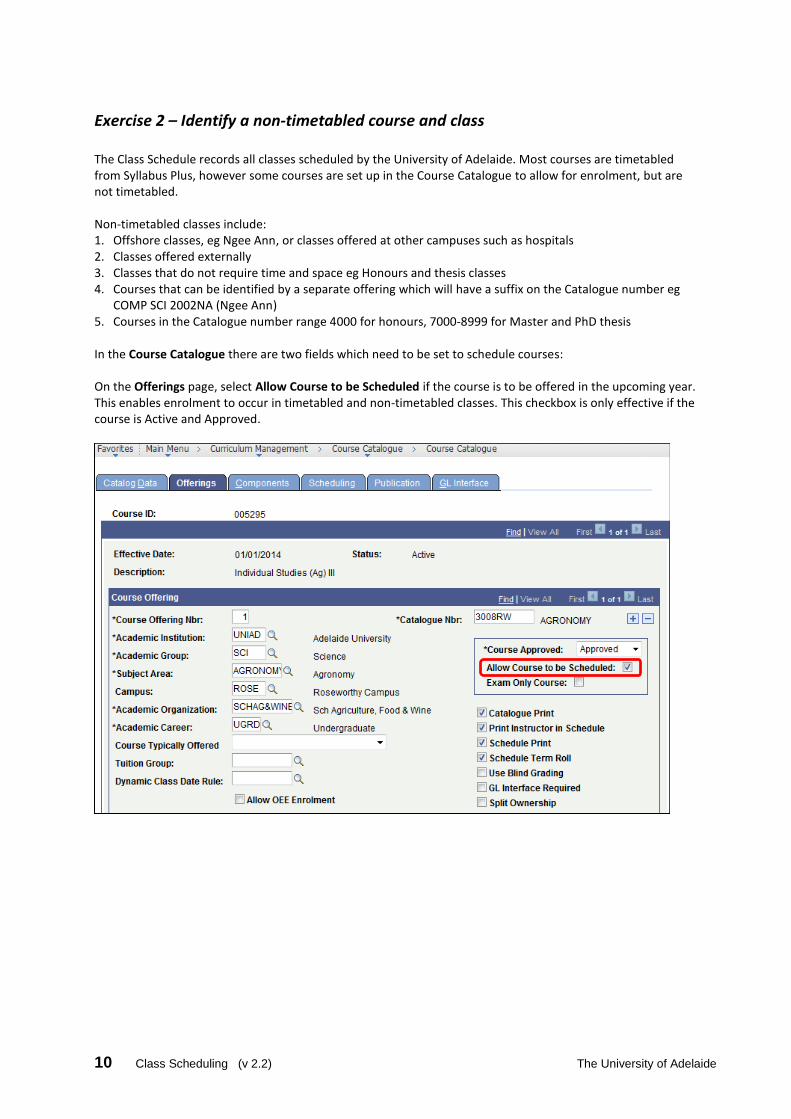
Exercise 2 – Identify a non-timetabled course and class The Class Schedule records all classes scheduled by the University of Adelaide. Most courses are timetabled from Syllabus Plus, however some courses are set up in the Course Catalogue to allow for enrolment, but are not timetabled. Non-timetabled classes include: 1. Offshore classes, eg Ngee Ann, or classes offered at other campuses such as hospitals 2. Classes offered externally 3. Classes that do not require time and space eg Honours and thesis classes 4. Courses that can be identified by a separate offering which will have a suffix on the Catalogue number eg
COMP SCI 2002NA (Ngee Ann) 5. Courses in the Catalogue number range 4000 for honours, 7000-8999 for Master and PhD thesis
In the Course Catalogue there are two fields which need to be set to schedule courses: On the Offerings page, select Allow Course to be Scheduled if the course is to be offered in the upcoming year. This enables enrolment to occur in timetabled and non-timetabled classes. This checkbox is only effective if the course is Active and Approved.

The University of Adelaide Class Scheduling (v 2.2) 11
On the Scheduling page, the Timetabled in Syllabus Plus checkbox is not selected for courses that will not be timetabled. Relevant terms need to be selected.
Non-timetabled courses business process:
Course Catalogue • The first step in the scheduling
process. • Source data for all course
information – units, offerings, components, descriptions, fees etc.
• For non-PGRS courses: One class per offering is created based on the primary/graded component in the Course Catalogue. For PGRS courses: 2 classes per offering are created, with a TRF and a THE section
• If more classes are required you must create them manually in the Class Schedule. See Exercise 15 – Schedule a new course.
Class Schedule • Non-timetabled classes
are created in PeopleSoft via SPI.
• Course information defaults from the Course Catalogue.

12 Class Scheduling (v 2.2) The University of Adelaide
View a non-timetabled class in the Class Schedule
Step 1
From the Navigation Menu, select: Curriculum Management > Schedule of Classes > Maintain Schedule of Classes
Expected Results:
The Find an Existing Value page of the Maintain Schedule of Classes component is displayed.
Step 2
Enter or select the following: Academic Institution: UNIAD Term: 3310 Subject Area: AGRONOMY Catalogue Nbr: 3008RW (Individual Studies (AG) III)
Expected Results:
Correct data entry.
Step 3
Click Search.
Expected Results:
The Basic Data page is displayed.
Step 4
Compare your page with the one shown below:
Expected Results:
The page matches. If these elements do not match, review the steps and ask the instructor. Continue to the next step.
Class Section of 01RW indicates a non-timetabled class

The University of Adelaide Class Scheduling (v 2.2) 13
Step 5
Click the Meetings page tab.
Expected Results:
The Meetings page is displayed.
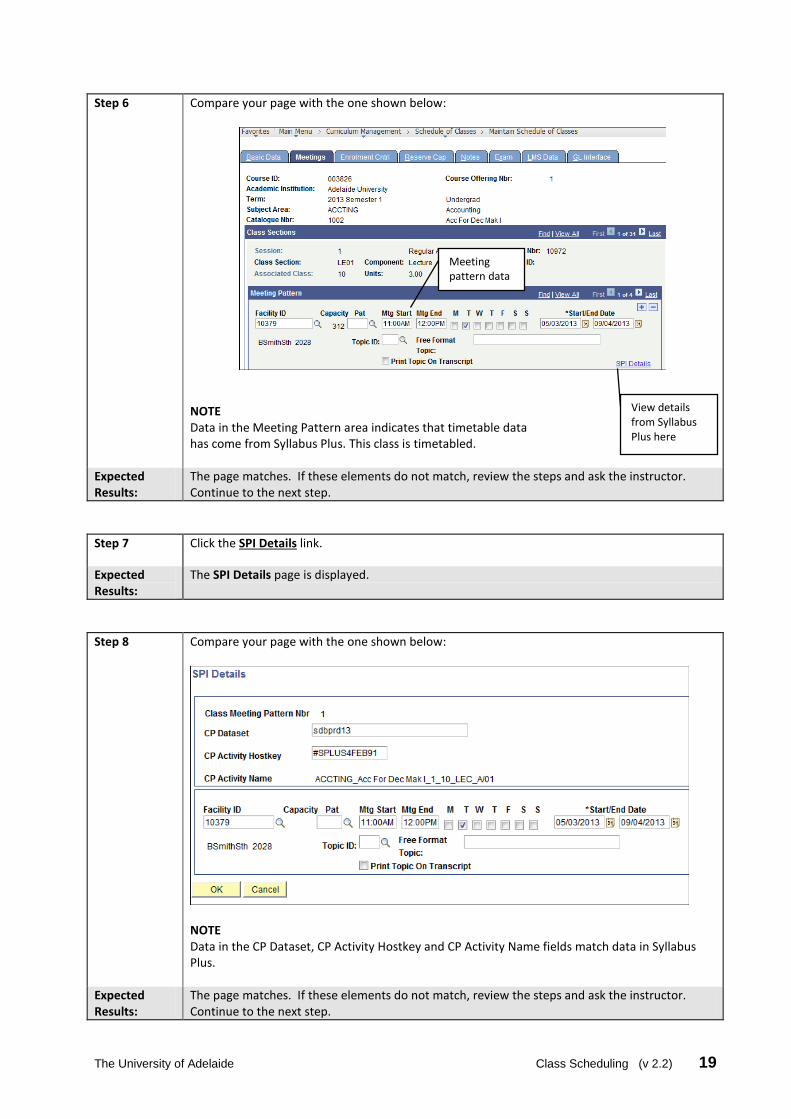
Step 6
Compare your page with the one shown below:
NOTE Lack of data in the Meeting Pattern area indicates that no timetable data has come from Syllabus Plus. This class is not timetabled.
Expected Results:
The page matches. If these elements do not match, review the steps and ask the instructor. Continue to the next step.
Step 7
Click the SPI Details link.
Expected Results:
The SPI Details page is displayed.
Meeting pattern data
View details from Syllabus Plus here

14 Class Scheduling (v 2.2) The University of Adelaide
Step 8
Compare your page with the one shown below:
NOTE The CP Dataset, CP Activity Hostkey and CP Activity Name fields are blank.
Expected Results:
The page matches. If these elements do not match, review the steps and ask the instructor. Continue to the next step.
Step 9
Click OK.
Expected Results:
The Meetings page is displayed.

The University of Adelaide Class Scheduling (v 2.2) 15
Exercise 3 – Identify a timetabled course and class Timetabled classes are assigned a time and space using Syllabus Plus timetabling software.
In Course Catalogue there are two fields which need to be set to schedule courses. These enable enrolments to occur in timetabled and non-timetabled classes: On the Offerings page, select Allow Course to be Scheduled if the course is to be offered in the upcoming year.

16 Class Scheduling (v 2.2) The University of Adelaide
On the Scheduling page, the Timetabled in Syllabus Plus checkbox is selected for courses that will be timetabled, and releveant terms must also be selected.
Timetabled courses business process:
Exercise completed.
Course Catalogue • The first step in the
scheduling process. • Source data for all course
information – units, offerings, components, descriptions, fees etc.
• Course data is transferred to Syllabus Plus via SPI for all course offerings with the ‘Timetabled in Syllabus Plus’ checkbox selected (timetabled classes)
Syllabus Plus • Source of all timetabled
class information – day, time and location.
• Prime repository for all locations data
• Modules, Activity Templates and Programmes of Study are all created via SPI.
Class Schedule • Source of all class
information for online enrolment
• Timetabled classes are created, updated and deleted via SPI

The University of Adelaide Class Scheduling (v 2.2) 17
Exercise 4 – View the Schedule of Classes pages in PeopleSoft Scenario: You are asked to use the Class Schedule in PeopleSoft to view
Semester 1 2013 course structures.
View a timetabled class in the Class Schedule
Step 1
From the Navigation Menu, select: Curriculum Management > Schedule of Classes > Maintain Schedule of Classes
Expected Results:
The Find an Existing Value page of the Maintain Schedule of Classes component is displayed.
Step 2
Enter or select the following: Academic Institution: UNIAD Term: 3310 Subject Area: ACCTING (Accounting) Catalogue Nbr: 1002 (Acc For Dec Mak 1) Campus: NTRCE
Expected Results:
Correct data entry.
Step 3
Click Search.
Expected Results:
The Basic Data page is displayed.

18 Class Scheduling (v 2.2) The University of Adelaide
Step 4
Compare your page with the one shown below:
Expected Results:
The page matches. If these elements do not match, review the steps and ask the instructor. Continue to the next step.
Step 5
Click the Meetings page tab.
Expected Results:
The Meetings page is displayed.
Class Section of LE01 indicates a timetabled class
The University of Adelaide Class Scheduling (v 2.2) 19
Step 6
Compare your page with the one shown below:
NOTE Data in the Meeting Pattern area indicates that timetable data has come from Syllabus Plus. This class is timetabled.
Expected Results:
The page matches. If these elements do not match, review the steps and ask the instructor. Continue to the next step.
Step 7
Click the SPI Details link.
Expected Results:
The SPI Details page is displayed.
Step 8
Compare your page with the one shown below:
NOTE Data in the CP Dataset, CP Activity Hostkey and CP Activity Name fields match data in Syllabus Plus.
Expected Results:
The page matches. If these elements do not match, review the steps and ask the instructor. Continue to the next step.
Meeting pattern data
View details from Syllabus Plus here

20 Class Scheduling (v 2.2) The University of Adelaide
Step 9
Click OK.
Expected Results:
The Meetings page is displayed.
View a Class Type in the Class Schedule
Step 10
Click the Basic Data page tab.
Expected Results:
The Basic Data page is displayed.
Step 11
Compare your page with the one shown below:
NOTE Only one component in each course will have Class Type set to Enrolment, and this should be the same as the ‘Enrolment Component’ which was set in Course Catalogue, eg Lecture. This determines the class the student needs to select in Access Adelaide to enrol in this course. Once the Enrolment component has been selected, the student is then able to select other components of the course in which to enrol. These are known as related classes, eg Tutorial, Practical.
Expected Results:
The page matches. If these elements do not match, review the steps and ask the instructor. Continue to the next step.
The University of Adelaide Class Scheduling (v 2.2) 21
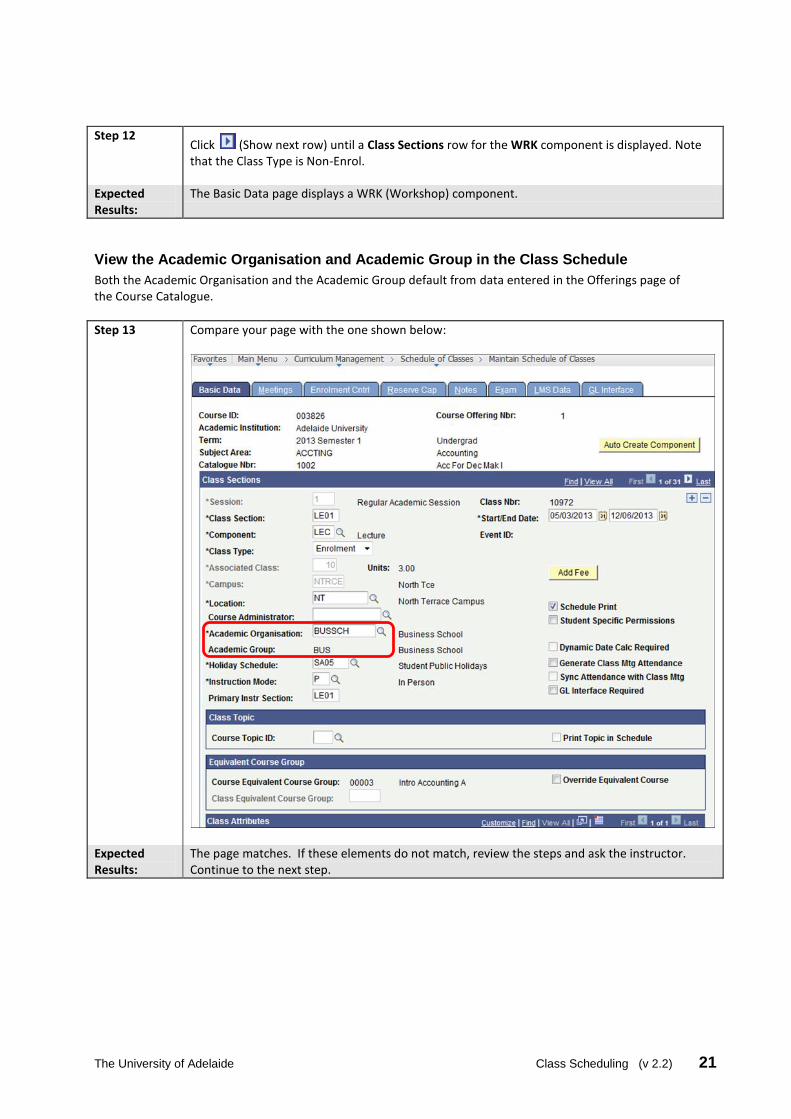
Step 12
Click (Show next row) until a Class Sections row for the WRK component is displayed. Note that the Class Type is Non-Enrol.
Expected Results:
The Basic Data page displays a WRK (Workshop) component.
View the Academic Organisation and Academic Group in the Class Schedule
Both the Academic Organisation and the Academic Group default from data entered in the Offerings page of the Course Catalogue.
Step 13
Compare your page with the one shown below:
Expected Results:
The page matches. If these elements do not match, review the steps and ask the instructor. Continue to the next step.

22 Class Scheduling (v 2.2) The University of Adelaide
Interpret Meeting Pattern information in the Class Schedule
Step 14
Click the Meetings page tab.
Expected Results:
The Meetings page is displayed.
Step 15
Compare your page with the one shown below:
NOTE This component has two lectures per week displayed as 4 rows in the Meeting Pattern section: Pat Nbr 1: LE01 from 05/03/2013 (Tuesday) to 09/04/2013 (Tuesday) Pat Nbr 2: LE01 from 06/03/2013 (Wednesday) to 10/04/2013 (Wednesday) Pat Nbr 3: LE01 from 30/04/2013 (Tuesday) to 11/06/2013 (Tuesday) Pat Nbr 4: LE01 from 01/05/2013 (Wednesday) to 12/06/2013 (Wednesday) This ensures that the venues are vacant during the mid-semester break, and that students are free to enrol in other sessions at this time if required. Click the View All link to view all meeting patterns at one time.
Expected Results:
The page matches. If these elements do not match, review the steps and ask the instructor. Continue to the next step.

The University of Adelaide Class Scheduling (v 2.2) 23
View Enrolment Controls in the Class Schedule
Step 16
Click the Enrolment Cntrl page tab.
Expected Results:
The Enrolment Control page is displayed.
Step 17
Compare your page with the one shown below:
Expected Results:
The page matches. If these elements do not match, review the steps and ask the instructor. Continue to the next step.

24 Class Scheduling (v 2.2) The University of Adelaide
NOTE Enrolment control data is described in the following table:
Field Possible Values Description
Class Status Active Default value
Cancelled Section Can only be selected when all enrolments have been dropped from a non-timetabled course. The Cancel Class button will then become active
Stop Further Enrolment
Used to temporarily remove the class from Access Adelaide and Course Planner to fix a problem such as a timetable clash. Assumed that this class will be re-activated for enrolments at a later stage
Tentative Section Used to temporarily remove the component from Access Adelaide and Course Planner. This is usually used when holding back classes for later enrolment (eg for international students)
To Be Cancelled Not to be selected (SPI only)
Consent Dept Cnsnt Inst Cnsnt No Consent
Not to be used as it can prevent enrolment. Default = No Consent
Requested Room Capacity
Do not change in the Class Schedule. If change is needed, alter from within Syllabus Plus. This value provides a guide to the original capacity in cases where enrolment capacity has been temporarily decreased
Enrolment Capacity Set to capacity needed. If altered to a number less than the number already enrolled, the component will be closed. Can be used to hold back places to spread load. Enrolment capacity must not be higher than the capacity of the location selected in Syllabus Plus
Wait List Capacity Not used
Minimum Enrolment Number
Not used
Auto Enrol from Wait List
Not used
1st Auto Enrol Section Used to automatically enrol students from a primary enrolment section. For example, if only one lecture is scheduled, when students enrol in a tutorial they will be automatically enrolled in the lecture
2nd Auto Enrol Section
Resection to Section Not used
Exercise completed.

The University of Adelaide Class Scheduling (v 2.2) 25
Exercise 5 – Set up enrolment control When enrolling, students select components of a course that are designated as the enrolment component first. They can then select from related classes for any other components of that course. For example, if a lecture is the enrolment component of a course, related classes might include a selection of tutorials and practicals where students are required to enrol in one of each of the related components. Changing the enrolment component from the lecture to the tutorials in many instances provides a more streamlined enrolment process for students, particularly when coupled with the Auto Enrol facility which will automatically enrol students in a component if there is only one class. Course components are initially set in the Course Catalogue on the Components and Scheduling pages prior to the initial build of the Class Schedule for the upcoming year. Scenario: Your goals in this 4 part exercise include:
Change the session for a non-timetabled course
Change the enrolment component of a course from the lecture to the tutorials
Change the enrolment capacity of a lecture
Set up Auto Enrol. BUSINESS RULES 1. Changes to enrolment component must be set before enrolment commences. 2. Once a class is created in the Class Schedule you can only change the enrolment component from within
the Class Schedule.
Change the session for a non-timetabled course
NOTE
You can only change a session for a non-timetabled class in PeopleSoft. Contact the University Timetable Co-ordinator if you need to change a session for a timetabled class.
As all non-timetabled courses are created with a default session of 1 you must change the session of new full year (part 1 or 2) courses to FY1 or FY2 etc (see page 8 for a full list).
If changing sessions for courses with multiple parts, ensure you check and update all parts (eg FY1 and FY2).
You must never change a session for classes that have enrolments. Contact [email protected] if you have any problems.
Step 1
From the Navigation Menu, select: Curriculum Management > Schedule of Classes > Maintain Schedule of Classes
Expected Results:
The Find an Existing Value page of the Maintain Schedule of Classes component is displayed.
Step 2
Enter or select the following: Academic Institution: UNIAD Term: 3310 Subject Area: CHEM Catalogue Nbr: 4000B
Expected Results:
Correct data entry.

26 Class Scheduling (v 2.2) The University of Adelaide
Step 3
Click Search.
Expected Results:
The Basic Data page is displayed.
Step 4
Ensure that you are viewing the Thesis row (THE component).
Expected Results:
The thesis row is displayed.
Step 5
Enter or select the following: Session: FM2 (Full Mid Year 2)
Expected Results:
Correct data entry.
Step 6
Compare your page with the one shown below:
Expected Results:
The page matches. If these elements do not match, review the steps and ask the instructor. Continue to the next step.
Step 7
Click Save.
Expected Results:
The data is saved.
The University of Adelaide Class Scheduling (v 2.2) 27
NOTES 1. If you are changing a non-timetabled session and the course is timetabled with more than one component
you will need to remove components for class associations. See Exercise 12: Delete non-enrolment components.
2. To change a session for a timetabled course, change the module's Named Availability entered in Syllabus Plus.
Change an enrolment component for a timetabled course
NOTE Only one component can be the Enrolment component. This process can also be completed within the Course Catalogue prior to enrolments.
Step 8
From the Navigation Menu, select: Curriculum Management > Schedule of Classes > Maintain Schedule of Classes
Expected Results:
The Find an Existing Value page of the Maintain Schedule of Classes component is displayed.
Step 9
Enter or select the following: Academic Institution: UNIAD Term: 3310 Subject Area: ACCTING (Accounting) Catalogue Nbr: 1002 (Acc For Dec Mak 1) Campus: NTRCE
Expected Results:
Correct data entry.
Step 10
Click Search.
Expected Results:
The Basic Data page is displayed.
Each class is listed in a row in this page. We need to change the class type of the lecture component to Non-Enrol, then change the class type for each workshop to Enrolment.
Step 11
Ensure that you are viewing the first lecture row (class section LE01).
Expected Results:
The first lecture row is displayed.
Step 12
Enter or select the following: Class Type: Non-Enrol
Expected Results:
Correct data entry.

28 Class Scheduling (v 2.2) The University of Adelaide
Step 13
Repeat step 12 to change the class type for the remaining lectures (if applicable).
Expected Results:
The class type is changed to Non-Enrol for all lectures.
Step 14
Compare your page with the one shown below:
Expected Results:
The page matches. If these elements do not match, review the steps and ask the instructor. Continue to the next step.
Step 15
Click (Show next row) to move to the first workshop.
Expected Results:
Class Section WR01 is displayed.
Step 16
Enter or select the following Class Type: Enrolment
Expected Results:
Correct data entry.

The University of Adelaide Class Scheduling (v 2.2) 29
Step 17
Compare your page with the one shown below:
Expected Results:
The page matches. If these elements do not match, review the steps and ask the instructor. Continue to the next step.
Step 18
Repeat steps 15 to 17 to change the class type for the remaining workshops. Take care not to change the Class Type for the GEN class, which is used for MyUni.
Expected Results:
The class type is changed to Enrolment for all workshops.
Step 19
Click Save.
Expected Results:
The data is saved.
NOTE If you have the Course Coordinators’ details, they can be added in the GEN class (in the Meetings tab) at this time.
30 Class Scheduling (v 2.2) The University of Adelaide
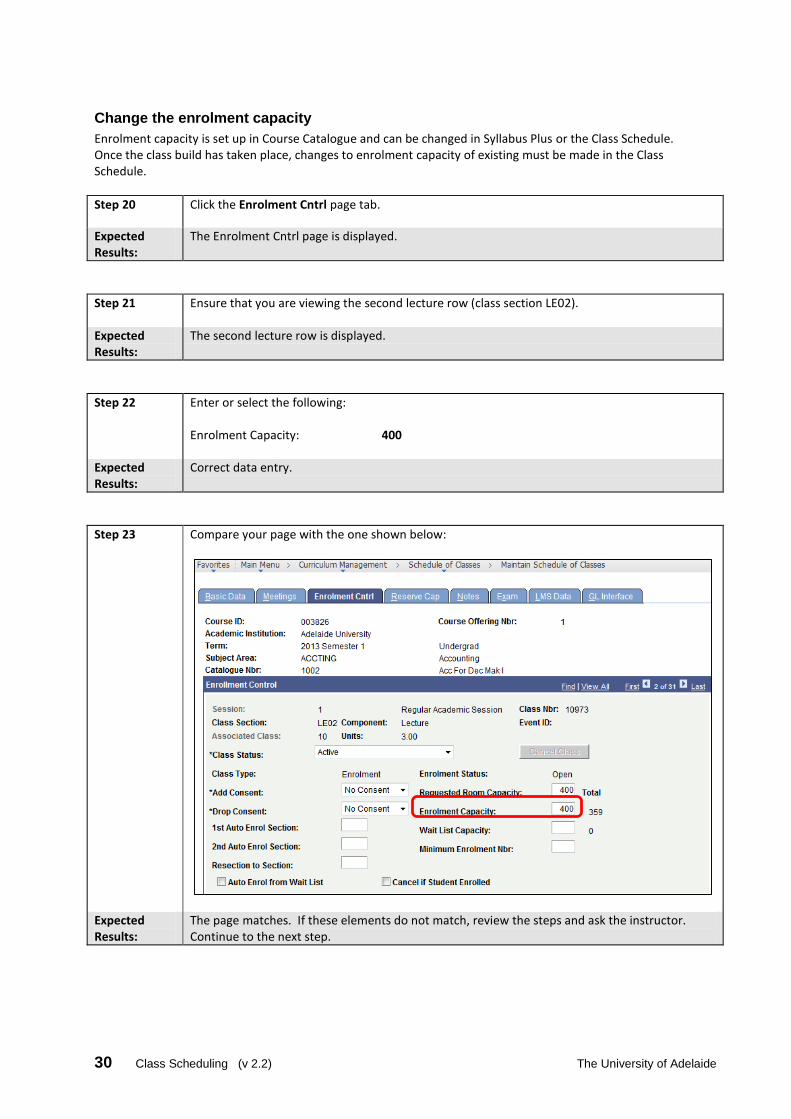
Change the enrolment capacity
Enrolment capacity is set up in Course Catalogue and can be changed in Syllabus Plus or the Class Schedule. Once the class build has taken place, changes to enrolment capacity of existing must be made in the Class Schedule.
Step 20
Click the Enrolment Cntrl page tab.
Expected Results:
The Enrolment Cntrl page is displayed.
Step 21
Ensure that you are viewing the second lecture row (class section LE02).
Expected Results:
The second lecture row is displayed.
Step 22
Enter or select the following: Enrolment Capacity: 400
Expected Results:
Correct data entry.
Step 23
Compare your page with the one shown below:
Expected Results:
The page matches. If these elements do not match, review the steps and ask the instructor. Continue to the next step.

The University of Adelaide Class Scheduling (v 2.2) 31
Step 24
Click (Show next row) to view the first workshop (class section WR01).
Expected Results:
The first tutorial row is displayed.
Step 25
Enter or select the following: Enrolment Capacity: 25
Expected Results:
Correct data entry.
Step 26
Compare your page with the one shown below:
Expected Results:
The page matches. If these elements do not match, review the steps and ask the instructor. Continue to the next step.
32 Class Scheduling (v 2.2) The University of Adelaide
Set up Auto Enrol to automatically enrol students in a component
Students enrol in the component of a course that is designated as the enrolment component. They can then select from related classes for any other components of that course. For example, if a lecture is the enrolment component of a course, related classes might include a selection of tutorials and practicals. Students are required to enrol in one of each of the related components. The Auto Enrol facility can be set up to automatically enrol students in specified classes of related component(s) when they enrol in the enrolment component. BUSINESS RULE Changes to the enrolment component, including the use of Auto Enrol, must happen before enrolment commences. Each class is listed in a row in this page. We need to enter the class section for the non-enrolment component (in this case, the lecture) into the 1st Auto Enrol Section field to ensure that students will be automatically enrolled in the lecture when they choose a workshop. This will be repeated for each workshop row.
Step 27
On the Enrolment Cntrl page, ensure that you are viewing the first workshop row (class section WR01).
Expected Results:
The first workshop row is displayed.
Step 28
Enter or select the following: 1st Auto Enrol Section: LE01
Expected Results:
Correct data entry.
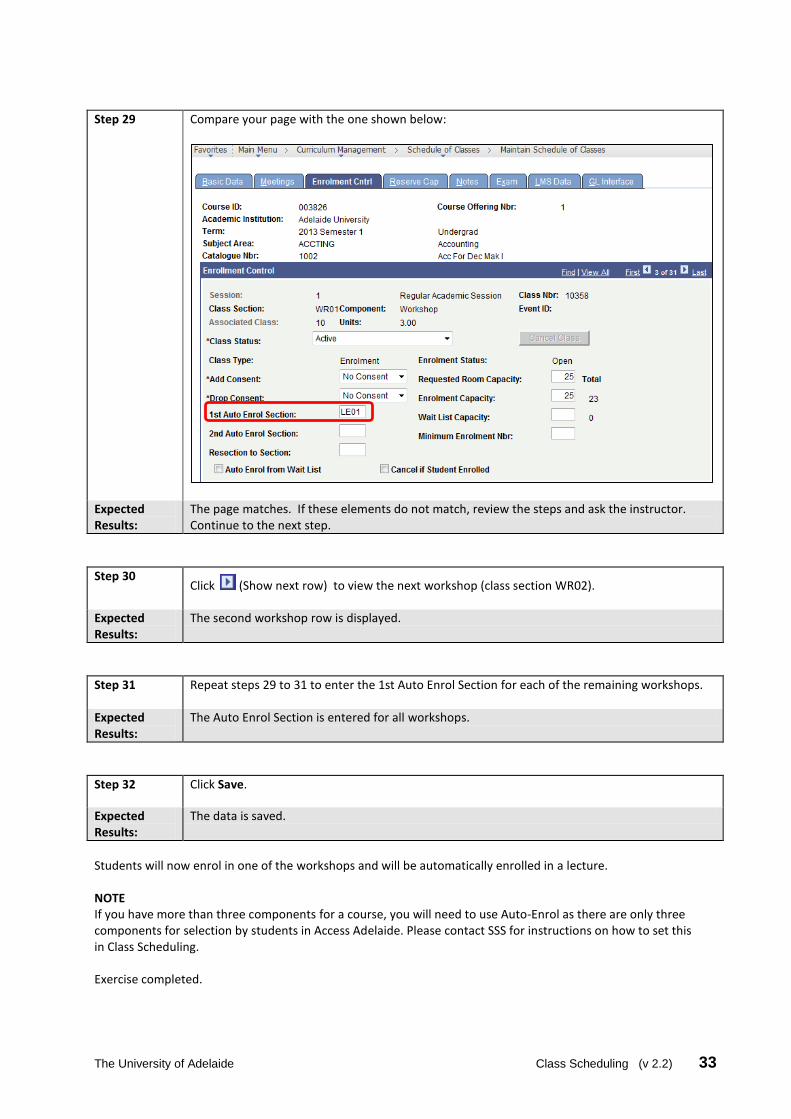
The University of Adelaide Class Scheduling (v 2.2) 33
Step 29
Compare your page with the one shown below:
Expected Results:
The page matches. If these elements do not match, review the steps and ask the instructor. Continue to the next step.
Step 30
Click (Show next row) to view the next workshop (class section WR02).
Expected Results:
The second workshop row is displayed.
Step 31
Repeat steps 29 to 31 to enter the 1st Auto Enrol Section for each of the remaining workshops.
Expected Results:
The Auto Enrol Section is entered for all workshops.
Step 32
Click Save.
Expected Results:
The data is saved.
Students will now enrol in one of the workshops and will be automatically enrolled in a lecture. NOTE If you have more than three components for a course, you will need to use Auto-Enrol as there are only three components for selection by students in Access Adelaide. Please contact SSS for instructions on how to set this in Class Scheduling. Exercise completed.

34 Class Scheduling (v 2.2) The University of Adelaide
Exercise 6 – Hold a class back from enrolment Scenario: You have been asked to hold back 2 workshop classes from enrolment.
These can be released later if the extra classes are required at enrolment time.
BUSINESS RULE Classes are held back by setting their Class Status to Tentative. If a class is set as Tentative, students will not be able to view this class or enrol through Access Adelaide. The enrolment cannot be overridden in the Enrolment Request page of PeopleSoft. This process must not be used if students are currently enrolled in the class. Users must adjust the enrolment capacity for all components to ensure that, for example, a student cannot enrol in a lecture for which there are no corresponding places in tutorials.
Step 1
From the Navigation Menu, select: Curriculum Management > Schedule of Classes > Maintain Schedule of Classes
Expected Results:
The Find an Existing Value page of the Maintain Schedule of Classes component is displayed.
Step 2
Enter or select the following: Academic Institution: UNIAD Term: 3310 Subject Area: ACCTING (Accounting) Catalogue Nbr: 1002 (Acc For Dec Mak 1) Campus: NTRCE
Expected Results:
Correct data entry.
Step 3
Click Search.
Expected Results:
The Basic Data page is displayed.
Step 4
Click the Enrolment Cntrl page tab.
Expected Results:
The Enrolment Cntrl page is displayed.
Step 5
Locate the workshop with Class Section WR32.
Expected Results:
The row for the required workshop is displayed.

The University of Adelaide Class Scheduling (v 2.2) 35
Step 6
Enter or select the following: Class Status: Tentative Section
Expected Results:
Correct data entry.
Step 7
Compare your page with the one shown below:
Expected Results:
The page matches. If these elements do not match, review the steps and ask the instructor. Continue to the next step.
Step 8
Repeat steps 5 and 6 for the previous workshop, WR31.
Expected Results:
Correct data entry.
Step 9
Click Save.
Expected Results:
The data is saved. Enrolment is immediately prevented in Access Adelaide.
NOTE Remember to change the Class Status back to Active if you wish to make the tutorials available for enrolment at a later time. Exercise completed.

36 Class Scheduling (v 2.2) The University of Adelaide
Exercise 7 – Release a class for enrolment Scenario: You have been asked to release 2 workshop classes for enrolment. These
classes were held back earlier in the enrolment process until enrolment numbers were firmer.
Step 1
From the Navigation Menu, select: Curriculum Management > Schedule of Classes > Maintain Schedule of Classes
Expected Results:
The Find an Existing Value page of the Maintain Schedule of Classes component is displayed.
Step 2
Enter or select the following: Academic Institution: UNIAD Term: 3310 Subject Area: ACCTING (Accounting) Catalogue Nbr: 1002 (Acc For Dec Mak 1) Campus: NTRCE
Expected Results:
Correct data entry.
Step 3
Click Search.
Expected Results:
The Basic Data page is displayed.
Step 4
Click the Enrolment Cntrl page tab.
Expected Results:
The Enrolment Cntrl page is displayed.
Step 5
Use the scroll bar to locate the workshop with Class Section WR32.
Expected Results:
The row for the required tutorial is displayed.
Step 6 Enter or select the following: Class Status: Active
Expected Results:
Correct data entry.

The University of Adelaide Class Scheduling (v 2.2) 37
Step 10
Compare your page with the one shown below:
Expected Results:
The page matches. If these elements do not match, review the steps and ask the instructor. Continue to the next step.
Step 11
Repeat steps 5 and 6 for the previous workshop, WR31.
Expected Results:
Correct data entry.
Step 12
Click Save.
Expected Results:
The data is saved. The classes are now available for enrolment in Access Adelaide.
Exercise completed.

38 Class Scheduling (v 2.2) The University of Adelaide
Exercise 8 – Create an Enrolment Requirement Group for restriction by program Enrolment Requirement Groups (ERGs) can be used to restrict enrolments on the basis of the program in which a student is enrolled. You can specify that only students enrolled in a certain program are able to enrol in some courses. ERGs can also be used to reserve places in a class, for example, to ensure that 20 places in a Chemistry lecture will be reserved for Chemical Engineering students. Scenario: You have been asked to create an ERG that can be used to ensure that only
students who are enrolled in the program of Bachelor of Commerce or Bachelor of Economics can enrol in certain classes or courses.
NOTES 1. The same method can be used to set up an ERG for students in a specified plan or student group. 2. There are a large number of requirement groups set up in PeopleSoft already. Always search to make sure
that the requirement group you need has not already been created.
Check if the required ERG exists
Step 1
From the Navigation Menu, select: Curriculum Management > Enrolment Requirements > Enrolment Requirement Groups
Expected Results:
The Find an Existing Value page of the Enrolment Requirement Groups component is displayed.
Step 2
Enter or select the following: Academic Group: COM
Expected Results:
Correct data entry.
Step 3
Click Search.
Expected Results:
The Enrolment Requirement Groups display for Commerce.

The University of Adelaide Class Scheduling (v 2.2) 39
Step 4
Compare your page with the one shown below:
Expected Results:
The page matches. If these elements do not match, review the steps and ask the instructor. Continue to the next step.
Create an ERG
Step 5
Click the Add a New Value page tab.
Expected Results:
The Add a New Value page is displayed.
Step 6
Click Add. BUSINESS RULE The default value in this dialog box is set to a string of zeroes. Do not change this. The system will automatically assign a number once the requisite has been created and saved.
Expected Results:
The Course Requisite page is displayed.
Check the Description column to ensure that the required ERG doesn’t already exist.

40 Class Scheduling (v 2.2) The University of Adelaide
Step 7
Enter or select the following: Effective Date: 01/01/2013 Description: BCom or BEco check Long Description: Check student in B.Commerce or B.Economics program Academic Institution: UNIAD Academic Group: COM
Expected Results:
Correct data entry.
Step 8
Compare your page with the one shown below:
Expected Results:
The page matches. If these elements do not match, review the steps and ask the instructor. Continue to the next step.
Step 9
Click the Requisite Detail page tab.
Expected Results:
The Requisite Detail page is displayed.

The University of Adelaide Class Scheduling (v 2.2) 41
Step 10
Enter or select the following: Group Line Type: Condition Condition Code: Academic Program Condition Operator: Equal Condition Data: BCOM NOTE The same method can be used to set up an ERG for students in a specified plan or student group.
Expected Results:
Correct data entry.
Step 11
Compare your page with the one shown below:
Expected Results:
The page matches. If these elements do not match, review the steps and ask the instructor. Continue to the next step.
Step 12
In the Group Line Type level, click [Add a new row at Row 1).
Expected Results:
A new row is displayed.

42 Class Scheduling (v 2.2) The University of Adelaide
Step 13
Enter or select the following: And/Or list: OR Group Line Type: Condition Condition Code: Academic Program Condition Operator: Equal Condition Data: BEC
Expected Results:
Correct data entry.
Step 14
Compare your page with the one shown below:
Expected Results:
The page matches. If these elements do not match, review the steps and ask the instructor. Continue to the next step.
Step 15
Click Save. Record the Requirement Group number here: _____________________________
Expected Results:
The data is saved and a new number is displayed.
Exercise completed.
The Group Line Type header displays row 2 of 2

The University of Adelaide Class Scheduling (v 2.2) 43
Exercise 9 – Attach an Enrolment Requirement Group to a course Scenario: Once you have made an Enrolment Requirement Group (ERG) you can
attach it to a course or class. Your goal is to restrict the whole course offering to students in the programs of BCOM or BEC, for which a requirement group has been created.
BUSINESS RULE ERGs can only be attached to courses or classes before enrolment commences. It is only possible to attach 1 ERG to each course or class. It is recommended that pre- and co-requisites are inactivated to reduce the number of ERGs required. If an ERG is already attached to the course you wish to amend, you should create a new, single ERG which includes all criteria. Student enrolment will be blocked for courses where a student has failed to meet a requisite group. To enable enrolment for a full year where second semester courses have pre-requisites taken in first semester, requisite setup needs to allow “in Progress” grades (eg, blank, CN, WH) to satisfy the requisites. Where this happens, an inter-semester check must be done to identify students who have failed their first semester prerequisite courses. Information must then be sent to advise them that they need to withdraw from the second semester courses that required the prerequisites that were not met.
Step 1
From the Navigation Menu, select:
Curriculum Management > Course Catalogue > Course Catalogue
Expected Results:
The Find an Existing Value page of the Course Catalogue component is displayed.
Step 2
Enter or select the following: Academic Institution: UNIAD Subject Area: ACCTING Catalogue Nbr: 1002 Campus: NTRCE
Expected Results:
Correct data entry.
Step 3
Click Search.
Expected Results:
The Catalogue Data page is displayed.
Step 4
Click the Offerings page tab.
Expected Results:
The Offerings page is displayed.

44 Class Scheduling (v 2.2) The University of Adelaide
Step 5
Enter or select the following: Requirement Group: Enter the number of your Enrolment Requirement Group
Expected Results:
Correct data entry.
Step 6
Compare your page with the one shown below:
Expected Results:
The page matches. If these elements do not match, review the steps and ask the instructor. Continue to the next step.
Step 7
Click Save.
Expected Results:
The data is saved.
Exercise completed.
The University of Adelaide Class Scheduling (v 2.2) 45
Exercise 10 – Attach an Enrolment Requirement Group to a class Scenario: Your goal is to restrict a class to students in the program on BCOM or BEC,
for which there is a requirement group already created.
Step 1
From the Navigation Menu, select: Curriculum Management > Schedule of Classes > Maintain Schedule of Classes
Expected Results:
The Find an Existing Value page of the Maintain Schedule of Classes component is displayed.
Step 2
Enter or select the following: Academic Institution: UNIAD Term: 3310 Subject Area: ACCTING Catalogue Nbr: 1002 Campus: NTRCE
Expected Results:
Correct data entry.
Step 3
Click Search.
Expected Results:
The Basic Data page is displayed.
Step 4
Click the Reserve Cap page tab.
Expected Results:
The Reserve Cap page is displayed.
Step 5
In the Class Sections level, locate the first enrolment class section row (in this case it will probably be the workshop row).
Expected Results:
The appropriate class section row is displayed.

46 Class Scheduling (v 2.2) The University of Adelaide
Step 6
Enter or select the following: Start Date: 01/01/2013 Requirement Group: Enter the number of your Enrolment Requirement Group Cap Enrl: 5 (This is the number of places you wish to reserve for this group. If you wish to reserve the entire class, the Enrolment Capacity and Cap Enrl should be the same.) NOTE The Start Date for this group must be before the enrolment open date.
Expected Results:
Correct data entry.
Step 7
Compare your page with the one shown below:
Expected Results:
The page matches. If these elements do not match, review the steps and ask the instructor. Continue to the next step.
Step 8
Click Save.
Expected Results:
The data is saved.
NOTE Inserting extra rows at the Reserve Capacity Sequence level or the Requirement Group level will have different effects:
Extra rows at the lower level (Requirement Group) must have different start dates and will all have the same Reserve Capacity Sequence number. These Requirement Groups will be treated simultaneously.
Extra rows at the higher level (Reserve Capacity Sequence) will be indicated by a new sequence number (1, 2, 3…) and are used to control the order in which requirement groups are applied.
Exercise completed.

The University of Adelaide Class Scheduling (v 2.2) 47
Exercise 11 – Add class notes Class notes should be added prior to students enrolling. They are displayed in Access Adelaide and the Course Planner prior to a student enrolling. They can be used to display enrolment restrictions, instructions that may apply to a particular course, and/or to provide additional information for students such as fees for field trips. Scenario: You have been asked to add some notes to a course to ensure that students
are aware of enrolment restrictions.
Step 1
From the Navigation Menu, select: Curriculum Management > Schedule of Classes > Maintain Schedule of Classes
Expected Results:
The Find an Existing Value page of the Maintain Schedule of Classes component is displayed.
Step 2
Enter or select the following: Academic Institution: UNIAD Term: 3310 Subject Area: ACCTING Catalogue Nbr: 1002 Campus: NTRCE
Expected Results:
Correct data entry.
Step 3
Click Search.
Expected Results:
The Basic Data page is displayed.
Step 4
In the Class Sections level, click (Show next row) to locate the WR01 class section row.
Expected Results:
The WR01 class section row is displayed.
Step 5
Click the Notes page tab.
Expected Results:
The Notes page is displayed.
Step 6
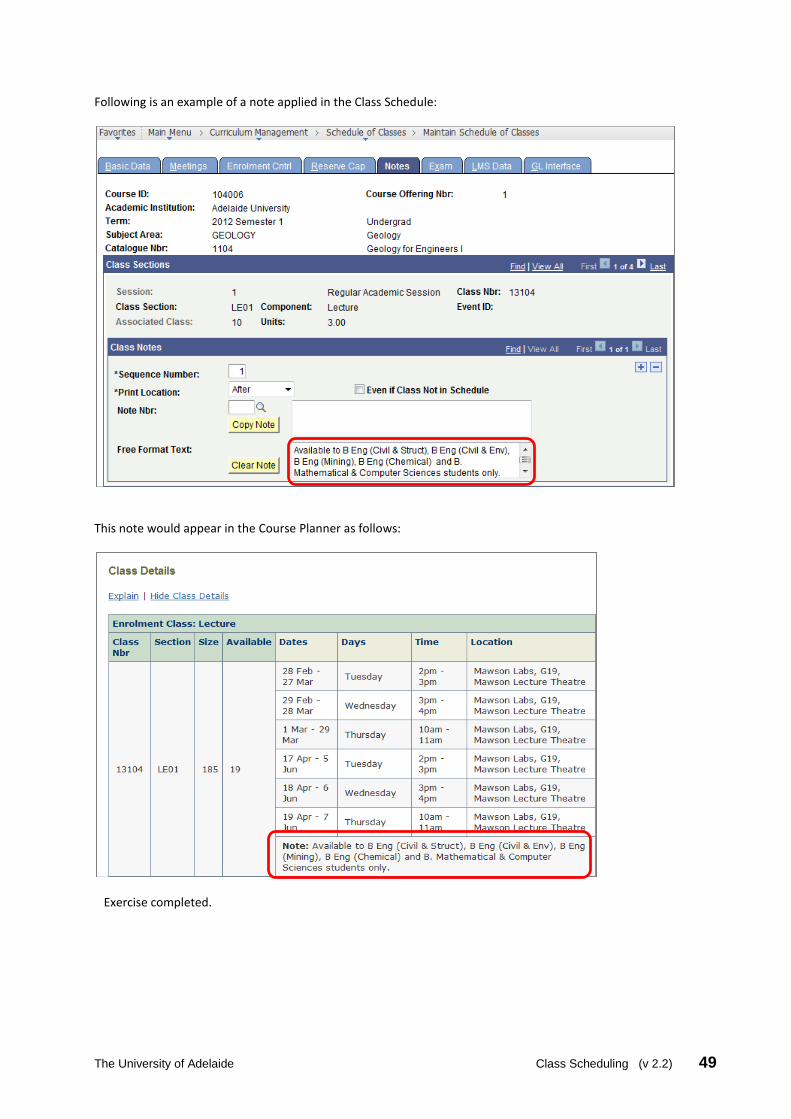
Enter the following: Free Format Text: This class is only open for students in the programs of B.Commerce
or B. Economics
Expected Results:
The Note is entered.

48 Class Scheduling (v 2.2) The University of Adelaide
Step 7
Compare your page with the one shown below:
Expected Results:
The page matches. If these elements do not match, review the steps and ask the instructor. Continue to the next step.
Step 8
Click Save.
Expected Results:
The data is saved.
The University of Adelaide Class Scheduling (v 2.2) 49
Following is an example of a note applied in the Class Schedule:
This note would appear in the Course Planner as follows:
Exercise completed.

50 Class Scheduling (v 2.2) The University of Adelaide
Exercise 12 – View associated classes The Associated Class field allows areas to specify different options for different groups of students for components within the same course. For example, tutorials may be held for different groups of students. Associated Class identifes classes that are set up differently from the other classes in the same course. For example:
FREN 1002 may have lectures and workshops scheduled from Syllabus Plus. However, one lecture and two of the workshops may be only for students who are French language continuers (for example, those who studied the language at school), while the other lecture and tutorials would only be for new French language students. One common grading system would be set for this course.
Associations can be used to record different topics being covered within the same course where this information should appear on a student’s transcript (eg special projects).
Associated Class determines how many components must be selected to enrol. Class association values are as follows:
Value Comment
1 Default
1 - 9 To be used for non-timetabled classes ONLY
10 - 97 To be used for timetabled classes
98 To be used for MyUni
9999 WildCard: for common Class Sections between Associations (anyone can enrol in these)
Session, Section and Associated Class information must not be changed once students have enrolled. Scenario: You are asked to view the Class Associations in Semester 2, 2012
to determine the different course structures.
View Class Association number from the Schedule of Classes page
Step 1
From the Navigation Menu, select: Curriculum Management > Schedule of Classes > Maintain Schedule of Classes
Expected Results:
The Find an Existing Value page of the Maintain Schedule of Classes component is displayed.
Step 2
Enter or select the following: Academic Institution: UNIAD Term: 3320 Subject Area: DESST (Design Studies) Catalogue Nbr: 1507 (Construction I)
Expected Results:
Correct data entry.

The University of Adelaide Class Scheduling (v 2.2) 51
Step 3
Click Search.
Expected Results:
The Basic Data page is displayed.
Step 4
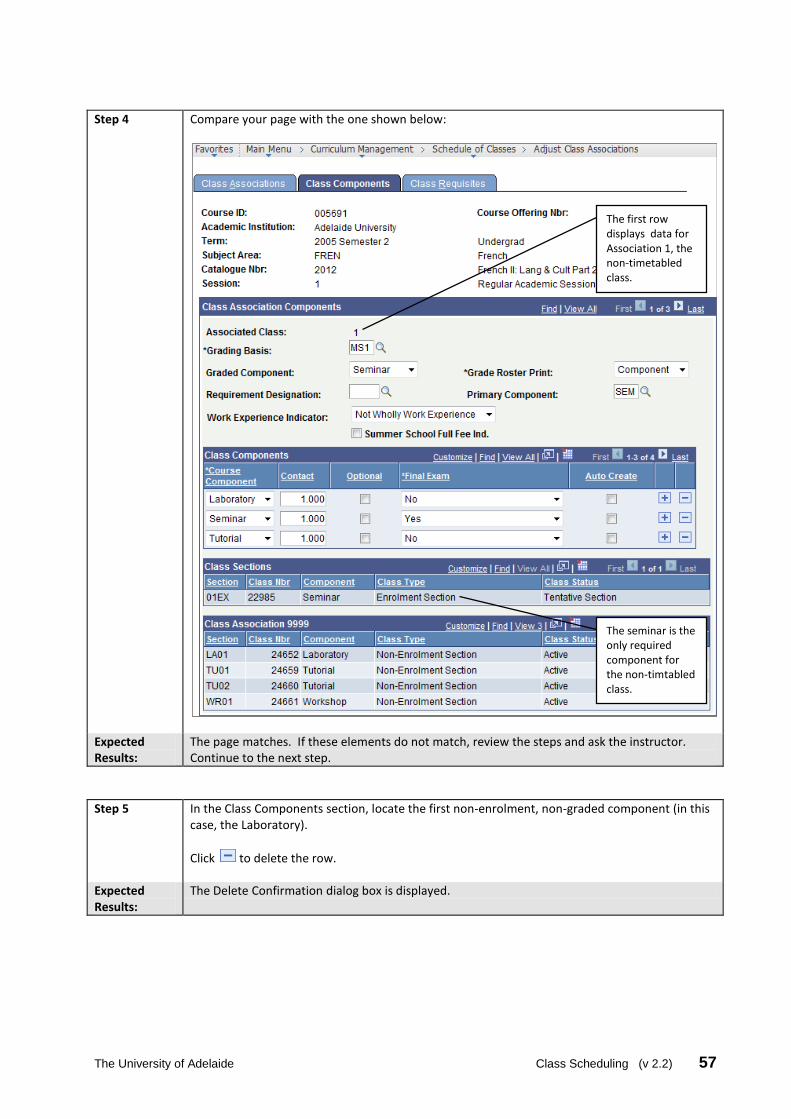
Compare your page with the one shown below:
Expected Results:
The page matches. If these elements do not match, review the steps and ask the instructor. Continue to the next step.
Step 5
Click (Show next row) to display the different Class Sections. Note that some class sections have Associated Classes of 1, 10, 11, 98 and 9999.
Expected Results:
Different Associated Classes are displayed.
View Associated Class from the Class Associations page
Step 6
From the Navigation Menu, select: Curriculum Management > Schedule of Classes > Adjust Class Associations
Expected Results:
The Find an Existing Value page of the Adjust Class Associations component is displayed.
Step 7
Enter or select the following: Academic Institution: UNIAD Term: 3320 Subject Area: DESST (Design Studies) Catalogue Nbr: 1507 (Construction I)
Expected Results:
Correct data entry.

52 Class Scheduling (v 2.2) The University of Adelaide
Step 8
Click Search.
Expected Results:
The Search Results list displays Regular and MyUni sessions.
Step 9
Select the record for the Regular session.
Expected Results:
The Class Associations page is displayed.
Step 10
Cick the View All link to display all associated classes. Compare your page with the one shown below:
NOTE Classes with a Class Association of 9999 belong to all associations. Although a class is with association number 9999 may appear in the Schedule of Classes pages, it does not have an association record and will therefore not appear in the Adjust Class Association pages.
Expected Results:
The page matches. If these elements do not match, review the steps and ask the instructor. Continue to the next step.

The University of Adelaide Class Scheduling (v 2.2) 53
NOTE Data in the Class Associations page is populated from the following pages:
Class Associations Field Populated from
Minimum/Maximum Units and Academic Progress Units
Course Units/Hours/Count section of the Catalogue Data page in Course Catalogue
Course Count Will default to 1. Only to be changed by SSS unless otherwise instructed by SSS after class build and prior to enrolments, eg to change Ngee Ann courses from ‘1’ to ‘0’.
Instructor Edit
Billing Factor
FA Units
Step 11
Click the Class Components page tab.
Expected Results:
The Class Components page is displayed.

54 Class Scheduling (v 2.2) The University of Adelaide
Step 12
Compare your page with the one shown below:
Expected Results:
The page matches. If these elements do not match, review the steps and ask the instructor. Continue to the next step.
BUSINESS RULES 1. All PGCW and UGRD courses must have a grading basis of M10 unless the use of an approved Grade
Scheme eg GS8 has been approved in writing by the Executive Dean (refer to Procedure 5f of Assessment for Coursework Programs Policy - http://www.adelaide.edu.au/policies/700/.
2. Only one component can be nominated as the Graded component. The graded component and the primary component must be the same component, eg lecture OR tutorial.
3. Data defaults from the Course Catalogue. 4. The 9999 association MUST NOT be applied to the Primary/Graded component. If you intend to use class
associations that include 9999, you must first have the Primary/Graded component changed to an alternate component in Course Catalogue prior to class build (for help, contact [email protected]). Failure to do this will require the classes to be deleted and recreated.

The University of Adelaide Class Scheduling (v 2.2) 55
NOTES 1. Grades and Units are attached to the graded (and primary) component setup in Course Catalogue. This
component controls the production of the Grade Roster. This component must be the same in Course Catalouge, Maintain Schedule of Classes and Adjust Class Association. Incorrect setup of course components prevent grades from being added or courses from appearing on students’ academic transcripts.
2. The Course Components listed under Class Components are the components that are offered in that term / course ID / course session and association. They determine how many components a student needs to select when enrolling.
3. The Final Exam field content defaults from the Course Catalogue. Exercise completed.

56 Class Scheduling (v 2.2) The University of Adelaide
Exercise 13 – Set up classes with different Class Associations Class associations identify classes that are set up differently from other classes in the same course, such as classes which are billed differently (eg offshore). Scenario: Within a language course you wish to allow separate lectures, tutorials and
workshops for students new to the language and those who are continuers.
Delete non-enrolment components
For non-timetabled courses, students enrol in one component only. Additional components may have been created where a session was changed or where an additional non-timetabled course was created. Additional components that are not needed should be deleted to prevent errors in the Syllabus Plus Interface (SPI). BUSINESS RULE Ensure that there are no students enrolled in the components and contact [email protected] if assistance is needed.
Step 1
From the Navigation Menu, select: Curriculum Management > Schedule of Classes > Adjust Class Associations
Expected Results:
The Find an Existing Value page of the Adjust Class Associations component is displayed.
Step 2
Enter or select the following: Academic Institution: UNIAD Term: 2520 Subject Area: FREN (French) Catalogue Nbr: 2012 (French II: Lang & Cult Part 2)
Expected Results:
Correct data entry.
Step 9
Click Search.
Expected Results:
The Class Associations page is displayed.
Step 3
Click the Class Components page tab.
Expected Results:
The Class Components page is displayed.
The University of Adelaide Class Scheduling (v 2.2) 57
Step 4
Compare your page with the one shown below:
Expected Results:
The page matches. If these elements do not match, review the steps and ask the instructor. Continue to the next step.
Step 5
In the Class Components section, locate the first non-enrolment, non-graded component (in this case, the Laboratory).
Click to delete the row.
Expected Results:
The Delete Confirmation dialog box is displayed.
The first row displays data for Association 1, the non-timetabled class.
The seminar is the only required component for the non-timtabled class.

58 Class Scheduling (v 2.2) The University of Adelaide
Step 6
Compare your dialog box with the one shown below:
Expected Results:
The dialog box matches. If these elements do not match, review the steps and ask the instructor. Continue to the next step.
Step 7
Click OK.
Expected Results:
The Class Components page is displayed.
Step 8
Compare your page with the one shown below. Note that the Laboratory row has been deleted:
Expected Results:
The page matches. If these elements do not match, review the steps and ask the instructor. Continue to the next step.
Step 9
Repeat Steps 6 to 9 for all other rows to be deleted, ensuring that the primary/graded component (in this case, the Seminar) is retained.
Expected Results:
Any remaining rows are deleted with the exception of the primary/graded component.
Step 10
Click Save.
Expected Results:
The data is saved.

The University of Adelaide Class Scheduling (v 2.2) 59
Group lectures with certain tutorials for timetabled classes
In some instances where a course has two lecture series you may wish to ensure that students enrol in a tutorial after the lecture.
Course Class Association Lecture Laboratory Tutorial
French 2012 10 LE01 LA01 TU01
11 LE02 LA02 LA03 LA04 LA05
TU02 TU03 TU04
Step 11
From the Navigation Menu, select: Curriculum Management > Schedule of Classes > Maintain Schedule of Classes
Expected Results:
The Find an Existing Value page of the Maintain Schedule of Classes component is displayed.
Step 12
Enter or select the following: Academic Institution: UNIAD Term: 2520 Subject Area: FREN Catalogue Nbr: 2012
Expected Results:
Correct data entry.
Step 13
Click Search.
Expected Results:
The Basic Data page is displayed.
Step 14
In the Class Sections level, click (Show next row) to locate the class section row(s) which require(s) an associated class.
Expected Results:
The correct Use - Schedule of Classes page is displayed.
Step 15
Enter the following: Associated Class: Enter the required Class Association number NOTE The dropdown is unavailable in the Associated Class field until after a second value has been entered and saved.
Expected Results:
Correct data entry.

60 Class Scheduling (v 2.2) The University of Adelaide
Step 16
Repeat steps 16 and 17 for all other rows except for the row with Associated Class 98 for Session Z, which must not change.
Expected Results:
Correct data entry.
Step 17
Click Save.
Expected Results:
The data is saved.

The University of Adelaide Class Scheduling (v 2.2) 61
Exercise 14 – Assign topics to a class Topics are used in generic courses where the content changes from year to year. More than one topic can be added in Course Catalogue in any year, BUT only one topic per class per term must be added as this will impact on statutory reporting. If Topics are not added in the Basic Data page, no details will appear in Course Planner or on the student’s Academic Transcript. Scenario: Topics have been assigned to your course in the Course Catalogue. You wish
to assign topics to individual classes of that course.
NOTE Check that the topic has been assigned to the course. If you need a topic assigned to a course, contact [email protected]. By assigning a topic to a class it will appear on the transcript by default.
Step 1
From the Navigation Menu, select: Curriculum Management > Course Catalogue > Course Catalogue
Expected Results:
The Find an Existing Value page of the Course Catalogue component is displayed.
Step 2
Enter or select the following: Academic Institution: UNIAD Subject Area: DESST Catalogue Nbr: 1001
Expected Results:
Correct data entry.
Step 3
Click Search. Choose the first search result if more than one option is available.
Expected Results:
The Catalogue Data page is displayed.
62 Class Scheduling (v 2.2) The University of Adelaide
Step 4
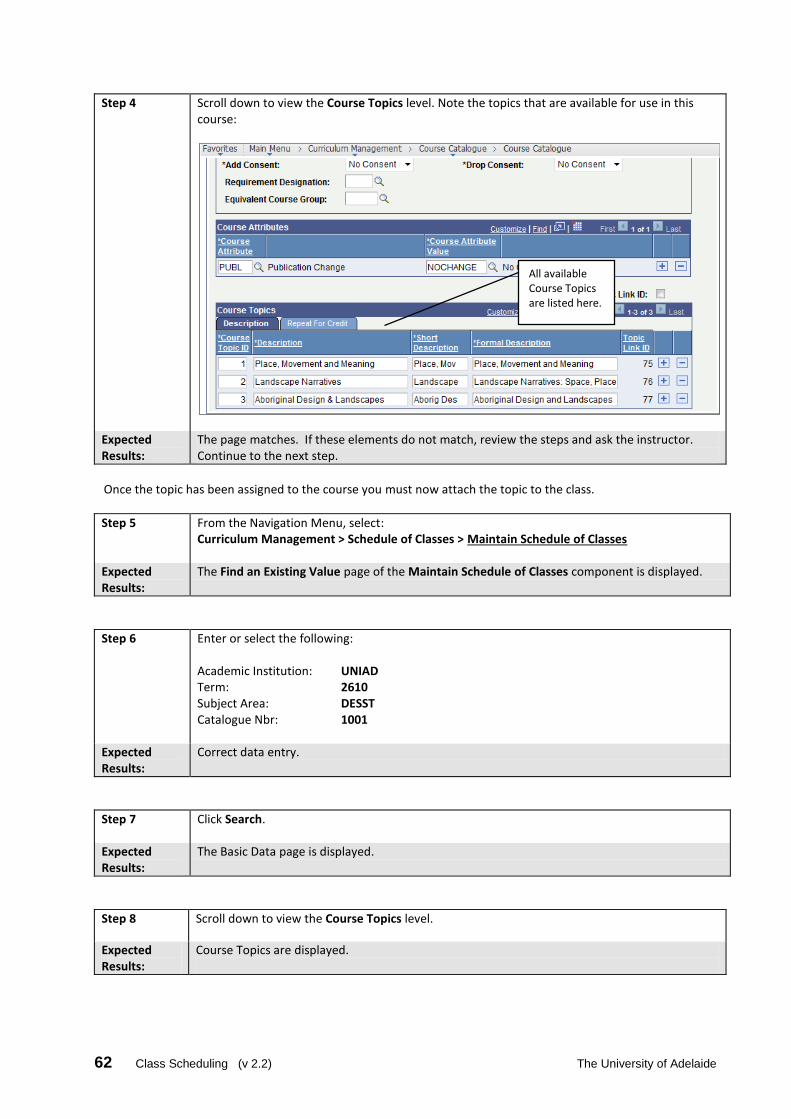
Scroll down to view the Course Topics level. Note the topics that are available for use in this course:
Expected Results:
The page matches. If these elements do not match, review the steps and ask the instructor. Continue to the next step.
Once the topic has been assigned to the course you must now attach the topic to the class.
Step 5
From the Navigation Menu, select: Curriculum Management > Schedule of Classes > Maintain Schedule of Classes
Expected Results:
The Find an Existing Value page of the Maintain Schedule of Classes component is displayed.
Step 6
Enter or select the following: Academic Institution: UNIAD Term: 2610 Subject Area: DESST Catalogue Nbr: 1001
Expected Results:
Correct data entry.
Step 7
Click Search.
Expected Results:
The Basic Data page is displayed.
Step 8
Scroll down to view the Course Topics level.
Expected Results:
Course Topics are displayed.
All available Course Topics are listed here.

The University of Adelaide Class Scheduling (v 2.2) 63
Step 9
Enter or select the following: Course Topic ID: Enter the required Course Topic number
Expected Results:
The data is saved.
Step 10
Compare your page with the one shown below:
Expected Results:
The page matches. If these elements do not match, review the steps and ask the instructor. Continue to the next step.
Step 11
Repeat for all classes in this course within the same association.
Expected Results:
The data is saved.
Step 12
Click Save.
Expected Results:
The data is saved.
NOTE If you have more than one topic per course and are going to offer both of these topics in the same semester, you will need to ensure that each topic is assigned within a different class association. Exercise completed.
Enter the required Course Topic ID here.

64 Class Scheduling (v 2.2) The University of Adelaide
Exercise 15 – Schedule a new course (non-timetabled) Timetabled courses can only be scheduled from within the Course Catalogue or Syllabus Plus. Non-timetabled classes are generally created by SPI from the Course Catalogue. This exercise shows a manual build from within the Class Schedule, where no room is required. Non-timetabled courses include offshore courses, courses at other campuses (such as teaching hospitals), Honours, Thesis (PGRS), Summer Semester and external courses. They can usually be identified by a separate offering which will have a suffix on the Catalogue number, eg COMP SCI 2002SI or WINE MARKTG 1003EX; or by the Catalogue number range, eg 4000 for Honours and 7000 - 8999 for Masters and PhD thesis. Scenario: The semester value of a course was not selected in the Course Catalogue
and therefore no course was created. Your goal is to create a course for the term in the Class Schedule, so that you can then create the required classes.
BUSINESS RULE A course must be active in the Course Catalogue and be available for scheduling before we can schedule it. Non-timetabled courses will only have an enrolment component class created and this must be the primary/graded component as specified in the Course Catalogue.
Step 1
From the Navigation Menu, select: Curriculum Management > Schedule of Classes > Schedule New Course
Expected Results:
The Find an Existing Value page of the Schedule New Course component is displayed.
Step 2
Enter or select the following: Academic Institution: UNIAD Term: 3310 [Entering a term creates the course in this term] Subject Area: AGRONOMY Catalogue Nbr: 3008RW
Expected Results:
Correct data entry.
Step 3
Click Search.
Expected Results:
The Basic Data page is displayed.
The University of Adelaide Class Scheduling (v 2.2) 65
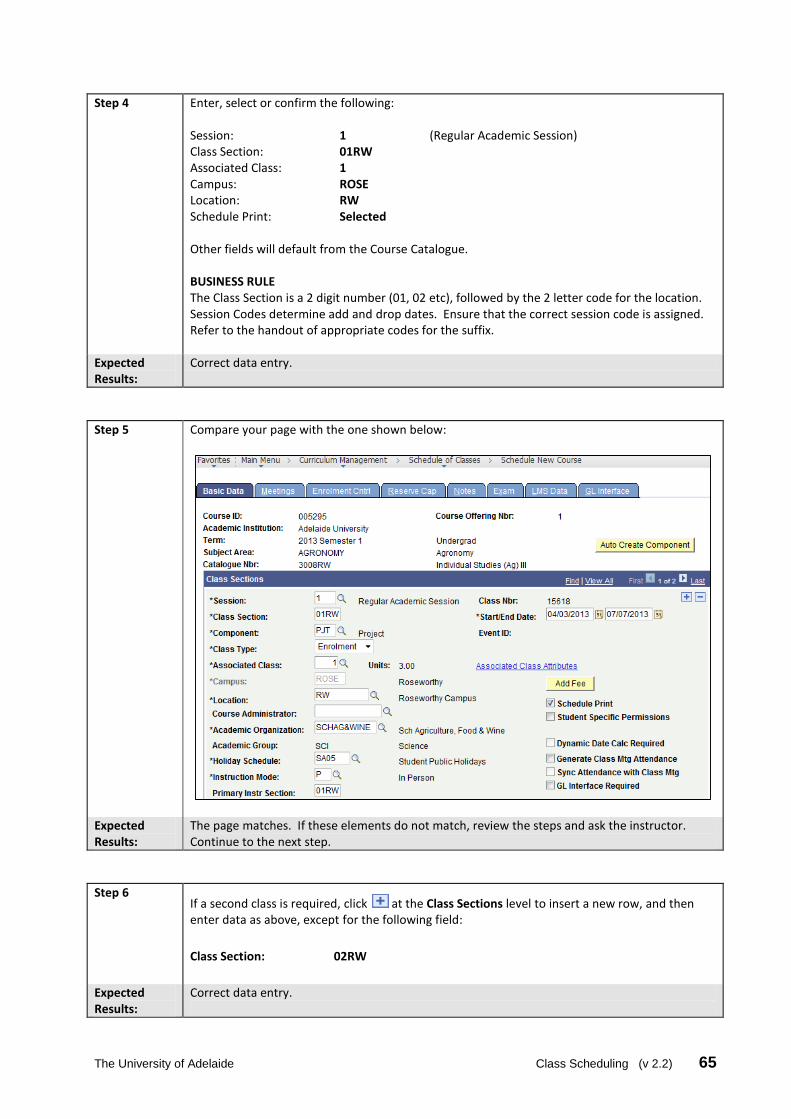
Step 4
Enter, select or confirm the following: Session: 1 (Regular Academic Session) Class Section: 01RW Associated Class: 1 Campus: ROSE Location: RW Schedule Print: Selected Other fields will default from the Course Catalogue. BUSINESS RULE The Class Section is a 2 digit number (01, 02 etc), followed by the 2 letter code for the location. Session Codes determine add and drop dates. Ensure that the correct session code is assigned. Refer to the handout of appropriate codes for the suffix.
Expected Results:
Correct data entry.
Step 5
Compare your page with the one shown below:
Expected Results:
The page matches. If these elements do not match, review the steps and ask the instructor. Continue to the next step.
Step 6
If a second class is required, click at the Class Sections level to insert a new row, and then enter data as above, except for the following field:
Class Section: 02RW
Expected Results:
Correct data entry.

66 Class Scheduling (v 2.2) The University of Adelaide
Step 7
Compare your page with the one shown below:
Expected Results:
The page matches. If these elements do not match, review the steps and ask the instructor. Continue to the next step.
Step 8
Click the Meetings page tab.
Expected Results:
The Meetings page is displayed.

The University of Adelaide Class Scheduling (v 2.2) 67
Step 9
Compare your page with the one shown below:
NOTE The Start/End Date: field displays the dates based on the Session entered at the Basic Data page. The Mtg Start, Mtg End and M, T, W, T, F, S, S fields will not be used for most non-timetabled classes.
Expected Results:
The page matches. If these elements do not match, review the steps and ask the instructor. Continue to the next step.
Step 10
Click the Enrolment Cntrl page tab.
Expected Results:
The Enrolment Cntrl page is displayed.
BUSINESS RULE The Requested Room Capacity and Enrolment Capacity will default from the Course Catalogue. For non-timetabled classes, where only one class is being created, the Enrolment Capacity must be set to the expected number of enrolments otherwise students will not be able to enrol.

68 Class Scheduling (v 2.2) The University of Adelaide
Step 11
Enter or select the following: Enrolment Capacity: 35 NOTE Requested Room Capacity is only updated when the class is originally built from data in Syllabus Plus. The Requested Room Capacity can be used as a reminder of the original Enrolment Capacity in cases where Enrolment Capacity is temporarily decreased (eg to hold places for international students).
Expected Results:
Correct data entry.
Step 12
Compare your page with the one shown below:
Expected Results:
The page matches. If these elements do not match, review the steps and ask the instructor. Continue to the next step.
Step 13
Click Save. Record the Class Nbr here: _________________________
Expected Results:
The record is saved and a new class number is displayed.
NOTE You must go back and delete any course components that are not required (see Delete non-enrolment components on page 56). Exercise completed.
The University of Adelaide Class Scheduling (v 2.2) 69
Exercise 16 – Add a class to a non-timetabled course Scenario: The co-ordinator of an external course has requested two separate class
lists. Your job is to create an additional class to provide this. BUSINESS RULE This procedure must only be used for non-timetabled classes. Timetabled classes can only be created from within Syllabus Plus.
Step 1
From the Navigation Menu, select: Curriculum Management > Schedule of Classes > Maintain Schedule of Classes NOTE The menu path above is used when we are adding another class where the offering is already scheduled in the given term. If you need to add classes to a course that has not been scheduled in the given term, use the Schedule New Course menu item.
Expected Results:
The Find an Existing Value page of the Maintain Schedule of Classes component is displayed.
Step 2
Enter or select the following: Academic Institution: UNIAD Term: 3310 [Entering a term creates the course in this term] Subject Area: AGRIBUS Catalogue Nbr: 2500EX
Expected Results:
Correct data entry.
Step 3
Click Search.
Expected Results:
The Basic Data page is displayed.
Step 4
Click at the Class Sections level to insert a new row.
Expected Results:
A new row is displayed.

70 Class Scheduling (v 2.2) The University of Adelaide
Step 5
Compare your page with the one shown below:
Expected Results:
The page matches. If these elements do not match, review the steps and ask the instructor. Continue to the next step.
Step 6
Enter or select the following: Session: 1 (Session numbers must match for all classes in the Offering) Class Section: 02EX Component: PAP Class Type: Enrolment Associated Class: 1
Expected Results:
Correct data entry.
The new class has no Class Section set.

The University of Adelaide Class Scheduling (v 2.2) 71
Step 7
Compare your page with the one shown below:
Expected Results:
The page matches. If these elements do not match, review the steps and ask the instructor. Continue to the next step.
You should check that Requsted Room and Enrolment Capacities for the new row reflect your needs.
Step 8
Click Save.
Expected Results:
The data is saved.
Exercise completed.
72 Class Scheduling (v 2.2) The University of Adelaide
Exercise 17 – Cancel a class Scenario: You wish to cancel a class and prevent any students from enrolling in it. BUSINESS RULE Users must check the current enrolment status before cancelling a class. If the class which will be cancelled has students enrolled, the students must be informed that they are to change their enrolments through Access Adelaide before the cancellation can be completed.
Step 1
From the Navigation Menu, select: Curriculum Management > Schedule of Classes > Maintain Schedule of Classes
Expected Results:
The Find an Existing Value page of the Maintain Schedule of Classes component is displayed.
Step 2
Enter or select the following: Academic Institution: UNIAD Term: 3310 Subject Area: ACCTING (Accounting) Catalogue Nbr: 1002 (Acc For Dec Mak 1) Campus: NTRCE
Expected Results:
Correct data entry.
Step 3
Click Search.
Expected Results:
The Basic Data page is displayed.
Step 4
Click the Enrolment Cntrl page tab.
Expected Results:
The Enrolment Cntrl page is displayed.
Step 5
In the Enrolment Control level, click (Show next row) to locate the first enrolment class row.
Expected Results:
The enrolment class row is displayed.

The University of Adelaide Class Scheduling (v 2.2) 73
Step 6
Compare your page with the one shown below. Note that the class is currently open for enrolment:
Expected Results:
The page matches. If these elements do not match, review the steps and ask the instructor. Continue to the next step.
Step 7
Enter or select the following: Class Status: Stop Further Enrolment Enrolment Capacity: 0
Expected Results:
Correct data entry.
74 Class Scheduling (v 2.2) The University of Adelaide
Step 8
Compare your page with the one shown below.
Expected Results:
The page matches. If these elements do not match, review the steps and ask the instructor. Continue to the next step.
Step 9
Click Save.
Expected Results:
The data is saved.
Cancel a timetabled class
BUSINESS RULE If any students are enrolled in the class you must wait until each one has withdrawn before proceeding further. The class must then be deleted in Syllabus Plus so that the meeting pattern information is removed from PeopleSoft by SPI and the assigned room becomes free for other bookings.
Step 10
After all students have unenrolled and the SPI interface has run, confirm the class status has been adjusted as follows: Class Status: To be cancelled
Expected Results:
Correct data entry.
Step 11
Click the Basic Data page tab.
Expected Results:
The Basic Data page is displayed.
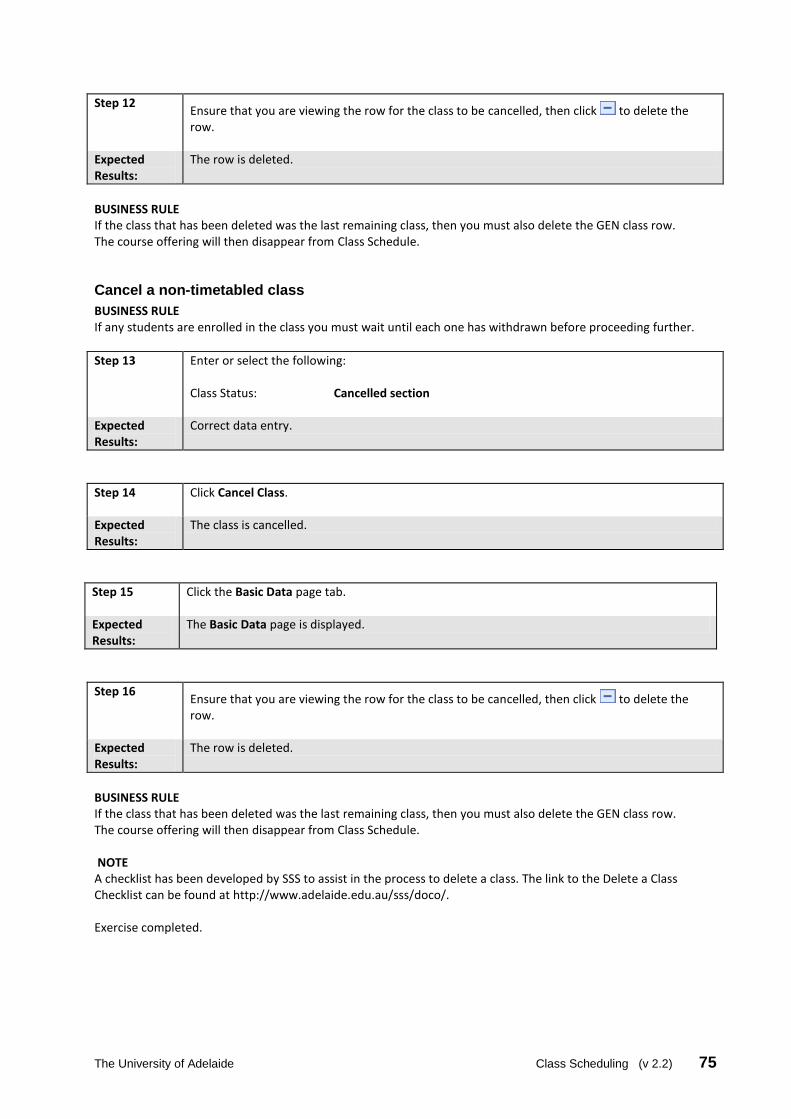
The University of Adelaide Class Scheduling (v 2.2) 75
Step 12
Ensure that you are viewing the row for the class to be cancelled, then click to delete the row.
Expected Results:
The row is deleted.
BUSINESS RULE If the class that has been deleted was the last remaining class, then you must also delete the GEN class row. The course offering will then disappear from Class Schedule.
Cancel a non-timetabled class
BUSINESS RULE If any students are enrolled in the class you must wait until each one has withdrawn before proceeding further.
Step 13
Enter or select the following: Class Status: Cancelled section
Expected Results:
Correct data entry.
Step 14
Click Cancel Class.
Expected Results:
The class is cancelled.
Step 15
Click the Basic Data page tab.
Expected Results:
The Basic Data page is displayed.
Step 16
Ensure that you are viewing the row for the class to be cancelled, then click to delete the row.
Expected Results:
The row is deleted.
BUSINESS RULE If the class that has been deleted was the last remaining class, then you must also delete the GEN class row. The course offering will then disappear from Class Schedule. NOTE A checklist has been developed by SSS to assist in the process to delete a class. The link to the Delete a Class Checklist can be found at http://www.adelaide.edu.au/sss/doco/. Exercise completed.

76 Class Scheduling (v 2.2) The University of Adelaide
Exercise 18 – Search and view Enrolment Control details Scenario: Validation of correct data for classes is very important. Incorrect data at this
level may prevent student enrolment. Your goal is to search for a class by subject area, Catalogue number or course ID and validate the data.
BUSINESS RULES 1. Enrolment capacity determines the number of students who are able to enrol through
Access Adelaide 2. If a class is set as Tentative, students will not be able to view this class or to enrol through Access Adelaide 3. Holding back places in tutorial classes is implemented to ensure that the international students who arrive
late have classes in which to enrol 4. The primary/graded component defaults from the Course Catalogue into the Component field 5. Using Auto Enrol ensures that students are automatically enrolled in selected related components of the
enrolment component.
Step 1
From the Navigation Menu, select: Curriculum Management > Schedule of Classes > Update Sections of a Class
Expected Results:
The Find an Existing Value page of the Update Sections of a Class component is displayed.
Step 2
Enter or select the following: Academic Institution: UNIAD Term: 3320 Subject Area: DESST (Design Studies) Catalogue Nbr: 1507 (Construction I) Campus: NTRCE
Expected Results:
Correct data entry.
Step 3
Click Search.
Expected Results:
The Update Sections of a Class page displays.

The University of Adelaide Class Scheduling (v 2.2) 77
Step 4
The Update Sections of Class page shows all classes related to this course. Compare your page with the one shown below:
Expected Results:
The page matches. If these elements do not match, review the steps and ask the instructor. Continue to the next step.
Step 5
Click the Class Enrolment Limits page tab.
Expected Results:
Class Enrolment Limits are displayed.
Enrol or Non-enrol.
Active, Stop Further Enrolment, Tentative or Cancelled (X).
Can only be changed before enrolment occurs.
Automatic enrolment will occur in these classes.
This field should not be used
Default values. Do not change.
Rows 1-8 of 13 are currently displayed.
Class Association field can only be amended before enrolment.

78 Class Scheduling (v 2.2) The University of Adelaide
Step 6
The Class Enrolment Limits tab shows enrolment and waiting list figures for each class. Compare your page with the one shown below:
Expected Results:
The page matches. If these elements do not match, review the steps and ask the instructor.
Exercise completed.
Maximum possible enrolment.
Number currently enrolled.
Not used.