studywiz eportfolio student's guide introduction … guides and additio… · 1 introduction...
TRANSCRIPT

Studywiz ePortfolio
Student's Guide 04.00, 16 Nov 2011
www.studywiz.com © Copyright Studywiz 2011 1
Introduction
Studywiz ePortfolio lets you store information about your academic and extra-curricular achievements in a flexible and portable format.
Starting with Learning Plans, you can work with your teachers to set out a course of action for learning about the topics that interest you. You can then store information and records about your achievements, add evidence and reflections, and then add your records to ePortfolio collections.
Your Collections are then reviewed by your teachers and you can publish them inside the Studywiz or export them as a set of HTML pages.
Open your Studywiz ePortfolio Follow this procedure to open your Studywiz ePortfolio.
1. Click the ePortfolio tab. The My ePortfolio Overview page appears.
From this page you can browse the ePortfolio by My Records, My Collections, and you can Search for ePortfolio collections.
Overview The ePortfolio Overview panel displays an overview of your ePortfolio, with your Profile and your ePortfolio reflections.
My Learning Plans Learning Plans help you to develop strategies for learning about a particular topic. Your teachers and parents can view and can contribute to your Learning Plans. Learning Plans are useful in guiding you through long term projects with clearly defined goals.

Studywiz ePortfolio Student's Guide
www.studywiz.com © Copyright Studywiz 2011 2
My Records The My Records section is a space for you to share information of your achievements, interests, qualifications, skills and training, and other activities and events. Each record can have evidence stored with it in the form of a file or link to a web site.
For information and procedures regarding Records, refer to the My Records section of this document.
My Collections The My Collections section contains collections of ePortfolio records that together show some aspect of your learning. You can build collections by selecting items from your My Records section.
For information and procedures regarding Collections, refer to the My Collections section of this document.
Search The Search section enables you to search for and view your published ePortfolio collections.
ePortfolio Profile Studywiz ePortfolio allows you to create and store a personal profile that is displayed on your ePortfolio Overview page. Your profile also forms the main content of the home page of your ePortfolio when you export it in HTML format. Your profile can contain text and images and other media content.
Create or Edit your ePortfolio Profile 1. Click the ePortfolio tab. The My ePortfolio page appears.
2. Click the Edit Profile button. The Edit Profile panel appears.
3. In the Profile field, enter your profile information.

Studywiz ePortfolio Student's Guide
www.studywiz.com © Copyright Studywiz 2011 3
4. Click Save and return. The profile information is saved and the ePortfolio overview page reappears.
ePortfolio Reflections ePortfolio reflections appear in the content section of the Overview tab in your ePortfolio. You can add as many reflections as you need.
Follow the procedures in this section to add, edit and delete ePortfolio reflections.
Add an ePortfolio Reflection 1. Click the ePortfolio button. Your ePortfolio appears and displays the Overview tab.
2. Click Add Reflection. The Adding new Reflection page appears.
3. In the Message field, type your reflection.
4. Click Save and return. The message is added and the ePortfolio Overview reappears.

Studywiz ePortfolio Student's Guide
www.studywiz.com © Copyright Studywiz 2011 4
Edit an ePortfolio Reflection 1. Click the ePortfolio button. Your ePortfolio appears and displays the Overview tab.
2. Adjacent to the reflection you want to edit, click the Edit button. The Editing panel appears.
3. In the Message field, edit your reflection.
4. Click the Save and return button. Your changes are saved and your ePortfolio Overview page reappears.

Studywiz ePortfolio Student's Guide
www.studywiz.com © Copyright Studywiz 2011 5
Delete an ePortfolio Reflection 1. Click the ePortfolio button. Your ePortfolio appears and displays the Overview tab.
2. Adjacent to the reflection you want to edit, click the Delete button. A confirmation dialog box appears.
3. Click the OK button. The reflection is deleted and the ‘Reflection Deleted’ message appears.
My Records Store and organise your achievement and assessment items in your My Records section to demonstrate that you have met specific learning goals and requirements. You can also add records from outside the formal learning environment and add appropriate evidence items.
Add a New Record Follow this procedure to add a new Record to your ePortfolio.
1. Click the ePortfolio tab. The ePortfolio Overview page appears.
2. Click the My Records button. The My Records panel appears.

Studywiz ePortfolio Student's Guide
www.studywiz.com © Copyright Studywiz 2011 6
3. Click a folder in which to create the new Record. The following folders are available:
Record folders are configurable and may be different on your Studywiz ePortfolio deployment.
• Achievements
• Experiences
• Interests
• Qualifications
• Skills and Training
• Other
The contents of the folder appear.
4. Click the button. The Adding new Record page appears.

Studywiz ePortfolio Student's Guide
www.studywiz.com © Copyright Studywiz 2011 7
Record types are configurable and may be different in your Studywiz ePortfolio.
5. Click a Record type. The new record appears, and displays a set of fields specific to the Record type you selected.
6. Use the record fields to enter all the information relevant to the new record.
7. If you want to add evidence to the record, refer to the instructions in the Add Evidence to a Record section below.
Add Evidence Method Procedure
Import a file from your eLocker as evidence
Follow the Import Evidence from your eLocker procedure from step 5.
Upload a file as evidence Follow the Upload an Evidence File procedure from step 5.
Add a web site as evidence Follow the Add a Web Site as Evidence procedure from step 5.
8. Click Save and return. The folder in which you saved the record opens.

Studywiz ePortfolio Student's Guide
www.studywiz.com © Copyright Studywiz 2011 8
Add Evidence to a Record You can add File or Web Site evidence to any record that you add to an ePortfolio. Each record can have any number of different evidences.
If you add evidence to a record that is part of a verified collection, the collection will lose its verified status.
Evidence files that you add to your ePortfolio records are counted against your total Studywiz storage limit.
Follow the appropriate procedure below to add evidence to a record.
Import Evidence from your eLocker 1. Click the ePortfolio tab. The ePortfolio Overview page appears.
2. Click the My Records button. The My Records panel appears.
3. Click the folder that contains the record to which you want to add evidence.

Studywiz ePortfolio Student's Guide
www.studywiz.com © Copyright Studywiz 2011 9
4. Adjacent to the record to which you want to add evidence, click the Edit button. The Edit Record page
opens.
5. Click the Import file from eLocker button.
a. If you are adding evidence to a record in a verified collection, a confirmation dialog box appears. Click OK. The verified collections which use the record will now be unverified and unpublished.
Your eLocker opens.
Studywiz ePortfolio Student's Guide
www.studywiz.com © Copyright Studywiz 2011 10
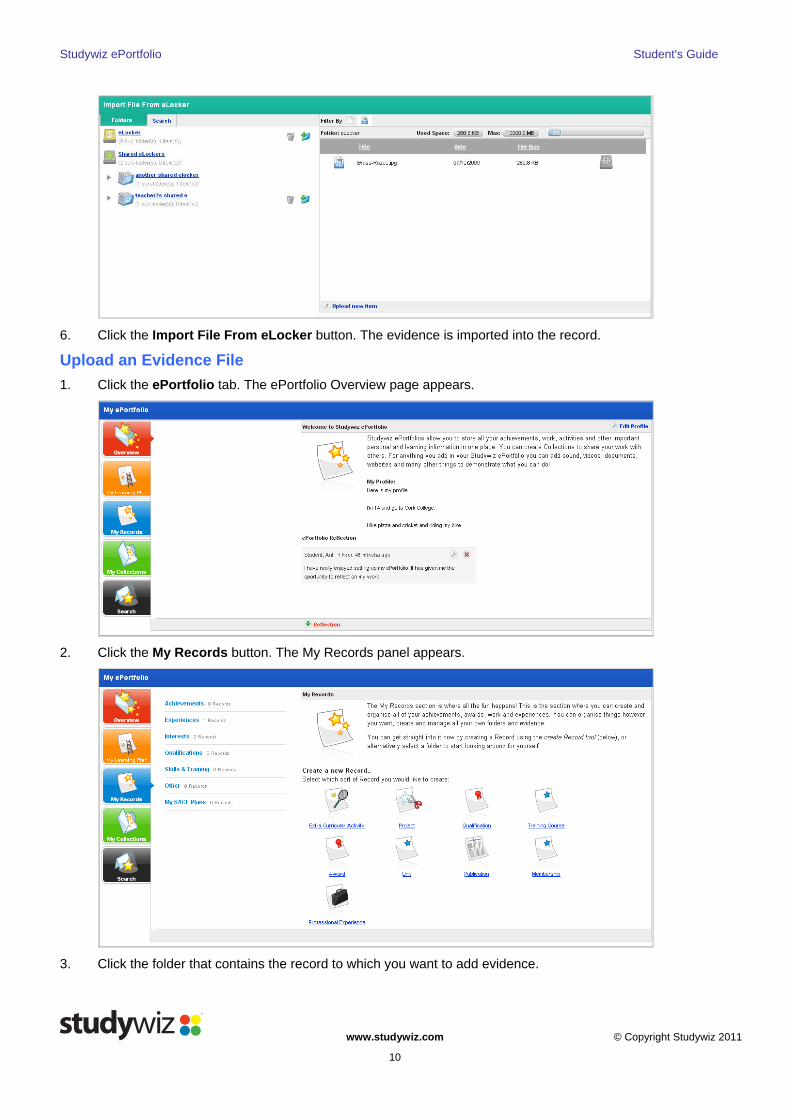
6. Click the Import File From eLocker button. The evidence is imported into the record.
Upload an Evidence File 1. Click the ePortfolio tab. The ePortfolio Overview page appears.
2. Click the My Records button. The My Records panel appears.
3. Click the folder that contains the record to which you want to add evidence.

Studywiz ePortfolio Student's Guide
www.studywiz.com © Copyright Studywiz 2011 11
4. Adjacent to the record to which you want to add evidence, click the Edit button. The Edit Record page
opens.
5. Click the File button.
a. If you are adding evidence to a record in a verified collection, a confirmation dialog box appears. Click OK. The verified collections which use the record will now be unverified and unpublished.
The Select a file to upload panel appears.
The File Upload behaviour depends on the operating system you are using. Macintosh and Windows upload procedures are shown below:
Studywiz ePortfolio Student's Guide
www.studywiz.com © Copyright Studywiz 2011 12
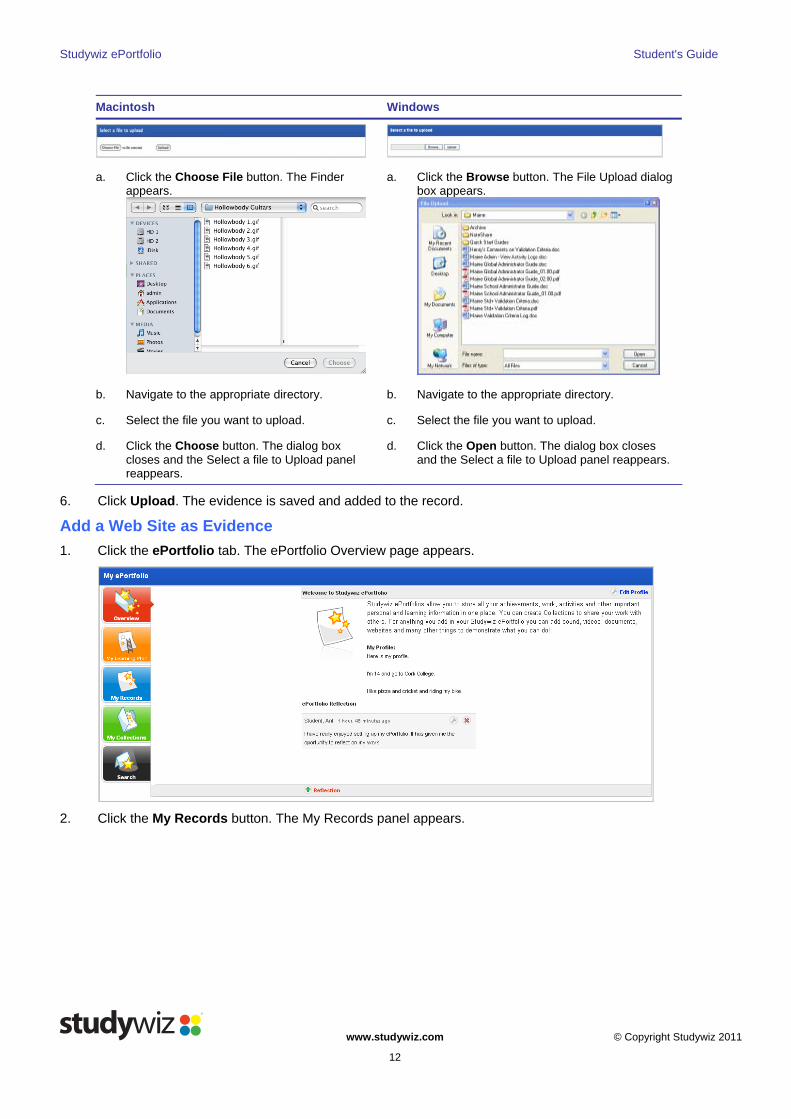
Macintosh Windows
a. Click the Choose File button. The Finder appears.
a. Click the Browse button. The File Upload dialog box appears.
b. Navigate to the appropriate directory. b. Navigate to the appropriate directory.
c. Select the file you want to upload. c. Select the file you want to upload.
d. Click the Choose button. The dialog box closes and the Select a file to Upload panel reappears.
d. Click the Open button. The dialog box closes and the Select a file to Upload panel reappears.
6. Click Upload. The evidence is saved and added to the record.
Add a Web Site as Evidence 1. Click the ePortfolio tab. The ePortfolio Overview page appears.
2. Click the My Records button. The My Records panel appears.

Studywiz ePortfolio Student's Guide
www.studywiz.com © Copyright Studywiz 2011 13
3. Click the folder that contains the record to which you want to add evidence.
4. Adjacent to the record to which you want to add evidence, click the Edit button. The Edit Record page
opens.

Studywiz ePortfolio Student's Guide
www.studywiz.com © Copyright Studywiz 2011 14
5. Click the Website button.
a. If you are adding evidence to a record in a verified collection, a confirmation dialog box appears. Click OK. The verified collections which use the record will now be unverified and unpublished.
The Adding new Website panel appears.
6. In the Name field, type a name for the evidence.
7. In the Description field, type a description of the evidence.
8. In the Website title field, type the title of the website.
9. In the URL field, type or copy and paste the URL of the website.
10. Click the Save and return button. The evidence is added to the record.

Studywiz ePortfolio Student's Guide
www.studywiz.com © Copyright Studywiz 2011 15
Edit Record Evidence Follow this procedure to keep a Record, but edit the Evidence attached to the Record.
If you edit evidence for a record that is part of a verified collection, the collection will lose its verified status and will no longer be published in Studywiz.
1. Click the ePortfolio tab. The ePortfolio Overview page appears.
2. Click the My Records button. The My Records panel appears.
3. Click the folder that contains the record you want to view. The <folder name> panel appears.
Studywiz ePortfolio Student's Guide
www.studywiz.com © Copyright Studywiz 2011 16
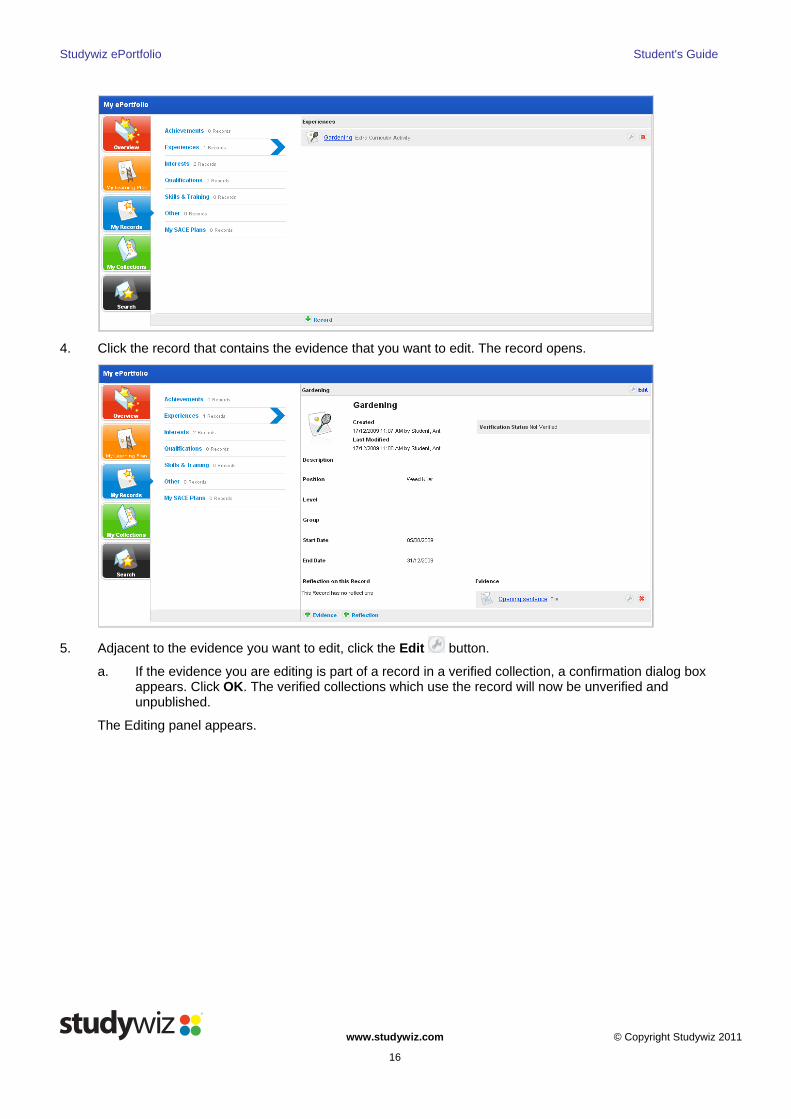
4. Click the record that contains the evidence that you want to edit. The record opens.
5. Adjacent to the evidence you want to edit, click the Edit button.
a. If the evidence you are editing is part of a record in a verified collection, a confirmation dialog box appears. Click OK. The verified collections which use the record will now be unverified and unpublished.
The Editing panel appears.
Studywiz ePortfolio Student's Guide
www.studywiz.com © Copyright Studywiz 2011 17
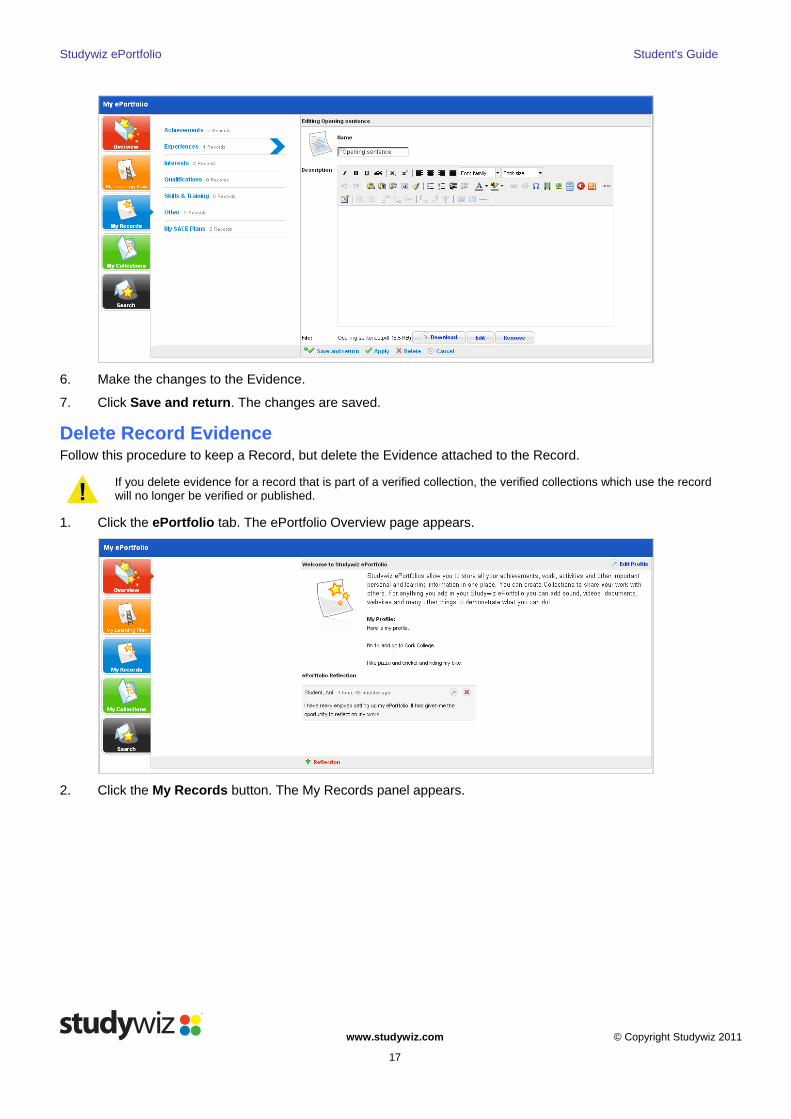
6. Make the changes to the Evidence.
7. Click Save and return. The changes are saved.
Delete Record Evidence Follow this procedure to keep a Record, but delete the Evidence attached to the Record.
If you delete evidence for a record that is part of a verified collection, the verified collections which use the record will no longer be verified or published.
1. Click the ePortfolio tab. The ePortfolio Overview page appears.
2. Click the My Records button. The My Records panel appears.

Studywiz ePortfolio Student's Guide
www.studywiz.com © Copyright Studywiz 2011 18
3. Click the folder that contains the record you want to view. The <folder name> panel appears.
4. Click the record that contains the evidence that you want to delete. The record opens.
5. Adjacent to the evidence that you want to delete, click the Delete button. A confirmation dialog box appears.

Studywiz ePortfolio Student's Guide
www.studywiz.com © Copyright Studywiz 2011 19
6. Click OK. The evidence is deleted.
Record Reflections Record reflections appear on the My Records page. You can add as many reflections as you need.
Follow the procedures in this section to add, edit or delete your record reflections.
If you add, edit or delete reflections for a record that is part of a verified collection, the collection will lose its verified status and will no longer be published in Studywiz.
Add a Record Reflection 1. Click the ePortfolio tab. The ePortfolio Overview page appears.
2. Click the My Records button. The My Records panel appears.
3. Click the folder that contains the record to which you want to add a reflection.

Studywiz ePortfolio Student's Guide
www.studywiz.com © Copyright Studywiz 2011 20
4. Click the record to which you want to add a reflection. The record opens.
5. Click Add Reflection.
a. If you are adding a reflection to a record that is part of a verified collection, a confirmation dialog box appears. Click OK. The verified collections which use the record will now be unverified and unpublished.
The Adding new Reflection panel appears.
6. In the Reflection field, type the reflection.

Studywiz ePortfolio Student's Guide
www.studywiz.com © Copyright Studywiz 2011 21
7. Click Save and return. The reflection is saved and the record panel reappears.
The new reflection is listed under the Reflection on this Record heading.
Edit a Record Reflection 1. Click the ePortfolio tab. The ePortfolio Overview page appears.
2. Click the My Records button. The My Records panel appears.
3. Click the folder that contains the record reflection you want to edit.

Studywiz ePortfolio Student's Guide
www.studywiz.com © Copyright Studywiz 2011 22
4. Click the record that contains the reflection you want to edit. The record opens.
5. Adjacent to the reflection you want to edit, click the Edit button.
a. If you are editing a reflection for a record that is part of a verified collection, a confirmation dialog box appears. Click OK. The verified collections which use the record will now be unverified and unpublished.
The Editing panel appears.
6. In the Reflection field, edit your reflection.
7. Click the Save and return button. Your changes are saved.
Studywiz ePortfolio Student's Guide
www.studywiz.com © Copyright Studywiz 2011 23
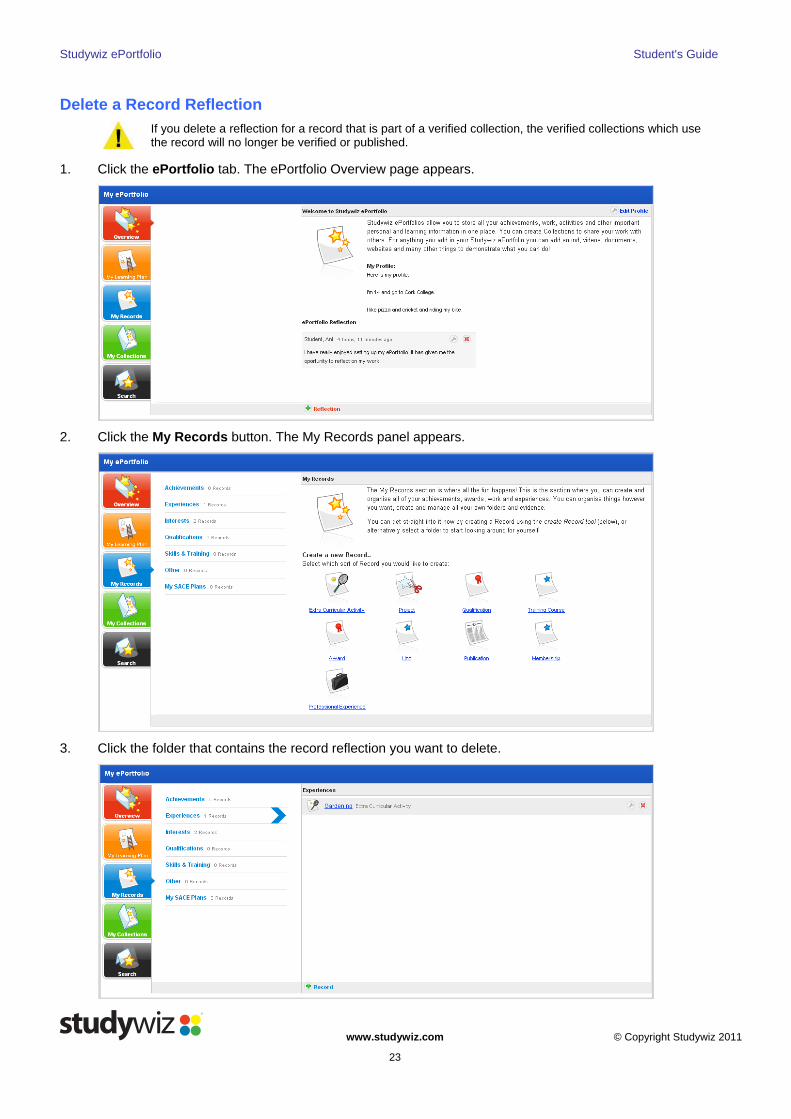
Delete a Record Reflection
If you delete a reflection for a record that is part of a verified collection, the verified collections which use the record will no longer be verified or published.
1. Click the ePortfolio tab. The ePortfolio Overview page appears.
2. Click the My Records button. The My Records panel appears.
3. Click the folder that contains the record reflection you want to delete.

Studywiz ePortfolio Student's Guide
www.studywiz.com © Copyright Studywiz 2011 24
4. Click the record that contains the reflection that you want to delete. The record opens.
5. Adjacent to the Reflection you want to delete, click the Delete button. A confirmation dialog box appears.
6. Click the OK button. The reflection is deleted and the ‘Reflection Deleted’ message appears.
Edit a Record
If you edit a record that is part of a verified collection, the collection will lose its verified status and will no longer be published in Studywiz.
1. Click the ePortfolio tab. The ePortfolio Overview page appears.
2. Click the My Records button. The My Records panel appears.

Studywiz ePortfolio Student's Guide
www.studywiz.com © Copyright Studywiz 2011 25
3. Click the folder that contains the record you want to edit. The <folder name> panel appears.
4. Adjacent to the record you want to edit, click the Edit button.
a. If the record you are editing is part of a verified collection, a confirmation dialog box appears. Click OK. The verified collections which use the record will now be unverified and unpublished.
The Editing page appears.

Studywiz ePortfolio Student's Guide
www.studywiz.com © Copyright Studywiz 2011 26
5. Make your desired changes to the record.
6. Click Save and return. The changes are saved and the folder reappears.
Delete a Record
If you delete a record that is part of a verified collection, the verified collections which use the record will no longer be verified or published.
1. Click the ePortfolio tab. The ePortfolio Overview page appears.
2. Click the My Records button. The My Records panel appears.
3. Click the folder that contains the record you want to edit. The <folder name> panel appears.

Studywiz ePortfolio Student's Guide
www.studywiz.com © Copyright Studywiz 2011 27
4. Adjacent to the record you want to delete, click the Delete button. A confirmation dialog box appears.
5. Click OK. The record is deleted.
My Collections The My Collections page contains your ePortfolio collections. A collection is a set of ePortfolio records that together show some aspect of your learning. You create new collections with items from your My Records section.
Once you have published a collection it can be viewed in Studywiz by your teachers and other students in your classes/groups and can be exported as a set of HTML pages.
Follow the procedures in this section to build a collection by creating a new collection folder, new sections and then adding records from your My Records section.
Before you build a collection it is a good idea to have created the records that you want to include in the collection. To add records to your ePortfolio follow the Add a New Record procedure in the section above.
Collection Structure Collections have three levels of hierarchy:
Collection The base folders that contain the appropriate sections and records.
Section The subsections of collections, displayed as folders, within each collection.
Record The content within sections.
Create a new Collection 1. Click the ePortfolio tab. The ePortfolio Overview page appears.

Studywiz ePortfolio Student's Guide
www.studywiz.com © Copyright Studywiz 2011 28
2. Click the My Collections button. The My Collections panel appears.
3. Click Create new Collection. The Adding new Collection panel appears.
4. In the Name field, type a name for the collection.
5. In the Description field, type a description of the collection.
6. Click Save and return. The collection is saved and the My Collections panel reappears.
You can now add Sections to the collection. Follow the Create a New Section procedure below.

Studywiz ePortfolio Student's Guide
www.studywiz.com © Copyright Studywiz 2011 29
Preview a Collection 1. Click the ePortfolio tab. The ePortfolio Overview page appears.
2. Click the My Collections button. The My Collections panel appears.
3. Click the collection that you want to view. The <collection name> panel appears.
4. To preview the collection, click the Preview button. The collection opens.

Studywiz ePortfolio Student's Guide
www.studywiz.com © Copyright Studywiz 2011 30
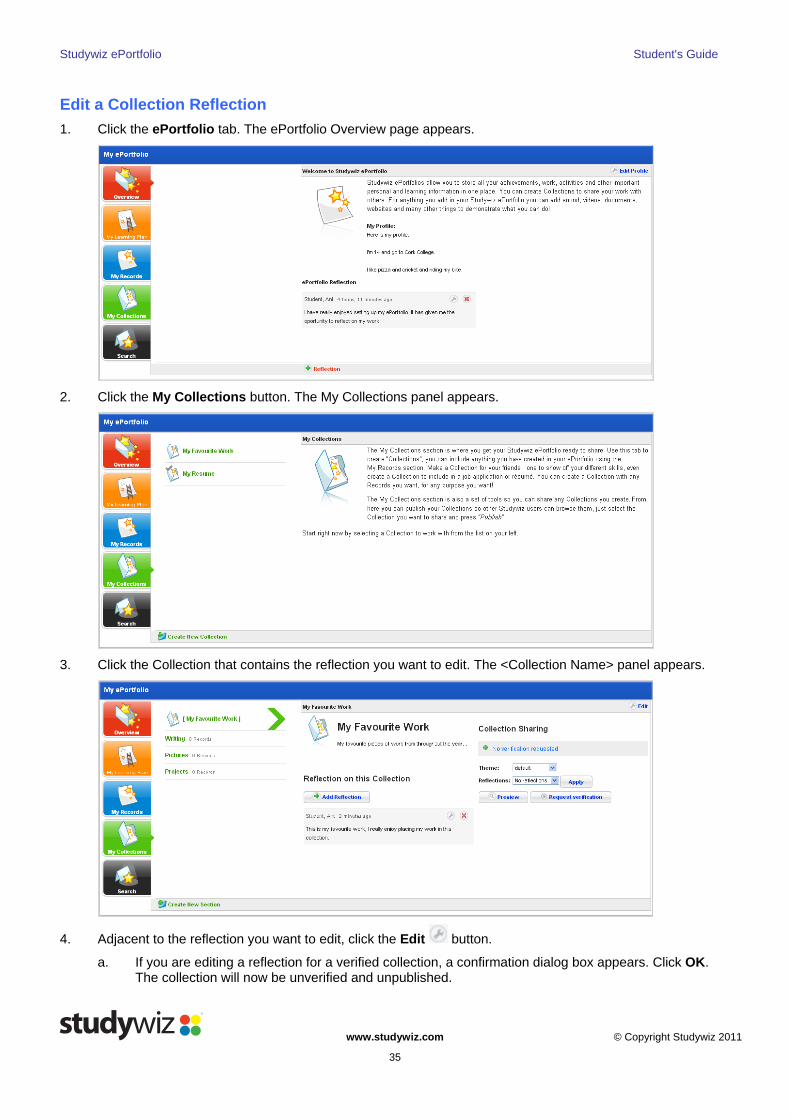
Edit a Collection
If you edit a verified collection, the collection will no longer be verified or published.
1. Click the ePortfolio tab. The ePortfolio Overview page appears.
2. Click the My Collections button. The My Collections panel appears.
3. Click the collection that you want to edit. The <collection name> panel appears.
4. Click the Edit button. The Editing panel appears.

Studywiz ePortfolio Student's Guide
www.studywiz.com © Copyright Studywiz 2011 31
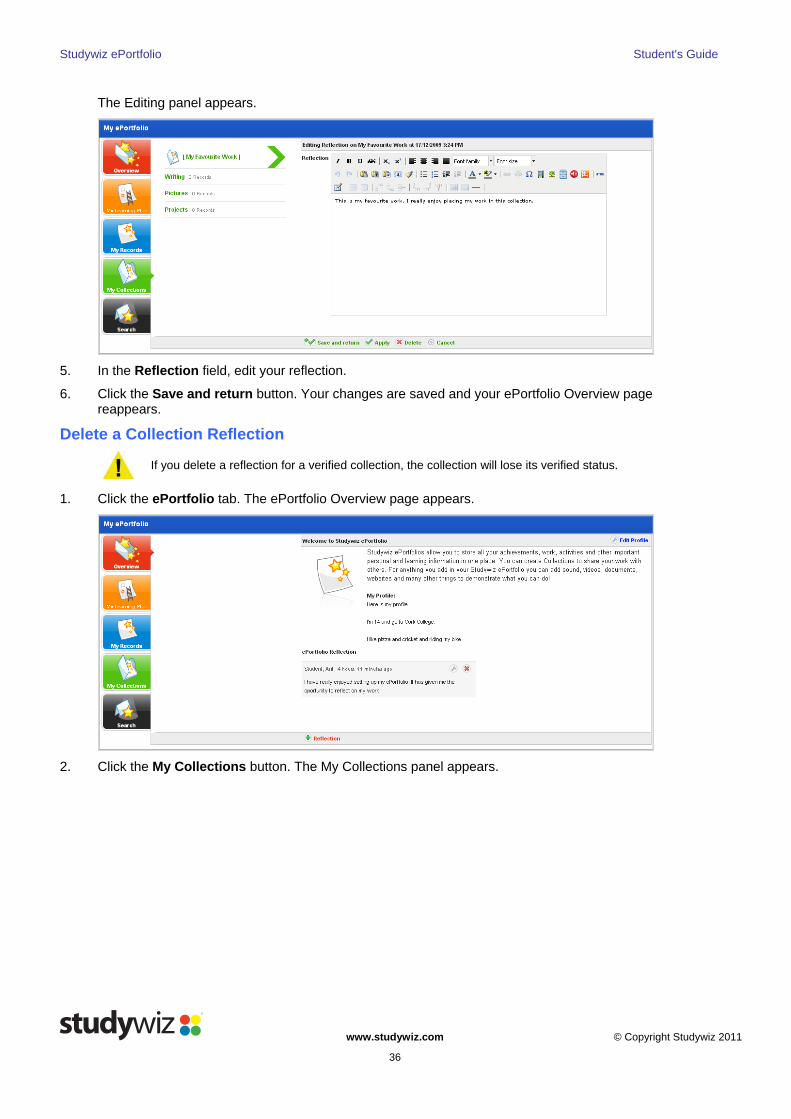
5. Make the changes to the collection Name or Description.
6. Click Save and return.
a. If you are editing a verified collection a confirmation dialog box appears. Click OK. The collection is no longer verified.
The changes are saved and the Collections page reappears.
Delete a Collection 1. Click the ePortfolio tab. The ePortfolio Overview page appears.
2. Click the My Collections button. The My Collections panel appears.

Studywiz ePortfolio Student's Guide
www.studywiz.com © Copyright Studywiz 2011 32
3. Click the collection that you want to edit. The <collection name> panel appears.
4. Click the Edit button. The Editing panel appears.
5. Click the Delete button. A confirmation dialog box appears.
6. Click OK. The collection is deleted.

Studywiz ePortfolio Student's Guide
www.studywiz.com © Copyright Studywiz 2011 33
Collection Reflections Collection reflections appear on the My Collections page. You can add as many reflections as you need.
Follow the procedures in this section to add, edit or delete collection reflections.
If you add, edit or delete reflections for a verified collection, the collection will lose its verified status and will no longer be published in Studywiz.
Add a Collection Reflection 1. Click the ePortfolio tab. The ePortfolio Overview page appears.
2. Click the My Collections button. The My Collections panel appears.
3. Click the Collection to which you want to add a reflection. The <Collection Name> panel appears.

Studywiz ePortfolio Student's Guide
www.studywiz.com © Copyright Studywiz 2011 34
4. Click the Add Reflection button.
a. If you are adding a reflection to a verified collection, a confirmation dialog box appears. Click OK. The collection will now be unverified and unpublished.
The Adding new Reflection panel appears.
5. In the Reflection field, type the reflection.
6. Click Save and return. The reflection is saved and the record panel reappears.
The new reflection is listed under the Reflection on this Collection heading.
Studywiz ePortfolio Student's Guide
www.studywiz.com © Copyright Studywiz 2011 35
Edit a Collection Reflection 1. Click the ePortfolio tab. The ePortfolio Overview page appears.
2. Click the My Collections button. The My Collections panel appears.
3. Click the Collection that contains the reflection you want to edit. The <Collection Name> panel appears.
4. Adjacent to the reflection you want to edit, click the Edit button.
a. If you are editing a reflection for a verified collection, a confirmation dialog box appears. Click OK. The collection will now be unverified and unpublished.
Studywiz ePortfolio Student's Guide
www.studywiz.com © Copyright Studywiz 2011 36
The Editing panel appears.
5. In the Reflection field, edit your reflection.
6. Click the Save and return button. Your changes are saved and your ePortfolio Overview page reappears.
Delete a Collection Reflection
If you delete a reflection for a verified collection, the collection will lose its verified status.
1. Click the ePortfolio tab. The ePortfolio Overview page appears.
2. Click the My Collections button. The My Collections panel appears.

Studywiz ePortfolio Student's Guide
www.studywiz.com © Copyright Studywiz 2011 37
3. Click the Collection that contains the reflection you want to delete. The <Collection Name> panel
appears.
4. Adjacent to the Reflection you want to delete, click the Delete button. A confirmation dialog box appears.
5. Click the OK button. The reflection is deleted and the ‘Reflection Deleted’ message appears.

Studywiz ePortfolio Student's Guide
www.studywiz.com © Copyright Studywiz 2011 38
Create a New Section
If you create a new section in a verified collection, the collection will no longer be verified or published.
1. Click the ePortfolio tab. The ePortfolio Overview page appears.
2. Click the My Collections button. The My Collections panel appears.
3. Click the collection to which you want to add the section. The <collection name> panel appears.
4. Click Create New Section.

Studywiz ePortfolio Student's Guide
www.studywiz.com © Copyright Studywiz 2011 39
a. If you are adding a section to a verified collection, a confirmation dialog box appears. Click OK. The collection will now be unverified and unpublished.
The Adding new Section panel appears.
5. In the Name field, type a name for the new Section.
6. In the Description field, type a description of the Section.
7. Click Save and return. The Section is saved and the <collection name> panel reappears.
You can now add Records to the collection section. Follow the Add a Record to a Collection procedure below.
Edit a Section
If you edit a section in a verified collection, the collection will no longer be verified or published.
1. Click the ePortfolio tab. The ePortfolio Overview page appears.
2. Click the My Collections button. The My Collections panel appears.

Studywiz ePortfolio Student's Guide
www.studywiz.com © Copyright Studywiz 2011 40
3. Click the collection that contains the section that you want to edit. The <collection name> panel appears.
4. Click the section that you want to edit. The section panel appears.
5. Click Edit. The Editing panel appears.

Studywiz ePortfolio Student's Guide
www.studywiz.com © Copyright Studywiz 2011 41
6. Make the changes to the section Name or Description.
7. Click Save and return.
a. If the section is part of a verified collection, a confirmation dialog box appears. Click OK. The collection is no longer verified.
The changes are saved and the Collections page reappears.
Delete a Section
If you delete a section in a verified collection, the collection will no longer be verified or published.
1. Click the ePortfolio tab. The ePortfolio Overview page appears.
2. Click the My Collections button. The My Collections panel appears.

Studywiz ePortfolio Student's Guide
www.studywiz.com © Copyright Studywiz 2011 42
3. Click the collection that contains the section that you want to delete. The <collection name> panel
appears.
4. Click the section that you want to delete. The section panel appears.
5. Click the Edit button. The Editing panel appears.

Studywiz ePortfolio Student's Guide
www.studywiz.com © Copyright Studywiz 2011 43
6. Click the Delete button. A confirmation dialog box appears.
7. Click OK. The section is deleted.
Add a Record to a Collection Before you begin this procedure, ensure that you have created the appropriate records, the collection folder itself and the appropriate sections within the collection.
1. Click the ePortfolio tab. The ePortfolio Overview page appears.
2. Click the My Collections button. The My Collections panel appears.

Studywiz ePortfolio Student's Guide
www.studywiz.com © Copyright Studywiz 2011 44
3. Click the collection to which you want to add a record. The <collection name> panel appears.
4. Click the section in which you want to create the record. The section panel appears.
5. Click the Add Record button.
a. If you are adding a record to a verified collection, a confirmation dialog box appears. Click OK. The collection is no longer verified.
The Adding new Record to panel appears. It displays the My Records folder structure.
To search for a record, click the Search tab, enter your search terms and click the Search button.

Studywiz ePortfolio Student's Guide
www.studywiz.com © Copyright Studywiz 2011 45
6. Click the folder that contains the record you want to add. The folder expands and displays its contents.
To create a new record, click the Create new Record in <Folder Name> button. Create the record. Once saved the record is automatically added to the Collection. For more information about creating a record, refer to the Add a New Record procedure.
7. Adjacent to the record you want to add, click the Add Record to Collection button. The record is added and the ‘Changes Saved’ notification appears.

Studywiz ePortfolio Student's Guide
www.studywiz.com © Copyright Studywiz 2011 46
Remove a Record from a Collection
If you are removing the record from a verified collection, the collection will loose its verified status.
1. Click the ePortfolio tab. The ePortfolio Overview page appears.
2. Click the My Collections button. The My Collections panel appears.
3. Click the collection that includes the record you want to remove. The <collection name> panel appears.
4. Click the section that contains the record that you want to remove. The section panel appears.

Studywiz ePortfolio Student's Guide
www.studywiz.com © Copyright Studywiz 2011 47
5. Adjacent to the record that you want to remove, click the Edit button. The Edit record page appears.
6. Click the Delete button. A confirmation dialog box appears.
7. Click the OK button. The record is removed from the collection.
Publish a Collection Before you can publish a collection it needs to be verified by one of your teachers. Once verified you can publish the collection in Studywiz.
You can also share your published collections outside Studywiz. When you share a collection outside Studywiz, you set a password and the system provides you with a link. Anyone can access the collection over the Internet if they are given this link and password.
The link will not provide access to any other part of your ePortfolio but provides access only to that specific collection and only as long as it is approved and published.
If you update a published collection, it becomes unverified and therefore also becomes unpublished. When the Collection is re-verified by a teacher it can then be republished. The Collection is then available again at the same URL as before with the updates applied.
You can also export your published collections as either a HTML file or an IMS package.
Follow the procedures in this section to manage your complete ePortfolio collections.
Request Verification Before you can publish a collection it needs to be verified by one of your teachers. Follow this procedure to send a verification request.
1. Click the ePortfolio tab. The ePortfolio Overview page appears.

Studywiz ePortfolio Student's Guide
www.studywiz.com © Copyright Studywiz 2011 48
2. Click the My Collections button. The My Collections panel appears.
3. Click the collection that you want to publish. The <collection name> panel appears.
4. Click the Request Verification button. The Changing Collection status panel appears.

Studywiz ePortfolio Student's Guide
www.studywiz.com © Copyright Studywiz 2011 49
5. If you want to include a message to your teacher(s), type the message in the message field.
6. Click Save and return. The verification request is sent and the <collection name> panel reappears.
Publish a Verified Collection Once a collection has been verified by one of your teachers, you can then publish the collection.
1. Click the ePortfolio tab. The ePortfolio Overview page appears.
2. Click the My Collections button. The My Collections panel appears.
3. Click the collection that you want to publish. The <collection name> panel appears.

Studywiz ePortfolio Student's Guide
www.studywiz.com © Copyright Studywiz 2011 50
If your verification request has been denied, the ‘Verification denied’ message is displayed and the Publish button does not appear.
4. Set the theme and reflections options for the collection:
a. From the Theme drop-down list, select the theme style you want for the collection.
b. From the Reflections drop-down list, select which reflections you want to appear in the published collection.
c. Click Apply. The theme and reflections options are saved.
5. Click the Publish button. The Changing Collection status panel appears.
6. If you would like to add a reflection, type it in the Message field.
7. From the Set Access Rights drop-down list, select whether you want the collection to appear for one of your Classes or User Groups.
8. Click the Select button. A list of either your classes or groups appear.

Studywiz ePortfolio Student's Guide
www.studywiz.com © Copyright Studywiz 2011 51
9. In the unselected list, select the classes/groups that you want the collection to be available to.
10. Click the Add Selected button. The classes/groups are added to the selected list.
11. Select the user types in the classes/groups that will be able to view the collection.
12. Click Save and return. The collection is published and the <collection name> panel reappears.
The Collection is now published and can be viewed by the classes/groups and user types you have selected.
• If you now want to publish the collection on an external page outside Studywiz, refer to the Share a Collection outside Studywiz procedure.
Share a Collection outside Studywiz Once a collection has been published you can make the collection available outside Studywiz.
The ability to share a collection outside Studywiz is an optional feature and may not be enabled on your deployment.
1. Click the ePortfolio tab. The ePortfolio Overview page appears.
2. Click the My Collections button. The My Collections panel appears.

Studywiz ePortfolio Student's Guide
www.studywiz.com © Copyright Studywiz 2011 52
3. Click the collection that you want to share externally. The collection pane appears.
4. Select the Can be viewed outside Studywiz option. The password field appears.
5. In the Password field, enter a password.
Do not use your Studywiz password. This is a password you will have to share with the people who you want to access the site.
6. Click the Save button. The changes are saved.

Studywiz ePortfolio Student's Guide
www.studywiz.com © Copyright Studywiz 2011 53
You can now access the collection from the external link that is displayed at the bottom of the page.
Unpublish a Collection 1. Click the ePortfolio tab. The ePortfolio Overview page appears.
2. Click the My Collections button. The My Collections panel appears.
3. Click the collection that you want to unpublish. The <collection name> panel appears.

Studywiz ePortfolio Student's Guide
www.studywiz.com © Copyright Studywiz 2011 54
4. Click the Unpublish button. The Changing Collection status panel appears.
5. If you would like to add a reflection, type it in the Message field.
6. Click Save and return. The collection is unpublished and the <collection name> panel reappears.
Export a Collection You can export Collections in three formats:
• HTML for viewing in a web browser
• PDF file with evidence files embedded
• IMS package for reimport into Studywiz or another IMS compliant ePortfolio application.
You can only export collections that have been verified and published.
Export a Collection as a set of HTML Pages Follow this procedure to export a Collection as a set of HTML pages.
1. Open your ePortfolio.

Studywiz ePortfolio Student's Guide
www.studywiz.com © Copyright Studywiz 2011 55
2. Click the My Collections button. The My Collections panel appears.
3. Click the collection that you want to export. The <collection name> panel appears.
4. Click the Export button. The Export Options panel appears.

Studywiz ePortfolio Student's Guide
www.studywiz.com © Copyright Studywiz 2011 56
5. From the Theme drop-down list, select a theme for the reflection. This will determine how the collection will appear.
6. From the Reflection drop-down list, select which reflections you want to appear for the collection.
To preview the Collection as a HTML export, click the Preview HTML Export button.
7. Click the Export as HTML button. The Generating Export Files progress indicator appears and then the Export Complete panel appears.
8. Click the Download File button. The Collection is exported as a zip file of HTML pages.
9. Save the zip file to a suitable location.
You can now extract the files from the zip and view them in a web browser.
Export a Collection as a PDF Follow this procedure to export a Collection as a PDF.
1. Open your ePortfolio.
2. Click the My Collections button. The My Collections panel appears.
3. Click the Collection that you want to export. The <collection name> panel appears.

Studywiz ePortfolio Student's Guide
www.studywiz.com © Copyright Studywiz 2011 57
4. Click the Export button. The Export Options panel appears.
5. From the Reflections drop-down list, select the reflection types you would like to export with the
Collection. You can export:
• No Reflections
• All Reflections – exports reflections for Collections and Records
• Records only – exports reflections only for Records and not for Collections
• Collections only – exports reflections only for Collections and not for Records.
6. Click the Export as PDF button. The ‘Generating export files’ message appears and then the Export complete panel appears.
7. Click the Download File button and save the file to a suitable location.
Export a Collection as an IMS Package Follow this procedure to export a Collection as an IMS package.
1. Open your ePortfolio.

Studywiz ePortfolio Student's Guide
www.studywiz.com © Copyright Studywiz 2011 58
2. Click the My Collections button. The My Collections panel appears.
3. Click the collection that you want to export. The <collection name> panel appears.
4. Click the Export button. The Export Options panel appears.

Studywiz ePortfolio Student's Guide
www.studywiz.com © Copyright Studywiz 2011 59
5. Click the Export as IMS package button. The Generating Export Files panel appears, followed by the Export Complete panel.
6. Click the Download File button. The Collection is exported as an IMS file.
7. Save the file to a suitable location.
Search for an ePortfolio Collection The ePortfolio Search panel enables you to search for your own collections and the published collections of other students who are in your classes.
1. Click the ePortfolio tab. The ePortfolio Overview page appears.
2. Click the Search button. The Showcase panel appears.
3. In the Keyword field, type any keywords for the collection that you want to view.
4. Click the Search button. The search results appear.

Studywiz ePortfolio Student's Guide
www.studywiz.com © Copyright Studywiz 2011 60
5. Click the collection that you want view. The collection opens.