support centre through tally.erp...
TRANSCRIPT

Support Centre through Tally.ERP 9

The information contained in this document is current as of the date of publication and subject to change. Because Tally must respond to changing market conditions, it should not be interpreted to be a commitment on the part of Tally, and Tally cannot guarantee the accuracy of any information presented after the date of publication. The information provided herein is general, not according to indi-vidual circumstances, and is not intended to substitute for informed professional advice.
This document is for informational purposes only. TALLY MAKES NO WARRANTIES, EXPRESS OR IMPLIED, IN THIS DOCUMENT AND SHALL NOT BE LIABLE FOR LOSS OR DAMAGE OF WHATEVER NATURE, ARISING OUT OF, OR IN CONNECTION WITH THE USE OF OR INABILITY TO USE THE CONTENT OF THIS PUBLICATION, AND/OR ANY CONDUCT UNDERTAKEN BY PLACING RELIANCE ON THE CONTENTS OF THIS PUBLICATION.
Complying with all applicable copyright and other intellectual property laws is the responsibility of the user. All rights including copy-rights, rights of translation, etc., are vested exclusively with TALLY SOLUTIONS PRIVATE LIMITED. No part of this document may be reproduced, translated, revised, stored in, or introduced into a retrieval system, or transmitted in any form, by any means (electronic, mechanical, photocopying, recording, or otherwise), or for any purpose, without the express written permission of Tally Solutions Pvt. Ltd.
Tally may have patents, patent applications, trademarks, copyrights, or other intellectual property rights covering subject matter in this document. Except as expressly provided in any written licence agreement from Tally, the furnishing of this document does not give you any licence to these patents, trademarks, copyrights, or other intellectual property.
© 2009 Tally Solutions Pvt. Ltd. All rights reserved.
Tally, Tally 9, Tally9, Tally.ERP, Tally.ERP 9, Shoper, Shoper 9, Shoper POS, Shoper HO, Shoper 9 POS, Shoper 9 HO, TallyDevel-oper, Tally Developer, Tally.Developer 9, Tally.NET, Tally Development Environment, Tally Extender, Tally Integrator, Tally Inte-grated Network, Tally Service Partner, TallyAcademy & Power of Simplicity are either registered trademarks or trademarks of Tally Solutions Pvt. Ltd. in India and/or other countries. All other trademarks are properties of their respective owners.
Version: Support Centre through Tally.ERP 9/1.0/Aug 2009
i
Contents
Support Centre .......................................................................................................................................... 1Introduction to the Support Centre ......................................................................................................... 1
Support Centre Features ...................................................................................................................... 1Accessing the Support Centre ............................................................................................................... 1
Using Licensed Tally.ERP 9 .................................................................................................................. 3Remote Access ................................................................................................................................... 3
Support Centre Display .......................................................................................................................... 7Adding a New Issue/ Query ................................................................................................................. 10Reply to an Issue/ Query ...................................................................................................................... 13Close an Issue/ Query .......................................................................................................................... 16Other Functions .................................................................................................................................... 18
Detailed/ Condensed .......................................................................................................................... 18Period ............................................................................................................................................... 19Group by ........................................................................................................................................... 20List/ Thread View ............................................................................................................................... 23Zoom In/ Zoom Out List ...................................................................................................................... 25Zoom In Content/ Zoom Out Content .................................................................................................... 26Site Filter .......................................................................................................................................... 29Status Filter ....................................................................................................................................... 31Page Size ......................................................................................................................................... 34F12: Configure ................................................................................................................................... 35

Support Centre
Introduction to the Support CentreShoper users are now provided with a new support mechanism known as Support Centre through Tally.ERP 9; this will enable them to directly post queries on the functional and technical aspects of all Tally products.
The Support Centre will display all the queries reported through different modes by the user i.e., posted using support centre, e-mail, telephone, etc.
Support Centre Features
Quick help and support: The Support Centre makes it easy and convenient to reach out to the system, which includes Tally Support and the Tally Service Partner, for help and support on any product, at the click of a button.
Access solutions to your problems any time: Response to the queries are instantly updated in the support centre, the user can access and implement solution at his conven-ience, any time.
Avoid repeated explanations: The availability of information on issues, interactions and resolutions, to the entire Tally Support Team, including the Tally Service Partners dramatically reduces the need for repeated explanations on issues/support queries and thereby ensures quality help and support.
Track your issues on a real-time basis: The user can track the status of your queries including the complete chain of interactions, irrespective of the mode of communication. Say a query is posted from the Support Centre within Tally. ERP 9 and then interacted over the phone, the user will be able to see both the interactions.
Access issues of any Location/Site: In case of a Multi-site License, the user can view the details pertaining to issues of any location /site, from any site.
Reach out to your nearest Service Partner instantly: The user can search for a service partner and send queries directly to the partner.
Access your Support Centre remotely from any Tally.ERP 9: As an authorised Tally.NET user, the Support Centre feature can be accessed remotely from any machine having Tally.ERP 9 in the activated or educational mode.
Accessing the Support CentreThe Support Centre can be accessed using the menu option Help > Support Centre from Shoper 9.
1

Support Centre
Figure 1. Shoper Menu
To make access to support centre easy and affordable, an evaluation exe of Tally.ERP 9 has been included with Shoper 9 and can be accessed using the menu option.
The Tally.ERP 9 evaluation copy installed during Shoper 9 installation opens the support centre login screen.
Figure 2. Support Centre with Shoper Account ID
2

Support Centre
The user can enter the Shoper Account ID (or Tally.Net ID) and password in the respective fields to access the Support Centre.
Since Tally.ERP 9 is in evaluation mode, no license details are displayed in the information bar. To logout of Support Centre, press Esc key, the application will close completely.
Using Licensed Tally.ERP 9Shoper 9 users, who have a licensed version of Tally.ERP 9 installed on the same network, have the option to use their Tally.ERP 9 to access the Support Centre from Shoper 9.
Configure the Support.ini file available in the Shoper 9 application folder. Edit the file and enter the path of the directory where Tally.ERP 9 is installed against TallyAppPath and save the file.
With the new configuration of the Support.ini file, open Support Centre from Shoper 9 menu option.
Figure 3. Support Centre Login screen
3

Support Centre
The licensed Tally.ERP 9 is opened and the Support Centre login screen is displayed. The user can enter the Shoper Account Id (Tally.net user id) and password in the respective fields to access the Support centre for the Shoper 9 Account ID.
The details of Tally.ERP 9 license are displayed in the information bar of Support Centre login screen. To logout of Support Centre press Esc key, Tally.ERP 9 will revert to company info screen and user may continue to use Tally.ERP 9 for regular usage.
Remote AccessAccess Support Centre from any other machine where Tally.ERP 9 has been installed and activated or is in the Educational mode.
To login to the Support Centre from a remote location:
1. Go to Company Info menu or Gateway of Tally > Support Centre
2. Click L: Login option in the buttons toolbar or press Alt + L from the Support Centre screen.
Figure 4. Login as Remote Tally.NET User
3. In the Remote Tally.Net User Login screen, enter the E-mail ID (Tally.Net ID/Account ID) and Tally.NET Password in the field provided.
4

Support Centre
Figure 5. Login your E-Mail ID and Password
4. Press Enter.
Figure 6. Select Account option
5. The Select Account option along with the list of User Accounts is displayed when the given E-mail ID is linked to a Single or Multiple Accounts. Select the required User Account and press Enter.
5

Support Centre
Figure 7. Support Centre remotely accessed
6. Click L: Logout or press Alt + L, to logout from the Support Centre.
In case the user has logged in to the Support Centre from the Gateway of Tally, i.e., after having selected a company using the ‘User Name and Password’, the Support Centre will display the ‘User name’ on the top right of the screen, as shown in the image.
In case the user has logged in to the Support Centre from the Company Info menu, the User name will not be displayed in the top right part of the screen.
Issues posted on the current date are in Blue.
The Support Centre for a newly activated Shoper 9 licenses will display a blank screen.
Using Alt + L, the user can toggle between Login/ Logout.
In case the user forgets Tally.NET Password, click on F5: Reset Password or press F5. The new password will be sent to the given E-mail address.
6

Support Centre
Select Account [Alt + S]
In case, the given ID (user name) is linked to multiple accounts, using this option, the user can select the required account from the list of User Accounts.
To Select the account, from the remotely logged in Support Centre screen:
1. Click S: Select Account provided in the buttons toolbar or press Alt + S from the Sup-port Centre screen.
The Select Account option along with the list of User Accounts is displayed, with all the accounts to which the given E-mail ID is linked.
Figure 8. Select Account
2. Select the required User Account.
3. Press Enter to view the selected User Account.
Support Centre DisplayBy default, the Support Centre screen will list the queries raised for the last 7 days.
Go to Company Info menu or Gateway of Tally > Support Centre [Ctrl + H]
7

Support Centre
Figure 9. Support Centre Screen
The Support Centre screen displays the following information:
Query List: The default setting of the page is set to display 10 queries. Click on the link 'There are 10 rows more, show next 10 rows' to view the next 10 queries. Once the next 10 queries are displayed, the option '10 more, show previous 10 rows' gets displayed on top of the list.
Ticket Summary: The Ticket Summary column includes:
The Ticket number.
The Account ID of the user.
The Reported On date.
Issues posted on the current date are in Blue.
Click on R: Refresh button or press Ctrl + R to refresh the query list, as required.
8

Support Centre
The Current Owner of the query.
The Current Status (Pending/ Closed).
The Ticket Interactions will display the subject of the query.
The second part of the Ticket Summary displays:
The Date of the query.
The Subject of the query.
The query received From name.
The query sent To name.
The Description of the query.
The user can also view the content in an enlarged mode, i.e., in a zoom in content mode. This mode displays a magnified view of the Ticket Summary.
To view the query/ issue horizontally:
Highlight the required query/ issue from the list of queries and press Enter.
Figure 10. Zoom in Mode
9

Support Centre
Click B: Go to Browser to display the query in a browser window.
Adding a New Issue/ Query The user can post a query for any support required on the functional and technical aspects of all Tally products.
To add a New Issue/ Query:
1. Go to Company Info menu or Gateway of Tally > Support Centre
2. Click N: New Issue provided in the buttons toolbar or press Alt + N from the Support Centre.
3. In the Post Your Support Query form displayed, fill in the details in the fields provided:
Figure 11. Post Your Support Query form
4. Send to: Select a New Service Partner or Tally Solutions Pvt Ltd. in this field. The Service Partner could be the one from whom the user has procured Shoper 9 software or the one with whom he has entered into a service contract.
A topic on Browse Issue is discussed separately
10
Support Centre
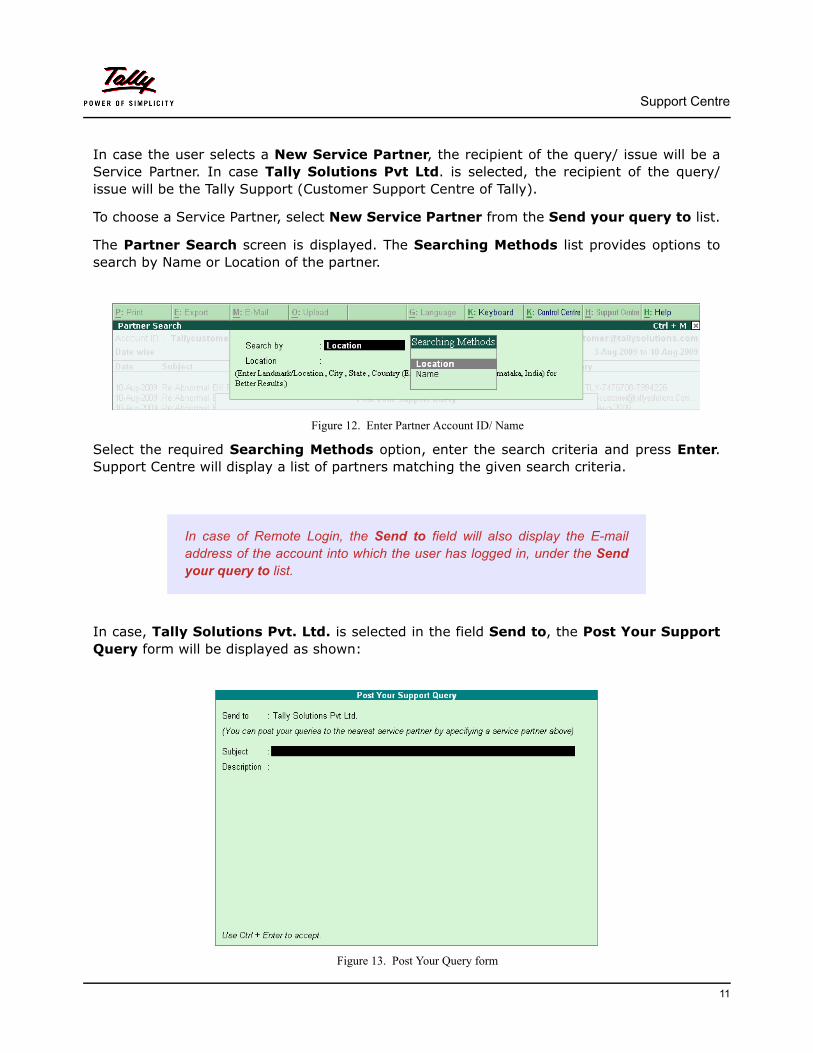
In case the user selects a New Service Partner, the recipient of the query/ issue will be a Service Partner. In case Tally Solutions Pvt Ltd. is selected, the recipient of the query/ issue will be the Tally Support (Customer Support Centre of Tally).
To choose a Service Partner, select New Service Partner from the Send your query to list.
The Partner Search screen is displayed. The Searching Methods list provides options to search by Name or Location of the partner.
Figure 12. Enter Partner Account ID/ Name
Select the required Searching Methods option, enter the search criteria and press Enter. Support Centre will display a list of partners matching the given search criteria.
In case, Tally Solutions Pvt. Ltd. is selected in the field Send to, the Post Your Support Query form will be displayed as shown:
Figure 13. Post Your Query form
In case of Remote Login, the Send to field will also display the E-mail address of the account into which the user has logged in, under the Send your query to list.
11
Support Centre
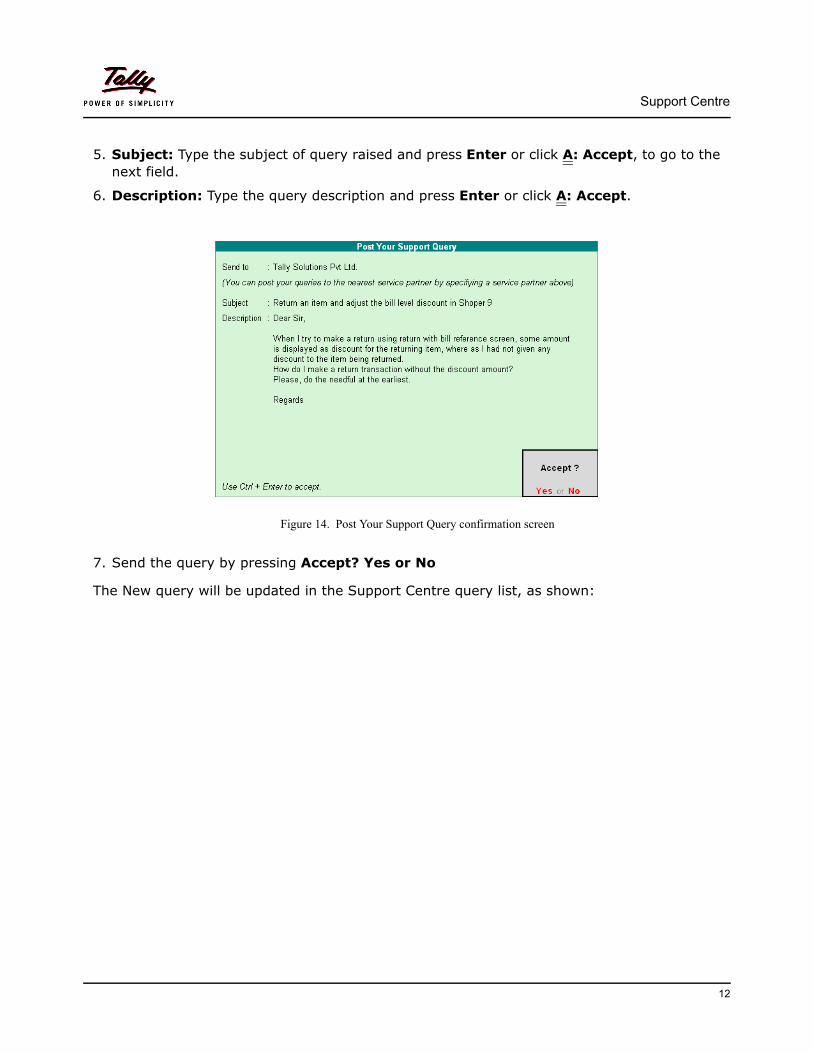
5. Subject: Type the subject of query raised and press Enter or click A: Accept, to go to the next field.
6. Description: Type the query description and press Enter or click A: Accept.
Figure 14. Post Your Support Query confirmation screen
7. Send the query by pressing Accept? Yes or No
The New query will be updated in the Support Centre query list, as shown:
12

Support Centre
Figure 15. Updated Query List
Reply to an Issue/ QueryThe user can click Reply, to seek further clarifications/ information required on the response received from the Customer Centre of Tally or a Service Partner for the query raised. The user can also forward any of the mails, with the status mentioned Pending or Closed by selecting the required query from the list.
To reply to a query:
1. Go to Company Info menu or Gateway of Tally > Support Centre
2. Select the query that needs to be replied/ forwarded
In the process of sending a New Query subsequently, the Send to field pro-vided in the Post Your Support Query form will list the partners chosen earlier in the Send your query to list.
13

Support Centre
3. Click R: Reply provided in the buttons toolbar or press Alt + R using the Keyboard from the Support Centre screen.
The Post Your Response window is displayed as shown.
Figure 16. Post Your Response Form
4. Description: Type the query description to post your response, in the field provided.
5. Send the query by pressing Accept? Yes or No
The Reply mail will be updated in the Support Centre query list, as shown.
14

Support Centre
Figure 17. Query List with User Response
The user can view the reply along with the query, as it is linked to the ticket number of the query raised. This can be viewed by selecting the subject under Ticket Interactions in the main screen of Support Centre, and also through the options Thread View, Zoom inContent or Go to Browser.
The ticket number of the query/ issue to which a reply has been posted, will automatically be displayed on top of the form, as shown in the image.
When the Reply button is pressed, the cursor will blink at the Descrip-tion field automatically in the Post Your Response form.
The Send to and Subject fields will automatically be pre-filled with the recipient address and the subject, respectively. The user may change the same by pressing back-space if required.
The user may also select the required Subject under Ticket Interac-tions available in the Zoom Out Content mode (default query list) or in the Zoom in Content mode and press Enter, to Reply.
15

Support Centre
Close an Issue/ QueryThe user can Close the issues once the response to a query is received from the Customer Centre of Tally or a Service Partner, or if the issue has been resolved. Any pending issue can be closed by the user as and when he wants.
To close an Issue:
1. Go to Company Info menu or Gateway of Tally > Support Centre
2. Select the Pending query that needs to be closed.
Figure 18. Selecting an issue row to Close
3. Click on C: Close provided in the buttons toolbar, or press Alt + C from the Support Centre screen.
16

Support Centre
The Status of the query will change to Closed, as shown:
Figure 19. Issue Closed
The Close button in the buttons toolbar will be active only for the Pending issues.
The user has to change the Status of an interaction for a query to Close, if the user is satisfied with the response received.
When an issue with Status as Pending is closed, the other issues which are linked to the same ticket number also get closed automati-cally.
17

Support Centre
Other FunctionsGo to Company Info menu or Gateway of Tally > Support Centre
Detailed/ CondensedGo to Company Info menu or Gateway of Tally > Support Centre > F1: Detailed/ Condensed
The user can opt to view the queries in Detailed or Condensed mode. This button will be active only when Status wise or Site wise (F3: Group by > Status/ Site) list is selected.
The Detailed Status wise report displays a list of queries based on the Status (All/ Pending/ Closed) opted, as shown:
Figure 20. Status wise Detailed list view
18

Support Centre
The Condensed Status wise report displays only the count of queries based on the Status(All/ Pending/ Closed) opted, as shown:
Figure 21. Status wise Condensed view
PeriodGo to Company Info menu or Gateway of Tally > Support Centre > F2: Period
The user can opt to view the query list for a particular period. By default, the query listing is set to the last 7 days. To change the period, press the button F2: Period provided in the buttons toolbar, or press F2 from the Support Centre screen.
The user may type the number of Days/ Weeks/ Months/ Years in the Default Period field provided. For instance: 15 Days, 1 Month, 2 Months and so on.
Use the F1 button to toggle between Detailed and Condensed view.
19

Support Centre
Figure 22. Selecting Period
Group byGo to Company Info menu or Gateway of Tally > Support Centre > F3: Group by
This option allows the user to view the query list based on Groups. The options available under Group by are Date, Site and Status wise. The user can set the Default Groupingusing this option.
Click on F3: Group by provided at the buttons toolbar or press the function key F3, to select the Group by option.
Figure 23. Group by option
Group by Date
Using this option the user can view date wise list of queries. Issues for the latest date are on the top followed by the issues from earlier dates.
Group by Site
This option allows the user to view the query list on the basis of the Site/ Location, i.e., the issues sent and received at different Sites belonging to the same or different Serial Numbers, under a single account.
20

Support Centre
Figure 24. Site wise Detailed Query List
Click F1: Condensed to display the Site wise query list in Condensed mode as shown:
21

Support Centre
Figure 25. Site wise Condensed Query List
Group by Status
This option allows the user to view the query list based on the Status.
The option Site located under Default Grouping will not be listed for Single Site users.
22

Support Centre
Figure 26. Status wise Query List
The query list can further be viewed on the basis of the Status selected using the F9: Status Filter option.
List/ Thread ViewGo to Company Info menu or Gateway of Tally > Support Centre > F4: Thread View/ List View
The Support queries can be viewed, either in the List View mode or in the Thread Viewmode.
Click on F4: Thread View/ List View provided in the buttons toolbar or press the function key F4.
List View
List View displays the queries individually in a detailed mode, as shown:
23

Support Centre
Figure 27. Queries in List View mode
Thread View
Thread View displays the entire chain of interaction, i.e., the query and the response based on the options selected in the Group by screen.
24

Support Centre
Figure 28. Queries in Thread View mode
Say, for instance, a Tally Expert, replies to a new query raised by the user and he continues the interaction by further replying to the response. In such cases,the user will be able to see the entire chain of the interaction along with the links between each query, as shown in the image. In other words, the queries linked to the same ticket number can be viewed in the Thread View mode.
Zoom In/ Zoom Out ListGo to Company Info menu or Gateway of Tally > Support Centre > Z: Zoom In List/ Zoom Out List [Alt + Z]
This option allows the user to view query list with other column details, in an enlarged mode.
Zoom In List
To view in an enlarged mode, press the button Z: Zoom in list provided in the buttons toolbar or press Alt + Z. The Support Centre screen is displayed as shown:
The user can use the F4 button to toggle between Thread View/ List View.
25

Support Centre
Figure 29. Query list in Zoom in List mode
Zoom Out List
To view the default screen, press the button Z: Zoom out list provided in the buttons toolbar or press Alt + Z. The normal view screen, which is the default screen, is displayed as shown:
Zoom In Content/ Zoom Out ContentGo to Company Info menu or Gateway of Tally > Support Centre > Z: Zoom In Content/ Zoom Out Content [Ctrl + Z]
This option allows the user to view a selected query in an enlarged mode.
Using Z (Alt + Z), the user can toggle between Zoom in list/ Zoom out list.
The user will not be allowed to view the query in Zoom in list mode when in the Zoom in content mode.
26

Support Centre
Zoom In Content
To view the content in an enlarged mode, click Z: Zoom in content provided in the buttons toolbar or press Ctrl + Z. The screen is displayed as shown:
Figure 30. Query in Zoom In Content view mode
In case the user has zoomed in by selecting an issue row from a List View, he may view the other issue(s) linked to the same ticket number under Ticket Interactions (Refer to the above figure), by selecting the appropriate subject(s).
In case the user has zoomed in by selecting an issue row from a Thread View, be will be able to view the interactions pertaining to that particular issue only.
Go to Browser [Alt + B]
In order to view more details with regard to Ticket Summary, Interactions and Interac-tion details such as Content, Properties, etc., the Browse mode can be used.
The Browse mode displays all the additional information that is not provided in the Zoom In Content option, such as Reported by, Issue type, Priority, Product, Product Serial No., Status, etc., placed under Ticket Summary.
27

Support Centre
Similarly, the content area in the Support Centre screen is limited to the display of specified contents, since the contents cannot be displayed if they exceed the limit. In such cases, the Browse Issue mode will help the user to view the entire content of an issue.
The Browse Issue mode will also help the user to view the Properties of the selected issue, under Interaction details.
To get into Browse mode, click the button B: Go to Browser provided in the buttons toolbar or press Alt + B.
The Ticket View window of query/ issue is displayed, as shown:
Figure 31. Query in Browser mode
Zoom Out Content
This option will enable the user to exit from the Zoom in Content mode and shift to the default view mode. Press the button Z: Zoom out content provided in the buttons toolbar or press Ctrl + Z.
The B: Go to Browser button in the buttons toolbar will be active only when the query is viewed in the Zoom in Content mode.
28
Support Centre
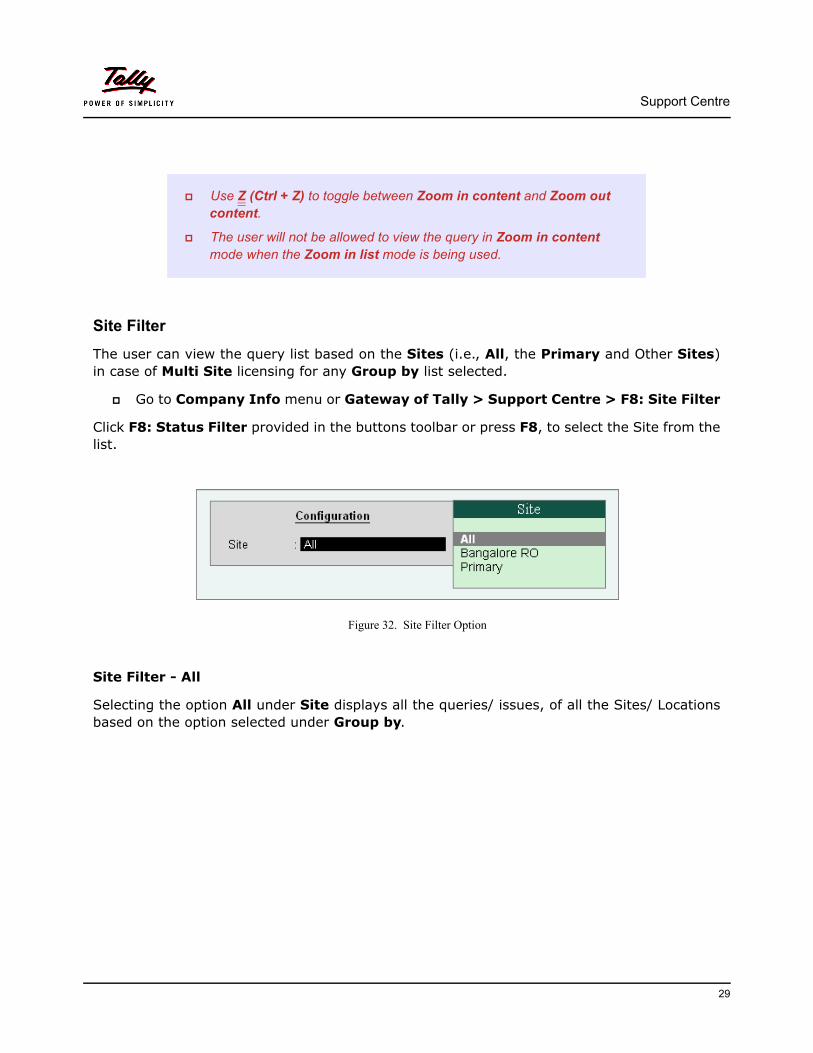
Site FilterThe user can view the query list based on the Sites (i.e., All, the Primary and Other Sites) in case of Multi Site licensing for any Group by list selected.
Go to Company Info menu or Gateway of Tally > Support Centre > F8: Site Filter
Click F8: Status Filter provided in the buttons toolbar or press F8, to select the Site from the list.
Figure 32. Site Filter Option
Site Filter - All
Selecting the option All under Site displays all the queries/ issues, of all the Sites/ Locations based on the option selected under Group by.
Use Z (Ctrl + Z) to toggle between Zoom in content and Zoom out content.
The user will not be allowed to view the query in Zoom in content mode when the Zoom in list mode is being used.
29

Support Centre
Figure 33. Query list of All Sites
Site Filter - Site (Selecting a Site from the list)
Selecting a Site, say ‘Bangalore RO’ from the list of Sites will display the query list pertaining to the selected Site, as shown:
30

Support Centre
Figure 34. Query list of a Selected Site
Status FilterGo to Company Info menu or Gateway of Tally > Support Centre > F9: Status Filter
The user can opt to view the query list based on the Status, namely, All, Closed and Pending, for any Group by option selected.
Click on the button F9: Status Filter provided on the buttons toolbar or press the function key F9, to select the Default Status.
The F8: Site Filter option will be available only in case of Multi Site licensing.
In case the user has selected a Site from the list of sites by pressing F8: Site Filter, the query list will display the Site ID on top left (below the Account ID) in the Support Centre screen, as shown.
31

Support Centre
Figure 35. Status Filter Option
Status Filter - All
Select the option All from Default Status to display all the Pending and Closed queries/ issues.
Figure 36. Query list displaying All Status
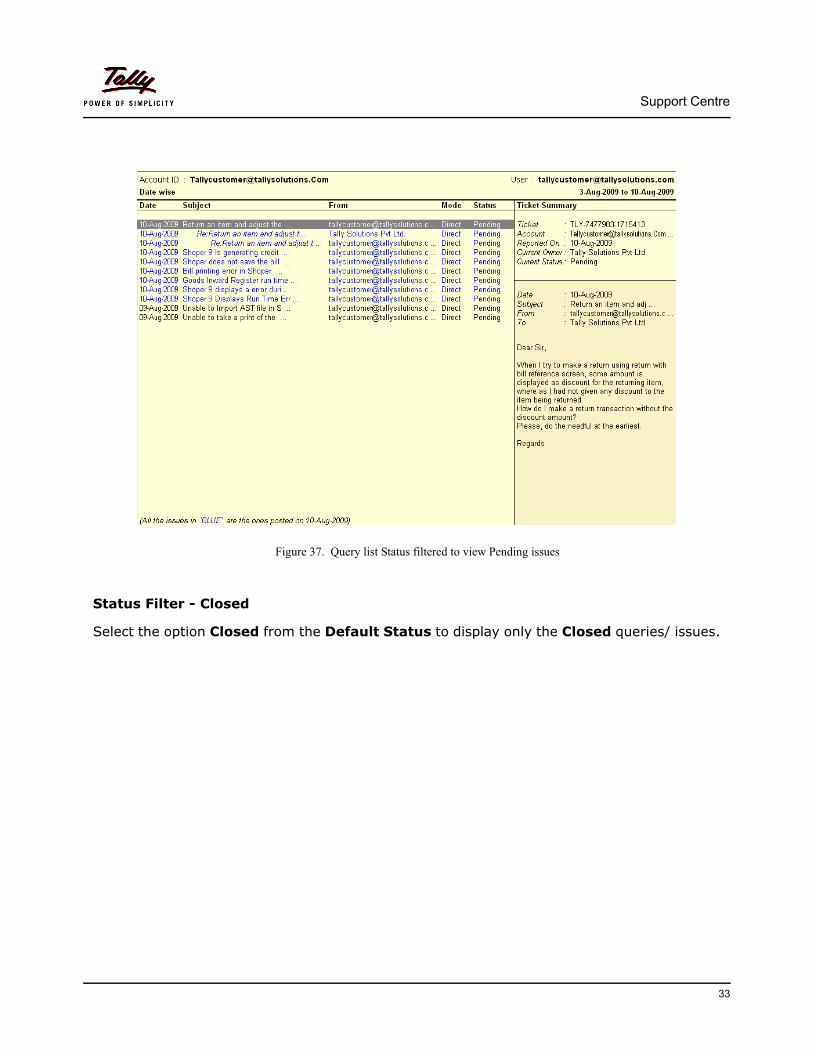
Status Filter - Pending
Select the option Pending from the Default Status to display only the Pending queries/ issues.
32
Support Centre
Figure 37. Query list Status filtered to view Pending issues
Status Filter - Closed
Select the option Closed from the Default Status to display only the Closed queries/ issues.
33

Support Centre
Figure 38. Query list displaying Closed issues
Page SizeGo to Company Info menu or Gateway of Tally > Support Centre > F10: Page Size (10)
This option allows the user to list the number of queries in a screen on the basis of the settings done. The default Page Size is 10, i.e., the Support Centre screen displays 10 queries at a time.
To set the number of queries in a list, click on the button F10: Page Size (10) provided in the buttons toolbar or press the function key F10.
Figure 39. Configure Page size
Type the required number of queries to be listed, say 15, and press Enter.
34

Support Centre
The Support Centre screen displays the number of queries according to the settings defined, as shown:
Figure 40. Query list with Page size set to 15 rows
F12: ConfigureGo to Company Info menu or Gateway of Tally > Support Centre > F12: Config-ure
The user can use this option to set the configuration according to his requirements.
he Page Size can be set to display between 10 and 100.
35

Support Centre
Figure 41. F:12 Configure of Support Centre
Default Period
The user can re-set the default Period to display the queries as per his requirement. Select Last 15 Days from the Default Period list to display the queries listed for the past 15 days. Similarly, the user can also choose other options from the Default Period list to display the queries for the respective period.
Default Grouping
This option allows the user to view list of queries on the basis of the Grouping options selected.
Default Grouping - Date
In cases where Date is selected from the Default Grouping list, the queries are displayed in a chronological order (Date wise).
Default Grouping - Site
In cases where the Site option is selected from the Default Grouping list, the queries are displayed Site/ Location wise.
The configuration setting options available under F12 Configure are also available in the buttons toolbar such as, F1: Detailed/ Condensed, F2: Period, F3: Group by, F9: Status Filter, F4: Thread/ List View and F10 Page Size.
36

Support Centre
Default Grouping - Status
In cases where the Status is selected from the Default Grouping list, the queries are displayed on the basis of the Status (All / Pending / Closed).
Default Status
This option allows the user to set the default Status, i.e., All, Closed or Pending, for any Group by option selected.
Default View
The user can opt to view the list of queries either in a List View or in a Thread View mode.
Default View - List
In cases where the option List View is selected, the query list can be viewed in List View mode.
Default View - Thread
In cases where the option Thread View is selected, the query list can be viewed in Thread View mode.
Default View Mode
The user can opt to view the list of queries in either a Detailed or Condensed mode.
Default View Mode - Detailed
The Detailed View Mode displays the list of queries in Detail based on the Status (All/ Pending/ Closed) selected.
Default View Mode - Condensed
The Condensed View Mode displays only the counts of queries based on the Status (All/Pending/ Closed) selected.
The option Site under Default Grouping will not be listed for Single Site users.
37

Support Centre
Default Page Size
This option allows the user to define the number of queries/ issues to be listed in the Support Centre screen, for instance: 15, 20, 25, and so on.
The default Page Size is 10. i.e., the Support Centre screen displays 10 queries in a screen at a time. The next set of 10 queries can be viewed by clicking on 'X rows more, show next x rows' available below the list.
The Default View Mode option will be disabled in case Date is selected under Default Grouping option.
38