supporting: lmffl2107a: select, operate … · supporting: lmffl2107a: select, operate and maintain...
TRANSCRIPT

Supporting:
LMFFL2107A: Select, operate
and maintain grinding
equipment
Concrete grinding
Learner guide
DRAFT VERSION October 11
Developed in 2012-2013 for the WELL Program


Concrete grinding – Learner guide
© Commonwealth of Australia 2013
Concrete grinding
Learner guide
This unit is also available in an e-learning format, which contains additional photos, interactive exercises and a voice-over narration of the text. It can be viewed on CD-ROM, or live on the web at:
www.flooringtech.com.au
Developed by Workspace Training for the 2012-2013 Workplace English Language and Literacy (WELL) Program
Flooring Technology resource development project

Concrete grinding – Learner guide
© Commonwealth of Australia 2013
Copyright and disclaimer
ISBN: 978-0-9873327-8-3
Funded under the Workplace English Language and Literacy Program by the Australian Government through the Department of Industry, Innovation, Climate Change, Science, Research and Tertiary Education
© Commonwealth of Australia 2013
CC BY-NC-SA
This work is copyright. Except where otherwise indicated, and save for the Commonwealth Coat of Arms, the Department has applied the Creative Commons Attribution-Noncommercial-Share Alike 3.0 Australia Licence to this work.
The Department of Industry, Innovation, Climate Change, Science, Research and Tertiary Education must be attributed as the author of the Department’s copyright material.
As far as practicable, material for which the copyright is owned by a third party has been clearly labelled. The Department has made all reasonable efforts to ensure that this material has been reproduced in the print-based resources and accompanying website with the full consent of the copyright owners.
Requests and enquiries concerning the Department’s copyright material should be addressed to:
The Legal Branch Department of Industry, Innovation, Climate Change, Science, Research and Tertiary Education GPO Box 9839 Canberra ACT 2601 Email: [email protected]
Questions about the design and content of the resource itself should be addressed to the project manager:
David McElvenny Workspace Training PO Box 1954 Strawberry Hills, NSW, 2012 Email: [email protected]
Disclaimer The content of this Learner guide is provided for educational purposes only. No claim is made as to the accuracy or authenticity of the content. The views expressed in this publication do not necessarily represent the view of the Minister for Tertiary Education, Skills, Science and Research or the Australian Government. The Australian Government does not give any warranty nor accept any liability in relation to the contents of this work.

Concrete grinding – Learner guide
© Commonwealth of Australia 2013
About this resource
This Learner guide is part of a suite of resources developed for the Flooring Technology project, funded by the WELL Program. The resources support 19 competencies from the Certificate III in Flooring Technology (LMF31208). The project comprises a website and an accompanying set of Learner guides and work books.
The individual competencies are grouped into ‘Learning units’ as shown below. Each one is given a title describing the main theme of that set of integrated competencies.
Learning unit title Competencies covered
Safety at work MSAPMOHS200A: Work safely LMFFL3002A: Establish and maintain a safe flooring
technology work environment
Inspecting and testing subfloors LMFFL2004A: Moisture test timber and concrete floors LMFFL3101A: Inspect sub-floors
Planning and costing LMFFL3001A: Plan and cost flooring technology work
Subfloor coatings and toppings LMFFL2102A: Prepare, select and apply smoothing and patching compounds
LMFFL2103A: Select and apply appropriate compounds and additives
LMFFL2105A: Select, prepare and apply moisture barriers and damp proof membranes to concrete sub-floors
Concrete grinding LMFFL2107A: Select, operate and maintain grinding equipment
Preparing floor coverings LMFFL2002A: Receive and prepare floor covering materials for installation
Lay flat vinyl LMFFL2301A: Install lay flat vinyl floor coverings
Resilient tiles LMFFL2302A: Install resilient tiles using standard installation practices
Commercial vinyl LMFFL3302A: Install commercial vinyl floor coverings LMFFL3303A: Install resilient floor coverings using custom
designs and decorative finishes
Linoleum LMFFL3301A: Install linoleum floor coverings
ESD floors LMFFL3308A: Install anti-static resilient floor coverings LMFFL3309A: Install conductive resilient floor coverings

Concrete grinding – Learner guide
© Commonwealth of Australia 2013
Making measurements MSAPMOPS101A: Make measurements
Working sustainably MSAENV272B: Participate in environmentally sustainable work practices
The purpose of these resources is to help trainee floor layers acquire the background knowledge needed to satisfy the theoretical components of the competencies covered in this project. However, the resources are not designed to replace the practical training necessary to develop the hands-on skills required. Learners will still need to receive extensive on-the-job training and supervision before they will be ready to be formally assessed in the relevant competencies.
E-learning version
All of the content material contained in this Learner guide is also available in an e-learning format, which has additional photos, interactive exercises and a voice-over narration of the text. The e-learning version can be viewed on the web at: www.flooringtech.com.au
The web version can also be purchased on a CD at a cost-recovery price from the project developer:
Workspace Training PO Box 1954 Strawberry Hills, NSW, 2012 Email: [email protected]

Concrete grinding – Learner guide
© Commonwealth of Australia 2013
Acknowledgements
Project team Project manager: David McElvenny Instructional designer: Kath Ware Technical developer (website): Jim Vaughan Assistant technical developer (and voice-over artist): Alex Vaughan Quality assurance consultant: Giselle Mawer Industry coordinator: Gary Dunshea (MSA Industry Skills Council)
Technical Advisory Group
Lead advisors William Tree – South West Sydney Institute of TAFE Mark Willis – Council of Textile and Fashion Industries of Australia Craig Bennett – Hunter Institute of TAFE
Reviewers Ian Ciesla – Polytechnic West Robert Cole – Furnishing Industry Association of Australia Steven Dalton – Marleston TAFE Shane Eales – SkillsTech Australia David Hayward – Australian Timber Flooring Association Bruce Ottens – Holmesglen TAFE Chris Shaw – Skills Institute Tasmania Warren West – Australian Resilient Floor Covering Association
Industry advisors Peter Brack – Forbo Flooring Systems Don Considine – IKW Consulting Group Gary Eggers – Tarkett Flooring Jim Hilston – Hilston Floors Lionel Jacobs – Epoxy Solutions Owen Jordian – Choices Flooring Steven King – Armstrong Floors Jarka Kluth – Pro Grind Australia Haydn Reynolds – Floorex Products Naomi Archer – All Preparation Equipment

Concrete grinding – Learner guide
© Commonwealth of Australia 2013
Photographs
Most of the photos in this suite of resource were taken by David McElvenny. Additional photos were provided by:
David Beeforth (ParexDavco) Don Considine (IKW Consulting Group) Craig Bennett (Hunter TAFE) David Hayward (Australian Timber Flooring Association) Gary Eggers (Tarkett) Lionel Jacobs (Epoxy Solutions) Jarka Kluth (Pro Grind Australia) Haydn Reynolds (Floorex Products) Naomi Archer (All Preparation Equipment)
We would like to thank the following organisations for allowing us to take on-site photos of their employees at work or students in class.
Choices Flooring – Sandgate, Bulleen, Thomastown and Mornington Lidcombe College of TAFE Lomac Commercial Flooring Tarkett Epoxy Solutions
Graphics
Graphics were drawn by Kath Ware. Many of these graphics are based on line drawings or photographs from installation manuals published by the following flooring manufacturers: Armstrong: http://www.armstrong.com/flooring/guaranteed-installation-systems.html Forbo: http://www.forbo-flooring.com.au/Commercial-flooring/Support-installation-and-
maintenance/Installation/Installation-technique/ Tarkett: http://professionals.tarkett.com.au/commdocu?field_docu_type_value=
Installation+guide
Financial contributions
This resource was funded by the Workplace English Language and Literacy Program by the Australian Government through the Department of Industry, Innovation, Climate Change, Science, Research and Tertiary Education. Additional financial assistance was provided by Manufacturing Skills Australia (Industry Skills Council).

Concrete grinding – Learner guide
© Commonwealth of Australia 2013
Table of contents Introduction ............................................................................................................... 1
Section 1 Principles of grinding .............................................................................. 3
Overview ................................................................................................................. 5
Machines used to prepare concrete ........................................................................ 6
Concrete surface profiles ...................................................................................... 10
Types of grinders .................................................................................................. 13
Diamond tooling .................................................................................................... 16
Assignment 1 ........................................................................................................ 19
Section 2 Practice of grinding ............................................................................... 21
Overview ............................................................................................................... 23
Health and safety .................................................................................................. 24
Selecting the tooling .............................................................................................. 29
Operating procedures ........................................................................................... 32
Basic maintenance ................................................................................................ 35
Assignment 2 ........................................................................................................ 38
Practical demonstrations ....................................................................................... 39

Concrete grinding – Learner guide
© Commonwealth of Australia 2013

Concrete grinding – Learner guide 1
© Commonwealth of Australia 2013
Introduction
Before you put any sort of underlayment, adhesive or floor covering onto a concrete subfloor, you need to make sure the surface is suitable for the specific material that will go on top.
If the surface isn’t suitable, you have to decide what treatment to apply to solve the problem.
Often the only solution is to remove the surface layer until you expose clean, sound concrete.
In this unit we'll cover the processes of selecting, operating and maintaining concrete grinding equipment.
We’ll also touch briefly on other forms of mechanical preparation and make comparisons between the different surface finishes achieved.
References
Much of the technical information in this learner guide is drawn from the publications and website material provided by the three companies listed below. For more details on the concepts presented in this guide, you should go to these websites and follow the links to their technical guidelines and information pages.
Floorex Products: http://floorex.com.au/
Worx+: http://www.totallyworks.com/
All Preparation Equipment: http://archquip.com.au/
Working through this unit
There are two sections in this unit:
• Principles of grinding
• Practice of grinding.

Concrete grinding – Learner guide 2
© Commonwealth of Australia 2013
Each section contains an Overview, an Assignment and Lessons which cover the content material.
Assignments
Your trainer may ask you to submit the assignments as part of your assessment evidence for the unit. You will find hard-copy templates for these assignments in the separate workbook.
Electronic ‘Word’ templates of the assignments are available on the website for this resource at: www.flooringtech.com.au
Learning activities
Each of the lessons has a learning activity at the end. The Workbook for this unit contains all of the learning activities together with spaces for written answers.
Again, you will find the learning activities on the website version, together with some interactive ‘Just for fun’ exercises.
Practical demonstrations
Your final assessment of competency in this unit will include various practical demonstrations. Their purpose is to assess your ability to select, operate and maintain concrete grinding equipment. To help you get ready for these hands-on assessment activities, see the sample checklist shown in the Practical demonstrations section at the back of this Learner guide.

Concrete grinding – Learner guide 3
© Commonwealth of Australia 2013
Section 1
Principles of
grinding

Concrete grinding – Learner guide 4
© Commonwealth of Australia 2013

Concrete grinding – Learner guide 5
© Commonwealth of Australia 2013
Overview
In this section, we’ll look at the range of ‘surface prep’ machines used to remove the top layer of concrete from a slab.
We’ll talk about their pros and cons and the finish they produce. Then we’ll focus on grinding machines and examine the different types available and the tooling they use.
The main purpose of concrete grinding is to remove ridges, contaminants and loose material from the subfloor surface.
By removing ridges and imperfections through grinding, you can often reduce the overall cost of preparing the surface for a floor covering. If you’re able to achieve a surface finish smooth enough to allow carpet or vinyl to be laid straight on top, you’ll not only avoid the expense of a cement-based skim coat, you’ll also save yourself the waiting time for the skim coat to dry.
Completing this section The assignment for this section is designed to test your knowledge of basic concrete grinding principles.
Have a look at the Assignment on page 19 to see what you'll need to do to complete it.
There are four lessons in this section:
• Machines used to prepare concrete
• Concrete surface profiles
• Types of grinders
• Diamond tooling.
These lessons will provide you with background information relevant to the assignment and the practical demonstration requirements.

Concrete grinding – Learner guide 6
© Commonwealth of Australia 2013
Machines used to prepare concrete
The best machine for a concrete preparation job depends on the nature of the material you want to remove and the amount you need to take off.
It also depends on the surface ‘profile’ and flatness you’re looking for.
The sorts of contaminants you may need to remove include oil, grease, asphalt, curing compounds and adhesive residues.
Loose surface material may include old or cracked cement-based toppings. It could also include laitance, which is a powdery or milky layer of cement and sand.
For more details on the nature of these problems and the effect they have on underlayments and adhesives, go to: ‘Inspecting concrete subfloors’ in the unit Inspecting and testing subfloors.
Machine types
Set out below are the main machines used to prepare a concrete subfloor. The ‘CSP’ numbers refer to the concrete surface profile of the floor once the machine has done its job.
Basically, the lower the number, the smoother the surface will be. We’ll explain CSP more fully in the next lesson, but for now you should keep in mind the following guide:
• CSP 1 or 2 provides a surface smooth enough to lay a floor covering directly on top
• CSP 3 to 5 is fine for self-levelling screeds and toppings, but not for directly applying a covering.

Concrete grinding – Learner guide 7
© Commonwealth of Australia 2013
Grinders
Concrete grinding machines use rotating heads to smooth and level the concrete surface.
The process is called ‘diamond grinding’ when the abrasive discs contain diamond particles. However, tungsten carbide discs can also be used, especially when thick membranes and glues need to be removed.
Diamond grinders provide a surface finish of CSP 2 and can take off high spots or uneven joints to a depth of about 1 to 3 mm. They are also good at removing sealers, paints and adhesives.
Shot blasters
Shot blasters throw thousands of steel shot particles at very high speed onto the concrete surface to remove weak or loose material. The machines are very manoeuvrable, entirely dustless, and relatively low noise.
The surface profile achieved by shot blasters ranges from CSP 3 to 7, depending on the grade of shot used.
They are best at removing laitance and other weak surface materials, but not as successful with thick coatings and adhesives. They are also unable to level a floor, because the blasting process tends to remove similar amounts from high areas and low areas.
Scabblers
Scabblers are much more aggressive than grinders and shot blasters, and can remove up to 6 mm of surface thickness per pass.
They use a percussion action to hammer the scabbling bits into the surface with pistons powered by compressed air.
With a CSP ranging from 6 to 9, scabblers can cause a lot of surface damage.

Concrete grinding – Learner guide 8
© Commonwealth of Australia 2013
They are typically used on footpaths, roads and runways, and can also be used to create non-slip surfaces on ramps.
Chisel scrapers
Chisel scrapers are basically jack hammers with a wide chisel-shaped blade head.
Different heads can be fitted for different purposes, such as lifting tiles, vinyl and cork from the floor, removing residues or even breaking up concrete or sandstone.
Most scrapers are pneumatic (air operated), but some models used 240 volt or battery power.
Because they are not really designed for removing the concrete surface itself, a CSP number is not relevant to their action.
Scarifiers
Scarifiers are a form of milling machine with a rotating drum.
The cutters are made of tungsten carbide or hardened steel, and they plane the surface of the concrete to produce a roughened finish of varying profiles, depending on the cutter assembly used.
Most scarifiers produce a surface profile of CSP 6 to 9. However, with a new attachment called ‘flat-faced tungsten flails’ these machines can achieve a CSP of 3 to 4.
Learning activity
As you can see from the range of machines described above, grinding is just one of the methods used to remove surface layers and coatings from a concrete subfloor.
However, it’s generally the most suitable method for floor laying, because it can achieve the flatness and surface finish you’re looking for as long as the original slab is in reasonable condition.

Concrete grinding – Learner guide 9
© Commonwealth of Australia 2013
Let’s say you had a subfloor with a heavy layer of laitance on the surface, and it was too deep to remove easily with a grinder. What machine would you choose to clean up the laitance before you finished the floor with a grinder?
State the name of the machine and reason you would choose it.

Concrete grinding – Learner guide 10
© Commonwealth of Australia 2013
Concrete surface profiles
In the previous lesson we looked at the range of machines used to remove the top layers of a concrete floor.
Each type of machine has its own mechanical action, which can often be described in more precise terms. Different machines also produce different surface profiles.
The International Concrete Repair Institute has developed a set of guidelines for assessing a concrete surface profile (CSP), ranging from CSP 1 (nearly flat) to CSP 9 (very rough).
The rating system works by taking the average measurement between the peaks and the valleys in the surface.
Below are the actions used by different machines, as well as some other techniques used to remove surface contaminants, such as acid etching and high pressure cleaning. Also shown are the corresponding CSP numbers.
Actions
Chemical reactions are produced when detergents or acids are used to remove surface contaminants.
Most chemical washes don’t have any effect on the CSP. However, there are various cautions that apply, especially in neutralising and hosing off the acid wash with water.
You must also ensure that the slab is allowed to dry out to a relative humidity level that’s safe for installing a floor covering. For more details, see ‘Preparing concrete substrates’ in the unit: Subfloor coatings and toppings.
Abrasion is used by grinders to erode the surface through a rubbing action. In many cases, grinders are able to smooth and level a floor to a standard that is sufficient for laying a resilient floor covering directly on top.
They can achieve a surface profile of CSP 1 to 2.

Concrete grinding – Learner guide 11
© Commonwealth of Australia 2013
Pulverization is the removal of material through blasting with small particles, such as sand or steel shot.
This is the process used by sand blasters and shot blasters, with wide ranging profiles of CSP 2 to 8.
Impact is used by scarifiers and scabblers to break up the concrete surface by repeatedly hitting it with hardened cutters or bits.
This mechanical action has the most potential to damage the concrete, but the profile can be varied with different attachments, ranging from CSP 4 to 9.
CSP guide
The following photos and captions are taken from a Floorex information page titled: ‘Surface profile guide’. It is an adaptation of the photos produced by the International Concrete Repair Institute to illustrate the different CSP textures, with captions that provide the CSP number and an example of the process used to achieve that profile.

Concrete grinding – Learner guide 12
© Commonwealth of Australia 2013
Learning activity
You can see the original Floorex document showing the above images on their website. Go to the ‘How to’ page at: http://floorex.com.au/how-to-floorex.html.
On that page you will see a link to the ‘Surface profile guide’, as well as various other documents.
One of the other information pages is the ‘Concrete preparation guide’, which provides more details on the different machines used to prepare concrete substrates.
Have a close look at each of the photos above. From what you know about the different processes used to create these CSPs, what characteristics can you see that makes each one distinctive?
In particular, what is it about the surface texture of the following processes that makes that type of concrete removal distinctive?
• Grinding – CSP 2
• Shotblasting – CSP 3 and 5
• Scarifying – CSP 4, 6 and 9.

Concrete grinding – Learner guide 13
© Commonwealth of Australia 2013
Types of grinders
Grinders come in a huge range of sizes and types. The final choice you make will depend on the size of the job and the type of material you need to remove.
In corners and tight areas, you can use a hand held grinder. These purpose-made grinders have a dust shroud and extraction hose, unlike an ordinary angle grinder.
It’s important to use these attachments when you’re grinding concrete and generating a lot of dust.
For the body of the floor, you’ll need a walk-behind grinder. Most floor layers use machines driven by mains electricity – either 240 volts or three phase.
However, petrol, diesel, LP gas and compressed air are sometimes used to drive larger models.
The most common types of heads are single, double and planetary action, but it’s also possible to get four headed grinders and other configurations for large projects.
Single headed grinders
These grinders have a central shaft that drives a single head.
On smaller machines the head comprises one disc, often with a diameter of 250 mm.
Larger machines can take three discs in a range of diameters, generally up to 250 mm each, which gives them a grinding width of 550 mm or more.

Concrete grinding – Learner guide 14
© Commonwealth of Australia 2013
Some machines contain six discs, typically with a reduced diameter. However, these machines are designed more for concrete polishing rather than preparing a surface for a floor covering.
Depending on the type of tooling you’re using, the disc will have slots, holes or other mounting fixtures to take the diamond segments or plugs.
Double headed grinders
As the name suggests, double headed grinders have two shafts, and each one takes one or more discs.
On some machines, the shafts are counter rotating – that is, they rotate in opposite directions – to balance the torque and make the machine more manoeuvrable.
Other machines allow both heads to rotate in the same direction. These grinders tend to pull to one side, which is a characteristic that can be put to good use when you’re working along a wall.
The grinding width typically ranges from about 750 mm to 1000 mm.
Planetary action grinders
The idea of a planetary action grinder is to enable the large planetary head to rotate independently of the grinding discs – or ‘satellites’ – that are mounted to it.
When they are used for surface preparation, the grinding discs and planetary head are all rotated in the same direction. This has the effect of increasing the speed, and therefore the aggressive nature of the cut, when the diamonds are closer to the outside of the head.

Concrete grinding – Learner guide 15
© Commonwealth of Australia 2013
For concrete polishing, the head and grinding discs can be set in counter rotation, which changes the area where the more aggressive grinding takes place.
However, counter rotation is not used when grinding the floor in preparation for a covering.
Learning activity
The video clip below demonstrates the action of a counter-rotating planetary grinder:
Concrete grinding machine – Planetary Pro Genie:
http://www.youtube.com/watch?v=IzGezzfuPuM
Watch the video and answer the following questions:
• How many diamonds does this three-headed machine hold?
• How is the tooling secured to the grinding discs?
Now go to a promotional video produced by HTC Professional Floor Systems at:
http://www.htc-floorsystems.com/en/Common/Media/Videos.aspx#section2
Select the second video clip in the first column, called: ‘Each HTC Greyline grinder presented’.
Watch the video and answer the following questions:
• What type of grinder is the first machine? (That is, describe its head configuration.) What is its grinding width?
• What type of grinder is the last machine? What is its grinding width?

Concrete grinding – Learner guide 16
© Commonwealth of Australia 2013
Diamond tooling
Diamond is used in abrasive products because it is the hardest material there is. Diamond abrasives are made by mixing synthetic diamond grit with a binding agent of metal or resin.
The resulting products are called metal bond or resin bond diamond segments.
The photos below show metal bond diamond segments suitable for use on the disc shown at right.
The smoothness of the surface finish on the floor is determined by the how fine or coarse the diamond grit is.
A small grit size will produce a finer scratch pattern and increase the life of the segment. A large grit size will have the opposite effect.
The life of the segment is also controlled by the hardness of the bond. A hard bond will take longer to wear away and expose more diamond grit, where a softer bond will wear away more quickly.
A hard bond also produces a finer scratch pattern in dry grinding.
The number of diamond segments under the machine will also have an effect on the surface finish.
Increasing the number of segments will reduce the amount of work each segment has to do and create a smoother scratch pattern. It also reduces the load on the machine.
Another technique used to increase efficiency is to put extra abrasive material onto the floor, such as sand or silicone carbide.

Concrete grinding – Learner guide 17
© Commonwealth of Australia 2013
Selecting the right tooling
The rule of thumb for selecting the right diamond segment for a particular slab is:
If the concrete is hard – use a soft bond segment
If the concrete is soft – use a hard bond segment.
This rule applies in general because hard concrete tends to produce fine, powdery dust, which is not very abrasive.
As a result, it doesn’t help to wear down the binding material in the segment and expose new diamonds to perform the cutting action.
In some cases, if the bond is too hard, the segment may stop grinding altogether and start to glaze over as it overheats. So you need to use softer bond that will open up more easily to keep the diamond grit working.
By contrast, if the concrete is soft and producing a much coarser dust, the dust will have an abrasive effect on the segment and wear it down faster. In this instance, you should use a segment with a harder bond to avoid going through the material too quickly.
How do you know how hard or soft the concrete is before you start?
In general, the higher the compressive strength of the concrete, the harder it will be. Compressive strength is measured in megapascals (MPa) and is specified when concrete is ordered from the supplier.
However, given the fact that the grinding process normally only deals with the surface layers (often the top 5 mm or so), the surface condition of the concrete is often far more important than its compressive strength.
For example, a highly burnished surface, caused by over-trowelling of the wet concrete, can make the surface very smooth and behave like hard concrete.
On the other hand, a rain-damaged or shot blasted surface will produce more gritty, sandy dust, and so behave more like soft concrete.
Concrete grinding – Learner guide 18
© Commonwealth of Australia 2013
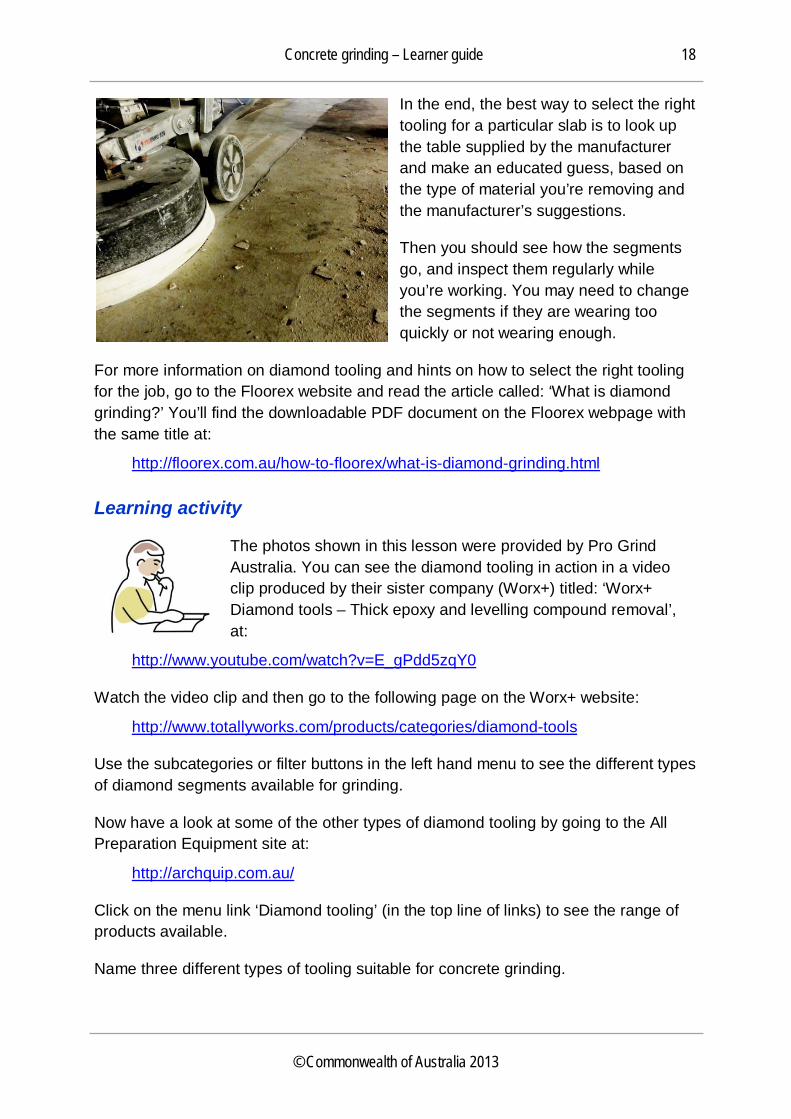
In the end, the best way to select the right tooling for a particular slab is to look up the table supplied by the manufacturer and make an educated guess, based on the type of material you’re removing and the manufacturer’s suggestions.
Then you should see how the segments go, and inspect them regularly while you’re working. You may need to change the segments if they are wearing too quickly or not wearing enough.
For more information on diamond tooling and hints on how to select the right tooling for the job, go to the Floorex website and read the article called: ‘What is diamond grinding?’ You’ll find the downloadable PDF document on the Floorex webpage with the same title at:
http://floorex.com.au/how-to-floorex/what-is-diamond-grinding.html
Learning activity
The photos shown in this lesson were provided by Pro Grind Australia. You can see the diamond tooling in action in a video clip produced by their sister company (Worx+) titled: ‘Worx+ Diamond tools – Thick epoxy and levelling compound removal’, at:
http://www.youtube.com/watch?v=E_gPdd5zqY0
Watch the video clip and then go to the following page on the Worx+ website:
http://www.totallyworks.com/products/categories/diamond-tools
Use the subcategories or filter buttons in the left hand menu to see the different types of diamond segments available for grinding.
Now have a look at some of the other types of diamond tooling by going to the All Preparation Equipment site at:
http://archquip.com.au/
Click on the menu link ‘Diamond tooling’ (in the top line of links) to see the range of products available.
Name three different types of tooling suitable for concrete grinding.

Concrete grinding – Learner guide 19
© Commonwealth of Australia 2013
Assignment 1
Go to the Workbook for this unit to write your answers to the questions shown below. If you prefer to answer the questions electronically, go to the website version and download the Word document template for this assignment. ___________________________________________________________________________
1. What does ‘diamond grinding’ mean? That is, how are the diamonds used and what is their purpose?
2. What are the main advantages of using a concrete grinder, compared with other surface preparation machines?
3. What does CSP stand for? What CSP can a diamond grinder achieve?
4. Circle the correct word in each of the following sentences:
• If the concrete is hard – use a hard / soft bond segment
• If the concrete is soft – use a hard / soft segment.
5. If you found that the diamond segments had glazed over and become very hot, what would that tell you about your choice of bond hardness? What bond hardness would you fit to the machine to overcome the problem?

Concrete grinding – Learner guide 20
© Commonwealth of Australia 2013

Concrete grinding – Learner guide 21
© Commonwealth of Australia 2013
Section 2
Practice of
grinding

Concrete grinding – Learner guide 22
© Commonwealth of Australia 2013

Concrete grinding – Learner guide 23
© Commonwealth of Australia 2013
Overview
Now that we’ve covered the basic principles of grinding, let’s apply that knowledge to the practice of grinding a floor.
This section provides guidelines on safe work procedures and the main steps involved in setting up and operating a grinder.
Note that the suggestions provided in these lessons are not designed to take the place of the manufacturer’s manual for your own machine.
Always follow what the manual says, because it’s been written by the engineers who have designed the machine and tested it under lots of different conditions.
You should also work with an expert operator while you’re learning how to use the machine. Remember, every job has its own characteristics and trickly little quirks, so you need to be able to ‘read’ the slab and adapt your techniques accordingly. The only way to do this is through hands-on experience, under the direct guidance of your trainer or supervisor.
Completing this section The assignment for this section goes hand-in-hand with the practical demonstrations you will perform for your assessor.
Have a look at the Assignment on page 38 to see what you'll need to do to complete it.
There are four lessons in this section:
• Health and safety
• Selecting the tooling
• Operating procedures
• Basic maintenance.
These lessons will provide you with background information relevant to the assignment and the practical demonstration requirements.
Concrete grinding – Learner guide 24
© Commonwealth of Australia 2013
Health and safety
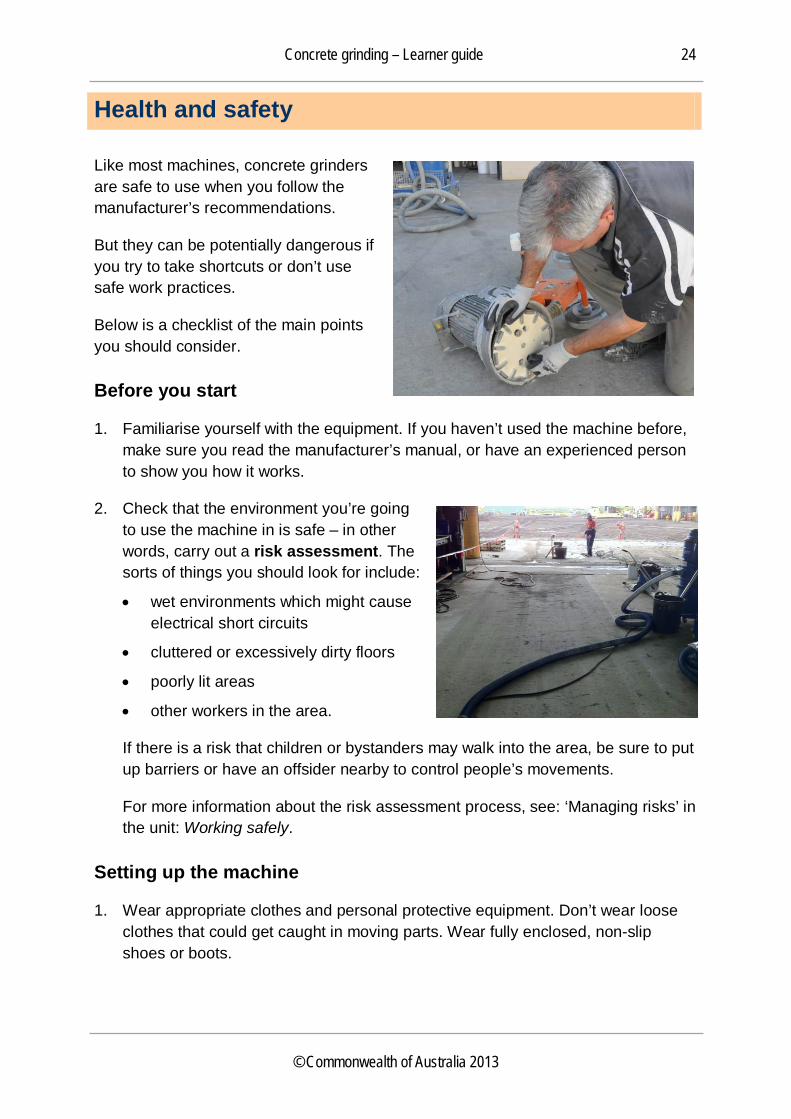
Like most machines, concrete grinders are safe to use when you follow the manufacturer’s recommendations.
But they can be potentially dangerous if you try to take shortcuts or don’t use safe work practices.
Below is a checklist of the main points you should consider.
Before you start
1. Familiarise yourself with the equipment. If you haven’t used the machine before, make sure you read the manufacturer’s manual, or have an experienced person to show you how it works.
2. Check that the environment you’re going to use the machine in is safe – in other words, carry out a risk assessment. The sorts of things you should look for include:
• wet environments which might cause electrical short circuits
• cluttered or excessively dirty floors
• poorly lit areas
• other workers in the area.
If there is a risk that children or bystanders may walk into the area, be sure to put up barriers or have an offsider nearby to control people’s movements.
For more information about the risk assessment process, see: ‘Managing risks’ in the unit: Working safely.
Setting up the machine
1. Wear appropriate clothes and personal protective equipment. Don’t wear loose clothes that could get caught in moving parts. Wear fully enclosed, non-slip shoes or boots.
Concrete grinding – Learner guide 25
© Commonwealth of Australia 2013
Make sure your ear muffs or plugs are at the ready for when you start the machine. Depending on the job you’re doing, you may also need gloves, safety glasses, dust mask and a hard hat.
2. Check that the accessories and attachments are properly fitted and that all guards and other safety devices are in place and working properly. Before you inspect any parts, make sure the power is turned off and the lead unplugged from the power source.
Make sure the extension lead is heavy enough to take the current required. Remember that the longer the lead, the heavier it will need to be to cope with the voltage drop over that distance.
Operating the machine
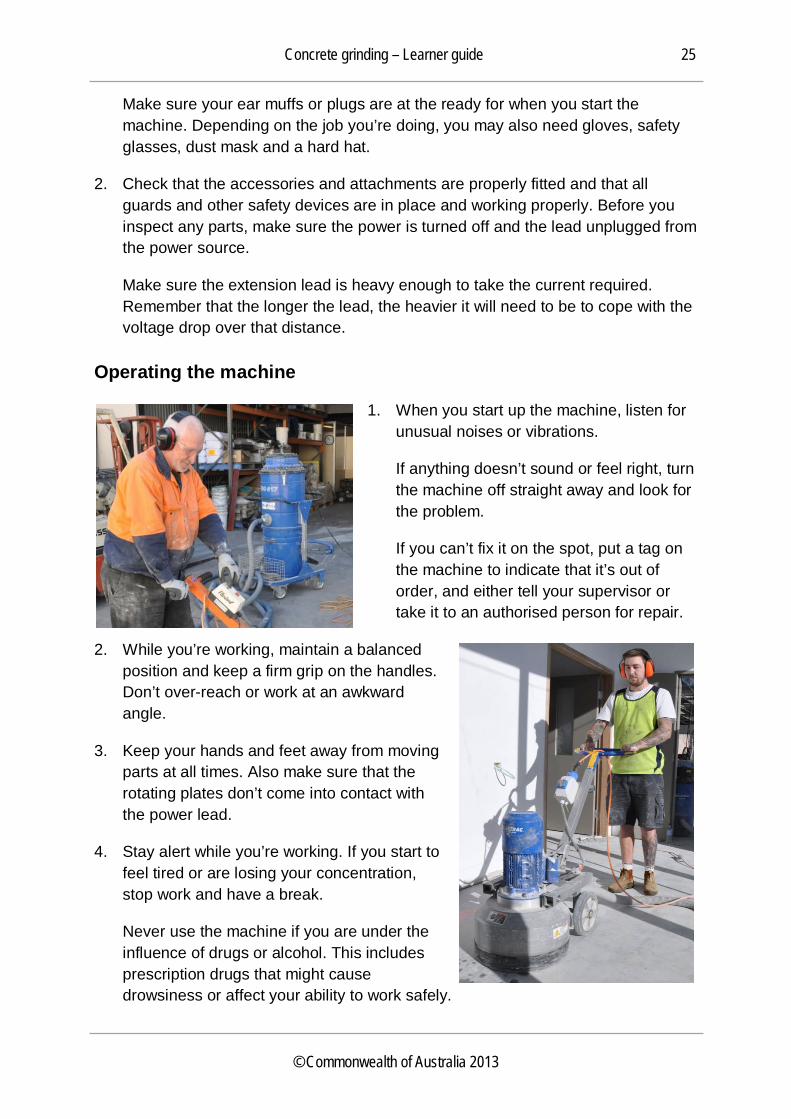
1. When you start up the machine, listen for unusual noises or vibrations.
If anything doesn’t sound or feel right, turn the machine off straight away and look for the problem.
If you can’t fix it on the spot, put a tag on the machine to indicate that it’s out of order, and either tell your supervisor or take it to an authorised person for repair.
2. While you’re working, maintain a balanced position and keep a firm grip on the handles. Don’t over-reach or work at an awkward angle.
3. Keep your hands and feet away from moving parts at all times. Also make sure that the rotating plates don’t come into contact with the power lead.
4. Stay alert while you’re working. If you start to feel tired or are losing your concentration, stop work and have a break.
Never use the machine if you are under the influence of drugs or alcohol. This includes prescription drugs that might cause drowsiness or affect your ability to work safely.

Concrete grinding – Learner guide 26
© Commonwealth of Australia 2013
Shutting down
1. When you’ve finished using the machine, unplug it from the power source. If it is diesel or petrol operated, turn off the fuel line or isolate it as recommended by the manufacturer.
2. Inspect the power lead and extension lead for damage before you put the machine away. Also inspect other parts that may get damaged or wear out over time.
If anything needs repairing, tell your supervisor or take the machine to an authorised person. Don’t just pack it up and forget about the problem – because the problem will still be there when you go to use the machine next time.
Dealing with dust
Concrete grinding produces silica dust. If the dust is breathed in over a period of time, it can lead to a disease called silicosis or scarring of the lungs.
This was such a common problem for grinder operators in years past that one of its common names was ‘grinder’s asthma’.
Fortunately, most modern machines have very good dust extraction systems. Depending on the model you’re using, this may include a separate dust collector and a rubber ‘skirt’ around the bottom of the machine.
However, you still need to be careful when you’re dusting down the machine and cleaning up the work area at the end of the day.
If you’re doing anything that generates dust and it’s not being collected by an efficient extraction system, make sure you wear an appropriate dust mask.

Concrete grinding – Learner guide 27
© Commonwealth of Australia 2013
There’s one type of dust that floor layers need to be especially mindful of when they’re working in older buildings – asbestos. If you don’t know what the floor surface is composed of, or you suspect it might contain asbestos, don’t grind it.
We talked about the problem of asbestos and how to deal with it in the following lessons:
• ‘Preparing concrete substrates’ (Subfloor coatings and toppings)
• ‘Assessing the subfloor’ – Learning activity (Lay flat vinyl).
Manual handling
Grinding machines can be very heavy. Always use good lifting practices and get an offsider if you need extra help. We talked about good manual handling techniques and ways to avoid muscle and joint injuries in the lesson: ‘Manual handling’ in Working safely. You should go back to that unit and revise the details if you can’t remember the principles of good manual handling.
For larger machines, you’ll need some form of mechanical assistance to get it on and off your vehicle. Most operators use aluminium loading ramps and a winch.
The machine will have a hook or winching point for connecting the cable to. It’s important that you use this point, so you don’t damage any fragile parts of the machine.
Once the equipment is in position inside the vehicle, it needs to be well secured to make sure it doesn’t move around while you’re driving. You can use tie down straps to hold the machine tight against anchor points in the floor or sides of the vehicle.
Learning activity
Most companies have a Safe Operating Procedure (SOP) for each piece of equipment their workers take on-site that is potentially hazardous.
They also generally complete a simple risk assessment before starting work at any new jobsite.
Below is a combined SOP and risk assessment for a hand held grinder developed by Epoxy Solutions. Their workers fill in this form each time they use the grinder on-site.

Concrete grinding – Learner guide 28
© Commonwealth of Australia 2013
• Are you required to complete a risk assessment or other type of safety document before you start work on-site?
• What are the forms called, and what is their purpose?

Concrete grinding – Learner guide 29
© Commonwealth of Australia 2013
Selecting the tooling
We discussed the basic principles of tooling in the Section 1 lesson: ‘Diamond tooling’.
Let’s now pick up where we left off and talk about different configurations, and how to set up the most suitable tooling for a particular job.
Number of segments on a disc
You may have noticed that a tripod never rocks backwards and forwards on a floor, even if the surface is uneven. This is because there are only three legs.
In the same way, three diamond segments, or ‘shoes’, on a grinding disc will tend to follow the surface of the floor.
This makes them good at removing old adhesives and other contaminants, because they are less likely to miss low spots and hollows in the floor.
However, for the very same reason they are not good at producing a flat floor. To remove undulations (or ‘waves’) in the floor, you need to use four or more segments.
Many machines use six segments per disc for grinding down high areas to achieve a flat surface.
This set-up also runs more smoothly and gives a finer cut, because there is less distance between the segments.
Some manufacturers use the terms ‘half set’ and ‘full set’ of diamonds to refer to these two basic configurations. Note that if you plan to use both set-ups on a floor, always start with a half set and finish with a full set.
Concrete grinding – Learner guide 30
© Commonwealth of Australia 2013
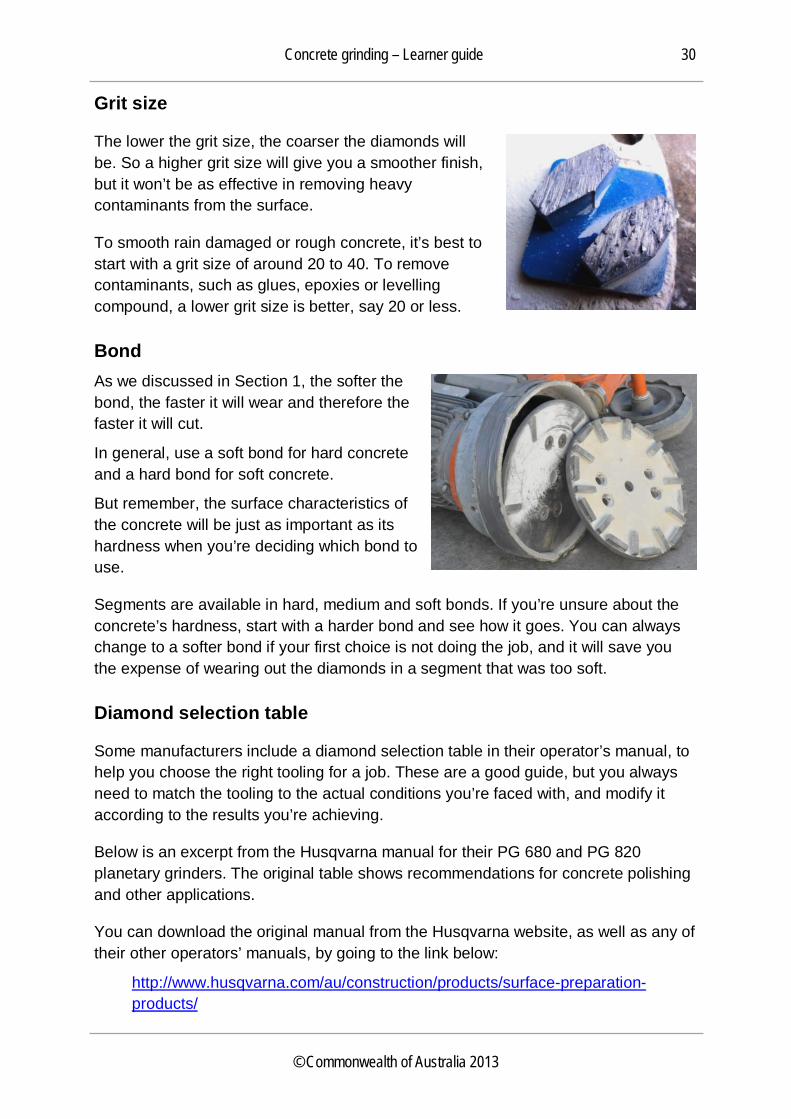
Grit size
The lower the grit size, the coarser the diamonds will be. So a higher grit size will give you a smoother finish, but it won’t be as effective in removing heavy contaminants from the surface.
To smooth rain damaged or rough concrete, it’s best to start with a grit size of around 20 to 40. To remove contaminants, such as glues, epoxies or levelling compound, a lower grit size is better, say 20 or less.
Bond As we discussed in Section 1, the softer the bond, the faster it will wear and therefore the faster it will cut.
In general, use a soft bond for hard concrete and a hard bond for soft concrete.
But remember, the surface characteristics of the concrete will be just as important as its hardness when you’re deciding which bond to use.
Segments are available in hard, medium and soft bonds. If you’re unsure about the concrete’s hardness, start with a harder bond and see how it goes. You can always change to a softer bond if your first choice is not doing the job, and it will save you the expense of wearing out the diamonds in a segment that was too soft.
Diamond selection table
Some manufacturers include a diamond selection table in their operator’s manual, to help you choose the right tooling for a job. These are a good guide, but you always need to match the tooling to the actual conditions you’re faced with, and modify it according to the results you’re achieving.
Below is an excerpt from the Husqvarna manual for their PG 680 and PG 820 planetary grinders. The original table shows recommendations for concrete polishing and other applications.
You can download the original manual from the Husqvarna website, as well as any of their other operators’ manuals, by going to the link below:
http://www.husqvarna.com/au/construction/products/surface-preparation-products/

Concrete grinding – Learner guide 31
© Commonwealth of Australia 2013
Application Metal bond Grit size Full set Half set
Flatten undulations – hard concrete SOFT 16 or 30
Flatten undulations – medium concrete MEDIUM 16 or 30
Flatten undulations – soft concrete HARD 16 or 30
Vinyl or carpet glue removal – hard concrete SOFT 16 or 30
Vinyl or carpet glue removal – medium concrete MEDIUM 6 or 16
Vinyl or carpet glue removal – soft concrete HARD 6 or 16
Epoxy paint removal – hard concrete SOFT 6, 16 or 30
Epoxy paint removal – medium concrete MEDIUM 6, 16 or 30
Epoxy paint removal – soft concrete HARD 6, 16 or 30
Ceramic tile adhesive removal HARD 6, 16 or 30
Rain damaged concrete HARD 16 or 30
Learning activity
Use the table above to answer the following questions:
• What is the suggested tooling and set-up for flattening undulations in medium concrete?
• What is the suggested tooling and set-up for removing vinyl or carpet glue in medium concrete?
• Why are the recommendations different? Explain the reasons for the different choices in:
o Grit size
o Set-up (full set or half set of diamonds).

Concrete grinding – Learner guide 32
© Commonwealth of Australia 2013
Operating procedures
Every grinding machine has an optimal method of operation. The variations in technique between different machines will depend a range of factors, such as:
• the size and type of machine it is, including the number of heads and the manufacturer’s design
• the tooling that’s been fitted and the CSP you’re aiming to achieve
• the loose material or contaminants that you’re removing
• the presence of high spots or ridges in the floor, especially if you are planning to install a floor covering directly on top.
Some machines are designed to be moved in a circular motion as they are pushed up and down the floor in parallel lines. Others may have different processes.
If you haven’t been instructed by an experienced operator on how to use a particular machine, make sure you read the manufacturer’s manual before you start.
This will tell you what pattern to follow, how much overlap to incorporate, and what to do if you strike unusual features in the floor.
Below is a general procedure that applies to most grinding machines.
General procedure
1. Assemble all the tools and equipment required, so that everything is to hand when you need it.
2. Clean the floor and prepare the area. This may include isolating smoke detectors if there’s a risk that the level of dust might set them off.

Concrete grinding – Learner guide 33
© Commonwealth of Australia 2013
3. Inspect the equipment and complete all pre-start checks. Look out for damaged or excessively worn parts, misalignments and binding of moving parts.
4. Set up the tooling, depending on the hardness of the concrete and the type of material that needs to be removed from the surface.
5. Connect the dust extraction hose and power lead. Position them so that they will stay out of the way while you’re working.
6. Turn on the extraction system and then start up the machine.
7. Grind in manageable sections of the floor, working up and down in parallel lines, or as instructed by the manufacturer.
8. Inspect the tooling regularly, and change the grit size and bond hardness to match the conditions and wear rate that’s appropriate.
9. Shut down the machine when you’ve finished. Sweep up or vacuum any remaining dust on the floor. Empty out the bag or bin in the dust extractor and dispose of the bag in the designated area.
10. Clean down the machine, extraction system and surrounding work area and pack the equipment away.
Working to Australian Standards
If you’re planning to lay a floor covering directly on top of the concrete subfloor, you’ll need to carefully check the planeness and smoothness of the surface before you finish the grinding task.
The tolerances for both of these characteristics are set by the Australian Standard that applies to the floor covering you’ll be laying.
We discussed methods for measuring planeness and smoothness in ‘Inspecting concrete subfloors’ in the unit: Inspecting and testing subfloors.

Concrete grinding – Learner guide 34
© Commonwealth of Australia 2013
Learning activity
Watch the following two video clips and then answer the questions underneath.
1. ‘Husqvarna PG 280 and DC 1400 - Grinding a concrete floor’:
http://www.youtube.com/watch?v=Z7wm_zbS8d8&feature=player_detailpage
• How are the diamond segments attached to the disc?
• What sort of movement does the operator use while he’s grinding the floor? That is, what pattern is the machine being moved in?
2. ‘Husqvarna PG 820 and PG 680’:
http://www.youtube.com/watch?v=jCyoTdIoVHA
• What type of machine is the operator using?
• What sort of movement does the operator use when he grinds the floor on the first pass? That is, what pattern is he moving the machine in?
Note that after he completes the first pass, the operator spreads water and polishing compound on the floor and begins the polishing process. We are not covering concrete polishing in this unit, but you can see the different polishing pads he uses as the floor is brought up to its final finish.

Concrete grinding – Learner guide 35
© Commonwealth of Australia 2013
Basic maintenance
Basic maintenance is sometimes called ‘operator maintenance’, because it involves the day-to-day upkeep that the operator carries out on the machine.
For repairs and more advanced service procedures, you should always take the machine to an authorised repairer or give it to your company’s maintenance officer.
The operator maintenance schedule for your machine will be listed in the manufacturer’s manual.
Your company may also use a checklist which requires you to work through the items, tick them off as you go, and then sign the sheet to say you’ve completed all checks.
Below are the sorts of things you need to do to keep your grinding equipment in good order. Note that these procedures are simply examples – you should always refer to your own checklists or the manufacturer’s maintenance schedules for the machine you’re using, because every machine has its own characteristics.
Grinding machine
Before each use:
• Check that the heads are tightly fixed to the shafts and there is no free play or ‘slop’. Some operators use Locktite (a thread locking compound) on the nuts to ensure that they don’t work loose.
On a weekly basis, or at regular intervals:
• For planetary heads – remove the head and check the chain links and drive sprocket for wear. Also clean out dust from behind the head and in the drive links while the head is removed.
Every two months, or periodically:
• Blow out the inside of the electrical cabinet and drive linkages with dry compressed air

Concrete grinding – Learner guide 36
© Commonwealth of Australia 2013
Every six months, or occasionally:
• Inspect the internal components of the machine, including drive belts, and remove dust, belt fragments and moisture. Note that the cover plate may require resealing with a silicone sealant.
Dust extractor
The size and type of the dust collection system you use will be matched to the grinding machine you’re operating.
Some dust extractors have automatic filter cleaning systems. Others need to be cleaned manually.
It’s very important that you inspect the filter regularly and check that it is in good condition and working properly.
The manufacturer’s manual will set out the inspection procedure and what to look for.
Remember, there are strict environmental protection laws in place that control the amount of dust allowed into the atmosphere, and you can be fined by the Environmental Protection Authority for exceeding these limits.
Apart from that, airborne dust is a nuisance to everyone who has to put up with it, and you won’t be popular if the dust is allowed to escape into surrounding areas.
Testing and tagging
All electrical tools used at work need to be tested and tagged every three months by an authorised person. The test is designed to ensure that the tools are safe and not likely to cause a fire or electric shock.
Make sure the grinder’s tag stays up to date. If you don’t, you may find that an on-site safety officer tells you to take the machine away and have it tested before you’re allowed to use it.

Concrete grinding – Learner guide 37
© Commonwealth of Australia 2013
It is also a WorkCover offence to have tools on building sites that aren’t properly tested and tagged.
Learning activity
Does your company have a maintenance checklist that you need to complete before operating the grinder?
It may be called a different name or be built into another form, such as an SOP or pre-start checklist.
What maintenance procedures are you responsible for? List the procedures and state how often you’re required to carry them out.

Concrete grinding – Learner guide 38
© Commonwealth of Australia 2013
Assignment 2
Go to the Workbook for this unit to write your answers to the questions shown below. If you prefer to answer the questions electronically, go to the website version and download the Word document template for this assignment. ___________________________________________________________________________
The questions below relate to the planetary action grinder that you’ll use for your practical demonstration. You should complete this assignment after you’ve selected the specific machine you plan to use.
1. State the manufacturer and model of the machine and briefly describe its type.
2. What voltage and amperage does it draw?
3. What is the machine’s grinding width?
4. Describe the diamond tooling and disc set-up you would choose for each of the following grinding applications:
• Smooth and remove high spots in hard concrete
• Smooth and remove high spots in soft concrete
• Remove old carpet adhesive in medium concrete
• Smooth rain damaged concrete surface.
5. Describe the operator maintenance you should carry out at various times on the grinding machine and dust extraction system.

Concrete grinding – Learner guide 39
© Commonwealth of Australia 2013
Practical demonstrations Your trainer may ask you to keep a log book or diary of the work you do on-the-job that relates to the practical components of this unit. This will help them to determine when you’ve had sufficient hands-on practice in these tasks to undertake the assessment events.
When you’re ready to be assessed, your assessor will ask you to complete a range of practical demonstrations, including:
• smoothing a concrete subfloor using single headed, double headed and planetary action grinders
• completing operator maintenance on the grinding equipment.
Your assessor will also check that you can:
• follow all work, health and safety requirements and environmental care procedures
• use good manual handling practices
• correctly interpret company documents and work instructions
• communicate and work effectively with others
• prevent damage to goods, equipment and products
• work productively and produce a high quality job
• modify activities and techniques used to suit different sites and working conditions.
Make sure you talk to your trainer or supervisor about any of the details you don’t understand, or aren’t ready to demonstrate, before the assessment events are organised. This will give you time to get the hang of the tasks you’ll need to perform, so that you’ll feel more confident when the time comes to be assessed.