system a - 100 - doepfer · because of the modular nature of the a-100, this manual is also...
TRANSCRIPT
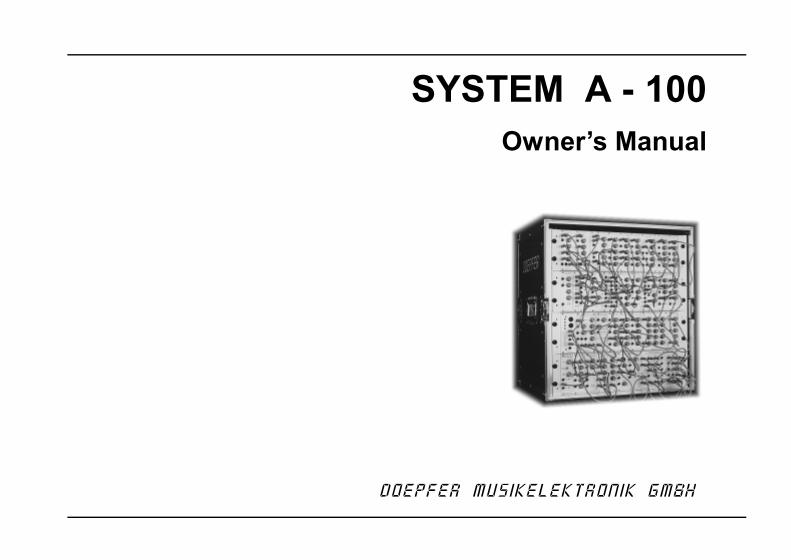
SYSTEM A - 100Owner’s Manual
doepfer Musikelektronik Gmbh

E Warning:
Inside the A-100 power supply are dangerous vol-tages. It is essential to take careful note of thefollowing safety instructions:
• Before opening up the case or moving a module orblanking panel, always take the mains powersupply plug out. This applies equally to removingor replacing any panel or module.
• All empty spaces in the rack must be filled withblanking panels.
• Before use, the top and bottom covers must also beproperly fixed in place. If modules are permanentlyfixed (eg. built into a 19” rack case) then the top ofthe highest of the rack systems and the bottom ofthe lowest must have their covers properly fitted.
The instrument must never be operated outdoors butonly in dry, closed rooms. Never use the instrument ina humid or wet environment nor near inflammables.
A Important safety notes.
Whenever electrical equipment is used, severalbasic precautions need to be taken, including thefollowing:
• Before using any part of the instrument, read theinstructions and notes carefully.
• The instrument may only be used for the purposedescribed in this operating manual. Due to safetyreasons, the instrument must never be used forother purposes not described in this manual. If youare not sure about the intended purpose of theinstrument please contact an expert.
• The instrument may only be operated with thevoltage written on the power input on the rear panel.
• Before opening the case disconnect the power plug.• All eventual modifications must only be carried out
by a qualified person who will follow the valid safetyinstructions. Every modification should becarriedout only at the manufacturer or an authorized ser-vice company. Any modification not released by themanufacturer leads to the extinction of the opera-tion permission.
• The instrument must never be operated outdoorsbut only in dry, closed rooms. Never use the instru-
Important safety notes System A - 100 doepfer
ii
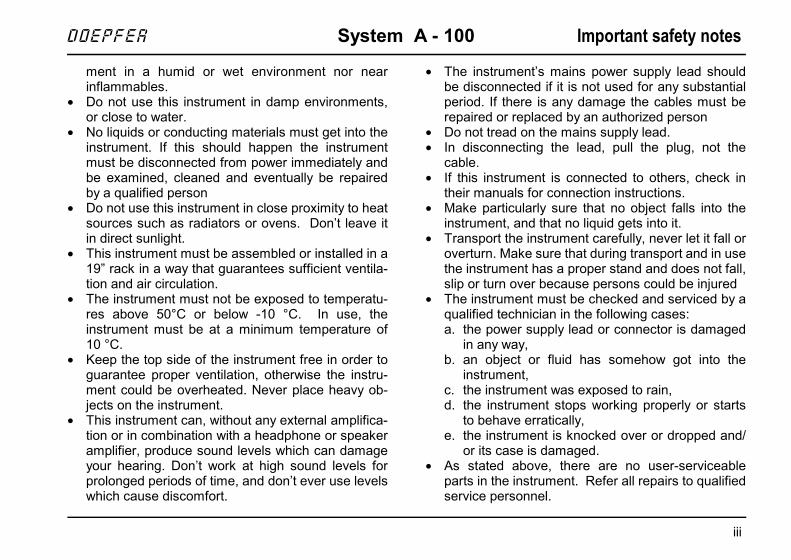
ment in a humid or wet environment nor nearinflammables.
• Do not use this instrument in damp environments,or close to water.
• No liquids or conducting materials must get into theinstrument. If this should happen the instrumentmust be disconnected from power immediately andbe examined, cleaned and eventually be repairedby a qualified person
• Do not use this instrument in close proximity to heatsources such as radiators or ovens. Don’t leave itin direct sunlight.
• This instrument must be assembled or installed in a19” rack in a way that guarantees sufficient ventila-tion and air circulation.
• The instrument must not be exposed to temperatu-res above 50°C or below -10 °C. In use, theinstrument must be at a minimum temperature of10 °C.
• Keep the top side of the instrument free in order toguarantee proper ventilation, otherwise the instru-ment could be overheated. Never place heavy ob-jects on the instrument.
• This instrument can, without any external amplifica-tion or in combination with a headphone or speakeramplifier, produce sound levels which can damageyour hearing. Don’t work at high sound levels forprolonged periods of time, and don’t ever use levelswhich cause discomfort.
• The instrument’s mains power supply lead shouldbe disconnected if it is not used for any substantialperiod. If there is any damage the cables must berepaired or replaced by an authorized person
• Do not tread on the mains supply lead.• In disconnecting the lead, pull the plug, not the
cable.• If this instrument is connected to others, check in
their manuals for connection instructions.• Make particularly sure that no object falls into the
instrument, and that no liquid gets into it.• Transport the instrument carefully, never let it fall or
overturn. Make sure that during transport and in usethe instrument has a proper stand and does not fall,slip or turn over because persons could be injured
• The instrument must be checked and serviced by aqualified technician in the following cases:a. the power supply lead or connector is damaged
in any way,b. an object or fluid has somehow got into the
instrument,c. the instrument was exposed to rain,d. the instrument stops working properly or starts
to behave erratically,e. the instrument is knocked over or dropped and/
or its case is damaged.• As stated above, there are no user-serviceable
parts in the instrument. Refer all repairs to qualifiedservice personnel.
doepfer System A - 100 Important safety notes
iii

Contents System A - 100 doepfer
iv
ContentsImportant safety notes .......................................... ii
Contents ................................................................. iv
About this manual ................................................... v
Introduction ............................................................ vi
1. Important notes ................................. 11.1 Connecting to the electricity supply ........ 1
1.2 Installation .............................................. 1
1.3 Care and maintenance ........................... 1
2. Overall design ............................................ 3
2.1 Introduction ............................................ 3
2.2 Installing modules .................................. 4
2.3 Interconnecting modules ........................ 6
3. Signal flow in the A-100 ........................ 73.1 The principles of voltage control ............ 7
3.2 Signals in the A-100 ............................... 8
3.3 The System Bus in the A-100 ................ 9
3.4 Integrating the A-100 with MIDI ........... 11
4. A-100 BS Basic Systems .................... 13
5. Accessories .............................................. 15
6. Items included as standard ............... 17
7. Further reading ....................................... 19
8. Module overview ..................................... 21
9. Appendix .......................................... 299.1 Adding a 5 V power supply ................... 29
9.2 Installing the AD5 low-cost 5V adaptor 31
9.3 Using the Mini power supply/bus .......... 33
10. Using the modulesH Because the A-100 is a modular system,
each module has its own separate manual,which can be inserted into this ring-binder.

About this manual
This user manual describes the A-100 modular synthe-sizer system, and explains how to use each section ofit.
If this is your first time using the A-100, pleasemake sure you are familiar with all the safety in-structions (eg. pages ii - iv) and important notes(chapter 1).
Because of the modular nature of the A-100, thismanual is also designed to be modular.
Chapter 2 (Overall design) describes the physicalmake-up of the system - and particularly how to installthe individual modules into the 19” rack.
Chapter 3 (The A-100 signal flow) details the A-100’ssignal path: the basic principles of voltage control, howto bring MIDI into the equation, and the possibilities forvoltage-controlled modulation.
Chapter 4 describes the A-100 Basic System.Chapter 5 details accessories.Chapter 6 explains the standard items included.Chapter 7 suggests further reading.
Chapter 8 (Module overview) gives a run-down of theindividual modules presently available, and an idea oftheir potential uses.
Chapter 9 (Appendix) deals with installing an extra 5Vpower supply, for modules such as the A-190 andA-191.
Detailed descriptions of the individual modules fol-low, in self-contained chapters, with descriptions,user examples, and patching aids. When buying indi-vidual modules, the relevant manual chapters whichare included should be inserted into this ring binder.
In the manual, you’ll find various symbols used:
A important user and safety advice
H note
➀ ... diagram numbering of module controls
... diagram numbering of module in / outputs
❒ next step in a list of instructions
P practical hint or tip
doepfer System A - 100 About this manual
v
Introduction System A - 100 doepfer
vi
Introduction
In the A-100, Doepfer have produced a capable andversatile analog modular synthesizer, built in the styleof the classic modular systems of the seventies.
The renaissance of analog synthesis in the last fewyears shows that analog sound production has a vitalplace alongside sampling and digital synthesis, andcan produce sounds that are unobtainable by any othermeans. In addition to the unique sounds of its oscilla-tors, filters, amplifiers, phasers, frequency shifters,wave-modifiers, different control sources, and so on,analog synthesis can provide almost unbounded mo-dulation opportunities, conventional and unconventio-nal - limited only by the number and variety of modulesavailable.
In designing the A-100, our priorities were: good soundquality; ease of integration into a MIDI system; diversityof modules available; and, maybe most important ofall, affordability.
Of course, a modular system doesn’t just have advan-tages. Creative work with an audio construction kit likethis takes time and practice, especially to start with.
Anyone who wants to be able to check out all itsavailable sounds at the press of a button will be verydisappointed with a modular system. Each uniquesound has to be puzzled out, and may never be exactlyrepeated.
Nor are there any fixed rules for connecting the variousmodules. A modular is an open system, in whichpractically anything is possible, and that’s where thefun really starts. Diversity and experimentation - andsometimes lateral thinking - are the keys to its power.
Although the user manuals for each module are verycomprehensive, they can’t substitute entirely for a ge-neral overview and knowledge of analog synthesis.Some very good specialised books have been writtenon the subject, and although some may be out of print,it’s crucial to find one or two of them, and learn fromthem. With that, the whole world of modular systemswill open up to you, and you’ll suddenly appreciate theirfascination and sheer sonic power.
We hope your A-100 brings you serious pleasure!
July, 2009
doepfer musikelektronik gmbh

doepfer System A - 100 1. Important notes
1
1. Important information
A As well as the important safety notice(see ii - iii) please also read and takenote of the following points.
1.1 Connecting to the electricity supply
• The system A-100 must only be connected to themains voltage that is specified at the back of theA-100 frame (220 V to 240 V / 50 Hz or 110 to 120V / 60 Hz).
• If the fuse has to be replaced only the type of fusespecified at the back of the A-100 frame is allowed.If another fuse is used the warranty is void and theA-100 may be damaged. The fuse is located at themains inlet on the back of the A-100 frame(exception: suitcase version with mains inlet at thefront). To replace the fuse one has to disconnectthe mains cable and remove the fuse holder (e.g.with the aid of a screw driver). The fuse holder is asmall black plastic part that is inserted into themains inlet.
• Do not connect the A-100 to a socket or outletwhich is also being used by equipment such aselectric motors, lighting dimmers, etc, which cancause interference. Use a separate outlet for theA-100.
1.2 Installation
• Do not expose the A-100 to rain or moisture.• Operation is allowed only in a dry environment in a
closed room but not in the open country.• The installation near a large amplifier or other
equipment which uses powerful mains transfor-mers may cause hum.
• Do not install the A-100 in close proximity to equip-ment which produces an electromagnetic field(monitors, computers, etc.), to avoid the possibilityof mutual interference.
• Use in a dusty environment should be avoided.
1.3 Care and maintenance
• Apart from cleaning the instrument, no other user-maintenance is recommended, of the modules orsystem busses. Internal maintenance should becarried out only by qualified technicians (see pagesii - iii: "Important safety notice").
• For regular cleaning, use a soft, dry, or slightlydamp cloth. To remove dirt, if necessary, use acloth slightly moistened with a very diluted milddetergent. This should be more than sufficient toclean the instrument. Never use solvents likepetrol, alcohol, or thinners.
System A -100 doepfer
2
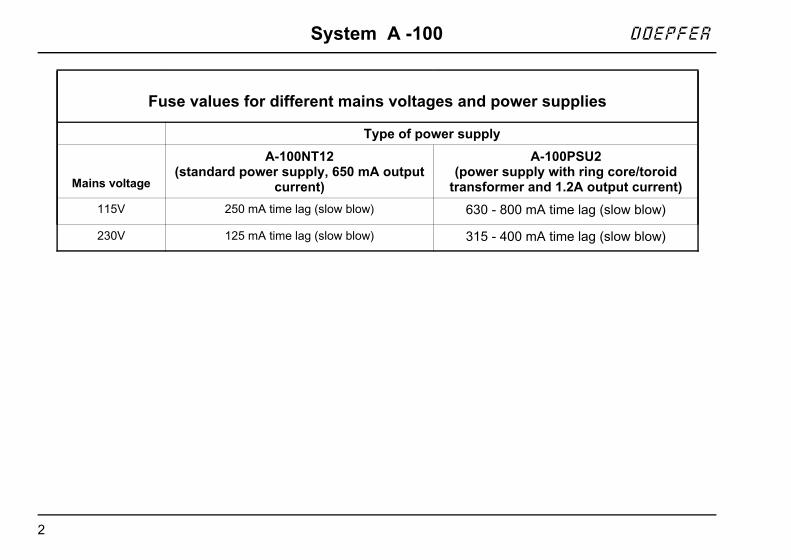
Fuse values for different mains voltages and power supplies
Type of power supply
Mains voltage
A-100NT12(standard power supply, 650 mA output
current)
A-100PSU2(power supply with ring core/toroid
transformer and 1.2A output current)
115V 250 mA time lag (slow blow) 630 - 800 mA time lag (slow blow)
230V 125 mA time lag (slow blow) 315 - 400 mA time lag (slow blow)
doepfer System A - 100 2. Overall design
3
2. Overall design
2.1 Introduction
The A-100 modular system is based on a standard 19”rack system A-100 G into which individual Modulescan be fitted in any chosen layout.
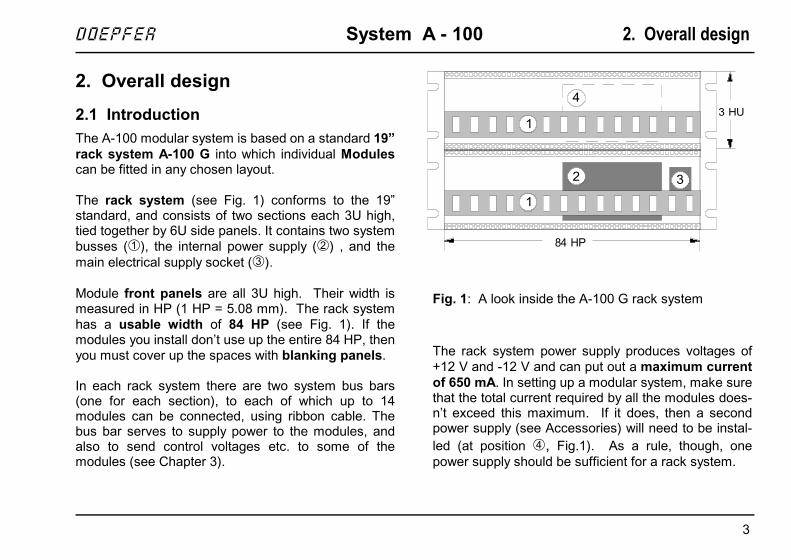
The rack system (see Fig. 1) conforms to the 19”standard, and consists of two sections each 3U high,tied together by 6U side panels. It contains two systembusses (1), the internal power supply (2) , and themain electrical supply socket (3).
Module front panels are all 3U high. Their width ismeasured in HP (1 HP = 5.08 mm). The rack systemhas a usable width of 84 HP (see Fig. 1). If themodules you install don’t use up the entire 84 HP, thenyou must cover up the spaces with blanking panels.
In each rack system there are two system bus bars(one for each section), to each of which up to 14modules can be connected, using ribbon cable. Thebus bar serves to supply power to the modules, andalso to send control voltages etc. to some of themodules (see Chapter 3).
Fig. 1: A look inside the A-100 G rack system
The rack system power supply produces voltages of+12 V and -12 V and can put out a maximum currentof 650 mA. In setting up a modular system, make surethat the total current required by all the modules does-n’t exceed this maximum. If it does, then a secondpower supply (see Accessories) will need to be instal-led (at position 4, Fig.1). As a rule, though, onepower supply should be sufficient for a rack system.
4
2
3 HU
84 HP
1
1
3
2. Overall design System A - 100 doepfer
4
2.2 Installing modules
A Important:
Before you install a module into the racksystem:
D Calculate the total current requirementof existing modules plus the new mo-dule/s.
D Check that this total is less than 1200mA.
D If it is, the existing power supply is fine.
D But if the total current requirement ismore than 1200 mA, you must install asecond power supply (see Accessories)before installing the module/s. Follow theinstallation notes that come with the se-cond power supply.
H Ignoring this warning can result in damage toyour system, and will void your guarantee!
Once you’ve checked that there is sufficient current inreserve for the extra module/s, there’s nothing to stopyou going ahead and installing them. Read on!
D First of all, take the A-100’s plug out of the wallsocket.
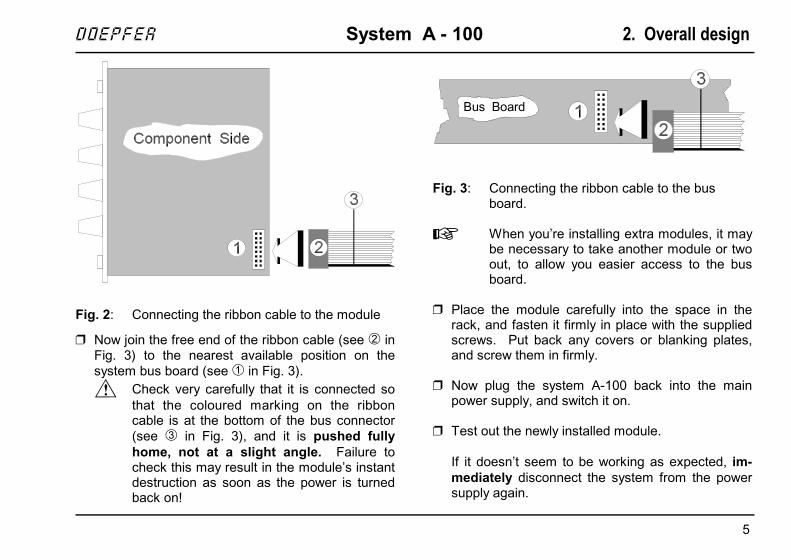
D Plug the supplied ribbon cable into the module’sbus socket (see 1 in Fig. 2). As a rule, the cable is16-way, but some modules only have a 10-waycable. Look carefully at the cable, and then pressthe appropriate connector onto the module’s buspins (see 2 in Fig. 2).
A Check very carefully that it is connected sothat the coloured marking on the ribboncable is at the bottom of the module’sconnector (see 3 in Fig. 2), and that theconnection is perfect, and pushed fullyhome, not at a slight angle. Failure tocheck this may result in the module’s instantdestruction as soon as the power is turnedback on.
doepfer System A - 100 2. Overall design
5
Fig. 2: Connecting the ribbon cable to the module
D Now join the free end of the ribbon cable (see 2 inFig. 3) to the nearest available position on thesystem bus board (see 1 in Fig. 3).A Check very carefully that it is connected so
that the coloured marking on the ribboncable is at the bottom of the bus connector(see 3 in Fig. 3), and it is pushed fullyhome, not at a slight angle. Failure tocheck this may result in the module’s instantdestruction as soon as the power is turnedback on!
Fig. 3: Connecting the ribbon cable to the busboard.
H When you’re installing extra modules, it maybe necessary to take another module or twoout, to allow you easier access to the busboard.
D Place the module carefully into the space in therack, and fasten it firmly in place with the suppliedscrews. Put back any covers or blanking plates,and screw them in firmly.
D Now plug the system A-100 back into the mainpower supply, and switch it on.
D Test out the newly installed module.
If it doesn’t seem to be working as expected, im-mediately disconnect the system from the powersupply again.
Bus Board

2. Overall design System A - 100 doepfer
6
In this case, double-check the connections, makingcompletely sure that the ribbon cable is the rightway round where it connects to the module and thebus.
Once your system is assembled and operational, youshould make use of the the patch sheets which comewith each module.
Photocopy the patch sheets for each of your modules,cut these out, and stick them onto a sheet of paper inthe order in which they occur in your system (see Fig.4). Then photocopy this sheet, and use the copies tonote down good settings and patches.
2.3 Interconnecting modules
For connecting modules to each other, you needmono mini-jack (∅∅∅∅ 3.5 mm) patch leads. You canobtain patch leads from us (see Accessories in chap-ter 5) in different lengths.
Fig. 4: Example of a personal patch sheet.
A-110 VCO
CV 1
CV 2
PW CV 1
Tune
CV 2
PW
PW CV 2
RangeSYNC
PW CV 2
0
0 10
0 10
0 10
0 10
-2
+2
STANDARD VCOA-120 VCF 1
CV 2
CV 3
Audio In
CV 2
CV 3
Lev.
Res.
Freq.
CV 1
LOW PASS FILTER
0 10
0 10
0 10
0 10
0 10
Audio Out
CV 2
Audio In 1
Audio In 2
Audio Out
Gain
CV 1
A-130 VCA-LIN.
0 10
0 10
0 10
0 10
0 10
CV 1
In 1
In 2
Out
A-118 NOISE / RANDOM
Colored
RandomOutput
Red
Rate
Level
RandomControl
BlueWhite
- +
0 10
0 10
0 10
0 10
A-110 VCO
CV 1
CV 2
PW CV 1
Tune
CV 2
PW
PW CV 2
RangeSYNC
PW CV 2
0
0 10
0 10
0 10
0 10
-2
+2
STANDARD VCOA-145 LFO
Frequ.
Frequ.Range
0 10Reset In
M H L
A-140 ADSR
Retrig.
Output
InverseOutput
ADSRControl
Gate
Output
0 10
HL
M
TimeRange
A
D
S
R
0 10
0 10
0 10
A-138 MIXER
Input 2
Input 3
Output
Input 1
Input 4
0 10
0 10
0 10
0 10
0 10
lin exp
In 1
In 2
In 3
In 4
Out
doepfer System A - 100 3. A-100 signal flow
7
3. Signal flow in the A-100
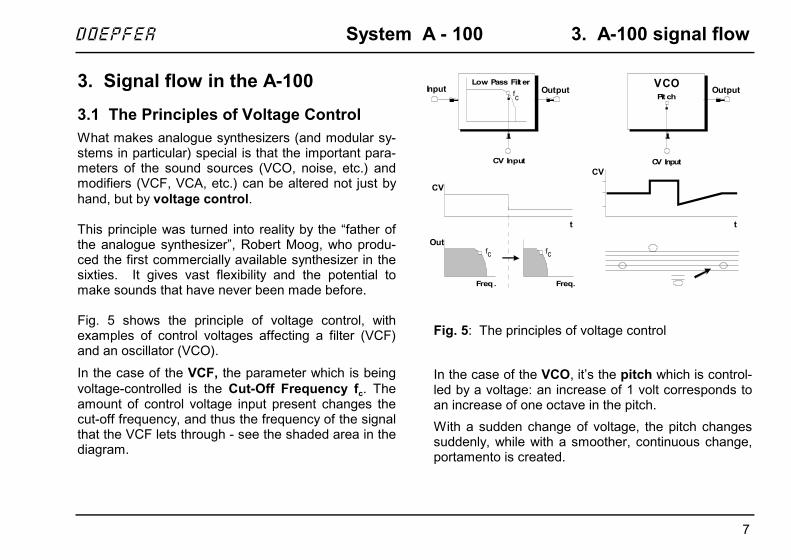
3.1 The Principles of Voltage Control
What makes analogue synthesizers (and modular sy-stems in particular) special is that the important para-meters of the sound sources (VCO, noise, etc.) andmodifiers (VCF, VCA, etc.) can be altered not just byhand, but by voltage control.
This principle was turned into reality by the “father ofthe analogue synthesizer”, Robert Moog, who produ-ced the first commercially available synthesizer in thesixties. It gives vast flexibility and the potential tomake sounds that have never been made before.
Fig. 5 shows the principle of voltage control, withexamples of control voltages affecting a filter (VCF)and an oscillator (VCO).
In the case of the VCF, the parameter which is beingvoltage-controlled is the Cut-Off Frequency fc. Theamount of control voltage input present changes thecut-off frequency, and thus the frequency of the signalthat the VCF lets through - see the shaded area in thediagram.
Fig. 5: The principles of voltage control
In the case of the VCO, it’s the pitch which is control-led by a voltage: an increase of 1 volt corresponds toan increase of one octave in the pitch.
With a sudden change of voltage, the pitch changessuddenly, while with a smoother, continuous change,portamento is created.
fc
Low Pass Filt erInput Output
CV Input
CV
Pit ch
VCOOutput
CV Input
Out
Freq . Freq.
fc fc
CV
t t

3. A-100 signal flow System A - 100 doepfer
8
As well as modules which can be affected by voltagecontrol, there are other modules like the ADSR andLFO which themselves produce voltages to controlother modules.
Usually, these modules need a Trigger Signal to bringthem into action. For instance, a GATE Signal, corre-sponding to a key being pressed on a keyboard, canset off an ADSR, which then puts out its variablevoltage “envelope” to affect other modules (see Fig.6).
Fig. 6: The envelope generated by an ADSR
3.2 Signals in the A-100
In the System A-100 there are three types of signal:
• Audio Signals
• Control voltages
• Trigger voltages
Audio Signals are produced by the sound sourceModules (such as VCO or NOISE), and lie in the rangefrom -5 V to +5 V (10 VSS). The System A-100 can alsolet you use external Audio Signals (e.g. Microphone,Electric Guitar, Keyboard).
H To interface satisfactorily, the level of exter-nal Audio Signals must be brought up to theA-100’s operating level. Module A-119 (External Input), is ideal forthis job, having among other things an inter-nal pre-amp, and two inputs of different sen-sitivity.
Control voltages, as produced by modulation sourceslike the LFO and ADSR, are typically from -2.5 V to+2.5 V (5 VSS) for the LFO, and from 0 V to +8 V forthe ADSR.
+ 5 V
0 VOn Off
t
GATE CV OutADSR
t
CV Out
GATE

doepfer System A - 100 3. A-100 signal flow
9
Trigger or Gate Signals, which start a process orfunction, are typically from 0 V to +5V or 0V to +12 V,with the trigger occurring as the leading edge of thewaveform shoots up from 0 V to +5V/12 V. The A-100modules usually output +12V, but the correspondinginputs of A-100 modules (e.g. Gate, Clock, Reset) willalso work with lower levels (typ. +5V).
These definitions of the various signals, and the di-stinctions between them - sound sources and modula-tion sources - are right in principle, but a modularsystem like the A-100 often makes a mockery of them.In a modular set-up, all of the modules produce volta-ges, and can be used as control voltages or triggers,thus blurring the distinction between the various types.
For example, the output from an LFO can be used asan audio signal, as a control voltage for a VCF or VCA,or as a trigger signals for a sequence.
It’s just about true to say that anything can be modula-ted by anything else, so that a modular system givesthe musician extraordinary flexibility and individuality.
3.3 The System Bus in the A-100
The A-100’s System Bus supplies power to the modu-les. It also carries the internal control system(INT.GATE and INT.CV), which some of the modules(such as the VCO A-110, or ADSR A-140) can tap into.You can choose whether these modules receive thesesignals, by altering an internal jumper.
Fig. 7: The A-100 system bus
If you use the A-190 MIDI-/CV-Interface in your sy-stem, when you press a key on your MIDI keyboard,the gate and CV1 signals from the A-190 will be sentvia the INT.GATE and INT.CV to all modules on thebus.The INT.GATE and INT.CV signal busses can be splitinto two equal halves by removing jumpers J1 andJ2 (see Fig. 7), so that for each whole bus, you canhave two separate CV/GATE subsystems.
INT. GateINT. CV+5 V+12 V
GND
-12 V
1 7 8 14J1
J2
3. A-100 signal flow System A - 100 doepfer
10
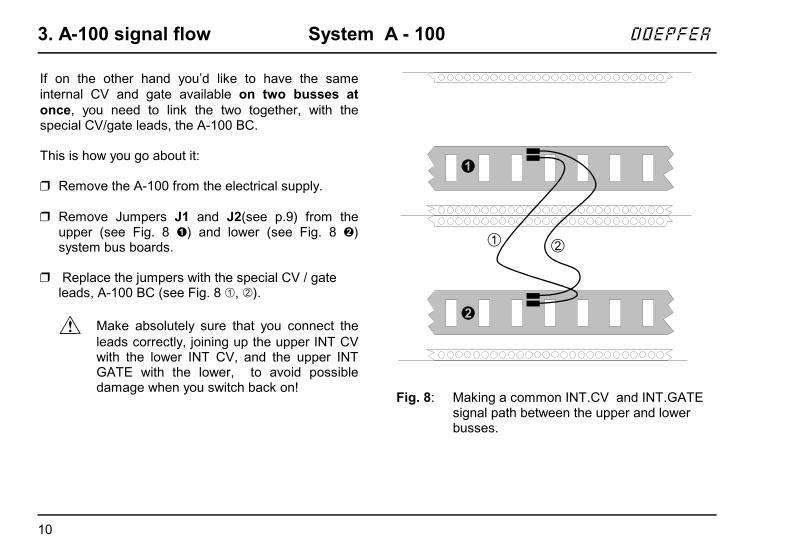
If on the other hand you’d like to have the sameinternal CV and gate available on two busses atonce, you need to link the two together, with thespecial CV/gate leads, the A-100 BC.
This is how you go about it:
D Remove the A-100 from the electrical supply.
D Remove Jumpers J1 and J2(see p.9) from theupper (see Fig. 8 !) and lower (see Fig. 8 ")system bus boards.
D Replace the jumpers with the special CV / gateleads, A-100 BC (see Fig. 8 1, 2).
A Make absolutely sure that you connect theleads correctly, joining up the upper INT CVwith the lower INT CV, and the upper INTGATE with the lower, to avoid possibledamage when you switch back on!
Fig. 8: Making a common INT.CV and INT.GATEsignal path between the upper and lowerbusses.
➀ ➁
doepfer System A - 100 3. A-100 signal flow
11
3.4 Integrating the A-100 with MIDI
To link the A-100 into a MIDI system, you can useexternal MIDI interfaces like our MCV4, MSY2 orMCV24.
The MIDI-CV/SYNC Interface A-190-1 is a MIDI-to-CV/Gate/Sync interface with the following outputs:
• CV 1 (for pitch control, 12 Bit)
• CV 2 (any MIDI-Controller, 8 Bit)
• Gate
• Clock
• Start / Stop
The A-190 automatically sends pitch control CV andgate information out on the INT.CV and INT.GATEbusses.
Another solution is the usage of the low cost MIDI-CVInterface A-190-2 which has one Gate and four CVoutputs available.
Another suitable MIDI-CV Interface for A-100 was the24-channel MCV24, a 19” rackmount with its ownpower supply. As the MCV24 is no longer in productionyou will have to try to find a second hand unit.
VC Modules like the A-141 VC-ADSR and A-147VC-LFO can be controlled via the A-190-1 or A-190-2,so that, for instance, a continuous MIDI controller canalter envelope parameters in real time. Since thesecontrollers can be recorded by a MIDI sequencer, VCmodules are effectively programmable.
Analog sequencing can be provided by the A-155 orthe external MAQ 16/3 MIDI Analog Sequencer.
To convert up to 16 control voltages in the range0...+5V (e.g. from a Theremin A-178 or Joy-StickA-174-1 or Foot-Controller A-177-2 or ribbon controllerA-198) into MIDI controllers the CV-to-MIDI interfaceA-192 is the right choice.
doepfer System A - 100 3. A-100 signal flow

3. A-100 signal flow System A - 100 doepfer
12
3. A-100 signal flow System A - 100 doepfer

doepfer System A - 100 4. A-100 Basic System
13
4. A-100 Basic Systems
It’s not in the nature of modular systems to have hardand fast rules about which modules should be inclu-ded. But if you’re just starting out along the modularpath, it may be difficult to choose a sensible first set ofmodules. Accordingly, we’ve designed Basic Systemswith all the modules mounted in a rack system, and 30patch leads thrown in as well. For an exact run-downof the modules included in Basic System 1 (A-100BS1), see the table on the right of this page, andthe illustration on the next page. To integrate BS1 itinto a MIDI system, you would need a separate MIDIinterface, such as an MCV4 or MCV24. In the BasicSystem 2 (A-100BS2) the MIDI interface A-190 isincluded (instead of A-150 and A-162). We also haveavailable a small Mini System (A-100MS). See ourtopic prospectus for details.The purpose and function of other modules will be-come more apparent as you work with your system,and you will be able to decide which extra modules youneed for your particular purposes.
In the future other types of complete systems may beavailable. We are planning an Expansion System con-taining nearly all modules not included in the BasicSystems, a Vocoder System and a Sound ProcessingSystem without VCO’s for external audio signals.
Pos. Quantity Module Function HP
2 A-110 VCO 20
1 A-114 Dual Ring Modulator 4
u 1 A-115 Audio Divider 8
p 1 A-116 Waveform Processor 8
p 1 A-138b Mixer (log) 8
e 1 A-120 VCF 1 - 24 dB Low Pass 8
r 1 A-121 12 dB Multimode Filter 12
1 A-130 VCA (lin) 8
1 A-131 VCA (log) 8
1 A-118 Noise / Random 8
1 A-148 Dual Sample & Hold 4
l 2 A-145 LFO 16
o 1 A-160 Clock Divider 4
w 1 A-161 Clock Sequencer 4
e 1 A-180 Multiples 4
r 1 A-138 a Mixer (lin) 8
1 A-170 Dual Slew Limiter 8
1 A-150 Dual VCS 4
1 A-162 Dual Trigger Delay 8
2 A-140 ADSR 16

4. A-100 BS Basic system System A - 100 doepfer
14
doepfer System A - 100 5. Accessories
Subject to change without notice 15
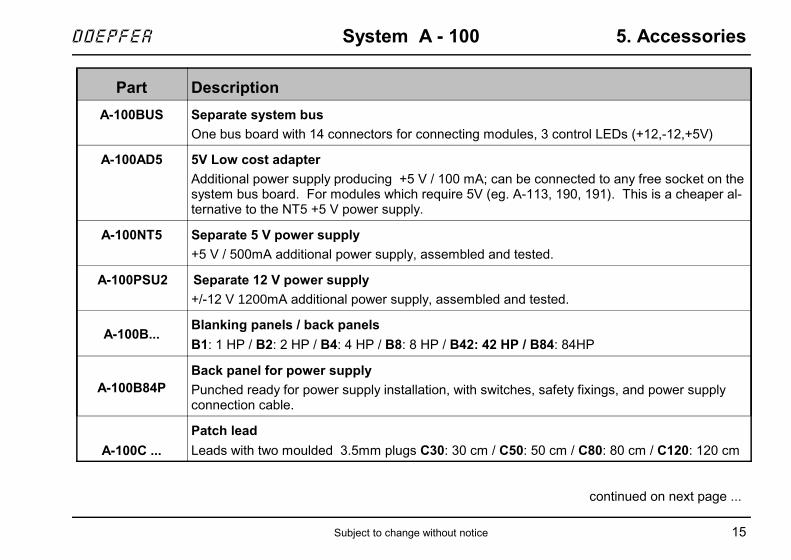
Part Description
A-100BUS Separate system bus
One bus board with 14 connectors for connecting modules, 3 control LEDs (+12,-12,+5V)
A-100AD5 5V Low cost adapter
Additional power supply producing +5 V / 100 mA; can be connected to any free socket on thesystem bus board. For modules which require 5V (eg. A-113, 190, 191). This is a cheaper al-ternative to the NT5 +5 V power supply.
A-100NT5 Separate 5 V power supply
+5 V / 500mA additional power supply, assembled and tested.
A-100PSU2 Separate 12 V power supply
+/-12 V 1200mA additional power supply, assembled and tested.
A-100B...Blanking panels / back panels
B1: 1 HP / B2: 2 HP / B4: 4 HP / B8: 8 HP / B42: 42 HP / B84: 84HP
A-100B84PBack panel for power supply
Punched ready for power supply installation, with switches, safety fixings, and power supplyconnection cable.
A-100C ...
Patch lead
Leads with two moulded 3.5mm plugs C30: 30 cm / C50: 50 cm / C80: 80 cm / C120: 120 cm
continued on next page ...

5. Accessories System A - 100 doepfer
16 Subject to change without notice
Part Description
A-100OPM
A-100 User Manual
Contains detailed description and instructions for use of all the currently available modules. Itis included when you buy a complete system (A-100BS1, BS2, MS). When buying individualmodules or frames, you have to order the manual separately. If you order the manual in ad-vance the price for the manual will be credited when ordering a complete system later (not onlya single module).
A-100SM
A-100 Service Manual
Contains the schematics, silk screens, parts lists, assembly, test, basic principles and adjust-ment instructions of all currently available modules. The words (e.g. assembly instructions) arein German language but schematics, components overlays and parts lists are international.Available only to A-100 customers.

doepfer System A - 100 6. Standard items included
17
6. Items included as standard
The following parts are included in each order:
A-100BS1/BS2/MS - Basic Systems
• Rack system (basic frame), completely assem-bled, including two system bus boards, one 12V,650mA power supply, internal power cables.
• All modules specified for the System (BS1, BS2 orMS) completely assembled, tested and mountedinto the frame
• 30 patch leads for A-100BS1 and BS2
• 15 patch lead for A-100MS
• External power lead.
• Complete instruction manual (containing the ma-nuals of all modules)
• +5V supply is not included (only the +5V low costadapter for A-100BS1 and MS)
A-100G3/G6 - Rack System 3HU/6HU
• Rack system, completely assembled, includingtwo system bus boards, one 12V, 650mA powersupply, internal power cables.
• External power lead.
• +5V supply is not included
A- XXX - any module
• Module A-XXX.
• Ribbon cable for connection to the system bus.
• Fixing screws.
The instruction manual is not included when orderinga single module or frame. In this case the completeinstruction manual has to be ordered additionally!

6. Standard items included System A - 100 doepfer
18
doepfer System A - 100 7. Further reading
19
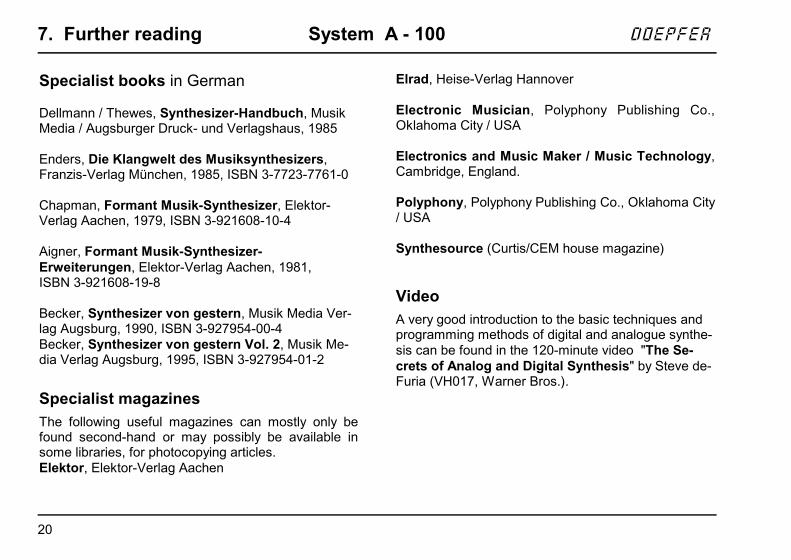
7. Further reading
The resources in the following list should help youincrease your knowledge of analog synthesis, and theskill with which you can use modular systems like theA-100.
Specialist books
In English
Allen Strange, Electronic Music Systems, Techni-ques and Controls, 2nd edition, Wm. C. Brown Co.Publishers, Iowa, USA. ISBN 0-697-03602-2*
This book by Allen Strange is very comprehensive andthoroughly recommended, because as well as all ofthe basics it also includes a huge number of patchesand practical tips. It’s easy to read, instructive andvery well organised. If your bookstore has troubleordering a copy, then try the publishers. In Europe, tryMcGraw-Hill Publishing, tel +44 (0)1628 502500; orSusurreal, tel +44 (0)1363 774627), who had copies at£25 including postage in late 1996.
Vail, Vintage Synthesizers, GPI Books / Miller Free-man Inc. San Francisco, 1993, ISBN 0-87930-275-5*(A background read rather than great technical help.)
Synthesizer Technique ISBN 0-88188-715-3 andSynthesizer Basics ISBN 0-88188-714-5 - (revisedre-prints of very useful and authoritative articles fromKeyboard magazine, by Moog, Rhea, Milano, Coster,Duke, Powell, Gleeson, DeFuria, Anderton, et al.)
Crombie, The Synthesizer & Electronic KeyboardHandbook ISBN 0 330 28681 1, and The New Com-plete Synthesizer ISBN 0-7119-0701-3 (The latterespecially is a good general introduction.)
Trythall, Principles and Practice of Electronic Mu-sic, 1973, ISBN 0-448-40002-6 (an early classic.)
Forrest, The A-Z of Analogue Synthesisers, PartOne (A-M), ISBN 0 9524377 0 8*, andPart Two (N-Z), ISBN 0 9524377 1 6* :Susurreal, England. tel +44 (0)1363 774627, fax +44(0)1363 777872, email: [email protected](A background read rather than great technical help.)
Chamberlin, Musical applications of microproces-sors, Hayden Book Company, Rochelle Park / NewJersey, 1980, ISBN 0-8104-5773-3
* Only the books whose ISBN numbers are followed byan asterisk are definitely in print as of Dec 1996.
7. Further reading System A - 100 doepfer
20
Specialist books in German
Dellmann / Thewes, Synthesizer-Handbuch, MusikMedia / Augsburger Druck- und Verlagshaus, 1985
Enders, Die Klangwelt des Musiksynthesizers,Franzis-Verlag München, 1985, ISBN 3-7723-7761-0
Chapman, Formant Musik-Synthesizer, Elektor-Verlag Aachen, 1979, ISBN 3-921608-10-4
Aigner, Formant Musik-Synthesizer-Erweiterungen, Elektor-Verlag Aachen, 1981,ISBN 3-921608-19-8
Becker, Synthesizer von gestern, Musik Media Ver-lag Augsburg, 1990, ISBN 3-927954-00-4Becker, Synthesizer von gestern Vol. 2, Musik Me-dia Verlag Augsburg, 1995, ISBN 3-927954-01-2
Specialist magazines
The following useful magazines can mostly only befound second-hand or may possibly be available insome libraries, for photocopying articles.Elektor, Elektor-Verlag Aachen
Elrad, Heise-Verlag Hannover
Electronic Musician, Polyphony Publishing Co.,Oklahoma City / USA
Electronics and Music Maker / Music Technology,Cambridge, England.
Polyphony, Polyphony Publishing Co., Oklahoma City/ USA
Synthesource (Curtis/CEM house magazine)
Video
A very good introduction to the basic techniques andprogramming methods of digital and analogue synthe-sis can be found in the 120-minute video "The Se-crets of Analog and Digital Synthesis" by Steve de-Furia (VH017, Warner Bros.).
8. Module Overview System A-100 DOEPFERDOEPFERDOEPFERDOEPFER
21
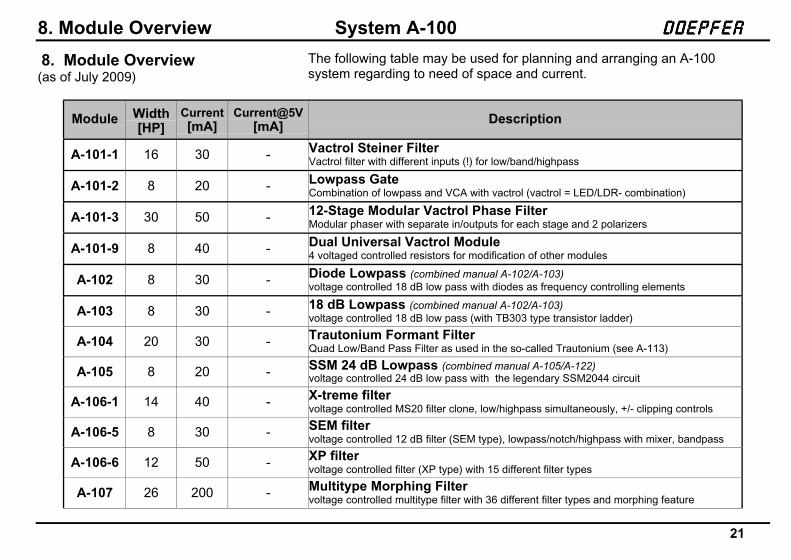
8. Module Overview(as of July 2009)
Module Width[HP]
Current[mA]
Current@5V[mA]
Description
A-101-1 16 30 - Vactrol Steiner FilterVactrol filter with different inputs (!) for low/band/highpass
A-101-2 8 20 - Lowpass GateCombination of lowpass and VCA with vactrol (vactrol = LED/LDR- combination)
A-101-3 30 50 - 12-Stage Modular Vactrol Phase FilterModular phaser with separate in/outputs for each stage and 2 polarizers
A-101-9 8 40 - Dual Universal Vactrol Module4 voltaged controlled resistors for modification of other modules
A-102 8 30 - Diode Lowpass (combined manual A-102/A-103)voltage controlled 18 dB low pass with diodes as frequency controlling elements
A-103 8 30 - 18 dB Lowpass (combined manual A-102/A-103)voltage controlled 18 dB low pass (with TB303 type transistor ladder)
A-104 20 30 - Trautonium Formant FilterQuad Low/Band Pass Filter as used in the so-called Trautonium (see A-113)
A-105 8 20 - SSM 24 dB Lowpass (combined manual A-105/A-122)voltage controlled 24 dB low pass with the legendary SSM2044 circuit
A-106-1 14 40 - X-treme filtervoltage controlled MS20 filter clone, low/highpass simultaneously, +/- clipping controls
A-106-5 8 30 - SEM filtervoltage controlled 12 dB filter (SEM type), lowpass/notch/highpass with mixer, bandpass
A-106-6 12 50 - XP filtervoltage controlled filter (XP type) with 15 different filter types
A-107 26 200 - Multitype Morphing Filtervoltage controlled multitype filter with 36 different filter types and morphing feature
The following table may be used for planning and arranging an A-100system regarding to need of space and current.
DOEPFERDOEPFERDOEPFERDOEPFER System A-100 8. Module Overview
22
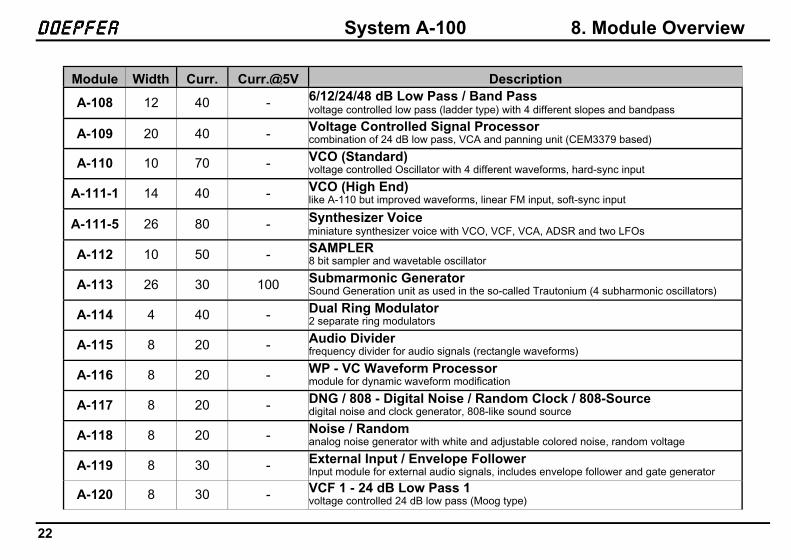
Module Width Curr. Curr.@5V Description
A-108 12 40 - 6/12/24/48 dB Low Pass / Band Passvoltage controlled low pass (ladder type) with 4 different slopes and bandpass
A-109 20 40 - Voltage Controlled Signal Processorcombination of 24 dB low pass, VCA and panning unit (CEM3379 based)
A-110 10 70 - VCO (Standard)voltage controlled Oscillator with 4 different waveforms, hard-sync input
A-111-1 14 40 - VCO (High End)like A-110 but improved waveforms, linear FM input, soft-sync input
A-111-5 26 80 - Synthesizer Voiceminiature synthesizer voice with VCO, VCF, VCA, ADSR and two LFOs
A-112 10 50 - SAMPLER8 bit sampler and wavetable oscillator
A-113 26 30 100 Submarmonic GeneratorSound Generation unit as used in the so-called Trautonium (4 subharmonic oscillators)
A-114 4 40 - Dual Ring Modulator2 separate ring modulators
A-115 8 20 - Audio Dividerfrequency divider for audio signals (rectangle waveforms)
A-116 8 20 - WP - VC Waveform Processormodule for dynamic waveform modification
A-117 8 20 - DNG / 808 - Digital Noise / Random Clock / 808-Sourcedigital noise and clock generator, 808-like sound source
A-118 8 20 - Noise / Randomanalog noise generator with white and adjustable colored noise, random voltage
A-119 8 30 - External Input / Envelope FollowerInput module for external audio signals, includes envelope follower and gate generator
A-120 8 30 - VCF 1 - 24 dB Low Pass 1voltage controlled 24 dB low pass (Moog type)

8. Module Overview System A-100 DOEPFERDOEPFERDOEPFERDOEPFER
23
Module Width Curr. Curr.@5V Description
A-121 12 30 - VCF 2 - 12 dB Multimode Filtervoltage controlled 12 dB multimode filter (low pass, high pass, band pass, notch)
A-122 8 20 - VCF 3 - 24 dB Low Pass 2 (combined manual A-105/A-122)voltage controlled 24 dB low pass (with CEM3320, Oberheim type)
A-123 8 20 - VCF 4 - 24 dB High Pass (module no longer available)voltage controlled 24 dB highpass
A-124 8 30 - VCF 5 - 12 dB Wasp Multimode Filterreproduction of the strange multimode filter used in the EDP Wasp Synthesizer
A-125 8 20 - VCP - Voltage Controlled Phaservoltage controlled FET based phase shifter with resonance
A-126 8 80 - VCFS - Voltage Controlled Frequency Shiftervoltage controlled analog frequency shifter
A-127 28 100 - VCRF - Triple Voltage Controlled Resonance Filter3 independent voltage controlled band pass filters with 3 LFOs
A-128 20 20 - Fixed Filter Bankfilter bank with 15 band filters
A-129-1 20 100 - Vocoder Analysis SectionAnalysis section of the modular vocoder
A-129-2 12 80 - Vocoder Synthesis Sectionsynthesis section of the modular vocoder
A-129-3 16 40 - Vocoder Slew Limiteruniversal 5-fold voltage controlled slew limiter/attenuator/offset generator
A-129-4 8 30 - SLC - Slew Limiter Controllercontroller module for slew limiter function of A-129/3
A-129-5 8 30 - VUV - Voiced / Unvoiced Detectormodule for recognition of "voiced/unvoiced" speech

DOEPFERDOEPFERDOEPFERDOEPFER System A-100 8. Module Overview
24
Module Width Curr. Curr.@5V Description
A-130 8 20 - VCA - Voltage Controlled Amplifiervoltage controlled amplifier with linear response
A-131 8 20 - VCA - Voltage Controlled Amplifiervoltage controlled amplifier with exponential response
A-132-1 4 20 - Dual Low Cost VCAtwo simple voltage controlled amplifier with linear response
A-132-2 8 30 - Quad VCAfour VCAs with independent inputs and outputs, common loudness/level control
A-132-3 8 30 - Dual linear/exponential VCAtwo separate VCAs with selectable control scale (switch, linear or exponential)
A-133 8 30 - Dual Voltage Controlled Polarizertwo special VCAs with positive and negative (=inverting) amplification
A-134-1 8 40 - VC PAN - Voltage Controlled Panning / Crossfadermodule for voltage controlled panning or crossfading
A-134-2 4 20 - Dual VC CrossfaderTwo separate voltage controlled crossfaders
A-135-1 22 30 - VC MIX - Voltage Controlled Mixer4 separate VCAs with common output
A-135-2 ? ? - VCF/VCA/Panning subsystem (still under development)subsystem with VCFs with VCQ, VCAs and VC panning units with common stereo output
A-136 8 30 - Distortion/Waveshaperdistortion and wave-shaping / wave-modifying module with extensive control possib.
A-137-1 14 40 - Voltage Controlled Wave-Multiplier Iwaveform multiplier with 4 VC parameters: Multiples, Harmonics, Folding, Symmetry
A-137-2 14 30 - Voltage Controlled Wave-Multiplier IImakes one sawtooth VCO sound like five VCOs (four VC algorithmic phase shifters)
8. Module Overview System A-100 DOEPFERDOEPFERDOEPFERDOEPFER
25
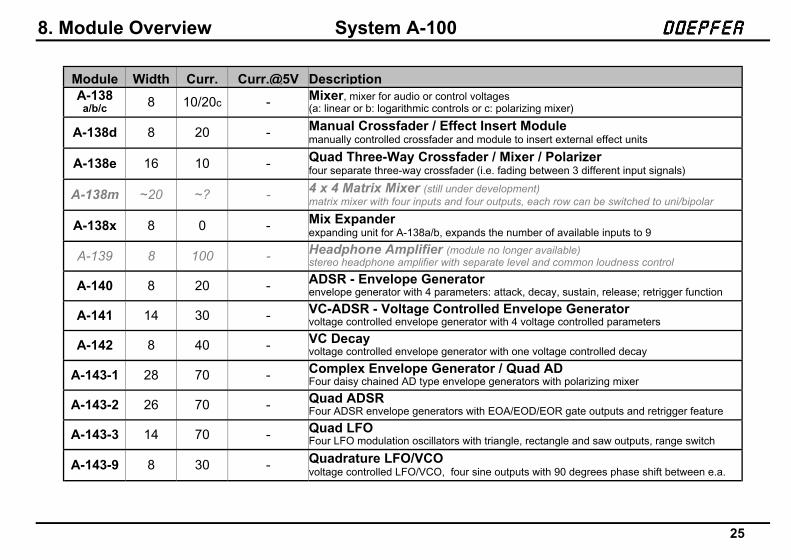
Module Width Curr. Curr.@5V DescriptionA-138
a/b/c 8 10/20c - Mixer, mixer for audio or control voltages(a: linear or b: logarithmic controls or c: polarizing mixer)
A-138d 8 20 - Manual Crossfader / Effect Insert Modulemanually controlled crossfader and module to insert external effect units
A-138e 16 10 - Quad Three-Way Crossfader / Mixer / Polarizerfour separate three-way crossfader (i.e. fading between 3 different input signals)
A-138m ~20 ~? - 4 x 4 Matrix Mixer (still under development)matrix mixer with four inputs and four outputs, each row can be switched to uni/bipolar
A-138x 8 0 - Mix Expanderexpanding unit for A-138a/b, expands the number of available inputs to 9
A-139 8 100 - Headphone Amplifier (module no longer available)stereo headphone amplifier with separate level and common loudness control
A-140 8 20 - ADSR - Envelope Generatorenvelope generator with 4 parameters: attack, decay, sustain, release; retrigger function
A-141 14 30 - VC-ADSR - Voltage Controlled Envelope Generatorvoltage controlled envelope generator with 4 voltage controlled parameters
A-142 8 40 - VC Decayvoltage controlled envelope generator with one voltage controlled decay
A-143-1 28 70 - Complex Envelope Generator / Quad ADFour daisy chained AD type envelope generators with polarizing mixer
A-143-2 26 70 - Quad ADSRFour ADSR envelope generators with EOA/EOD/EOR gate outputs and retrigger feature
A-143-3 14 70 - Quad LFOFour LFO modulation oscillators with triangle, rectangle and saw outputs, range switch
A-143-9 8 30 - Quadrature LFO/VCOvoltage controlled LFO/VCO, four sine outputs with 90 degrees phase shift between e.a.
DOEPFERDOEPFERDOEPFERDOEPFER System A-100 8. Module Overview
26
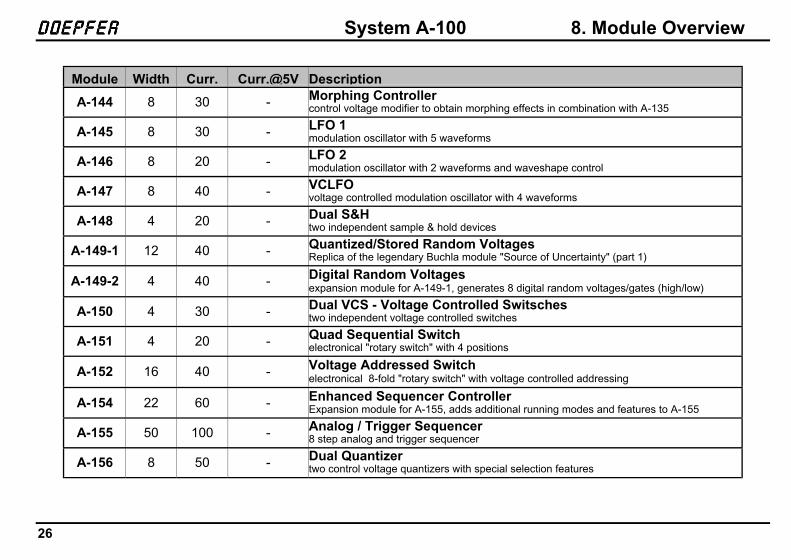
Module Width Curr. Curr.@5V Description
A-144 8 30 - Morphing Controllercontrol voltage modifier to obtain morphing effects in combination with A-135
A-145 8 30 - LFO 1modulation oscillator with 5 waveforms
A-146 8 20 - LFO 2modulation oscillator with 2 waveforms and waveshape control
A-147 8 40 - VCLFOvoltage controlled modulation oscillator with 4 waveforms
A-148 4 20 - Dual S&Htwo independent sample & hold devices
A-149-1 12 40 - Quantized/Stored Random VoltagesReplica of the legendary Buchla module "Source of Uncertainty" (part 1)
A-149-2 4 40 - Digital Random Voltagesexpansion module for A-149-1, generates 8 digital random voltages/gates (high/low)
A-150 4 30 - Dual VCS - Voltage Controlled Switschestwo independent voltage controlled switches
A-151 4 20 - Quad Sequential Switchelectronical "rotary switch" with 4 positions
A-152 16 40 - Voltage Addressed Switchelectronical 8-fold "rotary switch" with voltage controlled addressing
A-154 22 60 - Enhanced Sequencer ControllerExpansion module for A-155, adds additional running modes and features to A-155
A-155 50 100 - Analog / Trigger Sequencer8 step analog and trigger sequencer
A-156 8 50 - Dual Quantizertwo control voltage quantizers with special selection features
8. Module Overview System A-100 DOEPFERDOEPFERDOEPFERDOEPFER
27
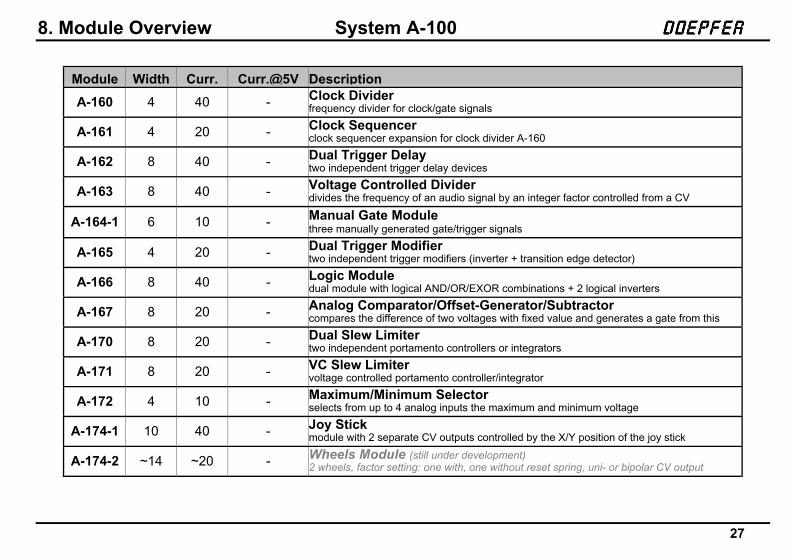
Module Width Curr. Curr.@5V Description
A-160 4 40 - Clock Dividerfrequency divider for clock/gate signals
A-161 4 20 - Clock Sequencerclock sequencer expansion for clock divider A-160
A-162 8 40 - Dual Trigger Delaytwo independent trigger delay devices
A-163 8 40 - Voltage Controlled Dividerdivides the frequency of an audio signal by an integer factor controlled from a CV
A-164-1 6 10 - Manual Gate Modulethree manually generated gate/trigger signals
A-165 4 20 - Dual Trigger Modifiertwo independent trigger modifiers (inverter + transition edge detector)
A-166 8 40 - Logic Moduledual module with logical AND/OR/EXOR combinations + 2 logical inverters
A-167 8 20 - Analog Comparator/Offset-Generator/Subtractorcompares the difference of two voltages with fixed value and generates a gate from this
A-170 8 20 - Dual Slew Limitertwo independent portamento controllers or integrators
A-171 8 20 - VC Slew Limitervoltage controlled portamento controller/integrator
A-172 4 10 - Maximum/Minimum Selectorselects from up to 4 analog inputs the maximum and minimum voltage
A-174-1 10 40 - Joy Stickmodule with 2 separate CV outputs controlled by the X/Y position of the joy stick
A-174-2 ~14 ~20 - Wheels Module (still under development)2 wheels, factor setting: one with, one without reset spring, uni- or bipolar CV output
DOEPFERDOEPFERDOEPFERDOEPFER System A-100 8. Module Overview
28
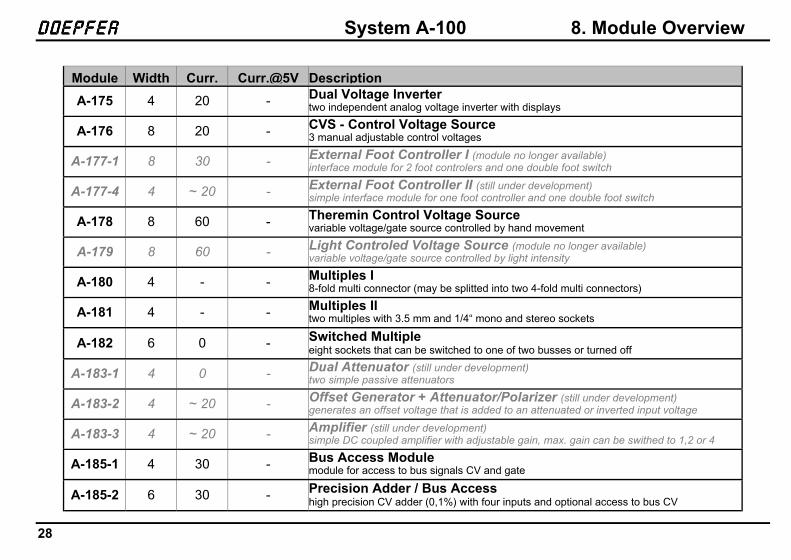
Module Width Curr. Curr.@5V Description
A-175 4 20 - Dual Voltage Invertertwo independent analog voltage inverter with displays
A-176 8 20 - CVS - Control Voltage Source3 manual adjustable control voltages
A-177-1 8 30 - External Foot Controller I (module no longer available)interface module for 2 foot controlers and one double foot switch
A-177-4 4 ~ 20 - External Foot Controller II (still under development)simple interface module for one foot controller and one double foot switch
A-178 8 60 - Theremin Control Voltage Sourcevariable voltage/gate source controlled by hand movement
A-179 8 60 - Light Controled Voltage Source (module no longer available)variable voltage/gate source controlled by light intensity
A-180 4 - - Multiples I8-fold multi connector (may be splitted into two 4-fold multi connectors)
A-181 4 - - Multiples IItwo multiples with 3.5 mm and 1/4“ mono and stereo sockets
A-182 6 0 - Switched Multipleeight sockets that can be switched to one of two busses or turned off
A-183-1 4 0 - Dual Attenuator (still under development)two simple passive attenuators
A-183-2 4 ~ 20 - Offset Generator + Attenuator/Polarizer (still under development)generates an offset voltage that is added to an attenuated or inverted input voltage
A-183-3 4 ~ 20 - Amplifier (still under development)simple DC coupled amplifier with adjustable gain, max. gain can be swithed to 1,2 or 4
A-185-1 4 30 - Bus Access Modulemodule for access to bus signals CV and gate
A-185-2 6 30 - Precision Adder / Bus Accesshigh precision CV adder (0,1%) with four inputs and optional access to bus CV
8. Module Overview System A-100 DOEPFERDOEPFERDOEPFERDOEPFER
29
Module Width Curr. Curr.@5V Description
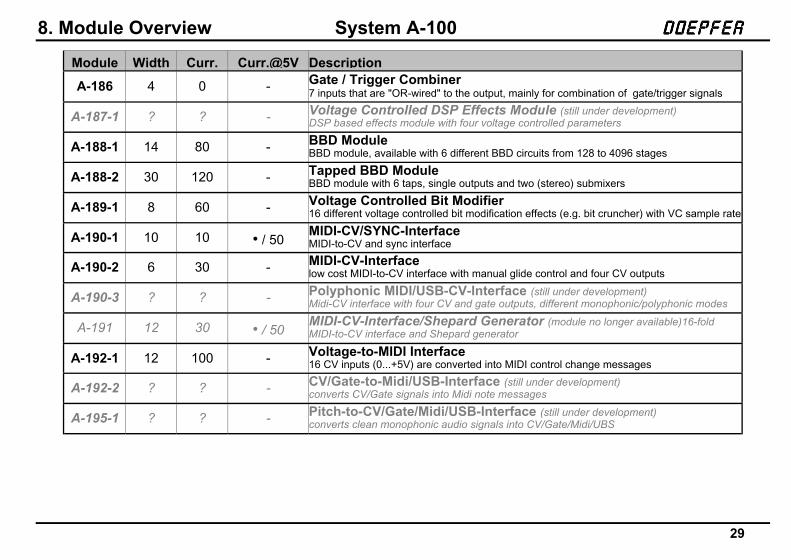
A-186 4 0 - Gate / Trigger Combiner7 inputs that are "OR-wired" to the output, mainly for combination of gate/trigger signals
A-187-1 ? ? - Voltage Controlled DSP Effects Module (still under development)DSP based effects module with four voltage controlled parameters
A-188-1 14 80 - BBD ModuleBBD module, available with 6 different BBD circuits from 128 to 4096 stages
A-188-2 30 120 - Tapped BBD ModuleBBD module with 6 taps, single outputs and two (stereo) submixers
A-189-1 8 60 - Voltage Controlled Bit Modifier16 different voltage controlled bit modification effects (e.g. bit cruncher) with VC sample rate
A-190-1 10 10 • / 50MIDI-CV/SYNC-InterfaceMIDI-to-CV and sync interface
A-190-2 6 30 - MIDI-CV-Interfacelow cost MIDI-to-CV interface with manual glide control and four CV outputs
A-190-3 ? ? - Polyphonic MIDI/USB-CV-Interface (still under development)Midi-CV interface with four CV and gate outputs, different monophonic/polyphonic modes
A-191 12 30 • / 50MIDI-CV-Interface/Shepard Generator (module no longer available)16-foldMIDI-to-CV interface and Shepard generator
A-192-1 12 100 - Voltage-to-MIDI Interface16 CV inputs (0...+5V) are converted into MIDI control change messages
A-192-2 ? ? - CV/Gate-to-Midi/USB-Interface (still under development)converts CV/Gate signals into Midi note messages
A-195-1 ? ? - Pitch-to-CV/Gate/Midi/USB-Interface (still under development)converts clean monophonic audio signals into CV/Gate/Midi/UBS
DOEPFERDOEPFERDOEPFERDOEPFER System A-100 8. Module Overview
30
Module Width Curr. Curr.@5V Description
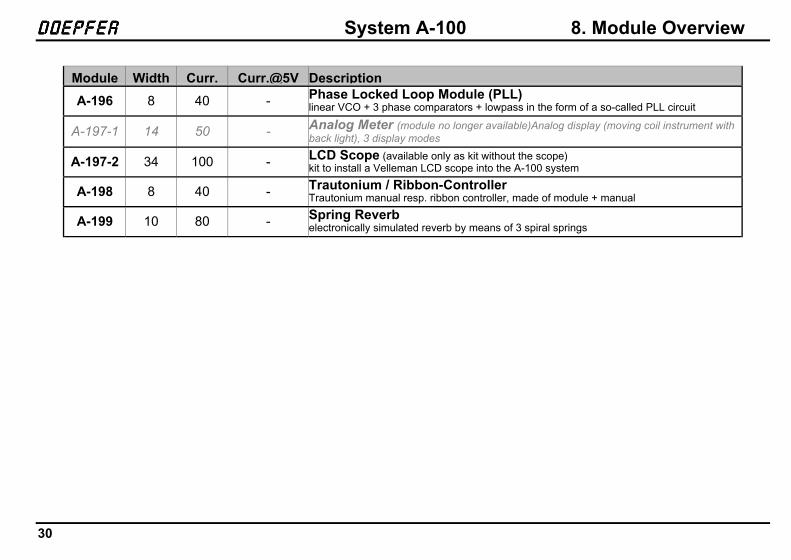
A-196 8 40 - Phase Locked Loop Module (PLL)linear VCO + 3 phase comparators + lowpass in the form of a so-called PLL circuit
A-197-1 14 50 - Analog Meter (module no longer available)Analog display (moving coil instrument withback light), 3 display modes
A-197-2 34 100 - LCD Scope (available only as kit without the scope)kit to install a Velleman LCD scope into the A-100 system
A-198 8 40 - Trautonium / Ribbon-ControllerTrautonium manual resp. ribbon controller, made of module + manual
A-199 10 80 - Spring Reverbelectronically simulated reverb by means of 3 spiral springs
8. Module Overview System A-100 DOEPFERDOEPFERDOEPFERDOEPFER
31
DOEPFERDOEPFERDOEPFERDOEPFER System A-100 8. Module Overview
32
doepfer System A - 100 9. Appendix
29
9.1 Adding a 5V power supply
Some A-100 modules, for instance the A-113, A-190 orA-191, need an extra 5 V power supply, as well as thestandard one. You can provide this with the A-100NT5 5 V supply (or in certain circumstances, you canuse the 100 AD5 5 V adaptor - see 9.2).
A If you are considering installing andconnecting the NT5, it’s crucial to takenote of the following safety instructions:
• The installation and connection of theNT5 must only be carried out by aqualified electrician or technician.
• If no suitable expert is available, therack must be sent to a service centreor direct to Doepfer Musikelektronikfor the power supply to be fitted.
• Danger! Before installation andconnection of the power supply, it isessential that the whole rack is isola-ted completely from the mains current.
The 5V power supply needs to be mounted near to themain power input, on the blank upper back panel withfour stand-offs, nuts, serrated washers, and bolts.Newer back panels (about since summer 1999) arealready equipped with 4 monting holes required for the5V supply. For back panels manufactured earlier the 4holes have to be drilled to receive the power supplyfixing bolts (Ø from. 3 to 3.5mm).
The NT5 connection diagram (Fig. 10) is on the nextpage. Check again that the rack is totally disconnectedfrom the mains power supply, then:-
D Remove the two 115/230V mains cables (normallyblue and black or brown cables) from the 12Vpower supply mains input, and reconnect them tothe corresponding mains connectors on the 5Vsupply. The case shield / GND cables/connectionsremain unchanged as the shielding is connecteddirectly to the metal frame (the yellow/green cable).
D Join up the two parallel connectors from the 5Vmains input to the mains input of the 12V supply(using the correct wires from the blue and black orbrown ones supplied).
D Connect the two low voltage outputs of the 5Vsupply (ground and +5V) to the system bus boardwhich requires the 5V supply.

9. Appendix System A - 100 doepfer
30
Fig. 10: NT5 power supply connections
GND(black)
+5 V(red)
t o t heconnect ors oft he bus board
f rom m ainsinlet
blue
black
blue blackblueblack or brown
black or brown
blue

doepfer System A - 100 9. Appendix
31
A The yellow/green wire is the safety (earth)connection, and must be never replaced bya different colour.
If you’ve been using the AD5 low-cost 5V adaptor, butare now installing an NT5, you must remove the AD5before commissioning the NT5!
9.2 Installing the AD5 low-cost 5V adaptor
The AD5 can be used for the 5V power supply, as longas the following applies:
• The current for the modules that require a 5Vsupply doesn’t exceed 100 mA (e.g. only one A-190or A-191)
• There is enough current handling still available onthe +12V supply to cope with the current require-ments of the 5V modules.
The AD5 adaptor can be connected to any available16-way socket on the system bus board (see Fig. 11).This will feed +5V to modules on that bus, as long astheir current requirements don’t exceed 100mA.
Fig. 11: Connecting the 5V low-cost adaptor(1: system bus board, 2: AD5, 3: heat sink)
To install the AD5, do the following:
Isolate the A-100 rack from the mains power sup-ply by removing the main plug.
D Carefully insert the AD5 into a free socket on thebus board.
A Make sure that the AD5 is the right way up,and aligned correctly with the bus socket.The correct position is shown on a sticker(with the arrow pointing upwards, and thered mark at the bottom - see Fig. 11).
rote Markierung
oben
➀➁
➂
red mark
up
9. Appendix System A - 100 doepfer
32
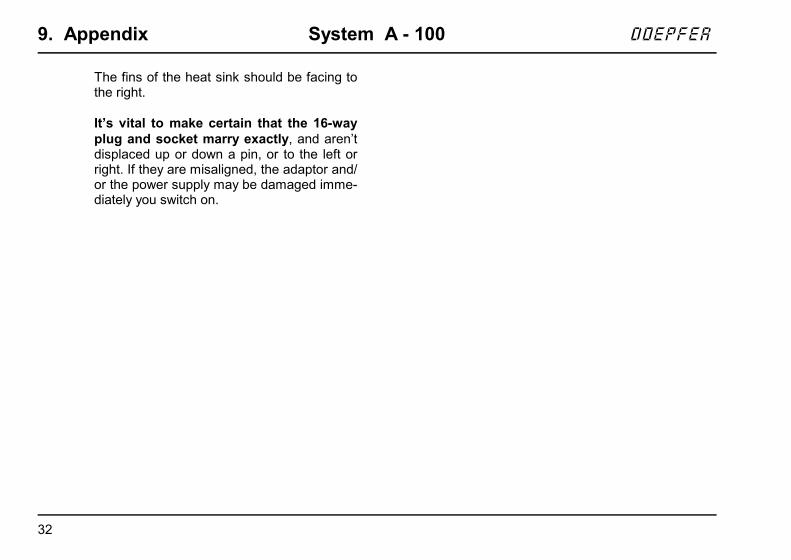
The fins of the heat sink should be facing tothe right.
It’s vital to make certain that the 16-wayplug and socket marry exactly, and aren’tdisplaced up or down a pin, or to the left orright. If they are misaligned, the adaptor and/or the power supply may be damaged imme-diately you switch on.
doepfer System A - 100 9. Appendix
33
9.3. Using the mini power supply/bus
9.3.1. Introduction
The A-100 MNT (Mini power supply / bus) is compo-sed of a miniature power supply and system bus, withconnectors for four modules. It’s designed to beused with a small set-up of just a few modules, in yourown custom-designed case.
The idea is that then you can use individual A-100modules - for instance the filters, the filterbank, fer-quency shifter, sampler, MIDI interface, etc. - asfree-standing pieces of equipment, which can easilybe integrated with your other instruments or recor-ding equipment.
The power supply provides the usual A-100 systemrequirements of +12 V and -12 V, and an additional +5V supply, for the few modulses (for instance A-190,A-191) which need it.
The maximum current loading capacity totals 100mA for +/- 12 V and/or 50 mA for the +5 V supply.
The sytem bus provides connections for four SystemA-100 modules. As well as the power supply, it alsocarries "INT.CV" and "INT.GATE" connections (see
A-100 manual, main introduction, chapter 3, ‘TheA-100 signal flow’.).
The A-100 MNT is supplied as standard with an exter-nal power supply, which has to be connected to thesocket on the MNT’s circuit board.
A The external power supply’s transformer sup-plies alternating current (AC).
If you want to use another power supplyinstead of the one supplied, it must have avoltage output of about 7 to 9 V AC and acapacity of at least 300 mA.
If you connect an external power supplywhich produces direct current (DC), theA-100 MNT simply won’t work!
A Both the A-100 MNT and any connected modu-les must be firmly fixed into a proper casing.
Any sort of "flying construction" is absolutely dis-couraged, because if two conductors from separatemodules accidentally make contact, (for instance if thebus-bars from one module ended up touching anothermodule’s bus-bars), damage will almost certainly re-sult.
In cases like that, the DOEPFER guarantee is definitelyvoid.
9. Appendix System A - 100 doepfer
34
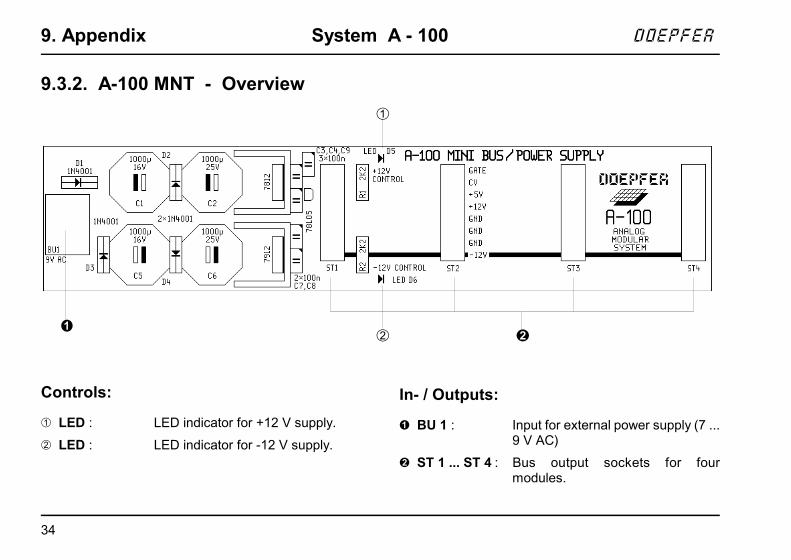
9.3.2. A-100 MNT - Overview
Controls:
1 LED : LED indicator for +12 V supply.
2 LED : LED indicator for -12 V supply.
In- / Outputs:
! BU 1 : Input for external power supply (7 ...9 V AC)
" ST 1 ... ST 4 : Bus output sockets for fourmodules.
➁
➀

doepfer System A - 100 9. Appendix
35
9.3.3. Controls / indicators
1 LED • 2 LED
LEDs 1 and 2 indicate that the power supply isworking properly. Once the MNT is connected, bothLEDs should come on.
A If both LEDs don’t come on, first of all checkthat mains power is available at the socketwhich the MNT power supply was connectedto; then that the mains adaptor is actuallyputting out voltages, and that a DC adaptorhasn’t been used by mistake. If both thesepoints are checked, then the MNT must bedefective. The same applies if just one of theLEDs comes on.
9.3.4. In- / outputs
! BU 1
This is the socket to which the plug from the externalpower supply is connected.
" ST 1 ... ST 4
The sockets labelled " on the diagram on p.2 arewhere the modules are connected.
So... to connect modules up to the MNT .....
D Disconnect the power supply lead from socket !.
D Connect the ribbon cable supplied with eachmodule to the module’s bus connector(see 1 in Fig. 1). As a rule, this is 16-way, but onsome modules it’s only 10-way. Check that thecable connector is oriented correctly, (see 2 in Fig.1), and press it on to the module’s bus pins.
A Be very careful to ensure that the colouredmarking on the ribbon cable is at the bottomof the module’s connector (see 3 in Fig.1) and that the connection is perfect, andpushed fully home, not at a slight angle.Failure to check this may result in the modu-le’s instant destruction as soon as the poweris re-connected.
9. Appendix System A - 100 doepfer
36
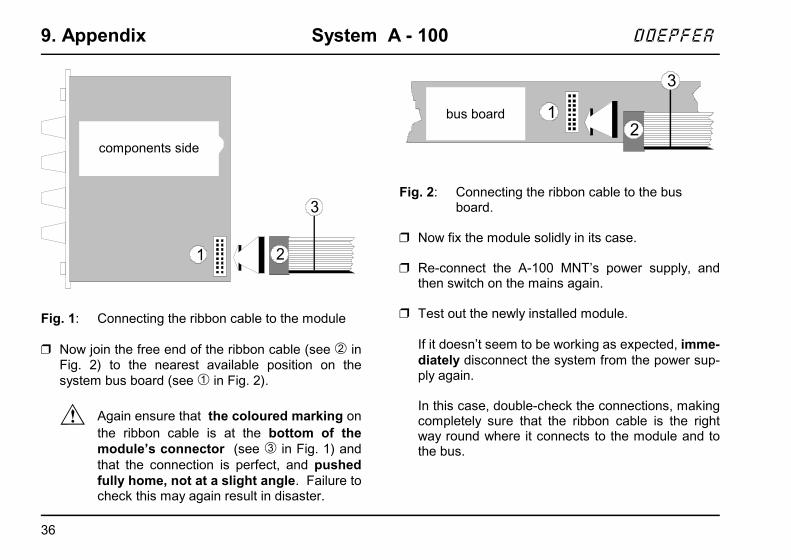
Fig. 1: Connecting the ribbon cable to the module
D Now join the free end of the ribbon cable (see 2 inFig. 2) to the nearest available position on thesystem bus board (see 1 in Fig. 2).
A Again ensure that the coloured marking onthe ribbon cable is at the bottom of themodule’s connector (see 3 in Fig. 1) andthat the connection is perfect, and pushedfully home, not at a slight angle. Failure tocheck this may again result in disaster.
Fig. 2: Connecting the ribbon cable to the busboard.
D Now fix the module solidly in its case.
D Re-connect the A-100 MNT’s power supply, andthen switch on the mains again.
D Test out the newly installed module.
If it doesn’t seem to be working as expected, imme-diately disconnect the system from the power sup-ply again.
In this case, double-check the connections, makingcompletely sure that the ribbon cable is the rightway round where it connects to the module and tothe bus.
Bestückungsseite
1
3
2
3
21Busplatine
components side
bus board