system center configuration manager 2012 r2 installation ... · pdf filesystem center...
TRANSCRIPT

System Center Configuration Manager 2012 R2 Installation with local SQL
2012 SP1.
Active Directory Setup:
Create the following accounts/Groups in Active Directory.
• DOMAIN\ConfigMgrAdmins ConfigMgr Administrators security group
• DOMAIN\ConfigMgrLocalAdmin ConfigMgr Client Push account
Add your account or any other member that is going to administer SCCM to the “ConfigMgrAdmins”
group.
Prerequisites List (SCCM Server):
• Install Server 2012 OS
• Join server to the domain
• Install all windows updates so the server is fully patched.
• Install Windows Assessment and Deployment Kit (Windows ADK) for Windows 8.1
• Install SQL 2012 SP1.
• Add the “ConfigMgrAdmins” domain global group to the Local Administrators group.
Windows Features Requirement:
Run the following from PowerShell (run as Administrator):
• Add-WindowsFeature Web-Windows-Auth,Web-ISAPI-Ext,Web-Metabase,Web-
WMI,BITS,RDC,NET-Framework-Features,Web-Asp-Net,Web-Asp-Net45,NET-HTTP-
Activation,NET-Non-HTTP-Activ,Web-Static-Content,Web-Default-Doc,Web-Dir-
Browsing,Web-Http-Errors,Web-Http-Redirect,Web-App-Dev,Web-Net-Ext,Web-Net-
Ext45,Web-ISAPI-Filter,Web-Health,Web-Http-Logging,Web-Log-Libraries,Web-Request-
Monitor,Web-HTTP-Tracing,Web-Security,Web-Filtering,Web-Performance,Web-Stat-
Compression,Web-Mgmt-Console,Web-Scripting-Tools,Web-Mgmt-Compat –Source
D:\sources\sxs –Restart
After installing these roles/features, you might have to register ASP.NET with IIS. The simplest way is
to open an elevated command prompt:
C:\Windows\Microsoft.NET\Framework64\v4.0.30319>aspnet_regiis.exe –r

Prepare Active Directory for Configuration Manager
• Connect to a domain controller in your environment and load ADSIEdit. ADSIEdit is found
under Administrative Tools. Expand Default Naming Context and then expand the DC name
and under the System OU create a new Object as Shown Above.
• Click on container and then click Next.

• Enter in System Management and click the Next button.
• Complete the Wizard and then close ADSIEdit.
Delegate control on the newly created container.
• Open up ADUC.MSC (Active Directory Users and Computers)
• Expand the System Container. You will see the System Management container you just
created above.
• Right click on the System Management Container and select Delegate Control.

• Click on “Create a custom task to delegate” and click the Next Button.
• Make sure the first option is selected and click the Next Button.

• Check all Permission boxes and click Next and then complete the delegate wizard.
Extend the Schema.
Open up the ISO file that contains the SCCM 2012 R2 installation files and navigate to the following
directory.
• \SMSSetup\Bin\x64\
Or open up and elevated command prompt and Navigate to that folder.
If you opened up the directory using explorer then Right Click on the Extadsch.exe and “Run as
Administrator” or from the prompt run the same file.
A log file ‘ExtADSch.log’ will be generated on the root of the C:\ Drive. Look for the entry
‘Successfully extended the Active Directory schema.’
**Note that replication can take time so rather wait or force replication**

Install Windows Assessment and Deployment Kit for Windows 8.1 (ADK)
Click on the link below to download the ADK
• http://www.microsoft.com/en-gb/download/details.aspx?id=39982
• Double click adksetup.exe and follow the prompts.
• Click on the checkbox to accept the terms for .NET and then click on the “Accept & Install”
button for .NET Framework 4.5 to install.
• When you get prompted to restart click the Ok button.

• After the server has rebooted the installation will resume. You can choose the default option
as shown above or Download the ADK to a share and run the install from there. I chose the
default, click the Next Button to proceed.

• Make your selection and then click the Next button.
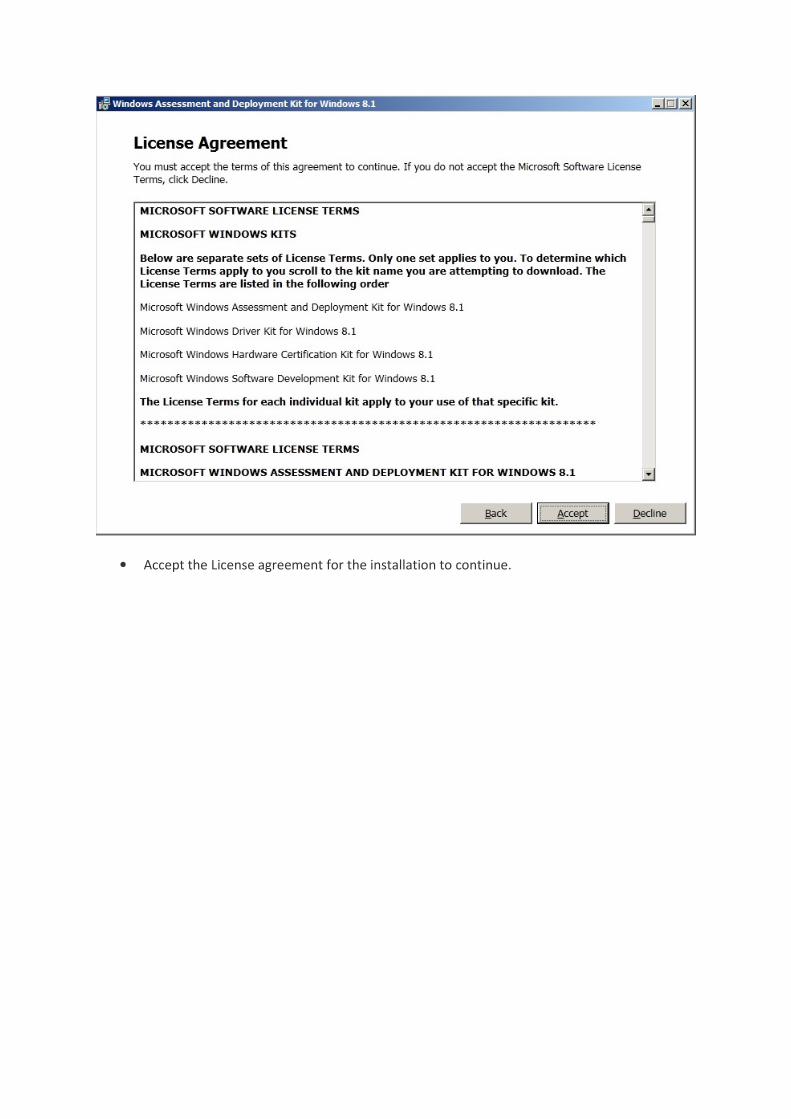
• Accept the License agreement for the installation to continue.

• Only install the following options above:
• Deployment Tools
• Windows Preinstallation Environment (Windows PE)
• User State Migration Tool (USMT)
• Click the Install button.

• Progress screen..

• Once the installation finishes you will get the screen above. Click the close button. The ADK
is now setup.
Install SQL Server (2012 SP1)

• Double click the setup file located in the SQL 2012 SP1 Media
• The screen above will show, click on “New SQL Server Stand-alone installation or add
features to an existing installation”

• The above screen will show, if there are any warnings or errors it will list them. Click Ok to
continue.

• Here you can enter a product key that you received from MS found on the media.
• In this Sandbox setup we will choose “Evaluation” and then click the Next button.

• Click the checkbox to accept the license terms and then click the Next button.
• If there are any updates on the next screen let them download and proceed with the install.

• Again the support rules will run, click Next to continue

• Select the first option and click the Next button.

• On the feature selection screen, choose the following options:
o Database Engine Services with Full-Text and Semantic Extractions for Search
o Reporting Services – Native
o Management Tools and its sub-feature.

• Click Next to continue

• I left the instance as default, click the Next button to continue.

• Click Next to continue.

• As this is a Sandbox environment the defaults were chosen but you will want to add in the
Domain accounts that have access to SQL in a production Environment.
• Don’t click next just yet, we need to set the Collation as with SCOM. Click the Collation Tab
next to the Service Accounts Tab.

• Click on the Customize button to change the collation.
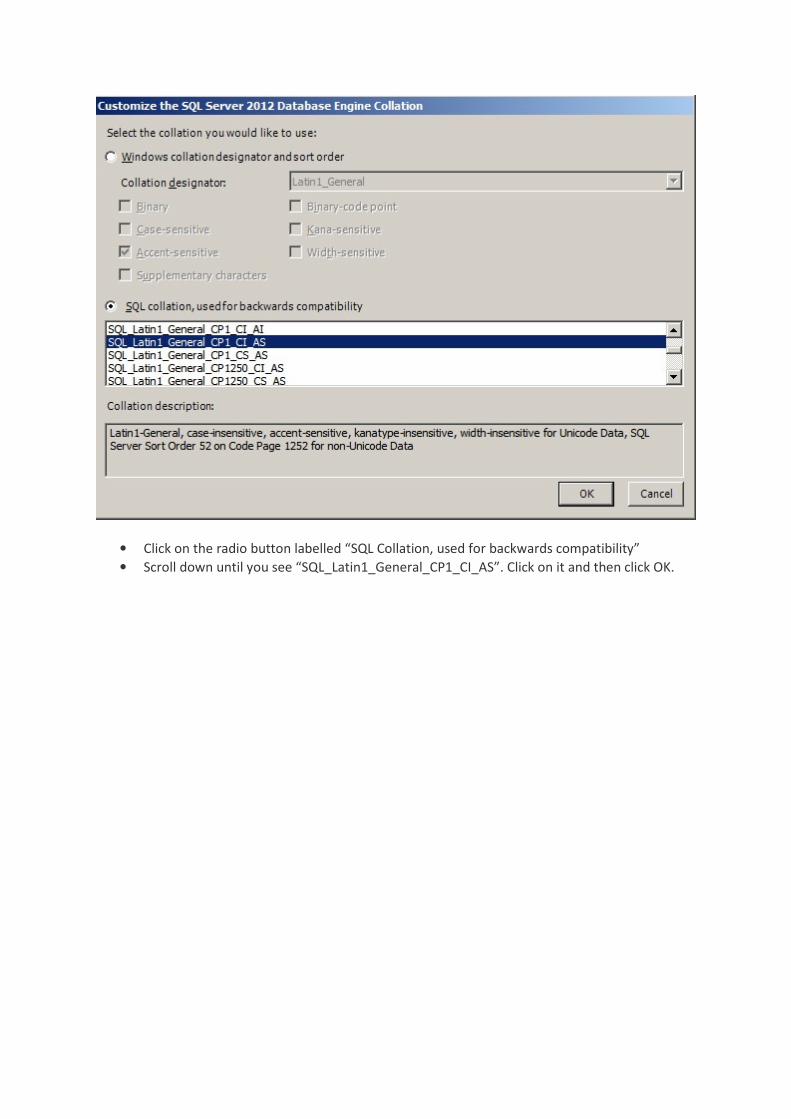
• Click on the radio button labelled “SQL Collation, used for backwards compatibility”
• Scroll down until you see “SQL_Latin1_General_CP1_CI_AS”. Click on it and then click OK.

• Add in the Current User and any other user that will be managing SQL. Click Next to
continue.

• Select the option “Install Only” and then click Next.

• Make your selection and click Next.

• Click Next to continue.

• Review all the options you just made, if happy click the Install button.
• Sit back and wait for the installation to finish, it can take a while.

Install System Center Configuration Manager 2012 R2 (SCCM)
• Go to the folder where you extracted the SCCM setup files and double click the setup. The
above screen will show. Click Next to continue.

• Click on the option “Install a Configuration Manager Primary Site” and then click Next.

• As this is a sandbox install we will install the evaluation edition of the product. Click next to
continue.

• Click tickbox to select and accept the license terms and click Next to continue.

• Accept all the license terms (3 Tick Boxes) and then click Next to continue.

• SCCM will required a number of files. I chose the default “C:\Downloads” but you can add in
your own share or directory. If you have manually downloaded the files then you would
select the 2 radio button and browse for them.
• A new window opens and displays a progress bar of the downloads.

• Select your desired Server language and then click Next to continue.

• Select your desired client language and then click next to continue.

• Enter in your site code and site name. Your site code needs to be unique, you cannot go and
change it later on as all this information will be written to AD.
• I used TLB for Test Lab and the site name as SCCM 2012 Test lab. Click Next to continue with
the installation.

• Select the radio button to install this as a stand-alone site and click Next to continue.
• Click Yes to continue.

• All the boxes will be populated, leave the defaults and click Next to continue.

• You can leave the defaults where SQL is located or you can change the paths, in this setup
the defaults were used. Click Next to continue.

• Enter your current server as the SMS Provider and click Next to continue.

• Select the 2nd radio button as shown above as we not running PKI. Click next to continue.

• Install both Management Points and Distribution Points on the server, enter in the server
FQDN. Click Next to continue.

• Make your selection and click Next to continue.

• Review the summary and then click Next to continue.

• The setup will do a prerequisite check, the warnings above can be ignored but in a
production environment you might want to make sure you have not errors/warnings. Click
Next to continue.

• The installation has started. Sit back and wait.
• After a little while the installation completed. You can click the close button and launch the
SCCM Console and start your configuration.