table of contents - docs.hol.vmware.comdocs.hol.vmware.com/hol-2019/hol-1957-04-uem_pdf_en.pdf ·...
TRANSCRIPT

Table of ContentsLab Overview - HOL-1957-04-UEM - Workspace ONE UEM - Windows 10 Management ....4
Lab Guidance .......................................................................................................... 5Module 1 - Introduction to Windows 10 Management ..................................................... 11
Introduction........................................................................................................... 12Login to the Workspace ONE UEM Console ........................................................... 13Create Test User Account ...................................................................................... 19Connect to the Windows 10 Virtual Machine......................................................... 21Modifying Internet Options for Windows Enrollment .............................................22Enrolling Your Windows 10 Device with a Basic Account.......................................27Return to the Main Console ................................................................................... 39Configuring a Device Profile for Windows 10......................................................... 40Delivering Apps on Windows 10............................................................................ 48Connect to the Windows 10 Virtual Machine......................................................... 62Validate Device Enrollment ................................................................................... 63Un-enrolling your Windows 10 Device................................................................... 67Conclusion............................................................................................................. 72
Module 2 - Windows 10 Software Distribution and Troubleshooting................................73Introduction........................................................................................................... 74Connect to Windows 10 VM................................................................................... 76Login to the Workspace ONE UEM Console ........................................................... 77Modifying Internet Options for Windows Enrollment .............................................83Enrolling Your Windows 10 Device ........................................................................ 88Deploying Notepad++ ........................................................................................ 100Confirm the aduser Certificate Has Installed....................................................... 118Login to the Workspace ONE Application ............................................................ 124Verify Notepad++ Deployment ........................................................................... 128Deploying Office 365 ProPlus .............................................................................. 145Verifying Office 365 Pro Plus Deployment ........................................................... 168Un-enrolling your Windows 10 Device................................................................. 181Sign Out of the Workspace ONE Application ....................................................... 186Close Chrome to Clear Session Cookies .............................................................. 188Conclusion........................................................................................................... 189
Module 3 - Windows 10 Real-Time and Automated Security Protection andCompliance ................................................................................................................... 190
Introduction......................................................................................................... 191Connect to Windows 10 VM................................................................................. 192Login to the Workspace ONE UEM Console ......................................................... 193Device Posture and Real-Time Compliance ......................................................... 199Conditional Access .............................................................................................. 203Modifying Internet Options for Windows Enrollment ...........................................209Enrolling Your Windows 10 Device ...................................................................... 214Confirm the aduser Certificate Has Installed....................................................... 226
HOL-1957-04-UEM
Page 1HOL-1957-04-UEM

Compliance with Workspace ONE ....................................................................... 232Login to the Workspace ONE Application ............................................................ 233Confirm Successful Login to the Workspace ONE App.........................................237Sign Out of the Workspace ONE Application ....................................................... 238Create a Compliance Rule ................................................................................... 240Data Loss Prevention .......................................................................................... 254Un-enrolling your Windows 10 Device................................................................. 256Remove the Compliance Policy ........................................................................... 261Close Chrome to Clear Session Cookies .............................................................. 262Conclusion........................................................................................................... 263
Module 4 - Manage Windows 10 Policy with Workspace ONE........................................264Introduction......................................................................................................... 265Moving Policy to Modern Management................................................................ 266Policy Builder Overview....................................................................................... 269Login to the Workspace ONE UEM Console ......................................................... 271Connect to the Windows 10 VM .......................................................................... 277Modifying Internet Options for Windows Enrollment ...........................................278Enrolling Your Windows 10 Device ...................................................................... 283Return to the Main Console ................................................................................. 295Review the Enrolled Device................................................................................. 296Review the VMware Policy Builder....................................................................... 297Set a CSP with the VMware Policy Builder ........................................................... 311Update an Existing CSP with VMware Policy Builder ...........................................322Return to the Main Console ................................................................................. 335Un-enrolling your Windows 10 Device................................................................. 336Conclusion........................................................................................................... 342
Module 5 - Migrating Devices from SCCM ..................................................................... 343Introduction......................................................................................................... 344Introduction to Workspace ONE AirLift ................................................................ 345Connect to the SCCM Server ............................................................................... 347Login to the Workspace ONE UEM Console ......................................................... 348Setup Workspace ONE AirLift .............................................................................. 354Review and Enable Co-Management in Workspace ONE AirLift...........................358Review Workspace ONE AirLift ............................................................................ 367Setup a Profile in Workspace ONE UEM .............................................................. 376Enroll SCCM Devices in Workspace ONE UEM with AirLift ...................................383Login to the Workspace ONE UEM Console ......................................................... 403Review and Validate the Enrolled Windows 10 Device ........................................409Conclusion........................................................................................................... 416
Module 6 - Migrating Applications from SCCM .............................................................. 417Introduction......................................................................................................... 418Enrolling Your Windows 10 Device (Optional)...................................................... 419Connect to the SCCM Server ............................................................................... 434Login to the Workspace ONE UEM Console ......................................................... 435Setup Workspace ONE AirLift .............................................................................. 441Review and Enable Co-Management in Workspace ONE AirLift...........................445Migrate Application from SCCM to Workspace ONE UEM with AirLift...................454Connect to the Windows 10 Virtual Machine....................................................... 463Confirm Application Install on Windows 10 Device .............................................464
HOL-1957-04-UEM
Page 2HOL-1957-04-UEM

Login to the Workspace ONE UEM Console ......................................................... 466Un-enrolling your Windows 10 Device................................................................. 472Conclusion........................................................................................................... 477
Module 7 - Migrating Group Policy Objects to Workspace ONE UEM .............................478Introduction......................................................................................................... 479Connect to the SCCM Server ............................................................................... 480Login to the Workspace ONE UEM Console ......................................................... 481Execute the AirWatch GPO Migration Tool ........................................................... 487Upload GPO Package to Workspace ONE UEM..................................................... 501Assign GPO Package............................................................................................ 508Remote Desktop to your Windows 10 Device for Enrollment ..............................513Modifying Internet Options for Windows Enrollment ...........................................514Enrolling Your Windows 10 Device ...................................................................... 519Login to the Workspace ONE UEM Console (IF NEEDED) .....................................531Verify GPO App Package Installed ....................................................................... 534Un-enrolling your Windows 10 Device................................................................. 546Conclusion........................................................................................................... 551
HOL-1957-04-UEM
Page 3HOL-1957-04-UEM

Lab Overview -HOL-1957-04-UEM -
Workspace ONE UEM -Windows 10 Management
HOL-1957-04-UEM
Page 4HOL-1957-04-UEM

Lab GuidanceNote: It may take more than 90 minutes to complete this lab. You shouldexpect to only finish 2-3 of the modules during your time. The modules areindependent of each other so you can start at the beginning of any moduleand proceed from there. You can use the Table of Contents to access anymodule of your choosing.
The Table of Contents can be accessed in the upper right-hand corner of theLab Manual.
Discover how Workspace ONE UEM with Windows 10 enables Policy Configuration, OSPatch Management, Software Distribution and Security. Also, learn about new SCCM co-management capabilities in order to ease the transition from traditional to modernmanagement for Windows 10.
Lab Module List:
• Module 1 - Introduction to Windows 10 Management (30 minutes)(Beginner) Explore how Unified Endpoint Management for Windows 10 enablesyou to configure restrictions and deploy applications to your managed devices.
• Module 2 - Windows 10 Software Distribution and Troubleshooting (30minutes) (Beginner) Many issues in PC management arise from the delivery,integration, and support of applications. As end-user demand drives organizationsto adopt more applications, these issues only grow in complexity and number.Today's sophisticated user requires control over apps on both personal andcorporate-owned devices. VMware AirWatch on Windows 10 introduces featuresand tools to simplify application integration and management.
• Module 3 - Windows 10 Real-Time and Automated Security Protectionand Compliance (30 minutes) (Beginner) The release of Windows 10 introducedfundamental changes to the Windows operating system to address the securityand data concerns of today’s digital workspace. Combining traditional clientrequirements with modern enterprise management capabilities creates asimplified, cost-effective management solution. Use Workspace ONE UEM toestablish user trust, assess the device posture, enforce conditional access, andenable data loss prevention.
• Module 4 - Manage Windows 10 Policy with Workspace ONE (30 minutes)(Intermediate) One of the biggest challenges with migration to ModernManagement is moving from traditional GPO to Configuration Service Providers(CSPs). In this module you will configure and deploy CSPs for common policysettings.
• Module 5 - Migrating Devices from SCCM (45 minutes) (Intermediate) Thisthis module, you will use existing tools to migrate devices from SCCM intoWorkspace ONE to enable co-management. This allows moving selectedworkloads from traditional to modern management.
HOL-1957-04-UEM
Page 5HOL-1957-04-UEM

• Module 6 - Migrating Applications from SCCM (45 minutes) (Intermediate) Inthis module you will migrate existing applications from SCCM to Workspace ONE.This eases the transition from legacy PCLM to modern management. The
applications can be delivered over the air leveraging CDN instead of traditionaldelivery methods.
• Module 7 - Migrating Group Policy Objects to Workspace ONE UEM (45minutes) (Intermediate) In this module you will download and run the GPOmigration tool in order to move local and group policy settings from domainmanaged to over the air delivery with Workspace ONE.
Lab Captains:
• Roger Deane, Sr. Manager, Technical Marketing, USA• Shardul Navare, Sr. Technical Marketing Architect, USA• Chris Halstead, EUC Staff Architect, USA• Andreano Lanusse, EUC Staff Architect, USA• Justin Sheets, Sr. Technical Marketing Architect, USA
Subject Matter Experts:
• Josue Negron, Sr. Technical Marketing Architect, USA
This lab manual can be downloaded from the Hands-on Labs Document site found here:
http://docs.hol.vmware.com
This lab may be available in other languages. To set your language preference and havea localized manual deployed with your lab, you may utilize this document to help guideyou through the process:
http://docs.hol.vmware.com/announcements/nee-default-language.pdf
HOL-1957-04-UEM
Page 6HOL-1957-04-UEM

Location of the Main Console
1. The area in the RED box contains the Main Console. The Lab Manual is on the tabto the Right of the Main Console.
2. A particular lab may have additional consoles found on separate tabs in the upperleft. You will be directed to open another specific console if needed.
3. Your lab starts with 90 minutes on the timer. The lab can not be saved. All yourwork must be done during the lab session. But you can click the EXTEND toincrease your time. If you are at a VMware event, you can extend your lab timetwice, for up to 30 minutes. Each click gives you an additional 15 minutes.Outside of VMware events, you can extend your lab time up to 9 hours and 30
minutes. Each click gives you an additional hour.
Alternate Methods of Keyboard Data Entry
During this module, you will input text into the Main Console. Besides directly typing itin, there are two very helpful methods of entering data which make it easier to entercomplex data.
Click and Drag Lab Manual Content Into Console ActiveWindow
HOL-1957-04-UEM
Page 7HOL-1957-04-UEM

You can also click and drag text and Command Line Interface (CLI) commands directlyfrom the Lab Manual into the active window in the Main Console.
Accessing the Online International Keyboard
You can also use the Online International Keyboard found in the Main Console.
1. Click on the Keyboard Icon found on the Windows Quick Launch Task Bar.
Click once in active console window
In this example, you will use the Online Keyboard to enter the "@" sign used in emailaddresses. The "@" sign is Shift-2 on US keyboard layouts.
1. Click once in the active console window.2. Click on the Shift key.
HOL-1957-04-UEM
Page 8HOL-1957-04-UEM

Click on the @ key
1. Click on the "@ key".
Notice the @ sign entered in the active console window.
Activation Prompt or Watermark
When you first start your lab, you may notice a watermark on the desktop indicatingthat Windows is not activated.
One of the major benefits of virtualization is that virtual machines can be moved andrun on any platform. The Hands-on Labs utilizes this benefit and we are able to run thelabs out of multiple datacenters. However, these datacenters may not have identicalprocessors, which triggers a Microsoft activation check through the Internet.
Rest assured, VMware and the Hands-on Labs are in full compliance with Microsoftlicensing requirements. The lab that you are using is a self-contained pod and does nothave full access to the Internet, which is required for Windows to verify the activation.Without full access to the Internet, this automated process fails and you see this
watermark.
This cosmetic issue has no effect on your lab.
HOL-1957-04-UEM
Page 9HOL-1957-04-UEM

Look at the lower right portion of the screen
Please check to see that your lab is finished all the startup routines and is ready for youto start. If you see anything other than "Ready", please wait a few minutes. If after 5minutes you lab has not changed to "Ready", please ask for assistance.
HOL-1957-04-UEM
Page 10HOL-1957-04-UEM

Module 1 - Introduction toWindows 10 Management
HOL-1957-04-UEM
Page 11HOL-1957-04-UEM

IntroductionIn this lab module, you will learn how to enroll a Windows 10 device into Workspace ONEUEM and how to configure and deploy restriction profiles and applications to your enrolldevice.
Pre-Requisites
To successfully complete this Hands-On Lab, you'll need to ensure you have thefollowing pre-requisites:
• A virtual machine or spare Windows device running Windows 10 (non Homeedition) with the latest updates installed. DO NOT access the Hands-OnLab from the same machine you will be managing.NOTE - We have provided a Windows 10 VM for you which has all thepre-requisites setup for this lab. We recommend you using that byfollowing the instructions in the manual for this lab.
• Administrative rights to the virtual machine or spare Windows device which youwill be using to perform the Hands-On Lab.
• A Windows 10 Desktop app (*.msi), such as 7-Zip. A sample Windows 10 app hasbeen provided in the lab machine for your use.
As a reminder, DO NOT access the Hands-On lab from the same machine you plan toenroll & manage as part of the HOL exercise. As part of the HOL, you will be rebootingthis machine and will temporarily lose access to the lab documentation if you run thelab from the machine you enroll.
HOL-1957-04-UEM
Page 12HOL-1957-04-UEM

Login to the Workspace ONE UEMConsoleTo perform most of the lab, you will need to login to the Workspace ONE UEM AdminConsole.
Launch Chrome Browser
Double-click the Chrome Browser on the lab desktop.
HOL-1957-04-UEM
Page 13HOL-1957-04-UEM

Authenticate to the Workspace ONE UEM Admin Console
The default home page for the browser is https://labs.awmdm.com. Enter yourWorkspace ONE UEM Admin Account information and click the Login button.
NOTE - If you see a Captcha, please be aware that it is case sensitive!
1. Enter your Username. This is your email address that you have associated withyour VMware Learning Platform (VLP) account.
2. Enter VMware1! for the Password field.3. Click the Login button.
NOTE - Due to lab restrictions, you may need to wait here for a minute or sowhile the Hands On Lab contacts the Workspace ONE UEM Hands On Labsserver.
HOL-1957-04-UEM
Page 14HOL-1957-04-UEM

Accept the End User License Agreement
NOTE - The following steps of logging into the Administration Console will onlyneed to be done during the initial login to the console.
You will be presented with the Workspace ONE UEM Terms of Use. Click the Acceptbutton.
HOL-1957-04-UEM
Page 15HOL-1957-04-UEM

Address the Initial Security Settings
After accepting the Terms of Use, you will be presented with a Security Settings pop-up. The Password Recovery Question is in case you forget your admin password andthe Security PIN is to protect certain administrative functionality in the console.
HOL-1957-04-UEM
Page 16HOL-1957-04-UEM

1. You may need to scroll down to see the Password Recovery Questions andSecurity PIN sections.
2. Select a question from the Password Recovery Question drop-down (defaultselected question is ok here).
3. Enter VMware1! in the Password Recovery Answer field.4. Enter VMware1! in the Confirm Password Recovery Answer field.5. Enter 1234 in the Security PIN field.6. Enter 1234 in the Confirm Security PIN field.7. Click the Save button when finished.
Close the Welcome Message
HOL-1957-04-UEM
Page 17HOL-1957-04-UEM

After completing the Security Settings, you will be presented with the Workspace ONEUEM Console Highlights pop-up.
1. Click on the Don't show this message on login check box.2. Close the pop-up by clicking on the X in the upper-right corner.
HOL-1957-04-UEM
Page 18HOL-1957-04-UEM

Create Test User AccountBasic accounts are the accounts which are created locally in the AirWatch adminconsole, as opposed to the accounts which are imported from an active directory. In thissection, we will create a Basic User account which we will use for enrollment in thefollowing section.
Click on Add / User
In the top right corner of the AirWatch console,
1. Click Add.2. Click User.
HOL-1957-04-UEM
Page 19HOL-1957-04-UEM

Add User information
In the pop-up window,
1. Ensure that security type is Basic2. Enter the username as testuser3. Enter the password as VMware1!4. Confirm the password as VMware1!5. Enter the first name as test6. Enter the last name as user7. Enter the e-mail address as [email protected]. Click on Save
NOTE - Use the scroll bar if you don't see the option to enter emailaddress
You should see a confirmation that user is created successfully. If the user is alreadycreated with the same username then you can use the existing user in the followingsection.
HOL-1957-04-UEM
Page 20HOL-1957-04-UEM

Connect to the Windows 10 VirtualMachine
Double-click the Win10-01a.rdp shortcut from the Main Console Desktop to connect tothe Windows 10 virtual machine.
HOL-1957-04-UEM
Page 21HOL-1957-04-UEM

Modifying Internet Options forWindows EnrollmentBefore enrolling the Windows 10 Virtual Machine, we will make modifications to theWindows 10 device to reduce network traffic to expedite enrollment.
Open Settings
1. Click the Windows button.2. Click the Settings (Gear) icon.
HOL-1957-04-UEM
Page 22HOL-1957-04-UEM

Open Internet Options
1. Type Internet Options in the search bar.2. Click Internet Options from the results list.
HOL-1957-04-UEM
Page 23HOL-1957-04-UEM

Modify the Certificate Revocation Options
1. Click the Advanced tab.2. Scroll down to find the Security section.3. Uncheck the Check for publisher's certification revocation option.4. Uncheck the Check for server certificate revocation option.5. Click Apply.6. Click OK.
HOL-1957-04-UEM
Page 24HOL-1957-04-UEM

Open PowerShell as Administrator
1. Right-Click the Windows button.2. Click Windows PowerShell (Admin).
HOL-1957-04-UEM
Page 25HOL-1957-04-UEM

Allow WindowsPowerShell to Make Changes
Click Yes when prompted to allow Windows PowerShell to make changes to your device.
Enter Commands to Stop Windows Update Service
Enter the following commands (remember that you can highlight then drag-and-drop thetext from the manual into PowerShell!)
1. Enter Set-Service wuauserv -startup disabled then press ENTER .2. Enter Stop-Service wuauserv then press ENTER .3. Click the Close button to exit PowerShell.
HOL-1957-04-UEM
Page 26HOL-1957-04-UEM

Enrolling Your Windows 10 Device witha Basic AccountWe will now enroll our Windows 10 device in Workspace ONE UEM. First, we will need todownload the Workspace ONE Intelligent Hub.
Download the Workspace ONE Intelligent Hub on theWindows 10 VM
From a new tab in the browser, if not opened already,
HOL-1957-04-UEM
Page 27HOL-1957-04-UEM

1. Enter https://www.getwsone.com in the navigation bar and press Enter .2. Click Download Hub for Windows 10.
NOTE: Please wait while the Workspace ONE Intelligent Hub installer finishesdownloading.
3. Click Keep when warned about the AirWatchAgent.msi download.
NOTE - If you do not see the warning about the AirWatchAgent.msi file, skipthis and continue to the next step.
Launch the Workspace ONE Intelligent Hub Installer
Click the AirWatchAgent.msi file in your download bar.
NOTE - The installer may take a few seconds to launch, please be patient afterclicking the AirWatchAgent.msi file.
Click Run
Click Run to proceed with the installation.
HOL-1957-04-UEM
Page 28HOL-1957-04-UEM

Accept the Default Install Location
Leave the default install location and click Next.
NOTE - The Next button may take several seconds to enable while therequired additional features are installed.
HOL-1957-04-UEM
Page 29HOL-1957-04-UEM

Accept the License Agreement
1. Select I accept the terms of the license agreement.2. Click Next.
HOL-1957-04-UEM
Page 30HOL-1957-04-UEM

Start the Workspace ONE Intelligent Hub Install
Click Install to start the installer.
HOL-1957-04-UEM
Page 31HOL-1957-04-UEM
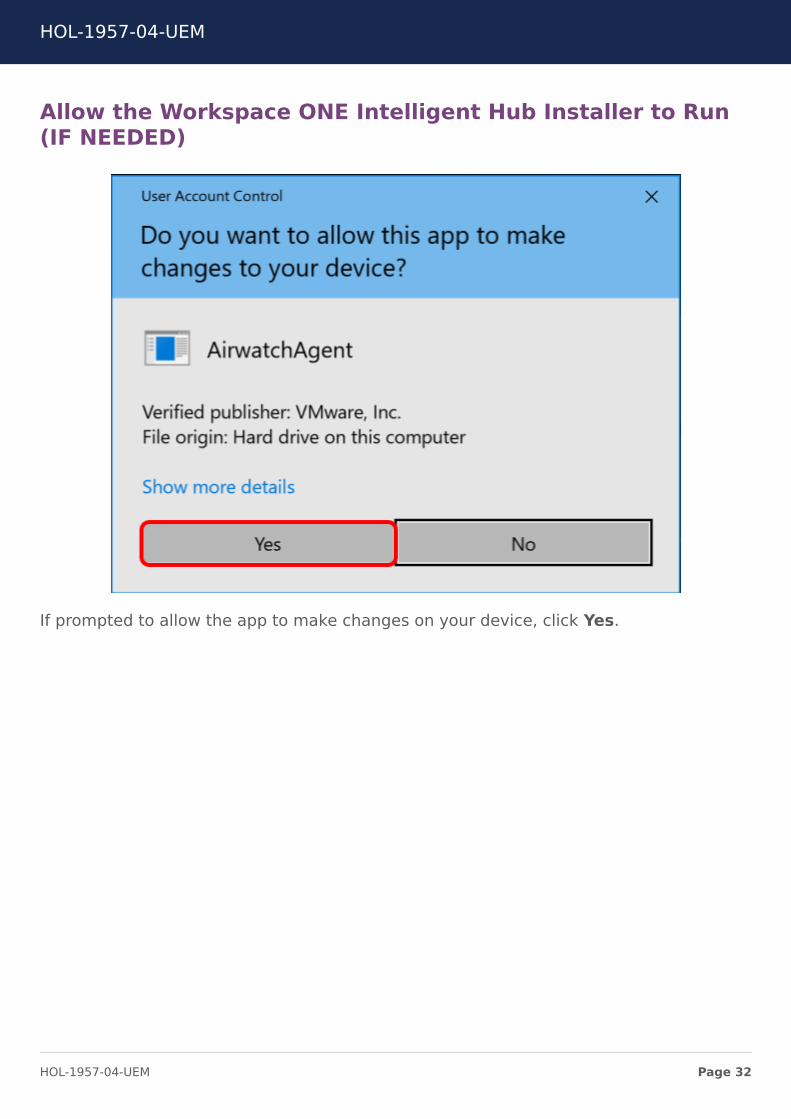
Allow the Workspace ONE Intelligent Hub Installer to Run(IF NEEDED)
If prompted to allow the app to make changes on your device, click Yes.
HOL-1957-04-UEM
Page 32HOL-1957-04-UEM

Complete the Workspace ONE Intelligent Hub Installer
Click Finish to complete the Workspace ONE Intelligent Hub installer.
NOTE - After clicking finish, the Native Enrollment application will launch toguide you through enrolling into Workspace ONE UEM. It will take around45-60 seconds to launch the agent.
HOL-1957-04-UEM
Page 33HOL-1957-04-UEM

Enroll Your Windows 10 Device Using the Workspace ONEIntelligent Hub
Click Server Detail.
Find your Group ID from Workspace ONE UEM Console
HOL-1957-04-UEM
Page 34HOL-1957-04-UEM

The first step is to make sure you know what your Organization Group ID is.
1. To find the Group ID, hover your mouse over the Organization Group tab at thetop of the screen. Look for the email address you used to log in to the lab portal.
2. Your Group ID is displayed at the bottom of the Organization Group pop up.
Enter the Server Details
1. Enter labs.awmdm.com for the Server Name field.2. Enter Your Group ID for the Group ID field. If you forgot your Group ID, check
the previous steps on how to retrieve it.
HOL-1957-04-UEM
Page 35HOL-1957-04-UEM

Enter Your User Credentials
1. Enter testuser in the Username field.2. Enter VMware1! in the Password field.3. Click Next
NOTE - Wait while the server checks your enrollment details.
HOL-1957-04-UEM
Page 36HOL-1957-04-UEM

Workspace ONE Application Launch
Since our Workspace ONE UEM and VMware Identity Manager environments are linkedfor this environment, the Workspace ONE Application will automatically open afterenrollment is complete. You will not need it for this exercise, so click Close.
HOL-1957-04-UEM
Page 37HOL-1957-04-UEM

Finish the Workspace ONE UEM Enrollment Process
Click Finish to end the Enrollment process. Your Windows 10 device is now successfullyenrolled into Workspace ONE UEM.
HOL-1957-04-UEM
Page 38HOL-1957-04-UEM

Return to the Main Console
Click Close (X) on the Remote Desktop Connection bar at the top of the screen toreturn to the Main Console to finish making configurations within the Workspace ONEUEM Console.
HOL-1957-04-UEM
Page 39HOL-1957-04-UEM

Configuring a Device Profile forWindows 10Profiles allow you to modify how the enrolled devices behave. This exercise helps you toconfigure and deploy a restrictions profile that we can verify has applied to the devicelater in the section.
Add a Profile
In the upper-right corner of Workspace ONE UEM Console:
1. Select Add.2. Select Profile.
HOL-1957-04-UEM
Page 40HOL-1957-04-UEM

Add a Windows Profile
Select the Windows icon.
Note: Make sure that you select Windows and not Windows Rugged.
Add a Windows Desktop Profile
HOL-1957-04-UEM
Page 41HOL-1957-04-UEM

Select Windows Desktop.
Select Context - Device Profile
Select Device Profile.
HOL-1957-04-UEM
Page 42HOL-1957-04-UEM

Define the General Settings
1. Select General if it is not already selected.2. Enter a profile name such as Windows Restrictions in the Name text box.3. Copy the profile name into the Description field.4. Click in the Assigned Groups field. This will pop-up the list of created
Assignment Groups. Select the All Devices Assignment Group.Note: You may need to scroll down to view the Assigned Groups field.
Note: You do not need to click Save & Publish at this point. This interface allows youto move around to different payload configuration screens before saving.
HOL-1957-04-UEM
Page 43HOL-1957-04-UEM

Select the Restrictions Payload
Note: When initially setting a payload, a Configure button will show to reduce the riskof accidentally setting a payload configuration.
1. Select the Restrictions payload in the Payload section on the left.2. Click the Configure button to continue setting the Restrictions payload.
HOL-1957-04-UEM
Page 44HOL-1957-04-UEM

Adding a Restriction - Disable Cortana
1. Using the scroll bar on the right, scroll down to the Device Functionalitysection.
2. Select Don't Allow for Cortana.3. Notice the 10 on the right side of the Restrictions window. These are all the
restrictions that Workspace ONE UEM can apply to a Windows 10 computer.4. Click Save & Publish.
HOL-1957-04-UEM
Page 45HOL-1957-04-UEM

Publish the Restrictions Profile
Click Publish.
HOL-1957-04-UEM
Page 46HOL-1957-04-UEM

Navigate to Profiles List View
1. Select Devices.2. Select Profiles & Resources.3. Select Profiles.
Verify the Restrictions Profile Now Exists
You should now see your Restrictions Profile within the List View of the Devices Profileswindow.
Note: If you need to edit the Restrictions Profile, this is where you would do so. To editthe profile, click the profile name, then select Add Version. Update the profile andclick Save & Publish to push the new settings to the assigned devices.
HOL-1957-04-UEM
Page 47HOL-1957-04-UEM

Delivering Apps on Windows 10You can distribute applications to Windows 10 devices, allowing for a seamless userexperience. This exercise helps you to create and distribute an application to yourWindows 10 device.
This exercise uses the 7-Zip installation program downloaded and stored in theDocuments folder.
Add Internal Application
In the upper-right corner of Workspace ONE UEM Console:
1. Select Add.2. Select Internal Application.
HOL-1957-04-UEM
Page 48HOL-1957-04-UEM

Upload Application
Click Upload.
Find the Application MSI
Click the Browse... button.
HOL-1957-04-UEM
Page 49HOL-1957-04-UEM

Upload the EXE File
Navigate to your installation file. The 7-zip installation file has been downloaded to theserver and placed in the Documents folder.
1. Select Documents.2. Expand HOL.3. Select the Windows 10 folder.4. Select your installation file, for example, 7z1604-x64.exe.5. Click Open.
HOL-1957-04-UEM
Page 50HOL-1957-04-UEM

Save the EXE File
Click Save.
Continue to the App Settings
HOL-1957-04-UEM
Page 51HOL-1957-04-UEM

1. Select No for Is this a dependency app?2. Click Continue.
Configure App Details
1. Enter a name for your application, for example, 7-Zip .2. Select 64-bit for the Supported Processor Architecture.
HOL-1957-04-UEM
Page 52HOL-1957-04-UEM
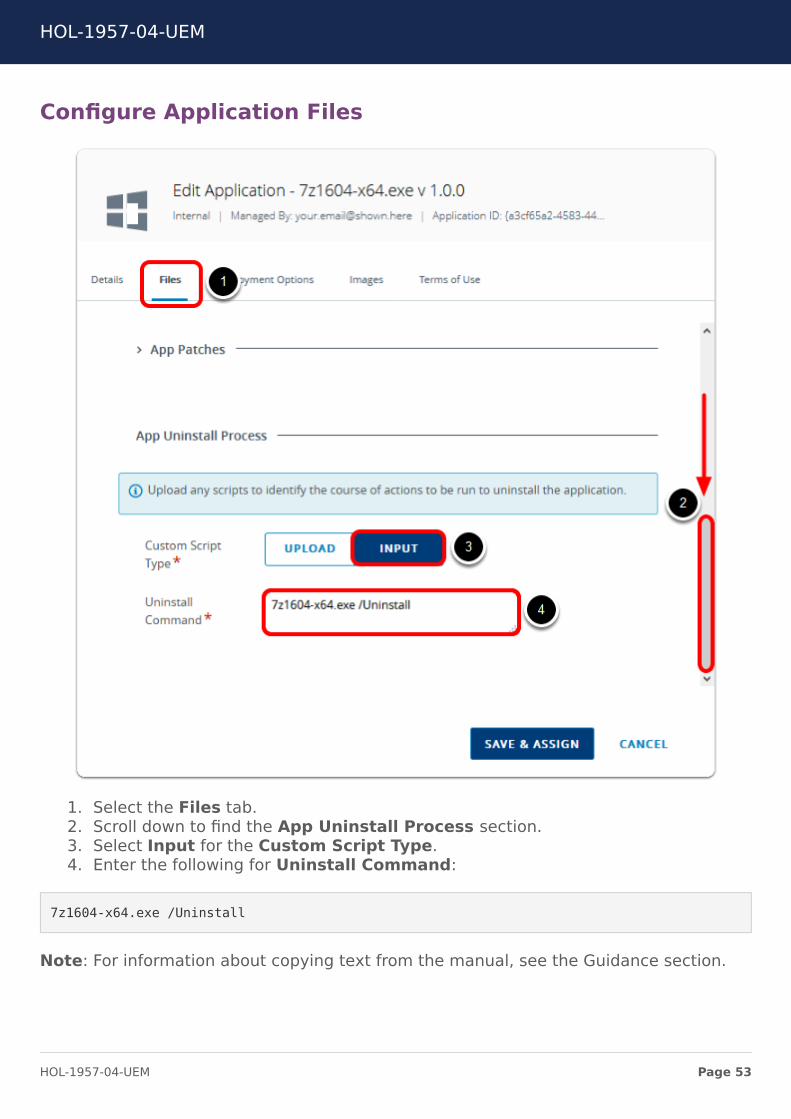
Configure Application Files
1. Select the Files tab.2. Scroll down to find the App Uninstall Process section.3. Select Input for the Custom Script Type.4. Enter the following for Uninstall Command:
7z1604-x64.exe /Uninstall
Note: For information about copying text from the manual, see the Guidance section.
HOL-1957-04-UEM
Page 53HOL-1957-04-UEM

Select Deployment Options
1. Select Deployment Options.2. Scroll down until you see the option for Install Command.3. Enter Install Command as:
7z1604-x64.exe /S
Note: For information about copying text from the manual, see the Guidance section.
HOL-1957-04-UEM
Page 54HOL-1957-04-UEM

Add Identify Application Condition
1. Scroll down to find the When To Call Install Complete section.2. Select Defining Criteria for Identity Application By.3. Click Add.
HOL-1957-04-UEM
Page 55HOL-1957-04-UEM

Configure the Install Complete Defining Criteria
1. Select File Exists for the Criteria Type.2. Enter C:\Program Files\7-Zip\7zFM.exe for the Path.3. Click Add.
Note: For information about copying text from the manual, see the Guidance section.
HOL-1957-04-UEM
Page 56HOL-1957-04-UEM

Save and Assign the Application
Click Save & Assign.
HOL-1957-04-UEM
Page 57HOL-1957-04-UEM

Add an Assignment
Click Add Assignment.
HOL-1957-04-UEM
Page 58HOL-1957-04-UEM

Add Assignment Group and Push Mode
1. Click the Select Assignment Groups search box and select All Devices([email protected]).
2. Select Auto for the App Delivery Method.3. Click Add.
HOL-1957-04-UEM
Page 59HOL-1957-04-UEM

Save and Publish the Application
Click Save & Publish.
HOL-1957-04-UEM
Page 60HOL-1957-04-UEM

Preview the Assigned Devices
Click Publish.
HOL-1957-04-UEM
Page 61HOL-1957-04-UEM

Connect to the Windows 10 VirtualMachine
Double-click the Win10-01a.rdp shortcut from the Main Console Desktop to connect tothe Windows 10 virtual machine.
HOL-1957-04-UEM
Page 62HOL-1957-04-UEM

Validate Device EnrollmentOnce your Windows 10 device is enrolled, the restriction profile and application youcreated earlier will be installed on the device. Continue to confirm enrollment wassuccessful and that the profile installed correctly by verifying that the restrictions tookplace on your device.
Confirm Profile
1. Click on Start logo.2. Click on Cortana in the apps list.
HOL-1957-04-UEM
Page 63HOL-1957-04-UEM

Cortana Disabled
Notice now you are not greeted by Cortana, you only have basic search capabilities nowthat Workspace ONE UEM has disabled Cortana.
HOL-1957-04-UEM
Page 64HOL-1957-04-UEM

Confirming Cortana is Disabled
For further confirmation, click on the Gear icon and you will see that all of the Cortanasettings which were present before have now disappeared. You should only see settingsregarding searching and indexing.
Confirm Application
Click Explorer from the bottom toolbar.
HOL-1957-04-UEM
Page 65HOL-1957-04-UEM

Open 7-Zip
1. Click Local Disk (C:).2. Click Program Files.3. Click 7-Zip.4. Double-click 7zFM.exe to launch the 7-Zip File Manager.
NOTE - If you do not see the 7-Zip Folder, your application may still bedownloading. Due to lab scalability and network resources, this may takeseveral minutes to finish.
HOL-1957-04-UEM
Page 66HOL-1957-04-UEM

Un-enrolling your Windows 10 DeviceIn this section, we are going to un-enroll our Windows 10 VM so that we can use it forother lab modules. We will delete the device record from the console, which will also un-enroll the device and remove all the apps and profiles that are pushed from WorkspaceONE UEM console, also known as managed content.
Delete Device from Workspace ONE UEM Console
From the Workspace ONE UEM Console,
1. Click on Devices2. Click on List View3. Select the check box next to your device friendly name.4. Click on More Actions5. Click on Delete Device
HOL-1957-04-UEM
Page 67HOL-1957-04-UEM

Enter Reason and Delete
1. Enter the reason as lab completed .2. Click on Delete
HOL-1957-04-UEM
Page 68HOL-1957-04-UEM

Validate DELETE IN PROGRESS...
1. You may see device friendly name changing to DELETE IN PROGRESS...2. Click on the Refresh Icon to validate if the device deletion is successful.
Ensure that device record is deleted
1. Use the Refresh Button if needed.2. Ensure that the device record is now deleted from the Workspace ONE UEM
console and you see the message No Records Found.
HOL-1957-04-UEM
Page 69HOL-1957-04-UEM

Navigate to Windows 10 Settings
1. Click on the Windows Icon2. Click on the gear icon to access Windows 10 Settings
Access Accounts Settings
From the Settings Menu, access Accounts
HOL-1957-04-UEM
Page 70HOL-1957-04-UEM

Validate That No Management Account Exists
1. Click on Access work or school2. Validate that you DO NOT see any account connected to AirWatchMDM.
NOTE - The CORP AD domain is the local domain in this lab and is not controlled byAirWatch Enrollment, so you will see this connection if your device is enrolled orunenrolled.
HOL-1957-04-UEM
Page 71HOL-1957-04-UEM

ConclusionIn addition to managing mobile devices, Workspace ONE UEM can also manage yourWindows 10 applications as well. This quick look into Windows 10 management shouldprovider a clearer picture on how you can manage your Windows 10 devices byconfiguring restrictions and profiles and deploying applications alongside your mobileworkforce. For a deeper dive into Windows 10 Management, consider taking thefollowing Windows 10 modules.
This concludes the Basic Windows 10 Management module.
HOL-1957-04-UEM
Page 72HOL-1957-04-UEM

Module 2 - Windows 10Software Distribution and
Troubleshooting
HOL-1957-04-UEM
Page 73HOL-1957-04-UEM

IntroductionMany issues in PC management arise from the delivery, integration, and support ofapplications. As end-user demand drives organizations to adopt more applications,these issues only grow in complexity and number. Today’s sophisticated user requirescontrol over apps on both personal and corporate-owned devices. Workspace ONE UEMon Windows 10 introduces features and tools to simplify application integration andmanagement.
Software Distribution and Lifecycle Flow with WorkspaceONE UEM
You can deploy Win32 applications from the Apps & Books section of the Workspace ONEUEM Console and, in doing so, use the application life-cycle flow that exists for allinternal applications. This feature is called software distribution.
HOL-1957-04-UEM
Page 74HOL-1957-04-UEM

You can use the Workspace ONE UEM software distribution feature to deliver Win32applications, track installation statuses, keep application versions current, and deleteold applications.
HOL-1957-04-UEM
Page 75HOL-1957-04-UEM

Connect to Windows 10 VMWe have provided you a Windows 10 VM to complete the necessary steps for this lab.Let's connect to it to complete the steps in the following section.
Connect to the Windows 10 VM
Double-click the Win10-01a.rdp shortcut on the lab desktop.
If prompted, the login credentials for the Windows 10 VM are:
• Username: corp\holuser• Password: VMware1!
HOL-1957-04-UEM
Page 76HOL-1957-04-UEM

Login to the Workspace ONE UEMConsoleTo perform most of the lab, you will need to login to the Workspace ONE UEM AdminConsole.
Launch Chrome Browser
Double-click the Chrome Browser on the lab desktop.
HOL-1957-04-UEM
Page 77HOL-1957-04-UEM

Authenticate to the Workspace ONE UEM Admin Console
The default home page for the browser is https://labs.awmdm.com. Enter yourWorkspace ONE UEM Admin Account information and click the Login button.
NOTE - If you see a Captcha, please be aware that it is case sensitive!
1. Enter your Username. This is your email address that you have associated withyour VMware Learning Platform (VLP) account.
2. Enter VMware1! for the Password field.3. Click the Login button.
NOTE - Due to lab restrictions, you may need to wait here for a minute or sowhile the Hands On Lab contacts the Workspace ONE UEM Hands On Labsserver.
HOL-1957-04-UEM
Page 78HOL-1957-04-UEM

Accept the End User License Agreement
NOTE - The following steps of logging into the Administration Console will onlyneed to be done during the initial login to the console.
You will be presented with the Workspace ONE UEM Terms of Use. Click the Acceptbutton.
HOL-1957-04-UEM
Page 79HOL-1957-04-UEM

Address the Initial Security Settings
After accepting the Terms of Use, you will be presented with a Security Settings pop-up. The Password Recovery Question is in case you forget your admin password andthe Security PIN is to protect certain administrative functionality in the console.
HOL-1957-04-UEM
Page 80HOL-1957-04-UEM

1. You may need to scroll down to see the Password Recovery Questions andSecurity PIN sections.
2. Select a question from the Password Recovery Question drop-down (defaultselected question is ok here).
3. Enter VMware1! in the Password Recovery Answer field.4. Enter VMware1! in the Confirm Password Recovery Answer field.5. Enter 1234 in the Security PIN field.6. Enter 1234 in the Confirm Security PIN field.7. Click the Save button when finished.
Close the Welcome Message
HOL-1957-04-UEM
Page 81HOL-1957-04-UEM

After completing the Security Settings, you will be presented with the Workspace ONEUEM Console Highlights pop-up.
1. Click on the Don't show this message on login check box.2. Close the pop-up by clicking on the X in the upper-right corner.
HOL-1957-04-UEM
Page 82HOL-1957-04-UEM

Modifying Internet Options forWindows EnrollmentBefore enrolling the Windows 10 Virtual Machine, we will make modifications to theWindows 10 device to reduce network traffic to expedite enrollment.
Open Settings
1. Click the Windows button.2. Click the Settings (Gear) icon.
HOL-1957-04-UEM
Page 83HOL-1957-04-UEM

Open Internet Options
1. Type Internet Options in the search bar.2. Click Internet Options from the results list.
HOL-1957-04-UEM
Page 84HOL-1957-04-UEM

Modify the Certificate Revocation Options
1. Click the Advanced tab.2. Scroll down to find the Security section.3. Uncheck the Check for publisher's certification revocation option.4. Uncheck the Check for server certificate revocation option.5. Click Apply.6. Click OK.
HOL-1957-04-UEM
Page 85HOL-1957-04-UEM

Open PowerShell as Administrator
1. Right-Click the Windows button.2. Click Windows PowerShell (Admin).
HOL-1957-04-UEM
Page 86HOL-1957-04-UEM

Allow WindowsPowerShell to Make Changes
Click Yes when prompted to allow Windows PowerShell to make changes to your device.
Enter Commands to Stop Windows Update Service
Enter the following commands (remember that you can highlight then drag-and-drop thetext from the manual into PowerShell!)
1. Enter Set-Service wuauserv -startup disabled then press ENTER .2. Enter Stop-Service wuauserv then press ENTER .3. Click the Close button to exit PowerShell.
HOL-1957-04-UEM
Page 87HOL-1957-04-UEM

Enrolling Your Windows 10 DeviceWe will now enroll our Windows 10 device in Workspace ONE UEM. First, we will need todownload the Workspace ONE Intelligent Hub.
Download the Workspace ONE Intelligent Hub on theWindows 10 VM
From a new tab in the browser, if not opened already,
1. Enter https://www.getwsone.com in the navigation bar and press Enter .
HOL-1957-04-UEM
Page 88HOL-1957-04-UEM

2. Click Download Hub for Windows 10.NOTE: Please wait while the Workspace ONE Intelligent Hub installer finishesdownloading.
3. Click Keep when warned about the AirWatchAgent.msi download.
NOTE - If you do not see the warning about the AirWatchAgent.msi file, skipthis and continue to the next step.
Launch the Workspace ONE Intelligent Hub Installer
Click the AirWatchAgent.msi file in your download bar.
NOTE - The installer may take a few seconds to launch, please be patient afterclicking the AirWatchAgent.msi file.
Click Run
Click Run to proceed with the installation.
HOL-1957-04-UEM
Page 89HOL-1957-04-UEM

Accept the Default Install Location
Leave the default install location and click Next.
NOTE - The Next button may take several seconds to enable while therequired additional features are installed.
HOL-1957-04-UEM
Page 90HOL-1957-04-UEM

Accept the License Agreement
1. Select I accept the terms of the license agreement.2. Click Next.
HOL-1957-04-UEM
Page 91HOL-1957-04-UEM

Start the Workspace ONE Intelligent Hub Install
Click Install to start the installer.
HOL-1957-04-UEM
Page 92HOL-1957-04-UEM

Allow the Workspace ONE Intelligent Hub Installer to Run(IF NEEDED)
If prompted to allow the app to make changes on your device, click Yes.
HOL-1957-04-UEM
Page 93HOL-1957-04-UEM

Complete the Workspace ONE Intelligent Hub Installer
Click Finish to complete the Workspace ONE Intelligent Hub installer.
NOTE - After clicking finish, the Native Enrollment application will launch toguide you through enrolling into Workspace ONE UEM. It will take around45-60 seconds to launch the agent.
HOL-1957-04-UEM
Page 94HOL-1957-04-UEM

Enroll Your Windows 10 Device Using the Workspace ONEIntelligent Hub
Click Server Detail.
Find your Group ID from Workspace ONE UEM Console
HOL-1957-04-UEM
Page 95HOL-1957-04-UEM

The first step is to make sure you know what your Organization Group ID is.
1. To find the Group ID, hover your mouse over the Organization Group tab at thetop of the screen. Look for the email address you used to log in to the lab portal.
2. Your Group ID is displayed at the bottom of the Organization Group pop up.
Enter the Server Details
1. Enter labs.awmdm.com for the Server Name field.2. Enter Your Group ID for the Group ID field. If you forgot your Group ID, check
the previous steps on how to retrieve it.
HOL-1957-04-UEM
Page 96HOL-1957-04-UEM

Enter Your User Credentials
1. Enter aduser in the Username field.2. Enter VMware1! in the Password field.3. Click Next
NOTE - Wait while the server checks your enrollment details.
HOL-1957-04-UEM
Page 97HOL-1957-04-UEM

Workspace ONE Application Launch
Since our Workspace ONE UEM and VMware Identity Manager environments are linkedfor this environment, the Workspace ONE Application will automatically open afterenrollment is complete. You will not need it for this exercise, so click Close.
HOL-1957-04-UEM
Page 98HOL-1957-04-UEM

Finish the Workspace ONE UEM Enrollment Process
Click Finish to end the Enrollment process. Your Windows 10 device is now successfullyenrolled into Workspace ONE UEM.
HOL-1957-04-UEM
Page 99HOL-1957-04-UEM

Deploying Notepad++In this exercise, we will deploy Notepad++ to our Windows 10 device to see how toconfigure and deploy an application to your end users and what the end user experienceis like for interacting with these applications.
Deploying Notepad++ In Workspace ONE UEM
1. Click Apps & Books.2. Click Add Application.
Upload Application File
HOL-1957-04-UEM
Page 100HOL-1957-04-UEM

Click Upload.
Choose Application File to Upload
Click Choose File.
HOL-1957-04-UEM
Page 101HOL-1957-04-UEM

Select the Notepad++ Installer
1. Click Documents.2. Click HOL.3. Click Notepad++ Installer.exe.4. Click Open.
HOL-1957-04-UEM
Page 102HOL-1957-04-UEM

Save the Application File
Click Save.
Configure Notepad++ Application
HOL-1957-04-UEM
Page 103HOL-1957-04-UEM

1. Select No for Is this a dependency file.2. Click Continue.
Configure Application Details
1. Enter Notepad++ for the Name.2. Select 64-bit for the Supported Processor Architecture.
HOL-1957-04-UEM
Page 104HOL-1957-04-UEM

Configure Application Files
1. Click Files.2. Scroll down to the App Uninstall Process section.3. Select Input for Custom Script Type.4. Enter "%ProgramFiles%\Notepad++\Uninstall.exe" /S for the uninstall command.
HOL-1957-04-UEM
Page 105HOL-1957-04-UEM

Configure Deployment Options
1. Click the Deployment Options tab.2. Enter 5 for Disk Space Required.3. Select MB for the Disk Space Required Units.4. Enter 50 for Device Power Required.5. Enter 1 for RAM Required.6. Select GB for the RAM Required Units.
HOL-1957-04-UEM
Page 106HOL-1957-04-UEM

Configure Install Options
1. Scroll down to the How To Install section.2. Select Device for Install Context.3. Enter Notepad++ Installer.exe /S for the Install Command.4. Select No for Admin Privileges.5. Enter 3 for Retry Count.6. Enter 5 for Retry Interval.7. Enter 15 for the Install Timeout.
HOL-1957-04-UEM
Page 107HOL-1957-04-UEM

Configure When To Call Install Complete
1. Scroll down to the When To Call Install Complete section.2. Enter 1 for the Installer Reboot Exit Code.3. Enter 0 for the Install Success Exit Code.4. Select Defining Criteria for Identity Application By.5. Click Add.
HOL-1957-04-UEM
Page 108HOL-1957-04-UEM

Add Defining Criteria
1. Select File Exists for the Criteria Type.2. Enter %ProgramFiles%\NotePad++ for the Path.3. Click Add.
HOL-1957-04-UEM
Page 109HOL-1957-04-UEM

Configure Application Images
1. Click the Images tab.2. Click the Icon tab.3. Click the Click or drag files here button.
HOL-1957-04-UEM
Page 110HOL-1957-04-UEM

Select the Notepad++.png file
1. Click Documents.2. Click HOL.3. Click Notepad++.png.4. Click Open.
HOL-1957-04-UEM
Page 111HOL-1957-04-UEM

Configure Terms of Use
1. Click the Terms of Use tab.2. If you wanted to configure a terms of use policy for this application, you would do
so here. For this lab, we will leave the Required Terms of Use as None.3. Click Save & Assign.
HOL-1957-04-UEM
Page 112HOL-1957-04-UEM

Add Assignment
Click Add Assignment.
HOL-1957-04-UEM
Page 113HOL-1957-04-UEM

Configure Assignment
1. Select All Devices ([email protected]) for Select Assignment Groups.2. Select Auto for the App Delivery Method.3. Click Add.
HOL-1957-04-UEM
Page 114HOL-1957-04-UEM

Save & Publish Notepad++ Application
Click Save & Publish.
HOL-1957-04-UEM
Page 115HOL-1957-04-UEM

Preview Assigned Devices and Publish
Click Publish
HOL-1957-04-UEM
Page 116HOL-1957-04-UEM

Confirm the Notepad++ Application Was Added
1. Click Apps & Books.2. Ensure the Notepad++ application was added successfully.
HOL-1957-04-UEM
Page 117HOL-1957-04-UEM

Confirm the aduser Certificate HasInstalledWe have configured few device profiles for you to automatically install the usercertificate you will need for this lab. In this section, we are going to validate if that usercertificate is installed on your Windows 10 device or not before proceeding.
Check the Device Details for the Certificate Profile Status
In the Workspace ONE UEM Console,
1. Click Devices2. Click List View3. Click the device link for the enrolled device.
HOL-1957-04-UEM
Page 118HOL-1957-04-UEM

Install the Win10 - User Cert Profile (IF NEEDED)
1. Click the Profiles tab.2. Mouse over the status of the Win10 - User Cert profile.
◦ If the status shows as Install Failed, follow the below steps to install it.◦ If the status shows as Pending Information, refresh the page and re-
check the status.◦ If the status is a green checkmark, continue to the Check the aduser
Certificate on the Windows 10 Device step.
3. Select the Win10 - User Cert4. Click Install.
Confirm the Install Action (IF NEEDED)
Click OK to confirm the Install action.
HOL-1957-04-UEM
Page 119HOL-1957-04-UEM

Ensure the Win10 - User Cert Profile Installs (IF NEEDED)
If you needed to install the Win10 - User Cert profile, follow these steps. Otherwise,continue to the next step.
1. Click Refresh.2. Check the status of the Win10 - User Cert profile, it should update about every
1-2 minutes. If the Status is not a green checkmark, refresh until the installcompletes.
NOTE - Mouse over the icon in the Status column to see the current status. Ifyou see the Yellow Warning sign respond with "Install Failed", select theWin10 - User Cert and click Install again to restart the install process.
HOL-1957-04-UEM
Page 120HOL-1957-04-UEM

Check the aduser Certificate on the Windows 10 Device
1. Click the Windows button.2. Type user certificates and the Search bar will populate.3. Click the Manage user certificates option.
HOL-1957-04-UEM
Page 121HOL-1957-04-UEM

Allow the Microsoft Management Console to make changes
Click Yes when asked if you want to allow this app to make changes to your device.
Confirm the aduser Certificate Has Installed
1. Click the Personal folder to expand it.2. Click the Certificates folder.3. Check if the aduser certificate exists.
HOL-1957-04-UEM
Page 122HOL-1957-04-UEM

4. If the aduser certificate does NOT exist, wait a minute or two and click theRefresh button to check again. Continue to refresh until you see that theaduser certificate exists.
Do not continue to the next step until you've confirm that the aduser certificate hasbeen installed.
NOTE - Due to lab scalability and limitations, the aduser certificate may take afew minutes to download from the CA.
HOL-1957-04-UEM
Page 123HOL-1957-04-UEM

Login to the Workspace ONEApplication
1. Click the Windows button.2. Click the Workspace ONE app icon from the start menu.
HOL-1957-04-UEM
Page 124HOL-1957-04-UEM

Enter the Workspace ONE Server Address (IF NEEDED)
1. Enter https://cn1193-2057-ws1win.vidmpreview.com for the Server Address field.2. Click Continue.
HOL-1957-04-UEM
Page 125HOL-1957-04-UEM

Enter Your Username for Workspace ONE
1. Enter aduser for the username.2. Click Next.
Allow Access to Credentials
Click Allow to allow access to your private key.
NOTE - The user will only be prompted once for this permission.
HOL-1957-04-UEM
Page 126HOL-1957-04-UEM

NOTE - If you receive the "Access Denied. Certificate login failure." screen,please wait a few minutes and try to login again. The device may take severalminutes to receive the certificate due to scalability and lab networklimitations.
Enter the Workspace
Once the workspace is ready, click Enter.
HOL-1957-04-UEM
Page 127HOL-1957-04-UEM

Verify Notepad++ DeploymentNow that you have published Notepad++ to your Windows 10 Devices and logged intothe Workspace ONE catalog, let's review how to verify that your application wasdeployed successfully.
Confirm Deployment in the Workspace ONE Catalog
1. Ensure the Notepad++ app displays and shows as Installed.2. If the Notepad++ app is not installed yet, you may need to wait a few minutes for
it to complete. Click the Refresh button to reload the page as needed.
As an end user, you will have access to the Notepad++ application once it is installed.If you are able to see the Notepad++ application in the Catalog and the status displays
as Installed, then the deployment was successful and our parameters for determining asuccessful install were correct.
INFO: The Notepad++ application began to install automatically because you set theApp Delivery Method as Auto in the Workspace ONE UEM Console. If you hadapplications that you did not want to deploy automatically that users could downloadwhen needed, you could set the App Delivery Method to On Demand and allow endusers to initiate the Notepad++ download from the Workspace ONE catalog.
HOL-1957-04-UEM
Page 128HOL-1957-04-UEM

Confirm Application Installed
1. Click the Windows button.2. Confirm Notepad++ displays in the Recently Added section, confirming the
install.
Deployment Details and Troubleshooting
In most cases, a successfully deployment is easily verified by inspecting if the app wasinstalled or deployed to your device through either the Workspace ONE Catalog or byinspecting files that you are expecting to install. Continue through this section to seehow you can inspect other details for further troubleshooting and for additional detailson Software Distribution on Windows 10.
HOL-1957-04-UEM
Page 129HOL-1957-04-UEM

Inspecting Application Details
You can view additional details about the application, the deployment status, andpotential errors in the Workspace ONE UEM Console. You can also find the Build Versionhere, which we will cover shortly to demo how to check the AppDeploymentCache andRegistry on your devices for further debugging.
In the Workspace ONE UEM Console,
1. Click Apps & Books.2. Click Notepad++.
HOL-1957-04-UEM
Page 130HOL-1957-04-UEM

Additional Information and Troubleshooting in theWorkspace ONE UEM Console
1. Click the Devices tab.2. Check the Install Status of the application. Note that ours already shows as
Installed. If an install was pending or had failed, this would be reflected here.3. Click the link to the enrolled device.
HOL-1957-04-UEM
Page 131HOL-1957-04-UEM

Inspecting Device Apps
In addition to our previous method, we can also check the status through the DeviceDetails View.
1. Click the Apps tab.2. Scroll through the list and find the Notepad++ application. Notice that our
shows as installed, and other statuses would be reflected here as well.
HOL-1957-04-UEM
Page 132HOL-1957-04-UEM

Navigate to the Device Troubleshooting Section
1. Click the More tab dropdown.2. Click Troubleshooting.
HOL-1957-04-UEM
Page 133HOL-1957-04-UEM

View the Event Logs for Application Events
1. Click Event Log.2. Enter Application into the search and press enter. Since we may have several
records to search through, we want to inspect only those pertaining to ourApplication events.
3. You may need to scroll to the right to view the Event Data column.4. Notice the Event Data column associated with each Event. You can click any of
these links to retrieve additional details about the event, inspecting potentialissues and errors for why the deployment failed.
Feel free to inspect the Event Data links as desired, then continue to the next step.
HOL-1957-04-UEM
Page 134HOL-1957-04-UEM

Obtaining the Application Build Version
The Application Build Version is used to find your application details within the Registryand AppDeploymentCache. Before investigating those areas, we will first obtain theBuild Version from the Workspace ONE UEM Console.
In the Workspace ONE UEM Console,
1. Click Apps & Books.2. Click Notepad++.
HOL-1957-04-UEM
Page 135HOL-1957-04-UEM

Note the Build Version for the Notepad++ Application
1. Click the Details tab.2. Note the Build Version value for this application.
In the following steps, we will check the Registry and App Deployment Cache on theWindows 10 device for additional troubleshooting. In our lab, we've only deployed oneapplication so finding the correct folder will be easy. However, in a productionenvironment, there could be multiple applications being deployed and the folder nameswill match the Build Version found above, so it is important to know where to retrievethis to debug the correct application deployment.
HOL-1957-04-UEM
Page 136HOL-1957-04-UEM

Inspecting the AppDeploymentCache
1. Click the File Explorer icon from the task bar.2. Enter %programdata%\AirWatchMDM\AppDeploymentCache into the search bar and press
enter.
HOL-1957-04-UEM
Page 137HOL-1957-04-UEM

Obtain Access to the AppDeploymentCache folder
Click Continue.
Open the Notepad++ Folder (Noted by Build Version)
Double-click the folder in the AppDeploymentCache. Note that the name matches theBuild Version we previewed in the Workspace ONE UEM Console for the Notepad++application previously.
In a production scenario, you could have multiple application caches here, each notatedby their own Build Version. Retrieving this value from the Workspace ONE UEM Consoleto find the correct cache is an important step in debugging the correct deployment.
HOL-1957-04-UEM
Page 138HOL-1957-04-UEM

Obtain Access to the Application Cache Folder
Click Continue.
Inspect App Deployment Cache for Notepad++
1. Notice that our only file for this deployment is the Notepad++ Installer.exe,which we uploaded to the Workspace ONE UEM Console in our previous steps. Ifwe had uploaded a .zip containing multiple files, those would be displayed here.
HOL-1957-04-UEM
Page 139HOL-1957-04-UEM

NOTE - This app cache allows you to confirm if the application contentsare reaching the device, and if so, what their file names are.
2. Notice that the deployed filename matches our Install Command underDeployment Options > How To Install when we setup the application in theAirWatch Console.NOTE - If your application is not installing, it is useful to compare thedeployed contents and ensure your Install Command is setup correctlyto reference the correct filenames and paths.
Inspecting the AppDeploymentAgent Registry Entries
You can also inspect the Registry for additional information on the deployment. To getstarted, we need to launch regedit.
HOL-1957-04-UEM
Page 140HOL-1957-04-UEM

1. Click the Windows Start button.2. Enter regedit .3. Click the regedit result.
Allow Access to RegEdit
Click Yes to allow User Account Control to Registry Editor.
Inspect the AppDeploymentAgent Contents
HOL-1957-04-UEM
Page 141HOL-1957-04-UEM

1. Expand Computer.2. Expand HKEY_LOCAL_MACHINE.3. Expand SOFTWARE.4. Expand AirWatchMDM.5. Expand AppDeploymentAgent.6. Inspect the contents of the AppManifests, ContentManifests, Queue and
S-1-#### sections.
Notice that the folder name matches the Build Version of our Notepad++ application,same as the AppDeploymentCache.
• AppManifests contains information about the options set in the Workspace ONEUEM Console from the Deployment Options tab of your application.
• ContentManifests contains information about the options set in the WorkspaceONE UEM Console from the Files tab of your application.
• Queue will contain information the applications that are currently pendinginstallation. In our example, the Notepad++ application has finished and so it'sentry is no longer available in the Queue. As files complete or error and theinstall stops, they will be moved to the S-1-#### section.
• S-1-#### will contain information about the install process for applications thatcompleted successfully or with errors. In our example, the Notepad++application has finished and has moved to this section.
There can be two S-1-#### entries under AppDeploymentAgent. The names of theseentries refer to the SID (Security Identifier), which will be based on the Install Contextwe configured when deploying the application previously in the AirWatch Console.
• S-1-5-18 contains applications pushed to the Device Install Context, andrefers to the service account that is used by the operating system.
• S-1-5-21-#### contains applications pushed to the User Install Context, andrefers to the SID (Security Identifier) of the user account.
For more information regarding SIDs (Security Identifiers), refer to:https://support.microsoft.com/en-us/help/243330/well-known-security-identifiers-in-windows-operating-systems.
HOL-1957-04-UEM
Page 142HOL-1957-04-UEM

Application Status Codes
1. Click the entry under S-1-####.2. Inspect the LastDeploymentLog entry.3. Inspect the LastStatusCode entry.
The Queue and S-1-#### entries will contain the LastStatusCode andLastDeploymentLog entires you can inspect to see additional details about theprocess and discern why the install finished or failed. When evaluating the logs(LastDeploymentLogs) provided in these entries, it is important to also reference theStatus Codes (LastStatusCode) to help determine what occurred and why.
For reference, a list of Status Codes are included below:
DEPLOYMENT_OPERATION_QUEUED = 0x000,
FIRST_DETECTION_INPROGRESS = 0x100,FIRST_DETECTION_FAILED,FIRST_DETECTION_SUCCESSFUL,
CHECK_REFERENCE_COUNT_INPROGRESS = 0x200,CHECK_REFERENCE_COUNT_FAILED,CHECK_REFERENCE_COUNT_SUCCESSFUL,
REQUIREMENTS_EVALUATION_INPROGRESS = 0x300,REQUIREMENTS_EVALUATION_FAILED,REQUIREMENTS_EVALUATION_SUCCESSFUL,
DEPENDENCIES_INPROGRESS = 0x400,DEPENDENCIES_FAILED,
HOL-1957-04-UEM
Page 143HOL-1957-04-UEM

DEPENDENCIES_SUCCESSFUL,
SANITIZE_CACHE_INPROGRESS = 0x500,SANITIZE_CACHE_FAILED,SANITIZE_CACHE_SUCCESSFUL,
PENDING_NETWORK_CONNECTIVITY = 0x600,DOWNLOAD_CONTENT_INPROGRESS,PENDING_DOWNLOAD_RETRY,DOWNLOAD_CONTENT_FAILED,DOWNLOAD_CONTENT_SUCCESSFUL,
TRANSFORM_CACHE_INPROGRESS = 0x700,TRANSFORM_CACHE_FAILED,TRANSFORM_CACHE_SUCCESSFUL,
PENDING_USER_SESSION = 0x800,EXEC_DEPLOYMENT_INPROGRESS, = 0x801PENDING_EXEC_DEPLOYMENT_RETRY, = 0x802EXEC_DEPLOYMENT_FAILED, = 0x803EXEC_DEPLOYMENT_SUCCESSFUL, = 0x804PENDING_REBOOT, = 0x805
FINAL_DETECTION_INPROGRESS = 0x900,FINAL_DETECTION_FAILED, = 0x901,FINAL_DETECTION_SUCCESSFUL, = 0x902,
DEPLOYMENT_OPERATION_FAILED = 0x40000000,DEPLOYMENT_OPERATION_SUCCEEDED = 0x80000000,DEPLOYMENT_OPERATION_SUSPENDED = 0xC0000000
Conclusion
There are several ways to debug a failed or erroneous Software Distributiondeployment, as we have reviewed. The Workspace ONE UEM Console is a good firststep for determining what is occurring, but digging into the AppDeploymentCache andAppDeploymentAgent registry files will assist in deeper troubleshooting to determineany issues.
With this knowledge in mind, we will move onto deploying Office 365. Continue to thenext step.
HOL-1957-04-UEM
Page 144HOL-1957-04-UEM

Deploying Office 365 ProPlusIn this hands on lab, you will package Office 2016 with a configuration file for click-to-run delivery to remote and enterprise worker devices. You will configure and assign theapplication to smart groups with the flexible deployment feature.
We have provided you with all of the files needed to complete the steps; however, inyour organization you will have a customized configuration file to embed with yourOffice installation.
Preparing the Office 365 ProPlus Files
Before we can upload the ProPlus app to the Workspace ONE UEM Console, we need toprepare and zip the files.
Package the Office 365 Files as a Zip
HOL-1957-04-UEM
Page 145HOL-1957-04-UEM

1. Click the File Explorer icon from the task bar.2. Click Documents.3. Click HOL.4. CTRL+Click to select both the configuration.xml and setup.exe files.5. Right-click either of the selected files and hover over Send to.6. Click Compressed (zipped) folder.
Rename the Zipped Folder
Rename the zipped folder to Office365ProPlus .
NOTE - If you accidentally canceled the rename after the zipped folder wascreated, you can rename it by right-clicking the zipped folder and selectingRename from the list.
HOL-1957-04-UEM
Page 146HOL-1957-04-UEM

Inspect the Configuration.xml File (Optional)
1. Select configuration.xml and right-click the file.2. Select Edit.
For this lab, we are using the default configuration.xml file that is provided withthe Office 365 ProPlus deployment. Your organization, if it has deployed Office365, will have a configuration.xml file already that contains organization specificsfor install and licensing options. For your knowledge, know that theconfiguration.xml file contains organization specific details that the setup.exeprocess uses to configure the Office 365 installation for your users.
Feel free to explore the configuration.xml file before continuing.3. Click the Close (X) button to exit Notepad.
HOL-1957-04-UEM
Page 147HOL-1957-04-UEM

Deploying Office 365 Pro Plus in Workspace ONE UEM
Now that you've zipped the setup.exe and configuration.xml files for your Office 365deployment, the next step is to upload and deploy this application through theWorkspace ONE UEM Console.
Add an Internal Application
Back in the Workspace ONE UEM Console,
1. Click Apps & Books.2. Click Add Application.
Upload the Application File
Click Upload.
HOL-1957-04-UEM
Page 148HOL-1957-04-UEM

Choose the File to Upload
Click Choose File.
HOL-1957-04-UEM
Page 149HOL-1957-04-UEM

Choose the Office365ProPlus.zip File
1. Click Documents.2. Click HOL.3. Click to select the Office365ProPlus.zip file.4. Click Open.
HOL-1957-04-UEM
Page 150HOL-1957-04-UEM

Save the Uploaded File
Click Save.
Continue after Saving the File
1. Select No for Is this a dependency app?2. Click Continue.
HOL-1957-04-UEM
Page 151HOL-1957-04-UEM

Selecting Yes for marking a file as a dependency file associates a dependency to Win32applications. Dependency files are libraries and frameworks that the app requires tofunction, such as Java, Silverlight, or .NET libraries.
Configure the Details Information
1. Ensure the Details tab is selected.2. Enter Office 365 Pro Plus for the Name.3. Select 64-bit for the Supported Processor Architecture. The Windows 10
device we are using for this lab is 64-bit, but you should verify which processorarchitecture is relevant for your devices during your organization's deployments.
HOL-1957-04-UEM
Page 152HOL-1957-04-UEM

NOTE - When uploading MSI files all possible fields are automatically pre-populated with all of the metadata, however for ZIP packages you will have togenerate a Name as well as some of the Deployment options.
Files App Information
1. Click the Files tab.2. Here you can configure additional details and requirements about your
application.App Dependencies: This is where you would select dependency files and enablethe system to apply dependencies.App Transforms: Allows you to apply MSI Transform (MST) files.App Patches: Allows you to apply MSI Patch (MSP) files.
Continue to the next step.
HOL-1957-04-UEM
Page 153HOL-1957-04-UEM

Configure the App Uninstall Process
1. Scroll down to find the App Uninstall Process section.2. Select Input for the Custom Script Type.3. Enter setup.exe /uninstall ProPlus into the Uninstall Command
HOL-1957-04-UEM
Page 154HOL-1957-04-UEM

Configure the When to Install Details
1. Click the Deployment Options tab.The When To Install section allows to configure details about what requirementsmust be met in order to install the application.
2. Enter 3 for the Disk Space Required which specifies the amount of disk spacethe device must have available to install the application.
3. Select GB for the Units of the Disk Space Required.4. Enter 50 for the Device Power Required which specifies the battery power, in
percentage, that the device must have to install the application.5. Enter 500 for the RAM Required which specifies the amount of RAM the device
must have to install the application.6. Enter MB for the Units of the RAM Required.
HOL-1957-04-UEM
Page 155HOL-1957-04-UEM

Configure the Deployment Options
1. Scroll down to find the How To Install section.2. Enter setup.exe /configure configuration.xml for the Install Command
HOL-1957-04-UEM
Page 156HOL-1957-04-UEM

Additional How to Install Configurations
1. Scroll down further to find the Retry and Installer fields described below.2. Enter 3 for the Retry Count, which specifies the number of times the system
attempts to install the application after an unsuccessful attempt.3. Enter 5 for the Retry Interval, which specifies the time (in minutes) the system
waits when it tries to install the application after an unsuccessful attempt.4. Enter 30 for the Install Timeout, which specifies the time (in minutes) the
system allows the installation process to run without success.5. Enter 1614 for the Installer Reboot Exit Code, which specifies the code the
installer outputs to identify a reboot action.6. Enter 0 for the Installer Success Exit Code, which specifies the code the
installer outputs to identify a successful installation.
HOL-1957-04-UEM
Page 157HOL-1957-04-UEM

NOTE - The Installer Reboot Exit Code is not guaranteed to be 1614 for everyapplication, but this is the usual default value that is commonly used. Youshould verify this code for any application you decide to deploy to verify it iscorrect.
Configure the When To Call Install Complete Section
1. Scroll down to the When To Call Install Complete section.2. Select Defining Criteria for Identify Application By.3. Click + Add.
HOL-1957-04-UEM
Page 158HOL-1957-04-UEM

Add the Identify Application By Criteria
1. Select Registry Exists for the Criteria Type.2. Enter HKLM\SOFTWARE\WOW6432Node\Microsoft\Windows\CurrentVersion\Uninstall\
O365ProPlusRetail - en-us for the Path.3. Enter DisplayName for the Value Name.4. Select String for the Value Type.5. Enter Microsoft Office 365 ProPlus - en-us for the Value Data.6. Click Add.
NOTE - There are multiple Criteria Types to choose from, allowing you to beflexible in determining if your deployment was successful. You can also addmultiple Criteria configurations and link them together logically to covercomplex deployments.
HOL-1957-04-UEM
Page 159HOL-1957-04-UEM

Configure Images
1. Click the Images tab.2. Click the Icon tab.3. Click the area labeled Click or drag files here.
HOL-1957-04-UEM
Page 160HOL-1957-04-UEM

Select the O365 Logo for the Icon
1. Click Documents.2. Click HOL.3. Click the o365-logo.jpg file to select it.4. Click Open.
HOL-1957-04-UEM
Page 161HOL-1957-04-UEM

View the Terms of Use and Assign
1. Click the Terms of Use tab.2. If you decide to have a Terms of Use that your users must accept before installing
applications, you can configure that here. For the purposes of this lab, we willleave this as None.
3. Click Save & Assign.
HOL-1957-04-UEM
Page 162HOL-1957-04-UEM

Add Assignments
Click + Add Assignment.
HOL-1957-04-UEM
Page 163HOL-1957-04-UEM

Configure the Application Assignment
1. Select All Devices ([email protected]) for the Assignment Groups.2. Select Auto for App Delivery Method.3. Click Add.
HOL-1957-04-UEM
Page 164HOL-1957-04-UEM

Save and Publish
Click Save & Publish.
HOL-1957-04-UEM
Page 165HOL-1957-04-UEM

Publish
Click Publish.
HOL-1957-04-UEM
Page 166HOL-1957-04-UEM

Confirm the Office 365 ProPlus Application Was Added
Back at the Internal Applications List View, confirm that the Office 365 Pro Plusapplication is displayed.
You have successfully added the Office 365 ProPlus app to Workspace ONE UEM fordeployment. Remember that Workspace ONE UEM supports uploading and deployingMSIs, EXEs, as well as packaged apps like the zipped file we uploaded in this lab.
Workspace ONE UEM Tip - When deploying numerous apps to end-user devices, itcan take some time to install all the device applications. After device on-boardingcompletes, apps queue up in a random order for the device to install per Windowsoperating system specifications, configured timeout values, and retry logic. Dependencyfiles are installed prior to the main application.
HOL-1957-04-UEM
Page 167HOL-1957-04-UEM

Verifying Office 365 Pro PlusDeploymentDue to the scalability of this lab, time constraints, and the size of the install size, theOffice 365 Pro Plus installer WILL NOT complete on your Windows 10 device beforethe lab session expires. This section will guide you through verifying that the installcommand was completed and how you can verify your software distribution process forscenarios outside of this lab.
Verify App Availability in Workspace ONE
You can confirm that the Office 365 Pro Plus application was assigned to your device andis installing within the Workspace ONE application.
HOL-1957-04-UEM
Page 168HOL-1957-04-UEM

View the Office 365 ProPlus app in the Catalog
1. Click the Workspace ONE App icon from the task bar.2. Click Refresh icon3. Notice that the Office 365 ProPlus application you configured within Workspace
ONE UEM displays as Installing.
Because our Office 365 ProPlus app was deployed as Auto install, the application isalready installing on our device. On Demand apps would also display here in thecatalog, and users would need to manually begin the installation process from this viewif they desired to download those apps.
HOL-1957-04-UEM
Page 169HOL-1957-04-UEM

NOTE - If you don't see the Office 365 Pro Plus application, you may need towait several minutes and try refreshing the Catalog by closing the WorkspaceONE application and re-opening it.
NOTE - The "Installing" status will update appropriately once the installationis finished. Due to limited network resources and limited lab time, wesuggest continuing to the next steps to see how else you could verify andtroubleshoot app deployments.
Verify Install Command Was Sent
You can retrieve details about the current install status of an application on the assigneddevices. This can be used to monitor if devices are installing the applicationappropriately.
Navigate to the Details View of the Internal Application
Back in the Workspace ONE UEM Console,
1. Click Apps & Books2. Click the Office 365 Pro Plus application you deployed.
HOL-1957-04-UEM
Page 170HOL-1957-04-UEM

Application Details View Summary
1. Notice that the Install Status is currently showing Not Installed for 1 device.This verifies that 1 device is currently assigned to receive the application and the
application is still reporting as Not Installed.2. You can also verify your Deployment Progress to ensure that the number of
devices receiving this application is correct and that your Deployment Mode (Autoor On Demand) is correct.
HOL-1957-04-UEM
Page 171HOL-1957-04-UEM

Application Devices View
1. Click the Devices tab. This will show the current list of Devices that are assignedto receive this application.
2. Notice that our enrolled Windows 10 Device is marked as Not Installed, but theReason is listed as Install Command Dispatched. Since we are installing a fewGB over a network with limited resources, this is expected as the install can takesome time.
NOTE - Once the Install Command is processed, the Install Status and Reasonfields will update to show either that the install was successful or that therewere errors.
Using Device Details to Track Applications &Troubleshooting
In addition to the applications details view, you can view Apps information andTroubleshooting logs, which can aid in tracking application deployments and debuggingwhy deployments may fail.
HOL-1957-04-UEM
Page 172HOL-1957-04-UEM

Navigate to the Device Details View
Click your Device Name from the Devices view.
HOL-1957-04-UEM
Page 173HOL-1957-04-UEM

Device Apps View
1. Click the Apps tab.2. Scroll down until you see the Office 365 Pro Plus app in the list.3. Here you can see a list of applications that are installed on the device and
additional information about each of them. Successful, pending, and failedinstallations will all appear here. You can see here that the Office 365 Pro Plusapplication is pending due to the grey checkmark.
HOL-1957-04-UEM
Page 174HOL-1957-04-UEM

Device Troubleshooting View
1. Click the More dropdown.2. Click Troubleshooting.
HOL-1957-04-UEM
Page 175HOL-1957-04-UEM

View Device Events
1. Ensure the Event Log tab is selected. Under Event Log, you can view the full listof events sent to the device. You can use this information to verify that the InstallCommand was received, and details around why the install succeeded or failed.
2. Enter Application in the search box.3. Scroll to the right.4. Find the Install Application Requested action for the Office 365 Pro Plus
application to verify that the device received the command. You may need toscroll to the right to find the necessary columns, which are:
• Event: Install Application Confirmed• Event Data: Application: Office 365 Pro Plus
Verify Install Was Completed (follow along)
The following steps are for instructional purposes only, as the Office 365 Pro Plusinstaller WILL NOT complete before the lab expires due to limited network resourcesand lab ! Please follow along to see how you can verify that software distributioninstalls are completed and successful.
NOTE - As mentioned before, the Office 365 Pro Plus installment will likely notcomplete before your lab expires due to limited network resources and the labtime limit! This section will demonstrate what a successful install would looklike in the Workspace ONE UEM Console in a real deployment.
HOL-1957-04-UEM
Page 176HOL-1957-04-UEM

Navigate to the Details View of the Internal Application(follow along)
1. Click Apps & Books.2. Click the Office 365 Pro Plus application you deployed.
NOTE - As mentioned before, the Office 365 Pro Plus installment will likely notcomplete before your lab expires due to limited network resources and the labtime limit! This section will demonstrate what a successful install would looklike in the Workspace ONE UEM Console in a real deployment.
HOL-1957-04-UEM
Page 177HOL-1957-04-UEM

Application Details View Summary (follow along)
Notice that the Install Status now shows Installed for the Windows 10 device.
NOTE - As mentioned before, the Office 365 Pro Plus installment will likely notcomplete before your lab expires due to limited network resources and the labtime limit! This section will demonstrate what a successful install would looklike in the Workspace ONE UEM Console in a real deployment.
HOL-1957-04-UEM
Page 178HOL-1957-04-UEM

Application Devices View (follow along)
Notice that the Install Status has been updated to show Installed, and that theReason is listed as Managed.
NOTE - As mentioned before, the Office 365 Pro Plus installment will likely notcomplete before your lab expires due to limited network resources and the labtime limit! This section will demonstrate what a successful install would looklike in the Workspace ONE UEM Console in a real deployment.
HOL-1957-04-UEM
Page 179HOL-1957-04-UEM

Verify Installation on the Windows 10 Device (followalong)
1. Click the Windows button.2. Once the install completes, you will notice that the Recently Added section now
displays the Office 2016 suite.
NOTE - As mentioned before, the Office 365 Pro Plus installment will likely notcomplete before your lab expires due to limited network resources and the labtime limit! This section will demonstrate what a successful install would looklike in the Workspace ONE UEM Console in a real deployment.
HOL-1957-04-UEM
Page 180HOL-1957-04-UEM

Un-enrolling your Windows 10 DeviceIn this section, we are going to un-enroll our Windows 10 VM so that we can use it forother lab modules. We will delete the device record from the console, which will also un-enroll the device and remove all the apps and profiles that are pushed from WorkspaceONE UEM console, also known as managed content.
Delete Device from Workspace ONE UEM Console
From the Workspace ONE UEM Console,
1. Click on Devices2. Click on List View3. Select the check box next to your device friendly name.4. Click on More Actions5. Click on Delete Device
HOL-1957-04-UEM
Page 181HOL-1957-04-UEM

Enter Reason and Delete
1. Enter the reason as lab completed .2. Click on Delete
HOL-1957-04-UEM
Page 182HOL-1957-04-UEM

Validate DELETE IN PROGRESS...
1. You may see device friendly name changing to DELETE IN PROGRESS...2. Click on the Refresh Icon to validate if the device deletion is successful.
Ensure that device record is deleted
1. Use the Refresh Button if needed.2. Ensure that the device record is now deleted from the Workspace ONE UEM
console and you see the message No Records Found.
HOL-1957-04-UEM
Page 183HOL-1957-04-UEM

Navigate to Windows 10 Settings
1. Click on the Windows Icon2. Click on the gear icon to access Windows 10 Settings
Access Accounts Settings
From the Settings Menu, access Accounts
HOL-1957-04-UEM
Page 184HOL-1957-04-UEM

Validate That No Management Account Exists
1. Click on Access work or school2. Validate that you DO NOT see any account connected to AirWatchMDM.
NOTE - The CORP AD domain is the local domain in this lab and is not controlled byAirWatch Enrollment, so you will see this connection if your device is enrolled orunenrolled.
HOL-1957-04-UEM
Page 185HOL-1957-04-UEM

Sign Out of the Workspace ONEApplication
1. Click the Workspace ONE App icon from the task bar.2. Click the User icon.3. Click Sign Out.
HOL-1957-04-UEM
Page 186HOL-1957-04-UEM

Confirm Sign Out
Click Sign Out
Close the Workspace ONE App
Click the Close button.
HOL-1957-04-UEM
Page 187HOL-1957-04-UEM

Close Chrome to Clear Session Cookies
1. Return to your Chrome browser.2. Click the Close (X) button.
Workspace ONE saves your OAuth session details in cookies. Closing your browserensures your previous session cookies will be deleted and won't interfere with the anyadditional modules you take.
HOL-1957-04-UEM
Page 188HOL-1957-04-UEM

ConclusionSoftware Distribution in AirWatch allows you to deliver Windows applications and adhereto the application life-cycle. Software Distribution enables your organization to deployapplications, track the installation statuses, debug and troubleshoot installation issues,and maintain applications with ease.
HOL-1957-04-UEM
Page 189HOL-1957-04-UEM

Module 3 - Windows 10Real-Time and AutomatedSecurity Protection and
Compliance
HOL-1957-04-UEM
Page 190HOL-1957-04-UEM

Introduction
The release of Windows 10 introduced fundamental changes to the Windows operatingsystem to address the security and data concerns of today’s digital workspace. To takeadvantage of Workspace ONE Unified Endpoint Management’s (UEM) capabilities, youcan fold the Windows 10 functionality into an existing VMware AirWatch managementsolution. Combining traditional client requirements with modern enterprise managementcapabilities creates a simplified, cost-effective management solution. Use WorkspaceONE UEM to establish user trust, assess the device posture, enforce conditional access,and enable data loss prevention.
In this hands on lab, we will explore how to configure many of the end-to-end securityfeatures, however, due to using VMs we will not be able to fully test all of our securityconfigurations.
NOTE - You may need to scroll to the right to view the full screen button onthe video above.
HOL-1957-04-UEM
Page 191HOL-1957-04-UEM

Connect to Windows 10 VMWe have provided you a Windows 10 VM to complete the necessary steps for this lab.Let's connect to it to complete the steps in the following section.
Connect to the Windows 10 VM
Double-click the Win10-01a.rdp shortcut on the lab desktop.
If prompted, the login credentials for the Windows 10 VM are:
• Username: corp\holuser• Password: VMware1!
HOL-1957-04-UEM
Page 192HOL-1957-04-UEM
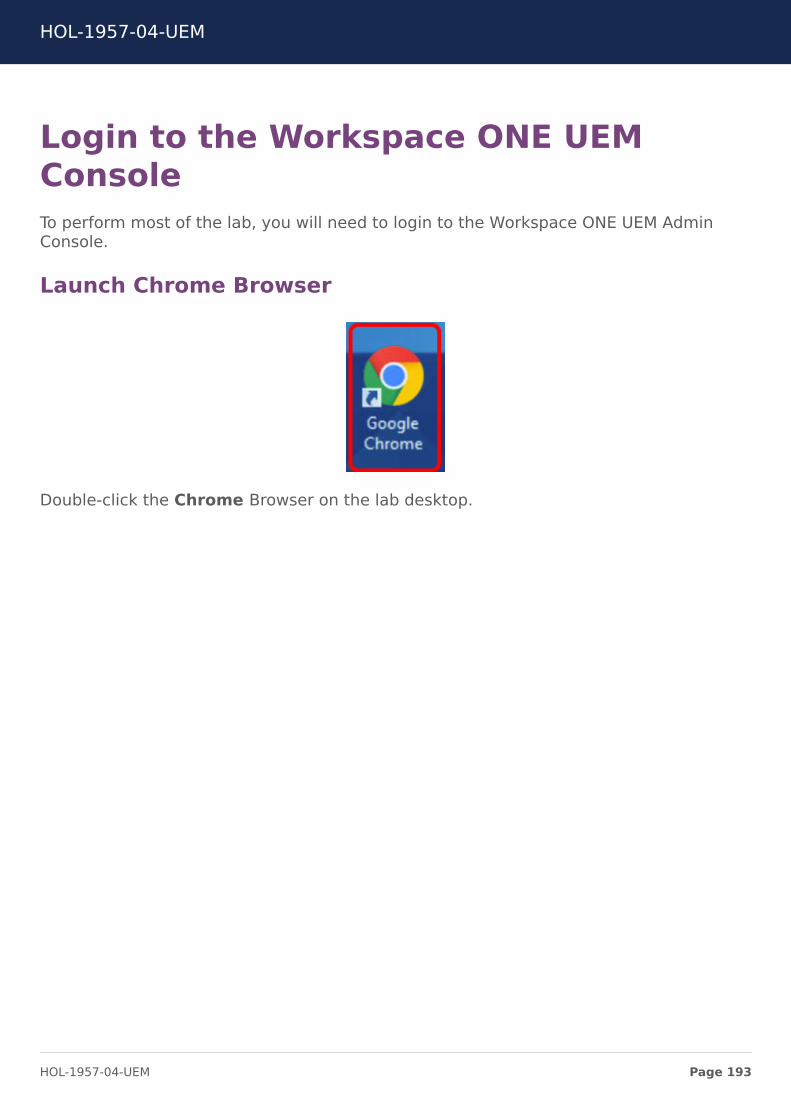
Login to the Workspace ONE UEMConsoleTo perform most of the lab, you will need to login to the Workspace ONE UEM AdminConsole.
Launch Chrome Browser
Double-click the Chrome Browser on the lab desktop.
HOL-1957-04-UEM
Page 193HOL-1957-04-UEM

Authenticate to the Workspace ONE UEM Admin Console
The default home page for the browser is https://labs.awmdm.com. Enter yourWorkspace ONE UEM Admin Account information and click the Login button.
NOTE - If you see a Captcha, please be aware that it is case sensitive!
1. Enter your Username. This is your email address that you have associated withyour VMware Learning Platform (VLP) account.
2. Enter VMware1! for the Password field.3. Click the Login button.
NOTE - Due to lab restrictions, you may need to wait here for a minute or sowhile the Hands On Lab contacts the Workspace ONE UEM Hands On Labsserver.
HOL-1957-04-UEM
Page 194HOL-1957-04-UEM

Accept the End User License Agreement
NOTE - The following steps of logging into the Administration Console will onlyneed to be done during the initial login to the console.
You will be presented with the Workspace ONE UEM Terms of Use. Click the Acceptbutton.
HOL-1957-04-UEM
Page 195HOL-1957-04-UEM

Address the Initial Security Settings
After accepting the Terms of Use, you will be presented with a Security Settings pop-up. The Password Recovery Question is in case you forget your admin password andthe Security PIN is to protect certain administrative functionality in the console.
HOL-1957-04-UEM
Page 196HOL-1957-04-UEM

1. You may need to scroll down to see the Password Recovery Questions andSecurity PIN sections.
2. Select a question from the Password Recovery Question drop-down (defaultselected question is ok here).
3. Enter VMware1! in the Password Recovery Answer field.4. Enter VMware1! in the Confirm Password Recovery Answer field.5. Enter 1234 in the Security PIN field.6. Enter 1234 in the Confirm Security PIN field.7. Click the Save button when finished.
Close the Welcome Message
HOL-1957-04-UEM
Page 197HOL-1957-04-UEM

After completing the Security Settings, you will be presented with the Workspace ONEUEM Console Highlights pop-up.
1. Click on the Don't show this message on login check box.2. Close the pop-up by clicking on the X in the upper-right corner.
HOL-1957-04-UEM
Page 198HOL-1957-04-UEM

Device Posture and Real-TimeComplianceWorkspace ONE UEM assesses device posture by evaluating, locally enforcing, andremediating devices using the compliance engine, a Workspace ONE UEM tool thatensures that all devices abide by specified policies. A policy can include basic securitysettings or more critical security configurations.
Navigate to All Settings
HOL-1957-04-UEM
Page 199HOL-1957-04-UEM

1. Click Groups & Settings.2. Click All Settings.
Navigate to Windows Health Attestation
1. Click Devices & Users2. Click Windows3. Click Windows Desktop4. Click Windows Health Attestation5. Select Override for the Current Setting6. Uncheck BitLocker Disabled under the Compromised Status Definition section.
HOL-1957-04-UEM
Page 200HOL-1957-04-UEM

Configure Health Attestation
1. Scroll down to the bottom of the page.2. Click Save
HOL-1957-04-UEM
Page 201HOL-1957-04-UEM

Close Settings
1. Ensure the Saved Successfully prompt is displayed.2. Click the Close (X) button to close the Setting window.
HOL-1957-04-UEM
Page 202HOL-1957-04-UEM

Conditional AccessFor this lab we will be using the VMware Workspace ONE app to demonstrate theconditional access and Single Sign-On functions instead of a public 3rd party applicationsuch as the native SalesForce app.
Introduction
Conditional access to corporate resources through Workspace ONE combines WorkspaceONE UEM (VMware AirWatch) management capabilities with VMware Identity Manager™.Available across all platforms and device types, conditional access provides theintelligence necessary for comprehensive unified endpoint management. WhileWorkspace ONE UEM automatically denies access to unmanaged devices, conditionalaccess enables a more nuanced approach by allowing managed devices to accesscorporate resources if they report a healthy compliance status.
For this lab several items such as Identity Manager integration and Certificate Profileshave been pre-configured for your Organization Group.
HOL-1957-04-UEM
Page 203HOL-1957-04-UEM

View Conditional Access Flow
We will now launch the Workspace ONE App to see how our access is affected whenlogging in from a device that is not enrolled.
Launch the Workspace ONE App
1. Click the Windows button.2. Click the Workspace ONE app icon from the start menu.
HOL-1957-04-UEM
Page 204HOL-1957-04-UEM

Enter the Workspace ONE Server Address (IF NEEDED)
1. Enter https://cn1193-2057-ws1win.vidmpreview.com for the Server Address field.2. Click Continue.
HOL-1957-04-UEM
Page 205HOL-1957-04-UEM

Enter Your Username for Workspace ONE
1. Enter aduser for the username.2. Click Next.
HOL-1957-04-UEM
Page 206HOL-1957-04-UEM

Confirm Authentication Failure
The environment has been configured to use certificate authentication into theapplication. The certificate is installed on the device only after the device has beenenrolled into Workspace ONE UEM thus preventing any unauthorized users fromaccessing the application's information.
HOL-1957-04-UEM
Page 207HOL-1957-04-UEM

Close Workspace ONE
Close the Workspace ONE application by clicking on the Close (X) in the upper rightcorner.
HOL-1957-04-UEM
Page 208HOL-1957-04-UEM

Modifying Internet Options forWindows EnrollmentBefore enrolling the Windows 10 Virtual Machine, we will make modifications to theWindows 10 device to reduce network traffic to expedite enrollment.
Open Settings
1. Click the Windows button.2. Click the Settings (Gear) icon.
HOL-1957-04-UEM
Page 209HOL-1957-04-UEM

Open Internet Options
1. Type Internet Options in the search bar.2. Click Internet Options from the results list.
HOL-1957-04-UEM
Page 210HOL-1957-04-UEM

Modify the Certificate Revocation Options
1. Click the Advanced tab.2. Scroll down to find the Security section.3. Uncheck the Check for publisher's certification revocation option.4. Uncheck the Check for server certificate revocation option.5. Click Apply.6. Click OK.
HOL-1957-04-UEM
Page 211HOL-1957-04-UEM

Open PowerShell as Administrator
1. Right-Click the Windows button.2. Click Windows PowerShell (Admin).
HOL-1957-04-UEM
Page 212HOL-1957-04-UEM

Allow WindowsPowerShell to Make Changes
Click Yes when prompted to allow Windows PowerShell to make changes to your device.
Enter Commands to Stop Windows Update Service
Enter the following commands (remember that you can highlight then drag-and-drop thetext from the manual into PowerShell!)
1. Enter Set-Service wuauserv -startup disabled then press ENTER .2. Enter Stop-Service wuauserv then press ENTER .3. Click the Close button to exit PowerShell.
HOL-1957-04-UEM
Page 213HOL-1957-04-UEM

Enrolling Your Windows 10 DeviceWe will now enroll our Windows 10 device in Workspace ONE UEM. First, we will need todownload the Workspace ONE Intelligent Hub.
Download the Workspace ONE Intelligent Hub on theWindows 10 VM
From a new tab in the browser, if not opened already,
1. Enter https://www.getwsone.com in the navigation bar and press Enter .
HOL-1957-04-UEM
Page 214HOL-1957-04-UEM

2. Click Download Hub for Windows 10.NOTE: Please wait while the Workspace ONE Intelligent Hub installer finishesdownloading.
3. Click Keep when warned about the AirWatchAgent.msi download.
NOTE - If you do not see the warning about the AirWatchAgent.msi file, skipthis and continue to the next step.
Launch the Workspace ONE Intelligent Hub Installer
Click the AirWatchAgent.msi file in your download bar.
NOTE - The installer may take a few seconds to launch, please be patient afterclicking the AirWatchAgent.msi file.
Click Run
Click Run to proceed with the installation.
HOL-1957-04-UEM
Page 215HOL-1957-04-UEM

Accept the Default Install Location
Leave the default install location and click Next.
NOTE - The Next button may take several seconds to enable while therequired additional features are installed.
HOL-1957-04-UEM
Page 216HOL-1957-04-UEM

Accept the License Agreement
1. Select I accept the terms of the license agreement.2. Click Next.
HOL-1957-04-UEM
Page 217HOL-1957-04-UEM

Start the Workspace ONE Intelligent Hub Install
Click Install to start the installer.
HOL-1957-04-UEM
Page 218HOL-1957-04-UEM

Allow the Workspace ONE Intelligent Hub Installer to Run(IF NEEDED)
If prompted to allow the app to make changes on your device, click Yes.
HOL-1957-04-UEM
Page 219HOL-1957-04-UEM

Complete the Workspace ONE Intelligent Hub Installer
Click Finish to complete the Workspace ONE Intelligent Hub installer.
NOTE - After clicking finish, the Native Enrollment application will launch toguide you through enrolling into Workspace ONE UEM. It will take around45-60 seconds to launch the agent.
HOL-1957-04-UEM
Page 220HOL-1957-04-UEM

Enroll Your Windows 10 Device Using the Workspace ONEIntelligent Hub
Click Server Detail.
Find your Group ID from Workspace ONE UEM Console
HOL-1957-04-UEM
Page 221HOL-1957-04-UEM

The first step is to make sure you know what your Organization Group ID is.
1. To find the Group ID, hover your mouse over the Organization Group tab at thetop of the screen. Look for the email address you used to log in to the lab portal.
2. Your Group ID is displayed at the bottom of the Organization Group pop up.
Enter the Server Details
1. Enter labs.awmdm.com for the Server Name field.2. Enter Your Group ID for the Group ID field. If you forgot your Group ID, check
the previous steps on how to retrieve it.
HOL-1957-04-UEM
Page 222HOL-1957-04-UEM

Enter Your User Credentials
1. Enter aduser in the Username field.2. Enter VMware1! in the Password field.3. Click Next
NOTE - Wait while the server checks your enrollment details.
HOL-1957-04-UEM
Page 223HOL-1957-04-UEM

Workspace ONE Application Launch
Since our Workspace ONE UEM and VMware Identity Manager environments are linkedfor this environment, the Workspace ONE Application will automatically open afterenrollment is complete. You will not need it for this exercise, so click Close.
HOL-1957-04-UEM
Page 224HOL-1957-04-UEM

Finish the Workspace ONE UEM Enrollment Process
Click Finish to end the Enrollment process. Your Windows 10 device is now successfullyenrolled into Workspace ONE UEM.
HOL-1957-04-UEM
Page 225HOL-1957-04-UEM

Confirm the aduser Certificate HasInstalledWe have configured few device profiles for you to automatically install the usercertificate you will need for this lab. In this section, we are going to validate if that usercertificate is installed on your Windows 10 device or not before proceeding.
Check the Device Details for the Certificate Profile Status
In the Workspace ONE UEM Console,
1. Click Devices2. Click List View3. Click the device link for the enrolled device.
HOL-1957-04-UEM
Page 226HOL-1957-04-UEM
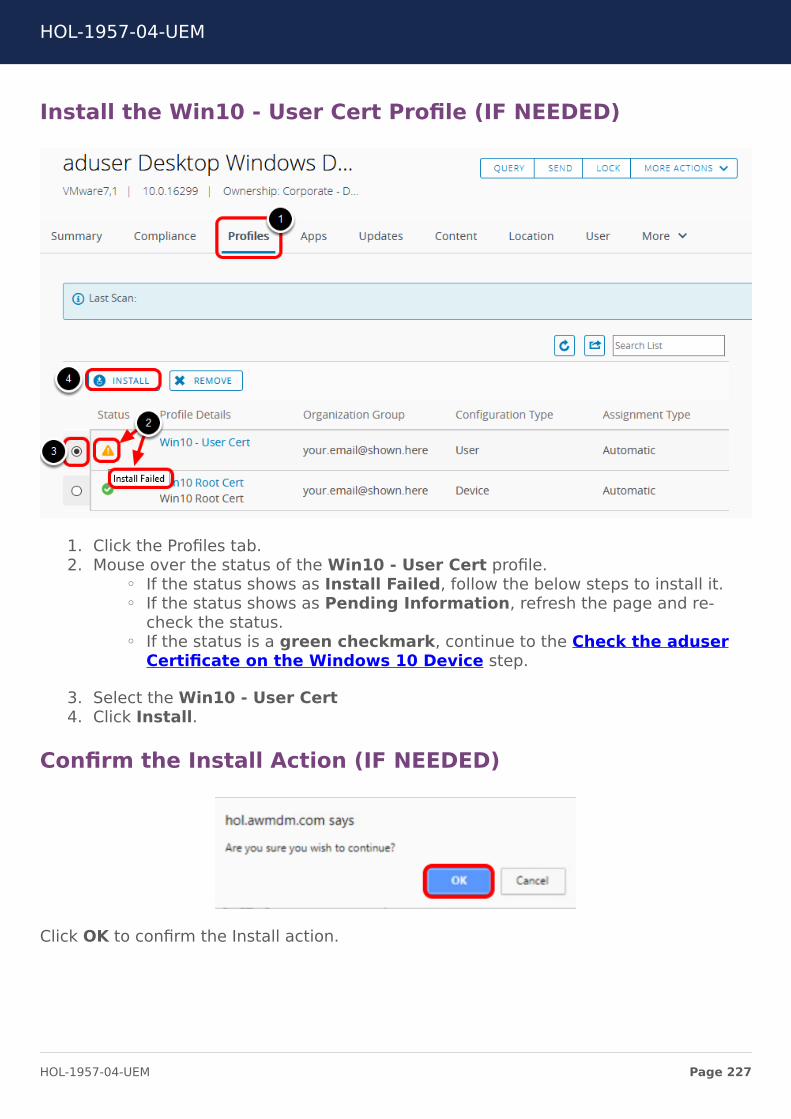
Install the Win10 - User Cert Profile (IF NEEDED)
1. Click the Profiles tab.2. Mouse over the status of the Win10 - User Cert profile.
◦ If the status shows as Install Failed, follow the below steps to install it.◦ If the status shows as Pending Information, refresh the page and re-
check the status.◦ If the status is a green checkmark, continue to the Check the aduser
Certificate on the Windows 10 Device step.
3. Select the Win10 - User Cert4. Click Install.
Confirm the Install Action (IF NEEDED)
Click OK to confirm the Install action.
HOL-1957-04-UEM
Page 227HOL-1957-04-UEM

Ensure the Win10 - User Cert Profile Installs (IF NEEDED)
If you needed to install the Win10 - User Cert profile, follow these steps. Otherwise,continue to the next step.
1. Click Refresh.2. Check the status of the Win10 - User Cert profile, it should update about every
1-2 minutes. If the Status is not a green checkmark, refresh until the installcompletes.
NOTE - Mouse over the icon in the Status column to see the current status. Ifyou see the Yellow Warning sign respond with "Install Failed", select theWin10 - User Cert and click Install again to restart the install process.
HOL-1957-04-UEM
Page 228HOL-1957-04-UEM

Check the aduser Certificate on the Windows 10 Device
1. Click the Windows button.2. Type user certificates and the Search bar will populate.3. Click the Manage user certificates option.
HOL-1957-04-UEM
Page 229HOL-1957-04-UEM

Allow the Microsoft Management Console to make changes
Click Yes when asked if you want to allow this app to make changes to your device.
Confirm the aduser Certificate Has Installed
1. Click the Personal folder to expand it.2. Click the Certificates folder.3. Check if the aduser certificate exists.
HOL-1957-04-UEM
Page 230HOL-1957-04-UEM

4. If the aduser certificate does NOT exist, wait a minute or two and click theRefresh button to check again. Continue to refresh until you see that theaduser certificate exists.
Do not continue to the next step until you've confirm that the aduser certificate hasbeen installed.
NOTE - Due to lab scalability and limitations, the aduser certificate may take afew minutes to download from the CA.
HOL-1957-04-UEM
Page 231HOL-1957-04-UEM

Compliance with Workspace ONEIn this section, we are going to create a Compliance Policy and validate both thecompliant and non-compliant states on our Windows 10 device to show how you cancontrol access to apps and services by requiring devices to remain within compliance.
View Conditional Access Flow After Enrollment
Now that our Windows 10 device is enrolled, let's sign in to Workspace ONE again andsee how the authentication flow has changed. We will validate that the Windows 10device is able to login to the Workspace ONE app after enrollment but prior to adding ina Compliance Policy.
HOL-1957-04-UEM
Page 232HOL-1957-04-UEM

Login to the Workspace ONEApplication
1. Click the Windows button.2. Click the Workspace ONE app icon from the start menu.
HOL-1957-04-UEM
Page 233HOL-1957-04-UEM

Enter the Workspace ONE Server Address (IF NEEDED)
1. Enter https://cn1193-2057-ws1win.vidmpreview.com for the Server Address field.2. Click Continue.
HOL-1957-04-UEM
Page 234HOL-1957-04-UEM

Enter Your Username for Workspace ONE
1. Enter aduser for the username.2. Click Next.
Allow Access to Credentials
Click Allow to allow access to your private key.
NOTE - The user will only be prompted once for this permission.
HOL-1957-04-UEM
Page 235HOL-1957-04-UEM

NOTE - If you receive the "Access Denied. Certificate login failure." screen,please wait a few minutes and try to login again. The device may take severalminutes to receive the certificate due to scalability and lab networklimitations.
Enter the Workspace
Once the workspace is ready, click Enter.
HOL-1957-04-UEM
Page 236HOL-1957-04-UEM

Confirm Successful Login to theWorkspace ONE App
Upon successfully logging in, you will see the app catalog page of the Workspace ONEapp. For this exercise, no applications have been assigned to your user, so you will notsee any available applications.
Continue to the next step after confirming your login was successful.
HOL-1957-04-UEM
Page 237HOL-1957-04-UEM

Sign Out of the Workspace ONEApplication
1. Click the Workspace ONE App icon from the task bar.2. Click the User icon.3. Click Sign Out.
HOL-1957-04-UEM
Page 238HOL-1957-04-UEM

Confirm Sign Out
Click Sign Out
Close the Workspace ONE App
Click the Close button.
HOL-1957-04-UEM
Page 239HOL-1957-04-UEM

Create a Compliance RuleWe will now create another Compliance rule to cause our device to become non-compliant. This way, we can validate the flow in the scenario where device becomesnon-compliant.
Add a Compliance Policy
Back to the Workspace ONE UEM console in Chrome,
1. Click Devices.2. Click Compliance Policies.3. Click List View.4. Click Add.
HOL-1957-04-UEM
Page 240HOL-1957-04-UEM

Select Compliance Platform Type
Click on the Windows icon.
NOTE - Do NOT select Windows Rugged icon.
Select Compliance Device Type
HOL-1957-04-UEM
Page 241HOL-1957-04-UEM

Click on the Windows Desktop icon.
Select Encryption
1. Click the Rules dropdown and select Encryption.2. Select is not encrypted.3. Click Next.
HOL-1957-04-UEM
Page 242HOL-1957-04-UEM

Configure Additional Compliance Action
1. Select Profile from the Actions dropdown.2. Ensure Block/Remove All Profiles is selected.3. Click Next.
This Action will remove all profiles from the device immediately upon becoming non-compliant. However, it will leave the device enrolled so that all of the Profiles will be re-installed when the device comes back into compliance.
HOL-1957-04-UEM
Page 243HOL-1957-04-UEM

Create Compliance Assignment
1. Select All Devices ([email protected]) for the Assigned Groups.2. Click Next.
HOL-1957-04-UEM
Page 244HOL-1957-04-UEM

Activate the Compliance Rule
Click Finish & Activate.
Confirm Device is Non-Compliant
With the new Compliance Policy in place, we will now confirm that our device is showingas non-compliant. Because our enrolled Windows 10 device is not encrypted, and ourCompliance Policy requires devices to be encrypted, it will be marked as non-compliantonce the policy applies.
HOL-1957-04-UEM
Page 245HOL-1957-04-UEM

Navigate to Device List View
1. Click Devices2. Click List View
HOL-1957-04-UEM
Page 246HOL-1957-04-UEM

Confirm the Device Shows as Non-Compliant
1. You may need to scroll right to view the Compliance Status for your Windows10 device.
2. Confirm the Windows 10 device shows Non-Compliant for your enrolled device.This may take a few minutes as the compliance check run every 5 minutes.
3. If the device does not show Non-Compliant, click on the Refresh icon to refreshthe page.
NOTE - You may need to wait several minutes for the Compliance Check tocomplete since it runs every 5 minutes. Please continue to refresh every fewminutes until you see the device marked as Non-Compliant before proceeding.
HOL-1957-04-UEM
Page 247HOL-1957-04-UEM

Open the Microsoft Management Console
1. Click the Windows button.2. Enter user certificates and the Search bar will populate.3. Click the Manage user certificates option.
HOL-1957-04-UEM
Page 248HOL-1957-04-UEM

Allow the Microsoft Management Console to make changes
Click Yes when asked if you want to allow this app to make changes to your device.
Confirm the aduser Certificate is Removed
1. Click the Personal folder to expand it.2. Click the Certificates folder.3. Check if the aduser certificate still exists.4. If the aduser certificate exists, wait a few minutes and click the Refresh button
to check again. Continue to refresh until you see that the aduser certificate isno longer shown.
Do not continue to the next step until you've confirm that the aduser certificate hasbeen removed.
HOL-1957-04-UEM
Page 249HOL-1957-04-UEM

NOTE - Due to lab scalability and limitations, the aduser certificate may take afew minutes to be removed.
Launch the Workspace ONE App
Now that our Windows 10 device is showing as non-compliant, let us return to theWorkspace ONE app on the Windows 10 VM and see how the authentication flow haschanged for our non-compliant device.
Launch the Workspace ONE App
1. Click the Windows button.2. Click the Workspace ONE app icon from the start menu.
HOL-1957-04-UEM
Page 250HOL-1957-04-UEM

Enter the Workspace ONE Server Address (IF NEEDED)
Your Workspace ONE app may have already validated the workspace server URL. If youare prompted to enter a username rather than a workspace server URL, you can skipthis step.
1. The server address https://cn1193-2057-ws1win.vidmpreview.com should already be setwhen launching the Workspace ONE app, enter the value in the Server Addressfield if it is not already set.
2. Click Continue.
HOL-1957-04-UEM
Page 251HOL-1957-04-UEM

Enter Your Username for Workspace ONE
1. Enter aduser for the username.2. Click Next.
HOL-1957-04-UEM
Page 252HOL-1957-04-UEM

Confirm Authentication Failure
1. Confirm that authentication into the Workspace ONE app now fails.
The authentication fails because our encryption Compliance Policy was setup toremove all Profiles should the device become non-compliant. Since the Windows10 device we are testing from is not encrypted, the device became non-compliantonce the Compliance Check completed and so the Profile containing thecertificate used to login to the Workspace ONE portal was revoked. Without thecertificate, the user can no longer login to the Workspace ONE app.
2. Click the Close button to exit the Workspace ONE app.
HOL-1957-04-UEM
Page 253HOL-1957-04-UEM

Data Loss PreventionLet's take a look at how Workspace ONE UEM can help with Data Loss Prevention withyour Windows 10 devices. To limit the scope of this lab, we will be going through videos,rather than actual configurations.
Windows Information Protection (WIP), App Control, & Per-App VPN
Workspace ONE UEM can configure the Windows Information Protection, App Control,and Per-App VPN feature that is built into Windows 10. Please watch the video for ademonstration on configuration and it working on a device.
NOTE - You may need to scroll to the right to view the full screen button onthe video above.
BitLocker Encryption
With Workspace ONE UEM you able to configure BitLocker settings, please watch thevideo for a demonstration on configuration and it working on a device.
<div class="player-unavailable"><h1 class="message">An error occurred.</h1><div class="submessage"><ahref="http://www.youtube.com/watch?v=UQziuIwWTB8" target="_blank">Try watching this video on www.youtube.com</a>, or enableJavaScript if it is disabled in your browser.</div></div>
HOL-1957-04-UEM
Page 254HOL-1957-04-UEM

NOTE - You may need to scroll to the right to view the full screen button onthe video above.
<div class="player-unavailable"><h1 class="message">An error occurred.</h1><div class="submessage"><ahref="http://www.youtube.com/watch?v=Fa9RIJtCLP4" target="_blank">Try watching this video on www.youtube.com</a>, or enableJavaScript if it is disabled in your browser.</div></div>
HOL-1957-04-UEM
Page 255HOL-1957-04-UEM

Un-enrolling your Windows 10 DeviceIn this section, we are going to un-enroll our Windows 10 VM so that we can use it forother lab modules. We will delete the device record from the console, which will also un-enroll the device and remove all the apps and profiles that are pushed from WorkspaceONE UEM console, also known as managed content.
Delete Device from Workspace ONE UEM Console
From the Workspace ONE UEM Console,
1. Click on Devices2. Click on List View3. Select the check box next to your device friendly name.4. Click on More Actions5. Click on Delete Device
HOL-1957-04-UEM
Page 256HOL-1957-04-UEM

Enter Reason and Delete
1. Enter the reason as lab completed .2. Click on Delete
HOL-1957-04-UEM
Page 257HOL-1957-04-UEM

Validate DELETE IN PROGRESS...
1. You may see device friendly name changing to DELETE IN PROGRESS...2. Click on the Refresh Icon to validate if the device deletion is successful.
Ensure that device record is deleted
1. Use the Refresh Button if needed.2. Ensure that the device record is now deleted from the Workspace ONE UEM
console and you see the message No Records Found.
HOL-1957-04-UEM
Page 258HOL-1957-04-UEM

Navigate to Windows 10 Settings
1. Click on the Windows Icon2. Click on the gear icon to access Windows 10 Settings
Access Accounts Settings
From the Settings Menu, access Accounts
HOL-1957-04-UEM
Page 259HOL-1957-04-UEM

Validate That No Management Account Exists
1. Click on Access work or school2. Validate that you DO NOT see any account connected to AirWatchMDM.
NOTE - The CORP AD domain is the local domain in this lab and is not controlled byAirWatch Enrollment, so you will see this connection if your device is enrolled orunenrolled.
HOL-1957-04-UEM
Page 260HOL-1957-04-UEM

Remove the Compliance Policy
In the Workspace ONE UEM Console in Chrome,
1. Click Devices.2. Expand Compliance Policies.3. Click List View.4. Find the Encryption Compliance Policy and click the X button to remove it.
Confirm the Compliance Policy Removal
Click OK to delete the Compliance Policy.
HOL-1957-04-UEM
Page 261HOL-1957-04-UEM

Close Chrome to Clear Session Cookies
1. Return to your Chrome browser.2. Click the Close (X) button.
Workspace ONE saves your OAuth session details in cookies. Closing your browserensures your previous session cookies will be deleted and won't interfere with the anyadditional modules you take.
HOL-1957-04-UEM
Page 262HOL-1957-04-UEM

ConclusionIn this hands on lab, we explored how to configure many of the end-to-end securityfeatures, however, due to using VMs we were not able to fully test all of our securityconfigurations. Thus, below you will find an end-to-end demo of Windows 10management using Workspace ONE UEM many of the same security features weconfigured.
NOTE - You may need to scroll to the right to view the full screen button onthe video above.
<div class="player-unavailable"><h1 class="message">An error occurred.</h1><div class="submessage"><ahref="http://www.youtube.com/watch?v=kbY0fgpjXQQ" target="_blank">Try watching this video on www.youtube.com</a>, or enableJavaScript if it is disabled in your browser.</div></div>
HOL-1957-04-UEM
Page 263HOL-1957-04-UEM
Module 4 - ManageWindows 10 Policy with
Workspace ONE
HOL-1957-04-UEM
Page 264HOL-1957-04-UEM

IntroductionIn this module, you will learn about why you should start migrating from traditionalpolicy management to modern management of policies.
You will do the following in this module:
• Learn about challenges with traditional policy management and why Windows 10is different
• Learn about Configuration Service Providers (CSPs)• Learn about the VMware Policy Builder tool• Use the VMware Policy Builder tool to set CSPs on a Windows 10 device
HOL-1957-04-UEM
Page 265HOL-1957-04-UEM

Moving Policy to Modern ManagementWindows 10 is essentially a mobile operating system and should be managed in amodern way. Users are no longer tethered to physical office locations with domainjoined, always on corporate network systems. We need to be able to manage thesesystems over the air from anywhere, much like we do with our other mobile devicestoday. We will now review how Windows was managed traditionally, and how we canmanage policy in a modern way with Configuration Service Providers (CSPs).
Traditional Policy Management
Traditional policy management methodologies are based on Domain Joined, corporatenetwork tethered systems. This does not provide a lot of flexibility for the way that themobile workforce operates today. Microsoft Policy management has been around forover 25 years and has the following management methodologies today:
Group Policy (GPO)
• Centrally managed domain based policies• Over 4000 GPOs available, many very obscure• Can lead to long log in times• Can’t be easily retrieved unless logging in on corporate network• Must be domain members to receive group policy
Local Policy (LGPO)
• Distributed GPO management for non-domain joined machines• Can emulate GPO settings• Difficult to control as there is no centralized management
Modern Policy Management
Windows 10 is essentially a mobile operating system and can be managed over the airin the same way as your other mobile devices are. It has interfaces that allow settingswhich affect the registry and file system to be pushed over the air. These
HOL-1957-04-UEM
Page 266HOL-1957-04-UEM

Configuration Service Providers Overview
What is a CSP and why is it important?
Configuration Service Providers (CSP) are the interfaces used to read or set policies onthe Windows device.
CSP capabilities have continued to grow with each release of the Windows 10 operatingsystem. More capabilities can now be managed over the air using modern methodsreducing the dependency on traditional methods like the requirement to log on to thedomain network to get updated policies or the need to a desk at a branch location.Configuration on devices can be updated in real time ensuring security and complianceat all times.
How can I use a CSP?
The Workspace ONE UEM console allows admin to configure policies through Profiles.Those policies that are used often and across industries and provide easy configurationthrough the GUI. The admin can simply toggle switches or use the text fields to set upthese policies. The Workspace ONE UEM console also provides a Custom Settings profilethat is extensible to any custom xml that can be sent to the device leveraging the
HOL-1957-04-UEM
Page 267HOL-1957-04-UEM

existing infrastructure to securely communicate with the device. Admins can leveragethe Custom Settings profile to configure any CSP and publish those settings to devices.The xml used to configure a CSP which the Open Mobile Alliance Device Management(OMA DM) client in the operating system can understand parse to apply the appropriatesettings is called SyncML.
HOL-1957-04-UEM
Page 268HOL-1957-04-UEM

Policy Builder OverviewWe will be using the VMware Policy Builder in this lab to set custom policy on a Windows10 machine. Please read about the VMware Policy Builder and watch the video demobelow to understand more about how the tool works and why you should use it.
VMware Policy Builder
The Policy Builder is an easy to use tool that will save time and effort throughout yourjourney to modernize management of Windows 10 devices.
• The Policy Builder reduces the complexity to hand rolling xml that is difficult anderror-prone. Admins can use the easy form-based UI to generate or modify xml.
• The tool supports the configuration by operating system version reducing thechances of error if a specific node is not supported in the operating systemversion of the device receiving the xml.
• Support for configuring or modifying multiple CSPs at a time for yourconvenience.
• Policy Builder dynamically generates SyncML for nodes that you populate. Whichmakes it easy to edit as you go or delete whole nodes if they are no longernecessary. The corresponding block of SyncML is removed if a node has no value.
• The ability to generate GUIDs if needed to populate SyncML is included in thetool.
• An easy to use Filter helps avoid the need to scroll through the list to find the CSPrequired
• The tool is cloud-hosted and can be updated quickly and easily with new featuresand bug fixes greatly reducing turn around time.
Please watch the video demo below to understand more about the VMware PolicyBuilder
HOL-1957-04-UEM
Page 269HOL-1957-04-UEM

Why should I use Policy Builder?
The Policy Builder is an easy to use tool that will save time and effort throughout yourjourney to modernize management of Windows 10 devices.
• The Policy Builder reduces the complexity to hand rolling xml that is difficult anderror-prone. Admins can use the easy form-based UI to generate or modify xml.
• The tool supports the configuration by operating system version reducing thechances of error if a specific node is not supported in the operating systemversion of the device receiving the xml.
• Support for configuring or modifying multiple CSPs at a time for yourconvenience.
• Policy Builder dynamically generates SyncML for nodes that you populate. Whichmakes it easy to edit as you go or delete whole nodes if they are no longernecessary. The corresponding block of SyncML is removed if a node has no value.
• The ability to generate GUIDs if needed to populate SyncML is included in thetool.
• An easy to use Filter helps avoid the need to scroll through the list to find the CSPrequired
• The tool is cloud-hosted and can be updated quickly and easily with new featuresand bug fixes greatly reducing turn around time.
<div class="player-unavailable"><h1 class="message">An error occurred.</h1><div class="submessage"><ahref="http://www.youtube.com/watch?v=sg-tQ6iCn1Y" target="_blank">Try watching this video on www.youtube.com</a>, or enableJavaScript if it is disabled in your browser.</div></div>
HOL-1957-04-UEM
Page 270HOL-1957-04-UEM

Login to the Workspace ONE UEMConsoleTo perform most of the lab, you will need to login to the Workspace ONE UEM AdminConsole.
Launch Chrome Browser
Double-click the Chrome Browser on the lab desktop.
HOL-1957-04-UEM
Page 271HOL-1957-04-UEM

Authenticate to the Workspace ONE UEM Admin Console
The default home page for the browser is https://labs.awmdm.com. Enter yourWorkspace ONE UEM Admin Account information and click the Login button.
NOTE - If you see a Captcha, please be aware that it is case sensitive!
1. Enter your Username. This is your email address that you have associated withyour VMware Learning Platform (VLP) account.
2. Enter VMware1! for the Password field.3. Click the Login button.
NOTE - Due to lab restrictions, you may need to wait here for a minute or sowhile the Hands On Lab contacts the Workspace ONE UEM Hands On Labsserver.
HOL-1957-04-UEM
Page 272HOL-1957-04-UEM

Accept the End User License Agreement
NOTE - The following steps of logging into the Administration Console will onlyneed to be done during the initial login to the console.
You will be presented with the Workspace ONE UEM Terms of Use. Click the Acceptbutton.
HOL-1957-04-UEM
Page 273HOL-1957-04-UEM

Address the Initial Security Settings
After accepting the Terms of Use, you will be presented with a Security Settings pop-up. The Password Recovery Question is in case you forget your admin password andthe Security PIN is to protect certain administrative functionality in the console.
HOL-1957-04-UEM
Page 274HOL-1957-04-UEM

1. You may need to scroll down to see the Password Recovery Questions andSecurity PIN sections.
2. Select a question from the Password Recovery Question drop-down (defaultselected question is ok here).
3. Enter VMware1! in the Password Recovery Answer field.4. Enter VMware1! in the Confirm Password Recovery Answer field.5. Enter 1234 in the Security PIN field.6. Enter 1234 in the Confirm Security PIN field.7. Click the Save button when finished.
Close the Welcome Message
HOL-1957-04-UEM
Page 275HOL-1957-04-UEM

After completing the Security Settings, you will be presented with the Workspace ONEUEM Console Highlights pop-up.
1. Click on the Don't show this message on login check box.2. Close the pop-up by clicking on the X in the upper-right corner.
HOL-1957-04-UEM
Page 276HOL-1957-04-UEM

Connect to the Windows 10 VMWe have provided you a Windows 10 VM to complete necessary steps for this lab.
Connect to the Windows 10 VM
Double-click the Win10-01a.rdp shortcut on the lab desktop.
If prompted, the login credentials for the Windows 10 VM are:
• Username: corp\holuser• Password: VMware1!
HOL-1957-04-UEM
Page 277HOL-1957-04-UEM

Modifying Internet Options forWindows EnrollmentBefore enrolling the Windows 10 Virtual Machine, we will make modifications to theWindows 10 device to reduce network traffic to expedite enrollment.
Open Settings
1. Click the Windows button.2. Click the Settings (Gear) icon.
HOL-1957-04-UEM
Page 278HOL-1957-04-UEM

Open Internet Options
1. Type Internet Options in the search bar.2. Click Internet Options from the results list.
HOL-1957-04-UEM
Page 279HOL-1957-04-UEM

Modify the Certificate Revocation Options
1. Click the Advanced tab.2. Scroll down to find the Security section.3. Uncheck the Check for publisher's certification revocation option.4. Uncheck the Check for server certificate revocation option.5. Click Apply.6. Click OK.
HOL-1957-04-UEM
Page 280HOL-1957-04-UEM

Open PowerShell as Administrator
1. Right-Click the Windows button.2. Click Windows PowerShell (Admin).
HOL-1957-04-UEM
Page 281HOL-1957-04-UEM
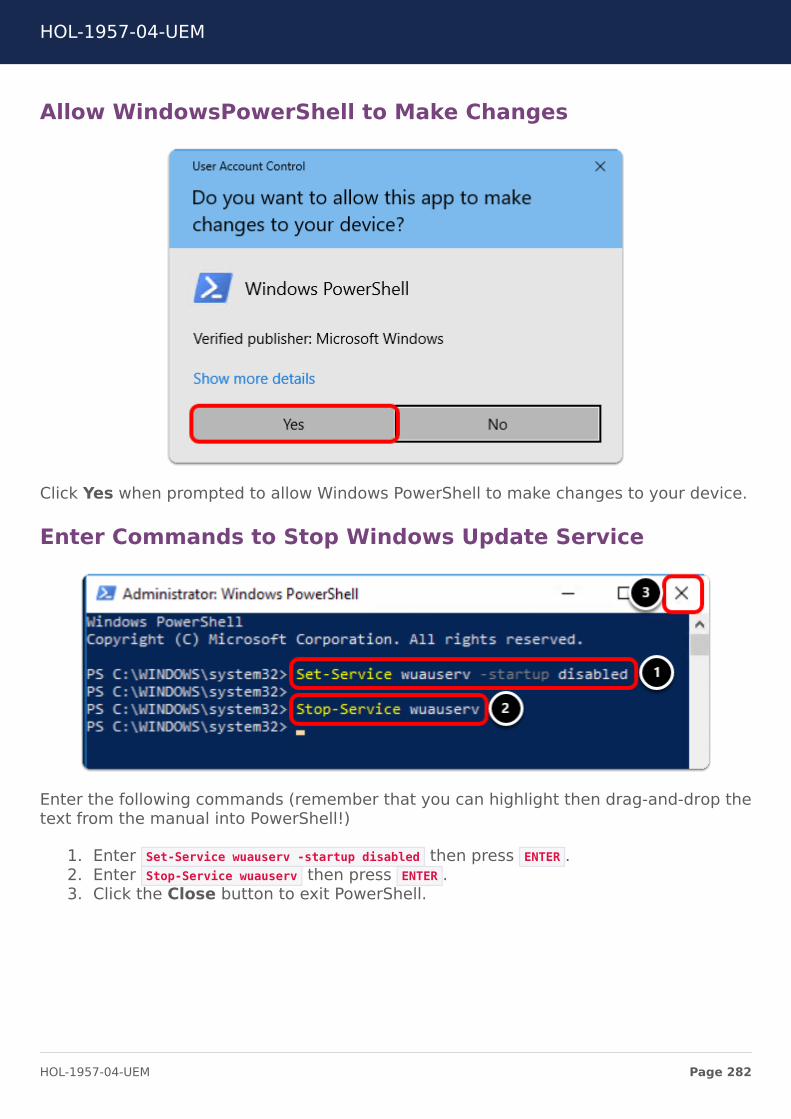
Allow WindowsPowerShell to Make Changes
Click Yes when prompted to allow Windows PowerShell to make changes to your device.
Enter Commands to Stop Windows Update Service
Enter the following commands (remember that you can highlight then drag-and-drop thetext from the manual into PowerShell!)
1. Enter Set-Service wuauserv -startup disabled then press ENTER .2. Enter Stop-Service wuauserv then press ENTER .3. Click the Close button to exit PowerShell.
HOL-1957-04-UEM
Page 282HOL-1957-04-UEM

Enrolling Your Windows 10 DeviceWe will now enroll our Windows 10 device in Workspace ONE UEM. First, we will need todownload the Workspace ONE Intelligent Hub.
Download the Workspace ONE Intelligent Hub on theWindows 10 VM
From a new tab in the browser, if not opened already,
1. Enter https://www.getwsone.com in the navigation bar and press Enter .
HOL-1957-04-UEM
Page 283HOL-1957-04-UEM

2. Click Download Hub for Windows 10.NOTE: Please wait while the Workspace ONE Intelligent Hub installer finishesdownloading.
3. Click Keep when warned about the AirWatchAgent.msi download.
NOTE - If you do not see the warning about the AirWatchAgent.msi file, skipthis and continue to the next step.
Launch the Workspace ONE Intelligent Hub Installer
Click the AirWatchAgent.msi file in your download bar.
NOTE - The installer may take a few seconds to launch, please be patient afterclicking the AirWatchAgent.msi file.
Click Run
Click Run to proceed with the installation.
HOL-1957-04-UEM
Page 284HOL-1957-04-UEM

Accept the Default Install Location
Leave the default install location and click Next.
NOTE - The Next button may take several seconds to enable while therequired additional features are installed.
HOL-1957-04-UEM
Page 285HOL-1957-04-UEM

Accept the License Agreement
1. Select I accept the terms of the license agreement.2. Click Next.
HOL-1957-04-UEM
Page 286HOL-1957-04-UEM

Start the Workspace ONE Intelligent Hub Install
Click Install to start the installer.
HOL-1957-04-UEM
Page 287HOL-1957-04-UEM

Allow the Workspace ONE Intelligent Hub Installer to Run(IF NEEDED)
If prompted to allow the app to make changes on your device, click Yes.
HOL-1957-04-UEM
Page 288HOL-1957-04-UEM

Complete the Workspace ONE Intelligent Hub Installer
Click Finish to complete the Workspace ONE Intelligent Hub installer.
NOTE - After clicking finish, the Native Enrollment application will launch toguide you through enrolling into Workspace ONE UEM. It will take around45-60 seconds to launch the agent.
HOL-1957-04-UEM
Page 289HOL-1957-04-UEM

Enroll Your Windows 10 Device Using the Workspace ONEIntelligent Hub
Click Server Detail.
Find your Group ID from Workspace ONE UEM Console
HOL-1957-04-UEM
Page 290HOL-1957-04-UEM

The first step is to make sure you know what your Organization Group ID is.
1. To find the Group ID, hover your mouse over the Organization Group tab at thetop of the screen. Look for the email address you used to log in to the lab portal.
2. Your Group ID is displayed at the bottom of the Organization Group pop up.
Enter the Server Details
1. Enter labs.awmdm.com for the Server Name field.2. Enter Your Group ID for the Group ID field. If you forgot your Group ID, check
the previous steps on how to retrieve it.
HOL-1957-04-UEM
Page 291HOL-1957-04-UEM

Enter Your User Credentials
1. Enter aduser in the Username field.2. Enter VMware1! in the Password field.3. Click Next
NOTE - Wait while the server checks your enrollment details.
HOL-1957-04-UEM
Page 292HOL-1957-04-UEM

Workspace ONE Application Launch
Since our Workspace ONE UEM and VMware Identity Manager environments are linkedfor this environment, the Workspace ONE Application will automatically open afterenrollment is complete. You will not need it for this exercise, so click Close.
HOL-1957-04-UEM
Page 293HOL-1957-04-UEM

Finish the Workspace ONE UEM Enrollment Process
Click Finish to end the Enrollment process. Your Windows 10 device is now successfullyenrolled into Workspace ONE UEM.
HOL-1957-04-UEM
Page 294HOL-1957-04-UEM

Return to the Main Console
Click the Close (X) button to return to the Main Console to complete the upcomingsteps.
HOL-1957-04-UEM
Page 295HOL-1957-04-UEM

Review the Enrolled Device
Back in the Workspace ONE UEM Console,
1. Click on Devices.2. Click List View.3. Confirm that the recently enrolled Windows 10 device is present.
HOL-1957-04-UEM
Page 296HOL-1957-04-UEM

Review the VMware Policy BuilderWe will now open and review the VMware Policy Builder.
Open the link to VMware Policy Builder
On the desktop of the Main Console, double-click the Policy Builder shortcut to openthe VMware Policy Builder
Sign up for a My VMware Account (Optional)
If you already have a My VMware account, please skip ahead to the Log into theVMware Policy Builder step.
If you currently don't have a My VMware account, you will need to sign up for one inorder to access the Policy Builder.
You need to sign in with a My VMware account in order to access the PolicyBuilder!
If you don't currently have a My VMware account, follow the next steps to signup for one. https://my.vmware.com/web/vmware/registration
If you believe you have a VMware account, but you are not sure of thepassword, go to the following link to reset your password:https://my.vmware.com/web/vmware/forgot-password
Both of these options will be detailed in following optional steps.
HOL-1957-04-UEM
Page 297HOL-1957-04-UEM

HOL-1957-04-UEM
Page 298HOL-1957-04-UEM

Click the Sign up for an account link or go to: https://my.vmware.com/web/vmware/registration
Register for My VMware Account
Enter the following required information
1. Email Address you want to use - you will need access to this email addressduring the lab to retrieve the activation code
2. Verify the Email Address3. Enter a Password with at least 6 characters4. Verify the Password5. Enter your First Name6. Enter your Last Name7. Select if you are a VMware Partner or not on the radio button
HOL-1957-04-UEM
Page 299HOL-1957-04-UEM

Register for My VMware Account (continued)
Continue entering in the required information:
1. Select a Department2. Select a Job Role3. Enter a Business Phone Number4. Select a Preferred Language5. Enter your Company Name6. Select your Industry7. Enter your Company Address8. Enter the City of your Company9. Enter the zip or postal code of your Company
HOL-1957-04-UEM
Page 300HOL-1957-04-UEM

Enter the Captcha Code
Enter the Captcha code shown in the box.
NOTE - Please match the captcha visible on your screen and not the manual.
Accept the My VMware Terms of Use
Continue entering in the required information:
HOL-1957-04-UEM
Page 301HOL-1957-04-UEM

1. Review the My VMware Terms of Use2. Check the box indicating you agree to the Terms of Use3. Uncheck the box indicating you would like to receive email communications4. Click the Continue button
Check your Email Account
You will receive an activation email next. If you don't receive it in a few minutes, youcan click the Resend Email button
HOL-1957-04-UEM
Page 302HOL-1957-04-UEM

Activate your new My VMware Account
When you get the activation email, click the Activate Now button, you will now beredirected to an activation webpage.
HOL-1957-04-UEM
Page 303HOL-1957-04-UEM

Enter your My VMware Account Password
On the My VMware activation page,
1. Enter the password you entered when setting up your My VMware Account2. Click the Continue button
HOL-1957-04-UEM
Page 304HOL-1957-04-UEM

Confirm Your Login Was Successful
HOL-1957-04-UEM
Page 305HOL-1957-04-UEM

HOL-1957-04-UEM
Page 306HOL-1957-04-UEM

Your My VMware account is now verified and you can use it to log in to the VMwarePolicy Builder. We will log in to Policy Builder in the next step.
HOL-1957-04-UEM
Page 307HOL-1957-04-UEM

Log into the VMware Policy Builder
HOL-1957-04-UEM
Page 308HOL-1957-04-UEM

If you have a My VMware account do the following to log in.
1. Enter the email address you use for My VMware2. Enter the password for your My VMware account3. Click the Login button to log into the Policy Builder
Review the VMware Policy Builder
One you are logged in, take a few minutes to review the features of the VMware PolicyBuilder.
1. This link takes you back to the list of Configuration Service Providers which canbe configured via the tool.
2. One a CSP is selected, this link allows you to enter configuration parameters andhave the SyncML generated automatically.
3. When this link is clicked, you are taken to a page which allows you to paste inexisting SyncML which can be modified graphically.
4. This link allows you to generate a unique GUID and copy it to the clipboard.Some CSP configurations require a GUID to be passed in.
5. This is the list of supported Windows 10 operating systems. The CSPs are uniqueand specific to the OS version you are targeting.
HOL-1957-04-UEM
Page 309HOL-1957-04-UEM

6. This is the list of CSPs and associated DDF files. Device Description Framework(DDF) files contain the configuration details of a CSP in XML format.
We will use the VMware Policy Builder to create custom SyncML for Windows 10 profilesin Workspace ONE UEM in the next section.
HOL-1957-04-UEM
Page 310HOL-1957-04-UEM

Set a CSP with the VMware PolicyBuilderWe will now use the VMware Policy Builder to create and push custom policy to ourWindows 10 device.
Create a custom CSP for Desktop Background
We will now use the Personalization CSP in order to set the desktop background on yourWindows 10 system over the air. This is something that is routinely done throughtraditional group policy management.
Do the following to find and create a policy from the Personalization CSP
1. Click the CSPs tab.2. Make sure the CSP Baseline is set to Windows 10, 1709. This is the operating
system of our Windows 10 virtual machine in this lab.3. Enter person in the filter box, to filter on the Personalization CSP.4. Click the Check-Box next to Personalization to select this CSP for configuration.5. Click the Configure button to start the process of creating a custom policy from
this CSP.
HOL-1957-04-UEM
Page 311HOL-1957-04-UEM

Review the Configure Page
1. Click the Expand All button to expand all of the settings as defined in the DDFfile for the CSP.
2. Click the Collapse All button to collapse all of the settings as defined in the DDFfile for the CSP.
3. Click the Reset Form button to reset any settings you have made on the page.4. This is where you enter the configuration parameters.5. The SyncML is dynamically generated here when you enter configuration data.6. The Copy button will save any generated SyncML to the clipboard so it can be
pasted into a profile in the Workspace ONE UEM Console.
HOL-1957-04-UEM
Page 312HOL-1957-04-UEM

Configure CSP and copy the generated SyncML
1. Click Expand All if the options are collapsed.2. Enter c:\hol\vmware.jpg in the Desktop Image Url section.3. Notice the SyncML is generated for you dynamically including the configuration
data you entered.4. Click the Copy button to copy the SyncML. We will paste this into the Workspace
ONE UEM Console in the following steps.
Create Windows 10 Profile in Workspace ONE UEM
We will now create a custom device profile for Windows 10 containing the SyncML wejust generated. We will push it down to our Windows 10 system and then verify thesettings applied on the device.
HOL-1957-04-UEM
Page 313HOL-1957-04-UEM

Add Device Profile for Desktop Background in WorkspaceONE UEM
In the Workspace ONE UEM console,
1. Click Devices.2. Select Profiles.3. Select Add.4. Select Add Profile.
HOL-1957-04-UEM
Page 314HOL-1957-04-UEM

Select the Windows Platform
Click Windows.
Select the Windows Desktop Device Type
Click Windows Desktop.
HOL-1957-04-UEM
Page 315HOL-1957-04-UEM

Select the Context
Click Device Profile.
HOL-1957-04-UEM
Page 316HOL-1957-04-UEM

Enter the General Payload Details
1. Click the General payload tab.2. Enter Background Image as the name of the Profile.3. Select the All Devices ([email protected]) group for the Assigned
Groups.
HOL-1957-04-UEM
Page 317HOL-1957-04-UEM

Add the Custom Settings Payload
1. Scroll down to the bottom on the left pane.2. Click the Custom Settings payload tab.3. Click Configure
HOL-1957-04-UEM
Page 318HOL-1957-04-UEM

Configure the Custom Settings Payload
1. Right-click within the Custom Settings textbox and click Paste to paste theSyncML you copied earlier.
2. Ensure the SynML pasted successfully.3. Click Save & Publish.
HOL-1957-04-UEM
Page 319HOL-1957-04-UEM

Confirm Device Assignment and Publish
1. Review the device assignment. Your Windows 10 device you recently enrolledinto Workspace ONE should be listed.
2. Click Publish to push the CSP down to your Windows 10 device.
Validate the CSP Profile was Installed
Double-Click the Win10-01a.rdp file on the desktop to reconnect to the Windows 10virtual machine to validate the CSP Profile.
HOL-1957-04-UEM
Page 320HOL-1957-04-UEM

Review the Desktop Background
Notice that the desktop background is now set to a VMware logo. This was configuredvia the Personalization CSP and pushed to your Windows 10 device with Workspace ONEUEM.
NOTE - You will see this change as soon as the device checks in withWorkspace ONE UEM and the profile is installed. If you do not see the changeimmediately, try closing the Remote Desktop Connection session to thewin10-01a virtual machine and re-connecting.
HOL-1957-04-UEM
Page 321HOL-1957-04-UEM

Update an Existing CSP with VMwarePolicy BuilderIn this exercise, you will modify an existing SyncML which enables or disables Cortana.We will paste the SyncML into the VMware Policy Builder, modify the setting and then
create a Workspace ONE Device profile to disable Cortana on your Windows 10 system.
HOL-1957-04-UEM
Page 322HOL-1957-04-UEM

Review current search settings
1. Click the Search Bar.2. Validate that Cortana is enabled on the device.
Return to the Main Console
HOL-1957-04-UEM
Page 323HOL-1957-04-UEM

Click the Close (X) button on the remote desktop connection bar to end the session tothe Windows 10 device and return to the Main Console.
Return to the VMware Policy Builder
HOL-1957-04-UEM
Page 324HOL-1957-04-UEM

1. Click the Google Chrome icon from the Task Bar.2. Click the tab you previously opened to the VMware Policy Builder.
Modify Existing SyncML
1. Click the Modify tab.2. Drag-and-drop the below SynML into the SyncML pane. The VMware Policy
Builder will read the SyncML and show configuration information in the left pane.3. Expand Policy.4. Expand Device.5. Expand Config.6. Scroll down.
<Replace><CmdID>4bfee036-2523-413e-aba3-40102dbca0f5</CmdID><Item>
<Target><LocURI>./Device/Vendor/MSFT/Policy/Config/Experience/AllowCortana</LocURI>
</Target><Meta>
<Format xmlns="syncml:metinf">int</Format>
HOL-1957-04-UEM
Page 325HOL-1957-04-UEM

<Type>text/plain</Type></Meta><Data>1</Data>
</Item></Replace>
Modify the Allow Cortana Setting
1. Expand Experience2. Under Allow Cortana notice it is set to 1. That means Cortana is currently
enabled.
HOL-1957-04-UEM
Page 326HOL-1957-04-UEM

Disable Cortana and copy SyncML
1. Enter 0 under Allow Cortana2. Notice that the SyncML dynamically updated, and it now shows a 0 for the Data
attribute.3. Click the Copy button to copy the SyncML.
HOL-1957-04-UEM
Page 327HOL-1957-04-UEM

Create Profile in Workspace ONE to Disable Cortana
In the Workspace ONE UEM Console,
1. Click Devices.2. Expand Profiles & Resources.3. Click Profiles.4. Click Add.5. Click Add Profile.
Select the Windows Platform
HOL-1957-04-UEM
Page 328HOL-1957-04-UEM

Click Windows.
Select the Device Type
Click Windows Desktop.
Select the Context
Click Device Profile.
HOL-1957-04-UEM
Page 329HOL-1957-04-UEM

Setup the General Payload Details
1. Click the General payload tab.2. Enter Disable Cortana as the name.3. Select All Devices ([email protected]) for the Assigned Groups.
HOL-1957-04-UEM
Page 330HOL-1957-04-UEM

Enable the Custom Settings Payload
1. Scroll down to find the Custom Settings payload tab.2. Click the Custom Settings payload tab.3. Click Configure.
HOL-1957-04-UEM
Page 331HOL-1957-04-UEM

Configure the Custom Settings Payload
1. Right-click within the the Custom Settings textbox and click Paste to paste thecopied SyncML.
2. Confirm the SyncML pasted.3. Click Save & Publish.
HOL-1957-04-UEM
Page 332HOL-1957-04-UEM

View the Device Assignment and Publish
1. Review the device assignment. Your Windows 10 desktop which you recentlyenrolled into Workspace ONE should be listed.
2. Click the Publish button to push the CSP down to your Windows 10 device.
Validate the Search Settings CSP
HOL-1957-04-UEM
Page 333HOL-1957-04-UEM

Double-click the Win10-01a.rdp file on the desktop of the Main Console to log back into our Windows 10 device.
Review Search Settings
1. Click the Search Bar.2. Confirm that Cortana is disabled.
Cortana is now disabled and the system is using standard search. This exercise showshow you can modify modify and push down existing SyncML with the VMware PolicyBuilder.
HOL-1957-04-UEM
Page 334HOL-1957-04-UEM

Return to the Main Console
Click the Close (X) button to return to the Main Console to complete the upcomingsteps.
HOL-1957-04-UEM
Page 335HOL-1957-04-UEM

Un-enrolling your Windows 10 DeviceIn this section, we are going to un-enroll our Windows 10 VM so that we can use it forother lab modules. We will delete the device record from the console, which will also un-enroll the device and remove all the apps and profiles that are pushed from WorkspaceONE UEM console, also known as managed content.
Delete Device from Workspace ONE UEM Console
From the Workspace ONE UEM Console,
1. Click on Devices2. Click on List View3. Select the check box next to your device friendly name.4. Click on More Actions5. Click on Delete Device
HOL-1957-04-UEM
Page 336HOL-1957-04-UEM

Enter Reason and Delete
1. Enter the reason as "lab completed"2. Click on Delete
HOL-1957-04-UEM
Page 337HOL-1957-04-UEM

Validate DELETE IN PROGRESS...
1. You may see device friendly name changing to DELETE IN PROGRESS...2. Click on the Refresh Icon to validate if the device deletion is successful.
Ensure that device record is deleted
1. Use the Refresh Button if needed.2. Ensure that the device record is now deleted from the Workspace ONE UEM
console and you see the message No Records Found.
HOL-1957-04-UEM
Page 338HOL-1957-04-UEM

Navigate to Windows 10 VM
If you are not on Windows 10 VM, double-Click the Win10-01a.rdp file on the desktopto reconnect to the Windows 10 virtual machine
Navigate to Windows 10 Settings
1. Click on the Windows Icon2. Click on the gear icon to access Windows 10 Settings
HOL-1957-04-UEM
Page 339HOL-1957-04-UEM

Access Accounts Settings
From the Settings Menu, access Accounts
HOL-1957-04-UEM
Page 340HOL-1957-04-UEM

Validate That No Management Account Exists
1. Click on Access work or school2. Validate that you DO NOT see any account connected to device management or
other types.
HOL-1957-04-UEM
Page 341HOL-1957-04-UEM

ConclusionIn this module you have learned about why you should start moving from Traditional toModern Management and how you can use the VMware Policy Builder to generatecustom CSPs and you pushed them to your Windows 10 device.
HOL-1957-04-UEM
Page 342HOL-1957-04-UEM

Module 5 - MigratingDevices from SCCM
HOL-1957-04-UEM
Page 343HOL-1957-04-UEM

IntroductionIn this module, you will migrate devices from Microsoft System Center ConfigurationManager (SCCM) to VMware Workspace ONE using Workspace ONE AirLIft.
HOL-1957-04-UEM
Page 344HOL-1957-04-UEM

Introduction to Workspace ONE AirLiftVMware Workspace ONE AirLift is a fully supported tool to help ease the migration fromtraditional PCLM (PC Lifecycle Management) management with SCCM to modernmanagement with Workspace ONE UEM.
Why Co-Management?
• As customers move to Modern Management, traditional PCLM tools arechallenging
• Not every customer is 100% at Windows 10, and cannot take advantage ofModern Management
• Legacy Windows desktop Operating Systems (OS's) and Server OS’s need to bemanaged
• Most companies have had SCCM in place for over 20 years and it is deeplyembedded into business systems
• Not easy to just “rip off the band-aid”• May need SCCM to get to Windows 10• May need SCCM to upgrade Windows 7 to Windows 10• Can enroll devices into Workspace ONE with SCCM• Typical hardware refresh cycle is 3-5 years
Workspace ONE AirLift
HOL-1957-04-UEM
Page 345HOL-1957-04-UEM

Workspace ONE AirLift has the following features:
• Has detailed monitoring information on progress of enrollment and modernmanagement
• Runs as a web service and keeps SCCM and Workpace ONE in Sync• Allows mapping between SCCM device collections and Workspace ONE UEM
Smart Groups◦ Uses Tags in Workspace ONE UEM to map devices and groups to SCCM
Collections
• Allows migration of applications from SCCM to Workspace ONE• Allows enrollment of devices into Workspace ONE by creating SCCM deployments• Has detailed logging information
Pre-Requisites for AirLift
• Clean Windows operating systems which is Domain joined to the same Domain asthe SCCM server
◦ Windows 10 and Windows Server tested◦ 2 CPU and 4 GB RAM
• SCCM 2012R2 or later• SCCM permissions required
◦ Read Only Analyst for basic functionality◦ Privilege to create and deploy SCCM applications in order to build and
deploy a custom enrollment application◦ At least one SCCM Device Collection with at least one Windows 10 client
• Workspace ONE 9.5 or later
HOL-1957-04-UEM
Page 346HOL-1957-04-UEM

Connect to the SCCM ServerWe will be doing all of the AirLift configuration on the SCCM server.
Launch sccm-01a.rdp from the main desktop.
HOL-1957-04-UEM
Page 347HOL-1957-04-UEM

Login to the Workspace ONE UEMConsoleTo perform most of the lab, you will need to login to the Workspace ONE UEM AdminConsole.
Launch Chrome Browser
Double-click the Chrome Browser on the lab desktop.
HOL-1957-04-UEM
Page 348HOL-1957-04-UEM

Authenticate to the Workspace ONE UEM Admin Console
The default home page for the browser is https://labs.awmdm.com. Enter yourWorkspace ONE UEM Admin Account information and click the Login button.
NOTE - If you see a Captcha, please be aware that it is case sensitive!
1. Enter your Username. This is your email address that you have associated withyour VMware Learning Platform (VLP) account.
2. Enter VMware1! for the Password field.3. Click the Login button.
NOTE - Due to lab restrictions, you may need to wait here for a minute or sowhile the Hands On Lab contacts the Workspace ONE UEM Hands On Labsserver.
HOL-1957-04-UEM
Page 349HOL-1957-04-UEM

Accept the End User License Agreement
NOTE - The following steps of logging into the Administration Console will onlyneed to be done during the initial login to the console.
You will be presented with the Workspace ONE UEM Terms of Use. Click the Acceptbutton.
HOL-1957-04-UEM
Page 350HOL-1957-04-UEM

Address the Initial Security Settings
After accepting the Terms of Use, you will be presented with a Security Settings pop-up. The Password Recovery Question is in case you forget your admin password andthe Security PIN is to protect certain administrative functionality in the console.
HOL-1957-04-UEM
Page 351HOL-1957-04-UEM

1. You may need to scroll down to see the Password Recovery Questions andSecurity PIN sections.
2. Select a question from the Password Recovery Question drop-down (defaultselected question is ok here).
3. Enter VMware1! in the Password Recovery Answer field.4. Enter VMware1! in the Confirm Password Recovery Answer field.5. Enter 1234 in the Security PIN field.6. Enter 1234 in the Confirm Security PIN field.7. Click the Save button when finished.
Close the Welcome Message
HOL-1957-04-UEM
Page 352HOL-1957-04-UEM

After completing the Security Settings, you will be presented with the Workspace ONEUEM Console Highlights pop-up.
1. Click on the Don't show this message on login check box.2. Close the pop-up by clicking on the X in the upper-right corner.
HOL-1957-04-UEM
Page 353HOL-1957-04-UEM

Setup Workspace ONE AirLiftYou will now setup Workspace ONE AirLift, connecting it to both Workspace ONE UEMand Microsoft SCCM in order to support Co-Management of Windows 10 devices.
Retrieve the Workspace ONE UEM API Key
We now need to retrieve the admin REST API key from the Workspace ONE UEM Console.This key will be required by AirLift in order to connect to Workspace ONE UEM.
HOL-1957-04-UEM
Page 354HOL-1957-04-UEM

In the Workspace ONE UEM Console,
1. Click Groups & Settings.2. Click All Settings.
Copy the REST API Key
1. Expand System.2. Expand Advanced.3. Expand API.4. Select REST API.5. Select the API Key value for the AirWatchAPI service.6. Right-click and click Copy.
You will need this key in the upcoming steps for configuring AirLift.
HOL-1957-04-UEM
Page 355HOL-1957-04-UEM

Launch Workspace ONE AirLift
Double click the AirLift shortcut on the desktop of the SCCM server.
This will be the first time we are launching AirLift, so we will be asked to configureconnectivity to Workspace ONE UEM and SCCM.
Configure AirLift
We will now configure AirLift to connect to both Workspace ONE UEM and SCCM.
Configure AirLift for Workspace ONE
HOL-1957-04-UEM
Page 356HOL-1957-04-UEM

1. Enter https://labs.awmdm.com for the API URL.2. Select Same as API for the Console Address.3. Paste the API Key from your Workspace ONE tenant that you captured in the
previous step.4. Enter your email address that you have associated with your VMware
Learning Platform (VLP) account.5. Enter VMware1! for the Password field.6. Click the Continue button.
Configure AirLift for SCCM
1. Enter sccm-01a.corp.local for the SCCM Server2. Enter HOL for the Site Code3. Enter CORP as the Domain4. Enter Administrator as the Account5. Enter VMware1! as the Password6. Click the Submit button
Congratulations - you have successfully configured AirLift!
HOL-1957-04-UEM
Page 357HOL-1957-04-UEM

Review and Enable Co-Management inWorkspace ONE AirLift
The first time you launch AirLift, you will be taken to a getting started page with directlinks to different phases of Co-Management.
Click on Plan to start using AirLift. This will take us to the Collections screen.
HOL-1957-04-UEM
Page 358HOL-1957-04-UEM

Review Device Collections in AirLift and compare to SCCM
When AirLift connects to SCCM, it imports Device Collections from SCCM. Let's take alook at the information which AirLift has imported and compare it to what is in our SCCMserver.
1. Click the eye symbol to the right of Getting Started so that a \ is through it.This will prevent Getting Started from coming up each time we refresh the page.
2. Click on Collections, if you are not already there.3. Review the Collections that have already been imported into AirLift from SCCM.
Notice all of the Device Collections which are imported have at least one deviceassigned.
Open the SCCM Console
Click the SCCM Console icon from the taskbar to return to the SCCM Console.
HOL-1957-04-UEM
Page 359HOL-1957-04-UEM

Navigate to SCCM Device Collections
1. Click on Assets and Compliance.2. Click on Device Collections.3. Review and compare the list of collections in SCCM to what is in AirLift. Notice
they DO NOT match. This is because AirLift only imports Device Collections fromSCCM which contain Windows 10 devices.
HOL-1957-04-UEM
Page 360HOL-1957-04-UEM

Review Management of Collections in AirLift
Back in the AirLift Console in Chrome,
1. Click the checkbox next to the Win10 collection.2. You can Map, Enroll, and Manages devices in collections from these buttons. DO
NOT interface with these yet, you will be using them in upcoming steps to viewthe functionality.Map allows you to determine a Workspace ONE UEM Smart Group for thiscollection to belong to in order to enable Co-Management.Enroll is enabled once Co-Management is enabled for a Collection, and allowsyou to enroll devices into Workspace ONE UEM.Manage is enabled once Co-Management is enabled for a Collection, and allowsyou to view and manage the Smart Group that your collection is mapped to inWorkspace ONE UEM.
3. Data is refreshed from SCCM and Workspace ONE UEM on a schedule. You canclick this button to initiate an immediate refresh of Collection and Smart Groupdata.
4. Click the number (1) in the Devices column for the Win10 collection. This willopen a page with details on the devices in this collection.
HOL-1957-04-UEM
Page 361HOL-1957-04-UEM

Review your Windows 10 Machine
1. Review the machine in the Win10 collection. This is the Win10-01a VirtualMachine that is available to you for this lab.
2. Click the Collections link to return to the collections page.
Map the Win10 Collection
1. Click the checkbox for the Win10 collection to select it.2. Click Map.
When you click the Map button on a Collection, a list of available Workspace ONE UEMSmart Groups will be displayed, which you can choose from to map your devicecollections to enable Co-Management.
HOL-1957-04-UEM
Page 362HOL-1957-04-UEM

Map SCCM Collection to Workspace ONE Group
1. Enter AirLift for Workspace ONE Group.Notice that the AirLift group does not exist in the dropdown list of availableWorkspace ONE UEM Smart Groups. Entering in the name manually will have theAirLift Smart Group automatically created and mapped for Co-Management in theWorkspace ONE UEM Console.NOTE: If you had an existing Smart Group you wanted to use to map and enableCo-Management for, you could select that from the Workspace ONE Groupdropdown instead.
2. Click Save to have the Win10 Device Collection mapped to the AirLift SmartGroup in Workspace ONE UEM.
HOL-1957-04-UEM
Page 363HOL-1957-04-UEM

Confirming AirLift Smart Group Creation
1. After clicking save, a message from AirLift will confirm that the Smart Groupcreation and mapping is In Progress. This will update to a clickable link once itis completed.
2. Once completed, the Workspace Mapping will update to the AirLift Smart Groupand the Management column will reflect that the devices in this collection arenow Co-managed. Click the AirLift hyperlink, this will take you directly to theSmart Group in the Workspace ONE UEM Console.
NOTE - This process may take a few minutes to complete. If the page does not refreshautomatically, you can click the Refresh button on the browser or the Refresh buttonin AirLift to check if the task has completed after a few minutes!
HOL-1957-04-UEM
Page 364HOL-1957-04-UEM

AirLift Smart Group in Workspace ONE UEM Console
Notice that clicking the AirLift hyperlink in AirLift will automatically take you to the AirLiftSmart Group mapping in the Workspace ONE UEM Console.
Click the Edit icon next to the AirLift Smart Group.
HOL-1957-04-UEM
Page 365HOL-1957-04-UEM

View Smart Group
1. Scroll down to find the Tags section.2. Notice that a new custom tag is created with the format
Co_Mgmt:site_<SCCM_Site_Code>:<Device_Collection_ID>. This wasgenerated automatically from AirLift.
3. Click on the X to close this popup.
HOL-1957-04-UEM
Page 366HOL-1957-04-UEM

Review Workspace ONE AirLiftYou will now review additional features and settings of AirLift to familiarize yourself withthe console before upcoming exercises.
Review Devices in AirLift and Compare to SCCM
AirLift imports Windows 10 devices that are active SCCM Clients. Let's take a look atwhat AirLift has imported and compare it to SCCM.
In the AirLift Console in Chrome,
1. Click on Devices in AirLift.2. Review details on the device imported into AirLift.
HOL-1957-04-UEM
Page 367HOL-1957-04-UEM

Compare Imported Devices to SCCM Device List
1. Click the SCCM Console icon from the taskbar to return to the SCCM Console.2. Click on Assets and Compliance.3. Click on Devices.4. Review the list of devices in SCCM. Notice there is only one active SCCM client
that is running Windows 10. This is the system that was imported into AirLift.
HOL-1957-04-UEM
Page 368HOL-1957-04-UEM

Review Applications in AirLift and compare to SCCM
AirLift imports metadata on SCCM Applications and allows these applications to beimported via APIs to Workspace ONE UEM. This greatly simplifies the process ofmigrating applications to Workspace ONE without the need for repackaging.
Back in the AirLift Console in Chrome,
1. Click on Applications.2. Review the list of applications that have already been imported into AirLift.
HOL-1957-04-UEM
Page 369HOL-1957-04-UEM

Review Applications in SCCM
1. Click the SCCM Console icon from the task bar.2. Click on Software Library.3. Expand Application Management.4. Click Applications.5. Review the applications in SCCM - notice they match what was imported into
AirLift.
HOL-1957-04-UEM
Page 370HOL-1957-04-UEM

This module will not cover managing and migrating applications using AirLift in detail. Ifyou wish to learn more on this subject, refer to Module 6 - Migrating Applicationsfrom SCCM.
Review the AirLift Activity Log
The activity logs shows details of actions such as exporting applications, or settingWorkspace ONE or SCCM connection information.
In the AirLift Console in Chrome,
1. Click on Activity Log.2. Review the Activity Log details. Notice that the actions you have taken during
this exercise have been logged here for review. This section can be useful forrecalling past actions and troubleshooting.
HOL-1957-04-UEM
Page 371HOL-1957-04-UEM

Review the AirLift Settings
All of the account settings that were set during the initial launch of AirLift can bemodified in the Settings section. In addition, Enrollment settings are managed here.The enrollment section lets you build a custom enrollment package in SCCM or select anexisting one.
1. Click on Settings in AirLift.2. Review the Workspace ONE settings. These settings can be updated from here
if required.3. Scroll down to Enter connection information for System Center
Configuration Manager.
HOL-1957-04-UEM
Page 372HOL-1957-04-UEM

Review SCCM Connection Info
1. Review the SCCM settings. These settings can be updated from here if required.2. Scroll back up to the very top.
HOL-1957-04-UEM
Page 373HOL-1957-04-UEM

Review Enrollment Application
1. Click the Enrollment tab to manage enrollment settings.2. Select Yes for Use Existing Enrollment Application.3. You can select an existing SCCM application to use for enrollment.
DO NOT select anything for now, you will return to these settings when enrolling adevice in upcoming steps.
HOL-1957-04-UEM
Page 374HOL-1957-04-UEM

Review the AirLift Dashboard
The AirLift dashboard provides real-time information on your workloads which aremanaged by AirLift.
1. Click Dashboard.2. The Devices section shows the number of devices managed by Workspace ONE
UEM.3. The Applications section shows the number of applications managed by
Workspace ONE UEM.4. The Top Workloads section shows the highest workloads on enrolled systems.5. The Co-Management by Collection section shows the breakdown of SCCM and
Co-Management by collection.
Now that you are familiar with the overview of AirLift, the upcoming exercises will showhow to use AirLift to manage and enroll a device.
HOL-1957-04-UEM
Page 375HOL-1957-04-UEM

Setup a Profile in Workspace ONE UEMIn this exercise, you will create a profile in the Workspace ONE UEM Console to configureBitLocker. These policies will be deployed to our AirLift Co-Managed devices and will bereported to our AirLift Dashboard. This allows us to co-manage the devices in this SCCMcollection with AirLift and Workspace ONE UEM.
Create Windows 10 Profile for Devices
In the Workspace ONE UEM Console,
1. Click Devices.2. Expand Profiles & Resources.3. Click Profiles.4. Click Add.5. Click Add Profile.
HOL-1957-04-UEM
Page 376HOL-1957-04-UEM

Select the Windows Platform
Select Windows.
Select the Device Type
Select Windows Desktop.
HOL-1957-04-UEM
Page 377HOL-1957-04-UEM

Select the Context
Select Device Profile.
Configure the Profile General Payload
HOL-1957-04-UEM
Page 378HOL-1957-04-UEM

1. Enter BitLocker as the name of the profile.2. Select AirLift ([email protected]) for the Assigned Groups.
Enable the Encryption Payload
1. Select Encryption.2. Click Configure.
HOL-1957-04-UEM
Page 379HOL-1957-04-UEM

Configure the Encryption Payload
1. Select System Partition for Encrypted Volume.2. Select System Default for Encrypted Method.3. Click the checkbox next to Only encrypt used space during initial encryption.4. Select Password for the Authentication Mode.5. Enter 8 for the Minimum Password Length.6. Click Save & Publish.
HOL-1957-04-UEM
Page 380HOL-1957-04-UEM

Publish the Encryption Profile
Click Publish.
Confirm the BitLocker Profile
HOL-1957-04-UEM
Page 381HOL-1957-04-UEM

View the BitLocker profile you just created, and make sure it is assigned to the AirLiftgroup.
HOL-1957-04-UEM
Page 382HOL-1957-04-UEM

Enroll SCCM Devices in Workspace ONEUEM with AirLiftIn this exercise, you will configure a SCCM Enrollment application for your WorkspaceONE UEM tenant and then deploy the application to the AirLift Collection that you haveenabled for Co-Management.
Create Enrollment Application in AirLift
In the AirLift Console in Chrome,
1. Click Settings.2. Click Enrollment.3. Select No for Use Exiting Enrollment Application.
HOL-1957-04-UEM
Page 383HOL-1957-04-UEM

4. Enter Workspace ONE Enrollment .5. Select your VLP email address from the Organization Group dropdown.6. Enter StagingUser7. Enter VMware1!8. Enter labs.awmdm.com9. Check the Include Workspace ONE App option. This option will automatically
install the Workspace ONE app if it is not present on the device.10. Un-check the Include SCCM Integration Client option, this client is only
needed when using pre-1709 Windows 10 and pre-1710 SCCM.11. Click Show.
Copy the Agent Install Command Line
1. Click and drag and highlight the Agent Install Command Line.2. Right-click the highlighted text and click Copy.
You will modify and use this copied text in an upcoming step.
HOL-1957-04-UEM
Page 384HOL-1957-04-UEM

Enter the Enrollment Application Content Location
1. Enter \\SCCM-01A\SCCMPackages\WS1 for Content Location. The needed files have beenpre-staged at this location for your convenience.
2. Click Create.
Confirm Application Creation
Click Proceed.
HOL-1957-04-UEM
Page 385HOL-1957-04-UEM

Review and Modify Workspace ONE Enrollment Application
The following steps involving modifying the Workspace ONE Enrollment app are notneeded in production. However, you will need to update the install command-line forthis lab.
Update Install Command Line
1. Right-Click the Windows button.2. Click Search.3. Enter Notepad for the search.4. Click the Notepad application.
HOL-1957-04-UEM
Page 386HOL-1957-04-UEM

Paste the Copied Install Command Line Text
1. Click Edit.2. Click Paste.3. Click Format.4. Click Word Wrap to enable wrapping.
Locate the LGName property
You will need to update the LGNAME value in our copied install command line to matchyour Group ID from the Workspace ONE UEM Console. Continue to the next step to findthe Group ID value to use here.
HOL-1957-04-UEM
Page 387HOL-1957-04-UEM

Obtain your Group ID from the Workspace ONE UEMConsole
In the Workspace ONE UEM Console,
1. Click on your Organization Group name.2. Copy your Group ID value. In this example, the Group ID is yourid1234.
Update the LGNAME Value
Update the LGNAME value with your Group ID from the Workspace ONE UEM Console.DO NOT use yourid1234 as shown, be sure to use your own Group ID.
HOL-1957-04-UEM
Page 388HOL-1957-04-UEM

Copy the Updated Install Command Line Text
1. Click Edit.2. Click Select All.3. Click Edit.4. Click Copy.
HOL-1957-04-UEM
Page 389HOL-1957-04-UEM

Review and Modify Properties of Workspace ONEEnrollment Application
1. Click the SCCM Console icon from the task bar.2. Click Software Library.3. Expand Application Management.4. Click Applications.5. If you do not see the Workspace ONE Enrollment application in the list, you may
need to click the Refresh button.6. Right-Click the Workspace ONE Enrollment application.7. Click Properties.
HOL-1957-04-UEM
Page 390HOL-1957-04-UEM

Edit the Workspace ONE Enrollment Windows Installer
1. Click the Deployment Types tab.2. Select the Workspace ONE Enrollment - Windows Installer x64 (*.msi file).3. Click the Edit button.
HOL-1957-04-UEM
Page 391HOL-1957-04-UEM

Replace the Installation Program Command
1. Click the Programs tab.2. In the Installation program text box, remove ALL existing text and paste your
copied install command.3. Click OK.
HOL-1957-04-UEM
Page 392HOL-1957-04-UEM

Save the Deployment Types Changes
Click OK again to save your changes.
Enroll Members of the Win10 Collection into WorkspaceONE UEM
Now that we have create the Workspace ONE Enrollment app using AirLift and mappedour Win10 device collection to the AirLift Smart Group, we will leverage AirLift toautomatically onboard our Win10 collection devices into Workspace ONE UEM.
HOL-1957-04-UEM
Page 393HOL-1957-04-UEM

Enroll the Win10 Collection into Workspace ONE UEM
In the AirLift Console in Chrome,
1. Click Collections.2. Click the checkbox next to the Win10 collection.3. Click the Enroll button.
Confirm Devices Affected
Click the Enroll button to confirm the enrollment - notice 1 Device will be affected.
HOL-1957-04-UEM
Page 394HOL-1957-04-UEM

Review Enrollment Confirmation
Review enrollment confirmation, the devices in the Win10 collection have begunenrollment.
Review Enrollment Application Deployment in SCCM
Back in the SCCM Console, ensure the Workspace ONE Enrollment app is selected.
HOL-1957-04-UEM
Page 395HOL-1957-04-UEM

1. Click on the SCCM Console icon on the task bar.2. Ensure the Workspace ONE Enrollment app is still selected.3. Click on the Deployments tab.4. Notice there is a deployment which was created by AirLift. This deployment is
mandatory and automatic and targets the Win10 collection.
Return to the Main Console
Click the Close (X) button to return to the Main Console.
Connect to Windows 10 Device
Double-click the Win10-01a.rdp shortcut on the desktop of the Main Console.
Modify Internet Options for Windows Enrollment
Before enrolling the Windows 10 Virtual Machine, we will make a modification to preventissues with the Hands on Labs firewall causing a delay in the enrollment process.
HOL-1957-04-UEM
Page 396HOL-1957-04-UEM

Open Settings
1. Click the Windows button.2. Click the Settings (Gear) icon.
Open Internet Options
HOL-1957-04-UEM
Page 397HOL-1957-04-UEM

1. Type Internet Options in the search bar.2. Click Internet Options from the results list.
Modify the Certificate Revocation Options
1. Click the Advanced tab.2. Scroll down to find the Security section.3. Uncheck the Check for publisher's certification revocation option.4. Uncheck the Check for server certificate revocation option.5. Click Apply.6. Click OK.
HOL-1957-04-UEM
Page 398HOL-1957-04-UEM

Launch Configuration Manager
Double-click the Configuration Manager shortcut on the desktop of the Windows 10device.
Force policy update on SCCM Client
We will now force a policy retrieval cycle on the SCCM client in order to speed up theprocess of receiving the deployment and enrolling the device into Workspace ONE UEM.
1. Click the Actions tab.
HOL-1957-04-UEM
Page 399HOL-1957-04-UEM

2. Select Machine Policy Retrieval & Evaluation Cycle.3. Click the Run Now button.
Confirm the Cycle Prompt
Click OK to confirm the cycle may take several minutes to complete.
Monitor Enrollment into Workspace ONE
Watch for the AirWatch Enrollment icon on the desktop of the Windows 10 system.
The deployment will run automatically and should happen fairly quickly. If you watchthe desktop of the Windows 10 client, you will see the AirWatch Enrollment icon appearon the desktop. This means the enrollment process is is running. This process shouldonly take a few minutes at most to complete.
Verify via Software Center
Click the icon shortcut on the taskbar of the Windows 10 device to launch the SCCMSoftware Center.
HOL-1957-04-UEM
Page 400HOL-1957-04-UEM

Software Center
We can also verify that the deployment has been received on the Windows 10 client byreviewing the SCCM Software Center
1. Click the Applications tab.2. Notice the Workspace ONE Enrollment deployment has been received on the
Windows 10 client.
You don't need to run the deployment manually. It will execute automatically.
HOL-1957-04-UEM
Page 401HOL-1957-04-UEM

Enter Agent User Credentials
Since the install command line was setup to use a staging user account (namedStagingUser), you will now need to provide your user credentials as part of theenrollment.
1. Enter aduser for the Username.2. Enter VMware1! for the Password.3. Click Submit.
NOTE: The user is only prompted for credentials due to the architecture of this lab. Inreal deployments where the VMware Enterprise Systems Connector is installed at theCustomer organization group and has access to the domain controller, the user wouldnot need to enter credentials.
HOL-1957-04-UEM
Page 402HOL-1957-04-UEM

Login to the Workspace ONE UEMConsoleTo perform most of the lab, you will need to login to the Workspace ONE UEM AdminConsole.
Launch Chrome Browser
Double-click the Chrome Browser on the lab desktop.
HOL-1957-04-UEM
Page 403HOL-1957-04-UEM

Authenticate to the Workspace ONE UEM Admin Console
The default home page for the browser is https://labs.awmdm.com. Enter yourWorkspace ONE UEM Admin Account information and click the Login button.
NOTE - If you see a Captcha, please be aware that it is case sensitive!
1. Enter your Username. This is your email address that you have associated withyour VMware Learning Platform (VLP) account.
2. Enter VMware1! for the Password field.3. Click the Login button.
NOTE - Due to lab restrictions, you may need to wait here for a minute or sowhile the Hands On Lab contacts the Workspace ONE UEM Hands On Labsserver.
HOL-1957-04-UEM
Page 404HOL-1957-04-UEM

Accept the End User License Agreement
NOTE - The following steps of logging into the Administration Console will onlyneed to be done during the initial login to the console.
You will be presented with the Workspace ONE UEM Terms of Use. Click the Acceptbutton.
HOL-1957-04-UEM
Page 405HOL-1957-04-UEM

Address the Initial Security Settings
After accepting the Terms of Use, you will be presented with a Security Settings pop-up. The Password Recovery Question is in case you forget your admin password andthe Security PIN is to protect certain administrative functionality in the console.
HOL-1957-04-UEM
Page 406HOL-1957-04-UEM

1. You may need to scroll down to see the Password Recovery Questions andSecurity PIN sections.
2. Select a question from the Password Recovery Question drop-down (defaultselected question is ok here).
3. Enter VMware1! in the Password Recovery Answer field.4. Enter VMware1! in the Confirm Password Recovery Answer field.5. Enter 1234 in the Security PIN field.6. Enter 1234 in the Confirm Security PIN field.7. Click the Save button when finished.
Close the Welcome Message
HOL-1957-04-UEM
Page 407HOL-1957-04-UEM

After completing the Security Settings, you will be presented with the Workspace ONEUEM Console Highlights pop-up.
1. Click on the Don't show this message on login check box.2. Close the pop-up by clicking on the X in the upper-right corner.
HOL-1957-04-UEM
Page 408HOL-1957-04-UEM

Review and Validate the EnrolledWindows 10 DeviceYou will now review the enrolled Windows 10 device in the Workspace ONE UEM Consoleand AirLift Console to see how to confirm that the enrollment was successful. You willalso verify that the BitLocker profile you configured was delivered to the device.
Return to the Main Console
Click the Close (X) button on the Remote Desktop Connection to return to the MainConsole.
Connect to the SCCM Server
Launch sccm-01a.rdp from the main desktop.
HOL-1957-04-UEM
Page 409HOL-1957-04-UEM

Initiate Full Sync for AirLift
We will want to perform a real-time sync between AirLift and Workspace ONE UEM to seean updated dashboard.
In the AirLift Console in Chrome,
1. Click Settings.2. Scroll down to the bottom of the Account tab.3. Click Sync.
HOL-1957-04-UEM
Page 410HOL-1957-04-UEM

Review AirLift Dashboard
1. Click on the Dashboard link on the left pane of AirLift.2. Notice on the Top Workloads section, you see there is a client with Encryption
and Compliance Enabled.
Return to the Main Console
Click the Close (X) button to return to the Main Console.
HOL-1957-04-UEM
Page 411HOL-1957-04-UEM

Connect to Windows 10 Device
Double-click the Win10-01a.rdp shortcut on the desktop of the Main Console.
Review Enrolled Client in Workspace ONE UEM Console
In the Workspace ONE UEM Console,
1. Click Devices.2. Click List View.3. If you navigate to the Workspace ONE UEM Console quickly enough, you may see
that the device is enrolled to the StagingUser account. Shortly after enrollingyour user credentials for aduser, the device will show it is enrolled for aduserinstead. Click the device link to view the Device Details View.
HOL-1957-04-UEM
Page 412HOL-1957-04-UEM

Review Device Details
1. Notice the device is a member of the AirLift Workspace ONE Smart Group, due toenabling Co-Management.
2. Review the computer name, this matches what we seen earlier in the SCCM andAirLift console.
3. Notice the device has had the Co-Management tag added to it. This is the sametag that was added to the Workspace ONE AirLift Smart Group. This is whatenables synchronization between SCCM and Workspace ONE during Co-Management.
HOL-1957-04-UEM
Page 413HOL-1957-04-UEM

Verify BitLocker Profile is Pushed via AirLift Co-Management
The BitLocker Encryption dialog will pop up, indicating the device was enrolled intoWorkspace ONE UEM and that it is properly enabled for Co-Management.
1. Enter VMware1! for the password.2. Enter VMware1! for the password confirmation.3. Click the Encrypt button to start BitLocker encryption.
HOL-1957-04-UEM
Page 414HOL-1957-04-UEM

Close the VMware Workspace ONE App
The Workspace ONE Application will open automatically after enrollment.
Click the X to close the application. We don't use it during this exercise.
Validation Completed
Congratulations! You have successfully enrolled your Windows 10 device intoWorkspace ONE UEM using AirLift and validated a successful enrollment after pushing aBitLocker profile to the device!
HOL-1957-04-UEM
Page 415HOL-1957-04-UEM

ConclusionIn this module you have learned how to setup and use VMware Workspace ONE AirLIft tosetup Co-Management between SCCM and Workpace ONE. You have also learned howto automatically enroll SCCM devices into Workspace ONE using AirLift.
HOL-1957-04-UEM
Page 416HOL-1957-04-UEM

Module 6 - MigratingApplications from SCCM
HOL-1957-04-UEM
Page 417HOL-1957-04-UEM

IntroductionIn this module, you will migrate an application from Microsoft System CenterConfiguration Manager (SCCM) to Workspace ONE UEM using Workspace ONE AirLift
HOL-1957-04-UEM
Page 418HOL-1957-04-UEM

Enrolling Your Windows 10 Device(Optional)NOTE: You only need to perform the following steps if you did not completethe previous module (Module 5 - Migrating Devices from SCCM). Skip to thenext exercise if your Windows 10 system is already enrolled.
You will now enroll a Windows 10 device in Workspace ONE UEM. You will need toconnect to the Windows 10 virtual machine made available as part of the lab anddownload and run the Workspace ONE Intelligent Hub.
Connect to the Windows 10 Virtual Machine
Double-click the Win10-01a.rdp shortcut from the Main Console Desktop to connect tothe Windows 10 virtual machine.
Modify Internet Options for Windows Enrollment
Before enrolling the Windows 10 Virtual Machine, we will make a modification to preventissues with the Hands on Labs firewall causing a delay in the enrollment process.
HOL-1957-04-UEM
Page 419HOL-1957-04-UEM

Open Settings
1. Click the Windows button.2. Click the Settings (Gear) icon.
Open Internet Options
HOL-1957-04-UEM
Page 420HOL-1957-04-UEM

1. Type Internet Options in the search bar.2. Click Internet Options from the results list.
Modify the Certificate Revocation Options
1. Click the Advanced tab.2. Scroll down to find the Security section.3. Uncheck the Check for publisher's certification revocation option.4. Uncheck the Check for server certificate revocation option.5. Click Apply.6. Click OK.
HOL-1957-04-UEM
Page 421HOL-1957-04-UEM

Download the Workspace ONE Intelligent Hub on theWindows 10 VM
From a new tab in the browser, if not opened already,
1. Enter https://www.getwsone.com in the navigation bar and press Enter .2. Click Download.
NOTE: Please wait while the Workspace ONE Intelligent Hub installer finishesdownloading.
3. Click Keep when warned about the AirWatchAgent.msi download.
NOTE - If you do not see the warning about the AirWatchAgent.msi file, skipthis and continue to the next step.
HOL-1957-04-UEM
Page 422HOL-1957-04-UEM

Launch the Workspace ONE Intelligent Hub Installer
Click the AirWatchAgent.msi file in your download bar.
NOTE - The installer may take a few seconds to launch, please be patient afterclicking the AirWatchAgent.msi file.
Click Run
Click Run to proceed with the installation.
HOL-1957-04-UEM
Page 423HOL-1957-04-UEM

Accept the Default Install Location
Leave the default install location and click Next.
NOTE - The Next button may take several seconds to enable while therequired additional features are installed.
HOL-1957-04-UEM
Page 424HOL-1957-04-UEM

Accept the License Agreement
1. Select I accept the terms of the license agreement.2. Click Next.
HOL-1957-04-UEM
Page 425HOL-1957-04-UEM

Start the Workspace ONE Intelligent Hub Install
Click Install to start the installer.
HOL-1957-04-UEM
Page 426HOL-1957-04-UEM

Allow the Workspace ONE Intelligent Hub Installer to Run(IF NEEDED)
If prompted to allow the app to make changes on your device, click Yes.
HOL-1957-04-UEM
Page 427HOL-1957-04-UEM

Complete the Workspace ONE Intelligent Hub Installer
Click Finish to complete the Workspace ONE Intelligent Hub installer.
NOTE - After clicking finish, the Native Enrollment application will launch toguide you through enrolling into Workspace ONE UEM. It will take around45-60 seconds to launch the agent.
HOL-1957-04-UEM
Page 428HOL-1957-04-UEM

Enroll Your Windows 10 Device Using the Workspace ONEIntelligent Hub
Click Server Detail.
Find your Group ID from Workspace ONE UEM Console
HOL-1957-04-UEM
Page 429HOL-1957-04-UEM

The first step is to make sure you know what your Organization Group ID is.
1. To find the Group ID, hover your mouse over the Organization Group tab at thetop of the screen. Look for the email address you used to log in to the lab portal.
2. Your Group ID is displayed at the bottom of the Organization Group pop up.
Enter the Server Details
1. Enter labs.awmdm.com for the Server Name field.2. Enter Your Group ID for the Group ID field. If you forgot your Group ID, check
the previous steps on how to retrieve it.
HOL-1957-04-UEM
Page 430HOL-1957-04-UEM

Enter Your User Credentials
1. Enter aduser in the Username field.2. Enter VMware1! in the Password field.3. Click Next
NOTE - Wait while the server checks your enrollment details.
HOL-1957-04-UEM
Page 431HOL-1957-04-UEM

Workspace ONE Application Launch
Since our Workspace ONE UEM and VMware Identity Manager environments are linkedfor this environment, the Workspace ONE Application will automatically open afterenrollment is complete. You will not need it for this exercise, so click Close.
HOL-1957-04-UEM
Page 432HOL-1957-04-UEM

Finish the Workspace ONE UEM Enrollment Process
Click Finish to end the Enrollment process. Your Windows 10 device is now successfullyenrolled into Workspace ONE UEM.
Return to the Main Console
Click the Close (X) button on the Remote Desktop Connection bar to return to the MainConsole.
HOL-1957-04-UEM
Page 433HOL-1957-04-UEM

Connect to the SCCM Server
Double-click the sccm-01a.rdp shortcut from the Main Console Desktop to connect tothe SCCM Server.
HOL-1957-04-UEM
Page 434HOL-1957-04-UEM

Login to the Workspace ONE UEMConsoleTo perform most of the lab, you will need to login to the Workspace ONE UEM AdminConsole.
Launch Chrome Browser
Double-click the Chrome Browser on the lab desktop.
HOL-1957-04-UEM
Page 435HOL-1957-04-UEM

Authenticate to the Workspace ONE UEM Admin Console
The default home page for the browser is https://labs.awmdm.com. Enter yourWorkspace ONE UEM Admin Account information and click the Login button.
NOTE - If you see a Captcha, please be aware that it is case sensitive!
1. Enter your Username. This is your email address that you have associated withyour VMware Learning Platform (VLP) account.
2. Enter VMware1! for the Password field.3. Click the Login button.
NOTE - Due to lab restrictions, you may need to wait here for a minute or sowhile the Hands On Lab contacts the Workspace ONE UEM Hands On Labsserver.
HOL-1957-04-UEM
Page 436HOL-1957-04-UEM

Accept the End User License Agreement
NOTE - The following steps of logging into the Administration Console will onlyneed to be done during the initial login to the console.
You will be presented with the Workspace ONE UEM Terms of Use. Click the Acceptbutton.
HOL-1957-04-UEM
Page 437HOL-1957-04-UEM

Address the Initial Security Settings
After accepting the Terms of Use, you will be presented with a Security Settings pop-up. The Password Recovery Question is in case you forget your admin password andthe Security PIN is to protect certain administrative functionality in the console.
HOL-1957-04-UEM
Page 438HOL-1957-04-UEM

1. You may need to scroll down to see the Password Recovery Questions andSecurity PIN sections.
2. Select a question from the Password Recovery Question drop-down (defaultselected question is ok here).
3. Enter VMware1! in the Password Recovery Answer field.4. Enter VMware1! in the Confirm Password Recovery Answer field.5. Enter 1234 in the Security PIN field.6. Enter 1234 in the Confirm Security PIN field.7. Click the Save button when finished.
Close the Welcome Message
HOL-1957-04-UEM
Page 439HOL-1957-04-UEM

After completing the Security Settings, you will be presented with the Workspace ONEUEM Console Highlights pop-up.
1. Click on the Don't show this message on login check box.2. Close the pop-up by clicking on the X in the upper-right corner.
HOL-1957-04-UEM
Page 440HOL-1957-04-UEM

Setup Workspace ONE AirLiftYou will now setup Workspace ONE AirLift, connecting it to both Workspace ONE UEMand Microsoft SCCM in order to support Co-Management of Windows 10 devices.
Retrieve the Workspace ONE UEM API Key
We now need to retrieve the admin REST API key from the Workspace ONE UEM Console.This key will be required by AirLift in order to connect to Workspace ONE UEM.
HOL-1957-04-UEM
Page 441HOL-1957-04-UEM

In the Workspace ONE UEM Console,
1. Click Groups & Settings.2. Click All Settings.
Copy the REST API Key
1. Expand System.2. Expand Advanced.3. Expand API.4. Select REST API.5. Select the API Key value for the AirWatchAPI service.6. Right-click and click Copy.
You will need this key in the upcoming steps for configuring AirLift.
HOL-1957-04-UEM
Page 442HOL-1957-04-UEM

Launch Workspace ONE AirLift
Double click the AirLift shortcut on the desktop of the SCCM server.
This will be the first time we are launching AirLift, so we will be asked to configureconnectivity to Workspace ONE UEM and SCCM.
Configure AirLift
We will now configure AirLift to connect to both Workspace ONE UEM and SCCM.
Configure AirLift for Workspace ONE
HOL-1957-04-UEM
Page 443HOL-1957-04-UEM

1. Enter https://labs.awmdm.com for the API URL.2. Select Same as API for the Console Address.3. Paste the API Key from your Workspace ONE tenant that you captured in the
previous step.4. Enter your email address that you have associated with your VMware
Learning Platform (VLP) account.5. Enter VMware1! for the Password field.6. Click the Continue button.
Configure AirLift for SCCM
1. Enter sccm-01a.corp.local for the SCCM Server2. Enter HOL for the Site Code3. Enter CORP as the Domain4. Enter Administrator as the Account5. Enter VMware1! as the Password6. Click the Submit button
Congratulations - you have successfully configured AirLift!
HOL-1957-04-UEM
Page 444HOL-1957-04-UEM

Review and Enable Co-Management inWorkspace ONE AirLift
The first time you launch AirLift, you will be taken to a getting started page with directlinks to different phases of Co-Management.
Click on Plan to start using AirLift. This will take us to the Collections screen.
HOL-1957-04-UEM
Page 445HOL-1957-04-UEM

Review Device Collections in AirLift and compare to SCCM
When AirLift connects to SCCM, it imports Device Collections from SCCM. Let's take alook at the information which AirLift has imported and compare it to what is in our SCCMserver.
1. Click the eye symbol to the right of Getting Started so that a \ is through it.This will prevent Getting Started from coming up each time we refresh the page.
2. Click on Collections, if you are not already there.3. Review the Collections that have already been imported into AirLift from SCCM.
Notice all of the Device Collections which are imported have at least one deviceassigned.
Open the SCCM Console
Click the SCCM Console icon from the taskbar to return to the SCCM Console.
HOL-1957-04-UEM
Page 446HOL-1957-04-UEM

Navigate to SCCM Device Collections
1. Click on Assets and Compliance.2. Click on Device Collections.3. Review and compare the list of collections in SCCM to what is in AirLift. Notice
they DO NOT match. This is because AirLift only imports Device Collections fromSCCM which contain Windows 10 devices.
HOL-1957-04-UEM
Page 447HOL-1957-04-UEM

Review Management of Collections in AirLift
Back in the AirLift Console in Chrome,
1. Click the checkbox next to the Win10 collection.2. You can Map, Enroll, and Manages devices in collections from these buttons. DO
NOT interface with these yet, you will be using them in upcoming steps to viewthe functionality.Map allows you to determine a Workspace ONE UEM Smart Group for thiscollection to belong to in order to enable Co-Management.Enroll is enabled once Co-Management is enabled for a Collection, and allowsyou to enroll devices into Workspace ONE UEM.Manage is enabled once Co-Management is enabled for a Collection, and allowsyou to view and manage the Smart Group that your collection is mapped to inWorkspace ONE UEM.
3. Data is refreshed from SCCM and Workspace ONE UEM on a schedule. You canclick this button to initiate an immediate refresh of Collection and Smart Groupdata.
4. Click the number (1) in the Devices column for the Win10 collection. This willopen a page with details on the devices in this collection.
HOL-1957-04-UEM
Page 448HOL-1957-04-UEM

Review your Windows 10 Machine
1. Review the machine in the Win10 collection. This is the Win10-01a VirtualMachine that is available to you for this lab.
2. Click the Collections link to return to the collections page.
Map the Win10 Collection
1. Click the checkbox for the Win10 collection to select it.2. Click Map.
When you click the Map button on a Collection, a list of available Workspace ONE UEMSmart Groups will be displayed, which you can choose from to map your devicecollections to enable Co-Management.
HOL-1957-04-UEM
Page 449HOL-1957-04-UEM

Map SCCM Collection to Workspace ONE Group
1. Enter AirLift for Workspace ONE Group.Notice that the AirLift group does not exist in the dropdown list of availableWorkspace ONE UEM Smart Groups. Entering in the name manually will have theAirLift Smart Group automatically created and mapped for Co-Management in theWorkspace ONE UEM Console.NOTE: If you had an existing Smart Group you wanted to use to map and enableCo-Management for, you could select that from the Workspace ONE Groupdropdown instead.
2. Click Save to have the Win10 Device Collection mapped to the AirLift SmartGroup in Workspace ONE UEM.
HOL-1957-04-UEM
Page 450HOL-1957-04-UEM

Confirming AirLift Smart Group Creation
1. After clicking save, a message from AirLift will confirm that the Smart Groupcreation and mapping is In Progress. This will update to a clickable link once itis completed.
2. Once completed, the Workspace Mapping will update to the AirLift Smart Groupand the Management column will reflect that the devices in this collection arenow Co-managed. Click the AirLift hyperlink, this will take you directly to theSmart Group in the Workspace ONE UEM Console.
NOTE - This process may take a few minutes to complete. If the page does not refreshautomatically, you can click the Refresh button on the browser or the Refresh buttonin AirLift to check if the task has completed after a few minutes!
HOL-1957-04-UEM
Page 451HOL-1957-04-UEM

AirLift Smart Group in Workspace ONE UEM Console
Notice that clicking the AirLift hyperlink in AirLift will automatically take you to the AirLiftSmart Group mapping in the Workspace ONE UEM Console.
Click the Edit icon next to the AirLift Smart Group.
HOL-1957-04-UEM
Page 452HOL-1957-04-UEM

View Smart Group
1. Scroll down to find the Tags section.2. Notice that a new custom tag is created with the format
Co_Mgmt:site_<SCCM_Site_Code>:<Device_Collection_ID>. This wasgenerated automatically from AirLift.
3. Click on the X to close this popup.
HOL-1957-04-UEM
Page 453HOL-1957-04-UEM

Migrate Application from SCCM toWorkspace ONE UEM with AirLiftReview Applications in AirLift
AirLift imports metadata on SCCM Applications and allows these applications to beimported via APIs to Workspace ONE UEM. This greatly simplifies the process ofmigrating applications to Workspace ONE without the need for repackaging.
Back in the AirLift Console in Chrome,
1. Click on Applications.2. Review the list of applications that have already been imported into AirLift.
HOL-1957-04-UEM
Page 454HOL-1957-04-UEM

Review Applications in SCCM
1. Click the SCCM Console icon from the task bar.2. Click on Software Library.3. Expand Application Management.4. Click Applications.5. Review the applications in SCCM - notice they match what was imported into
AirLift.
HOL-1957-04-UEM
Page 455HOL-1957-04-UEM

Confirm Apps in SCCM are not available in Workspace ONEUEM
In the Workspace ONE UEM Console,
1. Click Apps & Books.2. Expand Applications.3. Click Native.4. Click the Internal tab.5. Confirm that the applications seen in AirLift and SCCM are currently unavailable in
the Workspace ONE UEM Console.
Managing Applications in AirLift
In the AirLift Console in Chrome,
1. Click the checkbox next to 7-Zip 17.01 (x64 edition).
HOL-1957-04-UEM
Page 456HOL-1957-04-UEM

2. Click on the informational tooltip. Notice we receive a validation warning sinceour app in SCCM is set for both system/user install context. AirLift tells us it willdefault to using Device context when exporting to Workspace ONE UEM.
3. Click the Export button to export an application from SCCM to Workspace ONEUEM.
Export Applications Confirmation
Click Export to confirm.
Viewing Exported App in Workspace ONE UEM Console
AirLift indicates when an application has been exported, then displays a link under theWorkspace Application column.
1. After the Application has been exported, the Status will change from Exporting toExported.
2. To manually check the status of the export, click the Refresh button.NOTE: The application may take several minutes to finish exporting.
3. Click the 7-Zip 17.01 (x64 edition) hyperlink, which takes you directly to theapp in the Workspace ONE UEM console.
HOL-1957-04-UEM
Page 457HOL-1957-04-UEM

Assign 7-Zip
Click Assign.
Assign and Publish the Application
Once we export the app to the Workspace ONE UEM console, all you have to do is assignthe app to devices. In this case, we will assign the app to our AirLift smart group whichwe mapped to our Win10 SCCM device collection.
Click Add Assignment.
HOL-1957-04-UEM
Page 458HOL-1957-04-UEM

Add Assignment
1. Select the AirLift smart group for the Assignment Group.2. Select Auto for the App Delivery Method.
HOL-1957-04-UEM
Page 459HOL-1957-04-UEM

Configure Assignment Policies
1. Scroll down to the Policies section.2. Select Enabled for Make App MDM Managed if User Installed.
NOTE: This option allows Workspace ONE UEM to assume management of anapplication that the user has already installed, allowing you to check forinstallation status and manage the application as necessary.
3. Click Add.
HOL-1957-04-UEM
Page 460HOL-1957-04-UEM

Update Assignment
Click Save & Publish.
HOL-1957-04-UEM
Page 461HOL-1957-04-UEM

Publish
Click Publish.
HOL-1957-04-UEM
Page 462HOL-1957-04-UEM

Connect to the Windows 10 VirtualMachine
Click the Close (X) button to return to the Main Console.
Connect to Windows 10 Virtual Machine
Double-click the Win10-01a.rdp shortcut on the desktop of the Main Console.
HOL-1957-04-UEM
Page 463HOL-1957-04-UEM

Confirm Application Install on Windows10 Device
1. Click the Windows button.2. Click the dropdown next to the 7-Zip folder.3. Confirm the 7-Zip File Manager.exe has installed on the device.4. You may also notice that the 7-Zip File Manager.exe has been added to the
Recently Added list at the top of the start menu.
HOL-1957-04-UEM
Page 464HOL-1957-04-UEM

This confirms that you were able to successfully export the application details fromSCCM, import the application into Workspace ONE UEM and then assign and install theapplication to your devices.
HOL-1957-04-UEM
Page 465HOL-1957-04-UEM

Login to the Workspace ONE UEMConsoleTo perform most of the lab, you will need to login to the Workspace ONE UEM AdminConsole.
Launch Chrome Browser
Double-click the Chrome Browser on the lab desktop.
HOL-1957-04-UEM
Page 466HOL-1957-04-UEM

Authenticate to the Workspace ONE UEM Admin Console
The default home page for the browser is https://labs.awmdm.com. Enter yourWorkspace ONE UEM Admin Account information and click the Login button.
NOTE - If you see a Captcha, please be aware that it is case sensitive!
1. Enter your Username. This is your email address that you have associated withyour VMware Learning Platform (VLP) account.
2. Enter VMware1! for the Password field.3. Click the Login button.
NOTE - Due to lab restrictions, you may need to wait here for a minute or sowhile the Hands On Lab contacts the Workspace ONE UEM Hands On Labsserver.
HOL-1957-04-UEM
Page 467HOL-1957-04-UEM

Accept the End User License Agreement
NOTE - The following steps of logging into the Administration Console will onlyneed to be done during the initial login to the console.
You will be presented with the Workspace ONE UEM Terms of Use. Click the Acceptbutton.
HOL-1957-04-UEM
Page 468HOL-1957-04-UEM

Address the Initial Security Settings
After accepting the Terms of Use, you will be presented with a Security Settings pop-up. The Password Recovery Question is in case you forget your admin password andthe Security PIN is to protect certain administrative functionality in the console.
HOL-1957-04-UEM
Page 469HOL-1957-04-UEM

1. You may need to scroll down to see the Password Recovery Questions andSecurity PIN sections.
2. Select a question from the Password Recovery Question drop-down (defaultselected question is ok here).
3. Enter VMware1! in the Password Recovery Answer field.4. Enter VMware1! in the Confirm Password Recovery Answer field.5. Enter 1234 in the Security PIN field.6. Enter 1234 in the Confirm Security PIN field.7. Click the Save button when finished.
Close the Welcome Message
HOL-1957-04-UEM
Page 470HOL-1957-04-UEM

After completing the Security Settings, you will be presented with the Workspace ONEUEM Console Highlights pop-up.
1. Click on the Don't show this message on login check box.2. Close the pop-up by clicking on the X in the upper-right corner.
HOL-1957-04-UEM
Page 471HOL-1957-04-UEM

Un-enrolling your Windows 10 DeviceIn this section, we are going to un-enroll our Windows 10 VM so that we can use it forother lab modules. We will delete the device record from the console, which will also un-enroll the device and remove all the apps and profiles that are pushed from WorkspaceONE UEM console, also known as managed content.
Delete Device from Workspace ONE UEM Console
From the Workspace ONE UEM Console,
1. Click on Devices2. Click on List View3. Select the check box next to your device friendly name.4. Click on More Actions5. Click on Delete Device
HOL-1957-04-UEM
Page 472HOL-1957-04-UEM

Enter Reason and Delete
1. Enter the reason as lab completed .2. Click on Delete
HOL-1957-04-UEM
Page 473HOL-1957-04-UEM

Validate DELETE IN PROGRESS...
1. You may see device friendly name changing to DELETE IN PROGRESS...2. Click on the Refresh Icon to validate if the device deletion is successful.
Ensure that device record is deleted
1. Use the Refresh Button if needed.2. Ensure that the device record is now deleted from the Workspace ONE UEM
console and you see the message No Records Found.
HOL-1957-04-UEM
Page 474HOL-1957-04-UEM
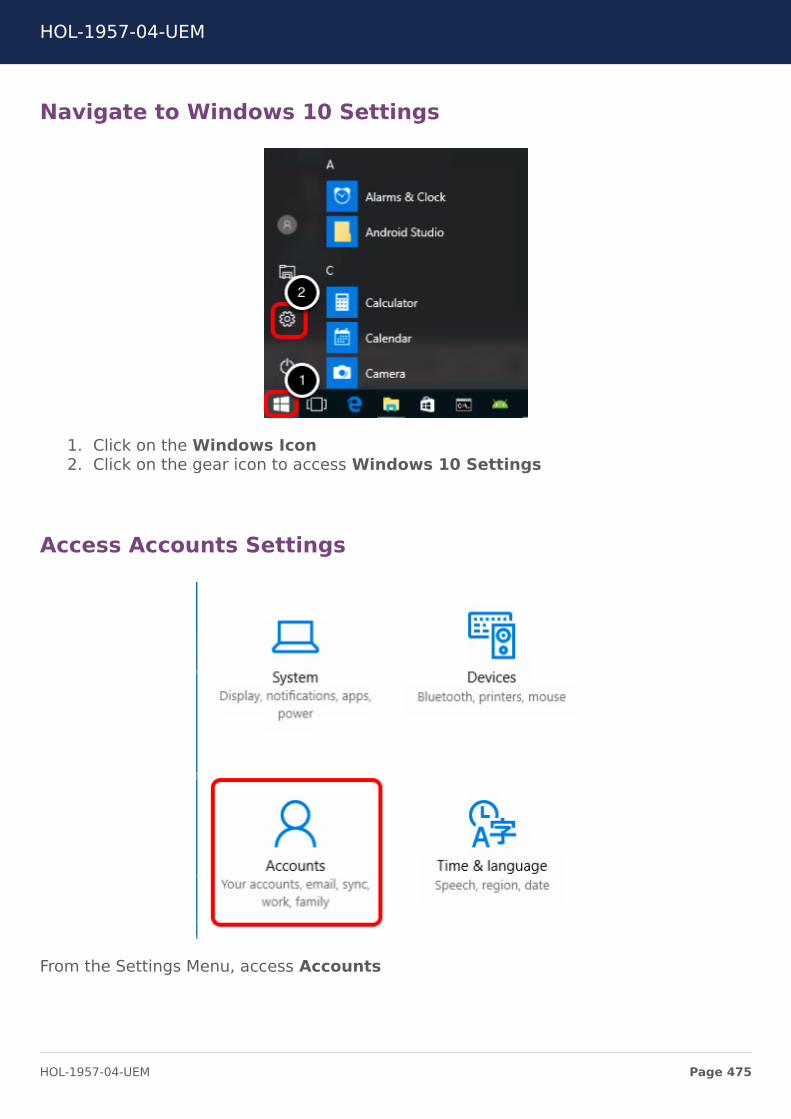
Navigate to Windows 10 Settings
1. Click on the Windows Icon2. Click on the gear icon to access Windows 10 Settings
Access Accounts Settings
From the Settings Menu, access Accounts
HOL-1957-04-UEM
Page 475HOL-1957-04-UEM

Validate That No Management Account Exists
1. Click on Access work or school2. Validate that you DO NOT see any account connected to AirWatchMDM.
NOTE - The CORP AD domain is the local domain in this lab and is not controlled byAirWatch Enrollment, so you will see this connection if your device is enrolled orunenrolled.
HOL-1957-04-UEM
Page 476HOL-1957-04-UEM

ConclusionThis module reviewed how to utilize AirLift to quickly migrate your desired applicationfrom SCCM to Workspace ONE UEM and how to deploy this application to your devicesand users.
HOL-1957-04-UEM
Page 477HOL-1957-04-UEM

Module 7 - MigratingGroup Policy Objects to
Workspace ONE UEM
HOL-1957-04-UEM
Page 478HOL-1957-04-UEM

IntroductionIn this module, you will migrate your Group Policy Objects (GPOs) to VMware AirWatchand assign those GPOs to users and devices.
This module contains the following lessons:
• Download and Run AirWatch GPO Migration Tool• Upload GPOs to AirWatch• Assign and Test GPO App Package• Enroll Windows 10 Device• Verify GPO App Package Installation
HOL-1957-04-UEM
Page 479HOL-1957-04-UEM

Connect to the SCCM Server
Double-click sccm-01a.rdp from the Main Console desktop.
NOTE - The files and resources required to complete this lab are on thesccm-01a server! Please ensure you connect and remain connected untilinstructed to change servers to complete the lab!
HOL-1957-04-UEM
Page 480HOL-1957-04-UEM

Login to the Workspace ONE UEMConsoleTo perform most of the lab, you will need to login to the Workspace ONE UEM AdminConsole.
Launch Chrome Browser
Double-click the Chrome Browser on the lab desktop.
HOL-1957-04-UEM
Page 481HOL-1957-04-UEM

Authenticate to the Workspace ONE UEM Admin Console
The default home page for the browser is https://labs.awmdm.com. Enter yourWorkspace ONE UEM Admin Account information and click the Login button.
NOTE - If you see a Captcha, please be aware that it is case sensitive!
1. Enter your Username. This is your email address that you have associated withyour VMware Learning Platform (VLP) account.
2. Enter VMware1! for the Password field.3. Click the Login button.
NOTE - Due to lab restrictions, you may need to wait here for a minute or sowhile the Hands On Lab contacts the Workspace ONE UEM Hands On Labsserver.
HOL-1957-04-UEM
Page 482HOL-1957-04-UEM

Accept the End User License Agreement
NOTE - The following steps of logging into the Administration Console will onlyneed to be done during the initial login to the console.
You will be presented with the Workspace ONE UEM Terms of Use. Click the Acceptbutton.
HOL-1957-04-UEM
Page 483HOL-1957-04-UEM

Address the Initial Security Settings
After accepting the Terms of Use, you will be presented with a Security Settings pop-up. The Password Recovery Question is in case you forget your admin password andthe Security PIN is to protect certain administrative functionality in the console.
HOL-1957-04-UEM
Page 484HOL-1957-04-UEM

1. You may need to scroll down to see the Password Recovery Questions andSecurity PIN sections.
2. Select a question from the Password Recovery Question drop-down (defaultselected question is ok here).
3. Enter VMware1! in the Password Recovery Answer field.4. Enter VMware1! in the Confirm Password Recovery Answer field.5. Enter 1234 in the Security PIN field.6. Enter 1234 in the Confirm Security PIN field.7. Click the Save button when finished.
Close the Welcome Message
HOL-1957-04-UEM
Page 485HOL-1957-04-UEM

After completing the Security Settings, you will be presented with the Workspace ONEUEM Console Highlights pop-up.
1. Click on the Don't show this message on login check box.2. Close the pop-up by clicking on the X in the upper-right corner.
HOL-1957-04-UEM
Page 486HOL-1957-04-UEM

Execute the AirWatch GPO MigrationToolThe bulk of this exercise will be completed from the SCCM Server, where we will utilizethe AirWatch GPO Migration Tool to deploy our modified local policies to other devices.
We will now execute the GPO Migration script to to deploy our modified local policiesto other devices via AirWatch.
The GPO Migration script has already been downloaded and included for you on theDesktop of your SCCM Server under the GPO Migration folder. Outside of the lab, thisscript is available for download at https://code.vmware.com/samples.
Setup the GPO Migration PowerShell Script
HOL-1957-04-UEM
Page 487HOL-1957-04-UEM

1. Click the File Explorer icon from the task bar.2. Click Documents.3. Click HOL.4. Click GPO Migration.5. Right-click the Migrate-GPO-AirWatch.ps1 file.6. Click Run with Powershell.
Note the LGPO.exe Requirement
1. Notice that the PowerShell terminal outputs a warning stating that the LGPO.exefile is required. LGPO.exe will be utilized to capture and package your localpolicies, so our first step will be to download the LGPO.exe from the provided link.
2. The link to the Microsoft Security Compliance Toolkit is available in the output foreasy reference.
3. Click Close for the Windows PowerShell window.
For the purposes of this exercise, the LGPO.exe file has already been downloaded foryou. You will now move the LGPO.exe file into the project folder as you would need todo when downloading the tool to meet the dependency requirements.
HOL-1957-04-UEM
Page 488HOL-1957-04-UEM

Copy the LGPO.exe File to the GPO Tool Folder
NOTE - The LGPO.exe file is only available on the sccm-01a server! If you arenot connected to the sccm-01a server, please refer to the instructions at thebeginning of the lab for how to connect and continue with these steps onceyou have connected!
1. Click the File Explorer icon from the task bar.2. Click Documents.3. Click HOL.4. Click LGPO.5. Right-click the LGPO.exe file.6. Click Copy.
HOL-1957-04-UEM
Page 489HOL-1957-04-UEM

Paste the LGPO.exe file in the GPO Migration Folder
1. Click the GPO Migration folder.2. Right-click within the folder and click Paste.
HOL-1957-04-UEM
Page 490HOL-1957-04-UEM

Execute the GPO Migration PowerShell Script After Setup
1. Confirm that the LGPO.exe file exists in the GPO Migration folder now alongsideMigrate-GPO-AirWatch.ps1.
2. Right-click the Migrate-GPO-Airwatch.ps1 file.3. Click Run with PowerShell.
Confirm GPO Migration PowerShell Script StartsSuccessfully
Once the LGPO.exe file is included, the GPO Migration script will initialize and presentthe Task selection input for further use. Confirm that you no longer see output
HOL-1957-04-UEM
Page 491HOL-1957-04-UEM

prompting for the LGPO.exe file to be included in the folder and then continue to thenext step.
Modify Local GPO Settings
Before proceeding, we will modify our local GPO so that we can capture and distributethese changes to other devices to confirm that our deploy was successful.
1. Right-click the Windows icon.2. Click Run.
Launch Local Group Policy Editor
HOL-1957-04-UEM
Page 492HOL-1957-04-UEM

You will launch the Local Group Policy Editor to make the policy changes.
1. Enter gpedit.msc .2. Click OK
Navigate to the Active Power Plan Settings
1. Click Computer Configuration.2. Click Administrative Templates.3. Click System.4. Click Power Management.5. Double-click the Select an Active Power Plan policy.
HOL-1957-04-UEM
Page 493HOL-1957-04-UEM

Select Active Power Plan
1. Select Enabled.2. Select High Performance as the Active Power Plan.3. Click OK.
We will use this local GPO as a reference on our enrolled devices to ensure that ourcaptured policies applied correctly.
HOL-1957-04-UEM
Page 494HOL-1957-04-UEM

Capture GPO Backups
1. Return to the PowerShell Terminal by clicking PowerShell icon on the task bar.2. At the Task prompt, enter 2 and press ENTER .3. Confirm that the output shows that the local GPO was captured after task
finishes.
View GPO Backups
From the PowerShell prompt, enter 1 and press ENTER to view the list of GPO backups.
HOL-1957-04-UEM
Page 495HOL-1957-04-UEM

Confirm Captured GPO Backup Displays
1. Any captured or copied GPO backups placed in the expected directory ( /GPOBackups ) are displayed here. Notice that the GPO backup you just took is availablein this list.
2. Click OK to close the window.
Using External GPO Backups
If you have previously captured GPO backups that you want to use with this tool, youcan include these in the /GPO Backups folder of the root directory of the GPO Migrationtool. Any GPO backups available in the /GPO Backups folder will display as selectableGPOs for Option 1 (Viewing GPOs) and option 3 (Uploading GPOs to AirWatch).
HOL-1957-04-UEM
Page 496HOL-1957-04-UEM

Copy the Existing Security GPO Backups
1. Click the File Explorer icon from the task bar.2. Click Documents.3. Click HOL.4. Click Security GPO Backups.5. Select all of the folders within the Security GPO Backups folder and right-click.6. Click Copy.
HOL-1957-04-UEM
Page 497HOL-1957-04-UEM

Paste the Security GPO Backups in the GPO Backups folder
1. Click GPO Migration.2. Click GPO Backups.3. Right-click within the GPO Backups folder.4. Click Paste to insert the Security GPO Backup folders that were previously
copied.
HOL-1957-04-UEM
Page 498HOL-1957-04-UEM

View GPO Backups from the Tool
1. Return to the PowerShell Terminal by clicking PowerShell icon on the task bar.2. At the Task prompt, enter 1 and press ENTER to view the list of available GPO
Backups again.
Confirm the Security GPO Backups Are Listed
HOL-1957-04-UEM
Page 499HOL-1957-04-UEM

1. Confirm that the 4 Security GPO Backups that were copied into the GPO Backupsfolder now display alongside the local GPO capture that was taken previously fora total of 5 GPO Backups.
2. Click OK to close the dialog.
HOL-1957-04-UEM
Page 500HOL-1957-04-UEM

Upload GPO Package to WorkspaceONE UEMWith a range of GPO backups now available, we can use the GPO migration tool toupload the package to Workspace ONE UEM for distribution. This exercise will coverselecting a GPO package to upload to the Workspace ONE UEM Console that we candistribute to our devices.
Uploading GPOs to Workspace ONE UEM
1. Return to the PowerShell terminal by clicking the PowerShell icon from the taskbar.
2. For the Task selection, enter 3 to Upload the GPO to AirWatch and press ENTER .3. Enter https://labs.awmdm.com for the awServer and press ENTER .4. Enter your email address for the awUsername and press ENTER . This is the
same username you used to login to the Workspace ONE UEM Console in previoussteps.
5. Enter VMware1! for the awPassword and press ENTER .
Continue to the next step for instructions on obtaining the remaining parameter valuesfrom the Workspace ONE UEM Console (awTenantAPIKey and awGroupID).
HOL-1957-04-UEM
Page 501HOL-1957-04-UEM

Navigate to the Workspace ONE UEM AdministrationConsole
1. Click Chrome icon from the task bar.2. From the Workspace ONE UEM Console, click Groups & Settings.3. Click All Settings.
HOL-1957-04-UEM
Page 502HOL-1957-04-UEM

Retrieve the REST API Key
1. Click System.2. Click Advanced.3. Click API.4. Click REST API.5. Click and drag or double-click to highlight the API Key text for the AirWatchAPI
service.6. Right-click and select Copy.7. Click Close to exit the REST API menu.
Paste the Copied API Key
HOL-1957-04-UEM
Page 503HOL-1957-04-UEM

1. Return to the PowerShell Terminal by clicking the PowerShell icon from the taskbar.
2. Paste the copied API Key for the awTenantAPIKey parameter by right-clicking,then press ENTER .
Retrieve the Organization Group Numerical ID
Return to the Workspace ONE UEM Console.
1. Click Groups & Settings.2. Click Groups.3. Click Organization Groups.4. Click Details.
HOL-1957-04-UEM
Page 504HOL-1957-04-UEM

5. The numerical ID at the end of the URL is your Organization Group NumericalID. Highlight this text and right-click.
6. Click Copy.
Paste the Copied Organization Group Numerical ID
1. Return to the PowerShell Terminal by clicking the PowerShell icon from the taskbar.
2. Paste the copied Organization Group Numerical ID for the awGroupID parameterby right-clicking, then press ENTER .
Wait for API Authentication
After inputting the connection details, a prompt will be displayed stating ConfirmingAirWatch API authentication... this may take a few moments . This process will check that theAPI Authentication was successful and that the Group ID provided exists and can beaccessed with the provided API Key.
Once this completes, you will be presented with a popup to select the GPO Backup forUpload. Continue to the next step.
HOL-1957-04-UEM
Page 505HOL-1957-04-UEM

Select GPO to Upload
1. Select the GPO you captured in the previous steps. This GPO is in the format GPO<machinename> <date> <time> .
2. Click OK.
A series of loading tasks will begin to run, notated by the progress bars at the top of thePowerShell terminal. These will inform you what step the process is currently on.
HOL-1957-04-UEM
Page 506HOL-1957-04-UEM

Confirm the GPO Package App was uploaded to theWorkspace ONE UEM Console Successfully
When the process has completed successfully, you should see the following text:
Successfully saved GPO package app to the AirWatch Console!
----- IMPORTANT -----Be sure to navigate to the AirWatch Console and assign the application '{filename}' to theappropriate users and devices!----- IMPORTANT -----
The app is now uploaded to the Workspace ONE UEM Console and is ready forassignment. You will assign this package to a device in an upcoming exercise.
NOTE: If you are uploading multiple GPOs in a single package, they will be applied toenrolled devices in the order in which they are selected from the Select GPO Backups toUpload prompt. If the order of the GPOs matters for your deployment, ensure you selectthem in the intended order!
HOL-1957-04-UEM
Page 507HOL-1957-04-UEM

Assign GPO PackageAfter the GPO app package is uploaded using the tool, the final step is to addassignments to deploy to the users and/or devices that you designate.
Assign GPO App Package
Return to the Workspace ONE UEM Console,
1. Click Apps & Books.2. Click Applications.3. Click Native.4. Click the Internal tab.5. Select the GPO package uploaded in the previous exercise. The name format will
be GPO <machinename> <date> <time>.zip .6. Click Assign.
HOL-1957-04-UEM
Page 508HOL-1957-04-UEM

Add Assignment
Click Add Assignment.
HOL-1957-04-UEM
Page 509HOL-1957-04-UEM

Update the App Assignment Details
1. Select All Devices ([email protected]) for the Select AssignmentGroups field.
2. Select Auto for the App Delivery Method.3. Click Add.
HOL-1957-04-UEM
Page 510HOL-1957-04-UEM

Save & Publish
Click Save & Publish.
HOL-1957-04-UEM
Page 511HOL-1957-04-UEM

Publish the GPO App Package
Click Publish.
After the GPO app package has been assigned to all devices, the next step is to enrollyour Windows 10 device. Proceed to the next exercise to enroll your Windows 10 device.
HOL-1957-04-UEM
Page 512HOL-1957-04-UEM

Remote Desktop to your Windows 10Device for Enrollment
Close the RDP session to the SCCM Server by clicking the Close button (X) on theRemote Desktop Connection tab at the top of your screen.
NOTE: If this blue tab does not appear, you may have unpinned this from displaying atthe top. Hover your mouse near the top of the screen to show the tab.
Connect to the Windows 10 VM
From the Desktop of the Main Console, double-click the Win10-01a.rdp shortcut.
This Windows 10 device will be used to enroll and test our uploaded GPO package.
Open Google Chrome
Double-click the Google Chrome shortcut on the desktop.
HOL-1957-04-UEM
Page 513HOL-1957-04-UEM

Modifying Internet Options forWindows EnrollmentBefore enrolling the Windows 10 Virtual Machine, we will make modifications to theWindows 10 device to reduce network traffic to expedite enrollment.
Open Settings
1. Click the Windows button.2. Click the Settings (Gear) icon.
HOL-1957-04-UEM
Page 514HOL-1957-04-UEM

Open Internet Options
1. Type Internet Options in the search bar.2. Click Internet Options from the results list.
HOL-1957-04-UEM
Page 515HOL-1957-04-UEM

Modify the Certificate Revocation Options
1. Click the Advanced tab.2. Scroll down to find the Security section.3. Uncheck the Check for publisher's certification revocation option.4. Uncheck the Check for server certificate revocation option.5. Click Apply.6. Click OK.
HOL-1957-04-UEM
Page 516HOL-1957-04-UEM

Open PowerShell as Administrator
1. Right-Click the Windows button.2. Click Windows PowerShell (Admin).
HOL-1957-04-UEM
Page 517HOL-1957-04-UEM

Allow WindowsPowerShell to Make Changes
Click Yes when prompted to allow Windows PowerShell to make changes to your device.
Enter Commands to Stop Windows Update Service
Enter the following commands (remember that you can highlight then drag-and-drop thetext from the manual into PowerShell!)
1. Enter Set-Service wuauserv -startup disabled then press ENTER .2. Enter Stop-Service wuauserv then press ENTER .3. Click the Close button to exit PowerShell.
HOL-1957-04-UEM
Page 518HOL-1957-04-UEM

Enrolling Your Windows 10 DeviceWe will now enroll our Windows 10 device in Workspace ONE UEM. First, we will need todownload the Workspace ONE Intelligent Hub.
Download the Workspace ONE Intelligent Hub on theWindows 10 VM
From a new tab in the browser, if not opened already,
1. Enter https://www.getwsone.com in the navigation bar and press Enter .
HOL-1957-04-UEM
Page 519HOL-1957-04-UEM

2. Click Download Hub for Windows 10.NOTE: Please wait while the Workspace ONE Intelligent Hub installer finishesdownloading.
3. Click Keep when warned about the AirWatchAgent.msi download.
NOTE - If you do not see the warning about the AirWatchAgent.msi file, skipthis and continue to the next step.
Launch the Workspace ONE Intelligent Hub Installer
Click the AirWatchAgent.msi file in your download bar.
NOTE - The installer may take a few seconds to launch, please be patient afterclicking the AirWatchAgent.msi file.
Click Run
Click Run to proceed with the installation.
HOL-1957-04-UEM
Page 520HOL-1957-04-UEM

Accept the Default Install Location
Leave the default install location and click Next.
NOTE - The Next button may take several seconds to enable while therequired additional features are installed.
HOL-1957-04-UEM
Page 521HOL-1957-04-UEM

Accept the License Agreement
1. Select I accept the terms of the license agreement.2. Click Next.
HOL-1957-04-UEM
Page 522HOL-1957-04-UEM

Start the Workspace ONE Intelligent Hub Install
Click Install to start the installer.
HOL-1957-04-UEM
Page 523HOL-1957-04-UEM

Allow the Workspace ONE Intelligent Hub Installer to Run(IF NEEDED)
If prompted to allow the app to make changes on your device, click Yes.
HOL-1957-04-UEM
Page 524HOL-1957-04-UEM

Complete the Workspace ONE Intelligent Hub Installer
Click Finish to complete the Workspace ONE Intelligent Hub installer.
NOTE - After clicking finish, the Native Enrollment application will launch toguide you through enrolling into Workspace ONE UEM. It will take around45-60 seconds to launch the agent.
HOL-1957-04-UEM
Page 525HOL-1957-04-UEM

Enroll Your Windows 10 Device Using the Workspace ONEIntelligent Hub
Click Server Detail.
Find your Group ID from Workspace ONE UEM Console
HOL-1957-04-UEM
Page 526HOL-1957-04-UEM

The first step is to make sure you know what your Organization Group ID is.
1. To find the Group ID, hover your mouse over the Organization Group tab at thetop of the screen. Look for the email address you used to log in to the lab portal.
2. Your Group ID is displayed at the bottom of the Organization Group pop up.
Enter the Server Details
1. Enter labs.awmdm.com for the Server Name field.2. Enter Your Group ID for the Group ID field. If you forgot your Group ID, check
the previous steps on how to retrieve it.
HOL-1957-04-UEM
Page 527HOL-1957-04-UEM

Enter Your User Credentials
1. Enter aduser in the Username field.2. Enter VMware1! in the Password field.3. Click Next
NOTE - Wait while the server checks your enrollment details.
HOL-1957-04-UEM
Page 528HOL-1957-04-UEM

Workspace ONE Application Launch
Since our Workspace ONE UEM and VMware Identity Manager environments are linkedfor this environment, the Workspace ONE Application will automatically open afterenrollment is complete. You will not need it for this exercise, so click Close.
HOL-1957-04-UEM
Page 529HOL-1957-04-UEM

Finish the Workspace ONE UEM Enrollment Process
Click Finish to end the Enrollment process. Your Windows 10 device is now successfullyenrolled into Workspace ONE UEM.
HOL-1957-04-UEM
Page 530HOL-1957-04-UEM

Login to the Workspace ONE UEMConsole (IF NEEDED)To perform most of the lab you will need to login to the Workspace ONE UEMManagement Console.
Launch Chrome Browser
Double-click the Chrome Browser on the lab desktop.
HOL-1957-04-UEM
Page 531HOL-1957-04-UEM

Authenticate to the Workspace ONE UEM AdministrationConsole
The default home page for the browser is https://labs.awmdm.com. Enter yourWorkspace ONE UEM Admin Account information and click the Login button.
NOTE - If you see a Captcha, please be aware that it is case sensitive!
1. Enter your Username. This is your email address that you have associated withyour VMware Learning Platform (VLP) account.
2. Enter VMware1! for the Password field.3. Click the Login button.
HOL-1957-04-UEM
Page 532HOL-1957-04-UEM

NOTE - Due to lab restrictions, you may need to wait here for a minute or sowhile the Hands On Lab contacts the Workspace ONE UEM Hands On Labsserver.
HOL-1957-04-UEM
Page 533HOL-1957-04-UEM

Verify GPO App Package InstalledWith the application uploaded, assigned, and enrolled, we will now verify that the GPOapp package is applied successfully to our enrolled device.
Verify the App Package Installed from the Workspace ONEUEM Console
1. Click Apps & Books.2. Click Applications.3. Click Native.4. Click the Internal tab.5. Click the uploaded GPO App Package. This will be in the name format GPO
<machinename> <date> <time>.zip .
This will open the Details View page of the GPO App Package, allowing you to seeadditional details about the application.
HOL-1957-04-UEM
Page 534HOL-1957-04-UEM

Verify the Install Status of the GPO App Package
1. The Install Status section confirms how many devices have installed theapplication. You will likely see 1 Not Installed when navigating here since youjust enrolled your Windows 10 device and it has not had sufficient time to receivethe install command yet.
2. The Deployment Progress section confirms which devices the app is assignedto, as well as the status and deployment configurations.
3. Click the Devices tab.
HOL-1957-04-UEM
Page 535HOL-1957-04-UEM

Send the Install Command to the Device (IF NEEDED)
To expedite the device receiving the install command for this lab, you will send theinstall command manually from the console.
1. Check the Install Status and Reason of your device. If you see Install CommandReady for Device for the Reason, that means the device has not received theinstall command yet. If the Install Status shows Installed already, you can skip tothe next step.
2. Click the checkbox to select the device.3. Click Install.
HOL-1957-04-UEM
Page 536HOL-1957-04-UEM

Confirm the Application Install Command (IF NEEDED)
Click OK to confirm the application install command.
Confirm the Install Command was Dispatched
1. Confirm the Reason now shows Install Command Dispatched. This means thecommand has been sent to the device and is waiting to be processed.
2. Click Refresh. You should refresh periodically every 1-2 minutes until the InstallStatus or Reason updates.
HOL-1957-04-UEM
Page 537HOL-1957-04-UEM

Confirm the Application Installed
Confirm that the Install Status shows Installed.
NOTE: If you do not see the Installed status, you may need to continue refreshing.The application may take several minutes to download and deploy to the device before
it reports as Installed.
HOL-1957-04-UEM
Page 538HOL-1957-04-UEM

Open Group Policy Editor
1. In Windows Search, enter gpedit.msc .2. Click gpedit.msc.
HOL-1957-04-UEM
Page 539HOL-1957-04-UEM

Allow Microsoft Management Console to Make Changes toDevice (IF NEEDED)
If you are prompted to allow the Microsoft Management Console to make changes toyour device, click Yes.
If you do not see this prompt, continue to the next step.
Navigate to Power Management Settings
1. Click Computer Configuration.2. Click Administrative Templates.3. Click System.4. Double-click Power Management.
HOL-1957-04-UEM
Page 540HOL-1957-04-UEM

Open the Active Power Plan Settings
Double-click Select an active power plan.
HOL-1957-04-UEM
Page 541HOL-1957-04-UEM

Confirm Policy Settings
1. Confirm that the policy is Enabled and that the Active Power Plan is set to HighPerformance. These settings were applied by our GPO application package thatwas sent to our device.
2. Click Close.
HOL-1957-04-UEM
Page 542HOL-1957-04-UEM

Confirm Power and Sleep Settings
1. Right-click the Windows button.2. Click Power Options.
HOL-1957-04-UEM
Page 543HOL-1957-04-UEM

Navigate to Additional Power Settings
Click Additional power settings.
HOL-1957-04-UEM
Page 544HOL-1957-04-UEM

Confirm the Power Options Settings shows HighPerformance
1. Confirm that the set plan is set to High Performance.2. You should also see a notification above the power plans stating Change
settings that are currently unavailable. Clicking this message will show thatthe settings are unavailable to change because they are being controlled by thesystem administrator through the policies we packaged and deployed throughWorkspace ONE UEM.
This shows how you can capture and export GPOs from one device and quickly apply thesame settings to another device without the need to create profiles or policies manually.
HOL-1957-04-UEM
Page 545HOL-1957-04-UEM

Un-enrolling your Windows 10 DeviceIn this section, we are going to un-enroll our Windows 10 VM so that we can use it forother lab modules. We will delete the device record from the console, which will also un-enroll the device and remove all the apps and profiles that are pushed from WorkspaceONE UEM console, also known as managed content.
Delete Device from Workspace ONE UEM Console
From the Workspace ONE UEM Console,
1. Click on Devices2. Click on List View3. Select the check box next to your device friendly name.4. Click on More Actions5. Click on Delete Device
HOL-1957-04-UEM
Page 546HOL-1957-04-UEM

Enter Reason and Delete
1. Enter the reason as lab completed .2. Click on Delete
HOL-1957-04-UEM
Page 547HOL-1957-04-UEM

Validate DELETE IN PROGRESS...
1. You may see device friendly name changing to DELETE IN PROGRESS...2. Click on the Refresh Icon to validate if the device deletion is successful.
Ensure that device record is deleted
1. Use the Refresh Button if needed.2. Ensure that the device record is now deleted from the Workspace ONE UEM
console and you see the message No Records Found.
HOL-1957-04-UEM
Page 548HOL-1957-04-UEM

Navigate to Windows 10 Settings
1. Click on the Windows Icon2. Click on the gear icon to access Windows 10 Settings
Access Accounts Settings
From the Settings Menu, access Accounts
HOL-1957-04-UEM
Page 549HOL-1957-04-UEM

Validate That No Management Account Exists
1. Click on Access work or school2. Validate that you DO NOT see any account connected to AirWatchMDM.
NOTE - The CORP AD domain is the local domain in this lab and is not controlled byAirWatch Enrollment, so you will see this connection if your device is enrolled orunenrolled.
HOL-1957-04-UEM
Page 550HOL-1957-04-UEM

ConclusionLab Conclusion
You have successfully completed the SCCM Migration lab.
In this lab, we covered migrating users and devices from SCCM to AirWatch, migratingapplications from SCCM to AirWatch, and using the AirWatch GPO migration tool.
This concludes the SCCM Migration hands-on lab.
HOL-1957-04-UEM
Page 551HOL-1957-04-UEM

ConclusionThank you for participating in the VMware Hands-on Labs. Be sure to visithttp://hol.vmware.com/ to continue your lab experience online.
Lab SKU: HOL-1957-04-UEM
Version: 20200210-204932
HOL-1957-04-UEM
Page 552HOL-1957-04-UEM