talkmaster focus - digital acoustics · talkmaster focus server added support for changing the...
TRANSCRIPT

TalkMaster™ FOCUS
Admin Console
Reference Manual


iii
Table of Contents
Welcome to Admin Console .......................................................................................................................... 1
Welcome .................................................................................................................................................... 1
Release Notes ........................................................................................................................................... 1
TalkMaster FOCUS Server .................................................................................................................... 1
TalkMaster FOCUS Server .................................................................................................................... 2
System Requirements ............................................................................................................................... 7
System Overview ....................................................................................................................................... 7
Solo and Enterprise ................................................................................................................................... 8
Fail Forward Overview ............................................................................................................................... 9
TalkMaster FOCUS Status ICON ............................................................................................................ 10
Administrator Console Overview ............................................................................................................. 11
Using Endpoint Security .......................................................................................................................... 11
Logon ....................................................................................................................................................... 13
Common Buttons ..................................................................................................................................... 14
Setup Tab .................................................................................................................................................... 15
Setup ....................................................................................................................................................... 15
Settings .................................................................................................................................................... 15
Defaults.................................................................................................................................................... 17
File Locs .................................................................................................................................................. 20
Paging Options ........................................................................................................................................ 22
Queues Tab ................................................................................................................................................ 25
Queues .................................................................................................................................................... 25
IP Endpoints Tab ......................................................................................................................................... 27
IP Endpoints ............................................................................................................................................ 27
Client Types ............................................................................................................................................. 30
General - Configuration ........................................................................................................................... 32
General - Adapters .................................................................................................................................. 34
Options 1 ................................................................................................................................................. 35
Options 2 ................................................................................................................................................. 38
Options 3 ................................................................................................................................................. 41
WiFi - Config ............................................................................................................................................ 43
WiFi - Status ............................................................................................................................................ 44

TalkMasterFOCUSAdminConsoleReferenceManual
iv
eSIP - Options 1 ...................................................................................................................................... 45
eSIP - Options 2 ...................................................................................................................................... 48
ZC - Options ............................................................................................................................................ 49
ZC - Zone Groups .................................................................................................................................... 50
PTT vs Call button Feature...................................................................................................................... 51
eSIP Stand-alone Configuration Steps .................................................................................................... 52
Automatic Level Control .......................................................................................................................... 56
Messages Tab ............................................................................................................................................. 59
Messages ................................................................................................................................................ 59
Paging Groups Tab ..................................................................................................................................... 63
Paging Groups ......................................................................................................................................... 63
Endpoint Members .................................................................................................................................. 64
Message List ........................................................................................................................................... 65
Operators Tab ............................................................................................................................................. 67
Operators ................................................................................................................................................. 67
Information ............................................................................................................................................... 67
Queue Management ................................................................................................................................ 69
Group List ................................................................................................................................................ 70
Audit Tab ..................................................................................................................................................... 71
Audit ......................................................................................................................................................... 71
Status Tab ................................................................................................................................................... 73
Status ....................................................................................................................................................... 73
IP Video Sources tab .................................................................................................................................. 75
IP Video Sources ..................................................................................................................................... 75
Menu Options .............................................................................................................................................. 77
File Menu ................................................................................................................................................. 77
Search Menu ........................................................................................................................................... 77
Tools Menu .............................................................................................................................................. 78
Licensing Menu ....................................................................................................................................... 79
Settings Menu .......................................................................................................................................... 81
Help Menu ............................................................................................................................................... 83
Support Information ..................................................................................................................................... 85
Support Central ....................................................................................................................................... 85

Table of Contents
v
Contacting Technical Support ................................................................................................................. 89
About Us .................................................................................................................................................. 89
Glossary ...................................................................................................................................................... 91
Index ............................................................................................................................................................ 93


1
Welcome to Admin Console
Welcome
Welcome to the Admin Console. The Admin Console is used to configure the TalkMaster FOCUS Server and the IP Endpoints that connect to it.
If configuring IP Endpoints to operate only with a SIP 2.0 Server, please review the eSIP Standalone Configuration topic.
If upgrading from a previous version, please review the Release Notes topic.
For an overview of the system, please review the System Overview topic.
For an Overview of the Administrator Console, review the Administrator Console Overview topic.
Release Notes
V 6.0.2 Release August 2019
Administrator Console Changes and Corrections
Fixed an issue where the Text to Speech Engine on the Setup → File Locs tab change would not affect the selected voice
Added the ability to suppress Call Queue Entries generated by an IP Endpoint when it’s Talk button was pressed. This enables the Talk button to trigger an Event in the Event Configuration Console. The new option is available on the IP Endpoints → Opt 3 tab. Device needs to be configured as call-button and no call queue entries
Fixed an issue where the IP Endpoint list would be disabled when creating a new Paging Group on the Paging Groups → Endpoint Members tab, and the group type was changed to queued
Fixed an issue that would prevent the removal of a fixed RTP port on the IP Endpoints → Opt 1 tab
Improved the performance when loading tens of thousands of entries on the Audit tab
TalkMaster FOCUS Server
Fixed an issue where an IP Endpoint could be reported as being "Disconnected" to Consoles, but the endpoint’s LEDs indicated it was “connected”. This caused issues with TalkMaster communications, but SIP calls would still work
Improved the performance and reliability of sending RTP audio to IP Endpoints
Added .5 seconds of silence to the end of a pre-recorded audio file when sending it to one or more IP Endpoints
Fixed a pacing issue when sending a pre-recorded audio file via TCP to an IP Endpoint
Fixed an issue which could occur after several weeks if many devices were continually connecting and disconnecting
V 6.0 Release June 2018

TalkMasterFOCUSAdminConsoleReferenceManual
2
Administrator Console Changes and Corrections
Changed the meaning of the colored ICONs in the IP Endpoints tab to indicate whether Authorized IP Endpoints are connected to or disconnected from the TalkMaster Server
Added menu option Search-->Search IP Endpoint List (and keyboard shortcut ctrl+f ) which is available on the IP Endpoints and Status tabs
Added menu option Tools-->Remove Disconnected Devices to remove IP Endpoint configurations for old devices
Added the Endpoint Keep Alive value on the Setup-->Settings tab for IP Endpoints with firmware V7.3 or greater
Improved the performance of the IP Endpoints and Status tabs when connecting hundreds of IP Endpoints
Added configuration support for IP7s that have a wireless network connection (available in Q3 2018)
TalkMaster FOCUS Server
Added support for changing the keep-alive time between the TalkMaster FOCUS Server and IP7 Endpoints with Firmware Version V7.3 or greater
If Paging Group audio is sent via Multicast and the Endpoints support RTP, the Server will send audio to the Endpoint using standard 160 byte RTP packets
Reduced the default memory size used for creating new threads to improve overall memory usage
Optimized thread dispatching for installations with thousands of IP Endpoints
Added the ability to send a server based Message to a single IP Endpoint via RTP using the TalkMaster FOCUS .Net SDK
Added support for IP7 Wireless configuration
V 5.2.6 Release May 2018
Administrator Console Changes and Corrections
Added menu option Tools-->Find Device By IP Address and Tools--> Save Device By IP Address
Added menu option Tools--> Record Program Events To File and Tools--> Open Support Folder
Added automatic duplicate checking in the IP Endpoints tab for Location Name and SIP Extension
V 5.2 Release June 2016
Administrator Console Changes and Corrections
Added support for IP7s running firmware V7. PLEASE NOTE that TalkMaster FOCUS V5.2 or greater is required to discover IP7 endpoints with V7 firmware

Welcome to Admin Console
3
Added support for the new IP7-MZC Multi Zone Controller. The IP7-MZC is an IP Endpoint that can support up to 48 zones of full-duplex audio and is designed for use in Central Station security environments. Refer to the ZC tab on the IP Endpoints tab
Added the ability to display an internal "health" report on a device. Refer to the IP Endpoints tab
Added the ability to add existing MP3 audio files as Messages. Please note that when the audio file is sent to the IP Endpoints it will be converted to a uLaw wav file with an 8k sample rate
Added support for Paging Groups that support low priority multicast audio which allows the audio to be interrupted with normal priority audio or intercom requests. Refer to the Multicast Address and Port on the Paging Groups tab
Added support for using the STUN Protocol when an IP Endpoint is running as an eSIP client. STUN (if allowed by a firewall) can help improve connectivity between SIP based IP Endpoints connecting to a SIP Server from behind a NAT'd firewall
Added the ability to password protect IP Endpoints using the IP Endpoint Security option. IP Endpoint Security implements a Challenge Response Authentication process between an IP Endpoint and any software program that tries to access it. IP Endpoint Security requires IP7 Firmware V7.1.2 or greater. Please refer to the topic on Using Endpoint Security for further details
V 5.1 Release November 2015
Administrator Console Changes and Corrections
Added "IP Video Sources" tab to define supported Axis and RTSP capable IP Video Cameras
Added Setting -> Video Source Types editor to add support for additional IP video sources
Added Associated Video Source to IP endpoint --> Options 3 tab
Version 4.1 Release December 2013
Administrator Console Changes and Corrections
Support for Software License Key, machine signing
Support for Software License Key, application of license key
Support for server-based Message Playback
Support for server-based Message Recording
IP Endpoint "IP7 Tracking Enabled" address supports UNICAST host address
Version 4.0 Release December 2012
Administrator Console Changes and Corrections
Added the Recording Warning option to the Endpoints --> Options 3 tab to enable the IP7 to play a warning tone when the IP7's Microphone is active

TalkMasterFOCUSAdminConsoleReferenceManual
4
Added the Allow Multiple Logons to the Operators tab
The Status tab lists the number of times an Operator has logged on with the same Operator ID
Added the Export Settings and Import Settings to the File Menu for backing up and restoring the TalkMaster FOCUS Server settings
The Audit tab now lists the starting and stopping of Monitoring sessions
The Fail Forward Overview topic has been added to this manual
Added support for configuring an IP Endpoint as a Music Injector
Version 3.0 Release January 2012
Administrator Console Changes and Corrections
Added several new configuration options
Added the Endpoint Defaults and the eSIP Defaults tabs to streamline the configuration process
Added the Defaults button on the IP Endpoint Configuration tab to copy in the Endpoint and eSIP Defaults setting to a new or existing IP Endpoint
Added the Shared RTP Port for Operator Console Audio
Added the "Automatic Return" option for IP7 Fail Forward on the Options 1 tab
Added the Audio Profile settings for new AEC enabled IP Endpoints
Added the eSIP settings for IP Endpoints
Renamed the Paging Protocols tab to Paging Options
Added the USB License Key information to the Help --> About menu
Added the ability to define a Repeating pre-recorded Message
Added the ability to define Queued Paging Groups
Added the ability to define an IP Endpoint to be used as a Microphone input device for a Queued Paging Group
Renamed the Intercom Responses tab to File Locs
Eliminated the TTS tab and relocated the option to File Locs tab
Eliminated the Info tab for IP Endpoints and relocated the Firmware Version information to the Configuration tab
Server Corrections and Enhancements
Updated the USB License Key driver to the latest release
Added support for Queued Paging
Added support for sending/receiving Operator Console Audio via RTP
Added support for overflowing IP7 IP Endpoints configured for eSIP to a SIP Extension

Welcome to Admin Console
5
Added support for firmware updating of IP Endpoints
Improved pacing of audio paging packets for UDP and RTP operations
When sending Audio Pages via UDP Unicast, if the IP Endpoint is configured to use RTP, the audio is sent via RTP to the IP Endpoint's dynamically assigned or Fixed RTP Port
Added the ability to use an IP Endpoint as a microphone for a Queued Paging Group
Version 2.0.2 Release December 2010
Administrator Console Changes and Corrections
Added the ability for discovery, configuration and firmware updates to "connecected" IP Endpoints via TCP instead of UDP, so updates can now be made to IP Endpoints behind a NAT'd Firewall
Added the ability to define a Shared RTP Listening port for IP Endpoint audio
Added the ability to define a Fixed RTP Port for IP Endpoints on the IP Endpoints --> Options 1 sub tab
Server Corrections and Enhancements
Added support for using Fixed RTP Ports on IP7 IP Endpoints
Added support for IP Endpoint discovery and configuration to "connected" IP Endpoints
Added support for using a shared RTP Listening port for IP Endpoints
Version 2.0 Release October 2009
Administrator Console Changes and Corrections
Added the ability to define pre-recorded Messages for 1-way paging
Added the ability to define paging Groups for 1-way paging and associate pre-recorded Messages with each Group
Added the ability to add Groups to Operators. When an Operator logs on to the Operator Console, the Groups and their associated Messages are included on a new tab used for 1-way audio paging
Added the ability to select the Text-to-Speech engine to be used for applications created using the "SayText" API from the Software Development Kits
Added an Update Now option to the bottom of the screen to dynamically send most Administrator Console updates to the Server and Operator Consoles without needing to restart the Server service
Added an option to use the RTP protocol instead of the TCP/IP protocol to send and receive 2-way Intercom audio
Added a Managed check box to the Intercom configuration to authorize devices added to the system
Added a Replace option on the Intercoms tab to copy the configuration of an existing endpoint and replace it with a new endpoint

TalkMasterFOCUSAdminConsoleReferenceManual
6
Added support for new Handset options to the Options2 tab of the Intercoms tab
Added the ability to Disable the Intercom's AGC (Automatic Gain Control) and manually set the Mic Gain in the Options2 tab of the Intercoms tab
Added the ability to specify the default Microphone codec to be used when the IP7's Talk switch is engaged
Server Corrections and Enhancements
Added support for server based Groups and Messages
Added support for Text-to-Speech
Enhanced usage memory used for Intercom threads
Added additional error and buffer overflow checking to enhance system stability
Updated the USB License Key driver to Version 7.5.0
Updated the USB License Key Installation to only install the USB Driver. The USB License Key can still be accessed over a network by installing the Network driver separately

Welcome to Admin Console
7
System Requirements
The minimum requirements* to run TalkMaster FOCUS Server and Administrator Console are:
Windows 7, Windows 8.1, Windows 10, Windows Server 2012 or Windows Server 2016
4th Gen Intel Core i3 or greater
4GB RAM
30 MB available disk space for software
If audio sessions will be recorded, allow sufficient space based on retention requirements. One hour of recorded full-duplex audio takes approximately 60 MB of disk space.
Available USB port to hold the USB License Key (alternatively, Software License keys are available)
Windows supported Sound Card with microphone and speakers (the Server does not require a Sound Card and the Admin Console will function without one but it will not be able to record audio Messages and will not be able to listen to recorded audio sessions. These functions can be accomplished on other PCs.)
* These are minimum requirements. As systems grow in size and complexity, more resources are required.
System Overview
TalkMaster FOCUS Software is an IP based server solution designed to manage and interact with up to 5,000 intercoms and paging end-points from multiple consoles, regardless of geography utilizing standards based TCP/IP protocols. TalkMaster FOCUS Software consists of the Server, the Administrator Console, one or many operator consoles, and additional integrated services. The Server manages the connections between IP Endpoints, Operator Consoles, and Integrated services.
The TalkMaster FOCUS Server software is available either without a license (Solo) or with a license (Enterprise). For additional information on the differences, see the Solo and Enterprise topic.
The Administrator Console is used to specify Server options, Intercom configurations, Queues, Operators, Messages, Paging Groups and Video Sources. Operator Console is used to answer calls from and initiate calls to IP Endpoints.
Queues (Logical groups) of Intercoms can be created and simultaneously managed by one or more Operators utilizing Operator Consoles. Incoming calls from IP Endpoints are automatically routed to the Operators assigned to the Queues. Unanswered calls are listed in priority sequence at each console that is monitoring the Intercom. When answered, a call is immediately removed from the Calls Waiting list of other Operator Consoles .
If a Queue's call volumes exceed defined service levels (Overflow), unanswered calls are directed to additional console operators. The Overflow condition is automatically reset when call volumes return to defined acceptable service levels.
Logical groups of IP Paging Endpoints (Paging Groups) can be created and listed on one or more Operator Consoles. Operators can send live or pre-recorded Messages to the Paging Groups. The Paging Group can be configured to deliver the message immediately or to queue the message, then send when all intercoms are available.

TalkMasterFOCUSAdminConsoleReferenceManual
8
With the release of TMEE v5 support for associated IP Video Cameras has been added. Associated Video is an additional license for Talk Master Enterprise Edition. The feature supports associating IP Video Cameras (Axis and other IP Video Cameras that support RTSP) with a Digital Acoustics IP7 Endpoint for display in TalkMaster FOCUS Operator Console. The associated video is displayed in a separate window when the IP Endpoint is answered. Multiple IP cameras can be monitored as a group in a separate window.
Solo and Enterprise
The TalkMaster FOCUS Server software is available either without a license (Solo) or with a license (Enterprise).
The TalkMaster FOCUS Installer is the same regardless of the version. It includes:
TalkMaster FOCUS Server
Administrator Console
Operator Console
Firmware Management Console
Archive Viewer Console
Restart Service

Welcome to Admin Console
9
Support Central Service
Solo does not require a license and is available with the purchase of Digital Acoustics hardware. Solo includes the ability to run the TalkMaster FOCUS Server software with a single Operator logged in with up to 250 IP Endpoints. Solo can be upgraded to the Enterprise Edition by purchasing a License Key.
Enterprise requires a License Key that determines the number of IP Endpoints that can connect to the Server as well as the number of Operators that can be signed on concurrently.
The following integrated services can be purchased and added to the License Key:
VoIP Connect - provides the ability to send live or queued audio messages to groups of IP Endpoints from SIP based telephone systems
Automation - provides automated audio messages to groups of IP Endpoints based on RSS or CAP Atom feeds as well as event based messages
Associated Video - Adds the ability to view Axis or RTSP based cameras in the Operator Console
Fail Forward Overview
Digital Acoustics' IP Endpoints have patented fail forward technology, the ability to connect to an alternate Server if the Primary Server Fails. All of the associated Consoles and Services also incorporate this feature. Using Fail Forward improve the availability of critical communications.
In order for Fail Forward to work properly, the Primary Server and Fail Forward Server should have the same settings (Operators, Paging Groups, Messages, etc). To facilitate this, use the File --> Export option on the Primary Server, then use the File --> Import Settings on each of the Fail Forward Servers.
When using Fail Forward, the following criteria should be considered to determine how quickly IP Endpoints will Fail Forward to an alternate Server:
Component Disconnect Time
Primary Server Retry Duration
Supports Auto Return
ii3 Endpoints up to 45 Seconds
120 Seconds No
IP7 V5 Firmware Endpoints
up to 45 Seconds
90 seconds No
IP7 V6 or greater Firmware Endpoints
Configurable
< 10 - 45 seconds
Configurable 1 - 18 times x 5 seconds
(5 - 90 seconds)
Configurable
Disconnect Time - The maximum amount of time required for an IP Endpoint or Console to sense a disconnection with the TalkMaster FOCUS Server.
Primary Server Retry Duration - The amount of time the IP Endpoint or Console will automatically attempt to reconnect with the Primary Server before attempting to connect to a Fail Forward server.
Supports Auto Return - Whether the IP Endpoint or Console can automatically return to the Primary Server when it becomes available. If Auto Return is not used, manual intervention will be required to have the IP Endpoints and Console return to the Primary Server. For instance, the

TalkMasterFOCUSAdminConsoleReferenceManual
10
Fail Forward Server can be restarted which will force the IP Endpoints and Consoles to reconnect with the Primary Server.
TalkMaster FOCUS Status ICON
When the TalkMaster FOCUS Server is installed, an ICON that tracks the status of TalkMaster FOCUS Server (iEnterprise.exe) is added to the Windows system tray.
Green ICON - TalkMaster FOCUS Server is running and Licensed
Yellow ICON - TalkMaster FOCUS Server is running without a license (TalkMaster SOLO)
Red ICON - TalkMaster FOCUS Server is not currently running
Right-clicking on the ICON provides the following options:
Open TMAC - Opens the TalkMaster FOCUS Admin Console
Restart Service - Restarts the TalkMaster FOCUS Server. This option is disabled if the FOCUS Services Status is enabled
FOCUS Services Status - Opens the TalkMaster FOCUS Restart utility used for managing all of the related TalkMaster FOCUS services
Preferences - Displays the port used to communicate with the TalkMaster FOCUS Server. If a change is made to this, the same change needs to be made in the Paging Options - System Tray Port
About - Displays the version of the TalkMaster FOCUS Server and License information
Exit - Terminates the TalkMaster FOCUS Status ICON application
Digital Acoustics recommends using Windows to customize the Notification ICON settings so that it is always visible. The procedure varies based upon the version of Windows being used.
Windows 10 - Open Settings--> Personalization--> Taskbar--> Notification Area

Welcome to Admin Console
11
Windows 7 - Control Panel --> Notification Area Icons
Administrator Console Overview
The Administrator Console must be used to configure the TalkMaster Server options, IP Endpoint Options, the Queues, Messages, Paging Groups, Operators and Video Sources that work together is the system. It can also be used to track IP Endpoint events, play any recorded audio and see which IP Endpoints and Operators are currently connected to the Server.
The Administrator Console must be installed and run on the same PC as the Server.
Using Endpoint Security

TalkMasterFOCUSAdminConsoleReferenceManual
12
When Endpoint Security is used, a security code or password is configured for each IP Endpoint in the Admin Console and saved into the IP Endpoint. Once a Security code has been set, both the TalkMaster FOCUS Server and IP Endpoint will issue "challenge-response" requests in order to establish a TCP connection. The IP Endpoint will also issue a Challenge-Response request when ever it receives a UDP command (such as a FIND ALL request). If the correct security code is not received, the IP Endpoint will not respond to the request.
In order to use Endpoint Security:
Check the Enable Endpoint Security option on the Setup --> Settings tab
If the same security code is to be used on each endpoint, enable the Security option on the Endpoint Defaults tab and assign the default value
On the IP Endpoints --> General --> Configuration tab, make sue to press the Copy Defaults button when adding (or updating) an IP Endpoint. This will automatically add the default security code on the IP Endpoints --> General --> Options 1 tab for the endpoint. A different Security code can also be entered for each IP Endpoint
Once all of the IP Endpoints have been configured, make sure to use the menu option File --> Export Settings to save all configuration information to a secure location. This action must also be taken any time security codes change or new IP Endpoints are added or replaced
If the TalkMaster FOCUS Server ever needs to be restored, the File --> Import Settings option must be used to restore all of the security information
Once a Security code has been saved in an IP Endpoint, it will no longer respond to a FIND ALL discovery request and the IP Endpoint will not connect to the TalkMaster FOCUS Server unless the correct Security code is provided.
If an IP Endpoint with a Security code attempts to connect to the TalkMaster FOCUS Server, but the Security code in the IP Endpoints tab does not match, a Failed Authentication error will be listed in the Audit tab:
and in the Windows Event Viewer - Application Log:

Welcome to Admin Console
13
In order to restore the Security code and re-connect the IP Endpoint, one of the following option must be used:
Change the Security code for the device in the IP Endpoints --> Option 1 tab. If the device is not listed in the Admin Console, use the menu option Tools - Add Device Security code to set the Security code for the device and then click the FIND ALL button. The Endpoint should automatically reconnect within 60 seconds
Restore the Admin Console settings from a previous backup by using menu option File --> Import Settings
Restore the IP Endpoint back to Factory Defaults (please note that this requires physical access to the IP Endpoint). Use the FIND ALL button to rediscover it and then re-configure it.
Logon
The Logon dialog is displayed when the Administrator Console program is started.

TalkMasterFOCUSAdminConsoleReferenceManual
14
Logon with an Operator that has been defined with Administrative Rights in the Operator tab. The default Logon ID is admin and Password is admin
The Administrator Console must be run on the same PC that the TalkMaster FOCUS Server software is installed on.
If the connection to the Server is interrupted or if the Server is restarted, the Administrator Console will automatically log back in using the Logon ID and Password that was previously entered.
Once logged on, change the Administrator password and create at least one additional Operator with Administrator rights.
Common Buttons Three buttons are found at the bottom of the screen. They can be used from any tab.
Update Now - used to send changes made in the Administrator Console to the Server and to Operator Consoles that are currently logged on. The Update Now process is automatically run when the Administrator Console is closed. This option significantly reduces the need to restart the Server service.
Close - exits the Administrator Console.
Help - Opens the online Help.

15
Setup Tab
Setup
The Setup tab is used to setup Server-based options. There are four sub-tabs on this page: Settings, Defaults, File Locs and Paging Options.
After all changes have been made, press the Update Now button on the bottom of the screen to send changes that have been made in the Administrator Console to the Server and Operator Consoles.
Settings
The Settings sub-tab of the Setup tab is used to set the Server options.

TalkMasterFOCUSAdminConsoleReferenceManual
16
Unattended Queues Overflow - When checked, any Queue that is not currently monitored by an Operator Console will automatically overflow to any Operator Console that is currently logged on. This minimizes the chance of having Endpoints that are not monitored by an Operator.
Play Beeps at Start and End - When checked, a beep tone is inserted at the start and end of each Talk segment between an Operator Console and an Intercom. This provides an audible cue for the participants in a Half-Duplex audio conversation.
Record Audio in Call Queue - When checked, Intercom audio is recorded while an Intercom User presses the Endpoints' Talk button (audio is recorded for the duration of the button press) and is available to be played back from the Calls Waiting List on the Operator Console.
Archive all audio - When checked, all audio between an Operator Console and an IP Endpoint is recorded by the Server. The audio archive location is specified on the File Locs tab in the Server Storage Path.
Consult local laws governing the recording of audio conversations before selecting this option!
Support Console - Should only be used when directed by Digital Acoustics Technical Support. Check this option to enable the TalkMaster FOCUS Support Service to record server tracking information while it is running. The IP Address defaults to 127.0.0.1 (local machine). The IP Address can be changed to send information to the TalkMaster FOCUS Support Service installed on another machine. Refer to the Support Central topic for details.
Intercom Port - Specifies the TCP/IP Port that the Server will listen for Intercom connections on. The default is Port 3000. The Endpoint's Server IP Port must match this value in order to connect to the Server.

Setup Tab
17
Console Port - Specifies the TCP/IP Port that the Server will listen for Operator Consoles to connect on. The default is Port 3010. The Operator Console Logon dialog must match this value along with the Server’s IP address in order to connect.
Use RTP for IP7 Intercom Audio - Check this box to allow the Server to send and receive 2-way Intercom audio via the RTP protocol. The Use UDP/RTP box on the Options 1 sub-tab of the Intercoms tab must be checked for each IP7 that should use RTP. If this option is not selected, audio will be sent and received using the TCP protocol which may cause poor audio quality if network delays are encountered
Shared RTP Port - Check this box to allow the specification of a single Listening Port for receiving RTP Audio from IP Endpoints. If this is option is not selected, the Server will dynamically assign a separate RTP port for each IP Endpoint that connects to the Server.
Use Console UDP/RTP if Possible - Check this box to allow the Server to send and receive 2-way Operator Console audio via the RTP protocol. The Use UDP/RTP box on the Console's Logon dialog must be checked for each Console that uses RTP. The Operator Console always establishes a TCP connection for sending/receiving commands to/from the Server.
Enable IP Endpoint Security - Check this option in order to use IP Endpoint Security.
Please review the Using Endpoint Security topic before using this option
Endpoint Keep Alive - TalkMaster FOCUS sends Keep Alive packets to IP Endpoint to ensure they are still connected. For IP Endpoints using Firmware prior to V7.3, the Server sends a TCP Keep Alive every 5 seconds. For IP Endpoints with firmware V7.3 or greater, this option specifies the number of seconds between Keep Alive packets sent by the Server to the IP Endpoint's TCP connection. A value between 5 and 60 seconds can be specified. This can significantly reduce network activity for installations with many IP Endpoints. Digital Acoustics also recommends setting the Enable Fast Disconnect Detection on the IP Endpoints --> General --> Options 3 tab along with this option
Defaults
Defaults are used to define default settings or templates used when adding or updating IP Endpoints. Defaults can be setup for IP Endpoint settings, eSIP settings and for WiFi settings.
Endpoint Defaults - used to define default settings used when adding or maintaining IP Endpoints. If the button next to an option is pressed, the corresponding values will be used when the Copy Defaults button is selected in the IP Endpoints tab.

TalkMasterFOCUSAdminConsoleReferenceManual
18
IP Endpoint Type - Sets the TYPE for an IP Endpoint. See the Configuration sub tab for details.
Assign Automatically with DHCP - Determines whether the IP Endpoint will use DHCP or will require a static IP Address to be entered.
Use UDP/RTP - Determines whether the IP Endpoint will use the RTP Protocol for transmitting audio (recommended for most applications).
Authorized Endpoint - Determines whether the IP Endpoints will be automatically authorized to the Server.
Server IP Address - Determines the IP Address of the TalkMaster Focsu Server that the IP Endpoint will connect to. This defaults to the IP Address(s) of the PC.
Fail Forward IP 1 - Determines the IP Address of the Endpoint's first Fail Forward Server.
Fail Forward IP 2 - Determines the IP Address of the Endpoint's second Fail Forward Server.
Fail Forward IP 3 - Determines the IP Address of the Endpoint's third Fail Forward Server.
Enable Automatic Return to Primary - Available for IP Endpoints with Firmware V6 or greater. For IP Endpoints that have failed forward to another server, determines if the IP Endpoint should automatically return to its Primary Server when it becomes available.
Security - Sets a standard security password for IP Endpoints. The Enable Endpoint Security option on the Setup -->Settings tab must be checked in order to set this option
Enable Fast Disconnect - Sets the Enable Fast Disconnect option on. See the Enable Fast Disconnect option on the IP Endpoints -- > General --> Options 3 tab
Attempts to Main Server before Fail Forward - Sets the number of times the endpoint will retry the Primary Server before attempting a connection to the Fail Forward Server(s). See the Number of connection attempts before trying Fail Forward Servers option on the IP Endpoints -- > General --> Options 3 tab

Setup Tab
19
eSIP Defaults - used to define default settings used when adding or maintaining IP Endpoints that will communicate with a SIP based phone system. If the button next to an option is pressed, the corresponding values will be used when the Copy Defaults button is selected in the IP Endpoints tab.
.
Primary Registrar - Specify the IP Address or DNS of the primary SIP Registrar. Normally, the SIP Registrar and the SIP Server are the same.
Primary SIP Server - Specifies the IP Address or DNS of the primary SIP Server.
If the Primary SIP Server or Registrar becomes unavailable, the IP Endpoint will automatically register with the Secondary Registrar and Server. The IP Endpoint will automatically de-register with the Secondary Registrar and register with the Primary Registrar when it is available
Secondary Registrar - Specifies the IP Address or DNS of the primary SIP Server
Secondary SIP Server - Specifies the IP Address or DNS of the Secondary SIP Server
Local SIP Port - Specifies the port to be used by the IP Endpoint for the SIP protocol. This defaults to port 5060.
RTP Port - Specifies the port to be used by the IP Endpoint for the RTP Protocol. This defaults to port 46000.
Door Code - Specifies the keys on the Phone's keypad to be pressed for the IP Endpoint to activate its Relay (to open a door). If more that 1 digit is entered, the # key must be pressed in addition to the Door Code through the Phones keypad.
Call Timeout - While a call is in progress, specifies the number of seconds that audio can drop
out before the call will be automatically terminated.
WiFI Defaults - used to define default settings used when adding or IP Endpoints that can connect to wireless networks. If the button next to an option is pressed, the corresponding values will be used when the Copy Defaults button is selected in the IP Endpoints tab.

TalkMasterFOCUSAdminConsoleReferenceManual
20
SSID - Specifies the name of the Wireless Network to connect to
PassPhrase - Specifies the password or passphrase that is associated with the Wireless Network
File Locs
The File Locs sub-tab of the Setup tab specifies the file locations for several Server settings.
Play File at Intercom Connect - check this box to have all IP Endpoints play the associated wav file when connecting to the Server. This option is typically used during installation to give the installer an audible confirmation that the IP Endpoint is working. It is typically unchecked after the system is installed.

Setup Tab
21
Click the Browse button to select a wav file when the Endpoint connects to the TalkMaster FOCUS Server.
Play File at Start of Intercom Session - check this box to have an Intercom play a wav file when the Intercom's Talk button is pressed. This acknowledgement lets the Intercom User know that their call request has been received by the Server. Click the Browse button to select a wav file.
Play File when Intercom is Unattended - check this box to have an Intercom play a wav file anytime then Intercom's Talk button is pressed and no Operator Console is monitoring the Intercom. Click the Browse button to select a wav file.
The wav files sent to the Endpoints must be encoded in either 8khz 8-bit PCM or 16-bit uLaw wave format. 8khz 16-bit uLaw provides the best quality audio. Commercial or free software is available to create these format. See application note for more information.
Server Storage Path - Specifies the file location used by the Server to store the iArchive directory for Audit and Archived Audio files. If the Archive all audio option is checked, the audio clips will be created in the iArchive directory.
Each day, a new sub-directory is created to store the audio archives. The sub-directory name is formatted as YYYYMMDD where YYYY is the year, MM is the month and DD is the Day of the month.
Each time microphone or speaker output is produced, a separate file is created using the following naming convention:
"in-" (for audio coming in from an IP Endpoint) / "out-" (for audio going from an Operator's microphone)
Unique ID assigned to an Operator ID
Unique IP Endpoint MAC ID
Time (HH:MM:SS-mmmm)
.wav extension
Use the Audit tab or the TalkMaster FOCUS Archive Viewer Console to play back the archived audio.
To specify a network drive for any of these file locations, use UNC notation (\\server\sharename) and add the appropriate Account and Password information to the Log On tab of the Windows Service for the TalkMaster FOCUS Server.
Text to Speech Engine - The Text to Speech (TTS) drop down list is used to define the Text-to-Speech voice engine that is available to Consoles and third party product that interface with the Server
Select the Text-To-Speech engine to be used by clicking the Voice drop down arrow New engines can be added through the Windows Control Panel by selecting the Speech option.

TalkMasterFOCUSAdminConsoleReferenceManual
22
Paging Options
The Paging Options sub-tab of the Setup tab is used to specify how audio packets are delivered when the same audio is simultaneously sent to multiple IP Endpoints (in the Operator Console, Talk Mode is set to Group or All Active on the Intercoms tab or any operation from the Paging Groups tab).
UBAM is in use - Check this box if you are using UBAM software to send 1-way audio pages and to find and configure Intercoms/ Paging Endpoints in remote subnets. Checking this box forces the TalkMaster FOCUS Server to use UDP Broadcasts to find and configure Intercoms/ Paging Endpoints via the UBAM software. This is typically used for older ii3 IP Endpoints.
If this option is selected, the Send Pages via UDP Broadcast must also be checked and the UBAM Software must be setup.
Send Pages via UDP Unicast - By checking this box, audio will be sent to each device in the group via UDP Unicast. UPD Unicast generates a separate audio stream for each device that is receiving the Page. The maximum number of devices that can concurrently receive UDP Unicasts is dependent on the Server and network hardware.
IP7 IP Endpoints configured with the RTP option will receive the Unicast audio via RTP. The TalkMaster FOCUS Server will automatically assign a unique Source and Destination port for each IP7. The Source and Destination Ports will be automatically assigned starting from port

Setup Tab
23
20000. If the IP7 is configured using a Fixed RTP Port, it will override the Destination Port assigned by the TalkMaster FOCUS Server.
For ii3 or IP7's configured without the RTP option, the Source Port will rotate between 5002 and 7002. Port 1459 will be used as the Destination Port.
If an IP Endpoint has been configured to use RTP, the audio will be sent via RTP to the automatically assigned or fixed RTP Port of the IP Endpoint.
Send Pages via:
UDP Broadcast - By checking this box, audio will be sent to the group via UDP Broadcast. UDP Broadcasts generate a single audio stream on your network that can be "heard" by all IP Intercoms/ Paging Endpoint. UDP Broadcasts do not typically cross subnets.
UDP Multicast - This option is only valid for the IP7 series intercoms and paging endpoints. By checking this box, audio will be sent to each device in the group via UDP Multicast. Multicast capable devices "subscribe" to a single audio stream sent by the Server. UDP Multicast must be properly configured on the network for this to work.
Multicast Address /24 - Specify the first 24 bits of the Multicast Address that will be used when pages are sent via UPD Multicast. The last 8 bits along with the destination port will be rotated from 3 to 253 and will then be reset back to 3.
Note: If both Broadcast and Multicast are selected, IP7 Series devices will automatically use Multicast and ii3 Series devices will use Broadcast.
System Tray Port - Allocates the port number used for the System tray tool to communicate with the TalkMaster FOCUS Server. The System Tray Port icon to changes color to indicate the server status. If the ICON is red, but the TalkMaster FOCUS Server is running, the port is most likely in use. Select a different port and make the corresponding change in the Preferences for the system tray status ICON


25
Queues Tab
Queues
The Queues tab lists the currently defined queues and allows them to be maintained.
A Queue is a group of logically related IP Endpoints that will be monitored by one or more Operator Consoles for 2-way Intercom operations. Once Queues have been defined, IP Endpoints will be assigned to them using the IP Endpoints - Options 3 sub-tab. Queues will be managed by Operators specified in the Operator - Queue Management sub-tab.
The Unassigned Queue is the system defined default Queue that will be used if no Queues are created. If an IP Endpoint is not assigned to a specific queue, it belongs to the Unassigned Queue.
A Queue can be configured to overflow IP Endpoints to additional Operators monitoring other Queues based upon certain conditions. The Overflow condition is reset when call volumes return to defined acceptable service levels.
Queue Name - Assign a descriptive name that will be used to identify the Queue.
Overflow on queue age - Specifies that the Overflow condition is based upon the age of the oldest call that has not been answered for this queue.

TalkMasterFOCUSAdminConsoleReferenceManual
26
Reset Overflow Age - The age of the oldest call that will reset the Overflow condition.
Overflow Age - The age of the oldest call that will set the Overflow condition based on seconds, minutes or hours.
And / Or - When both the Overflow on queue age and the Overflow on queue size have been selected, click the And or Or radio button to specify how the two conditions should be evaluated. When And is selected, both conditions must be met to put the Queue into Overflow status. When Or is selected, either condition can be met to put the Queue into Overflow status.
Overflow on queue size - Specifies that the Overflow condition is based upon the number of unanswered calls in this queue.
Reset Overflow size - Enter the number of unanswered calls that will reset the Overflow condition.
Overflow size - Enter the number of unanswered calls that will set the Overflow condition.
Priority Intercoms Overflow to all Consoles - Sets an overflow condition for any Intercom that has a defined priority in this queue. If a call is received from a Priority Intercom, the call will be sent to all Operator Consoles that are currently logged on. The Priority can be set in the Queues sub tab of the IP Endpoints tab.
To Create a new Queue, click the New button. A default name of NEW QUEUE is automatically populated into the Queue Name field. Highlight the value and type in a new name. Configure any overflow conditions and click Save when done.
To Update an existing Queue, click on the Queue Name on the left hand side of the page, then change any settings on the right hand side of the page. Click Save.
To Delete an existing Queue, click on the Queue Name on the left hand side of the page, click the Delete button. A dialog box will be presented to confirm the deletion.
Press the Update Now button on the bottom of the screen to send any changes that have been made in the Administrator Console to the Server and Operator Consoles.

27
IP Endpoints Tab
IP Endpoints
The IP Endpoints tab is used to discover and configure all IP Intercoms/Paging Endpoints connected to the current network. Once discovered, they can be configured as a Client connecting to the TalkMaster Server and/or Registering to a SIP server.
Initially, the Intercom list will be empty. Press the FIND ALL button to discover any new IP Endpoints that have been added to the network to populate the IP Endpoint list. All IP Endpoints must initially be discovered on the network in order for them to be configured.
Click the Find All button to discover IP Endpoints as follows:
The Server will issue both a UDP Broadcast and a UDP Multicast discovery request to discover any new IP Endpoints. IP7 series devices in Multicast capable subnets will respond with a UDP packet to the Server with their device configuration and will be added to the list of IP Endpoints. ii3 series devices (and IP7 series devices that are not in a multicast capable network) in the same network segment as the Server will respond by sending a UDP Broadcast with their device configuration and will be added to the list of IP Endpoints
If an IP7 IP Endpoint was not discovered because it was in a non-multicast capable subnet but the device's IP Address is know, use menu option Tools-->Find Device By IP Address and Tools--> Save Device By IP Address to discover and configure the device
If the IP Endpoint was not discovered and the IP Address is not known, install TalkMaster on a laptop or PC in the same subnet as the device to perform the initial configuration
Once a device has been configured to connect to the Server, the device's configuration will always be available through its TCP connection to the Server
Once an IP Endpoint has been discovered, it will remain in the list on the IP Endpoints tab until it is deleted
If an IP address is listed as Remote, the device is an ii3 device and cannot be configured from this Administrator Console. If appropriate, refer to the installation CD for instructions on installing the UBAM software which will allow configuration of older ii3 IP Endpoints across different network segments.
If an IP address is listed as Disconnected, the intercom is turned off, not connected to this Server or not operating correctly.
The IP Endpoints tab is composed of four sub-tabs General, WiFi, eSIP and ZC and each of these has multiple sub-tabs. Changes made on the General, WiFi, eSIP and ZC sub-tabs are applied when the Save button is pressed. Depending on the IP Endpoint model, it will take 10 to 40 seconds for the changes to take affect.
The IP Endpoints are listed in ascending order by Auth / Location Name / Icom ID. IP Endpoints that are not authorized will appear at the top of the list, sorted by the Icom ID. Click any one of the column headers to resort the IP Endpoint list.

TalkMasterFOCUSAdminConsoleReferenceManual
28
Auth - The Authorized column is used to specify that the IP Endpoint has been authorized for use on this Server. If the IP Endpoint is configured to connect to a different Server, then this option should not be checked. Any IP Endpoint that connects to this Server must be Authorized in order to be listed on Operator Consoles. If the Authorized box is checked, the Auth column will contain a green or a red ICON
The Auth ICON colors are described below:
Green - Indicates that the IP Endpoint is Authorized and that it is currently connected to this Server. Note that if the Save button is pressed, the ICON will change to Red till the device reconnects
Red - Indicates that the IP Endpoint is Authorized, but is not currently connected to this Server
Yellow - Indicates that the IP Endpoint is connected to this Server, but is not Authorized to this Server
White - Indicates that the IP Endpoint is not connected and not Authorized to this Server
Location Name - Friendly name assigned to an IP Endpoint.
ICOM ID - Unique ID (last 6 digits of the MAC Address) assigned to the IP Endpoint at the factory. Match this number to the ICOM ID sticker on the side or bottom of the Intercom.
IP Address - The IP Address of the Intercom.

IP Endpoints Tab
29
Queue - Name of the Queue the Intercom has been assigned to. If the Intercom has not been added to a Queue, it defaults to Unassigned.
Right clicking on an IP Endpoint provides the ability to display an IP Endpoint's health report:
Reset Connection - Closes the TCP connection between the IP Endpoint and Server and forces the device to reconnect.
Save Configuration - Saves the IP Endpoint's configuration. This is the same as pressing the SAVE button in the lower right hand corner of the screen.
Delete Device - Removes the IP Endpoint's configuration from TalkMaster. This is the same as pressing the DELETE button in the lower right hand corner of the screen.
Get health - This option will display the following dialog:
The buttons located under the right hand pane are used when maintaining the IP Endpoints list.

TalkMasterFOCUSAdminConsoleReferenceManual
30
Delete - To delete an IP Endpoint from the list, select it and press the Delete button. A confirmation dialog will be presented to confirm the action. If the IP Endpoint has a Security Code, a dialog will be presented to verify that the device should be deleted.
Save - Applies any changes made to the IP Endpoint's configuration. Once the Save button is clicked, the Intercom will be unavailable for approximately 10 - 40 seconds while the changes are applied.
Replace - The Replace button is used to replace the configuration of an existing IP Endpoint with a new IP Endpoint that is not yet configured. When a IP Endpoint that is not yet configured is selected, the Replace button becomes available. Pressing the Replace button opens a dialog containing any Authorized IP Endpoint that is currently disconnected (check the Show All box to display all Authorized IP Endpoints). Select the Intercom/Paging Endpoint from the list that should be replaced. The IP Endpoint's configuration, including the Queue and Group information will be copied and the old endpoint will be removed.
Press the Update Now button on the bottom of the screen to send any changes that have been made in the Administrator Console to the Server and Operator Consoles.
Client Types
IP7s can be defined in one of five ways by modifying the Endpoint Type and the eSIP Type:

IP Endpoints Tab
31
TalkMaster FOCUS Endpoint – The IP Endpoint will connect to the TalkMaster FOCUS Server or to
an IP Endpoint configured as a Direct Mode Server-Peer.
o On the General--> Configuration tab, select Client from the Type drop down box
o On the eSIP--> Options 1 tab, select Not a SIP Device from the drop down box
SIP Extension – The IP Endpoint will register as an extension on a SIP based VOIP Phone system.
The IP7 can be configured as a 1-way Paging Speaker or as a 2-way audio extension that can optionally dial an extension when its TALK button is pressed.
o On the General--> Configuration tab, select SIP Stand-alone from the Type drop down box
o On the eSIP--> Options 1 tab, select SIP Extension Only or Dial SIP Extension on PTT from
the drop down box
o If the Dial SIP Extension on PTT was selected, enter a number in the Out Dial Extension
field
o Refer to the eSIP Stand-alone Configuration Steps topic for additional details.
TalkMaster FOCUS/SIP Extension – The IP Endpoint will connect to the TalkMaster FOCUS Server
and can be configured as an extension on a SIP based VOIP Phone system. This provides the ability for a call initiated from an IP7 to appear as an incoming call on the TalkMaster FOCUS Operator Console and if it is not answered, to “overflow” to a SIP Extension.
o On the General--> Configuration tab, select Client from the Type drop down box
o On the eSIP--> Options 1 tab, select SIP Extension Only or Dial SIP Extension on PTT from
the drop down box
♦ When SIP Extension Only is selected, engaging the IP Endpoint's TALK switch will create
a Call Queue Entry in TalkMaster. If the Out Dial on Queue Overflow option is checked and a Queue Overflow occurs, the Call Queue Entry in TalkMaster will be removed and a SIP call will be generated using the Out Dial Extension
♦ When Dial SIP Extension on PTT is selected, engaging the IP Endpoint's TALK switch will
make a SIP call
o If the Dial SIP Extension on PTT was selected, enter a number in the Out Dial Extension
field.
Server-Peer - Two IP Endpoints can be configured as a standalone pair of Intercoms in Direct Mode
(no software required) . In this configuration, one is configured as Server and the other as a Client.
o On the General--> Configuration tab of the first IP Endpoint, select Server from the Type
drop down box

TalkMasterFOCUSAdminConsoleReferenceManual
32
o Assign a fixed IP Address, Subnet and Gateway and specify 3000 for the Port
o On the General--> Configuration tab of the second IP Endpoint, select Client from the Type
drop down box
o Configure the Server IP and Port to the IP Address and Port assigned to the Server Intercom
o On the eSIP--> Options 1 tab, make sure both IP Endpoints have the Not a SIP Device
selected from the drop down box
Music Injector - The IP7 IP Endpoint can be configured as a Music Injector to send low priority
Multicast background audio to other IP7s on the Network. The Injector receives analog audio input from its Microphone or Line In connections and sends it out on the network to a specific Multicast IP Address/Port. Any IP7 that is setup to play Background Music from that IP Address/Port will play this audio while it is idle.
o On the General--> Configuration tab of the IP Endpoint, select Music Injector from the Type
drop down box
o On the General--> Options 1 tab, select the Input Source of the analog music source as
either Microphone or Line In
o On the General--> Options 2 tab, check the Play Multicast Background Music option
o Enter the Multicast IP Address and Port that the audio is to be sent to
o Check the PTT Sends Audio option to have the Injector send the Multicast audio when the
Injector's Talk switch is engaged. If this option is not check, the Injector will continuously send Multicast audio
o Select the Sample Rate Multicast audio will be sent at. A higher sample rate produces better
fidelity, but also uses more bandwidth. 8000 will produce a 64kbps stream, 11025 will produce a 88kbps stream and 22050 will produce a 176kbps stream
o Configure all IP7s that should play audio from the Music Injector by checking the Play
Multicast Background Music option and entering the same Multicast IP Address and Port used by the Injector.
General - Configuration
The Configuration sub-tab of the IP Endpoints tab is used to update the IP Address and option information that is saved in the IP Endpoints so they can operate on the network.
Press the Copy Defaults button to copy in the settings from the Endpoint, eSIP and WiFi Defaults. The Save button must be pressed for these settings to be applied.

IP Endpoints Tab
33
Select an Intercom on the left side of the page and set up the IP information as specified below. Select other tabs to configure additional information before clicking the Save button at the bottom of the page.
Type - The Type determines how the IP Endpoint will be used. IP7s can configured in one of
four ways. Refer to the Client Types topic for more information.
Client – The IP Endpoint will connect to a software server or to a IP7 device configured as a Direct Mode Server. This is the setting used to connect to software servers based on the TalkMaster FOCUS family of software products.
Server - The IP7 Endpoint will act as a Direct Mode Server. In Direct Mode, a pair of IP7 Endpoints can communicate with each other without any software running. An IP7 configured as a Client will connect to it. Refer to the Application Note on Direct Mode Configuration for details.
SIP Stand-alone – The IP7 IP Endpoint will be configured as an Extension on a SIP based VOIP Phone system. The IP7 can be configured as a 1-way Paging Speaker or as a 2-way audio extension that can dial a pre-defined extension when its TALK button is pressed.
Music Injector - The IP7 IP Endpoint can be configured as an Audio Injector to send Multicast audio to other IP7s on the Network. The IP7 Endpoint cannot be used for any other purpose when this option is selected. Refer to the Application Note on Configuring an IP7 as an Audio Injector to complete the configuration.
The SIP Stand-alone and Music Injector types are not supported on the ii3 model IP Endpoints.

TalkMasterFOCUSAdminConsoleReferenceManual
34
Location Name - Assign a descriptive name to the IP Endpoint. This will be used to identify the Endpoint and will be displayed on the Consoles.
Adapter In Use: - Will display Ethernet or Wireless depending on how the IP Endpoint is connected to the network. The IP Address, Subnet Mask, Gateway and DNS Address are displayed below
Authorized IP Endpoint - This box must be checked to authorize this device to this TalkMaster Server and allow the IP Endpoint to appear on the Operator Consoles. If an Intercom is connected to this Server but this box is not checked, it will only appear on the Administrator Console or on an Operator's Console defined with Administrative Rights running on the Server. If the device is configured to connect to a Server other than this one, do not check this option
Server IP/Port - Configures the Intercom to connect to the IP address and port of the machine that the TalkMaster FOCUS Server is running on. The Server's IP Address can be selected by clicking in the box or a different IP address can be entered. The default port TalkMaster FOCUS Server uses to listen for IP Endpoint connections is Port 3000
NIC Version - Firmware Version information.
ICOM Version - Firmware Version information and associated options.
Defaults button - Pressing the Defaults button copies in all of the settings from the Endpoint Defaults and eSIP Defaults tab.
General - Adapters
The Adapters tab sub-tab of the General tab is used to specify the IP Address of the IP Endpoint. On devices that have a Wireless adapter , it will only be available when the Ethernet port is unplugged. Only one adapter can be active at a time. If both the Ethernet and Wireless are available, the Ethernet adapter always takes precedence.

IP Endpoints Tab
35
IP Endpoint's Ethernet Adapter
Assign IP Automatically with DHCP - Check this option to use DHCP to assign the IP Address or enter a static IP Address, Subnet Mask, Gateway and DNS. If DNS is not available, specify 0.0.0.0. Please note that DNS is only available in IP7 running V7 or greater firmware
IP Endpoint's Wireless Adapter
Assign IP Automatically with DHCP - Check this option to use DHCP to assign the IP Address or enter a static IP Address, Subnet Mask, Gateway and DNS. If DNS is not available, specify 0.0.0.0. Please note that DNS is only available in IP7 running V7 or greater firmware
Alt Network Set - The wireless adapter creates an internal bridge using IP Address 192.168.3.2. If the IP7 needs to route to any address within the 192.168.3.x subnet, then check this option. The IP7 will then using an internal bridge address of 172.16.3.x
Server-Peer Listening Port
If the Server-Peer option was selected from the Type drop down on the Configuration tab, specify the port the Server-Peer will listen on for a connection request. The default port is 3000.
Options 1
The Options 1 sub-tab of the General tab allows additional features found on the IP Endpoints to be configured.

TalkMasterFOCUSAdminConsoleReferenceManual
36
Fail Forward IP 1,2,3 - specify up to three IP addresses of alternate server / ports that this IP Endpoint will attempt to connect to if it's current server / port becomes unavailable
Enable Automatic Return to Primary - Select this option to have the IP Endpoint automatically return to its primary Server IP when that Server is available. Only available for IP7 IP Endpoints running firmware version 6.0 or greater
GPIO 4 Mode - (legacy ii3 devices only) specify how General Purpose I/O (GPIO) port 4 is used. On Intercom models with an integrated Relay (Dry Contact), GPIO 4 is used to activate the Relay. The following options are available in the drop down list.
Factory Default - Controls the Monitor function in Direct Mode on Desktop models
Door / Relay Output - Selecting this option displays the Open button in the Active Intercom List. This option is used in conjunction with Door Relay Activate (see below) which sets the amount of time the relay will stay active
Logic Input - Uses GPIO 4 as an input device. Used with custom developed applications to monitor other equipment
Activate On... - Activates onboard Relay when ever the IP Endpoint's Mic and/or Speaker are activated. When both Mic and Speaker are checked, the Intercom will wait for 1 second of inactivity before turning off the GPIO 4

IP Endpoints Tab
37
Activate on PTT - Activates GPIO4 (or the onboard Relay if present) when the IP Endpoint's button is pushed
Relay Mode - (IP7 devices) specify how the dry contact Relay is used. The following options are available in the drop down list.
Factory Default - Relay is not used
Door / Relay Output - Selecting this option displays the Open button in the Active Intercom List of the Operator Console. After selecting this option, the Door Relay Activate option will appear which sets the amount of time the relay will stay active
Activate On... - Activates onboard Relay when ever the IP Endpoint's Mic and/or Speaker are activated. When both Mic and Speaker are checked, the Intercom will wait for 1 second of inactivity before turning off the relay. This allows you to trigger external devices when interacting with endpoints
Activate on PTT - Activates the Relay when the IP Endpoint's Talk button is pushed
Security - this option sets a password for the IP Endpoint. Once this has been set, both the TalkMaster FOCUS Server and IP Endpoint will issue "challenge-response" requests after establishing a TCP connection. The IP Endpoint will also issue a Challenge-Response when ever it receives a UDP command (such as a FIND ALL request). If the correct password is not received by the "challenger", no additional information will be sent to the receiver .
Please Note: To use Security, the Enable Endpoint Security option must be selected on the Setup --> Settings tab. Consider using Endpoint Defaults to assign the security value and make sure to use the menu option File --> Export Settings to save all configuration information to a secure location so it can be restored using the File - Import Settings. Make sure to review the Using Endpoint Security topic before selecting this option.
Sensor - (IP7 series) the Sensor can be used to monitor the status of a door that is being controlled by the Relay. The Sensor can be configured to trigger when it is closed to ground or open to ground. When triggered, the Door Open button in the Operator Console screen will change colors to indicate its status. Yellow indicates the door was open after the Operator pressed the Door Open button. Red indicates the door was open without the Operator first pressing the Door Open button. The color of the Door Open button remains until the Sensor is returns to its default value.
Active when closed to ground Door) - Changes the Door Open button's color in the Operator Console when the Sensor connector is connected to the GND connector on the IP7
Active when open to ground (Door) - Changes the Door Open button's color in the Operator Console when the Sensor connector is dis-connected from the GND connector on the IP7
Active when closed to ground (Custom) - Sends the "custom keypress" to the software when the Sensor connector is connected to the GND connector on the IP . Select this option for monitoring the Sensor in custom developed applications
Active when open to ground (Custom) - Sends the "custom keypress" to the software when the Sensor connector is dis-connected from the GND connector on the IP7. Select this option for monitoring the Sensor in custom developed applications
Input Source - (IP7 series) the Input Source determines whether the Intercom will use audio originating from the Intercom's Microphone or Line In connectors.

TalkMasterFOCUSAdminConsoleReferenceManual
38
Enable ADA Mode - (IP7 series) check this box only when using ADA model IP Endpoints (Americans with Disabilities Act). Selecting this option disables the Relay, Sensor and Call Button options. When this option is selected, the LED on the ADA Call Station will begin to flash and an audible tone will sound until the call has been answered. The audible tone will then stop and the LED will go solid. When the call has been completed, the LED will be shut off.
Use UDP/RTP - Available on IP7 series Intercoms only. Check this box to have the Intercom send and receive audio using the RTP protocol instead of the TCP protocol. Using this option will reduce the chance for audio delays to occur. If this option is selected, make sure the Use RTP for IP7 IP Endpoint Audio box on the Settings sub-tab of the Setup tab is also checked.
Fixed RTP Port - If the IP7 is behind a NAT'd Firewall, a Fixed RTP Port must be specified and a port forwarding rule must be established in the Firewall. The combination of the IP7's external IP Address and Fixed RTP Port must be unique.
Supports Full Duplex Audio - Check this box if the IP7 Endpoint will be used in Full Duplex mode.
Please Note: Most IP7s are capable of utilizing full duplex audio, but only the latest models support Acoustic Echo Cancellation (AEC). AEC is required in installations where the audio coming from the IP Endpoint's Speaker can be picked up by the IP Endpoint's Microphone. To use Full Duplex with older IP7's, a handset or headset is required to prevent an echo from being heard by the device calling the IP7.
ALC - An Automatic Level Control (ALC) Detector monitors the ambient noise level in a area and sends it to ALC Enabled devices in the same area. The ALC Enabled devices can adjust their speaker volume level up to 2 steps higher or lower t o compensate for the change in the ambient noise level..
The 1st selection specifies the ALC mode
The 2nd selection specifies the typical ambient noise level of the area
The 3rd selection specifies the Port the ALC Group will communicate on
The 4th selection determines the sensitivity level of the microphone on the ALC Detector
Please Note: ALC Level Control is a separately licensed TalkMaster FOCUS feature
Options 2
The Options 2 sub-tab of the General tab allows additional features found on the IP Intercoms to be configured.

IP Endpoints Tab
39
Remote Listen Disable - Disables the ability to remotely activate the Intercom's microphone. Used for Paging Speakers or environments where remote listening is not allowed.
Call Button - Changes the Intercom's PTT button to a Call button. Prevents the audio from being transmitted when the button is pressed. See PTT vs Call button topic.
Handset - Check this box when using the HS-x1 Handset hardware. When a user picks up the HS-x1 Handset from its cradle, an incoming call is placed to the Operator Console. The Operator Console can place an outgoing call to a Handset by selecting it and clicking the Call button (the Talk button changes to a Call button when the device is selected and no call is in progress).
Speaker - Check this box if the HS-x1 Handset has an optional speaker that can be used to play an audio page while the Handset is still in the cradle.
IP7 Tracking Enabled - Allows IP7 status information to be sent to a unicast or multicast IP Address. Use only under the supervision of Digital Acoustics Technical Support. Data will be captured by the TalkMaster FOCUS Support Service and can be displayed using the TalkMaster FOCUS Support Central application.
Use IGMPV3 Instead of IGMPV2 - changes the Intercom to use IGMPV3 instead of the default IGMPV2. IGMPV2 devices will work correctly in an IGMPV3 network.
Play Multicast Background Music - Check this option and specify a multicast IP Address:port to include this endpoint in low priority background music operations. Use this with a IP7 configured as a Music Injector to play background music/audio. Background music is considered low priority and will automatically be interrupted by any Intercom or Paging activity. Once the Endpoint has been idle for 5 - 10 seconds, it will start the background music up again.

TalkMasterFOCUSAdminConsoleReferenceManual
40
Server-Peer Settings - These options are available when configuring a Direct Mode Server. For more details on direct mode configuration, refer to the Application Note - Direct Mode Configuration included with the software documentation.
No Beep Tone After PTT Released - check this box to prevent a beep from being played at the end of a Talk session.
Default To Listen - check this box to have the Server automatically monitor the Client Intercom.
Server-Peer Hands Free - checking this box causes the Client Intercom's Talk button to "dial" the Server Intercom. The Server Intercom answers by pressing and holding the Talk button. When the Server's Talk button is released, the Client Intercom can respond "hands-free".
Audio Settings - These options are used to change some of the IP7audio defaults.
Disable AGC - Check this box to disable the IP7's Microphone AGC (Automatic Gain Control). The Microphone's AGC attempts to amplify soft sounds and soften loud sounds. In certain environments, it may be necessary to turn this feature off. When the AGC is turned off, a fixed amount of Mic Gain must be specified as a number between 0 and 63. When specifying Mic Gain, try making changes in increments of 25% and adjust as necessary.
Default Microphone - Select the default audio codec to be used to be used when the IP7's Talk switch is depressed. The IP7's microphone supports sending uLaw or PCM audio. Older ii3 Intercoms only support sending PCM.
Please note that this only applies when the IP7's Talk switch is pressed. This does not apply when the IP7's microphone is activated via software or if the IP7 has been configured with the Call Button option.
Audio Profile - This option is only available on new IP7's that support Acoustic Echo Cancellation (AEC). The manual included with the hardware may recommend one or more Audio Profiles based on the environment it is installed in.
Press the Set button and select a profile from the dialog. Press the Done button to apply the audio profile

IP Endpoints Tab
41
To clear the audio profile, select None, then press the Done button
Options 3
The Queue Assignment sub-tab of the Intercoms tab assigns the Intercom to a Queue and allows a priority to be specified.

TalkMasterFOCUSAdminConsoleReferenceManual
42
Queue Settings
Assigned Queue - Select a Queue from the drop down list to assign to this IP Endpoint. If no queues have been selected or assigned, the IP Endpoint will default to the system generated Unassigned queue.
Priority - Select a priority from the drop down list. If the value Normal is selected, the Intercom has no priority. Calls from intercoms are sorted in Priority sequence in the Operator Console Calls Waiting List in the following Sequence:
Highest
Values 1-9 (1 is highest in the range)
Normal
If the Queue is set for Priority Intercoms Overflow to all Consoles, selecting any value other than Normal will cause this Intercom to go into an Overflow condition when its call button is pressed.
Input Device for Group - An IP Endpoint can be configured to record audio that will be sent to a Paging Group defined with a "queued" delivery option. If a Paging Group is selected, any time the TALK switch

IP Endpoints Tab
43
is engaged on the IP Endpoint, audio will be recorded and then sent to the Queued Paging Group when the Talk button is released. This can be used to make announcements in areas where a PC is not available. Please note that the IP7 cannot be used for 2-way communication when this option is used.
To configure this option, select a Queued Paging Group from the drop down list.
When configured with the Input Device for Group option, the IP Endpoint cannot be used to initiate a 2-way Intercom call.
Enable Fast Disconnect Detection - This option enables a two-way keep-alive packets between the IP Endpoint and the Sever. With this option enabled, both the IP Endpoint and Server will ensure that keep-alives are being received in a timely manner. If a keep-alive fails to arrive on time (Keep-Alive time plus 5 seconds), the connection will automatically be closed. If this option is not checked, the connection can take up to 45 seconds to close after a failed keep-alive
Primary Server Retry Attempts - Specify the number times an Endpoint should attempt to connect to the Primary Server before attempting to connect to a Fail Forward Server. Connection attempts are made every 5 seconds.
Recording Warnings - This option plays a tone to an IP7 Endpoint speaker to indicate that the endpoint's Microphone is switched on. The tone is repeated based on the frequency specified below.
Consult local laws governing the recording of audio conversations to determine if this option must be checked!
Enable Recording Warning - Check this option to enable the recording warnings.
For - Enter the duration of the recording tone in 100 millisecond increments from 100 to 500 milliseconds (1/10 to 1/2 second). The longer the duration, the louder the tone will sound. If the tone causes the Sound Level meter to spike, use the lowest setting for this value.
Every - Enter how often the recording tone should be repeated. The frequency of the recording warning can be specified in 15 second increments from 15 seconds to 300 seconds .
Associated Video Source - Select an IP Camera from the drop down list that will be associated with this IP Endpoint. The cameras must be defined as described in the IP Video Sources topic.
PTT Disabled - Check this option to disable the TALK connector on an IP Endpoint. This option is rarely used.
Don't Create Call Queue Entries - Check this option if using this IP Endpoint's TALK connector in conjunction with the TalkMaster FOCUS Event Management Software. By checking this option (as well as the Call Button option on the Options2 tab), the TALK connector can be used to generate an Event, but will not generate a call that must be answered by an operator.
WiFi - Config
The Config sub-tab of the WiFi tab is used to specify the SSID and Passphrase used to connect to the wireless network. If an IP Endpoint does not have a wireless adapter, this tab is not enabled.

TalkMasterFOCUSAdminConsoleReferenceManual
44
SSID - Enter or select the wireless SSID after pressing the GET button
GET - Pressing the GET button will retrieve a list of wireless SSIDs that are currently available. After pressing the button, wait about 5 seconds before selecting the SSID drop down arrow
Passphrase - Enter the passphrase associated with the SSID
WPA2-Enterprise - Not currently supported
Test - Pressing the test button forces the IP Endpoint to verify that it can reach any of the IP Addresses specified in its configuration:
Gateway
Internet
SIP Server
TalkMaster Server IP
WiFi - Status
The Status sub-tab of the WiFi tab provides information about the wireless network connection. If an IP Endpoint does not have a wireless adapter, this tab is not enabled.

IP Endpoints Tab
45
Connection Status - Displays the status of the Wireless Network Adapter
SSID - Displays the SSID that the IP Endpoint is currently connected to
Strength - Displays the relative signal strength of the connection
IPw MAC - Displays the MAC Address of the Wireless Adapter
Query APs - Press this button to display a list of SSIDs, their relative signal strength and the Encryption method
eSIP - Options 1
The eSIP sub-tab of the IP Endpoints tab is used to configure the SIP Protocol for IP7 Endpoints. The SIP Protocol is used to communicate with SIP based IP Phone systems.
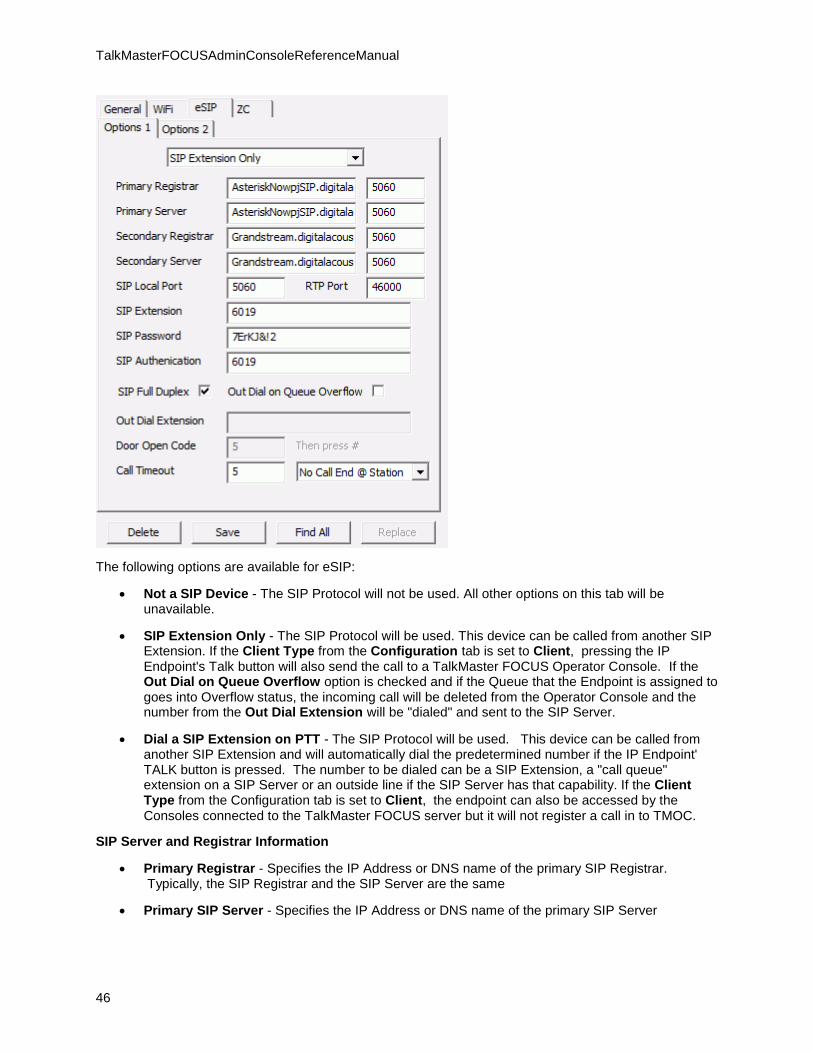
TalkMasterFOCUSAdminConsoleReferenceManual
46
The following options are available for eSIP:
Not a SIP Device - The SIP Protocol will not be used. All other options on this tab will be unavailable.
SIP Extension Only - The SIP Protocol will be used. This device can be called from another SIP Extension. If the Client Type from the Configuration tab is set to Client, pressing the IP Endpoint's Talk button will also send the call to a TalkMaster FOCUS Operator Console. If the Out Dial on Queue Overflow option is checked and if the Queue that the Endpoint is assigned to goes into Overflow status, the incoming call will be deleted from the Operator Console and the number from the Out Dial Extension will be "dialed" and sent to the SIP Server.
Dial a SIP Extension on PTT - The SIP Protocol will be used. This device can be called from another SIP Extension and will automatically dial the predetermined number if the IP Endpoint' TALK button is pressed. The number to be dialed can be a SIP Extension, a "call queue" extension on a SIP Server or an outside line if the SIP Server has that capability. If the Client Type from the Configuration tab is set to Client, the endpoint can also be accessed by the Consoles connected to the TalkMaster FOCUS server but it will not register a call in to TMOC.
SIP Server and Registrar Information
Primary Registrar - Specifies the IP Address or DNS name of the primary SIP Registrar. Typically, the SIP Registrar and the SIP Server are the same
Primary SIP Server - Specifies the IP Address or DNS name of the primary SIP Server

IP Endpoints Tab
47
If the Primary SIP Server or Registrar becomes unavailable, the IP Endpoint will automatically register with the Secondary Registrar and Server. The IP Endpoint will automatically de-register with the Secondary Registrar and register with the Primary Registrar when it is available
Secondary Registrar - Specifies the IP Address or DNS name of the secondary SIP Registrar. Typically, the SIP Registrar and the SIP Server are the same
Secondary SIP Server - Specifies the IP Address or DNS name of the secondary SIP Server
SIP Port Information
SIP Local Port - Specifies the IP Endpoint's port to be used for the SIP protocol. This defaults to port 5060
RTP Port - Specifies the IP Endpoint's port to be used for the RTP traffic. This defaults to port 46000
SIP Extension Information
SIP Extension - Specify the SIP Extension that has been assigned in the SIP Server
SIP Password - Specify the SIP Password that has been assigned in the SIP Server
SIP Authentication - Specify the User associated with the Extension. Typically, this is the same as the SIP Extension
Processing Options
SIP Full Duplex - Check this box if the IP7 Endpoint will be used in Full Duplex mode
Some IP7s are capable of utilizing full duplex audio, but only the IP7-FD model supports Acoustic Echo Cancellation (AEC). AEC is required in installations where the audio coming from the IP Endpoint's Speaker can be picked up by the IP Endpoint's Microphone. To use Full Duplex with older IP7's, a handset or headset is required to prevent an echo from being heard by the device calling the IP7
If this option is not checked, calls will be in half-duplex mode. The phone operator will be able to speak and the user at the IP Endpoint will be able to listen when the call is initiated. The phone operator can press 0 on the phone to toggle the direction of speaking and listening
Out Dial on Queue Overflow - This option is only available when the Type field on the General--> Configuration tab is set to Client and the eSIP Endpoint is configured for SIP Extension Only. This option is not available when the Dial a SIP Extension on PTT has been selected. If this option is checked and the IP Endpoint's Talk button is pressed, the call will be sent to an Operator Console. If the Queue that the Endpoint is assigned to goes into Overflow status, the incoming call will be removed from the Operator Console and the endpoint will use the number from the Out Dial Extension field to dial the SIP server.
Out Dial Extension - If the Dial a SIP Extension on PTT option is selected, the number listed here will be dialed automatically when the IP7's Talk button is pressed . If the Out Dial on Queue Overflow option is selected and a Queue the IP Endpoint is a assigned to overflows, the TalkMaster FOCUS Server will instruct the IP Endpoint to dial this number
Door Code - Specifies the keys on the Phone's keypad to be pressed for the IP Endpoint to activate its Relay to open a door. If more that 1 digit is entered, the # key must be entered in addition to the Door Code through the Phones keypad
Call Timeout - While a call is in progress, specifies the number of seconds that audio can drop out before the call will be automatically terminated

TalkMasterFOCUSAdminConsoleReferenceManual
48
End Call - This option determines if the IP7 should be able to end the SIP call when the Endpoint's Talk or Sensor button is activated
No Call End @ Station - The call must be ended by the other party
PTT Ends Call - During an active SIP call, pressing the IP7's TALK button will end the call
Sensor Ends Call - During an active SIP call, activating the IP7's Sensor will end the call
eSIP - Options 2
The eSIP Options 2 sub-tab of the IP Endpoints tab is used to specify some less common SIP Settings.
When eSIP Endpoints behind a NAT'd firewall communicate with a SIP Server outside the firewall, the SIP packets may have to specify the external IP address of the eSIP Endpoint instead of the local address. Cloud based VoIP suppliers, Application Layer Gateway or Session Border Controllers often take care of this for voip traffic. If none of these are available, the following options can be used:
SIP Local Address - Specifies the IP Address to be specified in the SIP Packets for an IP Endpoint

IP Endpoints Tab
49
Use Local Address - Use the IP Endpoint's local address in SIP Packets. This is the default option
Use External Address - Use the external IP Address of the eSIP Endpoint. Selecting this option enables the External IP Address field so it can be manually entered
Use STUN - Use a STUN Server to determine the external IP Address of the eSIP Endpoint. Selecting this option will also test exchanging information with the STUN Server to ensure it works (some firewalls prevent STUN from working)
External IP Address - If the Use External Address option has been selected, enter the external IP Address of the eSIP endpoint. If the Use STUN option has been selected, this will be automatically determined by communicating with the STUN Server (press the FIND ALL button after the endpoint has rebooted to see the IP Address)
STUN Server - Enter the DNS of a private STUN Server or use a public stun server such as stun.stunprotocol.org with a port of 3478
STUN Status - If the Use STUN option has been selected, the results of the STUN test will be displayed
Keep-Alive Period (30-285) - The IP Endpoint generates a keep alive signal by sending an Options packet to the SIP server. The value can be set from 30 to 285 seconds
Register retry period (1-255) - Unless directed by Digital Acoustics, do not use this field. On a failed SIP Registration the IP Endpoint automatically varies the retry period based upon the number of failed attempts
Default to Listen - For Half-Duplex SIP calls, this option enables the Phone Operator to automatically listen to the user at the IP Endpoint when the call is initiated. The phone operator can press 0 on the phone to toggle the direction of speaking and listening. This option is ignored if the SIP Full-Duplex option has been enabled
Peer-to-peer - Checking this option will enable SIP peer-to-peer operations. The SIP Server and SIP Registrar fields will be disabled and ignored. The eSIP Endpoint can communicate with other SIP devices as long as the "called extension's" IP Address is included in the Extension that is being dialed (ie [email protected] where 6000 is the extension and 10.0.0.100 is the IP Address of the SIP peer)
Always Connected - This rarely used option is only enabled when the Peer-to-Peer option has been enabled. This option will cause the eSIP device to always "be connected" to the Out Dial Extension. If this device is ever disconnected, it will automatically initiate a peer-to-peer connection to the out dial extension
Register is Proxy - Some SIP Servers use the IP Address of the Register as a Proxy Address.
SIP/TCP - Checking this box will force the eSIP endpoint to use TCP instead of UDP for all SIP communication. Please note that TLS is not supported
Re-REGISTER with fresh credentials - Don not use this option unless directed by Digital Acoustics Support. The IP Endpoint will automatically refresh the credentials anytime a 401 response is received from the SIP Server
ZC - Options

TalkMasterFOCUSAdminConsoleReferenceManual
50
The ZC tabs are enabled when configuring an IP7-MZC - Multi Zone Controller. The IP7-MZC is a single IP Endpoint that can have up to 48 zones of full-duplex audio, expandable in groups of four using the ZX4L 4 Zone Expansion board.
During a call, the audio zones are software controlled and any combination of speakers and/or microphones in the zones can be activated or deactivated. Any active Speaker zones will play the same audio and any active microphone zones will be mixed and sent to the other party. An analog telephone can also be connected to the IP7-MZC so that a private conversation can be held over the IP connection.
This device has x Zones - The IP7-MZC will automatically detect the number of ZX4L Expansion Boards that are connected and multiply that number by 4 and will be displayed on the Zone Groups tab. This will enable the corresponding number of Zone Groups on the next tab, but this can be overridden by specifying a different number here. This can be helpful if the IP7-MZC is being pre-configured and the ZX4L expansion boards are not connected
Zone Controller has handset - Check this box if an analog telephone has been connected to the IP7-MZC and the Handset status needs to be reported to the software
Off-hook Sets Relay ON - Check this box if taking the analog Handset off hook should activate the IP7-MZC's onboard Relay
Off-Hook Activates PTT - Check this box if taking the analog Handset off hook should cause a "dialing" tone to be activated on the IP7-MZC
On-Hook Restores Previous ZONE - Check this box to automatically restore the Zone that was active prior to picking up the Handset
Off-Hook Mutes Active Zones - Check this box to enable automatic Muting of any active zones when the Handset is picked up
ZC - Zone Groups
The IP7-MZC can be controlled through custom software using Frame or Zone Group commands.
A Frame command specifies which speakers and microphones are activate in each of the 48 zones
A Zone Group command specifies a pre-defined group number that determines which speakers and microphones are activated in each of the 48 zones

IP Endpoints Tab
51
To define a Zone Group:
Check the box next to Available Zones. The Available Zones field will show the number of zones that have actually been detected or the number of zones entered on the ZC --> Options tab, which ever is greater, and the corresponding number of zones will be enabled
Select the Group to define from the drop down. Groups 1 thru 8 can be selected
Enter a Name to be associated with the Zone Group
Check the associated Speaker and Microphones that should be activated for the group
Continue to define groups by selecting a new group from the drop down
Zone Group 0 is reserved for deactivating all speakers and microphones is all zones.
Zone Group 9 is reserved for all speakers and microphones in all zones.
PTT vs Call button Feature
By default, when an IP Endpoint's TALK connector is grounded and the Call Button option is not checked::
The IP Endpoint's microphone is turned on and the audio is transmitted to the Server
The Server starts recording the audio
The Server sends the audio to the Operator Console

TalkMasterFOCUSAdminConsoleReferenceManual
52
An entry is placed in the Operator Console's Calls Waiting list
The "Your call is being connected" message is sent to the intercom
Once the Operator Console sends audio to the IP Endpoint, its microphone is turned off
When the TalkMaster FOCUS operator activates the Listen button, the IP Endpoint's microphone automatically switches on so the IP Endpoint's user can operate in Hands Free mode.
If desired, the Operator can play the recorded audio back by using the Message Player located at the bottom of the Calls Waiting list
When the TalkMaster FOCUS operator activates the Listen button, the Intercom's microphone automatically switches on so the Intercom user can operate in Hands Free mode
When the Call Button feature on the IP Endpoints --> General --> Opt2 tab is checked for an IP Endpoint, The Talk connector's function is changed to a Call button. When the Call button is pressed:
A short signal is transmitted to the Server.
The Server receives the signal.
The Server places an entry in the Calls Waiting Queue of the Operator Console.
The Server sends a signal to play a dual tone beep on the Intercom.
No audio is captured and associated with the entry in the Calls Waiting Queue using this option.
When the TalkMaster FOCUS operator activates the Listen button, the Intercom's microphone automatically switches on so the IP Endpoint's user can operate in Hands Free mode.
Intercoms in Call Button mode play a dual tone beep whenever they connect to the Server.
The Call Button feature should be selected when the IP7's TALK connector is activate for the entire call (for example, when connected to a magnetometer to detect the presence of an auto at a gate).
eSIP Stand-alone Configuration Steps
Digital Acoustics’ IP7 IP Endpoints support the SIP 2.0 Protocol and can connect to a SIP compliant Phone System. These instructions explain how to configure IP Endpoints to function as Standalone SIP Endpoints that do not connect to the TalkMaster FOCUS Server.
The first step is to set the defaults to be used for the IP Endpoint configuration:
Select the Setup --> Endpoint Defaults tab.

IP Endpoints Tab
53
Enable the IP Endpoint Type option and select SIP Stand-alone from the drop down box.
Enable the Assign Automatically with DHCP option. Check the box to enable DHCP or uncheck it to assign static IP Addresses.
Select the Setup --> Defaults--> eSIP Defaults tab
Enable the Primary Registrar and Primary SIP Server options and enter the IP Address and Port of the SIP Server. Typically, these have the same IP Address or DNS name.
Enable the Local SIP Port option and enter the default SIP Port for the IP Endpoint.
Enable the RTP Port option and enter the default RTP Port for the IP Endpoint.
If the IP7’s onboard relay will be used to open a door, enable the Door Code option and enter the 1 to 4 digit value to be entered through the Phones keypad to activate the relay.
Enable the Call Timeout option and enter the number of seconds to timeout an active call. While in a SIP call, if the other party in the conversation terminates abnormally, this is the number of seconds the IP7 will wait for RTP audio to be received before automatically ending the call.
The second step is to discover the IP Endpoints on the network:
Connect the IP7 IP Endpoints to the network.
Select the IP Endpoints tab.
Press the Find All button in the right hand corner of the screen. The IP Endpoints will be discovered on the network and will be listed in the left hand pane.

TalkMasterFOCUSAdminConsoleReferenceManual
54
The third step is to configure each IP Endpoint:
Select the IP Endpoint to be updated by clicking on it.
Select the Configuration sub tab:
Press the Copy Defaults button at the bottom of the right hand pane to copy the IP Endpoint and eSIP default values.
Optionally, enter a Location Name. This will only be displayed in the Administrator Console. The name that is associated with the extension defined in the SIP Server will display on phones during a call
If static IP Addresses are being assigned to the endpoints, enter the IP Address, Subnet Mask and Gateway
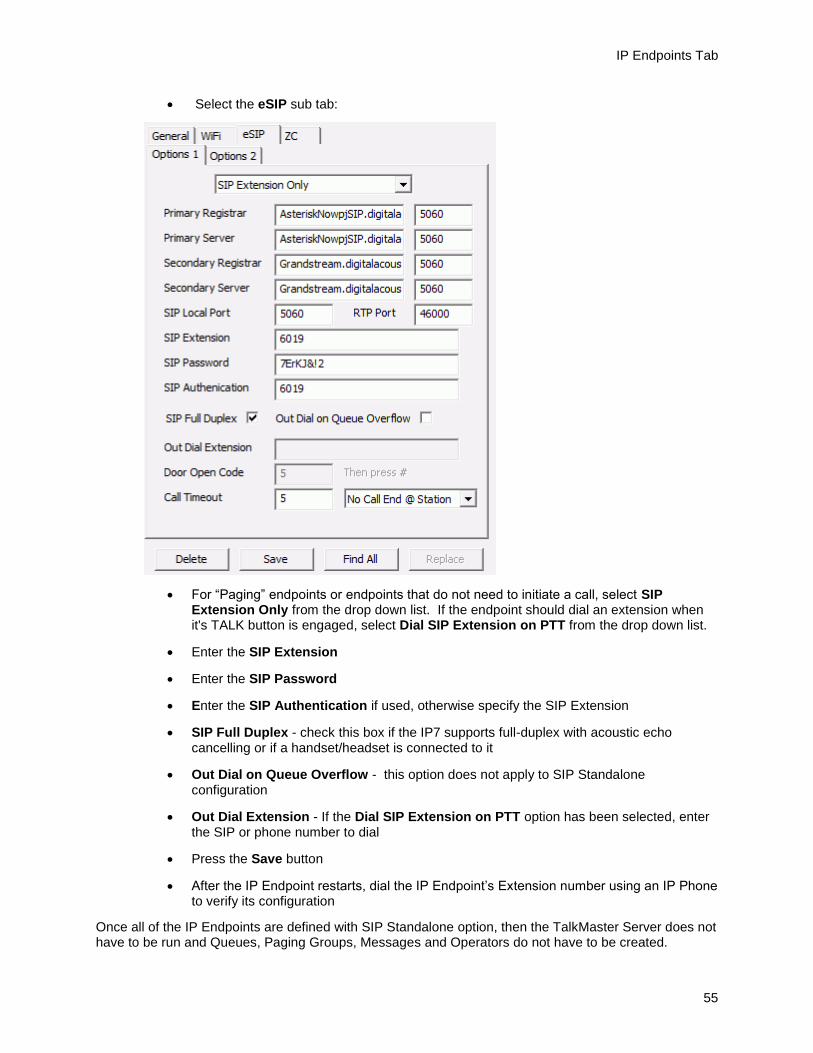
IP Endpoints Tab
55
Select the eSIP sub tab:
For “Paging” endpoints or endpoints that do not need to initiate a call, select SIP Extension Only from the drop down list. If the endpoint should dial an extension when it's TALK button is engaged, select Dial SIP Extension on PTT from the drop down list.
Enter the SIP Extension
Enter the SIP Password
Enter the SIP Authentication if used, otherwise specify the SIP Extension
SIP Full Duplex - check this box if the IP7 supports full-duplex with acoustic echo cancelling or if a handset/headset is connected to it
Out Dial on Queue Overflow - this option does not apply to SIP Standalone configuration
Out Dial Extension - If the Dial SIP Extension on PTT option has been selected, enter the SIP or phone number to dial
Press the Save button
After the IP Endpoint restarts, dial the IP Endpoint’s Extension number using an IP Phone to verify its configuration
Once all of the IP Endpoints are defined with SIP Standalone option, then the TalkMaster Server does not have to be run and Queues, Paging Groups, Messages and Operators do not have to be created.

TalkMasterFOCUSAdminConsoleReferenceManual
56
Endpoint Security can be used with IP Endpoints that have been configured for SIP Standalone. This will prevent them from being discovered/changed on the network using TalkMaster FOCUS Admin Console unless the device is listed in the IP Endpoints tab with the correct password. Make sure to use menu option File --> Export Settings and save the configurations to a secure location so that they can be restored if anything happens to the PC that was used to configure the IP Endpoints.
Automatic Level Control
Automatic Level Control is a separately licensed feature of IP7 IP Endpoints that can be used to automatically adjusts the volume level of IP Endpoints up or down one to two steps as the ambient noise in an area changes.
An IP7 with a microphone is configured as an ALC Detector. The ALC Detector monitors the ambient noise in an area and reports the normal level, the current level and the volume step change over the network every 2.5 seconds. Please note that the ALC Detector should not be used for other audio operations.
ALC Enabled IP Endpoints listening on the same Port number for Multicast Address 224.0.23.59 receive information from the detector and adjust their volume level immediately. Once an ALC Enabled IP Endpoint begins to play audio, it will ignore any other volume level changes till it is finished playing the current audio message.
Since Digital Acoustics IP Endpoints have 7 volume steps, the ALC Enabled IP Endpoints normal volume level should be set to level 3, 4 or 5 so that it can be raised or lowered by 2 steps.
Configure an ALC Detector
In the Administration Console, select the IP Endpoints --> General --> Configuration tab
Press the FIND ALL button
Select the IP Endpoint to be configured as an ALC Detector
Enter a Location Name
Assign a DHCP or Static IP Address
Assign a Server IP:Port
Select the IP Endpoints --> General --> Options 1 tab
Select ALC Detector from the drop down
Select the Normal Ambient Noise Level environment that closely matches the noise level that the ALC Detector will be monitoring:
o Quiet - (about 60dB)
o Mall - (about 75dB)
o Highway - (about 105dB)
o Jetway - (about 135dB)
o If the typical ambient noise level is different than any of the listed environments, the ambient
Noise Level can be automatically determined by measuring the current ambient noise level. See below*

IP Endpoints Tab
57
Enter the Multicast Port to transmit the noise levels on Digital Acoustics' registered Multicast Address of 224.0.23.59. Only one ALC Detector should be configured with this port
Select the Microphone Sensitivity from the drop down list (Low, Medium or High). The Mic Sensitivity will determine how aggressively the ambient noise level will be monitored
Press the Save button
Measuring the Normal Ambient Noise Level
To automatically detect the Normal Ambient Noise Level for an area:
Configure the ALC Detector as described above
Activate the ALC Detector's Senor (J3-5 and J3-6) for 5-10 seconds to have the Microphone listen to the current ambient noise. The Normal Ambient Noise Level will be automatically saved as Custom (99) where 99 is the ambient noise value that was detected
Open the Admin Console, select the IP Endpoints --> General --> Options 1 tab and press the FIND ALL button to see the detected value
Please note that value Custom (99) is a relative energy level that is converted to dB at a later time
Configure an ALC Enabled IP Endpoint
Use the Vol+ and Vol- buttons on the IP7 to set its normal volume level
In the Admin Console, select the IP Endpoints --> General --> Options 1 tab Very Important - Press the FIND ALL button. This will read the current Volume Level and
ensure that it is saved along with all of the other IP7's configuration information Select ALC Enabled from the drop down Enter the Multicast Port that the associated ALC Detector is transmitting on The Normal Ambient Noise Level and Microphone Sensitivity are not used Press the Save button


59
Messages Tab
Messages
The Messages tab allows pre-recorded Wav files to be stored on the Server for use in 1-way audio paging from the Operator Console.
Messages must be associated with one or more Groups on the on the Message List sub-tab of the Paging Groups tab.
The files sent to the Intercoms must be encoded in either 8khz 8-bit PCM or 16-bit uLaw wave format. 8khz 16-bit uLaw will provide the best quality audio. Use the integrated recording interface, or third party software to create these formatted audio files.

TalkMasterFOCUSAdminConsoleReferenceManual
60
Message Repeats until Stopped - Check this box to force the message played from the Operator Console to repeat until the Operator presses the Stop File button.
Message Title - Assign a descriptive name that will be used to identify this message on the Operator Console.
File Name - Press the Change button to open a File List to select a different wav file.
Priority - Select a priority to be assigned to this message. Each priority has a different colored ICON associated with it in the Operator Console.
Priority ICON
Emergency
Important
Normal
All Messages are stored on the Server in the Message Store sub-directory of the Server program directory.

Messages Tab
61
To add new Messages from an existing file, click the New Message Existing File button at the bottom of the right hand panel, select a wav or an MP3 file from the File List dialog, then fill in the other fields and click Save.
MP3 or WAV files may be selected but will automatically be converted to 16-bit uLaw wave format when the audio file is sent to the IP Endpoints.
To add new Messages from the local microphone, click the New Message Create File button at the bottom of the right hand panel, enter in the name of the wav file to create. Then use the "record" icon to record the file. Enter in all of the other fields, and click Save.
To maintain Messages, select the message from above, make changes and click Save.
To delete a Message, select the message from above and then click Delete. A dialog box will ask whether the wav file should be deleted from the Message Store sub-directory. Click Yes to delete the associated wav file or No to leave it in the Message Store sub-directory.
Press the Update Now button on the bottom of the screen to send any changes that have been made in the Administrator Console to the Server and Operator Consoles.


63
Paging Groups Tab
Paging Groups
The Paging Groups tab allows IP Endpoints to be grouped together for sending 1-way audio pages.
A Paging Group can contain one or more Endpoints. An Endpoint may be included in more than one Paging Group.
Each Group is associated to one or more Messages.
Paging Groups and their associated Messages can be assigned to one or more Operators using the Group List sub-tab of the Operators tab.
To add new Groups, click the New button at the bottom of the right hand panel.
Paging Group Name - Enter the descriptive name of the Paging Group
Global Paging Group - Check this box to make the Paging Group available to all Operators. If this box is not checked, the Paging Group must be assigned to Operators using the Operators --> Paging Group List tab
Delivery Method - The delivery method determines when audio messages will be delivered to the Paging Group
Send Immediately to available - Microphone Audio and Messages are sent in real time to IP Endpoints in the Paging Group that are not involved in another audio operation
Queued - When all are available - Microphone Audio is recorded and Messages are delayed till all IP Endpoints in the Paging Group are not involved in another audio operation
Queued - When some are available - Microphone Audio is recorded and Messages are delayed till at least one IP Endpoint in the Paging Group is not involved in another audio operation

TalkMasterFOCUSAdminConsoleReferenceManual
64
Select the Endpoints to be included in the Paging Group by checking the Member check box. Click the Member column header to select or deselect all members
Low Priority Multicast Address - This option is only available for "queued" paging groups. Check this box to treat "queued" Paging Group messages as a "low priority" (the Page will be interrupted by any other Page or Intercom activity). The audio page will be directed to any IP Endpoint that is configured with the same Background Music Multicast Address and Port, so IP Endpoints cannot be selected from the member list
Click the Save button
To delete a Group, select the group from above and then click Delete. A confirmation dialog will be presented to verify the action.
Press the Update Now button on the bottom of the screen to send any changes that have been made in the Administrator Console to the Server and Operator Consoles.
Endpoint Members
The Endpoints Members sub-tab of the Paging Groups tab shows all managed Intercom/Paging Endpoints defined to the Server.
Assign Endpoints to be members of the selected Paging Group:
IP Endpoints must have the Authorized IP Endpoint option checked on the IP Endpoints --> General --> Configuration tab to appear in the Endpoint Members list
Click each check box in the Member column that will be included in the Paging Group
Click the Member column header to select all Endpoints. Click it a second time to de-select all Endpoints
Click the Message List sub-tab to select the associated Messages for this group.
Click the Save button when done making changes.

Paging Groups Tab
65
Please note, the Member List is disabled if the Low Priority Multicast Address has been selected
Message List
The Message List sub-tab of the Groups tab shows all Messages that have been defined on the Server and allows the selected entries to be associated with this Group.
Place a check in the Sel column for each Message to be associated with this Group
Click the Endpoint Members list sub-tab to make more changes or click the Save button to save the Paging Group


67
Operators Tab
Operators
The Operators tab is used to setup logon IDs for users of the Administrator Console and the other Consoles that interact with the TalkMaster FOCUS Server. The Operators tab is composed of three sub-tabs Information, Queue Management and Group List.
To add new Operators, click the New button at the bottom of the right hand panel, fill in the Information, Queue Management and Group List sub-tabs and click Save.
To manage Operators, select the Operator from above, then make changes in the Information, Queue Management, and Group List sub-tabs then click Save.
To delete an Operator, select the Operator from above and then click Delete. A confirmation dialog will be presented to verify the action.
Select the Information and Queue Management tabs to change additional settings before clicking the Save button.
Press the Update button on the bottom of the screen to send any changes that have been made in the Administrator Console to the Server and Operator Consoles.
Information
The Information sub-tab Of the Operators tab is used to define the Operators that will be using the Administrator Console or Operator Console and their associated logon information.

TalkMasterFOCUSAdminConsoleReferenceManual
68
Full Name - Enter the Operators full name. This will be displayed on the Status page and on the Title Bar of the Operator Console screen.
Logon ID - This is the ID the Operator will use to logon to a Console.
Password - The operator's password. Please note this value is case sensitive.
Confirm - Re-enter the password here to verify that it is correct.
Email - Documentation only - not used.
Last On - Records the last time this Operator logged on.
Last Off - Records the last time this Operator logged off.
Administrator Rights - Allows an operator to logon to the Administrator Console to administer the Server settings. Also, when logged on as a Console Operator, the menu option View Preferences becomes visible so Preferences can be set for the current Windows user. (applies to all operators using that Windows user ID).
Allow Multiple Logons - This option allows an Operator to concurrently logon to multiple Consoles. This option should be specified when the Immix software created by Sureview systems is also being used. Under certain circumstances, Immix software requires that the same operator be logged on multiple times. If an Operator is logged on multiple times, the right hand side of the Status tab list the number of Logons after the Name.
Warning - Use of this settings may prevent the administrator from being able to distinguish which Operator performed a specific task such as opening a Door or sending an Audio Page.

Operators Tab
69
Press the Queue Management and Group List sub tabs to specify the Intercoms and paging groups that should be associated with this Operator.
Press Save when all changes have been completed.
Queue Management
The Queue Management sub-tab of the Operators tab defines the Queues of IP Endpoints that an Operator will be responsible for monitoring.
An Operator can have Primary or Overflow responsibility for one or more Queues. Intercoms in Primary Queues are always listed in the top window of the Operator Consoles display. Intercoms in Overflow Queues will only be listed when a Queue goes into Overflow status. Overflow Intercoms will be removed from an Operator's display when the Overflow status is reset.
To update an Operator's Queues:
Click on an Operator name from the left side of the screen.
Check or uncheck a Queue Name.
Select the Primary Management, Overflow Management or No Management radio button for that Queue.
Repeat for each of the listed Queues.

TalkMasterFOCUSAdminConsoleReferenceManual
70
Group List
The Group List sub-tab of the Operator tab defines the paging Groups that will be listed on the Operator Console.
Place a check mark in the Member column to include the Group on the Operator Console for this Operator.
Click the Information or Queue Management sub-tabs to make more changes or click the Save button.
If a Paging Group is defined with the Global Paging Group option, it is automatically included on all Operator Console displays.

71
Audit Tab
Audit
The Audit tab displays events that occur while the Server is running and optionally plays back all of the audio between an IP Endpoint and an Operator.
The following events are tracked:
Intercom connects / disconnects
Operator logons / logoffs
Intercom button presses
Audio sessions between IP Endpoints and Operator Consoles
Recorded audio between IP Endpoints and Operator Consoles (only if the Archive all Audio Setup option has been checked)
Door Open Commands sent to IP Endpoints
Sensor inputs sent from IP Endpoints
Use the IP Endpoint and Operator drop down lists to limit the amount of information being displayed.
Use the Calendar to select a day to review. Click the Refresh button to display any events that have occurred since the time when the last selection was made.
If the Archive all Audio Setup option has been selected, the recorded audio sessions can be selected and played back.
To playback archived audio:
Select an entry in the Audit Log.
Click the Play button to begin playback of the file.
Use the << button to backup.
Use the >> button to move forward.
Use Stop to halt playback.


73
Status Tab
Status
The Status tab shows the status of all configured IP Endpoints and currently logged on Operators.
The Status page is divided into two halves.
The left side of the screen shows the connection status of all IP Endpoints that have been configured on the server.
The right hand side shows all Operators that have been configured and whether they are currently signed on. If an Operator is logged on multiple times, the count will be displayed after the Operator's name.
To sort the list, click on the Location, IP Address or Status column headers.


75
IP Video Sources tab
IP Video Sources
The IP Video Sources tab is used to setup and configure video feeds that will be available in the Operator Console. This tab only appears if a license for the Video option has been licensed and the Admin Console RTSP Viewer has been downloaded and installed. Once the Video Sources have been setup, they can be associated with a specific IP Endpoint and automatically displayed when an Operator answers an Incoming Call. A Video Source can also be setup for continuous monitoring in the Operator Console.
The IP Video Sources tab is divided into two halves. The left side of the screen shows the name and IP addresses of the camera feeds that have defined.
The right hand side allows Video Sources to be created, edited, and deleted.
Video Source Name - Assign a name/location for the camera.
Video Source Type - Select the Video source type* of the camera. If the RTSP capable IP Camera is not listed, select menu option Settings --> Video Source Types to add a new type
Video Source Address - Specify the IP Address* of the camera.
User Name - Specify the UserName* that has been assigned in the camera software.

TalkMasterFOCUSAdminConsoleReferenceManual
76
Password - Specify the Password* that has been assigned in the camera software.
Preview - Click to verify that the video feed. If the Video Feed does not appear, verify the Video Source parameters with the camera software.
New - Click to create a new Video Feed for the list.
Delete - Click to remove the selected video feed from the list.
Save - Click to save the video feed for use with the iEnterprise server.
To create a new camera feed:
Click New
Enter the cameras name, type, and address.
Enter the Camera's User name* and Password*
Click Save
Click Preview to view the feed in the window just below.
Once the Video Sources have been created, they can be associated with specific IP Endpoints by specifying the Associated Video Source in the IP Endpoints --> Options 3 sub tab. Video Sources can also be monitored. The Video Sources can also be monitored continuously in the Operator Console by logging in to the Operator Console as an admin and selecting menu option View --> Monitored Video.
* Refer to the camera documentation for specific information such as the Source Address, Type, Username, and Password.

77
Menu Options
File Menu
The File menu has the following options:
Restart Service - Restarts the Servers Windows service to allow certain configuration options to take affect. All currently logged in consoles will automatically log back in when the Server service is available.
Update Now - Sends changes made in the Administrator Console to the Server and Operator Console so the Server service does not have to be restarted.
Import Settings - Restores the TalkMaster FOCUS Server settings that have been created using the Export Settings option. This can be used when backing up the Server settings or setting up a Fail Forward Server.
o Merge - Merges the settings created using the Export Settings menu option with the settings already on this Server.
o Clean Install - Clears all of the settings on this Server and replaces them with the settings created using the Export Settings menu option. This option should be used when restoring a Server or creating a Fail Forward Server.
o IP Endpoints Only - Clears all of the IP Endpoints from the current Server and replaces them with the settings created using the Export Settings. This does not affect Server Settings, Queues, Paging Groups or Messages.
Export Settings - Creates a backup of all of the Server Settings, IP Endpoints, Queues, Paging Groups, and Messages.
Warning - This option does not backup the Audio Archives or the daily Audit Logs. Please reference the Application Note for backing up the TalkMaster FOCUS Server system..
Logoff - Logs the current user out of the software and displays the Logon dialog.
Exit - Exits the Administrator Console session and closes the application.
Search Menu
The Search menu has the following option:

TalkMasterFOCUSAdminConsoleReferenceManual
78
Search IP Endpoint List - This option is only enabled when the IP Endpoints tab or the Status tab is selected. Selecting this option (or pressing ctrl+f) opens the Search IP Endpoint List dialog. If the dialog is open and a different tab is selected, the controls on the dialog box will be temporarily disabled
On the IP Endpoints tab, the search will look for a match anywhere within the IP Endpoint Location Name, the IP Address and the ICOM ID
On the Status tab, the search will look for a match anywhere within the IP Endpoint Location Name
Enter the string to search for and click either the FIND PREV or FIND NEXT button
The search will automatically wrap when it reaches the end of the list
Once a device has been found, the same device will be selected in the IP Endpoints tab, the Paging Groups --> Endpoint Members tab and the Status tab
The dialog can stay open and be repositioned while other tabs are selected
Search criteria can be selected from the drop down arrow showing the last ten searches
Tools Menu
The Tools menu has the following options:

Menu Options
79
Add Device Security code - This option can used to set the Security option for an IP Endpoint that has been deleted from the IP Endpoints tab and is unable to connect due to an Authentication error. It can also be used to set a temporary password for an IP Endpoint that was configured by another machine so the IP Endpoint can be discovered using the FIND ALL button and configured by this machine. The Device Security code will only be saved till the TalkMaster FOCUS Server is restarted, unless the device is saved in the IP Endpoints tab with its Security code
Remove Disconnected Devices - This option can be used to clear the list of any IP Endpoints that are not connected. Please note, that if a device has a Security code, it will not be deleted using this option. The Delete button must be used for any device that has a Security code set
Find Device by IP Address - This option can be used to discover the configuration for an IP Endpoint that is in a subnet that does not have Multicast enabled. The device must be reachable by UDP on Port 1459 and be able to respond by UDP on Port 5001. After the device is discovered, make changes to the device using the IP Endpoints tab and then save the device using menu option Save Device By IP Address
Save Device by IP Address - This option must be used to save configuration changes after a Find Device by IP Address has been issued. The device must be reachable by UDP on Port 1459 and be able to respond by UDP on Port 5001
Record Program Events to File - This option logs detailed program activity to a file. Each day's activity is stored in a separate file. This should only be used when instructed by Digital Acoustics Technical Support
Open Support Folder - This option is used to open the folder containing the activity recorded by the Record Program Events to File menu option
Licensing Menu
The Licensing menu has the following options:
Manage - Manage software licensing for TalkMaster FOCUS Enterprise edition and additional services.

TalkMasterFOCUSAdminConsoleReferenceManual
80
Disable Hardware License Key Search - By default, searching for a Hardware License Key is disabled. When using a USB License key, uncheck this box and press the Apply button
Disable Software License Key if entered - If a software license key has been entered, this box must be unchecked.
License Key Entry Box - Used to enter the software license key supplied by Digital Acoustics. Load or copy/paste the Software License Key into this field and then click the Apply button to license the software
Instructions for obtaining a software license key:
Select menu option License --> Create Signature

Menu Options
81
Press “Create” to generate a Machine Signature
Select “Save” to save the generated machine signature to your computer in an easy to find location. Name the file "Company-MachineSignature.txt".
Email the file to [email protected] with a copy of the Serial Number provided by Digital Acoustics as proof of purchase
Once the email is received by Digital Acoustics, the License Admin will issue a Software Key and email it within one business day.
Applying the Software License Key:
Once you receive the license file from the Digital Acoustics’, save it on the machine that TalkMaster FOCUS EE is installed on.
Open the Licensing -> Manage menu and select “Load License File”. Select the license file and press Open
The license text should automatically populate the license box. Alternatively, copy and paste the text string into the license text area
Press Apply
The system tray ICON should turn green within a minute
Settings Menu
The Settings menu has the following options:
Audio Configuration - Select this option to setup the audio device to be used by the Admin Console. The Playback and Record options should specify the Speaker and Microphone to be used

TalkMasterFOCUSAdminConsoleReferenceManual
82
The selected device is used on the Messages and Audit tabs to playback messages and recorded audio.
Video Source Types - Select this option to add support for IP Cameras that use either HTTP or RTSP to access a live video feed
Support for Axis Cameras is already included in the software.
To add a new Video Source Type, click the New button.

Menu Options
83
Video Source Name - Enter the Name of the Camera Manufacturer
Viewer Type - Select the Generic radio button for RTSP for cameras that support RTSP. If the RTSP option is disabled, go to the Digital Acoustics website and find the software download page. Download and install the RTSP Viewer for the the Admin Consol. After the installation, the RTSP option will be enabled. Please note that the RTSP Viewer for Operator Console will need to be installed on each PC running the Operator Console software
View Options - Up to three different URL formats can be set up to access a camera. For instance, different camera resolutions can be specified and Operators who will be viewing the camera can select the resolution they want to use. The following variables can be used to represent the UserName, Password and IP Address required by the specific type of camera. The variables and View Option will be replaced based on the specific camera that is specified on the IP Video Sources tab. The variables are specified as follows:
%username%
%password%
%addr%
Once the new Video Source option has been created, it can be selected on the IP Video Sources tab.
Help Menu
The Help menu has the following options:
Open Support Folder - Opens the folder containing the tracking log.
Help about Administrator Console - Launches the Online Help.
About - Displays the current software version and the software license information.

TalkMasterFOCUSAdminConsoleReferenceManual
84
If no License Key is detected, the system will be licensed for 1 Console Operator and 250 IP Endpoints. Otherwise the settings and information for the license key is displayed.

85
Support Information
Support Central
If directed by Digital Acoustics Technical Support, the TalkMaster FOCUS Support Service can track information about the TalkMaster FOCUS Server service and selected IP7 Endpoints. The TalkMaster FOCUS Support Service and the Support Central Application do not require any TalkMaster FOCUS Console Licenses.
To start recording TalkMaster FOCUS Server information in the TalkMaster FOCUS Support Service:
Open the Administrator Console to the Settings sub-tab of the Setup tab
Check the Support Console check box
Press the Update Now button
The TalkMaster FOCUS Support Service starts collecting information from the TalkMaster FOCUS Server and writing to the daily log files
To start recording selected IP7 tracking information in the TalkMaster FOCUS Support Service:
Open the Administrator Console to the IP Endpoints --> Options 2 and then select the IP7 to be tracked.
Check the IP7 Tracking Enabled check box
The IP7 tracking information is sent to the associated Multicast Address of 225.0.0.160. Alternatively, the IP Address of the TalkMaster FOCUS Server can be specified
Press the Save button
Repeat for each IP7 to be tracked
The TalkMaster FOCUS Support Service starts collecting information from the selected IP7(s) and writing to the daily log files
To view the log information, press the Windows menu Start button and select All Programs --> TalkMaster Focus--> Server Tools --> Support Central
iEnterprise tab
The iEnterprise tab displays tracking information collected from the TalkMaster FOCUS Server:
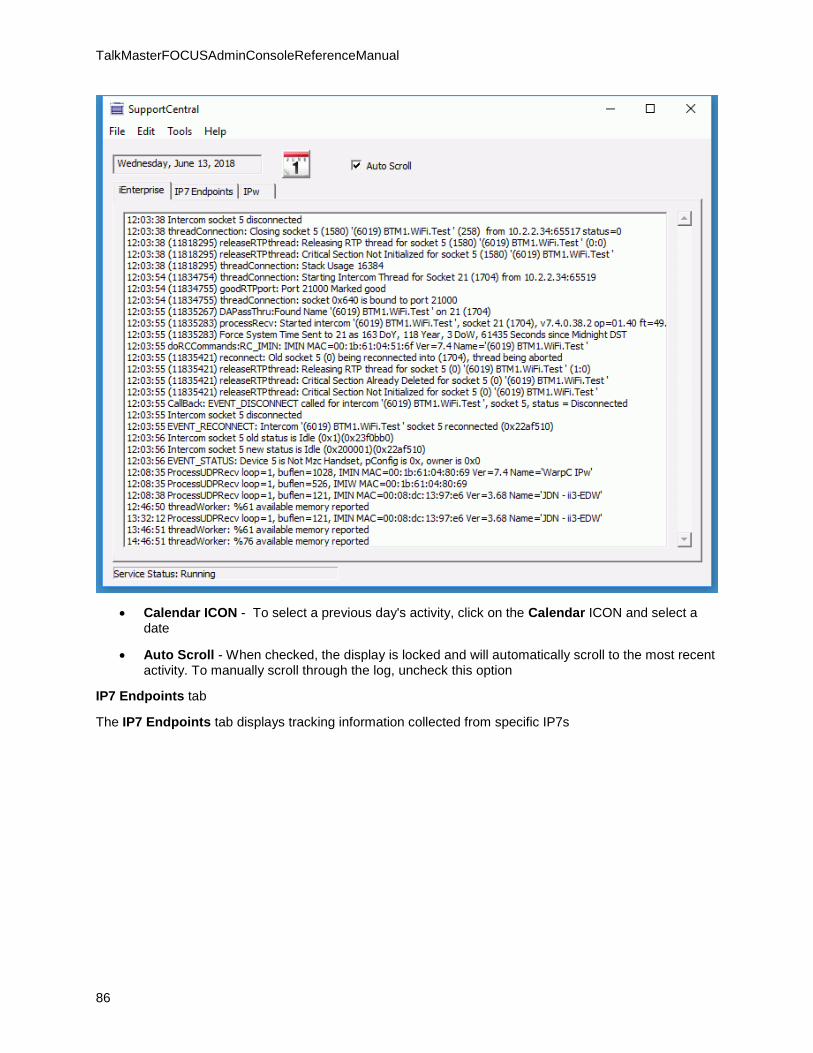
TalkMasterFOCUSAdminConsoleReferenceManual
86
Calendar ICON - To select a previous day's activity, click on the Calendar ICON and select a date
Auto Scroll - When checked, the display is locked and will automatically scroll to the most recent activity. To manually scroll through the log, uncheck this option
IP7 Endpoints tab
The IP7 Endpoints tab displays tracking information collected from specific IP7s

Support Information
87
Address Filter dropdown - If multiple IP7s are being tracked, a specific IP Address can be selected from the Filter dropdown
Filters button - Displays a set of filters that can be used to select or deselect SIP information
IPw tab
IP7 Wireless Endpoints Tracking

TalkMasterFOCUSAdminConsoleReferenceManual
88
Support Central Menu options:
File --> Open Current Folder - To copy tracking information, select this menu option, then open either the iEnterprise Support Database or the IP7 Support Database folder and copy the selected day's activity. Email the data to Digital Acoustics Technical Support
File --> Clear Database - This option will clear the current day's activity for either iEnterprise or IP7 Endpoints
File --> Export Records - This option will export a specific day's activity for either iEnterprise or IP7 Endpoints
Edit--> Find - Enter a text string to search on the currently displayed data
Edit--> Find Next - This will find the next instance of a text string
Tools --> Save Window Size / Position - Click this option to always open the Support Central console window to the same position

Support Information
89
Tools --> Preferences - To change the number of days worth of tracking information that is collected, change the default of 30. The system will automatically remove information older that the specified number of days. Uncheck the Save Only option to save all tracking information
Contacting Technical Support
For information on contacting Technical Support, please visit our web site at:
www.digitalacoustics.com/support
About Us
Digital Acoustics, LLC
www.digitalacoustics.com
Digital Acoustics®, TalkMaster FOCUS®, ii3®, IP7® and UBAM® are trademarks of Digital Acoustics LLC, all other marks used are properties of their respective owners. Digital Acoustics' product designs are packaged by leading manufacturers around the world.
© 2003 - 2019 Digital Acoustics, LLC
All Rights Reserved


91
Glossary
E
eSIP: eSIP is an embedded version of SIP that has been implemented in Digital Acoustic's IP7 Firmware
S
SIP: Session Initiated Protocol. SIP 2.0 is a standard protocol used in many IP Based Phone Systems. This enables IP7 IP Endpoints to connect directly to SIP based IP Phone Systems
U
USB License Key: The USB License Key is inserted into the TMEE Server PC and determines the number of Consoles and IP Endpoints that can be connected to the Server. If no USB License Key is available, a single Console Operator and up to 250 IP Endpoints can connect to the Server.


93
Index
A
About Admin Console ...................................... 89
Admin Console Overview ................................. 11
AGC .................................................................. 38
Associated Video Source ................................. 41
Audit ................................................................. 71
B
Broadcast ......................................................... 22
C
Configuration .................................................... 32
Contacting Technical Support .......................... 89
E
Endpoint List .................................................... 64
F
Fast Disconnect Detection ............................... 41
File Locs ........................................................... 20
File Menu.......................................................... 77
G
Group List ......................................................... 70
H
Handset ............................................................ 38
Help Menu ........................................................ 83
I
Info ................................................................... 45
Information ....................................................... 67
Intercoms........................................27, 32, 35, 38
IP Address ........................................................ 32
IP Endpoints ..................................................... 27
L
License Key ...................................................... 79
Logon ............................................................... 13
Low Priority Pages ..................................... 38, 63
M
Message List .................................................... 65
Messages ......................................................... 59
Microphone .......................................... 35, 38, 45
MP3 Files ......................................................... 59
Multicast ........................................................... 22
O
Operators ................................................... 67, 69
Options 1 .......................................................... 35
Options 2 .......................................................... 38
Overflow ........................................................... 25
P
Paging Groups ................................................. 63
Paging Options ................................................ 22
Password ......................................................... 13
Playback .......................................................... 71
PTT vs Call button ........................................... 51
Q
Queue Assignment .......................................... 41
Queue Management ........................................ 69
Queues ...................................................... 15, 25
R
Recording ......................................................... 15
Recording Warnings ........................................ 41
Release Notes ................................................... 1
Replace ............................................................ 27
RTP .......................................... 15, 17, 22, 35, 45
S
Security ................................................ 12, 35, 78
Setup .............................................. 15, 17, 20, 22
SIP ....................................................... 45, 48, 52

TalkMasterFOCUSAdminConsoleReferenceManual
94
Status ............................................................... 73
STUN ................................................................ 48
Support Console ........................................ 15, 85
System Overview ............................................... 7
T
TTS ................................................................... 20
U
UBAM ............................................................... 27
Unicast ............................................................. 22
Update Now ..................................................... 14
USB License Key ....................................... 79, 83
V
Video .................................................... 15, 41, 75
W
Wav Files ......................................................... 59
Welcome ............................................................ 1
Z
Zone Controller .......................................... 49, 50

95
www.digitalacoustics.com
© Copyright 2005-2018 Digital Acoustics LLC, All Rights Reserved