taurus safety and operation manual -...
TRANSCRIPT

PISTOLGeneral Safety,
Operating Instructions
and Limited Warranty
READ CAREFULLY BEFOREUSING YOUR FIREARM
Important: Keep this manual withyour firearm.The information contained in thismanual is useful, both forbeginners and experiencedshooters. In addition to importantinformation about functioning,cleaning and care of the gun, themanual contains instructions thatmay be very helpful in shootingproperly.The most important rule of safegun handling is always keep themuzzle pointed in a safe direction!!!

2ALWAYS KEEP THE MUZZLE POINTED IN A SAFE DIRECTION.
TAURUS SECURITY SYSTEM™Engagement (Secure)
PT58 S-D, PT92 C-D, PT92 AF-D, PT99 AF-D,PT908, PT100 AF-D, PT101 AF-D, PT911,
PT938, PT940, PT945 and PT957Insert the key into the mechanism and turn
clockwise until a click is felt or heard. Themechanism now partially protrudesabove the surface of the backstrap ofthe grip. The action is locked in place
and cannot function.
Disengagement (Ready-to-Fire)PT58 S-D, PT92 C-D, PT92 AF-D, PT99 AF-D, PT908, PT100 AF-D,PT101 AF-D, PT911, PT938,PT940, PT945 and PT957To place the pistol in a firingcondition, insert the key into themechanism and turn it counter-clockwise. The mechanism is nowvirtually flush with the backstrap of thegrip. The pistol can now be fired.
CAUTION:Never engage the Taurus Security System on your Taurus Pistol with theslide in the open (rearward) position. This will result in permanent damage toyour firearm.
WARNING:
Securing your firearm may inhibit access to it in a defense situation andresult in injury or death.
WARNING:
Failure to properly secure a firearm may result in injury or death.
Engagement (Secure) PT111, PT111TI,PT132, PT138, PT14O, PT145 & PT145TiInsert the key into the mechanism and turnclockwise until a click is felt or heard. Themechanism now partially protrudes above thesurface of the slide. The action is locked in placeand cannot function.
Disengagement (Ready-to-Fire)PT111, PT111TI, PT132, PT138, PT14O,PT145 & PT145TiTo place the pistol in a firing condition, insert thekey into the mechanism and turn it counter-clockwise. The mechanism is now virtually flush with the slide on the PT111,PT132, PT138, PT140, PT145). The pistol can now be fired.

SAFETY WARNINGS NOT JUST FOR BEGINNERS Regardless of your familiarity or experience with firearms, you need to studythis manual.
The safe handling of firearms requires specialized training, disciplineand caution. Firearms, by their nature and intended function, are deadlyinstruments. Accidental death or serious injury can result if they are handledimproperly or carelessly.
Firearms rarely cause accidents. Firearms accidents almost always arecaused by a failure to obey the basic rules of gun safety. Unfortunately,experienced shooters seem to violate these rules as frequently as beginners.Thus the basics of safe firearms handling cannot be repeated too often.Read, re-read and practice the basic principles of firearms safety until theybecome second nature: habits that you don’t forget.
If you have any question about your knowledge or ability to use this orany other firearm with complete safety you should seek supervisedinstruction. Personalized instruction is often available from firearms dealers,gun clubs, state hunter safety programs or police departments in the UnitedStates. If none of these sources is accessible, write to the National RifleAssociation, 11250 Waples Mill Road, Fairfax, VA 22030. THEY WILL ASSIST YOU.
A person with a firearm in his possession has a full-time responsibility.He must KNOW how to keep and use his firearm safely, and then mustalways TAKE the precautions necessary -all of them. He cannot guess; hecannot forget. This responsibility is his alone. It cannot be passed off tosomeone else.
Remember: no firearm can be made accident-proof. A firearm is just amachine, with no judgement of its own. It responds to your actions, whetherwise or foolish. The only truly effective safety device is the mind of a cautiousshooter who never forgets that a moment’s carelessness can producepermanent tragedy.
THIS BOOKLET The safety warnings in this booklet are important. By understanding thedangers inherent in the use of any firearm, and by taking the precautionsdescribed herein, you can enjoy complete safety in the use of your Taurusrevolver or pistol. Failure to heed any of these warnings may result in seriousinjury to you or others, as well as severe damage to the firearm or otherproperty.
DANGEROUS WEAPONSREVOLVERS and PISTOLS are classified as FIREARMS or DANGEROUSWEAPONS and are sold by us with the specific understanding that we arenot responsible in any manner whatsoever for their improper or negligenthandling or resale under local laws and regulations.
TAURUS shall not be responsible in any manner whatsoever formalfunctioning of the firearm, or for physical injury or property damage,resulting in whole or in part from (1) criminal or negligent discharge, (2)improper or careless handling, (3) unauthorized modifications, (4) defective,improper hand-loaded, or reloaded ammunition, (5) neglect, or (6) otherinfluences beyond our direct and immediate control. This limitation appliesregardless of whether liability is asserted on the basis of contract, negligenceor strict liability (including any failure to warn). Under no circumstance shallTaurus be liable for incidental or consequential damages, such as loss of useof property, commercial loss and loss of earnings or profits.
3ALWAYS KEEP THE MUZZLE POINTED IN A SAFE DIRECTION.

FIREARMS ARE NOT ALL ALIKE Many makes and models of firearms might LOOK nearly the same. However,they differ widely in design and operation, and in the location and function ofvarious controls.
Study this manual thoroughly. Educate yourself on the characteristicsand operation of your particular firearm before attempting to handle it. Do notpermit others to handle it - unless they also have done so.
You should have an instruction manual for every firearm you own. Ifyou do not, write the manufacturer and obtain one. Most manufacturers willgladly send you one free. If for any reason a manual is not available, visityour public library. Many books have been published which contain detailedinformation on obsolete or discontinued firearms.
Your knowledge can prevent injuries.
Taurus firearms are designed and made to offer maximumsafety when correctly used. However, as with any otherweapon, it is not foolproof, and may become very dangerous ifthe following basic recommendations are not RIGIDLYobserved:
ATTENTION 1. DANGER: Never, never-ever point any firearm, loaded or unloaded, at
anything you do not intend to shoot.
2. WARNING: Always treat every firearm as if it were loaded.
3. NOTICE: Get instruction from a competent firearms instructor beforeusing any firearm.
4. SAFETY FIRST: The safety is only a mechanical device, not a substitutefor common sense.
5. WARNING: Keep your finger off the trigger until you are actually aimingat the target ready to shoot.
6. WARNING: Be certain the firearm is unloaded before cleaning.
7. WARNING: Always empty firearms before entering a place where thereare people.
8. SAFETY FIRST: Never leave a loaded firearm unattended.
9. SAFETY FIRST: Store firearms and ammunition separately beyond thereach of children.
10. WARNING: Don’t test the safety by pulling the trigger while the safety ison unless you are absolutely sure the firearm is empty and you arepointing away from everyone.
11. SAFETY FIRST: Be sure of your target and backstop before you shoot.
12. SAFETY FIRST: Firearms and alcohol or drugs don’t mix.
13. WARNING: Never pull a firearm towards you by the muzzle. Don’t climba tree or cross a fence with a loaded firearm.
4ALWAYS KEEP THE MUZZLE POINTED IN A SAFE DIRECTION.

14. DANGER: Load and unload with the muzzle pointed in a safe direction.
15. SAFETY FIRST: If a firearm fails to fire when the trigger is pulled, keepit pointed at the target for at least 30 seconds. Sometimes slow primerignition will cause a “hang” fire and the cartridge will go off after a shortpause.
16. SAFETY FIRST: Never shoot at hard flat surfaces or water.., bullet mayricochet.
17. DANGER: When receiving a firearm always check that it is unloaded(Pistols: Remove magazine and open slide to check if chamber isempty. Revolvers: Open cylinder to check if it is empty), even if you sawit done previously.
18. DANGER: Never put your hand over the muzzle of a firearm.
19. DANGER: Check ammunition to be sure it is the right size and caliber,and that it is not dented.
20. SAFETY FIRST: Use a proper holster and draw only if you intend toshoot.
21. NOTICE: Never cock the firearm until you are ready to shoot.
22. SAFETY FIRST: Dry firing is bad for this firearm, whether the hammerblock is engaged or not.
23. DANGER: WHILE HANDLING ANY FIREARM, NEVER ALLOW IT TOPOINT AT ANY PART OF YOUR BODY OR AT ANOTHER PERSON.NO HARM SHOULD RESULT IF YOU OBEY THIS RULE, EVEN IF ANACCIDENTAL DISCHARGE OCCURS.
24. CAUTION: If there is any reason to suspect that a bullet is obstructingthe barrel, immediately unload the firearm and look through the bore. Itis not sufficient to merely look in the chamber.
25. SAFETY FIRST: Treat this firearm as a precision instrument.
26. WARNING: Old or reloaded ammunition may be dangerous. Werecommend against using it.
27. WARNING: Never carry any handgun in your pocket, purse or waist-band. Use a pistol case or proper holster with safety flap or strap.
28. DANGER: Don’t try to change your firearm’s trigger pull, becausealteration of trigger pull usually affects sear engagement and may causeaccidental discharge.
29. SAFETY FIRST: Write to us concerning any items or circumstanceswhich might relate to your safety and the operation of our products.
30. DANGER: Never engage a gun lock on a loaded firearm.
5ALWAYS KEEP THE MUZZLE POINTED IN A SAFE DIRECTION.
WARNING
Taurus pistols were manufactured to perform properly with the original partsas designed. It is your duty to make sure any parts you buy are installedcorrectly and that neither replacements nor originals are altered or changed.Your firearm is a simple tool but it has many parts that must relate correctlyto other parts. Putting a firearm together wrong or with modified parts canresult in a damaged firearm, danger and injury or death to you and othersthrough malfunction. Always have a qualified gunsmith work on your firearm.
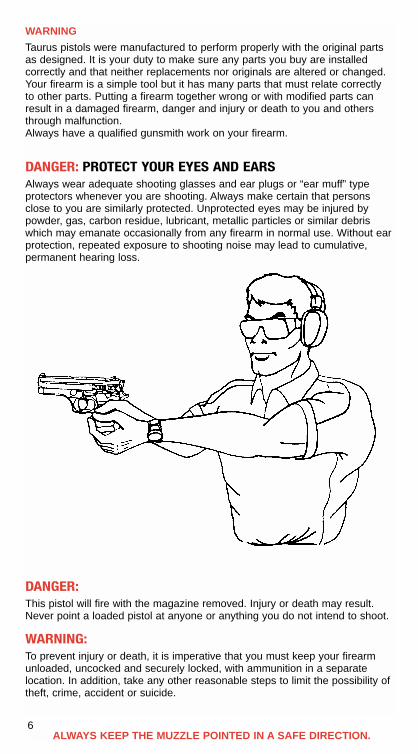
DANGER: PROTECT YOUR EYES AND EARS Always wear adequate shooting glasses and ear plugs or “ear muff” typeprotectors whenever you are shooting. Always make certain that personsclose to you are similarly protected. Unprotected eyes may be injured bypowder, gas, carbon residue, lubricant, metallic particles or similar debriswhich may emanate occasionally from any firearm in normal use. Without earprotection, repeated exposure to shooting noise may lead to cumulative,permanent hearing loss.
DANGER:This pistol will fire with the magazine removed. Injury or death may result.Never point a loaded pistol at anyone or anything you do not intend to shoot.
WARNING:To prevent injury or death, it is imperative that you must keep your firearmunloaded, uncocked and securely locked, with ammunition in a separatelocation. In addition, take any other reasonable steps to limit the possibility oftheft, crime, accident or suicide.
6ALWAYS KEEP THE MUZZLE POINTED IN A SAFE DIRECTION.

ALWAYS KEEP THE MUZZLE POINTED IN A SAFE DIRECTION.7
FOR TAURUS PISTOLS WITHOUT A MAGAZINE DISCONNECTOR:WARNING: This pistol will fire with the magazine removed. Injury or deathmay result. Never point a loaded pistol at anyone or anything you do notintend to shoot.
FOR TAURUS PISTOLS WITH A MAGAZINE DISCONNECTOR:
WARNING: This pistol is equipped with a magazine disconnector. It isintended but not warranted or promised that the pistol will not fire with themagazine removed, however,
(i) The magazine disconnector is not a safety and should not be relied on assuch to prevent injury or death.
(ii) The magazine disconnector can be accidentally bypassed throughabnormal handling. If so, the pistol will fire and may result in injury or death.
(iii) The magazine disconnector may break and allow the pistol to fire with themagazine removed, resulting in injury or death.
(iv) Do not attempt to remove, alter or modify the magazine disconnector.Injury or death may result.
(v) If you purchase this product “used” check the operation of the magazinedisconnector as follows: Verify that the magazine is out and visually confirmthat the chamber is empty by pulling the slide back with your finger well clearof the trigger. Close the slide, and point the muzzle in a safe direction andattempt to pull the trigger. If the trigger pull is complete and a loud clicking isheard, then the disconnector may be broken and the firearm should bereturned to Taurus customer service for inspection and, if necessary, repair.Failure to do so may result in injury or death.
(vi) If you are unclear about the purpose, function or proper procedures forperforming the test, please return the product to Taurus in accordance withyour warranty for a free inspection.

ALWAYS KEEP THE MUZZLE POINTED IN A SAFE DIRECTION.8
WARNING: AMMUNITION1. Use only high quality, original, factory-manufactured ammunition. Do not
use cartridges that are dirty, wet, corroded, bent or damaged. Do not oilcartridges. Do not spray aerosol-type lubricants, preservatives, or cleanersdirectly onto cartridges or where excess spray may flow into contact withcartridges. Lubricant or other foreign matter on cartridges can causepotentially dangerous ammunition malfunctions. Use only ammunition of thecaliber for which your firearm is chambered. The proper caliber ispermanently engraved on your firearm; never attempt to use ammunition ofany other caliber.
2. The use of reloaded, “remanufactured”, hand-loaded, or other non-standard ammunition voids all warranties. Improperly loaded ammunitionvoids all warranties. Improperly loaded ammunition can be extremelydangerous. Severe damage to the firearm and serious injury to the shooteror to others may result. Always use ammunition that complies with theindustry performance standards established by the Sporting Arms andAmmunition Manufacturers Institute, Inc., of the United States, (SAAMI) orthe equivalent from other countries.
3. Firearms may be severely damaged and serious injury to the shooter or toothers may result from any condition causing excessive pressure inside thechamber or barrel during firing. Excessive pressure can be caused byobstructions in the barrel, propellant powder overloads, or by the use ofincorrect cartridges or defectively assembled cartridges. In addition, the useof a dirty, corroded, or damaged cartridge can lead to a burst cartridge caseand consequent damage to the firearm and personal injury from the suddenescape of high-pressure propellant gas within the firearm’s mechanism.
4. Immediately stop shooting and check the barrel for a possible obstructionwhenever: • You have difficulty in, or feel unusual resistance in, chambering a
cartridge, or • A cartridge misfires (does not go off), or• The mechanism fails to extract a fired cartridge case, or • Unburned grains of propellant powder are discovered spilled in
mechanism, or • A shot sounds weak or abnormal. In such cases it is possible that a bullet is lodged part way down the barrel.Firing a subsequent bullet into the obstructed barrel can wreck the firearmand cause serious injury to the shooter or to bystanders.
5.Bullets can become lodged in the barrel. • If the cartridge has been improperly loaded without propellant powder, or if
the powder fails to ignite (Ignition of the cartridge primer alone will push the bullet out the cartridge case, but usually does not generate sufficient energy to expel the bullet completely from the barrel).
• If the bullet is not properly seated tightly in the cartridge case. When such a cartridge is extracted from the chamber without being fired, thebullet may be left behind in the bore at the point where the rifling begins.Subsequent chambering of another cartridge may push the first bullet furtherinto the bore.
6. If there is any reason to suspect that a bullet is obstructing the barrel,immediately unload the firearm and look through the bore. It is not sufficientto merely look in the chamber. A bullet may be lodged some distance downthe barrel where it can not easily be seen.

ALWAYS KEEP THE MUZZLE POINTED IN A SAFE DIRECTION.
IF A BULLET IS IN THE BORE, DO NOT ATTEMPT TO SHOOT IT OUT BYUSING ANOTHER CARTRIDGE, OR BY BLOWING IT OUT WITH A BLANKOR ONE FROM WHICH THE BULLET HAS BEEN REMOVED. SUCHTECHNIQUES CAN GENERATE EXCESSIVE PRESSURE, WRECK THEFIREARM AND CAUSE SERIOUS PERSONAL INJURY.If the bullet can be removed with a cleaning rod, clean any unburned powdergrains from the bore, chamber, and mechanism before resuming shooting. Ifthe bullet cannot be dislodged by tapping it with a cleaning rod, take thefirearm to a gunsmith.
7. Dirt, corrosion, or other foreign matter on a cartridge can impede completechambering and may cause the cartridge case to burst upon firing. The sameis true of cartridges which are damaged or deformed.
8. Do not oil cartridges, and be sure to wipe the chamber clean of any oil orpreservative before commencing to shoot. Oil interferes with the frictionbetween cartridge case and chamber wall that is necessary for safefunctioning, and subjects the firearm to stress similar to that imposed byexcessive pressure.
9. Use lubricants sparingly on the moving parts of your firearm. Avoidexcessive spraying of any aerosol firearm care product, especially where itmay get on ammunition. All lubricants and aerosol spray lubricants inparticular, can penetrate cartridge primers and cause misfires. Some highlypenetrative lubricants can also migrate inside cartridge cases and causedeterioration of the propellant powder; on firing, the powder may not ignite. Ifonly the primer ignites, there is danger that the bullet may become lodged inthe barrel.
Taurus pistols were designed to use cartridges loaded to the limits shownbelow. Other cartridges of various types or bullet weights may or may notfunction acceptably; such ammunition should be thoroughly tested by theuser before relying on it. Because of the widely differing specifications ofsuch other ammunition, Taurus cannot be responsible for malfunctionsresulting from its use.
BULLET MUZZLE CALIBER WEIGHT VELOCITY
.32 ACP.................................................... 71 GR FMP 905 FPS
.380 ACP.................................................. 95 GR FMJ 1000 FPS 9MMPARA. ..............................................124 GR FMJ 1225 FPS .357 SIG ..................................................125 GR FMJ 1350 FPS .40 S&W ..................................................180 GR FMJ 985 FPS .45 ACP....................................................225 GR FMJ 900 FPS
GR = grainsFMJ = Full metal jacketed bullet FPS = Feet per second
“Plus-P’, “PIus-P-Plus” or other ultra or high velocity ammunition generatespressures significantly in excess of the pressures associated with standardammunition. Such pressures may affect the useful life of the firearm orexceed the margin of safety built into many pistols and could therefore beDANGEROUS.
CAUTION Discharging firearms in poorly ventilated areas, cleaning firearms, or handlingammunition may result in exposure to lead and other substances known tocause birth defects, reproductive harm, and other serious physical injury. Haveadequate ventilation at all times. Wash hands thoroughly after exposure.
9

POSITION FOR TARGET SHOOTING Take such stance that your body faces the target at a 90 degree angle. Keepyour feet 1 ft. to 1-1/2 ft. apart. Raise your arm so that it lines up naturallywith the target. Your head should be turned as needed, so to have a goodsight picture. When you are in a correct position, aim the firearm andsqueeze the trigger.
AIMING Align the rear and front sights carefully. The top of the front sight must beleveled with the top of the rear sight and set in the middle of the rear sightnotch. The bullseye should rest on the top of the sights.
SQUEEZE OF THE TRIGGER Squeeze the trigger very carefully with index-finger, keeping sight alignedwith the target. If the trigger is jerked, the target will possibly be missed dueto the movement of the firearm. The pressure should be applied between thetip and the first joint of the finger. Press slowly and carefully. More speed willbe gained with practice.
ADJUSTING THE SIGHTSAdjustable Sight Models Only To raise the rear sight, turn the elevation adjusting screw counterclockwise.To lower the rear sight turn the screw clockwise. When raising the sight thepoint of impact rises. Lowering the sight, the point is lowered. The rear sightcan also be adjusted for windage. Turn the windage adjusting screwclockwise to move the notch to right side, and counter-clockwise to move thenotch to left side.
10ALWAYS KEEP THE MUZZLE POINTED IN A SAFE DIRECTION.
CARE AND MAINTENANCE A. The firearm may be cleaned and lubricated under normal conditionswithout the need of any disassembly.
B. In special conditions, such as repairs, when disassembling is necessary, itis recommended the firearm be returned to the factory or sent to a competentgunsmith or to the importer.
C. In order to keep a firearm in perfect condition it must be kept clean andcovered with a slight film of good quality oil to prevent corrosion. This isespecially necessary after use.
D. For normal cleaning of handgun not used or kept in storage for some time,it is necessary to rub it with a lightly oiled cloth. In the same way proceedwith the bore of the barrel. The excess of oil must be removed, but a thinprotecting film should remain. Also the dust should be removed from allcrevices with a small, clean brush.
E. For cleaning after shooting, it is of special importance that all residues ofpowder be removed from barrel and other adjacent areas subject to suchdeposits, using an appropriate brush. If particles of lead are detected inbarrel they must be scrubbed with a brass brush, drenched with oil. Oncecleaned, lubrication should be done as above described. When shootingmore than 200 shots in a row, your firearm should be cleaned.
F. Do not keep handguns in contact with materials that attract moisture orpossess a certain degree of acidity, or in environments with great variation oftemperature or of humidity. Avoid the use of holsters of cloth or of any othermaterial except natural leather appropriately cured.
G. If the weapon is to be stored for a long period of time, extreme careshould be taken with metal surfaces, in order to protect them againstcorrosion.
H. If magazine becomes dirty, which usually happens after 200 shots, itshould be disassembled and thoroughly cleaned. To do so, use a punch topress in on magazine spring seat where it protrudes into the hole in themagazine floorplate. Slide the magazine floorplate toward the front of themagazine, taking care to prevent the forcible ejection of the magazine springseat and compressed magazine spring. Withdraw magazine spring plate andmagazine spring from magazine body. Turn magazine upside down andremove magazine follower.
Reassemble in reverse order.
WARNING: Damaged or improperly assembled magazines should not beused. They can cause the pistol to malfunction.
11ALWAYS KEEP THE MUZZLE POINTED IN A SAFE DIRECTION.

TAURUS LIMITED WARRANTYWhat Does This Warranty Cover? This warranty covers any service and repair needed by any productmanufactured by Forjas Taurus SA., and imported by Taurus InternationalManufacturing, Inc. or manufactured in the United States by TaurusInternational Manufacturing, Inc.
How Long Does Coverage Last? This warranty is of unlimited duration.
What Will We Do?Taurus will service and/or repair all covered products free of charge.
What Does This Warranty Not Cover?This warranty does not cover grips, sights, accessories, cosmetic defectsafter one year, or damage caused by customer abuse at any time. Thisexpress limited warranty is the only warranty on this product. This product issold “as is” and has no implied warranties of merchantability or fitness for aparticular purpose. There are no warranties which extend beyond thedescription on the face hereof.
How Do I Get Service?To simplify repair and service Forjas Taurus and Taurus International productsare serviced and repaired by Taurus International. Questions regarding theproducts of either company can be directed to Taurus International in Miami,Florida at 1-305-624-1115 or in writing to:
16175 NW. 49th Avenue Miami, Florida 33014 in care of the Consumer Affairs Department.
12ALWAYS KEEP THE MUZZLE POINTED IN A SAFE DIRECTION.

In order to obtain warranty service or repair you must first complete andreturn the enclosed warranty registration card within 10 days of the date ofpurchase. Then, if a problem should arise, describe the problem in writingand send the firearm to Taurus International at the above address, insuredand pre-paid with the written description of the problem enclosed. Within 4business days of our receipt of your firearm our Customer ServiceDepartment will contact you in writing advising you of when to expect yourfirearm back. We will ship guns serviced because of defect in materials orworkmanship insured and pre-paid. We will ship guns repaired out ofwarranty COD. There will, of course, be no charge for parts or labor if therepair work performed is covered by this express warranty.
How Does State Law Apply? This warranty gives you specific legal rights and you may also have otherrights which vary from state to state.
13ALWAYS KEEP THE MUZZLE POINTED IN A SAFE DIRECTION.

LOADING 1. DANGER: Always make sure the muzzle is pointed in a safe direction.
2. SAFETY FIRST: Never attempt to load or unload any firearm inside avehicle, building or other confined space (except a properly constructedshooting range). Enclosed areas frequently do not offer a completely safedirection to point the firearm; if an accidental discharge occurs, there is agreat risk of injury or property damage.
3. SAFETY FIRST: Before loading, always clean all grease and oil from thebore and chamber, and check to be certain that no obstruction is in thebarrel. Any foreign matter in the barrel could result in a bulged or burst barrelor other damage to the firearm, and could cause serious injury to the shooteror to others.
14ALWAYS KEEP THE MUZZLE POINTED IN A SAFE DIRECTION.

FIRING 1. DANGER: Keep the muzzle pointed in a safe direction and your fingeraway from the trigger when cocking any firearm.
2. WARNING: Never carry, handle or leave unattended any firearm which iscocked and ready to fire. When cocked, it will fire from slight pressure on thetrigger. An accidental discharge could easily result if you fall or drop thefirearm, or if the firearm is struck or disturbed by someone or something.
3. WARNING: Never fire any semi-automatic firearm with your finger, hand,face, or other part of your body over or adjacent to the ejection port, or in anyposition where you may be struck by reciprocating movement of the slide (orbolt). Both the ejection of empty cartridge cases and the movement of theslide (or bolt) are part of the normal operating cycle of semi-automaticfirearms, and pose no safety hazard to the shooter if the firearm is held in anormal grip and fired at arm’s length (in the case of a handgun) as intendedby its design.
4. CAUTION: Never allow other persons to stand beside you where theymight be struck by an ejected cartridge case. The case is hot, and may beejected with sufficient force to cause a burn or cut or injury to an unprotectedeye. Make certain there is a clear, unobstructed path for safe ejection of thefired case. Remember, the case may bounce off a hard object nearby andstrike you or someone else.
5. DANGER: If while shooting, your firearm develops ANY mechanicalmalfunction or binding, or “spits” powder, gas, or if a cartridge primer ispunctured or a cartridge case is bulged or ruptured, or if the report on firingdoes not sound quite right, STOP SHOOTING IMMEDIATELY. It may bedangerous to continue. UNLOAD THE FIREARM. DO NOT try “one moreshot”. Take the firearm and ammunition to a gunsmith for examination.
6. SAFETY FIRST: While shooting any semi-automatic firearm, an unfiredcartridge case may occasionally become jammed between the slide (or bolt)and the barrel. Clear the jam as follows, WHILE KEEPING THE MUZZLEPOINTED IN A SAFE DIRECTION: remove the magazine, then pull back theslide (or bolt) and hold or lock it to the rear. The jammed cartridge or casenow can be removed by shaking it out or by picking it out.
15ALWAYS KEEP THE MUZZLE POINTED IN A SAFE DIRECTION.

SEMI-AUTOMATIC PISTOLS 1. SAFETY FIRST: Risk of an accident is greatly increased when any semi-automatic pistol, no matter how safely designed, is carried with a cartridge inthe chamber. THIS PRACTICE IS NOT RECOMMENDED AND MAY BEJUSTIFIED ONLY IN CIRCUMSTANCE OF CLEAR AND PRESENTDANGER WHEN THE PISTOL MAY IMMEDIATELY HAVE TO BE USED INSELF-DEFENSE. By far the safest procedure when carrying a loaded pistolis to leave the chamber empty.
2. SAFETY FIRST: If you MUST carry a Taurus semi-automatic pistol with acartridge in the chamber, always lower the hammer to the uncocked position.In addition, if your pistol is equipped with a manual safety, never carry thepistol with a cartridge in the chamber unless the safe is “on” until you areready to shoot and the firearm is pointed at the target.
3. SAFETY FIRST: When uncocking the hammer, always EASE the hammerdown, NEVER LET IT SNAP DOWN, AS THIS MAY CAUSE THE PISTOL TOFIRE ACCIDENTALLY.
4. On some semi-automatic pistols it is possible to lower the hammer to a“half-cock” position. This position is the intercept notch.
WARNING: DO NOT USE THIS INTERCEPT NOTCH OR HALF COCKPOSITION AS A SAFETY DEVICE. DO NOT CARRY THE FIREARM ATANYTIME IN THE HALF COCK POSITION. It is not designed or suitablefor that purpose. The “half cock” or intercept notch serves only to preventunintended firing in case of internal malfunction or in case your thumbslips off the hammer during manual cocking or decocking.
WARNING: TO PREVENT ACCIDENTAL DISCHARGE, it is absolutelyessential to USE THE MANUAL SAFETY. NEVER CARRY THE PISTOLIN THE COCKED OR HALF COCKED POSITION AT ANYTIME.
5. SAFETY FIRST: Always point the muzzle in a safe direction whenmanually operating the slide to load the first cartridge from the magazine intothe chamber. Malfunctions which allow the pistol to fire without the triggerbeing pulled when the slide snaps closed are rare but can happen. Alwaysgrip the slide so that your fingers, hand, elbow, and other parts of your bodyare BEHIND the pistol and your finger is off of the trigger.
16ALWAYS KEEP THE MUZZLE POINTED IN A SAFE DIRECTION.
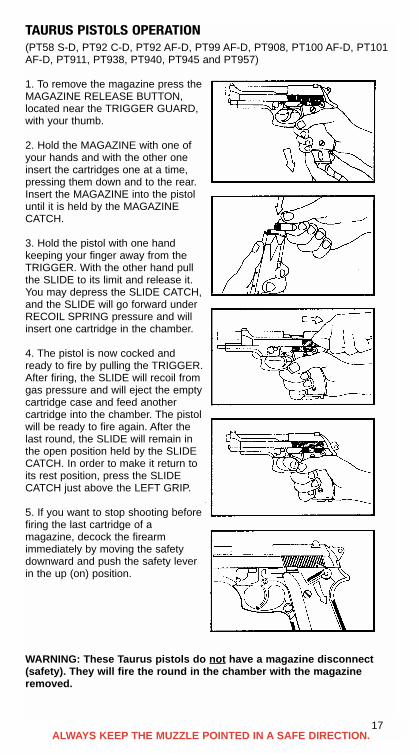
TAURUS PISTOLS OPERATION (PT58 S-D, PT92 C-D, PT92 AF-D, PT99 AF-D, PT908, PT100 AF-D, PT101AF-D, PT911, PT938, PT940, PT945 and PT957)
1. To remove the magazine press theMAGAZINE RELEASE BUTTON,located near the TRIGGER GUARD,with your thumb.
2. Hold the MAGAZINE with one ofyour hands and with the other oneinsert the cartridges one at a time,pressing them down and to the rear.Insert the MAGAZINE into the pistoluntil it is held by the MAGAZINECATCH.
3. Hold the pistol with one handkeeping your finger away from theTRIGGER. With the other hand pullthe SLIDE to its limit and release it.You may depress the SLIDE CATCH,and the SLIDE will go forward underRECOIL SPRING pressure and willinsert one cartridge in the chamber.
4. The pistol is now cocked andready to fire by pulling the TRIGGER.After firing, the SLIDE will recoil fromgas pressure and will eject the emptycartridge case and feed anothercartridge into the chamber. The pistolwill be ready to fire again. After thelast round, the SLIDE will remain inthe open position held by the SLIDECATCH. In order to make it return toits rest position, press the SLIDECATCH just above the LEFT GRIP.
5. If you want to stop shooting beforefiring the last cartridge of amagazine, decock the firearmimmediately by moving the safetydownward and push the safety leverin the up (on) position.
WARNING: These Taurus pistols do not have a magazine disconnect(safety). They will fire the round in the chamber with the magazineremoved.
17ALWAYS KEEP THE MUZZLE POINTED IN A SAFE DIRECTION.

OPERATION OF TAURUS PT111, PT111TI, PT132, PT138, PT14O,PT145 & PT145Ti
1. To remove the magazine press theMAGAZINE RELEASE BUTTON,located near the TRIGGER GUARD,with your thumb.
2. Hold the MAGAZINE with one ofyour hands and with the other oneinsert the cartridges one at a time,pressing them down and to the rear.Insert the MAGAZINE into the pistoluntil it is held by the MAGAZINECATCH. For PT145 and PT145Timodels, use the magazine loader toinsert the cartridges (seeinstructions).
3. Hold the pistol with one handkeeping your finger away from theTRIGGER. With the other hand pullthe SLIDE to its limit and release it.You may depress the SLIDE CATCH,and the SLIDE will go forward underRECOIL SPRING pressure and willinsert one cartridge in the chamber.
4. The pistol is now ready to fire bypulling the TRIGGER. After firing, theSLIDE will recoil from gas pressureand will eject the empty cartridgecase and feed another cartridge intothe chamber. The pistol will be readyto fire again. After the last round, theSLIDE will remain in the openposition held by the SLIDE CATCH.In order to make it return to its restposition, press the SLIDE CATCHdownward just above the LEFTGRIP. On the PT145 and PT145Ti,the slide will not close with an emptymagazine in place. To return theslide to its rest position, release theempty magazine by pushing themagazine catch button with yourthumb.
5. If you want to stop shooting beforefiring the last cartridge of amagazine, push the safety lever in the up (on) position.
WARNING: These Taurus pistols do not have a magazine disconnect(safety). They will fire the round in the chamber with the magazineremoved.
18ALWAYS KEEP THE MUZZLE POINTED IN A SAFE DIRECTION.

SAFETY AGAINST ACCIDENTAL FIRING FROM DROPPING Like any other precision instrument of small size, this pistol can be damagedor broken by unusual abuse, such as by severe impact on a hard surface. Ifdropped from a height at which the pistol is normally used, the manual safetyand automatic safety together provide double strong resistance againstaccidental firing caused by such impact, BUT THE MANUAL SAFETY MUSTBE “ON” TO FULFILL ITS FUNCTION. A user who neglects to apply themanual safety runs a greater risk of accidental firing. It is important to recognize that it is impossible to make any small firearmabsolutely foolproof against drop firing under all circumstances, so long as acartridge is loaded in the chamber.The risk is virtually eliminated by the simple precaution of leaving thechamber empty until you are ready to shoot. In the event of a severe drop,the pistol should be checked by a competent gunsmith to ensure that nointernal damage has occurred which may impair its safety or reliability.
DANGER:USE OF SAFETY 1. Your firearm comes equipped with an effective, well designed safetydevice. HOWEVER, NEVER RELY COMPLETELY ON ANY SAFETYMECHANISM. The best safety mechanism is your own common sense: USEIT! Always handle your firearm as though you expect the safety NOT to work.
2. While handling any firearm, never allow it to point at any part of your bodyor at another person. No harm will result if you obey this rule, even if anaccidental discharge occurs.
3. Leave the safety “on” until you are ready to shoot and the firearm ispointed at the target.
4. Always keep your finger off the trigger and point the muzzle in a safedirection when turning the safety “on” or “off”.
5. When applying the safety, be certain to move it fully into position. On somefirearms a red warning dot is located beside the safety; when the safety isfully “on”, the red dot should be completely covered. Always remember, “Half-safe” is NOT SAFE.
6. Never carry any firearm with a cartridge in the chamber without placing thesafety “on”. (The only exceptions are double-action revolvers and somedouble-action pistols which have automatic internal safeties and which arenot equipped with manual safeties.)
7. For maximum safety never carry a firearm with a cartridge in the chamber.
19ALWAYS KEEP THE MUZZLE POINTED IN A SAFE DIRECTION.

8. Most TAURUS pistols are equipped with the following:
THE AMBIDEXTROUS MANUAL SAFETY - levers on the left and right sideof the slide. It is “ON” when the lever is turned fully up to cover the RED dot.When turned on, the safety lever will disengage the hammer and searsimultaneously.
AMBIDEXTROUS MANUAL HAMMER DROP SAFETY. Mechanism thatallows the hammer to be lowered safely, when one of the safety levers isturned fully down. Hammer and firing pin are kept apart, and pistol is now indouble action condition.
AUTOMATIC FIRING PIN BLOCK SAFETY built-in safety that blocks thefiring pin from movement until the trigger is pulled completely to the rear aspart of the firing sequence.
LOADED CHAMBER INDICATOR is in the extractor which protrudes on theright side of the slide, near the ejection port. When there is a round in thechamber, a red line is visible in daylight or may be felt in poor light
9. PT111, PT111Ti, PT132, PT138,PT140, PT145 and PT145Ti SAFETYFEATURES - The PT111, PT111Ti,PT132, PT138, PT140, PT145 andPT145Ti pistols are equipped with thefollowing safety features:
A. Manual safety lever on the left sideof the frame above the left-hand grip.When turned ON (up), the Safety Leverwill prevent the trigger from being pulled to the rear.
B. Automatic firing pin block safety is built in and blocks the firing pin fromforward movement until the trigger is pulled completely to the rear.
WARNING NEVER RELY COMPLETELY ON ANY SAFETY MECHANISM. It is NOT asubstitute for cautious firearm handling. NO safety, however positive or well-designed, should be totally trusted. Like all mechanical devices, the safety issubject to breakage or malfunction and can be adversely affected by wear,abuse, dirt, corrosion, incorrect assembly, improper adjustment or repair, orlack of maintenance. Moreover, there is no such thing as a safety which is“childproof” or which can completely prevent accidental discharge fromimproper usage, carelessness, or “horseplay”. The automatic safety canprovide only partial protection against mishaps. By itself it is not a completesafety system. To prevent accidents, it is absolutely essential to consistentlyand correctly use the manual safety lever also. If water, sand, or other foreignmatter enters the internal mechanism, the firearm should be dismantled forcomplete and thorough cleaning. Failure to keep your firearm clean and inproper working order can lead to a potentially dangerous condition.
20ALWAYS KEEP THE MUZZLE POINTED IN A SAFE DIRECTION.

SAFETY DEVICES (PT58 S-D, PT92 C-D, PT92 AF-D, PT99 AF-D, PT100 AF-D, PT101 AF-D, PT908, PT911, PT938, PT940, PT945 and PT957)
1. The FIRING PIN BLOCK (4) is permanently locked preventing the FIRINGPIN (5) from going forward which could cause accidental discharge shouldthe pistol be dropped.
The FIRING PIN BLOCK (4) is only released at the TRIGGER (1) final stageposition, allowing the FIRING PIN (5) to advance as soon as it receives theHAMMER (6) impact energy. The release is done through the followingmovement series: TRIGGER (1), TRIGGER BAR (2), FIRING PIN BLOCKLEVER (3) and FIRING PIN BLOCK(4).
2.By moving the SAFETY upward you will disengage the hammer and searsimultaneously. The SAFETY was designed to allow AMBIDEXTROUS useand it enables a rapid change from safe to fire position.
3. When a cartridge is loaded in the chamber the EXTRACTOR endprotrudes and its red colored surface can be easily seen or felt without theneed of moving back the SLIDE.
CAUTION - Taurus Models PT111, PT140, PT911, PT938, PT940 andPT957 manufactured before July, 2000 do NOT contain a loaded
chamber indicator. To determine if chamber is loaded, make sure yourfinger is not on the trigger or inside the trigger guard and pull slide to rearand visually inspect the chamber. In any case, always inspect the chambervisually by pulling the slide back slowly and looking into the chamber whilekeeping your finger well clear of the trigger and trigger guard and keeping themuzzle pointed in a safe direction.
DANGER: CLEARING THE CHAMBERTo clear the chamber of a Taurus Pistol, first make sure the muzzle is pointedin a safe directon. Remove magazine and set aside. While keeping yourfinger well away from the trigger and trigger guard, disengage the manualsafety, and pull the slide smartly to the rear. The cartridge will eject. Lock theslide open and visually inspect the chamber to make sure the pistol inunloaded. You may then close the slide and secure your firearm. 21
ALWAYS KEEP THE MUZZLE POINTED IN A SAFE DIRECTION.
PT58, 92, 92C, 99, 100, 101, 908, 911, 938, 940, 945, 957.

4. By moving safety (3) downward you will lower the hammer (5) anddisengage the trigger bar (2) so that the connection between trigger (1) andsear (4) will be interrupted. The hammer (5) forward motion will be stoppedby the hammer catch (6).
FIELD STRIPPING (PT58 S-D, PT92 C-D, PT92 AF-D, PT99 AF-D, PT100 AF-D, PT101 AF-D,PT908, PT911, PT938, PT940, PT945,and PT957)
22ALWAYS KEEP THE MUZZLE POINTED IN A SAFE DIRECTION.
PT58, 92, 92C, 99, 100, 101, 908, 911, 938, 940, 945, 957.
1. Remove the MAGAZINE bypressing the MAGAZINE RELEASEBUTTON; be sure that the chamberis EMPTY.
3. Pull forward the SLIDE-BARRELassembly.
2. With the left forefinger press theDISASSEMBLY LATCH RELEASEand with the left thumb rotate theDISASSEMBLY LATCH clockwiseuntil it stops.
4. Slightly press the RECOILSPRING GUIDE. Lift and remove itcarefully.
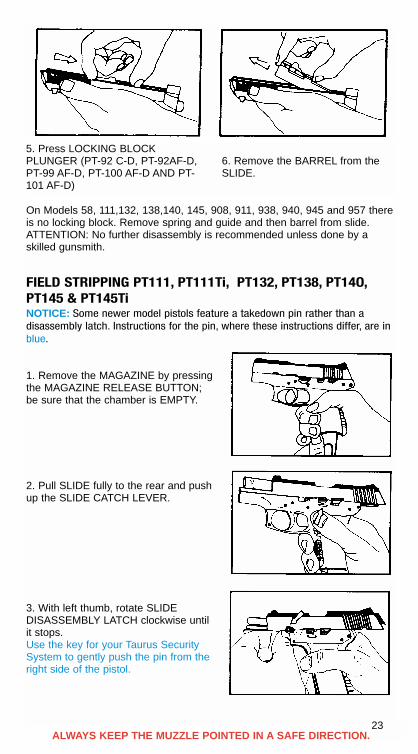
On Models 58, 111,132, 138,140, 145, 908, 911, 938, 940, 945 and 957 thereis no locking block. Remove spring and guide and then barrel from slide.ATTENTION: No further disassembly is recommended unless done by askilled gunsmith.
FIELD STRIPPING PT111, PT111Ti, PT132, PT138, PT14O,PT145 & PT145TiNOTICE: Some newer model pistols feature a takedown pin rather than adisassembly latch. Instructions for the pin, where these instructions differ, are inblue.
1. Remove the MAGAZINE by pressingthe MAGAZINE RELEASE BUTTON;be sure that the chamber is EMPTY.
2. Pull SLIDE fully to the rear and pushup the SLIDE CATCH LEVER.
3. With left thumb, rotate SLIDEDISASSEMBLY LATCH clockwise untilit stops.Use the key for your Taurus SecuritySystem to gently push the pin from theright side of the pistol.
23ALWAYS KEEP THE MUZZLE POINTED IN A SAFE DIRECTION.
5. Press LOCKING BLOCKPLUNGER (PT-92 C-D, PT-92AF-D,PT-99 AF-D, PT-100 AF-D AND PT-101 AF-D)
6. Remove the BARREL from theSLIDE.

4. With left hand, pull SLIDEDISASSEMBLY LATCH or TAKE-DOWN PIN out of frame.
5. Carefully release SLIDE CATCH,and with SLIDE under full control, pullSLIDE forward off of frame.
6. Carefully remove SLIDE SPRINGand GUIDE from its position on thebottom of the BARREL. SPRING isunder compression so it must be keptunder control until removed.
7. Remove BARREL from SLIDE bypulling to the rear and up.
ATTENTION: No further disassembly isrecommended unless done by a skilledgunsmith.
24ALWAYS KEEP THE MUZZLE POINTED IN A SAFE DIRECTION.
If the slide sticks on the frame, be sure thechamber is empty and firmly pull the triggerfully to the rear while pulling the slide forwardoff the frame.
If the slide does not move because the barrelremains to the rear and tilted upward, be surethe chamber is empty and push the muzzleagainst the palm of one hand while pushingthe slide forward with the other.
ASSEMBLY
(PT58 S-D, PT92 C-D, PT92 AF-D, PT99 AF-D, PT100 AF-D, PT1O1 AF-DPT908, PT911, PT938, PT940, PT945 and PT957)
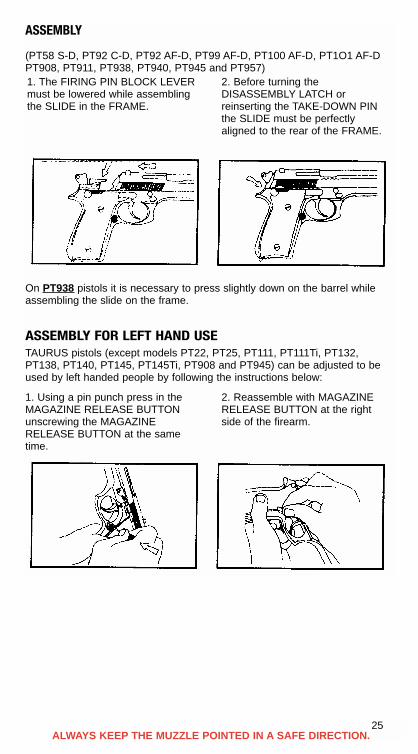
On PT938 pistols it is necessary to press slightly down on the barrel whileassembling the slide on the frame.
ASSEMBLY FOR LEFT HAND USE TAURUS pistols (except models PT22, PT25, PT111, PT111Ti, PT132,PT138, PT140, PT145, PT145Ti, PT908 and PT945) can be adjusted to beused by left handed people by following the instructions below:
25ALWAYS KEEP THE MUZZLE POINTED IN A SAFE DIRECTION.
1. The FIRING PIN BLOCK LEVERmust be lowered while assemblingthe SLIDE in the FRAME.
2. Before turning theDISASSEMBLY LATCH orreinserting the TAKE-DOWN PINthe SLIDE must be perfectlyaligned to the rear of the FRAME.
1. Using a pin punch press in theMAGAZINE RELEASE BUTTONunscrewing the MAGAZINERELEASE BUTTON at the sametime.
2. Reassemble with MAGAZINERELEASE BUTTON at the rightside of the firearm.

ASSEMBLY OF PT111, PT111Ti, PT132, PT138, PT14O, PT145AND PT145TiIn order to reassemble the pistol, proceed by reversing the disassemblingprocedure while observing the following details:
1. Replace the barrel in the slidepushing it to the rearward position.Mount the spring on the guide rod.Insert the spring/guide rod sub-assembly into the slide over the barrel,compressing the spring slightly to get itinto posiiton. The SLIDE should bemounted on the frame and pulled fullyto the rear and the SLIDE CATCH mustbe moved upward to hold the SLIDE tothe rear.
2. When reinstalling the SLIDEDISASSEMBLY LATCH, it is insertedinto the frame with the lever pointingrearward and the horizontal roundportion of the latch must engage themating surface on the bottom of theBARREL. Insert the take-down pin once the slideis in position to line up the barrel withthe hole, and gently push in. A click willindicate the pin is secured in place.
3. The SLIDE CATCH then can bedepressed which allows the SLIDE togo forward.
4. You should cycle the SLIDE severaltimes, with no magazine inserted andno rounds in the chamber, to insurethat the barrel/slide/frame relationshipis correct.
26ALWAYS KEEP THE MUZZLE POINTED IN A SAFE DIRECTION.
The slide may stick on the frame before going fullyto the rear, or the barrel may ride with it to the rear.Begin again andpress down with thefinger onto that rearportion of the barrel
accessible through the ejection port.
When the barrel depresses and locks to theframe, continue moving the slide fully to therear and engage the slide catch lever.
1
2
3
4

SAFETY FIRST: PARTS All firearms require periodic maintenance and inspection which may reveal aneed for adjustment or repair. Have your firearm checked by a competentgunsmith annually, even if it seems to be working well, since breakage,improper functioning, undue wear, or corrosion of some components may notbe apparent from external examination. If you notice ANY mechanicalmalfunction, do NOT continue to use the firearm. UNLOAD the firearm andtake it to a competent gunsmith immediately.
Our Service Department maintains a full complement of replacementparts for our firearms of current manufacture. Even though most gunsmithshave the knowledge, training and ability to make the necessary repairs toyour firearm, the skill and workmanship of any particular gunsmith is totallybeyond our control. Should your firearm ever require service, we stronglyrecommend that you return it to Taurus. Follow the instructions outlinedbelow. Remember, unauthorized adjustments or parts replacement can voidyour warranty.
It is the responsibility of the purchaser to be absolutely certain that anyparts ordered from Taurus are of the correct type and are properly fitted andinstalled by a competent person. THIS FIREARM IS A PRECISION MECHANISM AND THE IMPROPERFITTING OF PARTS OR IMPROPER MECHANICAL ADJUSTMENT MAYRESULT IN A DANGEROUS MALFUNCTION, DAMAGE TO THE FIREARM,AND POSSIBLE SERIOUS INJURY TO THE SHOOTER OR TO OTHERS.Therefore, the purchaser and/or installer of parts must accept fullresponsibility for the correct adjustment of and function of the firearm aftersuch installation has been made or attempted.
27ALWAYS KEEP THE MUZZLE POINTED IN A SAFE DIRECTION.

TAURUS SERVICE POLICYBefore shipment, your firearm was carefully inspected and test fired in orderto ensure that it conformed to our specifications and standards. Should yourfirearm require adjustment or repair, we strongly recommend that you returnit to Taurus for factory service.
If there is any question regarding the performance of your firearm, pleasewrite to our Service Department fully describing all circumstances andconditions involved. If our Service Department makes the determination thatyour firearm requires factory service, you will be so advised and will be giveninstructions for the most expeditious handling of your shipment.
Our Service Department will give your firearm a complete inspection, andevaluate the problem(s) specified in your letter. If the work required is notcovered under the terms of our Warranty (when applicable) you will receivean actual cost quotation, not an estimate. Any repair work must be authorizedby you, and no work will be done without your expressed approval.
Please follow these suggestions to expedite service in the United States ofAmerica to return any firearm to us for adjustment or repair.
1. Federal law permits you to return your firearm to the manufacturer forservice via common carriers. However, state and local firearms laws varygreatly; you should consult your local prosecuting attorney regarding anyrestrictive laws in your jurisdiction regarding your shipment or receipt offirearms. With the above in mind, it is strongly recommended that anyfirearm sent to us for repair be sent through a Federally licensed dealer.
2. All firearms must be shipped to us prepaid. WE WILL NOT ACCEPTCOLLECT SHIPMENTS.
3. Be sure to enclose a letter stating your name, address and telephonenumber, serial number, caliber and barrel length of your firearm. Also statenature of trouble experienced or work required. Merely stating “defective”or “repair as necessary” is inadequate information. Be specific andenclose copies of any previous correspondence. Work (other thanwarranty repair) will bear minimum labor charge of $ 10.00.
4. FIREARMS MUST BE SHIPPED UNLOADED. Double check thechamber of your firearm before shipping. If firearms are sent to Taurus ina loaded condition, we are required by law to notify the Federalauthorities.
5. DO NOT include telescopic sights; custom grips, holsters, or otheraccessories with any firearm shipped to us.
28ALWAYS KEEP THE MUZZLE POINTED IN A SAFE DIRECTION.
ALWAYS KEEP THE MUZZLE POINTED IN A SAFE DIRECTION.
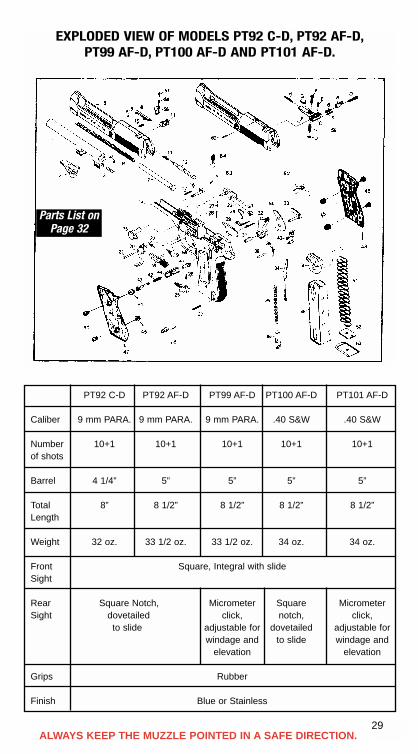
EXPLODED VIEW OF MODELS PT92 C-D, PT92 AF-D,PT99 AF-D, PT100 AF-D AND PT101 AF-D.
29
PT92 C-D PT92 AF-D PT99 AF-D PT100 AF-D PT101 AF-D
Caliber 9 mm PARA. 9 mm PARA. 9 mm PARA. .40 S&W .40 S&W
Number 10+1 10+1 10+1 10+1 10+1of shots
Barrel 4 1/4” 5” 5” 5” 5”
Total 8” 8 1/2” 8 1/2” 8 1/2” 8 1/2”Length
Weight 32 oz. 33 1/2 oz. 33 1/2 oz. 34 oz. 34 oz.
Front Square, Integral with slideSight
Rear Square Notch, Micrometer Square MicrometerSight dovetailed click, notch, click,
to slide adjustable for dovetailed adjustable forwindage and to slide windage and
elevation elevation
Grips Rubber
Finish Blue or Stainless
Parts List on Page 32

ALWAYS KEEP THE MUZZLE POINTED IN A SAFE DIRECTION.30
PT58 S-D
Caliber 9 mm PARA.
Number 10+of shots
Barrel 4 1/4”
Total 8”Length
Weight 32 oz.
Front Square, Integral with slideSight
Rear Square Notch, dovetailed to slideSight
Grips Rubber
Finish Blue or Stainless
EXPLODED VIEW OF MODEL PT 58 S-D
Parts List on Page 32

ALWAYS KEEP THE MUZZLE POINTED IN A SAFE DIRECTION.31
PT911 PT938 PT940 PT945 PT957
Caliber 9 mm PARA. .380 ACP .40 S&W .45 ACP .357 SIG
Number 10+1 10+1 10+1 8+1 10+1of shots
Barrel 3.86” 3.7” 3.88” 4.25” 3.88”
Total 7.12” 6.7” 7.12” 7.45” 7.12”Length
Weight 28 oz. 26.8 oz. 30 oz. 30 oz. 30 oz.
Front Square, dovetailed to slideSight
Rear Square Notch, dovetailed to slideSight
Grips Santoprene
Finish Blue or Stainless
EXPLODED VIEW OF MODEL PT911, PT938,PT940, PT945 AND PT957
Parts List on Page 32

ALWAYS KEEP THE MUZZLE POINTED IN A SAFE DIRECTION.
ITEM NAME01 Barrel 02 Locking block 03 Locking block plunger 04 Locking block plunger pin 05 Slide 06 Recoil spring 07 Recoil spring guide 08 Extractor 09 Extractor pin 10 Extractor spring 11 Rear sight 12 Firing pin 13 Firing pin spring 14 Frame 15 Disassembly latch 16 Disassembly latch release 17 Disassembly latch release
spring 18 Slide catch 19 Slide catch spring20 Trigger 21 Trigger pin 22 Trigger spring 23 Trigger bar 24 Trigger bar spring25 Safety 26 Safety elastic pin 27 Safety plunger 28 Safety plunger spring 29 Ejector 30 Ejector pin 31 Hammer bushing 32 Hammer 33 Right safety latch 34 Hammer spring guide 35 Hammer spring 36 Hammer spring support 37 Hammer spring support
pin
ITEM NAME38 Sear pin 39 Sear spring 40 Sear 41 Magazine release 42 Magazine release spring 43 Magazine release button 44 Magazine release case 45 Grip bushing 46 Grip screw 47 Left grip 48 Right grip 49 Magazine box 50 Magazine follower 51 Magazine spring 52 Magazine plate 53 Magazine bottom 54 Firing pin block lever 55 Firing pin block 56 Firing pin block spring 57 Firing pin block pin 58 Magazine release case pin 59 Rear sight assembly60 Rear sight pin 61 Left grip upper bushing62 Hammer catch 63 Hammer catch plunger 64 Hammer catch plunger
spring 65 Front sight 66 Central support 67 Magazine release pin 68 Safety spring
32
PT92 C-D, PT92 AF-D, PT99 AF-D, PT100 AF-D, PT101 AF-D,PT 58 S-D, PT911, PT938, PT940, PT945 AND PT957
PART LIST
ALWAYS KEEP THE MUZZLE POINTED IN A SAFE DIRECTION.33
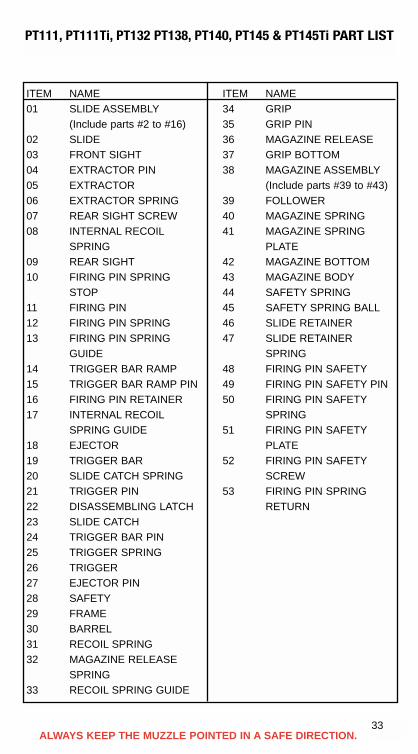
ITEM NAME01 SLIDE ASSEMBLY
(Include parts #2 to #16) 02 SLIDE 03 FRONT SIGHT04 EXTRACTOR PIN 05 EXTRACTOR 06 EXTRACTOR SPRING 07 REAR SIGHT SCREW 08 INTERNAL RECOIL
SPRING 09 REAR SIGHT10 FIRING PIN SPRING
STOP11 FIRING PIN 12 FIRING PIN SPRING13 FIRING PIN SPRING
GUIDE 14 TRIGGER BAR RAMP15 TRIGGER BAR RAMP PIN 16 FIRING PIN RETAINER 17 INTERNAL RECOIL
SPRING GUIDE 18 EJECTOR 19 TRIGGER BAR 20 SLIDE CATCH SPRING 21 TRIGGER PIN 22 DISASSEMBLING LATCH 23 SLIDE CATCH 24 TRIGGER BAR PIN 25 TRIGGER SPRING 26 TRIGGER 27 EJECTOR PIN 28 SAFETY29 FRAME 30 BARREL31 RECOIL SPRING 32 MAGAZINE RELEASE
SPRING 33 RECOIL SPRING GUIDE
ITEM NAME34 GRIP35 GRIP PIN 36 MAGAZINE RELEASE 37 GRIP BOTTOM 38 MAGAZINE ASSEMBLY
(Include parts #39 to #43) 39 FOLLOWER 40 MAGAZINE SPRING 41 MAGAZINE SPRING
PLATE 42 MAGAZINE BOTTOM 43 MAGAZINE BODY44 SAFETY SPRING 45 SAFETY SPRING BALL46 SLIDE RETAINER 47 SLIDE RETAINER
SPRING 48 FIRING PIN SAFETY49 FIRING PIN SAFETY PIN 50 FIRING PIN SAFETY
SPRING 51 FIRING PIN SAFETY
PLATE 52 FIRING PIN SAFETY
SCREW 53 FIRING PIN SPRING
RETURN
PT111, PT111Ti, PT132 PT138, PT140, PT145 & PT145Ti PART LIST

ALWAYS KEEP THE MUZZLE POINTED IN A SAFE DIRECTION.
PT111 PT132 PT138 PT140 PT145PT111Ti PT145Ti
Caliber 9 mm .32 ACP .380 ACP .40 .45 ACP
Number 10+1 10+1 10+1 10+1 10+1of shots
Barrel 3.30” 3.30” 3.30” 3.30” 3.30”
Total 6.00” 6.00” 6.00” 6.00” 6.10”Length
Weight 19 oz. 19 oz. 19 oz. 21 oz. 22 oz.16 oz. 19 oz.
Front Square, dovetailed to slideSight
Rear Square notch, dovetailed to slideSight
Grips Polymer
Finish Blue, Stainless orTitanium Shadow Gray (PT111Ti & PT145 Ti only)
EXPLODED VIEW OF MODELS PT111, PT111Ti, PT132 PT138, PT140, PT145 & PT145Ti
34 10/01
Parts List on Page 33

35ALWAYS KEEP THE MUZZLE POINTED IN A SAFE DIRECTION.
This trademark, forged for over 60 years of hard anddedicated work, became a symbol of quality in handguns forcivilian, police and military use. This outstanding quality is theresult of constant technological evolution and from thedevoted work of expert gunsmiths and highly specializedprofessionals, which makes TAURUS a respected name inmore than 75 countries all over the world.

A WORD TO THE WISEMOST FIREARM ACCIDENTS HAPPEN BECAUSE THE SHOOTER CARELESSLY
VIOLATES THE SINGLE MOSTIMPORTANT RULE OF SAFE FIREARM
HANDLING:ALWAYS KEEP THE MUZZLE POINTED
IN A SAFE DIRECTION!
IMPORTANT:DO NOT DISCARD
KEEP THIS MANUAL WITH YOURFIREARM. UPON CHANGE OFOWNERSHIP, TRANSFER THISMANUAL WITH THE FIREARM.
Forjas Taurus, S.AAv. do Forte, 511 - Cx. Postal 44 - Telegr.: “Forja”Fone: (051)3347.4000 - Fax: (051)3347.307591360-000 - Porto Alegre - RS - Brasil
Taurus International Manufacturung, Inc.16175 NW 49 AvenueMiami, Florida 33014Telephone: (305)624.1115 - Fax: (305)624.1126
10/01