tebis tx100 configurator - english · tx100 remote control 1 6t 7865a tebis tx100 configurator...
TRANSCRIPT
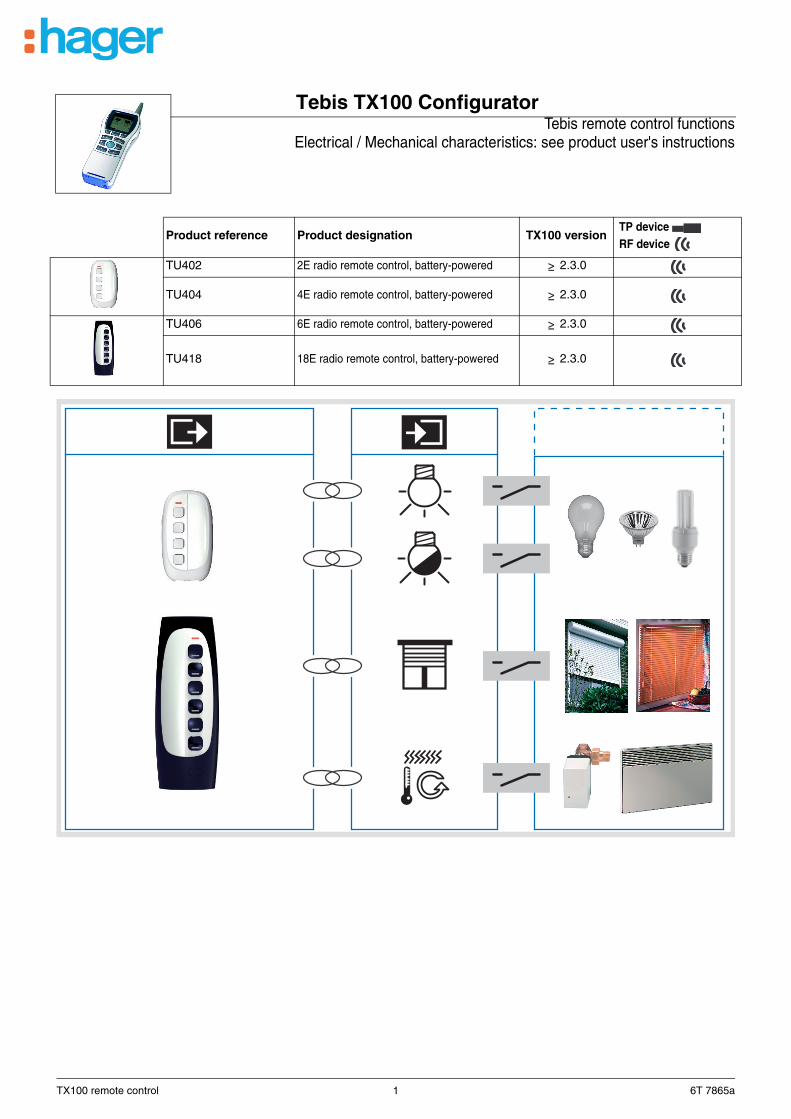
Tebis TX100 ConfiguratorTebis remote control functions
Electrical / Mechanical characteristics: see product user's instructions
Product reference Product designation TX100 version TP device RF device
TU402 2E radio remote control, battery-powered 2.3.0
TU404 4E radio remote control, battery-powered 2.3.0
TU406 6E radio remote control, battery-powered 2.3.0
TU418 18E radio remote control, battery-powered 2.3.0
TX100 remote control 1 6T 7865a
1. Presentation of the remote control functions .................................................................................................................... 31.1 Presentation of the remote controls............................................................................................................................. 31.2 Remote control functions............................................................................................................................................. 3
2. Remote control configuration and settings (Standard mode)............................................................................................ 32.1 General points ............................................................................................................................................................. 32.2 On/Off Lighting functions ............................................................................................................................................. 42.3 Dimmer Lighting functions ........................................................................................................................................... 52.4 Shutters/Blinds function............................................................................................................................................... 72.5 Heating/Air-Conditioning function ................................................................................................................................ 82.6 Scene function............................................................................................................................................................. 9
3. TX100 "+ info" and "expert" mode .................................................................................................................................. 10
4. Restore Factory Configuration function .......................................................................................................................... 11
5. Characteristics ................................................................................................................................................................ 11
Summary
TX100 remote control 2 6T 7865a
1.1 Presentation of the remote controls
■ The 868MHz radio remote control offer includes:
• 2 compact products with 2 and 4 channels: the small 2 and 4 key remote controls have 2 side keys. They allow the keys on the front to be locked/unlocked.
• 2 products with 6 and 18 channels: The lighting for the keys and label holder on the TU418 comes on automatically when picked up.
• Remote control power supply: Remote controls with 2-4-6 and 3 x6 keys are all powered by 2 CR2430 3.0 V batteries (battery life-time: 5 years).
1.2 Remote control functions
■ Sending commandsThe remote controls are used to control lighting, blinds, shutters, heating/air conditioning and scenes.
■ SceneThe Scene function sends group controls to different kinds of outputs to create ambiences or scenarios (leaving home scenario, reading ambience, etc.).
■ Label holderA label holder identifies each function associated with a remote control key.
■ LEDA 3 colour LED identifies the following functions when a key is pressed:
- the green LED lights up briefly, indicating that the command has been transmitted (for a channel which has already been configured),
- orange flashs for 2 seconds, indicates a channel which is not configured,- red flashes for 2 seconds, indicates low battery level.
For further information, see product user manual.
PHRASE NON TRADUITE : 2400Error phrase 2534 Right button
The remote controls are used to transmit commands and perform the following functions:
- Lighting control:Toggle switch, ON, OFF, ON / OFF, Timer.1 or 2 button dimmer.
- Shutter/Blind control:Up, Down, Stop, Blind slat angle.
- Heating/Air-Conditioning control:Comfort, Economy, Eco, Frost protection, Time limited comfort, Presence/Absence.
- Scene controls.
These functions are available in the TX100's Standard configuration mode by creating links with the appropriate output devices.
■ Remote control configurationIn normal operation and to increase the battery life-time, the radio remote controls operate in one direction.
➜ Activating configuration mode- Press the ’’Cfg’’ button on the remote control to enter configuration mode. The remote control switches to two-way
mode during configuration,
- Press and hold button of the TX100 to launch learning of the installation products.
1. Presentation of the remote control functions
2. Remote control configuration and settings (Standard mode)
2.1 General points
TX100 remote control 3 6T 7865a
➜ To number the inputs (keys) on the radio remote control:- Go to the Num numbering menu,- Press on the input key to be numbered. An audible sound is emitted when the input key is detected, The configurator
automatically assigns a number to it.- Proceed the same way for the other inputs, on your remote control.
➜ To allocate a function to an input key:- Go to the Num numbering menu,- Select the number of the input key required,
- Press ,
- Select the function and validate using .
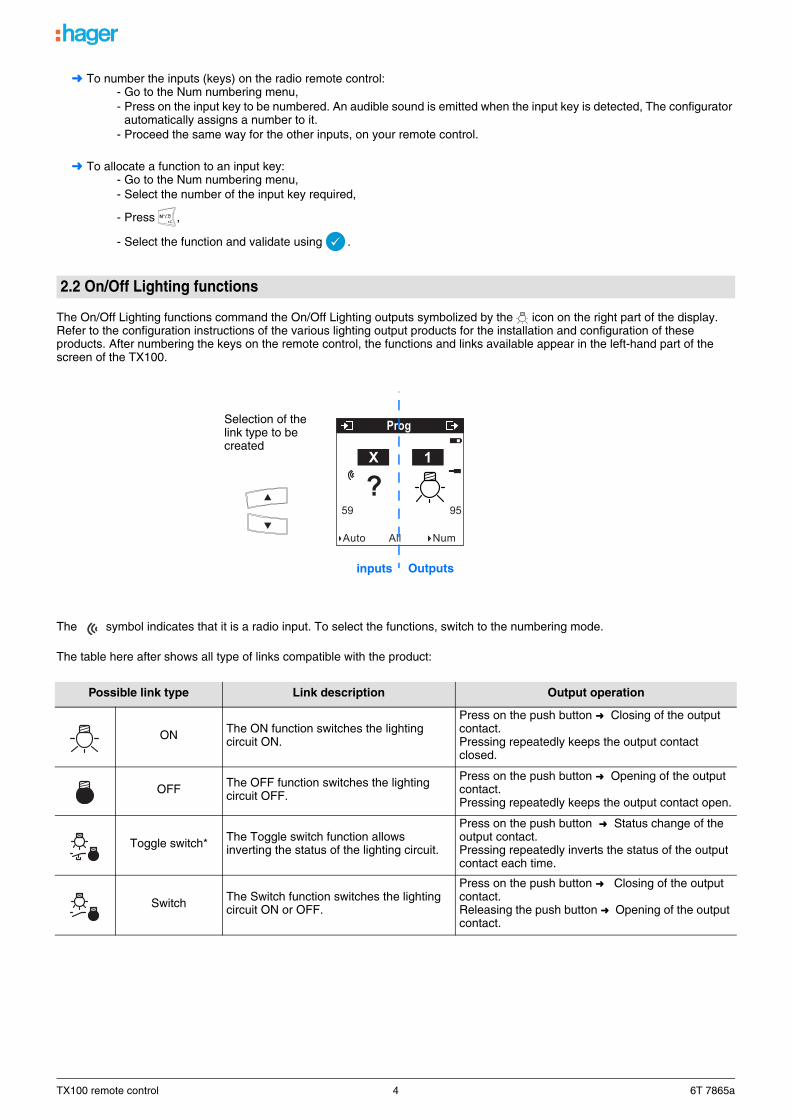
The On/Off Lighting functions command the On/Off Lighting outputs symbolized by the icon on the right part of the display. Refer to the configuration instructions of the various lighting output products for the installation and configuration of these products. After numbering the keys on the remote control, the functions and links available appear in the left-hand part of the screen of the TX100.
The symbol indicates that it is a radio input. To select the functions, switch to the numbering mode.
The table here after shows all type of links compatible with the product:
2.2 On/Off Lighting functions
Possible link type Link description Output operation
ON The ON function switches the lighting circuit ON.
Press on the push button ➜ Closing of the output contact.Pressing repeatedly keeps the output contact closed.
OFF The OFF function switches the lighting circuit OFF.
Press on the push button ➜ Opening of the output contact.Pressing repeatedly keeps the output contact open.
Toggle switch* The Toggle switch function allows inverting the status of the lighting circuit.
Press on the push button ➜ Status change of the output contact.Pressing repeatedly inverts the status of the output contact each time.
Switch The Switch function switches the lighting circuit ON or OFF.
Press on the push button ➜ Closing of the output contact.Releasing the push button ➜ Opening of the output contact.
95
Prog
AllAuto Num
X 1
?59
Outputsinputs
Selection of the link type to be created
TX100 remote control 4 6T 7865a
* Remark: In normal operation, the radio remote controls operate in one direction. They momentarily switch to two-way mode each time a "remote control switch" type command is made in order to ensure the output status is inverted.
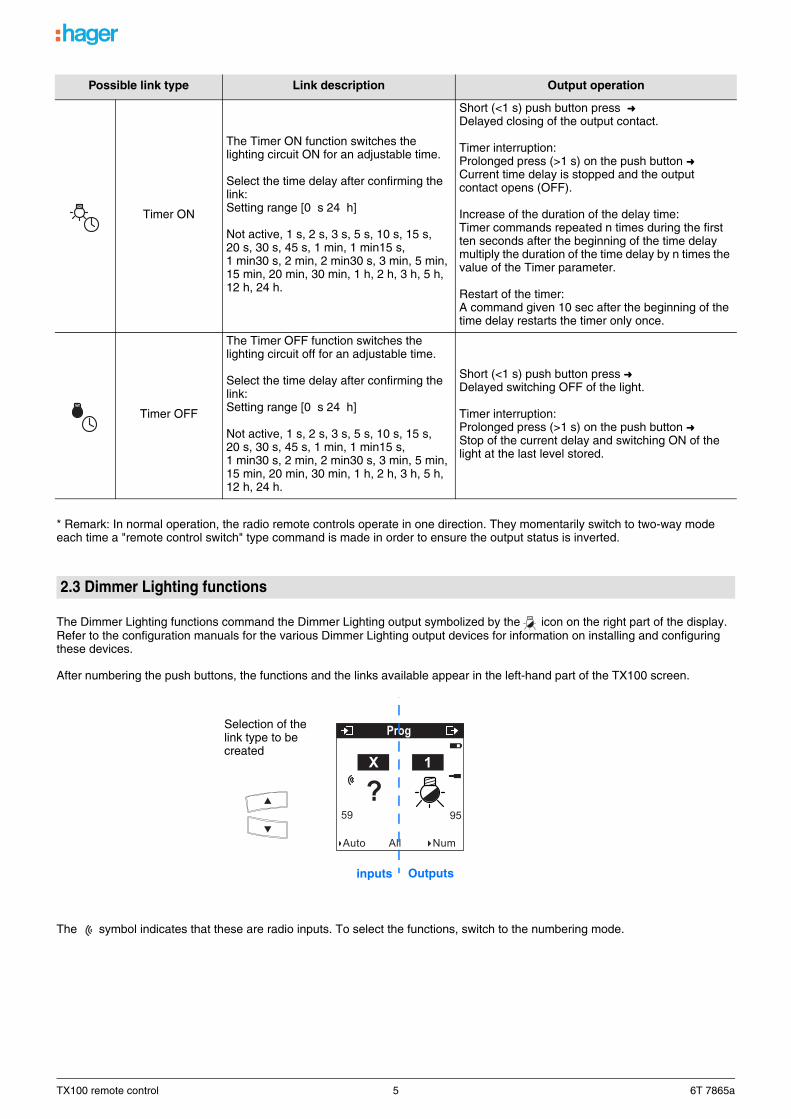
The Dimmer Lighting functions command the Dimmer Lighting output symbolized by the icon on the right part of the display. Refer to the configuration manuals for the various Dimmer Lighting output devices for information on installing and configuring these devices.
After numbering the push buttons, the functions and the links available appear in the left-hand part of the TX100 screen.
The symbol indicates that these are radio inputs. To select the functions, switch to the numbering mode.
Timer ON
The Timer ON function switches the lighting circuit ON for an adjustable time.
Select the time delay after confirming the link: Setting range [0 s 24 h]
Not active, 1 s, 2 s, 3 s, 5 s, 10 s, 15 s, 20 s, 30 s, 45 s, 1 min, 1 min15 s, 1 min30 s, 2 min, 2 min30 s, 3 min, 5 min, 15 min, 20 min, 30 min, 1 h, 2 h, 3 h, 5 h, 12 h, 24 h.
Short (<1 s) push button press ➜ Delayed closing of the output contact.
Timer interruption:Prolonged press (>1 s) on the push button ➜ Current time delay is stopped and the output contact opens (OFF).
Increase of the duration of the delay time:Timer commands repeated n times during the first ten seconds after the beginning of the time delay multiply the duration of the time delay by n times the value of the Timer parameter.
Restart of the timer:A command given 10 sec after the beginning of the time delay restarts the timer only once.
Timer OFF
The Timer OFF function switches the lighting circuit off for an adjustable time.
Select the time delay after confirming the link:Setting range [0 s 24 h]
Not active, 1 s, 2 s, 3 s, 5 s, 10 s, 15 s, 20 s, 30 s, 45 s, 1 min, 1 min15 s, 1 min30 s, 2 min, 2 min30 s, 3 min, 5 min, 15 min, 20 min, 30 min, 1 h, 2 h, 3 h, 5 h, 12 h, 24 h.
Short (<1 s) push button press ➜ Delayed switching OFF of the light.
Timer interruption:Prolonged press (>1 s) on the push button ➜ Stop of the current delay and switching ON of the light at the last level stored.
2.3 Dimmer Lighting functions
Possible link type Link description Output operation
95
Prog
AllAuto Num
X 1
?59
Outputsinputs
Selection of the link type to be created
TX100 remote control 5 6T 7865a
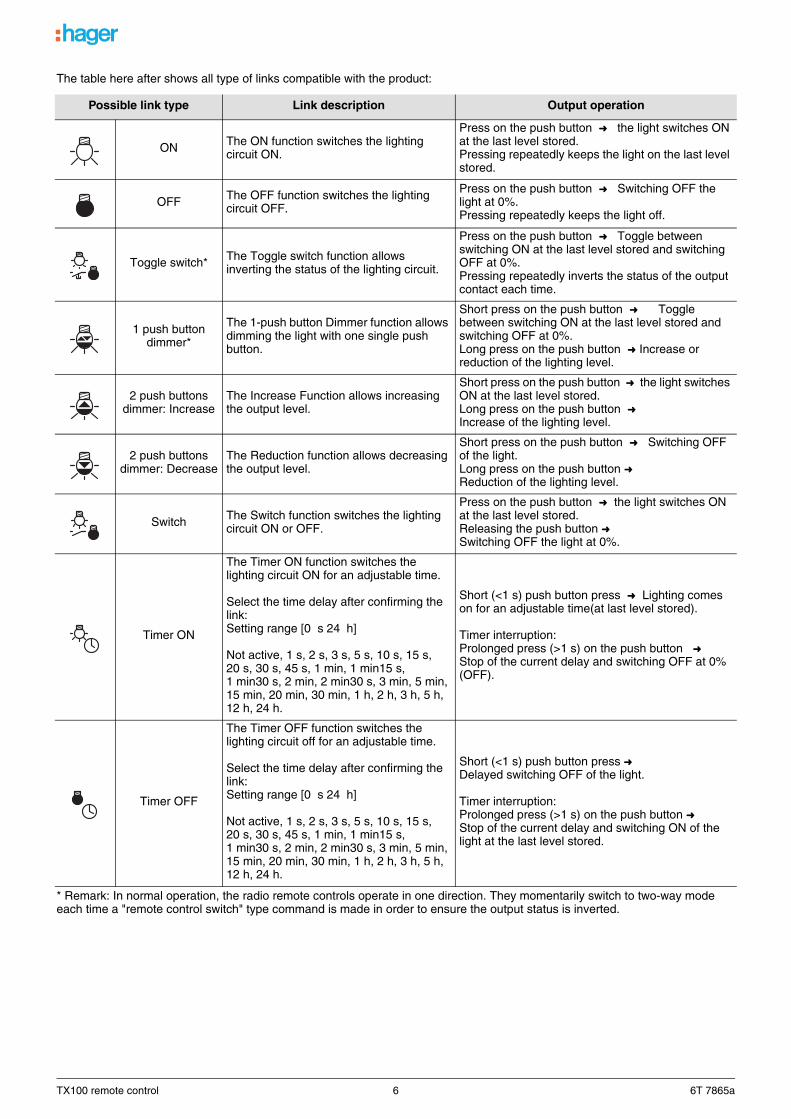
The table here after shows all type of links compatible with the product:
* Remark: In normal operation, the radio remote controls operate in one direction. They momentarily switch to two-way mode each time a "remote control switch" type command is made in order to ensure the output status is inverted.
Possible link type Link description Output operation
ON The ON function switches the lighting circuit ON.
Press on the push button ➜ the light switches ON at the last level stored.Pressing repeatedly keeps the light on the last level stored.
OFF The OFF function switches the lighting circuit OFF.
Press on the push button ➜ Switching OFF the light at 0%.Pressing repeatedly keeps the light off.
Toggle switch* The Toggle switch function allows inverting the status of the lighting circuit.
Press on the push button ➜ Toggle between switching ON at the last level stored and switching OFF at 0%.Pressing repeatedly inverts the status of the output contact each time.
1 push button dimmer*
The 1-push button Dimmer function allows dimming the light with one single push button.
Short press on the push button ➜ Toggle between switching ON at the last level stored and switching OFF at 0%.Long press on the push button ➜ Increase or reduction of the lighting level.
2 push buttons dimmer: Increase
The Increase Function allows increasing the output level.
Short press on the push button ➜ the light switches ON at the last level stored. Long press on the push button ➜ Increase of the lighting level.
2 push buttons dimmer: Decrease
The Reduction function allows decreasing the output level.
Short press on the push button ➜ Switching OFF of the light.Long press on the push button ➜ Reduction of the lighting level.
Switch The Switch function switches the lighting circuit ON or OFF.
Press on the push button ➜ the light switches ON at the last level stored.Releasing the push button ➜ Switching OFF the light at 0%.
Timer ON
The Timer ON function switches the lighting circuit ON for an adjustable time.
Select the time delay after confirming the link:Setting range [0 s 24 h]
Not active, 1 s, 2 s, 3 s, 5 s, 10 s, 15 s, 20 s, 30 s, 45 s, 1 min, 1 min15 s, 1 min30 s, 2 min, 2 min30 s, 3 min, 5 min, 15 min, 20 min, 30 min, 1 h, 2 h, 3 h, 5 h, 12 h, 24 h.
Short (<1 s) push button press ➜ Lighting comes on for an adjustable time(at last level stored).
Timer interruption:Prolonged press (>1 s) on the push button ➜ Stop of the current delay and switching OFF at 0% (OFF).
Timer OFF
The Timer OFF function switches the lighting circuit off for an adjustable time.
Select the time delay after confirming the link:Setting range [0 s 24 h]
Not active, 1 s, 2 s, 3 s, 5 s, 10 s, 15 s, 20 s, 30 s, 45 s, 1 min, 1 min15 s, 1 min30 s, 2 min, 2 min30 s, 3 min, 5 min, 15 min, 20 min, 30 min, 1 h, 2 h, 3 h, 5 h, 12 h, 24 h.
Short (<1 s) push button press ➜ Delayed switching OFF of the light.
Timer interruption:Prolonged press (>1 s) on the push button ➜ Stop of the current delay and switching ON of the light at the last level stored.
TX100 remote control 6 6T 7865a
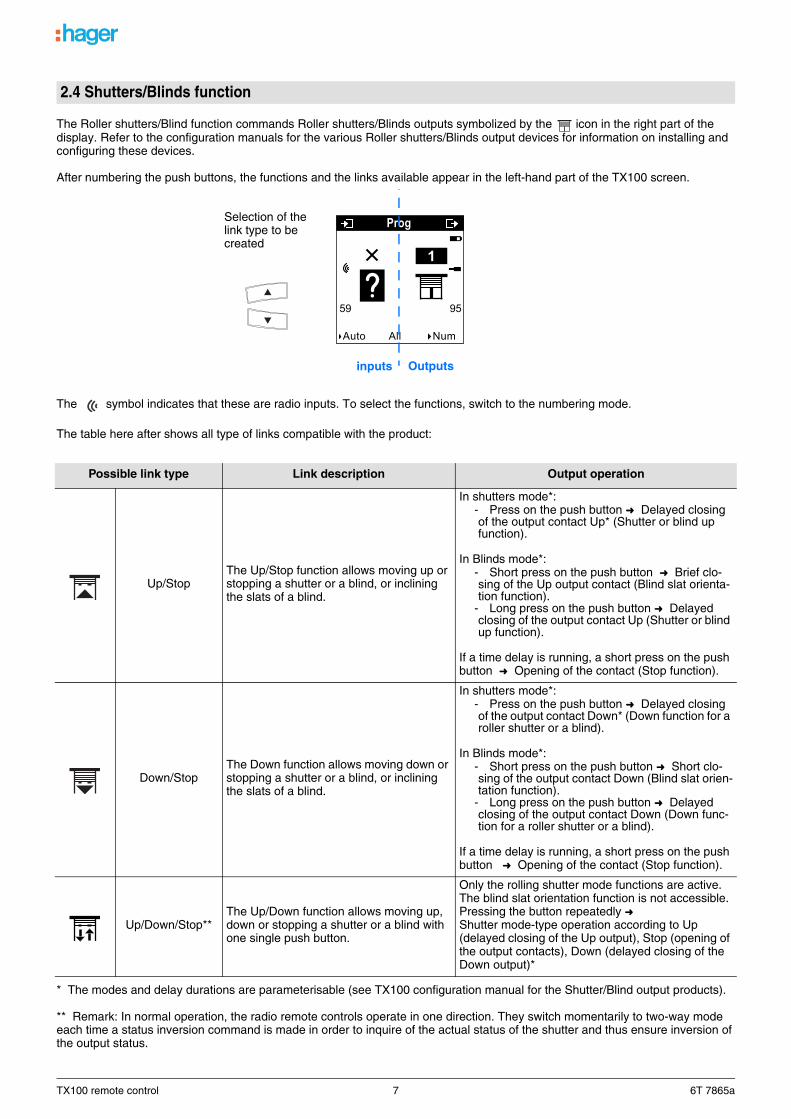
The Roller shutters/Blind function commands Roller shutters/Blinds outputs symbolized by the icon in the right part of the display. Refer to the configuration manuals for the various Roller shutters/Blinds output devices for information on installing and configuring these devices.
After numbering the push buttons, the functions and the links available appear in the left-hand part of the TX100 screen.
The symbol indicates that these are radio inputs. To select the functions, switch to the numbering mode.
The table here after shows all type of links compatible with the product:
* The modes and delay durations are parameterisable (see TX100 configuration manual for the Shutter/Blind output products).
** Remark: In normal operation, the radio remote controls operate in one direction. They switch momentarily to two-way mode each time a status inversion command is made in order to inquire of the actual status of the shutter and thus ensure inversion of the output status.
2.4 Shutters/Blinds function
Possible link type Link description Output operation
Up/StopThe Up/Stop function allows moving up or stopping a shutter or a blind, or inclining the slats of a blind.
In shutters mode*:- Press on the push button ➜ Delayed closing of the output contact Up* (Shutter or blind up function).
In Blinds mode*:- Short press on the push button ➜ Brief clo-sing of the Up output contact (Blind slat orienta-tion function).
- Long press on the push button ➜ Delayed closing of the output contact Up (Shutter or blind up function).
If a time delay is running, a short press on the push button ➜ Opening of the contact (Stop function).
Down/StopThe Down function allows moving down or stopping a shutter or a blind, or inclining the slats of a blind.
In shutters mode*:- Press on the push button ➜ Delayed closing of the output contact Down* (Down function for a roller shutter or a blind).
In Blinds mode*:- Short press on the push button ➜ Short clo-sing of the output contact Down (Blind slat orien-tation function).
- Long press on the push button ➜ Delayed closing of the output contact Down (Down func-tion for a roller shutter or a blind).
If a time delay is running, a short press on the push button ➜ Opening of the contact (Stop function).
Up/Down/Stop**The Up/Down function allows moving up, down or stopping a shutter or a blind with one single push button.
Only the rolling shutter mode functions are active. The blind slat orientation function is not accessible.Pressing the button repeatedly ➜Shutter mode-type operation according to Up (delayed closing of the Up output), Stop (opening of the output contacts), Down (delayed closing of the Down output)*
95 59
Prog
AllAuto Num
1
Outputsinputs
Selection of the link type to be created
TX100 remote control 7 6T 7865a
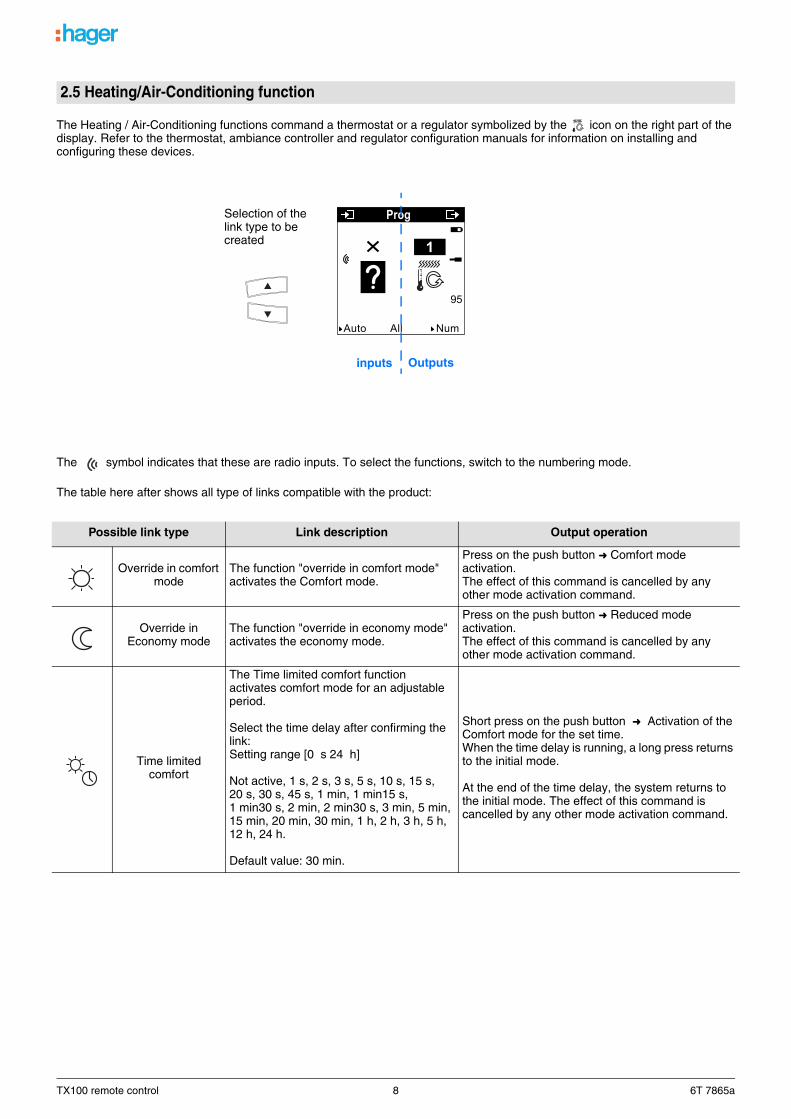
The Heating / Air-Conditioning functions command a thermostat or a regulator symbolized by the icon on the right part of the display. Refer to the thermostat, ambiance controller and regulator configuration manuals for information on installing and configuring these devices.
The symbol indicates that these are radio inputs. To select the functions, switch to the numbering mode.
The table here after shows all type of links compatible with the product:
2.5 Heating/Air-Conditioning function
Possible link type Link description Output operation
Override in comfort mode
The function "override in comfort mode" activates the Comfort mode.
Press on the push button ➜ Comfort mode activation. The effect of this command is cancelled by any other mode activation command.
Override in Economy mode
The function "override in economy mode" activates the economy mode.
Press on the push button ➜ Reduced mode activation.The effect of this command is cancelled by any other mode activation command.
Time limited comfort
The Time limited comfort function activates comfort mode for an adjustable period.
Select the time delay after confirming the link:Setting range [0 s 24 h]
Not active, 1 s, 2 s, 3 s, 5 s, 10 s, 15 s, 20 s, 30 s, 45 s, 1 min, 1 min15 s, 1 min30 s, 2 min, 2 min30 s, 3 min, 5 min, 15 min, 20 min, 30 min, 1 h, 2 h, 3 h, 5 h, 12 h, 24 h.
Default value: 30 min.
Short press on the push button ➜ Activation of the Comfort mode for the set time.When the time delay is running, a long press returns to the initial mode.
At the end of the time delay, the system returns to the initial mode. The effect of this command is cancelled by any other mode activation command.
Prog
AllAuto Num
95
1
Outputsinputs
Selection of the link type to be created
TX100 remote control 8 6T 7865a
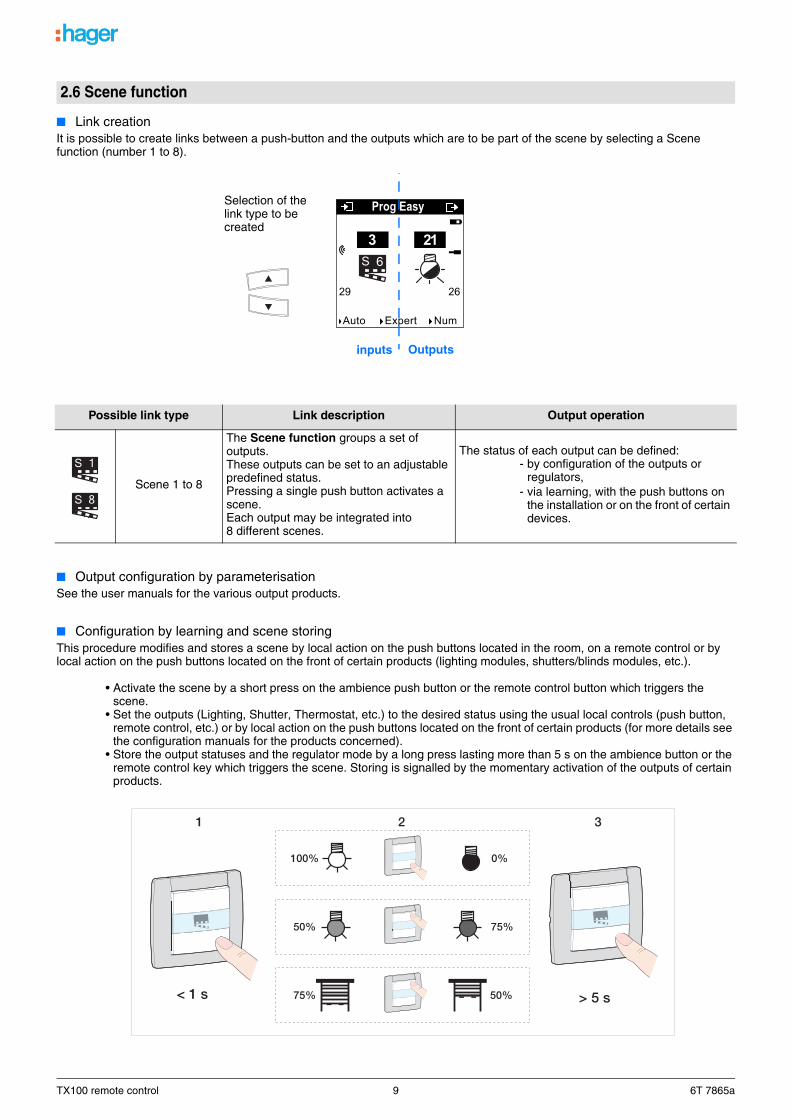
■ Link creationIt is possible to create links between a push-button and the outputs which are to be part of the scene by selecting a Scene function (number 1 to 8).
■ Output configuration by parameterisationSee the user manuals for the various output products.
■ Configuration by learning and scene storingThis procedure modifies and stores a scene by local action on the push buttons located in the room, on a remote control or by local action on the push buttons located on the front of certain products (lighting modules, shutters/blinds modules, etc.).
• Activate the scene by a short press on the ambience push button or the remote control button which triggers the scene.
• Set the outputs (Lighting, Shutter, Thermostat, etc.) to the desired status using the usual local controls (push button, remote control, etc.) or by local action on the push buttons located on the front of certain products (for more details see the configuration manuals for the products concerned).
• Store the output statuses and the regulator mode by a long press lasting more than 5 s on the ambience button or the remote control key which triggers the scene. Storing is signalled by the momentary activation of the outputs of certain products.
2.6 Scene function
Possible link type Link description Output operation
Scene 1 to 8
The Scene function groups a set of outputs.These outputs can be set to an adjustable predefined status.Pressing a single push button activates a scene.Each output may be integrated into 8 different scenes.
The status of each output can be defined:- by configuration of the outputs or
regulators,- via learning, with the push buttons on
the installation or on the front of certain devices.
29 26
Prog Easy
Expert Auto Num
6
3 21
Outputsinputs
Selection of the link type to be created
TX100 remote control 9 6T 7865a
PHRASE NON TRADUITE : 2400Error phrase 2534 Right button
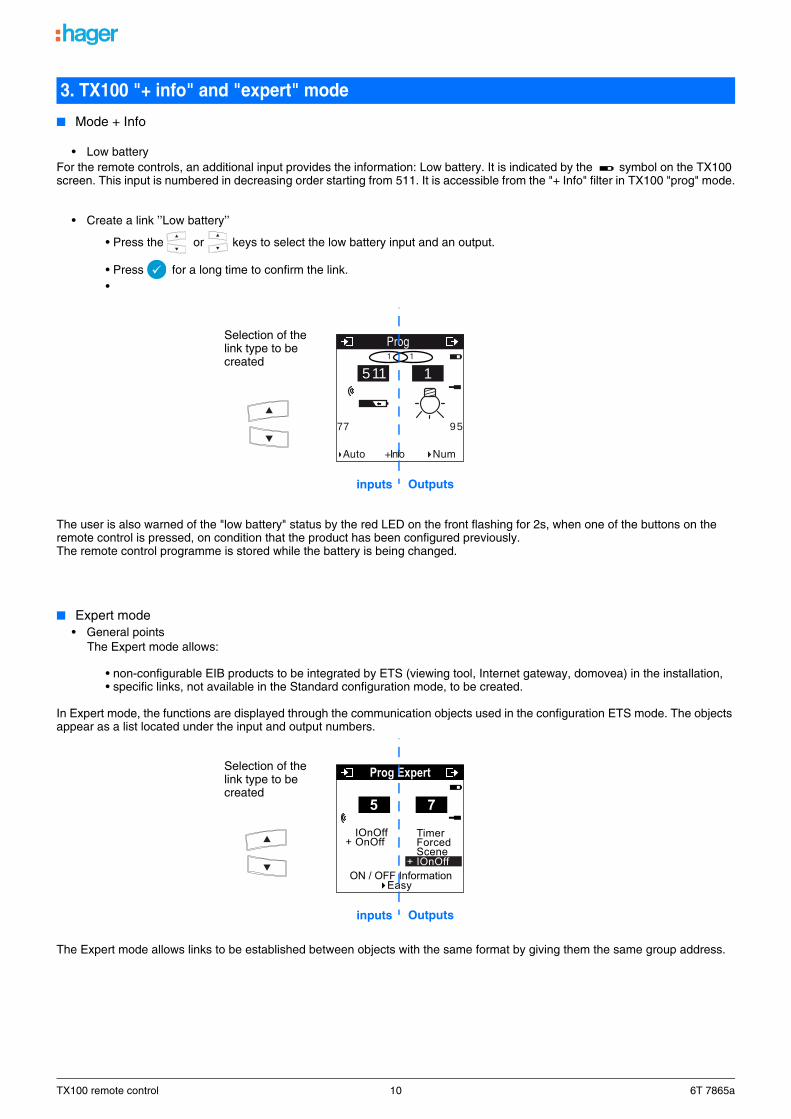
■ Mode + Info
• Low batteryFor the remote controls, an additional input provides the information: Low battery. It is indicated by the symbol on the TX100 screen. This input is numbered in decreasing order starting from 511. It is accessible from the "+ Info" filter in TX100 "prog" mode.
• Create a link ’’Low battery’’
• Press the or keys to select the low battery input and an output.
• Press for a long time to confirm the link.•
The user is also warned of the "low battery" status by the red LED on the front flashing for 2s, when one of the buttons on the remote control is pressed, on condition that the product has been configured previously.The remote control programme is stored while the battery is being changed.
■ Expert mode• General points
The Expert mode allows:
• non-configurable EIB products to be integrated by ETS (viewing tool, Internet gateway, domovea) in the installation,• specific links, not available in the Standard configuration mode, to be created.
In Expert mode, the functions are displayed through the communication objects used in the configuration ETS mode. The objects appear as a list located under the input and output numbers.
The Expert mode allows links to be established between objects with the same format by giving them the same group address.
3. TX100 "+ info" and "expert" mode
95
Prog
+InfoAuto Num
511 11 1
77
Outputsinputs
Selection of the link type to be created
Prog Expert
ON / OFF Information
IOnOff + OnOff
Easy
Timer Forced Scene
+ IOnOff
5 7
Outputsinputs
Selection of the link type to be created
TX100 remote control 10 6T 7865a
• List of the available objects
On/Off and Dimmer Lighting controls
* In the case of radio products, this object is already linked with object OnOff.
PHRASE NON TRADUITE : 2400Error phrase 2534 Right button
This function resets the device to its original configuration (Factory configuration). After a device reset, the device can be re-used in a new installation. The factory reset can either be performed directly on the product, or using the TX100 Product Management/Factory Reset menu. The latter solution is recommended if the product is part of the installation configured by the TX100.
■ Factory reset using the TX100The device belongs to the installation: it appears in the Reset menu's list of devices that can be reset to Factory configuration.
- Select the product in the list,
- Press and confirm the erasing.
After a device reset, the installation must be learnt again in order to relocate the devices reset to Factory configuration.
■ Factory reset on the product
The factory reset can be performed on the product, if the data of the TX100 project has been lost or if the product is not part of the installation.
Factory reset on the product:
- Press and hold the "Cfg" button (> 10 seconds), release the button as soon as the "Cfg" LED starts to flash. The "Cfg" but-ton is located on the back of the TU402, TU404 remote control and on the battery cover for the TU406 and TU418 remote controls.
- Wait for the "Cfg" LED to go out, indicating that the factory reset is complete.
PHRASE NON TRADUITE : 2400Error phrase 2534 Right button
Designation TX100 Designation ETS Function Format Description
OnOff On/Off ON/OFF EIS1 1 Bit Allows an ON/OFF command to be transmitted.
IOnOff* InfoOn/Off ON/OFF information EIS1 1 Bit Indicates the output's status.
DimCtrl DimmingCtrl Dimming command 1 Bit Allows changing the output level of a dimmer.
Timer TimedStartstop Timer EIS1 1 Bit Allows you to activate or interrupt the timer.
Shutter/Blind control
StepStop StepStop Slat angle 1 Bit Sends a slat angle command for a blind.
UpDown UpDown Up/Down 1 BitSends an Up or Down command for a roller shutter or a blind.
IUpDown InfoMoveUpDown Up/Down information 1 Bit Provides the status of the Up/Down output (control 1 BP)
IOnOff* Info On/Off ON/OFF information EIS1 1 Bit Indicates the output's status.
Heating/Air-Conditioning control
HvacMode HvacMode Heating mode 1 byteActivates a heating or air-conditioning mode (Comfort, Reduced, ...).
IOnOff* InfoOn/Off ON/OFF information EIS1 1 Bit Indicates the output's status.
Timer TimedStartstop Timer EIS1 1 Bit Starts a delayed deviation.
4. Restore Factory Configuration function
5. Characteristics
Max. number of group addresses 62
Max. number of links 60
TX100 remote control 11 6T 7865a