technical report how to configure nvidia gpu k1 and k2 ... · drivers available for vmware vsphere...
TRANSCRIPT
Technical Report
How to Configure NVIDIA GPU K1 and K2 Cards with Citrix XenDesktop 7.6 and vSphere 6.0 in FlexPod Express with Cisco C-Series Servers Chris Rodriguez, NetApp
Frank Anderson, Cisco August 2016 | TR-4536
2 How to Conf igure a NVIDIA GPU with Citrix XenDesktop 7.6 and v Sphere 6.0 in FlexPod Express
© 2016 NetApp, Inc. All rights reserv ed.
TABLE OF CONTENTS
1 Executive Summary ....................................................................................................................4
1.1 Reference Architecture Objectives ...............................................................................................................................4
2 Introduction.................................................................................................................................4
2.1 Outstanding Performance ..............................................................................................................................................5
2.2 Solution Summary ...........................................................................................................................................................5
3 Solution Configuration ................................................................................................................5
3.1 Hardware Components of Solution...............................................................................................................................6
3.2 Software Components of Solution ................................................................................................................................6
3.3 Configure NetApp FAS2552 ..........................................................................................................................................6
3.4 NetApp Storage Configuration for VMware ESXi 6.0 Infrastructure and VDA Virtual Machines ..................... 10
3.5 Configure Cisco Unified Computing System ............................................................................................................ 42
3.6 Configure VMware ESXi Host Server for vGPU Configuration ............................................................................. 57
3.7 Additional Configurations............................................................................................................................................. 68
4 Conclusion ................................................................................................................................ 71
References ...................................................................................................................................... 71
Recognition..................................................................................................................................... 73
Authors ..................................................................................................................................................................................... 73
Acknowledgements......................................................................................................................... 73
LIST OF TABLES
Table 1) Deduplication recommendations. ................................................................................................................................ 13
Table 2) Minimum server firmware versions required for GPU cards. .................................................................................. 42
Table 3) NVIDIA GPU population rules for Cisco UCS C240 M4 rack server. .................................................................... 42
Table 4) User profile specifications for GRID K1 and K2 cards. ............................................................................................ 61
LIST OF FIGURES
Figure 1) Reference architecture (graphic provided by Cisco)..................................................................................................5
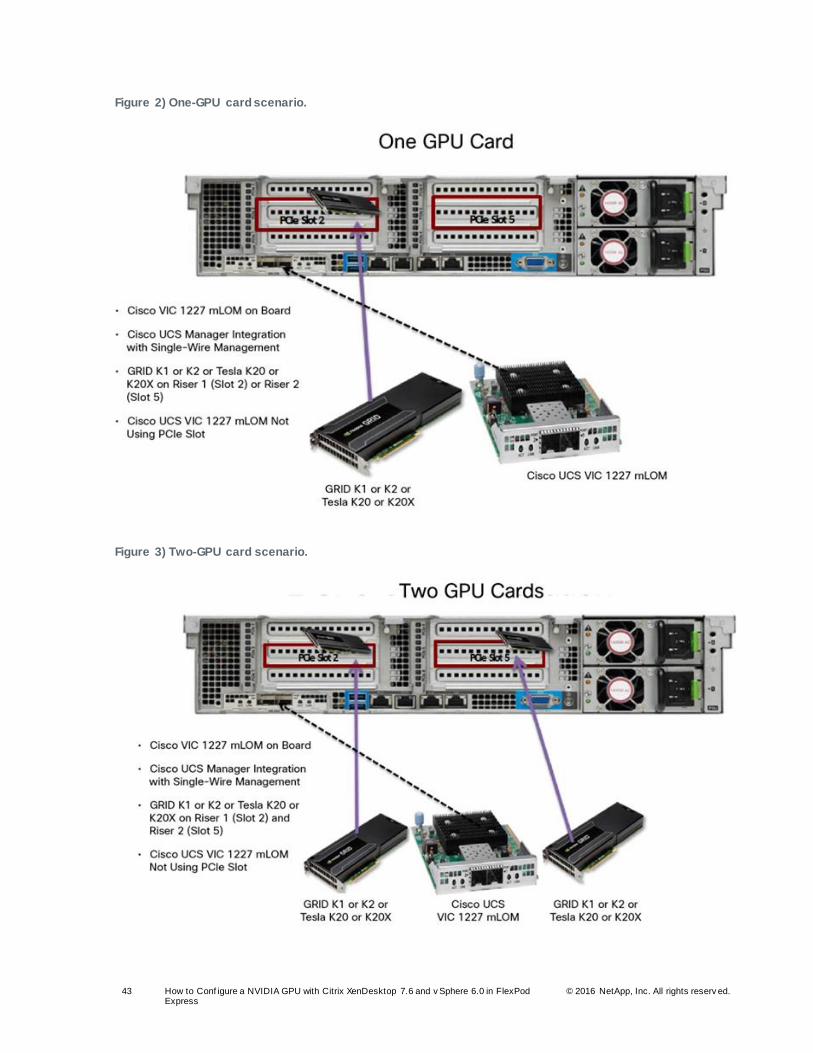
Figure 2) One-GPU card scenario. ............................................................................................................................................. 43
Figure 3) Two-GPU card scenario. ............................................................................................................................................. 43
Figure 4) NVIDIA GRID GPU pass-through components. ...................................................................................................... 47
Figure 5) NVIDIA GRID vGPU components. ............................................................................................................................. 57
Figure 6) GRID vGPU GPU system architecture...................................................................................................................... 68

3 How to Conf igure a NVIDIA GPU with Citrix XenDesktop 7.6 and v Sphere 6.0 in FlexPod Express
© 2016 NetApp, Inc. All rights reserv ed.
4 How to Conf igure a NVIDIA GPU with Citrix XenDesktop 7.6 and v Sphere 6.0 in FlexPod Express
© 2016 NetApp, Inc. All rights reserv ed.
1 Executive Summary
Server virtualization is a mainstream practice in current IT infrastructure deployments. The infrastructure
of a virtualized environment typically includes compute nodes (physical servers), switches , and a storage
array system. The majority of virtualized environments also use shared storage and shared switches. In
addition to the virtualization of standard business applications, video clusters are now making the jump to
the virtualized world with the advent of powerful graphics processing cards (GPUs) and drivers provided
by hypervisor companies. NVIDIA is a major player in this movement, and NVIDIA GPU cards now have
drivers available for VMware vSphere and Citrix XenServer.
Cisco has developed firmware to support NVIDIA GPU cards in C series M4 servers, and Citrix
XenDesktop has virtual desktop infrastructure (VDI) software to accommodate GPU cards in a shared
VDI environment. The files processed by these VDI video clients are typically very large in size. NetApp
provides superior storage for CIFS access of these large input files. NetApp® systems also allow you to
use CIFS storage for the VDI software and storage requirements of this environment.
Graphics display users tend to be small groups that use a portion of the overall virtualized server
environment. The FlexPod® Express converged platform is positioned for the remote office/branch office
(ROBO) market, the small to medium-sized business market, or small user base solutions. FlexPod
Express is composed of the Cisco Unified Computing System (Cisco UCS) mini B series or C series
servers, Cisco Nexus switches, and NetApp FAS2552 series storage. FlexPod Express fulfills the
requirement for a small user base for GPU users, the need to process large files, and the need for server
performance with drivers to support NVIDIA GPU offload graphics card positions in this reference
architecture.
1.1 Reference Architecture Objectives
This reference architecture describes how to configure NetApp storage and NVIDIA GPU cards in a
FlexPod Express system so that it accommodates your video VDI requirements. In addition, it shows how
to add a Cisco UCS rack mount server into a Cisco UCS Mini blade server environment. This reference
architecture uses vSphere 6.0u1 on a Cisco UCS Mini with a C240 M4 rack server, two Cisco Nexus
9000 series switches, and a NetApp FAS2552 under the FlexPod Express converged infrastructure
umbrella.
This technical report is a how-to document. Therefore, we assume that the reader is familiar with the
architecture, design, infrastructure, and VDI configuration of a FlexPod Express system. To learn more
about these subjects, see the Cisco validated design (CVD) document FlexPod Express with Cisco UCS
Mini and Citrix XenDesktop 7.6 with Cisco Nexus 9000 Series, and VMware vSphere 5.5 Update 2. This
CVD covers Cisco UCS servers, Cisco Nexus 9000 switches, and the NetApp FAS2500 series product
line in detail. In addition, this CVD covers VDI load testing and VDI configuration on a FlexPod Express
configuration.
The hardware and software infrastructure described in this CVD was used to conduct the NVIDIA
validation and to create this technical report. This proven infrastructure provides step-by-step instructions
on configuring NVIDIA GPU cards in a FlexPod Express configuration.
2 Introduction
Built on more than five years of innovation, FlexPod has evolved to meet the changing needs of our
customers and has helped drive their success. Specifically, FlexPod Express provides a rich set of data
management features and clustering for scale-out, operational efficiency, and nondisruptive operations.
This combination offers you one of the most compelling value propositions in the industry. The IT
landscape is undergoing a fundamental shift to IT as a service, a model that requires a pool of compute,
network, and storage to serve a wide range of applications and deliver a wide range of services.
Innovations such as FlexPod Express are fueling this transformation.
5 How to Conf igure a NVIDIA GPU with Citrix XenDesktop 7.6 and v Sphere 6.0 in FlexPod Express
© 2016 NetApp, Inc. All rights reserv ed.
2.1 Outstanding Performance
For this reference architecture, we used a FAS2552 with four SSD drives and 20 SAS drives in one
internal DS2246 shelf. This configuration provides outstanding performance for CIFS and for large data
access. The FAS2552 is a superior storage array for ROBO or small to medium businesses, and it also
provides ample performance for a VDI environment. The NetApp FAS2552, when matched with a Cisco
UCS converged infrastructure with Cisco Nexus data switches, provides the performance required for
NVIDIA GPU environments.
2.2 Solution Summary
This solution is a converged infrastructure with full redundancy that is based on the following hardware
and software:
One NetApp FAS2552HA two-node storage cluster with NetApp Flash Pool™ intelligent data caching
Two Cisco Nexus 9372 switches for data
One Cisco UCS Mini chassis with 6324 fabric interconnects
One Cisco UCS C240 rack mount server with an NVIDIA GPU card
VMware vSphere ESXi 6.0
vCenter Server Appliance 6.0
Windows 2012 Server for the virtual machines (VMs)
NetApp clustered Data ONTAP® 8.3.1
NetApp Virtual Storage Console (VSC) 6.0 plug-in for vCenter
3 Solution Configuration
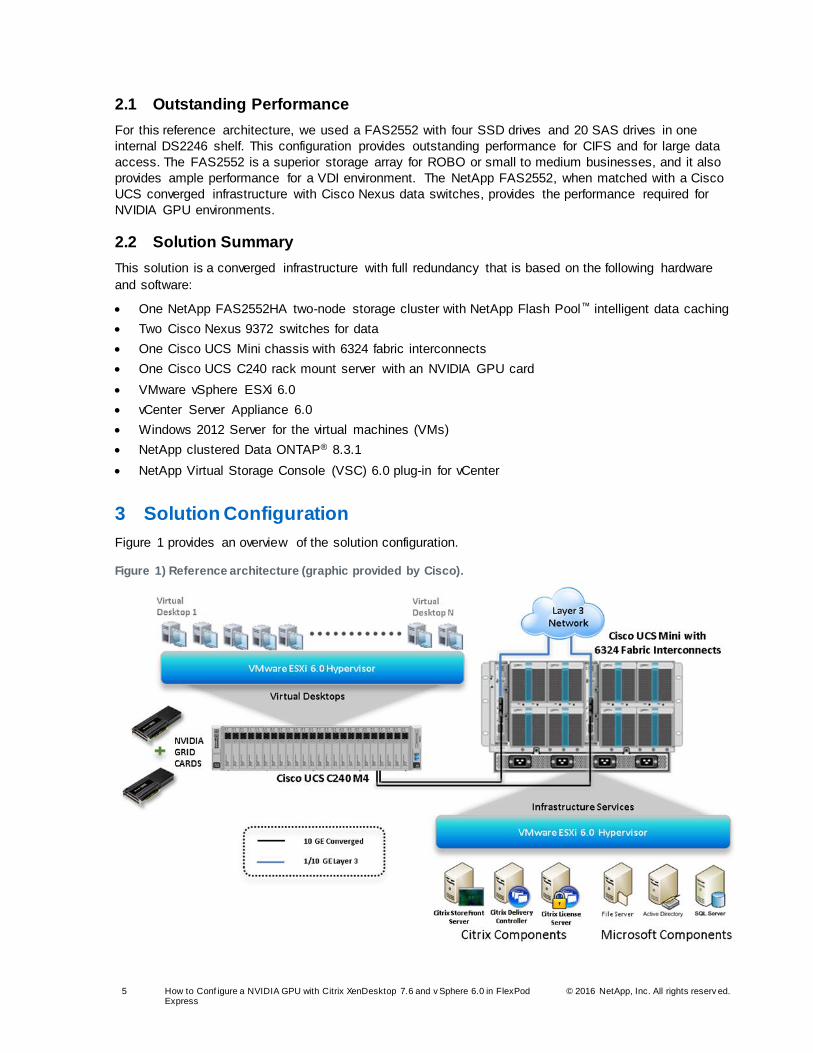
Figure 1 provides an overview of the solution configuration.
Figure 1) Reference architecture (graphic provided by Cisco).
6 How to Conf igure a NVIDIA GPU with Citrix XenDesktop 7.6 and v Sphere 6.0 in FlexPod Express
© 2016 NetApp, Inc. All rights reserv ed.
3.1 Hardware Components of Solution
One NetApp FAS2552 with four SSD drives (Flash Pool) and 20 SAS drives
One Cisco UCS C240-M4 rack server (two Intel Xeon processor E5-2660 v3 CPUs at 2.60GHz) with
256GB of memory (16 GB x 16 DIMMs at 2133MHz) and a hypervisor host
Cisco UCS VIC1227 mLOM
Two Cisco Nexus 9372 switches (access switches)
Two Cisco UCS 6324 fabric interconnects through Cisco UCS Mini
12 x 600GB SAS disks at 10,000 rpm
NVIDIA GRID K1 and K2 cards
3.2 Software Components of Solution
Cisco UCS firmware 3.0(2d)
VMware ESXi 6.0 for VDI hosts
Citrix XenApp/XenDesktop 7.6 with Feature Pack 3
Microsoft Windows 7 SP1 64-bit
NetApp VSC 6.0
3.3 Configure NetApp FAS2552
The following sections describe the configuration of the NetApp FAS2552 data storage system.
Cluster Setup in ONTAP
The FAS2552 is set up and configured with the NetApp System Setup tool. See the NetApp System
Setup documentation (installation and setup instructions) to automatically create the storage cluster and
configure the storage nodes, the root aggregates, and the initial storage configuration.
Storage Networking Configuration
This section describes the configuration of storage networking based on ONTAP®.
Set Auto-Revert on Cluster Management
To set the auto-revert parameter on the cluster management interface, run the following command:
network interface modify –vserver <<var_clustername>> -lif cluster_mgmt –auto-revert true
Failover Group Management in ONTAP
Logical interfaces (LIFs) and ports have roles, and different ports are used for management, storage, data
motion, and fault tolerance. Roles include cluster management and node management: cluster for traffic
between nodes and intercluster for NetApp SnapMirror® replication to a separate cluster and for data.
From a solution perspective, data LIFs are further classified by how they are used by servers and
applications and whether they are on private, nonroutable networks; corporate internal routable networks;
or a DMZ.
The NetApp cluster connects to these various networks by using data ports. Data LIFs must use a
specific set of ports on each node for traffic to be routed properly. Some LIFs, such as cluster
management and data LIFs for NFS and CIFS, can fail over between ports within the same node or
between nodes, so that traffic continues without interruption if a cable is unplugged or a node fails.
Failover groups control to which ports a LIF can fail over. If failover groups are not set up or are set up
incorrectly, LIFs can fail over to a port on the wrong network and cause a loss of connectivity.
7 How to Conf igure a NVIDIA GPU with Citrix XenDesktop 7.6 and v Sphere 6.0 in FlexPod Express
© 2016 NetApp, Inc. All rights reserv ed.
Best Practices
All data ports should be members of an appropriate failover group.
All data LIFs should be associated with an appropriate failover group.
To keep network connectivity as standardized as possible, use the same port on each node for the same purpose.
1. Create a management port failover group.
network interface failover-groups create –vserver <<var_clustername>> -failover-group fg-cluster-
mgmt -targets <<var_node01>>:e0a, <<var_node02>>:e0a
2. Assign the management port failover group to the cluster management LIF.
network interface modify –vserver <<var_clustername>> -lif cluster_mgmt –failover-group fg-cluster-mgmt
Failover Group Node Management in ONTAP
Create a management port failover group
network interface failover-groups create –vserver <<var_clustername>> -failover-group fg-node-
mgmt-01 -targets <<var_node01>>:e0M, <<var_node01>>:e0a
network interface failover-groups create –vserver <<var_clustername>> -failover-group fg-node-mgmt-02 -targets <<var_node02>>:e0M, <<var_node02>>:e0a
Assign Node Management Failover Groups to Node Management LIFs
Assign the management port failover group to the cluster management LIF.
network interface modify -vserver <<var_clustername>> -lif <<var_node01>>_mgmt1 -auto-revert true
-failover-group fg-node-mgmt-01
network interface modify –vserver <<var_clustername>> -lif <<var_node02>>_mgmt1 –auto-revert true
–failover-group fg-node-mgmt-02
Service Processor Network Interface Setup
Assign a static IPv4 address to the service processor on each node.
system service-processor network modify –node <<var_node01>> -address-family IPv4 –enable true –
dhcp none –ip-address <<var_node01_sp_ip>> -netmask <<var_node01_sp_mask>> -gateway
<<var_node01_sp_gateway>>
system service-processor network modify –node <<var_node02>> -address-family IPv4 –enable true –
dhcp none –ip-address <<var_node02_sp_ip>> -netmask <<var_node02_sp_mask>> -gateway <<var_node02_sp_gateway>>
Note: The service processor IP addresses should be in the same subnet as the node management IP addresses.
Disable Flow Control on 10GbE and UTA2 Ports
Best Practice
NetApp recommends disabling flow control on all of the 10GbE and UTA2 ports that are connected to external devices.
To disable flow control, run the following commands:
network port modify -node <<var_node02>> -port e0c,e0d,e0e,e0f -flowcontrol-admin none
Warning: Changing the network port settings will cause a several second interruption in carrier.
Do you want to continue? {y|n}: y
8 How to Conf igure a NVIDIA GPU with Citrix XenDesktop 7.6 and v Sphere 6.0 in FlexPod Express
© 2016 NetApp, Inc. All rights reserv ed.
network port show –fields flowcontrol-admin
Disable Unused FCoE Ports
To disable unused switchless cluster interconnect FCoE ports, run the following commands:
fcp adapter modify -node <<var_node01>> -adapter 0e –state down
fcp adapter modify -node <<var_node01>> -adapter 0f –state down
fcp adapter modify -node <<var_node02>> -adapter 0e –state down
fcp adapter modify -node <<var_node02>> -adapter 0f –state down
fcp adapter show –fields state
Network Time Protocol in ONTAP
To configure time synchronization on the cluster, complete the following steps:
1. Set the time zone for the cluster.
timezone <<var_timezone>>
Note: For example, the time zone in the Eastern United States is America/New_York.
2. Set the date for the cluster.
date <ccyymmddhhmm.ss>
Note: The format for the date is <[Century][Year][Month][Day][Hour][Minute].[Second]> : for example, 201309081735.17.
3. Configure the Network Time Protocol servers for the cluster.
cluster time-service ntp server create -server <<var_global_ntp_server_ip>>
Simple Network Management Protocol in ONTAP
To configure the Simple Network Management Protocol (SNMP), complete the following steps:
1. Configure basic SNMP information, such as the location and contact. When polled, this information is
visible as the sysLocation and sysContact variables in SNMP.
snmp contact <<var_snmp_contact>>
snmp location “<<var_snmp_location>>”
snmp init 1
options snmp.enable on
2. Configure SNMP traps to send to remote hosts, such as a DFM server or another fault management system.
snmp traphost add <<var_oncommand_server_fqdn>>
SNMPv1 in ONTAP
To configure SNMPv1, set the shared, secret plain-text password, which is called a community.
snmp community add ro <<var_snmp_community>>
Note: Use the delete all command with caution. If community strings are used for other monitoring products, the delete all command removes them.
SNMPv3 in ONTAP
SNMPv3 requires that a user be defined and configured for authentication. To configure SNMPv3,
complete the following steps:
1. Create a user called snmpv3user.
9 How to Conf igure a NVIDIA GPU with Citrix XenDesktop 7.6 and v Sphere 6.0 in FlexPod Express
© 2016 NetApp, Inc. All rights reserv ed.
security login create -username snmpv3user -authmethod usm -application snmp
2. Enter the authoritative entity's engine ID and select md5 as the authentication protocol.
3. Run the security snmpusers command to view the engine ID.
4. When prompted, enter an eight-character minimum-length password for the authentication protocol.
5. Select des as the privacy protocol.
6. When prompted, enter an eight-character minimum-length password for the privacy protocol.
AutoSupport HTTPS in ONTAP
NetApp AutoSupport® sends support summary information to NetApp through HTTPS. To configure
AutoSupport, run the following command:
system node autosupport modify -node * -state enable –mail-hosts <<var_mailhost>> -transport
https -support enable -noteto <<var_storage_admin_email>>
Cisco Discovery Protocol in ONTAP
To enable the Cisco Discovery Protocol (CDP) on the NetApp storage controllers, run the following
command:
node run -node * options cdpd.enable on
Note: To be effective, CDP must also be enabled on directly connected networking equipment such as switches and routers.
Create Jumbo Frame MTU Broadcast Domain in ONTAP
You can enable jumbo frames for data network VLANs if the switch supports it.
Best Practice
NetApp recommends using jumbo frames or MTU 9000 for the data network.
To create a data broadcast domain with an MTU of 9000 on Data ONTAP, run the following command:
broadcast-domain create -broadcast-domain Data -mtu 9000
Move 10GbE Data Ports to Data Broadcast Domain
To move the 10GbE data ports to the data broadcast domain, run the following commands:
broadcast-domain remove-ports -broadcast-domain Default -ports <<var_node01>>:e0c,
<<var_node01>>:e0d,<<var_node02>>:e0c,<<var_node02>>:e0d
broadcast-domain add-ports -broadcast-domain Data -ports <<var_node01>>:e0c,<<var_node01>>:e0d,
<<var_node02>>:e0c,<<var_node02>>:e0d
broadcast-domain show network port show –fields mtu
VLANs in ONTAP
1. Create NFS VLAN ports and add them to the data broadcast domain.
network port vlan create –node <<var_node01>> -vlan-name e0c-<<var_nfs_vlan_id>>
network port vlan create –node <<var_node01>> -vlan-name e0d-<<var_nfs_vlan_id>>
network port vlan create –node <<var_node02>> -vlan-name e0c-<<var_nfs_vlan_id>>
network port vlan create –node <<var_node02>> -vlan-name e0d-<<var_nfs_vlan_id>>
broadcast-domain add-ports -broadcast-domain Data -ports <<var_node01>>:e0c-<<var_nfs_vlan_id>>,
<<var_node01>>:e0d-<<var_nfs_vlan_id>>,<<var_node02>>:e0c-<<var_nfs_vlan_id>>,
<<var_node02>>:e0d-<<var_nfs_vlan_id>>
10 How to Conf igure a NVIDIA GPU with Citrix XenDesktop 7.6 and v Sphere 6.0 in FlexPod Express
© 2016 NetApp, Inc. All rights reserv ed.
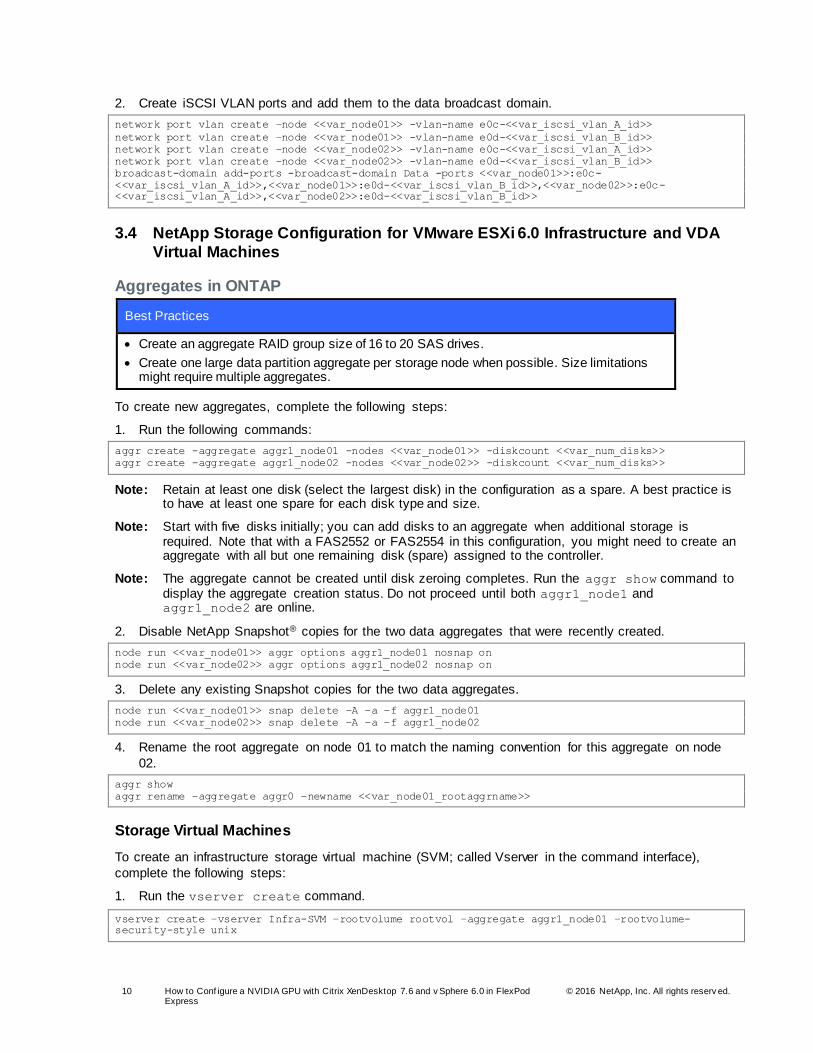
2. Create iSCSI VLAN ports and add them to the data broadcast domain.
network port vlan create –node <<var_node01>> -vlan-name e0c-<<var_iscsi_vlan_A_id>>
network port vlan create –node <<var_node01>> -vlan-name e0d-<<var_iscsi_vlan_B_id>>
network port vlan create –node <<var_node02>> -vlan-name e0c-<<var_iscsi_vlan_A_id>>
network port vlan create –node <<var_node02>> -vlan-name e0d-<<var_iscsi_vlan_B_id>>
broadcast-domain add-ports -broadcast-domain Data -ports <<var_node01>>:e0c-
<<var_iscsi_vlan_A_id>>,<<var_node01>>:e0d-<<var_iscsi_vlan_B_id>>,<<var_node02>>:e0c-
<<var_iscsi_vlan_A_id>>,<<var_node02>>:e0d-<<var_iscsi_vlan_B_id>>
3.4 NetApp Storage Configuration for VMware ESXi 6.0 Infrastructure and VDA
Virtual Machines
Aggregates in ONTAP
Best Practices
Create an aggregate RAID group size of 16 to 20 SAS drives.
Create one large data partition aggregate per storage node when possible. Size limitations might require multiple aggregates.
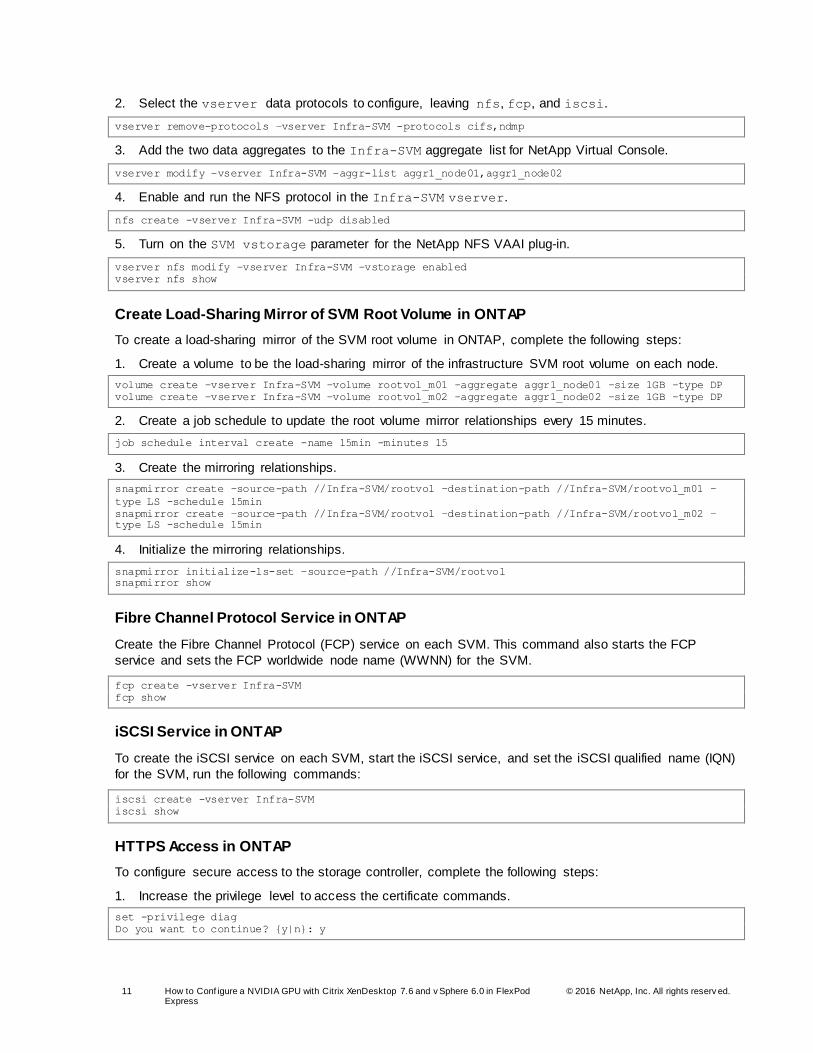
To create new aggregates, complete the following steps:
1. Run the following commands:
aggr create -aggregate aggr1_node01 -nodes <<var_node01>> -diskcount <<var_num_disks>>
aggr create -aggregate aggr1_node02 -nodes <<var_node02>> -diskcount <<var_num_disks>>
Note: Retain at least one disk (select the largest disk) in the configuration as a spare. A best practice is to have at least one spare for each disk type and size.
Note: Start with five disks initially; you can add disks to an aggregate when additional storage is required. Note that with a FAS2552 or FAS2554 in this configuration, you might need to create an aggregate with all but one remaining disk (spare) assigned to the controller.
Note: The aggregate cannot be created until disk zeroing completes. Run the aggr show command to display the aggregate creation status. Do not proceed until both aggr1_node1 and aggr1_node2 are online.
2. Disable NetApp Snapshot® copies for the two data aggregates that were recently created.
node run <<var_node01>> aggr options aggr1_node01 nosnap on
node run <<var_node02>> aggr options aggr1_node02 nosnap on
3. Delete any existing Snapshot copies for the two data aggregates.
node run <<var_node01>> snap delete –A –a –f aggr1_node01
node run <<var_node02>> snap delete –A –a –f aggr1_node02
4. Rename the root aggregate on node 01 to match the naming convention for this aggregate on node
02.
aggr show
aggr rename –aggregate aggr0 –newname <<var_node01_rootaggrname>>
Storage Virtual Machines
To create an infrastructure storage virtual machine (SVM; called Vserver in the command interface),
complete the following steps:
1. Run the vserver create command.
vserver create –vserver Infra-SVM –rootvolume rootvol –aggregate aggr1_node01 –rootvolume-security-style unix
11 How to Conf igure a NVIDIA GPU with Citrix XenDesktop 7.6 and v Sphere 6.0 in FlexPod Express
© 2016 NetApp, Inc. All rights reserv ed.
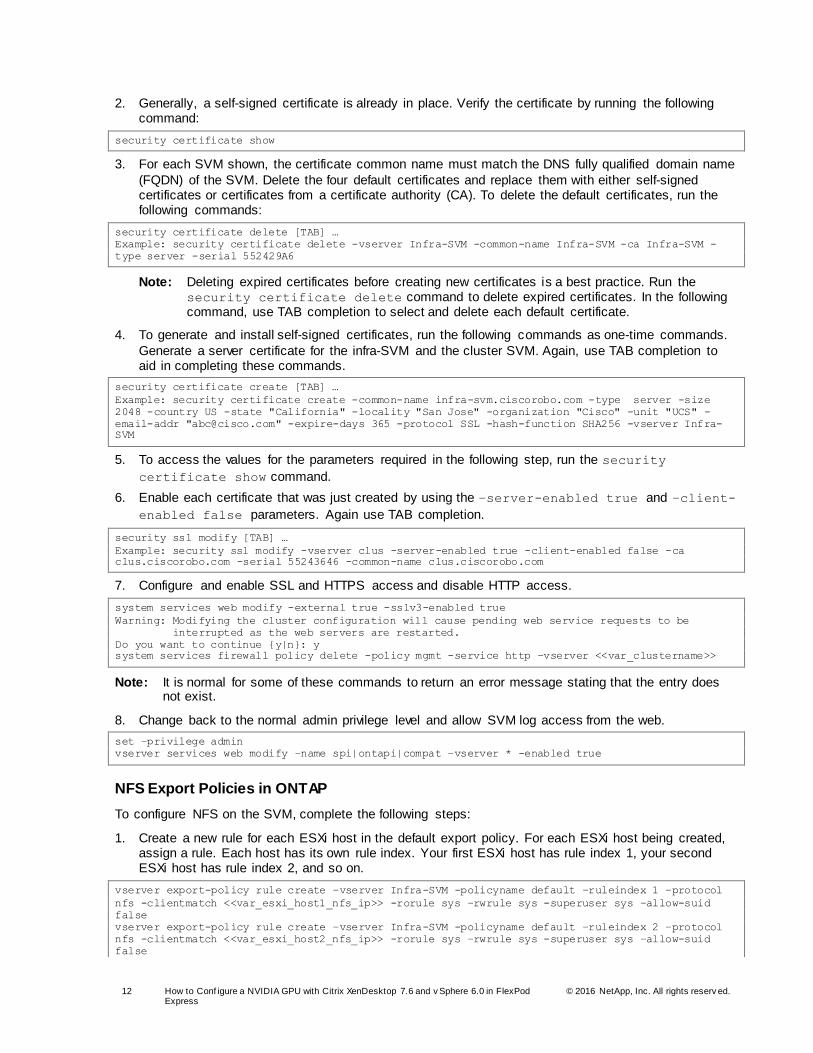
2. Select the vserver data protocols to configure, leaving nfs, fcp, and iscsi.
vserver remove-protocols –vserver Infra-SVM -protocols cifs,ndmp
3. Add the two data aggregates to the Infra-SVM aggregate list for NetApp Virtual Console.
vserver modify –vserver Infra-SVM –aggr-list aggr1_node01,aggr1_node02
4. Enable and run the NFS protocol in the Infra-SVM vserver.
nfs create -vserver Infra-SVM -udp disabled
5. Turn on the SVM vstorage parameter for the NetApp NFS VAAI plug-in.
vserver nfs modify –vserver Infra-SVM –vstorage enabled
vserver nfs show
Create Load-Sharing Mirror of SVM Root Volume in ONTAP
To create a load-sharing mirror of the SVM root volume in ONTAP, complete the following steps:
1. Create a volume to be the load-sharing mirror of the infrastructure SVM root volume on each node.
volume create –vserver Infra-SVM –volume rootvol_m01 –aggregate aggr1_node01 –size 1GB –type DP
volume create –vserver Infra-SVM –volume rootvol_m02 –aggregate aggr1_node02 –size 1GB –type DP
2. Create a job schedule to update the root volume mirror relationships every 15 minutes.
job schedule interval create -name 15min -minutes 15
3. Create the mirroring relationships.
snapmirror create –source-path //Infra-SVM/rootvol –destination-path //Infra-SVM/rootvol_m01 –
type LS -schedule 15min
snapmirror create –source-path //Infra-SVM/rootvol –destination-path //Infra-SVM/rootvol_m02 –type LS -schedule 15min
4. Initialize the mirroring relationships.
snapmirror initialize-ls-set –source-path //Infra-SVM/rootvol
snapmirror show
Fibre Channel Protocol Service in ONTAP
Create the Fibre Channel Protocol (FCP) service on each SVM. This command also starts the FCP
service and sets the FCP worldwide node name (WWNN) for the SVM.
fcp create -vserver Infra-SVM
fcp show
iSCSI Service in ONTAP
To create the iSCSI service on each SVM, start the iSCSI service, and set the iSCSI qualified name (IQN)
for the SVM, run the following commands:
iscsi create -vserver Infra-SVM
iscsi show
HTTPS Access in ONTAP
To configure secure access to the storage controller, complete the following steps:
1. Increase the privilege level to access the certificate commands.
set -privilege diag
Do you want to continue? {y|n}: y
12 How to Conf igure a NVIDIA GPU with Citrix XenDesktop 7.6 and v Sphere 6.0 in FlexPod Express
© 2016 NetApp, Inc. All rights reserv ed.
2. Generally, a self-signed certificate is already in place. Verify the certificate by running the following command:
security certificate show
3. For each SVM shown, the certificate common name must match the DNS fully qualified domain name
(FQDN) of the SVM. Delete the four default certificates and replace them with either self-signed certificates or certificates from a certificate authority (CA). To delete the default certificates, run the following commands:
security certificate delete [TAB] …
Example: security certificate delete -vserver Infra-SVM -common-name Infra-SVM -ca Infra-SVM -
type server -serial 552429A6
Note: Deleting expired certificates before creating new certificates is a best practice. Run the security certificate delete command to delete expired certificates. In the following command, use TAB completion to select and delete each default certificate.
4. To generate and install self-signed certificates, run the following commands as one-time commands.
Generate a server certificate for the infra-SVM and the cluster SVM. Again, use TAB completion to aid in completing these commands.
security certificate create [TAB] …
Example: security certificate create -common-name infra-svm.ciscorobo.com -type server -size
2048 -country US -state "California" -locality "San Jose" -organization "Cisco" -unit "UCS" -
email-addr "[email protected]" -expire-days 365 -protocol SSL -hash-function SHA256 -vserver Infra-SVM
5. To access the values for the parameters required in the following step, run the security
certificate show command.
6. Enable each certificate that was just created by using the –server-enabled true and –client-
enabled false parameters. Again use TAB completion.
security ssl modify [TAB] …
Example: security ssl modify -vserver clus -server-enabled true -client-enabled false -ca clus.ciscorobo.com -serial 55243646 -common-name clus.ciscorobo.com
7. Configure and enable SSL and HTTPS access and disable HTTP access.
system services web modify -external true -sslv3-enabled true
Warning: Modifying the cluster configuration will cause pending web service requests to be
interrupted as the web servers are restarted.
Do you want to continue {y|n}: y
system services firewall policy delete -policy mgmt -service http –vserver <<var_clustername>>
Note: It is normal for some of these commands to return an error message stating that the entry does not exist.
8. Change back to the normal admin privilege level and allow SVM log access from the web.
set –privilege admin
vserver services web modify –name spi|ontapi|compat –vserver * -enabled true
NFS Export Policies in ONTAP
To configure NFS on the SVM, complete the following steps:
1. Create a new rule for each ESXi host in the default export policy. For each ESXi host being created, assign a rule. Each host has its own rule index. Your first ESXi host has rule index 1, your second ESXi host has rule index 2, and so on.
vserver export-policy rule create –vserver Infra-SVM -policyname default –ruleindex 1 –protocol
nfs -clientmatch <<var_esxi_host1_nfs_ip>> -rorule sys –rwrule sys -superuser sys –allow-suid
false
vserver export-policy rule create –vserver Infra-SVM -policyname default –ruleindex 2 –protocol
nfs -clientmatch <<var_esxi_host2_nfs_ip>> -rorule sys –rwrule sys -superuser sys –allow-suid
false
13 How to Conf igure a NVIDIA GPU with Citrix XenDesktop 7.6 and v Sphere 6.0 in FlexPod Express
© 2016 NetApp, Inc. All rights reserv ed.
vserver export-policy rule show
2. Assign the FlexPod export policy to the infrastructure SVM root volume.
volume modify –vserver Infra-SVM –volume rootvol –policy default
NFS FlexVol Volumes in ONTAP
Best Practices
Create a minimum of two volumes per storage node.
Group similar data on each volume for better deduplication ratios.
Set auto-grow on the volumes.
Set the Delete Oldest Snapshot parameter when running low on space on a volume.
Use thin provisioning on volumes when possible.
Set up reallocation jobs to run against each volume on all storage nodes, with the exception of root volumes.
Never reallocate an aggregate unless you are directed to do so by NetApp Global
Support.
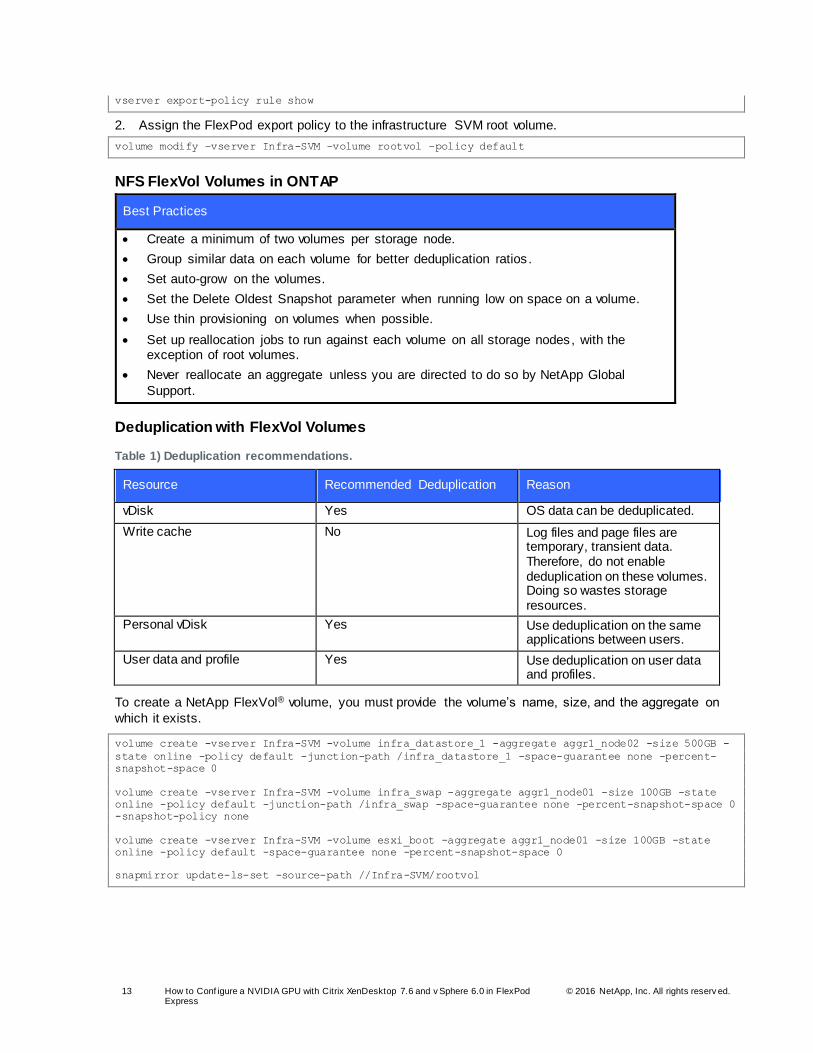
Deduplication with FlexVol Volumes
Table 1) Deduplication recommendations.
Resource Recommended Deduplication Reason
vDisk Yes OS data can be deduplicated.
Write cache No Log files and page files are temporary, transient data. Therefore, do not enable deduplication on these volumes. Doing so wastes storage resources.
Personal vDisk Yes Use deduplication on the same applications between users.
User data and profile Yes Use deduplication on user data and profiles.
To create a NetApp FlexVol® volume, you must provide the volume’s name, size, and the aggregate on
which it exists.
volume create -vserver Infra-SVM -volume infra_datastore_1 -aggregate aggr1_node02 -size 500GB -
state online -policy default -junction-path /infra_datastore_1 -space-guarantee none -percent-
snapshot-space 0
volume create -vserver Infra-SVM -volume infra_swap -aggregate aggr1_node01 -size 100GB -state
online -policy default -junction-path /infra_swap -space-guarantee none -percent-snapshot-space 0
-snapshot-policy none
volume create -vserver Infra-SVM -volume esxi_boot -aggregate aggr1_node01 -size 100GB -state
online -policy default -space-guarantee none -percent-snapshot-space 0
snapmirror update-ls-set -source-path //Infra-SVM/rootvol
14 How to Conf igure a NVIDIA GPU with Citrix XenDesktop 7.6 and v Sphere 6.0 in FlexPod Express
© 2016 NetApp, Inc. All rights reserv ed.
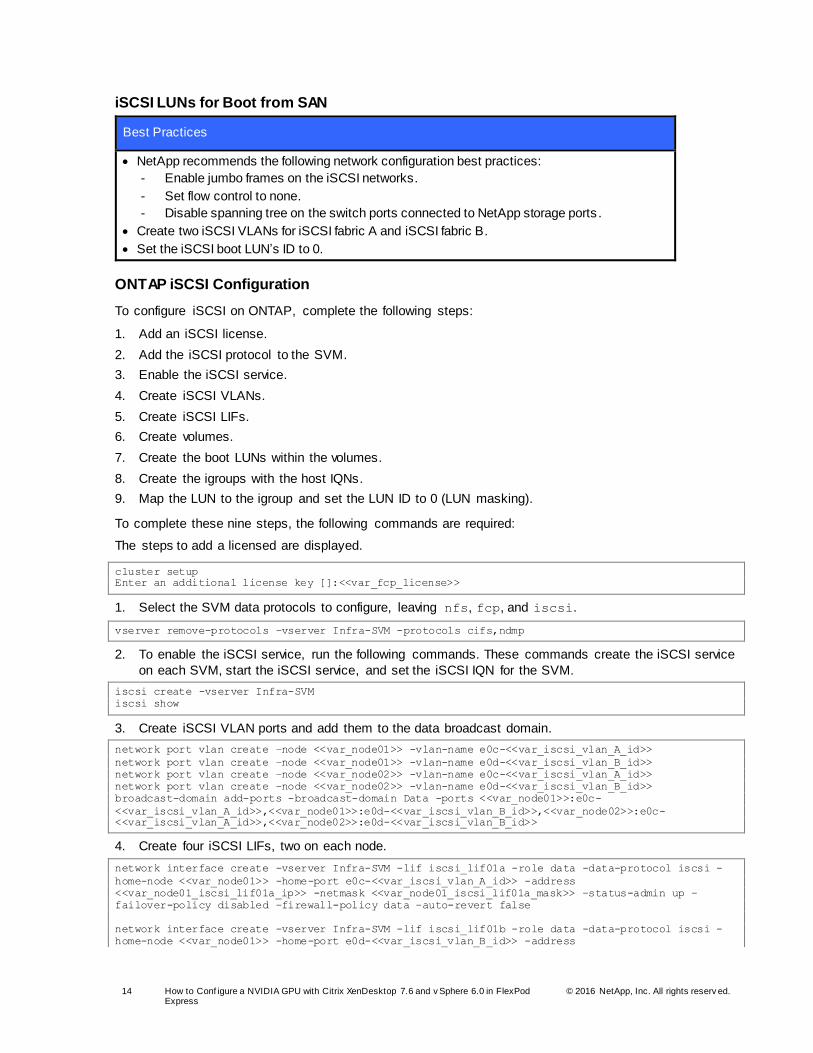
iSCSI LUNs for Boot from SAN
Best Practices
NetApp recommends the following network configuration best practices:
- Enable jumbo frames on the iSCSI networks.
- Set flow control to none.
- Disable spanning tree on the switch ports connected to NetApp storage ports .
Create two iSCSI VLANs for iSCSI fabric A and iSCSI fabric B.
Set the iSCSI boot LUN’s ID to 0.
ONTAP iSCSI Configuration
To configure iSCSI on ONTAP, complete the following steps:
1. Add an iSCSI license.
2. Add the iSCSI protocol to the SVM.
3. Enable the iSCSI service.
4. Create iSCSI VLANs.
5. Create iSCSI LIFs.
6. Create volumes.
7. Create the boot LUNs within the volumes.
8. Create the igroups with the host IQNs.
9. Map the LUN to the igroup and set the LUN ID to 0 (LUN masking).
To complete these nine steps, the following commands are required:
The steps to add a licensed are displayed.
cluster setup
Enter an additional license key []:<<var_fcp_license>>
1. Select the SVM data protocols to configure, leaving nfs, fcp, and iscsi.
vserver remove-protocols –vserver Infra-SVM -protocols cifs,ndmp
2. To enable the iSCSI service, run the following commands. These commands create the iSCSI service
on each SVM, start the iSCSI service, and set the iSCSI IQN for the SVM.
iscsi create -vserver Infra-SVM
iscsi show
3. Create iSCSI VLAN ports and add them to the data broadcast domain.
network port vlan create –node <<var_node01>> -vlan-name e0c-<<var_iscsi_vlan_A_id>>
network port vlan create –node <<var_node01>> -vlan-name e0d-<<var_iscsi_vlan_B_id>>
network port vlan create –node <<var_node02>> -vlan-name e0c-<<var_iscsi_vlan_A_id>>
network port vlan create –node <<var_node02>> -vlan-name e0d-<<var_iscsi_vlan_B_id>>
broadcast-domain add-ports -broadcast-domain Data -ports <<var_node01>>:e0c-
<<var_iscsi_vlan_A_id>>,<<var_node01>>:e0d-<<var_iscsi_vlan_B_id>>,<<var_node02>>:e0c-<<var_iscsi_vlan_A_id>>,<<var_node02>>:e0d-<<var_iscsi_vlan_B_id>>
4. Create four iSCSI LIFs, two on each node.
network interface create -vserver Infra-SVM -lif iscsi_lif01a -role data -data-protocol iscsi -
home-node <<var_node01>> -home-port e0c-<<var_iscsi_vlan_A_id>> -address
<<var_node01_iscsi_lif01a_ip>> -netmask <<var_node01_iscsi_lif01a_mask>> –status-admin up –
failover-policy disabled –firewall-policy data –auto-revert false
network interface create -vserver Infra-SVM -lif iscsi_lif01b -role data -data-protocol iscsi -
home-node <<var_node01>> -home-port e0d-<<var_iscsi_vlan_B_id>> -address
15 How to Conf igure a NVIDIA GPU with Citrix XenDesktop 7.6 and v Sphere 6.0 in FlexPod Express
© 2016 NetApp, Inc. All rights reserv ed.
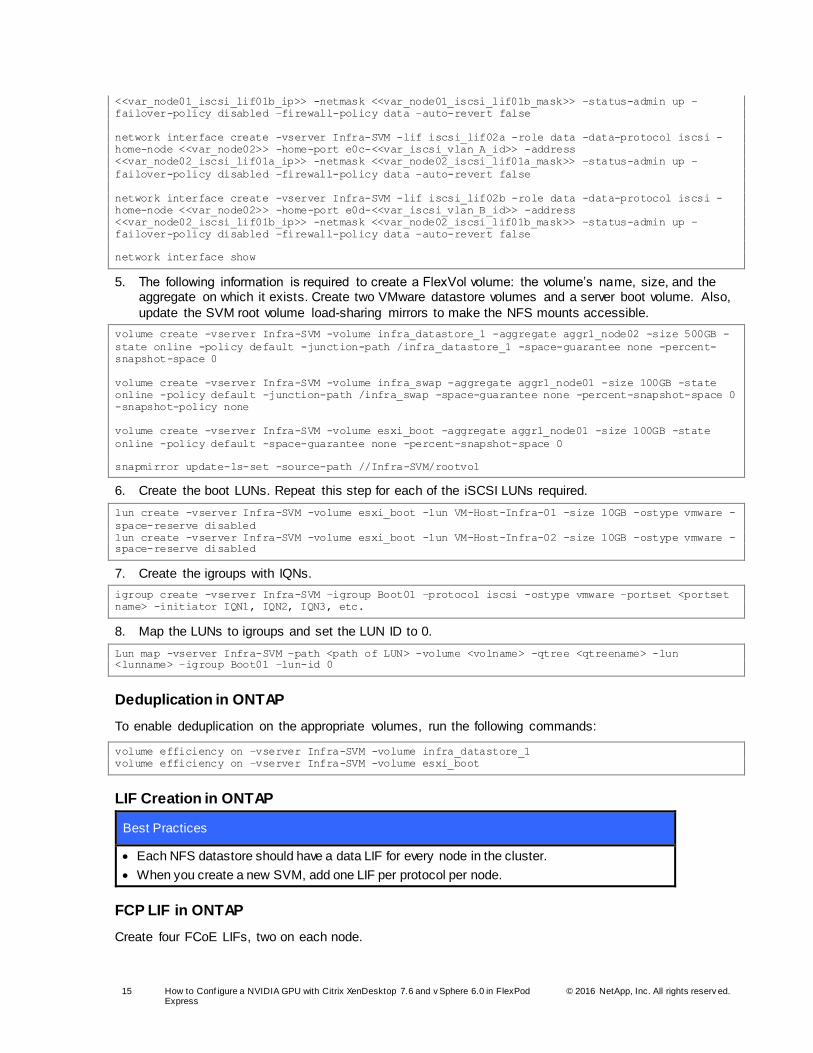
<<var_node01_iscsi_lif01b_ip>> -netmask <<var_node01_iscsi_lif01b_mask>> –status-admin up –
failover-policy disabled –firewall-policy data –auto-revert false
network interface create -vserver Infra-SVM -lif iscsi_lif02a -role data -data-protocol iscsi -
home-node <<var_node02>> -home-port e0c-<<var_iscsi_vlan_A_id>> -address
<<var_node02_iscsi_lif01a_ip>> -netmask <<var_node02_iscsi_lif01a_mask>> –status-admin up –
failover-policy disabled –firewall-policy data –auto-revert false
network interface create -vserver Infra-SVM -lif iscsi_lif02b -role data -data-protocol iscsi -
home-node <<var_node02>> -home-port e0d-<<var_iscsi_vlan_B_id>> -address
<<var_node02_iscsi_lif01b_ip>> -netmask <<var_node02_iscsi_lif01b_mask>> –status-admin up –
failover-policy disabled –firewall-policy data –auto-revert false
network interface show
5. The following information is required to create a FlexVol volume: the volume’s name, size, and the aggregate on which it exists. Create two VMware datastore volumes and a server boot volume. Also,
update the SVM root volume load-sharing mirrors to make the NFS mounts accessible.
volume create -vserver Infra-SVM -volume infra_datastore_1 -aggregate aggr1_node02 -size 500GB -
state online -policy default -junction-path /infra_datastore_1 -space-guarantee none -percent-
snapshot-space 0
volume create -vserver Infra-SVM -volume infra_swap -aggregate aggr1_node01 -size 100GB -state
online -policy default -junction-path /infra_swap -space-guarantee none -percent-snapshot-space 0
-snapshot-policy none
volume create -vserver Infra-SVM -volume esxi_boot -aggregate aggr1_node01 -size 100GB -state
online -policy default -space-guarantee none -percent-snapshot-space 0
snapmirror update-ls-set -source-path //Infra-SVM/rootvol
6. Create the boot LUNs. Repeat this step for each of the iSCSI LUNs required.
lun create -vserver Infra-SVM -volume esxi_boot -lun VM-Host-Infra-01 -size 10GB -ostype vmware -
space-reserve disabled
lun create -vserver Infra-SVM -volume esxi_boot -lun VM-Host-Infra-02 -size 10GB -ostype vmware -
space-reserve disabled
7. Create the igroups with IQNs.
igroup create -vserver Infra-SVM –igroup Boot01 –protocol iscsi -ostype vmware –portset <portset
name> -initiator IQN1, IQN2, IQN3, etc.
8. Map the LUNs to igroups and set the LUN ID to 0.
Lun map -vserver Infra-SVM –path <path of LUN> -volume <volname> -qtree <qtreename> -lun <lunname> –igroup Boot01 –lun-id 0
Deduplication in ONTAP
To enable deduplication on the appropriate volumes, run the following commands:
volume efficiency on –vserver Infra-SVM -volume infra_datastore_1
volume efficiency on –vserver Infra-SVM -volume esxi_boot
LIF Creation in ONTAP
Best Practices
Each NFS datastore should have a data LIF for every node in the cluster.
When you create a new SVM, add one LIF per protocol per node.
FCP LIF in ONTAP
Create four FCoE LIFs, two on each node.
16 How to Conf igure a NVIDIA GPU with Citrix XenDesktop 7.6 and v Sphere 6.0 in FlexPod Express
© 2016 NetApp, Inc. All rights reserv ed.
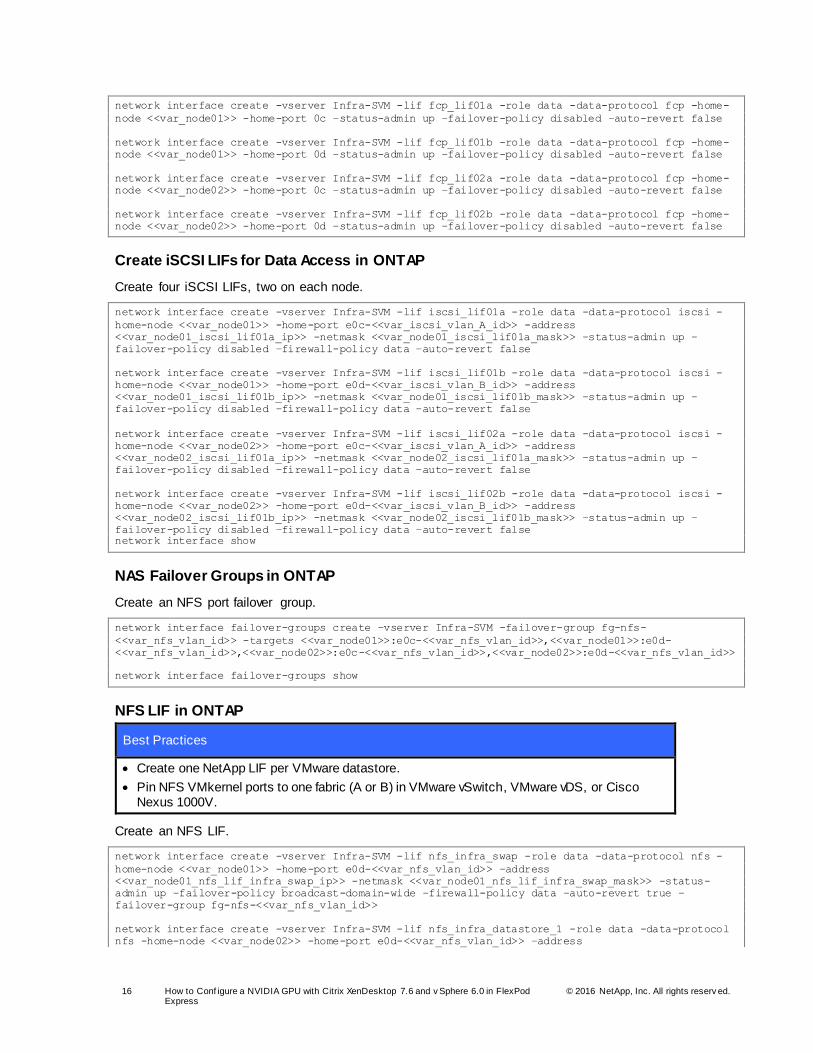
network interface create -vserver Infra-SVM -lif fcp_lif01a -role data -data-protocol fcp -home-
node <<var_node01>> -home-port 0c –status-admin up –failover-policy disabled –auto-revert false
network interface create -vserver Infra-SVM -lif fcp_lif01b -role data -data-protocol fcp -home-
node <<var_node01>> -home-port 0d –status-admin up –failover-policy disabled –auto-revert false
network interface create -vserver Infra-SVM -lif fcp_lif02a -role data -data-protocol fcp -home-
node <<var_node02>> -home-port 0c –status-admin up –failover-policy disabled –auto-revert false
network interface create -vserver Infra-SVM -lif fcp_lif02b -role data -data-protocol fcp -home-
node <<var_node02>> -home-port 0d –status-admin up –failover-policy disabled –auto-revert false
Create iSCSI LIFs for Data Access in ONTAP
Create four iSCSI LIFs, two on each node.
network interface create -vserver Infra-SVM -lif iscsi_lif01a -role data -data-protocol iscsi -
home-node <<var_node01>> -home-port e0c-<<var_iscsi_vlan_A_id>> -address
<<var_node01_iscsi_lif01a_ip>> -netmask <<var_node01_iscsi_lif01a_mask>> –status-admin up –
failover-policy disabled –firewall-policy data –auto-revert false
network interface create -vserver Infra-SVM -lif iscsi_lif01b -role data -data-protocol iscsi -
home-node <<var_node01>> -home-port e0d-<<var_iscsi_vlan_B_id>> -address
<<var_node01_iscsi_lif01b_ip>> -netmask <<var_node01_iscsi_lif01b_mask>> –status-admin up –
failover-policy disabled –firewall-policy data –auto-revert false
network interface create -vserver Infra-SVM -lif iscsi_lif02a -role data -data-protocol iscsi -
home-node <<var_node02>> -home-port e0c-<<var_iscsi_vlan_A_id>> -address
<<var_node02_iscsi_lif01a_ip>> -netmask <<var_node02_iscsi_lif01a_mask>> –status-admin up –
failover-policy disabled –firewall-policy data –auto-revert false
network interface create -vserver Infra-SVM -lif iscsi_lif02b -role data -data-protocol iscsi -
home-node <<var_node02>> -home-port e0d-<<var_iscsi_vlan_B_id>> -address
<<var_node02_iscsi_lif01b_ip>> -netmask <<var_node02_iscsi_lif01b_mask>> –status-admin up –
failover-policy disabled –firewall-policy data –auto-revert false network interface show
NAS Failover Groups in ONTAP
Create an NFS port failover group.
network interface failover-groups create –vserver Infra-SVM -failover-group fg-nfs-
<<var_nfs_vlan_id>> -targets <<var_node01>>:e0c-<<var_nfs_vlan_id>>,<<var_node01>>:e0d-
<<var_nfs_vlan_id>>,<<var_node02>>:e0c-<<var_nfs_vlan_id>>,<<var_node02>>:e0d-<<var_nfs_vlan_id>>
network interface failover-groups show
NFS LIF in ONTAP
Best Practices
Create one NetApp LIF per VMware datastore.
Pin NFS VMkernel ports to one fabric (A or B) in VMware vSwitch, VMware vDS, or Cisco Nexus 1000V.
Create an NFS LIF.
network interface create -vserver Infra-SVM -lif nfs_infra_swap -role data -data-protocol nfs -
home-node <<var_node01>> -home-port e0d-<<var_nfs_vlan_id>> –address
<<var_node01_nfs_lif_infra_swap_ip>> -netmask <<var_node01_nfs_lif_infra_swap_mask>> -status-
admin up –failover-policy broadcast-domain-wide –firewall-policy data –auto-revert true –
failover-group fg-nfs-<<var_nfs_vlan_id>>
network interface create -vserver Infra-SVM -lif nfs_infra_datastore_1 -role data -data-protocol
nfs -home-node <<var_node02>> -home-port e0d-<<var_nfs_vlan_id>> –address
17 How to Conf igure a NVIDIA GPU with Citrix XenDesktop 7.6 and v Sphere 6.0 in FlexPod Express
© 2016 NetApp, Inc. All rights reserv ed.
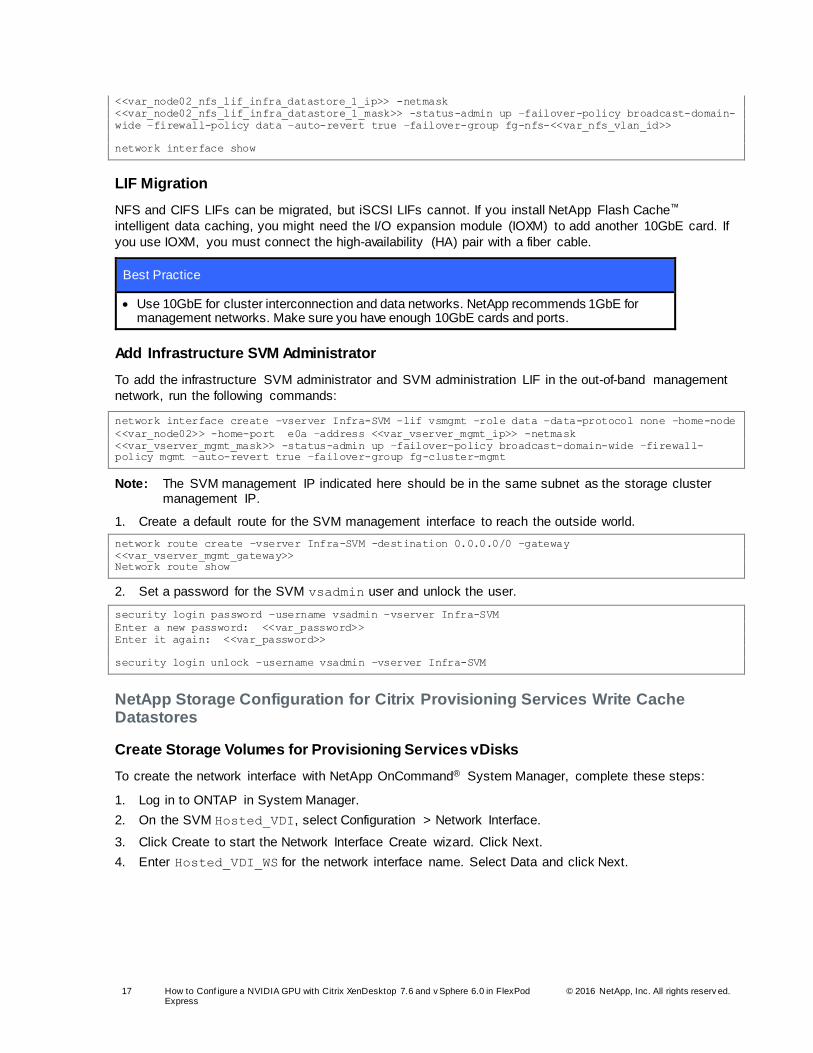
<<var_node02_nfs_lif_infra_datastore_1_ip>> -netmask
<<var_node02_nfs_lif_infra_datastore_1_mask>> -status-admin up –failover-policy broadcast-domain-
wide –firewall-policy data –auto-revert true –failover-group fg-nfs-<<var_nfs_vlan_id>>
network interface show
LIF Migration
NFS and CIFS LIFs can be migrated, but iSCSI LIFs cannot. If you install NetApp Flash Cache™
intelligent data caching, you might need the I/O expansion module (IOXM) to add another 10GbE card. If
you use IOXM, you must connect the high-availability (HA) pair with a fiber cable.
Best Practice
Use 10GbE for cluster interconnection and data networks. NetApp recommends 1GbE for management networks. Make sure you have enough 10GbE cards and ports.
Add Infrastructure SVM Administrator
To add the infrastructure SVM administrator and SVM administration LIF in the out-of-band management
network, run the following commands:
network interface create –vserver Infra-SVM –lif vsmgmt –role data –data-protocol none –home-node
<<var_node02>> -home-port e0a –address <<var_vserver_mgmt_ip>> -netmask
<<var_vserver_mgmt_mask>> -status-admin up –failover-policy broadcast-domain-wide –firewall-policy mgmt –auto-revert true –failover-group fg-cluster-mgmt
Note: The SVM management IP indicated here should be in the same subnet as the storage cluster management IP.
1. Create a default route for the SVM management interface to reach the outside world.
network route create –vserver Infra-SVM -destination 0.0.0.0/0 –gateway
<<var_vserver_mgmt_gateway>> Network route show
2. Set a password for the SVM vsadmin user and unlock the user.
security login password –username vsadmin –vserver Infra-SVM
Enter a new password: <<var_password>>
Enter it again: <<var_password>>
security login unlock –username vsadmin –vserver Infra-SVM
NetApp Storage Configuration for Citrix Provisioning Services Write Cache Datastores
Create Storage Volumes for Provisioning Services vDisks
To create the network interface with NetApp OnCommand® System Manager, complete these steps:
1. Log in to ONTAP in System Manager.
2. On the SVM Hosted_VDI, select Configuration > Network Interface.
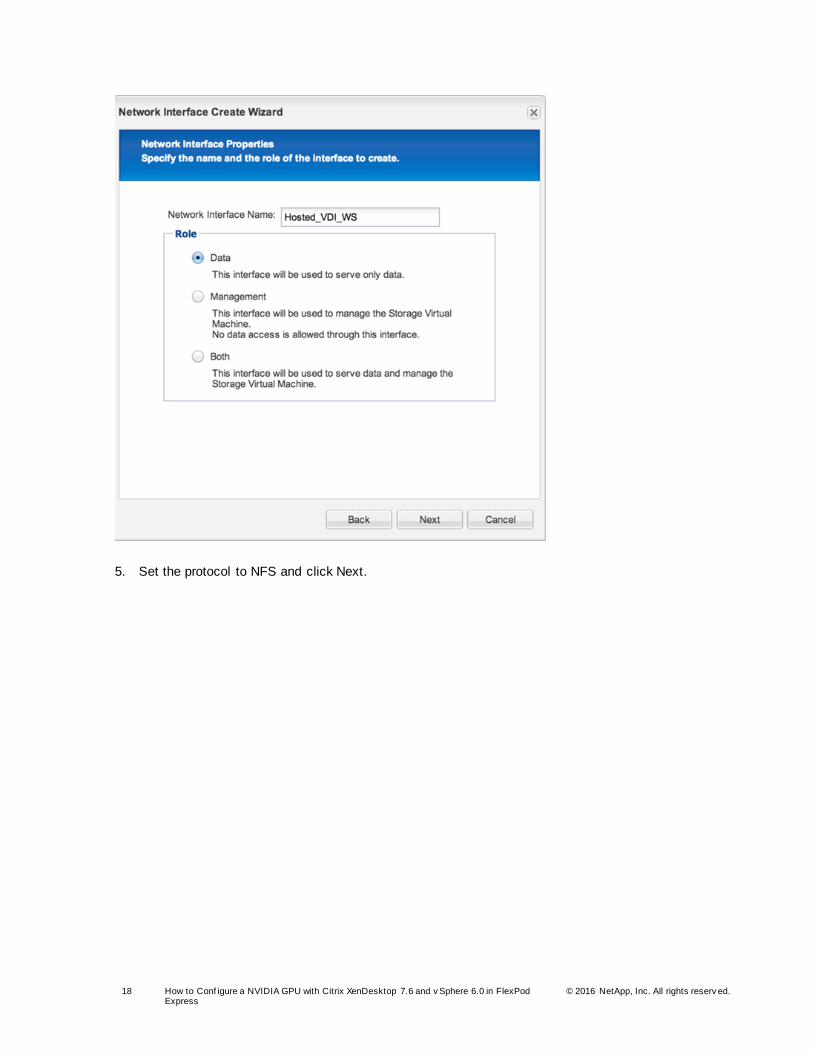
3. Click Create to start the Network Interface Create wizard. Click Next.
4. Enter Hosted_VDI_WS for the network interface name. Select Data and click Next.
18 How to Conf igure a NVIDIA GPU with Citrix XenDesktop 7.6 and v Sphere 6.0 in FlexPod Express
© 2016 NetApp, Inc. All rights reserv ed.
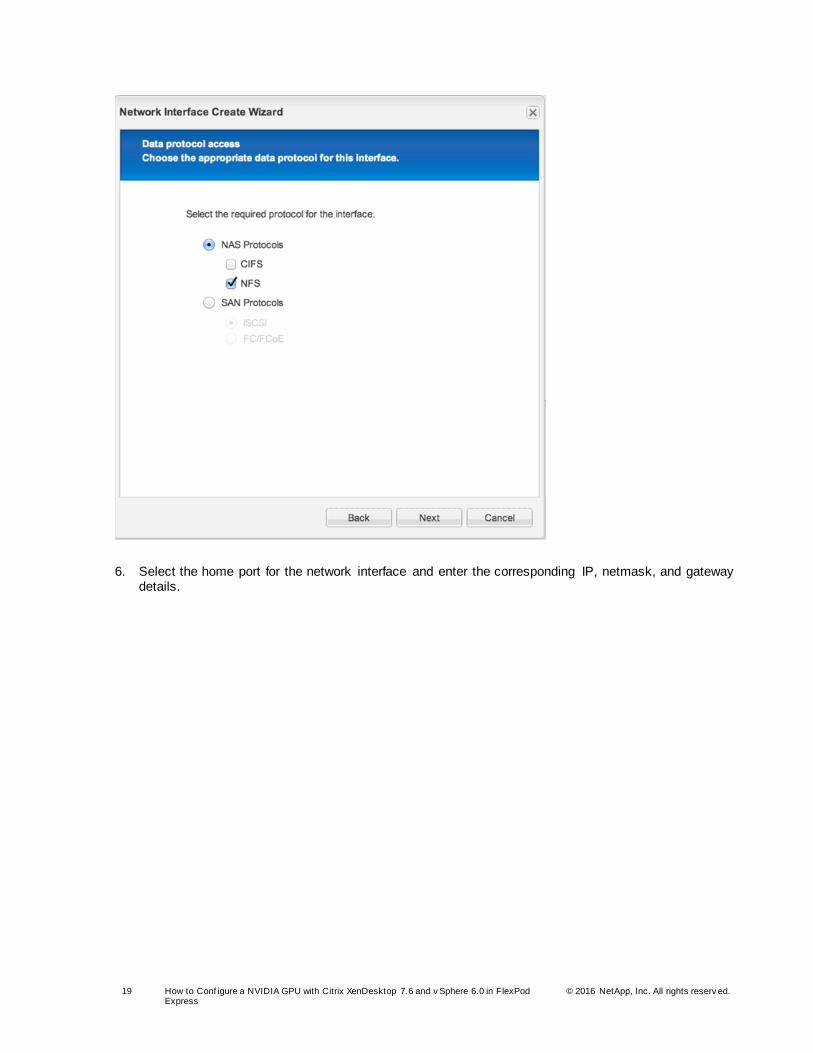
5. Set the protocol to NFS and click Next.
19 How to Conf igure a NVIDIA GPU with Citrix XenDesktop 7.6 and v Sphere 6.0 in FlexPod Express
© 2016 NetApp, Inc. All rights reserv ed.
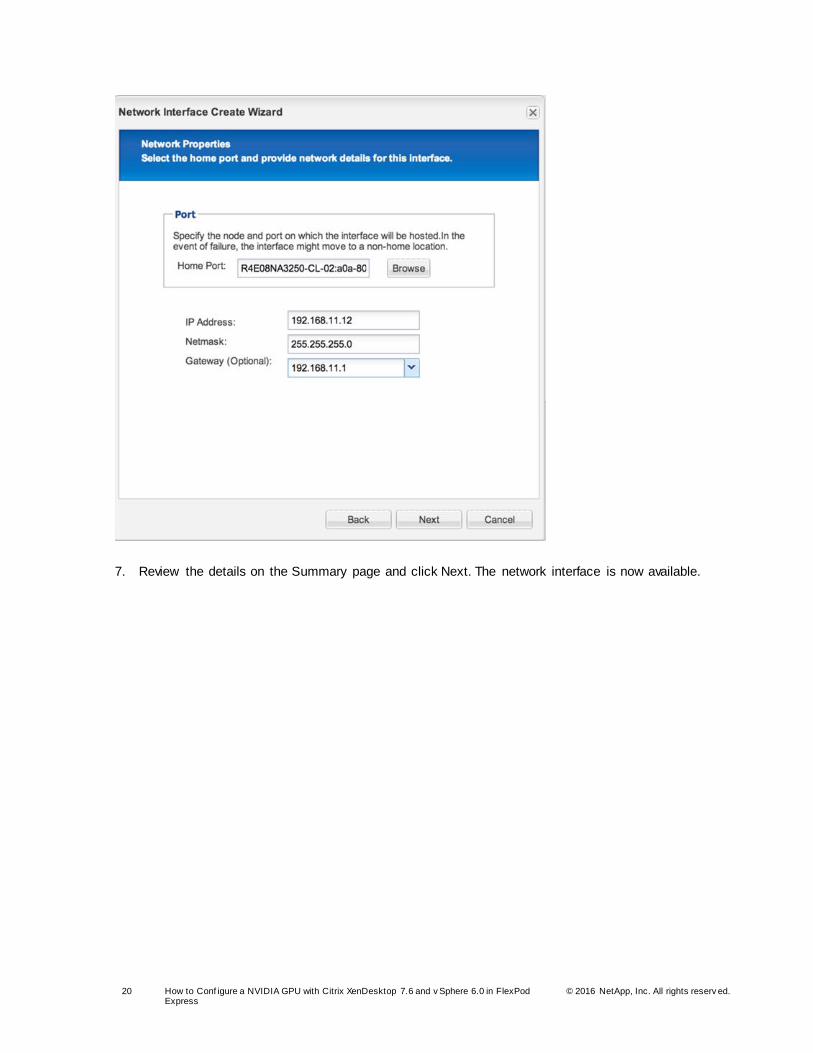
6. Select the home port for the network interface and enter the corresponding IP, netmask, and gateway details.
20 How to Conf igure a NVIDIA GPU with Citrix XenDesktop 7.6 and v Sphere 6.0 in FlexPod Express
© 2016 NetApp, Inc. All rights reserv ed.
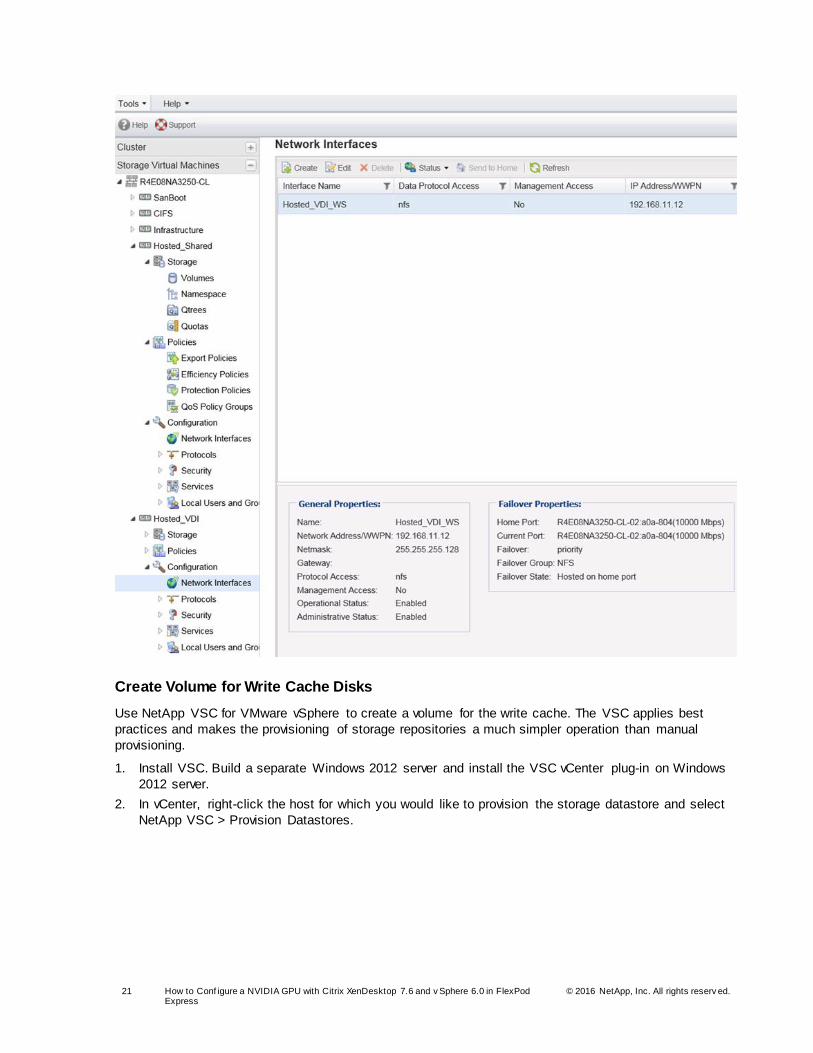
7. Review the details on the Summary page and click Next. The network interface is now available.
21 How to Conf igure a NVIDIA GPU with Citrix XenDesktop 7.6 and v Sphere 6.0 in FlexPod Express
© 2016 NetApp, Inc. All rights reserv ed.
Create Volume for Write Cache Disks
Use NetApp VSC for VMware vSphere to create a volume for the write cache. The VSC applies best
practices and makes the provisioning of storage repositories a much simpler operation than manual
provisioning.
1. Install VSC. Build a separate Windows 2012 server and install the VSC vCenter plug-in on Windows
2012 server.
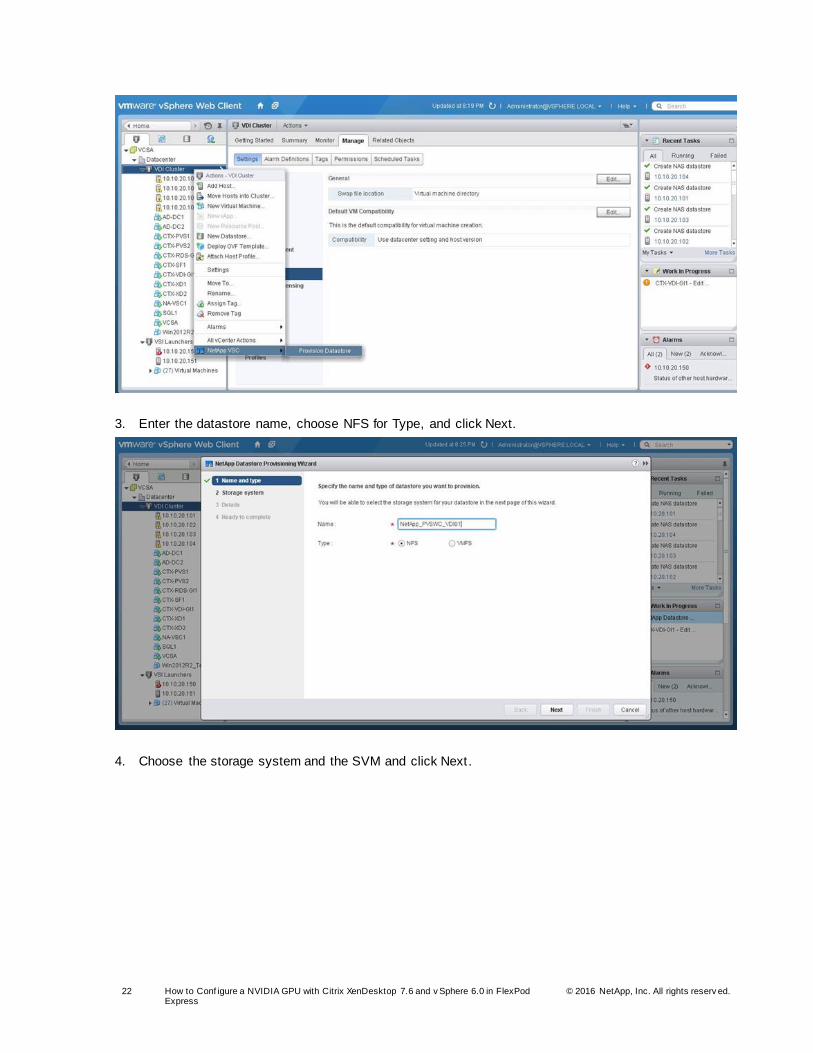
2. In vCenter, right-click the host for which you would like to provision the storage datastore and select
NetApp VSC > Provision Datastores.
22 How to Conf igure a NVIDIA GPU with Citrix XenDesktop 7.6 and v Sphere 6.0 in FlexPod Express
© 2016 NetApp, Inc. All rights reserv ed.
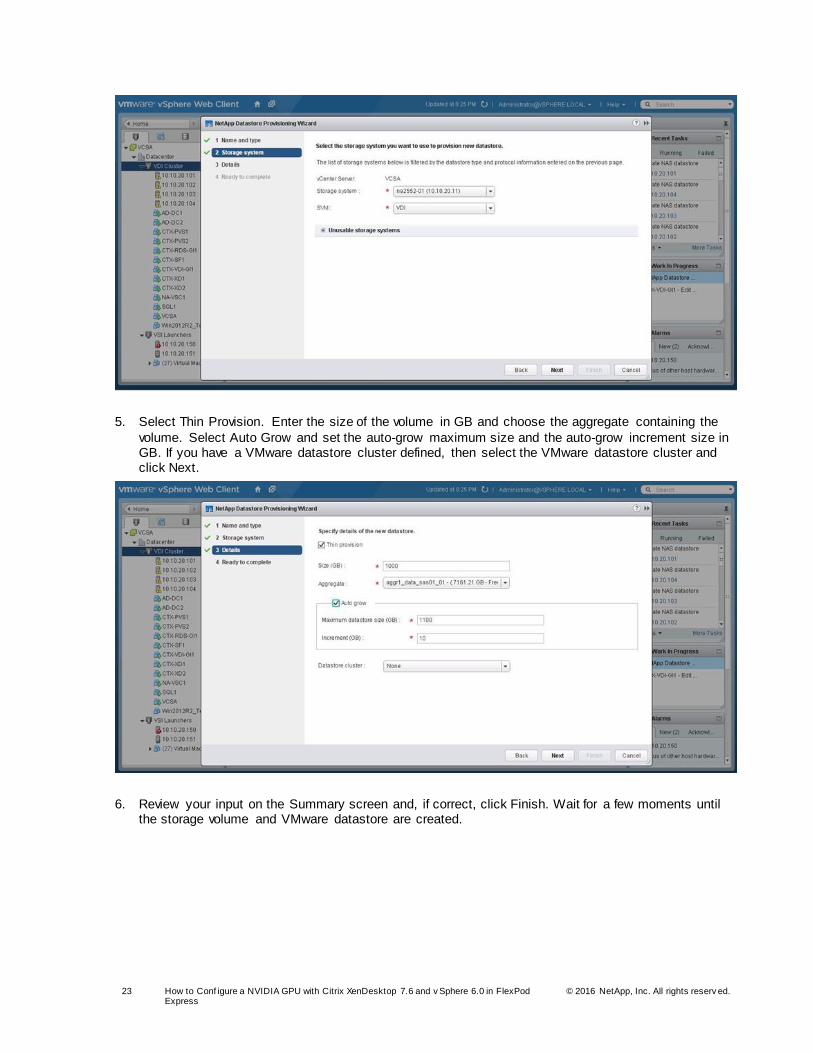
3. Enter the datastore name, choose NFS for Type, and click Next.
4. Choose the storage system and the SVM and click Next.
23 How to Conf igure a NVIDIA GPU with Citrix XenDesktop 7.6 and v Sphere 6.0 in FlexPod Express
© 2016 NetApp, Inc. All rights reserv ed.
5. Select Thin Provision. Enter the size of the volume in GB and choose the aggregate containing the
volume. Select Auto Grow and set the auto-grow maximum size and the auto-grow increment size in GB. If you have a VMware datastore cluster defined, then select the VMware datastore cluster and click Next.
6. Review your input on the Summary screen and, if correct, click Finish. Wait for a few moments until the storage volume and VMware datastore are created.

24 How to Conf igure a NVIDIA GPU with Citrix XenDesktop 7.6 and v Sphere 6.0 in FlexPod Express
© 2016 NetApp, Inc. All rights reserv ed.
7. You must now launch the System Manager tool to finish the advance volume settings. In version 8.3, System Manager is built into clustered Data ONTAP inside the storage nodes. With your browser,
connect to the cluster IP address. The System Manager login screen appears. Enter the administrator user name and password and click Sign In.
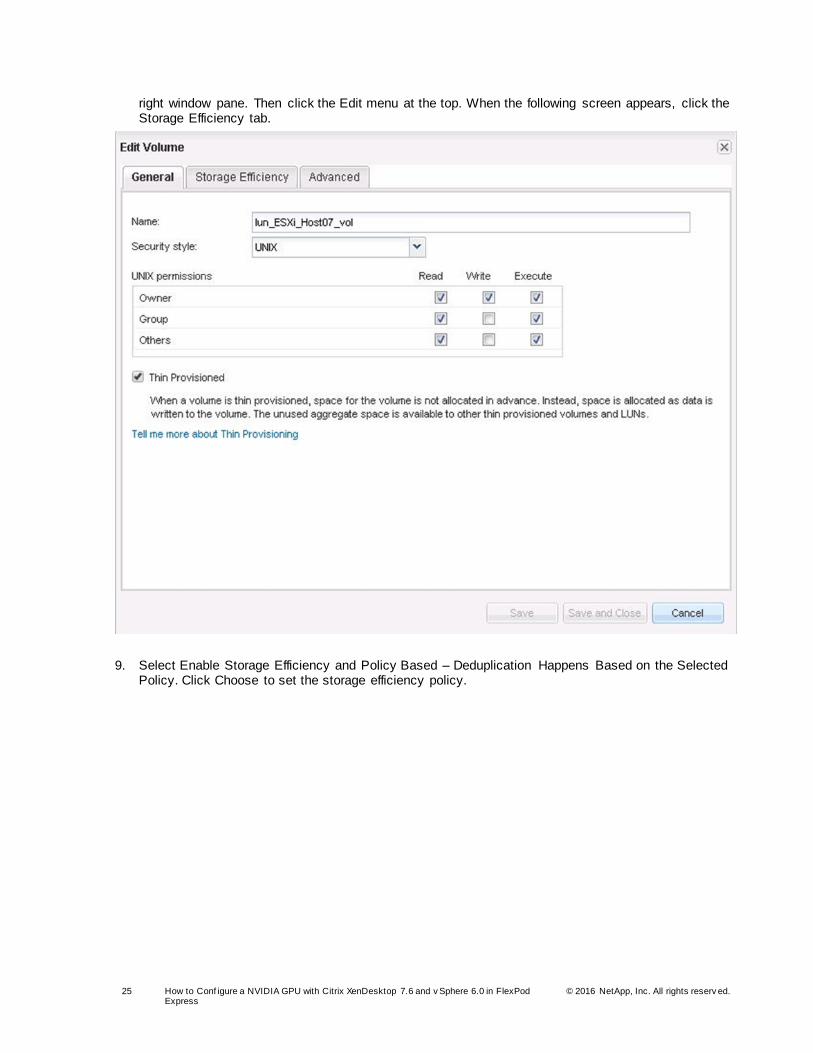
8. Sign in to the NetApp System Manager and click Storage Virtual Machine. Then select the storage submenu and volume submenu. Highlight the write cache volume by clicking the volume name in the
25 How to Conf igure a NVIDIA GPU with Citrix XenDesktop 7.6 and v Sphere 6.0 in FlexPod Express
© 2016 NetApp, Inc. All rights reserv ed.
right window pane. Then click the Edit menu at the top. When the following screen appears, click the Storage Efficiency tab.
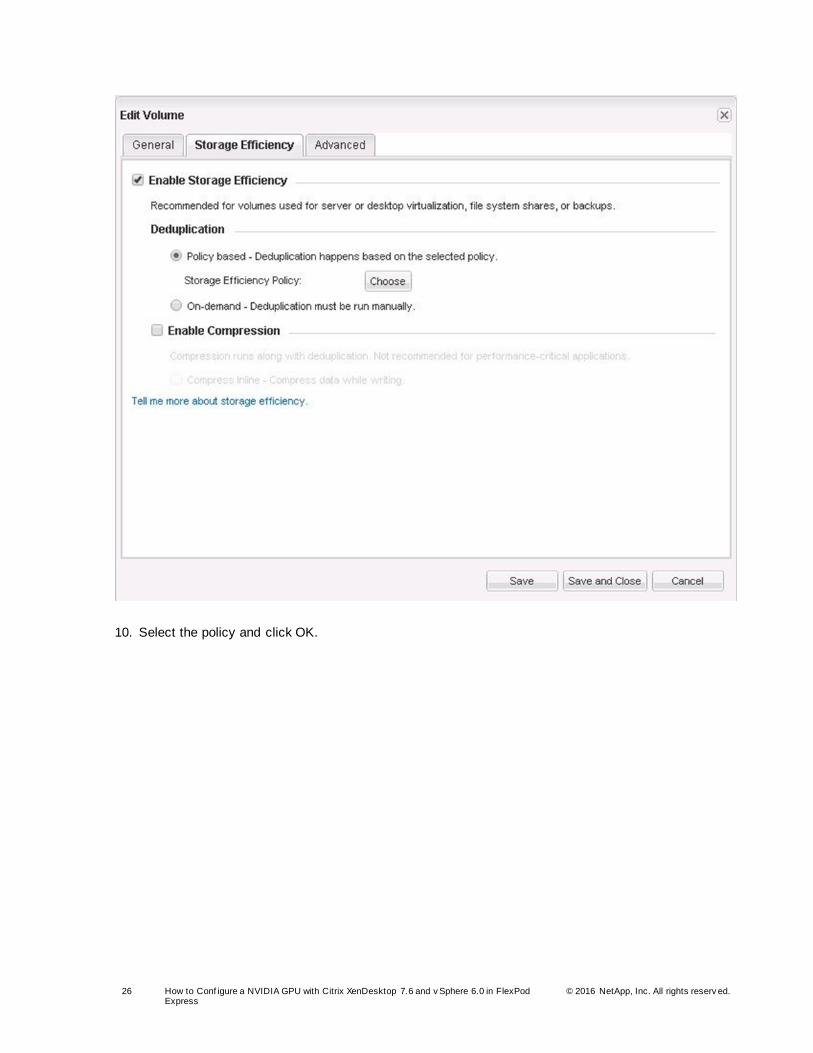
9. Select Enable Storage Efficiency and Policy Based – Deduplication Happens Based on the Selected Policy. Click Choose to set the storage efficiency policy.
26 How to Conf igure a NVIDIA GPU with Citrix XenDesktop 7.6 and v Sphere 6.0 in FlexPod Express
© 2016 NetApp, Inc. All rights reserv ed.
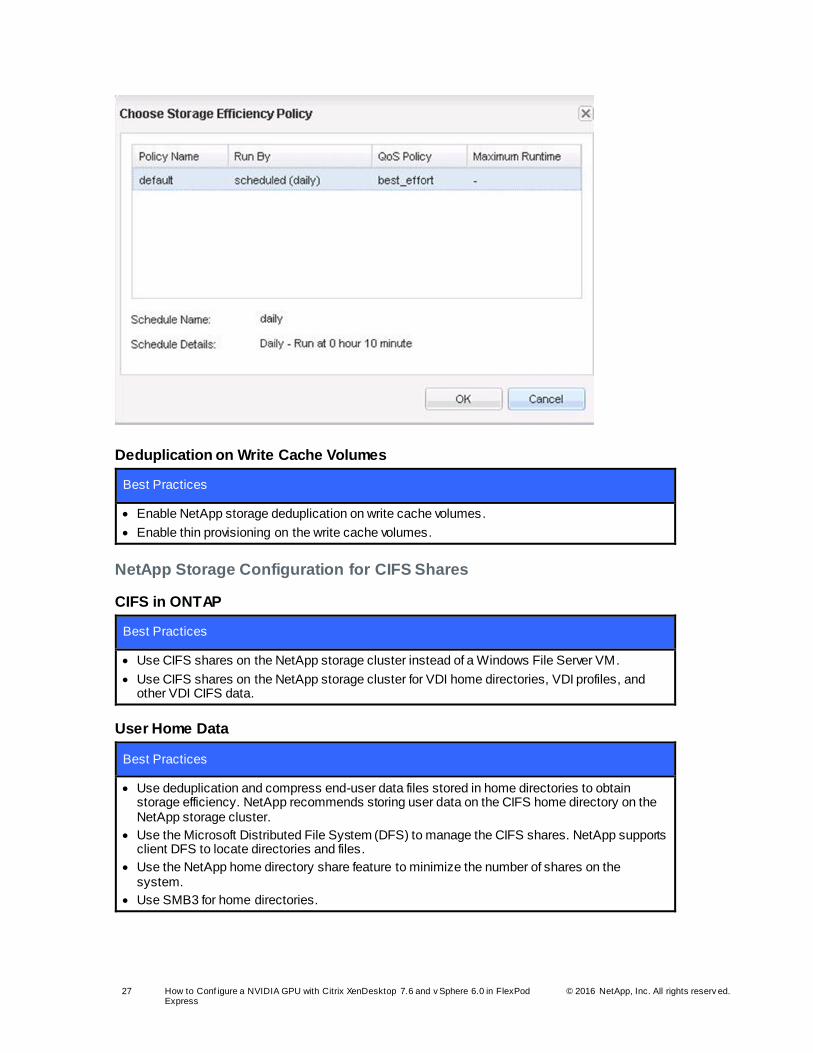
10. Select the policy and click OK.
27 How to Conf igure a NVIDIA GPU with Citrix XenDesktop 7.6 and v Sphere 6.0 in FlexPod Express
© 2016 NetApp, Inc. All rights reserv ed.
Deduplication on Write Cache Volumes
Best Practices
Enable NetApp storage deduplication on write cache volumes.
Enable thin provisioning on the write cache volumes.
NetApp Storage Configuration for CIFS Shares
CIFS in ONTAP
Best Practices
Use CIFS shares on the NetApp storage cluster instead of a Windows File Server VM.
Use CIFS shares on the NetApp storage cluster for VDI home directories, VDI profiles, and other VDI CIFS data.
User Home Data
Best Practices
Use deduplication and compress end-user data files stored in home directories to obtain storage efficiency. NetApp recommends storing user data on the CIFS home directory on the NetApp storage cluster.
Use the Microsoft Distributed File System (DFS) to manage the CIFS shares. NetApp supports client DFS to locate directories and files.
Use the NetApp home directory share feature to minimize the number of shares on the system.
Use SMB3 for home directories.
28 How to Conf igure a NVIDIA GPU with Citrix XenDesktop 7.6 and v Sphere 6.0 in FlexPod Express
© 2016 NetApp, Inc. All rights reserv ed.
User Profile Data
Best Practices
NetApp recommends using a profile management solution such as Citrix User Profile Management or Liquidware Labs ProfileUnity to allow end users to customize their experience in a nonpersistent desktop environment.
Use redirected folders with a Microsoft Group Policy object (GPO).
Use SMB3 for the user profile share.
Profile Management
Best Practices
For faster login, NetApp recommends the following configurations:
A Flash Cache card in 8000 series models
A Flash Pool cache with a read cache allocated in 2500 series models
User profile management software to eliminate unnecessary file copying during login
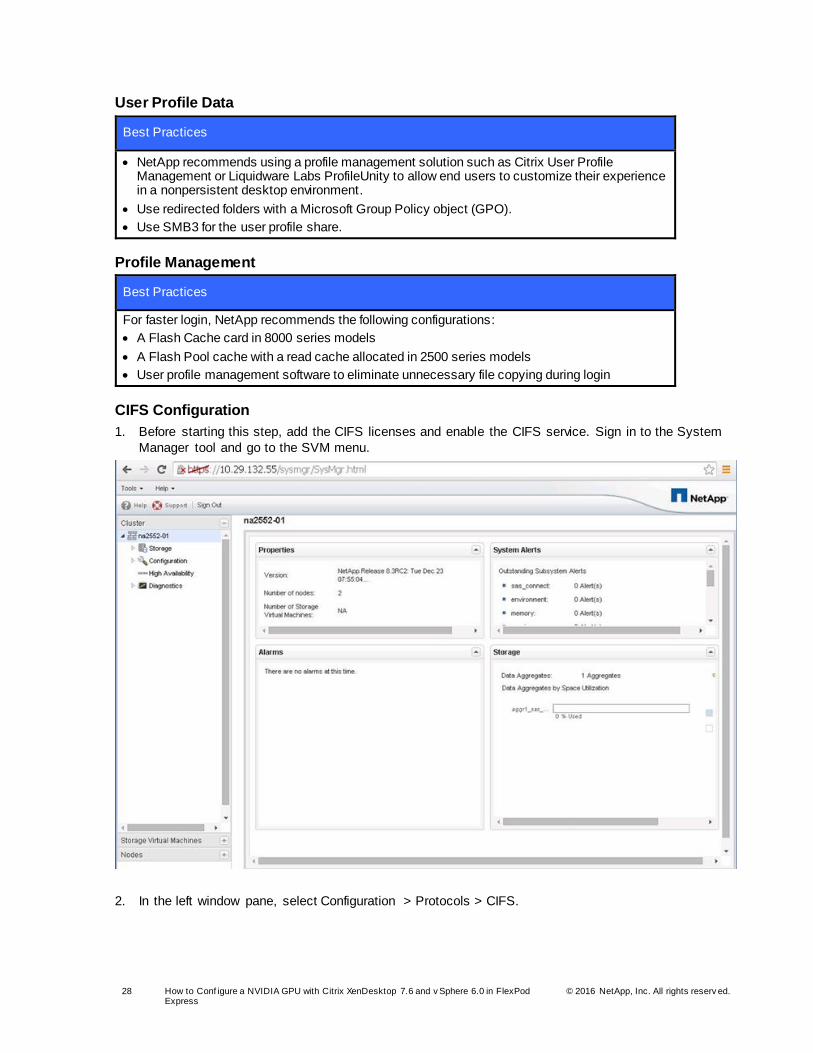
CIFS Configuration
1. Before starting this step, add the CIFS licenses and enable the CIFS service. Sign in to the System
Manager tool and go to the SVM menu.
2. In the left window pane, select Configuration > Protocols > CIFS.
29 How to Conf igure a NVIDIA GPU with Citrix XenDesktop 7.6 and v Sphere 6.0 in FlexPod Express
© 2016 NetApp, Inc. All rights reserv ed.
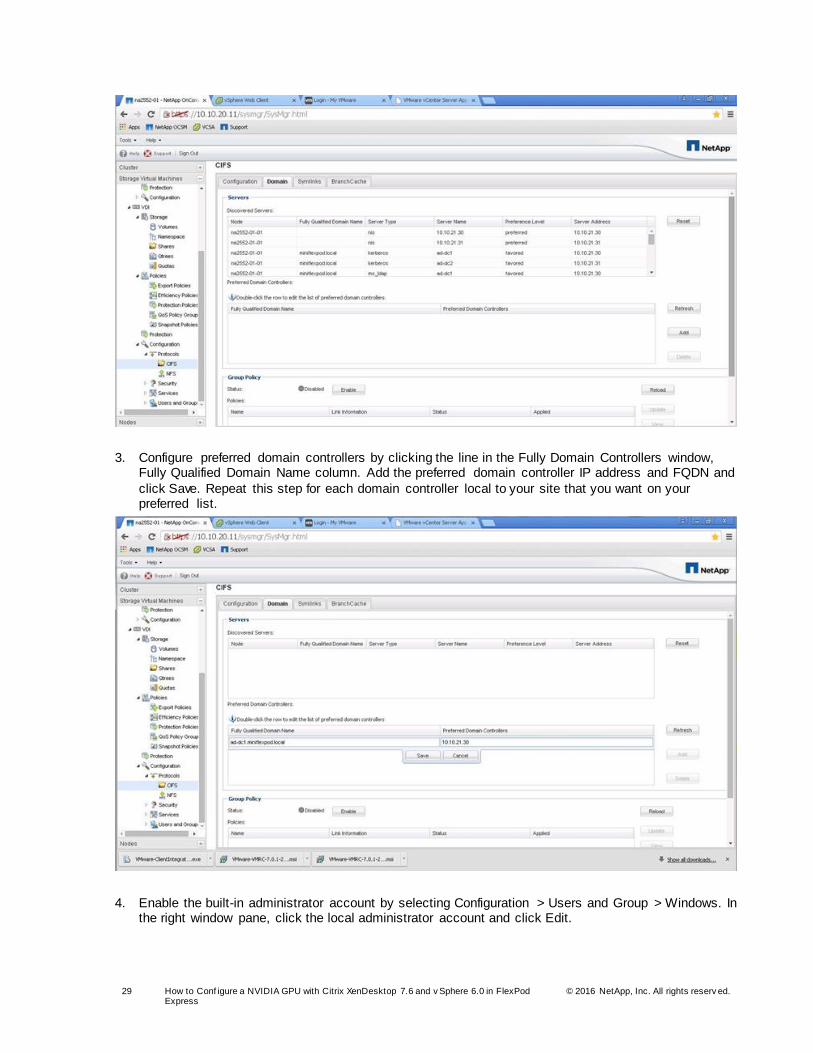
3. Configure preferred domain controllers by clicking the line in the Fully Domain Controllers window, Fully Qualified Domain Name column. Add the preferred domain controller IP address and FQDN and
click Save. Repeat this step for each domain controller local to your site that you want on your preferred list.
4. Enable the built-in administrator account by selecting Configuration > Users and Group > Windows. In the right window pane, click the local administrator account and click Edit.
30 How to Conf igure a NVIDIA GPU with Citrix XenDesktop 7.6 and v Sphere 6.0 in FlexPod Express
© 2016 NetApp, Inc. All rights reserv ed.
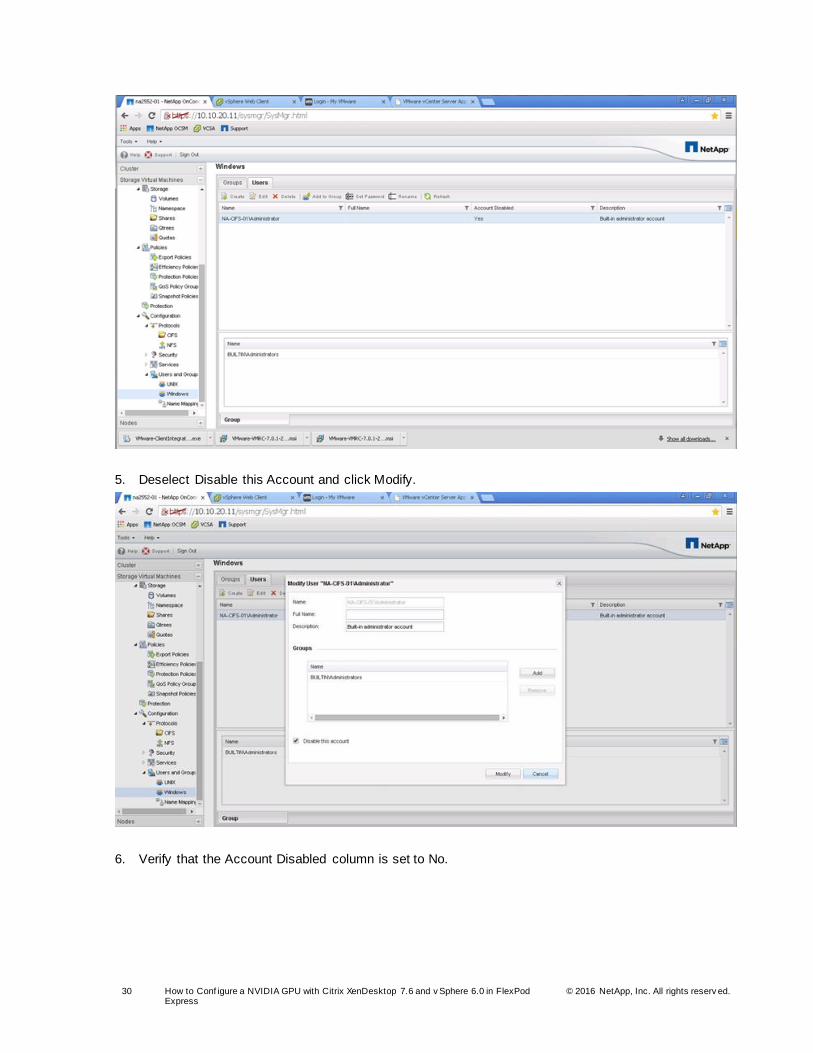
5. Deselect Disable this Account and click Modify.
6. Verify that the Account Disabled column is set to No.
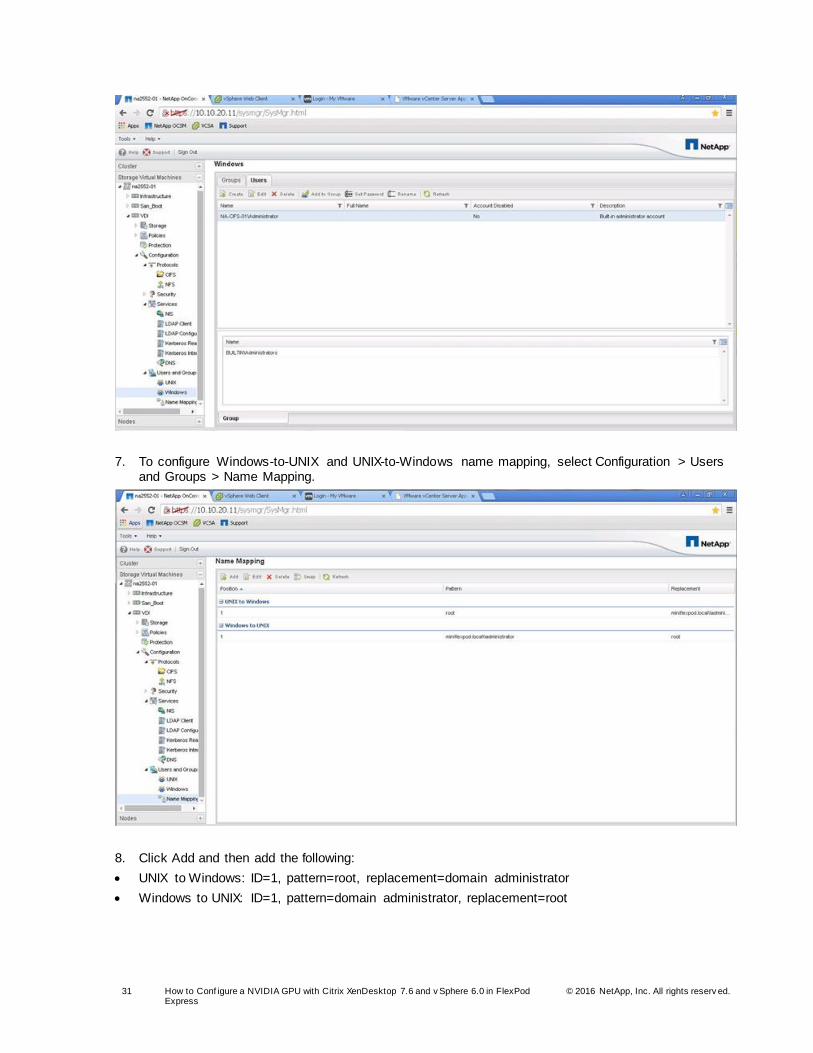
31 How to Conf igure a NVIDIA GPU with Citrix XenDesktop 7.6 and v Sphere 6.0 in FlexPod Express
© 2016 NetApp, Inc. All rights reserv ed.
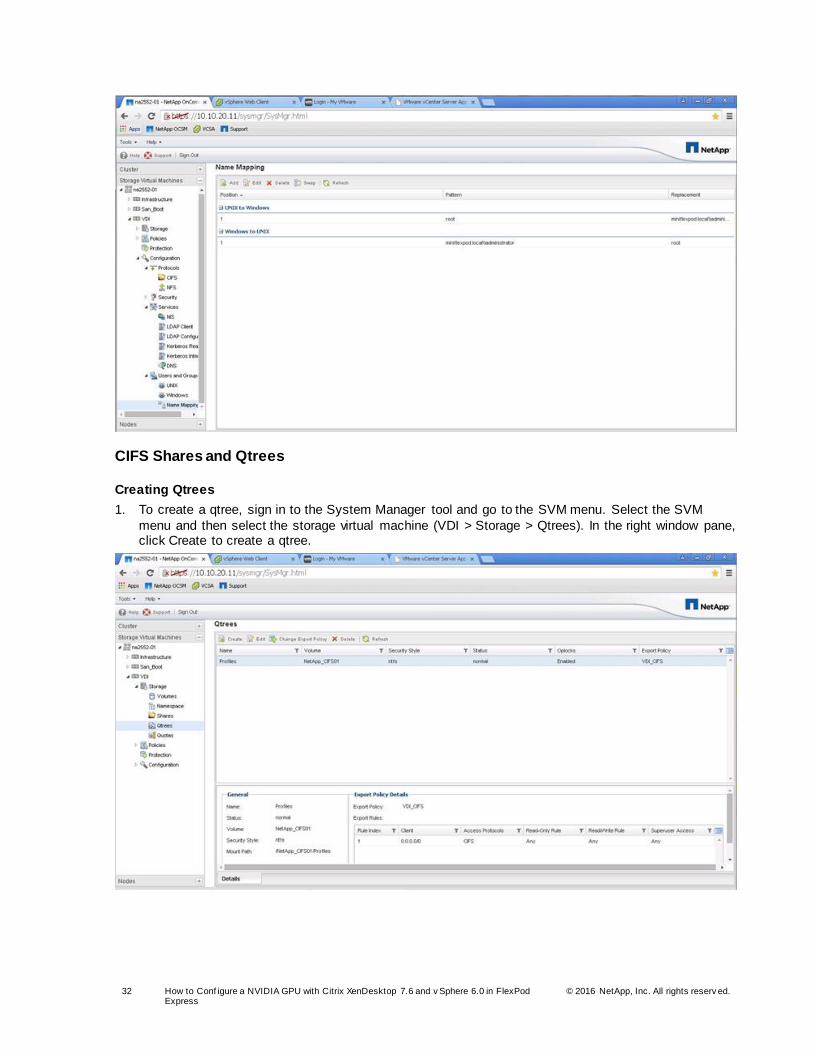
7. To configure Windows-to-UNIX and UNIX-to-Windows name mapping, select Configuration > Users and Groups > Name Mapping.
8. Click Add and then add the following:
UNIX to Windows: ID=1, pattern=root, replacement=domain administrator
Windows to UNIX: ID=1, pattern=domain administrator, replacement=root
32 How to Conf igure a NVIDIA GPU with Citrix XenDesktop 7.6 and v Sphere 6.0 in FlexPod Express
© 2016 NetApp, Inc. All rights reserv ed.
CIFS Shares and Qtrees
Creating Qtrees
1. To create a qtree, sign in to the System Manager tool and go to the SVM menu. Select the SVM
menu and then select the storage virtual machine (VDI > Storage > Qtrees). In the right window pane, click Create to create a qtree.
33 How to Conf igure a NVIDIA GPU with Citrix XenDesktop 7.6 and v Sphere 6.0 in FlexPod Express
© 2016 NetApp, Inc. All rights reserv ed.
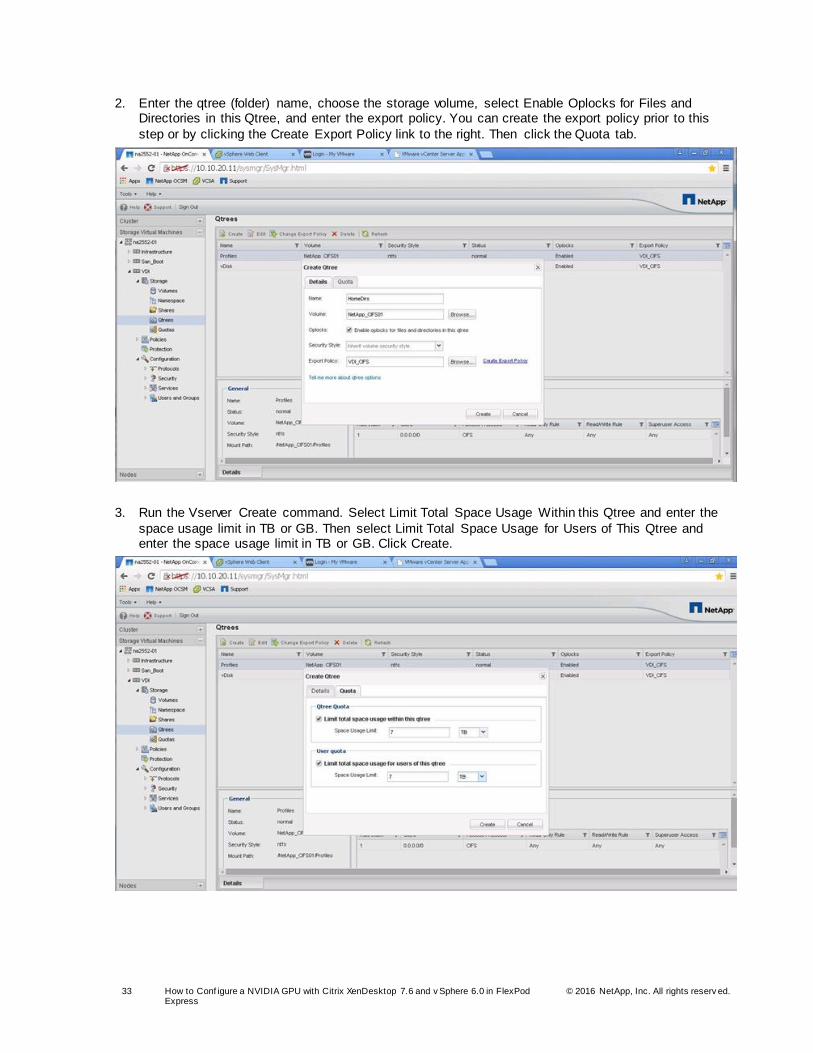
2. Enter the qtree (folder) name, choose the storage volume, select Enable Oplocks for Files and Directories in this Qtree, and enter the export policy. You can create the export policy prior to this
step or by clicking the Create Export Policy link to the right. Then click the Quota tab.
3. Run the Vserver Create command. Select Limit Total Space Usage Within this Qtree and enter the
space usage limit in TB or GB. Then select Limit Total Space Usage for Users of This Qtree and enter the space usage limit in TB or GB. Click Create.
34 How to Conf igure a NVIDIA GPU with Citrix XenDesktop 7.6 and v Sphere 6.0 in FlexPod Express
© 2016 NetApp, Inc. All rights reserv ed.
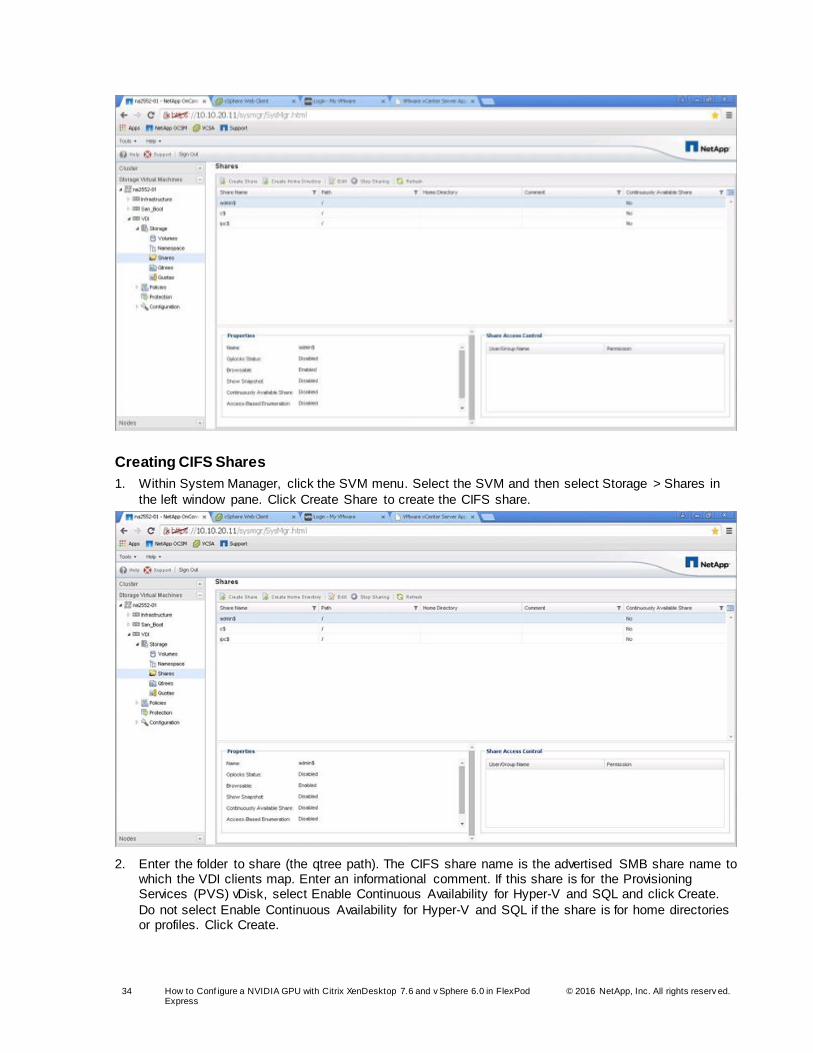
Creating CIFS Shares
1. Within System Manager, click the SVM menu. Select the SVM and then select Storage > Shares in
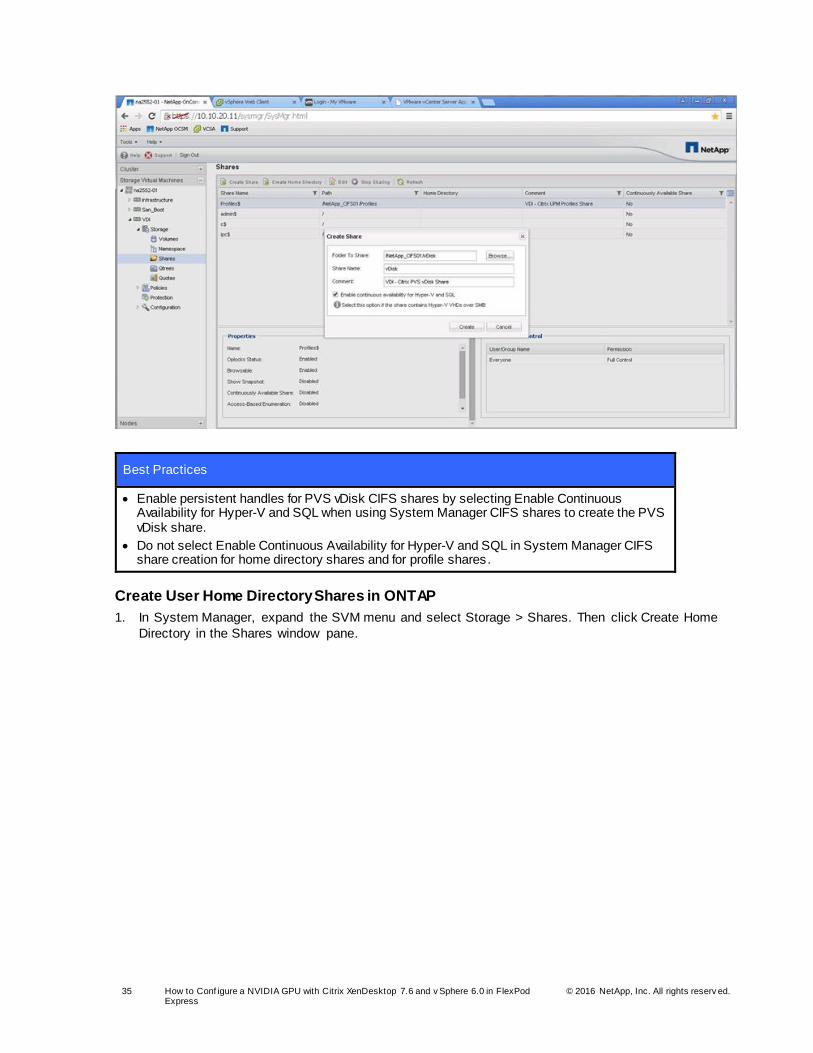
the left window pane. Click Create Share to create the CIFS share.
2. Enter the folder to share (the qtree path). The CIFS share name is the advertised SMB share name to which the VDI clients map. Enter an informational comment. If this share is for the Provisioning Services (PVS) vDisk, select Enable Continuous Availability for Hyper-V and SQL and click Create.
Do not select Enable Continuous Availability for Hyper-V and SQL if the share is for home directories or profiles. Click Create.
35 How to Conf igure a NVIDIA GPU with Citrix XenDesktop 7.6 and v Sphere 6.0 in FlexPod Express
© 2016 NetApp, Inc. All rights reserv ed.
Best Practices
Enable persistent handles for PVS vDisk CIFS shares by selecting Enable Continuous Availability for Hyper-V and SQL when using System Manager CIFS shares to create the PVS vDisk share.
Do not select Enable Continuous Availability for Hyper-V and SQL in System Manager CIFS share creation for home directory shares and for profile shares.
Create User Home Directory Shares in ONTAP
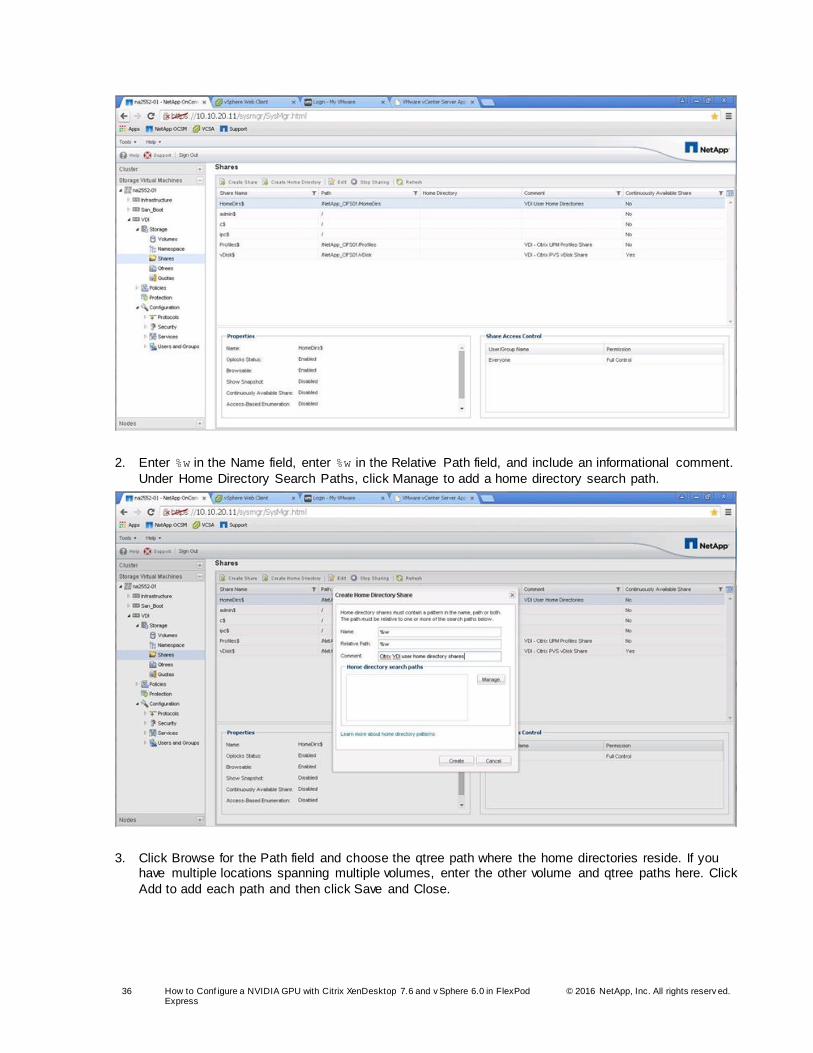
1. In System Manager, expand the SVM menu and select Storage > Shares. Then click Create Home
Directory in the Shares window pane.
36 How to Conf igure a NVIDIA GPU with Citrix XenDesktop 7.6 and v Sphere 6.0 in FlexPod Express
© 2016 NetApp, Inc. All rights reserv ed.
2. Enter %w in the Name field, enter %w in the Relative Path field, and include an informational comment.
Under Home Directory Search Paths, click Manage to add a home directory search path.
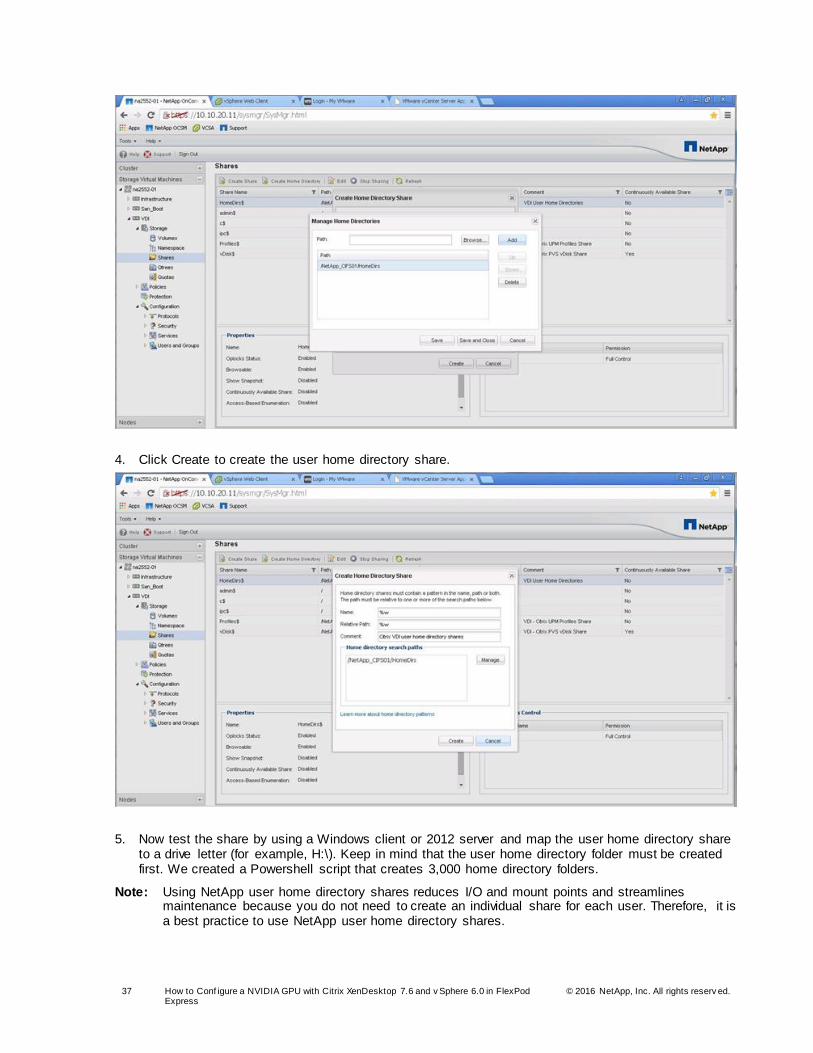
3. Click Browse for the Path field and choose the qtree path where the home directories reside. If you have multiple locations spanning multiple volumes, enter the other volume and qtree paths here. Click
Add to add each path and then click Save and Close.
37 How to Conf igure a NVIDIA GPU with Citrix XenDesktop 7.6 and v Sphere 6.0 in FlexPod Express
© 2016 NetApp, Inc. All rights reserv ed.
4. Click Create to create the user home directory share.
5. Now test the share by using a Windows client or 2012 server and map the user home directory share to a drive letter (for example, H:\). Keep in mind that the user home directory folder must be created first. We created a Powershell script that creates 3,000 home directory folders.
Note: Using NetApp user home directory shares reduces I/O and mount points and streamlines maintenance because you do not need to create an individual share for each user. Therefore, it is a best practice to use NetApp user home directory shares.
38 How to Conf igure a NVIDIA GPU with Citrix XenDesktop 7.6 and v Sphere 6.0 in FlexPod Express
© 2016 NetApp, Inc. All rights reserv ed.
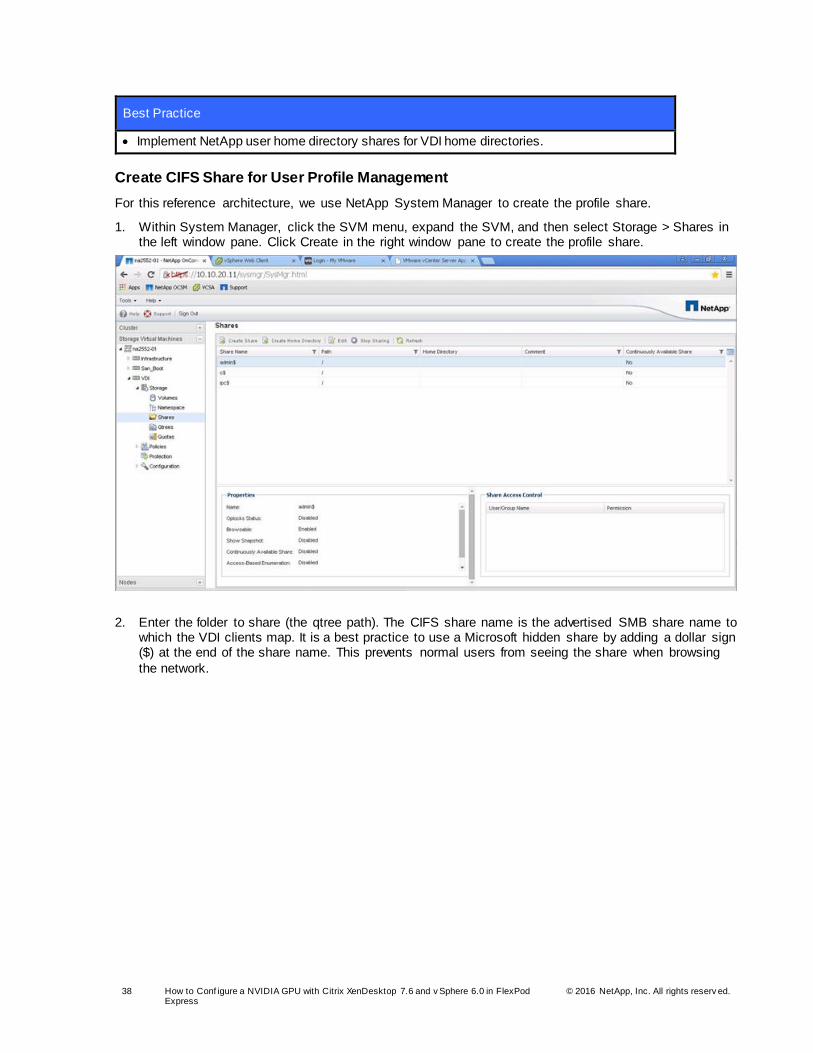
Best Practice
Implement NetApp user home directory shares for VDI home directories.
Create CIFS Share for User Profile Management
For this reference architecture, we use NetApp System Manager to create the profile share.
1. Within System Manager, click the SVM menu, expand the SVM, and then select Storage > Shares in the left window pane. Click Create in the right window pane to create the profile share.
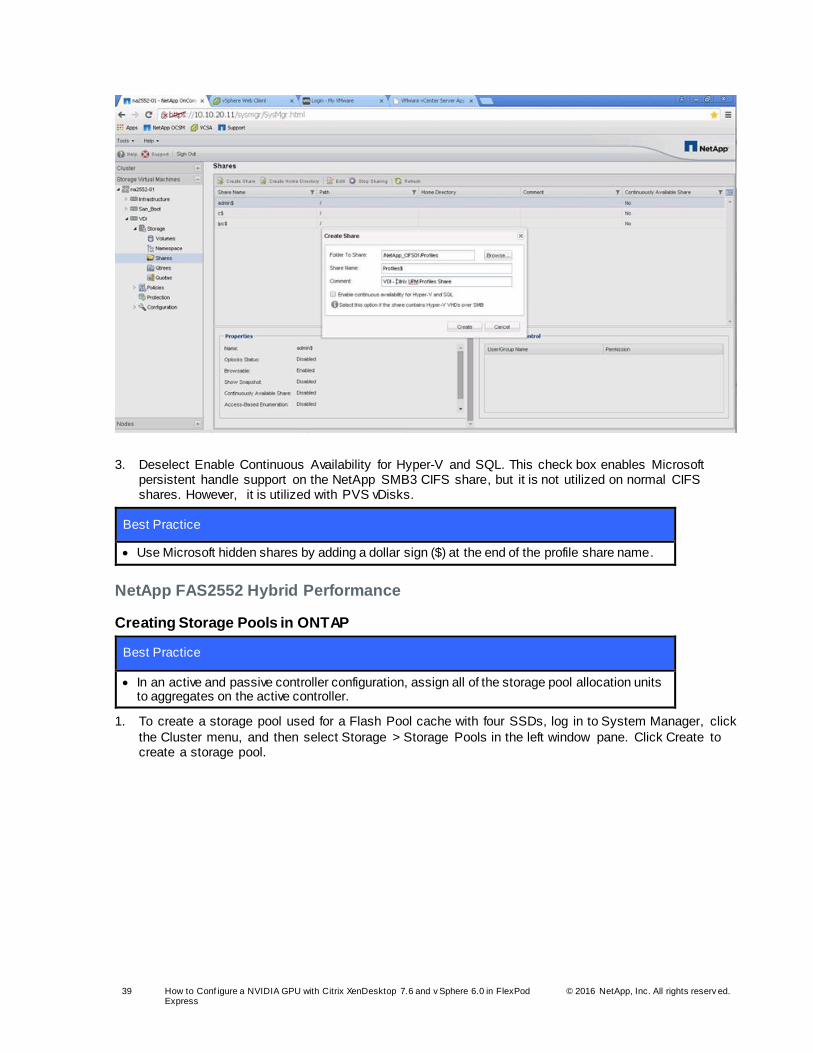
2. Enter the folder to share (the qtree path). The CIFS share name is the advertised SMB share name to which the VDI clients map. It is a best practice to use a Microsoft hidden share by adding a dollar sign ($) at the end of the share name. This prevents normal users from seeing the share when browsing
the network.
39 How to Conf igure a NVIDIA GPU with Citrix XenDesktop 7.6 and v Sphere 6.0 in FlexPod Express
© 2016 NetApp, Inc. All rights reserv ed.
3. Deselect Enable Continuous Availability for Hyper-V and SQL. This check box enables Microsoft persistent handle support on the NetApp SMB3 CIFS share, but it is not utilized on normal CIFS shares. However, it is utilized with PVS vDisks.
Best Practice
Use Microsoft hidden shares by adding a dollar sign ($) at the end of the profile share name.
NetApp FAS2552 Hybrid Performance
Creating Storage Pools in ONTAP
Best Practice
In an active and passive controller configuration, assign all of the storage pool allocation units to aggregates on the active controller.
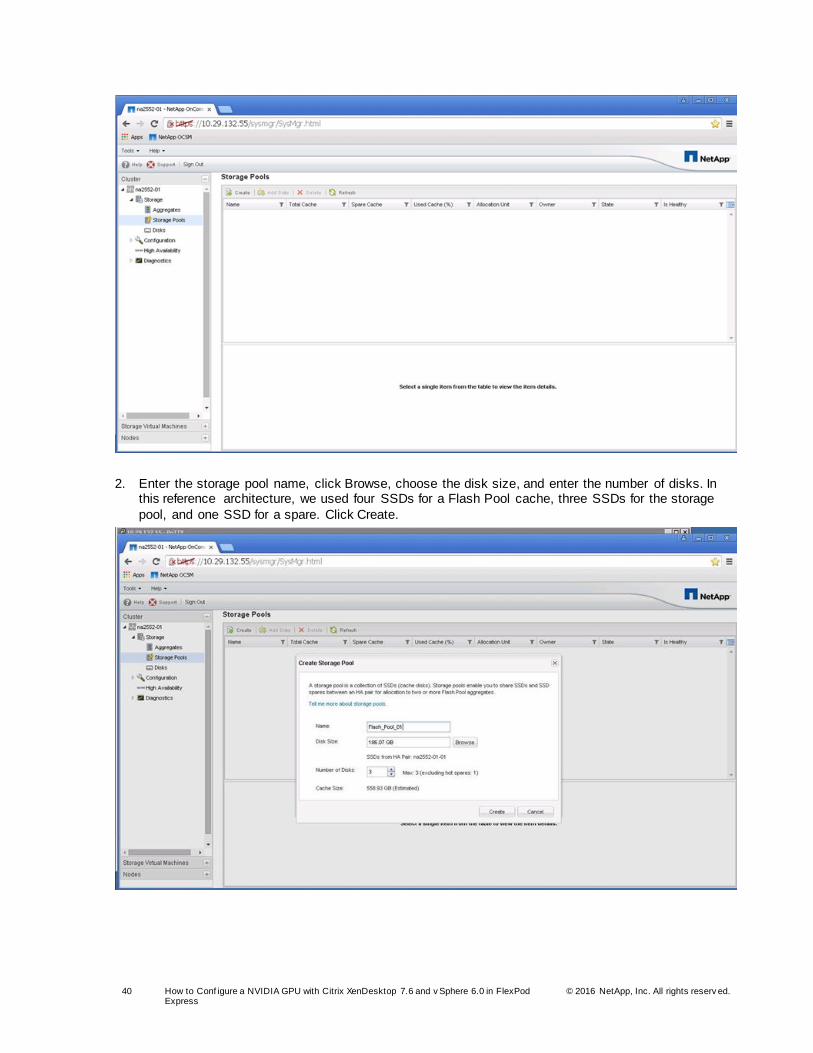
1. To create a storage pool used for a Flash Pool cache with four SSDs, log in to System Manager, click
the Cluster menu, and then select Storage > Storage Pools in the left window pane. Click Create to create a storage pool.
40 How to Conf igure a NVIDIA GPU with Citrix XenDesktop 7.6 and v Sphere 6.0 in FlexPod Express
© 2016 NetApp, Inc. All rights reserv ed.
2. Enter the storage pool name, click Browse, choose the disk size, and enter the number of disks. In this reference architecture, we used four SSDs for a Flash Pool cache, three SSDs for the storage
pool, and one SSD for a spare. Click Create.
41 How to Conf igure a NVIDIA GPU with Citrix XenDesktop 7.6 and v Sphere 6.0 in FlexPod Express
© 2016 NetApp, Inc. All rights reserv ed.
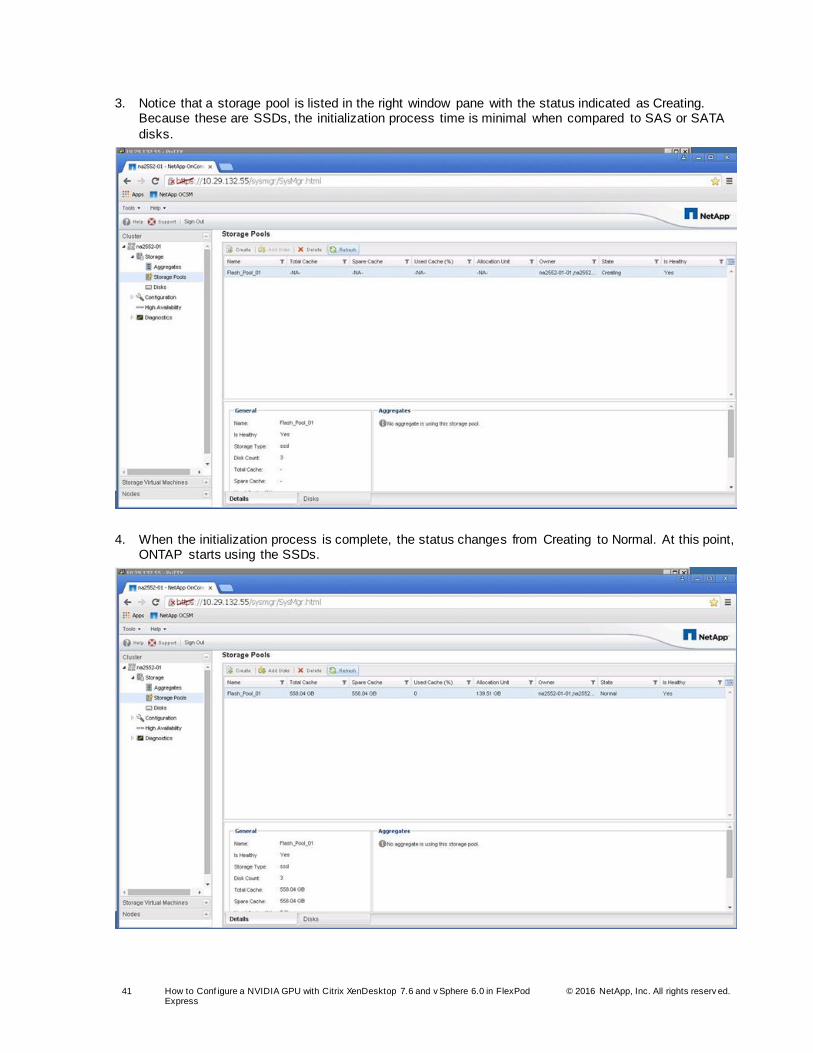
3. Notice that a storage pool is listed in the right window pane with the status indicated as Creating. Because these are SSDs, the initialization process time is minimal when compared to SAS or SATA
disks.
4. When the initialization process is complete, the status changes from Creating to Normal. At this point, ONTAP starts using the SSDs.
42 How to Conf igure a NVIDIA GPU with Citrix XenDesktop 7.6 and v Sphere 6.0 in FlexPod Express
© 2016 NetApp, Inc. All rights reserv ed.
3.5 Configure Cisco Unified Computing System
This section describes the configuration of the Cisco UCS.
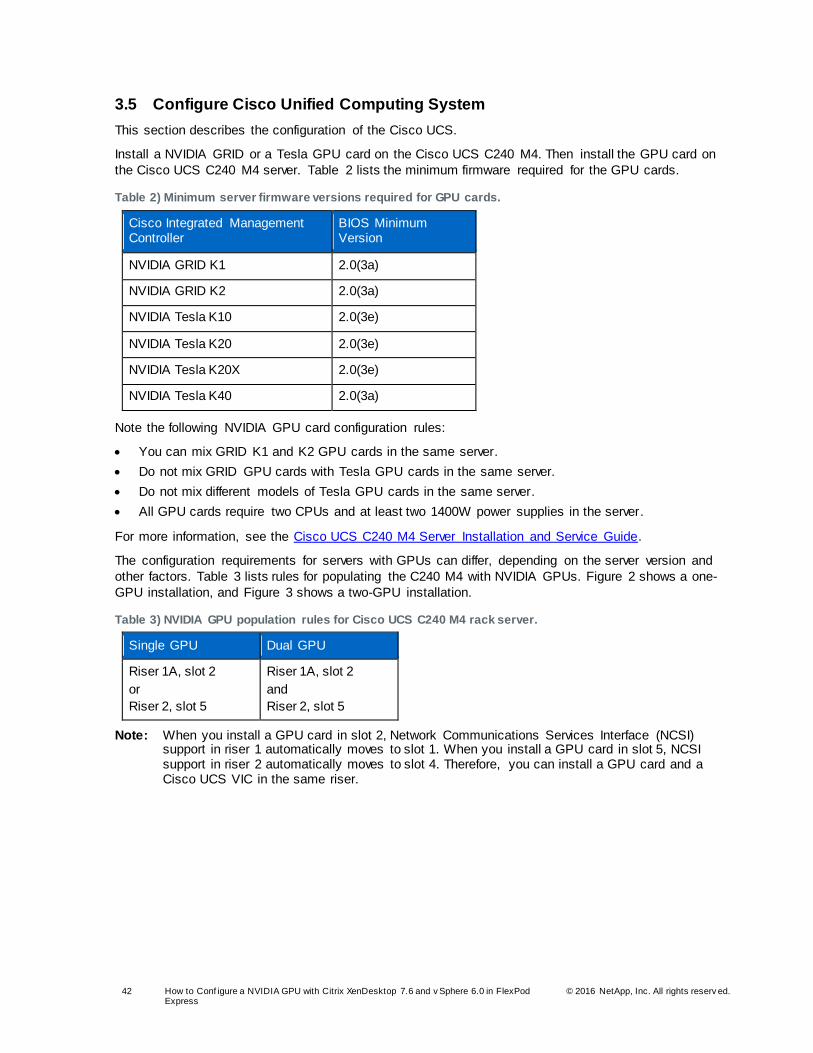
Install a NVIDIA GRID or a Tesla GPU card on the Cisco UCS C240 M4. Then install the GPU card on
the Cisco UCS C240 M4 server. Table 2 lists the minimum firmware required for the GPU cards.
Table 2) Minimum server firmware versions required for GPU cards.
Cisco Integrated Management Controller
BIOS Minimum Version
NVIDIA GRID K1 2.0(3a)
NVIDIA GRID K2 2.0(3a)
NVIDIA Tesla K10 2.0(3e)
NVIDIA Tesla K20 2.0(3e)
NVIDIA Tesla K20X 2.0(3e)
NVIDIA Tesla K40 2.0(3a)
Note the following NVIDIA GPU card configuration rules:
You can mix GRID K1 and K2 GPU cards in the same server.
Do not mix GRID GPU cards with Tesla GPU cards in the same server.
Do not mix different models of Tesla GPU cards in the same server.
All GPU cards require two CPUs and at least two 1400W power supplies in the server.
For more information, see the Cisco UCS C240 M4 Server Installation and Service Guide.
The configuration requirements for servers with GPUs can differ, depending on the server version and
other factors. Table 3 lists rules for populating the C240 M4 with NVIDIA GPUs. Figure 2 shows a one-
GPU installation, and Figure 3 shows a two-GPU installation.
Table 3) NVIDIA GPU population rules for Cisco UCS C240 M4 rack server.
Single GPU Dual GPU
Riser 1A, slot 2
or
Riser 2, slot 5
Riser 1A, slot 2
and
Riser 2, slot 5
Note: When you install a GPU card in slot 2, Network Communications Services Interface (NCSI) support in riser 1 automatically moves to slot 1. When you install a GPU card in slot 5, NCSI support in riser 2 automatically moves to slot 4. Therefore, you can install a GPU card and a Cisco UCS VIC in the same riser.
43 How to Conf igure a NVIDIA GPU with Citrix XenDesktop 7.6 and v Sphere 6.0 in FlexPod Express
© 2016 NetApp, Inc. All rights reserv ed.
Figure 2) One-GPU card scenario.
Figure 3) Two-GPU card scenario.
44 How to Conf igure a NVIDIA GPU with Citrix XenDesktop 7.6 and v Sphere 6.0 in FlexPod Express
© 2016 NetApp, Inc. All rights reserv ed.
Specify the Base Cisco UCS Configuration
To configure physical connectivity and implement best practices for Cisco UCS C-Series server
integration with Cisco UCS Manager, see the Release Notes for Cisco UCS Software, Release 2.2.
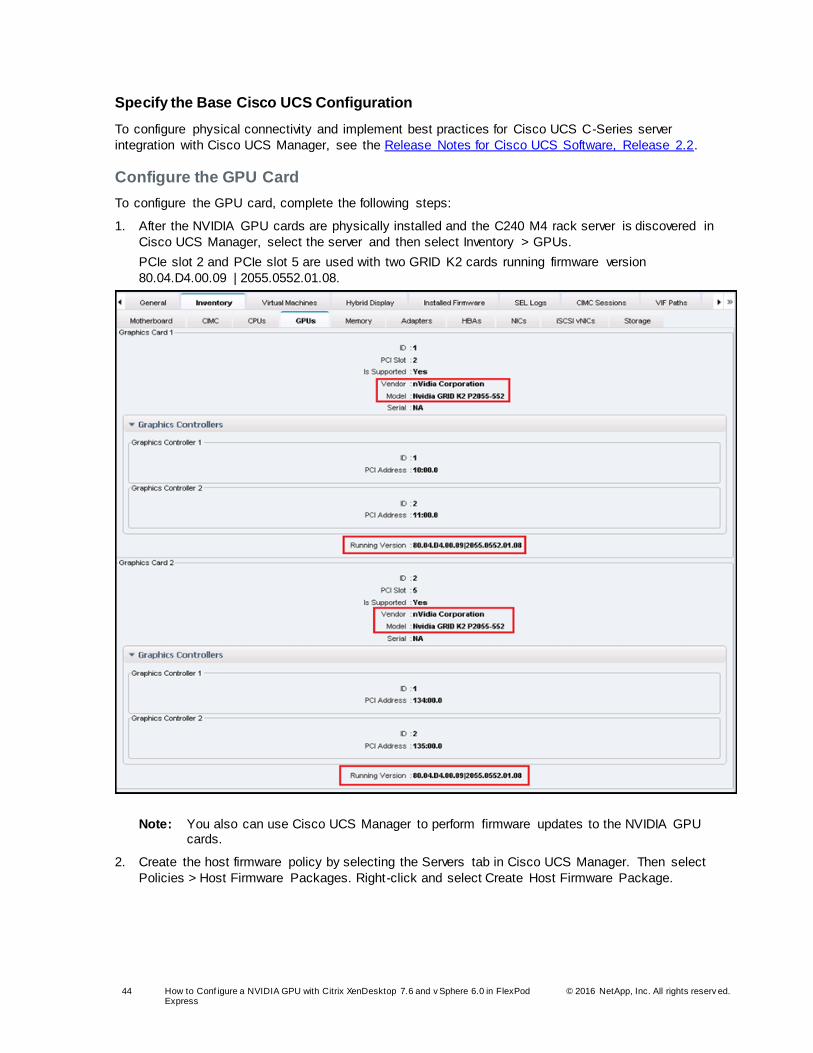
Configure the GPU Card
To configure the GPU card, complete the following steps:
1. After the NVIDIA GPU cards are physically installed and the C240 M4 rack server is discovered in
Cisco UCS Manager, select the server and then select Inventory > GPUs.
PCIe slot 2 and PCIe slot 5 are used with two GRID K2 cards running firmware version
80.04.D4.00.09 | 2055.0552.01.08.
Note: You also can use Cisco UCS Manager to perform firmware updates to the NVIDIA GPU cards.
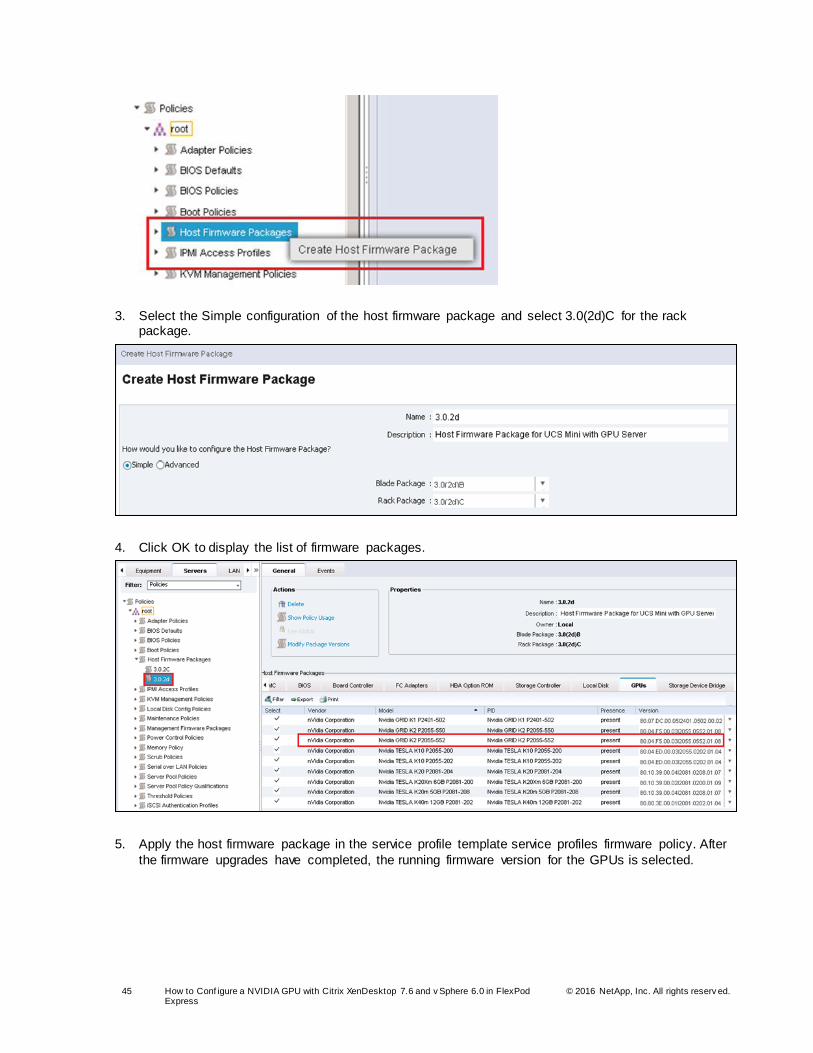
2. Create the host firmware policy by selecting the Servers tab in Cisco UCS Manager. Then select
Policies > Host Firmware Packages. Right-click and select Create Host Firmware Package.
45 How to Conf igure a NVIDIA GPU with Citrix XenDesktop 7.6 and v Sphere 6.0 in FlexPod Express
© 2016 NetApp, Inc. All rights reserv ed.
3. Select the Simple configuration of the host firmware package and select 3.0(2d)C for the rack package.
4. Click OK to display the list of firmware packages.
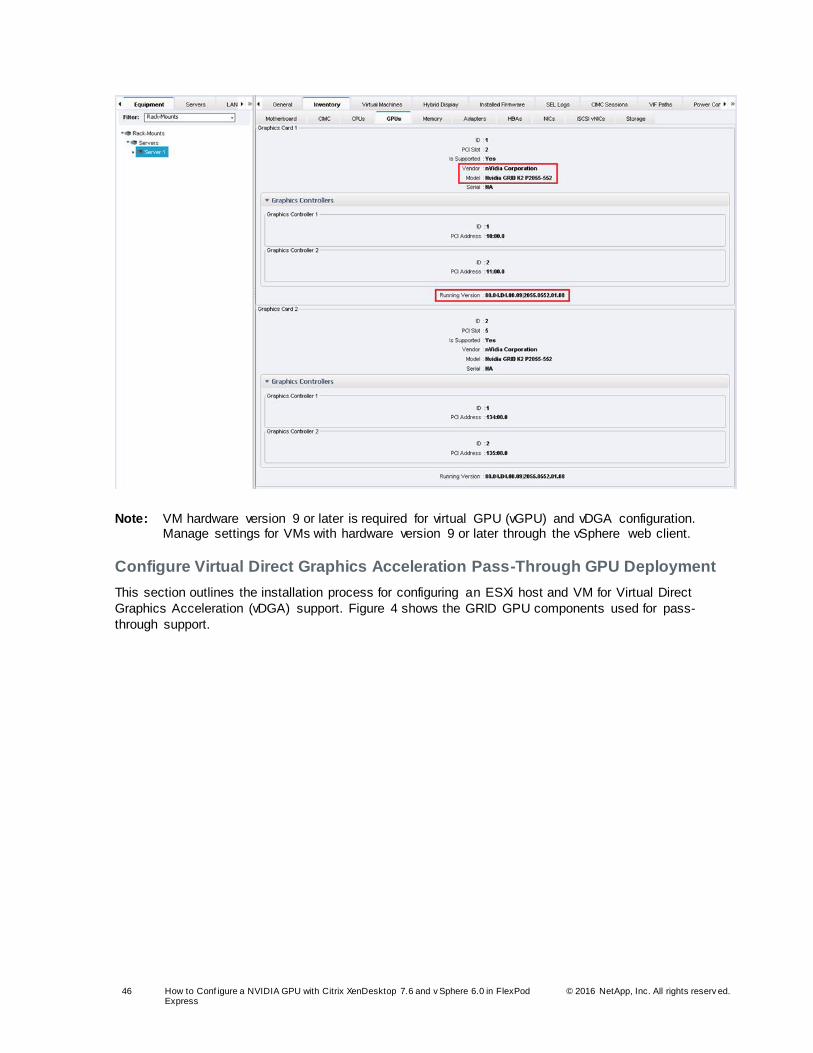
5. Apply the host firmware package in the service profile template service profiles firmware policy. After
the firmware upgrades have completed, the running firmware version for the GPUs is selected.
46 How to Conf igure a NVIDIA GPU with Citrix XenDesktop 7.6 and v Sphere 6.0 in FlexPod Express
© 2016 NetApp, Inc. All rights reserv ed.
Note: VM hardware version 9 or later is required for virtual GPU (vGPU) and vDGA configuration. Manage settings for VMs with hardware version 9 or later through the vSphere web client.
Configure Virtual Direct Graphics Acceleration Pass-Through GPU Deployment
This section outlines the installation process for configuring an ESXi host and VM for Virtual Direct
Graphics Acceleration (vDGA) support. Figure 4 shows the GRID GPU components used for pass-
through support.
47 How to Conf igure a NVIDIA GPU with Citrix XenDesktop 7.6 and v Sphere 6.0 in FlexPod Express
© 2016 NetApp, Inc. All rights reserv ed.
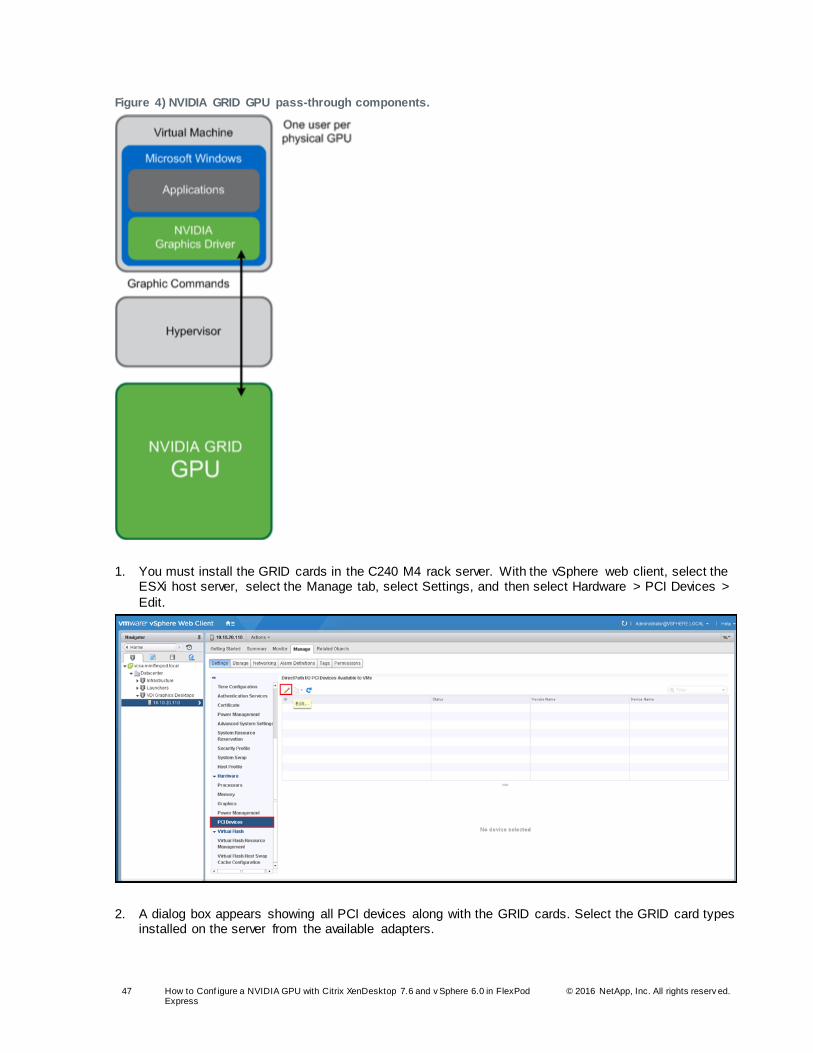
Figure 4) NVIDIA GRID GPU pass-through components.
1. You must install the GRID cards in the C240 M4 rack server. With the vSphere web client, select the ESXi host server, select the Manage tab, select Settings, and then select Hardware > PCI Devices >
Edit.
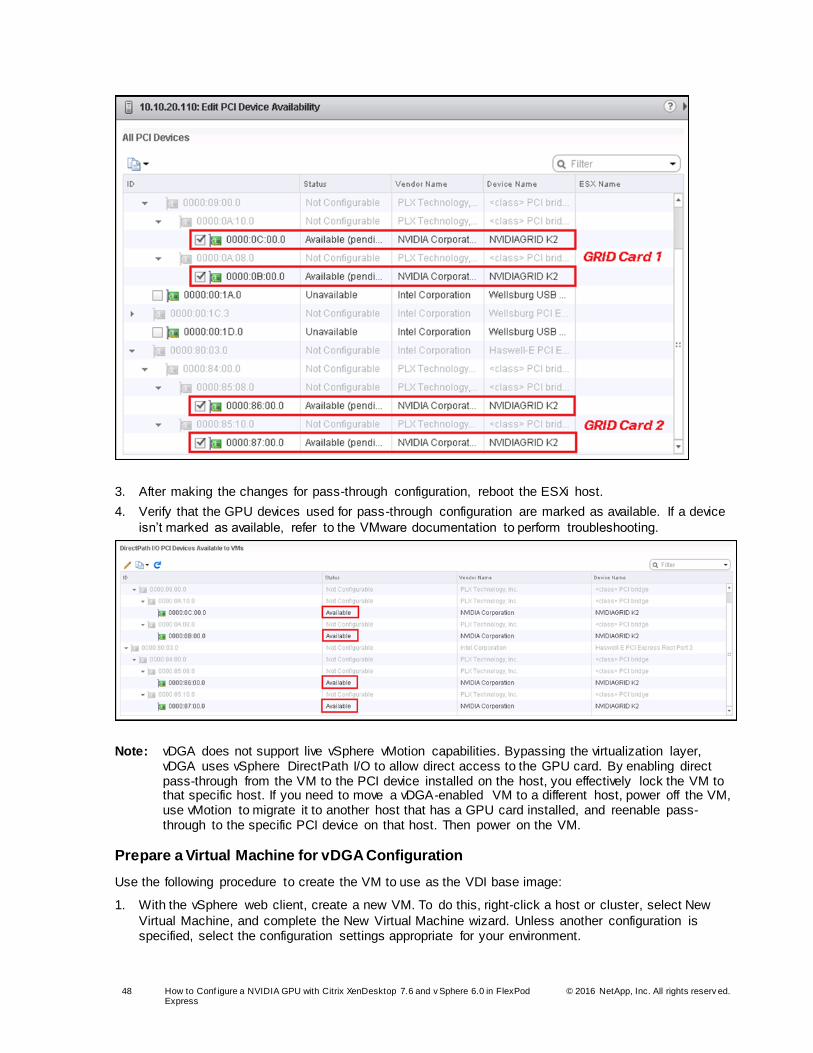
2. A dialog box appears showing all PCI devices along with the GRID cards. Select the GRID card types installed on the server from the available adapters.
48 How to Conf igure a NVIDIA GPU with Citrix XenDesktop 7.6 and v Sphere 6.0 in FlexPod Express
© 2016 NetApp, Inc. All rights reserv ed.
3. After making the changes for pass-through configuration, reboot the ESXi host.
4. Verify that the GPU devices used for pass-through configuration are marked as available. If a device
isn’t marked as available, refer to the VMware documentation to perform troubleshooting.
Note: vDGA does not support live vSphere vMotion capabilities. Bypassing the virtualization layer, vDGA uses vSphere DirectPath I/O to allow direct access to the GPU card. By enabling direct pass-through from the VM to the PCI device installed on the host, you effectively lock the VM to that specific host. If you need to move a vDGA-enabled VM to a different host, power off the VM, use vMotion to migrate it to another host that has a GPU card installed, and reenable pass-through to the specific PCI device on that host. Then power on the VM.
Prepare a Virtual Machine for vDGA Configuration
Use the following procedure to create the VM to use as the VDI base image:
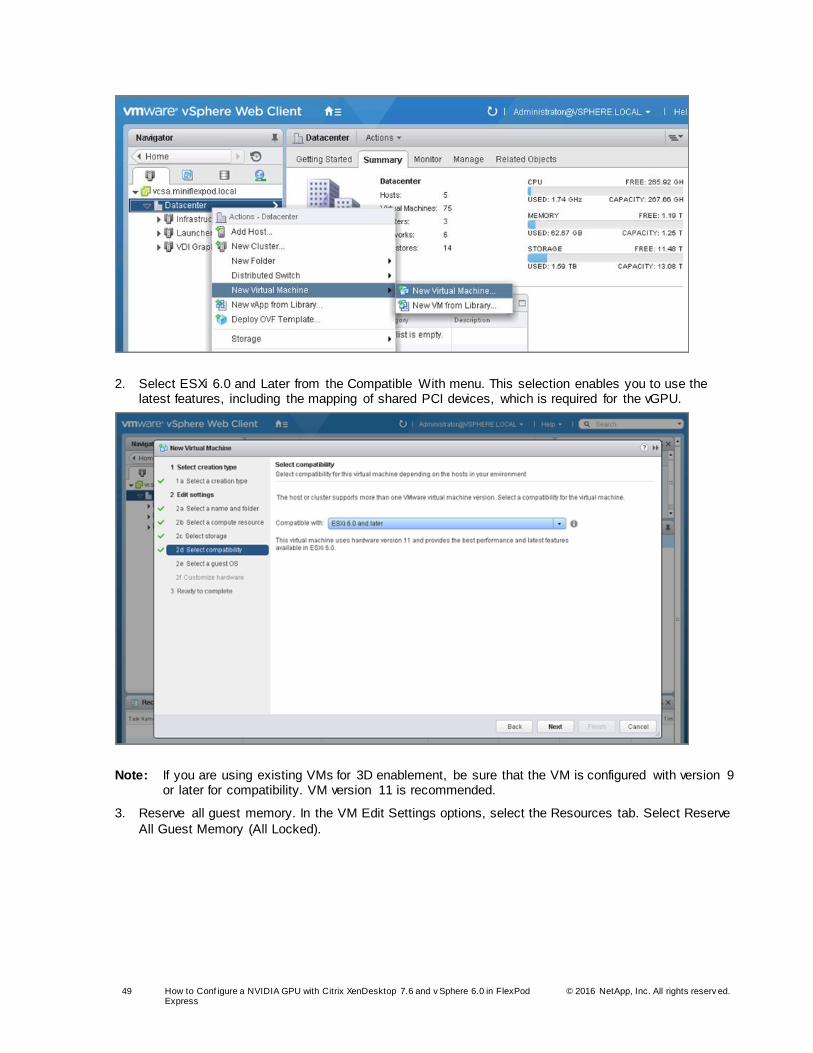
1. With the vSphere web client, create a new VM. To do this, right-click a host or cluster, select New
Virtual Machine, and complete the New Virtual Machine wizard. Unless another configuration is specified, select the configuration settings appropriate for your environment.
49 How to Conf igure a NVIDIA GPU with Citrix XenDesktop 7.6 and v Sphere 6.0 in FlexPod Express
© 2016 NetApp, Inc. All rights reserv ed.
2. Select ESXi 6.0 and Later from the Compatible With menu. This selection enables you to use the latest features, including the mapping of shared PCI devices, which is required for the vGPU.
Note: If you are using existing VMs for 3D enablement, be sure that the VM is configured with version 9 or later for compatibility. VM version 11 is recommended.
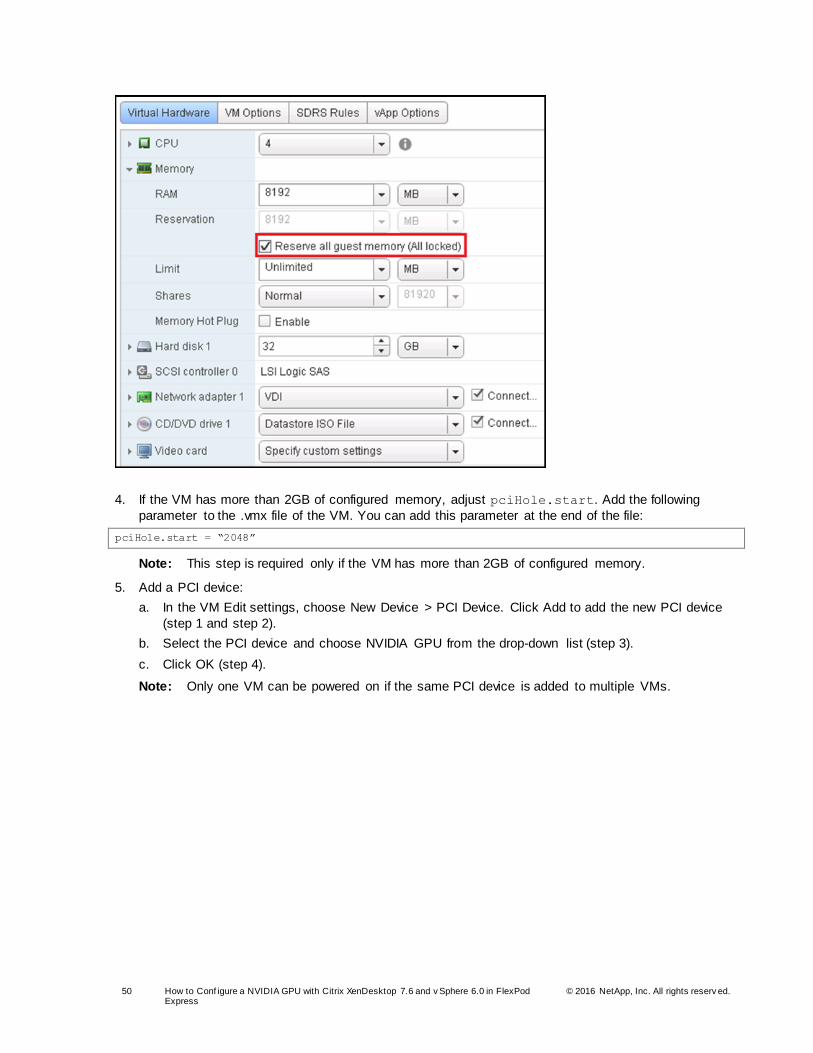
3. Reserve all guest memory. In the VM Edit Settings options, select the Resources tab. Select Reserve
All Guest Memory (All Locked).
50 How to Conf igure a NVIDIA GPU with Citrix XenDesktop 7.6 and v Sphere 6.0 in FlexPod Express
© 2016 NetApp, Inc. All rights reserv ed.
4. If the VM has more than 2GB of configured memory, adjust pciHole.start. Add the following
parameter to the .vmx file of the VM. You can add this parameter at the end of the file:
pciHole.start = “2048”
Note: This step is required only if the VM has more than 2GB of configured memory.
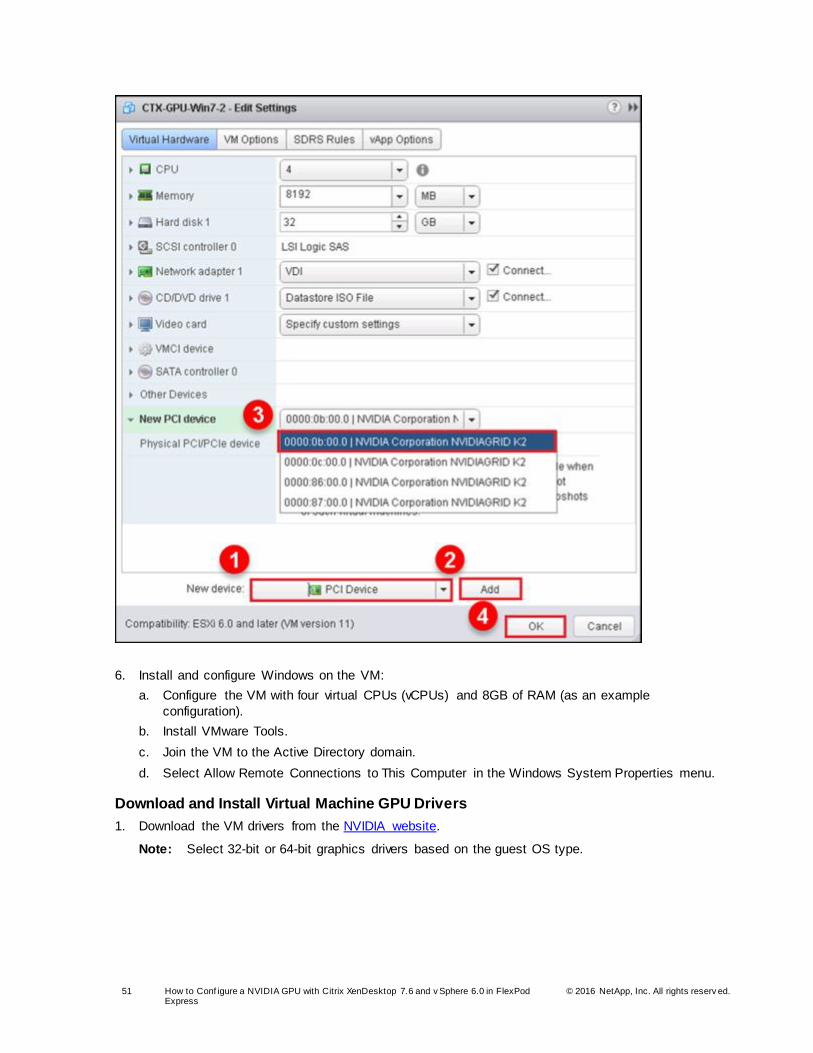
5. Add a PCI device:
a. In the VM Edit settings, choose New Device > PCI Device. Click Add to add the new PCI device
(step 1 and step 2).
b. Select the PCI device and choose NVIDIA GPU from the drop-down list (step 3).
c. Click OK (step 4).
Note: Only one VM can be powered on if the same PCI device is added to multiple VMs.
51 How to Conf igure a NVIDIA GPU with Citrix XenDesktop 7.6 and v Sphere 6.0 in FlexPod Express
© 2016 NetApp, Inc. All rights reserv ed.
6. Install and configure Windows on the VM:
a. Configure the VM with four virtual CPUs (vCPUs) and 8GB of RAM (as an example
configuration).
b. Install VMware Tools.
c. Join the VM to the Active Directory domain.
d. Select Allow Remote Connections to This Computer in the Windows System Properties menu.
Download and Install Virtual Machine GPU Drivers
1. Download the VM drivers from the NVIDIA website.
Note: Select 32-bit or 64-bit graphics drivers based on the guest OS type.

52 How to Conf igure a NVIDIA GPU with Citrix XenDesktop 7.6 and v Sphere 6.0 in FlexPod Express
© 2016 NetApp, Inc. All rights reserv ed.
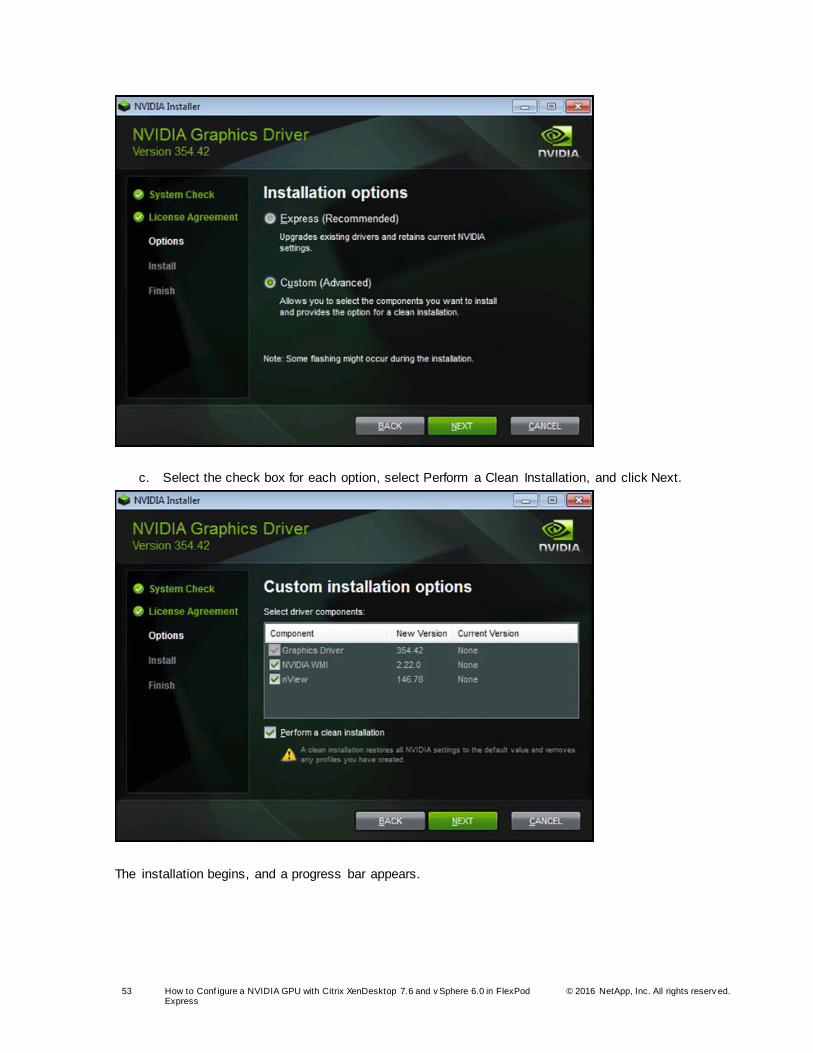
2. Install the drivers.
a. Accept the license terms and agreement and click Next.
b. Select Custom (Advanced) installation and click Next.
53 How to Conf igure a NVIDIA GPU with Citrix XenDesktop 7.6 and v Sphere 6.0 in FlexPod Express
© 2016 NetApp, Inc. All rights reserv ed.
c. Select the check box for each option, select Perform a Clean Installation, and click Next.
The installation begins, and a progress bar appears.
54 How to Conf igure a NVIDIA GPU with Citrix XenDesktop 7.6 and v Sphere 6.0 in FlexPod Express
© 2016 NetApp, Inc. All rights reserv ed.
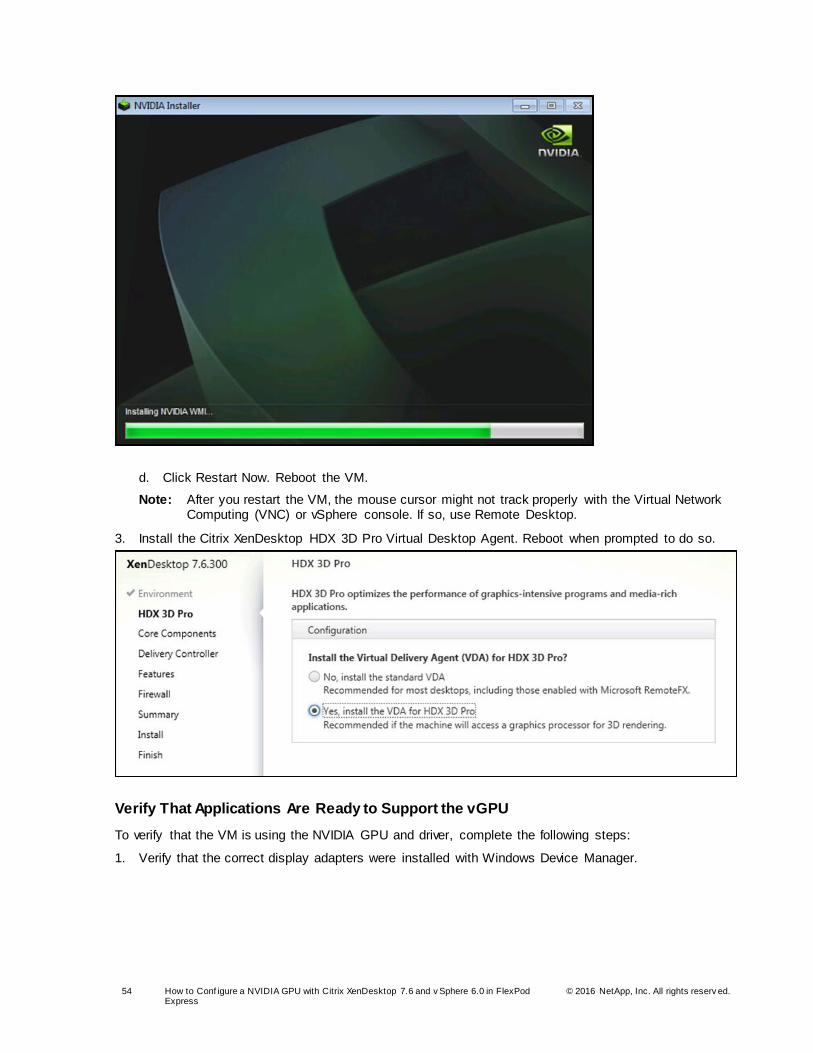
d. Click Restart Now. Reboot the VM.
Note: After you restart the VM, the mouse cursor might not track properly with the Virtual Network Computing (VNC) or vSphere console. If so, use Remote Desktop.
3. Install the Citrix XenDesktop HDX 3D Pro Virtual Desktop Agent. Reboot when prompted to do so.
Verify That Applications Are Ready to Support the vGPU
To verify that the VM is using the NVIDIA GPU and driver, complete the following steps:
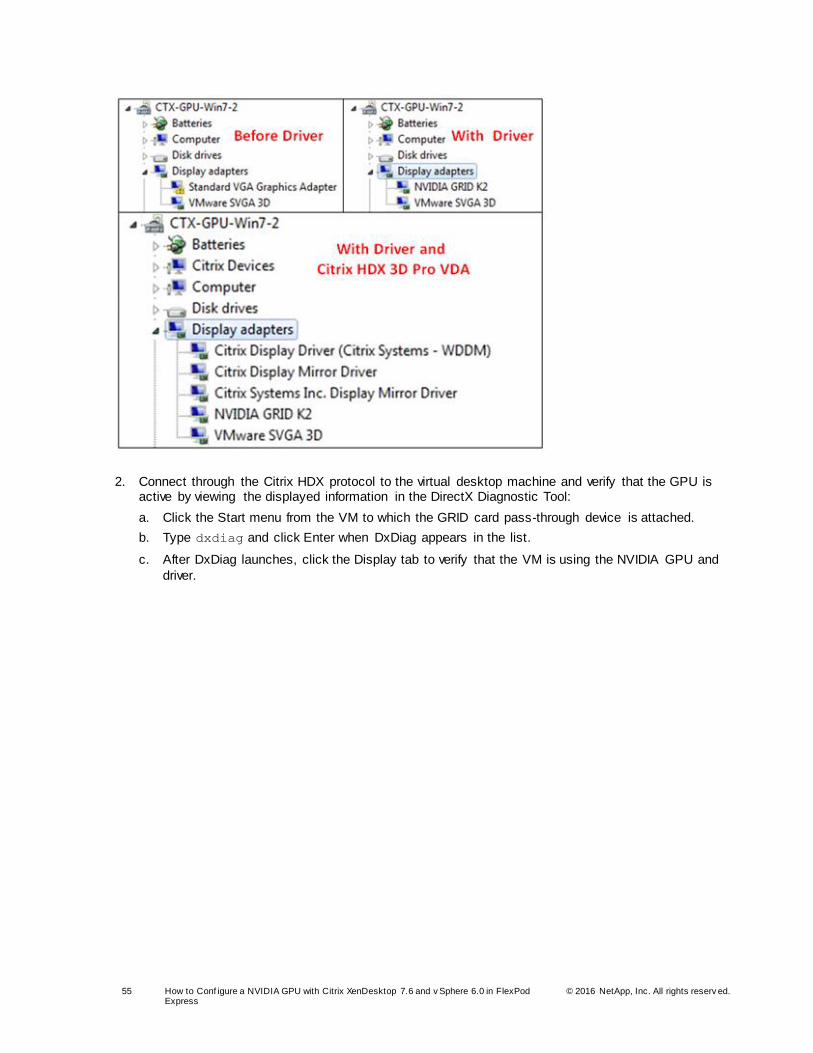
1. Verify that the correct display adapters were installed with Windows Device Manager.
55 How to Conf igure a NVIDIA GPU with Citrix XenDesktop 7.6 and v Sphere 6.0 in FlexPod Express
© 2016 NetApp, Inc. All rights reserv ed.
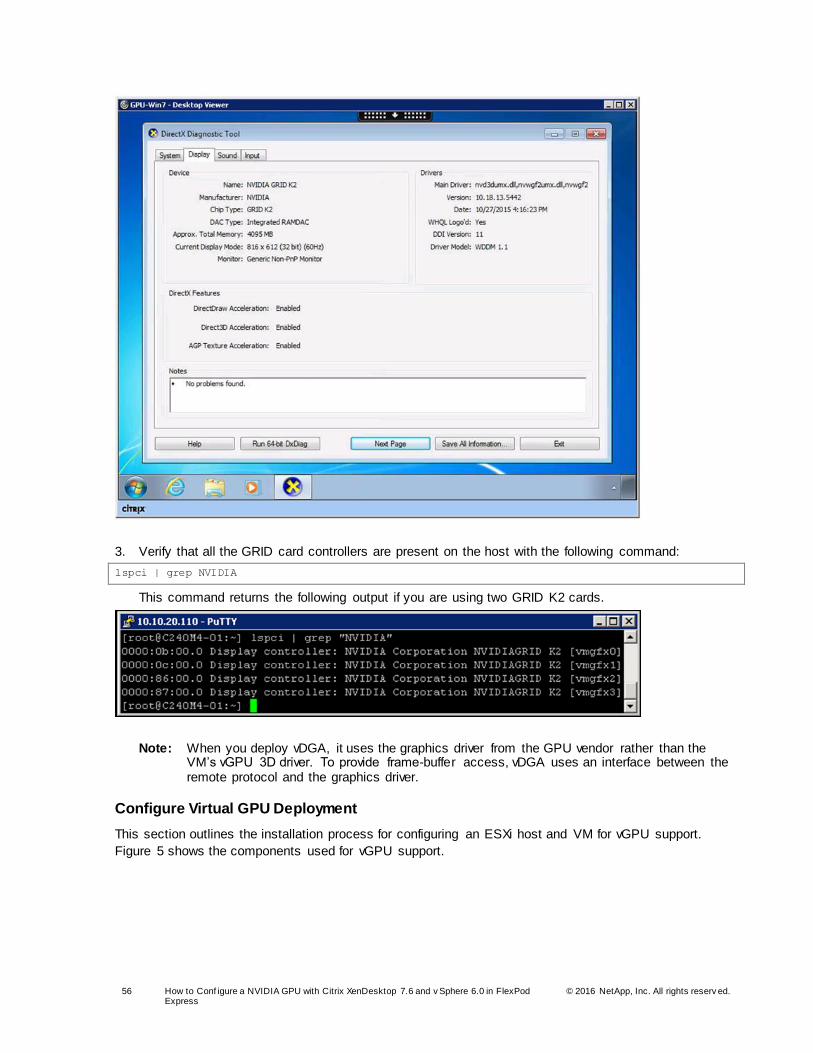
2. Connect through the Citrix HDX protocol to the virtual desktop machine and verify that the GPU is active by viewing the displayed information in the DirectX Diagnostic Tool:
a. Click the Start menu from the VM to which the GRID card pass-through device is attached.
b. Type dxdiag and click Enter when DxDiag appears in the list.
c. After DxDiag launches, click the Display tab to verify that the VM is using the NVIDIA GPU and
driver.
56 How to Conf igure a NVIDIA GPU with Citrix XenDesktop 7.6 and v Sphere 6.0 in FlexPod Express
© 2016 NetApp, Inc. All rights reserv ed.
3. Verify that all the GRID card controllers are present on the host with the following command:
lspci | grep NVIDIA
This command returns the following output if you are using two GRID K2 cards.
Note: When you deploy vDGA, it uses the graphics driver from the GPU vendor rather than the VM’s vGPU 3D driver. To provide frame-buffer access, vDGA uses an interface between the remote protocol and the graphics driver.
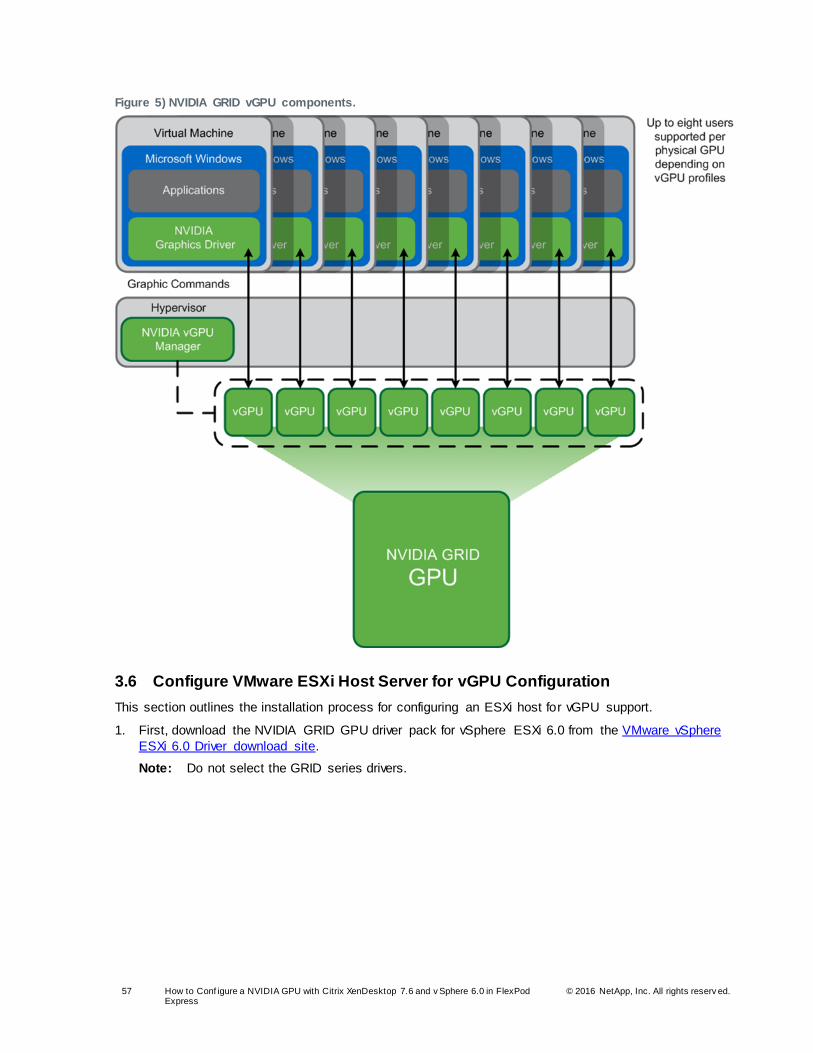
Configure Virtual GPU Deployment
This section outlines the installation process for configuring an ESXi host and VM for vGPU support.
Figure 5 shows the components used for vGPU support.
57 How to Conf igure a NVIDIA GPU with Citrix XenDesktop 7.6 and v Sphere 6.0 in FlexPod Express
© 2016 NetApp, Inc. All rights reserv ed.
Figure 5) NVIDIA GRID vGPU components.
3.6 Configure VMware ESXi Host Server for vGPU Configuration
This section outlines the installation process for configuring an ESXi host for vGPU support.
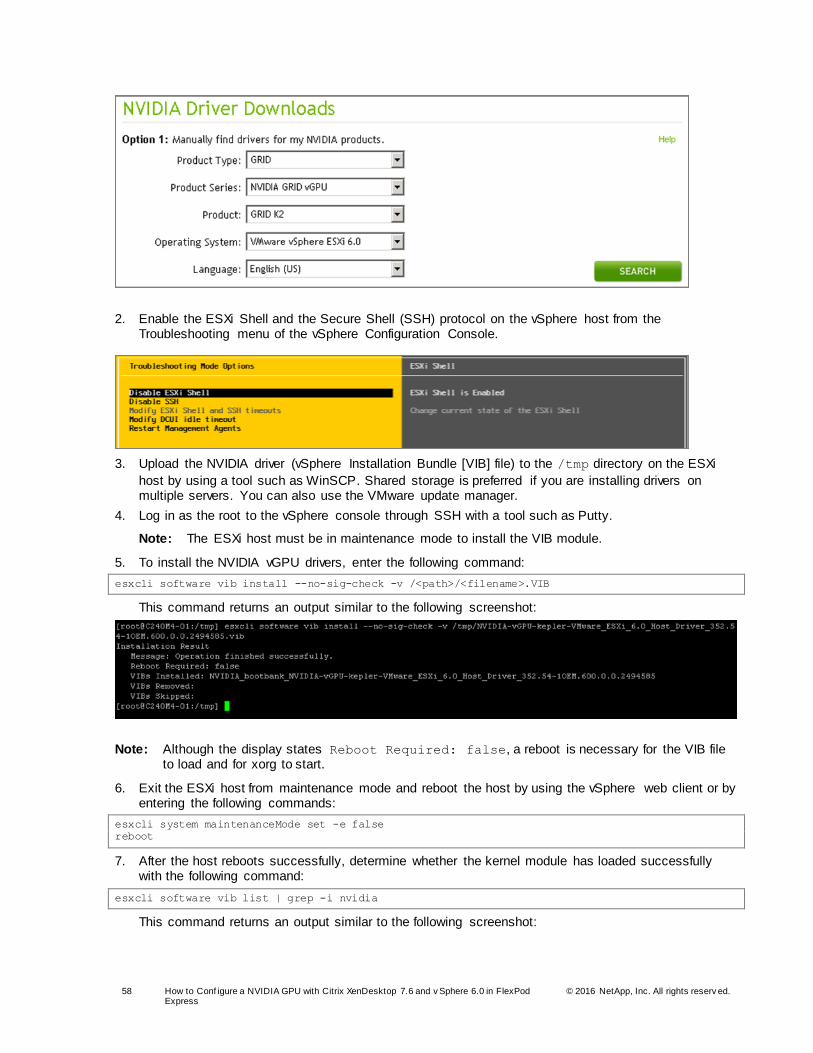
1. First, download the NVIDIA GRID GPU driver pack for vSphere ESXi 6.0 from the VMware vSphere
ESXi 6.0 Driver download site.
Note: Do not select the GRID series drivers.
58 How to Conf igure a NVIDIA GPU with Citrix XenDesktop 7.6 and v Sphere 6.0 in FlexPod Express
© 2016 NetApp, Inc. All rights reserv ed.
2. Enable the ESXi Shell and the Secure Shell (SSH) protocol on the vSphere host from the Troubleshooting menu of the vSphere Configuration Console.
3. Upload the NVIDIA driver (vSphere Installation Bundle [VIB] file) to the /tmp directory on the ESXi
host by using a tool such as WinSCP. Shared storage is preferred if you are installing drivers on multiple servers. You can also use the VMware update manager.
4. Log in as the root to the vSphere console through SSH with a tool such as Putty.
Note: The ESXi host must be in maintenance mode to install the VIB module.
5. To install the NVIDIA vGPU drivers, enter the following command:
esxcli software vib install --no-sig-check -v /<path>/<filename>.VIB
This command returns an output similar to the following screenshot:
Note: Although the display states Reboot Required: false, a reboot is necessary for the VIB file to load and for xorg to start.
6. Exit the ESXi host from maintenance mode and reboot the host by using the vSphere web client or by entering the following commands:
esxcli system maintenanceMode set -e false
reboot
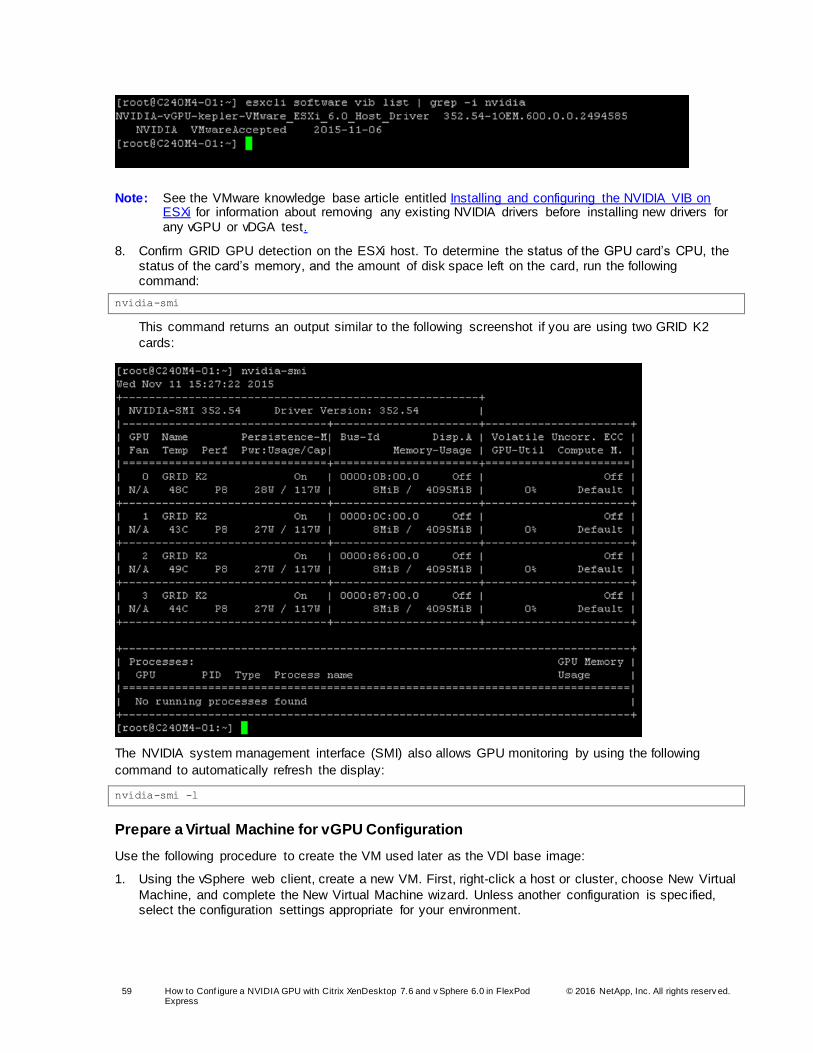
7. After the host reboots successfully, determine whether the kernel module has loaded successfully with the following command:
esxcli software vib list | grep -i nvidia
This command returns an output similar to the following screenshot:
59 How to Conf igure a NVIDIA GPU with Citrix XenDesktop 7.6 and v Sphere 6.0 in FlexPod Express
© 2016 NetApp, Inc. All rights reserv ed.
Note: See the VMware knowledge base article entitled Installing and configuring the NVIDIA VIB on ESXi for information about removing any existing NVIDIA drivers before installing new drivers for any vGPU or vDGA test.
8. Confirm GRID GPU detection on the ESXi host. To determine the status of the GPU card’s CPU, the status of the card’s memory, and the amount of disk space left on the card, run the following command:
nvidia-smi
This command returns an output similar to the following screenshot if you are using two GRID K2
cards:
The NVIDIA system management interface (SMI) also allows GPU monitoring by using the following
command to automatically refresh the display:
nvidia-smi -l
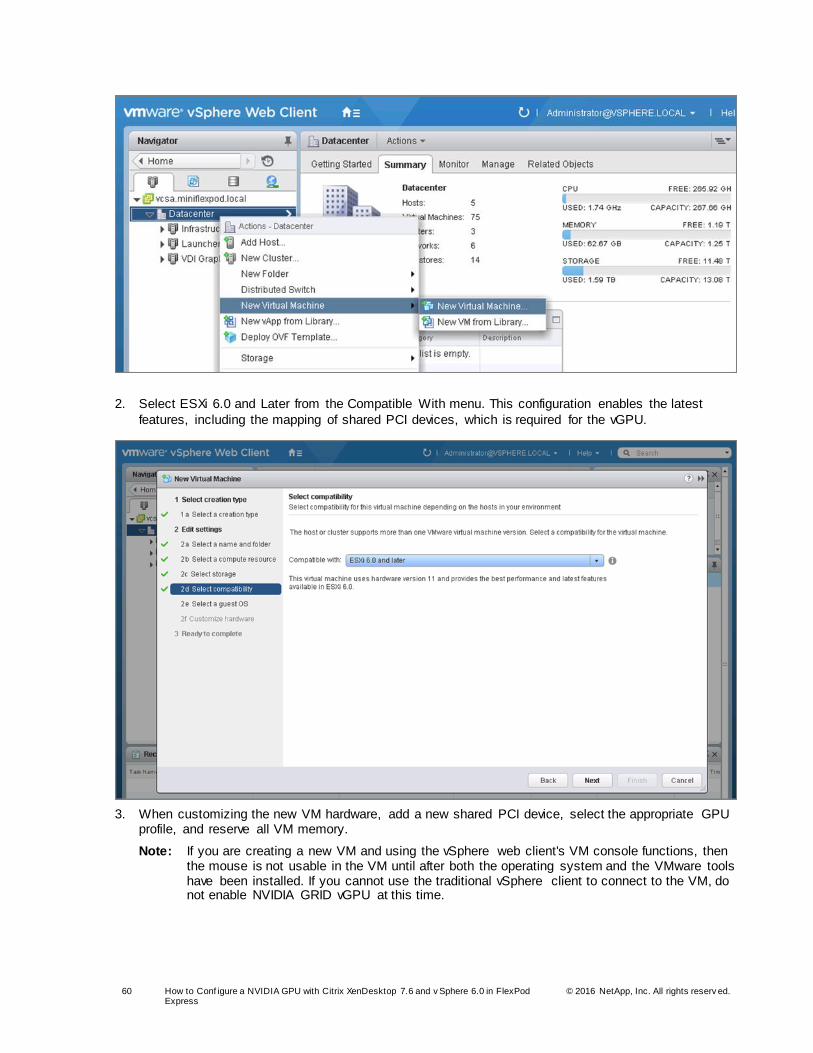
Prepare a Virtual Machine for vGPU Configuration
Use the following procedure to create the VM used later as the VDI base image:
1. Using the vSphere web client, create a new VM. First, right-click a host or cluster, choose New Virtual
Machine, and complete the New Virtual Machine wizard. Unless another configuration is spec ified, select the configuration settings appropriate for your environment.
60 How to Conf igure a NVIDIA GPU with Citrix XenDesktop 7.6 and v Sphere 6.0 in FlexPod Express
© 2016 NetApp, Inc. All rights reserv ed.
2. Select ESXi 6.0 and Later from the Compatible With menu. This configuration enables the latest
features, including the mapping of shared PCI devices, which is required for the vGPU.
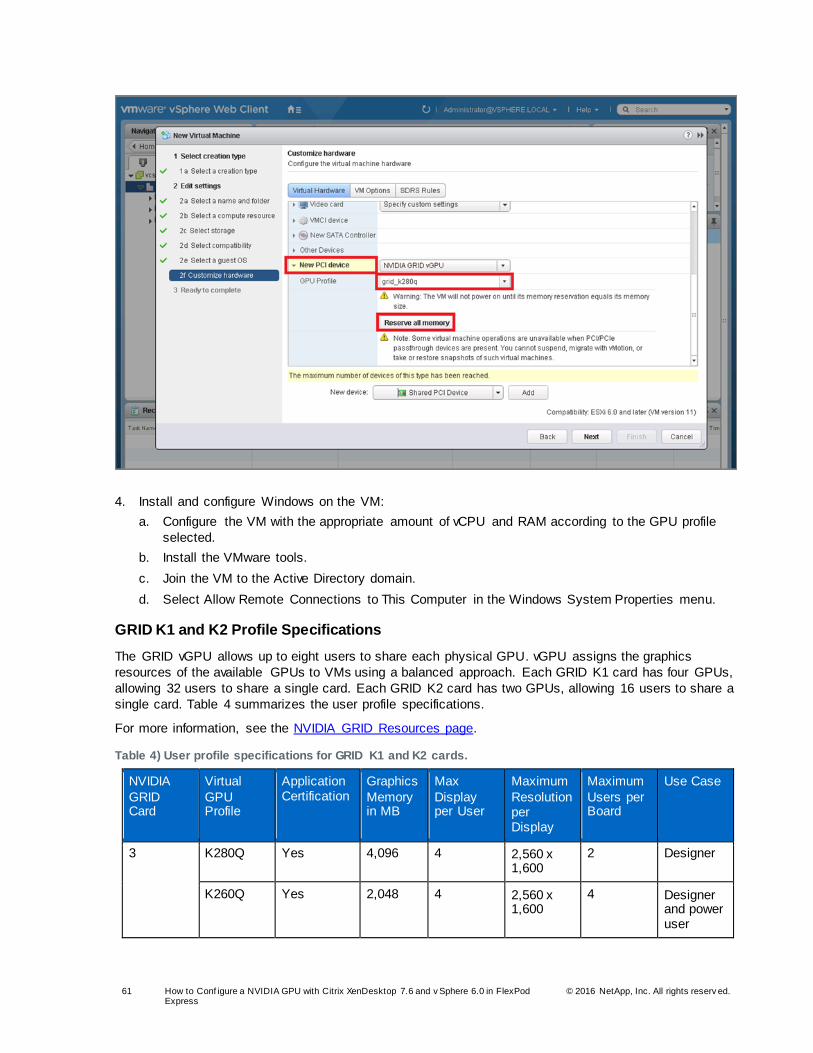
3. When customizing the new VM hardware, add a new shared PCI device, select the appropriate GPU profile, and reserve all VM memory.
Note: If you are creating a new VM and using the vSphere web client's VM console functions, then the mouse is not usable in the VM until after both the operating system and the VMware tools have been installed. If you cannot use the traditional vSphere client to connect to the VM, do not enable NVIDIA GRID vGPU at this time.
61 How to Conf igure a NVIDIA GPU with Citrix XenDesktop 7.6 and v Sphere 6.0 in FlexPod Express
© 2016 NetApp, Inc. All rights reserv ed.
4. Install and configure Windows on the VM:
a. Configure the VM with the appropriate amount of vCPU and RAM according to the GPU profile
selected.
b. Install the VMware tools.
c. Join the VM to the Active Directory domain.
d. Select Allow Remote Connections to This Computer in the Windows System Properties menu.
GRID K1 and K2 Profile Specifications
The GRID vGPU allows up to eight users to share each physical GPU. vGPU assigns the graphics
resources of the available GPUs to VMs using a balanced approach. Each GRID K1 card has four GPUs,
allowing 32 users to share a single card. Each GRID K2 card has two GPUs, allowing 16 users to share a
single card. Table 4 summarizes the user profile specifications.
For more information, see the NVIDIA GRID Resources page.
Table 4) User profile specifications for GRID K1 and K2 cards.
NVIDIA
GRID Card
Virtual
GPU Profile
Application Certification
Graphics
Memory in MB
Max
Display per User
Maximum
Resolution per Display
Maximum
Users per Board
Use Case
3 K280Q Yes 4,096 4 2,560 x 1,600
2 Designer
K260Q Yes 2,048 4 2,560 x 1,600
4 Designer and power user
62 How to Conf igure a NVIDIA GPU with Citrix XenDesktop 7.6 and v Sphere 6.0 in FlexPod Express
© 2016 NetApp, Inc. All rights reserv ed.
NVIDIA
GRID Card
Virtual
GPU Profile
Application Certification
Graphics
Memory in MB
Max
Display per User
Maximum
Resolution per Display
Maximum
Users per Board
Use Case
K240Q Yes 1,024 2 2,560 x 1,600
8 Designer and power user
K220Q Yes 512 2 2,560 x 1,600
16 Power user
GRID K1 K180Q Yes 4,096 4 2,560 x 1,600
4 Power user
K160Q Yes 2,048 4 2,560 x 1,600
8 Power user
K140Q Yes 1,024 2 2,560 x 1,600
16 Knowledge worker
K120Q Yes 512 2 2,560 x 1,600
32 Knowledge worker
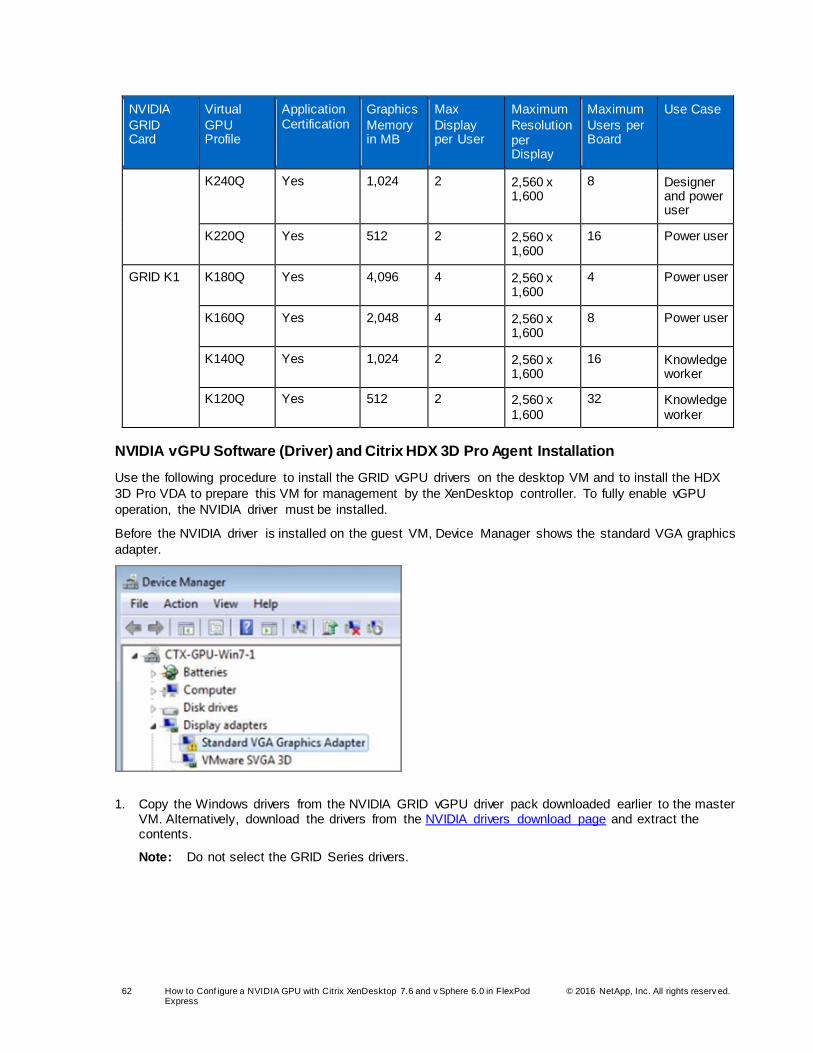
NVIDIA vGPU Software (Driver) and Citrix HDX 3D Pro Agent Installation
Use the following procedure to install the GRID vGPU drivers on the desktop VM and to install the HDX
3D Pro VDA to prepare this VM for management by the XenDesktop controller. To fully enable vGPU
operation, the NVIDIA driver must be installed.
Before the NVIDIA driver is installed on the guest VM, Device Manager shows the standard VGA graphics
adapter.
1. Copy the Windows drivers from the NVIDIA GRID vGPU driver pack downloaded earlier to the master VM. Alternatively, download the drivers from the NVIDIA drivers download page and extract the contents.
Note: Do not select the GRID Series drivers.
63 How to Conf igure a NVIDIA GPU with Citrix XenDesktop 7.6 and v Sphere 6.0 in FlexPod Express
© 2016 NetApp, Inc. All rights reserv ed.
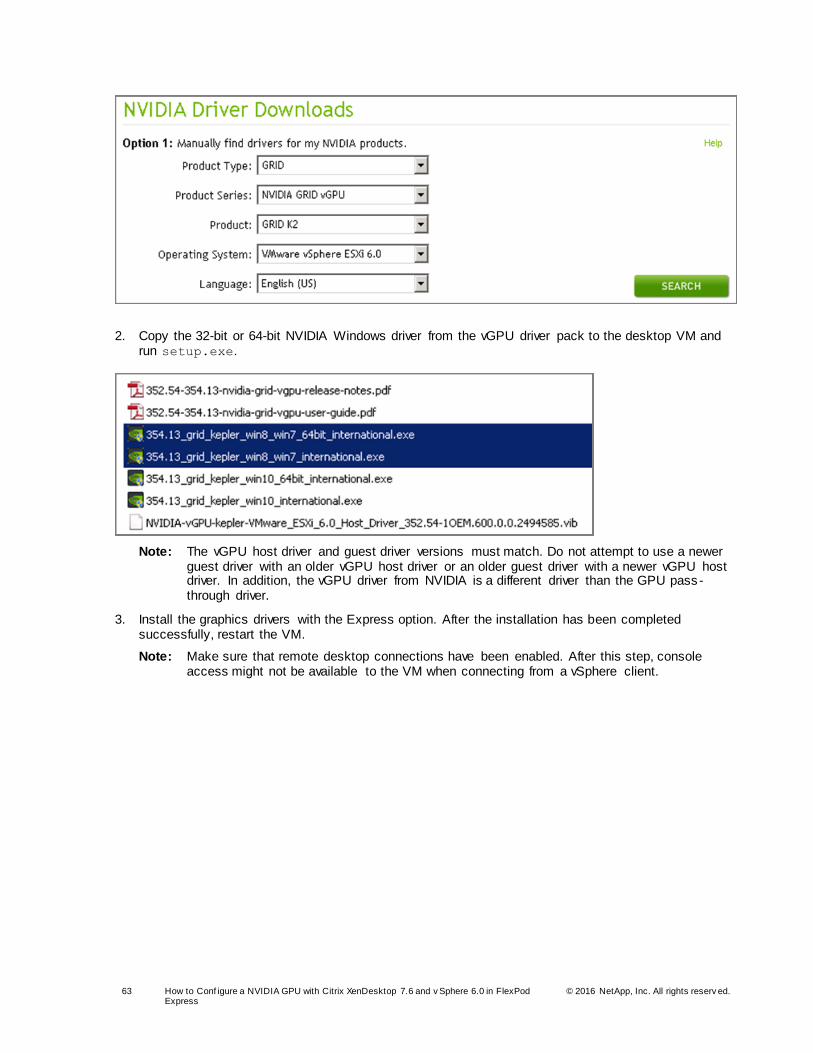
2. Copy the 32-bit or 64-bit NVIDIA Windows driver from the vGPU driver pack to the desktop VM and run setup.exe.
Note: The vGPU host driver and guest driver versions must match. Do not attempt to use a newer guest driver with an older vGPU host driver or an older guest driver with a newer vGPU host driver. In addition, the vGPU driver from NVIDIA is a different driver than the GPU pass -through driver.
3. Install the graphics drivers with the Express option. After the installation has been completed successfully, restart the VM.
Note: Make sure that remote desktop connections have been enabled. After this step, console access might not be available to the VM when connecting from a vSphere client.
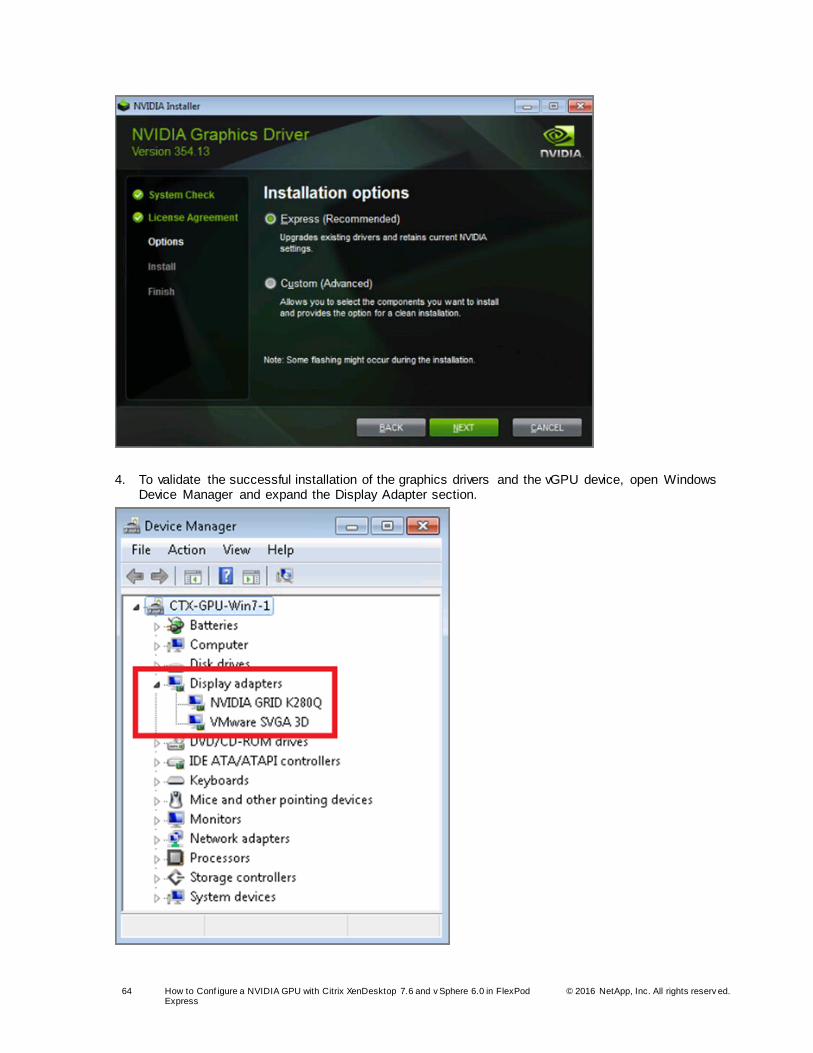
64 How to Conf igure a NVIDIA GPU with Citrix XenDesktop 7.6 and v Sphere 6.0 in FlexPod Express
© 2016 NetApp, Inc. All rights reserv ed.
4. To validate the successful installation of the graphics drivers and the vGPU device, open Windows Device Manager and expand the Display Adapter section.
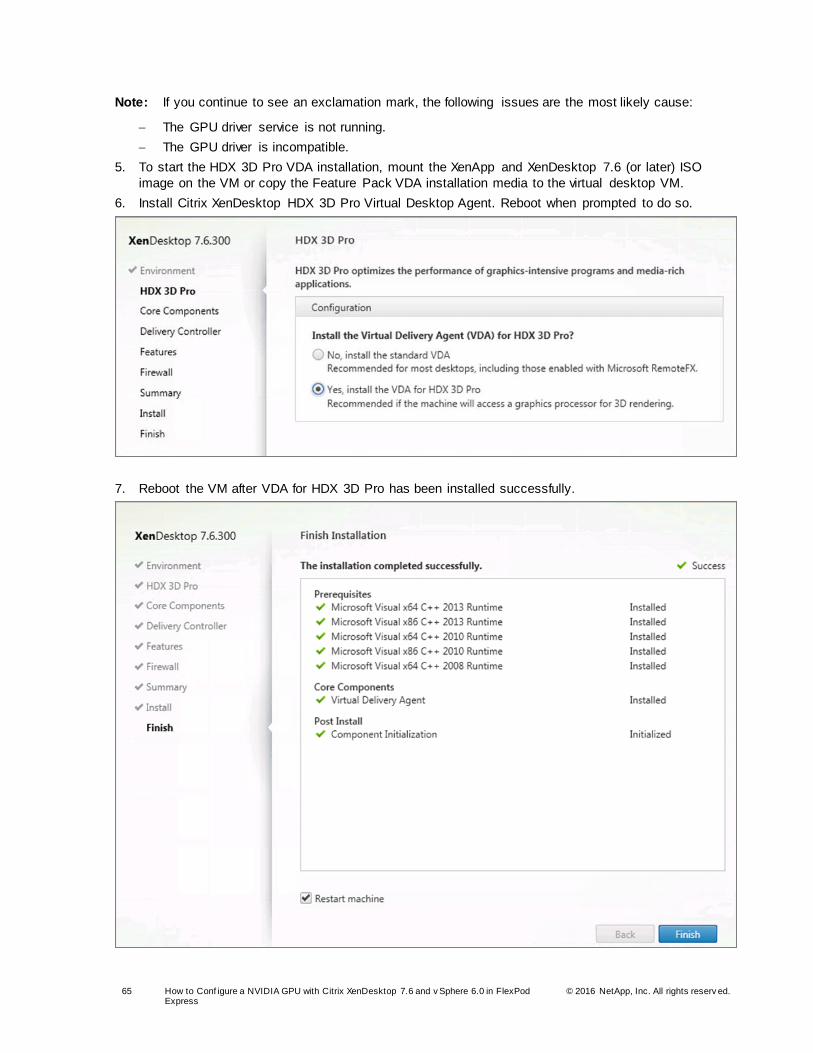
65 How to Conf igure a NVIDIA GPU with Citrix XenDesktop 7.6 and v Sphere 6.0 in FlexPod Express
© 2016 NetApp, Inc. All rights reserv ed.
Note: If you continue to see an exclamation mark, the following issues are the most likely cause:
The GPU driver service is not running.
The GPU driver is incompatible.
5. To start the HDX 3D Pro VDA installation, mount the XenApp and XenDesktop 7.6 (or later) ISO
image on the VM or copy the Feature Pack VDA installation media to the virtual desktop VM.
6. Install Citrix XenDesktop HDX 3D Pro Virtual Desktop Agent. Reboot when prompted to do so.
7. Reboot the VM after VDA for HDX 3D Pro has been installed successfully.
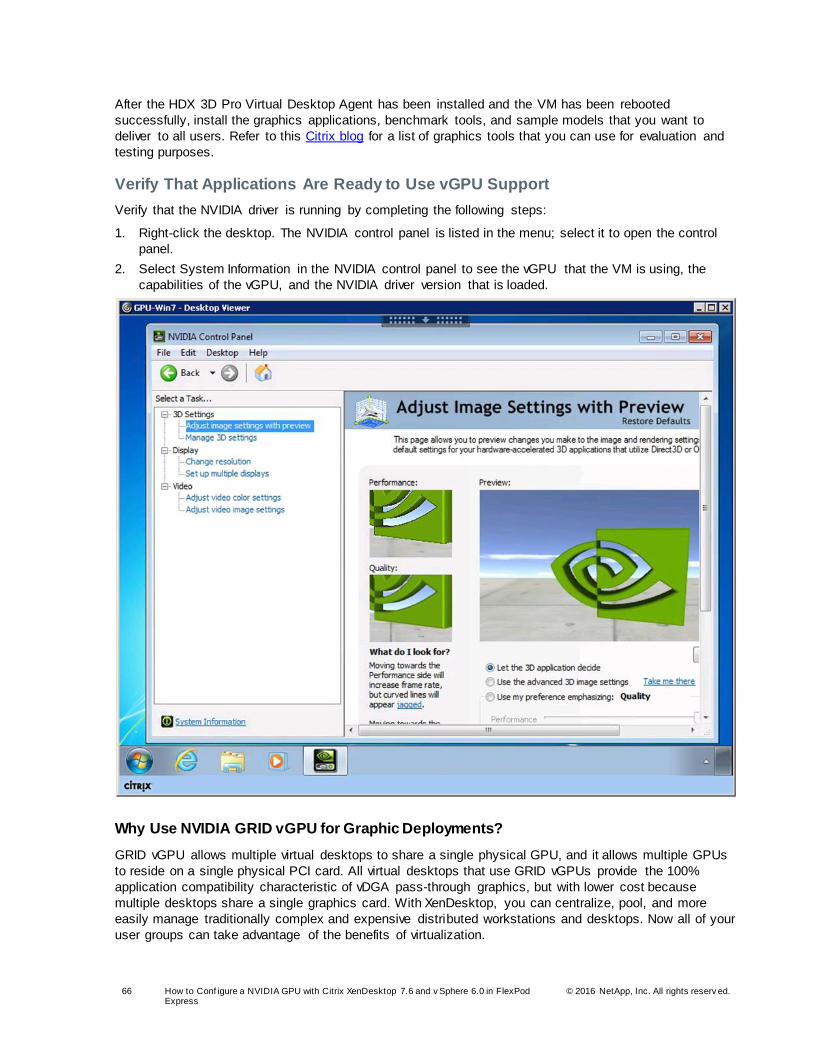
66 How to Conf igure a NVIDIA GPU with Citrix XenDesktop 7.6 and v Sphere 6.0 in FlexPod Express
© 2016 NetApp, Inc. All rights reserv ed.
After the HDX 3D Pro Virtual Desktop Agent has been installed and the VM has been rebooted
successfully, install the graphics applications, benchmark tools, and sample models that you want to
deliver to all users. Refer to this Citrix blog for a list of graphics tools that you can use for evaluation and
testing purposes.
Verify That Applications Are Ready to Use vGPU Support
Verify that the NVIDIA driver is running by completing the following steps:
1. Right-click the desktop. The NVIDIA control panel is listed in the menu; select it to open the control
panel.
2. Select System Information in the NVIDIA control panel to see the vGPU that the VM is using, the
capabilities of the vGPU, and the NVIDIA driver version that is loaded.
Why Use NVIDIA GRID vGPU for Graphic Deployments?
GRID vGPU allows multiple virtual desktops to share a single physical GPU, and it allows multiple GPUs
to reside on a single physical PCI card. All virtual desktops that use GRID vGPUs provide the 100%
application compatibility characteristic of vDGA pass-through graphics, but with lower cost because
multiple desktops share a single graphics card. With XenDesktop, you can centralize, pool, and more
easily manage traditionally complex and expensive distributed workstations and desktops. Now all of your
user groups can take advantage of the benefits of virtualization.
67 How to Conf igure a NVIDIA GPU with Citrix XenDesktop 7.6 and v Sphere 6.0 in FlexPod Express
© 2016 NetApp, Inc. All rights reserv ed.
The GRID vGPU brings the full benefits of NVIDIA hardware-accelerated graphics to virtualized solutions.
This technology provides exceptional graphics performance for virtual desktops equivalent to local PCs
that share a GPU among multiple users.
GRID vGPU is the industry's most advanced technology for sharing true GPU hardware acceleration
among multiple virtual desktops without compromising the graphics experience. Application features and
compatibility are exactly the same as they would be at the user's desk.
With GRID vGPU technology, the graphics commands of each VM are passed directly to the GPU,
without translation by the hypervisor. By allowing multiple VMs to access the power of a single GPU in the
virtualization server, enterprises can increase the number of users with access to true GPU-based
graphics acceleration on VMs.
The physical GPU in the server can be configured with a specific vGPU profile. Organizations have a
great deal of flexibility in how to best configure their servers to meet the needs of the various types of end
users. vGPU support allows businesses to use the power of the NVIDIA GRID technology to create a
whole new class of VMs designed to provide end users with a rich, interactive graphics experience.
In any given enterprise, the needs of individual users vary widely. One of the main benefits of GRID
vGPU is the flexibility to use various vGPU profiles designed to serve the needs of different classes of
end users. Although the needs of end users can be diverse, for simplicity , users can be grouped into the
following categories: knowledge workers, designers, and power users.
Knowledge workers typically require office productivity applications, a robust web experience, and fluid
video playback. Knowledge workers have the least-intensive graphics demands, but they expect the
same smooth, fluid experience that exists natively on today’s graphics -accelerated devices such as
desktop PCs, notebooks, tablets, and smartphones.
Power users typically run more demanding office applications, such as office productivity software, image-
editing software such as Adobe Photoshop, mainstream CAD software such as Autodesk AutoCAD, and
product lifecycle management applications. These applications are more demanding and require
additional graphics resources with full support for APIs such as OpenGL and Direct3D.
Designers typically run demanding professional applications such as high-end CAD software and
professional digital content creation (DCC) tools. Examples include Autodesk Inventor, PTC Creo,
Autodesk Revit, and Adobe Premiere. Historically, designers have used desktop workstations and have
been a difficult group to incorporate into virtual deployments because of their need for high-end graphics
and the certification requirements of professional CAD and DCC software.
vGPU profiles allow the GPU hardware to be time-sliced to deliver exceptional shared virtualized graphics
performance.
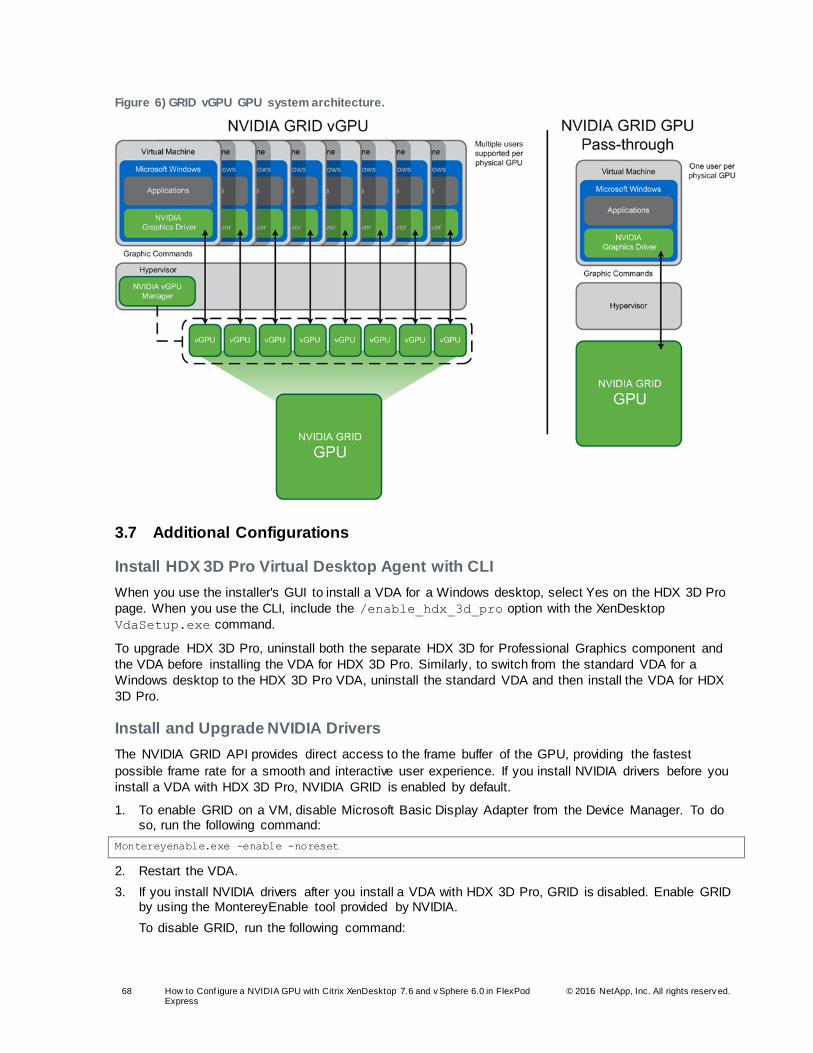
68 How to Conf igure a NVIDIA GPU with Citrix XenDesktop 7.6 and v Sphere 6.0 in FlexPod Express
© 2016 NetApp, Inc. All rights reserv ed.
Figure 6) GRID vGPU GPU system architecture.
3.7 Additional Configurations
Install HDX 3D Pro Virtual Desktop Agent with CLI
When you use the installer's GUI to install a VDA for a Windows desktop, select Yes on the HDX 3D Pro
page. When you use the CLI, include the /enable_hdx_3d_pro option with the XenDesktop
VdaSetup.exe command.
To upgrade HDX 3D Pro, uninstall both the separate HDX 3D for Professional Graphics component and
the VDA before installing the VDA for HDX 3D Pro. Similarly, to switch from the standard VDA for a
Windows desktop to the HDX 3D Pro VDA, uninstall the standard VDA and then install the VDA for HDX
3D Pro.
Install and Upgrade NVIDIA Drivers
The NVIDIA GRID API provides direct access to the frame buffer of the GPU, providing the fastest
possible frame rate for a smooth and interactive user experience. If you install NVIDIA drivers before you
install a VDA with HDX 3D Pro, NVIDIA GRID is enabled by default.
1. To enable GRID on a VM, disable Microsoft Basic Display Adapter from the Device Manager. To do so, run the following command:
Montereyenable.exe -enable -noreset
2. Restart the VDA.
3. If you install NVIDIA drivers after you install a VDA with HDX 3D Pro, GRID is disabled. Enable GRID by using the MontereyEnable tool provided by NVIDIA.
To disable GRID, run the following command:
69 How to Conf igure a NVIDIA GPU with Citrix XenDesktop 7.6 and v Sphere 6.0 in FlexPod Express
© 2016 NetApp, Inc. All rights reserv ed.
Montereyenable.exe -disable –noreset
4. Restart the VDA.
HDX Monitor
Use the HDX Monitor tool (which replaces the Health Check tool) to validate the operation and
configuration of HDX visualization technology and to diagnose and troubleshoot HDX problems. To
download the tool and learn more about it, see the Citrix HDX Monitor download page.
Optimize the HDX 3D Pro User Experience
To use HDX 3D Pro with multiple monitors, be sure that the host computer is configured with at least as
many monitors as there are monitors attached to user devices. The monitors attached to the host
computer can be either physical or virtual.
Do not attach a monitor (either physical or virtual) to a host computer while a user is connected to the
virtual desktop or any application providing the graphical application. Doing so can cause instability for
the duration of a user's session.
Let your users know that changes to the desktop resolution (by them or an application) are not supported
when a graphical application session is running. After closing the application session, a user can change
the resolution of the desktop viewer window in the Citrix Receiver Desktop Viewer preferences.
When multiple users share a connection with limited bandwidth (for example, at a branch office), Citrix
recommends that you use the overall session bandwidth limit policy setting to limit the bandwidth
available to each user. This setting helps make sure that the available bandwidth does not fluctuate
widely as users log on and off. Because HDX 3D Pro automatically adjusts to make use of all the
available bandwidth, large variations in the available bandwidth over the course of user ses sions can
negatively affect performance.
For example, if 20 users share a 60Mbps connection, the bandwidth available to each user can vary
between 3Mbps and 60Mbps, depending on the number of concurrent users. To optimize the user
experience in this scenario, determine the bandwidth required per user at peak periods and limit users to
this amount at all times.
For users of a 3D mouse, Citrix recommends that you increase the priority of the generic USB redirection
virtual channel to 0. For information about changing the virtual channel priority, see Change Virtual
Channel Priority in XenDesktop (CTX128190).
GPU Acceleration for Windows Server OS: DirectX, Direct3D, and WPF Rendering
DirectX, Direct3D, and WPF rendering is available only on servers with a GPU that supports display driver
interface version 9ex, 10, or 11:
Windows Server 2008 R2, DirectX, and Direct3D require no special settings to use a single GPU.
For Windows Server 2012, Remote Desktop Services (RDS) sessions on the remote desktop session host server use the Microsoft Basic Render driver as the default adapter. To use the GPU in RDS sessions on Windows Server 2012, select Use the Hardware Default Graphics Adapter for All Remote Desktop Services Sessions in the group policy by selecting Local Computer Policy > Computer
Configuration > Administrative Templates > Windows Components > Remote Desktop Services > Remote Desktop Session Host > Remote Session Environment.
On Windows Server 2008 R2 and Windows Server 2012, all DirectX and Direct3D applications
running in all sessions use the same single GPU by default. To enable experimental support for distributing user sessions across all eligible GPUs for DirectX and Direct3D applications, create the following settings in the registry of the server running Windows Server sessions:
[HKEY_LOCAL_MACHINE\SOFTWARE\Citrix\CtxHook\AppInit_Dlls\Graphics Helper]
"DirectX"=dword:00000001
70 How to Conf igure a NVIDIA GPU with Citrix XenDesktop 7.6 and v Sphere 6.0 in FlexPod Express
© 2016 NetApp, Inc. All rights reserv ed.
[HKEY_LOCAL_MACHINE\SOFTWARE\Wow6432Node\Citrix\CtxHook\AppInit_Dlls\Graphics Helper] "DirectX"=dword:00000001
To enable rendering by WPF applications by using the server's GPU, create the following settings in the registry of the server running Windows Server sessions:
[HKEY_LOCAL_MACHINE\SOFTWARE\Citrix\CtxHook\AppInit_Dlls\Multiple Monitor Hook]
"EnableWPFHook"=dword:00000001
[HKEY_LOCAL_MACHINE\SOFTWARE\Wow6432Node\Citrix\CtxHook\AppInit_Dlls\Multiple Monitor Hook] "EnableWPFHook"=dword:00000001
GPU Acceleration for Windows Server OS: Experimental GPU Acceleration for
CUDA or OpenCL Applications
Experimental support is provided for GPU acceleration of CUDA and OpenCL applications running in a
user session. This support is disabled by default, but you can enable it for testing and evaluation
purposes.
To use the experimental CUDA acceleration features, enable the following registry settings:
[HKEY_LOCAL_MACHINE\SOFTWARE\Citrix\CtxHook\AppInit_Dlls\Graphics Helper] "CUDA"=dword:00000001
[HKEY_LOCAL_MACHINE\SOFTWARE\Wow6432Node\Citrix\CtxHook\AppInit_Dlls\Graphics Helper] "CUDA"=dword:00000001
To use the experimental OpenCL acceleration features, enable the following registry settings:
[HKEY_LOCAL_MACHINE\SOFTWARE\Citrix\CtxHook\AppInit_Dlls\Graphics Helper] "OpenCL"=dword:00000001
[HKEY_LOCAL_MACHINE\SOFTWARE\Wow6432Node\Citrix\CtxHook\AppInit_Dlls\Graphics Helper] "OpenCL"=dword:00000001
OpenGL Software Accelerator
The OpenGL Software Accelerator is a software rasterizer for OpenGL applications such as ArcGIS,
Google Earth, Nehe, Maya, Blender, Voxler, CAD, and CAM. In some cases, the OpenGL Software
Accelerator can eliminate the need to use graphics cards to deliver a good user experience with OpenGL
applications.
Note: The OpenGL Software Accelerator is provided as is and must be tested with all applications. It might not work with some applications and should be tried if the Windows OpenGL rasterizer does not provide adequate performance. If the OpenGL Software Accelerator works with your applications, it can be used to avoid the cost of GPU hardware.
The OpenGL Software Accelerator is provided in the support folder on the installation media and is
supported on all valid VDA platforms.
Try the OpenGL Software Accelerator in the following cases:
If the performance of OpenGL applications running in VMs is a concern, try the OpenGL accelerator. For some applications, the accelerator outperforms the Microsoft OpenGL software rasterizer that is
included with Windows because the OpenGL accelerator uses SSE4.1 and AVX. The OpenGL accelerator also supports applications using OpenGL up to version 2.1.
For applications running on a workstation, first try the default version of OpenGL support provided by the workstation's graphics adapter. If the graphics card is the latest version, it should deliver the best
performance in most situations. If the graphics card is an earlier version or does not deliver satisfactory performance, try the OpenGL Software Accelerator.
3D OpenGL applications that are not adequately delivered using CPU-based software rasterization
might benefit from OpenGL GPU hardware acceleration. This feature can be used on bare-metal devices or VMs.
71 How to Conf igure a NVIDIA GPU with Citrix XenDesktop 7.6 and v Sphere 6.0 in FlexPod Express
© 2016 NetApp, Inc. All rights reserv ed.
4 Conclusion
The combination of Cisco UCS Manager, Cisco UCS C240 M4 rack servers, NVIDIA GRID K1 and K2 or
Tesla cards using VMware vSphere ESXi 6.0, and Citrix XenDesktop 7.6 provides a high-performance
platform for virtualizing graphics-intensive applications.
NetApp FAS provides high performance for the processing of graphics files on CIFS shares and the VDI
environment for shared storage. The combination of both Cisco and NetApp in a FlexPod Express
converged infrastructure provides excellent performance for GPU users. With the guidance in this
document, our customers and partners are ready to host a growing list of graphics applications.
The following key findings were observed during the reference architecture configuration:
Use the drivers prescribed in this document for NVIDIA configuration.
Use NetApp storage for the VDI write cache and infrastructure environment.
The use of Flash Pool storage caching is very beneficial.
Use NetApp CIFS for the Citrix PVS vDisks, user profile management profiles, and home directories.
NetApp CIFS provides very high performance for processing large video graphics data workloads.
References
This section lists the resources we used to build out the lab environment.
Cisco UCS C-Series Rack Servers
Cisco Servers: Unified Computing http://www.cisco.com/en/US/products/ps10265/
Cisco UCS C240 M4 Rack Server http://www.cisco.com/c/en/us/products/servers-unified-computing/ucs-c240-m4-rack-
server/index.html
Cisco UCS Virtual Interface Card 1227 http://www.cisco.com/c/en/us/products/interfaces-modules/ucs-virtual-interface-card-1227/index.html
Cisco UCS C-Series Rack Servers http://www.cisco.com/c/en/us/products/servers-unified-computing/ucs-c-series-rack-servers/index.html
NVIDIA
GRID vGPU Deployment Guide http://www.nvidia.com/object/grid-citrix-deployment-guide.html
NVIDIA GRID Resources http://www.nvidia.com/object/grid-enterprise-resources.html#deploymentguides
NVIDIA GRID K1 and K2 Graphics-Accelerated Virtual Desktops and Applications http://www.nvidia.com/content/cloud-computing/pdf/nvidia-grid-datasheet-k1-k2.pdf
Tesla Kepler GPU Accelerators http://www.cisco.com/c/dam/en/us/products/collateral/servers-unified-computing/ucs-b-series -blade-
servers/tesla_kseries_overview_lr.pdf
NVIDIA GRID K1 Graphics Board Specifications http://www.nvidia.com/content/grid/pdf/GRID_K1_BD-06633-001_v02.pdf
NVIDIA GRID K1 Graphics Board Specifications http://www.nvidia.com/content/grid/pdf/GRID_K2_BD-06580-001_v02.pdf
72 How to Conf igure a NVIDIA GPU with Citrix XenDesktop 7.6 and v Sphere 6.0 in FlexPod Express
© 2016 NetApp, Inc. All rights reserv ed.
Citrix XenApp/XenDesktop 7.6
FlexCast Services: Virtualize 3D Professional Graphics | Design Guide https://www.citrix.com/content/dam/citrix/en_us/documents/products -solutions/virtualize-3d-
professional-graphics-design-guide.pdf
Citrix HDX System Requirements http://docs.citrix.com/en-us/xenapp-and-xendesktop/7/cds-deliver-landing/hdx-enhance-ux-xd/hdx-
sys-reqs.html
Citrix GPU Acceleration for Windows Desktop OS http://docs.citrix.com/en-us/xenapp-and-xendesktop/7-6/xad-hdx-landing/xad-hdx3dpro-gpu-accel-desktop.html
Citrix GPU Acceleration for Windows Server OS http://docs.citrix.com/en-us/xenapp-and-xendesktop/7-6/xad-hdx-landing/xad-hdx3dpro-gpu-accel-server.html
Citrix OpenGL Software Accelerator http://docs.citrix.com/en-us/xenapp-and-xendesktop/7-6/xad-hdx-landing/xad-hdx-opengl-sw-accel.html
Reviewer’s Guide for HDX 3D Pro https://www.citrix.com/content/dam/citrix/en_us/documents/products -solutions/reviewers-guide-for-hdx-3d-pro.pdf
Reviewer’s Guide for Remote 3D Graphics Apps
https://www.citrix.com/content/dam/citrix/en_us/documents/go/reviewers -guide-remote-3d-graphics-apps-part-2-vsphere-gpu-passthrough.pdf
Citrix HDX 3D Pro
http://docs.citrix.com/en-us/xenapp-and-xendesktop/7-6/xad-hdx-landing/xad-hdx3dpro-intro.html
Citrix XenApp and XenDesktop 7.6 what’s new http://support.citrix.com/proddocs/topic/xenapp-xendesktop-76/xad-whats-new.html
Citrix XenApp and XenDesktop 7.6 architecture
http://support.citrix.com/proddocs/topic/xenapp-xendesktop-76/xad-architecture-article.html
Citrix Virtual Desktop Handbook 7.x http://support.citrix.com/article/CTX139331
Citrix XenDesktop 7.x Blueprint http://support.citrix.com/article/CTX138981
Citrix HDX blog http://blogs.citrix.com/2014/08/13/citrix-hdx-the-big-list-of-graphical-benchmarks-tools-and-demos/
NetApp Storage and Storage Interconnect Switches
NetApp FAS2500 Series Technical Specifications http://www.netapp.com/us/products/storage-systems/fas2500/ fas2500-tech-specs.aspx
Clustered Data ONTAP High-Availability Configuration Guide
https://library.netapp.com/ecmdocs/ECMP1367947/html/index.html
Clustered Data ONTAP Network Management Guide https://library.netapp.com/ecmdocs/ECMP1401193/html/index.html
Clustered Data ONTAP Software Setup Guide
https://library.netapp.com/ecmdocs/ECMP1368696/html/index.html
TR-4070: Flash Pool Design and Implementation Guide http://www.netapp.com/us/system/pdf-reader.aspx?pdfuri=tcm:10-60637-16&m=tr-4070.pdf
TR-4182: Ethernet Storage Design Considerations and Best Practices for Clustered Data ONTAP Configurations http://www.netapp.com/us/media/tr-4182.pdf
73 How to Conf igure a NVIDIA GPU with Citrix XenDesktop 7.6 and v Sphere 6.0 in FlexPod Express
© 2016 NetApp, Inc. All rights reserv ed.
TR-4138: Design Guide for Citrix XenDesktop on NetApp Storage http://www.netapp.com/us/system/pdf-reader.aspx?pdfuri=tcm:10-108557-16&m=tr-4138.pdf
TR-4191: Best Practice Guide for Clustered Data ONTAP 8.2 and 8.3 Windows File Services http://www.netapp.com/us/system/pdf-reader.aspx?pdfuri=tcm:10-111337-16&m=tr-4191.pdf
Recognition
Authors
Chris Rodriguez, Senior Technical Marketing Engineer, NetApp, Inc. Chris Rodriguez (C-Rod) is a
senior technical marketing engineer (TME) at NetApp who has been involved with VDI since the late
1990s. Prior to Chris’s TME role, he worked as a NetApp Professional Services consultant and
implemented NetApp storage in VDI environments. He has 15 years of enterprise storage experience and
has architected, designed, and implemented storage for many enterprise customers. Currently, Chris
works for the Converged Infrastructure team at NetApp, where he conducts reference architectures with
XenDesktop, VMware on NetApp storage, and FlexPod.
Frank Anderson, Senior Solutions Architect, Cisco Systems, Inc. Frank Anderson is a senior
solutions architect at Cisco Systems with 20 years of experience working in the technology industry. Of
those, 17 have been focused on Citrix products at various Fortune 500 companies (ranging from
healthcare to entertainment, electrical utilities, and technology). Throughout his career, he has held
various roles ranging from server administration to consulting, sales engineer, technical marketing
manager, strategic alliances director, and solutions architect , to name just a few. His current role at Cisco
is focused on building Virtual Desktop and application solutions. His responsibilities include solutions
validation, strategic alliances support, technical content creation, and performance testing and
benchmarking.
Acknowledgements
The authors would like to thank the following people:
Rachel Berry, Mayunk Jain, and Pushpal Ray from Citrix Systems, Inc.
Mike Brennan from Cisco Systems, Inc.
Brian Casper, NetApp Technical Marketing Engineer
Fred Devoir, Jeff Weiss, and Luke Wignall from NVIDIA, Inc.
Abhinav Joshi, NetApp VDI Product Manager
Troy Magnum, NetApp Cloud Convergence Infrastructure (CCI) Manager
74 How to Conf igure a NVIDIA GPU with Citrix XenDesktop 7.6 and v Sphere 6.0 in FlexPod Express
© 2016 NetApp, Inc. All rights reserv ed.
Refer to the Interoperability Matrix Tool (IMT) on the NetApp Support site to validate that the exact product and feature versions described in this document are supported for your specific environment. The NetApp IMT defines the product components and versions that can be used to construct
configurations that are supported by NetApp. Specific results depend on each customer's installation in accordance with published specifications.
Trademark Information
NetApp, the NetApp logo, Go Further, Faster, AltaVault, ASUP, AutoSupport, Campaign Express, Cloud
ONTAP, Clustered Data ONTAP, Customer Fitness, Data ONTAP, DataMotion, Flash Accel, Flash
Cache, Flash Pool, FlashRay, FlexArray, FlexCache, FlexClone, FlexPod, FlexScale, FlexShare,
FlexVol, FPolicy, GetSuccessful, LockVault, Manage ONTAP, Mars, MetroCluster, MultiStore, NetApp
Fitness, NetApp Insight, OnCommand, ONTAP, ONTAPI, RAID DP, RAID-TEC, SANshare, SANtricity,
SecureShare, Simplicity, Simulate ONTAP, SnapCenter, SnapCopy, Snap Creator, SnapDrive,
SnapIntegrator, SnapLock, SnapManager, SnapMirror, SnapMover, SnapProtect, SnapRestore,
Snapshot, SnapValidator, SnapVault, SolidFire, StorageGRID, Tech OnTap, Unbound Cloud, WAFL,
and other names are trademarks or registered trademarks of NetApp Inc., in the United States and/or
other countries. All other brands or products are trademarks or registered trademarks of their respec tive
holders and should be treated as such. A current list of NetApp trademarks is available on the web at
http://www.netapp.com/us/legal/netapptmlist.aspx. TR-4536-0816
Copyright Information
Copyright © 1994–2016 NetApp, Inc. All rights reserved. Printed in the U.S. No part of this document
covered by copyright may be reproduced in any form or by any means—graphic, electronic, or mechanical, including photocopying, recording, taping, or storage in an electronic retrieval system—without prior written permission of the copyright owner.
Software derived from copyrighted NetApp material is subject to the following license and disclaimer:
THIS SOFTWARE IS PROVIDED BY NETAPP "AS IS" AND WITHOUT ANY EXPRESS OR IMPLIED WARRANTIES, INCLUDING, BUT NOT LIMITED TO, THE IMPLIED WARRANTIES OF
MERCHANTABILITY AND FITNESS FOR A PARTICULAR PURPOSE, WHICH ARE HEREBY DISCLAIMED. IN NO EVENT SHALL NETAPP BE LIABLE FOR ANY DIRECT, INDIRECT, INCIDENTAL, SPECIAL, EXEMPLARY, OR CONSEQUENTIAL DAMAGES (INCLUDING, BUT NOT
LIMITED TO, PROCUREMENT OF SUBSTITUTE GOODS OR SERVICES; LOSS OF USE, DATA, OR PROFITS; OR BUSINESS INTERRUPTION) HOWEVER CAUSED AND ON ANY THEORY OF LIABILITY, WHETHER IN CONTRACT, STRICT LIABILITY, OR TORT (INCLUDING NEGLIGENCE OR
OTHERWISE) ARISING IN ANY WAY OUT OF THE USE OF THIS SOFTWARE, EVEN IF ADVISED OF THE POSSIBILITY OF SUCH DAMAGE.
NetApp reserves the right to change any products described herein at any time, and without notice.
NetApp assumes no responsibility or liability arising from the use of products described herein, except as expressly agreed to in writing by NetApp. The use or purchase of this product does not convey a license under any patent rights, trademark rights, or any other intellectual property rights of NetApp.
The product described in this manual may be protected by one or more U.S. patents, foreign patents, or pending applications.
RESTRICTED RIGHTS LEGEND: Use, duplication, or disclosure by the government is subject to
restrictions as set forth in subparagraph (c)(1)(ii) of the Rights in Technical Data and Computer Software
clause at DFARS 252.277-7103 (October 1988) and FAR 52-227-19 (June 1987).