the plankton of boston harbor - bio 111 and 112 home...
TRANSCRIPT

Plankton - 3 !
The Plankton of Boston Harbor Objectives:
• To think about how organisms are classified • To learn how to use a dichotomous key • To view plankton from the seawater around our campus using microscopes • To classify the plankton we find into groups and to create a dichotomous key • To begin to collect organisms for the Phylogenetic Collection Lab at the end of the
semester.
Classification
Scientists try to understand life on Earth by classifying the millions of organisms they have identified into groups. They group organisms by their similarities and they try to show which organisms evolved from other organisms. Similarities in organisms can be in external structures, such as having 2 sets of wings, or they can be in internal structures, such as a 3-chambered heart, or organisms can share molecular similarity in their DNA and RNA sequences. The science of classifying organisms is called taxonomy; it is not a static field but one that is constantly changing to encompass the new discoveries and new arguments of how to group organisms made by scientists.
Protists
The protists are a diverse group of small, mostly single-celled organisms that have undergone many taxonomic changes recently. Formerly, the protists were classified in their own kingdom, but now are listed in many different kingdoms of the domain Eukarya. Single-celled organisms may seem simple because they are small but each cell must carry out the survival and reproductive functions of its species. It must obtain or make nutrition, regulate its interior environment, expel wastes, possibly defend itself against predation, and at some point, reproduce. Protists use their cellular organelles and contractile vacuoles to perform these functions.
Plankton
Plankton are mostly protists and small organisms that live in water and move with the currents of the water; they cannot propel themselves through water the way fish can. Plankton are the base of the food web in aquatic habitats; phytoplankton are plant-like and photosynthesize, and zooplankton are animal-like heterotrophs and larval stages of higher aquatic organisms such as sea worms and snails. In our samples of plankton from Boston Harbor, we often see diatoms and dinoflagellates as phytoplankton. Copepods, larval forms of sea worms, mollusks and arthropods; hydra and worms are most of the zooplankton we see here. When we take our 50 micron mesh net to the dock to sweep it through the seawater for our plankton sample, we collect non-living items in the sample as well. We find fecal pellets, pollen grains, decaying tissues and molts of arthropod exoskeletons; you may find some of these in your sample too.
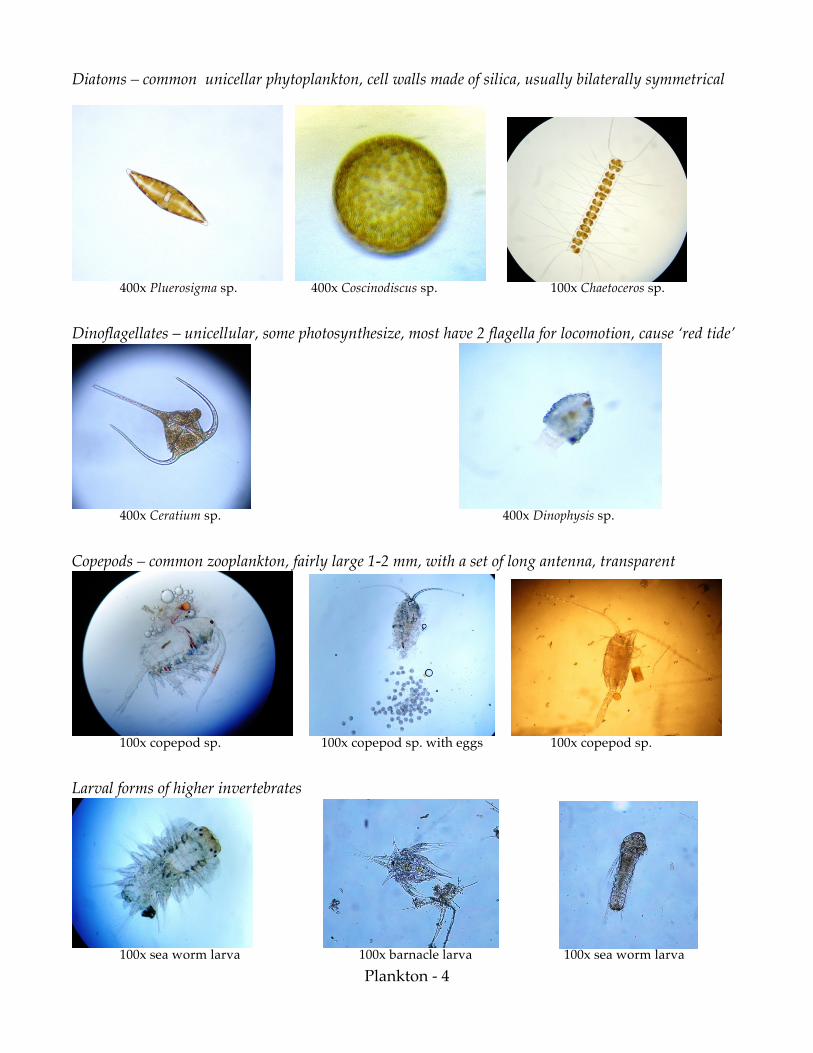
Plankton - 4 !
Diatoms – common unicellar phytoplankton, cell walls made of silica, usually bilaterally symmetrical
400x Pluerosigma sp. 400x Coscinodiscus sp. 100x Chaetoceros sp. Dinoflagellates – unicellular, some photosynthesize, most have 2 flagella for locomotion, cause ‘red tide’
400x Ceratium sp. 400x Dinophysis sp. Copepods – common zooplankton, fairly large 1-2 mm, with a set of long antenna, transparent
100x copepod sp. 100x copepod sp. with eggs 100x copepod sp. Larval forms of higher invertebrates
100x sea worm larva 100x barnacle larva 100x sea worm larva

Plankton - 5 !
Dichotomous Keys
A dichotomous key is a means of identifying organisms (or anything) by using an ordered list of yes/no questions. Answering the questions correctly and in sequence will allow you to identify the organisms. The questions are usually related to observable exterior traits seen with the naked eye, such as shape, color, number of legs etc. Creating a dichotomous key forces you to work backwards and separate the collection of organisms into groups and to formulate questions that can be responded to with a yes or no for each organism. For example, if you wanted to make a dichotomous key to identify 4 types of trees: white pine, red maple, white oak and white birch, you could create these yes/no questions. Other questions and ways to group these trees are possible. 1) Is the tree evergreen or not? If yes, it is a white pine; if no, go to question 2.
2) Does the tree have white bark? If yes, it is a white birch; if no, go to question 3.
3) Does the tree have leaves coming to sharp points? If yes, it is a red maple; if no, it is a white oak.
Introduction to Microscopy
Always treat the microscope with great care. Make certain that you do not touch any part of the lens system with anything abrasive (such as a slide or dirty water) or greasy (such as even the cleanest fingers). Never clean a lens with anything except clean lens paper! If the view gets foggy, and lens paper will not clean it, call your TA. Compound Microscope – magnification of 40X – 400X
(1) Structure of the Compound Microscope It is very important that you familiarize yourself with the parts of the microscope and their function. Your first task is to locate all of the parts named in the diagram on the next page. Place the microscope so that it is at right angles to you. In addition to the stand (arm & base) and a movable stage by which the object can be positioned and focused for viewing, the microscope consists of the following sub-units: A. The system involved in illuminating the object to be viewed, i.e., light, diaphragm
and condenser. B. The lens system - eyepiece, body tube and objective lens which magnify the object. A. The System of Illumination. Keeping the microscope in the same position: (l) plug it in, (2) turn on the light and (3) move the diaphragm lever as far to the left as possible. Place a clean slide on the stage over the condenser and put a piece of white paper about 25 mm square on top of the slide. Now slide the condenser knob and move the condenser up and down while observing the light on the piece of paper (do not look through the microscope but continue to look at the paper with your naked eye). Note that you see a fairly intense small circle of light when the condenser is at its uppermost position and that this circle gets larger and more diffuse as one lowers the condenser. For most work with the 4X, l0X and 40X objectives it is best to have the condenser near the top of its travel. Put your eye at table level and look up at the bottom of the condenser. Now move the diaphragm lever and observe what happens. This is an iris diaphragm. Why do you suppose

Plankton - 6 !
it is called this? Look at the piece of paper again while opening and closing the diaphragm. The diaphragm serves to regulate the amount of light passing through the condenser. It also serves to cut down stray light. Later when you look through the microscope you will see that the diaphragm can be kept partly closed without cutting down on the light passing through the lens (i.e., only light beyond the field of the lens is being blocked). Further closing of the diaphragm will cause less light to enter the lens and decrease the resolving power of the lens while increasing contrast in the viewed object (Resolving power is how well specimen detail is preserved. Contrast is the ability to see particular detail against its background.) Control of the light entering the microscope is very important.
The Nikon compound microscope
Preparing A Slide and Making Observations. Your lab instructor will show you how to make a slide. The great art here is to avoid air bubbles when you lower the coverslip! A useful trick for this is to: (1) put drop of sample on slide (2) while holding coverslip at an angle, slide edge of coverslip to edge of drop (3) slowly let coverslip fall flat: slide: (2) (3)
POINTS TO REMEMBER: The following are worth remembering as you use the microscope.
sample!

Plankton - 7 !
1) Do all preliminary focusing under low power. Find a corner of the cover slip and focus on that first. When you have your sample in focus, change the lens to increase the magnification.
2) Use the fine adjustment constantly to keep things in focus. 3) Use lens paper to clean the lenses occasionally, you will find that the microscope works
best when clean. 4) Control the amount of light entering the microscope – the contrast at which you view
the specimen will control how much detail you view. 5) Keep an eye on the stage while using the image focusing knob so that you don’t put the
objective through the slide. 6) Become familiar with how the microscope works before trying to view a specimen.
Dissection Microscope – magnification of 13X – 56X
Larger, thicker objects can be viewed in the dissection microscopes. Sample containers can be put directly on the stage of the dissection microscope.
Leica EZ 4 Dissection Microscope

Plankton - 8 !
How big is it? You can use the microscope to measure the approximate size of the objects you are looking at. Given the magnification, the table below gives the diameter of the field of view. See diagram: Once you know that, you can estimate the size of what you’re seeing. If the field size is 450mm and the thing you’re looking at is half as wide as the field, then it’s about 220mm wide.
Magnification shown on
objective lens
Actual
magnification
Field size
(millimeters)
Field size
(microns (mm)) 4x 40x Þ 5 5000 10x 100x Þ 2 2000 40x 400x Þ 0. 5 500
Nikon compound microscope field view sizes
Magnification shown on knob
Actual magnification
Field size (inches)
Field size (millimeters)
1.3x 13x Þ 0.74 18.8 2.0x 20x Þ 0.47 12 3.2x 32x Þ 0.30 7.5 5.6x 56x Þ 0.17 4.3
Leica EZ 4 dissection microscope field view sizes
Area!you!can!see.!
Field!size!

Plankton - 9 !
Part I : Plankton Lab Procedure
(1) A Size Standard: a Grain of Salt It is often difficult to get a sense of the size of microscopic objects. As a link to the macroscopic world, you will use one of the smallest things you can see with the naked eye - a grain of salt - as a size standard. Obtain some salt grains from your TA. Put them on a slide WITHOUT WATER and estimate their size. Pool the class results and record the ‘typical’ size of a salt grain here: salt grain size = mm
(2) Viewing the Boston Harbor Plankton in the Microscopes Recently, we sampled plankton from boat docks here at UMass, Boston. You have some of that sample in the plastic container on ice. The temperature of the water off the docks is about 6° C (48° F) this time of year so we wanted to keep the sample close to that temperature. a. Place the entire container of plankton on the stage of the dissection microscope and see if you can see and identify the larger organisms in the sample. You will only be able to focus on one depth of the sample at a time, for example you could focus on the bottom of the container to see the organisms at that depth, or you could focus on the surface plane to see the organisms there. Moving organisms will be changing their depth constantly and you will have to constantly change your plane of vision to try to keep that organism in focus. Take notes onthe appearance of the organisms you find and how they move. b. Next, take a deep well slide and remove the cover. Use your plastic pipet and transfer some of the plankton to the deep well slide. The deep well slide holds about 20 drops of sample. Put the cover on and view the deep-well slide under the dissection microscope. You should be able to get a better view of organisms here. Try to identify what you see using the phytoplankton and zooplankton ID sheets. Draw the organism or take its picture; estimate the organism’s size using the tables above as you did with the grain of salt. c. You can also take this deep-well slide and put it on the stage of the Nikon compound scope. You can focus this slide under the 4X or the 10X lenses, but it is too thick to fit under the 40X lens. d. Take the cover off the deep-well slide and pipet out an organism you want to look at more closely. Place 1 or 2 drops of the plankton including your organism of interest on a regular, glass, microscope slide and cover with a cover slip. Focus the organism; here you can use the 40X lens. Try to find at least 8 different organisms and list their traits in the following chart.

Plankton - 10 !
Jar of plankton and 2 kinds of slides to view the plankton under the microscopes.
(3) Making a Dichotomous Key Fill in the chart on the following page and use it as a guide in making a dichotomous key which will identify 6 of the organisms you found in your plankton sample. Post the following to your lab section’s data blog (found on your Blackboard site for this course):

Plan
kton
- 11
!
Cha
ract
eris
tics
of th
e pl
ankt
on y
ou fo
und:
N
ame
Ph
yto-
or
Zoo
- pl
ankt
on
Si
ze
Sh
ape
C
olor
H
as a
he
ad?
H
as
ante
nnae
?
H
as
eyes
?
M
ovin
g?
Sing
le
cell
; co
lony
; fi
lam
ent
1
2
3
4
5
6
7
8
9
10

Plankton - 12 !
The Phylogenetic Collection Lab The Phylogenetic Collection Lab is the last lab of the semester. Before this lab session, your group will need to collect samples of organisms from 16 different phyla. Some of the organisms you’ve found in this lab come from different phyla and this will allow you to get a head start on the Phylogenetic Collection Lab. Using the resources for the Phylogenetic Collection Lab in the OLLM, you include some of the organisms you’ve found in your collection, provided that you can demonstrate convincingly to your TA that you have identified the organisms correctly and found their correct phylum. As with all the other organisms in the Phylogenetic Collection Lab, it is up to you to prove to your TA that you’ve got the classification right. If your TA approves one or more of these organisms, you can include the approved organisms in the charts on the last two pages of the Phylogenetic Collection Lab (PhylColl-13 and -14).

Plankton - 13 !
Part II: c-Ferns - gametophytes and sperm release Objective To observe the phenomenon of alternation of generations and its genetic consequences To follow the life cycle of a plant through a complete cycle Today, we will observe gametophytes and sperm release. In two weeks, we will observe the resulting sporophytes and do a genetic analysis. Introduction Variations on the pattern of alternation of generations are an important part of the diversity among living things. It varies extensively – see figure 13.6 in Campbell for a general description; figure 29.5 shows it for a generalized plant. The life-cycle of a c-fern can be found on page PlantDiv-11. You will be following the development of a fern Ceratopteris richardii – “c-fern” for short. It is a tropical homosporous (Campbell page 611) fern. Its life cycle is like that of most ferns (figure 29.13) with one exception: figure 29.13 shows a hermaphroditic gametophyte – the gametophytes have both male (antheridia that make sperm) and female (archaegonia that make eggs) parts; c-ferns have hermaphroditic gametophytes which are “heart-shaped” as in fig. 29.13 as well as male gametophytes (which have only antheridia). The figure below shows the two different types of gametophytes:
Male:!
Smaller!and!looks!like!a!“bunch!of!grapes”!
Hermaphrodite:!larger!and!“heart!shaped”!

Plankton - 14 !
The strain of c-ferns you will be observing also has a mutation: Allele Contribution to phenotype normal: D normal distribution of chloroplasts – dominant phenotype mutant: d chloroplasts clumped (“polka-dot”) – recessive phenotype Some pictures of hermaphrodites are show below:
This phenotype is visible in both haploid and diploid forms of the fern (except the spores, eggs, and sperm). As a result: For haploids: Genotype Phenotype (gametophytes) D normal d polka-dot For diploids: Genotype Phenotype (sporophytes) DD normal Dd normal dd polka-dot Two weeks ago, you sowed spores produced by a Dd sporophyte onto the petri dishes you have. The gametophytes have grown up by now and are ripe for fertilization (not in the sense of fertilizer, but in the sense of egg and sperm). When you add water, the sperm will be released from the antheridia and will swim towards the archaegonia to fertilize the eggs there. At this stage, it may be possible to tell normal from polka-dot, but in a further two weeks the differences will be more obvious.
Polka:dot:!
notice!the!spotty!green!color.!
Normal:!!
notice!the!even!green!color.!

Plankton - 15 !
Procedure (1) Get your group’s plate of gametophytes that you sowed 2 weeks ago from your TA. (2) Place two separate drops of water on a glass microscope slide. Using a toothpick, scoop up 1 male gametophyte and place it in one of the drops of water. Cover it with a cover slip. Scoop up a hermaphrodite gametophyte and put it in the other drop of water; cover with a cover slip. Try to get a gametophyte of each type – the males are much smaller than the hermaphrodites. You may want to put your plate of gametophytes under the dissectionmicroscope to find a male and a hermaphrodite gametophyte. (3) Observe the release of sperm from both gametophytes. Place the slide on the compound microscope stage and focus it on low power. Change the objective lens to the 10X to see the sperm release. The sperm are small, biflagellate, spinning spheres. Draw one gametophyte of each type. Label the diagrams with their approximate sizes as well as hermaphrodite vs. male. Also label the rhizoids, the root-like projections. (4) Try to tell if the hermaphrodite gametophytes in your Petri plate are normal or polka-dot. Mark the bottom of the plate under the gametophyte with a + for normal and a p for polka-dot. (5) Flood the plate with about 3 ml of sterile water and swirl it so that the entire surface is wet. Cover it and put it back in the incubator for another two weeks when we will look at it again. (6) Keep your plate of gametophytes covered at all times and do not leave it under a
microscope light because that will dry it out. Be sure to get drawings of male and hermaphrodite gametophytes with sizes - you will need this for your plant diversity lab report.

Plankton - 16 !
Lab Report You may find it necessary to consult your textbooks for some of the information required. • Must be typed; handwritten reports will not be accepted. Hand-drawn and labeled drawings
are fine. • Due next week at the start of the lab session you are currently in. This is a firm deadline. • Although you will perform these activities as a group, each member of the group must turn in an individual lab report. Each person’s report must be in his or her own words as much as possible. • Your lab report must contain: Part I: Protozoa: For each of the organisms you saw. (1) A drawing or photo of the 8 organisms you looked at with size clearly marked. These may or may not be on the plankton identification sheets. Post these to your lab section’s blog if possible. (2) Sketch a crystal of table salt. Next to it, sketch the outline of each organism you observed to scale with the salt grain. Your drawings need not include all details, but should show the relative sizes of the organisms and the salt grain. Note that, since all the sizes you will measure are approximate, your drawings only have to be roughly correct – we will not grade on the precision of your measurements. (3) Produce a dichotomous key with at least 5 yes/no questions that will allow someone to identify the 6 organisms of your collection. Post this key to your lab section’s blog as well. Many different keys will be possible; we are looking for a key that is reasonable and made from careful observations. Part II: c-ferns: (1) Drawings of male and hermaphrodite gametophytes with sizes indicated. (2) Re-draw Campbell figure 29.5 and indicate which parts of the life cycle you have seen today. (3) Compare the life cycle part of the human life cycle (adults, eggs, sperm, zygote) with the life cycle part of figure 29.5. What are the similarities? What are the differences?