the science of golf test lab toolkit the ball: aerodynamics · pdf filetest lab toolkit the...
TRANSCRIPT

MathematicsEngineeringTechnologyScience
The Science of Golf
Test Lab ToolkitThe Ball: Aerodynamics
Facilitator Guide Grades 6-8

Table of Contents
Welcome to the Test Lab 02How to Use the Toolkit 03Investigate: Bernoulli’s Principle Guide 04 Activity 06Investigate: Wind Tunnel Guide 09 Activity 11Create: Paper Airplane Tournament Guide 15 Activity 17Connect: Sports Swap Guide 20 Activity 22Background Information 25Additional Resources 30Education Standards 31
Test Lab Toolkits bring math and science to life by showing how STEM studies play a big role in
the game of golf. They are funded by the United States Golf Association (USGA).

02
Sometimes the study of science and math can seem a little disconnected from the “real” world. Yet a closer look reveals that science and math are everywhere in the world around us, in familiar and surprising ways.
Take something fun, like the game of golf. Sure, there’s math, because you have to keep score. But there’s also science, technology, and engineering hidden in the game — from the physics of how you swing, to the mechanics of a golf club, to the remote sensors that tell you when to water the golf course.
To get students more excited about science, technology, engineering, and math (STEM), the United States Golf Association has created a multi-media educational platform that uses golf to bring those fields to life. Hands-on learning experiences let students move beyond the textbook and classroom to explore science as an essential part of a real-world game.
The TEST LAB TOOLKITS use the USGA Test Center as inspiration for a fun series of golf-focused science activities. At the Test Center, scientists and engineers play around with golf balls, clubs, and other equipment every day to learn how they work. Since people keep thinking of new ways to improve the game, the Test Center needs to test new equipment to make sure it works with the game’s traditions and doesn't give any unfair advantages. And now students can do some of the same experiments that the Test Center does.
Each Toolkit presents a specific topic related to one of the major elements of golf: The Swing, The Club, The Ball, The Course, and The Score. In the AERODYNAMICS Toolkit, you will find background information and instructions for four hands-on activities, including:
1 Experiment with air pressure (and learn about Bernoulli’s Principle)
2 Build a wind tunnel (and investigate how drag affects the flight of a ball)
3 Design your own paper airplane (and figure out how to make it go farther than anyone else’s)
4 Mix up equipment from different sports (and discover how it changes the game)
We hope you enjoy using this Test Lab Toolkit, and that it leads you to try others. The more Toolkits you do, the more your students will become experts at science — and golf!
How to Use the Toolkit Aerodynamics Welcome to the Test Lab Toolkit!

03
BackgroundEach Toolkit includes information about the science and math concepts behind a specific golf topic. Each Toolkit also relates directly to one or more videos in the NBC Learn: Science of Golf series — for AERODYNAMICS, the related video is “Evolution of the Golf Ball.”
You can have the group review this information and watch the video as an introduction before doing any of the activities.
ActivitiesThe four activities in this Toolkit can each be done independently, but they also build on each other:
- Investigate: In these two activities, students explore fundamental scientific concepts through hands-on experiments. You can run them informally as a large group activity, or have students do them as more formal science labs with standard scientific procedure (hypothesis, observation, conclusion, etc.).
- Create: This activity encourages creative thinking by challenging students to design their own version of a fundamental component of golf, such as a club, a golf ball, a putting green, etc. Students will
rely on the scientific concepts they explored in the Investigate activities.
- Connect: While all Toolkit activities relate to the real world through the golf focus, this activity actually sends students out into the world to explore science in context. Using the concepts they first investigated through simulations, they will see what happens in an actual golf game or environment.
The student Toolkit includes full instructions and sample charts to record data for each activity. This Facilitator Guide includes each student activity, as well as further instructions for the facilitator.
MaterialsEach activity has been designed to require only inexpensive, easy-to-find materials. Often students will also be asked to use a golf ball and putter. If you don’t have a golf ball, use another small ball (ping pong ball, tennis ball, etc.). If you don’t have a putter, use a stick of similar length (hockey stick, yardstick, etc.) or simulate one with a long wooden dowel, cardboard tube, or other materials.
Test Lab LogAll of the activities in this Toolkit, and across the other Toolkits, are designed to work together to teach interconnected science and math concepts. But they
can also help students learn more about the game of golf, so that they can improve their understanding and skill.
After each activity, we recommend that students document what they learned in some way — notes, photos, video, diagrams, etc. They can then compile all their results into an ongoing Test Lab Log, which they can use as both a summary of their work and a handbook for the game. Depending on your available resources, the Test Lab Log can be as low-tech or high-tech as you like. Recommendations include:
- Binder notebook: Keep a single notebook for the entire class to use, or have students create their own binders of individual and shared materials.
- Tumblr (tumblr.com): Use this free site to create a customized microblog for the group, where students can easily upload results, post comments, and build conversations. The microblog can be public, or can be made private through the password protection option.
- Wordpress (wordpress.com): Use this free site to create a customized blog for the group. With a username and password, students can easily access the blog, upload results, and post comments.
How to Use the Toolkit Aerodynamics

04
The Science of Golf
At the USGA Test Center, scientists examine every aspect of a golf ball — its weight, shape, size, materials, and how it flies. For the last part, they need to understand the science of aerodynamics, or how objects move through the air. Air continually exerts pressure (or pushing power) on everything it surrounds. The faster the air moves, the less pressure it exerts — an effect called Bernoulli’s Principle. In this activity, you’ll investigate the relationship between low and high pressure air by seeing Bernoulli’s Principle in action.
Learning Objectives
To understand the concepts of air pressure and Bernoulli’s Principle.To understand the effect of air pressure on a golf ball.To conduct an experiment.
STEM Fields
Science: air pressure
Time RequirementOne session 45 min
Activity TypePlan ahead (gather materials)
Indoors
ESGrades 6-8
Aerodynamics
MT
Investigate: Bernoulli’s PrincipleFacilitator Guide

05
What Do You Do?
1 Introduce the Activity - Read Background Information.
- Watch the NBC Learn video “Evolution of the Golf Ball” at www.nbclearn.com/science-of-golf.
- Review the concepts of air pressure and Bernoulli’s Principle, using the diagram in the activity instructions.
2 Run the Experiment Investigate: Bernoulli’s Principle, steps 1-6
- For the ping pong and funnel experiments, have students refer first to the illustrations, so that they understand how to set them up.
- Before each experiment, ask for predictions about what will happen. Afterwards, ask about what did happen and why.
What Happens?Have students create a short report about the activity to add to their Test Lab Log. The report could include notes, photos, diagrams, etc.
What Does it Mean?Have the group reflect on the activity and encourage them to draw conclusions based on their data.
- How accurate were their predictions?
- What were they surprised by?
- What did they learn about air pressure?
- If a golf ball with backspin causes the air on top of it to move faster than the air under it, how do they think that lower air pressure (faster moving air) would affect the ball?
Challenge!Using the same materials, or others, have students try to create their own experiments that prove Bernoulli’s Principle. Any experiment will need to include a contrast between still (or slow) air and faster moving air.
AerodynamicsInvestigate: Bernoulli’s Principle Facilitator Guide Grades 6-8

06
The Science of Golf
Air Pressure
LowerPressure
Higher Pressure
FLIGHT PATH
AIR FLOW
AIR FLOW
At the USGA Test Center, scientists examine every aspect of a golf ball — its weight, shape, size, materials, and how it flies. For the last part, they need to understand the science of aerodynamics, or how objects move through the air. Air continually exerts pressure (or pushing power) on everything it surrounds.
The faster the air moves, the less pressure it exerts — an effect called Bernoulli’s Principle. In this activity, you’ll investigate the relationship between low and high pressure by seeing Bernoulli’s Principle in action.
What Do You Need?
2 pieces of paper (8½ by 11)3 Ping Pong BallsStringScissorsChopstick (or other stick)TapeStraw
How does air pressure keep a golf ball in the air?
METSGrades 6-8
Aerodynamics Investigate: Bernoulli’s Principle

07
What Do You Do?
Ping Pong Experiment Funnel Experiment 1 Funnel Experiment 2
Blow Air
String
Chopstick
PingPong
Ball
Blow AirStraw
Funnel
Ball
Blow Air
1 Before each of these experiments, think about where the air will have lower or higher pressure (where it is moving faster or slower). Predict what will happen, and then see if you’re right.
2 Parallel Paper: Hold two sheets of paper so that they hang down parallel to each other, about 4 inches apart. Blow between them. What happens?
3 Paper Tent: Fold a sheet of paper in half. Rest it on a table so that it makes a “tent.” Blow inside the tent. What happens?
4 Hanging Ping Pong: Cut 2 pieces of string, 1 foot long. Tape one end of each to a ping pong ball. Tape the other end of each string to a chopstick, about 3 inches apart. Hold the chopstick horizontally in front of you, and blow between the balls. What happens?
5 Funnel: Roll a piece of paper into a cone and tape it together to make a funnel. Tape a straw to the bottom, so that no air can escape between the paper and straw. Hold the funnel so that the bowl faces up and the straw is on the bottom. Put a ping pong ball inside the funnel. Put your head under the funnel, and blow hard into the straw.
6 Then turn the funnel upside down, so that the straw is on top. Put the ball inside the funnel again, and hold it in place against the funnel bottom with your finger. Start blowing hard in the straw and remove your finger while blowing. What happens?
What Happens?Use the chart to record your results, and make more as needed.
What Does it Mean? - What did you learn about air pressure?
- If a golf ball with backspin causes the air on top of it to move faster than the air under it, how would that lower air pressure (faster moving air) affect the ball?
Challenge!Using the same materials, or others, can you create your own experiment that proves Bernoulli’s Principle?
Find Out More - Read Key Concepts at the back of this Toolkit.
- Read Aerodynamics: Background Information.
- Watch the NBC Learn video “Evolution of the Golf Ball” at www.nbclearn.com/science-of-golf.
AerodynamicsInvestigate: Bernoulli’s Principle Grades 6-8

08
Experiment What Will Happen? What Did Happen? Where is the Low Pressure Air?
Where is the High Pressure Air?
Parallel Paper Prediction Result Location Location
Paper Tent
Hanging Ping Pong
Funnel
Add this chart to your Test Lab Log!
AerodynamicsInvestigate: Bernoulli’s Principle Grades 6-8
09
The Science of Golf
The hit from a club starts the golf ball moving, but how far it flies depends in part on how aerodynamic it is. The aerodynamic force called lift makes the ball move upward — the more lift it has, the farther it will go. At the same time, wind resistance pushes back against the ball, creating a force called drag, which slows the ball down. The USGA Test Center uses a high-speed robot launcher to shoot golf balls at speeds up to 200 mph so that they can measure their aerodynamics. In this activity, you’ll make your own wind tunnel to see which balls cause the least drag and fly most easily.
Learning Objectives
To understand the forces of drag and lift.To understand how different types of balls are affected by these forces.To conduct an experiment.
STEM Fields
Science: aerodynamicsEngineering: wind tunnel
Time RequirementOne session 45 min
Activity TypePlan ahead (gather materials)
Indoors
SGrades 6-8
Aerodynamics
ET M
Investigate: Wind TunnelFacilitator Guide

10
What Do You Do?
1 Introduce the Activity - Read Background Information.
- Watch the NBC Learn video “Evolution of the Golf Ball” at www.nbclearn.com/science-of-golf.
- Review the concepts of lift and drag, using the diagram in the activity instructions.
2 Build the Wind Tunnel Investigate: Wind Tunnel, steps 1-5
- If you have a round fan, you can use a big piece of posterboard curved in an upside-down u-shape, instead of a cardboard box.
- Instead of acetate, you can use another see-through material.
3 Run the Experiments Investigate: Wind Tunnel, steps 6-9
- To find the diameter of a ball, have students lay it next to a ruler. It may be helpful to put one finger on either side of the ball, and then measure the distance between fingers.
- Before trying each type of ball, ask for predictions about what will happen. Afterwards, ask about what did happen and why.
What Happens?Have students create a short report about the activity to add to their Test Lab Log. The report could include notes, photos, diagrams, etc.
What Does it Mean?Have the group reflect on the activity and encourage them to draw conclusions based on their data.
- How accurate were their predictions?
- What were they surprised by?
- What seems to have the biggest effect on decreasing drag and making a ball fly forward more easily — weight, size, texture, something else?
- Why do they think the USGA regulates golf ball design?
AerodynamicsInvestigate: Wind Tunnel Facilitator Guide Grades 6-8

11
The Science of Golf
How does drag affect how a ball flies through the air?
The hit from a club starts the golf ball moving, but how far it flies depends in part on how aerodynamic it is. The aerodynamic force called lift makes the ball move upward — the more lift it has, the farther it will go. At the same time, wind resistance pushes back against the ball, creating a force called drag, which slows the ball down. The USGA Test Center uses a high-speed robot launcher to shoot golf balls at speeds up to 200 mph so that they can measure their aerodynamics. In this activity, you’ll make your own wind tunnel to see which balls cause the least drag and fly most easily.
Portable fanLarge cardboard boxQuart-size milk cartons, at least 12, more depending on the size of your box1 or more sheets of acetate (available at an art or office supply store)PosterboardMasking tapeScissorsMarkers in different colorsStringTissue paper, paper strip, or lightweight fabric
Golf ball and other light balls with different weight, size, texture, etc.Tape measure (optional)Scale (optional)Protractor (optional)
FLIGHT PATH
Lift
Drag
Weight
AIR FLOW
AIR FLOW
Lift and Drag
SPIN
SPIN
AIR
FLOW
What Do You Need?
MTSGrades 6-8
Aerodynamics
E
Investigate: Wind Tunnel

12
What Do You Do?
FanPaperGrid AcetateBall
Stringwith Tape Hole Cardboard Box
Open End
1 Get a large cardboard box, more rectangular than square. The short end should be approximately the same size as the fan (or as close as possible). Cut off the two short ends, so that air can easily pass through the box.
2 Cut a square window out of the middle of one long side. Tape a sheet of acetate over the window, so that you can see into the box.
3 Cut the ends off the milk cartons, stack them together, and tape them, so that they form a grid that fits inside the box at one end. They should extend no more than 1/3 of the way along the box, not past the window. If the cartons are too long, cut them shorter. This grid will even out the air from the fan.
4 Place the fan at the grid end of the box, as close to it as possible, facing inside. If there is extra room between the fan and the edges of the box, cut pieces of posterboard and tape them over the open spaces, so that all the air is directed into the box.
5 Make a small hole on the top of the box, in the middle of the window area.
6 Your wind tunnel is ready to use! First attach a small piece of tissue paper to a piece of string with tape. Thread the string through the hole at the top of the box, position the tissue paper so that it hangs in the middle of the tunnel, and tape the string to the top.
7 Turn the fan on and record how far forward the paper moves. Try different fan speeds.
8 Now use the wind tunnel with different balls. If you want to be precise, you can weigh each ball and measure its diameter. For each ball, attach it to a string, position it so that it hangs in the middle of the tunnel, and tape the string (through the hole) to the top of the box. Turn the fan on and try different speeds.
9 You can use a marker on the acetate to draw the position of the string when the fan is off and at different speeds, and then use a protractor to measure the angles. Use a different sheet of acetate for each ball, or a different color marker on the same acetate.
AerodynamicsInvestigate: Wind Tunnel Grades 6-8

13
What Happens?Use the chart to record your results, and make more as needed.
What Does it Mean? - What seems to have the biggest effect on
decreasing drag and making a ball fly forward more easily — weight, size, texture, something else?
- How did the golf ball compare to the others?
- Why do you think the USGA regulates golf ball design?
Find Out More - Read Key Concepts at the back of this Toolkit.
- Read Aerodynamics: Background Information.
- Watch the NBC Learn video “Evolution of the Golf Ball” at www.nbclearn.com/science-of-golf.
AerodynamicsInvestigate: Wind Tunnel Grades 6-8

14
Ball Weightounces
Diameterinches
Texture Angle at Fan Speed 1degrees
Angle at Fan Speed 2degrees
Angle at Fan Speed 3degrees
Golf Ball 1.6 1.7 dimpled 5 10 20
Add this chart to your Test Lab Log!
AerodynamicsInvestigate: Wind Tunnel Grades 6-8

15
The Science of Golf
Even small design changes can greatly increase a ball’s lift (the force that makes it go up) and decrease its drag (the force that slows it down), which in turn affect how far the ball can go. That’s why the USGA sets specific standards for golf ball design (weight, size, shape, speed, etc.) and tests more than 30,000 balls per year to make sure they meet those standards. In this activity, you’ll use what you’ve learned about aerodynamics to design a paper airplane, and see if you can make yours go farther than anyone else’s!
Learning Objectives
To understand the forces of lift and drag.To understand how paper planes are affected by these forces.To develop creative thinking.
STEM Fields
Science: aerodynamics Engineering: design a paper plane
Time RequirementOne session 45 min
Activity TypePlan ahead (gather materials)
Outdoors
SGrades 6-8
Aerodynamics
E MT
Create: Paper Airplane TournamentFacilitator Guide

16
What Do You Do?
1 Introduce the Activity - Read Background Information.
- Watch the NBC Learn video “Evolution of the Golf Ball” at www.nbclearn.com/science-of-golf.
- Review the concepts of lift and drag.
2 Design the Paper Planes Create: Paper Airplane Tournament, steps 1-4
- Students should first make and test out basic dart planes before altering the design (or trying a different airplane design).
- Students can also decorate their planes with markers, pencils, etc.
3 Run the Tournament Create: Paper Airplane Tournament, steps 5-6
- Before the tournament, have students look at all of the planes and make predictions about which will go farthest.
- Have students fly their planes from the same starting position.
- You can award multiple prizes: longest distance, longest time in the air, most height, etc.
What Happens?Have students create a short report about the activity to add to their Test Lab Log. The report could include notes, photos, diagrams, etc.
What Does it Mean?Have the group reflect on the activity and encourage them to draw conclusions based on their data.
- How accurate were their predictions?
- What were they surprised by?
- Which airplane flew the farthest and why?
- What did they learn about the forces of lift and drag?
AerodynamicsCreate: Paper Airplane Tournament Facilitator Guide Grades 6-8

17
The Science of Golf
What Do You Need?
How to Make a Paper Airplane
How to Make a Paper Airplane, continued
Step 1Fold the paper in half lengthwise. Run your thumbnail along the fold to make it sharp. Then unfold it.
Step 2Fold down the top corners so that they meet in the middle.
Step 3Fold the two top edges toward the center line.
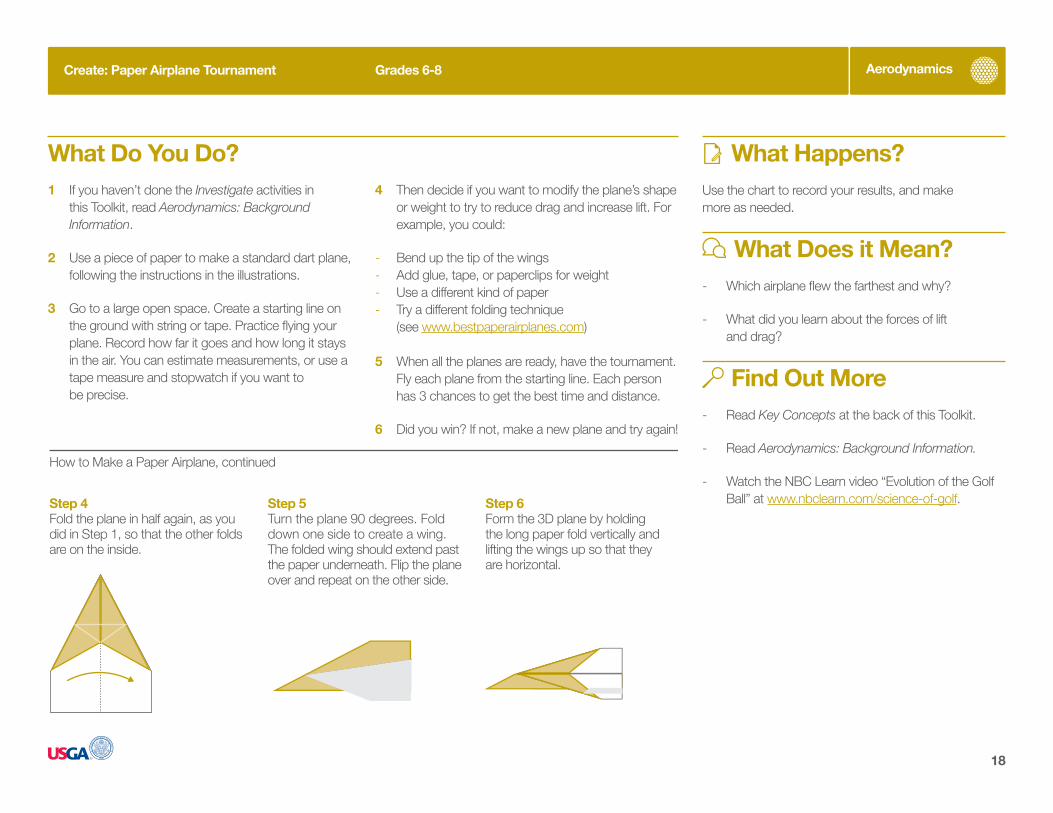
Step 4Fold the plane in half again, as you did in Step 1, so that the other folds are on the inside.
Step 5Turn the plane 90 degrees. Fold down one side to create a wing. The folded wing should extend past the paper underneath. Flip the plane over and repeat on the other side.
Step 6Form the 3D plane by holding the long paper fold vertically and lifting the wings up so that they are horizontal.
This activity is adapted from Amazing Paper Airplanes (www.amazingpaperairplanes.com/Basic_Dart.html)
What kind of paper airplane flies the best?
Even small design changes can greatly increase a ball’s lift (the force that makes it go up) and decrease its drag (the force that slows it down), which in turn affect how far the ball can go. That’s why the USGA sets specific standards for golf ball design (weight, size, shape, speed, etc.) and tests more than 30,000 balls per year to make sure they meet those standards. In this activity, you’ll use what you’ve learned about aerodynamics to design a paper airplane, and see if you can make yours go farther than anyone else’s!
Copy paper (8½ by 11)Other types of paper (optional)ScissorsString
Materials that could be added to a plane (paperclips, tape, glue, staples, etc.)Tape measure (optional)Stopwatch
MTSGrades 6-8
Aerodynamics
E
Create: Paper Airplane Tournament
18
What Do You Do?1 If you haven’t done the Investigate activities in
this Toolkit, read Aerodynamics: Background Information.
2 Use a piece of paper to make a standard dart plane, following the instructions in the illustrations.
3 Go to a large open space. Create a starting line on the ground with string or tape. Practice flying your plane. Record how far it goes and how long it stays in the air. You can estimate measurements, or use a tape measure and stopwatch if you want to be precise.
4 Then decide if you want to modify the plane’s shape or weight to try to reduce drag and increase lift. For example, you could:
- Bend up the tip of the wings - Add glue, tape, or paperclips for weight - Use a different kind of paper - Try a different folding technique
(see www.bestpaperairplanes.com)
5 When all the planes are ready, have the tournament. Fly each plane from the starting line. Each person has 3 chances to get the best time and distance.
6 Did you win? If not, make a new plane and try again!
What Happens?Use the chart to record your results, and make more as needed.
What Does it Mean? - Which airplane flew the farthest and why?
- What did you learn about the forces of lift and drag?
Find Out More - Read Key Concepts at the back of this Toolkit.
- Read Aerodynamics: Background Information.
- Watch the NBC Learn video “Evolution of the Golf Ball” at www.nbclearn.com/science-of-golf.
How to Make a Paper Airplane
How to Make a Paper Airplane, continued
Step 1Fold the paper in half lengthwise. Run your thumbnail along the fold to make it sharp. Then unfold it.
Step 2Fold down the top corners so that they meet in the middle.
Step 3Fold the two top edges toward the center line.
Step 4Fold the plane in half again, as you did in Step 1, so that the other folds are on the inside.
Step 5Turn the plane 90 degrees. Fold down one side to create a wing. The folded wing should extend past the paper underneath. Flip the plane over and repeat on the other side.
Step 6Form the 3D plane by holding the long paper fold vertically and lifting the wings up so that they are horizontal.
AerodynamicsCreate: Paper Airplane Tournament Grades 6-8

19
Plane Model Paper Type Change Shape? Change Texture Change Weight? Distance Time in the Air
Standard Dart Copy Paper No No No 15 feet 5 seconds
Add this chart to your Test Lab Log!
AerodynamicsCreate: Paper Airplane Tournament Grades 6-8

20
The Science of Golf
Many sports use a ball. But the balls are designed for different purposes — hitting (golf), throwing (baseball), kicking (soccer), and more. And the aerodynamics of each is different also, with different balls better for travelling short or long distances, or bouncing, or flying high. How well-suited is each ball to its own sport? In this activity, you’ll mix up sports and balls to find out!
Learning Objectives
To understand the concept of aerodynamics.To understand why specific equipment is designed for specific sports.To apply scientific concepts in a real-world context.
STEM Fields
Science: aerodynamics Engineering: design of sporting equipment
Time RequirementOne session 45 min
Activity TypePlan ahead (gather materials)
Outdoors (challenge)
SGrades 6-8
Aerodynamics
ET M
Connect: Sports SwapFacilitator Guide
21
What Do You Do?
1 Introduce the Activity - Read Background Information.
- Watch the NBC Learn video “Evolution of the Golf Ball” at www.nbclearn.com/science-of-golf.
2 Ball Comparison Connect: Sports Swap, steps 1-2
- Students should first compare all of the balls they have available in terms of size, weight, texture, aerodynamics, etc.
- To find the diameter of a ball, have students lay it next to a ruler. It may be helpful to put one finger on either side of the ball, and then measure the distance between fingers.
- After the Sports Swap activity, they can also cut the balls in half to see how their construction is different. Adult supervision is required.
3 Sports Swap Connect: Sports Swap, steps 3-4
- Have students make predictions about which combinations of balls and equipment will work the best, or the worst.
What Happens?Have students create a short report about the activity to add to their Test Lab Log. The report could include notes, photos, diagrams, etc.
What Does it Mean?Have the group reflect on the activity and encourage them to draw conclusions based on their data.
- How accurate were their predictions?
- What were they surprised by?
- How does changing the ball change the sport?
- Why is a golf ball the best ball to use for golf?
AerodynamicsConnect: Sports Swap Facilitator Guide Grades 6-8

22
The Science of Golf
What Do You Need?Why do different sports use such different balls?
Many sports use a ball. But the balls are designed for different purposes — hitting (golf), throwing (baseball), kicking (soccer), and more. And the aerodynamics of each is different also, with different balls better for travelling short or long distances, or bouncing, or flying high. How well-suited is each ball to its own sport? In this activity, you’ll mix up sports and balls to find out!
A variety of balls from different sports (golf, tennis, basketball, etc.)Equipment used with each ball (golf club, tennis racket, etc.)Scale (optional)Tape measure (optional)Stopwatch (optional)
MTSGrades 6-8
Aerodynamics
E
Connect: Sports Swap

23
What Do You Do?1 Take a look at all the balls you have. How
are they different in terms of weight, size (diameter), shape, and texture? You can estimate measurements, or use a scale and tape measure if you want to be precise.
2 Go to a large open space. Try throwing each ball. Record how far it goes, how long it stays in the air, and how it feels to throw it.
3 Try each piece of equipment with each ball. For example, try using the golf club with each of the balls, then the tennis racket, and so on. What happens?
4 Try playing a full game that mixes equipment from different sports — for example, play basketball with a ping pong ball. What happens?
What Happens?Use the charts to record your results, and make more as needed.
What Does it Mean? - Why do you think the balls are made the way
they are?
- How does changing the ball change the sport?
- Why is a golf ball the best ball to use for golf?
Find Out More - Read Key Concepts at the back of this Toolkit.
- Read Aerodynamics: Background Information.
- Watch the NBC Learn video “Evolution of the Golf Ball” at www.nbclearn.com/science-of-golf.
AerodynamicsConnect: Sports Swap Grades 6-8

24
Ball Throw (Step 2)
Ball Weight Diameter Shape Texture Distance Thrown
Time in the Air Feel of the Throw
Golf 1.6 ounces 1.7 inches sphere dimpled 30 feet 5 seconds light
Equipment Swap (Step 3)
Ball Equipment What Do You Think Will Happen?
What Did Happen? Is the Sport Easier or More Difficult with the Different Ball?
Golf Baseball bat Will hit it far Too small to hit easily More difficult
Add this chart to your Test Lab Log!
AerodynamicsConnect: Sports Swap Grades 6-8

25
FLIGHT PATH
Lift
Drag
Weight
AIR FLOW
AIR FLOW
Lift and Drag
SPIN
SPIN
AIR
FLOW
When you hit the perfect shot and send the ball soaring, what makes it fly so far? The power of your swing plays an important part, but so does the design of the ball itself. What may look like a simple ball is actually a marvel of science and engineering — and understanding how a golf ball moves through the air can help you design better ones to fly even higher and farther!
Something in the AirIt all starts with the air around us. While we don’t ordinarily feel the weight of air, it’s actually full of gas molecules that exert pressure (or push) on everything they surround. This pressure acts evenly on all sides of an object, pushing down on the top as much as it pushes up on the bottom. So what makes a golf ball (or even an airplane) fly?
Aerodynamics, the science of how objects move through the air, has the answer. When you hit the ball, you provide the initial momentum to the ball. As it heads along its flight path toward the hole, the ball pushes through the air, creating wind resistance. This
wind resistance pushes back against the ball, creating drag, a force that causes a moving object to slow down. You can feel drag in the wind against your face when you ride a bike downhill, or see its power if you try to hit a golf ball directly into the wind.
If the ball had no spin, then that would be the end of the story. However, golf balls usually have backspin. Because of this, the air moving over the top of the ball moves faster (relative to the ball) than the air moving under the ball. The faster the air moves, the less pressure it exerts, an effect that is called Bernoulli’s Principle. This lower pressure air above the ball helps generate lift, a force that pushes the ball upward, helping it to travel farther. These forces (drag, lift) affect how high and far a golf ball can move.
Building a Better BallThe first golf balls were hard wooden balls, which didn’t go very far. In the 17th century, a new type of ball was created by stuffing a wet leather pouch with goose feathers and sewing it up, which shrank into a hard, compact ball as it dried. These featheries could fly better than wooden balls, but were expensive to make and very fragile. Then in 1848, Robert Adams tried making golf balls out of gutta-percha (a rubbery sap from tropical sapodilla trees). More solid and resilient than featheries, these gutties could move faster and bounce better, and quickly became popular. About 50 years later, Coburn Haskell created the first multi-layered golf ball, which had a solid rubber core that was wrapped in rubber bands and then covered with a layer of gutta-percha.
Modern golf balls have as few as one or as many as six different layers of solid material, usually polymers such as polybutadiene (a highly resilient synthetic rubber that is also used in car tires). For example, a professional golf ball might have a thin rubber cover, an inner layer of stiff plastic, and a solid core of polybutadiene.
What’s with the Dimples?Something else that most golf balls have in common is dimples — the little dents all over the ball. Dimples may seem to be there just for decoration, but they actually have a specific aerodynamic purpose. Back in the 19th century, players discovered that dented old gutties flew farther than smooth new ones, so they began
Aerodynamics The Ball: Aerodynamics Background Information

26
Anatomy of a Sample Golf Ball
High-FrictionRubber Cover
Solid RubberCore (1-3 layers)
Stiff PlasticLayer
hammering dents into them deliberately. At the time, they may not have known exactly why the dents helped. But we now know it’s because these imperfections create turbulence in the airflow around a moving ball, which makes its wake (the air behind the ball) thinner and reduces drag.
Dimples also increase spin. As a ball moves forward through the air, the dimples cause the ball to actually spin backwards, pulling the airflow downwards. As this happens, the air at the bottom of the ball pushes up against the ball (Newton’s Third Law), creating more lift. So dimples are a small design feature with a big impact.
Good Design, But Not Too Good
Today’s golf balls fly farther and are engineered better than at any time in history. But balls shouldn’t be so good that a player’s skill no longer matters, which is why the USGA has created specific standards — a golf ball can’t be smaller than 1.68 inches in diameter (but no maximum size), can’t be heavier than 1.62 ounces (but no minimum weight), can’t go faster than 255 feet/second when hit by the USGA’s impact machine, can’t go any farther than 317 yards when hit at 120 mph, must be spherically symmetric, and must not contain unusual construction features.
It’s not difficult to check the weight, size, or shape of a golf ball, but how do you figure out whether it conforms to those limits on distance and speed? With a robot golfer, of course! The robot golfer hits the ball off a tee with a 120 mph swing speed to see how fast the ball leaves the tee, and to find its initial angle and spin. The USGA Equipment Standards Department then uses a high-speed launcher to shoot the ball at speeds up to 200 mph through a 70-foot tunnel of sensors, which helps the USGA learn about its aerodynamic performance. Combining the launch data from the robot golfer with the aerodynamic data from the tunnel, the USGA can accurately simulate golf ball trajectories.
The USGA tests more than 30,000 golf balls per year to make sure that they are within the rules. This system is also used by golf ball companies around the world to test new ball designs (and not just for the fun of using a robot).
Test Center
The golf ball tunnel at the USGA Test Center (Copyright USGA/John Mummert)
This information is adapted from NBC Learn: Science of Golf, “Evolution of the Golf Ball” (www.nbclearn.com/science-of-golf) and “STEMZone and the World of Golf” (www.kidscoopnews.com/downloads/stem-zone/ksn_stemzone.pdf )
The Ball: Aerodynamics Grades 6-8 Aerodynamics

27
AerodynamicsThe science of how objects move through the air. The word comes form the combination of the Greek words aeroes (of the air) and dynamis (power, strength, force).
AirflowThe motion of air. In the case of a golf ball, airflow refers to how air moves around and/or past a ball as it travels.
Air PressureA force caused by air pressing (or pushing) on an object. Air continually exerts pressure on everything it surrounds.
Bernoulli’s PrincipleA scientific principle that states that moving air causes less pressure on an object than still air. This is also true of moving fluids (like water).
DimplesDents on a golf ball that help it travel farther through the air. They do this by creating turbulence in the airflow around the ball, which reduces drag.
Drag (Air Resistance)A force created by air pushing back against a moving object, which causes it to slow down. Most round objects (like a golf ball) have less drag than flat objects (like a cube).
Flight PathThe direction in which a golf ball travels through the air.
ForceThe means by which an object is pushed or pulled.
Golf Ball (Featherie)In the 17th century, golf balls were created by stuffing a wet leather pouch with goose feathers and sewing it up, which then shrank into a hard, compact ball as it dried. Featheries could fly better than earlier wood balls, but were expensive to make and very fragile.
Golf Ball (Guttie)In the mid-19th century, golf balls were made out of gutta-percha (a rubbery sap from tropical sapodilla trees). Gutties were more solid and resilient than featheries, so they could bounce better and fly faster, but also stop quickly when landing.
Key Concepts Aerodynamics

28
Golf Ball (Modern)Golf balls today have as few as one or as many as six different layers of solid material, usually polymers such as polybutadiene (a highly resilient synthetic rubber that is also used in car tires).
GravityA force of attraction that pulls objects toward each other. The more mass an object has, the stronger its gravitational pull.
LiftA force that lifts an object upward due to the difference between the air pressure above and below it. The air moving over the top of a golf ball travels faster than the air below it, causing the ball to move upward.
MassThe amount of matter in an object. The more mass an object has, the more force is required to move it.
Newton’s Laws of MotionScientific principles established by English scientist Isaac Newton in the 17th century. First law: an object at rest will stay at rest, or an object in motion will stay in motion at a constant speed, unless an external force acts on it. Second law: when a force acts on an object, the object will move in the same direction that the force was moving. Third law: any object will react to a force applied to it, and the force of the reaction will be equal to and in the opposite direction of the original force applied.
SpeedThe measure of how fast an object travels a specific distance over a specific time.
SpinThe circular motion of a golf ball as it travels through the air. As a ball moves forward through the air, the dimples cause the ball to actually spin backwards, pulling the airflow downwards. As this happens, the air at the bottom of the ball pushes up against the ball, creating more lift.
TurbulenceIrregular or agitated motion of the air. You can feel this when an airplane encounters turbulence and starts to shake.
AerodynamicsKey Concepts

29
VelocityThe measure of speed in a specific direction.
WeightThe measure of the pull of gravity on the mass of an object. The weight of an object makes it harder to lift or stay aloft in the air.
AerodynamicsKey Concepts

30
To further explore the science of the AERODYNAMICS or the game of golf, please check out the following resources:
Science of GolfUSGA STEM Resourceswww.usga.org/stem Portal to a variety of STEM-related experiences, funding, and other content
USGA Test Centerwww.usga.org/equipment/overview/Equipment-Standards-Overview Information about the Test Center and the Rules of Golf
NBC Learn: Science of Golfwww.nbclearn.com/science-of-golf Videos and lesson plans about the science of golf
Sports ‘n Science: Golfsportsnscience.utah.edu/science-behind-the-sport/sport/golf Information about the science of golf, as well as other sports
STEMZone and the World of Golf (Kid Scoop News)www.kidscoopnews.com/downloads/stem-zone/ksn_stemzone.pdf Information and activities related to the science of golf
GolfUSGAwww.usga.orgOfficial Rules of Golf, equipment standards, golf course information, and more
USGA Museumwww.usgamuseum.com Online exhibits and photos related to the history of golf
Aerodynamics Additional Resources

31
Test Lab Toolkits are designed to support Next Generation Science Standards, Common Core Mathematics Standards, and the 21st-century skills of communication, collaboration, critical thinking, and creativity. The specific Next Generation Science Standards related to this Toolkit include:
Motion and Stability: Forces and InteractionsMS-PS2-1Apply Newton’s Third Law to design a solution to a problem involving the motion of two colliding objects.
MS-PS2-2 Plan an investigation to provide evidence that the change in an object’s motion depends on the sum of the forces on the object and the mass of the object.
MS-PS2-4 Construct and present arguments using evidence to support the claim that gravitational interactions are attractive and depend on the masses of interacting objects.
Engineering DesignMS-ETS1-1Define the criteria and constraints of a design problem with sufficient precision to ensure a successful solution, taking into account relevant scientific principles and potential impacts on people and the natural environment that may limit possible solutions.
MS-ETS1-2Evaluate competing design solutions using a systematic process to determine how well they meet the criteria and constraints of the problem.
MS-ETS1-3Analyze data from tests to determine similarities and differences among several design solutions to identify the best characteristics of each that can be combined into a new solution to better meet the criteria for success.
MS-ETS1-4Develop a model to generate data for iterative testing and modification of a proposed object, tool, or process such that an optimal design can be achieved.
Aerodynamics Education Standards