the specialists in land rovers • usa preparing or repairing a zenith carburetor · 2010-12-09 ·...
TRANSCRIPT
T H E S P E C I A L I S T S I N L A N D R O V E R S • U S A
1 802 879-0032 or (800) 403-7591 • Fax: (802) [email protected] • www.roversnorth.com
Rovers North, Inc. • 1319 VT Rt. 128 • Westford, Vermont • 05494-9601 USA
INSTRUCTIONS: RNC959I
Preparing or Repairing a Zenith Carburetor
The Zenith 36IV carburetor is probably the most common carburetor found on Series LandRovers and can provide years of reliable service when properly maintained. Unfortunately,over time, a vacuum leak can occur between the mating surfaces due to heat that causedwarping. The symptoms of this problem are a rich running at idle where the mixture screwhas no effect, and a stumble on acceleration that clears up at high speed or when the chokeis pulled out.
1) First, remove the carburetor. Drain the remaining gas, remove the cotter pins (twoeach) from the linkage, and disconnect the spring from the top housing. Now separate the top from the bottom by removing the four screws.
2) Flip the top over and separate the emulsion block from the top cover by removing thefloat, the two screws, and the needle (float) guide. You will also have to remove the throt-tle linkage by removing the nut and the c-clip, and pulling the throttle linkage out of thetop. Remove the accelerator diaphragm located on top of the top cover by removing thethree small screws.
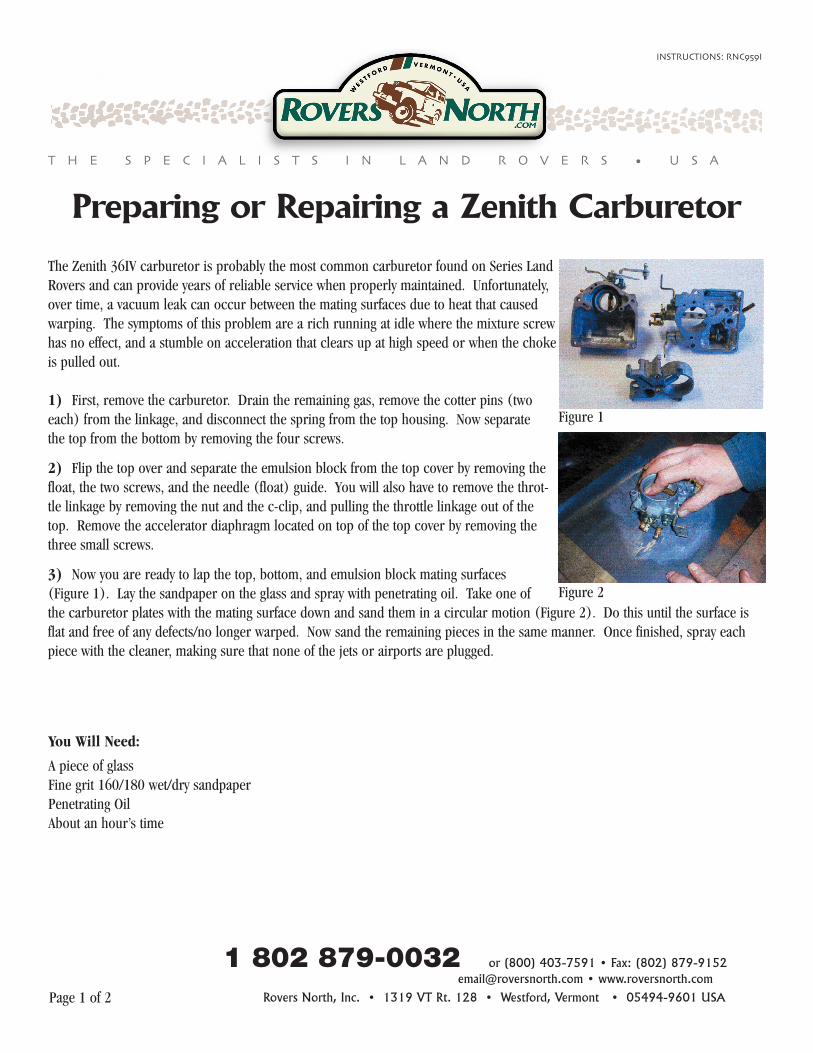
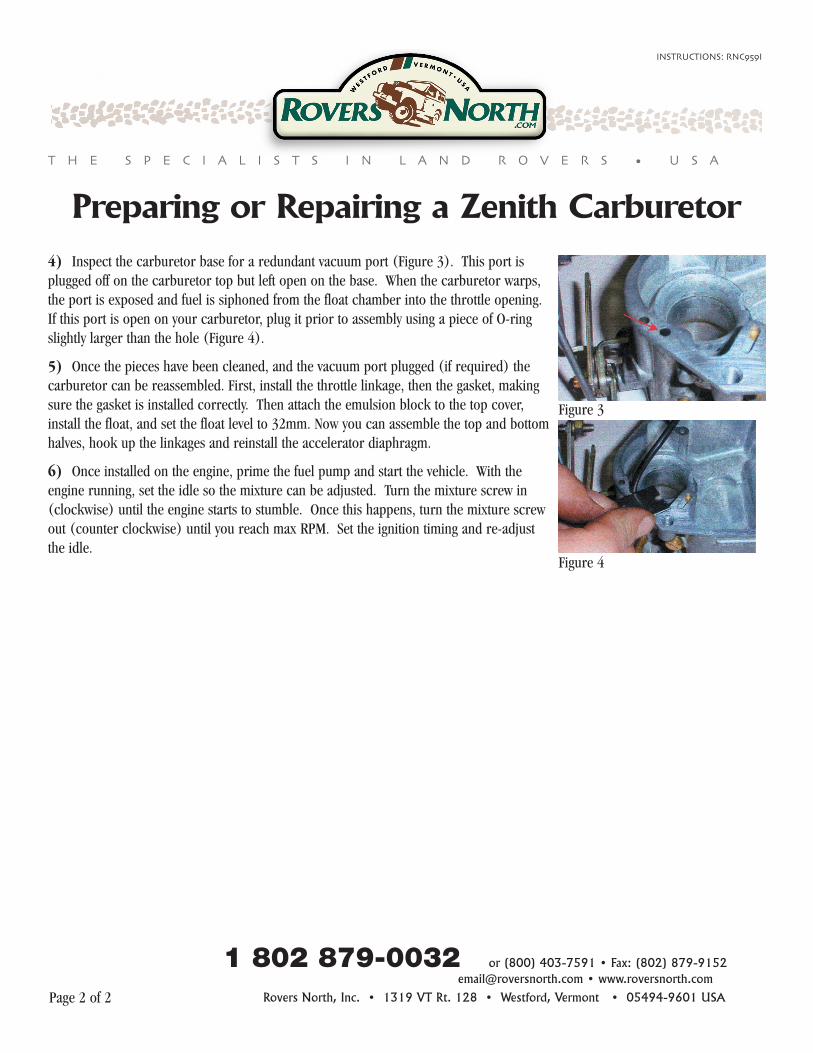
3) Now you are ready to lap the top, bottom, and emulsion block mating surfaces (Figure 1). Lay the sandpaper on the glass and spray with penetrating oil. Take one of the carburetor plates with the mating surface down and sand them in a circular motion (Figure 2). Do this until the surface isflat and free of any defects/no longer warped. Now sand the remaining pieces in the same manner. Once finished, spray eachpiece with the cleaner, making sure that none of the jets or airports are plugged.
Page 1 of 2
You Will Need:
A piece of glassFine grit 160/180 wet/dry sandpaperPenetrating OilAbout an hour’s time
Figure 1
Figure 2
T H E S P E C I A L I S T S I N L A N D R O V E R S • U S A
1 802 879-0032 or (800) 403-7591 • Fax: (802) [email protected] • www.roversnorth.com
Rovers North, Inc. • 1319 VT Rt. 128 • Westford, Vermont • 05494-9601 USA
INSTRUCTIONS: RNC959I
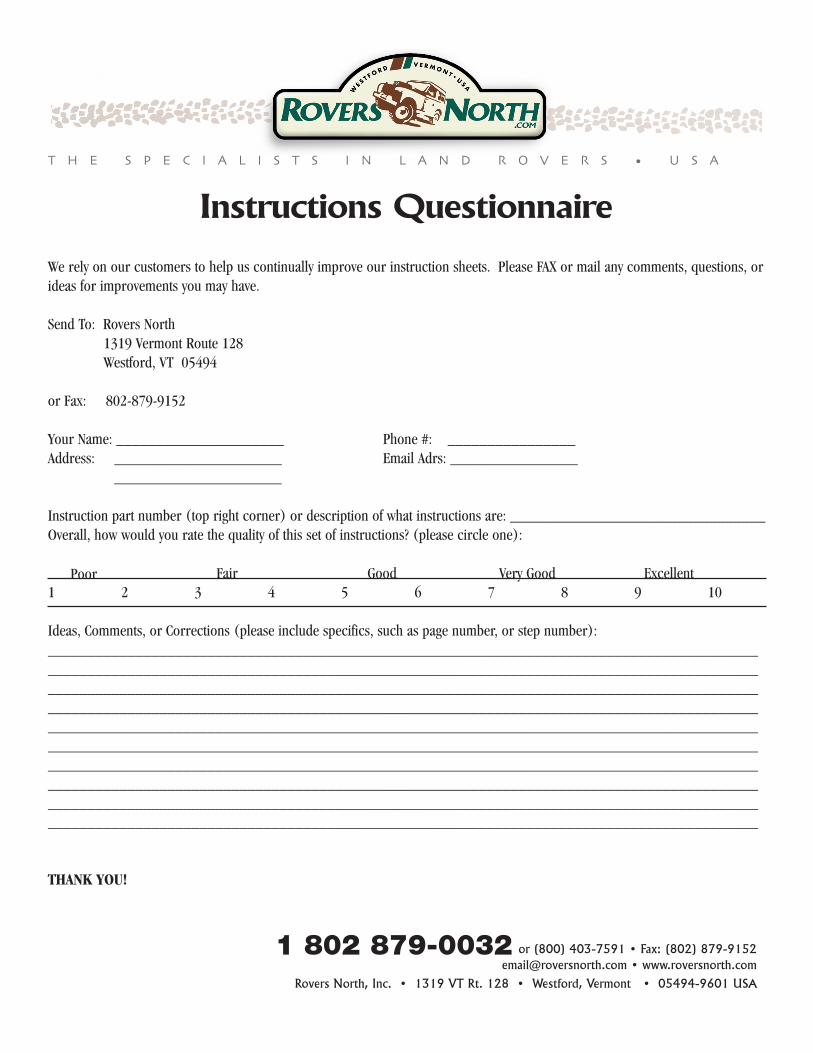
4) Inspect the carburetor base for a redundant vacuum port (Figure 3). This port isplugged off on the carburetor top but left open on the base. When the carburetor warps,the port is exposed and fuel is siphoned from the float chamber into the throttle opening.If this port is open on your carburetor, plug it prior to assembly using a piece of O-ringslightly larger than the hole (Figure 4).
5) Once the pieces have been cleaned, and the vacuum port plugged (if required) thecarburetor can be reassembled. First, install the throttle linkage, then the gasket, makingsure the gasket is installed correctly. Then attach the emulsion block to the top cover,install the float, and set the float level to 32mm. Now you can assemble the top and bottomhalves, hook up the linkages and reinstall the accelerator diaphragm.
6) Once installed on the engine, prime the fuel pump and start the vehicle. With theengine running, set the idle so the mixture can be adjusted. Turn the mixture screw in(clockwise) until the engine starts to stumble. Once this happens, turn the mixture screwout (counter clockwise) until you reach max RPM. Set the ignition timing and re-adjust the idle.
Page 2 of 2
Figure 3
Figure 4
Preparing or Repairing a Zenith Carburetor
T H E S P E C I A L I S T S I N L A N D R O V E R S • U S A
or (800) 403-7591 • Fax: (802) [email protected] • www.roversnorth.com
Rovers North, Inc. • 1319 VT Rt. 128 • Westford, Vermont • 05494-9601 USA
Instructions Questionnaire
We rely on our customers to help us continually improve our instruction sheets. Please FAX or mail any comments, questions, orideas for improvements you may have.
Send To: Rovers North1319 Vermont Route 128Westford, VT 05494
or Fax: 802-879-9152
Your Name: _____________________ Phone #: ________________Address: _____________________ Email Adrs: ________________
_____________________
Instruction part number (top right corner) or description of what instructions are: ________________________________Overall, how would you rate the quality of this set of instructions? (please circle one):
1 2 3 4 5 6 7 8 9 10
Ideas, Comments, or Corrections (please include specifics, such as page number, or step number):__________________________________________________________________________________________________________________________________________________________________________________________________________________________________________________________________________________________________________________________________________________________________________________________________________________________________________________________________________________________________________________________________________________________________________________________________________________________________________________________________________________________________________________________________________________________________________________________________________________________________________________________________________________________________________________________
THANK YOU!
1 802 879-0032
Poor Fair Good Very Good Excellent