thermal design project final report john wallerich principal engineer wallerich group, llc
TRANSCRIPT

Thermal Design ProjectFinal Report
John WallerichPrincipal EngineerWallerich Group, LLC

Agenda 1. Introduction2. Executive Summary 3. Project Summary4. Recommendations5. CFD models
22009 - Wallerich Group, LLC

1. Introduction
3
statistical analysis
actual experiences in building and testing
data centers
CFD modeling
[customer]
Wallerich Group, LLC
Datacenter design standards
Most efficient cooling design
Develop and Provide
Project tasks
2009 - Wallerich Group, LLC
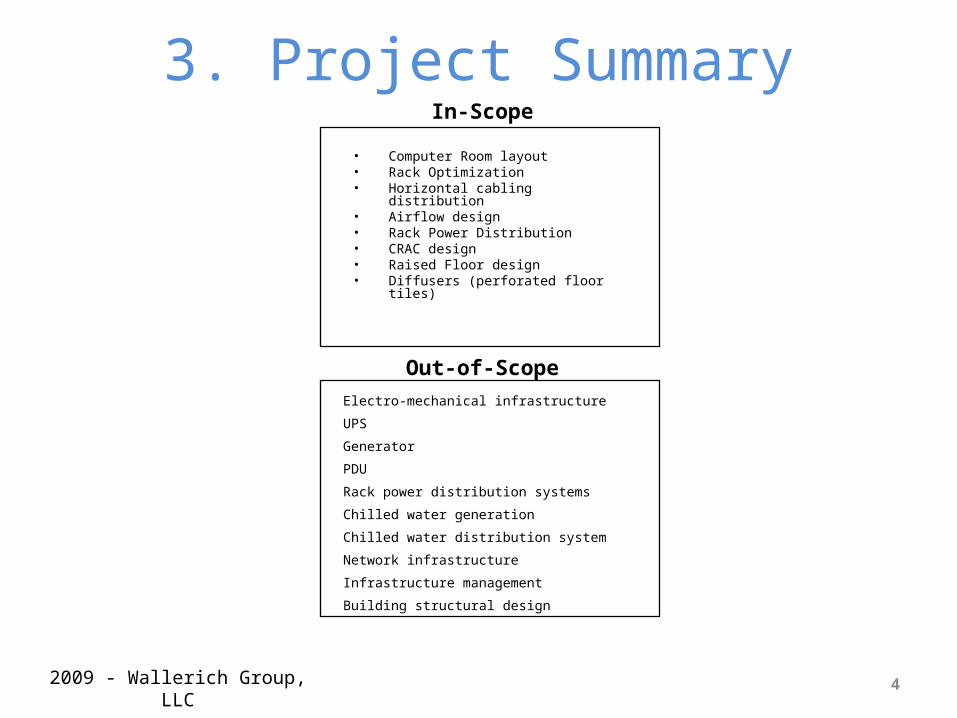
3. Project Summary• Computer Room layout• Rack Optimization• Horizontal cabling distribution• Airflow design• Rack Power Distribution• CRAC design• Raised Floor design• Diffusers (perforated floor tiles)
4
Electro-mechanical infrastructure
UPS
Generator
PDU
Rack power distribution systems
Chilled water generation
Chilled water distribution system
Network infrastructure
Infrastructure management
Building structural design
In-Scope
Out-of-Scope
2009 - Wallerich Group, LLC

Design Components Analysis results
5
Design Components ReccomendationA1 Airflow Design ROWA2 Cooling Architecture Primary CoolingA3 Primary Cooling Architecture Chilled WaterA4 Supplemental Cooling Design N/A (Outside Air)A5 CRAC Grouping No GroupingB1 Cold Air Supply Under FloorB2 Raised Floor Height 900mm / 36inchB3 Perforated Tile type FixedB4 Perforated Tile opening >50% OpenB5 Rack Configuration Ho Aisle & Cold AisleB6 Rack Air Control Blank Panels & Side PanelsB7 Perforated Tile location Determined by CFD modelB8 Return Air Design PlenumB9 Plenum Design Hot Ailse EnclosureB10 Rack Door (Ft & Bk) High Flow Rack DoorsB11 CRAC Position OppsiongB12 CRAC Location Outside RMFB13 CRAC Design Off ther Shelf / CustomB14 Tile Size 600mm sqB15 Network Cable Location OverheadB16 Power cable location Under FloorB17 Rack Width 600mmB18 Rack Depth 1.2mB19 Rack Height 2mB20 Rack-Ceiling Distance >460mm
The letter/number designations and solution consensus came from the initial analysis session documents and are maintained for the sake of document continuity. These design decisions were agreed to by consensus and are incorporated into the CFD modeling analysis.
2009 - Wallerich Group, LLC

A1:Airflow Design Diagram Option Pros and Cons
Room Merit:Assure N+1 configuration. Room level cooling was adequate for mainframe environments,
Demerit:but is not cost effective to cool high density equipment cost effectively.Very inefficient and will not deliver sufficient cooling for high density environments.
Row
Merit:Assure N+1 configuration. Optimize capital investment and available space. Reduce maintenance time and facilitate maintenance work. Quantify the cooling system performance. Maximize the operational efficiency by matching capacity to load.Maximizes efficiency of cooling system infrastructure
Rack
Merit:Assure N+1 configuration.
Merit:Rack level cooling devices are much more expensive than Row type cooling, and lower revenue potential. N+1 configuration reduces # of productive racks.
62009 - Wallerich Group, LLC

A2:Cooling Architecture Diagram Option Pros and Cons
Primary cooling
Merit:Centralized chilled water system ensures maximum efficiency and redundancy that supports Tier 3.
Demerit:Must support entire critical load with full redundancy (chiller, plumbing, CRAC)
Primary Cooling&Supplemental Cooling
Merit:Supplemental cooling is designed to provide options for datacenters who have exhausted their primary cooling capacity.
Demerit:Full critical load must be supported with supplemental option disabled, or supplemental cooling design must also support critical load without use of primary cooling system..Supplemental cooling is designed to provide options for datacenters who have exhausted their primary cooling capacity and voids Tier 3 capability. It is more costly and may reduce cabinet count.
7
Primary cooling system
Primary cooling system
Supplemental cooling system
2009 - Wallerich Group, LLC

A3:Primary cooling Architecture
Diagram Option Pros and Cons
Air Conditioner
Demerit:This design does not provide N+1 redundancy.Instead of assessing heat rise characteristicsthere are other issues regarding using AC units that need to be decided first.One of those assumption is that racks will never exceed 2.5KW over the life of facility (.10 to 12 years).Initial investment is less than chilled water system, but may not support Tier 3 for the life of the facility (2.5kW may increase)
Chilled Water/AHU
Merit:Supports Tier 3 requirements for all computing models.Provides high availability option when using excess chilled water storage and achieves required cooling capacity for all rooms.Provides most cost effective solution while supporting Tier 3 specification. Allows for use of outside cold air to reduce energy consumption.
8
Chiller
CRAC
Cooling Medium
Cooling Tower
CRAC
Chilled Water
2009 - Wallerich Group, LLC

A4:Supplemental cooling Diagram Option Pros and Cons
XD
Merit:XD is used when primary cooling system is exhausted and provides cold air to a very small area
Demerit:XD is a Liebert solution that does not support Tier 3 availability.More costly to operate and provides cold air to a very small area. Cannot provide total cooling and is used when primary cooling system is exhausted.
Water to Rack
Merit:Cools hot air as it exits equipment
Demerit:Tier 3 capability assumes redundant chilled water system. May be required for very high density, but at higher risk and costs.. Makes accessing equipment more difficult, and is typically vendor specific.
Rack Cooling
Merit:Cools hot air as it exits rack.
Demerit:Rack cooling devices must support entire room if primary CRAC failed, however they can not support this requirement. Rack cooling replaces a revenue generating rack and replaces it with a device that only cools racks on either side. Not cost effective.
Outside Air
Merit:No risk to Tier 3.Can have a significant impact on energy consumption during cold days. Options are being evaluated.
9
Rack
RackRack
RackRack
Water
Chilled Water
Cooling Tower
Rack Rack Rack Rack
inside Room
outside
2009 - Wallerich Group, LLC

A5:CRAC Grouping
Diagram Option Pros and Cons
No Grouping
Merit:Assure “Concurrently Maintainable” and “Redundancy N+1”configuration. Reduce maintenance time and facilitate maintenance work
Grouping
Merit:Assure “Concurrently Maintainable” and “Redundancy N+1”configuration.
Demerit:Recommended when using single chilled water supply (not recommended)
10
Group A
Group B
Group C
2009 - Wallerich Group, LLC

B1:Cold Air Supply
Diagram Option Pros and Cons
Under Floor
Merit:Supports Tier 3 model.Optimize cooling capacity by supplying cold air efficiently. Allows flexibility of air delivery and cable plenum.
Overhead
Merit: Supports Tier 3 model
Demerit:Less flexible to change. More cost to install.Use when building height is limited.
Side Feed
Merit: Supports Tier 3 model
Demerit:Interrupts controlled airflow. Used only as supplemental cooling when unable to used under-floor plenum
Combination
Merit: Supports Tier 3 model
Demerit:No advantage, and would be used when primary cooling design is inadequate.
11
CRAC rack
CRAC rack
2009 - Wallerich Group, LLC
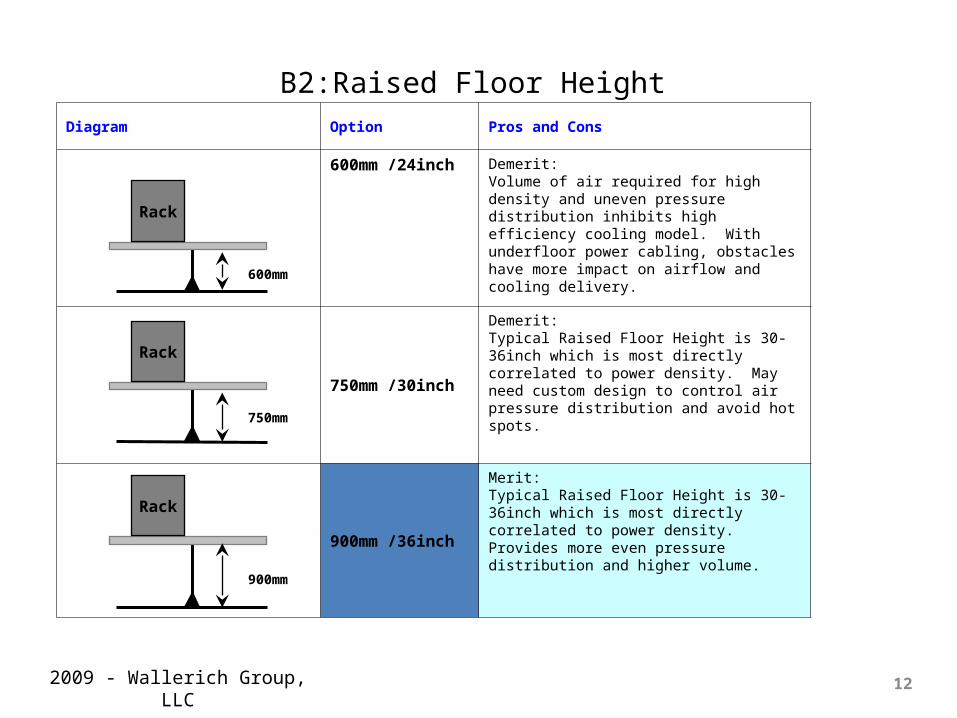
B2:Raised Floor HeightDiagram Option Pros and Cons
600mm /24inch Demerit:Volume of air required for high density and uneven pressure distribution inhibits high efficiency cooling model. With underfloor power cabling, obstacles have more impact on airflow and cooling delivery.
750mm /30inch
Demerit:Typical Raised Floor Height is 30-36inch which is most directly correlated to power density. May need custom design to control air pressure distribution and avoid hot spots.
900mm /36inch
Merit:Typical Raised Floor Height is 30-36inch which is most directly correlated to power density. Provides more even pressure distribution and higher volume.
12
Rack
Rack
Rack
600mm
750mm
900mm
2009 - Wallerich Group, LLC
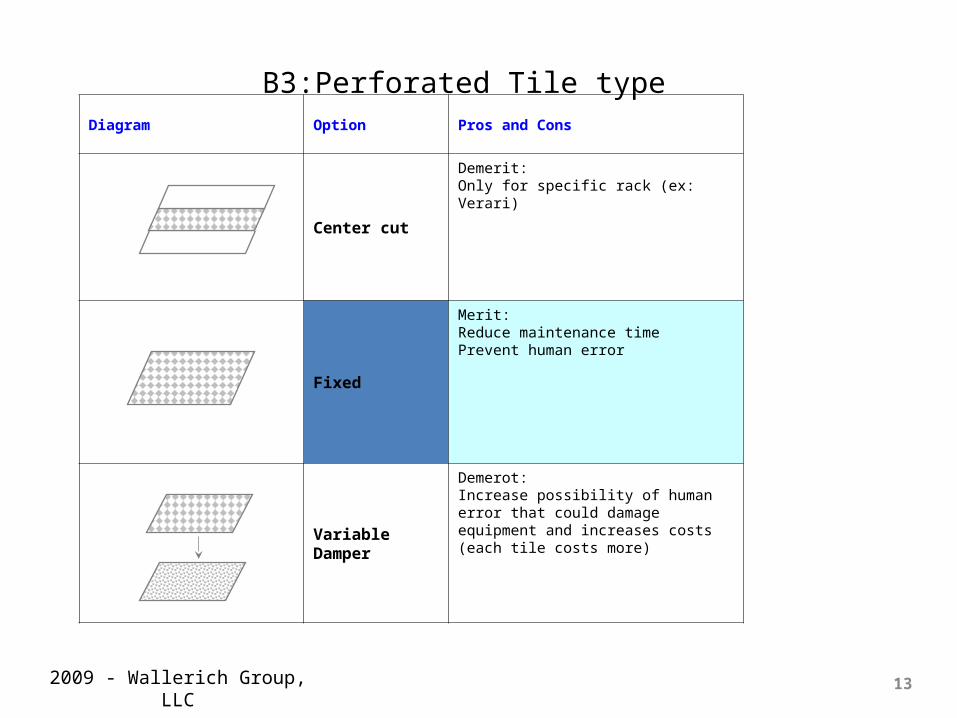
B3:Perforated Tile type Diagram Option Pros and Cons
Center cut
Demerit:Only for specific rack (ex: Verari)
Fixed
Merit:Reduce maintenance timePrevent human error
Variable Damper
Demerot:Increase possibility of human error that could damage equipment and increases costs (each tile costs more)
132009 - Wallerich Group, LLC

B4:Perforated Tile opening
Diagram Option Pros and Cons
20-50% open
Merit:Perforated tile openings will be determined by CFD modeling. Range likely to be 40-50% open.
>50% Open
Merit:Perforated tile openings will be determined by CFD modeling
<20% open
Merit:Perforated tile openings will be determined by CFD modeling
142009 - Wallerich Group, LLC

B5:Rack Configuration
Diagram Option Pros and Cons
Random
Very poor control of hot air, increased likelihood of overheating equipment and higher energy costs
Hot Aisle / Cold Aisle
Maximize efficiency of cooling system through isolation of cold and hot air.
152009 - Wallerich Group, LLC
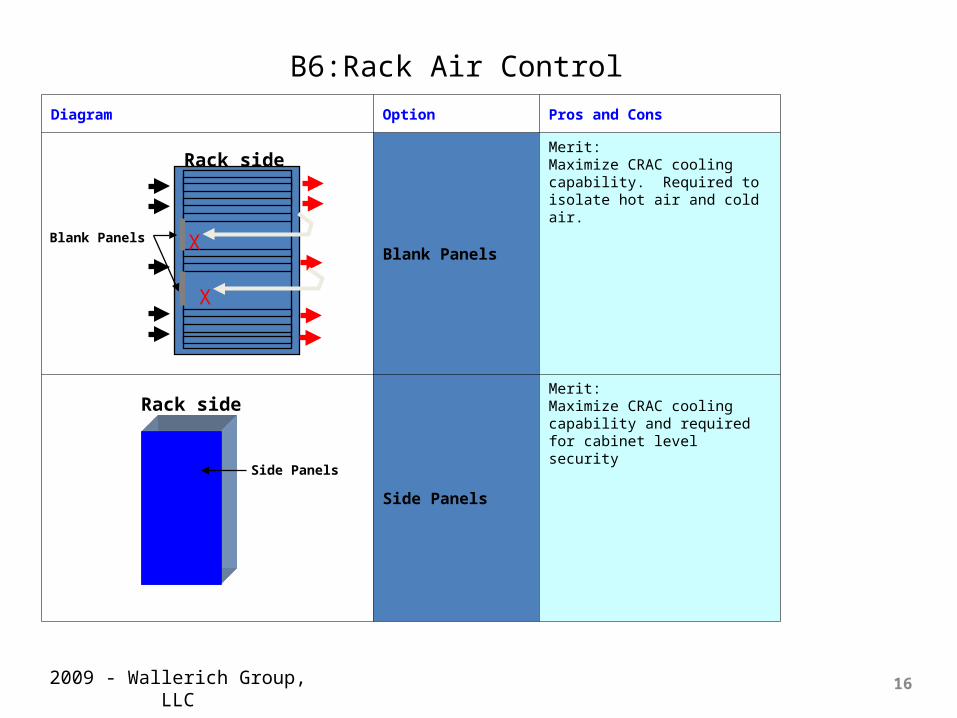
B6:Rack Air Control Diagram Option Pros and Cons
Blank Panels
Merit:Maximize CRAC cooling capability. Required to isolate hot air and cold air.
Side Panels
Merit:Maximize CRAC cooling capability and required for cabinet level security
16
X
X
Rack side
Blank Panels
Rack side
Side Panels
2009 - Wallerich Group, LLC

B7:Perforated Tile location
Diagram Option Pros and Cons
Cold Aisle
Merit:Required for efficient delivery of cold air to equipment.
Under rack
Demerit:Only required by specific rack manufacturer.
Other
Demerit:May be required for room air supply if cold aisle enclosure selected
17
Rack RackRack
Rack RackRack
Rack RackRack
2009 - Wallerich Group, LLC

B8:Return Air Design Diagram Option Pros and Cons
Open
Merit:Unclosing return air flow is used when floor height is low to obtain plenum area.
Demerit:Hot and cold air are allowed to mix lowering the thermal load that room can support and increases costs of operation.
Plenum
Merit:Maximize CRAC cooling capability and increase thermal load that room can support.
18
CRAC rack rack rack
CRAC rack rack rack
2009 - Wallerich Group, LLC

B9:Plenum Design Diagram Option Pros and Cons
Cold Aisle
Merit:Improves cooling efficiency and load that can be supported.
Demerit:No as efficient as hot aisle enclosure.
Hot Aisle
Merit:Recommended by Intel. Internal tests show as being most efficient and effective airflow design.
No enclosure
Demerit:Not Recommended
Hot and Cold Aisle(20KW Only)
Demerit:Not recommended: blocks access to network infrastructure, adds costs with no real benefit.
19
Rack
Rack
Rack
Rack
Enclosure
ラッ
ク
ラッ
ク
Rack
Rack
Enclosure
Rack
Rack
ラッ
ク
Rack
Rack
ラッ
クR
ack
Rack
Rack
Rack
Enclosure
Rack
Rack
2009 - Wallerich Group, LLC

B10:Rack Doors (Front & Back)
Diagram Option Pros and Cons
No Door
Merit:Maximize cooling efficiency.
Demerit:no server access control. May be OK for some racks.
<50%
Demerit:There is no necessity to recommend.
50-70% open
Demerit:There is no necessity to recommend.
80% open
Merit:Accelerate cooling efficiency with server access controlPrevent human error
20
Rack
Rack
Rack
Rack
2009 - Wallerich Group, LLC

B11:CRAC Position Diagram Option Pros and Cons
Opposing
Merit:Maximize CRAC cooling efficiency for typical rectangular room
Multi-Wall
Demerit:Can be used, but only if total capacity requires it.
Mid-Floor
Demerit:Not recommended as it introduces water to the RMF area, exposing equipment to possible water contamination
21
CRAC
CRAC
CRAC
2009 - Wallerich Group, LLC

B12:CRAC Location Diagram Option Pros and Cons
Inside RMFDemerit:Not recommended due to noise and security requirements.
Outside RMF
Merit:Reduce maintenance time and facilitate maintenance work with server access controlPrevent human error
OverheadDemerit:Not recommended due to building height limitations.
22
CRAC
CRAC
Rack
CRAC
Rack
Rack
2009 - Wallerich Group, LLC
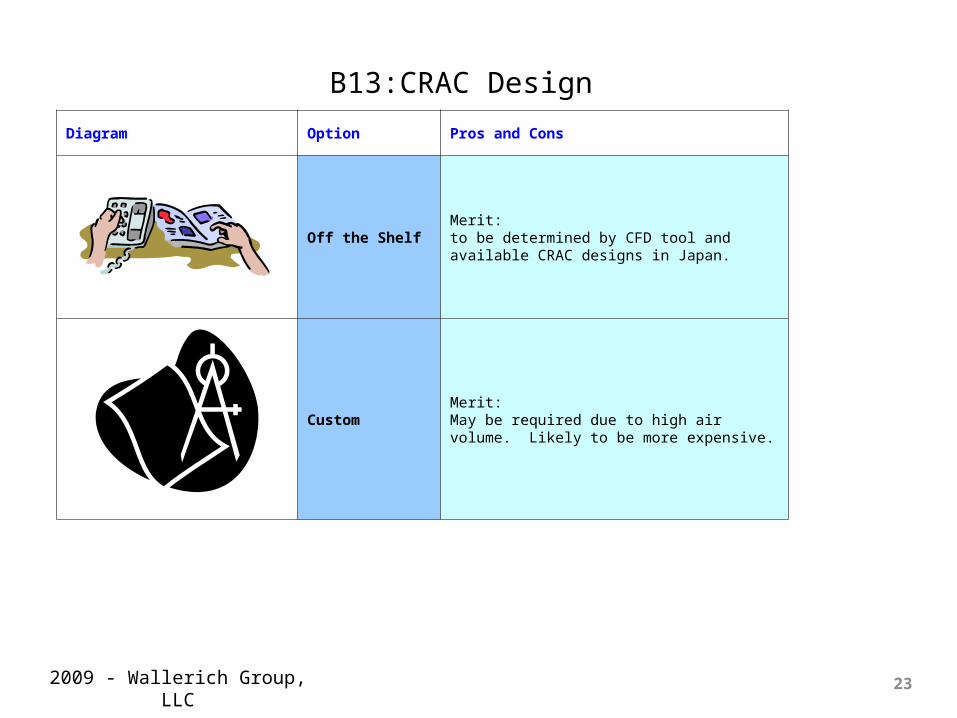
B13:CRAC Design
Diagram Option Pros and Cons
Off the ShelfMerit:to be determined by CFD tool and available CRAC designs in Japan.
CustomMerit:May be required due to high air volume. Likely to be more expensive.
232009 - Wallerich Group, LLC

B14:Tile Size Diagram Option Pros and Cons
600mm sq
Merit::Widely distributed in Japan and Easy to purchase
700mm sq
Demerit:Odd Size, no value.
800mm sq
Demerit:Odd size, no value.
24
600mm
700mm
800mm
2009 - Wallerich Group, LLC

B15:Network Cable Location
Diagram Option Pros and Cons
Overhead
Merit:Reduce maintenance time and facilitate maintenance work.Maximize CRAC cooling efficiency by avoiding under-floor air blockage
Under Floor
Demerit:Twisted-pair cable (network cable)become obstacle for efficient airflow
25
Rack
Rack
2009 - Wallerich Group, LLC

B16:Power cable location Diagram Option Pros and Cons
Overhead
Merit:Separated distance from network cable must be 50-300mm
Under Floor
Merit:Reduce maintenance time and facilitate maintenance work to keep distance from network cable as 50-300mm *3
Thin bus power cable affect a little to airflow
26
Rack
Rack
2009 - Wallerich Group, LLC

B17:Rack Width
Diagram Option Pros and Cons
600mm / 24”
Merit:Utilizing cable mgmt system, revenue target requires maximum rack count. Increase number of racks per room.
700mm / 30”
Demerit:No clear advantage, and reduces overall rack count. Can be used with 600mm if needed. Reduce number of racks per roomthan 600mm
800mm / 36”
Demerit:No clear advantage, and reduces overall rack count. Can be used with 600mm if needed. Reduce number of racks per roomthan 600mm
27
600mm
700mm
Rack
800mm
Rack
Rack
2009 - Wallerich Group, LLC

B18:Rack Depth
Diagram Option Pros and Cons
1mMerit:Should be less than twice tile size for maintenance access
1.2m
Merit:Should be less than twice of tile size for maintenance efficiency
> 1.2m
Demerit:Not recommended – rack will overlap tile edge making access impossible.
28
Rack
1m
Rack
1.2m
Rack
2m
2009 - Wallerich Group, LLC

B19:Rack Height
Diagram Option Pros and Cons
1.8m
Merit:Lower rack can reduce number of servers per rack
2m
Merit:Typical rack size, creates no op issues. Will support up to 42 1U servers
2.2m
Merit:Higher rack can increase number of servers per rack
Demerit:Will limit space available for overhead network cabling
29
Rack 1.8m
Rack2m
Rack
2.2m
2009 - Wallerich Group, LLC

B20:Rack-Ceiling Distance
Diagram Option Pros and Cons
<460mm
Demerit:A minimum clearance between ceiling to rack shall be 460mm
>460mm
Merit:A minimum clearance between ceiling to rack shall be 460mm*4
30
Rack
Rack
<460mm
>460mm
2009 - Wallerich Group, LLC

Design Elements Diagram (1/4)
31
CRAC CRAC
Air Flow=ROW
CRAC Grouping=No Grouping
Supplemental Cooling Design
Primary Cooling Architecture=Chilled Water
Cold Air Supply=Under Floor
Raised Material Floor(RMT)
Dropped Ceiling
Raised Floor Height=900mm
(36inch)
Rack
Cooling Architecture=Primary Cooling
2009 - Wallerich Group, LLC

Design Elements Diagram (2/4)
32
CRAC CRAC
Rack
Perforated Tile
Perforated Tile type=Fixed
Perforated Tile opening= >50%open
Rack Configuration= Hot Aisle & Cold Aisle
Rack Air Control=
Blank Panels & Side Panels
Return Air Design= Plenum
Plenum Design= Hot Aisle
Tile Size= 600mm
Perforated Tile location= Cold Aisle
2009 - Wallerich Group, LLC
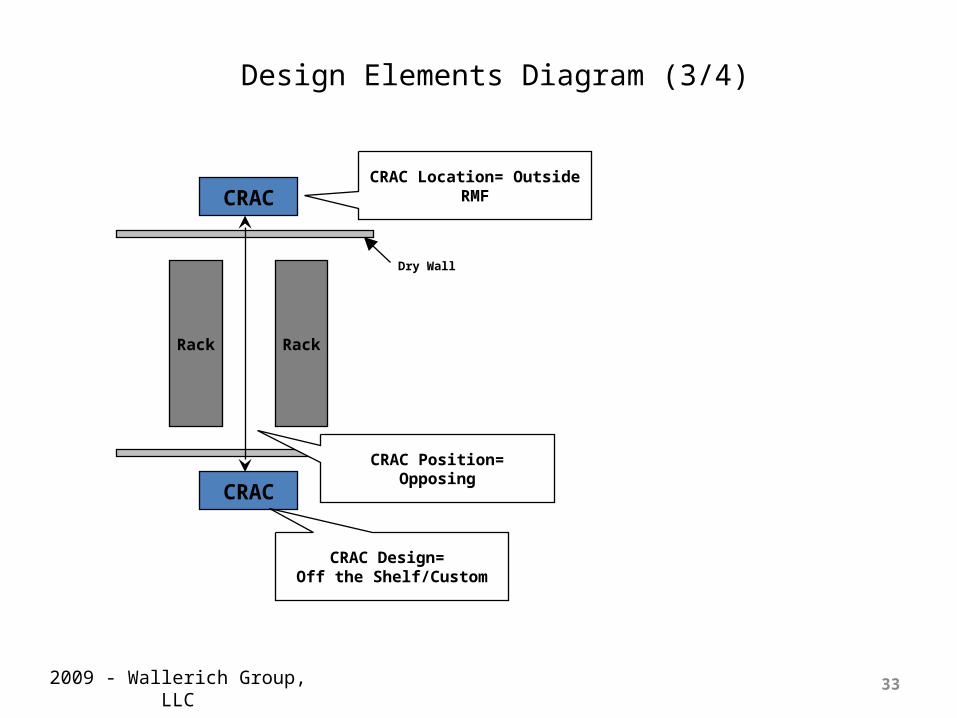
Design Elements Diagram (3/4)
33
RackRack
CRAC
CRAC
CRAC Position= Opposing
CRAC Location= Outside RMF
Dry Wall
CRAC Design= Off the Shelf/Custom
2009 - Wallerich Group, LLC

Design Elements Diagram (4/4)
34
Rack
Building DesginBuilding Design
Raised Floor Height = 900mm(36inch)
Rack Height = 2m
Rack-Ceiling Distance= >460mm
Rack
Rack Width = 600mm
Rack Depth = 1.2m
Network Cable Location=Overhead
Power Cable Location=Under Floor
2009 - Wallerich Group, LLC
352009 - Wallerich Group, LLC