time overcurrent relays instructions gek · pdf filetime overcurrent relays ... to theextent...
TRANSCRIPT

GEK-34055F
TYPES
INSTRUCTIONS
TIME OVERCURRENT RELAYS
IAC77A FORM 800 AND UPIAC77B FORM 800 AND UPIAC78A FORM 800 AND UPIAC]8B FORM 800 AND UP
GENERAL ELECTRIC
GEK-34055
TABLE OF CONTENTS
PAGEDESCRIPTIONAPPLICATIONCONSTRUCTIONRATINGS
TIME-OVERCURRENT UNITINSTANTANEOUS UNITTARGET AND SEAL-IN UNITCONTACTS
BURDENSCHARACTERISTICSRECEIVING, HANDLING, AND STORAGEACCEPTANCE TESTS
VISUAL INSPECTIONMECHANICAL INSPECTIONELECTRICAL TESTS
DRAWOtJT RELAYS GENERALPOWER REQUIREMENTS GENERALTIME—OVERCURRENT UNIT
PICKUP TESTTIME TEST
INSTANTANEOUS UNITSETTING THE INSTANTANEOUSPICK UP TESTS
TARGET AND SEAL-IN UNITPICK-UP AND DROPOUT TEST
INSTALLATIONTIME-OVERCURRENT UNITTARGET AND SEAL-IN UNITINSTANTANEOUS UNIT
PERIODIC CHECKS AND ROUTINE MAINTENANCETIME OVERCURRENT UNITINSTANTANEOUS UNITTARGET AND SEAL-IN UNITCONTACT CLEANINGSYSTEM TEST
SERVICINGTIME-OVERCIJRRENT UNITTIME TESTSINSTANTANEOUS UNITTARGET AND SEAL-IN UNIT
RENEWAL PARTS
34455678899101010111111111212121213131314141414151515151515161617181818
(Cover photo 8041299)
UNIT
2

GEK-34055
TIME OVERCURRENT RELAYSTYPES IAC77A, 77B, 78A, 78B FORM 800 and UP
DESCRIPTION
‘ype 1AC77 and 1AC78 relays are single—phase, current—operated,AC de .ces with extremely inverse time/current characteristics. Theycan be utilized to protect commercial, industrial, and utility powerdistribution systems against either multi—phase or phase—to—groundfaults.
Each relay consists of a basic induction—disk time—overcurrentunit, and a dual—rated target/seal—in unit, and may include a hinge—type instantaneous—overcurrent unit. Both the time—overcurrent unitand the instantaneous unit are adjustable over a range of about 8 to1. The available ranges in amperes of both units, as well asinformation on their continuous rating, contact rating, andtarget/seal—in unit tap ratings are given in the section on RATINGS.
A standard Sl case is used to mount each relay. The outline andmounting dimensions of this case are shown in Figures 11 and 12.
The basic differences between the relays covered by theseinstructions are noted in the following Table I.
TABLE I
INSTANTANEOUS CONTACT INTERNALTYPE UNIT CIRCUITS CONNECTIONS
IAC77A NO 1 FIGURE 4IAC77B YES 1 FIGURE 5IAC78A NO 2 FIGURE 6IAC78B YES 2 FIGURE 7
These instructions do not purport to cover all details or variations in equipment nor provide for everypossible contingency to be met in connection with installation, operation or rnuintenunce. Should furtherinjhrmation he desired or should particular pro hiems arise which are not covered sufficiently for the purchaser’spurposes, the matter should be referred to the General Electric Company.
To the extent required the products described herein meet applicable ANSI, IEEE and NEMAstandards; but no such assurance is given with respect to local codes and ordinances because they vary greatly.
3

GEK-34055
APPLICATION
The extremely inverse time/current characteristics make the 1AC77and 1AC78 relays particularly well suited for the protection ofprimary distribution circuits. In such applications, because therelay characteristics closely parallel those of the power fusesnormally employed in these circuits, it is possible to obtainselective fault protection with a minimum time delay.
The unique time—current characteristics of these relays also makethem well suited for picking up cold loads. For any given cold loadpick up capability, the resulting setting will provide fasterprotection at high fault currents with the extremely inverse relaythan with less inverse devices.
The general practice is to use a set of three relays forinterphase faults. A separate relay, residually connected, can beutilized for single—phase—to—ground faults. Use of a separate groundrelay is advantageous because it can be adjusted to provide moresensitive protection on ground faults. Typical connections forapplying these relays are shown in Figures 14 and 15.
In the application of 1AC77 and IAC78 relays with automaticreclosing devices, the reset time should be considered. The resettime of all relays covered by these instructions is approximately 60seconds from the fully—closed to the fully—open position, when set atnumber 10 on the time dial.
When setting these relays to coordinate with “downstream’s relays,a coordination time of from 0.25 to .40 second is generally allowed.These coordination times include, in addition to breaker—clearingtime, 0.10 second for relay overtravel and 0.17 second for safetyfactor. For example, if the breaker-clearing time is 0.13 second (8cycles) the coordination time would be 0.40 second. If the relaytime is set by test at the current level in question, the safetyfactor may be reduced from 0.17 to 0.07 second. Then with relayovertravel of .10 second, if the ‘downstream” breaker time is 5cycles (0.08 second), a minimum of 0.25 second could be allowed forcoordination. If the downstream devices are fuses rather thancircuit breakers, then the maximum clearing time of the fuse shouldbe used and the time allowed for breaker—clearing time should beomitted.
CONSTRUCTION
The induction unit is the basic unit in all Type—IAC relays.Figures 2 and 3 show the induction unit mounted in the cradle. Theseunits are of the induction—disk construction type.
The disk is actuated by a wattmetric—type current—operatingelement. This is similar to the standard element as used in watthourmeters, except the actuating coils above and below the operating diskare connected in series. A capacitor and variable resistor connectedin series with the inner coil on the upper laminated structure makesup the phase—shifting circuit. The disk shaft carries the movingcontact, which completes the trip or alarm circuit. The disk shaftis restrained by a spiral spring to give proper contact—closing
4

GEK-34055
current, and its motion is retarded by a permanent magnet acting onthe disk to give correct time delay.
There is a target and seal—in unit mounted on the front, to theleft of the shaft of the time—overcurrent unit. The seal—in unit hasits coil in series and its contacts in parallel with the contacts ofthe time—overcurrent unit, such that when the induction—unit contactsclose, the seal—in unit picks up and seals in. When the seal—in unitpicks up, it raises a target into view, which latches up and remainsexposed until released by pressing a button beneath the lower leftcorner of the cover.
The instantaneous unit is a small hinge—type unit, which ismounted on the front of the B models to the right of the shaft of thetime—overcurrent unit. Its contacts are normally connected inparallel with the contacts of the time—overcurrent unit and its coilis connected in series with the time—overcurrent unit. When theinstantaneous unit picks up it raises a target, which latches up andremains exposed until it is released. The same button that releasesthe target of the seal—in unit also releases the target of theinstantaneous unit.
RATINGS
TIME-OVERCURRENT UNIT
Ratings of the time—overcurrent unit are given in Table II.
TPBLE II
PICK UP RANGE. AMPERESRELAY FREQUENCY MAIN (TIME) INSTANTANEOUS
CYCLES UNIT UNIT
IAC77A and 50 0.5 - 4.0IAC78A 60
IAC77B and 50 0.5 - 4.0 0.5 - 4.0IAC78B 60 1.5 - 12.0 2.0 - 16.0
2.0 - 15.0 10.0 - 80.020.0 - 160.0
Available taps of the time—overcurrent unit are shown on TableIII.
TABLE III
RANGE, AMPERES TAPS AVAILABLE (AMPERES)0.5 - 4.0 0.5, 0.6, 0.7, 0.8 1.0, 1.?, 1.5, 2.0, 2.5, 3.0, 4.01.5 — 12.0 1.5, 2.0, 2.5, 3.0, 4.0, 5.0, 6.0, 7.0, 8.0, 10.0, 12.02.0 — 15.0 2.0, 2.5, 3.0, 4.0, 5.0, 6.0, 7.0, 8.0, 10.0, 12.0, 15.0
The one—second thermal ratings are listed in Table IV.
5

GE K-340 55
TABLE IV
TIME OVERCURRENT UNIT ONE SECOND K(AMPS) RATING(AMPS)
0.5 - 4.0 125.0 15,625
1.5 - 12.0 260.0 67,600
2.0 - 15.0 260.0 67,600
For ratings of less than one second, the rating may be calculatedaccording to the formula
1=4
where T is the time, in seconds, that the current flows.
The continuous ratings of the time—overcurrent units are shown inTable V.
TABLE V
0.5- 4.0 AMP RANGE
TAP 0.5 0.6 0.7 0.8 1.0 1.2 1.5 2.0 2.5 3.0 4.0
[\TING 3.5 3.7 4.0 4.5 5.0 5.5 6.0 7.0 8.0 9.0 10.0
1.5- 12.0 AMP RANGE
TAP 1.5 2.0 2.5 3.0 4.0 5.0 6.0 7.0 8.0 10.0 12.0
RATING 9.5 10.5 11.5 12.5 14.0 15.5 17.0 18.0 19.0 20.0 20.0
2.0- 1 5.0 AMP RANGE
TAP 2.0 2.5 3.0 4.0 50 6.0 7.0 8.0 10.0 12.0 15.0
RATING 10.0 11.0 12.0 13.0 15.0 17.0 18.0 19.0 20.0 20.0 20.0
INSTANTANEOUS UNIT
The instantaneous unit has a double—wound coil for operation oneither one of two ranges. Any setting obtained in the lower range(series connected) is doubled, within ±3%, when the unit is connectedfor high—range operation (parallel connected).
6

GE K-340 55
The instantaneous unit has a continuous rating of 1.5 timesminimum setting or 25 amperes, whichever is smaller. Example: The2.0—16.0 ampere instantaneous unit, when set on the low range (2.0—8.0 amperes) has a continuous rating of 3.0 amperes, and whenconnected for high-range operation (4.0—16.0 amperes) has acontinuous rating of 6.0 amperes. The continuous and one—secondratings for the instantaneous unit are shown in Table VI.
TABLE VI
RANGE CONNECT— CONTINUOUS t ONE KIONS tt RATING SECOND
0.5 - 4.0 0.5 — 2.0 S 0.15 25.0 6251.0 - 4.0 P 1.5 50.0 2,500
2.0 - 16.0 2.0 - 8.0 S 3.0 130.0 16,9004.0 - 16.0 p 6.0 260.0 67,600
10.0 - 80.0 10.0 - 40.0 S 15.0 400.0 160,00020.0 - 80.0 P 25.0 600.0 360,000
20.0 - 160.0 20.0 - 80.0 S 25.0 600.0 360,00040.0 - 160.0 P 25.0 600.0 360,000
t Higher currents may be applied for shorter lengths oftime in accordance with the formula
K
where T is the time, in seconds, that the current flows.
t S = Series connected, P = Parallel connected
TARGET AND SEAL-IN UNIT
Ratings for the target seal—in unit are shown in Table VII.
TABLE VII
TAP
0.2 2.0
D.C. Resistance ± 10% (ohms) 7 0.13
MIN. Operating (amperes) +0 - 25% 0.2 2.0
Carry Continuously (amperes) 0.3 3.0
Carry 30 Amps for (sec.) 0.03 4.0
Carry 10 Amps for (sec.) 0.25 30.0
60 Hz Impedance (ohms) 52.0 0.53
7
GEK-34055
If the tripping current exceeds 30 amperes, an auxiliary relayshould be used, the connections being such that the tripping currentdoes not pass through the contacts of the target and seal—in coils ofthe protective relay.
CONTACTS
The current—closing rating of the contacts is 30 amperes forvoltages not exceeding 250 volts. The current—carrying rating islimited by the ratings of the seal—in unit.
BURDENS
Burdens for the time—overcurrent unit are given in Table VIII.
TABLE VIII
BURDENS AT MIN. BURDENS INPICKUP MIN. TAP OHMS (1) V.A. AT 5 AMPS
RANGE HZ MIN. R Z 3 10 20.0 CALCULATED FROMTAP TIMESTIMESTIMES IMPEDANCE AT MIN.
PICK- PICK- PICK- PICKUP (121)tip LIP UP
0.5 - 0.4 60 0.5 0.80 1.38 1.60 1.60 1.60 1.60 401.5 - 12.0 60 1.5 0.085 .147 0.17 0.17 0.17 0.17 4.252.0 - 15.0 60 2.0 0.05 0.086 0.099 0.10 0.10 0.10 2.5
NOTE: The impedance values given are those for the minimumtap of each relay. The impedance for other taps atpick—up current (tap rating) varies inversely(approximately) as the square of the tap rating. Forexample, for a relay with 0.5 — 4.0 amp range, theimpedance of the 0.5 amp tap is given as 1.60 ohms.The impedance of the 2.0 amp tap at 2.0 amperes is(.5/2)2 x 1.6 or 0.10 ohm.
8

GEK-34055
The instantaneous unit burdens are listed in Table IX.
TABLE IX
BURDENS AT MIN. BURDENS INRANGE PICKUP MIN. TAP OHMS (Z)
RELAYS TIONS AMPS R Jx Z 3 10 20.0 V.A. AT 5 AMPSONLY t OHMS OHMS OHMS TIMES TIMES TIMES CALCULATED FROM(AMPS) PICK PICK PICK IMPEDANCE AT MIN.
UP UP UP PICKUP (I?Z)O 5-4 0 LOW 0.5 12.1 11.5 17.1 9.6 8.7 8.2 427.5
HIGH 1.0 3.18 2.87 4.28 2.40 2.18 2.04 107.0
2 0-16 0 LOW 2.0 0.76 0.72 1.05 O.5 0.53 0.50 26.25HIGH 4.0 0.189 0.180 0.261 0.147 0.133 0.125 6.63
10 0-80 0 LOW 10.0 0.042 0.029 0.051 0.029 0.026 0.024 1.28HIGH 20.0 0.010 0.007 0.013 0.007 0.001 0.006 0.33
20 0-160 0 LOW 20.0 0.015 0.008 0.017 0.010 0.009 0.008 0.43HIGH 40.0 0.004 0.002 0.004 0.002 0.002 0.002 0.10
t Low means two windings connected in series.High means two windings connected in parallel.See Internal—Connections diagram for additional information.
CHARACTERISTICS
Pickup of these relays is defined as the current required toclose the contacts from the 0.5 time—dial position. The pickup valueof the 1AC77 relays is within 3% of the tap value.
The setting of the time dial determines the length of time theunit requires to close its contacts when the current reaches thepredetermined value. The contacts are just closed when the dial isset at zero. When the dial is set at 10, the disk must travel themaximum distance to close the contacts; this gives the maximum timesetting. The unit resets at 85% of the minimum closing value ofcurrent.
Figure 9 shows the 50—Hz and Figure 10 shows the 60—HzTime/Current Characteristics for Relay types 1AC77 and 1AC78.
The time to reset to the 10 time-dial position when the currentis reduced to zero is approximately 57 seconds.
The time/current curve for the instantaneous unit is shown onFigure 8.
RECEIVING, HANDLING, AND STORAGE
These relays, when not included as a part of a control panel,will be shipped in cartons designed to protect them against damage.Immediately upon receipt of a relay, examine it for any damage
9
GEK-34055
sustained in transit. If injury or damage resulting from roughhandling is evident, file a damage claim at once with thetransportation company and promptly notify the nearest GeneralElectric Sales Office.
Reasonable care should be exercised in unpacking the relay inorder that none of the parts are injured nor the adjustmentsdisturbed.
If the relays are not to be installed immediately, they should bestored in their original cartons in a place that is free frommoisture, dust, and metallic chips. Foreign matter collected on theoutside, of the case may find its way inside when the cover isremoved and cause trouble in the operation of the relay.
ACCEPTANCE TESTS
Immediately upon receipt of the relay, an INSPECTION ANDACCEPTANCE TEST should be made to make sure that no damage has beensustained in shipment and that the relay calibrations have not beendisturbed. If the examination or test indicates that readjustment isnecessary, refer to the section on SERVICING.
These tests may be performed as part of the installation or asacceptance tests, at the discretion of the user. Since mostoperating companies use different procedures for acceptance and forinstallation tests, the following section includes all applicabletests that may be performed on these relays.
VISUAL INSPECTION
Check the nameplate stamping to make sure that the model numberand rating of the relay agree with the requisition.
Remove the relay from its case and check that there are no brokenor cracked molded parts or other signs of physical damage, and thatall the screws are tight.
MECHANICAL INSPECTION
1. There should be no noticeable friction when the disk isrotated slowly clockwise. The disk should return by itselfto its rest position.
2. Make sure the control spring is not deformed, nor itsconvolutions tangled or touching.
3. The armature and contacts of the seal—in unit, as well as thearmature and contacts of the instantaneous unit, should movefreely when operated by hand; there should be at least 1/32”wipe on the seal—in contacts.
4. The targets in the seal—in unit and in the instantaneous unitmust come into view and latch when the armatures are operatedby hand, and should unlatch when the target release lever isoperated.
10
GEK-34055
5. Make sure that the fingers and shorting bars agree with theinternal—connections diagram.
CAUTION
Every circuit in the drawout case has an auxiliary brush.It is especially important on current circuits and othercircuits with shorting bars that the auxiliary brush be benthigh enough to engage the connecting plug or test plugbefore the main brushes do. This will prevent Ct secondarycircuits from being opened. See Figure 1.
ELECTRICAL TESTS
DRAWOUT RELAYS, GENERAL
Since all drawout relays in service operate in their cases, it isrecommended that they be tested in their cases or an equivalent steelcase. In this way, any magnetic effects of the enclosure will beaccurately duplicated during testing. A relay may be tested withoutremoving it from the panel by using a 12XLA13A test plug. This plugmakes connections only with the relay and does not disturb anyshorting bars in the case. The 12XLA12A test plug may also be used.Although this test plug allows greater testing flexibility, itrequires C.T. shorting jumpers and the exercise of greater care,since connections are made to both the relay and the externalcircuitry.
POWER REQUIREMENTS, GENERAL
All devices operating on alternating current (AC) are affected byfrequency. Since non—sinusoidal waveforms can be analyzed as afundamental frequency plus harmonics of that fundamental frequency,it follows that alternating—current devices (relays) will be affectedby applied waveforms. AC relays (and AC devices in general) aresignificantly affected by the application of non—sinusoidalwaveforms.
Therefore, in order to test AC relays properly it is essential touse a test voltage and/or current waveform that is sinusoidal. Thepurity of the sine wave (i.e., its freedom from harmonics) cannot beexpressed as a finite number for any particular relay; however, anyrelay using tuned circuits, RL or RC networks, or saturatingelectromagnets (such as time—overcurrent relays) would be especiallyaffected by non—sinusoidal wave forms.
TIME-OVERCURRENT UNIT
Rotate the time dial slowly and check, by means of a lamp in thecircuit, that the contacts just close at the zero (0) time—dialsetting.
The point at which the contacts just close can be adjusted byrunning the stationary contact brush in or out by means of itsadjusting screw. This screw should be held securely in its support.
11
GE K-3 4055
With the contacts just closing at No. 0 time—dial setting, thereshould be sufficient gap between the stationary contact brush and itsmetal backing strip to ensure approximately 1/32” wipe.
The minimum current at which the contact will just close isdetermined by the position of the tap screw in the tap block at thetop of the relay.
When changing the current setting with the relay in its case,remove the connection plug, to short the current transformer (CT)secondary circuit. Next, screw the tap screws into the tap markedfor the desired current, and then replace the connection plug.
The pickup of the unit for any current tap setting is adjusted bymeans of the variable resistor in the phase—shifting circuit. Thisadjustment also permits any desired setting intermediate between thevarious tap settings to be obtained. The control spring is prewoundapproximately 6600 with the contacts just closed. Further adjustmentof this setting is seldom required. The unit is adjusted at thefactory to close its contacts from any time—dial position at aminimum current within 5% of the tap setting. The unit resets at 85%of the minimum closing value,
Pickup Test
Set the relay at the 0.5 time—dial position and 2.0 amp tap.Using the test connections of Figure 13, the main unit should closeits contacts within ±2% of tap value current (1.96—2.04 amp.). Allother tap positions should pick up at tap value ±5% of tap value.
Time Test
* Set the relay at the 5.0 time—dial position and 2.0 amp tap.Using the test connections of Figure 13, and applying 5 times tapcurrent (10.0 amp), the relay should operate in 0.92 second ±0.05second. At 2 times tap current and 10 times tap current, theoperating time should agree with the time—curve value ±7%.
INSTANTANEOUS UNIT
Make sure that the instantaneous unit is wired for the range inwhich it is to operate (see Internal—Connections Diagram Figure 5 orFigure 7) arid connected as indicated in Test—Circuit Figure 13.Whenever possible, use the higher range, since the higher range has ahigher continuous rating.
Setting the Instantaneous Unit
Loosen the locknut and turn the pole piece toward the desiredsetting. See Figure 2. Turning the pole piece up increases thepickup; turning the pole piece down decreases the pickup. Bring upthe current slowly until the unit picks up. It may be necessary torepeat this operation until the desired pickup value is obtained.Once the desired pickup value is reached, tighten the locknut.
12

GEK-34055
r CAUTION_]
The instantaneous unit is rated 1.5 times minimum pickup. Do notleave the test current on too long ,as it may damage the unit.
Pickup Tests
With the unit connected for high—range operation (parallelconnections) and the target in the “Down” position, check the pickupat the maximum calibration mark; the pickup should be within thelimits in Table X.
TABLE X
UNIT RANGE MINIMUM CALIBRATION MAXIMUMAMPERES AMPERES AMPERES AMPERES0.5 - 4.0 3.6 4.0 4.52.0 — 16.0 14.4 16.0 17.7
10.0 - 80.0 72.0 80.0 89.020.0 - 160.0 144.0 160.0 177.0
TARGET AND SEAL-IN UNIT
The target and seal—in unit has an operating coil tapped at 0.2and 2.0 amperes. The relay is shipped from the factory with the tapscrew in the lower—ampere position. The tap screw is the screwholding the right—hand stationary contact. To change the tapsetting, first remove one screw from the left—hand stationary contactand place it in the desired tap. Next, remove the screw from thefirst, undesired, tap and place it on the left hand stationarycontact where the first screw was removed. See Figure 2. Thisprocedure is necessary to prevent the right—hand stationary contactfrom getting out of adjustment. Screws should never be left in bothtaps at the same time.
Pickup and Dropout Test
1. Connect relay studs 1 and 2 (See Internal—Connections Diagram) toa DC source, ammeter and load box so that the current can becontrolled over a range of 0.1 to 2.0 amperes.
2. Turn the time dial to the ZERO (0) TIME—DIAL position.
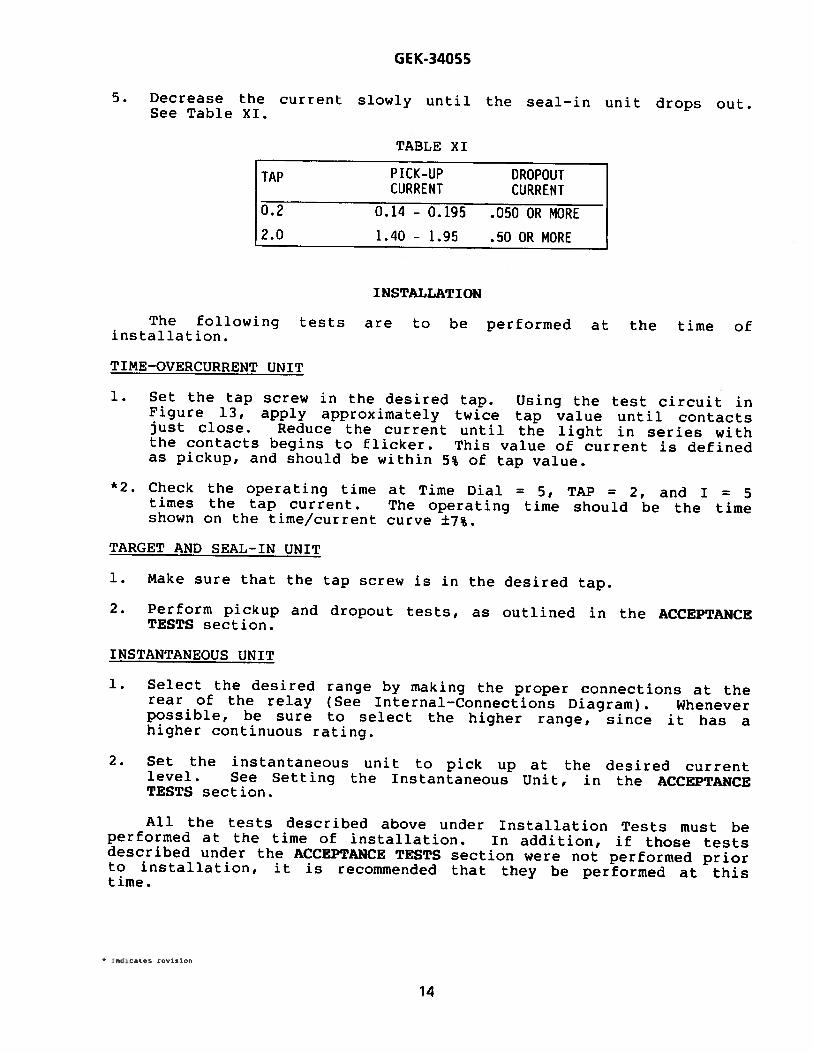
3. Increase the current slowly until the seal—in unit picks up. SeeTable XI.
4. Move the time dial away from the ZERO (0) TIME—DIAL position, theseal—in unit should remain in the picked-up position.
13
GEK-34055
5. Decrease the current slowly until the seal—in unit drops out.See Table XI.
TABLE XI
TAP PICK-UP DROPOUTCURRENT CURRENT
0.2 0.14 - 0.195 .050 OR MORE
2.0 1.40 - 1.95 .50 OR MORE
INSTALLATION
The following tests are to be performed at the time ofinstallation.
TIME-OVERCURRENT UNIT
1. Set the tap screw in the desired tap. Using the test circuit inFigure 13, apply approximately twice tap value until contactsjust close. Reduce the current until the light in series withthe contacts begins to flicker. This value of current is definedas pickup, and should be within 5% of tap value.
*2. Check the operating time at Time Dial = 5, TAP = 2, and I = 5times the tap current. The operating time should be the timeshown on the time/current curve ±7%.
TARGET AND SEAL-IN UNIT
1. Make sure that the tap screw is in the desired tap.
2. Perform pickup and dropout tests, as outlined in the ACCEPTANCETESTS section.
INSTANTANEOUS UNIT
1. Select the desired range by making the proper connections at therear of the relay (See Internal—Connections Diagram). Wheneverpossible, be sure to select the higher range, since it has ahigher continuous rating.
2. Set the instantaneous unit to pick up at the desired currentlevel. See Setting the Instantaneous Unit, in the ACCEPTANCETESTS section.
All the tests described above under Installation Tests must beperformed at the time of installation. In addition, if those testsdescribed under the ACCEPTANCE TESTS section were not performed priorto installation, it is recommended that they be performed at thistime.
* fldICEIL€-S revis,Qfl
14

GEK-34055
PERIODIC CHECKS AND ROUTINE MAINTENANCE
In view of the vital role of protective relays in the operationof a power system, it is important that a periodic test program befollowed. It is recognized that the interval between periodic checkswill vary depending upon environment, type of relay and the user’sexperience with periodic testing. Until the user has accumulatedenough experience to select the test interval best suited to hisindividual requirements, it is suggested that the points listed belowbe checked at an interval of from one to two years.
These tests are intended to make sure that the relays have notdeviated from their original setting. If deviations are encountered,the relay must be retested and serviced as described in this manual.
TIME-OVERCURRENT UNIT
1. Perform the Pickup Test as described in the ACCEPTANCE TESTSsection for the tap in service.
2. Perform the Time Test as described in the ACCEPTANCE TESTSsection.
INSTANTANEOUS UNIT
1. Check that the Instantaneous Unit picks up at the desired currentlevel, as outlined in the ACCEPTANCE TESTS section.
TARGET AND SEAL-IN UNIT
1. Check that the unit picks up at the values shown in Table XI.
2. Check that the units drops out at 30% or more of tap value.
CONTACT CLEANING
For cleaning relay contacts, a flexible burnishing tool should beused. This consists of a flexible strip of metal with an etch—roughened surface, resembling in effect a superfine file. Thepolishing action is so delicate that no scratched are left, yet itwill clean off any corrosion thoroughly and rapidly. Its flexibilityensures the cleaning of the actual points of contact. Do not useknives, files, abrasive paper or cloth of any kind to clean relaycontacts.
SYSTEM TEST
Although this Instruction Book is primarily written to check andset the IAC relay, overall functional tests to check the systemoperation are recommended at intervals based on the customer’sexperience.
15
GEK-34055
SERVICING
TIME-OVERCURRENT UNIT
If it is found during installation or periodic testing that thetime overcurrent unit is out of limits, the unit may be recalibratedas follows:
1. Rotate the time dial to the No.0 time—dial setting and check, bymeans of a lamp in the circuit, that the contacts just close.
The point at which the contacts just close can be adjusted byrunning the stationary contact brush in or out by means of itsadjusting screw. This screw should be held securely in itssupport.
With the contacts just closing at No.0 time—dial setting, thereshould be sufficient gap between the stationary contact brush andits metal backing strip to ensure approximately 1/32” wipe.
2. Connect the operating—coil terminals to a source of the properfrequency and good waveform having a voltage of 120 or more, withpure resistance load boxes for setting the current. See testcircuit, Figure 13.
3. Set the tap plug in the 2 amp. tap, and the time dial where thecontacts are just open. Set the resistor at the midpoint of itsrange and check the current required to just close the contacts.It should fall within the limits given in Table XII.
TABLE XII
TAP RANGE TAP MINIMUM AMPS MAXIMUM AMPS0.5 - 4.0 2 AMP 1.96 2.041.5 - 12.0 2 AMP 1.96 2.042.0 - 15.0 2 AMP 1.96 2.04
It should never be necessary to wind up the control—springadjustor more than 30° (one notch) or unwind it more than 90°(three notches) from the factory setting to obtain the abovepickup setting.
4. After pick up has been set within the prescribed limits, thecompensation must be checked. With the 2 amp tap setting as inparagraph 3, set the time dial at No. 10 and check the currentrequired to just move the disk away from the stop arm. Thiscurrent should be within the limits shown in Table XIII, whichare ±6% of tap amperes. If the disc moves at the lower limit,check that the movement is not over 1/2”, measured along theperiphery of the disc.
16

GEK-34055
TABLE XIII
If the current falls outside these limits, the following stepsshould be taken. Reset the control spring until compensation at#10 time dial setting (TDS) is within the limits shown above.Then set at 41/2 T.D.S. and restore pick up by adjusting theresistor. Compensation should be rechecked after the resistoradjustment.
With the contacts just open, check the current required to justclose the contacts on each of the other taps. This currentshould be within ±3% of tap value.
With the time dial at the No. 10 time setting and the tap plug inthe 2 amp tap, apply sufficient current to the relay todefinitely close the contacts. Reduce the current to 80% of tapvalue and the disk should reset all the way to the No. 10 dialsetting position.
Time Tests
With the tap plug in the 2 amp tap and the time dial at No. 5time setting, apply five times (5X) tap current to the relay.
Adjust the drag magnet to obtain a closing time as near aspossible to 0.92 second but at least between 0.87 and 0.97 second.The magnet should be approximately in the middle of its travel. Themagnet is adjusted by loosening the nut under the magnet shelf.Moving the magnet in decreases the time, moving the magnet outincreases the time.
When adjusting the drag magnet, be sure the outer edge of themagnet never extends out beyond the cutout in the disk. Be sure thenut clamping the drag magnet to its supporting shelf is tight beforeproceeding with other time checks. Make sure the drag magnet doesnot hit the counterweight at any position of the disk.
With the tap plug in the 2 amp tap and the time dial at the No.5time setting, check the contact closings at 2 times and 10 times tapvalue. These closing times must be within the limits shown in TableXIV.
TABLE XIV
60HZ 50HZTAP AMPS MIN SEC. MAX SEC. MIN. SEC. MAX SEC.2.0 4.0 6.27 7.22 6.58 7.562.0 20.0 0.26 0.30 0.27 0.31
TAP RANGE TAP MINIMUM AMPS MAXIMUM AMPS0.5 - 4.0 2 AMP 1.88 2.121.5 - 12.0 2 AMP 1.88 2.122.0 - 15.0 2 AMP 1.88 2.12
17

GEK-34055
INSTANTANEOUS UNIT
1. Both contacts should close at the same time.
2. The backing strip should be so formed that the forked end (front)bears against the molded strip under the armature.
3. With the armature against the pole piece, the cross member of the‘T” spring should be in a horizontal plane and there should be atleast 1/32 inch wipe on the contacts. Check this by inserting a0.012 inch feeler gage between the front half of the shaded poleand the armature, with the armature held closed. The contactsshould close with the feeler gage in place.
TARGET AND SEAL-IN UNIT
Check steps 1 and 2 as described under INSTANTANEOUS UNIT above.
To check the wipe of the seal—in unit, insert a 0.012 inch feelergage between the plastic resid a1 of the armature and the pole piecewith the armature held close The contacts should close with thefeeler gage in place.
RENEWAL PARTS
It is recommended that sufficient quantities of renewal parts becarried in stock to enable the prompt replacement of any that areworn, broken, or damaged.
When ordering renewal parts, address the nearest Sales Office ofthe General Electric Company, specify the quantity required and thename of the part wanted, and the complete model number of the relayfor which the part is required.
18

.i4055
LIST OF FIGURES
FIGURE PAGE
1 Cross Section of Drawout Case Showing Positionof Auxiliary Brush 20
2 Type—1AC77 800 Series Relay Removed from Case(Front View) 21
3 Type—1AC77 800 Series Relay Removed from Case(Rear View) 22
4 Type—IAC77A 800 Series Relay Internal Connections(Front View) 23
5 Type—IAC77B 800 Series Relay Internal Connections(Front View) 24
6 Type—IAC78A 800 Series Relay Internal Connections(Front View) 25
7 Type—IAC78B 800 Series Relay Internal Connections(Front View) 26
8 Time/Current Curve of the Instantaneous Unit . . . 27
9 Time/Current Characteristics of 50 HzTypes 1AC77 and 1AC78 800 Series Relays 28
10 Time/Current Characteristics of 60 HzTypes 1AC77 and 1AC78 800 Series Relays 29
11 Outline and Panel Drilling for the IAC78B Series Relay 30
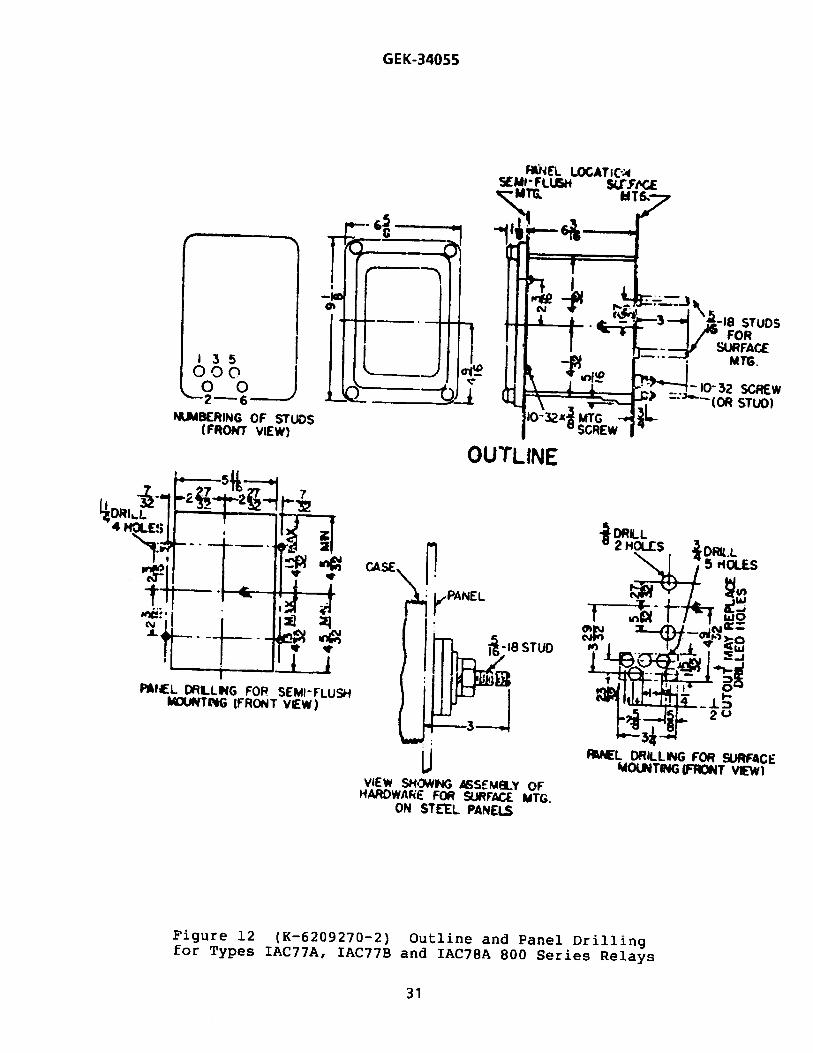
12 Outline and Panel Drilling for Types TAC77A,IAC77B and IAC78A 800 Series Relays 31
13 Test connections for Testing Pickup and Time Curveof IAC Relays 32
14 External Connections of Four IAC77A Relays Usedfor Multi—Phase and Phase—to—Ground Fault Protectionof a 3—Phase Circuit 33
15 External Connections of Four IAC78A Relays Protectinga 3—Phase Circuit Against Multi—Phase andPhase—to—Ground Faults 34
19

GEK-34055
CONNECTING PLUG MAIN BRUSH
NOTEAFTER ENGAGING AUXILIARY BRUSH, CONNECTING PLUG
TRAVELS 1/4 INCH BEFORE ENGAGING THE MAIN BRUSH ONTHE TERMINAL BLOCK
Figure 1 (8025039) Cross Section of Drawout Case Showing Positionof Auxiliary Brush
CONNECTING BLOCK
AUXILIARY BRUSH TERMINAL BLOCK\SHORTING BAR
20

GEK-34055
TOP PIVOT 11
TARGET AND—SEAL-IN UNIT
SEAL-INTARGET LiiSEAL-INTARGET TAPSELECTORSCREW
CONTROLSPRINGADJUSTINGRING
—INSTANTANEOUS UNITADJUSTABLE CORE
- DISK AND SHAFT
- INSTANTANEOUSUNIT
-MAIN MOVINGSHAFT
MAINSTATIONARYBRUSH ANDCO N TACTASSEMBLY
MAGNET
Figure 2 (8041298) Type—1AC77 800 Series Relay Removed from Case(Front View)
TAP BLOCK—--1TAP PLUG—---
II;
-TIME DIAL
SENEALJ ELECTRICTIMI OV1CU1*INT RSAY
_________
21

GEK-34055
Figure 3 (8041297) Type—1AC77 800 Series Relay Removed from Case(Rear View)
VAR) ABLER ES) STOR
- CRADLE
CAPAC ITOR
INSTANTANEOUS _j___L_UNIT RANGESELECTOR LEADS -‘J
22
GEK-34055
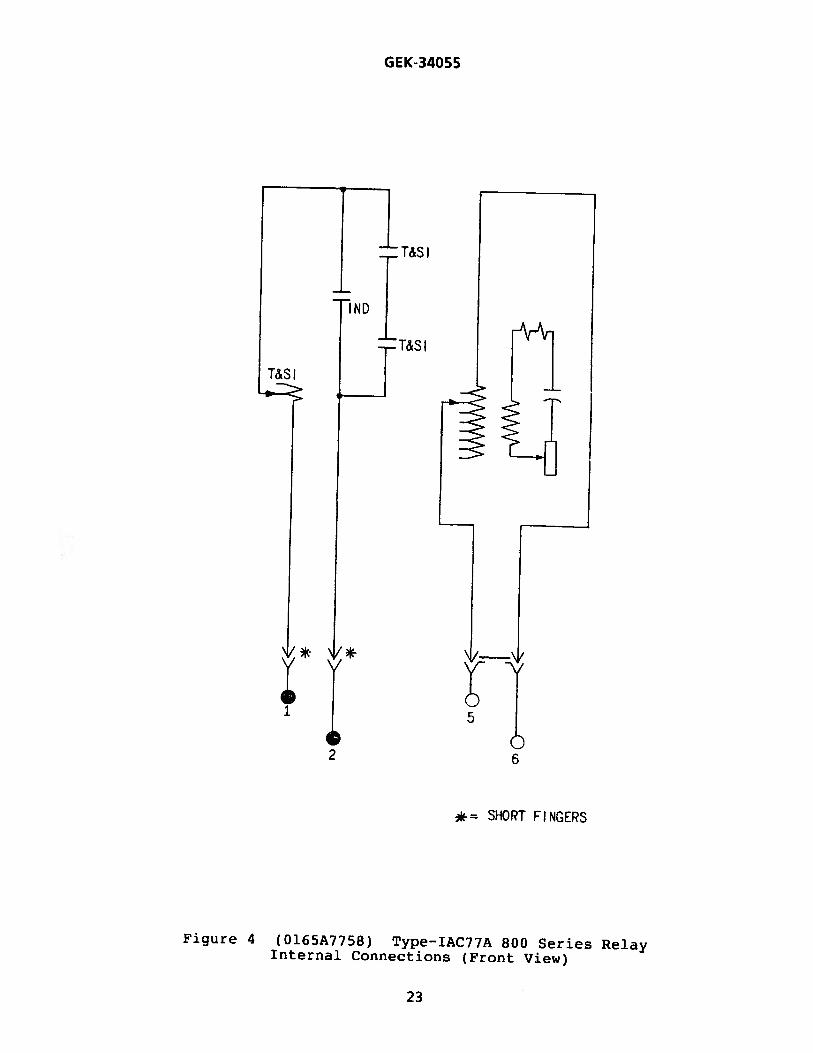
-= SHORT FINGERS
Figure 4 (0165A7758) Type—IAC77A 800 Series RelayInternal Connections (Front View)
*
2 6
23

GEK-34055
WOUND SHADIN(
INDUCTION UNIT
= SHORT FINGERTSI= TARGET SEAL-IN
INST. = INSTANTANEOUS UNIT
NOTE: INST. UNIT CQNNS.SHOWN ARE FOR LOW
I RANGE OPERATION. FORI HIGH RANGE OPERATIONI CONNECT BD TO
OTERrvHNAL #5 ‘A-CSTO TERIVUNAL *7.
Figure 5 (0246A2200—l) Type—IAC77B 800 Series Relay
Internal Connections (Front View)
INST
\ /
(5
2
24
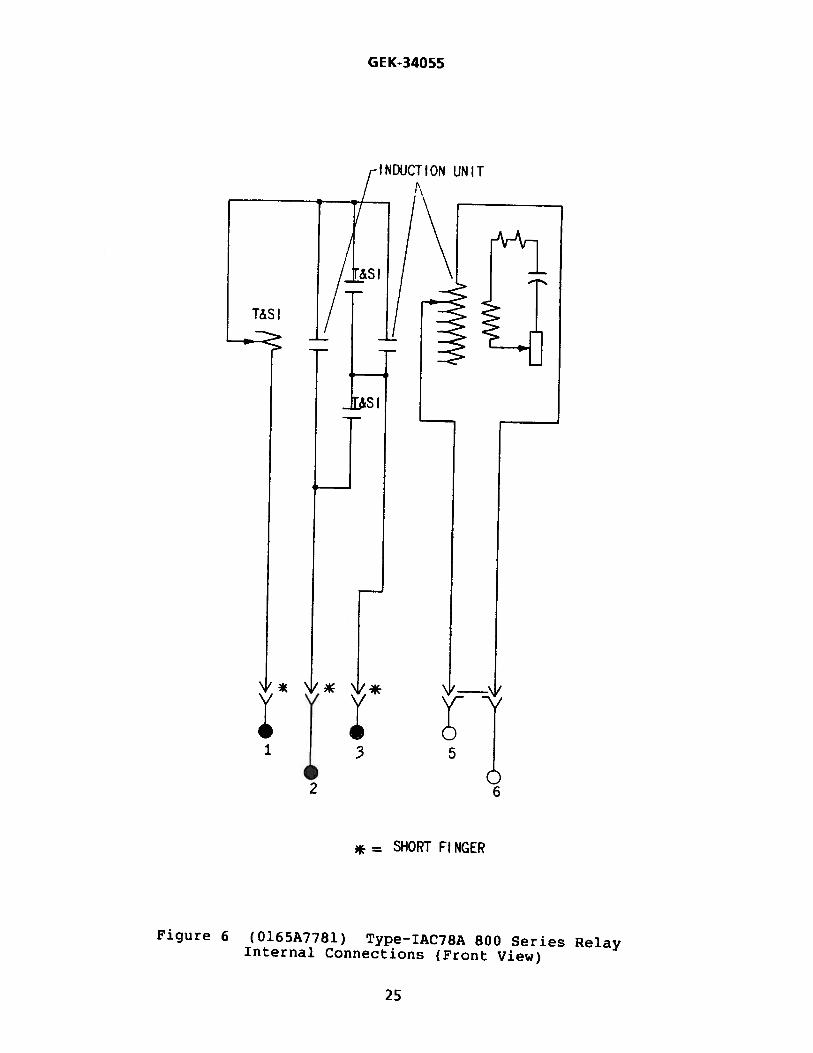
GEK-34055
SHORT Fl NGER
Figure 6 (0165A7781) Type-IAC78A 800 Series RelayInternal Connections (Front View)
INDUCTION UNIT
*
1 3 5
6
25

GEK-34055
TIME OVERCURRENTUNIT-
4=SHORT FINGER
TS1 =TARGET SEAL-INNOTE:-JNSTANTANEQUS UNIT CONNECTIONS SHOWN ARE FOR
LOW RANGE OPERATION. FOR HIGH RANGE OPERATIONCONNECT “B” “D” TO TERM INAL 5 “A” “C” TOTERMINAL 7
Figure 7 (0246A2286—l) Type—IAC78B 800 Series Relay
Internal Connections (Front View)
INSTANTANEOUS UNIT
2 6 10
26

C C CD CD C-)
C (V 0 r1 CD i-i
U) rt r1 CD 0 C U)
1I
0 C CD
FI$E
IS4I
CRA
TED
INST
N4T
NIE
O(J
SU
4IT
OPE
RA
TIN
GT
IlE
0208A
8695
I0 ‘1
,U
,
1.5
23
145
67
89
tO
MU
LTIP
LES
OF
PIC
KU
P

GEK-34055
TYPE tAC77 RELAYS EXTREMELY INVERSE TIME CHARACTERISTIC CURVEFigure 9 (0108B8940—3) Time/Current Characteristics or 50 Hz
Types 1AC77 and 1AC78 800 Series Relays
we ._- .If ‘ Z E_Ez.: z ‘*4 Z.z *E44Z4 %‘9- -——--S-- ‘.,‘‘--‘ ‘T ‘“‘“ ‘‘‘ 7W
,,
._
i—.------•-- -....‘.—-.-__
— —-—-i—
:z
_
Ill
‘0
Ill
l0414171
N
p.
II
‘C
20
_
--
___ _ _
_-
:lLi.
i_I
F—
iT I.
-H [-
—i--——-—
LU..
r-.
‘N
ZTTH ‘:±:-f- - -
INNN7.
‘.
I.
4’
II
7,
20
-I
-I
.4
I.
I
I
I
l I_:: 1-j:I4 ] - 4:z 4 zzz:
Jiz if: p ±tf:: zz z
N4:::: E::r
-- J-)t
1 12 -- EfE.
- -r- Lz_;•-‘ ——- 2 -- . -- ..÷441: I TZL.
-—- --j- [ —-r— -. - — -14 - -f--’ ‘JLJftjJI1r: 1
:I-1J1iLLIt1zjiJi I i iL1i-
:41.00-I?
.41
.01
.04
.1-7
-I
-I
-4
-7
.01.1 I
UI0
“a
p7 “a
.04
I I hi. 71 44 7. W7PNW
MULTIPLES OF RELAY TAP SETTING
II
! IIIt[’
28

TIM
EIN
SEC
ON
DS
!!
g
Lñ
If)
rn
--
—-
--
---
—-
---
----_i
----
-—
---—
—--
---
—-
---
-—
-_I
----
-—
--——
-----
—-
-----
——
——
——
——
——
——
——
——
——
———
——
----
——
---—
—--
--——
—-
---
—--—
L-
---
——
---—
—--
--—
——
----
——
a.
-----—
---—
—-
-----±—
-“--—
-I
----
-—
----—
—-
----—
----
-—
s,
------
-—
----—
—-
----—
-—
——
——
——
———
——
——
——
——
—
+-IO
L
i.c
oI
00)
DO
t
010
000-
:-
-
0-
——
——
——
——
--
--—
——
--
——
-—
—--
I0!C
OW
Ij:
:::Z
E1
::
::z:ii
=—
::::E
:E
::E
:E
::::j.
:ir
EI
0zIIwU,
a-4I—>-4.1ILl
LL0U,
w-3a-JD
NCD0IflC)
rjC
flCtl
o(J
)
1-4—
-EQ
)cJci,
Io
1-4
uC
JVE
-4
CDø4
CD
CD
ft4
H-
--
---—
-----
L_
--—
-----
--
-+---
--
:L
r.—
r-
-
SO
NO
D4c
NTT
hI.L

GEK-34055
9. 125232MM
____
6625 .
• 168MM
-
1/4 DRILL4 HOLES6MM
2 1 8756MM
4,375111 MM
-
.2185MM
STUDNUMBERING
9753100000
0000010 8 6 ‘ 2
BACK VIEW
Figure 11 (K—6209271[8]) Outline and Panel Drilling
for the IAC78B Series Relay
—--(2) 5/16-18 STUDSFUR SURFACE MTG.
PANEL LOCATIONSEMI-FLUSH SURFACE
___
MTG.
:1
MTG. SCREWS(4) 10—32 X 3/8
GLASS
j rc1.125
6.18729MM
157MM
8. 375212MM
1 0-32STUDS
H—
CUTLJUT
I MAY REPLACEDRILLED HOLES
5/8 DRILL2 HOLES
HI4.406112MM
8.812223MM
__l--e-
72MM- -
5. 687
2185MM
PANEL144MM
PANEL DRILLINGFOR SEMI—FLUSH MOUNTING
FRONT VIEW
3/4 DR.LL10 HOLES
19MM
TYPICAL DIM.
INCHESMM
CASE
PANEL W?ILLNGFOR SU[FACE MOUNTING
FRONT VIEW
5/1618 STUD
___
3.076MM
VIEW SHOWING ASSEMBLY OF HARDWARE
FOR SURFACE MTG. UN STEEL PANFLS
30
GE K-340 55
DRLL4 HOLES
13500000
P&l4BLRING OF STUDS(FRONT VIEW)
PA?L ()RLLIG FOR SEMI-FLUSH3UNTLG (FRONT VW)
STUD
UVIEW SHY,JG ASSEMR..Y OF
HADWiFE FOR SURFACE MTG.ON STEEL PANELS
-I8 STUDSFOR
SVRFACEMTG.
SCREW‘iOR STUD)
FJL DRILLWIG FOR SURF4CE%tO.WT4G (FNONT ViEW)
Figure 12 (K—6209270—2) Outline and Panel Drillingfor Types IAC77A, IAC77B and IAC78A 800 Series Relays
5..j
OUTLINE
pfr_PANE L
31

GE K-340 55
-
— TQ NDICTINc [IGHT WHENCHECK NG PICKUP OF
— -
—- N SlANT ANE C UN I T
TO ACCURATELY REPRODUCERELAY CHARACTERISTiCSALL TESTS SHOULD BEMADE WITH RELAY IN CASE.
Figure 13 (K—6154399—7) Test connections for Testing Pickupand Time Curve of IAC Relays
T T MELI ()
(: INDICAE INC LICHE- WHH CHECK I NC P I ([NOR
-— cr MAIN UNIT
I F SJ DL[JG
cLIAD_r FL C.
fC I I .1L N
.FF!r[E[ \:flLT,T TF :-‘T
32

A—C BUS
GEK-34055
51-1
(4) V—C TRIP BUS
51—3SI
51-3j) 51-2 51-I
J1i
Figure 14 (0246A6966—1) External Connections of Four IAC77A RelaysUsed for Multi—Phase and Phase—to—Ground Fault Protectionof a 3-Phase Circuit
51N
52A
52TC
33

GEK-34055
Figure 15 (0246A6967) External Connections of Four IAC78A RelaysProtecting a 3—Phase Circuit Against Multi—Phase
and Phase—to—Ground Faults
(U D—C TRIP BUS
52 BA
52 BTC
(—)
34


GE Power Management
215 Anderson AvenueMarkham, OntarioCanada L6E 1B3Tel: (905) 294-6222Fax: (905) 201-2098www.ge.comlindsyslpm