titanium orbital plates. for reconstruction of medial wall ...synthes.vo.llnwd.net/o16/llnwmb8/us...
TRANSCRIPT

Titanium Orbital Plates.For reconstruction of medial wall and orbital floor fractures.
Technique Guide

Introduction
Surgical Technique
Product Information
Table of Contents
Titanium Orbital Plates 2
AO Principles 3
Indications 3
Universal Orbital Floor Plate 4
Medial Wall Plate (left or right) 7
Orbital Plates 10
Synthes
Contourable Mesh Plate
Titanium Orbital Plates. For reconstruction of medial wall and orbital floor fractures.
2 Synthes Titanium Orbital Plates Technique Guide
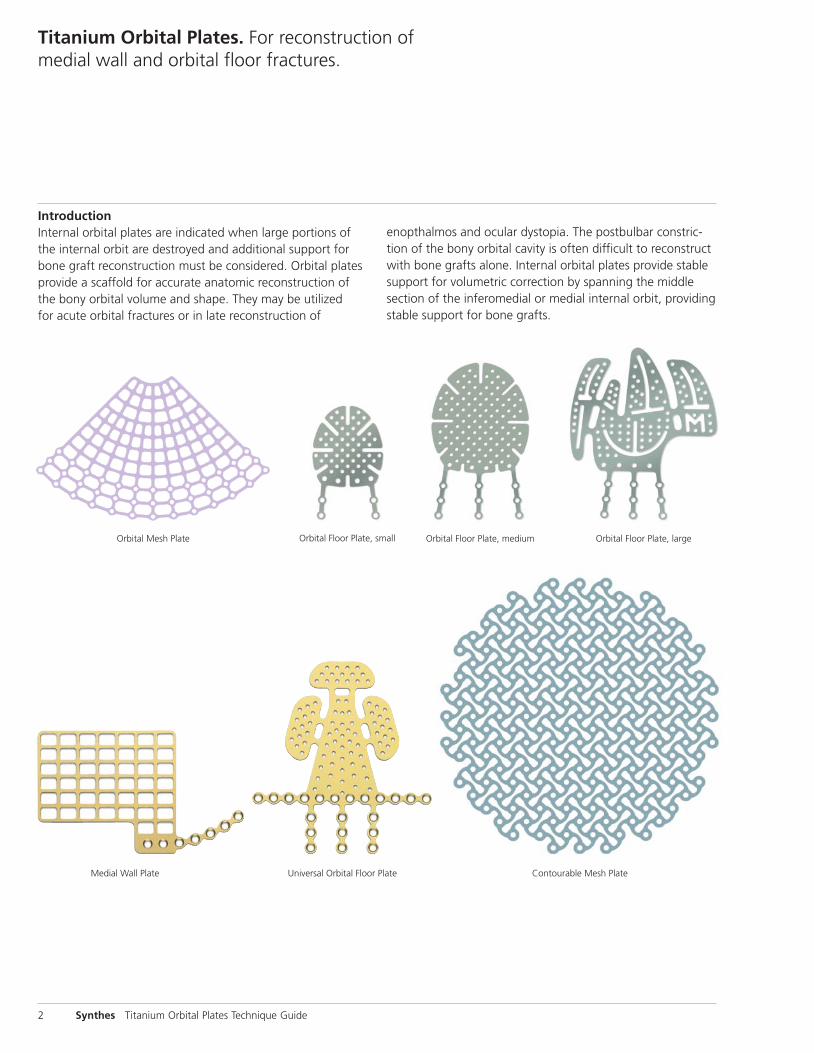
Orbital Mesh Plate Orbital Floor Plate, small Orbital Floor Plate, medium Orbital Floor Plate, large
IntroductionInternal orbital plates are indicated when large portions ofthe internal orbit are destroyed and additional support forbone graft reconstruction must be considered. Orbital platesprovide a scaffold for accurate anatomic reconstruction ofthe bony orbital volume and shape. They may be utilized for acute orbital fractures or in late reconstruction of
Universal Orbital Floor PlateMedial Wall Plate
enopthalmos and ocular dystopia. The postbulbar constric-tion of the bony orbital cavity is often difficult to reconstructwith bone grafts alone. Internal orbital plates provide stablesupport for volumetric correction by spanning the middlesection of the inferomedial or medial internal orbit, providingstable support for bone grafts.

Synthes Orbital Mesh Plates for the Midfacial System are indicated for selective trauma of the midface and craniofacialskeleton; craniofacial surgery, reconstructive procedures; andselective orthognathic surgery of the maxilla and chin.
Synthes 3
Indications
AO Principles
In 1958 the AO formulated four basic principles, which have become the guidelines for internal fixation.1 Theseprinciples, as applied to the Titanium Orbital Plates, are:
Anatomic reductionFracture reduction and fixation to restore anatomical relationships.
Stable fixationStability by rigid fixation (compression plating) or splintage,as the personality of the fracture and the injury requires.
Preservation of blood supplyPreservation of the blood supply to soft tissue and bone bycareful handling and gentle reduction techniques.
Early mobilizationEarly and safe mobilization of the part and the patient.
1. M.E. Müller, M. Allgöwer, R. Schneider, and H. Willenegger. Manual of InternalFixation, 3rd Edition. Berlin: Springer-Verlag. 1991.

4 Synthes Titanium Orbital Plates Technique Guide
2Reduce orbital rim segments
Orbital rim segments are initially reduced and temporarilyfixed with wires, and their position secured with plateand screw fixation. The intact posterior orbit and restoredanterior rim provide positioning “landmarks” for preciseinternal plate and bone graft positioning.
Surgical Technique for Universal Orbital Floor Plate
1Expose lower orbit
Exposure of the lower orbit is provided by a subciliary inci-sion. When exposure of the upper medial wall, upper lateralwall, superior orbital rim or roof are required, a coronal incision is utilized. Subperiosteal intraorbital dissection of theanterior and middle third of the orbit is performed. Attach-ments of the medial canthal ligament, lacrimal system andthe contents of the inferior orbital fissure are avoided.
Orbital soft tissues are mobilized by gentle dissection underloupe magnification. Intact undisplaced bone in the posteriororbit is identified as an index to proper bone graft position.

Synthes 5
4Insert implant
The implant is inserted and positioned to span the orbital defect. The implant must not impinge on structures in theorbital fissures or on the optic nerve.
3Use template to contour implant
An aluminum template may be used to provide a model forbending and trimming the implant.
The titanium implant is bent with plate bending pliers or ribcontour forceps to match the contours of the aluminumbending template.

5Secure implant
The implant is fixed to the anterolateral internal orbit or inferior orbital rim with the appropriate diameter titaniumscrews inserted through the selected tabs.
Surgical Technique for Universal Orbital Floor Plate
6 Synthes Titanium Orbital Plates Technique Guide
7Close incision
The surgical incision is closed and normal postoperative protocol is followed.
6Test impingement
A forced duction test must be completed and compared to similar ductions performed before and after dissection. Any change in resistance must be presumed to be an im-pingement by the bone graft or implant on the musculofas-cial ligament system. These areas must be visualized to confirm soft tissue freedom.
Note: Vertical position of the globe and globe projection can be adjusted by insertion of bone grafts. Emphasis mustbe placed on accurate anatomical reconstruction of bony orbital volume.

2
Reduce orbital rim segmentsOrbital rim segments are initially reduced and temporarilyfixed with wires, and their position secured with plate andscrew fixation. The intact posterior orbit and restored anterior rim providepositioning “landmarks” for precise internal plate and bonegraft positioning.
Synthes 7
Surgical Technique for Medial Wall Plate (left or right)
1Expose lower orbit
Exposure of the lower orbit is provided by a subciliary incision. When exposure of the upper medial wall, upper lateral wall, superior orbital rim or roof are required, a coro-nal incision is utilized. Subperiosteal intraorbital dissection of the anterior and middle third of the orbit is performed.Attachments of the medial canthal ligament, lacrimal systemand the contents of the inferior orbital fissure are avoided.
Orbital soft tissues are mobilized by gentle dissection underloupe magnification. Intact undisplaced bone in the posteriororbit is identified as an index to proper bone graft position.

Surgical Technique for Medial Wall Plate (left or right)
8 Synthes Titanium Orbital Plates Technique Guide
3Use template to contour implant
An aluminum template may be used to provide a model forbending and trimming the implant.
The titanium implant is bent with plate bending pliers or ribcontour forceps to match the contours of the aluminumbending template.
4Insert implant
The implant is inserted and positioned to span the orbital defect. The implant must not impinge on structures in theorbital fissures or on the optic nerve.

5Secure implant
The implant is fixed to the anterolateral internal orbit or inferior orbital rim with the appropriate diameter titaniumscrews inserted through the selected tabs.
Synthes 9
6Test for impingement
A forced duction test must be completed and compared to similar ductions performed before and after dissection. Any change in resistance must be presumed to be an impingement by the bone graft or implant on the musculo-fascial ligament system. These areas must be visualized toconfirm soft tissue freedom.
Note: Vertical position of the globe and globe projection can be adjusted by insertion of bone grafts. Emphasis mustbe placed on accurate anatomical reconstruction of bony orbital volume.
7Close incision
The surgical incision is closed and normal postoperative protocol is followed.
Orbital Plates
10 Synthes Titanium Orbital Plates Technique Guide
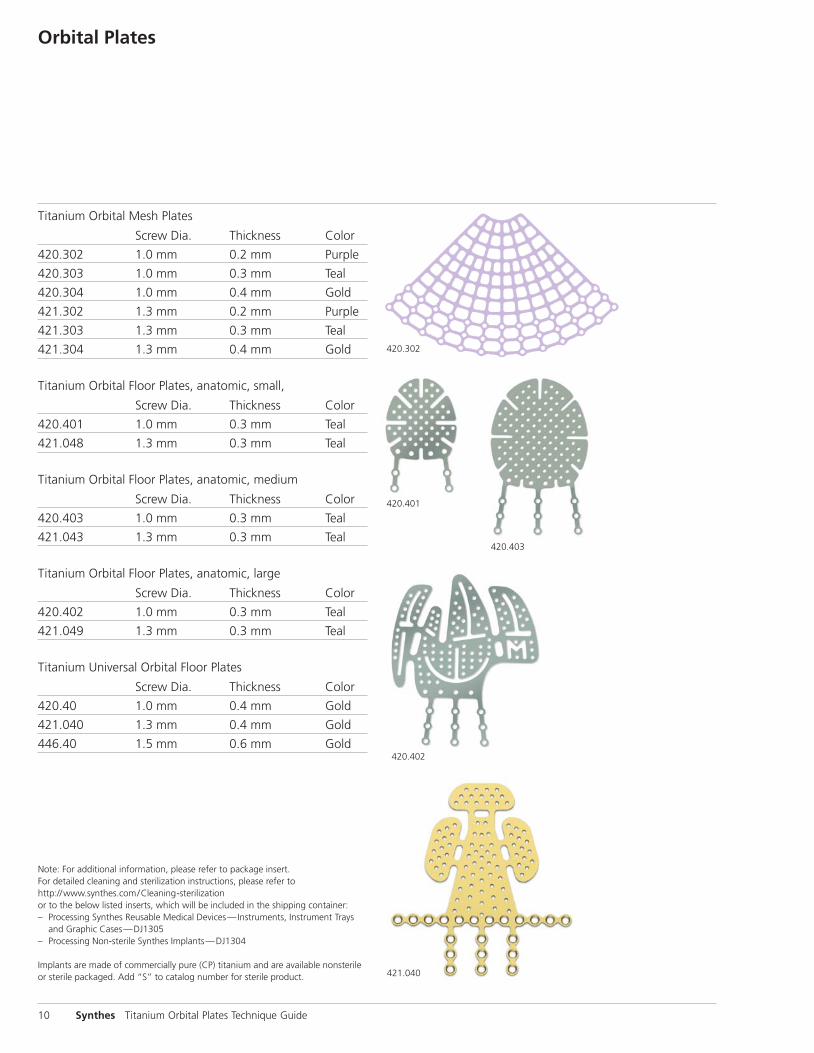
Titanium Orbital Mesh Plates
Screw Dia. Thickness Color
420.302 1.0 mm 0.2 mm Purple
420.303 1.0 mm 0.3 mm Teal
420.304 1.0 mm 0.4 mm Gold
421.302 1.3 mm 0.2 mm Purple
421.303 1.3 mm 0.3 mm Teal
421.304 1.3 mm 0.4 mm Gold
Titanium Orbital Floor Plates, anatomic, small,
Screw Dia. Thickness Color
420.401 1.0 mm 0.3 mm Teal
421.048 1.3 mm 0.3 mm Teal
Titanium Orbital Floor Plates, anatomic, medium
Screw Dia. Thickness Color
420.403 1.0 mm 0.3 mm Teal
421.043 1.3 mm 0.3 mm Teal
Titanium Orbital Floor Plates, anatomic, large
Screw Dia. Thickness Color
420.402 1.0 mm 0.3 mm Teal
421.049 1.3 mm 0.3 mm Teal
Titanium Universal Orbital Floor Plates
Screw Dia. Thickness Color
420.40 1.0 mm 0.4 mm Gold
421.040 1.3 mm 0.4 mm Gold
446.40 1.5 mm 0.6 mm Gold
420.302
421.040
420.401
420.403
420.402
Note: For additional information, please refer to package insert. For detailed cleaning and sterilization instructions, please refer tohttp://www.synthes.com/Cleaning-sterilizationor to the below listed inserts, which will be included in the shipping container:– Processing Synthes Reusable Medical Devices—Instruments, Instrument Trays
and Graphic Cases—DJ1305– Processing Non-sterile Synthes Implants—DJ1304
Implants are made of commercially pure (CP) titanium and are available nonsterileor sterile packaged. Add “S” to catalog number for sterile product.

421.044
Synthes 11
Titanium Medial Wall Plates
Right Screw Dia. Thickness Color
420.45 1.0 mm 0.5 mm Gold
421.045 1.3 mm 0.5 mm Gold
446.45 1.5 mm 0.6 mm Gold
Left
420.44 1.0 mm 0.5 mm Gold
421.044 1.3 mm 0.5 mm Gold
446.44 1.5 mm 0.6 mm Gold
Titanium Contourable Mesh Plates, malleable, 1.3 mm
Dimensions Thickness Color
421.004 38 mm x 45 mm 0.4 mm Teal
421.007 100 mm x 100 mm 0.4 mm Teal
421.015 30 mm diameter 0.4 mm Teal
421.016 70 mm diameter 0.4 mm Teal
Titanium Contourable Mesh Plates, rigid, 1.3 mm
Dimensions Thickness Color
421.005 38 mm x 45 mm 0.4 mm Gold
421.008 100 mm x 100 mm 0.4 mm Gold
421.018 30 mm diameter 0.4 mm Gold
421.019 70 mm diameter 0.4 mm Gold
Titanium Contourable Mesh Plates, malleable, 1.5 mm
Dimensions Thickness Color
446.014 38 mm x 45 mm 0.4 mm Teal
446.017 100 mm x 100 mm 0.4 mm Teal
446.050 30 mm diameter 0.4 mm Teal
446.051 70 mm diameter 0.4 mm Teal
Titanium Contourable Mesh Plates, rigid, 1.5 mm
Dimensions Thickness Color
446.015 38 mm x 45 mm 0.6 mm Gold
446.018 100 mm x 100 mm 0.6 mm Gold
446.053 30 mm diameter 0.6 mm Gold
446.054 70 mm diameter 0.6 mm Gold
421.016

Synthes CMF1302 Wrights Lane EastWest Chester, PA 19380Telephone: (610) 719-5000To order: (800) 523-0322Fax: (610) 251-9056
Synthes (Canada) Ltd.2566 Meadowpine BoulevardMississauga, Ontario L5N 6P9Telephone: (905) 567-0440To order: (800) 668-1119Fax: (905) 567-3185
© 1998 Synthes, Inc. or its affiliates. All rights reserved. Synthes is a trademark of Synthes, Inc. or its affiliates. Printed in U.S.A. 9/12 J1828-D
www.synthes.com