tloxp account administrator tips - tloxp - login · this guide is designed to provide the...
TRANSCRIPT

TLOxp Account Administrator Tips
v2.2 – 03/25/2019

TLOxp Account Administrator Tips
1 | © 2019 TransUnion Risk and Alternative Data Solutions Inc. All Rights Reserved Back to the Table of Contents
Preferences ............................................................................................................................... 2
Account Preferences .............................................................................................................................. 2
My Account ............................................................................................................................... 4
History ..................................................................................................................................................... 4
Changing Your TLOxp Password ........................................................................................................... 5
Details ..................................................................................................................................................... 7
Billing ...................................................................................................................................................... 7
Pricing ..................................................................................................................................................... 7
Report Template ..................................................................................................................................... 8
Export Template ................................................................................................................................... 10
User Maintenance ................................................................................................................... 12
Creating New User Groups .................................................................................................................. 12
Creating New Users ............................................................................................................................. 15
Editing Existing User Groups ................................................................................................................ 22
Editing Existing Users ........................................................................................................................... 22
Resetting Passwords ............................................................................................................................ 23
Unlocking Accounts .............................................................................................................................. 24
Deactivating Users................................................................................................................................ 25
Deleting User Groups ........................................................................................................................... 25
Changing Search for People Options ................................................................................................... 26
Configuring Use Certification Defaults.................................................................................................. 28

TLOxp Account Administrator Tips
2 | © 2019 TransUnion Risk and Alternative Data Solutions Inc. All Rights Reserved Back to the Table of Contents
Introduction
This guide is designed to provide the Administrators (Primary, Account or Billing) with detailed
instructions to perform critical functions such as setting up and maintaining users, defining or
restricting account and data access, reporting on user activity, and performing billing-related
functions. For detailed questions not addressed here, please reach out to your dedicated
Account Representative.
Preferences
Click the Account Settings menu on the main navigation bar and select Preferences to make
adjustments to your Account and User preference settings.
Account Preferences
Changes made by the Account Administrator to any Admin section settings will affect all users.
In this section, you can:

TLOxp Account Administrator Tips
3 | © 2019 TransUnion Risk and Alternative Data Solutions Inc. All Rights Reserved Back to the Table of Contents
• Adjust the Session Time Out settings in TLOxp
from 5 - 60 minutes.
• Make it mandatory for all users to enter a
Reference ID such as an account, file, or case
number prior to executing a search or ordering
report. Note: If you do not wish to make the
Reference ID mandatory for all users, you can
instead require it for individual User Group
members.
• Allow or disable the ability to Add Data, use
Flash Copy, Copy Search Links, or use
Popup Search Box Links by checking or
unchecking the appropriate fields.
• Allow All Administrators or select a specific
Administrator to be notified of any Password Reset Requests.
TLOxp Account Administrator Tips
4 | © 2019 TransUnion Risk and Alternative Data Solutions Inc. All Rights Reserved Back to the Table of Contents
My Account
History
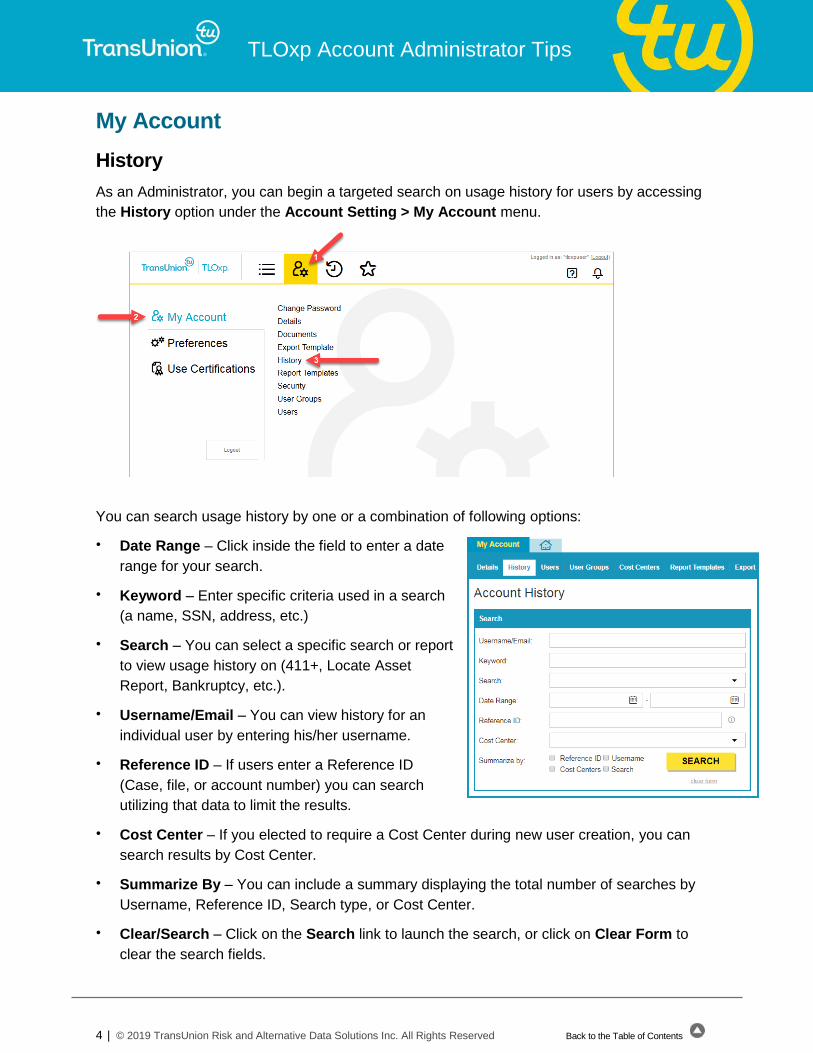
As an Administrator, you can begin a targeted search on usage history for users by accessing
the History option under the Account Setting > My Account menu.
You can search usage history by one or a combination of following options:
• Date Range – Click inside the field to enter a date
range for your search.
• Keyword – Enter specific criteria used in a search
(a name, SSN, address, etc.)
• Search – You can select a specific search or report
to view usage history on (411+, Locate Asset
Report, Bankruptcy, etc.).
• Username/Email – You can view history for an
individual user by entering his/her username.
• Reference ID – If users enter a Reference ID
(Case, file, or account number) you can search
utilizing that data to limit the results.
• Cost Center – If you elected to require a Cost Center during new user creation, you can
search results by Cost Center.
• Summarize By – You can include a summary displaying the total number of searches by
Username, Reference ID, Search type, or Cost Center.
• Clear/Search – Click on the Search link to launch the search, or click on Clear Form to
clear the search fields.

TLOxp Account Administrator Tips
5 | © 2019 TransUnion Risk and Alternative Data Solutions Inc. All Rights Reserved Back to the Table of Contents
Once your search results are returned, you can choose the following additional options:
• Transactions Per Page – You can adjust the number of transactions displayed per page
from 50-500.
• Export to CSV – Allows you to export search results to be used in a spreadsheet, such as
Microsoft Excel.
Additionally, from the Users tab, you can view an invidual user’s search history by clicking on
the View History link for that user.
Changing Your TLOxp Password
To change your TLOxp password click on the Change Password option under the Account
Settings > My Account menu.

TLOxp Account Administrator Tips
6 | © 2019 TransUnion Risk and Alternative Data Solutions Inc. All Rights Reserved Back to the Table of Contents
A password window will appear, allowing you to change your current password. Click on the
Change button after you have entered, and then retyped, your new passord. Make sure to
review and follow the requirements for creating a new password.

TLOxp Account Administrator Tips
7 | © 2019 TransUnion Risk and Alternative Data Solutions Inc. All Rights Reserved Back to the Table of Contents
Details
The Details tab will display account and personal details.
Billing
View current balance and past invoices, set and update payment preferences such as credit
card or bank ACH, make one-time payments, and set up recurring monthly auto-debit
payments. Auto-debit is recommended to avoid potential account suspension due to late
payments. To request a copy of an invoice not displayed on TLOxp, contact
Pricing
View the current price list for all searches and reports.

TLOxp Account Administrator Tips
8 | © 2019 TransUnion Risk and Alternative Data Solutions Inc. All Rights Reserved Back to the Table of Contents
Report Template
Each report can be customized to show specific or all information available in that report. The
Report Templage provides the option to create numerous report customizations for each report.
Click on the Report Template option under the Account Settings > My Account menu.
Click on the link of the preferred report.
• Name the Report Template and check Public to provide it to all users in the account. Next,
select Change Settings, to indicate the items to appear in the report.

TLOxp Account Administrator Tips
9 | © 2019 TransUnion Risk and Alternative Data Solutions Inc. All Rights Reserved Back to the Table of Contents
• Once the settings have been selected, click the Close link on the settings page and then
click Save to complete the template.
• The Report Templates will appear in the report section of the search results screen. To edit
an existing Template, click the Edit button.
• Deselecting the Active checkbox will deactivate the Report Template for all users.
Deselecting the Public checkbox will only allow the creator of the Report Template to view
it.

TLOxp Account Administrator Tips
10 | © 2019 TransUnion Risk and Alternative Data Solutions Inc. All Rights Reserved Back to the Table of Contents
Export Template
• The Export Template option gives you
the ability to create a tagline and upload
a logo to be used in your reports and
exports.
• To add a tagline, simply fill the desired
text in the field provided or leave the
field blank and choose the default
tagline. Click on Browse to choose a
file to upload as a logo.
• Only one tagline and logo can be added
to an acount at any given time. Make
sure that the Active checkbox is
checked.
• You can modify the tagline and change the current logo by uploading a new logo at any
time, or deselect the Active checkbox to prevent the current tagline and logo from being
accessible to users when exporting and printing.
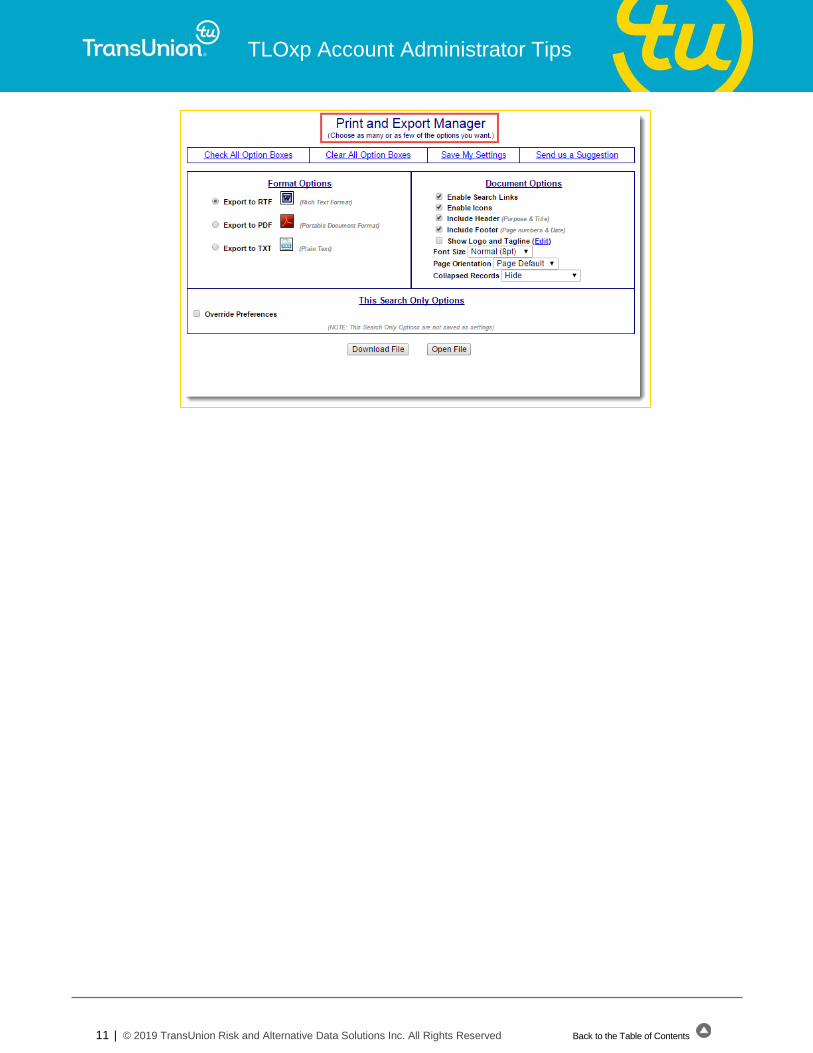
• Once you have added a tagline and logo your users can include them when exporting the
results and reports by checking the appropriate box in Print and Export. The logo and tagline
will be displayed at the top of the first page of the export print-out.
TLOxp Account Administrator Tips
11 | © 2019 TransUnion Risk and Alternative Data Solutions Inc. All Rights Reserved Back to the Table of Contents

TLOxp Account Administrator Tips
12 | © 2019 TransUnion Risk and Alternative Data Solutions Inc. All Rights Reserved Back to the Table of Contents
User Maintenance
As an Administrator, you have the ability and responsibliity to add users and user groups, edit
an existing user’s access to searches and reports, unlock accounts, reset passwords, and
deactivate accounts.
Creating New User Groups
As an Administrator, you can segment or customize access to TLOxp searches and reports by
group, or whenever creating tiered access is necessary. Once a user is assigned to a User
Group, his/her access will mirror that of the User Group.
Select the User Groups option under the Account Settings > My Account menu.
Click on the New User Group link.
Enter the name of the User Group in the Name field, then select the searches and reports to
which you want this User Group to have access.

TLOxp Account Administrator Tips
13 | © 2019 TransUnion Risk and Alternative Data Solutions Inc. All Rights Reserved Back to the Table of Contents
Control access and custimize report content for the User Group by clicking on the Modify link to
right of the each report. This will open the Report Manager window allowing you to select the
categories you want included, and accessible, in that report. To restrict access to an entire
report, click on the Clear All link, then click on the Close link.
When you are finished creating your User Group, make sure to click on the Save button to
complete the process.

TLOxp Account Administrator Tips
14 | © 2019 TransUnion Risk and Alternative Data Solutions Inc. All Rights Reserved Back to the Table of Contents
After a User Group has been created, users can then be assigned to the User Group. Under
the User Groups tab click on the Manage Users link for that User Group.
Click on the box next to the name of each user you want to put in that group. Make sure to click
the Save button once you have finished assiging users.
To remove a user from a User Group, uncheck his/her name and click on the Save button.

TLOxp Account Administrator Tips
15 | © 2019 TransUnion Risk and Alternative Data Solutions Inc. All Rights Reserved Back to the Table of Contents
Creating New Users
As an Administrator, you have the ability to create new users, which includes setting desired
access to specific searches and reports, reseting passwords, editing access for existing users,
and unlocking or deactivating accounts.
To begin the process of creating and adding new users to TLOxp, click the Users options under
the Account Settings > My Account menu.
• Click on the Add User link on the Users page.
• Complete the following fields:
- Name – First & Last
- Job Title – i.e. “Collector”
- User Name – Minimum of 6 Characters
- Email Address – Enter an email address for the user, or if the user doesn’t have access
to email, enter the email address for the Administrator. The email address entered is
where new passwords will be sent.

TLOxp Account Administrator Tips
16 | © 2019 TransUnion Risk and Alternative Data Solutions Inc. All Rights Reserved Back to the Table of Contents
- Cell Phone for SMS – Required for all users to log in unless user’s IP address has been
added to the account. To have IPs added to the account, send the IPs to
- Office Phone – Optional
- User Group – Optional. The Add to User Group option will appear if you have created
User Groups.
- Cost Center – Optional. The Add to User Cost Center option will appear if you have
access to and created Cost Centers. ( We do not tell how to add or what a cost center
is)
- Save – Click the Save button at the bottom of the screen to move to the next step
Once saved, confirm that the information is complete and accurate.
An email will be sent to the user’s email address with their user ID, password, and login
instructions. A security email will be sent to the Administrator verifying the user has been added.
You can modify the list of searches and/or reports the user can access, copy setting from
another user, change the user’s data masking settings, etc. by editing each of the sections listed
below:
User Profile Section
Click the Edit button in the lower right corner of the User Profile section to update the user’s
first and last name, change an email address or phone number, or change the group or cost
center to which the user belongs.

TLOxp Account Administrator Tips
17 | © 2019 TransUnion Risk and Alternative Data Solutions Inc. All Rights Reserved Back to the Table of Contents
Copy User Settings Section
(Add: if adding many users we recommend User Groups to manage user permissions.
With User Groups, permission changes can be done for an entire group rather at once
rather than each user individually.)
To save time creating new users, you can copy an existing user’s settings. Click on the drop
down menu and select the name of the existing user to copy. If you use this function, the user
you are creating will have access to the same searches and reports of the user you are copying.
NOTE: Make sure NOT to select an Administrator when copying rights for a standard user,
otherwise, that user will have Administrator rights and functionality.
Access Rights Section
Certain accounts may have included the option to use the IDxp product. If so, this section can
be edited by clicking the “Edit” button. Consult your Account Representative to discuss this
option.
Per Seat Section
If your account is under a Per Seat contract, this section allows you to designate whether an
individual user is included as a Seat on the contract. Including a user in a Per Seat contract is
effective immediately, with a prorated charge for a seat added mid-month. Removing a user
from a Per Seat contract takes effect at the beginning of the next billing cycle. If you elect not to
include a new user in the Per Seat contract, any searches or reports run by that user will be
billed transactionally. Contact your Account Representative with any questions about how your
account is structured.
TLOxp Account Administrator Tips
18 | © 2019 TransUnion Risk and Alternative Data Solutions Inc. All Rights Reserved Back to the Table of Contents
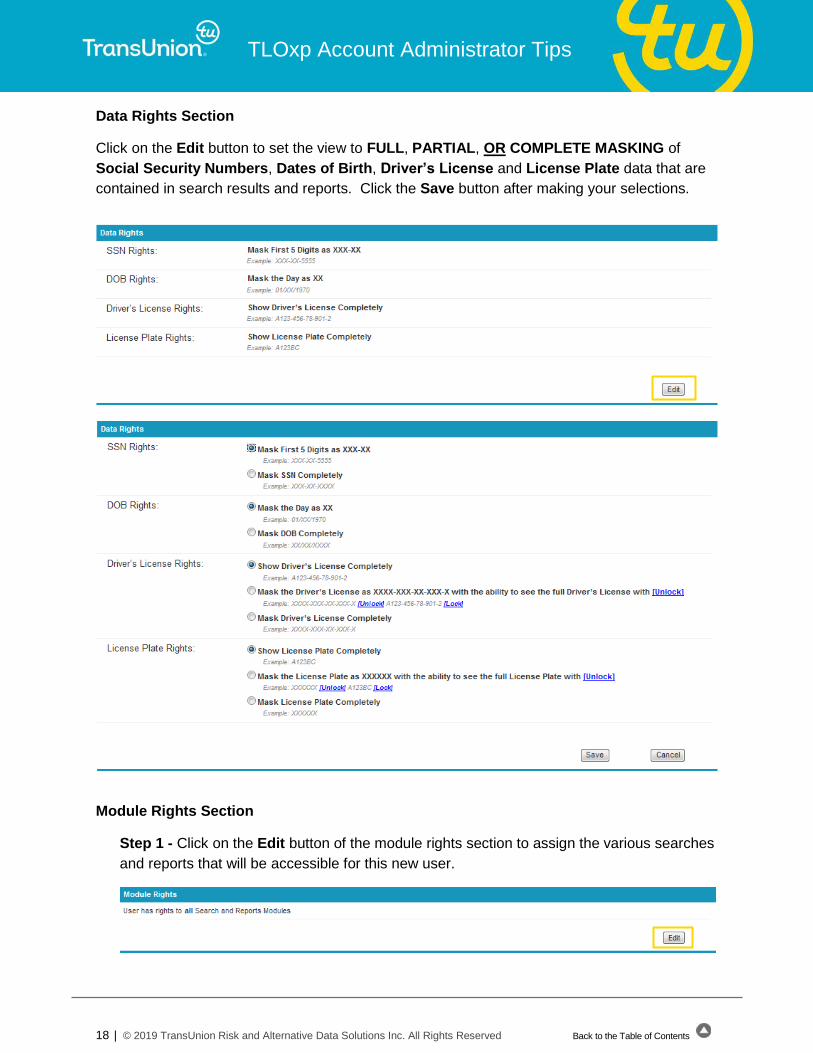
Data Rights Section
Click on the Edit button to set the view to FULL, PARTIAL, OR COMPLETE MASKING of
Social Security Numbers, Dates of Birth, Driver’s License and License Plate data that are
contained in search results and reports. Click the Save button after making your selections.
Module Rights Section
Step 1 - Click on the Edit button of the module rights section to assign the various searches
and reports that will be accessible for this new user.

TLOxp Account Administrator Tips
19 | © 2019 TransUnion Risk and Alternative Data Solutions Inc. All Rights Reserved Back to the Table of Contents
Step 2 – Check the boxes to select the searches and reports that you want this user to
access. Unchecked searches and reports will not be available to the user.
Step 3 - Click the Modify link next to any report to customize specific access to report
content. Unchecked items will not be available to the user. Make sure to click on the Close
button once completed.
Step 4 – Click the Save button to save all changes.
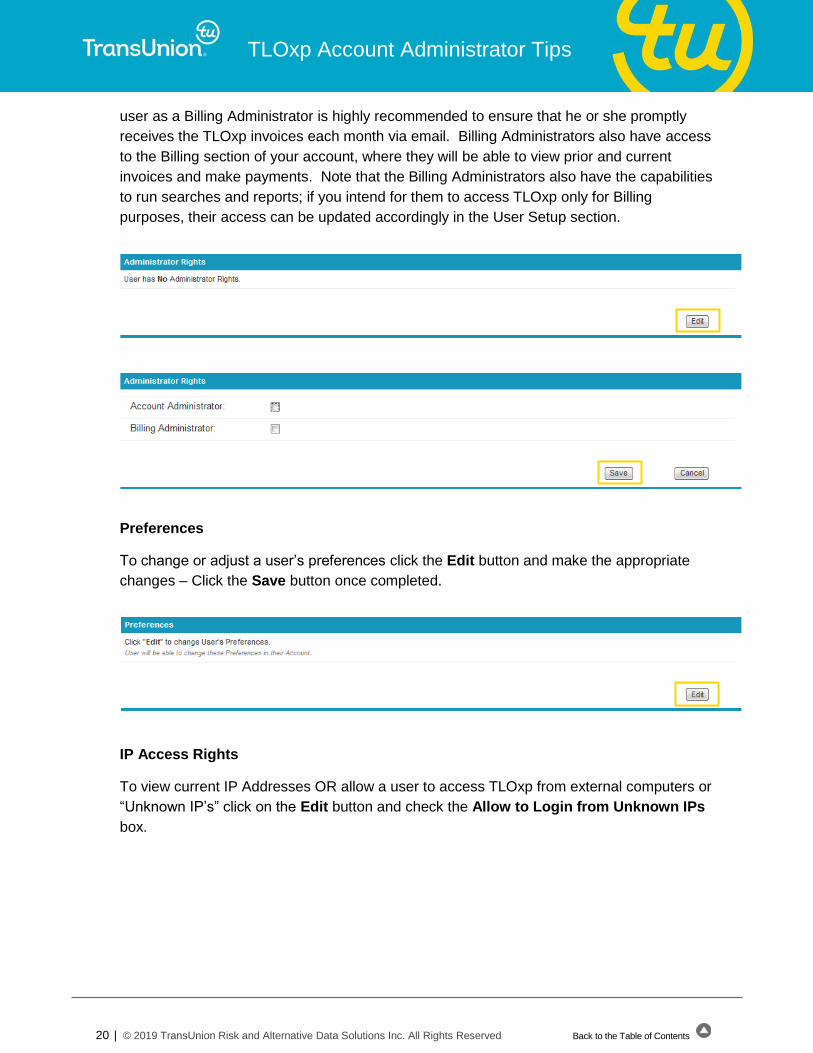
Administrator Rights
You can select to make this user an Account Administrator or a Billing Administrator. Please
be advised that by adding a user as an Account Administrator, they will have all the abilities
of an administrator, such as modifying user preferences and deactivating users. Adding a
TLOxp Account Administrator Tips
20 | © 2019 TransUnion Risk and Alternative Data Solutions Inc. All Rights Reserved Back to the Table of Contents
user as a Billing Administrator is highly recommended to ensure that he or she promptly
receives the TLOxp invoices each month via email. Billing Administrators also have access
to the Billing section of your account, where they will be able to view prior and current
invoices and make payments. Note that the Billing Administrators also have the capabilities
to run searches and reports; if you intend for them to access TLOxp only for Billing
purposes, their access can be updated accordingly in the User Setup section.
Preferences
To change or adjust a user’s preferences click the Edit button and make the appropriate
changes – Click the Save button once completed.
IP Access Rights
To view current IP Addresses OR allow a user to access TLOxp from external computers or
“Unknown IP’s” click on the Edit button and check the Allow to Login from Unknown IPs
box.

TLOxp Account Administrator Tips
21 | © 2019 TransUnion Risk and Alternative Data Solutions Inc. All Rights Reserved Back to the Table of Contents

TLOxp Account Administrator Tips
22 | © 2019 TransUnion Risk and Alternative Data Solutions Inc. All Rights Reserved Back to the Table of Contents
Editing Existing User Groups
To change access to searches and reports for an existing User Group click on the Edit Group
link for that user group. Once the user group’s profile opens, you can click the Edit button for
each section you wish to change. Be sure to click the Save button for each section you make
changes to.
Editing Existing Users
The Users list displays only Active users by default. You can filter the Users list by All, Active,
Deactivated, Locked, or Password Reset Request by clicking the appropriate link above the
Search bar.
To change access to searches and reports for an existing User click the Edit link for that user.
Once the user’s profile opens, you can click the Edit button for each section you wish to
change. Be sure to click the Save button for each section you make changes to.

TLOxp Account Administrator Tips
23 | © 2019 TransUnion Risk and Alternative Data Solutions Inc. All Rights Reserved Back to the Table of Contents
Resetting Passwords
To reset a password for a user who has forgotten his/her password, locate the user under the
Users tab and click on the Reset Password link.
NOTE: Primary Administrators will need to call or email Customer Support to unlock or reset
their password.
Phone: 800-856-5599
Email: [email protected].
An email with a new temporary password will be sent to the email address listed in the user
profile. Once the user enters the temporary password, he/she will be prompted by the system
to set up a personal password. Passwords must be at least 8 characters in length and must
include letters, at least one number and at least one special symbol (#, $, @, etc.).

TLOxp Account Administrator Tips
24 | © 2019 TransUnion Risk and Alternative Data Solutions Inc. All Rights Reserved Back to the Table of Contents
Unlocking Accounts
In the event a user’s account becomes locked, either due to inactivity (90 + days), or incorrectly
entering a TLOxp password multiple times, as an Administrator, you can unlock the account.
Under the Users tab you will see a key icon representing that this user’s account has been
locked.
To unlock a user’s account, click on the Unlock link for that specific user.
NOTE: Primary Administrators will need to call or email TLO Customer support to unlock their
account or reset their password.
Phone: 800-856-5599
Email: [email protected]

TLOxp Account Administrator Tips
25 | © 2019 TransUnion Risk and Alternative Data Solutions Inc. All Rights Reserved Back to the Table of Contents
Deactivating Users
The account administrator is responsible for all users. If access should be removed for any user,
the account administrator should deactivate those users right away. Any user can be
deactivated by clicking on Deactivate in the Actions column in the Users Tab. To reactivate a
user, simply click on Activate.
A popup box will open prompting you to confirm your action to deactivate the user. Click on the
“OK” button to finalize the process. You will no longer see the user listed once this step has
been completed. Once deactivated a user will no longer have access to TLOxp, however, you
will still have access to search deactived users’ history.
Deleting User Groups
In the event you need to delete a user group, locate the group under the User Groups tab and
click Manage Users. Uncheck all users and click Save so that the group will be empty. Next, in
the User Group list click on the Delete link to have this User Group removed.

TLOxp Account Administrator Tips
26 | © 2019 TransUnion Risk and Alternative Data Solutions Inc. All Rights Reserved Back to the Table of Contents
Changing Search for People Options
As an Administrator, you can you can limit the amount of data returned in the Advanced People
Search Results on an individual, or user group, level. Click on the Edit link for a user, or the
Edit Group link for user groups.
When the User Profile or User Group opens, click the Edit button in the Module Rights section.
Click on the Modify link to the right of the Search for People Options field. This will open the
Search for People Options Manager box.

TLOxp Account Administrator Tips
27 | © 2019 TransUnion Risk and Alternative Data Solutions Inc. All Rights Reserved Back to the Table of Contents
Uncheck any category that you don’t want to be included in the Advanced People Search
Results.
Click on Close when you are finished. Make sure to click on the Save button at the bottom of
the Module Rights section to save any changes.
TLOxp Account Administrator Tips
28 | © 2019 TransUnion Risk and Alternative Data Solutions Inc. All Rights Reserved Back to the Table of Contents
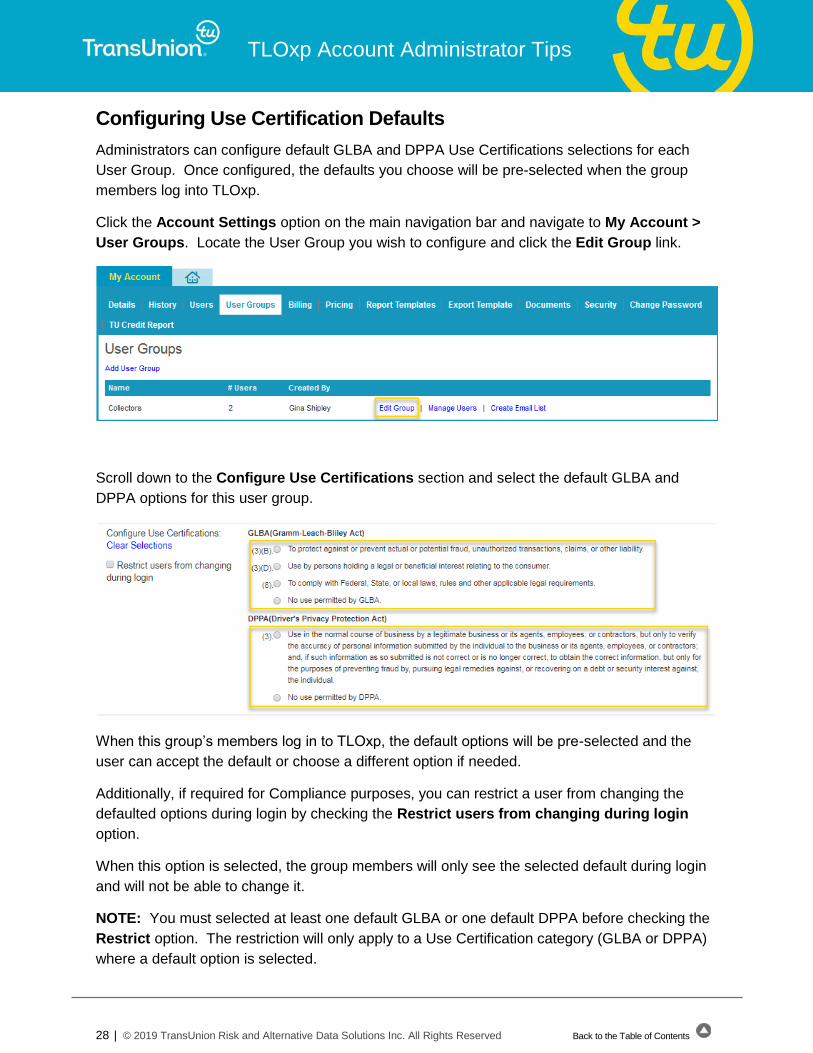
Configuring Use Certification Defaults
Administrators can configure default GLBA and DPPA Use Certifications selections for each
User Group. Once configured, the defaults you choose will be pre-selected when the group
members log into TLOxp.
Click the Account Settings option on the main navigation bar and navigate to My Account >
User Groups. Locate the User Group you wish to configure and click the Edit Group link.
Scroll down to the Configure Use Certifications section and select the default GLBA and
DPPA options for this user group.
When this group’s members log in to TLOxp, the default options will be pre-selected and the
user can accept the default or choose a different option if needed.
Additionally, if required for Compliance purposes, you can restrict a user from changing the
defaulted options during login by checking the Restrict users from changing during login
option.
When this option is selected, the group members will only see the selected default during login
and will not be able to change it.
NOTE: You must selected at least one default GLBA or one default DPPA before checking the
Restrict option. The restriction will only apply to a Use Certification category (GLBA or DPPA)
where a default option is selected.

TLOxp Account Administrator Tips
29 | © 2019 TransUnion Risk and Alternative Data Solutions Inc. All Rights Reserved Back to the Table of Contents