to a shed - redi-footing
TRANSCRIPT

BY RICK ARNOLD
time-saving tips about planning, materials, and construction that will help to get any outbuilding up in a hurry
Shortcutsto a Shed
I’ve always enjoyed projects that let me step back and see a completed, weathertight structure in just a short period of time. Building a shed like the one shown here is just this type of project. From foundation to roof, it involves nearly all the
framing components of a house, yet it can be completed by one person in a weekend.
When homeowners hire me to build a shed, it’s usually because they want it to match their house. The materials that are used to build a shed from scratch typically cost only about half of what you’d pay for a shed made in a factory and trucked to your site. Also, a custom
shed that matches the house enhances the property value rather than detracts from it.
Smart framing saves time and materialsI give myself a couple of days to build a shed like this, but careful planning is key. First, I write down all the measurements, then cre-ate a cutlist. From the cutlist, I make a buy list that I can give to the lumberyard for a materials delivery.
To save time and money, I design the shed’s framing so that there’s a direct load path from rafter to stud to floor joist. For the floor, I use
One builder, one weekend. Balloon-framed gable ends, factory-primed siding panels, and a straightforward framing plan are a few of the fea-tures that stream-line this shed’s construction.
FINE HOMEBUILDING60 Photo right, facing page: Krysta S. Doerfler
COPYRIGHT 2008 by The Taunton Press, Inc. Copying and distribution of this article is not permitted.

PVC piers are easy to level. Fit all four PVC piers in their bases, and set them in their holes. After cutting the first one a few inches above grade, I level across to mark the cutlines on the other three.
a fast foundation supports basic framing
Beams eliminate the need for joist hangers. I let the side rim joists overlap each double 2x6 beam. This creates a ledge inside the rim that supports all the joists. I toenail the rim and joists to the beam for a solid connection.
Plastic piers save time
I used to dread the grunt work of hauling cinder blocks, gravel, and maybe even wet concrete for a shed foundation. Six years ago, eager to find an alternative, I tried the Redi-Footing (www.redifooting.com). Designed to exploit the strength and durability of schedule-40 PVC pipe, these piers require no concrete or cinder blocks, and can han-dle a load of 10,000 lb. as soon as the hole is backfilled.
Setting the piers is simple. Once the holes are dug, I drop in each Redi-Footing base with a length of PVC pipe attached. I establish a level line for all the piers, cut the schedule-40 pipe to length, then set each base, pipe, and cap assembly in its hole. The cap accepts a 31⁄2-in.-thick beam. I finish by tamping the backfill. A Redi-Footing (cap and base pieces) costs $32.
I don’t bother with stakes, strings, or batterboards. I nail together the rim of the floor frame, roughly square it, and use it as a guide to locate four holes for my PVC-based pier foundation (sidebar right). I center the holes about 1 ft. from each end of the frame. After I dig a small patch at each hole location, I slide the frame out of the way to dig the holes and to level the piers.
APRIL/MAY 2008 61www.finehomebuilding.com
COPYRIGHT 2008 by The Taunton Press, Inc. Copying and distribution of this article is not permitted.

beams to support the rim and the floor joists instead of supporting the joists with joist hangers con-nected to the rim.
I lay out the joist locations 16 in. on center and use the same layout for the studs and the raf-ters. I use only one wall top plate because the roof load is trans-ferred directly from the rafters to the studs.
Finally, the gable-end walls are framed so that the top plate is at the same height as the top of the rafters to support the roof sheathing. This saves me the expense of four rafters and also the time required to cut and install them.
Material choices make a differenceFor this shed, I used PVC for all of the trim. This matched the house and also saved me the time of prepping and painting. I gave the shed a steeply pitched roof that matches the house while also adding overhead stor-age space.
I like Louisiana-Pacific’s SmartSide for shed-wall sheath-ing. This oriented-strand-board (OSB) panel comes with exte-rior primer already applied and a cedar-channel pattern on the outside face, so it can serve as finished siding. However, I build out the rake trim 3⁄4 in. so that in the future, I can easily install the sidewall shingles to match the house.
A few years ago, I discovered Redi-Footing, a pier foundation that uses commonly available schedule-40 PVC pipe in place of poured concrete (sidebar p. 61).
Shed foundations are always a balancing act. It’s tempting to provide the bare minimum because frankly, it’s only a shed. In my mind, the bare minimum is a pressure-treated floor system
Sheathe and side in one step. Louisiana-Pacific’s SmartSide pan-els (www.lpcorp.com) are 3⁄8-in.-thick OSB, but have a simulated cedar-channel exterior texture. The factory-applied primer can be left unpainted for up to 120 days. Edges are designed to lap over studs (inset photo) for an easy, weathertight installation. A 4x8 panel costs about $20.
A big blade chops studs with a single cut. Replacing my worm-drive saw’s standard blade and housing assembly with a BigFoot version lets me cut with a 101⁄4-in.-dia. blade. I gang the sidewall studs together, square the ends, and cut them to the same length in a single pass. A BigFoot attachment costs about $290 (www.bigfootsaws.com).
Let the walls lean out and the sid-ing hang down. Once the wall is up, I brace it leaning out so that I can easily build and stand the gable walls on the floor deck. The 7-ft.- 5-in. wall height allows the siding to hang down past the floor framing and act as a drip edge.
Fine-tune the wall placement with the holding nail. Before I build the wall, I snap a layout line 31⁄2 in. in from the edge of the floor and toe-nail the bottom plate to the inside. When I stand the wall, the nails keep the wall from sliding off the floor. Once the wall is up, I can move the wall back to the line by bending the nail with a hammer.
floor deck is a perfect platform for wall framing
FINE HOMEBUILDING62
COPYRIGHT 2008 by The Taunton Press, Inc. Copying and distribution of this article is not permitted.

balloon-framing tHe gable walls won’t slow you down
Gang-cut the gable-wall studs. I don’t mess around with marking and cutting each board separately. I mark and cut the bevel angle on all the studs at once using the diagonal function on the construction calcula-tor (inset photo). Then I rearrange the studs, using the calculator’s rake-wall function to determine the differ-ence in length from one stud to the next. That enables me to gang-cut them again with the bot-toms aligned.
Screw the center stud, but nail the rest. I have to remove the top 71⁄2 in. of the center stud later to support the 2x8 ridge board. Before I assemble the wall, I cut halfway through the stud from the back to make it easier to remove. The rest of the studs are nailed to the top plate with 16d nails.
laid directly on cinder blocks set on grade.
Although I like to have some-thing a little more substantial, poured-concrete piers that are set below the frost line seem like overkill for a small shed. Gener-ally, unless otherwise specified, I will excavate below the topsoil and, if the ground is not gravel, provide a 4-in. bed of gravel to keep the foundation drained.
Weatherizing an unheated structure is simpleA shed doesn’t have the same complex weatherization con-siderations as a house, but water still needs to be kept out. For the roof, I use 1⁄2-in. AdvanTech OSB sheathing (www.huber wood.com) because it doesn’t swell with moisture. For this shed, I used a long-lasting archi-tectural shingle left over from roofing the house. The eave detail keeps rain off the siding.
The height of the shed is designed to keep water out as well. I cut the studs so that 8-ft.-tall sheathing panels will hang about 1⁄2 in. below the bottom of the floor joists of a 7-ft.-5-in.-tall wall. This creates a drip edge that helps to keep the joists dry. I coat the first inch of the inside edge of the panel with wood preservative because it will be exposed below the floor joist.
I spend extra for AdvanTech’s 5⁄8-in. tongue-and-groove sheath-ing for the subfloor to give it a little extra stiffness, and I coat the underside with preservative. Because the underside of the shed is exposed, I use pressure-treated lumber for the support beams and floor joists.
Make roof framing easier with a calculatorFor a structure this small, you could do a reasonable job of working out the rafter pattern by
Well-thought-out design details keep things moving. The back wall goes up first to get it out of the way. For the front wall, I use the existing layout where I can. For example, the center stud becomes part of the door’s rough open-ing. I use an existing stud on layout for the window as well.
APRIL/MAY 2008 63www.finehomebuilding.com
COPYRIGHT 2008 by The Taunton Press, Inc. Copying and distribution of this article is not permitted.
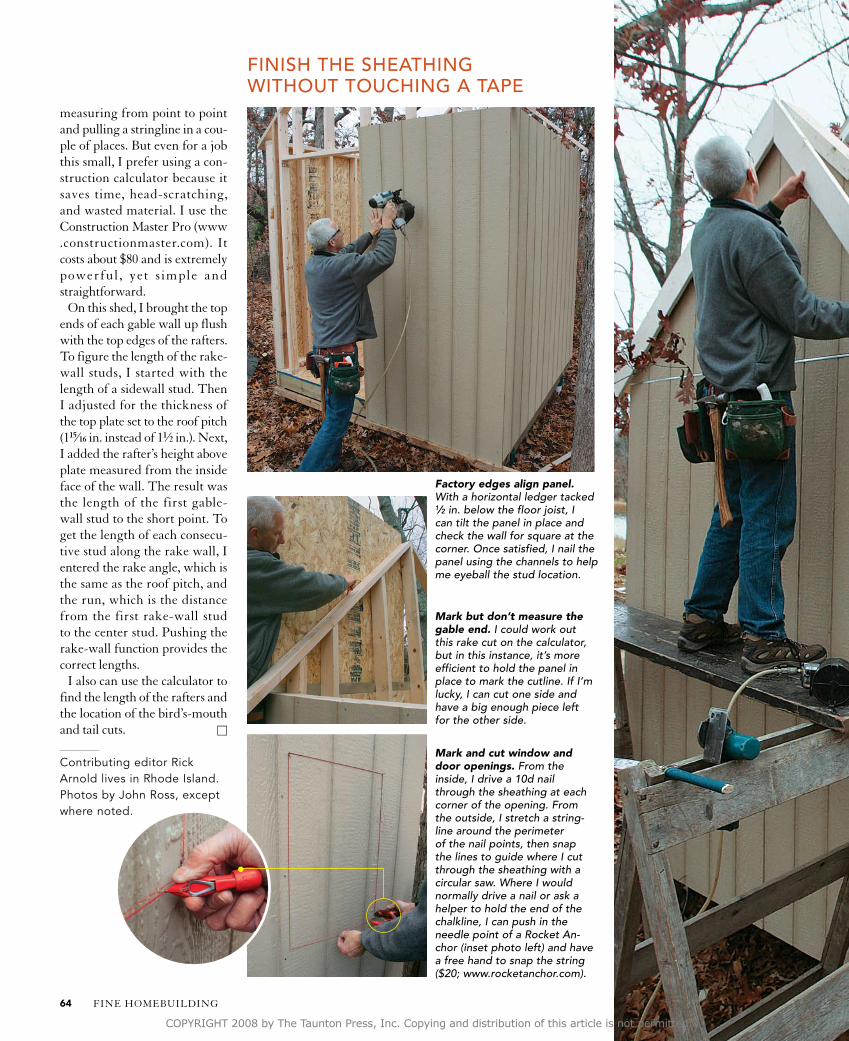
finisH tHe sHeatHing witHout toucHing a tape
Mark and cut window and door openings. From the inside, I drive a 10d nail through the sheathing at each corner of the opening. From the outside, I stretch a string-line around the perimeter of the nail points, then snap the lines to guide where I cut through the sheathing with a circular saw. Where I would normally drive a nail or ask a helper to hold the end of the chalkline, I can push in the needle point of a Rocket An-chor (inset photo left) and have a free hand to snap the string ($20; www.rocketanchor.com).
measuring from point to point and pulling a stringline in a cou-ple of places. But even for a job this small, I prefer using a con-struction calculator because it saves time, head-scratching, and wasted material. I use the Construction Master Pro (www .constructionmaster.com). It costs about $80 and is extremely powerful , yet s imple and straightforward.
On this shed, I brought the top ends of each gable wall up flush with the top edges of the rafters. To figure the length of the rake-wall studs, I started with the length of a sidewall stud. Then I adjusted for the thickness of the top plate set to the roof pitch (115⁄16 in. instead of 11⁄2 in.). Next, I added the rafter’s height above plate measured from the inside face of the wall. The result was the length of the first gable-wall stud to the short point. To get the length of each consecu-tive stud along the rake wall, I entered the rake angle, which is the same as the roof pitch, and the run, which is the distance from the first rake-wall stud to the center stud. Pushing the rake-wall function provides the correct lengths.
I also can use the calculator to find the length of the rafters and the location of the bird’s-mouth and tail cuts. □
Contributing editor Rick Arnold lives in Rhode Island. Photos by John Ross, except where noted.
Factory edges align panel. With a horizontal ledger tacked 1⁄2 in. below the floor joist, I can tilt the panel in place and check the wall for square at the corner. Once satisfied, I nail the panel using the channels to help me eyeball the stud location.
Mark but don’t measure the gable end. I could work out this rake cut on the calculator, but in this instance, it’s more efficient to hold the panel in place to mark the cutline. If I’m lucky, I can cut one side and have a big enough piece left for the other side.
FINE HOMEBUILDING64
COPYRIGHT 2008 by The Taunton Press, Inc. Copying and distribution of this article is not permitted.

trim tHe rake first; tHen install tHe fascia after tHe roof framing
Locate the fascia with a straightedge. I hold my Speed Square on top of the rafter and butt the top edge of the fascia against the square before nailing it fast. This ensures that the roof sheathing is not pushed up where it meets the fascia.
look for the magazine extras section on our home page to see rick arnold demonstrate how he uses a construction calculator to figure out rafters and rake walls for this shed.
FineHomebuilding.com
Framing and trim go on together. After I establish solid staging (see fHb #160, pp. 86-87), I build out the gable-end rake trim to 3⁄4 in. proud of the sheathing. This provides space for siding to tuck behind the trim if it’s added later. I let the bottom end run wild and cut it later to fit the fascia board.
Cut the rake trim flush with the fascia. Once I’ve secured the rake trim to the fascia with a couple of trim nails, I use the edge of the fascia to guide the plumb cut on the rake trim. Then I make a horizontal cut even with the bottom of the fascia.
Create a pocket for the ridge. At the top of the center stud, I fin-ish the plunge cut that I started before I assembled the wall. Once the cut is com-plete, I remove the two screws holding the top plate to the center stud, remove the piece, and drop the ridge board into place.
Use a level to scribe the rake return quickly. I tack a short piece of trim in place along the rake, then scribe the vertical and hori-zontal cuts.
APRIL/MAY 2008 65www.finehomebuilding.com
COPYRIGHT 2008 by The Taunton Press, Inc. Copying and distribution of this article is not permitted.