tools - ソフトバンクbroadband.mb.softbank.jp/mb/support/3g/product/830n_841n/...11-2 11 tools...
TRANSCRIPT

Tools
11
Osaifu-Keitai® .................................... 11-2About Osaifu-Keitai® .............................. 11-2Using Osaifu-Keitai® ............................... 11-3Activating IC Card Lock........................... 11-4
Life History Viewer............................ 11-6Life History Viewer Window .................. 11-6Viewing Data in Chronological Order ... 11-7
Schedule............................................. 11-8Schedule Window ................................... 11-8Saving Events to Schedule ...................... 11-8Checking Saved Events ........................... 11-9
To Do List ......................................... 11-11Saving Tasks........................................... 11-11Checking Saved Tasks ........................... 11-12Deleting Tasks ....................................... 11-12
Text Memo....................................... 11-13Saving Text Memos ............................... 11-13Deleting Text Memos............................ 11-13
Voice Memo ..................................... 11-14Recording the Other Party’s Voice....... 11-14
Recording Your Voice............................ 11-14Calculator......................................... 11-15Alarm................................................ 11-16
Setting Alarm......................................... 11-16Canceling Alarm .................................... 11-17
Bar Code Reader.............................. 11-18Scanning Bar Codes ............................... 11-18Checking Scanned Data......................... 11-19
Text Reader...................................... 11-20Scanning Text......................................... 11-21Checking Scanned Text ......................... 11-22
Advanced Features.......................... 11-23Osaifu-Keitai® ........................................ 11-23Life History Viewer ................................ 11-23Schedule ................................................. 11-24To Do List ............................................... 11-25Text Memo............................................. 11-25Alarm...................................................... 11-26Bar Code Reader & Text Reader ........... 11-26
11-1

11-2
11
Too
ls
Osaifu-Keitai®
About Osaifu-Keitai®
“Osaifu-Keitai®“ is a range of IC Card-based services used by Osaifu-Keitai® compatible handsets. Make purchases using e-money or e-ticketing. Hold handset up to a reader/writer to pay for your purchase.
●Osaifu-Keitai® Terms
Getting Started
Osaifu-Keitai®
Cellular phone equipped with “FeliCa“ contactless IC card technology for reading and writing data by holding phone up to a reader/writer.
IC Card An IC chip embedded in Osaifu-Keitai®-compatible handsets.
Lifestyle-Appli
S! Applications to use Osaifu-Keitai®. Some applications are preinstalled.
Tip・ Data saved in IC Card varies by service
content and usage history.Procedures to delete IC Card data vary by Lifestyle-Appli.Contact Osaifu-Keitai® service providers for details.・ Softbank is not liable for damage from
accidental loss or alteration of IC Card data or settings.・ IC Card data can be misused if your
Osaifu-Keitai® compatible handset is lost or stolen. Softbank is not liable for any resulting damages.
Note・ Keep a copy of service passwords,
customer service contact, etc. in a separate place.
Downloading Lifestyle-AppliDownload Lifestyle-Appli via Internet website.・ Lifestyle-Appli is saved to Data Folder.
Registrations/SettingsActivate Lifestyle-Appli to completeregistration or customize settings.・Make deposit into account, check payment records or balance, etc.
Osaifu-Keitai®
11
Too
ls
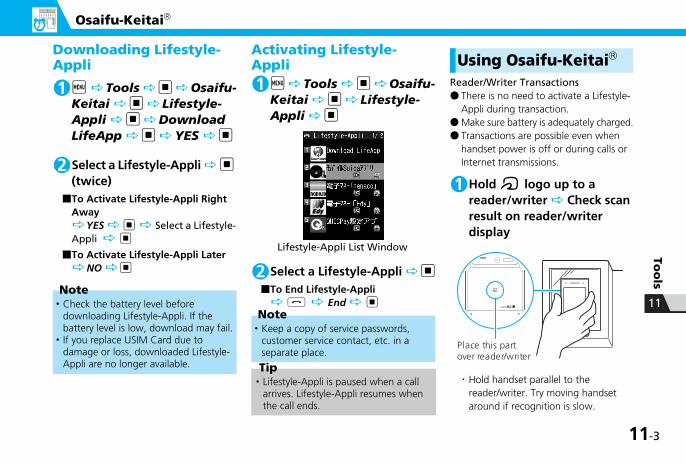
Downloading Lifestyle-Appli
i Tools d Osaifu-Keitai d Lifestyle-Appli d Download LifeApp d YES d
Select a Lifestyle-Appli d (twice)
■To Activate Lifestyle-Appli Right Away
YES d Select a Lifestyle-Appli d
■To Activate Lifestyle-Appli Later NO d
Activating Lifestyle-Appli
i Tools d Osaifu-Keitai d Lifestyle-Appli d
Select a Lifestyle-Appli d■To End Lifestyle-Appli
y End d
Using Osaifu-Keitai®
Reader/Writer Transactions● There is no need to activate a Lifestyle-
Appli during transaction.● Make sure battery is adequately charged.● Transactions are possible even when
handset power is off or during calls or Internet transmissions.
Hold e logo up to a reader/writer Check scan result on reader/writer display
・ Hold handset parallel to the reader/writer. Try moving handset around if recognition is slow.
Note・ Check the battery level before
downloading Lifestyle-Appli. If the battery level is low, download may fail.・ If you replace USIM Card due to
damage or loss, downloaded Lifestyle-Appli are no longer available.
1
2
Note・ Keep a copy of service passwords,
customer service contact, etc. in a separate place.
Tip・ Lifestyle-Appli is paused when a call
arrives. Lifestyle-Appli resumes when the call ends.
1
Lifestyle-Appli List Window
2
1
Place this part over reader/writer
11-3
11
Osaifu-Keitai®
11
Too
ls
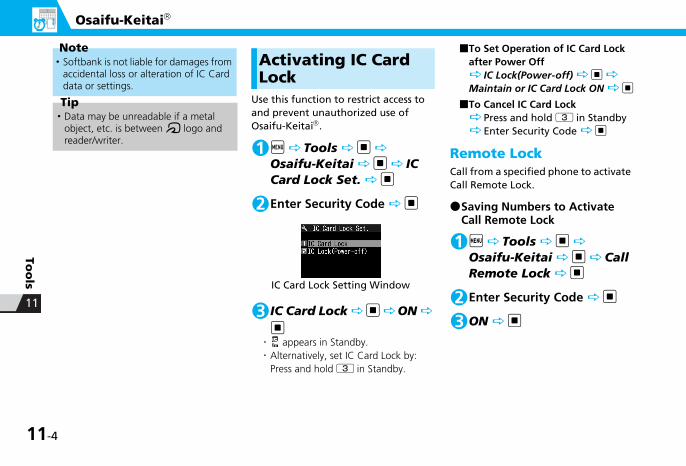
Activating IC Card Lock
Use this function to restrict access to and prevent unauthorized use of Osaifu-Keitai®.
i Tools d Osaifu-Keitai d IC Card Lock Set. d
Enter Security Code d
IC Card Lock d ON d・ appears in Standby.・ Alternatively, set IC Card Lock by:
Press and hold 3 in Standby.
■To Set Operation of IC Card Lock after Power Off
IC Lock(Power-off) d Maintain or IC Card Lock ON d
■To Cancel IC Card Lock Press and hold 3 in Standby Enter Security Code d
Remote LockCall from a specified phone to activate Call Remote Lock.
●Saving Numbers to Activate Call Remote Lock
i Tools d Osaifu-Keitai d Call Remote Lock d
Enter Security Code d
ON d
Note・ Softbank is not liable for damages from
accidental loss or alteration of IC Card data or settings.
Tip・ Data may be unreadable if a metal
object, etc. is between e logo and reader/writer. 1
2
IC Card Lock Setting Window
3
1
23
-4
Osaifu-Keitai®
11
Too
ls
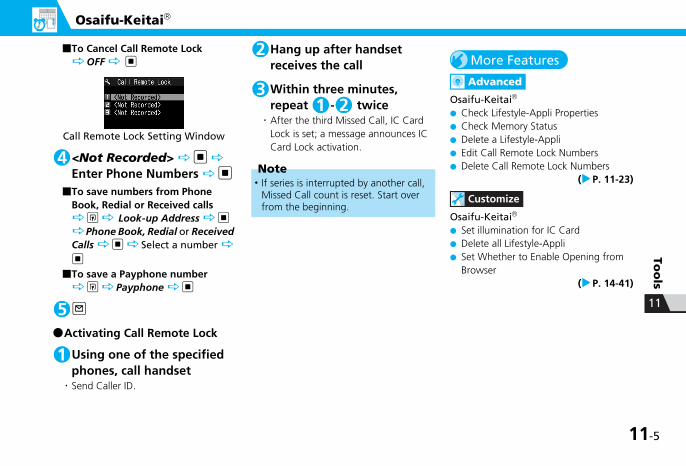
■To Cancel Call Remote Lock OFF d
<Not Recorded> d Enter Phone Numbers d
■To save numbers from Phone Book, Redial or Received calls
u Look-up Address d Phone Book, Redial or Received
Calls d Select a number d]
■To save a Payphone number u Payphone d
o
●Activating Call Remote Lock
Using one of the specified phones, call handset・ Send Caller ID.
Hang up after handset receives the call
Within three minutes, repeat - twice・ After the third Missed Call, IC Card
Lock is set; a message announces IC Card Lock activation.
More Features
Advanced
Osaifu-Keitai®
● Check Lifestyle-Appli Properties● Check Memory Status● Delete a Lifestyle-Appli● Edit Call Remote Lock Numbers● Delete Call Remote Lock Numbers
( P. 11-23)
Customize
Osaifu-Keitai® ● Set illumination for IC Card● Delete all Lifestyle-Appli● Set Whether to Enable Opening from
Browser( P. 14-41)
Call Remote Lock Setting Window
4
5
1
Note・ If series is interrupted by another call,
Missed Call count is reset. Start over from the beginning.
2
31 2
11-5

11-6
11
Too
ls
Life History Viewer
View activities in chronological order.
Life History Viewer Window
③①
⑤Life History Viewer Window
p
②
o
④
⑥⑦
⑤
③
②
① Time Axis
② Scale of Time Axis - - -
③ IconStill image, image: Image thumbnailMovie: Movie iconSchedule: Schedule iconMail message(send/receive)history: Mail message (send/receive)icon
④ Data propertiesStill image, image, Movie: No imageSchedule: Schedule nameMail message (send/receive) history:The sender for the received mail, andthe receiver for the sent mail
⑤ Data TypeStill image, Image dataVideoScheduleReceivedSentReceived & sent messages
⑥ Date and timeStill image, image, movie:Shooting, Updating or Saving date and timeSchedule: Start date and timeMail message (send/receive) history:Received/Sent date and time
⑦ TitleStill image, image, movie: TitleSchedule: Schedule nameMail message (send/receive) history:The sender for the received mail, and the receiver for the sent mail

Life History Viewer
11
Too
ls
Viewing Data in Chronological Orderi Tools d Life History Viewer d
■To Reduce/Enlarge Scale of Time Axis
o or p
Select a data item d
oThe function corresponding to the data type is activated and the data is opened.
More Features
Advanced
Life History Viewer● Hide Some Items in Life History Viewer● Update Life History Viewer
( P. 11-23)
1
Life History Viewer Window
2
Life History Viewer Closeup Window
3
11-7

11-8
11
Too
ls
Schedule
Save future events to Schedule. Set the alarm to be activated at a specified time with message and animation appearing to remind you of the event. Saved events can be checked from Schedule window.
Schedule Window
Saving Events to Schedulei Tools d Schedule d
o Schedule d
d Enter subject d Select an icon d
d Enter start/end date and time d
Schedule Window
①
②
① CalendarBlue date: SaturdaysRed date: Sundays, public and other
holidays_ : Today□ : Events for the morning■ : Events for the afternoon
② Information PanelDate, day of the week, content type icon, time, and saved content・ Content Type Icon
(or a user icon) EventHoliday
・ Event Repetition IconDaily eventWeekly event Monthly eventAnnual eventEvent for over a day
1
2
Event Edit Window
3
4

Schedule
11
Too
ls
d 1 Time, Daily ( ), Weekly ( ), Monthly ( ) or Annually ( ) d
■To Specify Days of the Week Weekly ( ) d Put
checkmarks to days of the week o
d Select an alarm notification option d
■To Activate Alarm Prior to Event ON/Set Time d Enter
time
d Select an alarm tone type d ( Select a folder d Select an alarm tone d)Folders are unavailable when Clock Alarm Tone or OFF is selected.
d Enter place d
d Enter details d oEntered content appears when alarm sounds or vibrates.
●Alarm Notification OperationsWhen the set time arrives, alarm sounds and animation appears (on Display) for approximately five minutes.When handset is closed, press a to stop the alarm and read out the schedule sujbect.When handset is opened, press any key to stop the alarm.Press any key again to end notification message.
Adding Holidays[Schedule] window o Holiday d
d Enter year, month and date d
d 1 Time or Annually ( ) d
d Enter content d
o
Checking Saved Eventsi Tools d Schedule d
■To Toggle between Weekly View and Monthly View
p
b to select a date with events d
5
6
7
89
Tip・ If the set alarm time arrives during a
call, alarm tone sounds through earpiece.・ If a call arrives while the alarm is
sounding, the alarm stops.
1
2
3
4
5
1
Schedule Window
2
Event List Window
11-9

11
Schedule
11
Too
ls
Select an event d
Deleting Events
●To Delete One Event
[Event List] window Select an event u
Delete d Delete This d YES d
●To Delete Multiple Events
[Event List] window u
Delete d Delete selected d
Select an event dRepeat this step to specify other events or vibrates.
o YES d
●To Delete All Events Prior to a Specified Date
In [Schedule] window, select date, [Event List] window or [Event Details] window u
Delete d Delete Past d Select an item d YES d
More Features
Advanced
Schedule● Sort Events by Icon● Check Number of Saved Events● Edit an Event● Copy an Event● Make/Cancel Secret Setting of an Event● Delete All Events● Reset Holidays● Search Information by Keyword
( P. 11-24)
Customize
Alarm● Set Priority at Alarm Notification Time● Change Alarm Tone
( P. 14-3)
3
Event Details Window
1
2
12
3
4
1
2
-10

To Do List
11
Too
ls
Save tasks to To Do List. Set Alarm to remind you of deadlines.
Saving Tasksi Tools d To Do List d o
■To Edit a Saved Task Select a task o
d Enter task dTask appears when alarm time arrives.
d Enter Date d Enter due date and time d
■To Enter Due Date from Calendar Choose Date d Select a
date on Calendar d Enter date/time d
■To Cancel a Due Date No Date d
d Select a priority level d
d Select a category d
d Select an alarm notification option d
■To Activate Alarm Prior to Due Time
ON/Set Time d Enter time
d Select an alarm tone type d ( Select a folder d Select an alarm tone d) o Folders are unavailable when Clock Alarm Tone or OFF is selected.
●Alarm Notification OperationsWhen the set time arrives, alarm sounds and animation appears (on Display) for approximately five minutes.When handset is closed, press a to stop the alarm and read out the schedule sujbect.When handset is opened, press any key to stop the alarm.Press any key again to end notification message.
1
Task Edit Window
2
3
4
5
6
7
Tip・ If the set alarm time arrives during a
call, alarm tone sounds through earpiece.・ If a call arrives while the alarm is
sounding, the alarm stops.
11-11

11
To Do List
11
Too
ls
Checking Saved Tasksi Tools d To Do List d
Select a task d
Deleting Tasks●To Delete One Task
[Task List] window Select a task u
Delete d Delete This d YES d
●To Delete Multiple Tasks
[Task List] window u
Delete d Delete selected d
Select a task dRepeat this step to specify other tasks.
o YES d
More Features
Advanced
To Do List● Sort Tasks by Category● Change Order of Tasks● Set Task Status● Delete All Tasks
( P. 11-25)
Customize
Alarm● Set Priority at Alarm Notification Time● Change Alarm Tone
( P. 14-3)
Tip・ Overdue tasks are indicated by red
status icons (e.g. ).
1
Task List Window
2
Task Details Window
1
2
12
3
4
-12
Text Memo
11
Too
ls
Save short notes or messages as text memos.● Saved text memos can be inserted in
Schedule or in messages.
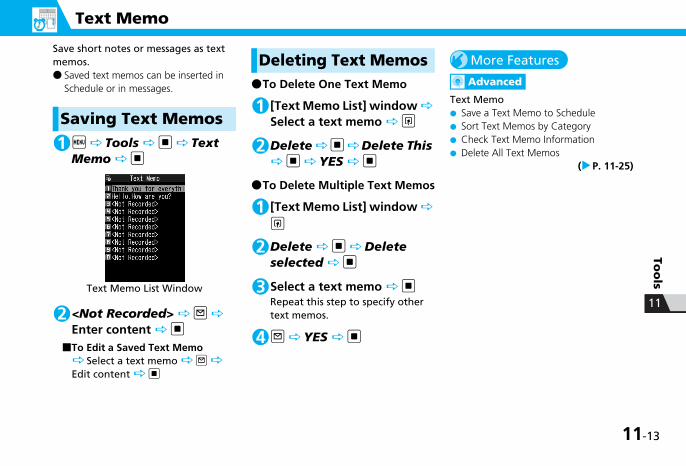
Saving Text Memosi Tools d Text Memo d
<Not Recorded> o Enter content d
■To Edit a Saved Text Memo Select a text memo o
Edit content d
Deleting Text Memos●To Delete One Text Memo
[Text Memo List] window Select a text memo u
Delete d Delete This d YES d
●To Delete Multiple Text Memos
[Text Memo List] window u
Delete d Delete selected d
Select a text memo dRepeat this step to specify other text memos.
o YES d
More Features
Advanced
Text Memo● Save a Text Memo to Schedule● Sort Text Memos by Category● Check Text Memo Information● Delete All Text Memos
( P. 11-25)
1
Text Memo List Window
2
1
2
1
2
3
4
11-13

11-14
11
Too
ls
Voice Memo
The following two types of voice memos can be recorded with Voice Memo:“Voice memo during a call“ to record the other party’s voice during a call; and “Voice memo in Standby“ to record your voice in Standby.●Only one entry, either a voice memo
during a call or a voice memo in Standby, can be saved on handset. When a new voice memo is recorded, the previously saved entry is overwritten.
● The available recording time is 20 seconds for both types of voice memos.
● See P. 3-5 and P. 3-18 for playing and deleting a recorded voice memo.
Recording the Other Party’s Voice
Press and hold a during a callA short beep sounds through the earpiece, and recording starts.When remaining recording time reaches five seconds, a short beep sounds. When recording is finished, two short beeps sound.
■To Stop Recording d or Press and hold a
Recording Your Voicei Tools d Voice Memo d
YES d Record your voiceSpeak into microphone after short beep sounds through earpiece.When remaining recording time reaches five seconds, a short beep sounds. When recording is finished, two short beeps sound.
■To Stop Recording d
1
Tip・ Recording stops automatically when a
call arrives, alarm goes off or another function is activated.
1
2

Calculator
11
Too
ls
i Tools d Calculator d
Enter numbers with Keypad Enter + , - , × or ÷ with
Multi Selector■To Calculate Negative Numbers
h Enter numbers with keypad Enter + , - , × or ÷ with Multi Selector
dResult appears.
Available Functions1
2
3
Enter Number 0 - 9
+ (Add) j
- (Subtract) h
× (Multiply) f
÷ (Divide) g
= (Equal) d
Decimal Point o
Cancel Calculation t ( )
Clear Number t ( )
Tip・ If the calculation result exceeds 10
digits, .E appears.
11-15

11-16
11
Too
ls
Alarm
Setting Alarmi Tools d Alarm
d
■To View Alarm Entries Select an entry d
Select an alarm o
d Enter title dTitle appear in Alarm message.
d Enter time d
d 1 Time, Daily ( ) or Select Day ( ) d
■To Specify Days of the Week Select Day ( ) d
Put checkmarks to days of the week o
d Select an alarm tone type d ( Select a folder d Select an alarm tone d)Folders are unavailable when Clock Alarm Tone or OFF is selected.
d c to adjust volume d
d ON d Enter number of activation times
Enter time interval■To Cancel Snooze
OFF d Enter ringing duration
d ON or OFF d o
1
Alarm List
Alarm Details Window
2
Alarm Setting Window
3
45
6
7
8
9

Alarm
11
Too
ls
●Alarm Activation OperationsWhen the set time arrives, alarm is activated and animation appears (on Display). When the auto power-on function is set to ON in Alarm Setting window, handset is automatically turned on, if it has been off, to activate the alarm.Press any key to stop the alarm tone.When Snooze is set to OFF, press any key again to cancel the alarm with two short beeps, and return to the window before the alarm activation.When Snooze is set to ON, the alarm sounds repeatedly in the set time interval. Press y to cancel Snooze with two short beeps.
Canceling Alarm[Alarm List] Select an alarm pEach time you press p, the alarm toggles between ON and OFF.
More Features
Advanced
Alarm● Cancel All Alarms● Edit Alarm Settings
( P. 11-26)
Customize
Alarm● Set Priority at Alarm Notification Time● Change Alarm Tone
( P. 14-3)
Note・ The alarm and snooze cancellation
beeps do not sound when Keypad Sound is set to OFF.・ Set the auto power-on function to OFF
in Alarm Setting window and turn off handset, when you are near high-precision electronic devices or devices using weak signals, on an aircraft or in a hospital where handset use is prohibited.・ If a call arrives while the alarm is
sounding, the alarm stops.・ If the alarm activation time comes
during a call, Snooze does not work even if it is set to ON.
Tip・ Alarm settings are retained even if the
alarm is canceled.
1
11-17

11-18
11
Too
ls
Bar Code Reader
JAN codes and QR codes can be scanned by Bar Code Reader using handset camera.
About JAN & QR Codes
●JAN CodeA bar code made of vertical lines (bars) with different widths and spaces in between, representing numbers. Handset can scan 8-digit (JAN8) and 13-digit (JAN13) bar codes.
●QR CodeA two-dimensional code representing alphanumerics, kanji, kana, or pictographs. Some QR codes are made up of several data areas that are scanned as individual QR codes and then automatically combined as one QR code.
Scanning Bar Codes● Position handset camera at a distance of
10 cm from the bar code.
i Tools d Bar Code Reader d
Frame the bar code in the recognition field
Scanning starts automatically.┏ , ┓ , ┗ and ┛ indicate the corners of the recognition field.
■To Cancel Scanning d OK d
■To Adjust Zoom h (Zoom out) or j (Zoom in)
■To Use Auto Focus o
■To Scan a QR Code Made of Several Data Areas (QR Codes)
OK d (twice) Scan a QR codeRepeat this step to scan other QR codes.All component QR codes must be scanned in order to access or save scanned data on handset.
Check scanned data■To Discard Scanned Data
t YES d
u Store d YES d OK d
1
2
Bar Code Scanning WindowTip・ A JAN code/QR code must be
accurately focused and be enlarged to fill the recognition field.・ Scanning may take a while.・ Some bar codes may not be scanned
depending on the size, version or print quality, or due to scratches, stains, damage or the reflection of light.
3
4
Bar Code Reader
11
Too
ls
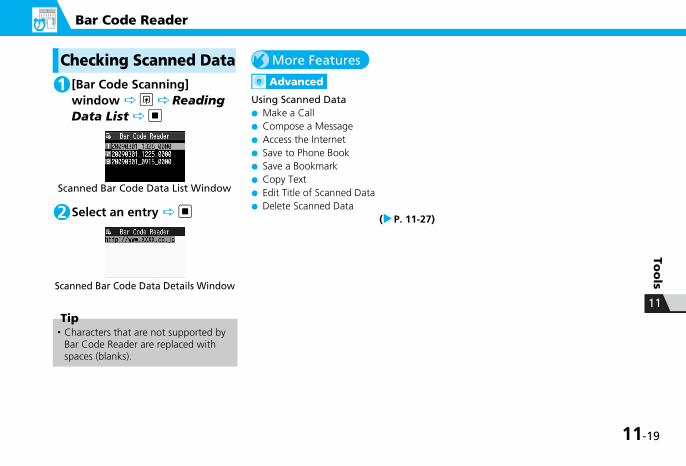
Checking Scanned Data[Bar Code Scanning] window u Reading Data List d
Select an entry d
More Features
Advanced
Using Scanned Data● Make a Call● Compose a Message● Access the Internet● Save to Phone Book● Save a Bookmark● Copy Text● Edit Title of Scanned Data● Delete Scanned Data
( P. 11-27)
Tip・ Characters that are not supported by
Bar Code Reader are replaced with spaces (blanks).
1
Scanned Bar Code Data List Window
2
Scanned Bar Code Data Details Window
11-19
11-20
11
Too
ls
Text Reader
Use Text Reader to scan printed text.
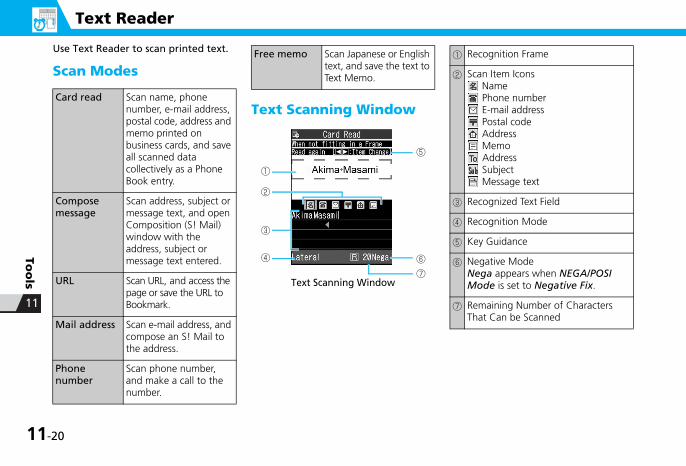
Scan Modes
Text Scanning WindowCard read Scan name, phone
number, e-mail address, postal code, address and memo printed on business cards, and save all scanned data collectively as a Phone Book entry.
Compose message
Scan address, subject or message text, and open Composition (S! Mail) window with the address, subject or message text entered.
URL Scan URL, and access the page or save the URL to Bookmark.
Mail address Scan e-mail address, and compose an S! Mail to the address.
Phone number
Scan phone number, and make a call to the number.
Free memo Scan Japanese or English text, and save the text to Text Memo.
Text Scanning Window
⑤
①
⑦
②
④ ⑥
③
① Recognition Frame
② Scan Item IconsNamePhone numberE-mail addressPostal codeAddressMemoAddressSubjectMessage text
③ Recognized Text Field
④ Recognition Mode
⑤ Key Guidance
⑥ Negative ModeNega appears when NEGA/POSI Mode is set to Negative Fix.
⑦ Remaining Number of Characters That Can be Scanned
Text Reader
11
Too
ls
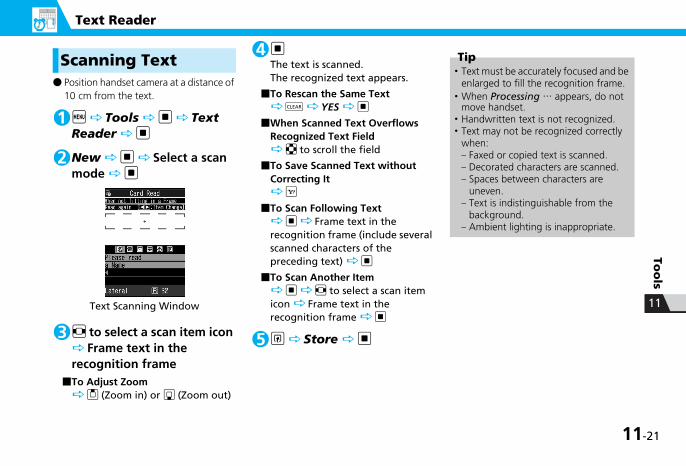
Scanning Text● Position handset camera at a distance of
10 cm from the text.
i Tools d Text Reader d
New d Select a scan mode d
v to select a scan item icon Frame text in the
recognition frame■To Adjust Zoom
f (Zoom in) or g (Zoom out)
dThe text is scanned.The recognized text appears.
■To Rescan the Same Text t YES d
■When Scanned Text Overflows Recognized Text Field
b to scroll the field
■To Save Scanned Text without Correcting It
p
■To Scan Following Text d Frame text in the
recognition frame (include several scanned characters of the preceding text) d
■To Scan Another Item d v to select a scan item
icon Frame text in the recognition frame d
u Store d
1
2
Text Scanning Window
3
4
5
Tip・ Text must be accurately focused and be
enlarged to fill the recognition frame.・When Processing … appears, do not
move handset.・ Handwritten text is not recognized.・ Text may not be recognized correctly
when:– Faxed or copied text is scanned.– Decorated characters are scanned.– Spaces between characters are
uneven.– Text is indistinguishable from the
background.– Ambient lighting is inappropriate.
11-21

11
Text Reader
11
Too
ls
Checking Scanned Texti Tools d Text Reader d Reading Data List d
Select an entry d
More Features
Advanced
Scanning Text● Correct Scanned Text● Edit Scanned Text● Set Printing Status of Text● Set Guidance ON/OFF● Set Vertical/Lateral Scan
( P. 11-26)
Using Scanned Data● Make a Call● Compose a Message● Access the Internet● Save to Phone Book● Save a Bookmark● Search Phone Book● Save a Text Memo● Copy Text● Delete Scanned Data
( P. 11-27)
1
Scanned Text List Window
2
Scanned Text Details Window
-22

Advanced Features
11
Too
ls
Osaifu-Keitai®
Start Here【Lifestyle-Appli List】 window
.................................................... P. 11-3【Call Remote Lock Setting】 window
.................................................... P. 11-5
Life History ViewerStart Here【Life History Viewer】 window
.................................................... P. 11-7【Life History Viewer Closeup】 window
.................................................... P. 11-7
Check Lifestyle-Appli Properties
【Lifestyle-Appli List】 window Select a Lifestyle-Appli u Properties d
Check Memory Status
【Lifestyle-Appli List】 window u Memory Info d
Delete a Lifestyle-Appli
【Lifestyle-Appli List】 window Select a Lifestyle-Appli u Delete d YES d
Edit Call Remote Lock Numbers
【Call Remote Lock Setting】 window Select phone number
d Change phone number d YES d o
Delete Call Remote Lock Numbers
【Call Remote Lock Setting】 window Select phone number
u Delete this or Delete All d YES d
Hide Some Items in Life History Viewer
【Life History Viewer】 window or 【Life History Viewer Closeup】 window u Display setting
d Select a data item d Select an item d oOnly checked items appear in Life History Viewer window.
Update Life History Viewer
【Life History Viewer】 window or 【Life History Viewer Closeup】 window u Reload d
11-23

11
Advanced Features
11
Too
ls
ScheduleStart Here【Schedule】 window .................. P. 11-8【Event Edit】 window ................ P. 11-8【Event List】 window ................. P. 11-9【Event Details】 window ......... P. 11-10
Sort Events by Icon
【Schedule】 window,【Event List】 window or【Event Details】 window u Icon Display d Select an icon d
Check Number of Saved Events
【Schedule】 window u No. of Schedules d
Edit an Event
【Event List】 window/【Event Details】 window ( Select an event) u Edit d Edit each item o
Copy an Event
【Event List】 window/【Event Details】 window u Copy d Edit each item o
Repetition setting of an event is canceled when it is copied.
Make/Cancel Secret Setting of an Event
● To Make Secret Setting
【Event Edit】 window Enter each item o ● To Cancel Secret Setting
【Event List】 window/【Event Details】 window u Release Secret d YES d
Before making/canceling secret setting, set handset to Secret Mode or Secret Data Only Mode (P. 4-8).
Delete All Events
【Schedule】 window,【Event List】 window or【Event Details】 window u Delete d Delete All d Enter Security Code d Select an item d
YES d
Reset Holidays
【Schedule】 window u Reset Holiday d YES d
-24

Advanced Features
11
Too
ls
To Do ListStart Here【Task List】 window ................. P. 11-12【Task Details】 window ........... P. 11-12
Text MemoStart Here【Text Memo List】 window ...... P. 11-13
Search Information by Keyword
【Event Details】 window u Quick Search d Enter Keyword d Enter keyword
d or d Select an item from search results
dTo select a keyword from previous entries, select History, press d, select a keyword, and then press d.To enter a keyword with Quote keyword, select Quote Keyword, press d, and select range start/end.
Sort Tasks by Category
【Task List】 window u Category Display d Select a category d
Change Order of Tasks
【Task List】 window u Sort/Filter d Select a criterion d
Set Task Status
【Task List】 window/【Task Details】 window ( Select a task) u Change Status d Select a status d
The set status is indicated by the status icon in Task List window and in Task Details window.When Completion is set as status, enter the completion date.
Delete All Tasks
【Task List】 window u Delete d Delete All d Enter
Security Code d YES d
Save a Text Memo to Schedule
【Text Memo List】 window Select a text memo u Edit Schedule d Enter each item
oEvent Edit window opens with the text memo details set as event content.
Sort Text Memos by Category
【Text Memo List】 window Select a text memo u Category d Select a category d
Check Text Memo Information
【Text Memo List】 window Select a text memo u Text Memo Info d
11-25

11
Advanced Features
11
Too
ls
AlarmStart Here【Alarm List】 ............................. P. 11-16【Alarm Details】 window......... P. 11-16
Bar Code Reader & Text ReaderStart Here【Scanned Bar Code Data List】 window
.................................................. P. 11-19【Scanned Bar Code Data Details】 window .................................... P. 11-19【Text Scanning】 window ........ P. 11-21【Scanned Text List】 window
.................................................. P. 11-22【Scanned Text Details】 window
.................................................. P. 11-22
Scanning Text
Delete All Text Memos
【Text Memo List】 window u Delete d Delete All d Enter Security Code d YES
d
Cancel All Alarms
【Alarm List】/【Alarm Details】 window u Release All d
YES d
Edit Alarm Settings
【Alarm List】 Select an alarm o Edit each item o
Correct Scanned Text
【Text Scanning】 window Scan text v to move cursor to the character you want to correct Press the number key corresponding to the correct character on the suggestion list
Press w to toggle between upper case and lower case.
Edit Scanned Text
【Text Scanning】 window Scan text u Edit d Edit text using keypad
To cancel editing and return to scanned text, press u, select Select Recog. Data and then press d.
Set Printing Status of Text
【Text Scanning】 window u NEGA/POSI Mode d Auto setting, Positive Fix or Negative Fix d
Set to Positive Fix when dark-colored text is printed on a light-colored background.Set to Negative Fix when light-colored text is printed on a dark-colored background.
Set Guidance ON/OFF
【Text Scanning】 window u Guidance OFF or Guidance ON d
-26
Advanced Features
11
Too
ls
Using Scanned Data
Set Vertical/Lateral Scan
【Text Scanning】 window u Vertical Writing or Lateral Writing
d
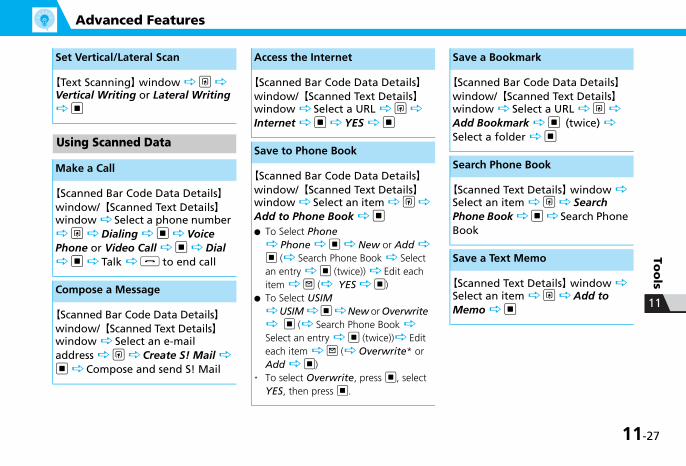
Make a Call
【Scanned Bar Code Data Details】 window/【Scanned Text Details】 window Select a phone number
u Dialing d Voice Phone or Video Call d Dial
d Talk y to end call
Compose a Message
【Scanned Bar Code Data Details】 window/【Scanned Text Details】 window Select an e-mail address u Create S! Mail d Compose and send S! Mail
Access the Internet
【Scanned Bar Code Data Details】 window/【Scanned Text Details】 window Select a URL u Internet d YES d
Save to Phone Book
【Scanned Bar Code Data Details】 window/【Scanned Text Details】 window Select an item u Add to Phone Book d ● To Select Phone
Phone d New or Add d ( Search Phone Book Select an entry d (twice)) Edit each item o ( YES d)
● To Select USIM USIM d New or Overwrite d ( Search Phone Book
Select an entry d (twice)) Edit each item o ( Overwrite* or Add d)
* To select Overwrite, press d, select YES, then press d.
Save a Bookmark
【Scanned Bar Code Data Details】 window/【Scanned Text Details】 window Select a URL u Add Bookmark d (twice) Select a folder d
Search Phone Book
【Scanned Text Details】 window Select an item u Search Phone Book d Search Phone Book
Save a Text Memo
【Scanned Text Details】 window Select an item u Add to Memo d
11-27

11
Advanced Features
11
Too
ls
Copy Text
【Scanned Bar Code Data Details】 window/【Scanned Text Details】 window u Copy d Select beginning of characters d Select end of characters d
Edit Title of Scanned Data
【Scanned Bar Code Data List】 window Select an entry u
Edit Title d Edit title d
Delete Scanned Data
【Scanned Bar Code Data List】 window/【Scanned Text List】 window Select an entry u ● To Select Delete This
Delete This d YES d ● To Select Delete All
Delete All d Enter Security Code d YES d
-28