tr nimble oracle test dev guide - nimble storage · pdf filenimble technical report: nimble...
TRANSCRIPT

N IMB LE T E CHN I C A L R E POR T : N IMB LE S TORAGE F O R ORA CL E T E S T AND D E V 1
TECHNICAL REPORT
Nimble Storage – Oracle Test and Dev Guide

N IMB LE T E CHN I C A L R E POR T : N IMB LE S TORAGE F O R ORA CL E T E S T AND D E V 2
Table of Contents
Introduction ................................................................................................................................................................................. 3
Audience ...................................................................................................................................................................................... 3
Scope ........................................................................................................................................................................................... 3
Using Nimble Zero-Copy Clone for Test or Development Environments ........................................................................... 3
Running Test or Development Environment on Production Array .................................................. 4
Running Test/Development Environment on Separate Array .......................................................... 6
Using Nimble Storage Array as a Test or Development Tier ..............................................................................................18
N IMB LE T E CHN I C A L R E POR T : N IMB LE S TORAGE F O R ORA CL E T E S T AND D E V 3
Introduction
The purpose of this technical white paper is to discuss architecting development and test environments rapidly and
seamlessly from Oracle production environment running ASM by leveraging the Nimble Zero-Copy Clone feature. It also
discusses leveraging Oracle Data Guard replication and Nimble Storage CS-Series to create a secondary solution for
variety of use cases. Tuning Oracle database performance is beyond the scope of this paper. Please visit
www.oracle.com for Oracle Performance Tuning Guide for more information in tuning your database.
Audience
This guide is intended for Oracle database solution architects, storage engineers, system administrators and IT
managers who analyze, design and maintain a robust database environment on Nimble Storage. It is assumed that the
reader has a working knowledge of network design for iSCSI SAN, and basic Nimble Storage operations. Knowledge of
Oracle Linux operating system, Oracle Clusterware, Oracle Data Guard, and Oracle database is also required.
Scope
In today Oracle environment, maintaining and refreshing test and development is a continuous event for System
Administrators and Oracle DBAs. The need for refreshing includes testing new Oracle applications, new code, test
system patches and Oracle patches, etc. Using the traditional methods such as RMAN duplicate database or restore
command is time consuming and cumbersome as it requires data to be copied. This paper discusses how to create a
Oracle Test and Development environment using Nimble Storage snapshot and zero-copy clone. The report covers both
cases where the primary database resides either on Nimble storage or another storage offering. For the latter case, the
use of Oracle Data Guard is discussed.,
Using Nimble Zero-Copy Clone for Test or Development Environments
Understanding the zero-copy clone feature on the Nimble Storage CS-Series array is key for planning on how to use it in
an Oracle environment. The zero-copy clone feature on the Nimble Storage array allows clones of existing volumes to be
created without taking any additional space. In the case of Oracle databases, this functionality enables the creation of
clone volumes from the snapshots of production Oracle database servers instantaneously. These clones can be
presented to a different host that can be used as testing and development.
There are two ways to refresh test or development databases on Nimble Storage.
1. Running test or development environment on the same CS-Series array as the production database.
N IMB LE T E CHN I C A L R E POR T : N IMB LE S TORAGE F O R ORA CL E T E S T AND D E V 4
2. Running test or development environment on a second CS-Series array separate from production
Running Test or Development Environment on Production Array
If refreshing Oracle test or development environment databases on the same Nimble Storage array as production in an
Oracle ASM environment, then follow the steps below:
PrePrePrePrerequisitesrequisitesrequisitesrequisites
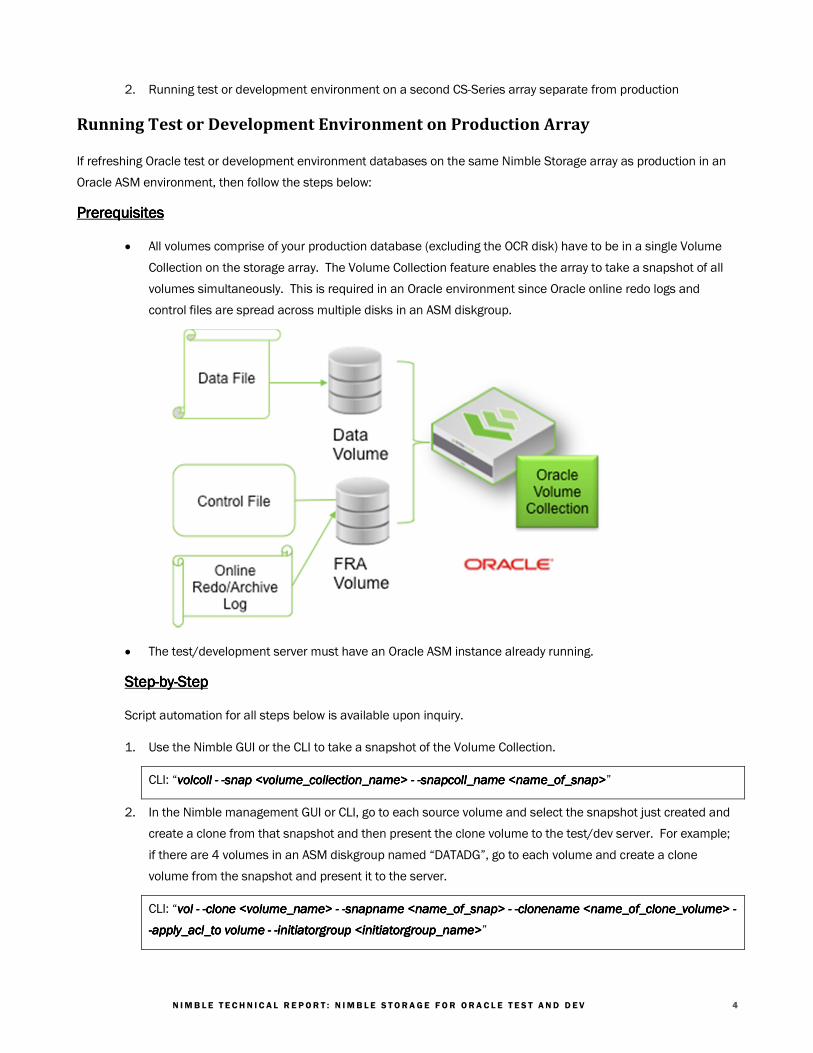
• All volumes comprise of your production database (excluding the OCR disk) have to be in a single Volume
Collection on the storage array. The Volume Collection feature enables the array to take a snapshot of all
volumes simultaneously. This is required in an Oracle environment since Oracle online redo logs and
control files are spread across multiple disks in an ASM diskgroup.
• The test/development server must have an Oracle ASM instance already running.
StepStepStepStep----bybybyby----StepStepStepStep
Script automation for all steps below is available upon inquiry.
1. Use the Nimble GUI or the CLI to take a snapshot of the Volume Collection.
CLI: “volcollvolcollvolcollvolcoll ---- ----snap <volume_collection_name> snap <volume_collection_name> snap <volume_collection_name> snap <volume_collection_name> ---- ----snapcoll_name <name_of_snap>snapcoll_name <name_of_snap>snapcoll_name <name_of_snap>snapcoll_name <name_of_snap>”
2. In the Nimble management GUI or CLI, go to each source volume and select the snapshot just created and
create a clone from that snapshot and then present the clone volume to the test/dev server. For example;
if there are 4 volumes in an ASM diskgroup named “DATADG”, go to each volume and create a clone
volume from the snapshot and present it to the server.
CLI: “vol vol vol vol ---- ----clone <volume_name> clone <volume_name> clone <volume_name> clone <volume_name> ---- ----snapname <name_of_snap> snapname <name_of_snap> snapname <name_of_snap> snapname <name_of_snap> ---- ----clonename <name_of_clone_volume> clonename <name_of_clone_volume> clonename <name_of_clone_volume> clonename <name_of_clone_volume> ----
----apply_acl_to volume apply_acl_to volume apply_acl_to volume apply_acl_to volume ---- ----initiatorgroup <initiatorgroup_name>initiatorgroup <initiatorgroup_name>initiatorgroup <initiatorgroup_name>initiatorgroup <initiatorgroup_name>”
N IMB LE T E CHN I C A L R E POR T : N IMB LE S TORAGE F O R ORA CL E T E S T AND D E V 5
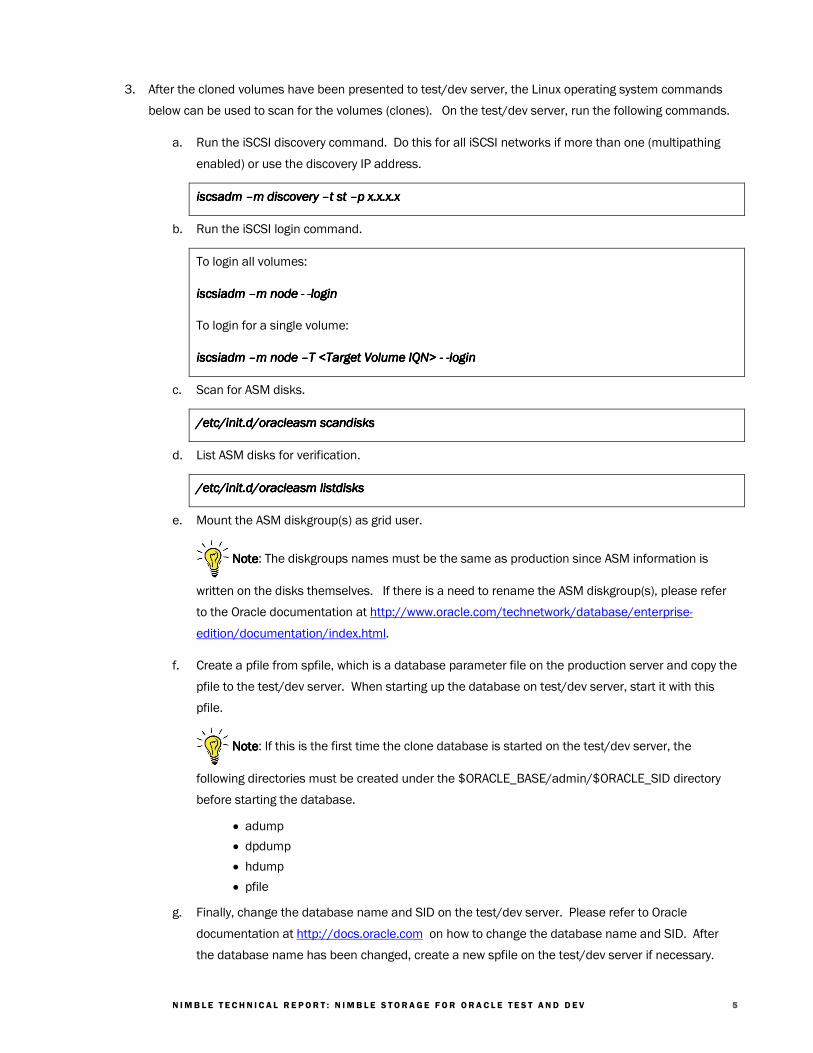
3. After the cloned volumes have been presented to test/dev server, the Linux operating system commands
below can be used to scan for the volumes (clones). On the test/dev server, run the following commands.
a. Run the iSCSI discovery command. Do this for all iSCSI networks if more than one (multipathing
enabled) or use the discovery IP address.
iscsadm iscsadm iscsadm iscsadm ––––m discovery m discovery m discovery m discovery ––––t st t st t st t st ––––p x.x.x.xp x.x.x.xp x.x.x.xp x.x.x.x
b. Run the iSCSI login command.
To login all volumes:
iscsiadm iscsiadm iscsiadm iscsiadm ––––m node m node m node m node ---- ----loginloginloginlogin
To login for a single volume:
iscsiadm iscsiadm iscsiadm iscsiadm ––––m node m node m node m node ––––T <T <T <T <Target Volume IQN> Target Volume IQN> Target Volume IQN> Target Volume IQN> ---- ----loginloginloginlogin
c. Scan for ASM disks.
/etc/init.d/oracleasm scandisks/etc/init.d/oracleasm scandisks/etc/init.d/oracleasm scandisks/etc/init.d/oracleasm scandisks
d. List ASM disks for verification.
/etc/init.d/oracleasm listdisks/etc/init.d/oracleasm listdisks/etc/init.d/oracleasm listdisks/etc/init.d/oracleasm listdisks
e. Mount the ASM diskgroup(s) as grid user.
NoteNoteNoteNote: The diskgroups names must be the same as production since ASM information is
written on the disks themselves. If there is a need to rename the ASM diskgroup(s), please refer
to the Oracle documentation at http://www.oracle.com/technetwork/database/enterprise-
edition/documentation/index.html.
f. Create a pfile from spfile, which is a database parameter file on the production server and copy the
pfile to the test/dev server. When starting up the database on test/dev server, start it with this
pfile.
NoteNoteNoteNote: If this is the first time the clone database is started on the test/dev server, the
following directories must be created under the $ORACLE_BASE/admin/$ORACLE_SID directory
before starting the database.
• adump
• dpdump
• hdump
• pfile
g. Finally, change the database name and SID on the test/dev server. Please refer to Oracle
documentation at http://docs.oracle.com on how to change the database name and SID. After
the database name has been changed, create a new spfile on the test/dev server if necessary.

N IMB LE T E CHN I C A L R E POR T : N IMB LE S TORAGE F O R ORA CL E T E S T AND D E V 6
Running Test/Development Environment on Separate Array
If refreshing Oracle test/dev databases on a separate Nimble Storage array in an Oracle ASM environment then native
Nimble Storage replication feature must be used.
Nimble Replication Partners Configuration
Setup Replication Partner on Source (upstream) Array
• Launch the Nimble GUI of the source array.
• Go to “Manage”, “Protection” and select “Replication Partners” button
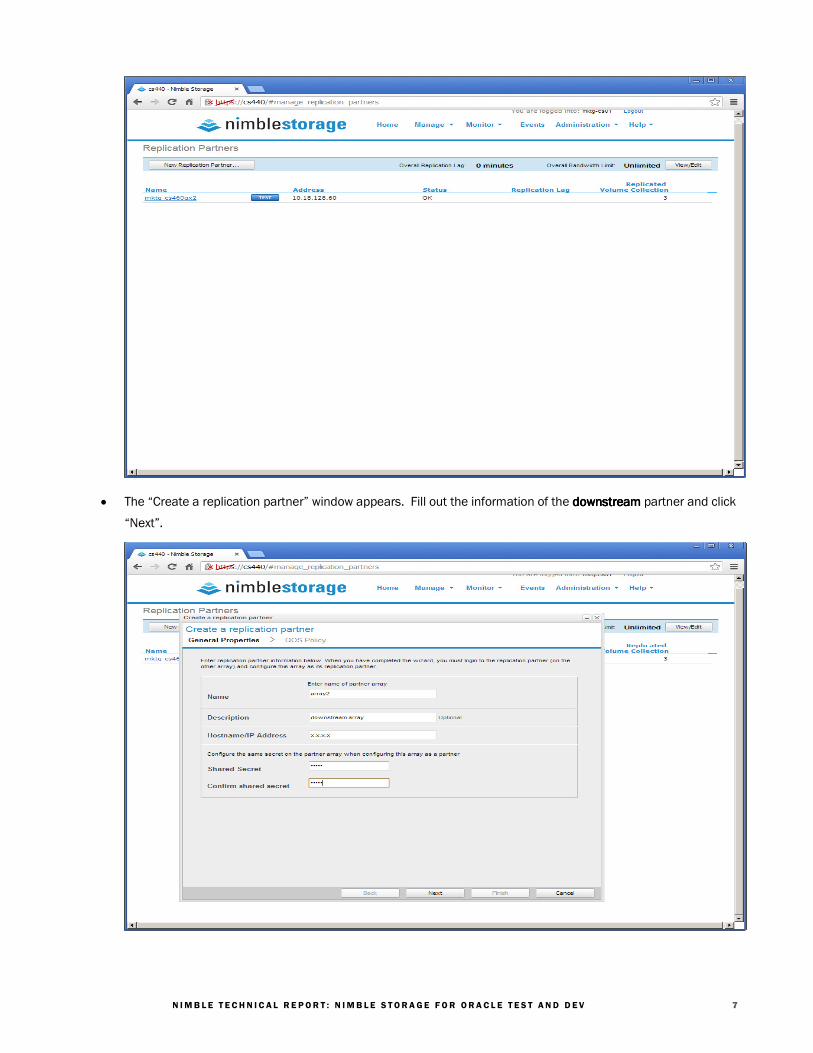
• Click on the “New Replication Partner” button
N IMB LE T E CHN I C A L R E POR T : N IMB LE S TORAGE F O R ORA CL E T E S T AND D E V 7
• The “Create a replication partner” window appears. Fill out the information of the downstreamdownstreamdownstreamdownstream partner and click
“Next”.
N IMB LE T E CHN I C A L R E POR T : N IMB LE S TORAGE F O R ORA CL E T E S T AND D E V 8
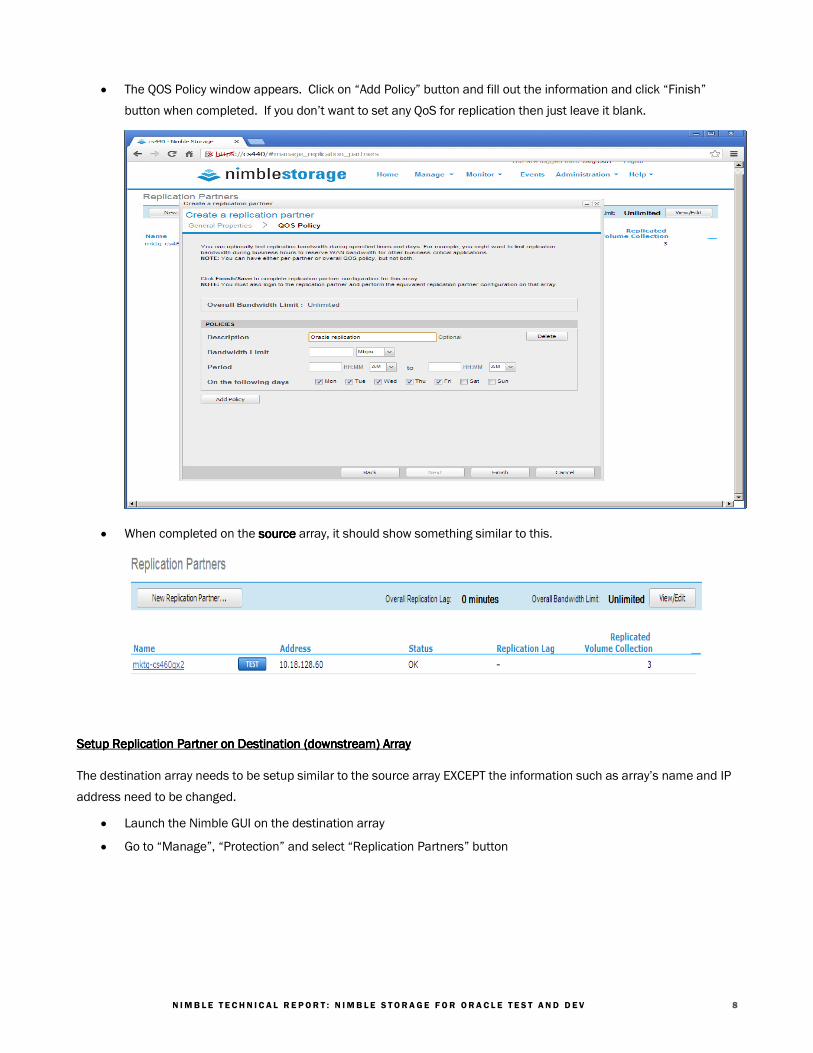
• The QOS Policy window appears. Click on “Add Policy” button and fill out the information and click “Finish”
button when completed. If you don’t want to set any QoS for replication then just leave it blank.
• When completed on the sourcesourcesourcesource array, it should show something similar to this.
Setup Replication Setup Replication Setup Replication Setup Replication Partner Partner Partner Partner on on on on Destination (downstream) ArrayDestination (downstream) ArrayDestination (downstream) ArrayDestination (downstream) Array
The destination array needs to be setup similar to the source array EXCEPT the information such as array’s name and IP
address need to be changed.
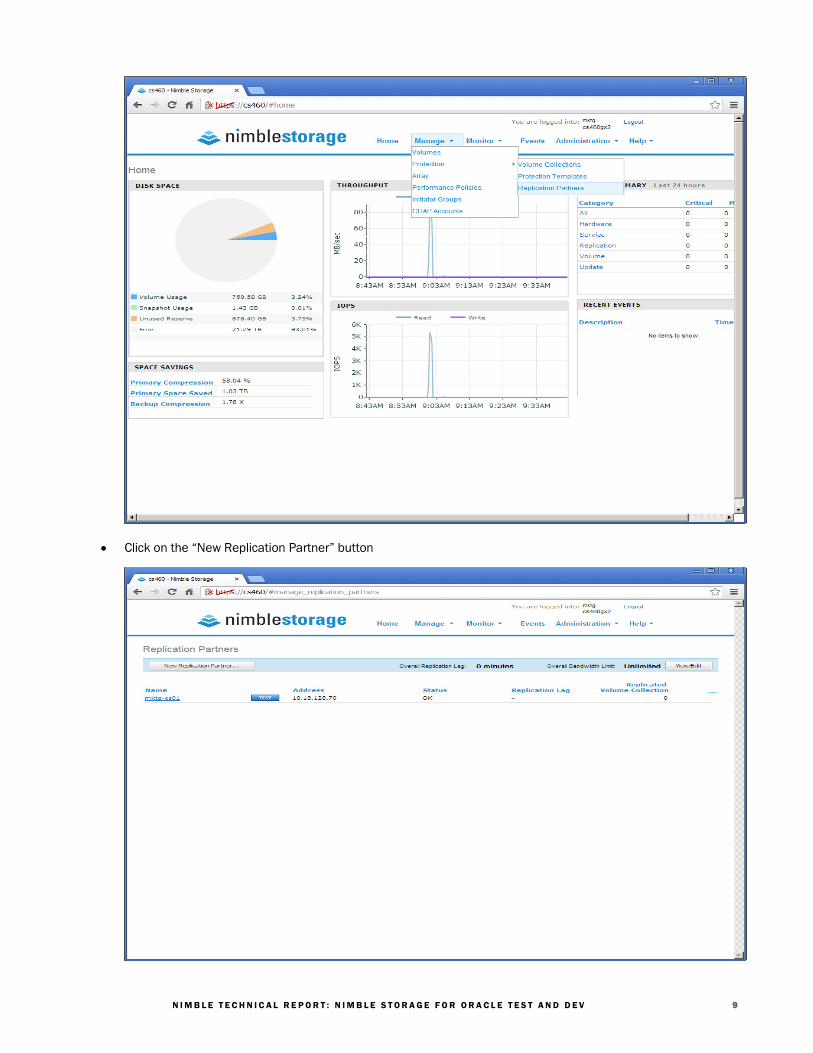
• Launch the Nimble GUI on the destination array
• Go to “Manage”, “Protection” and select “Replication Partners” button
N IMB LE T E CHN I C A L R E POR T : N IMB LE S TORAGE F O R ORA CL E T E S T AND D E V 9
• Click on the “New Replication Partner” button
N IMB LE T E CHN I C A L R E POR T : N IMB LE S TORAGE F O R ORA CL E T E S T AND D E V 1 0
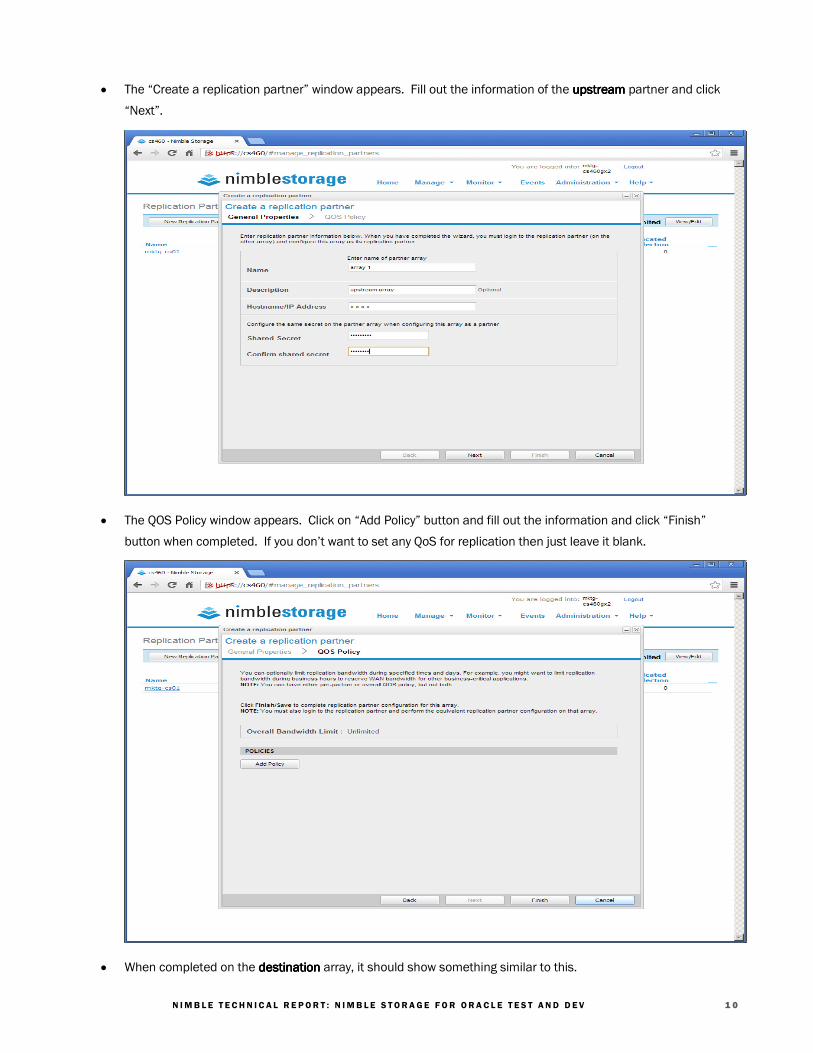
• The “Create a replication partner” window appears. Fill out the information of the upupupupstreamstreamstreamstream partner and click
“Next”.
• The QOS Policy window appears. Click on “Add Policy” button and fill out the information and click “Finish”
button when completed. If you don’t want to set any QoS for replication then just leave it blank.
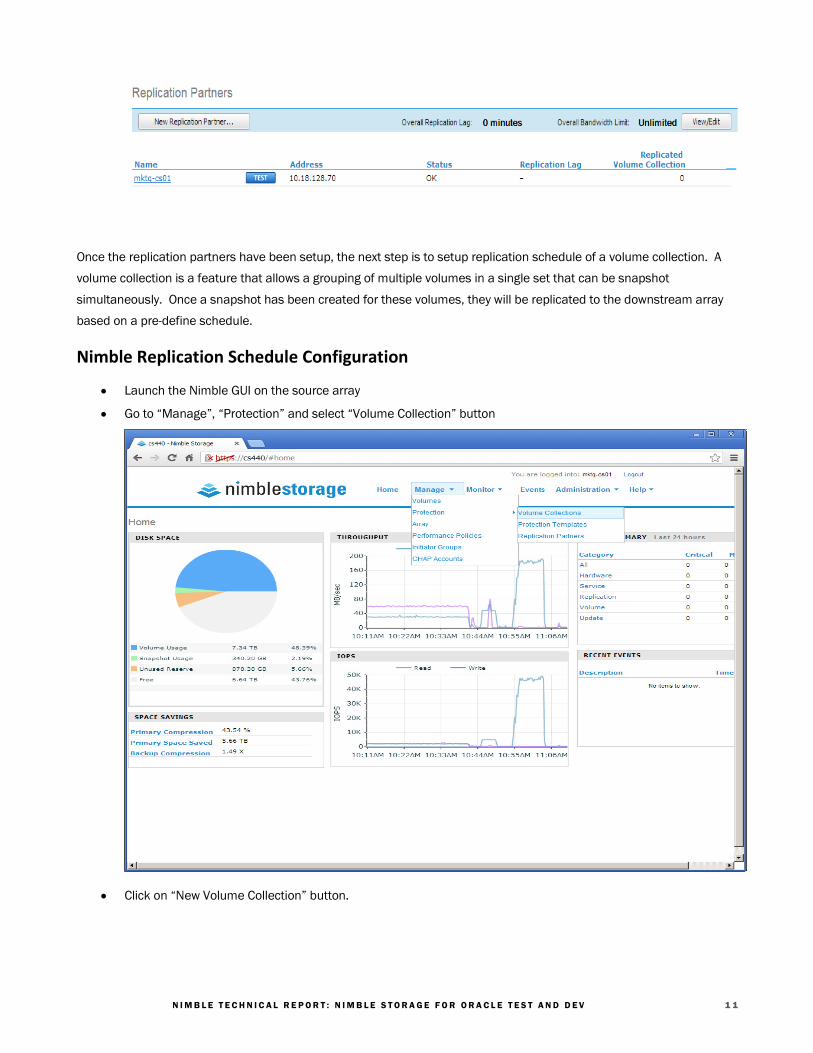
• When completed on the destinationdestinationdestinationdestination array, it should show something similar to this.
N IMB LE T E CHN I C A L R E POR T : N IMB LE S TORAGE F O R ORA CL E T E S T AND D E V 1 1
Once the replication partners have been setup, the next step is to setup replication schedule of a volume collection. A
volume collection is a feature that allows a grouping of multiple volumes in a single set that can be snapshot
simultaneously. Once a snapshot has been created for these volumes, they will be replicated to the downstream array
based on a pre-define schedule.
Nimble Replication Schedule Configuration
• Launch the Nimble GUI on the source array
• Go to “Manage”, “Protection” and select “Volume Collection” button
• Click on “New Volume Collection” button.
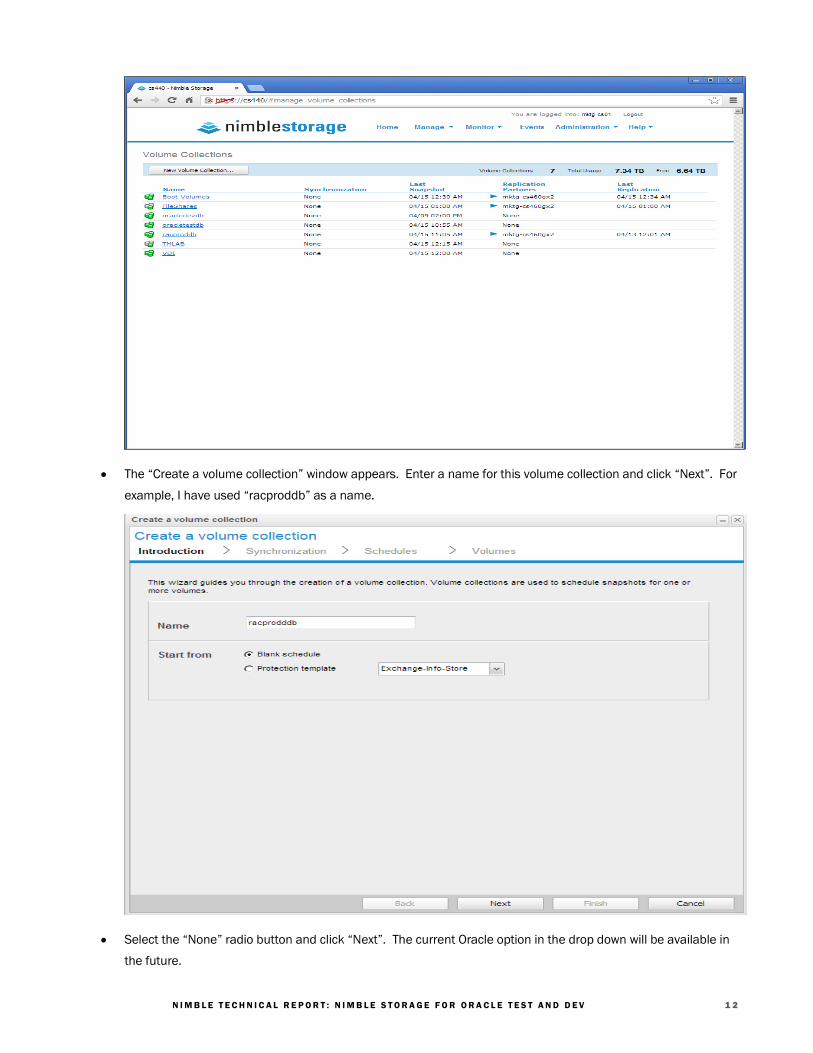
N IMB LE T E CHN I C A L R E POR T : N IMB LE S TORAGE F O R ORA CL E T E S T AND D E V 1 2
• The “Create a volume collection” window appears. Enter a name for this volume collection and click “Next”. For
example, I have used “racproddb” as a name.
• Select the “None” radio button and click “Next”. The current Oracle option in the drop down will be available in
the future.
N IMB LE T E CHN I C A L R E POR T : N IMB LE S TORAGE F O R ORA CL E T E S T AND D E V 1 3
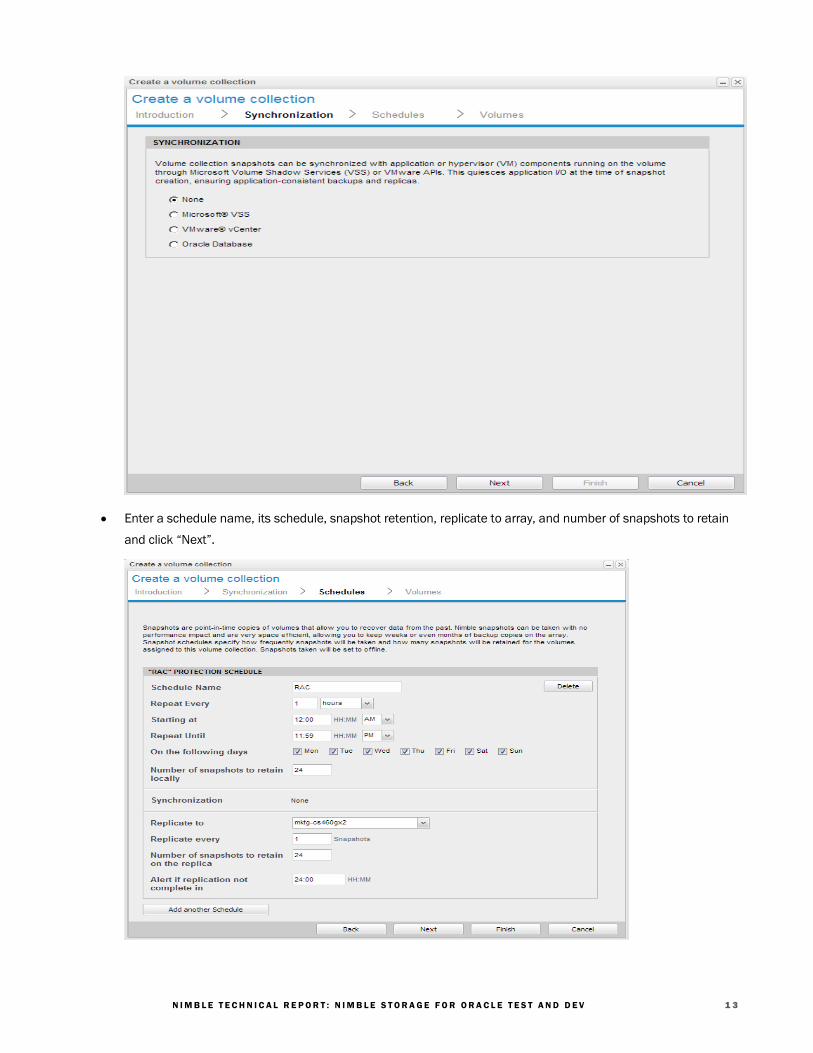
• Enter a schedule name, its schedule, snapshot retention, replicate to array, and number of snapshots to retain
and click “Next”.
N IMB LE T E CHN I C A L R E POR T : N IMB LE S TORAGE F O R ORA CL E T E S T AND D E V 1 4
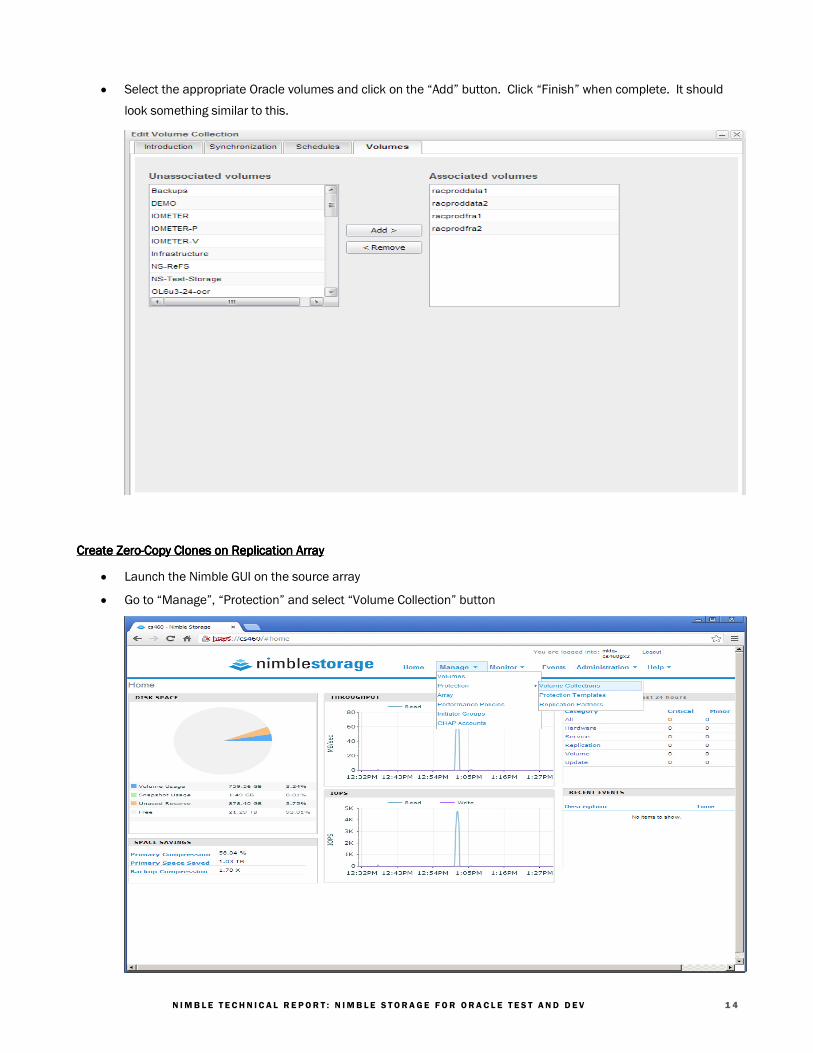
• Select the appropriate Oracle volumes and click on the “Add” button. Click “Finish” when complete. It should
look something similar to this.
Create ZeroCreate ZeroCreate ZeroCreate Zero----Copy Clones on Replication ArrayCopy Clones on Replication ArrayCopy Clones on Replication ArrayCopy Clones on Replication Array
• Launch the Nimble GUI on the source array
• Go to “Manage”, “Protection” and select “Volume Collection” button

N IMB LE T E CHN I C A L R E POR T : N IMB LE S TORAGE F O R ORA CL E T E S T AND D E V 1 5
• Click on the “racproddb” volume collection name
• On the right of the screen, click on the “snapshot” tab and select the appropriate snapshot for your clone.
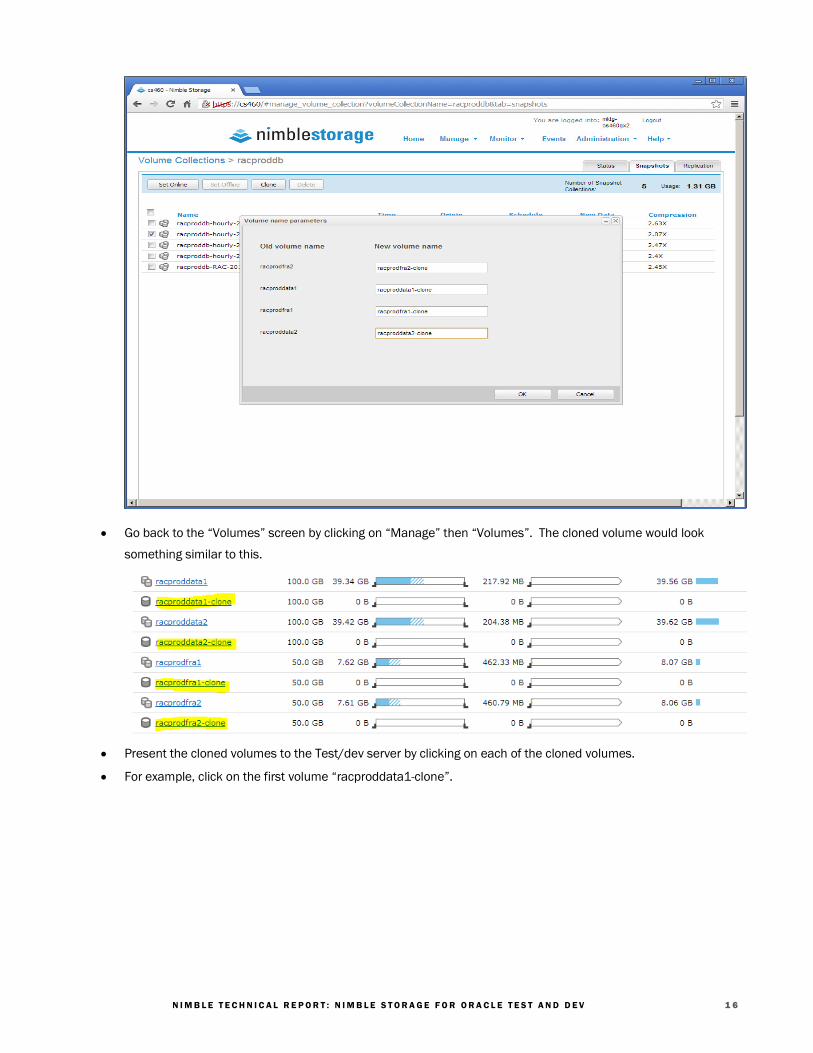
• Click on the “clone” button and a window appears with all the volumes belong to that volume collection. Enter
the names for the cloned volumes and click the “OK” button.
N IMB LE T E CHN I C A L R E POR T : N IMB LE S TORAGE F O R ORA CL E T E S T AND D E V 1 6
• Go back to the “Volumes” screen by clicking on “Manage” then “Volumes”. The cloned volume would look
something similar to this.
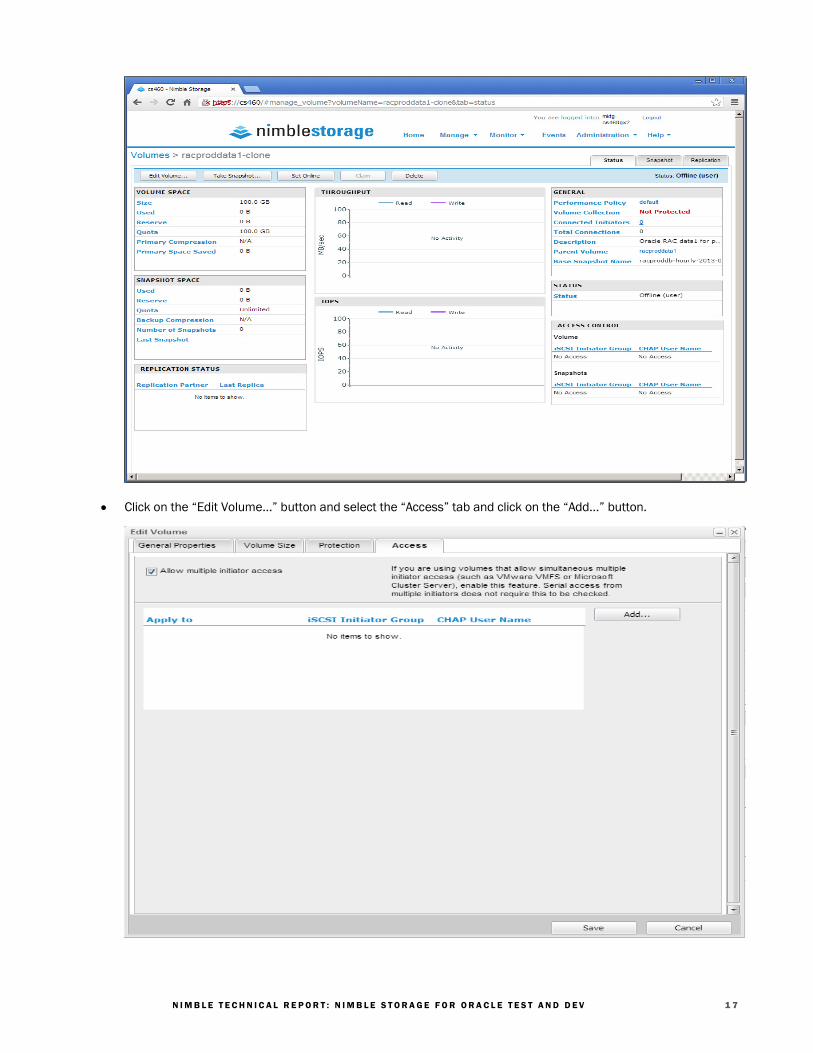
• Present the cloned volumes to the Test/dev server by clicking on each of the cloned volumes.
• For example, click on the first volume “racproddata1-clone”.
N IMB LE T E CHN I C A L R E POR T : N IMB LE S TORAGE F O R ORA CL E T E S T AND D E V 1 7
• Click on the “Edit Volume…” button and select the “Access” tab and click on the “Add…” button.

N IMB LE T E CHN I C A L R E POR T : N IMB LE S TORAGE F O R ORA CL E T E S T AND D E V 1 8
• The “Create Access Control Entry” window appears. Select the “Limit access to iSCSI initiator group” radio
button and click the drop-down box to select the Test/dev server of choice then click “OK”.
• After all cloned volumes have been presented to the Test/dev server, set the cloned volumes online then
proceed with step #3 above under the “Running Test/dev on Production Array” section on page 4.
Using Nimble Storage Array as a Test or Development Tier
Suppose the Oracle production database is running on a SAN other than Nimble Storage and having the same SAN type
for test or development could be costly. The alternative is to use Nimble Storage array as a Test or Development tier and
still maintain the performance requirement as production by utilizing Oracle Data Guard (if licensed) for replication.
N IMB LE T E CHN I C A L R E POR T : N IMB LE S TORAGE F O R ORA CL E T E S T AND D E V 1 9
The below procedures outline the use of Oracle Data Guard for replication at a high level. The same process for cloning
databases for the purpose of creating individual test/development environments apply after the data itself has been
replicated to the Nimble Storage array. This same process can be applied to replicate the data for disaster recovery.
Details of this are covering in the technical report “Nimble Storage Disaster Recovery Guide for Oracle.”
1. Make sure the production database is in archived log mode
2. Make sure the production database has logging enabled
3. Configure SQL*Net between the two Oracle servers
4. Configure Redo Transport on production server
5. Prepare the Standby server
6. Create the Standby server
7. Start the Redo Apply on the Standby server
8. Verify the Redo Apply is working
For Oracle Data Guard best practices, please refer to Oracle documentation at
http://docs.oracle.com/cd/E11882_01/server.112/e10803/config_dg.htm. This document discusses in detail on
guidelines and setup such as Oracle Maximum Availability Architecture (MAA).
Nimble Storage, Inc.
211 River Oaks Parkway, San Jose, CA 95134
Tel: 877-364-6253) | www.nimblestorage.com | [email protected]
© 2014 Nimble Storage, Inc. Nimble Storage, InfoSight, SmartStack, NimbleConnect, and CASL are trademarks or registered trademarks of Nimble Storage, Inc. All other trademarks are the property of their respective owners. TR-OTD-1114