training manual for chemistry nmr facility...
TRANSCRIPT

Training Manual For Chemistry NMR
Facility Spectrometers
Indiana University NMR Facility
January, 2017
Staff: Dr. Frank Gao, Director
Dr. Arif Tapash
Dr. Hongwei Wu
Location: C237 and C234F
Web Site: http://nmr.chem.indiana.edu

1
Contents
• Spectrometer Training for New Users ………………………………………………………………………… 2 • Safety Considerations ………………………………………………………………………………………………… 2 • Sample Handling ………………………………………………………………………………………………………… 4 • Facility Overview ………………………………………………………………………………………………………… 5 • Scheduling ………………………………………………………………………………………………………………… 6 • Billing ………………………………………………………………………………………………………………………… 6
• Linux, VnmrJ and ChemPack ……………………………………………………………………………………… 7 • Getting Your Sample in the Magnet …………………………………………………………………………… 7 • VnmrJ Interface Overview …………………………………………………………………………………………… 9 • Mouse and Keyboard ………………………………………………………………………………………………… 10 • Starting ……………………………………………………………………………………………………………………… 10 • Locking ……………………………………………………………………………………………………………………… 11 • Shimming …………………………………………………………………………………………………………………… 12 • Spinning and Temperature Control …………………………………………………………………………… 13 • Experiment Set Up …………………………………………………………………………………………………… 14 • Acquiring Data ………………………………………………………………………………………………………… 15 • Processing Data ………………………………………………………………………………………………………… 16 • Graphics Controls ……………………………………………………………………………………………………… 17 • Plotting ……………………………………………………………………………………………………………………… 18 • Saving Data ……………………………………………………………………………………………………………… 19 • Auto Plot Review Example ………………………………………………………………………………………… 20 • Logout ………………………………………………………………………………………………………………………… 20 • Remote Data Access From Workstations ………………………………………………………………… 21
• Commands and Parameters ……………………………………………………………………………………… 21 • Acquisition parameters of interest to users ……………………………………………………………… 22 • Quick Guide for Taking NMR Spectra with VnmrJ …………………………………………………… 23 • External Referencing ………………………………………………………………………………………………… 25 • Transferring NMR Data to Your Computers ……………………………………………………………… 26 • Email NMR data ………………………………………………………………………………………………………… 27 • Other NMR Programs ………………………………………………………………………………………………… 28 • List of Useful 1D VNMR Commands ………………………………………………………………………… 29
2
Spectrometer Training for New Users
The NMR facility staff has developed the following procedures to allow researchers to independently generate high-quality NMR spectra. Following these procedures will also help maintain the spectrometers in a state of good working order for all users. Please look over this manual prior to your first training session and bring it with you to your training sessions.
1. We ask that you first complete the Request for NMR Facility Training form and return it to the NMR facility staff several days before you would like to be trained. You are encouraged not to undertake NMR training until you plan to start using the spectrometer for research. You may not use the spectrometer before the first training session.
2. To schedule your first training sessions at the facility, ask any staff member for the
form or obtain it online from http://nmr.chem.indiana.edu. You may schedule additional training sessions with the facility staff and/or other experienced users after your first training session. Please don’t hesitate to ask for assistance from any of the NMR staff at any time.
3. Plan to initially use the spectrometers with research samples between 8 AM and 5 PM
weekdays when a staff member is present in the facility.
4. At the end of your first training session, you should be able to do the following:
Login to your NMR account and insert sample Obtain a lock signal and optimize the shims on your sample. Collect a 1H spectrum of a typical research sample. Process your spectrum including referencing, phasing, and integrating. Plot a spectrum with scale, normalized integration, and peak frequencies displayed. Save your data to file. Eject your sample and logout from your NMR account Recall saved data at a data station.
As you progress with your NMR abilities, you will be able to perform more sophisticated experiments and learn more processing and plotting options with the software.
Safety Considerations
1. Only faculty, staff, authorized users and trainees are allowed in the facility. Visitors are allowed with escorts. Social guests are not permitted.
2. Orderly conduct and safe lab practice is expected. Do not attempt non-routine

3
operations such as variable temperature, probe changes, non-routine experiments or instrument repair without consulting the NMR staff. Immediately report any instrument problems.
3. Users are responsible for knowing the hazard ratings of their samples and solvents, handling samples safely and making the staff aware of any especially hazardous materials brought into the facility. Do not exceed the boiling or freezing point of your sample. Material safety data sheets (MSDS) are located in the chemistry storeroom. There is a list of NMR chemicals and their MSDS located in office 237E.
4. High magnetic fields are present! 5 Gauss lines around the magnets are indicated with yellow safety tape. Magnetic fields can generate large attractive forces on ferromagnetic objects and disrupt operation of electronic devices. People with medical implants should check with Facility personnel before entering the NMR Facility. Pacemakers are not permitted in the Facility. All magnetic objects and electronic devices must be kept outside the 5 gauss line of each magnet. This includes keys, wallets and tools. If in doubt, assume any piece of metal is magnetic.
5. If a magnet quenches He and N2 gas can be rapidly expelled from the magnet.
Although these gases are inert and non-toxic, there is risk of asphyxiation in confined spaces. Everyone must immediately evacuate the area in such a situation. A quench warranting evacuation will be obvious by the noise of the escaping gas and cloud of water vapor.
6. In the event of a fire alarm or other situation requiring building evacuation use the stairs next to the NMR facility to exit the east end of the building.
7. Use caution when walking in the NMR Facility. Stay outside the 5G lines as much as
possible and in the normal paths. Watch for electrical cords and airlines, which could be trip hazards and generally do not walk behind or in between instruments.
8. Be very careful with sample tubes as they are fragile and break easily. Do not force tubes into spinners, they should go easily with gentle twisting. Most tubes are broken when being inserted or removed from the magnet so be sure to lift the tube fully above the magnet. A broom and disposal bin for glass are in the wet lab.
9. Lab gloves are not to be worn in the facility.
10. No food in the Facility. Other University and Chemistry Department Safety
procedures apply: http://www.chem.indiana.edu/ugrad/labsafety.asp.
11. A first aid kit, if needed, is located on the gray metal cabinet by the entrance door to the facility. See an NMR staff member for assistance.
12. Report all injuries, broken tube and sample spill incidents to the staff – no exceptions!
4
Sample Handling
1. High quality 5mm NMR tubes are recommended: Kontes 235, Wilmad 528pp or whatever
the stockroom carries. Cheaper tubes are intended to be disposable, are made from lower quality glass with lower tolerances and can cause difficulty with spinning and shimming.
2. For best care of your NMR tubes follow these procedures for cleaning and drying:
- Simple Cleaning of NMR Tubes
For routine cleaning of organic compounds rinse with acetone and then with water.
- Difficult Cleaning Problems WILMAD recommends using strong mineral acids such a concentrated or, in severe cases, fuming Nitric Acid soaks of 1-3 days, as needed. Nitric Acid can oxidize many organic chemicals and dissolves most inorganic materials, as well. WILMAD doesn't recommend using Chromic Acid, since residual Chromium can often adversely affect NMR experiments. Chromic Acid, while a stronger oxidizer, can leave paramagnetic Chromium VI behind, which can be removed only with repeated soaks with Nitric Acid. Copious rinsing of NMR tubes washed in acids is required to assure removal of residual acids. A final rinse with distilled water or Acetone is also appropriate.
- Improper cleaning can damage NMR tubes. Drying in ovens can warp tubes!
3. Do not use a brush or other abrasive materials to clean NMR tubes. Scratches on the
inside surface of the tube allow a portion of the sample to extend beyond the perfect cylinder defined by the NMR tube. Lines will broaden and resolution will deteriorate when you use scratched tubes.
4. Do not attempt or have a glass shop try to repair damaged tubes. Normal tubes that are damaged should be thrown away. Broken J-Young tubes can be repaired by the manufacturer – see the NMR staff for more information.
5. For routine solid or liquid samples dissolve about 5-20mg of material in 0.6 – 0.7 ml of
deuterated solvent. This will give a liquid sample height of 4cm in a standard 5mm NMR tube. If TMS reference is desired and the solvent does not already contain it, add 0.1% TMS. Filtering the sample with a pipette and cotton, cotton+silica gel, glass wool plug or other appropriate material is desirable. Use a plastic NMR tube cap. Wrapping the top with parafilm will reduce solvent evaporation.
6. Samples should be prepared or modified (titrations for example) in your lab or the NMR
wet lab. Do not do this in the NMR Facility spectrometer area.
Facility Overview
The Chemistry Department NMR Facility currently consists of 4 NMR spectrometers in C237 and C234F and an undergraduate teaching NMR spectrometer in C145. There are also several workstations running the Red Hat Enterprise Linux and VnmrJ software for offline processing and an open access PC with NMR centric software including ACD 1H, 13C, 19F, 31P, 15N NMR Predictors. The facility has 150 seats of license of Mnova NMR v11 for users to install and run on their group or personal computers.

5
The Varian Spectrometers: VXR400 – 400MHz Inova with VnmrJ 2.2D software. This is a 2 channel instrument that currently uses a broadband probe tuned to 13C for routine acquisition of 1H and 13C data. Simple 2D spectra can also be run with this probe and other probes are available. I400 – 400MHz Inova with VnmrJ 2.2D. This instrument has 3 channels but is typically run with 2 channels. The default probe is PFG 4-Nucleus for routine acquisition of 1H, 19F, 13C and 31P spectra and 2D spectra. I500 – 500MHz Inova with VnmrJ 2.2D. This is a 3 channel instrument with shaped pulse capability on two channels that can be used for a variety of 1D, 2D and 3D experiments. The default probe is PFG 1H/13C dual probe for routine acquisition of 1H and 13C as well as 2D spectra. A broadband probe is available for observing other nuclei, such as 11B, 15N, 17O, 51V, etc.. This instrument has 3 (xyz) axis PFG and can work with a 3 axis PFG HCN probe. A 3 channel indirect detection 1H/13C/X PFG probe and a 4 channel 1H/13C/15N/31P penta PFG probe are also available. I600 – 600MHz Inova with VnmrJ 3.2A. This is a four channel instrument with shaped pulse capability on each channel that can be used for a variety of 1D, 2D and 3D experiments. The current default probe is a 3 channel HCN probe with gradient. The HCN probe has high 1H sensitivity and it is ideal for all indirect detection 2D experiments such as COSY, TOCSY, NOESY, ROESY, HSQC, HMQC and HMBC. The Chemistry Facility spectrometers all have variable temperature capability. 2H spectra can be obtained on all spectrometers without recabling. Instrument Probe 1H S/N 13C S/N 19F S/N 31P S/N VT Range I500 Dual PFG (default) 390:1 270:1 -80 to 120 °C
I500 BB 335:1 -150 to 200 °C
I500 HCX PFG 700:1 N/A 0 to 50 °C
I500 HCN 3-axis PFG 650:1 N/A 0 to 50 °C
I400 4Nuc PFG (default) 175:1 160:1 230:1 145:1 -80 to 130 °C
VXR400 BB (default) 110:1 200:1 -150 to 200 °C
Either 400 INV PFG 450:1 N/A 0 to 50 °C
I600 HCN PFG (default) 800:1 150:1 -20 to 60 °C
Dual=fixed 1H & 13C, BB=broadband, tunable heteronucleus main coil+ fixed 1H, INV = inverse detection, fixed 1H main coil, tunable heteronucleus, HCX=3 channel, 1H main, fixed 13C, tunable X, HCN=3 channel, fixed 1H main,13C and 15N, 4Nuc=fixed 13C/31P main coil, fixed 1H/19F, PFG=pulsed field gradient, better for 2D NMR
The teaching instrument is a Mercury 200 with VnmrJ and PFG 4 Nucleus options currently running a broadband probe tuned for 1H and 13C.
6
There are a Varian 800MHz Vnmrs and a Varian 600 MHz Vnmrs NMR spectrometers in Simon Hall SI037. Both are equipped with cold probes offering much higher sensitivity of 1H (and moderately higher sensitivity of 13C). They are not open accessible spectrometers and primarily for bioNMR researches but can also be used for small molecules in a need basis.
Scheduling
1. Users who have completed training should have accounts on all spectrometers and the
MAGnet REServation (MAGRES) system. Let the NMR staff know if you don’t. For the VnmrJ spectrometers and workstations you will use your IU Network ID and passphrase to log on. For the MAGRES system you will need to use your assigned NMR 3-letter username.
2. The MAGRES reservation system can be accessed from the IU NMR homepage at http://nmr.chem.indiana.edu/ under MAG-RES tag. Select desired time blocks, enter your 3-letter NMR username and password and click Submit Request. To remove reservations use the same process – select the reserved blocks you wish to remove, enter NMR username and password and click Submit Request. You MUST have a reservation to use the instruments any time outside of the OPEN HOUR periods.
3. Users may sign up for time 2 days in advance. Monday sign up begins on Friday.
4. Daytime hours are 8AM – 7:30PM, Monday – Friday. During Daytime hours there is a
user limit of 90 minutes total per day per spectrometer. There is also a limit of 30 minute blocks per user during this time. During first come first served OPEN HOUR periods there is a limit of 15 minutes per user. There are no time constraints for evenings, nights and weekends.
5. You are responsible for using a time slot when you’ve reserved it. Always cancel
reservations you will not use. Users forfeit their scheduled time slot if they are more than 5 minutes late and the instrument is then available for walkup users during that user’s reserved time.
6. Currently there is no time constraints for the I500 and I600. Users may sign up for time
7 days in advance. 7. Reservation for the same time slots on multiple instruments are not allowed.
8. See a NMR staff member at least 1 day in advance to schedule special experiments that
require long acquisition times and/or setup assistance from the NMR staff. The most requested special experiments are non-standard nuclei. These are typically run on the I500 broadband probe.
Billing You must have a charge account associated with your user account to use the NMR spectrometers. The cost of using the spectrometers varies according to the spectrometer.

7
Rates are currently $4.50/hr for the VXR400 and I400, $5.00/hr for the I500 and $6.00/hr for the I600. Users are billed for the time they are logged into the spectrometer computers. Users must make sure that they log out after they have finished. There is no charge for using the data-stations. For this reason users are encouraged to acquire data using the spectrometer, but process data using the data-stations.
Linux, VnmrJ and ChemPack
The Indiana University Varian NMR spectrometer computers use the Red Hat Enterprise Linux operating system. Computers are connected to the spectrometers with Ethernet. Spectrometer computers and data-stations are connected to the University network with Ethernet for user authentication, internet and data transfer. Spectrometer data directories are shared to the data-stations for remote processing. Users are not permitted to remote login to spectrometer computers for any purpose other than SSH data transfer. You will use Varian VnmrJ software to operate the spectrometers and to process data, and will not have to interact with the Linux operating system directly. Chemistry spectrometer computers and data-stations run Varian VnmrJ software with the ChemPack package for data acquisition and processing. All user accounts are setup to have VnmrJ autostart when you log on. All references to VnmrJ in this guide will assume the ChemPack package is installed. Getting Your Sample in the Magnet
This image cannot currently be displayed.

8
1) Insert your sample tube into a spinner using the sample depth gauge. Gently twist
the tube if the fit is tight. If a gauge is not available the bottom of the tube should be 68mm below the bottom of the spinner with the recommended sample volume of 0.7ml or higher. If you have less than the recommended sample volume center the sample around the coil location shown on the depth gauge.
2) Clean the bottom of the tube and the spinner turbine with Kimwipes and ethanol or propanol to remove any residues such as body oils and aluminium oxide from the magnet bore tube.
3) Log on to your account on the spectrometer. After VnmrJ has autostarted and
displays a green “Idle” status, use the “e” command or eject button to eject the standard sample. Carefully remove the standard from the top of the magnet, place it in the sample holder and place your sample in the top of the magnet. Do not release the sample until you are sure there is a cushion of air to support it. Go back to the spectrometer workstation and enter the “i” command or use the “insert” button. After lowering a sample into the magnet you should hear an audible “clunk” when the sample is in place. If you cannot for example get a lock signal the sample might be stuck in the bore. If this happens try to eject and insert it again.
Most broken sample tubes occur when removing tubes from the magnet. Be careful to lift sample tubes clear of the bore tube before moving them away from the magnet.
4) You are now ready to lock, shim, set up an experiment and acquire data.

9
VnmrJ Interface Overview
VnmrJ Interface With 1D Proton Spectrum Displayed.
1) Red Hat Linux Menu Bar – Not used for routine operation
2) VnmrJ Menu Bar – Used primarily for experiment selection and setup
3) VnmrJ Tool Bar – Open and save NMR data
4) Graphic Controls – Display tools for 1D spectra, 2D spectra and raw data
5) Message Area – Command and message history
6) Command Line – Manually enter VnmrJ commands
7) Experiment Information – Displays current experiment and experiment number
8) Graphic Canvas – Displays spectra and associated information
9) Parameter Panel – Various panels and controls to interact with the spectrometer
10) Spectrometer status – Must say “Idle” to acquire data

10
Mouse and Keyboard
Mouse – The left button of the mouse is the primary button and is used for activating areas such as the command entry line, selecting menu choices and buttons, moving interactive lock and shim controls “left”, controlling the main graphics cursor, setting the peak picking threshold, integral stop points and more. The right button is used mainly to control the second graphics cursor and move interactive lock and shim controls to the “right”. The middle button is used to control the vertical scale in the graphics window and set the multiplier (1,10,100) for interactive lock and shims controls.
Keyboard and Commands – The keyboard is used to enter text in text fields and text commands in the command line. Commands can be used to setup experiments, process and display data and change acquisition or processing parameters. Text commands can be strung together before using the return key. The up and down arrow keys will scroll through the command history.
Starting
Once your sample is in the magnet the general procedure for acquiring routine data is: 1) Set solvent 2) Lock 3) Shim 4) Set up experiment 5) Acquire data
Start with the Standard Panel under the Start tab.
You will generally insert the sample and select solvent under this panel and proceed to the Lock panel. All of the solvents VnmrJ recognizes are on the Start panel. Several other functions are available from this panel.
11
Setlock – Recall default z0, lock gain, power and phase
Getshim – Recall standard shims
Reset Console – Can sometimes restore communication with the console
Gradient Autoshim – Fully automated shimming method
Autolock – Manual locking is usually faster and more accurate
Lock Autoshim – Requires good lock. Use default z1z2 method and click on button
Sample Name – A field stored with NMR data, this is not the file name
Comment – Also stored with data and shown on print outs
Locking
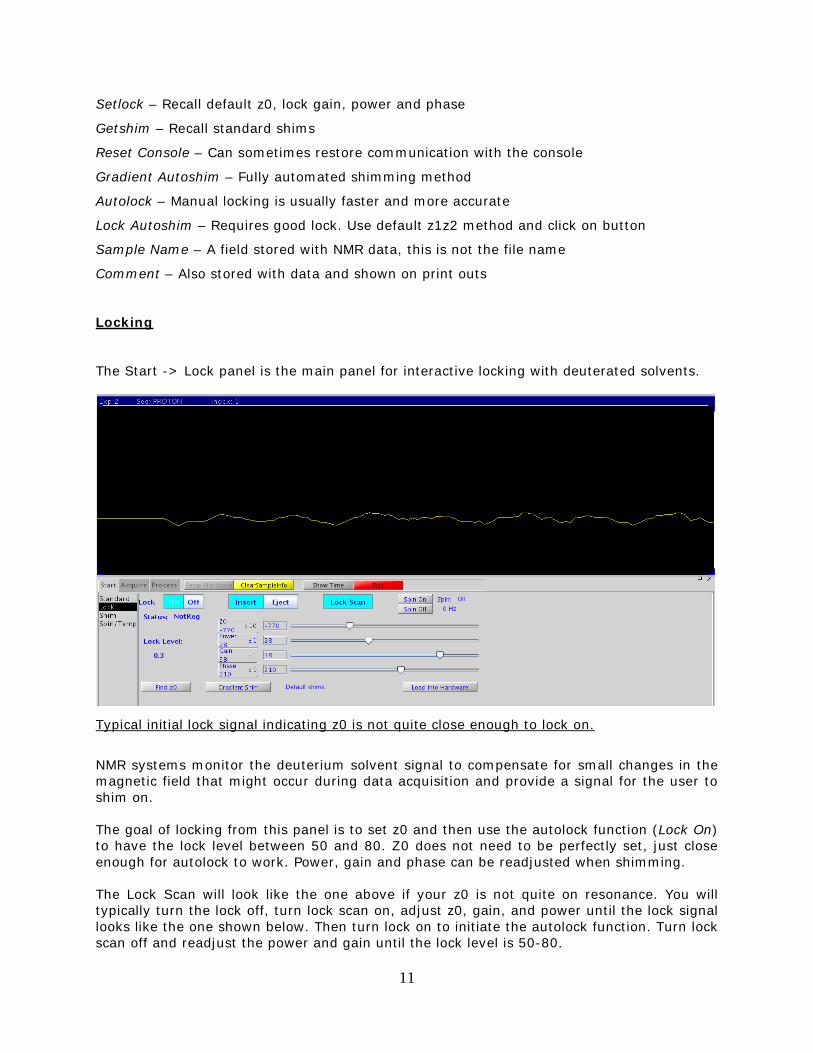
The Start -> Lock panel is the main panel for interactive locking with deuterated solvents.
Typical initial lock signal indicating z0 is not quite close enough to lock on.
NMR systems monitor the deuterium solvent signal to compensate for small changes in the magnetic field that might occur during data acquisition and provide a signal for the user to shim on. The goal of locking from this panel is to set z0 and then use the autolock function (Lock On) to have the lock level between 50 and 80. Z0 does not need to be perfectly set, just close enough for autolock to work. Power, gain and phase can be readjusted when shimming. The Lock Scan will look like the one above if your z0 is not quite on resonance. You will typically turn the lock off, turn lock scan on, adjust z0, gain, and power until the lock signal looks like the one shown below. Then turn lock on to initiate the autolock function. Turn lock scan off and readjust the power and gain until the lock level is 50-80.

12
This is what your lock signal should look like before proceeding to shimming.
If the lock signal is gyrating wildly your lock power is too high. If in doubt, set the gain to the maximum and adjust just the power. The lock phase will usually not need adjustment but it never hurts to check. Shimming The Start –> Shim panel is used for interactive shimming. The list of shims may be different with different spectrometers, but for routine samples you only need to adjust Z1C and Z2C or Z1 and Z2.
VnmrJ Shimming Interface Panel.
The goal of routine shimming is to maximize the lock level by adjusting the Z1 and Z2 shims (note: if Z1C and Z2C buttons are present, use them instead of the Z1 and Z2 buttons to adjust Z1 and Z2 shims. “C” stands for “coarse”). The simple cycle is to adjust Z1C or Z1 to give the highest lock level, adjust Z2C or Z2 to give the highest lock, then repeat this process until there is no further improvement. Use the left and right mouse buttons to lower and raise the shim values. The middle mouse button adjusts the amount by which values are changed.

13
You can also adjust the lock phase to give the highest signal and if there is a large change in the phase, readjust Z1 and Z2. It can be useful to recall the standard shims if you have difficulty shimming. Shimming CDCl3 samples is easy to learn with a little practice although each spectrometer responds differently to the controls. Shimming non-routine samples can be complicated though so seek help if you have problems. Solvents with more deuterium atoms per molecule such as DMSO and acetone will require less lock power than CDCl3. Some solvents such as THF-d8 will have more than one deuterium resonance to lock on to. There are also two methods to autoshim samples. Gradient autoshimming (currently available on all the spectrometers) is a powerful time-saving technique that works well with most routine samples and does not even require the spectrometer to be locked on the sample. To launch gradient autoshimming, go to the Standard panel, make sure a correct solvent was selected and click the Setlock button, also make sure sample spinning is OFF (if ON, turn it OFF. see next section), then click the Gradient Autoshim button (on the Standard panel) and wait until you see “Gradient autoshimming on Z done!” in the message window. It usually takes 30-45 seconds. Z1Z2 lock autoshimming is also useful but requires a good lock and takes much longer time. See previous Start -> Standard tab for this option.
Spinning and Temperature Control Spinning and temperature are controlled from the Start -> Spin/Temp panel. Values are entered in the boxes or set with the slider controls, then use the respective “Regulate” buttons.
The Spin/Temp control panel.
For routine 1D experiments, spinning the sample (at 16-20 Hz) might improve spectral resolution but it’s not recommended if economy NMR tubes are used. All our spectrometers provide very good “non-spinning” resolution with gradient autoshimming therefore it’s not necessary to spin the sample unless an ultra high resolution is needed (then you should use high quality NMR tubes). Always set the spin off (0 Hz) for 2D experiments and for gradient autoshimming.

14
Keep the spectrometers at 25 °C by default. For variable temperature experiments, change temperature by 10 – 15 °C increments and allow the temperature to equilibrate 5 minutes between changes. The cooling units will need to be used for temperatures lower than room temperature. Note: Setting Temperature vs Actual Temperature
Actual sample temperature could be different from displayed temperature (or setting temperature if the temperature has been regulated), especially at very high or very low temperature. We calibrated temperature for each spectrometer and wrote a macro command set_temp to let users read the actual sample temperature and set the desired sample temperature accurately. To read the actual sample temperature of the current setting, type set_temp. To set the sample temperature to 40 °C (actual), type set_temp(40). This sets the
parameter temp to a value calculated based on the temperature calibration. You will still need to click the “Regulate Temp” button to initiate the temperature change.
Experiment Set Up
Experiments are set up from the VnmrJ Experiments menu as shown here.
15
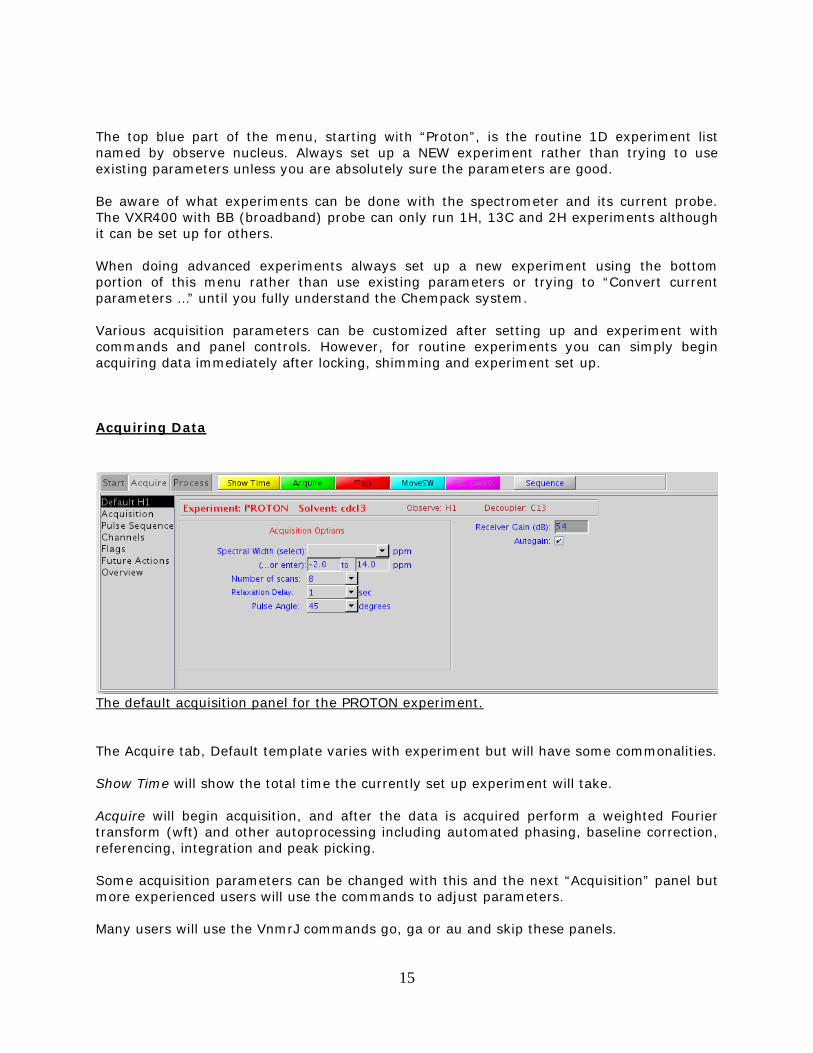
The top blue part of the menu, starting with “Proton”, is the routine 1D experiment list named by observe nucleus. Always set up a NEW experiment rather than trying to use existing parameters unless you are absolutely sure the parameters are good. Be aware of what experiments can be done with the spectrometer and its current probe. The VXR400 with BB (broadband) probe can only run 1H, 13C and 2H experiments although it can be set up for others. When doing advanced experiments always set up a new experiment using the bottom portion of this menu rather than use existing parameters or trying to “Convert current parameters …” until you fully understand the Chempack system. Various acquisition parameters can be customized after setting up and experiment with commands and panel controls. However, for routine experiments you can simply begin acquiring data immediately after locking, shimming and experiment set up. Acquiring Data
The default acquisition panel for the PROTON experiment. The Acquire tab, Default template varies with experiment but will have some commonalities. Show Time will show the total time the currently set up experiment will take. Acquire will begin acquisition, and after the data is acquired perform a weighted Fourier transform (wft) and other autoprocessing including automated phasing, baseline correction, referencing, integration and peak picking. Some acquisition parameters can be changed with this and the next “Acquisition” panel but more experienced users will use the commands to adjust parameters. Many users will use the VnmrJ commands go, ga or au and skip these panels.

16
go – Just acquires data
ga - Acquires data and does a wft
au - Acquires data, does a wft and executes post-acquistion commands - typically a macro called “process” that does the functions listed above. The green acquire button performs the au command.
Processing Data
After acquiring data you need to process, plot and save it. You will eventually have to learn some VnmrJ panels, the graphics controls toolbar and several commands to do this efficiently. Saving data after processing will save the processing parameters with it.
The Process -> Basic panel has a few useful controls including basic plotting.
Autoprocess – Run “process” macro to autophase, reference, baseline correction, etc.
Plot Preview – Useful for preview but the color plot will not print correctly on laser printers.
Plot – Does an autoplot based on Plot Options listed above this button.
Process options - Under process options you can set the FT data size. This number must be at least 2 x np (number of points). The linebroaden (lb) can also be adjusted, for H1 the default lb of 0.3 is good. However, for C13, a lb of 2 is good but could be 1 to 5 depending on the resolution and S/N needed.

17
The Process -> Default panel has some more detailed controls.
This is the only panel with referencing options and you might use this panel only for that.
The Process -> Integration panel.
This panel is used primarily to normalize integrals. Put the cursor on an integrated region that you want to normalize. For example, you know it is 2 protons. Click “Single Peak” on this panel and type “2” in the Integral Area box. You can also set, edit and clear integral regions from this panel instead of using the graphics controls toolbar. Graphics Controls
The 1D graphics controls toolbar is available when a 1D NMR spectrum is displayed and is useful for several basic processing functions.
- Toggle to display 1 or 2 cursors
- Display full spectrum

18
- Reset to full display
- Drag cursor across spectrum to expand a region
- Toggle 3 integral modes - off, full and partial integral regions
- When Show Integral Regions is selected use this tool to create integral regions
- Set threshold for peak picking
- Manual phasing – click on right side of spectrum to begin zero order phasing, click on
left side to begin first order phasing, then repeat this process until phased
- Redraw display
Plotting
The plotter can be left as the default or selected using the File -> Plotter VnmrJ menu item or the Plot panel shown below.
The Process -> Plot panel. The Plot panel is a very useful tool for doing all basic plot functions. Experienced users may prefer using the text commands instead. Send this plot to: Select plotter or leave as default. Auto Plot Preview – Shows a pdf plot of what the Automatic Plot will give you. Do not plot from this preview however because the color plot will not print correctly on a black and white laser printer.

19
Automatic Plot Page – Select plot options such as integrals and peak picking then use this for a quick plot that will also include the spectrum and scale. For manual plotting select Plot Spectrum, Plot Scale, then select Parameters, Integrals, and Peak Frequencies options and use their respective plot buttons. When all plot options have been given use the bottom right Plot Page button to send it all to the selected plotter. You can use the Plot Preview beforehand to make sure you have everything on the plot that you want. Saving Data
VnmrJ Toolbar. Click the floppy disk icon in the upper VnmrJ toolbar to save your data or select File -> Save As … from the VnmrJ menu. Save all data in the default data directory to keep remote data access and data file transfer simplified and to make sure your data will be included in backups. Note: file names should only use alphanumeric characters, underscores, and hyphens. The following characters are reserved in Linux/Unix therefore should never be used: / > < \ | : & ? * and space.

20
Auto Plot Preview Example
Auto Plot Preview of a phased proton spectrum with the “Scaled, Horiz.” integrals and “On Peaks, var, ppm” Peak Frequencies options selected.
Logout To log out of any spectrometer or workstation type “iuexit” in the command line.

21
Remote Data Access From Workstations
To access spectrometer data using remote workstations, logon to the workstation with your same IU account name and passphrase. VnmrJ will autostart and look the same as on the spectrometers. Use the File -> Open VnmrJ menu option, the Folder icon in the VnmrJ toolbar or ctrl-O to open the file tool.
The 4 buttons across the top of the file tool are not well marked but if you hover the mouse over them will show you what spectrometer they correspond to as shown above. Click on the appropriate button then navigate to your data directory on that instrument to locate your data files. You can then process and plot them the same as described above. Commands and Parameters There are hundreds of commands and macros that can be entered in the VnmrJ command line for experiment set up, acquisition, display, processing, plotting. A guide for most commonly used commands is in the Appendix. Commands are entered by typing the name of the command and the command arguments (if appropriate) in parentheses, then pressing the Return key. More than one command can be entered on the same line separating with a space for sequential execution, e.g. wft aph dscale. There are also many acquisition, processing, display and plotting parameters that can be customized by the user. VnmrJ has several types of parameters but the values changed are always numeric, alphanumeric strings or flag strings (example: restricted to ‘y’ or ‘n’). All

22
parameters are entered the same way: type the name of the parameter, an equals sign (=), the value, and then the Return key. For example, sw=1000 (numeric), wexp=’process’ (string) and dm=’yyy’ (flag). Flag or string values are always enclosed in single quotation marks. Numeric values can be integer (1000) or real (1000.0) and can be restricted to positive values. Scientific notation (1e3) is also acceptable. It is not always obvious what the units of numeric parameters are. Pulse widths are microseconds but delays are in seconds. Some parameters can be numeric or flag, e.g. gain=24 or gain=’n’. Mathematical expressions can be used when entering numeric values, e.g. sw=10*reffeq+20/4. Three suffixes p, d, and k can also be used in the following manner: p translates the input to ppm units, e.g. sw=10p is equivalent to sw=10*reffeq (i.e. 10ppm). d translates the input to ppm units relative to the decoupler frequency, e.g. sw1=160d is equivalent to sw1=160*reffrq1. k translates the input to thousands, e.g. sw=10k is equivalent to sw=10*1000 (with an exception for the parameter fn with which k means 1024, e.g. fn=16k is equivalent to fn=16*1024). All parameters have restricted values. Attempting to enter an out-of-range or unacceptable value will result in either an error message or the system assigning a default value. To display the current value of a parameter, type the name of the parameter, followed by a question mark (then press the Return key), e.g. nt? While learning new commands, it is helpful to refer to the online manual by typing man('command_name'), e.g. man(‘cosy’). Acquisition parameters of interest to users
nt Number of transient (scans). In general, it should be a multiple of 4 d1 Delay before first pulse in seconds sw Spectral width in Hz bs Block size – Data is stored every bs scans during acquisition lb Line broadening factor in Hz vs Vertical scale of spectrum vp Vertical position of spectrum pw Pulse width in microseconds. gain Receive gain. gain=’n’ enables an automatic adjustment of receiver gain ss Number of steady-state scans or dummy scans np Number of FID data points fn Fourier number, i.e. number of spectral data points solvent Lock solvent tof Frequency offset for observe transmitter dof Frequency offset for decoupler dm Decoupler mode dmm Decoupler modulation mode tn Nucleus for observe transmitter dn Nucleus for decoupler sfrq Transmitter frequency of observe nucleus dfrq Decoupler frequency

23
Quick Guide for Taking NMR Spectra with VnmrJ
1) Login using your IU username and passphrase (when you do this the standard shims will automatically be
loaded). Wait until “Idle” appears in the status window. 2) Click “Start” tab then click on “Standard” page if you’re not already on this page. 3) Click “Eject” button (or type “e” in command line) to eject the standard sample, replace it with your sample
then click “Insert” (or type “i”) to insert the sample. 4) Click on “Experiments” in the menu bar, then click on whatever nucleus you want to run. 5) Click and select a solvent on the “Standard” page. 6) Click “Setlock” button (or type “iusetlk”) to load optimum lock parameters. 7) If the sample is spinning, turn it OFF by clicking “Spin off” button on the “Spin/Temp” page. 8) Click “Gradient Autoshim” button on the “Standard” page. You should see “Gradient autoshimming on Z
done!” in the message window in 30-45 seconds. 9) If you prefer to run experiments with sample spinning (it’s not necessary), you could turn ON sample spinning
now: on the “Spin/Temp” page, enter 18 in the spin rate box , then click the “Regulate speed” button. 10) Click “Autolock” to activate lock. You should see “LOCK: Regulated” displayed in “Sample Status” section
in 10 seconds. If not, do the followings: a. Click on “Lock” page. b. Click Lock “Off” button to turn lock off. c. Click “Lock Scan” button to display lock signal. d. Adjust Z0 until lock signal is on resonance. You might need to adjust lock power and gain to get a better
lock signal. e. Click Lock “On” button to activate lock. f. If lock still cannot be established, something is not quite right. It could be that your sample is very
concentrated, very low volume, poorly positioned in the spinner, or a non-deuterated solvent is used. 11) If for some reason “Gradient Autoshimming” doesn’t work at step 8), you need to do manual shimming:
a. Click on “Shim” page. b. Adjust “Z1C” and “Z2C” (or “Z1” and “Z2”) by clicking the left (-) and right (+) mouse button on them to
get the highest lock level. c. You may have to decrease lock gain if your lock level goes above 100%. After you are finished shimming,
adjust the lock gain to obtain an 50-80% lock level. You may also need to adjust lock power. 12) Click “Acquire” tab.
a. If you need to change number of scans and/or spectral width, go to the “Acquisition” page and enter your numbers there.
b. Click “Acquire” button (or type “au”) to start acquisition. With default parameters, it will automatically set the receiver gain, acquire the spectrum, and perform fully automatic data processing after acquisition as described in 13a). If you’re satisfied with the auto-processed spectrum, you may jump to 18) to make a plot. Alternatively, you may start acquisition by typing “ga”, if you don’t want the automatic data processing.
c. During acquisition, you may see your spectrum after each “bs” number of scans. Type “process” or “wft” in command line.
d. You may click “Stop” button (or type “aa” in command line) at any time to stop acquisition. 13) Click “Process” tab.
a. Click “Autoprocess” button to automatically process your spectrum. This includes applying weighting function, doing FT (“wft”), autophase (“aph”), auto-reference (“setref”), auto-integration (“integrate”), autoscale (“f”, “vsadj”), auto-peakpicking, etc. up to a point where the spectrum could be plotted.
b. If autophase doesn’t work well, you can manually phase it by clicking the graphic “phase” icon. c. You may need to click “Display Spectrum” button (or type “ds”) to switch to interactive mode, so that you
can use the mouse to interactively adjust spectral display (e.g. expand the spectral region between the two cursors, adjust vertical scale by dragging the spectrum with the middle mouse button, etc.).
14) To set your reference: a. You may expand your spectrum about the reference peak by clicking the left mouse button at the left edge
and the right button at the right edge and click graphic “zoom in” icon. b. Click on “Display” page.

24
c. Mark the reference peak by clicking the left button. d. Click “Nearest Line” button (or type “nl”) to get the exact peak. e. Enter the chemical shift value of the reference peak in the “Reference cursor to” field (7.24 for
chloroform or other value for different solvent) and select “ppm” next to it, then click “By Cursor” button. Alternatively, you may type “rl (7.24p)” in command line.
15) To do a baseline correction, type “abc” in command line. 16) To integrate, click on “Integration” page.
a. Click “Clear Integrals” button (or type “cz”). b. Under “Integral Display Mode” click “Partial”. c. Click “Interactive Resets” button. d. Chop your integral into pieces by clicking of your left button and erasing mistakes with right one. e. Click “Scale display to fit” button, then move cursor to the reference integral. f. Under “Normalize Area to” click “Single Peak”. g. Enter “Integral Area” value (e.g. 3 for a CH3 peak), then click “Set Integral Value” button. h. Click “Show Integral Values” button to display normalized integrals under spectrum.
17) To pick peaks, on “Default” or “Display” page click “Peak Threshold” button followed by dragging of your left button on the popup yellow line, then click “Find Peaks” button.
18) To plot: a. Click on “Basic” page. Enter comments in “Comments:” field (or type “text(‘Here is my comments’)”). b. Click on “Plot” page. c. Select:
• “Basic (left)” under “Parameters”; • “Scaled, Horiz” under “Integrals”; • “On peaks, Var, ppm” under “Peak Frequencies”
d. Click “Automatic Plot Page” button to plot. e. You may also do manual plot: on “Plot” page, click to select whatever you want to plot, then click “Plot
Page” button at end. 19) To save your FID and parameters, in the menu bar:
a. Click on “File” then “Save as…” b. Enter filename such as “jxh_C13_11-06-2003” then click “Save”. Note: file names should only use alphanumeric characters, underscores, and hyphens. The following characters are reserved in Linux/Unix therefore should never be used: / > < \ | : & ? * and space.
20) To load your spectrum back later, click on “File” then “Open…”. 21) Make sure sample spinning is OFF – click “Spin off” button on the “Spin/Temp” page. 22) Please be sure to put back the standard sample before you log out. 23) Click on “File” then “Exit VnmrJ and Logout” (or type “iuexit”) to log out. Other things you may want to know: To reset shims: Click “Getshim” button on “Stardard” page under “Start” tab (or type “getshim”). To reset the spectrometer:
If the system does not respond to your actions, click “Reset Console” button on the “Stardard” page (or type “reset”).
25
External Referencing The easiest way of referencing the chemical shift scale using an external reference is to measure the spectrum of the reference sample first and then take the spectrum of your sample with the exactly same parameters. The steps to be taken are:
1. Insert the external reference sample. 2. Set up an experiment. You should set the solvent corresponding to your sample (not the
reference sample). You may also set nt=1 to make a quick run. 3. Turn off the lock and set lock power to 0. 4. Write down the z0 value of the lock window. 5. Take a spectrum of the reference sample. 6. Reference the line as indicated on the tube of the reference sample (for example rl(-78.5p)
for trifluoroacetic acid). 7. Eject the reference sample and insert your sample. Shim, if you like. You may have to turn
on the lock and set the lock power for shimming. 8. Turn off the lock and set the lock power to 0. 9. Set z0 to the value you wrote down.
10. Take a spectrum of your sample (you may want to change nt). It is already referenced. If you took the spectrum of your sample first and the spectrum of the reference second things are a little more involved. Steps to take are:
1. Insert your sample. 2. Shim on it if you like. 3. Write down the z0 value. 4. Turn off the lock and set lock power to 0. 5. Take a spectrum of your sample. 6. Type mp(i,j) where i is the experiment number you are in, j the experiment number you
want to take the reference spectrum in. For example mp(1,2) moves the parameters from exp1 to exp2.
7. Join the experiment for the reference spectrum, e.g. jexp2 8. Eject your sample and insert the reference sample. 9. Turn off the lock and set lock power to 0.
10. Make sure that z0 is identical to the written value (see 3) 11. Take a spectrum of the reference sample (you may set nt=1). 12. Reference the resonance line to the value given on the tube of the reference sample (for
example rl(-78.5p) for trifluoroacetic acid. ) 13. Type mref. You will be asked for the experiment number of the reference and of your
sample. This transfers the reference information from the experiment, where you took the reference sample to the spectrum of your sample.

26
Transferring NMR Data to Your Computers You could transfer your NMR data from the spectrometers to your computers, so that you can 1) keep these data on your own computer for easy archive, and 2) reprocess and analyze the spectrum on your computer using an post-processing software, such as Mestrenova (IU site license). You need to have a sftp client program installed on your computer to do this job. For Windows/PC systems, you can download WinSCP from IUware online and install it on your computer. If your computer already have SSH secure shell package installed, then you don’t need WinSCP. SSH secure shell works as well. 1. Download WinSCP (https://iuware.iu.edu/Windows/Title/785) and install it. You may want
to select the Explore interface during installation. You need to restart your computer after the installation completes.
2. Start WinSCP. A WinSCP Login window is open.
a. If there are no stored sessions (see below), WinSCP displays the Session tab. Enter the following information to configure a session.
o Host name: i600.chem.indiana.edu or i500.chem.indiana.edu or vxr400.chem.indiana.edu or i400.chem.indiana.edu
o User name: your user name for this spectrometer o Password: your password for this spectrometer
Do not change the default settings of Port number (22) and File protocol (SFTP with SCP fallback).
b. If there are one or more stored sessions (see below), WinSCP will display the Stored
sessions tab by default. Click to select a stored session. 3. Click Login to connect to the remote host.
Note: If it’s first time to remotely login to this spectrometer from your computer, you’ll get a warning message “The server’s host kay was not found in the cache. You ......”. Click Yes to proceed.
4. Once connected, you can drag & drop files from the remote (spectrometer) directory window to the local folder. There are many other useful functions you may use, such as synchronize the local directory with remote directory.
5. Click File then Disconnect to disconnect from the remote host, or Quit to exit the program. 6. You may want to save a configured session (see 2.a.) so next time you can recall it (see 2.b.)
without entering the remote host information again. To save a session, click Save after you configure a session (2.a.).
7. To configure a new session when the Stored session tab is displayed, Click New on right.

27
For MAC users, you will need to use a SFTP program (http://kb.iu.edu/data/akqg.html). Mac has a build-in command line SFTP program which can be executed in a terminal window (http://kb.iu.edu/data/akpx.html). If you prefer a graphical SFTP program, you may download and install Cyberduck from http://cyberduck.ch . A short instruction of using Cyberduck can be found at http://kb.iu.edu/data/akom.html. Email NMR data You can email NMR data in the current experiment (e.g. exp2) or a .fid data file you saved on spectrometers or workstations within VnmrJ, using the macro commands emaildata or vnmremail.
The default email address can be set by the parameter email (e.g. in the VnmrJ command line, type email=’[email protected]’). If you don’t set this parameter (i.e. email=”), the default email address would be [email protected].
To email NMR data in the current experiment: - to your default email address: type emaildata - to an email address you provide: emaildata(‘[email protected]’) - to multiple email addresses: emaildata(‘”[email protected] [email protected]”‘)
Data is sent as an attachment, with a name in format of Spectrometer-ExpNo-Date-Time.fid.zip (e.g. vxr400-exp2-20130409-1623.fid.zip).
To email a .fid data file in your home directory: - to your default email address: type vnmremail(‘filename.fid’) - to an email address you provide: vnmremail(‘filename.fid’, ‘[email protected]’) - to multiple email addresses: vnmremail(‘filename.fid’, ‘”[email protected] [email protected]”‘) - to email multiple .fid files: vnmremail(‘”filename1.fid filename2.fid”‘, ‘[email protected]’)
For .fid data file(s) in other directories, you need to provide a path with the filename. For example, vnmremail(‘/home/xgao/vnmrsys/data/test.fid’, ‘[email protected]’) or vnmremail(‘vnmrsys/data/test.fid’, ‘[email protected]’).
NMR data files are compressed and archived into .zip format, which can be read by Mnova without need of unzip. However, if you use other programs to process the data, you may need to unzip the files first with winzip, 7-zip, or other unzip utility programs.
28
You may use the emaildata command with wexp parameter to set up your experiment to email NMR data automatically when the experiment completes, e.g. type wexp(‘emaildata’) or wexp(‘process emaildata’) before start the experiment with au.
Other NMR programs
We have a multiple seat license for Mnova NMR v9.0.1 maintained by ITG. This is a popular package for offline NMR processing and preparing spectra for publications and presentations. You might download and install this software onto your computers, following the installation guide at http://forms.chem.indiana.edu/itg/mestrenova/MestReNovaInstall.asp.
ACD/NMR Predictor is installed on the walkup PC in the NMR lab C237. It is most used for 1H and 13C chemical shift prediction and includes 19F, 31P, and 15N prediction. We also use and recommend ACD/NMR Processor as an alternative to Mnova. It’s free for academic users, get it from http://www.acdlabs.com/resources/freeware/nmr_proc/index.php.
SpinWorks is a free NMR spin simulation package that includes DNMR3. It’s installed on the walkup NMR lab PC. You might download this program from http://home.cc.umanitoba.ca/~wolowiec/spinworks/. An IU installation guide is available on the Software page of our NMR facility website (http://nmr.chem.indiana.edu/nmrblog/?page_id=44).
HypNMR (http://www.hyperquad.co.uk/hypnmr.htm) is used in some labs to determine equilibrium constants from NMR kinetics data.

29
List of Useful 1D VNMR Commands This preliminary list includes useful VNMR commands, macros and IU specific macros. It does not include most parameters. Help on most of these commands can be obtained with man(‘command’) , example: man(‘pir’). 1D Setup/Acquisition aa - abort acquisition, more harsh than sa abortallacqs - reset acquisition computer in a drastic situation cancel - there is not a VnmrJ cancel command, use the Cancel button on the menu getshim - reset shims go/ga/au - start acquisition and do a wft at the end jexp - join another experiment, example: jexp(3), jexp3 man('command or macro name') - displays help for many commands and macros movesw - change the sw to cover the region between the 2 cursors movetof - move tof (center of spectrum) to the vertical cursor location mf - copy FIDs to another experiment, example: mf(1,2) mp - copy parameters to another experiment, example: mp(1,2) reset - reset acquisition computer in a drastic situation rts - retrieve shim settings sa - stop acquisition, less harsh than aa iusetlk - load optimum lock parameters setup(‘nucleus’) - fully reset standard parameters, use caps, example: setup(‘H1’) iusetup(‘nucleus’,’solvent’) – alternate to setup command set_temp - convert temperature setting from non-calibrated to calibrated, or vice versa su - send current parameters to the spectrometer svs - save current shim settings time - tell you how long the experiment will take 1D Processing abc - auto baseline correction aph - autophase cdc - cancels the baseline drift correction offset (dc to turn it on) dc - turn on baseline drift correction offset (cdc to turn it off) ft - Fourier transform without window function gaussian - automatically set up Gaussian window function lpbc(n+1) - back predict first n data points of FID, default n=63 rt(‘filename’) - load saved data into current experiment svf(‘filename’) - save your data wft - Fourier transform with window function wtia - bring up interactive window to display and set window function

30
1D Display ai - change to absolute intensity display, alternate is nm av - display in absolute value mode, toggle with ph cz - clears all integral reset points df - display 1D raw data (FID) dg - display standard parameters dg1 - display plotting and display parameters dli - list integral regions in the parameter window dll - list lines in the parameter window above threshold set by th dpf - display peak frequencies over spectrum for peaks above threshold th ds - display and refresh 1D spectrum dscale - display scale if not shown dssh - display 1D arrays side by side dtext - display text string in graphics window f - expand data (spectrum and raw) to maximum size full - expand display to full display and plotting sizes nl - put the cursor on nearest line nm - change to normalized intensity display, alternate is ai ph - display in phase sensitive mode (what you usually want), toggle with av r1 - recall display parameter set saved with s1, r1-r9 can be used rl(shift) - set reference line on the cursor location, example: rl(7.26p) s1 - save display parameters, s1-s9 can be used, recall with r1 text(‘string’) - example: text(‘sample aa2345-6’) th - parameter to set threshold for line list vsadj - adjust the vertical scale so that largest peak shown fits on screen z - manual method to set integral reset points 1D Plotting iupage - alternate to page command, see man(‘iupage’) page - send to plotter, example: pl pscale ppa pir ppf page pap - plot long list of parameters (ppa is short list) pir - plot integral region amplitudes under the regions pl - plot spectrum, will need to be followed by page or iupage command pll - plot peak list in a column for peaks higher than th value plotter - parameter, to set to the common plotter use: plotter=‘sun2lj’ full pltext - plot text string, use text(‘string’) to create ppa - plot short list of parameters (pap is long list) ppf - plot peak frequencies over peaks for peaks higher than th value Others exit - exit from VnmrJ iuexit - exit from VnmrJ and log out